


WR-22

 GB
GB 

Version 1

Important safety instructions
1. Read these instructions.
GB
2.Keep these instructions.
3.Heed all warnings.
4.Follow all instructions.
5.Do not use this apparatus near water.
6.Clean only with dry cloth.
7.Do not block any ventilation openings. Install in accordance with the manufacturer’s instructions.
8.Do not install near any heat sources such as radiators, heat registers, stoves, or other apparatus (including amplifiers) that produce heat.
9.Do not defeat the safety purpose of the polarized or groundingtype plug. A polarized plug has two blades with one wider than the other. A grounding type plug has two blades and a third grounding prong. The wide blade or the third prong are provided for your safety. If the provided plug does not fit into your outlet. consult an electrician for replacement of the obsolete outlet.
10.Protect the power cord from being walked on or pinched particularly at plugs, convenience receptacles, and the point where they exit from the apparatus.

11.Only use attachments/accessories specified by the manufacturer.
12.Use only with the cart, stand, tripod, bracket, or table specified by the manufacturer, or sold with the apparatus. When a cart is used, use caution when moving the cart/apparatus combination to avoid injury from tip-over.
13.Unplug this apparatus during lightning storms or when unused for long periods of time.
14.Refer all servicing to qualified service personnel. Servicing is required when the apparatus has been damaged in any way, such as power-supply cord or plug is damaged. liquid has been spilled or objects have fallen into the apparatus, the apparatus has been exposed to rain or moisture, does not operate normally, or has been dropped.
15.To Reduce the Risk of Fire or Electric Shock, Do not Expose This Appliance To Rain or Moisture.

16.The Shock Hazard Marking and Associated Graphical Symbol is provided on the rear of unit.
GB
17.Apparatus shall not be exposed to dripping or splashing and no objects filled with liquids, shall be placed on the apparatus.
18.Excessive sound pressure on earand headphones could impair the hearing ability. Higher setting that idle on the equalizer leads to higher signal voltages on the output for ear and headphones.
19.The power plug should be close to the radio, and easy to be approached that during the emergency, to disconnect the power from the radio, just unplug the power plug from the AC power slot.
20.Where the MAINS plug or an appliance coupler is used as the disconnect device, the disconnected device shall remain readily operable.
IMPORTANT NOTE:
To comply with the FCC RF exposure compliance requirements, no change to the antenna or the device is permitted. Any change to the antenna or the device could result in the device exceeding the RF exposure requirements and void user’s authority to operate the device.

1 |
2 |
3 |
4 |
5 |
6 |
7 |
8 |
9 |
10 |
11 |
20 |
19 |
18 |
17 |
16 |
15 |
14 |
13 |
12 |

Controls
1 |
Speaker |
|
2 |
Bluetooth indicator |
|
GB |
||
3 |
Display |
|
4 |
Source button |
|
5 |
Play mode button |
|
6 |
Alarm 1 button |
|
7 |
Alarm 2 button |
|
8 |
Nap button |
|
9 |
Menu / Info button |
|
10 |
On / Off button / Sleep button |
|
11 |
Rotary tuning control |
|
12 |
Volume control / Tone control |
|
13 |
Dimmer sensor |
|
14 |
Remote control sensor |
|
15 |
Preset 5 / Fast-forward button |
|
16 |
Preset 4 / Play / Pause button |
|
17 |
Preset 3 / Backward button |
|
18 |
Preset 2 / Fold up button |
|
19 |
Preset 1 / Fold down button |
|
20 |
USB port |
|
21 |
Reset button |
|

Controls
22 |
AC power cord socket |
|
23 |
12V DC input socket |
|
GB |
24Subwoofer output socket
25AUX IN socket
26Headphone socket
27External / Internal antenna switch
28External F-type FM antenna terminal
29& 30 External AM antenna terminal (USA version only)
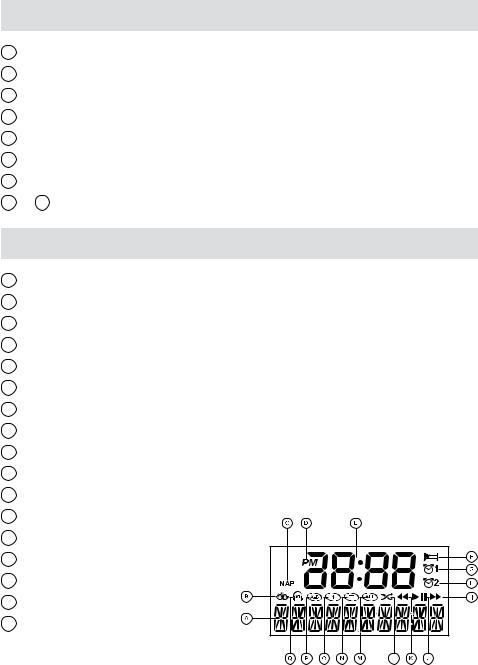
Display
AFrequency / Station display
BRDS / RBDS indicator
CNap indicator
DPM indicator
ETime indicator
FSleep indicator
GAlarm 1 indicator
HAlarm 2 indicator
I Fast-forward indicator
J Play / pause indicator
KBackward indicator
LShuffle
M Repeat all
N Repeat folder
O Repeat one
P Repeat section A-B
Q Stereo indicator
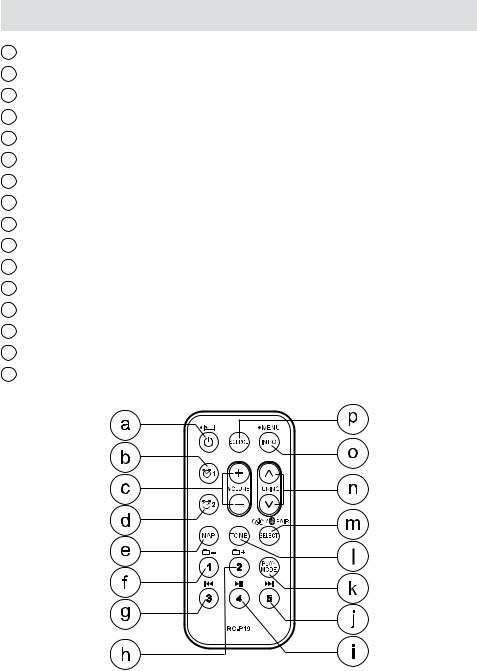
Remote control
a b c d e f g h i j k L m n o p
On / Off button / Sleep button Alarm1 button
Volume control button Alarm 2 button
Nap button
Preset 1 / Folder down button Preset 3 / Backward button Preset 2 / Folder up button Preset 4 / Play / Pause button Preset 5 / Fast-forward button Play mode button
Tone control button
Repeat A-B / Select button / Bluetooth pairing button Tuning up / down button
Info / menu button
Source button

Power your radio
AC operation
Before plugging the AC cord into the radio, make sure the AC GB voltage is correct. Insert the plug on the end of the supplied power cord into the AC power socket on the back of the radio.
DC operation
For outdoor use, you can power the radio by using 12v DC input socket from a DC power supply (example, from the power supply of vehicles or boats). An AC power adaptor with 1 Ampere and center positive in polarity can also power the radio in house.
Antenna setup for FM reception
The radio comes with built-in AM/FM antenna and external antenna.
To use FM internal antenna, make sure to switch FM external/ internal antenna switch in the back of your radio to internal antenna position (i.e. INT. FM ANTENNA). As for external antenna, there are two types of antenna can be used to improve FM reception. You can connect the supplied FM antenna to the F-type antenna terminal and adjust the wire for best reception. You can also connect a 75 ohm coaxial cable of outdoor antenna to the terminal. Make sure to switch external/internal antenna switch to external position while connecting the outdoor / rooftop antenna.
Note:
In some of the European countries, you may have to use adaptor plug to connect with the outdoor/rooftop antenna in case your antenna has an incorrect type of plug.
Antenna setup for AM reception
The radio comes with built-in AM Ferrite antenna which should be enough for normal listening. To improve the AM reception, you may connect the outdoor AM antenna (not supplied) with AM external antenna terminal.
10

Operating your radio
Your radio is equipped with three tuning methodsScan tuning, |
|
manual tuning and memory preset tuning. |
GB |
Scan tuning FM / AM
1.Make sure you have set up the FM antenna in advance .
2.Press the On/Off button to switch on your radio.
3.Press the Source button repeatedly to select the desired wave band.
4.Press the Tuning control rotary. Your radio will scan in an upwards direction (low frequency to high frequency) and stop automatically when it finds a station of sufficient strength.
5.After a few seconds the display will update. The display will show the frequency of the signal found. If the signal is strong enough and there is RDS / RBDS data present then the radio will display the station name.
6.To find other stations, press the Tuning control rotary as before.
7.When the waveband end is reached your radio will recommence tuning from the opposite waveband end.
8.Adjust the Volume buttons to the required setting.
9.To switch off your radio press the On/Off button.
11
Manual tuning – FM / AM
1.Press the On/Off button to switch on your clock radio.
2.Press the Source button repeatedly to select the desired wave band.
3.Rotate the Tuning control rotary to tune to a station. The frequency will change in steps of 50kHz/100 kHz in FM or 9 kHz/10 kHz in AM.
4.When the waveband end is reached the radio will recommence tuning from the opposite waveband end.
5.Adjust the Volume buttons to the desired settings.
6.To switch off your clock radio press the On/Off button.
Setting up the tuning step increment
1.Press and hold the Info/menu button to enter the menu setting when the radio source is in AM/FM mode.
2.Rotate the Tuning control rotary button until FM xxK or AM xxkHz shown on the display, and press the Tuning control rotary to enter the step increment setting.
3.Rotate the Tuning control rotary button to select 50kHz/100kHz for FM radio, and 9kHz/10kHz for AM radio. Then press the
Tuning control rotary to confirm the setting.
12
 Loading...