


PR-D5

PR-D5
User Manual

1
Important safety in struction s
1. Read a nd understand all safety and operating instruction s
before the radio is operated.
2. Retain instruction: The safety a nd operating instruction s
should be retained for future reference.
3. Heed warnings. All warnings on the appliance a nd operating
instructions should be followed.
4. Follow all operations and use in struction s.
5. Water and moisture: The a ppliance should not be used near
water. Do not use near a bathtub, washbowl, laundry tub,
kitchen sink, wet ba sement, swimming pool, etc.
6. Un plug the ra dio from the AC power outlet before cleaning.
Use only a da mp cloth for cleaning the exterior of the radio.
7. Do not place the radio on an unstable cart, stand, bracket or
table. The radio may fall, causing serious personal injury and
damage to the radio.
8. Ventilation: This radio should be situated so that its location
or position does not interfere with its proper ventilation.
For exa mple, the radio should not be used on a bed, sofa,
rug or other soft surfaces that may block the ventilation
openings. It should not be placed in a built-in situation
like a cabinet that may reduce air flow through the
ventilation openings.
9. Power sources: The radio should be operated only from the
type of power source indicated on the marking label. If you are
not sure of the type of power supply to your home, consult your
radio dealer or power company.

2
GB
10. Power cords: The power cord should be positioned so it is not
walked on, pinched, or items placed on top of it. Pay particular
attention to cords at plugs, convenience receptacles, and the
point where they exit from the unit. Unplug the power cord by
gripping the power plug, not the cord. Operate the radio using
only the current type of power source indicated. If you are not
sure of the type of power supply to your home, consult your
dealer or local power company.
11. Do not overload wall outlets or extension cords. This can result
in a risk of fire or electrical shock. Never insert objects of any
kind into the radio through opening. The objects may touch
dangerous voltage points or short out parts. This could cause
a fire or electrical shock.
12. If the radio is left attended a nd unused for long periods of time,
unplug it form the wall outlet. This will prevent damage caused
by lightning or power line surges.
13. If the radio is left unattended and unused for a long period of
time, remove the batteries. The batteries may leak and damage
furniture of your radio.
14. Do not attempt to service the receiver yourself. Removing the
cover may expose you to dangerous voltage, and will void the
warranty. Refer all servicing to authorized service personnel.
15. Object and Liquid Entry-Never push obje cts of any kind into this
radio through opening as they may touch dangerous voltage
points or short-out parts that could result in a fire or electric
shock. Never spill liquid of any kind of product.
16. The applia nce should be serviced by qualified service personnel
when:
The power supply cord or the plug ha s been damaged.
Objects have fallen or liquid had been spilled into the radio.
The radio has been exposed to rain or water.
The radio does not appear to operate normally or exhibits a
marked change in perf orma nce.
The radio has been dropped, or the enclosure da maged.
A.
B.
C.
D.
E.
3
4
GB
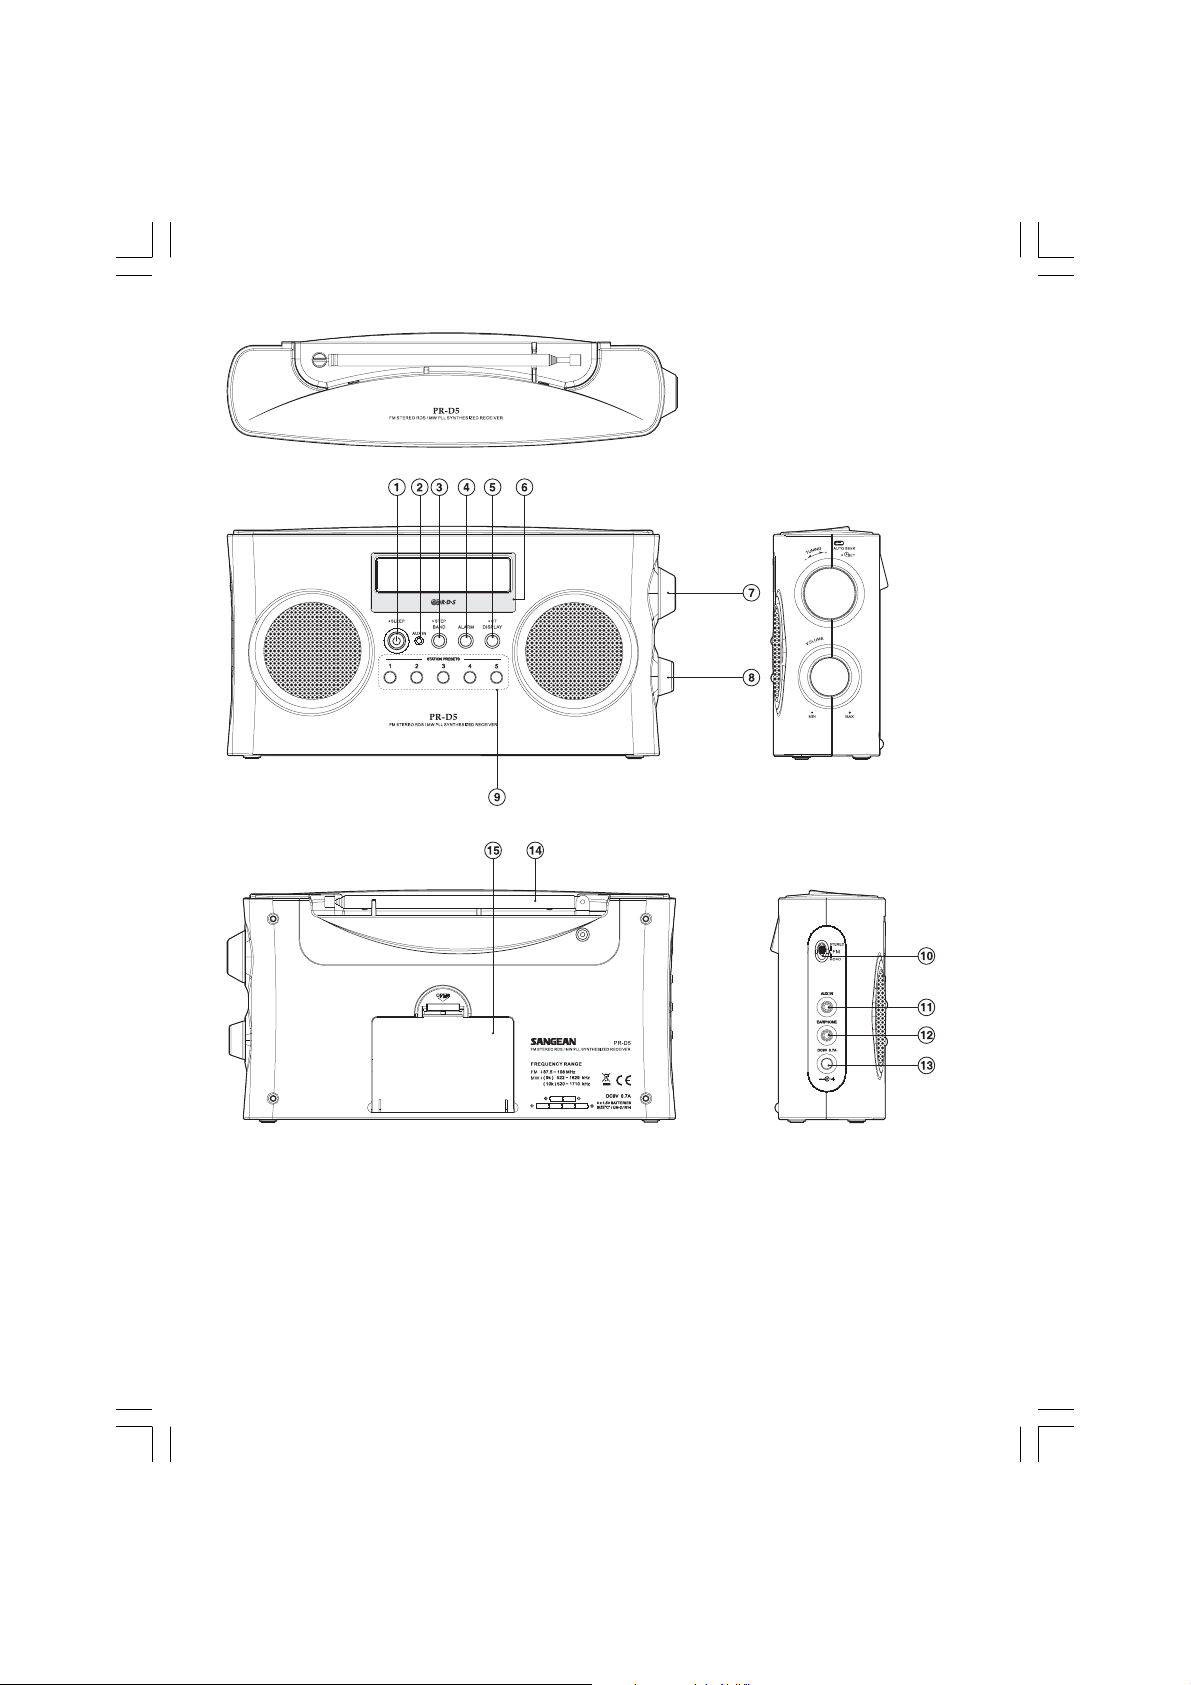
Controls
Power button
AUX In signal
Band and Tuning ste p sele ction
Alarm set
CT Display
LCD display
Tuning/SET/AUT O SEEK knob
Volume Control
Preset buttons
FM Stereo/Mono switch
AUX IN socket
Earphone socket
DC input socket
Antenna
Battery compartment
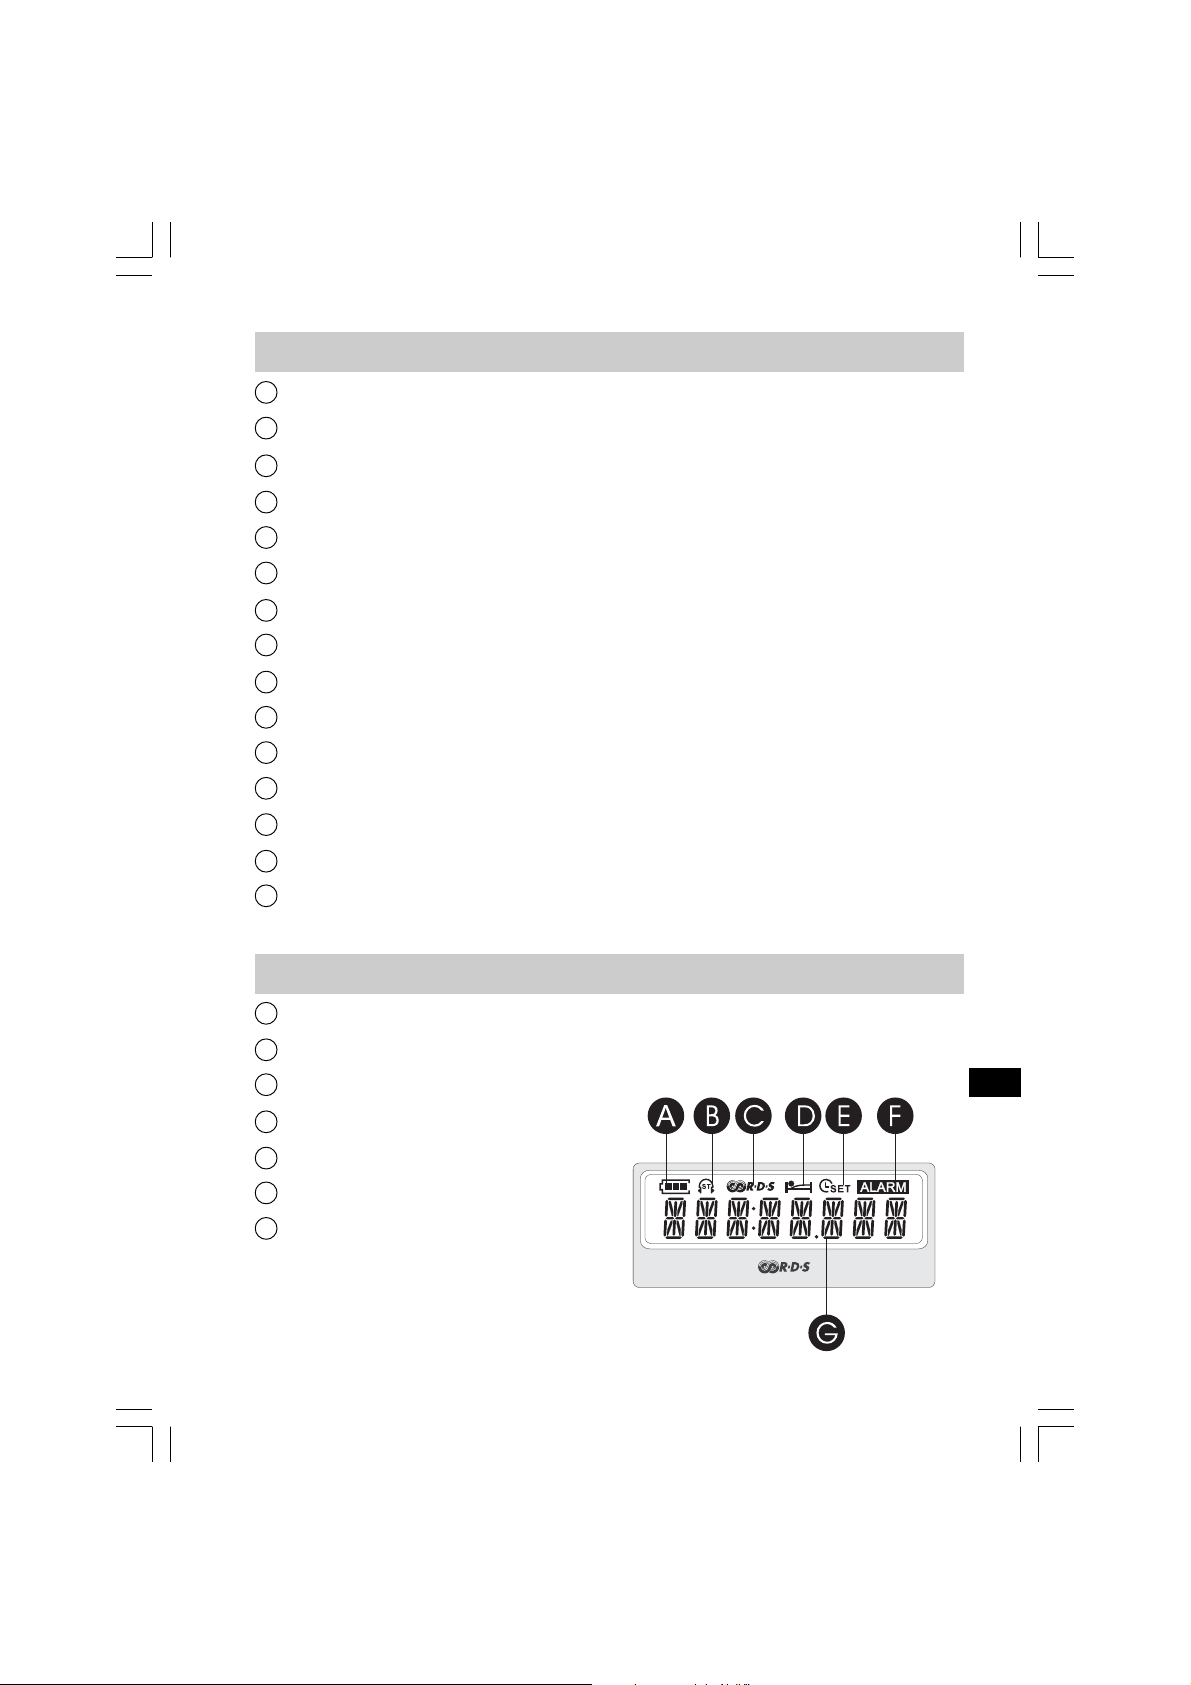
LCD Display
Battery power
Stereo display
RDS display
Sleep a nd s nooze status
Time set
Alarm display
Digital display
1
2
3
4
5
6
7
8
9
10
11
12
13
14
15
A
B
C
D
E
G
F

5
Setting the clock
1. Clock can be set either the radio is power on or off.
2. Press the SET knob (on the side of the radio) for more than
2 seconds, display will flash time set symbol and also the
hour digits, followed by a beep.
3. Rotate the SET knob to set the required hours.
4. Press the SET knob, the minute digits will flash.
5. Rotate the SET knob to set the required minute.
6. Press the SET knob to complete ti me setting.
Or press POWER.
Operating the radio
Tuning the radio
1. Press the Power button to turn on the radio.
2. Select the required waveband by pre ssing the Band button.
There are 3 ba nds which are FM, AM and AUX-IN.
3. Rotate the Tuning knob to the de sired frequency, shown in
the display.
4. Or, press the TUNING button to seek for the next available
station.
5. Rotate the Volume knob (on the side of the radio) to get required
sound level.
6. To turn off the radio, press the Power button.
6
GB
Storing station presets
There are 5 memory presets for each waveband –
STATION PRESETS 1 to 5.
1. Press the Power button to turn on the radio.
2. Tune to required station using one of the methods previously
described.
3. Press and hold the required preset until the ra dio beeps.
The preset number will appear in the display (such as: )
and the station will be stored under chosen pre set button.
4. Repeat this procedure for the remaining presets.
5. Stations stored in preset memories can be overwritten by
following above procedures.
Recalling stations presets
1. Press the Power button to turn on the radio.
2. Select the required waveband.
3. Momentarily press the required Preset button, the preset
number and station frequency will appear in the display.
RDS function
This function only applie s when FM station which is listening
provides the RDS service.
1. When FM station provides RDS service, shows on the
display and the display shows the program type a nd then
shows the radio text if radio text is provided.
2. Press and hold CT button for more than 2 seconds until it beeps,
then the radio clock time will be automatically corrected. When it
shows “No CT” means there is no service.

7
AUX IN
1. Turn on the ra dio, and press the STEP/BAND button until “AUX”
is displayed.
2. Connect a stereo or mono audio source (ie iPod, MP3 or
CD player) to the Aux in socket on the side of the radio.
And the AUX-IN light will be on.
3. Adjust the Volume control on your iPod, MP3 or CD player.
Setting the radio alarm
1. To activate the alarm, press and hold the ALARM button for
more than 2 seconds and it will beep and the display will
show “ALARM”.
2. To deactivate the alarm, press and hold the ALARM button for
more than 2 se conds and it will beep and the “ALARM” will
disappear from the display.
When the radio alarm is selected, the radio will turn on and play
the last played radio station at the chosen alarm time. (If it is under
AUX band, or the battery is low, then the alarm will sound by
buzzer). The radio alarm will continue for one hour unless turned
off by pressing the Power button.
8
GB
Setting radio alarm time
The alarm time may be set after the clock time is set. The alarm
can be set either radio is on or off.
1. Press the ALARM button, the radio alarm symbol will flash,
and the alarm time is shown.
2. During radio alarm flashing, press the SET knob for more
than 2 se conds followed by a beep tone, and the hour digits
will flash.
3. Rotate the SET knob to select the hour then press the SET knob
to confirm hour setting, and the minute digits will flash.
4. Rotate the SET knob to select the minute then press the
SET knob to finish setting.
5. Tune into the desired radio station and adjust the volume f or the
alarm, and turn off the radio.
6. While the alarm is sounding, press the POWER button to stop it.
Sleep function
The sleep timer switches off the radio after a preset time
has ela psed.
1. Press and continue to hold down the Power button for more than
2 seconds, followed by beep tone, the display will cycle through
the available sleep times in the order 60-45-30-15-120-90-60.
Release the Power button when the required sleep time appears
on the display. The symbol will appear on the display and
the radio will play the last station selected.
2. To cancel the sleep function, press the POWER button, and the
symbol will disappear and radio is off.

9
Setting tuning step
Why setting tuning step?
There are different tuning steps for different countries. If you buy
the radio in Europe a nd intend to use it in America, includes Latin
America, the tuning step should be switched.
1. When radio is off, long press the STEP/BAND button until it
beeps and “24 HOUR” flashes. Then rotate the TUNING knob
to switch 24/12 hour system.
2. Press the STEP/BAND button and then rotate the TUNING knob
to switch MW (AM) step which is MW 9KHz or MW 10 KHz.
(10K for America and 9K for most other countries)
3. Press the STEP/BAND button to finish the setting.
Note:
After the tuning step is switched, AM station presets are erased.
FM Stereo/Mono mode
1. FM Stereo/Mono mode switch is on the side of the radio.
2. When FM signal is weak, some hiss may be audible. To reduce
the hiss, switch the Stereo/Mono to Mono mode.
Headphone socket
A 3.5mm headphone socket located on the left-hand side of your
radio. That is to provide for either headphones or an earpiece.
Inserting a plug automatically mutes the internal speaker.
Reset the ra dio
When this device been attach by static ele ctricity, the display
may show random code s ( meaningless characters ). To retrieve it,
unplug the power and take out the batteries for more than
3 minutes, the display will be back to the normal.

10
GB
Specifications
Power Requirements
AC Power adaptor
Batteries
Battery Life
Frequency Coverage
Circuit Feature
Loudspeaker
Output Power
Headphone socket
Aerial System
DC 9V 700mA center pin positive
6 X UM-2 ( C size )
Approx . 70 hours of listening for 4 hours
A day at normal volume using alkaline cells
FM 87.50 – 108 MHz
AM 522 – 1629 kHz ( 9 kHz /step) or
AM 520 – 1710 kHz ( 10 kHz/step )
2.5 inches 8 ohm
800 + 800 mW
3.5 m dia.
Telescopic aeri al
If at any time in the future you should need to dispose of this product please
note that: Waste electrical products should not be disposed of with household
waste. Please recycle where facilities exist. Check with your Local Authority or
retailer for recycling a dvice. (W aste Electrical and Electronic Equipment Directive)

11

12
Importante s in structions de sécurité
1. Lire et comprendre toutes les instructions de sécurité et
d’utilisation avant que la ra dio ne soit utilisée.
2. Conserver les instructions. Les instructions de sécurité et
d’utilisation doivent être conserves pour consultation ultérieure.
3. Tenir compte des avertissements. Tous les avertissements du
produit et les instructions d’utilisation doivent être observés.
4. Suivre les instructions. Toute s les instructions de fonctionnement
et d‘utilisation doivent être suivies.
5. Eau et humidité. Ne pas utiliser ce produit près d’eau,
par exemple près de baignoire, évier ou lavabo, da n s un
sous-sol humide ou près d’une piscine.
6. Débranchez la radio de la prise de courant avant de nettoyer .
N’utilisez qu’un tissu humide pour le nettoyage extérieur de
la radio.
7. Ne pas pla cer ce produit sur un chariot instable, un trépied,
un crochet ou une table. Le produit peut tomber, causant de
sérieuses blessures et des dommages au produit.
8. Ventilation: Cette radio doit être placée dans un endroit ou
une position qui n’interfère pa s ave c sa propre ventilation.
Par exemple, la radio ne doit pas être utilisée sur un lit, canapé,
couverture ou autres surfa ce s souple s qui peuvent bloquer le s
ouvertures de ventilation. La radio ne doit pas être placée dans
une situation intégrée, telle qu’une étagère fermée qui peut
réduire le flot d’air dans les ouvertures de ventilation.
F

13
9. Sources électriques: Ce produit ne doit être utilisé uniquement
avec le type de source électrique indiqué l’étiquette marquée.
Si vous n’êtes pas sûr du type de source électrique de votre
maison, consultez votre revendeur ou la compagnie électrique
locale.
10. Protection du câble électrique – Les câbles électriques doivent
être placés de façon à ce qu’on ne marche pas dessus ou
qu’ils ne soient pas pincés par des éléments places sur ou
contre eux, en payant particulièrement attention aux prises,
réceptacles et aux points où ils sortent de l’appareil.
Débranchez l’unité en tenant la prise, et non le câble.
Ce produit ne doit être utilisé uniquement avec le type de
source électrique indiqué l’étiquette marquée. Si vous n’êtes
pas sûr du type de source électrique de votre maison,
consultez votre revendeur ou la compagnie électrique locale.
11. Ne pas surcharger les prises de courant murales, les câbles
d’extensions ou les réceptacles, ceci pouva nt résulter en de s
risques d’incendie ou d’éle ctrocution. Ne jamais insérer d’objet
de tout type dans les ouvertures de la radio. Les objets
peuvent toucher des points de voltage dangereux ou
court-circuiter des éléments. Cela peut causer un incendie ou
une électrocution.
12. Si la radio est laissée sa n s surveillance et non utilisée pendant
une longue période, débranchez la de la prise murale. Cela
empêchera les dommages causés par les orages ou les
surcharge des lignes électriques.

14
13. Si la radio est laissée sa n s surveillance et non utilisée pendant
une longue période, retirez les piles. Les batteries peuvent
couler et endommager le meuble sur lequel la radio est posée.
14. Ne pas essayer de réparer ce produit soi-même, ouvrir ou en
retirer les couvercles peut vous exposer à de da ngereux
voltage ou autres risques. Pour tout réparation, référez vous
à du personnel de service qualifié.
15. Entrée d’objet et de liquide. Ne jamais mettre d’objets de
n’importe quelle sorte dans les ouvertures, ceux-ci pouvant
toucher de dangereux points de voltage ou court-circuiter
des pièces résultant en de s incendies ou électrocution.
Ne jamais renverser de liquide sur le produit.
16. L’a ppareil doit être réparé par un personnel de service
qualifié lorsque:
Le câble d’alimentation électrique a été endommagé.
Des objets ou du liquide ont été renversés dans la radio.
La radio a été exposée à la pluie ou l’eau.
La radio n’a pas l’air de fonctionner normalement ou montre
des marques de changement de performa nce.
La radio a été lâchée ou le boîtier endommagé.
A.
B.
C.
D.
E.
F
15
Commande s
Bouton Power (Marche)
Signal entrée AUX
Sélection de bande et réglage par étape
Réglage d’alarme
Affichage CT
Affichage LCD
Bouton Réglage/CONFIG/RECH. AUTO
(Tuning/SET/AUTO SEEK)
Bouton volume
Boutons programme
Bouton FM Stéréo/Mono
Prise AUX IN
Prise d’écouteurs
Prise d’entrée DC
Antenne
Compartiment à piles
Affichage LCD
Nive au de pile
Affichage stéréo
Affichage RDS
Etat de Sleep et Snooze
Réglage de l’heure
Affichage de l’alarme
Affichage digital
1
2
3
4
5
6
7
8
9
10
11
12
13
14
15
A
B
C
D
E
G
F
16
Régler l’horloge
1. L’horloge peut être réglée lorsque la radio est allumée
ou éteinte.
2. Appuyez sur le bouton SET (sur le côté de la radio) pendant plus
de 2 secondes, l’écran fera clignoter le symbole de réglage
d’heure et les quatre chiffres, suivi d’un bip.
3. Faites tourner le bouton SET pour régler l’heure requise.
4. Appuyez sur le bouton SET, les chiffres es minutes clignoteront.
5. Faites tourner le bouton SET pour régler les minutes requises.
6. Appuyez sur le bouton SET pour compléter le réglage de l’heure.
Ou a ppuyez sur POWER.
Utilisation de la radio
Régler la radio
1. Appuyez sur le bouton Power pour allumer la ra dio.
2. Sélectionner la bande d’onde néce ssaire et appuyez sur le
bouton Bande. Il existe trois types de bandes:
FM, AM et AUX-IN.
3. Faites tourner le bouton de réglage sur la fréquence souhaitée,
affichée à l’écran.
4. Ou, a ppuyez sur le bouton TUNING pour rechercher la station
suivante disponible.
5. Faites tourner le bouton volume (sur le côté de la radio) pour
atteindre le niveau de son souhaité.
6. Pour éteindre la radio, appuyez sur le bouton Power.
F

17
Stocker les stations programmées
Il existe 5 progra mme s de mémoire pour chaque bande
d’onde – PROGRAMME DE STATION 1 à 5.
1. Appuyez sur le bouton Power pour allumer la ra dio.
2. Réglez sur la station souhaitée en utilisant l’une des méthode s
expliquées ci-dessous.
3. Appuyez et maintenez sur le programme souhaité jusqu’à ce
que la radio émette un bip. Le numéro de programme apparaîtra
à l’écran (tel que: ) et la station sera stockée sous le
bouton progra mme choisi.
4. Répétez cette procédure pour les stations restantes.
5. Les stations stockées da n s le s mémoires programme peuvent
être rempla cée s en suivant les procédures précédentes.
Ra ppeler les stations programmées
1. Appuyez sur le bouton Power pour allumer la ra dio.
2. Sélectionner la bande d’onde souhaitée.
3. Appuyez momentanément sur le bouton progra mme souhaité,
le numéro de programme et la fréquence de la station
apparaîtront à l’écran.
 Loading...