


RCR-22
GB
Version 1

Important safety instructions
1. Read these instructions.
GB
2.Keep these instructions.
3.Heed all warnings.
4.Follow all instructions.
5.Do not use this apparatus near water.
6.Clean only with dry cloth.
7.Do not block any ventilation openings. Install in accordance with the manufacturer’s instructions.
8.Do not install near any heat sources such as radiators, heat registers, stoves, or other apparatus (including amplifiers) that produce heat.
9.Do not defeat the safety purpose of the polarized or groundingtype plug. A polarized plug has two blades with one wider than the other. A grounding type plug has two blades and a third grounding prong. The wide blade or the third prong are provided for your safety. If the provided plug does not fit into your outlet. Consult an electrician for replacement of the obsolete outlet.
10.Protect the power cord from being walked on or pinched particularly at plugs, convenience receptacles, and the point where they exit from the apparatus.

11.Only use attachments/accessories specified by the manufacturer.
12.Use only with the cart, stand, tripod, bracket, or table specified by the manufacturer, or sold with the apparatus. When a cart is used, use caution when moving the cart/apparatus combination to avoid injury from tip-over.
13.Unplug this apparatus during lightning storms or when unused for long periods of time.
14.Refer all servicing to qualified service personnel. Servicing is required when the apparatus has been damaged in any way, such as power-supply cord or plug is damaged. liquid has been spilled or objects have fallen into the apparatus, the apparatus has been exposed to rain or moisture, does not operate normally, or has been dropped.
15.To Reduce the Risk of Fire or Electric Shock, Do not Expose This Appliance To Rain or Moisture.
16.The Shock Hazard Marking and Associated Graphical Symbol is provided on the rear of unit.

17.Apparatus shall not be exposed to dripping or splashing and no objects filled with liquids, shall be placed on the apparatus.
GB
18.Excessive sound pressure on earand headphones could impair the hearing ability. Higher setting that idle on the equalizer leads to higher signal voltages on the output for ear and headphones.
19.The power plug should be close to the radio, and easy to be approached that during the emergency, to disconnect the power from the radio, just unplug the power plug from the AC power slot.
20.Where the MAINS plug or an appliance coupler is used as the disconnect device, the disconnected device shall remain readily operable.
IMPORTANT NOTE:
To comply with the FCC RF exposure compliance requirements, no change to the antenna or the device is permitted. Any change to the antenna or the device could result in the device exceeding the RF exposure requirements and void user’s authority to operate the device.


Controls
1 |
Menu button |
|
2 |
Preset button |
GB |
3Tuning up / down button / Snooze button
4Band / Select button
5Time capsule
6Date button
7Time button
8Alarm 2 button
9Alarm 1 button
10Display
11Power button / Sleep button 12 Nap button
13Info button
14Light button 15 Reset button
16Light level control
17Aux in socket
18Headphone socket
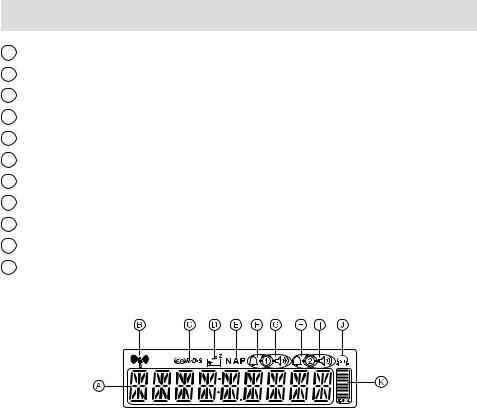
LCD display
ATime and frequency indicator
BRadio-controlled time signal
CRDS indicator
DSleep / Snooze indicator
ENap indicator
FAlarm 1 with buzzer alarm indicator
GAlarm 1 with radio alarm indicator
HAlarm 2 with buzzer alarm indicator I Alarm 2 with radio alarm indicator J FM stereo indicator
KSignal level indicator

Using the clock radio for the first time
1. Place your clock radio on a flat surface.
GB
2.Fully extend the wire aerial located on the rear of your clock radio. Place the wire antenna so that it is straight as possible extending either above or below the radio.
3.Insert the adaptor plug into the AC socket located on the rear of your clock radio. The display will show "time zone" for a few seconds and then the display will ask you to set your time zone. To set the time zone, press the Tuning up/down button and the
Select button to confirm. Your clock radio will show _ _: _ _ on the display and the indicator will flash. The radio will scan for signal and if a signal is found and received completely it will then show
 on the screen without flashing. Now the radio will show the current time.
4.If no signals are found,  will be flashing on the display. It may be necessary to relocate your clock radio to a position giving better reception.
IMPORTANT:
The mains adaptor is used as the means of connecting the clock radio to the mains supply. The mains socket used for the clock radio must remain accessible during normal use. In order to disconnect the radio from the mains completely, the mains adaptor should be removed from the mains socket outlet completely. Characters appearing on the LCD display indicates the clock radio is connected to and powered from the mains supply.
 Loading...