


 Loading...
DIGITAL
TELEVISION
Owner’s Instructions
Before operating the unit, please read this manual thoroughly, and retain it for future reference.
ON-SCREEN MENUS
DIGITALTERRESTRIAL RECEIVER
TELETEXT (depending on the model)
Register your product at www.samsung.com/global/register

ImportantWarranty Information RegardingTelevision Format
Viewing
Standardscreenformattelevisions(4:3,theaspectratioofthescreenwidthtoheight)areprimarilydesignedtoviewstandard formatfull-motionvideo.Theimagesdisplayedonthemshouldprimarilybeinthestandard4:3ratioformatandconstantlymoving. Displayingstationarygraphicsandimagesonscreen,suchasthedarktopandbottomletterboxbars(widescreenpictures),shouldbe limitedtonomorethan15%ofthetotaltelevisionviewingperweek.
Widescreenformattelevisions(16:9,theaspectratioofthescreenwidthtoheight)areprimarilydesignedtoviewwidescreenformat full-motionvideo.Theimagesdisplayedonthemshouldprimarilybeinthewidescreen16:9ratioformat,orexpandedtofillthe screenifyourmodeloffersthisfeature,andconstantlymoving.Displayingstationarygraphicsandimagesonscreen,suchasthedark side-barsonnon-expandedstandardformattelevisionvideoandprogramming,shouldbelimitedtonomorethan15%ofthetotal televisionviewingperweek.
Additionally,viewingotherstationaryimagesandtextsuchasstockmarketreports,videogamedisplays,stationlogos,websitesor computergraphicsandpatterns,shouldbelimitedasdescribedaboveforalltelevisions.Displayinganystationaryimagesthatexceed theaboveguidelinescancauseunevenagingofpicturetubes(CRTs)thatleavesubtle,butpermanentburned-inghostimagesinthe televisionpicture.Toavoidthis,varytheprogrammingandimages,andprimarilydisplayfullscreenmovingimages,notstationary patternsordarkbars.Ontelevisionmodelsthatofferpicturesizingfeatures,usethesecontrolstoviewthedifferentformatsasafull screenpicture.
Becarefulintheselectionanddurationoftelevisionformatsusedforviewing.UnevenCRTagingasaresultofformatselectionand use,aswellasotherburned-inimages,isnotcoveredbyyourSamsunglimitedwarranty.
English - 2

Contents
Accessories................................................................... |
4 |
Control Panel................................................................ |
4 |
Connection Panel (depending on the model) ................... |
5 |
Viewing the Remote Control (depending on the model).. |
7 |
Installing Batteries in the Remote Control..................... |
8 |
Operation |
|
Switching Your Television On and Off........................... |
8 |
Placing the Television in Standby Mode ....................... |
8 |
Plug & Play Feature (depending on the model)................ |
9 |
Viewing an External Signal Source |
|
(depending on the model) ................................................ |
10 |
Editing Device Names (depending on the model).......... |
10 |
Using the DTV Feature |
|
Previewing the DTV Menu System.............................. |
11 |
Choosing Your Language............................................ |
12 |
Adjusting the Translucency Level ............................... |
12 |
Updating the Channel ListAutomatically .................... |
13 |
Updating the Channel List Manually........................... |
13 |
Editing Your Favourite Channels................................. |
14 |
Setting up the Parental Lock....................................... |
15 |
Viewing EPG (Electronic Programme Guide) |
|
Information.................................................................. |
16 |
Using the Scheduled List............................................ |
17 |
Setting the Default Guide............................................ |
17 |
Viewing All Channels and Favourite Channels........... |
18 |
Viewing Channel Manager.......................................... |
19 |
Displaying Programme Information............................. |
19 |
Using the Preferences ................................................ |
20 |
Viewing Product Information....................................... |
20 |
Checking the Signal Information................................. |
21 |
Upgrading the Software (depending on the model) ....... |
21 |
Viewing Common Interface......................................... |
22 |
Selecting the CI Menu................................................. |
22 |
Resetting..................................................................... |
23 |
Channel Control |
|
Storing ChannelsAutomatically.................................. |
24 |
Storing Channels Manually......................................... |
25 |
Symbols
Press Important
Sorting the Stored Channels....................................... |
26 |
Assigning Names to Channels.................................... |
27 |
Fine Tuning Channel Reception.................................. |
27 |
Using the LNA(Low NoiseAmplifier) Feature |
|
(depending on the model) ................................................ |
28 |
Picture Control |
|
Changing the Picture Standard................................... |
28 |
Adjusting the Picture Settings..................................... |
29 |
Selecting the Picture Size (depending on the model).... |
30 |
Setting the Digital Noise Reduction ............................ |
30 |
Using the Tilt Control Feature |
|
(depending on the model) ................................................ |
31 |
Selecting the Film Mode ............................................. |
31 |
Freezing the Current Picture....................................... |
31 |
Sound Control |
|
Changing the Sound Standard.................................... |
32 |
Adjusting the Sound Settings |
|
(depending on the model) ................................................ |
32 |
Extra Sound Settings (depending on the model)............ |
33 |
Selecting the Sound Mode (depending on the model)... |
34 |
Function Description |
|
Setting the Time.......................................................... |
35 |
Choosing Your Language............................................ |
37 |
Setting the Blue Screen.............................................. |
37 |
Selecting the Melody................................................... |
37 |
Teletext Feature (depending on the model).................... |
38 |
Appendix |
|
Automatic Degaussing to Remove Colour Patches.... |
40 |
Troubleshooting: Before Contacting Service Personnel........ |
40 |
Note
English - 3
General Information
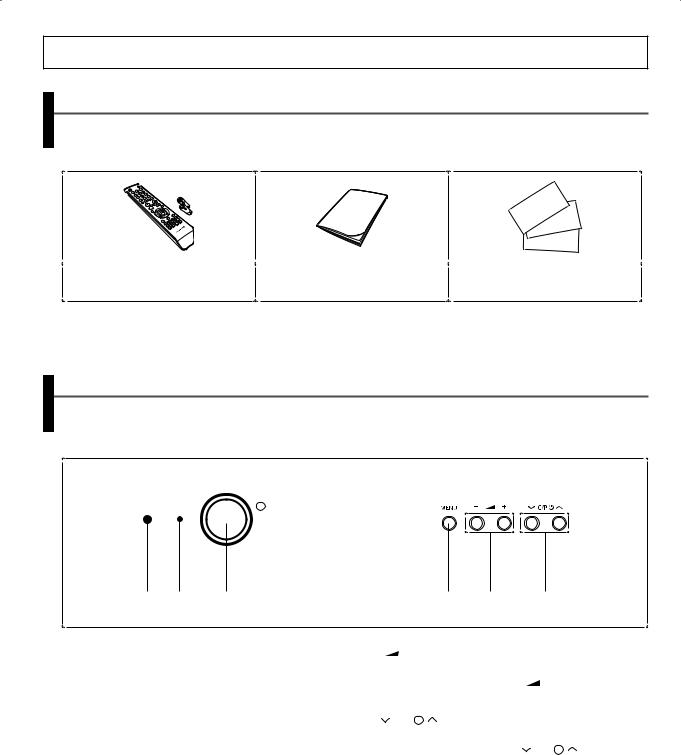
Accessories
PleasemakesurethefollowingitemsareincludedwithyourTV.
Ifanyitemsaremissing,contactyourdealer.
Theitemscolourandshapemayvarydependingonthemodel.
RemoteControl&Batteries(AAAx2) |
Owner’sInstructions |
WarrantyCard/RegistrationCard/ |
|
SafetyGuideManual |
|||
|
|
Control Panel
Theproductcolourandshapemayvarydependingonthemodel.
FrontoftheTV
1 2 |
3 |
|
4 |
5 |
6 |
|
|
|||
1 Remotecontrolsensor |
|
5 - |
+ |
|
|
|
|
|
|
|
AimtheremotecontroltowardsthisspotontheTV. |
Presstodecreaseorincreasethevolume. |
|
||||||||
2 Standbyindicator |
|
Intheon-screenmenu,usethe- |
+ buttonsasyouuse |
|||||||
|
the◄and►buttonsontheremotecontrol. |
|||||||||
Blinksandturnsoffwhenthepowerisonandlightsupin |
||||||||||
|
|
|
|
|
|
|
|
|||
stand-bymode. |
|
6 |
C/P. |
|
|
|
|
|
|
|
|
|
|
|
|
|
|||||
3 PowerOn/Off |
|
Presstochangechannels. |
|
|
|
|||||
|
Intheon-screenmenu,usethe |
C/P. |
|
buttonsas |
||||||
PresstoturntheTVonandoff. |
|
|||||||||
youusethe▲and▼buttonsontheremotecontrol. |
||||||||||
IftheTVwasturnedoffbyusingthePOWERbuttononthe |
||||||||||
|
|
|
|
|
|
|
|
|||
frontpanel,youwillnotbeabletoturnontheTVbyusing aremotecontrol.
4MENU
Presstoseeanon-screenmenuofyourTV’sfeatures.
PresstheMENU buttoninDTVmodetodisplaytheDTVmenu. TheanalogmenuappearswhenyoupresstheMENU buttonagain. Todismissthemenu,presstheMENU buttononceagain.
English - 4
Connection Panel (depending on the model)
Theproductcolourandshapemayvarydependingonthemodel.
Wheneveryouconnectanaudioorvideosystemtoyourtelevision,ensurethatallelementsareswitchedoff.
Refertothedocumentationsuppliedwithyourequipmentfordetailedconnectioninstructionsandassociatedsafety precautions.Pleasebesuretomatchthecolorcodedinputterminalsandcablejacks.
RearoftheTV
Pleaseinsertthe |
6 |
cardasshown |
|
InsertingtheCI(CommonInterface)card
Ifyouwanttowatchthescrambledchannel, inserttheCIcardintothe“COMMON INTERFACE”slot.
4 3 2
1
or
CableTelevisionNetwork
SideoftheTV
5 or
English - 5

1ConnectingtoanAerialorCableTelevisionNetwork
Connecttheaerialornetworkinputcabletothe75Ω coaxialsocket.
Toviewtelevisionchannelscorrectly,asignalmustbereceivedbythesetfromoneofthesources:anoutdooraerial,cable televisionnetwork,orsatellitenetwork.Ifyouareusinganindooraerial,youmayneedtoadjustitwhentuningyourtelevision untilyouobtainapicturethatisbothsharpandclear.
2ConnectingtotheCOMPONENTInput
Connectcomponentvideocablestocomponentconnector(Y,PB,PR)ontherearofyourtelevisionandtheotherendsto correspondingcomponentvideooutconnectorsontheDTVreceiverorDVDplayer.
TheY,PB andPR connectorsonyourcomponentdevices(DTVreceiverorDVDplayer)aresometimeslabeledY,B-YandR-Y orY,CbandCr.
ConnectRCAaudiocablestoAUDIO(L/R)IN ontherearofyourtelevisionandtheotherendstocorrespondingaudioout connectorsontheDTVreceiverorDVDplayer.
3ConnectingtotheSCARTInput/Output
ConnectSCARTcabletoanappropriateexternalA/VdevicesuchasaVCR,DVDplayer,decoder,satellitereceiver,videogame device,orvideodiscplayer.
-TheEXT1(RGB)connectorisusedforequipmentwithanRGBoutput,suchasavideogamedeviceorvideodiscplayer.
-TheEXT2(AV)connectorisusedfortheaudio/videooutputofcurrenttelevisionprogramme.
Input/OutputSpecification
Connector |
|
|
Input |
|
|
Output |
||
Video |
Audio(L/R) |
|
S-Video |
RGB |
Video |
|
Audio(L/R) |
|
|
|
|
||||||
EXT1 |
O |
O |
|
X |
O |
O |
|
O |
EXT2 |
O |
O |
|
X |
X |
O |
|
O |
4ConnectingtotheHDMI
SupportsconnectionsbetweenHDMI-connection-enabledAVdevices(Set-TopBoxes,DVDplayers,AVreceiversand digitalTVs).
NoadditionalAudioconnectionisneededforanHDMItoHDMIconnection.
WhatisHDMI?
“HighDefinitionMultimediainterface”allowsthetransmissionofhighdefinitiondigitalvideodataandmultiplechannels ofdigitalaudio(5.1channels).
TheHDMI/DVIterminalsupportsDVIconnectiontoanextendeddevicewiththeappropriatecable(notsupplied).The differencebetweenHDMIandDVIisthattheHDMIdeviceissmallerinsize,hastheHDCP(HighBandwidthDigitalCopy Protection)codingfeatureinstalled,andsupportsmulti-channeldigitalaudio.
YoushouldusetheDVI-to-HDMIcableorDVI-HDMIAdapterfortheconnection,andtheAUDIO(L/R)connectoronDVIfor soundoutput.
WhenconnectingthisproductviaHDMIorDVItoaSetTopBox,DVDPlayerorGamesConsoleetc,makesurethatithas beensettoacompatiblevideooutputmodeasshowninthetablebelow.Failuretoobservethismayresultinpicture distortion,imagebreakupornopicture.
SupportedmodesforDVIorHDMIComponent
|
480i |
480p |
576i |
576p |
720p |
1080i-50Hz |
1080i-60Hz |
HDMI-50Hz |
X |
X |
X |
O |
O |
O |
X |
HDMI-60Hz |
X |
O |
X |
X |
O |
X |
O |
Component |
O |
O |
O |
O |
O |
O |
O |
DonotattempttoconnecttheHDMIconnectortoaPCorLaptopGraphicsCard. (Thiswillresultinablankscreenbeingdisplayed)
5ConnectingtotheRCA/S-VIDEOInput
ConnectRCAvideoorS-VideocabletoVIDEOIN orS-VIDEOIN ontherearofyourtelevisionandtheotherendsto correspondingvideoorS-VideooutconnectorsontheA/Vdevice.
ConnectRCAaudiocablestoAUDIO(L/R)IN ontherearofyourtelevisionandtheotherendstocorrespondingaudioout connectorsontheA/Vdevice.
6COMMONINTERFACE
PCMCIASlotsupportstheDVBCommonInterface(DVB-CI)standard.Thisconnectionisprovidedforfutureexpansionofyour SamsungDTVsetallowingtheinstallationofDVB-CIcompatibleperipherals,forexampleaDVB-CImoduletosupportpayTV services.TheavailabilityofDVB-CIperipheralsvariescountrybycountry.Pleasecontactyourretailerforinformationaboutthe availabilityofDVB-CIperipheralsinyourregion.
English - 6
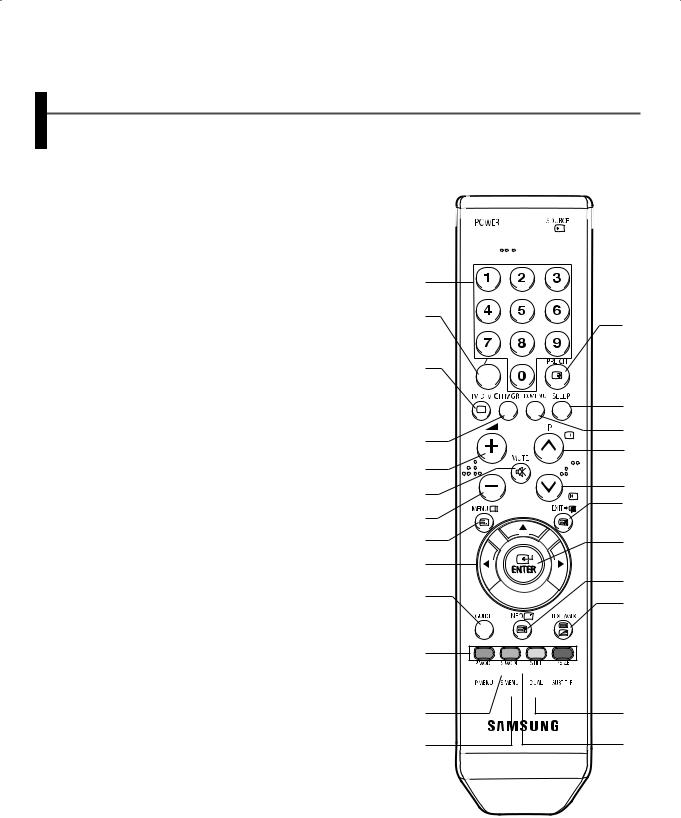
Viewing the Remote Control (depending on the model)
TheactualconfigurationonyourTVmaybedifferent,dependingonthemodel.
OperationofremotecontrolmaybeaffectedbybrightartificiallightneartotheTVset.
Thisisaspecialremotecontrolforthevisuallyimpaired,andhasBraillepointsonthePower,ChannelandVolume buttons.
1 Televisionstand-by
2 Directchannelselection
3 One/Two-digitchannelselection
4SwitchbetweenTVandDTV modeselection
5 Channelcontrol
6 Volumeincrease
7 Temporarysoundswitch-off
8 Volumedecrease
9 Menudisplay
0Movetotherequiredmenu option/Adjustanoptionvalue respectively
!ElectronicProgramGuide(EPG) display
@EPGDisplay/favouritechannel edition
# Pictureeffectselection
$ Picturemenudisplay
% Soundeffectselection
^ Soundmenudisplay
& Externalinputselection
*Switchrepeatedlybetweenthe lasttwochannelsdisplayed
( Automaticswitch-off
) DTVMenuDisplay
a Nextchannel
b Previouschannel
c Exitfromanydisplay
d Changeconfirmation
e Informationdisplay
f Picturesizeselection
g Digitalsubtitledisplay
h Soundmodeselection
i Stillpicture
TeletextFunctions
(Refertopage36)
4 Exitfromtheteletextdisplay
9 Teletextindex
# Teletextpagehold
% Teletextsizeselection
&Teletextmodeselection(LIST/ FLOF)
* Teletextsub-page
a Teletextnextpage
b Teletextpreviouspage
c Teletextcancel
e Teletextreveal
i Teletextstore
jTeletextdisplay/Mixboth PressingTEXT/MIXselects Teletext,Double,orMixmodein sequence.
@ Fastexttopicselection
1


 &
&
2
3 |
* |
|
|
||
4 |
|
|
|
( |
|
5 |
) |
|
a |
||
|
||
6 |
|
|
7 |
b |
|
c |
||
8 |
||
|
||
9 |
d |
|
0 |
|

 e !
e !  j
j
@
#


 f $
f $


 g
g
% h
^ i
English - 7
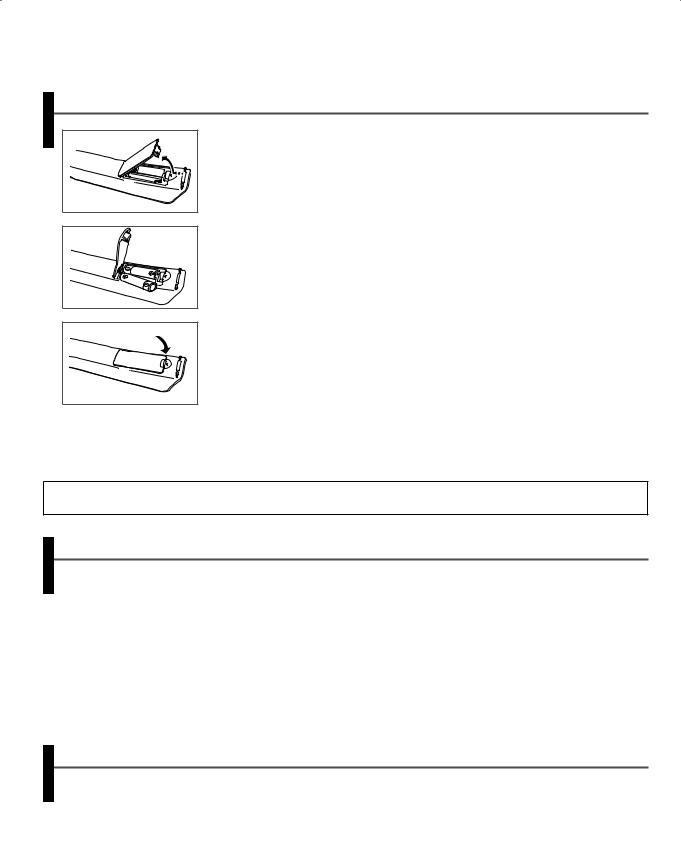
Installing Batteries in the Remote Control
1Lift the cover at the back of the remote control upward as shown in the figure.
2 Install twoAAAsize batteries.
Makesuretomatchthe“+”and“–”endsofthebatterieswiththediagraminsidethe compartment.
3Close the cover as shown in the figure.
Removethebatteriesandstoretheminacool,dryplaceifyouwon’tbeusingthe remotecontrolforalongtime.Theremotecontrolcanbeuseduptoabout23feet
(7m)fromtheTV.(AssumingtypicalTVusage,thebatterieslastforaboutoneyear.)
Iftheremotecontroldoesn’twork!Checkthefollowing:
1.IstheTVpoweron?
2.Aretheplusandminusendsofthebatteriesreversed?
3.Arethebatteriesdrained?
4.Isthereapowercut,oristhepowercordunplugged?
5.Isthereaspecialfluorescentlightoraneonsignnearby?
Operation
SwitchingYourTelevision On and Off
Themainsleadisattachedtotherearofthetelevision.
1Plug the mains lead into an appropriate socket.
Themainvoltageisindicatedontherearofthetelevisionandthefrequencyis50or60Hz.
2Press the “ ” button (On/Off) on the front of the television. The standby indicator on the front of the television lights up.
3Press the POWER button on the remote control to switch the television on. The programme that you were watching last is re-selected automatically.
Ifyouhavenotyetstoredanychannels,noclearpictureappears.
Referto“StoringChannelsAutomatically”onpage24or“StoringChannelsManually”onpage25.
4To switch your television off, press the “ ” button (On/Off) again.
Placing theTelevision in Standby Mode
Thetelevisioncanbeplacedinstandbymode,inordertoreducepowerconsumptionandwearofthecathoderaytube.
Standbymodecanbeusefulwhenyouwishtointerruptviewingtemporarily(duringameal,forexample).
1Press the POWER button on the remote control while viewing. The television is in standby mode.
2To switch the television back on, simply press it again.
YoucanalsoswitchonbypressingtheTV/DTV( ),P
),P  /
/ ,ornumericbutton.
Donotleaveyourtelevisioninstandbymodeforlongperiodsoftime.Turnyourtelevisionoffbypressingthe“ ” button (On/Off)onthefrontofthetelevision.Itisbesttounplugthesetfromthemainsandaerial.
English - 8

Plug & Play Feature (depending on the model)
Whenthetelevisionisinitiallypoweredon,threebasiccustomersettingsproceed automaticallyandsubsequently:settingthelanguage,channelandclock.
1If the television is in Standby mode, press the POWER button on the remote control.
The message Start Plug & Play is displayed.
2The Language menu will automatically appear after several seconds.
3Select the appropriate language by pressing the ▲ or ▼ button. Press the ENTER (  ) button to enter the language.
The message Check antenna input. is displayed.
IfanylanguageisnotselectedontheLanguage menu,theLanguage menuwilldisappearabout30secondslater.
4Make sure that the antenna is connected to the TV. Press the ENTER (  ) button.
The Auto Store menu is displayed.
5Select your country by pressing the ▲ or ▼ button, then press the ENTER (  ) button.
The Search menu is displayed.
6Press the ENTER (  ) button to start search the channels.
The channel search will start and end automatically.After all the available channels are stored, the Clock Set menu appears.
Referto“StoringChannelsAutomatically”onpage24.
7Press the ◄ or ► button to move to the hour or minute. Set the hour or minute by pressing the ▲ or ▼ button.
Referto“SettingandDisplayingtheCurrentTime”onpage35.
Youcansetthehourandminutedirectlybypressingthenumeric buttonsontheremotecontrol.
8When you have finished, press the MENU ( ) button.
The menu is turned to Auto Store in DTV mode automatically.
Ifyouwanttoresetthisfeature...
1Press the MENU ( ) button to display the menu.
2Press the ▲ or ▼ button to select Setup, and then press the ENTER (  ) button.
The Plug & Play is selected.
3Press the ENTER (  ) button again.
This feature starts with the message Start Plug & Play displayed.
|
|
|
Plug & Play |
|
|||||||||
|
|
Start Plug & Play |
|
||||||||||
|
|
|
|
|
OK |
|
|
|
|
||||
|
|
Enter |
|
|
|
|
|
|
|
Return |
|
||
|
|
|
|
|
|
|
|
|
|
|
|
|
|
|
|
|
|
|
|
|
|
|
|
|
|
|
|
T V |
|
|
|
|
|
|
|
|
|
|
Setup |
||
|
|
Plug & Play |
: |
|
|
|
Deutsch |
||||||
|
|
Language |
|
|
|
||||||||
|
|
Time |
|
|
|
|
English |
||||||
|
|
|
|
|
|
Italiano |
|||||||
|
|
Blue Screen |
|
|
|
|
Français |
||||||
|
|
|
|
|
|
Svenska |
|||||||
|
|
Melody |
|
|
|
|
: On |
|
|||||
|
|
Move |
|
|
Enter |
|
|
|
Skip |
||||
|
|
|
|
|
|
|
|
|
|
|
|
|
|
|
|
|
|
|
|
|
|
||||||
|
|
|
Plug & Play |
|
|||||||||
|
|
Check antenna input. |
|
||||||||||
|
|
|
|
|
OK |
|
|
|
|
||||
|
|
Enter |
|
|
|
|
|
|
|
Skip |
|
||
|
|
|
|
|
|
|
|
|
|
|
|
|
|
|
|
|
|
|
|
|
|
|
|
|
|||
T V |
|
|
|
|
|
|
|
Auto Store |
|||||
|
|
Country |
|
|
|
|
Germany |
||||||
|
|
Search |
|
|
United Kingdom |
||||||||
|
|
|
|
|
|
Sweden |
|||||||
|
|
|
|
|
|
|
|
|
|
Italy |
|||
|
|
|
|
|
|
|
|
|
|
Others |
|||
|
|
Move |
|
|
Enter |
|
|
|
Skip |
||||
|
|
|
|
|
|
|
|
|
|
|
|
|
|
|
|
|
|
|
|
|
|
|
|
|
|||
|
|
|
Search |
|
|
|
|
||||||
P 1 C − − |
− − − − − |
|
|
|
87 MHz |
10% |
|||||||
|
|
Enter |
|
|
Stop |
Skip |
|
||||||
|
|
|
|
|
|
|
|
|
|
||||
|
|
|
|
|
|
|
|
|
|
|
|
|
|
|
|
|
|
|
|
|
|
|
|
|
|
|
|
T V |
|
|
|
|
|
|
|
Clock Set |
|||||
|
|
|
Hour |
|
|
|
|
Minute |
|
||||
|
|
|
-- |
|
|
|
|
-- |
|
|
|
||
|
Move |
|
|
Adjust |
|
Exit |
|||||||
|
|
|
|
|
|||||||||
|
|
|
|
|
|
|
|
|
|
|
|
|
|
|
|
|
|
|
|
|
|
|
|
|
|
|
|
|
|
|
|
|
|
|
|
|
|
|
|
|
|
English - 9
Viewing an External Signal Source (depending on the model)
T V |
|
Input |
Source List |
: TV |
|
Edit Name |
|
|
Move |
Enter |
Return |
T V |
Source List |
|
TV |
|
|
DTV |
: ------ |
|
Ext.1 |
|
|
Ext.2 |
: ------ |
|
AV/S-Video : ------ |
|
|
More |
|
|
Move |
Enter |
Return |
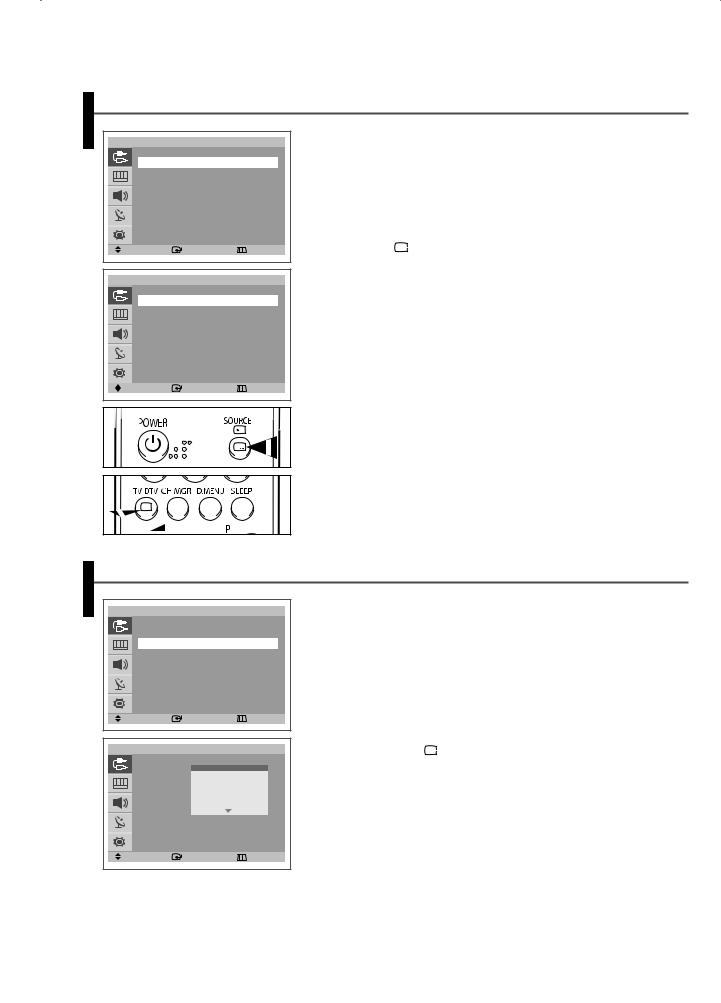
Usetheremotecontroltoswitchbetweenviewingsignalfromconnectedequipment, suchasVCR,DVD,Set-Top-boxesandtheTVsource(airorcable).
1 Press the MENU ( ) button to display the menu. 2 Press the ENTER (
 ) button to select Input.
3Press the ENTER ( ) button again.
4Press the ▲ or ▼ button to select the required signal source, then press the ENTER (  ) button.
Available signal source: TV, DTV, Ext. 1, Ext. 2, AV/S-Video,
Component, HDMI
WhenyouconnectequipmenttotheTV,youcanchoosebetweenthe followingsetsofjacks:Ext. 1,Ext. 2,Component,orHDMI ontheTV’s rearpanel,andAV/S-Video ontheTV’ssidepanel.
YoucanselecttheseoptionssimplybypressingtheSOURCE(  ) buttonontheremotecontrol.
Towatchtelevisionprogrammeagain,presstheTV/DTV( )buttonand selectthechannelnumberrequired.
Editing Device Names (depending on the model)
T V |
|
Input |
Source List |
: TV |
|
Edit Name |
|
|
Move |
Enter |
Return |
T V |
|
Edit Name |
Ext.1 |
|
VCR |
Ext.2 |
|
------ |
|
Cable STB |
|
AV |
|
DVD |
|
HD STB |
|
|
Sat. STB |
|
S-Video |
AV Receiver |
|
Component |
|
|
HDMI |
: ------ |
|
Move |
Enter |
Return |
Youcangiveanametotheexternalsource.
1 Press the MENU ( ) button to display the menu.
2Press the ENTER ( ) button to select Input.
3Press the ▲ or ▼ button to select Edit Name, then press the ENTER ( ) button.
4Press the ▲ or ▼ button to select the external source to be edited, then press the ENTER ( ) button.
5Select the required device’s name by pressing the ▲ or ▼ button, then press the ENTER (  ) button.
Available device names: VCR, DVD, Cable STB, HD STB, Sat. STB, AV Receiver, DVD Receiver, Game, Camcorder, DVD Combo, DHR (DVD HDD Recorder), or PC.
6Press the EXIT (
 ) button to exit.
English - 10

Using the DTV Feature
Previewing the DTV Menu System
AvailableinDTVmode.
PresettotheDTVmodebyusingtheTV/DTV( )button.
Tohelpyounavigatearoundtheon-screenmenusystemandadjustthevarioussettingsavailable,refertothefollowing illustration.
Press the D.MENU button.
 Guide
Guide
 Now & Next Guide
 Full Guide
 Scheduled List
 Default Guide
  Now/Next
 Full Guide
 Preference
 Preferred Subtitle Language
 English
 Welsh
Welsh
 Gaelic
 Irish
Irish
 Preferred Audio Language
  English
 Welsh
Welsh
 Gaelic
 Irish
Irish
 OSD Language
  English
 Deutsch
 Français
 Italiano
 Svenska
 Translucency Level
  High
High
 Medium
 Low
Low
 Opaque
 Parental Lock
  Parental Rating
 Change PIN
 Feature
 Subtitle
  Off
Off
 On
On
 Subtitle Language
 Audio Language
  English
 DigitalText
  Disable
 Enable
 Channel
 Auto Store
 Manual Store
  Channel
 Frequency
 Bandwidth
 Edit Favourite Channels
 Channel Manager System
 Product Information
 Signal Information
 Software Upgrade
 Common Interface
  Application Info.
 CI Menu
 Reset
Reset
English - 11
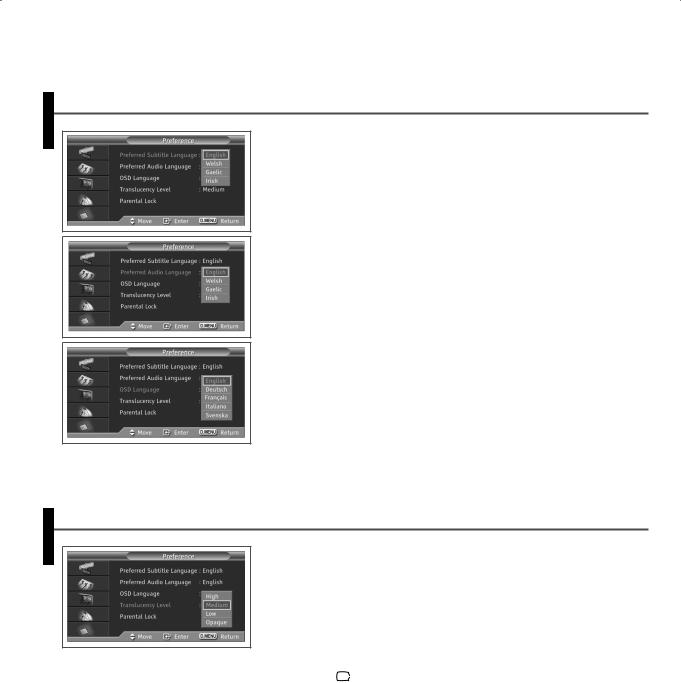
ChoosingYour Language
Whenyoustartusingyourtelevisionforthefirsttime,youmustselectthelanguage whichwillbeusedfordisplayingmenusandindications.
1Press the D.MENU button to display the DTV menu.
2Press the ▲ or ▼ button to select Preference, then press the ENTER ( ) button.
3Press the ENTER ( ) button to select Preferred Subtitle Language.
4Select the appropriate language by pressing the ▲ or ▼ button, then press the ENTER ( ) button.
5Press the ▲ or ▼ button to select Preferred Audio Language, then press the ENTER ( ) button.
6Select the appropriate language by pressing the ▲ or ▼ button, then press the ENTER ( ) button.
7Press the ▲ or ▼ button to select OSD Language, then press the ENTER ( ) button.
8Select the appropriate language by pressing the ▲ or ▼ button, then press the ENTER ( ) button.
9Press the EXIT (
 ) button to exit.
Adjusting theTranslucency Level
Youcansetthetranslucencyoftheon-screenmenu.
1Press the D.MENU button to display the DTV menu.
2Press the ▲ or ▼ button to select Preference, then press the ENTER ( ) button.
3Press the ▲ or ▼ button to select Translucency Level, then press the ENTER ( ) button.
4Press the ▲ or ▼ button to select the required option, then press the ENTER (  ) button.
Available options: High - Medium - Low - Opaque
5Press the EXIT (
 ) button to exit.
English - 12
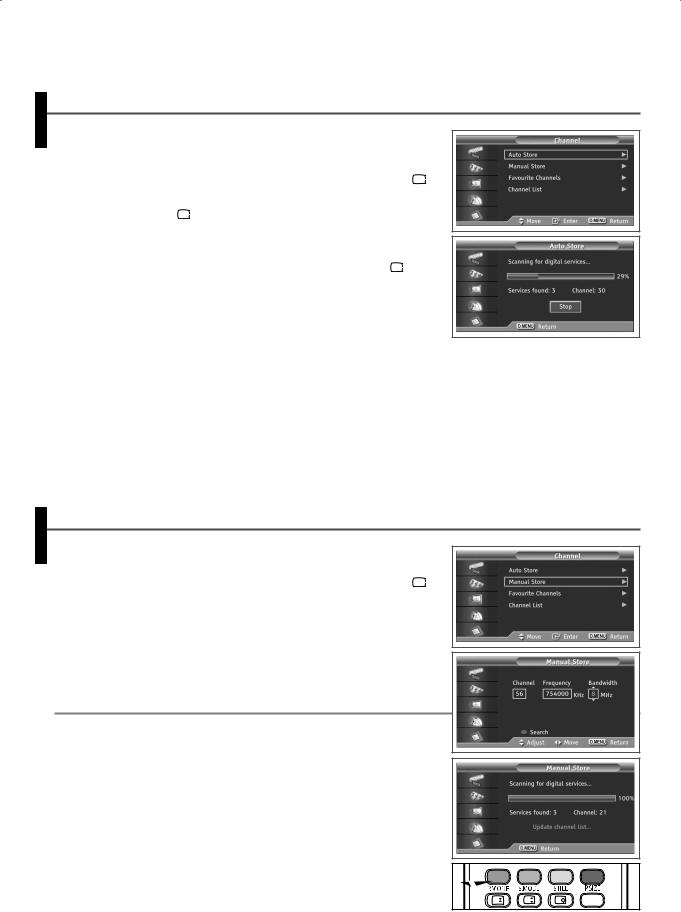
Updating the Channel List Automatically
Youcanupdatethechannellistwhenthebroadcasteraddsnewservicesorifyou movetheTVtoanewlocation.
1Press the D.MENU button to display the DTV menu.
2Press the ▲ or ▼ button to select Channel, then press the ENTER (  ) button.
3Press the ENTER (  ) button again to start the search.
When it has finished, the number of scanned services will be displayed.
Theexistingfavouritechannellistwillbedeletedwhenthechannel listisupdated.
Tostopthescanbeforeithasfinished,presstheENTER (  ) or D.MENU button.
Ifthesignalstatusispoor,theNo service found! Check the aerial connection. messageisdisplayed.
Updating the Channel List Manually
Youcanspecifythechannelorfrequencyforafastchannelsearch.
1Press the D.MENU button to display the DTV menu.
2Press the ▲ or ▼ button to select Channel, then press the ENTER (  ) button.
3Press the ▲ or ▼ button to select Manual Store, then press the ENTER ( ) button.
4Select the required option by pressing the ◄ or ► button, then press the ▲ or ▼ or numeric button.
5Press the red button to start the scan for digital services. When it has finished, channels are updated in the channel list.
Channel
Pressthe▲,▼ ornumericbuttons(0~9)toselectachannel. Theavailablechannelsare21~68.
Thecorrespondingfrequencyfortheselectedchannelisautomaticallyset.
Frequency
Youcanspecifythefrequency(KHz)usingthenumericbuttons(0~9).Ifyoudo notknowtheexactfrequency,followtheabovesteptoselectthefrequency automaticallyusingchannel.
Bandwidth
Pressthe▲ or ▼buttontoselectabandwidth. Theavailablebandwidthsare7and8MHz.
English - 13
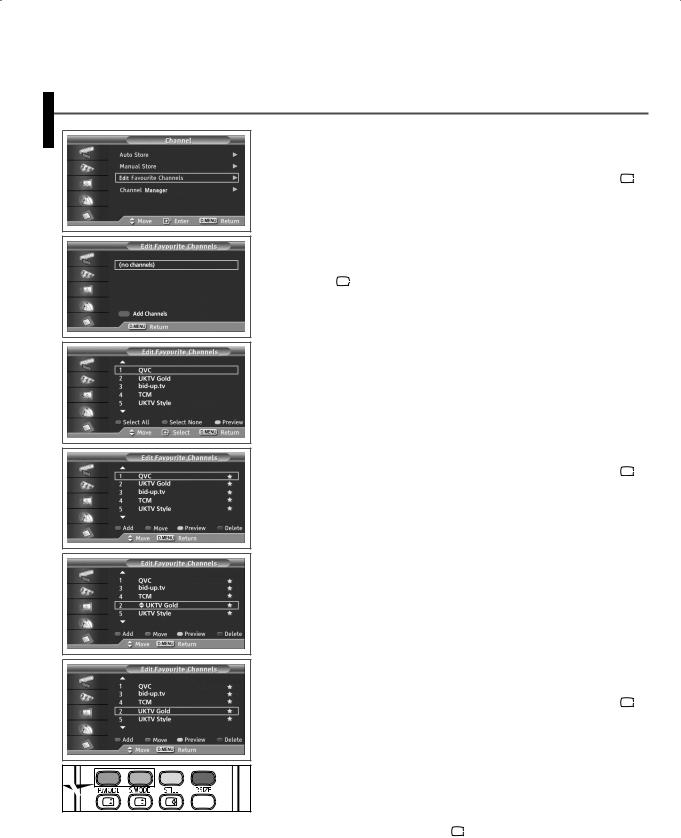
EditingYour Favourite Channels
Youcanedityourfavouritechannelsusingthecolourbuttons.
1Press the D.MENU button to display the DTV menu.
2Press the ▲ or ▼ button to select Channel, then press the ENTER (  ) button.
3Press the ▲ or ▼ button to select Edit Favourite Channels, then press the ENTER ( ) button.
4Press the red button to display all currently stored channels.
5Press the ▲ or ▼ button to select a channel you want, then press the ENTER (  ) button.
A" " icon is shown next to the selected channel and the channel will be added to the favourites list.
Toundo,presstheENTER ( ) button.
Select All :Selectallchannelscurrentlydisplayed.
Select None :Deselectallselectedchannels.
Preview :Displays(a)currentlyselectedchannel(s).
TheFavouriteChannelssettingshavebeencompleted.
Add
Youcanusethisfunctionwhenoneormorefavouritechannelshavebeenselected.
1 Press the D.MENU button to display the DTV menu.
2Press the ▲ or ▼ button to select Channel, then press the ENTER (  ) button.
3Press the ▲ or ▼ button to select Edit Favourite Channels, then press the ENTER ( ) button.
4Press the red button in the Edit Favourite Channels menu. To add more
channels, refer to the step 5 above.
Toaddallchannelstothefavouriteschannellist,pressthered button.
Toremoveallchannels,pressthegreenbutton.
AddedchannelsinthefavoriteschannellistaresavedinChannel Manager.
Move
1Press the D.MENU button to display the DTV menu.
2Press the ▲ or ▼ button to select Channel, then press the ENTER (  ) button.
3Press the ▲ or ▼ button to select Edit Favourite Channels, then press the ENTER ( ) button.
4 Press the ▲ or ▼ button to select the required channel, then press the green button.
A" " icon is displayed on the left side of the channel name.
5 Press the ▲ or ▼ button to select the channel that you want to move, then press the green or ENTER (  ) button.
The channel is moved to its new position.
continued...
English - 14
Loading...