

Samsung VP-D364W User Manual
Digital Video Camcorder
VP-D361(i)/D361W(i)/D362(i)/D363(i)/D364W(i)/D365W(i)
AF Auto Focus
CCD Charge Coupled Device
LCD Liquid Crystal Display
RoHS compliant
Our product complies with “The
Restriction Of the use of certain
Hazardous Substances in electrical and
use the 6 hazardous materials- Cadmium(Cd), Lead
(Pb), Mercury (Hg), Hexavalent Chromium (Cr
Brominated Biphenyls (PBBs), Poly Brominated
Diphenyl Ethers(PBDEs)- in our products.
Owner’s Instruction Book
Before operating the unit, please read this Instruction
Book thoroughly, and retain it for future reference.
electronic equipment”, and we do not
+6
), Poly
This product meets the intent of
Directive 89/ 336 CEE, 73/ 23 CEE, 93/68 CEE.
ENGLISH
Use only approved battery packs.
Otherwise, there is a danger of overheating, fire or explosion.
Samsung is not responsible for problems occurring due to using unapproved batteries.

ENGLISH
Contents
Notes and Safety Instructions..............................................5
Getting to Know Your Camcorder ......................................7
Features ....................................................................................7
Accessories Supplied with Camcorder ....................................8
Front & Left View ......................................................................9
Left Side View..........................................................................10
Right & Top View ....................................................................11
Rear & Bottom View................................................................12
Remote Control (VP-D363(i)/D364W(i)/D365W(i) only) ........13
Preparation ........................................................................14
Using the Hand Strap & Lens Cover ......................................14
Lithium Battery Installation ......................................................15
Using the Lithium Ion Battery Pack ........................................16
Connecting a Power Source ..................................................19
About the Operating Modes ....................................................19
Using the QUICK MENU ........................................................20
OSD (On Screen Display) in Camera/Player Modes ............21
OSD (On Screen Display) in M.Cam/M.Player Modes
(VP-D363(i)/D364W(i)/D365W(i) only) ....................................22
Turning the OSD (On Screen Display) On/Off ......................22
Initial Setting : System Menu Setting ................................23
Setting the Clock (Clock Set) ................................................23
Setting the Wireless Remote Control Acceptance
(Remote) (VP-D363(i)/D364W(i)/D365W(i) only) ..................24
Setting the Beep Sound (Beep Sound) ................................25
22
Setting the Shutter Sound (Shutter Sound)
(VP-D363(i)/D364W(i)/D365W(i) only) ....................................26
Selecting the OSD Language (Language) ............................27
Viewing the Demonstration (Demonstration)........................28
Initial Setting : Display Menu Setting ................................29
Adjusting the LCD Screen (LCD Bright/ LCD Colour) ........29
Displaying the Date/Time (Date/Time) ..................................30
Setting the TV Display (TV Display) ......................................31
Basic Recording ................................................................32
Using the Viewfinder................................................................32
Inserting / Ejecting a Cassette ................................................32
Various Recording Techniques ................................................33
Making your First Recording ..................................................34
Recording with Ease for Beginners (EASY.Q Mode) ............35
Reviewing and Searching when Recording (REC SEARCH)..36
Searching a quickly for a desired scene (Setting the Zero
Memory) (VP-D363(i)/D364W(i)/D365W(i) only) ..................37
Self Record using the Remote Control (Setting the Self
Timer) (VP-D363(i)/D364W(i)/D365W(i) only)........................38
Zooming In and Out ................................................................39
Using the Tele Macro ..............................................................39
Using the Fade In and Out ......................................................40
Using Back Light Compensation Mode (BLC) ......................41
Using the COLOR NITE (COLOUR NITE) ............................42
Using the LIGHT (VP-D364W(i)/D365W(i) only) ....................43

Contents
ENGLISH
Advanced Recording..........................................................44
Selecting the Record Mode & Audio Mode ............................44
Cutting Off Wind Noise (WindCut Plus) ................................45
Selecting the Real Stereo ......................................................46
Setting the Shutter Speed & Exposure ..................................47
Auto Focus / Manual Focus ....................................................48
Programmed Automatic Exposure Modes (Program AE) ....49
Setting the White Balance ......................................................51
Applying Visual Effects ............................................................52
Setting the 16:9 Wide ..............................................................54
Setting the Digital Image Stabilizer (DIS) ..............................55
Zooming In and Out with Digital Zoom (Digital Zoom) ........56
Still Image Recording ..............................................................57
Searching for a still image ..................................................57
Playback ............................................................................58
Playing Back a Tape You have recorded on the LCD Screen.. 58
Various Functions while in Player Mode ................................59
Zooming during Playback (PB ZOOM) ..................................61
Audio Dubbing (VP-D363(i)/D364W(i)/D365W(i) only) ..........62
Dubbed Audio Playback ..........................................................63
Tape Playback ........................................................................64
Audio Effect ............................................................................66
Setting the AV In/Out
(VP-D361i/D361Wi/D362i/D363i/D364Wi/D365Wi only)........ 67
Digital Still Camera Mode (VP-D363(i)/D364W(i)/D365W(i) only) ..68
Using the Memory Card (Usable Memory Card) (not supplied)
..68
Memory Card Functions......................................................68
Inserting a Memory Card ....................................................68
Ejecting a Memory Card ....................................................68
Structure of Folders and Files on the Memory Card ..............69
Selecting the Memory Type (VP-D365W(i) only)
Selecting the Photo Quality ....................................................71
Setting the File Number ..........................................................72
Taking a Photo Image (JPEG) on the Memory Card..............73
Viewing Photo Images (JPEG) ..............................................74
To view a Single Image ......................................................74
To view a Slide Show ........................................................74
To view the Multi Display ..................................................74
Protection from accidental Erasure ........................................75
Deleting Photo Images and Moving Images ..........................76
Formatting the Memory Card ..................................................78
Recording Moving Images (MPEG) on the Memory Card ........79
Playing Moving Images (MPEG) on the Memory Card
(M.Play Select) ......................................................................80
Recording a Moving Image from a Cassette as a Photo Image
Copying Still Images from a Cassette to Memory Card
(Photo Copy) ..........................................................................82
Copies Files from the Memory Card to the Built-in
Memory (Copy to) (VP-D365W(i) only)..................................83
Marking Images for Printing (Print Mark) ..............................84
Removing the Print Mark ....................................................84
PictBridgeTM(VP-D363(i)/D364W(i)/D365W(i) only) ......85
Printing Your Pictures – Using the PictBridgeTM......................85
......................
70
..81
33

ENGLISH
Contents
Connecting To a Printer ......................................................85
Selecting Images ................................................................86
Setting the Number of Prints ..............................................86
Setting the Date/Time Imprint Option ..................................86
Printing Images ..................................................................86
Canceling the Printing ........................................................86
IEEE 1394 Data Transfer ....................................................87
Transferring IEEE1394 (i.LINK)-DV Standard Data Connections
(VP-D361i/D361Wi/D362i/D363i/D364Wi/D365Wi only) ........87
Connecting to a DV Device (DVD Recorder, Camcorder, etc)
Connecting to a PC ............................................................87
System Requirements..........................................................87
Recording with a DV Connection Cable ..............................88
USB Interface (VP-D362(i)/D363(i)/D364W(i)/D365W(i) only) ..89
Using USB Interface
(VP-D362(i)/D363(i)/D364W(i)/D365W(i) only) ......................89
Transferring a Digital Image through a USB Connection ......89
USB Connection Speed depending on the System ................89
System Requirements..........................................................89
Selecting the USB Device (USB Connect)
(VP-D363(i)/D364W(i)/D365W(i) only) ....................................90
Installing DV Media PRO Program ........................................91
Connecting to a PC ................................................................92
Disconnecting the USB Cable ............................................92
Using the PC Camera Function............................................93
. ..87
Using the USB Streaming Function ....................................94
Using the removable Disk Function
(VP-D363(i)/D364W(i)/D365W(i) only) ..............................94
Maintenance ......................................................................95
After Finishing a Recording ....................................................95
Usable Cassette Tapes ..........................................................95
Cleaning and Maintaining the Camcorder ..............................96
Using Your Camcorder Abroad ..............................................97
Troubleshooting ......................................................98
Troubleshooting ......................................................................98
Self Diagnosis Display........................................................98
Self Diagnosis Display in M.Cam/M.Player Modes
(VP-D363(i)/D364W(i)/D365W(i) only) ..............................99
Setting menu items................................................................101
Specifications ...................................................... 103
Index .................................................................... 104
Power Sources (United Kingdom Only)................105
44
Notes and Safety Instructions
COLOR NITE
MENU
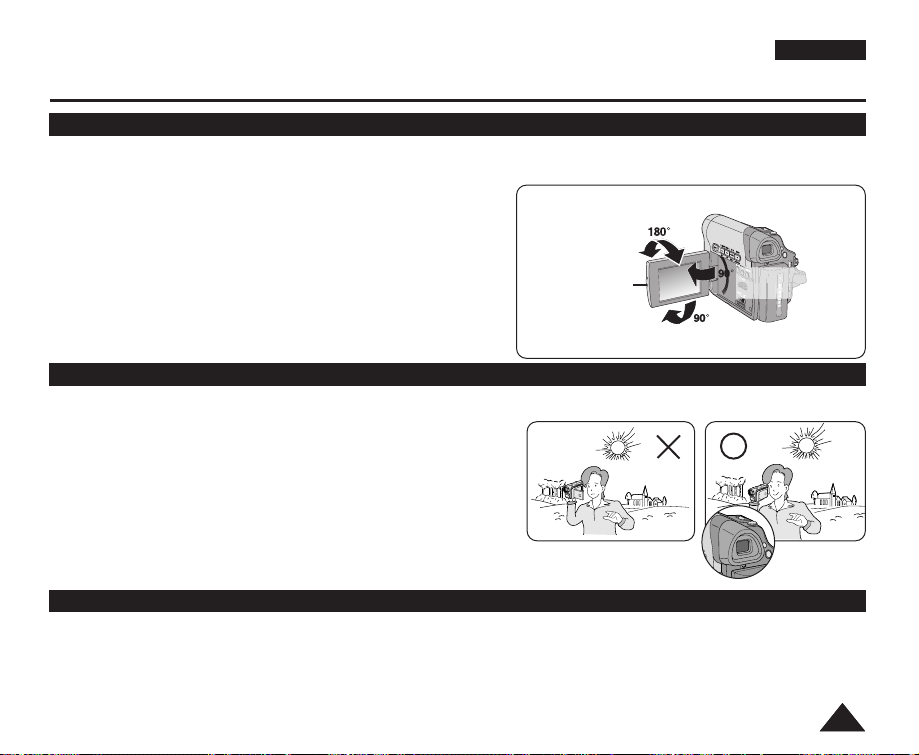
Notes regarding the Rotation of the LCD Screen
Please rotate the LCD Screen carefully as illustrated.
Over rotation may cause damage to the inside of the hinge that connects the LCD Screen to the Camcorder.
ENGLISH
1. Open the LCD Screen 90 degrees to the Camcorder
with your finger.
180 degrees (max.)
2. Rotate it to the best angle to record or play.
■
If you rotate the LCD Screen 180 degrees to the lens side, you
can close the LCD Screen with it facing out.
■
This is convenient during playback operations.
LCD Open Knob
[Note]
Refer to page 29 to adjust brightness and colour of the LCD Screen.
Notes regarding the LCD Screen, Viewfinder, Lens
1. Direct sunlight can damage the LCD Screen, the inside of the Viewfinder or the Lens.
Take pictures of the sun only in low light conditions, such as at dusk.
2. The LCD Screen has been manufactured
using high precision technology.
However, there may be tiny dots (red, blue or green in colour) that
appear on the LCD Screen. These dots are normal and do not
affect the recorded picture in any way.
3. Do not pick up the Camcorder by holding the Viewfinder, LCD
Screen or Battery Pack.
4. Applying excessive force to the Viewfinder may damage it.
Notes regarding the Video Head Cleaning
■
To ensure normal recording and a clear picture, clean the video heads regularly.
If a square block-shape distorts playback, or only a blue screen is displayed, the video heads may be dirty.
If this happens, clean the video heads with a dry type cleaning cassette.
■
Do not use a wet-type cleaning cassette. It may damage the video heads.
90 degrees
to the Camcorder
90 degrees (max.)
55

ENGLISH
Notes and Safety Instructions
Notes regarding Camcorder
■
Do not leave the Camcorder exposed to high temperatures (above 60 °C or 140 °F).
For example, in a parked car in the sun or exposed to direct sunlight.
■
Do not let the Camcorder get wet. Keep the Camcorder away from rain, sea water, and any other form of moisture.
If the Camcorder gets wet, it may get damaged. Sometimes a malfunction due to exposure to liquids cannot be
repaired.
■
A sudden rise in atmospheric temperature may cause condensation to form inside the Camcorder.
- When you move the Camcorder from a cold location to a warm location (e.g. from outside to inside during the winter.)
- When you move the Camcorder from a cool location to a hot location (e.g. from inside to outside during the summer.)
■
If the (DEW) protection feature is activated, leave the Camcorder for at least two hours in a dry, warm room with the
cassette compartment opened and the Battery Pack removed.
Notices regarding Copyright
Television programmes, video tapes, DVD titles, films, and other programme materials may be copyrighted.
Unauthorized copying of copyrighted material may be against the law.
All the trade names and registered trademarks mentioned in this manual or other documentation provided with your
Samsung product are trademarks or registered trademarks of their respective holders.
Servicing & Replacement Parts
■
Do not attempt to service this Camcorder yourself.
■
Opening or removing covers may expose you to dangerous voltage or other hazards.
■
Refer all servicing to qualified service personnel.
■
When replacement parts are required, be sure the service technician has used replacement parts specified by the
manufacturer and having the same characteristics as the original part.
■
Unauthorized substitutions may result in fire, electric shock or other hazards.
Correct Disposal of This Product
(Waste Electrical & Electronic Equipment)
(Applicable in the European Union and other European countries with separate collection systems)
This marking shown on the product or its literature, indicates that it should not be disposed with other household wastes at the end of its
working life. To prevent possible harm to the environment or human health from uncontrolled waste disposal, please separate this from
other types of wastes and recycle it responsibly to promote the sustainable reuse of material resources.Household users should contact
either the retailer where they purchased this product, or their local government office, for details of where and how they can take this item
for environmentally safe recycling. Business users should contact their supplier and check the terms and conditions of the purchase
66
contract. This product should not be mixed with other commercial wastes for disposal.

Getting to Know Your Camcorder
Features
■
Digital Data Transfer Function
with IEEE1394
By incorporating the IEEE 1394
(i.LINK™: i.LINK is a serial data
transfer protocol and
interconnectivity system, used to
transmit DV data) high speed data
transport port, both moving and
photo images can be transferred
to a PC, making it possible to
produce or edit various images.
■
USB Interface for Digital Image
Data Transfer (VP-D362(i)
/D363(i)/D364W(i)/D365W(i) only)
You can transfer images to a PC
using the USB interface without an
add-on card.
■
PHOTO
The PHOTO function lets you
capture an object as a still, while in
<Camera mode>.
■
1200x Digital Zoom
Allows you to magnify an image up
to 1200 times its original size.
■
Audio Enhancement
Provides more powerful sound by
added Real Stereo and Audio
Effect functionalities.
■
Colour TFT LCD
A high-resolution colour TFT LCD
gives you clean, sharp images as
well as the ability to review your
recordings immediately. A highresolution colour TFT LCD of 230K
pixels supports 16:9 aspect ratio of
VP-D361W(i)/D364W(i)/D365W(i).
■
Digital Image Stabilizer (DIS)
The DIS compensates for any
handshake, reducing unstable
images particularly at high
magnification.
■
Various Visual Effects
The Visual Effects allows you to
give your films a special look by
adding various special effects.
■
Back Light Compensation (BLC)
The BLC function compensates for
the bright background behind a
subject you're recording.
■
Program AE
The Program AE enables you to
alter the shutter speed and
aperture to suit the type of
scene/action to be filmed.
ENGLISH
■
High Power Zoom Lens
Power Zoom lens allows users to
magnify the subject clearly up to
x33.
■
Digital Still Camera Function
(VP-D363(i)/D364W(i)/D365W(i) only)
- Using Memory Card, you can
easily record and playback
standard photo images.
- You can transfer standard photo
images on the Memory Card to
your PC using the USB interface.
■
Moving Image Recording
(VP-D363(i)/D364W(i)/D365W(i) only)
Moving image recording makes it
possible to record video onto a
Memory Card.
■
Multi Memory Card Slot
(VP-D364W(i)/D365W(i) only)
Multi Memory Card slot is able to
use Memory Stick (Duo),
Memory Stick PRO, MMC and SD.
■
Built-in Memory
(VP-D365W(i) only)
You can use digital still camera
functions without a separate
external Memory Card, using the
built-in memory installed in your
Camcorder. (VP-D365W(i): 32MB)
77
 Loading...