

Samsung PS51D450A2W, PS43D450, PS43D451, PS43D452, PS51D450 User Manual
...
Plasma TV
user manual
imagine the possibilities
Thank you for purchasing this Samsung product.
To receive more complete service, please register
your product at
www.samsung.com/register
Model _____________ Serial No. _____________
E-MANUAL
© 2011 Samsung Electronics Co., Ltd. All rights reserved.
BN68-03491F-01
Contact SAMSUNG WORLDWIDE
If you have any questions or comments relating to Samsung products, please contact the SAMSUNG customer care centre.
Country
Customer Care Centre
Web Site
AUSTRIA 0810 - SAMSUNG (7267864, € 0.07/min) www.samsung.com/at
BELGIUM 02-201-24-18 www.samsung.com/be (Dutch)
www.samsung.com/be_fr (French)
CZECH 800 - SAMSUNG (800-726786) www.samsung.com/cz
Samsung Zrt., česká organizační složka, Oasis Florenc, Sokolovská394/17, 180 00, Praha 8
DENMARK 70 70 19 70 www.samsung.com/dk
FINLAND 030 - 6227 515 www.samsung.com/fi
FRANCE 01 48 63 00 00 www.samsung.com/fr
GERMANY 01805 - SAMSUNG (726-7864 € 0,14/Min) www.samsung.de
HUNGARY 06-80-SAMSUNG (726-7864) www.samsung.com/hu
ITALIA 800-SAMSUNG (726-7864) www.samsung.com/it
LUXEMBURG 261 03 710 www.samsung.com/lu
NETHERLANDS 0900-SAMSUNG (0900-7267864) (€ 0,10/Min) www.samsung.com/nl
NORWAY 815-56 480 www.samsung.com/no
POLAND 0 801 1SAMSUNG (172678)
022-607-93-33
www.samsung.com/pl
PORTUGAL 80820-SAMSUNG (726-7864) www.samsung.com/pt
SLOVAKIA 0800-SAMSUNG (726-7864) www.samsung.com/sk
SPAIN 902 - 1 - SAMSUNG (902 172 678) www.samsung.com/es
SWEDEN 0771 726 7864 (SAMSUNG) www.samsung.com/se
TURKEY 444 77 11 www.samsung.com/tr
U.K 0845 SAMSUNG (7267864) www.samsung.com/uk
EIRE 0818 717100 www.samsung.com/ie
SWITZERLAND 0848 - SAMSUNG (7267864, CHF 0.08/min) www.samsung.com/ch
www.samsung.com/ch_fr/(French)
LITHUANIA 8-800-77777 www.samsung.com/lt
LATVIA 8000-7267 www.samsung.com/lv
ESTONIA 800-7267 www.samsung.com/ee
Plasma TV user manual
[PD450-BT]BN68-03491F-01L09.indb 1 2011-02-21 오후 10:47:51
English - 2
For more information on how to use e-Manual
Figures and illustrations in this User Manual are provided for reference only and may differ from actual product
appearance. Product design and specifications may be changed without notice.
Digital TV notice
1. Functionalities related to Digital TV (DVB) are only available in countries/areas where DVB-T (MPEG2 and MPEG4 AVC) digital terrestrial signals are
broadcasted or where you are able to access to a compatible DVB-C (MPEG2 and MPEG4 AAC) cable-TV service. Please check with your local
dealer the possibility to receive DVB-T or DVB-C signal.
2. DVB-T is the DVB European consortium standard for the broadcast transmission of digital terrestrial television and DVB-C is that for the broadcast
transmission of digital TV over cable. However, some differentiated features like EPG (Electric Programme Guide), VOD (Video On Demand) and so
on, are not included in this specification. So, they cannot be workable at this moment.
3. Although this TV set meets the latest DVB-T and DVB-C standards, as of [August, 2008], the compatibility with future DVB-T digital terrestrial and
DVB-C digital cable broadcasts cannot be guaranteed.
4. Depending on the countries/areas where this TV set is used some cable-TV providers may charge an additional fee for such a service and you may
be required to agree to terms and conditions of their business.
5. Some Digital TV functions might be unavailable in some countries or regions and DVB-C might not work correctly with some cable service providers.
6. For more information, please contact your local Samsung customer care centre.
✎
The reception quality of TV may be affected due to differences in broadcasting method between the countries. Please check the TV
performance in the local SAMSUNG Authorized Dealer, or the Samsung Call Centre whether it can be improved by reconfiguring TV setting or
not.
User Instructions
• Screen Image retention
Do not display a still image (such as on a video game) on the plasma display panel for more than several minutes as it can cause screen image
retention. This image retention is also known as “screen burn”. To avoid such image retention, reduce the degree of brightness and contrast of the
screen when displaying a still image.
• Heat on the top of the Plasma TV
The top side of the product may be hot after long periods of use as heat dissipates from the panel through the vent hole in the upper part of the
product.
This is normal and does not indicate any defect or operation failure of the product.
However, children should be prevented from touching the upper part of the product.
• The product is making a “cracking” noise.
A “cracking” noise may occur when the product contracts or expands due to a change in the surrounding environment such as temperature or
humidity. This is normal and not a defect of the unit.
• Cell Defects
The PDP uses a panel consisting of 2,360,000(HD-level) to 6,221,000(FHD-level) pixels which require sophisticated technology to produce. However,
there may be a few bright or dark pixels on the screen. These pixels will have no impact on the performance of the product.
• Avoid operating the TV at temperatures below 41°F (5°C)
• A still image displayed too long may cause permanent damage to the PDP Panel.
Watching the Plasma TV in 4:3 format for a long period of time may leave traces of borders displayed on the left, right and centre of
the screen caused by the difference of light emission on the screen. Playing a DVD or a game console may cause similar effects to
the screen.
Damages caused by the above effect are not covered by the Warranty.
• After-images on the Screen.
Displaying still images from Video games and PC for longer than a certain period of time may produce partial after-images.
To prevent this effect, reduce the “brightness” and “contrast” when displaying still images for a long time.
• Warranty
Warranty does not cover any damage caused by image retention.
Burn-in is not covered by the warranty.
Correct Disposal of This Product (Waste Electrical & Electronic Equipment)
(Applicable in the European Union and other European countries with separate collection systems)
This marking on the product, accessories or literature indicates that the product and its electronic accessories (e.g. charger,
headset, USB cable) should not be disposed of with other household waste at the end of their working life. To prevent possible
harm to the environment or human health from uncontrolled waste disposal, please separate these items from other types of waste
and recycle them responsibly to promote the sustainable reuse of material resources. Household users should contact either the
retailer where they purchased this product, or their local government office, for details of where and how they can take these items
for environmentally safe recycling. Business users should contact their supplier and check the terms and conditions of the purchase
contract. This product and its electronic accessories should not be mixed with other commercial wastes for disposal.
Correct disposal of batteries in this product
(Applicable in the European Union and other European countries with separate battery return systems)
This marking on the battery, manual or packaging indicates that the batteries in this product should not be disposed of with other
household waste at the end of their working life. Where marked, the chemical symbols Hg, Cd or Pb indicate that the battery
contains mercury, cadmium or lead above the reference levels in EC Directive 2006/66. If batteries are not properly disposed of,
these substances can cause harm to human health or the environment. To protect natural resources and to promote material
reuse, please separate batteries from other types of waste and recycle them through your local, free battery return system.

English - 3
Accessories
✎
Please make sure the following items are included with your TV. If any items are missing, contact your
dealer.
✎
The items’ colours and shapes may vary depending on the models.
✎
Cables not included in the package contents can be purchased separately.
✎
Check that there is no accessory hidden behind packing materials when you open the box.
[
CAUTION: INSERT SECURELY LEST SHOULD BE DETACHED IN SET
• Remote Control & Batteries (AAA x 2) • Power Cord
• Owner’s Instructions • Cleaning-Cloth
• Warranty Card (Not available in some locations) / Safety Guide
43 inches model
Ferrite Core (2EA)
✎
Ferrite Core for Power Cord: The ferrite cores are used to shield the cables from
interference. When connecting a cable, open the ferrite core and clip it around the
cable near the plug as shown in the figure.
x
A Minimum distance between the ferrite core and the end of the cord inserted in
the TV: 6~8 inches
x
B Maximum distance between the ferrite core and the other end of the cord
inserted in the AC outlet: 3/4 inches
Power Cord
B
A
English - 4
51 inches model
Ferrite Core (2EA) Ferrite Core (1EA)
✎
Ferrite Core for Power Cord: The ferrite cores are used to shield the cables from
interference. When connecting a cable, open the ferrite core and clip it around the
cable near the plug as shown in the figure.
x
A Minimum distance between the ferrite core and the end of the cord inserted in
the TV: 6~8 inches
x
B Maximum distance between the ferrite core and the other end of the cord
inserted in the AC outlet: 3/4 inches
Power Cord
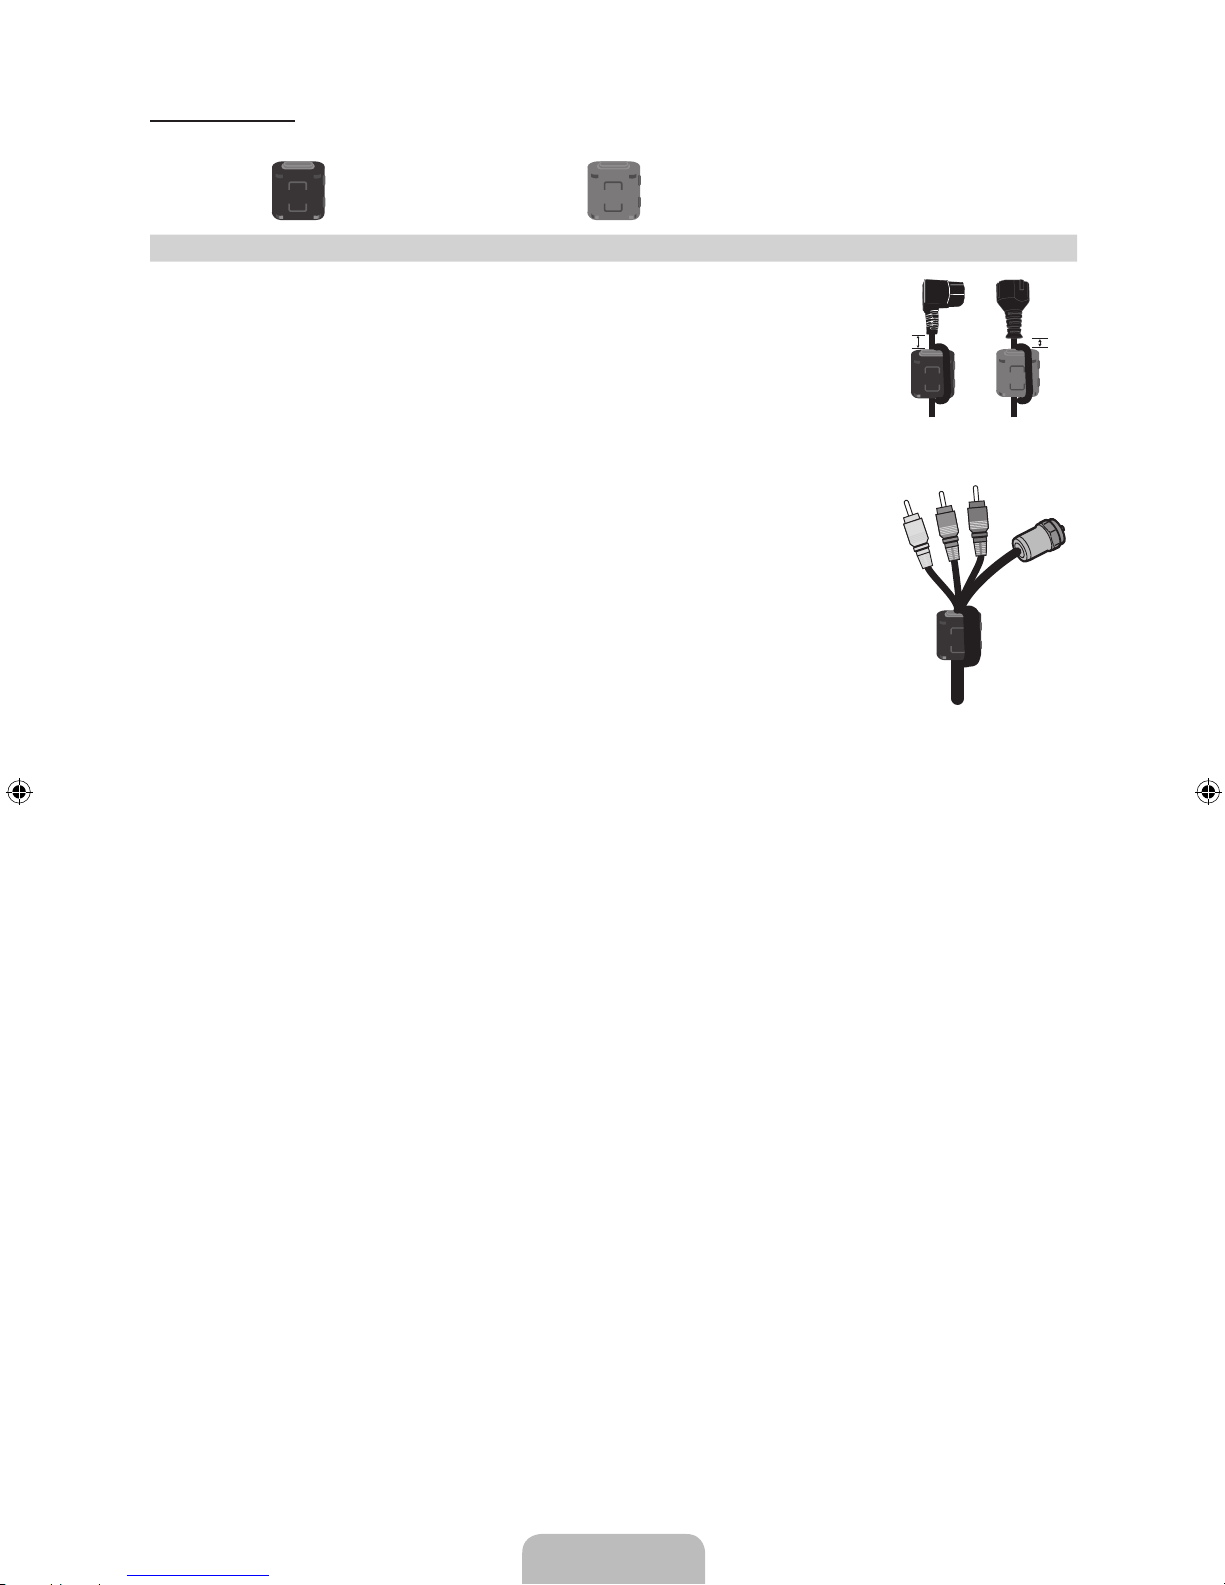
✎
Ferrite Core: The ferrite cores are used to shield the cables from interference.
When connecting a cable, open the ferrite core and clip it around the cable near
the plug as shown in the figure.
Antenna Cable /
Component Cable
(sold separately)
• An administration fee may be charged if either
– (a) an engineer is called out at your request and there is no defect in the product
(i.e. where you have failed to read this user manual)
– (b) you bring the unit to a repair centre and there is no defect in the product
(i.e. where you have failed to read this user manual).
• The amount of such administration charge will be advised to you before any work or home visit is carried out.
B
A

English - 5
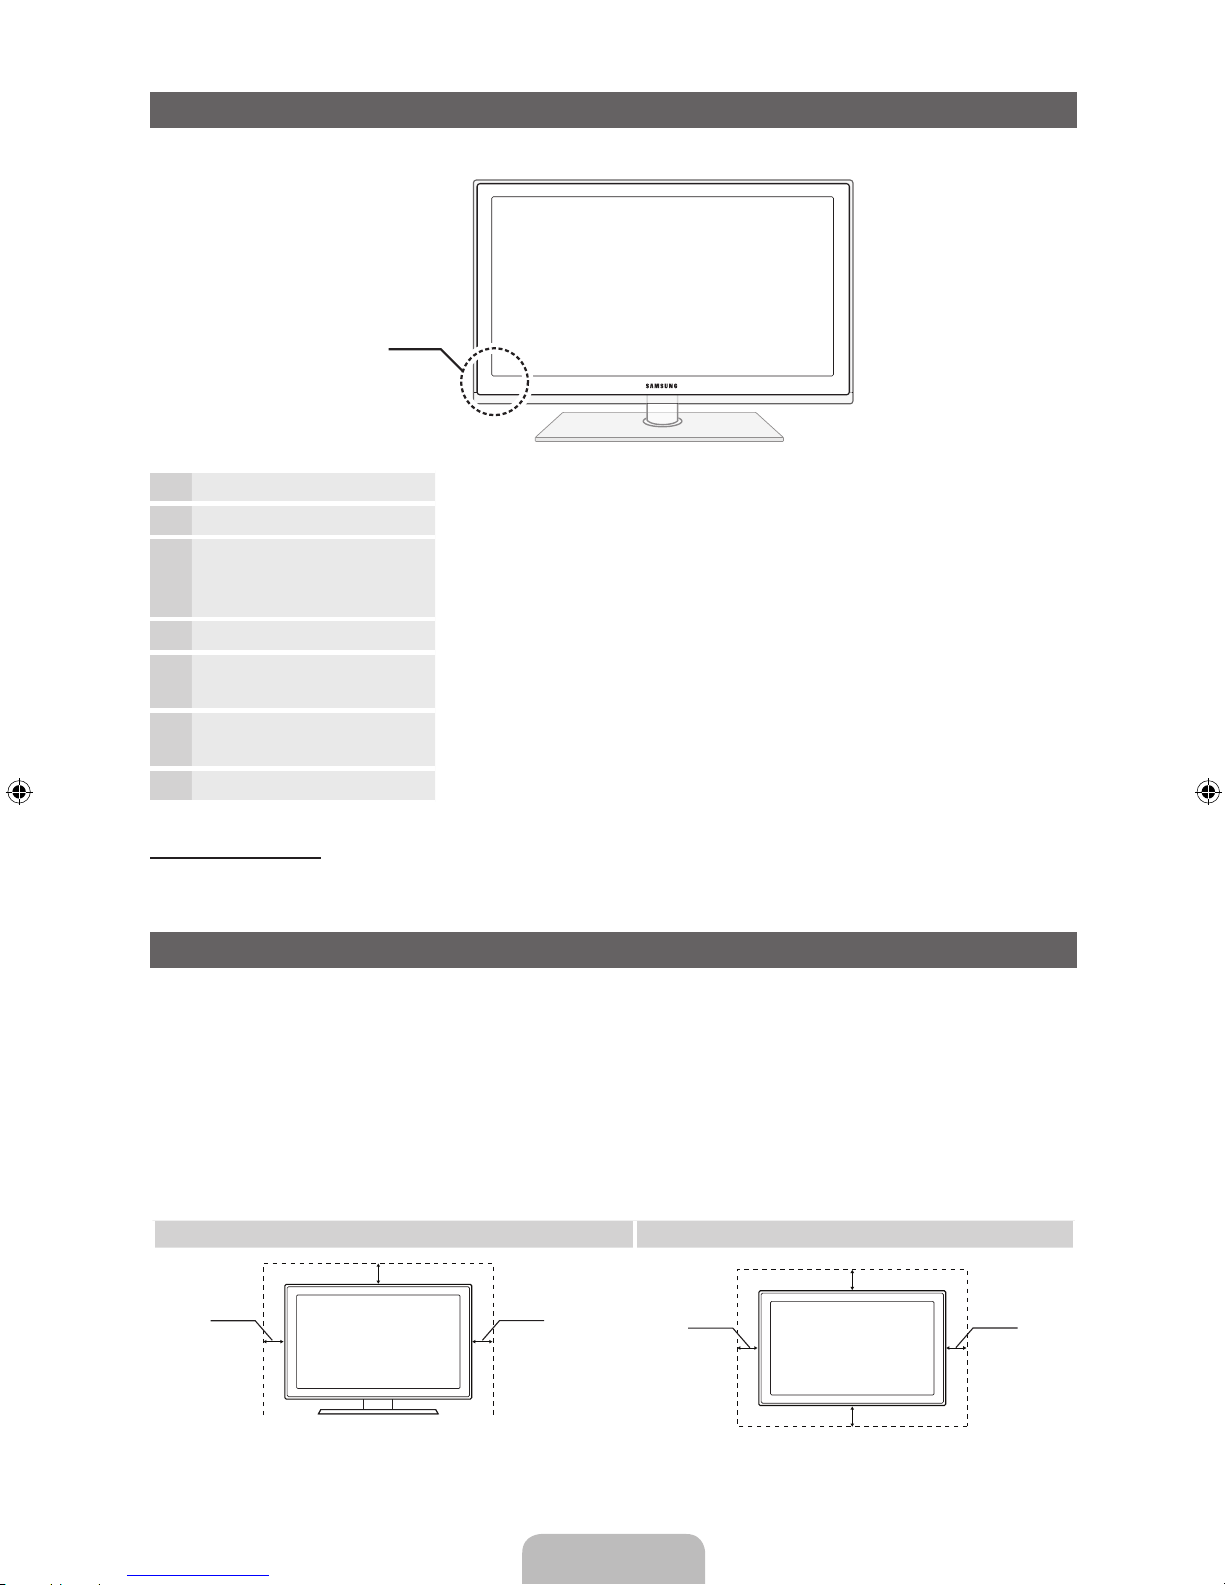
Viewing the Control Panel
✎
The product colour and shape may vary depending on the model.
Remote control sensor Aim the remote control towards this spot on the TV.
Power Indicator Blinks and turns off when the power is on and lights up in standby mode.
SOURCE
E
Toggles between all the available input sources. In the on-screen menu, use
this button as you would use the ENTERE button on the remote control.
MENU Displays an on-screen menu, the OSD (on screen display) of your TV’s
features.
y
Adjusts the volume. In the OSD, use the
y
buttons as you would use
the ◄ and ► buttons on the remote control.
z
Changes the channels. In the OSD, use the
z
buttons as you
would use the ▼ and ▲ buttons on the remote control.
P
(Power)
Turns the TV on or off.
Standby mode
Do not leave your TV in standby mode for long periods of time (when you are away on a holiday, for example).
A small amount of electric power is still consumed even when the power button is turned off. It is best to unplug
the power cord.
Securing the Installation Space
Keep the required distances between the product and other objects (e.g. walls) to ensure proper ventilation.
Failing to do so may result in fire or a problem with the product due to an increase in the internal temperature of
the product.
✎
When using a stand or wall-mount, use parts provided by Samsung Electronics only.
x
If you use parts provided by another manufacturer, it may result in a problem with the product or an injury
due to the product falling.
✎
The appearance may differ depending on the product.
✎
Be careful when you contact the TV because some parts can be somewhat hot.
Installation with a stand. Installation with a wall-mount.
10 cm10 cm
10 cm
10 cm
10 cm
10 cm
10 cm
Control Panel

English - 6
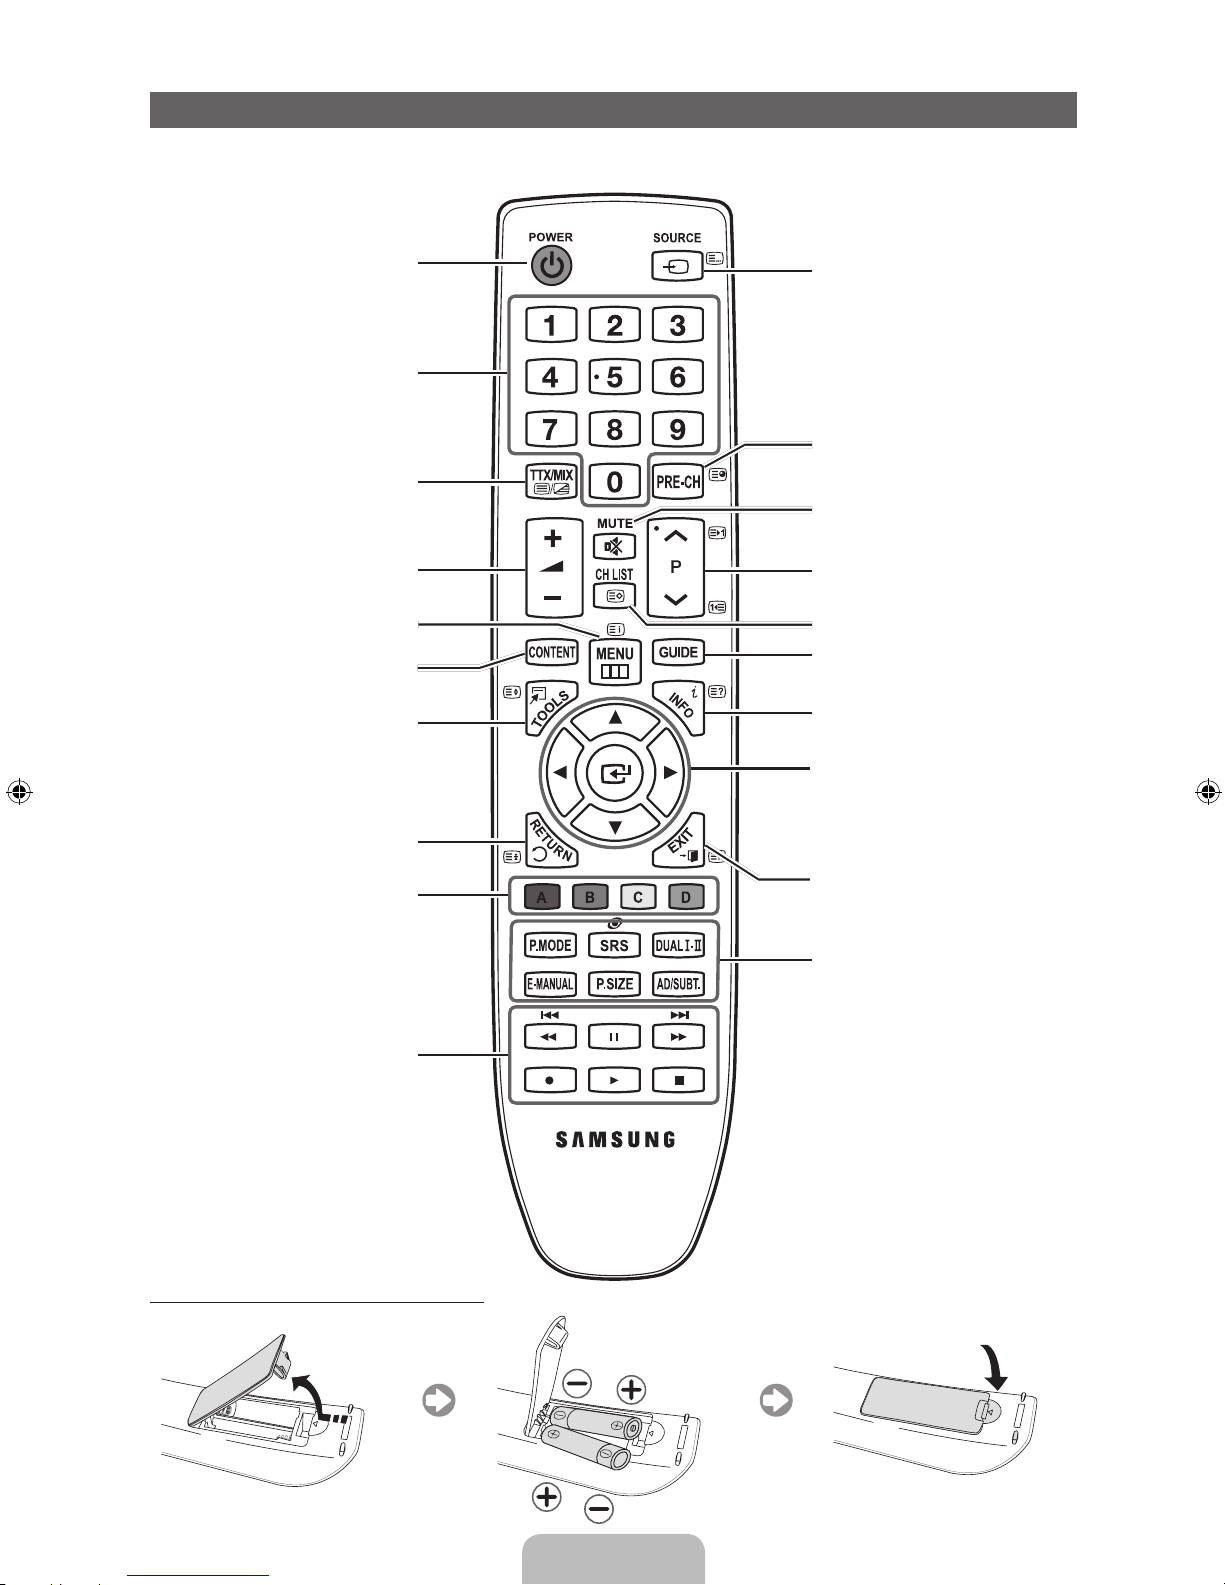
Viewing the Remote Control
✎
This is a special remote control for the visually impaired and has Braille points on the Channel and Number
buttons.
Installing batteries (Battery size: AAA)
Turns the TV on and off.
Displays and selects the available video
sources.
Returns to the previous channel.
Cuts off the sound temporarily.
Changes channels.
Displays channel lists on the screen.
Displays the EPG (Electronic Programme
Guide).
Displays information on the TV screen.
u/d/l/r
: Move the cursor on-screen
menu item.
ENTER
E
: Selects the menu and
changes the corresponding item value.
Exits the menu.
Have direct access to channels.
Adjusts the volume.
Alternately select Teletext ON, Double,
Mix or OFF.
Opens the OSD.
Quickly select frequently used functions.
Displays the Content Home, which
includes Watch TV, My Downloads and
Source.
Returns to the previous menu.
These buttons are for the Channel
Manager, My Downloads menu, etc.
Use these buttons in My Downloads
and Anynet+ modes.
P.MODE: Press to select the Picture
Mode.
SRS: Selects the SRS Theatersound
mode.
DUALf-g: Sound effect selection.
E-MANUAL: Displays the e-Manual.
P.SIZE: Selects the Picture Size.
AD/SUBT.: Turns the audio description on
and off (not available in some locations). /
Displays digital subtitles.
English - 7
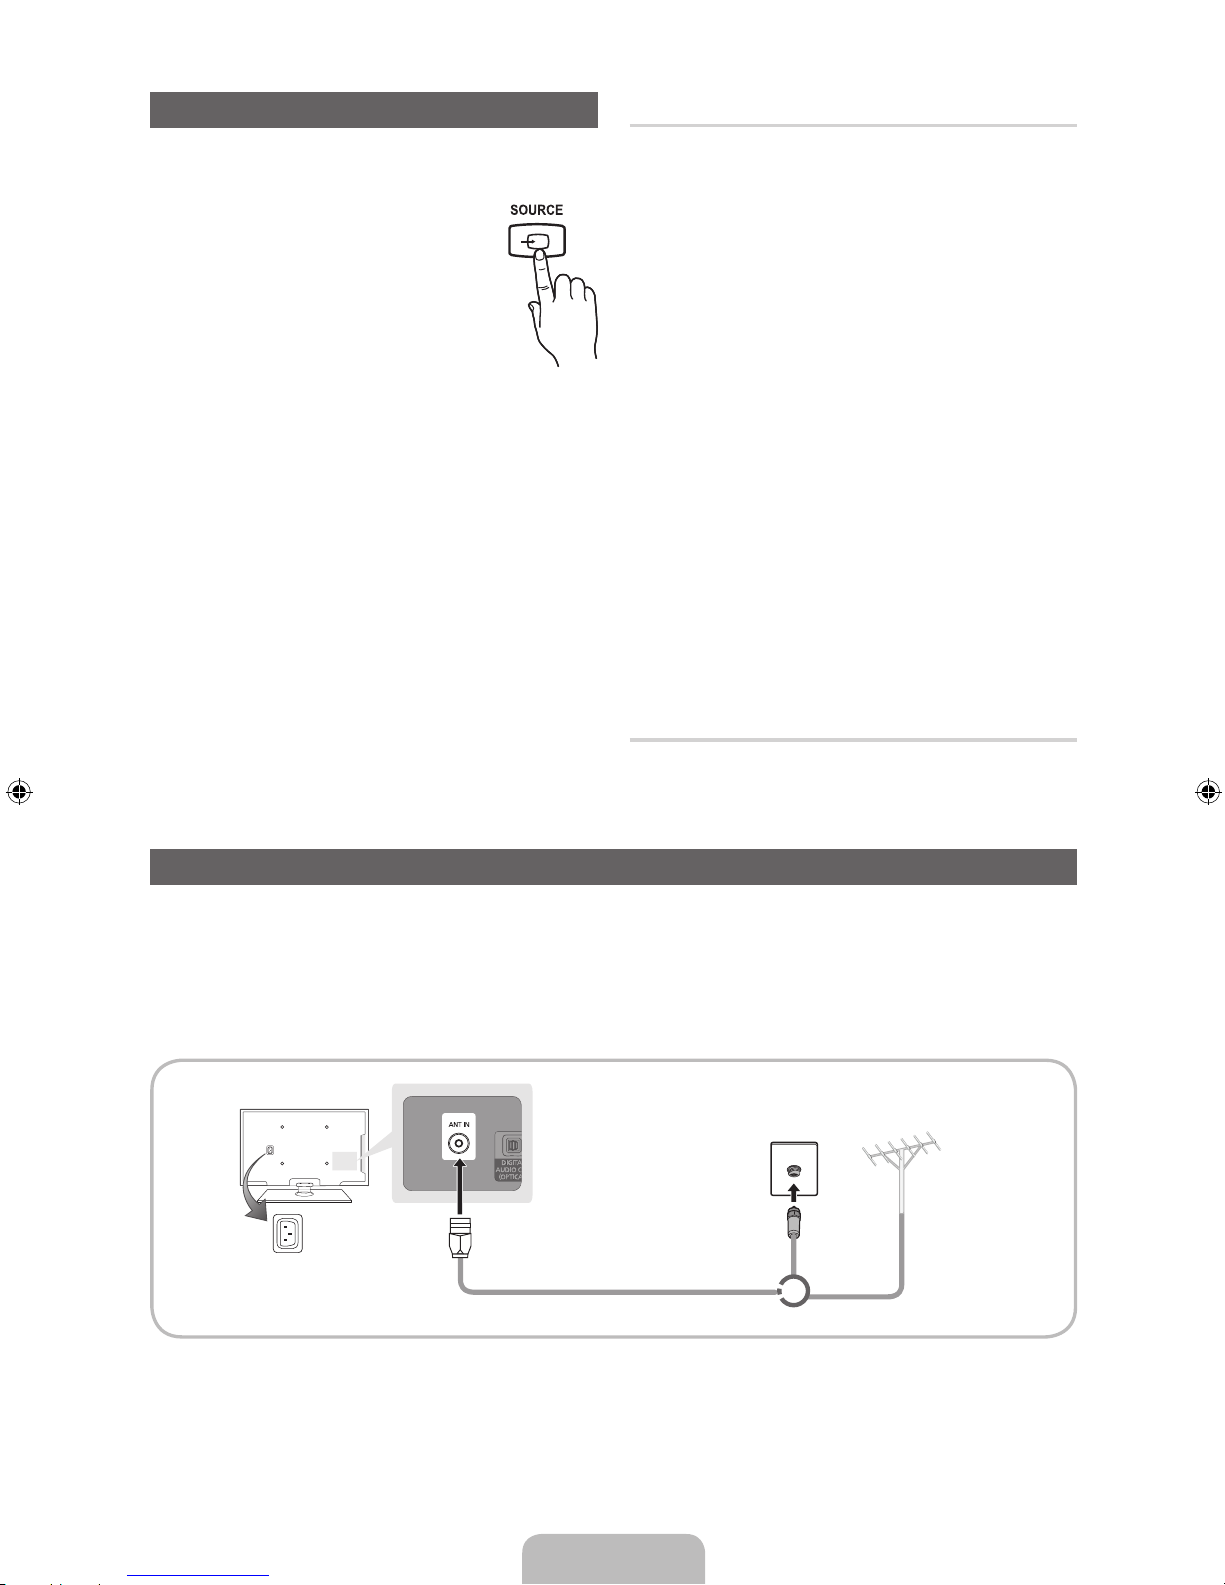
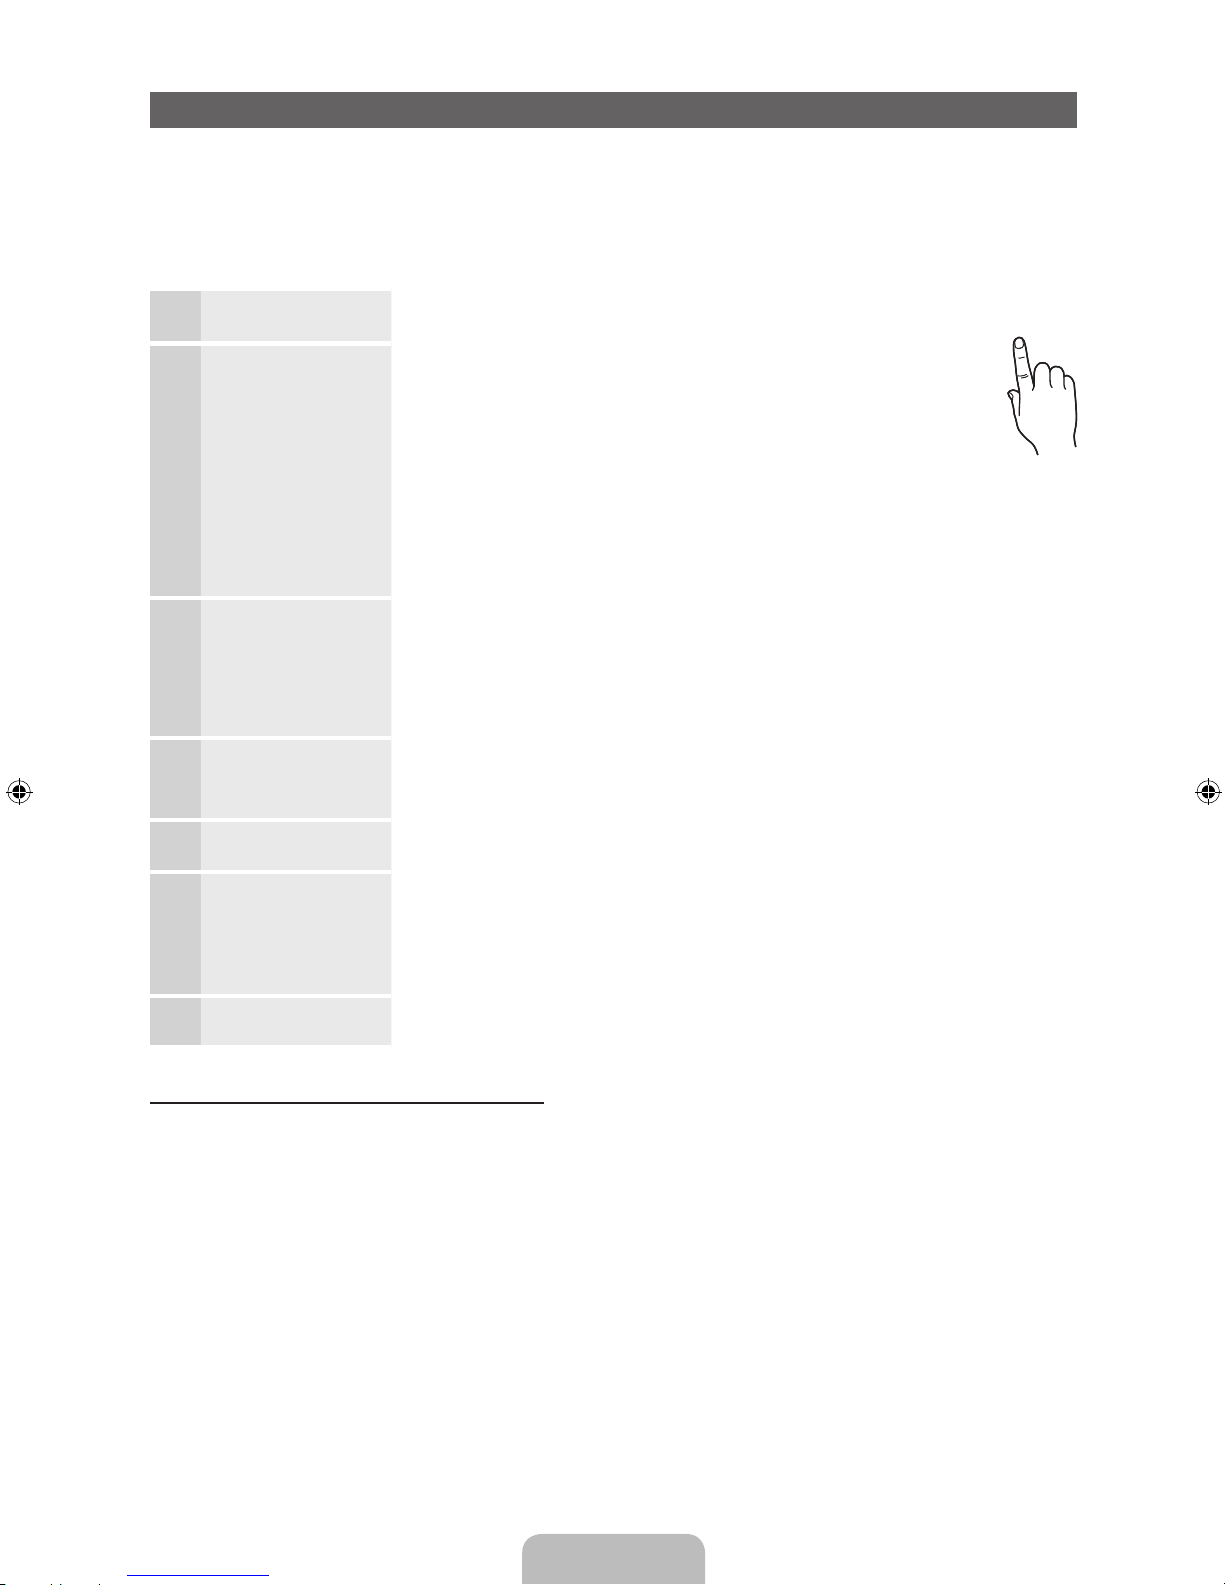
Changing the Input Source
Source
Use to select TV or an external input
sources such as a DVD / Blu-ray player /
cable box /STB satellite receiver.
1. Press the SOURCE button on your
remote.
2. Select a desired external input
source.
✎
You can change the view mode among the
All and Connected by pressing the l or r
button.
■ TV / Ext. / PC / HDMI1/DVI / HDMI2 / AV /
Component / USB
✎
In the Source, connected inputs will be
highlighted.
✎
Ext. and PC always stay activated.
✎
If the connected external devices are not
highlighted, press the red button. The TV will
search for connected devices.
Edit Name
In the Source, press the TOOLS button, and then you
can set an external input sources name you want.
■ VCR / DVD / Cable STB / Satellite STB / PVR
STB / AV Receiver / Game / Camcorder / PC /
DVI PC / DVI Devices / TV / IPTV / Blu-ray / HD
DVD / DMA: Name the device connected to the
input jacks to make your input source selection
easier.
✎
When connecting a PC to the HDMI IN 1(DVI)
port with HDMI cable, you should set the TV to
PC mode under Edit Name. (PS51D450)
✎
When connecting a PC to the HDMI IN 1(DVI)
port with HDMI to DVI cable, you should set
the TV to DVI PC mode under Edit Name.
(PS51D450)
✎
When connecting an AV devices to the HDMI IN
1(DVI) port with HDMI to DVI cable, you should
set the TV to DVI Devices mode under Edit
Name. (PS43D450, PS51D450)
Information
You can see detailed information about the selected
external device.
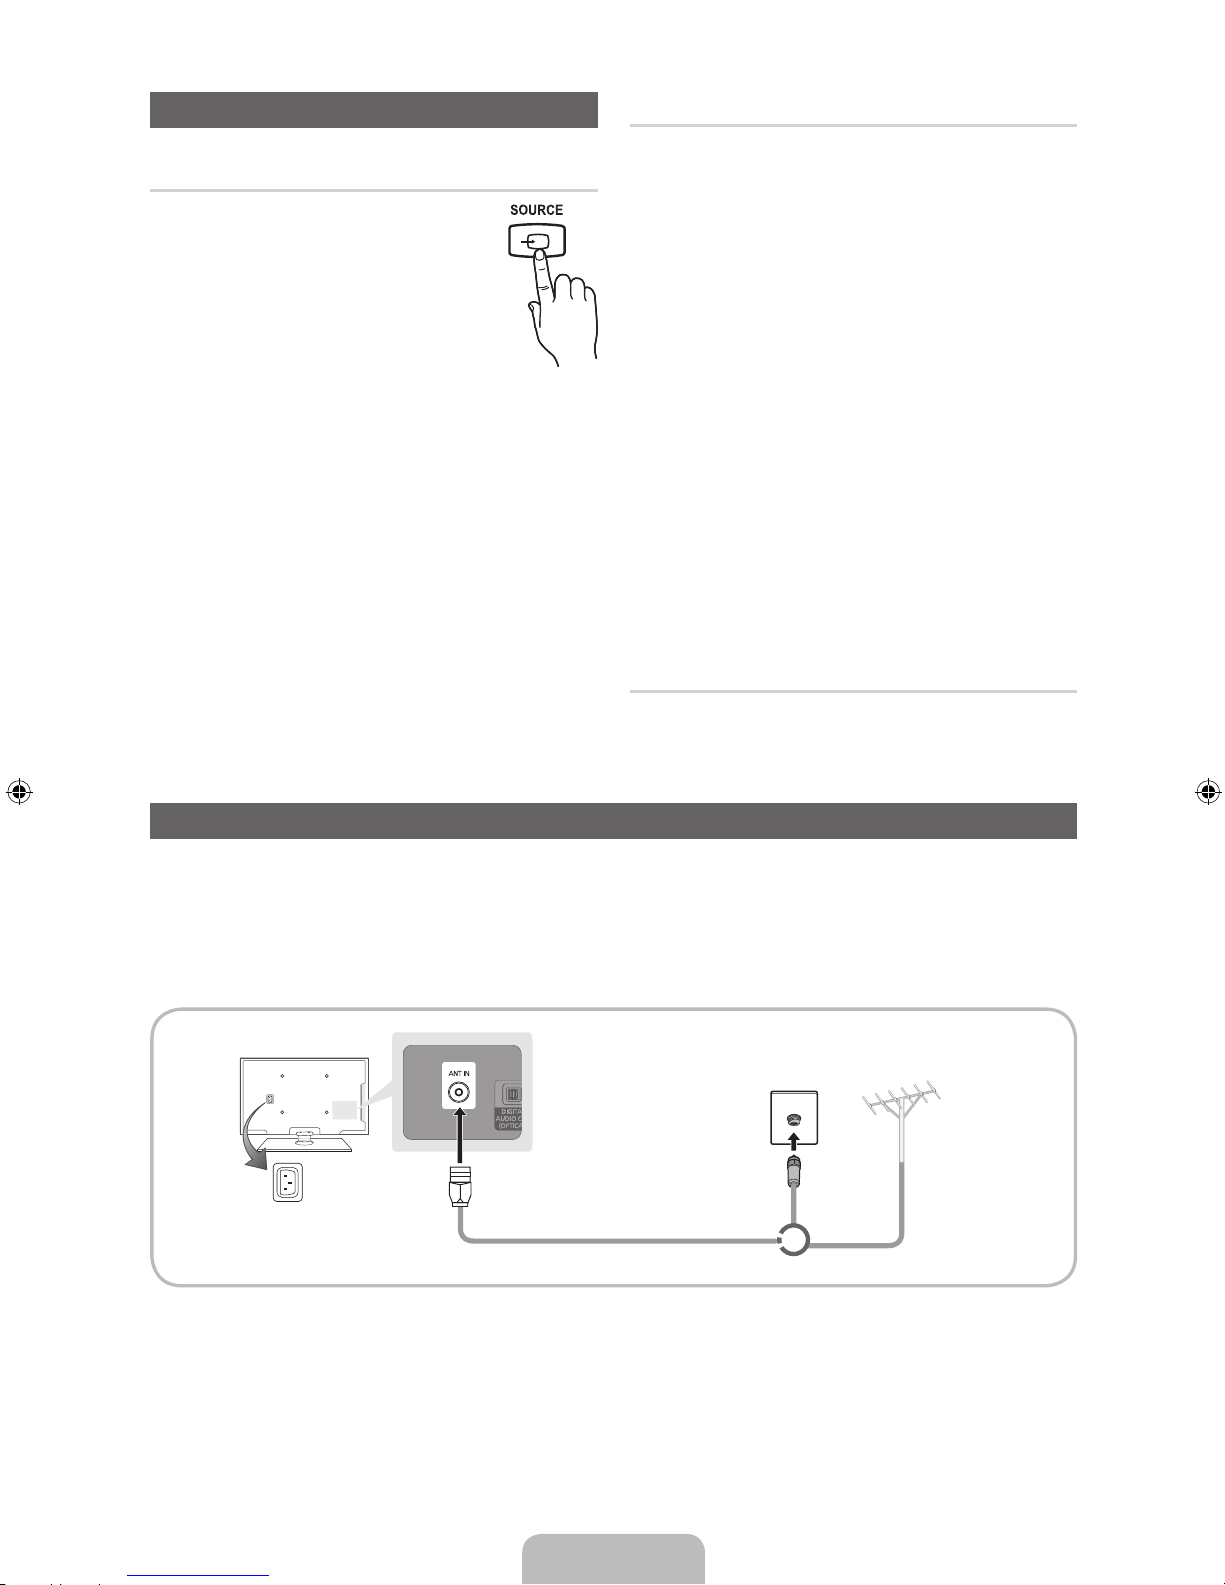
Connecting to an Antenna
When the TV is initially powered on, basic settings proceed automatically.
✎
Preset: Connecting the mains and antenna.
✎
The PDP device may interfere with an amateur radio or AM radio.
✎
When using two-way radio mobile and portable units or amateur radio or AM radio near by your TV, this
may cause the TV to malfunction.
VHF/UHF AntennaCable
or
Power Input

English - 8
Plug & Play (Initial Setup)
When the TV is initially powered on, a sequence of on-screen prompts will assist in configuring basic settings.
Press the POWERP button. Plug & Play is available only when the Source is set to TV.
✎
Before turning on the TV, make sure the antenna cable is connected (p. 6).
✎
To return to the previous step, press the Red button.
1
Selecting a language
Press the ▲ or ▼ button, then press the ENTER
E
button.
Select the desired OSD (On Screen Display) language.
2
Selecting Store
Demo or Home Use
Press the ◄ or ► button, then press the ENTER
E
button.
Select the Home Use mode. Store Demo mode is for retail
environments.
To return the unit’s settings from Store Demo to Home Use
(standard): Press the volume button on the TV. When you see the
volume OSD, press and hold MENU for 5 sec.
Store Demo is only for shop display. If you select it, several
functions are not able to use. Please select Home Use when you
watch at home.
3
Selecting a country
Press the ▲ or ▼ button, then press the ENTER
E
button. Select the
appropriate country.
✎
After selecting the country in the Country menu, some models may proceed
with an additional option to setup the pin number.
✎
When you input the PIN number, “0-0-0-0” is not available.
4
Setting the Clock
Mode
Set the Clock Mode automatically or manually.
Auto: Select the time zone where you are located.
Manual: Allows you to manually set the current date and time.
5
Selecting an antenna
Press the ▲ or ▼ button, then press the ENTER
E
button. Select the Antenna
source to memorise.
6
Selecting a channel
Press the ▲ or ▼ button, then press the ENTER
E
button. Select the channel
source to memorise. When setting the antenna source to Cable, a step appears
allowing you to assign numerical values (channel frequencies) to the channels. For
more information, refer to Channel → Auto Tuning.
7
Enjoy your TV.
Press the ENTER
E
button.
If You Want to Reset This Feature...
Select System - Plug & Play (Initial Setup). Enter your 4 digit PIN number. The default PIN number is “0-0-0-0”.
If you want to change the PIN number, use the Change PIN function.
You should do Plug & Play (MENU → System) again at home although you did in shop.
✎
If you forget the PIN code, press the remote control buttons in the following sequence in Standby mode,
which resets the PIN to “0-0-0-0”: MUTE → 8 → 2 → 4 → POWER (on).
P
POWER
English - 9
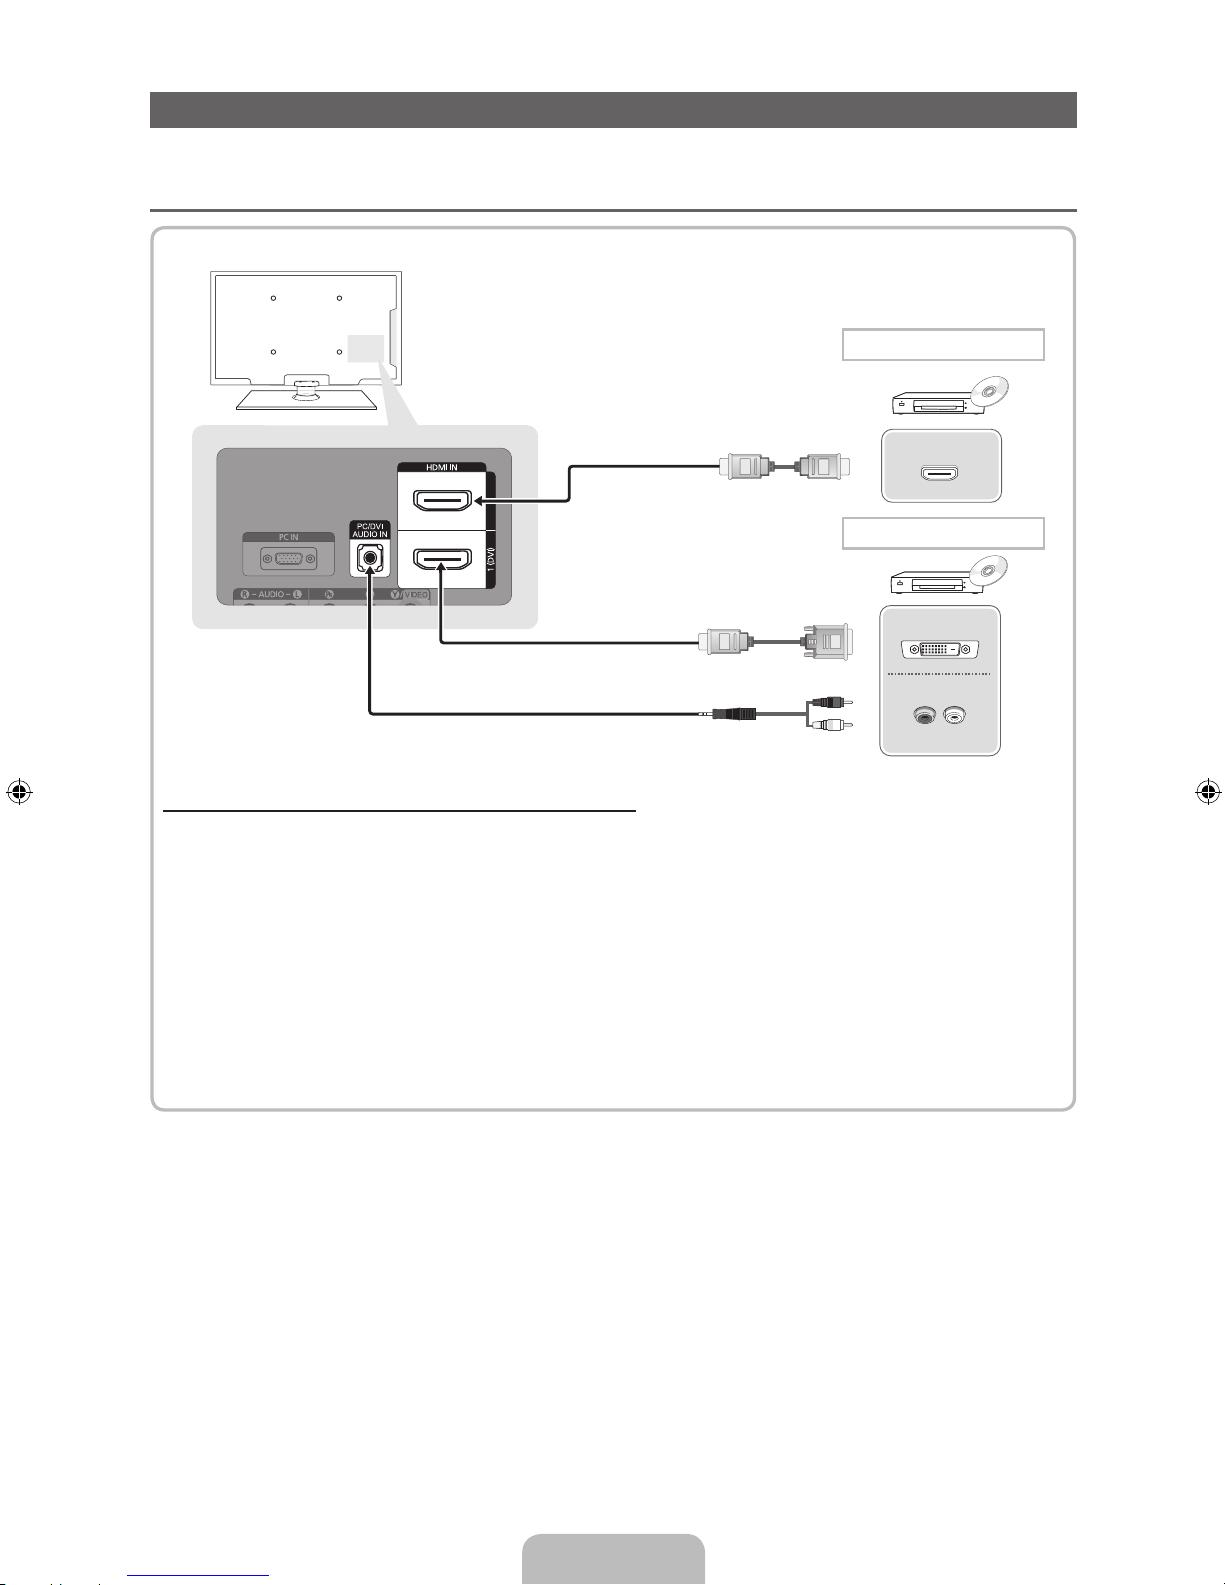
Connecting to an AV devices
¦¦
Available devices: DVD, Blu-ray player, HD cable box, HD STB (Set-Top-Box) satellite
receiver, VCR
Using an HDMI or an HDMI to DVI cable (up to 1080p)
✎
HDMI IN 1(DVI), 2 / PC/DVI AUDIO IN
x
When using an HDMI/DVI cable connection, you must use the HDMI IN 1(DVI) jack for video. A DVD,
Blu-ray player, HD cable box, or HD STB satellite receiver may require a DVI-HDMI (DVI to HDMI)
cable or DVI-HDMI (DVI to HDMI) adapter. The PC/DVI AUDIO IN jack is required for audio.
x
The picture may not display normally (if at all) or the audio may not work if an external device that
uses an older version of HDMI mode is connected to the TV. If such a problem occurs, ask the
manufacturer of the external device about the HDMI version and, if out of date, request an upgrade.
x
Be sure to purchase a certified HDMI cable. Otherwise, the picture may not display or a connection
error may occur.
HDMI OUT
DVI OUT
AUDIO OUT
R-AUDIO-L
W
R
HDMI connection
HDMI to DVI connection

English - 10
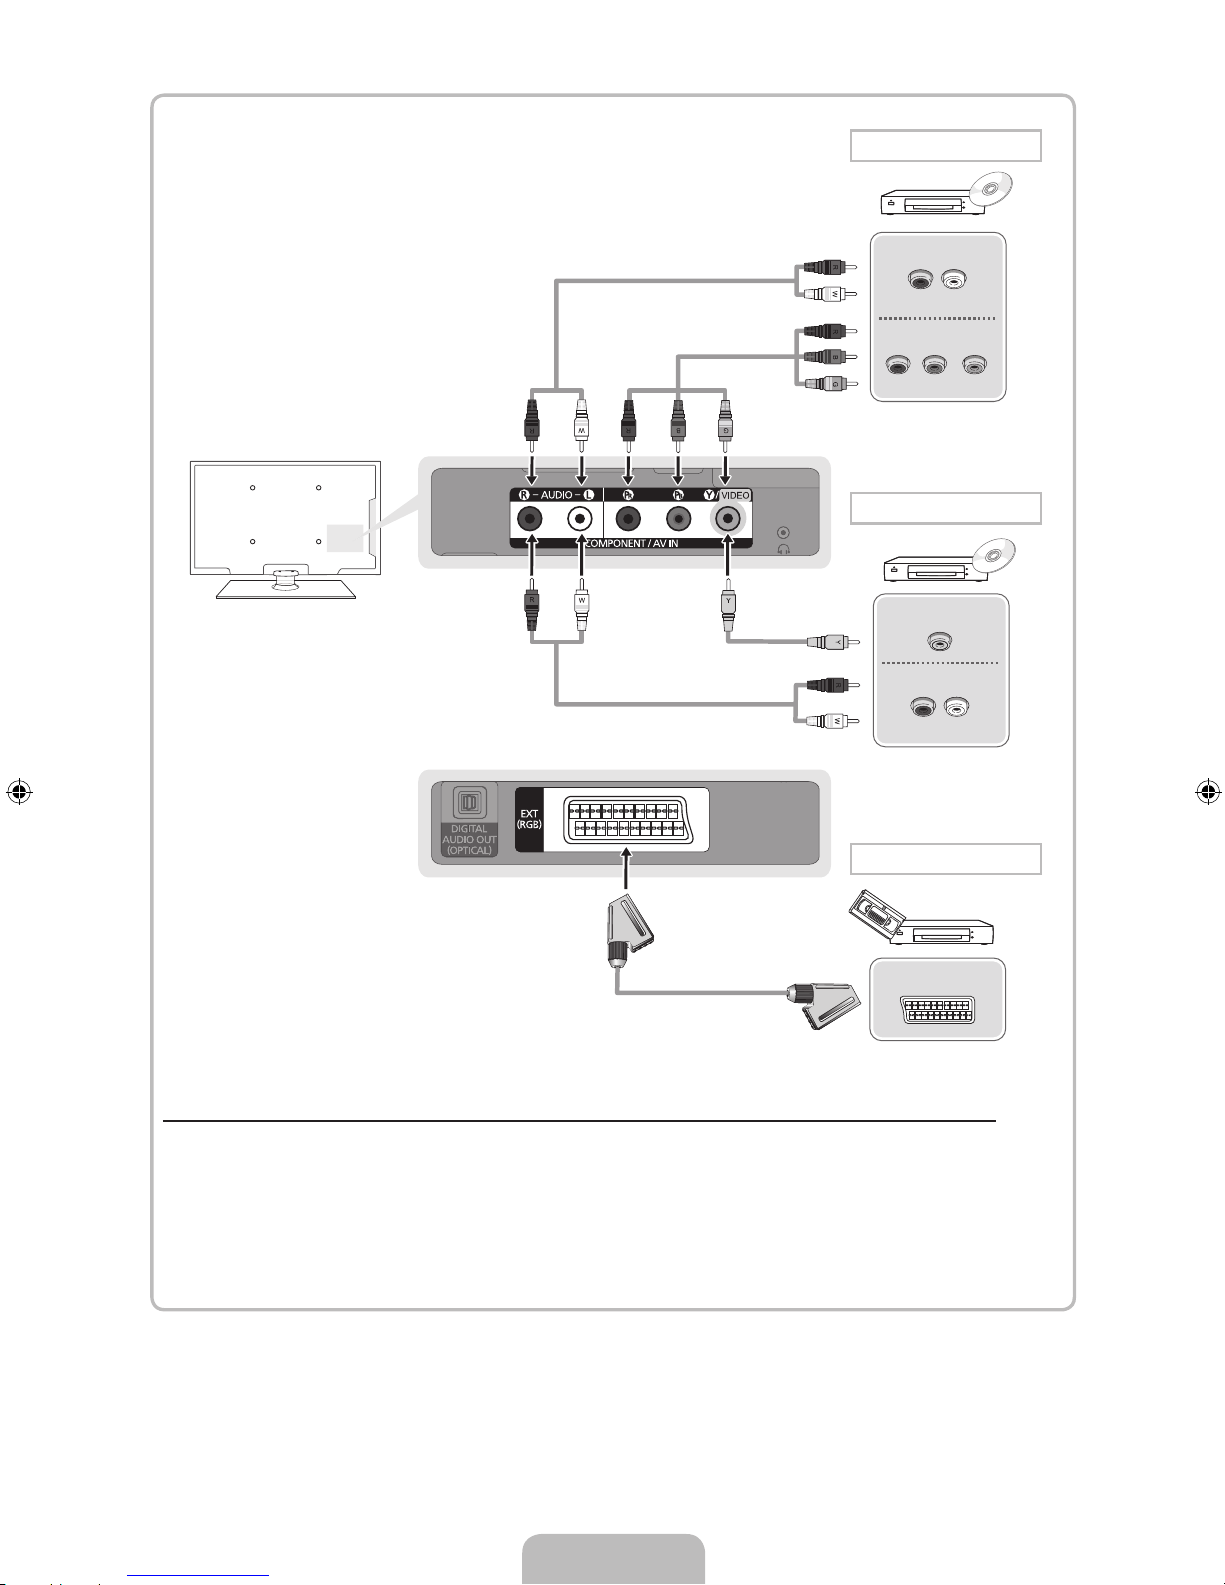
Using a Component (up to 1080p) or an Audio/Video (480i only) and a Scart Cable
✎
In Ext. mode, DTV Out supports MPEG SD Video and Audio only.
✎
When connecting to AV IN, the colour of the AV IN [Y/VIDEO] jack (green) will not match the video
cable (yellow).
✎
To obtain the best picture quality, the Component connection is recommended over the A/V
connection.
AUDIO OUT
R-AUDIO-L
VIDEO OUT
AUDIO OUT
R-AUDIO-L
PRPBG
COMPONENT OUT
EXT
Component connection
AV connection
SCART connection
English - 11
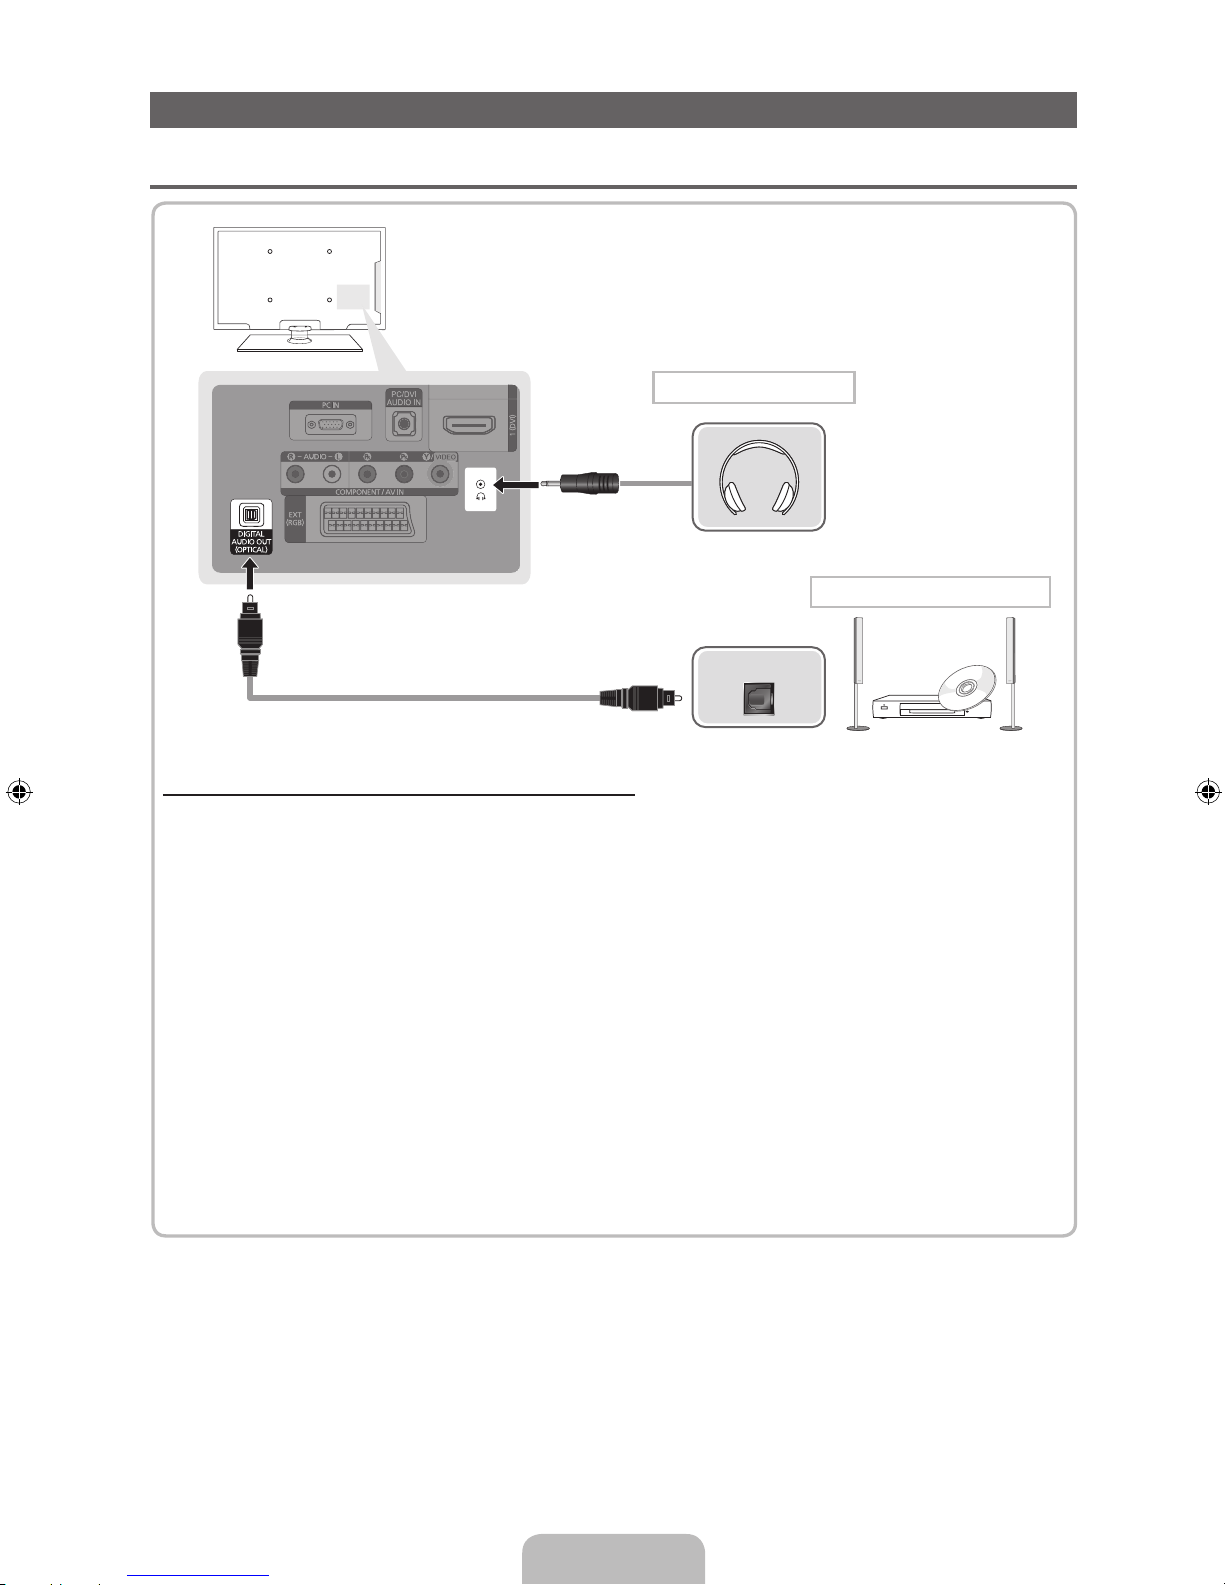
Connecting to a PC and Audio device
¦ Available devices: digital audio system, amplifier, DVD home theatre, PC
Using an Optical (Digital) or a Headphone Connection
✎
DIGITAL AUDIO OUT (OPTICAL)
x
When a digital audio system is connected to the DIGITAL AUDIO OUT (OPTICAL) jack, decrease the
volume of both the TV and the system.
x
5.1 CH (channel) audio is available when the TV is connected to an external device supporting 5.1 CH.
x
When the receiver (home theatre) is set to on, you can hear sound output from the TV’s optical jack.
When the TV is receiving a DTV signal, the TV will send 5.1 CH sound to the home theatre receiver.
When the source is a digital component such as a DVD / Blu-ray player / cable box / STB (Set-TopBox) satellite receiver and is connected to the TV via HDMI, only 2 CH audio will be heard from the
home theatre receiver. If you want to hear 5.1 CH audio, connect the digital audio out jack from your
DVD / Blu-ray player / cable box / STB satellite receiver directly to an amplifier or home theatre.
✎
Headphones H: You can connect your headphones to the headphones output on your set. While the
headphones are connected, the sound from the built-in speakers will be disabled.
x
Sound function may be restricted when connecting headphones to the TV.
x
Headphone volume and TV volume are adjusted separately.
OPTICAL
DVD home theatre connection
Headphones connection

English - 12
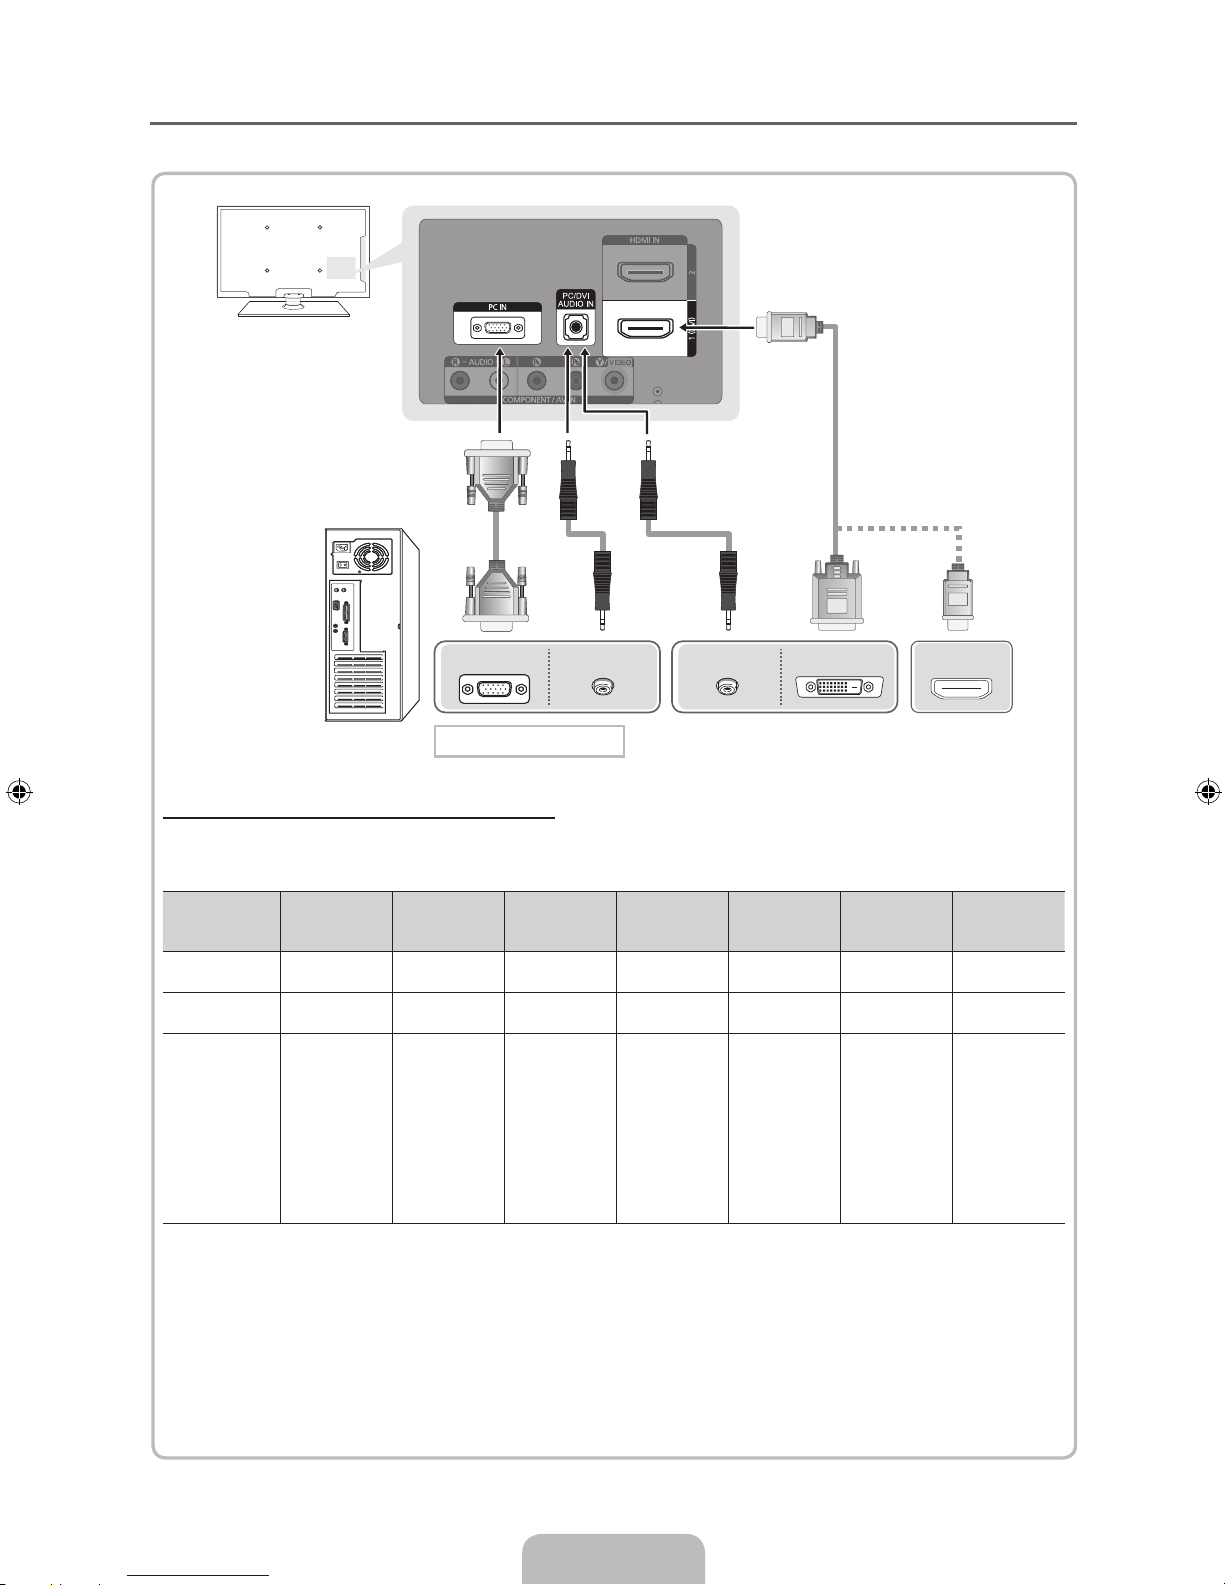
¦ Using an HDMI cable or an HDMI to DVI cable or a D-sub cable
✎
Connecting through the HDMI cable may not be supported depending on the PC.
Display Modes (D-Sub and an HDMI to DVI Input)
• PS43D450 PS43D451 PS43D452: 1024 X 768 @ 60Hz
• PS51D450 PS51D451 PS51D452: 1360 X 768 @ 60Hz
Mode Resolution
Horizontal
Frequency (KHz)
Vertical
Frequency (Hz)
Pixel Clock
Frequency
(MHz)
Sync Polarity
(H / V)
PS43D450
PS43D451
PS43D452
PS51D450
PS51D451
PS51D452
IBM
640 x 350
720 x 400
31.469
31.469
70.086
70.087
25.175
28.322
+/-
-/+
c
c
c
c
MAC
640 x 480
832 x 624
35.000
49.726
66.667
74.551
30.240
57.284
-/-
-/-
c
c
c
c
VESA DMT
640 x 480
640 x 480
640 x 480
800 x 600
800 x 600
800 x 600
1024 x 768
1024 x 768
1024 x 768
1360 x 768
31.469
37.861
37.500
37.879
48.077
46.875
48.363
56.476
60.023
47.712
59.940
72.809
75.000
60.317
72.188
75.000
60.004
70.069
75.029
60.015
25.175
31.500
31.500
40.000
50.000
49.500
65.000
75.000
78.750
85.500
-/-
-/-
-/+/+
+/+
+/+
-/-
-/+/+
+/+
c
c
c
c
c
c
c
c
c
c
c
c
c
c
c
c
c
c
c
✎
NOTE
x
For HDMI/DVI cable connection, you must use the HDMI IN 1(DVI) jack.
x
The interlace mode is not supported.
x
The set might operate abnormally if a non-standard video format is selected.
x
Separate and Composite modes are supported. SOG(Sync On Green) is not supported.
DVI OUT
AUDIO OUT AUDIO OUT
PC OUT
HDMI OUT
PC connection

English - 13
Connecting to a COMMON INTERFACE slot
Using the “CI or CI+ CARD”
To watch paid channels, the “CI or CI+ CARD” must be inserted.
• If you don’t insert the “CI or CI+ CARD”, some channels will
display the message “Scrambled Signal”.
• The pairing information containing a telephone number, the
“CI or CI+ CARD” ID the Host ID and other information will
be displayed in about 2~3 minutes. If an error message is
displayed, please contact your service provider.
• When the configuration of channel information has finished,
the message “Updating Completed” is displayed, indicating
the channel list is updated.
✎
NOTE
x
You must obtain a “CI or CI+ CARD” from a local cable service provider.
x
When removing the “CI or CI+ CARD”, carefully pull it out with your hands since dropping the “CI or CI+
CARD” may cause damage to it.
x
Insert the “CI or CI+ CARD” in the direction marked on the card.
x
The location of the COMMON INTERFACE slot may be different depending on the model.
x
“CI or CI+ CARD” is not supported in some countries and regions; check with your authorized dealer.
x
If you have any problems, please contact a service provider.
x
Insert the “CI or CI+ CARD” that supports the current antenna settings. The screen will be distorted or
will not be seen.

English - 14
How to view the e-Manual
Screen Display
How to toggle between the e-Manual and the corresponding menu(s).
✎
This function is not enabled in some menus.
Method 1 Method 2
1. Press the red button to select Try Now, if you
want to execute the corresponding menu(s).
2. To return to the e-Manual screen, press the
E-MANUAL button.
1. Press the ENTER
E
button when selecting
Contents Area. The “Are you sure?” is displayed.
Select Yes and then press the ENTERE button.
The OSD window will be displayed.
2. To return to the e-Manual screen, press the
E-MANUAL button.
E-MANUAL
You can read the introduction and instructions about the TV features stored
in your TV.
O
MENUm → Support → e-Manual → ENTER
E
✎
If you want to return to e-Manual, press E-MANUAL button on remote.
✎
You can’t use the Try Now function, if the menu is not activated.
Basic Features
Changing the Preset Picture Mode
Adjusting Picture Settings
Changing the Picture Size
Changing the Picture Options
Setting up the TV with Your PC
}
Index E Enter e Exit
TV Screen: Displays the current input
source screen.
Change the category. Press
l
or r
button to select category you want.
Displays the sub-menu list. Press
ENTER
E
button to select sub-
menu you want.
Operation Buttons:
}
Blue (Index): Displays index screen.
E
Enter: Select a category or sub-menu.
e
Exit: Exit the e-Manual.
Try Now
E-MANUAL
Picture
Picture Mode : Standard
r
Cell Light : 10
Contrast : 100
Brightness : 45
Sharpness : 50
Colour : 50
Tint (G/R) : G50/R50
Screen Adjustment
Changing the Preset Picture Mode
■
Picture Mode t
Select your preferred picture type.
• Dynamic: Suitable for a bright room.
• Standard: Suitable for a normal environment.
• Natural
for LED TV
/ Relax
for PDP TV
: Suitable for reducing eye strain.
• Movie: Suitable for watching movies in a dark room.
• Entertain: Suitable for watching movies and games.
N It is only available in PC mode.
Changing the Preset Picture Mode
O MENUm → Picture → Picture Mode → ENTER
E
■
Picture Mode
Select your preferred picture type.
N When an input source is set to PC, the Picture Mode is only available the
Standard and Entertain.
• Dynamic: Suitable for a bright room.
• Standard: Suitable for a normal environment.
• Movie: Suitable for watching movies in a dark room.
• Entertain: Suitable for watching movies and games.
Basic Features > Changing the Preset Picture Mode (5/10)
a
Try Now b Home { Zoom } Index L Page e Exit

English - 15
Viewing the Contents
Using the Zoom mode
When you view the e-Manual instruction, select the
yellow button to magnify the screen. You can scroll
through the magnified screen by using the
u
or d
buttons.
✎
To return to the previous screen, press the
RETURN button.
How to search a keyword by using index page
✎
This function may not supported depending on the language.
1. If you want to search a keyword, press the blue button to select Index.
2. Press the
l
or r button to select a character order you want, and then press the ENTERE button.
3. Press the
u
or d button to select a keyword you want to see, and then press the ENTERE button.
4. You can view the corresponding e-Manual instruction screen.
✎
To close the Index screen, press the RETURN button.
a
Try Now b Home { Zoom } Index L Page e Exit
Basic Features > Changing the Preset Picture Mode (5/10)
Contents Area: You can view the corresponding
contents, if you selected a sub-menu. To move
previous or next page, press the l or r button.
Operation Buttons:
a
Red (Try Now): Displays the corresponding menu(s).
b
Green (Home): Moves to the e-Manual home screen.
{
Yellow (Zoom): Magnifies a screen.
}
Blue (Index): Displays index screen.
L
(Page): Moves to previous or next page.
Changing the Preset Picture Mode
O MENUm → Picture → Picture Mode → ENTER
E
■
Picture Mode
Select your preferred picture type.
N When an input source is set to PC, the Picture Mode is only
available the Standard and Entertain.
• Dynamic: Suitable for a bright room.
• Standard: Suitable for a normal environment.
• Movie: Suitable for watching movies in a dark room.
• Entertain: Suitable for watching movies and games.
R
Return
Changing the Preset Picture Mode
O MENUm → Picture → Picture Mode → ENTER
E
■
Picture Mode
Select your preferred picture type.
N When an input source is set to PC, the Picture Mode is only available the Standard
and Entertain.
• Dynamic: Suitable for a bright room.
• Standard: Suitable for a normal environment.
• Movie: Suitable for watching movies in a dark room.
• Entertain: Suitable for watching movies and games.

English - 16
Installing the Wall Mount
Installing the Wall Mount Kit
The wall mount kit (sold separately) allows you to mount the TV on the wall.
For detailed information on installing the wall mount, see the instructions provided with the wall mount. Contact a
technician for assistance when installing the wall mount bracket.
Samsung Electronics is not responsible for any damage to the product or injury to yourself or others if you elect
to install the TV on your own.
Wall Mount Kit Specifications (VESA)
✎
The wall mount kit is not supplied, but sold separately.
Install your wall mount on a solid wall perpendicular to the floor. When attaching to other building materials,
please contact your nearest dealer. If installed on a ceiling or slanted wall, it may fall and result in severe personal
injury.
✎
NOTE
x
Standard dimensions for wall mount kits are shown in the table below.
x
When purchasing our wall mount kit, a detailed installation manual and all parts necessary for assembly
are provided.
x
Do not use screws that do not comply with the VESA standard screw specifications.
x
Do not use screws that are longer than the standard dimension or do not comply with the VESA standard
screw specifications. Screws that are too long may cause damage to the inside of the TV set.
x
For wall mounts that do not comply with the VESA standard screw specifications, the length of the
screws may differ depending on the wall mount specifications.
x
Do not fasten the screws that are too strongly; this may damage the product or cause the product to fall,
leading to personal injury. Samsung is not liable for these kinds of accidents.
x
Samsung is not liable for product damage or personal injury when a non-VESA or non-specified wall
mount is used or the consumer fails to follow the product installation instructions.
x
Do not mount the TV at more than a 15 degree tilt.
Product Family inches
VESA Spec.
(A * B)
Standard Screw Quantity
PDP-TV
43~51 400 X 400
M8 4
59~64 600 X 400
✎
Unscrew the hole around before installing Wall-Mount on the wall.
Do not install your Wall Mount Kit while your TV is turned on. It may result in personal injury
due to electric shock.

English - 17
Troubleshooting
If you have any questions about the TV, first refer to this list. If none of these troubleshooting tips apply, please
visit “www.samsung.com,” then click on Support, or contact the call centre listed on the back-cover of this
manual.
Issues Solutions and Explanations
The TV won’t turn on. • Make sure the AC power cord is securely plugged in to the wall outlet and the TV.
• Make sure the wall outlet is working.
• Try pressing the POWER button on the TV to make sure the problem is not the remote. If the TV turns
on, refer to “Remote control does not work” below.
There is no picture/video. • Check cable connections (remove and reconnect all cables connected to the TV and external
devices).
• Set your external device’s (Cable/Sat Box, DVD, Blu-ray etc) video outputs to match the connections
to the TV input. For example, if an external device’s output is HDMI, it should be connected to an
HDMI input on the TV.
• Make sure your connected devices are powered on.
• Be sure to select the TV’s correct source by pressing the SOURCE button on the remote control.
The remote control does not work. • Replace the remote control batteries with the poles (+/–) in the right direction.
• Clean the sensor’s transmission window on the remote.
• Try pointing the remote directly at the TV from 5~6 feet away.
The cable/set top box remote control
doesn’t turn the TV on or off, or adjust the
volume.
• Programme the Cable/Set remote control to operate the TV. Refer to the Cable/Set user manual for
the SAMSUNG TV code.
✎
Some of above pictures and functions are available at specific models only.
✎
You can keep your TV as optimum condition to upgrade the latest firmware on web site (samsung.com →
Support → Downloads) by USB.
Licence
List of Features
Excellent Digital Interface & Networking: With a built-in HD digital tuner, nonsubscription HD broadcasts can be
viewed without a cable box / STB (Set-Top-Box) satellite receiver.
Anynet+(HDMI-CEC)
Allows you to control all connected Samsung devices that support Anynet+ with your Samsung TV’s remote.
My Downloads
Allows you to play music files, pictures, and movies saved on a USB device.
English - 18
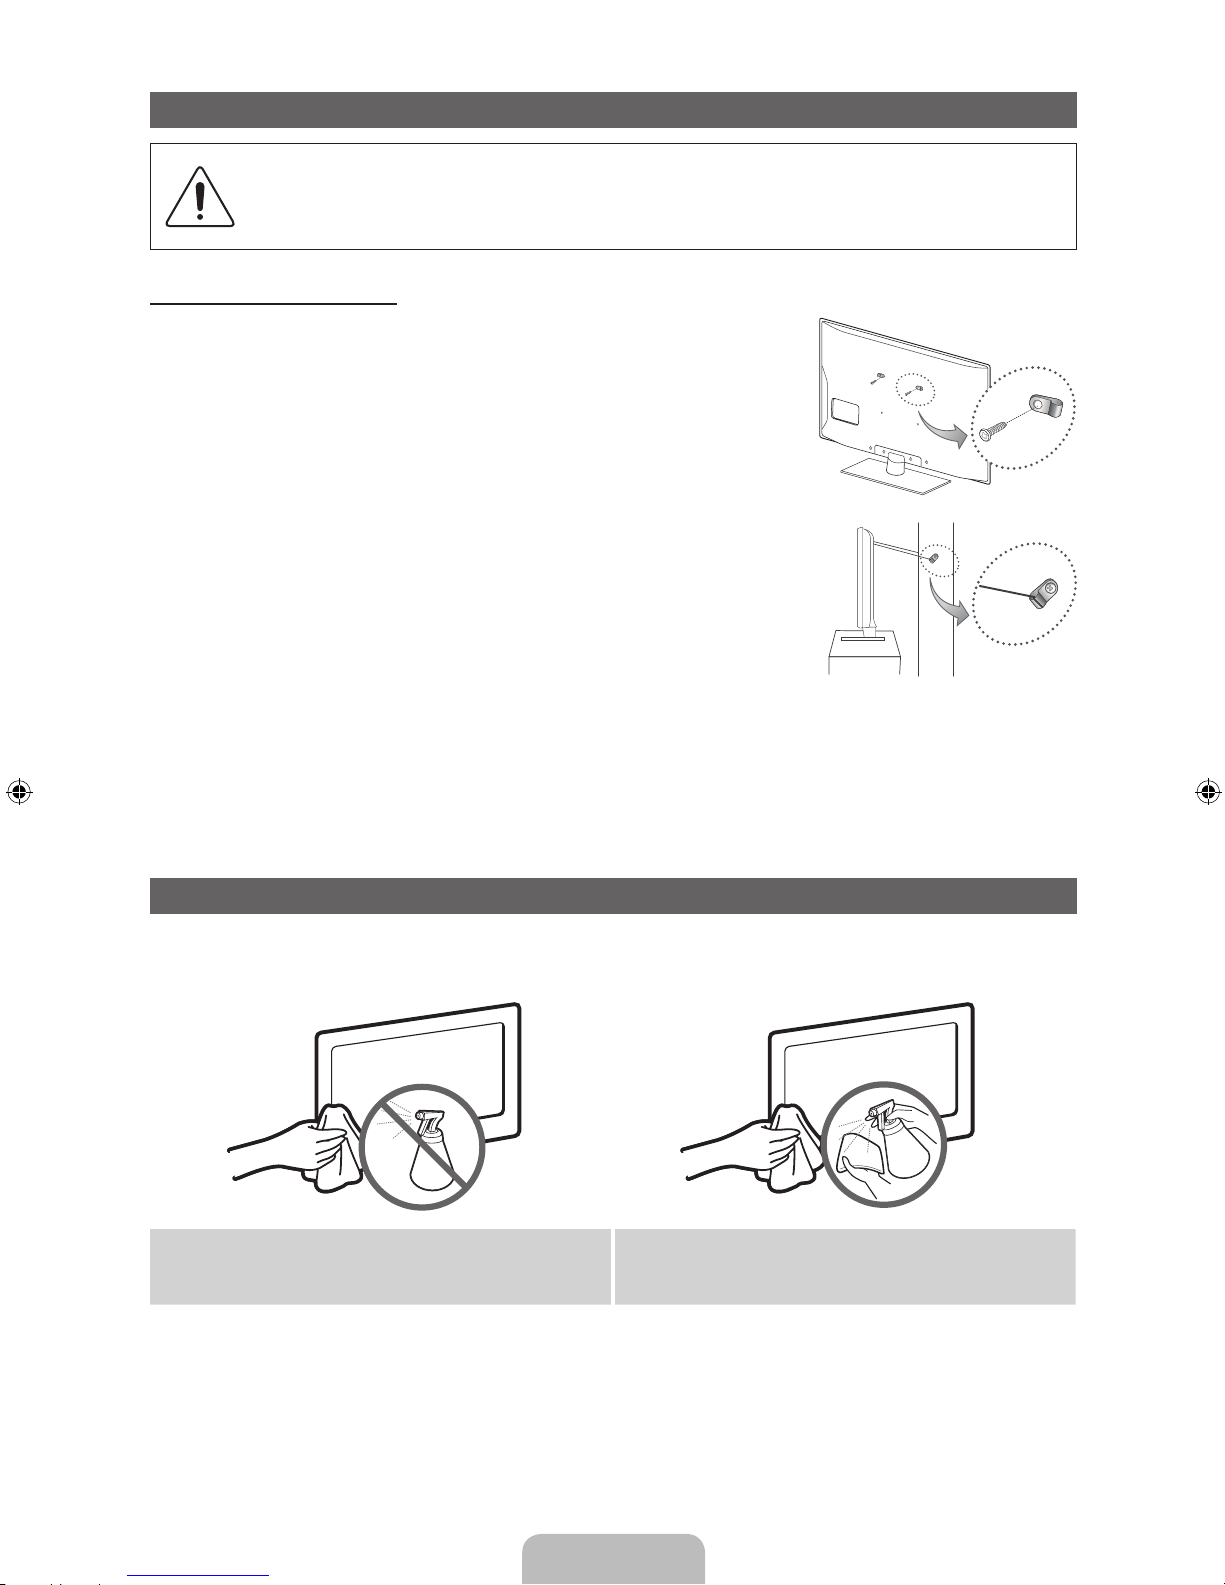
Securing the TV to the wall
Caution: Pulling, pushing, or climbing onto the TV may cause the TV to fall. In particular, ensure
that your children do not hang over or destabilize the TV; doing so may cause the TV to tip over,
resulting in serious injuries or death. Follow all safety precautions provided in the included Safety
Flyer. For added stability and safety, install the anti-fall device as follows.
To Avoid the TV from Falling
1. Put the screws into the clamps and firmly fasten them onto the wall.
Confirm that the screws have been firmly installed onto the wall.
✎
You may need additional material such as an anchor depending on
the type of wall.
✎
Since the necessary clamps, screws, and string are not supplied,
please purchase these additionally.
2. Remove the screws from the back centre of the TV, put the screws into
the clamps, and then fasten the screws onto the TV again.
✎
Screws may not be supplied with the product. In this case, please
purchase the screws of the following specifications.
3. Connect the clamps fixed onto the TV and the clamps fixed onto the wall
with a strong cable and then tie the string tightly.
✎
NOTE
x
Install the TV near to the wall so that it does not fall backwards.
x
It is safe to connect the string so that the clamps fixed on the wall are equal to or lower than the
clamps fixed on the TV.
x
Untie the string before moving the TV.
4. Verify all connections are properly secured. Periodically check connections for any sign of fatigue for failure. If
you have any doubt about the security of your connections, contact a professional installer.
Storage and Maintenance
✎
If you attached some stickers on the TV screen, it remains some debris after removing the sticker. Please
clean it to watch TV.
Do not spray water or a cleaning agent directly onto
the product. Any liquid that goes into the product may
cause a failure, fire, or electric shock.
Clean the product with a soft cloth dapped in a small
amount of water.
Wall

English - 19
Specifications
Environmental Considerations
Operating Temperature
Operating Humidity
Storage Temperature
Storage Humidity
10°C to 40°C (50°F to 104°F)
10% to 80%, non-condensing
-20°C to 45°C (-4°F to 113°F)
5% to 95%, non-condensing
TV System Analogue: B/G, D/K, L, I (Depending on your country selection)
Digital: DVB-T/DVB-C
Colour/Video System Analogue: PAL, SECAM, NTSC-4.43, NTSC-3.58, PAL60
Digital: MPEG-2 MP@ML, MPEG-4, H.264/AVC MP@L3, MP@L4.0, HP@L4.0
Sound System BG, DK, L, NICAM, MPEG1, DD, DD+, HEAAC.
HDMI IN Video: 1080 24p, 1080p, 1080i, 720p, 576p, 576i, 480p, 480i
Audio: 2Ch Linear PCM 32/44.1/48kHz, 16/20/24bits.
Stand Swivel (Left / Right) 0˚
Model Name PS43D450
PS43D451
PS43D452
PS51D450
PS51D451
PS51D452
Screen Size 43 inches 51 inches
Sound
(Output) 10 W X 2
Dimensions (WxDxH)
Body
With stand
1011.8 X 56.0 X 622.4 mm
1011.8 X 250.0 X 698.7 mm
1187.8 X 56.0 X 706.6 mm
1187.8 X 250.0 X 782.9 mm
Weight
Without Stand
With Stand
16.0 kg
19.0 kg
22.5 kg
25.5 kg
Display Resolution 1024 X 768 1360 X 768
✎
Design and specifications are subject to change without prior notice.
✎
For information about power supply, and more about power consumption, refer to the label attached to the
product.

Čeština - 2
Jak používat elektronickou příručku
Obrázky ailustrace vtéto uživatelské příručce slouží pouze pro informaci amohou se lišit od skutečného
vzhledu výrobku. Provedení aspecifikace výrobku se mohou změnit bez předchozího upozornění.
Oznámení odigitálním televizním vysílání
1. Funkce spojené sdigitálním televizním vysíláním (DVB) jsou dostupné pouze vzemích, kde jsou vysílány signály pozemního digitálního vysílání DVB-T
(MPEG2 aMPEG4 AVC) nebo kde je přístup ke kompatibilní službě kabelové televize DVB-C (MPEG2 aMPEG4 AAC). Ohledně příjmu signálů DVB-T
nebo DVB-C kontaktujte svého místního prodejce.
2. DVB-T je standard digitálního televizního vysílání přes pozemní vysílače aDVB-C je standard digitálního televizního vysílání vsítích kabelových televizí.
Vtěchto standardech však nejsou zahrnuty zvláštní služby, jako například EPG (Elektronický programový průvodce), VOD (Video-On-Demand) adalší.
Tyto služby proto nejsou vtuto chvíli podporovány.
3. Ačkoli tento televizor splňuje nejnovější standardy DVB-T a DVB-C kdatu [srpen, 2008], kompatibilitu sbudoucím pozemním digitálním vysíláním
DVB-T akabelovou televizí DVB-C nelze zaručit.
4. Vzávislosti na zemích/oblastech, kde je tento televizor používán, mohou někteří poskytovatelé kabelové televize vyžadovat za tyto služby dodatečné
poplatky amůže být vyžadováno, abyste souhlasili sjejich smluvními podmínkami.
5. Některé funkce digitální televize nemusí být vněkterých zemích dostupné aDVB-C nemusí uněkterých poskytovatelů služeb kabelové televize
fungovat správně.
6. Další informace získáte od místního střediska péče ozákazníky Samsung.
✎
Kvalita příjmu televizoru může být negativně ovlivněna rozdíly ve způsobu vysílání vrůzných zemích. Prověřte výkon televizoru umístního
autorizovaného prodejce společnosti SAMSUNG nebo vcentru telefonické podpory společnosti Samsung azjistěte, zda jej lze zlepšit změnou
konfigurace nastavení televizoru.
Pokyny pro uživatele
• Retence obrazu na obrazovce
Neponechejte na plazmové obrazovce statický obraz (například uvideohry) déle než několik minut, protože může dojít kretenci obrazu. Retence
obrazu se také označuje jako „vypálení obrazovky“. Abyste předešli zbytkovému obrazu, snižte při zobrazení statického obrazu nastavení jasu
akontrastu.
• Zahřívání horní části plazmového televizoru
Horní strana výrobku se může při dlouhodobém používání silně zahřát, protože od panelu je odváděno teplo skrze ventilační otvor vhorní části
výrobku.
Tento jev je normální aneznamená žádný problém ani poruchu výrobku.
Je ovšem třeba zabránit, aby se horní části výrobku dotkly děti.
• Zvýrobku se ozývá praskavý zvuk.
Praskání se může vyskytnout vpřípadě, že se výrobek smrští nebo roztáhne zdůvodu změn podmínek okolního prostředí, jako jsou teplota nebo
vlhkost. Tento jev je normální anejedná se ozávadu přístroje.
• Vadné obrazové body
Televizor PDP je vybaven panelem složeným z2360000 (úroveň HD) až 6221000 (úroveň FHD) pixelů, zpracovaných vysoce vyspělou technologií.
Na obrazovce se však přesto může vyskytovat několik světlých nebo tmavých pixelů. Tyto pixely nebudou mít žádný vliv na výkon výrobku.
• Vyvarujte se použití televizoru při teplotách nižších než 5°C
• Příliš dlouho zobrazovaný statický obraz může způsobit trvalé poškození plazmového televizoru.
Dlouhodobé sledování plazmového televizoru ve formátu 4:3 může zanechat vlevé, pravé astřední části obrazovky stopy okrajů
způsobené rozdílem ve vyzařování světla na obrazovce. Přehrávání DVD nebo hraní na konzoli mohou na obrazovce způsobit
podobný jev.
Na poškození způsobené výše uvedeným efektem se nevztahuje záruka.
• Zbytkový obraz na obrazovce.
Zobrazení statického obrazu zvideoher aPC po delší dobu může způsobit částečné falešné obrazy.
Tomuto efektu lze při dlouhodobém zobrazování statického obrazu předejít snížením jasu akontrastu.
• Záruka
Záruka se nevztahuje na žádné poškození způsobené retencí obrazu.
Záruka se nevztahuje na vypálení obrazu.
Správná likvidace výrobku (Elektrický a elektronický odpad)
Toto označení na výrobku, jeho příslušenství nebo dokumentaci znamená, že výrobek a jeho elektronické příslušenství (například
nabíječku, náhlavní sadu, USB kabel) je po skončení životnosti zakázáno likvidovat jako běžný komunální odpad. Možným
negativním dopadům na životní prostředí nebo lidské zdraví způsobeným nekontrolovanou likvidací zabráníte oddělením zmíněných
produktů od ostatních typů odpadu a jejich zodpovědnou recyklací za účelem udržitelného využívání druhotných surovin. Uživatelé
z řad domácností by si měli od prodejce, u něhož produkt zakoupili, nebo u příslušného městského úřadu vyžádat informace,
kde a jak mohou tyto výrobky odevzdat k bezpečné ekologické recyklaci. Podnikoví uživatelé by měli kontaktovat dodavatele
a zkontrolovat všechny podmínky kupní smlouvy. Tento výrobek a jeho elektronické příslušenství nesmí být likvidován spolu s
ostatním průmyslovým odpadem.
Správná likvidace baterií v tomto výrobku
(Platí v Evropské unii a dalších evropských zemích s vlastními systémy zpětného odběru baterií.)
Tato značka na baterii, návodu nebo obalu znamená, že baterie v tomto výrobku nesmí být na konci své životnosti likvidovány
společně s jiným domovním odpadem. Případně vyznačené symboly chemikálií Hg, Cd nebo Pb upozorňují na to, že baterie
obsahuje rtuť, kadmium nebo olovo v množství překračujícím referenční úrovně stanovené směrnicí ES 2006/66. Pokud baterie
nejsou správně zlikvidovány, mohou tyto látky poškodit zdraví osob nebo životní prostředí. Pro ochranu přírodních zdrojů a pro
podporu opakovaného využívání materiálů oddělte, prosím, baterie od ostatních typů odpadu a nechte je recyklovat prostřednictvím
místního bezplatného systému zpětného odběru baterií.

Čeština - 3
Příslušenství
✎
Přesvědčte se, zda jste obdrželi spolu stelevizorem všechny následující položky. Pokud některé položky
chybí, obraťte se na prodejce.
✎
Barva atvar výrobku se mohou ujednotlivých modelů lišit.
✎
Kabely, které nejsou zahrnuty do obsahu balení, lze zakoupit samostatně.
✎
Po otevření balení zkontrolujte, zda se nenachází žádné příslušenství za balicím materiálem.
[
UPOZORNĚNÍ: KONEKTORY ŘÁDNĚ ZAPOJTE TAK, ABY SE OD ZAŘÍZENÍ NEODPOJILY
• Dálkový ovladač abaterie (AAA×2) • Napájecí kabel
• Návod kobsluze • Čisticí textilie
• Záruční list (vněkterých zemích není kdispozici)/ Bezpečnostní příručka
pouze modely súhlopříčkou 43palců
Feritové jádro (2x)
✎
Feritové jádro pro napájecí kabel: Feritová jádra slouží kochraně kabelů proti rušení.
Při připojování kabelu otevřete feritové jádro apřipněte ho ke kabelu blízko zásuvky
tak, jak je zobrazeno na obrázku.
x
A Minimální vzdálenost mezi feritovým jádrem a koncem kabelu zapojeným v
televizoru: 6~8 palců
x
B Maximální vzdálenost mezi feritovým jádrem a druhým koncem kabelu
zapojeným do elektrické zásuvky: 3/4 palců
Napájecí kabel
B
A

Čeština - 4
pouze modely súhlopříčkou 51palců
Feritové jádro (2x) Feritové jádro (1x)
✎
Feritové jádro pro napájecí kabel: Feritová jádra slouží kochraně kabelů proti
rušení. Při připojování kabelu otevřete feritové jádro apřipněte ho ke kabelu blízko
zásuvky tak, jak je zobrazeno na obrázku.
x
A Minimální vzdálenost mezi feritovým jádrem a koncem kabelu zapojeným v
televizoru: 6~8 palců
x
B Minimální vzdálenost mezi feritovým jádrem a koncem kabelu zapojeným v
televizoru: 3/4 palců
Napájecí kabel
✎
Feritové jádro: Feritová jádra slouží kochraně kabelů proti rušení. Při připojování
kabelu otevřete feritové jádro apřipněte ho ke kabelu blízko zásuvky tak, jak je
zobrazeno na obrázku.
Kabel antény /
kabel Component
(prodává se
samostatně)
• Správní poplatek bude účtován vpřípadě, že
– a) je na vaši žádost přivolán technik ana výrobku není odhalena žádná závada
(např. když jste řádně nenastudovali uživatelskou příručku);
– b) přinesete výrobek do opravárenského střediska ana výrobku není odhalena žádná závada
(např. když jste řádně nenastudovali uživatelskou příručku).
• Výše takového správního poplatku vám bude oznámena před tím, než bude provedena jakákoli práce nebo
než dojde knávštěvě technika.
B
A
Čeština - 5
Seznámení sovládacím panelem
✎
Barva atvar výrobku se mohou lišit vzávislosti na modelu.
Snímač dálkového ovladače Zaměřte dálkový ovladač na tento bod na televizoru.
Indikátor napájení Zabliká azhasne při zapnutí napájení asvítí vpohotovostním režimu.
SOURCE
E
Přepíná mezi všemi dostupnými vstupními zdroji. Toto tlačítko používejte
vnabídce na obrazovce stejným způsobem jako tlačítko ENTERE na
dálkovém ovladači.
MENU Slouží kzobrazení nabídky na obrazovce (OSD) sfunkcemi televizoru.
y
Slouží knastavení hlasitosti. Vnabídce na obrazovce lze tlačítka
y
použít stejným způsobem jako tlačítka ◄ a► na dálkovém ovladači.
z
Slouží ke změně kanálů. Vnabídce na obrazovce lze tlačítka
z
použít stejným způsobem jako tlačítka ▼ a▲ na dálkovém ovladači.
P
(Napájení)
Zapíná nebo vypíná televizor.
Pohotovostní režim
Nenechávejte televizor vpohotovostním režimu delší dobu (například po dobu dovolené). Ivpřípadě, kdy je
přístroj tlačítkem napájení vypnutý, stále spotřebovává malé množství energie. Nejlepší je odpojit napájecí kabel.
Zabezpečení prostoru instalace
Zajistěte potřebnou vzdálenost mezi výrobkem ajinými objekty (např. zdmi), aby byla umožněna dostatečná
ventilace.
Vopačném případě může dojít kpožáru nebo problémům svýrobkem vdůsledku zvýšení teploty uvnitř výrobku.
✎
Při použití stojanu nebo při montáži na zeď používejte pouze díly společnosti Samsung Electronics.
x
Použijete-li díly jiného výrobce, může dojít kpotížím svýrobkem nebo ke zranění způsobenému jeho
pádem.
✎
Vzhled se může lišit vzávislosti na modelu.
✎
Při kontaktu stelevizorem buďte opatrní, některé části mohou být horké.
Instalace se stojanem. Instalace sdržákem na zeď.
10 cm10 cm
10 cm
10 cm
10 cm
10 cm
10 cm
Ovládací panel
Čeština - 6
Popis dálkového ovladače
✎
Jde ospeciální dálkový ovladač pro zrakově postižené, na němž jsou tlačítko Channel ačíselná tlačítka
označena Braillovým písmem.
Instalace baterií (velikost baterií: AAA)
Zapnutí avypnutí televizoru.
Zobrazení avýběr dostupných zdrojů
videa.
Návrat na předchozí kanál.
Dočasné vypnutí zvuku.
Přepínání kanálů.
Zobrazení seznamu kanálů na obrazovce.
Slouží kzobrazení elektronického
programového průvodce EPG.
Zobrazení informací na obrazovce
televizoru.
u/d/l/r
: Slouží kpřemisťování kurzoru
na položky nabídky na obrazovce.
ENTER
E
: Stisknutím zvolíte nabídku
nebo můžete změnit příslušnou hodnotu.
Zavře nabídku.
Přímý přístup ke kanálům.
Slouží knastavení hlasitosti.
Můžete zvolit možnost Teletext ZAPNUTÝ,
Dvojitý, Mix nebo VYPNUTÝ.
Slouží kotevření nabídky na obrazovce.
Rychlý výběr často používaných funkcí.
Zobrazí Domovský obsah, který obsahuje
položky Sledovat TV, Můj obsah
aZdroj.
Slouží knávratu do předchozí nabídky.
Tato tlačítka se používají vnabídkách
Správce kanálů, Můj obsah apod.
Tato tlačítka použijte vrežimech Můj
obsah aAnynet+.
P.MODE: Stisknutím tlačítka zvolte Režim
obrazu.
SRS: Vybere režim SRS TheaterSound.
DUALf-g: Výběr zvukových efektů.
E-MANUAL: Zobrazí elektronickou
příručku e-Manual.
P.SIZE: Nastaví Velikost obrazu.
AD/SUBT.: Zapnutí avypnutí funkce
Zvukový popis (vněkterých oblastech
není tato funkce kdispozici). / Slouží
kzobrazení digitálních titulků.
Čeština - 7
Změna zdroje vstupu
Zdroj
Tuto možnost lze použít kvýběru televizního vysílání
či externích vstupních zdrojů, jako je
přehrávač disků DVD/Blu-ray, kabelový
přijímač nebo satelitní přijímač (set-top
box).
1. Stiskněte tlačítko SOURCE na
dálkovém ovladači.
2. Vyberte požadovaný externí vstupní
zdroj.
✎
Režim zobrazení můžete změnit stisknutím
tlačítka l nebo r na hodnotu Všechny
aPřipojeno.
■ SviPovezanoTV / Ext. / PC / HDMI1/DVI /
HDMI2 / AV / Komponent / USB
✎
Vnabídce Zdroj budou zvýrazněny připojené
vstupy.
✎
Možnosti Ext. aPC jsou vždy aktivované.
✎
Pokud nejsou připojená externí zařízení
zvýrazněna, stiskněte červené tlačítko. Televizor
vyhledá připojená zařízení.
Upravit název
Stiskněte vnabídce Zdroj tlačítko TOOLS. Poté
budete moci nastavit požadovaný název externích
zdrojů vstupu.
■ Video / DVD / Kabel. STB / Satel. STB / PVR
STB / AV přijímač / Hra / Videokamera / PC /
DVI PC / Zařízení DVI / TV / IPTV / Blu-ray / HD
DVD / DMA: Pojmenujte externí zařízení připojené
do vstupního konektoru, ausnadněte si tak výběr
vstupního zdroje.
✎
Připojujete-li televizor kpočítači kabelem HDMI
přes konektor HDMI IN 1(DVI), měli byste
vnabídce Upravit název nastavit televizor do
režimu PC. (PS51D450)
✎
Připojujete-li televizor kpočítači kabelem HDMIDVI přes konektor HDMI IN 1(DVI), měli byste
vnabídce DVI PC nastavit televizor do režimu
Upravit název. (PS51D450)
✎
Připojujete-li televizor kzařízení AV kabelem
HDMI-DVI přes konektor HDMI IN 1(DVI), měli
byste vnabídce Zařízení DVI nastavit televizor do
režimu Upravit název. (PS43D450, PS51D450)
Informace
Lze zobrazit podrobné informace ovybraném
externím zařízení.
Připojení antény
Při prvním zapnutí televizoru automaticky proběhne základní nastavení.
✎
Přednastavení: Připojení napájení aantény.
✎
Mezi zařízením PDP aradioamatérským vysíláním nebo vysíláním rádia AM může docházet kinterferenci.
✎
Pokud vblízkosti televizoru používáte vysílačky, amatérské rádio nebo rádio AM, nemusí televizor pracovat
správně.
Anténa VHF/UHFKabel
nebo
Příkon
Čeština - 8
Funkce Plug & Play (Počáteční nastavení)
Při prvním zapnutí televizoru vám sekvence výzev na obrazovce pomůže provést konfiguraci základního
nastavení. Stiskněte tlačítko POWERP. Možnost Plug & Play je dostupná jen tehdy, je-li položka Zdroj
nastavena na možnost TV.
✎
Než zapnete televizor, ujistěte se, že je připojen anténní kabel (str.6).
✎
Chcete-li se vrátit kpředchozímu kroku, stiskněte červené tlačítko.
1
Výběr jazyka
Stiskněte tlačítko ▲ nebo ▼ apoté stiskněte tlačítko ENTER
E
.
Vyberte požadovaný jazyk nabídky na obrazovce (OSD).
2
Výběr možnosti
Prodejna nebo
Domácnost
Stiskněte tlačítko ◄ nebo ► apoté stiskněte tlačítko ENTER
E
.
Vyberte režim Domácnost. Režim Prodejna je určen pro použití
vmaloobchodní prodejně.
Jak vrátit nastavení přístroje zrežimu Prodejna na režim
Domácnost (standardní nastavení): Stiskněte tlačítko hlasitosti
na televizoru. Po zobrazení nabídky na obrazovce pro hlasitost
stiskněte tlačítko MENU apodržte ho stisknuté po dobu 5sekund.
Režim Prodejna je určen pouze pro použití vmaloobchodní
prodejně. Pokud jej vyberete, nebude možné použít několik funkcí.
Pokud se na televizor díváte doma, zvolte možnost Domácnost.
3
Výběr země
Stiskněte tlačítko ▲ nebo ▼ apoté stiskněte tlačítko ENTER
E
. Vyberte
příslušnou zemi.
✎
Jakmile nastavíte vnabídce Země vaši zemi, některé modely mohou
nabídnout další možnost – nastavení čísla PIN.
✎
Při zadávání čísla PIN nelze použít číslo „0-0-0-0“.
4
Nastavení možnosti
Režim hodin
Režim hodin lze nastavit automaticky nebo ručně.
Autom.: Zvolte časové pásmo, kde se nacházíte.
Manuální: Umožňuje manuálně nastavit aktuální datum ačas.
5
Výběr antény
Stiskněte tlačítko ▲ nebo ▼ apoté stiskněte tlačítko ENTER
E
. Zvolte anténu
jako zdroj zapamatování.
6
Výběr kanálu
Stiskněte tlačítko ▲ nebo ▼ apoté stiskněte tlačítko ENTER
E
. Vyberte zdroj
kanálu, který se má uložit do paměti. Pokud zdroj antény nastavíte na možnost
Kabel, zobrazí se krok postupu, který umožní kanálům přidělit číselné hodnoty
(frekvence kanálů). Další informace naleznete včásti Kanál → Automatické
ladění.
7
Užijte si svůj
televizor.
Stiskněte tlačítko ENTER
E
.
Obnovení původních nastavení této funkce...
Vyberte možnost Systém – Plug & Play (Počáteční nastavení). Zadejte svůj čtyřmístný kód PIN. Výchozí kód PIN
je „0-0-0-0“. Chcete-li kód PIN změnit, použijte funkci Změna kódu PIN.
Položku Plug & Play (MENU → Systém) byste měli doma nastavit znovu ivpřípadě, že jste ji nastavili předtím
vobchodě.
✎
Zapomenete-li kód PIN, stiskněte vpohotovostním režimu tlačítka dálkového ovladače vnásledujícím
pořadí. Obnovíte tak původní kód PIN „0-0-0-0“: MUTE → 8 → 2 → 4 → POWER (zap.).
P
POWER

Čeština - 9
Připojení kAV zařízení
¦¦
Dostupná zařízení: Přehrávač disků DVD/Blu-ray, kabelový přijímač HD, satelitní přijímač
(set-top box) HD, videopřehrávač
Použití kabelu HDMI nebo HDMI-DVI (až 1080p)
✎
HDMI IN 1(DVI), 2 / PC/DVI AUDIO IN
x
Pokud použijete propojení pomocí kabelu HDMI/DVI, musíte použít konektor HDMI IN 1(DVI) pro
video. Přehrávač disků DVD/Blu-ray, kabelový přijímač HD, satelitní přijímač HD (set-top box) mohou
vyžadovat kabel DVI-HDMI (DVI na HDMI) nebo adaptér DVI-HDMI (DVI na HDMI). Pro zvuk je nutný
konektor PC/DVI AUDIO IN.
x
Pokud je ktelevizoru připojeno externí zařízení, které používá starší verzi režimu HDMI, nemusí
se obraz zobrazovat normálně (nebo se nezobrazí vůbec), nebo nemusí fungovat zvuk. Pokud se
vyskytnou takové potíže, požádejte výrobce externího zařízení osdělení verze režimu HDMI, apokud
je verze zastaralá, vyžádejte si aktualizaci.
x
Nezapomeňte koupit certifikovaný kabel HDMI. Vopačném případě se nemusí zobrazovat obraz nebo
může dojít kchybě připojení.
HDMI OUT
DVI OUT
AUDIO OUT
R-AUDIO-L
W
R
Připojení kabelem HDMI
Připojení HDMI-DVI
Čeština - 10
Použití komponentního (až 1080p) nebo audio/video (pouze 480i) kabelu apoužití kabelu Scart
✎
Vrežimu Ext. podporuje výstup DTV pouze video azvuk ve formátu MPEG SD.
✎
Při připojení ke vstupu AV IN se barva konektoru AV IN [Y/VIDEO] (zelený) nebude shodovat
svideokabelem (žlutý).
✎
Chcete-li dosáhnout té nejlepší kvality obrazu, je vhodnější místo připojení A/V použít komponentní
připojení.
AUDIO OUT
R-AUDIO-L
VIDEO OUT
AUDIO OUT
R-AUDIO-L
PRPBG
COMPONENT OUT
EXT
Komponentní připojení
Připojení AV
Připojení SCART

Čeština - 11
Připojení kpočítači aaudio zařízení
¦ Dostupná zařízení: digitální zvukový systém, zesilovač, domácí kino DVD, PC
Připojení prostřednictvím optického (digitálního) kabelu nebo sluchátek
✎
DIGITAL AUDIO OUT (OPTICAL)
x
Pokud je digitální zvukový systém připojen ke konektoru DIGITAL AUDIO OUT (OPTICAL), snižte
hlasitost televizoru isystému.
x
.1kanálový zvuk je kdispozici tehdy, je-li televizor připojen kexternímu zařízení spodporou
5.1kanálového zvuku.
x
Pokud je přijímač (systém domácího kina) nastaven na možnost Zapnuto, uslyšíte zvuk prostřednictvím
propojení koptickému konektoru televizoru. Pokud televizor přijímá signál DTV, bude do přijímače
systému domácího kina posílat 5.1kanálový zvuk. Je-li zdrojem digitální komponenta, například
přehrávač DVD/Blu-ray, kabelový přijímač nebo satelitní přijímač (set-top box), která je připojena
ktelevizoru prostřednictvím rozhraní HDMI, bude možné na přijímači systému domácího kina
poslouchat pouze 2kanálový zvuk. Chcete-li poslouchat 5.1kanálový zvuk, připojte výstupní konektor
digitálního zvuku zpřehrávače DVD/Blu-ray, kabelového přijímače nebo satelitního přijímače (set-top
boxu) přímo do zesilovače nebo systému domácího kina.
✎
Sluchátka H: Sluchátka lze připojit kvýstupu pro sluchátka na vašem zařízení. Po zapojení sluchátek
bude vypnutý výstup zvuku zvestavěných reproduktorů.
x
Funkce zvuku může být při připojení sluchátek ktelevizoru omezena.
x
Hlasitost sluchátek ahlasitost televizoru se nastavují samostatně.
OPTICAL
Připojení domácího kina DVD
Připojení sluchátek
Čeština - 12
¦ Použití kabelu HDMI nebo HDMI-DVI nebo D-sub
✎
Připojení kabelem HDMI nemusí být vzávislosti na PC podporováno.
Režimy zobrazení (vstup D-Sub aHDMI-DVI)
• PS43D450 PS43D451 PS43D452: 1024 × 768 při 60Hz
• PS51D450 PS51D451 PS51D452: 1360 × 768 při 60Hz
Režim Rozlišení
Horizontální
frekvence (kHz)
Vertikální
frekvence (Hz)
Bodová
hodinová
frekvence (MHz)
Synchronizační
polarita (H/V)
PS43D450
PS43D451
PS43D452
PS51D450
PS51D451
PS51D452
IBM
640×350
720×400
31,469
31,469
70,086
70,087
25,175
28,322
+/-
-/+
c
c
c
c
MAC
640×480
832×624
35,000
49,726
66,667
74,551
30,240
57,284
-/-
-/-
c
c
c
c
VESA DMT
640×480
640×480
640×480
800×600
800×600
800×600
1024×768
1024×768
1024×768
1360×768
31,469
37,861
37,500
37,879
48,077
46,875
48,363
56,476
60,023
47,712
59,940
72,809
75,000
60,317
72,188
75,000
60,004
70,069
75,029
60,015
25,175
31,500
31,500
40,000
50,000
49,500
65,000
75,000
78,750
85,500
-/-
-/-
-/+/+
+/+
+/+
-/-
-/+/+
+/+
c
c
c
c
c
c
c
c
c
c
c
c
c
c
c
c
c
c
c
✎
POZNÁMKA
x
Pro připojení pomocí kabelu HDMI/DVI je nutné použít konektor HDMI IN 1(DVI).
x
Režim prokládaného zobrazení není podporován.
x
Pokud je zvolen nestandardní videoformát, nemusí přístroj fungovat správně.
x
Jsou podporovány režimy Separate (Oddělený) aComposite (Kompozitní). Režim SOG (Sync On
Green) není podporován.
DVI OUT
AUDIO OUT AUDIO OUT
PC OUT
HDMI OUT
Připojení kpočítači
 Loading...