

Samsung NV51M9770DM User Manual

Built-In Electric Wall Oven
User manual
NV51M9770D*
NV51M9770DS_AA_DG68-01001A-00_EN+MES+CFR.indb 1 2017-07-26 4:07:17

Regulatory Notice
1. FCC Notice
CAUTION
FCC CAUTION: Any changes or modications not expressly
approved by the party responsible for compliance could void
the user’s authority to operate the equipment.
This device complies with Part 15 of FCC Rules. Operation is
Subject to following two conditions:
1) This device may not cause harmful interference, and
2) This device must accept any interference received including
interference that cause undesired operation.
For products sold in the US and Canadian markets, only
channels 1~11 are available. You cannot select any other
channels.
FCC STATEMENT:
This equipment has been tested and found to comply within
the limits for a Class B digital device, pursuant to part 15 of
the FCC Rules. These limits are designed to provide reasonable
protection against harmful interference in a residential
installation.
This equipment generates, uses, and can radiate radio
frequency energy and, if not installed and used in accordance
with the instructions, may cause harmful interference to
radio communications. However, there is no guarantee that
interference will not occur in a particular installation. If
this equipment does cause harmful interference to radio or
television reception, which can be determined by turning the
equipment off and on, the user is encouraged to try to correct
the interference by one or more of the following measures:
• Reorienting or relocating the receiving antenna
• Increasing the separation between the equipment and
receiver
• Connecting the equipment to an outlet that is on a different
circuit than the radio or TV
• Consulting the dealer or an experienced radio/TV technician
for help.
2 English
NV51M9770DS_AA_DG68-01001A-00_EN+MES+CFR.indb 2 2017-07-26 4:07:17

Regulatory Notice
FCC RADIATION EXPOSURE STATEMENT:
This equipment complies with FCC radiation exposure limits
set forth for an uncontrolled environment. This equipment
should be installed and operated so there is at least 8 inches
(20 cm) between the radiator and your body. This device and
its antenna(s) must not be co-located or operated in conjunction
with any other antenna or transmitter.
2. IC Notice
The term “IC” before the radio certication number only
signies that Industry Canada technical specications were
met. Operation is subject to the following two conditions: (1)
this device may not cause interference, and (2) this device must
accept any interference, including interference that may cause
undesired operation of the device.
This Class B digital apparatus complies with Canadian ICES-003.
For products sold in the US and Canadian markets, only
channels 1~11 are available. You cannot select any other
IC RADIATION EXPOSURE STATEMENT:
This equipment complies with IC RSS-102 radiation exposure
limits set forth for an uncontrolled environment. This
equipment should be installed and operated so there is at least
8 inches (20 cm) between the radiator and your body. This
device and its antenna(s) must not be co-located or operated in
conjunction with any other antenna or transmitter.
channels.
English 3
NV51M9770DS_AA_DG68-01001A-00_EN+MES+CFR.indb 3 2017-07-26 4:07:17

ContentsContents
Important safety instructions 5
Contents
Introducing your new oven 18
Overview 18
What’s included with your oven 18
Before you begin 19
Energy saving tips 19
Water reservoir 19
Operating the oven 20
Control panel 20
Display 21
Setting the temperature 21
Control lockout 22
Kitchen timer 22
Timed cooking 24
Delay start 25
Using the temp probe 26
Twin cooking mode temperature setting ranges 27
Oven functions 28
Using the healthy cook feature 35
Using the favorite recipes and gourmet cook feature 37
Using the oven racks 38
Using the gliding rack 40
Using the divider 41
Using the clean feature 42
Settings 48
Using the Sabbath feature 51
Maintaining your appliance 53
Care and cleaning of the oven 53
Removing the oven doors 55
Replacing the oven doors 56
Changing the oven light 57
Troubleshooting 57
Troubleshooting 57
Information codes 60
Warranty (U.S.A) 61
Warranty (CANADA) 63
Open source announcement 64
4 English
NV51M9770DS_AA_DG68-01001A-00_EN+MES+CFR.indb 4 2017-07-26 4:07:17
SAVE THESE INSTRUCTIONS
Important safety instructions
Read and follow all instructions before using your oven to
prevent the risk of re, electric shock, personal injury, or
damage when using the oven. This guide does not cover all
possible conditions that may occur. Always contact your service
agent or the manufacturer about problems that you do not
understand.
WHAT YOU NEED TO KNOW ABOUT SAFETY
INSTRUCTIONS
Warnings and important safety instructions in this manual do
not cover all possible conditions and situations that may occur.
It is your responsibility to use common sense, caution, and care
when installing, maintaining, and operating your oven.
Important safety symbols and precautions
What the icons and signs in this user manual mean:
WARNING
Hazards or unsafe practices that may result in severe personal
injury or death.
CAUTION
To reduce the risk of re, explosion, electric shock, or personal
injury when using your oven, follow these basic safety
precautions.
Do NOT attempt.
Do NOT disassemble.
Do NOT touch.
Follow directions explicitly.
Unplug the power plug from the wall socket.
Make sure the machine is grounded to prevent electric
shock.
Call a Samsung service center for help.
Note
These warning signs are here to prevent injury to you and
others. Please follow them explicitly.
After reading this section, keep it in a safe place for future
reference.
Important safety instructions
CAUTION
Hazards or unsafe practices that may result in minor personal
injury or property damage.
NV51M9770DS_AA_DG68-01001A-00_EN+MES+CFR.indb 5 2017-07-26 4:07:17
English 5

Important safety instructions
SAVE THESE INSTRUCTIONS
Important safety instructions
STATE OF CALIFORNIA PROPOSITION 65 WARNING
US ONLY
WARNING : This product contains chemicals known to the State of
California to cause cancer and birth defects or other reproductive harm.
FOR YOUR SAFETY
When using electrical appliances, you should follow basic
safety precautions, including the following:
CAUTION
• Use this appliance only for its intended purpose as
described in this Owner’s Manual.
• Potentially hot surfaces include the oven vent opening,
surfaces near the opening, and crevices around the oven
door.
Proper Installation - Be sure your appliance is properly
installed and grounded by a qualied technician.
User servicing - Do not repair or replace any part of the
Always disconnect the power to the appliance before
servicing by removing the fuse or switching off the circuit
breaker.
• Do not enter the oven.
• Do not leave children alone. Never leave children alone or
unattended in an area where this appliance is in use. They
should never be allowed to sit or stand on any part of the
appliance.
• Never use your appliance for warming or heating the room.
• Do not use water on grease res. Turn off the oven to avoid
spreading the ames. Smother the re or ames by closing
the door or use a dry chemical, baking soda, or foam-type
extinguisher.
• Avoid scratching or striking the glass doors and the control
panel. Doing so may lead to glass breakage. Do not cook on
a product with broken glass. Shock, re, or cuts may occur.
appliance unless specically recommended in this manual.
All other servicing should be referred to a qualied
technician.
6 English
NV51M9770DS_AA_DG68-01001A-00_EN+MES+CFR.indb 6 2017-07-26 4:07:17

SAVE THESE INSTRUCTIONS
• If there is a re in the oven during self-cleaning, turn
• Use only dry potholders. Placing moist or damp
the oven off and wait for the re to go out. Do not
force the door open. The introduction of fresh air at
self-cleaning temperatures may lead to a burst of ame
from the oven. Failure to follow these instructions may
result in severe burns.
• If the oven is heavily soiled with oil, self-clean the oven
before using the oven again. Leaving the oil in place
creates a risk of re.
• Wipe up heavy soil on the oven bottom with a paper
tower or rag before self-cleaning. Self-cleaning the
oven when there is heavy soil on the oven bottom
requires longer cleaning cycles and produces more
smoke.
• Storage in or on the appliance. Do not store ammable
materials in the oven or near the surface units. Be sure
all packing materials are removed from the appliance
before operating it. Keep plastics, clothes, and paper
away from parts of the appliance that may become hot.
• Wear proper apparel. Never wear loose-tting or
potholders on hot surfaces may result in burns from
steam. Do not let the potholder touch hot heating
elements. Do not use a towel or other bulky cloth
instead of a potholder.
• Teach children not to play with the controls or any
other part of the oven.
• For your safety, do not use high-pressure water
cleaners or steam jet cleaners to clean any part of the
oven.
• If the power cord is damaged, it must be replaced
by the manufacturer, its service agent, or similarly
qualied persons to avoid creating a hazard.
• The appliance is not intended for use by persons
(including children) with reduced physical, sensory
or mental capabilities, or lack of experience and
knowledge, unless they have been given supervision or
instruction concerning use of the appliance by a person
responsible for their safety.
Important safety instructions
hanging garments while using the appliance.
NV51M9770DS_AA_DG68-01001A-00_EN+MES+CFR.indb 7 2017-07-26 4:07:17
English 7

Important safety instructions
SAVE THESE INSTRUCTIONS
Important safety instructions
ELECTRICAL SAFETY
• Use only the factory installed exible power cord to
connect to the power supply. Do not use a 3rd party
power supply cord kit.
• The appliance should be serviced only by qualied
service personnel. Repairs carried out by unqualied
individuals may cause injury or a serious malfunction.
If your appliance is in need of repair, contact a Samsung
authorized service center. Failure to follow these
instructions may result in damage and void the warranty.
• Flush - mounted appliances may be operated only after
they have been installed in cabinets and workplaces
that conform to the relevant standards. This ensures
that the appliances are installed in compliance with the
appropriate safety standards.
• If your appliance malfunctions or if fractures, cracks, or
splits appear:
WARNING
• Ensure that the appliance is switched off before replacing
the lamp to avoid the possibility of electric shock.
CHILD SAFETY
WARNING
• This appliance is not intended for use by young children
or inrm persons without the adequate supervision of a
responsible adult.
• Young children should be supervised to ensure that they do
not play with the appliance.
• Keep children away from the door when opening or closing
it as they may bump themselves on the door or catch their
ngers in the door.
• During self-cleaning, the surfaces may get hotter than usual.
Keep small children away from the oven when it is in the
self-cleaning mode.
• Switch off the oven.
• Unplug the oven from the AC wall outlet.
• Contact your local Samsung service center.
8 English
NV51M9770DS_AA_DG68-01001A-00_EN+MES+CFR.indb 8 2017-07-26 4:07:18
WARNING
Accessible parts may become hot during use. To avoid burns,
young children should be kept away.

SAVE THESE INSTRUCTIONS
OVEN
• Use care when opening the door. Let hot air or steam
• DO NOT TOUCH THE HEATING ELEMENTS OR INTERIOR
SURFACES OF THE OVEN. Heating elements may be hot
even though they are dark in color. Interior surfaces of
an oven become hot enough to cause burns. During and
after use, do not touch or let clothing or other ammable
materials contact the heating elements or interior
surfaces of the oven until they have had sufcient time
to cool. Other surfaces of the appliance may become hot
enough to cause burns. Among these surfaces are oven
vent openings and surfaces near these openings, the
oven door, and the window of the oven door.
• Do not heat unopened food containers. The build-up of
pressure may cause the container to burst and result in
injury.
• Do not use the oven to dry newspapers. If overheated,
newspapers can catch re.
• Do not use the oven for a storage area. Items stored in an
escape before you remove food from or put food into the
oven.
• Protective liners. Do not use aluminum foil to line the oven
bottoms, except as suggested in this manual. Improper
installation of these liners may result in a risk of electric
shock or re.
• Keep oven vent ducts unobstructed. The oven vent is
located above the right rear surface unit. This area could
become hot during oven use. Never block this vent or place
plastic or heat-sensitive items on it.
• Placement of oven racks. Always place oven racks in the
desired location while the oven is cool. If the rack must be
moved while the oven is hot, use potholders. Do not let the
potholders come in contact with the hot heating element in
the oven.
• Do not allow aluminum foil or a meat probe to contact
the heating elements.
Important safety instructions
oven can ignite.
NV51M9770DS_AA_DG68-01001A-00_EN+MES+CFR.indb 9 2017-07-26 4:07:18
English 9

Important safety instructions
SAVE THESE INSTRUCTIONS
Important safety instructions
• During use, the appliance becomes hot.
Care should be taken to avoid touching heating
elements inside the oven.
• Do not use harsh abrasive cleaners or sharp metal
scrapers to clean the oven door glass. They can scratch
the surface which may result in the glass shattering.
CAUTION
Do not attempt to operate the oven during a power failure.
If the power fails, always turn the oven off. If the oven is
not turned off and the power returns, the oven may begin to
operate again. Food left unattended could catch re or spoil.
SELFCLEANING OVENS
Do not clean the door gasket. The door gasket is essential
for a good seal. Care should be taken not to rub, damage,
or move the gasket.
• Never keep pet birds in the kitchen. Birds are
extremely sensitive to the fumes released during an
oven self-clean cycle. Fumes may be harmful or fatal to
birds. Move birds to a well-ventilated room.
• Clean only the parts listed in this manual in the self-
clean cycle. Before self-cleaning the oven, remove the
divider, racks, utensils, and any food.
• Before operating the self-clean cycle, wipe grease and
food soils from the oven. Excessive amounts of grease
may ignite, leading to smoke damage to your home.
• Do not use any commercial oven cleaner or oven liner
protective coating of any kind in or on the outside of
the oven.
• Remove the nickel oven shelves from the oven before
you begin the self-cleaning cycle or they may discolor.
10 English
NV51M9770DS_AA_DG68-01001A-00_EN+MES+CFR.indb 10 2017-07-26 4:07:18
SAVE THESE INSTRUCTIONS
• If the self-cleaning mode malfunctions, turn the oven
CRITICAL INSTALLATION WARNINGS
off and disconnect the power supply. Have it serviced
by a qualied technician.
• Excess spillage must be removed before you run the
self-cleaning cycle.
VENTILATING HOOD
• Clean ventilating hoods frequently. Do not let grease
accumulate on the hood or lter.
• When aming foods under the hood, turn the fan on.
WARNING
• This appliance must be installed by a qualied
technician or service company.
• Failing to have a qualied technician install the
oven may result in electric shock, re, an explosion,
problems with the product, or injury.
• Unpack the oven, remove all packaging material and
examine the oven for any damage such as dents
on the interior or exterior of the oven, broken door
latches, cracks in the door, or a door that is not lined
up correctly. If there is any damage, do not operate the
oven and notify your dealer immediately.
• Plug the power cord into a properly grounded outlet
with the proper conguration. Your oven should be the
only item connected to this circuit.
• Keep all packaging materials out of the reach of
children. Children may use them for play and injure
Important safety instructions
themselves.
NV51M9770DS_AA_DG68-01001A-00_EN+MES+CFR.indb 11 2017-07-26 4:07:18
English 11
Important safety instructions
SAVE THESE INSTRUCTIONS
Important safety instructions
• This appliance must be properly grounded.
• Do not ground the appliance to a gas pipe, plastic water
pipe, or telephone line.
• This may result in electric shock, re, an explosion,
or problems with the product
• Do not cut or remove the ground prong from the power
cord under any circumstances.
• Connect the oven to a circuit that provides the correct
amperage.
• Do not install this appliance in a humid, oily or dusty
location, or in a location exposed to direct sunlight or
water (rain drops).
• This may result in electric shock or re.
• Do not use a damaged power cord or loose wall socket.
• This may result in electric shock or re.
• Do not pull or excessively bend the power cord.
• Do not twist or tie the power cord.
• Do not hook the power cord over a metal object, place
a heavy object on the power cord, or insert the power
cord between objects.
• This may result in electric shock or re.
If the power cord is damaged, contact your nearest
Samsung service center.
CRITICAL USAGE WARNING
CAUTION
• If the appliance is ooded by any liquid, please contact
your nearest Samsung service center. Failing to do so
may result in electric shock or re.
• If the appliance produces a strange noise, a burning
smell, or smoke, unplug the power plug immediately
and contact your nearest Samsung service center.
• Failing to do so may result in electric shock or re
• In the event of a gas leak (such as propane gas, LP gas,
etc.), ventilate the area immediately. Do not touch the
power cord. Do not touch the appliance.
• A spark may result in an explosion or re.
• Take care not to contact the oven door, heating
elements, or any of the other hot parts with your body
while cooking or just after cooking.
• Failing to do so may result in burns.
12 English
NV51M9770DS_AA_DG68-01001A-00_EN+MES+CFR.indb 12 2017-07-26 4:07:18

SAVE THESE INSTRUCTIONS
• If materials inside the oven should ignite, keep the
oven door closed, turn the oven off and disconnect
the power cord, or shut off power at the fuse or circuit
breaker panel. If the door is opened, the re may
spread.
• Always observe safety precautions when using your
oven. Never try to repair the oven on your own - there
is dangerous voltage inside. If the oven needs to be
repaired, contact an authorized Samsung service center
near you.
• If you use the appliance when it is contaminated by
foreign substances such as food waste, it may result in
a problem with the appliance.
• Take care when removing the wrapping from food you
have taken out of the oven.
• If the food is hot, hot steam may be emitted
abruptly when you remove the wrapping and this
may result in burns.
• Do not attempt to repair, disassemble, or modify the
appliance yourself.
• Since a high voltage current enters the product
chassis, it may result in electric shock or re.
• When a repair is needed, contact your nearest
Samsung service center.
• If any foreign substance such as water has entered the
appliance, contact your nearest Samsung service center.
• Failing to do so may result in electric shock or re.
• Do not touch the power cord with wet hands.
• This may result in electric shock.
• Do not turn the appliance off while an operation is in
progress.
• This may cause a spark and result in electric shock
or re.
• Do not let children or any person with reduced
physical, sensory, or mental capabilities use this
appliance unsupervised.
• Make sure that the appliance’s controls and cooking
Important safety instructions
areas are out of the reach of children.
• Failing to do so may result in electric shock, burns,
or injury.
NV51M9770DS_AA_DG68-01001A-00_EN+MES+CFR.indb 13 2017-07-26 4:07:18
English 13

Important safety instructions
SAVE THESE INSTRUCTIONS
Important safety instructions
• Do not touch the inside of the appliance immediately
after cooking. The inside of the appliance will be hot.
• Failing to do so may result in burns.
• Do not use or place ammable sprays or objects near
the oven.
• Flammable items or sprays can cause res or an
explosion.
• Do not insert ngers, foreign substances, or metal
objects such as pins or needles into inlets, outlets, or
holes. If foreign substances are inserted into any of
these holes, contact your product provider or nearest
Samsung service center.
• Do not tamper with or make any adjustments or repairs
to the door. Under no circumstances should you remove
the door or outer shell of the oven.
• Do not store or use the oven outdoors.
• Never use this appliance for purposes other than
cooking.
• Open the cap or stopper of sealed containers (herb
tonic tea bottle, baby bottle, milk bottle and so on)
before heating them. Make a hole in food items that
have shells (eggs, chestnuts, etc.) with a knife before
cooking them.
• Failing to do so may result in burns or injury.
• Never heat plastic or paper containers and do not use
them for cooking.
• Failing to do so may result in re.
• Do not heat food wrapped in paper from magazines,
newspapers, etc.
• This may result in re.
• Do not open the door when the food in the oven is
burning.
• If you open the door, it causes an inow of oxygen
and may cause the food to ignite.
• Using the appliance for any purpose other than
cooking may result in re.
14 English
NV51M9770DS_AA_DG68-01001A-00_EN+MES+CFR.indb 14 2017-07-26 4:07:18

SAVE THESE INSTRUCTIONS
• Do not apply excessive pressure to the door or the
USAGE CAUTIONS
inside of the appliance. Do not strike the door or the
inside or the appliance.
• Hanging on to the door may result in the product
falling and cause serious injury.
• If the door is damaged, do not use the appliance.
Contact a Samsung service center.
• Do not hold food in your bare hands during or
immediately after cooking.
• Use cooking gloves. The food may be very hot and
you could burn yourself.
• As the handle and oven surfaces may be hot enough
to cause burns after cooking, use cooking gloves to
protect your hands from burns.
CAUTION
• If the surface is cracked, turn the appliance off.
• Failing to do so may result in electric shock.
• Dishes and containers can become hot. Handle with
care.
• Hot foods and steam can cause burns. Carefully remove
container coverings, directing the steam away your
hands and face.
• Remove lids from baby food jars before heating. After
heating baby food, stir well to distribute the heat
evenly. Always test the temperature by tasting before
feeding the baby. The glass jar or the surface of the
food may appear to be cooler than the interior, which
can be hot enough to burn an infant’s mouth.
• Take care as beverages or food may be very hot after
heating.
• Especially when feeding a child, make sure the food
Important safety instructions
or beverage has cooled sufciently.
NV51M9770DS_AA_DG68-01001A-00_EN+MES+CFR.indb 15 2017-07-26 4:07:18
English 15

Important safety instructions
SAVE THESE INSTRUCTIONS
Important safety instructions
• Take care when heating liquids such as water or other
beverages.
• Make sure to stir during or after cooking.
• Avoid using a slippery container with a narrow neck.
• Wait at least 30 seconds after heating before removing
the heated liquid.
• Failing to do so may result in an abrupt overow of the
contents and cause burns.
• Do not stand on top of the appliance or place objects
(such as laundry, an oven cover, lighted candles, lighted
cigarettes, dishes, chemicals, metal objects, etc.) on the
appliance.
• Items, such as a cloth, may get caught in the door.
• This may result in electric shock, re, problems with the
product, or injury.
• Do not operate the appliance with wet hands.
• This may result in electric shock.
• Do not spray volatile substances such as insecticide onto
the surface of the appliance.
• As well as being harmful to humans, it may also result
in electric shock, re, or problems with the product.
• Do not put your face or body close to the appliance while
cooking or when opening the door just after cooking.
• Take care that children do not come too close to the
appliance.
• Failing to do so may result in children burning
themselves.
• Do not place food or heavy objects over the edge of the
oven door.
• If you open the door, the food or object may fall and this
may result in burns or injury.
• Do not abruptly cool the door, the inside of the appliance, or
a dish by pouring water over it during or just after cooking.
• This may result in damage to the appliance. The steam
or water spray may result in burns or injury.
• Do not operate while empty except for self-cleaning.
• Do not defrost frozen beverages in narrow-necked bottles.
The bottles can break.
• Do not scratch the glass of the oven door with a sharp
object.
• This may result in the glass being damaged or broken.
16 English
NV51M9770DS_AA_DG68-01001A-00_EN+MES+CFR.indb 16 2017-07-26 4:07:18

SAVE THESE INSTRUCTIONS
• Do not store anything directly on top of the appliance
CRITICAL CLEANING WARNINGS
when it is in operation.
• Do not use sealed containers. Remove seals and lids
before cooking. Sealed containers can explode due to
the build up of pressure even after the oven has been
turned off.
• Take care that food you are cooking in the oven does
not come into contact with the heating element.
• This may result in re.
• Do not over-heat food.
• Overheating food may result in re.
• Use caution when opening or closing the door. Your
ngers may be pinched, resulting in physical injury.
• The door has wires at the bottom for connecting LED
lights. Be careful not to pull or cut the wires when
handling the door.
CAUTION
• Do not clean the appliance by spraying water directly
on to it.
• Do not use benzene, thinner, or alcohol to clean the
appliance.
• This may result in discoloration, deformation,
damage, electric shock, or re.
• Take care not to hurt yourself when cleaning the
appliance (externally or internally).
• You may hurt yourself on the sharp edges of the
appliance.
• Do not clean the appliance with a steam cleaner.
• This may result in corrosion.
• Keep the inside of the oven clean. Food particles or
spattered oils stuck to the oven walls or oor can cause
paint damage and reduce the efciency of the oven.
Important safety instructions
NV51M9770DS_AA_DG68-01001A-00_EN+MES+CFR.indb 17 2017-07-26 4:07:18
English 17
Introducing your new oven
Introducing your new oven
Introducing your new oven
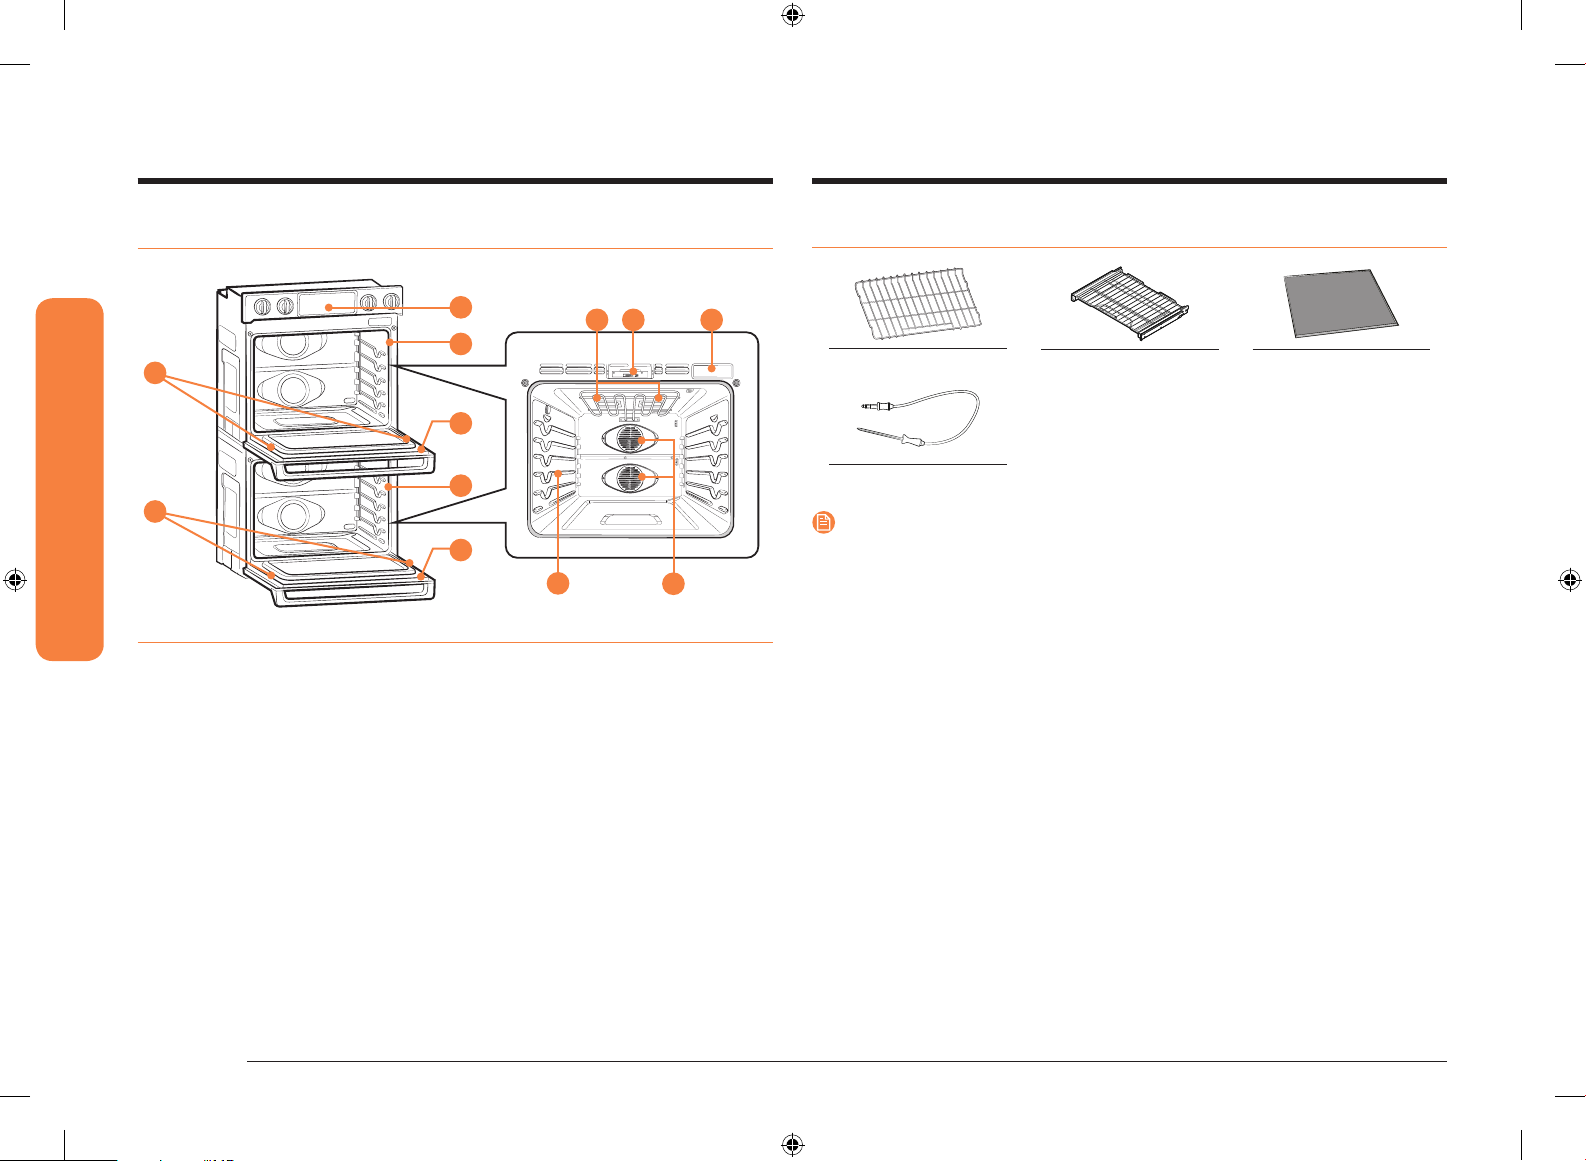
Overview
01
03
05
02
03
05
02
01 Oven control panel 02 Oven door 03 Oven gasket
04 Halogen lamp* 05 Door LED light 06 Door latch
07 Water reservoir 08 Convection fan 09 Shelf position
04
06 07
09
08
What’s included with your oven
Wire racks (3)* Gliding racks (3)* Divider (1)*
Temp probe (1)*
NOTE
If you need an accessory marked with a *, you can buy it from the Samsung
Contact Center (1-800-726-7864).
18 English
NV51M9770DS_AA_DG68-01001A-00_EN+MES+CFR.indb 18 2017-07-26 4:07:19

Before you begin
Clean the oven thoroughly before using it for the rst time. Then, remove the
accessories, set the oven to Bake, and then run the oven at 400 °F for 1 hour.
There will be a distinctive odor. This is normal.
Ensure your kitchen is well ventilated during this conditioning period.
Energy saving tips
• During cooking, the oven door should remain closed except when you turn
food over. Do not open the door frequently during cooking to maintain the
oven temperature and to save energy.
• If cooking time is more than 30 minutes, you can switch the oven off
5-10 minutes before the end of the cooking time to save energy. The residual
heat will complete the cooking process.
• To save energy and reduce the time needed for re-heating the oven, plan oven
use to avoid turning the oven off between cooking one item and the next.
• Whenever possible, cook more than one item at a time.
Water reservoir
The water reservoir is used for the Steam Bake, Steam Roast , Steam Bread Proof
and Hybrid Clean functions and also to remove water scale that may form on the
oven walls, especially after Steam Baking, Steam Roasting, Steam Bread Proong
and Hybrid cleaning. Fill it with water in advance of steam cooking or descaling.
1. Locate the water reservoir. The water
reservoir is on the right side of the
oven, just above the oven opening.
Touch Reservoir on the control
panel. The oven ejects the water
reservoir.
Grasp the front of the reservoir, and
then slide it out to remove.
2. Open the reservoir cap, and then ll
the reservoir with 22 oz (650 ml) of
drinkable water.
NOTE
You can open the reservoir by removing the
rubber cap or by removing the clear plastic
top.
Before you begin
English 19
NV51M9770DS_AA_DG68-01001A-00_EN+MES+CFR.indb 19 2017-07-26 4:07:19

Before you begin
Max
0.5L
0.3L
A
Operating the oven
Before you begin
3. Replace the cap or the clear plastic top,
and then slide the water reservoir back
into the reservoir slot.
4. Push the reservoir in. There will be soft
click when it is in place correctly. Touch
Reservoir . The oven retracts the
water reservoir.
5. Close the oven door.
NOTE
Do not exceed the max line.
NOTE
Make sure the cap and the upper portion of
the water reservoir (labeled A) are closed
before using the oven.
CAUTION
The water reservoir becomes hot during cooking. Make sure you wear oven gloves
to remove or rell the water reservoir.
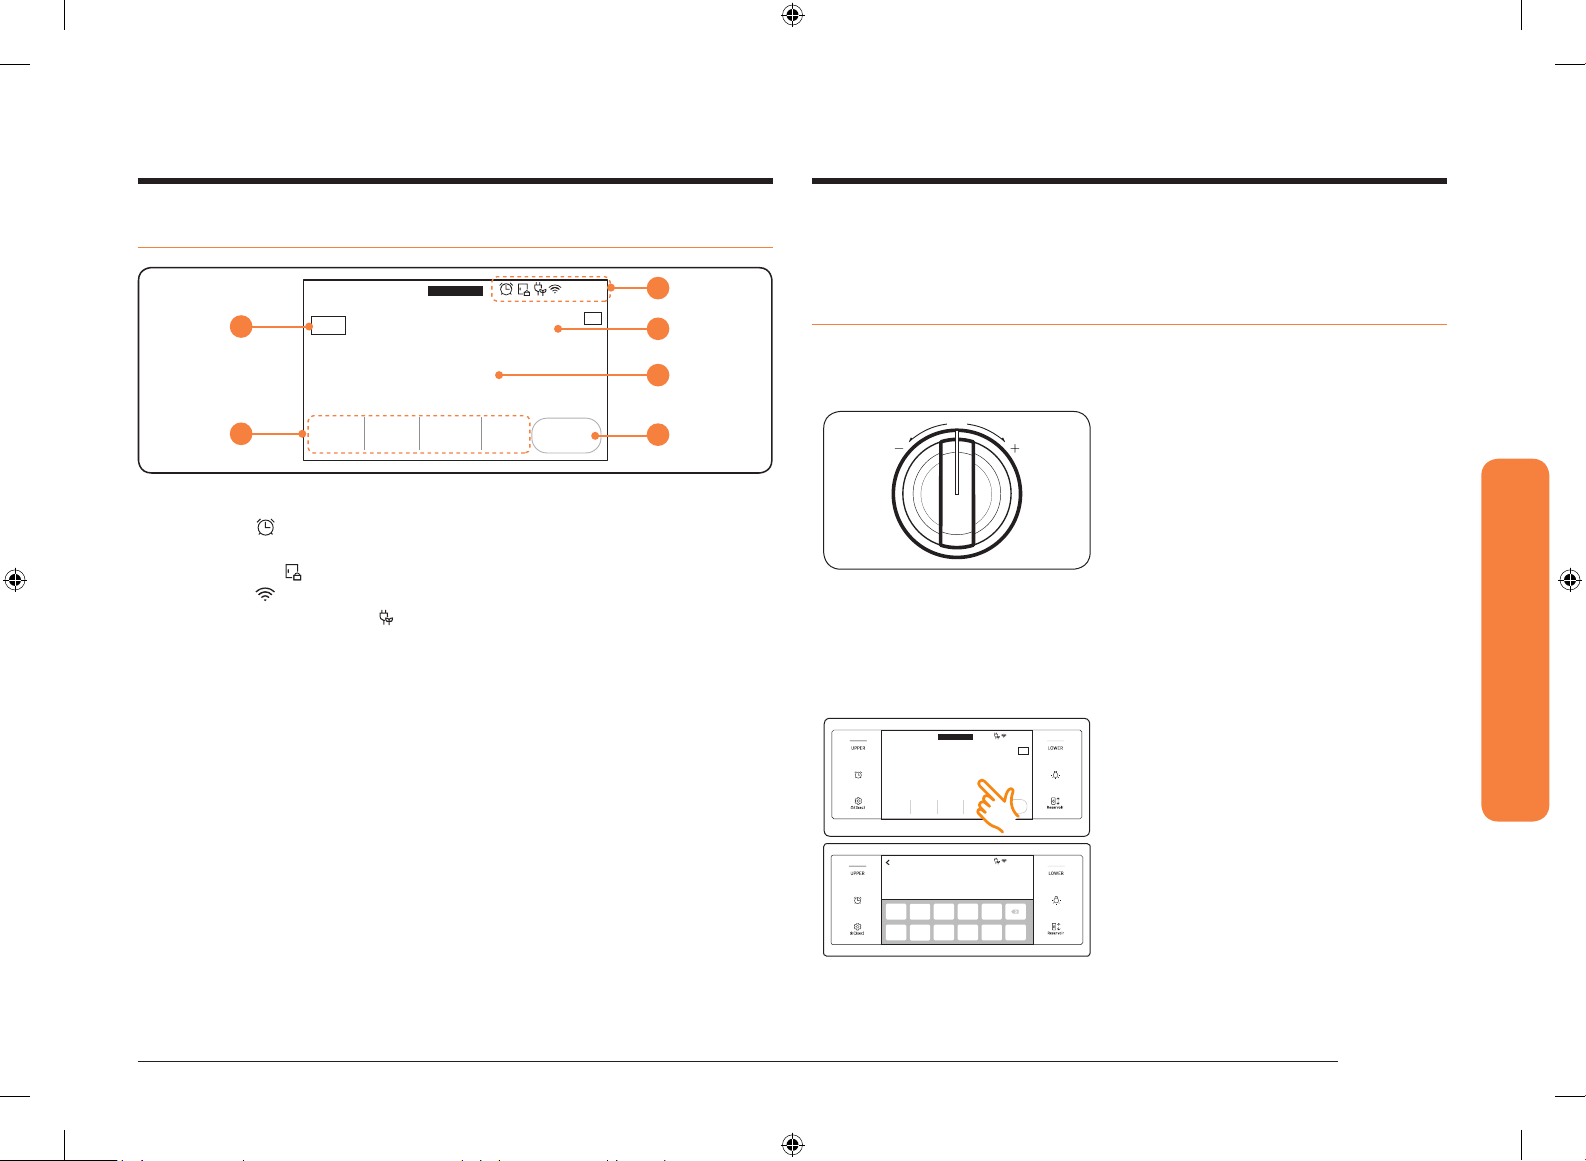
Control panel
0303
01 02 04 05 08 07
01 Upper or lower mode knob: Use to select the mode of the upper or lower
oven.
• Upper: Bake, Broil,
Roast), Steam Bake, Steam Roast, Steam Bread Proof, Healthy Cook,
Favorite Recipes, Gourmet Cook, Clean.
• Lower : Bake, Broil,
Roast), Broil (Convection Broil), Dehydrate, Keep Warm, Bread Proof,
Healthy Cook, Gourmet Cook, Clean.
02 Temperature knob: Use to set the temperature for the upper or lower oven
respectively.
03 UPPER, LOWER: Use to display the upper oven or lower oven mode screen on
the display. Touching here does not turn the ovens on or off. It only displays
their current status.
04 Timer : Use to display the set Timer screen.
05 Settings and Control Lockout : Use to display the Setting screen. If you
touch and hold this key for 3 seconds, all oven functions will be disabled.
06 Lamp : Use to turn the oven light on or off.
07 Reservoir : Touch to open the water reservoir.
08 Display: Swipe to navigate through the menus and tap to select a desired
setting.
NOTE
If you tap or touch the display while wearing plastic or oven gloves, the display
will not operate properly. Take the gloves off rst, and then tap with a bare nger.
Bake (Convection Bake), Roast (Convection
Bake (Convection Bake), Roast (Convection
06 01
02
20 English
NV51M9770DS_AA_DG68-01001A-00_EN+MES+CFR.indb 20 2017-07-26 4:07:20
Display
Convecon Bake
Faster, more even baking
4:35 PM
325
°F
START
Temp Probe
150
°F
Delay Start No Preheat
Off
Cook Time
None None
UPPER
ƟÃť
Ǥʪи
ƊЇɇθц
06
01
02
05 START: Tap to start the oven using the displayed settings.
06 View Summary: When you tap this area, the current modes of the upper and lower
oven are displayed.
Setting the temperature
This oven provides two methods to set the temperature.
03
04
05
01 Indicator area
• Timer ( ): When the timer is set, the timer indicator is displayed. When more
than 2 timers are set, the number of set timers is shown.
• Door lock ( ): Displayed when the oven door is locked.
• Wi-Fi ( ): Shows Wi-Fi signal strength in 5 steps.
• 12 hour energy saving ( ): Displayed when 12 hour energy saving is turned
on.
• Current time: Displays the current time.
02 Mode: Displays the current or selected menu with a mode description.
03 Temperature: Displays the current or selected temperature. Tap this area to display
the Temperature Adjustment screen.
04 Information area
• Temp Probe: Displays the set temperature of the temp probe. Tap this area to
display the Temp Probe screen.
• Cook Time: Displays the cooking time. Tap this area to display the Cooking Time
screen.
• Delay Start: Displays the delay start time. Tap this area to display the Delay
Start screen.
• No Preheat: Indicates if the No Preheat feature is on or off. (Only visible when
you are using the Convection Bake or Convection Roast mode.)
• Steam: Displays the steam level. Visible only when you are using the Steam
Bake or Steam Roast mode. When visible, tap to display the Steam Level screen.
• Steam Bread Proof can only be set on or off.
Temperature knob
Numeric pad
Convection Bake
Faster, more even baking
Temp Probe Cook Time Delay Start No Preheat
150°FNone None Off
Adjust temp. 175 °F ~ 550 °F
Ready at 4:35 PM
1
2 3 4 5
Set Cancel
6 7 8 9 0
Temp.
UPPER
325
325
• Use the Temperature knob on the left
or right side of the control panel to set
the temperature for the upper or lower
oven respectively.
• Turn the appropriate knob clockwise
(+) or counterclockwise (-) and then
release. The temperature will rise or fall
Operating the oven
by 5 °F.
• To change the temperature quickly by
more than 5 °F, turn and hold the knob
at the + or - position.
4:35 PM
TIP
°F
START
4:35 PM
°F
OK
• Tap the temperature area to display the
numeric pad.
• Tap the numbers in the numeric pad to
set the temperature.
• Tap OK.
English 21
NV51M9770DS_AA_DG68-01001A-00_EN+MES+CFR.indb 21 2017-07-26 4:07:21
Operating the oven
Operating the oven
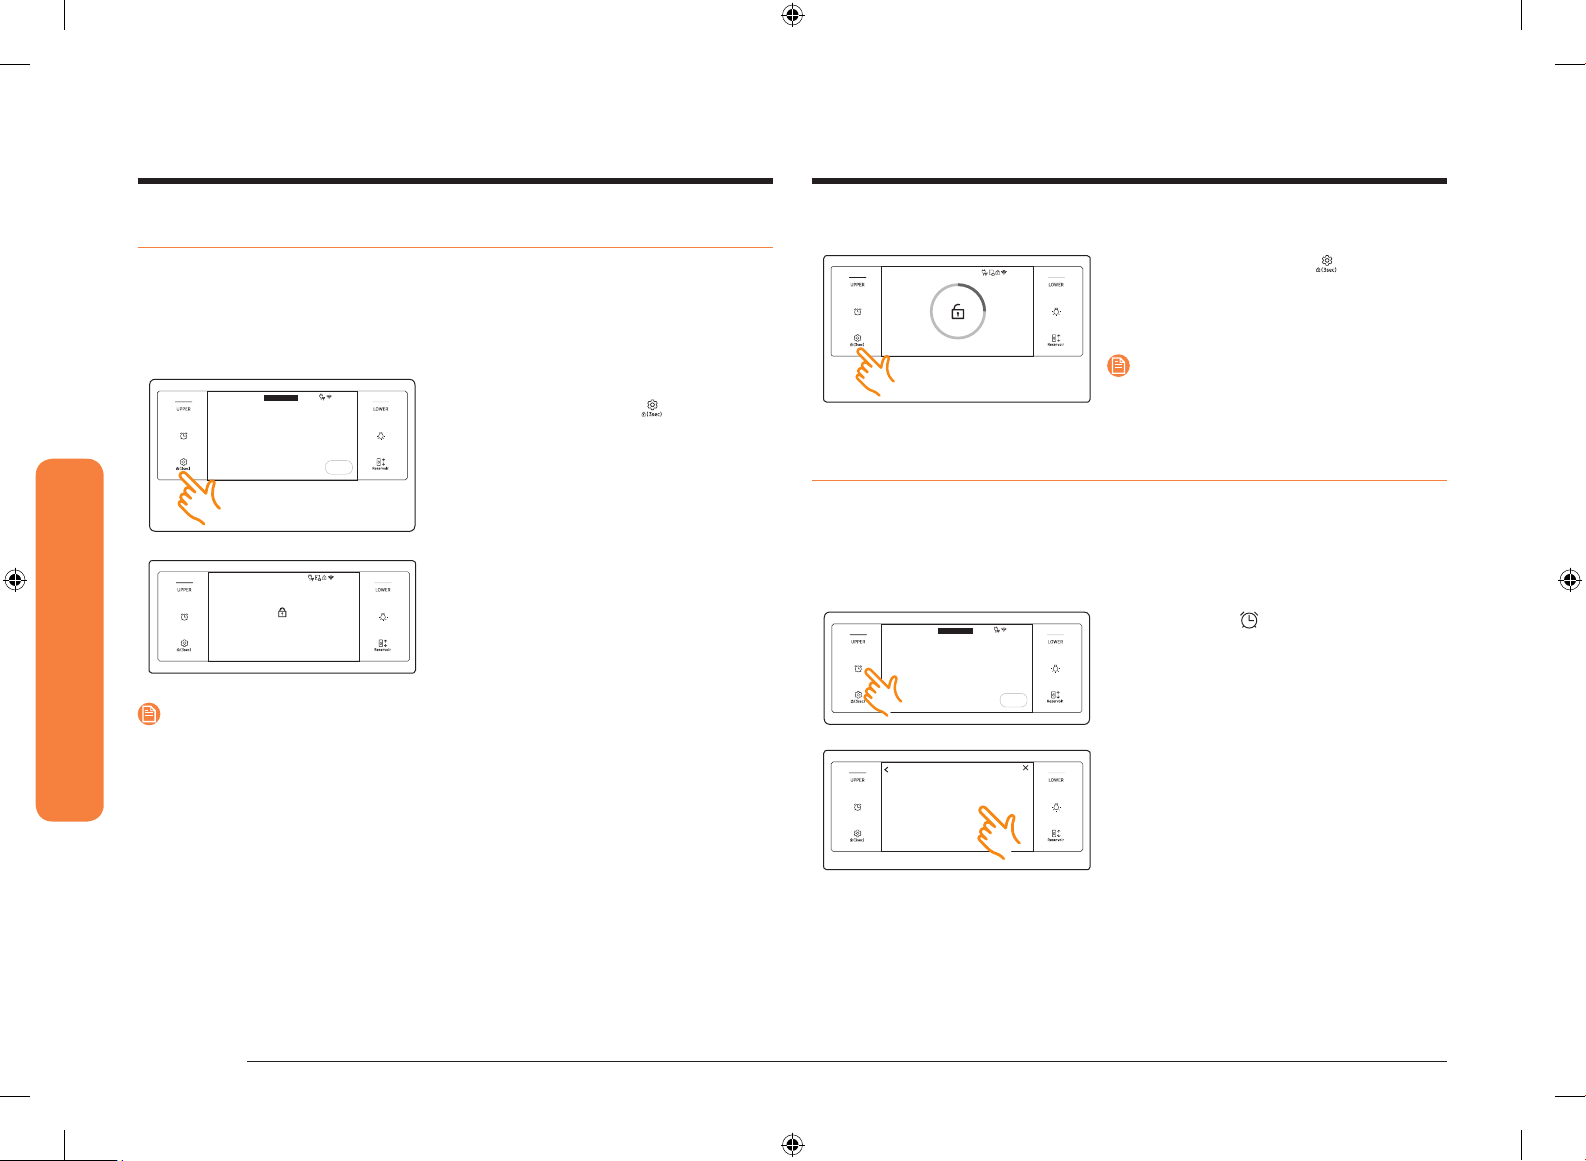
Control lockout
Control Lockout lets you lock the buttons on the touch pad so they cannot be
activated accidently. Control Lock also locks both oven doors so they cannot be
opened. You can only activate Control Lockout when the oven is in standby mode.
How to activate the Control Lockout feature
4:35 PM
UPPER
Broil
Direct heat cooking
High
START
4:35 PM
Child Lock
NOTE
• Control Lockout is available only when the oven temperature is under 400 °F.
• All other functions must be cancelled before you activate Control Lockout.
1. Cancel or turn off all functions.
2. Touch Control Lockout for 3 seconds.
3. The display will change to the control
lock screen and the control lock
conrmation will appear at the bottom
of the screen.
How to unlock the controls
4:35 PM
1. Touch Control Lockout for 3 seconds.
The control lock conrmation and
the lock icon will disappear from the
display.
NOTE
It may take up to 10 seconds for the doors
to unlock.
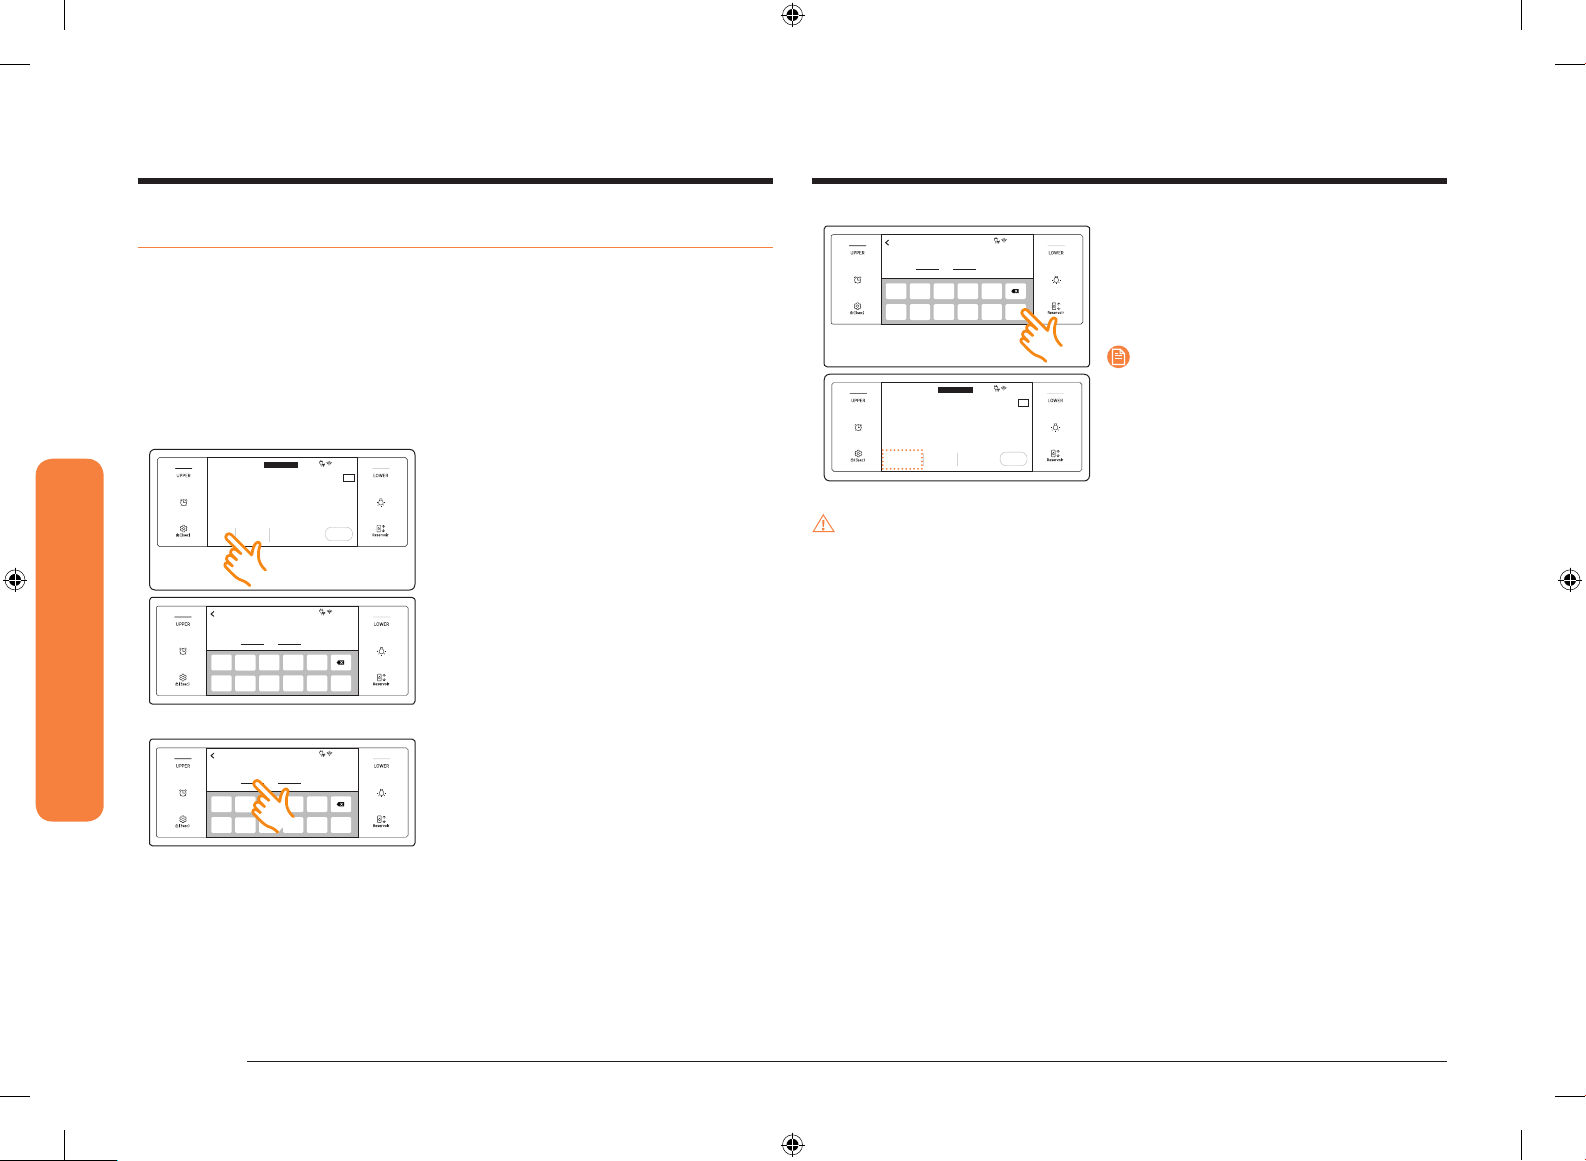
Kitchen timer
The kitchen timer serves as an extra timer that will beep when the set time has
elapsed. It does not start or stop cooking functions. You can use the kitchen timer
with any of the other oven functions.
How to set the timer
UPPER
Broil
Direct heat cooking
High
Timer
+
Add timer
4:35 PM
START
1. Touch Timer .
The display will change to the timer
screen.
2. Tap + Add timer.
22 English
NV51M9770DS_AA_DG68-01001A-00_EN+MES+CFR.indb 22 2017-07-26 4:07:22

Timer 01
67890
OK
0 hr 00 min 00 sec
1
2 3 4 5
6 7 8 9 0
Ready at 4:35 PM
Set Cancel
4:35 PM
OK
3. Tap the numbers in the numeric pad to
set time. (You can set the timer for any
amount of time from 1 sec to 24 hr).
How to change timer name
Timer
Timer 01
01:52:48
START
DELETE RESET
+ ADD
You can change the timer name to identify
what you are timing, for example, a chicken
defrosting.
1. Tap the timer name area.
Timer 01
1 hr 53 min 03 sec
1
2 3 4 5
DELETE RESET
DELETE RESET
Ready at 4:35 PM
Set Cancel
Timer
Timer 01
01:53:03
START
Timer
Timer 01
01:52:48
Pause
4:35 PM
+ ADD
+ ADD
4. Tap OK.
The timer is displayed on the screen.
5. Tap START.
When the set time has elapsed, the
Enter timer name.
Timer 01
1 2 3 4 5 6 7 8 9 0
wq e r t y u i o p
- @ * ^ : ; ( )
sa d f g h j k l
/ ‘ “ : , ? !
z x c v b n m
... ...
Enter timer name.
Chicken
1 2 3 4 5 6 7 8 9 0
wq e r t y u i o p
- @ * ^ : ; ( )
sa d f g h j k l
/ ‘ “ : , ? !
z x c v b n m
... ...
4:35 PM
~
OKEnglish?123
.
4:35 PM
~
OKEnglish?123
.
• The keyboard appears.
2. Enter the new timer name, and then
tap OK.
Operating the oven
oven will beep and the display will
show the Timer has nished.
Timer
• You can pause, reset, or delete the
timer at any time by touching the
screen.
Chicken
01:52:48
START
DELETE RESET
+ ADD
• The display shows the changed timer
name.
English 23
NV51M9770DS_AA_DG68-01001A-00_EN+MES+CFR.indb 23 2017-07-26 4:07:23
Operating the oven
Operating the oven
Timed cooking
In timed cooking mode, the oven turns on immediately and cooks for the length of
time you select.
At the end of the cooking time, the oven turns off automatically.
• You can use the timed cooking feature only with another cooking operation.
(Bake, Convection Bake, Convection Roast, Steam Bake, Steam Roast,
Convection Broil, Healthy Cook, Steam Bread Proof, Bread Proof).
How to set the oven for timed cooking
UPPER
Convection Bake
Faster, more even baking
325
Cook Time Delay Start No Preheat
None None Off
Set cooking time
0 hr 00 min
Ready at 4:35 PM
1
2 3 4 5
Set Cancel
6 7 8 9 0
Set cooking time
0 hr 30 min
Ready at 4:35 PM
1
2 3 4 5
Set Cancel
6 7 8 9 0
°F
4:35 PM
START
4:35 PM
OK
4:35 PM
Ready at 5:05 PM
OK
TIP
1. Turn the upper or lower Oven Mode
knob to the cooking operation you
want.
2. Tap Cook Time. The display will change
to the cooking time screen.
3. Tap numbers in the numeric pad to
set the cooking time. (You can set
the cooking time for any amount of
time from 1 minute to 9 hours and 59
minutes).
Set cooking time
1 hr 45 min
Ready at 4:35 PM
1
2 3 4 5
Set Cancel
6 7 8 9 0
4:35 PM
Ready at 6:20 PM
OK
4. Tap OK. The cooking time screen closes.
The cooking time is displayed in the
Cook Time area on the screen.
5. You can cancel a cook time at any time
by setting the Cook Time to 0 minutes.
NOTE
UPPER
Convection Bake
Faster, more even baking
325
Cook Time Delay Start No Preheat
1hr 45min None Off
4:35 PM
TIP
°F
START
See pages 32 through 35 for Basic baking
and broiling instructions.
CAUTION
Use caution with the timed cooking or delay start features. You can use these
features to cook cured or frozen meats and most fruits and vegetables.
For food that can easily spoil, such as milk, eggs, and unfrozen or fresh sh, meat,
or poultry, chill them in the refrigerator rst.
Even when chilled, they should not stand in the oven for more than 1 hour before
cooking begins, and should be removed promptly when cooking is completed.
Eating spoiled food can result in sickness from food poisoning.
24 English
NV51M9770DS_AA_DG68-01001A-00_EN+MES+CFR.indb 24 2017-07-26 4:07:24
Delay start
In the delay timed cooking mode, the oven’s timer turns the oven on at a time you
select in advance. You can have the oven turn off automatically after a set time
has elapsed by setting the Timed Cooking function as well.
• You can use the delay start feature only with another cooking operation
(Bake, Convection Bake, Convection Roast, Steam Bake, Steam Roast, Healthy
Cook, Self Clean).
• You can set the oven for a delay start before setting other cooking operations.
• The clock must be set to the current time.
How to set the oven for delay timed cooking
Set start time
5 : 35
Ready at 4:35 PM
1
2 3 4 5
Set Cancel
6 7 8 9 0
UPPER
Convection Bake
Faster, more even baking
325
Cook Time Delay Start No Preheat
None 5:35 Off
4:35 PM
AM
PM
OK
6. Tap OK. The Delay Start screen closes.
The start time, and, if you set it, the
cooking time, is displayed on the
screen.
NOTE
See pages 32 through 35 for Basic baking
4:35 PM
TIP
°F
START
and broiling instructions.
UPPER
Convection Bake
Faster, more even baking
325
Cook Time Delay Start No Preheat
None None Off
Set start time
4 : 35
Ready at 4:35 PM
1
2 3 4 5
Set Cancel
6 7 8 9 0
Set start time
4 : 35
Ready at 4:35 PM
1
2 3 4 5
Set Cancel
6 7 8 9 0
4:35 PM
TIP
°F
START
1. Position the oven rack(s) and place the
food in the oven.
2. Turn the upper or lower Oven Mode
knob to the cooking operation you
want.
Operating the oven
3. Set the cooking time if you want the
oven to turn off automatically after a
4:35 PM
AM
PM
set time.
(See the Timed cooking section on page
24).
OK
4. Tap Delay Start. The current time is
displayed as the rst entry.
4:35 PM
AM
PM
OK
5. Tap numbers in the numeric pad to set
the time you want the oven to start.
English 25
NV51M9770DS_AA_DG68-01001A-00_EN+MES+CFR.indb 25 2017-07-26 4:07:24
Operating the oven
Operating the oven
Using the temp probe
For many foods, especially roasts and poultry (beef, chicken, turkey, pork, lamb,
etc.), measuring the internal temperature is the best way to determine if the food
is properly cooked. The Temp probe lets you cook meat to the exact internal
temperature you want, taking the guess work out of determining whether a piece
of meat is done or not. This function can be used with Bake, Convection Bake,
Convection Roast, Steam Bake, or Steam Roast.
After the internal temperature of the food reaches 100 °F, the increasing internal
temperature will be shown in the display.
How to use the Temp probe
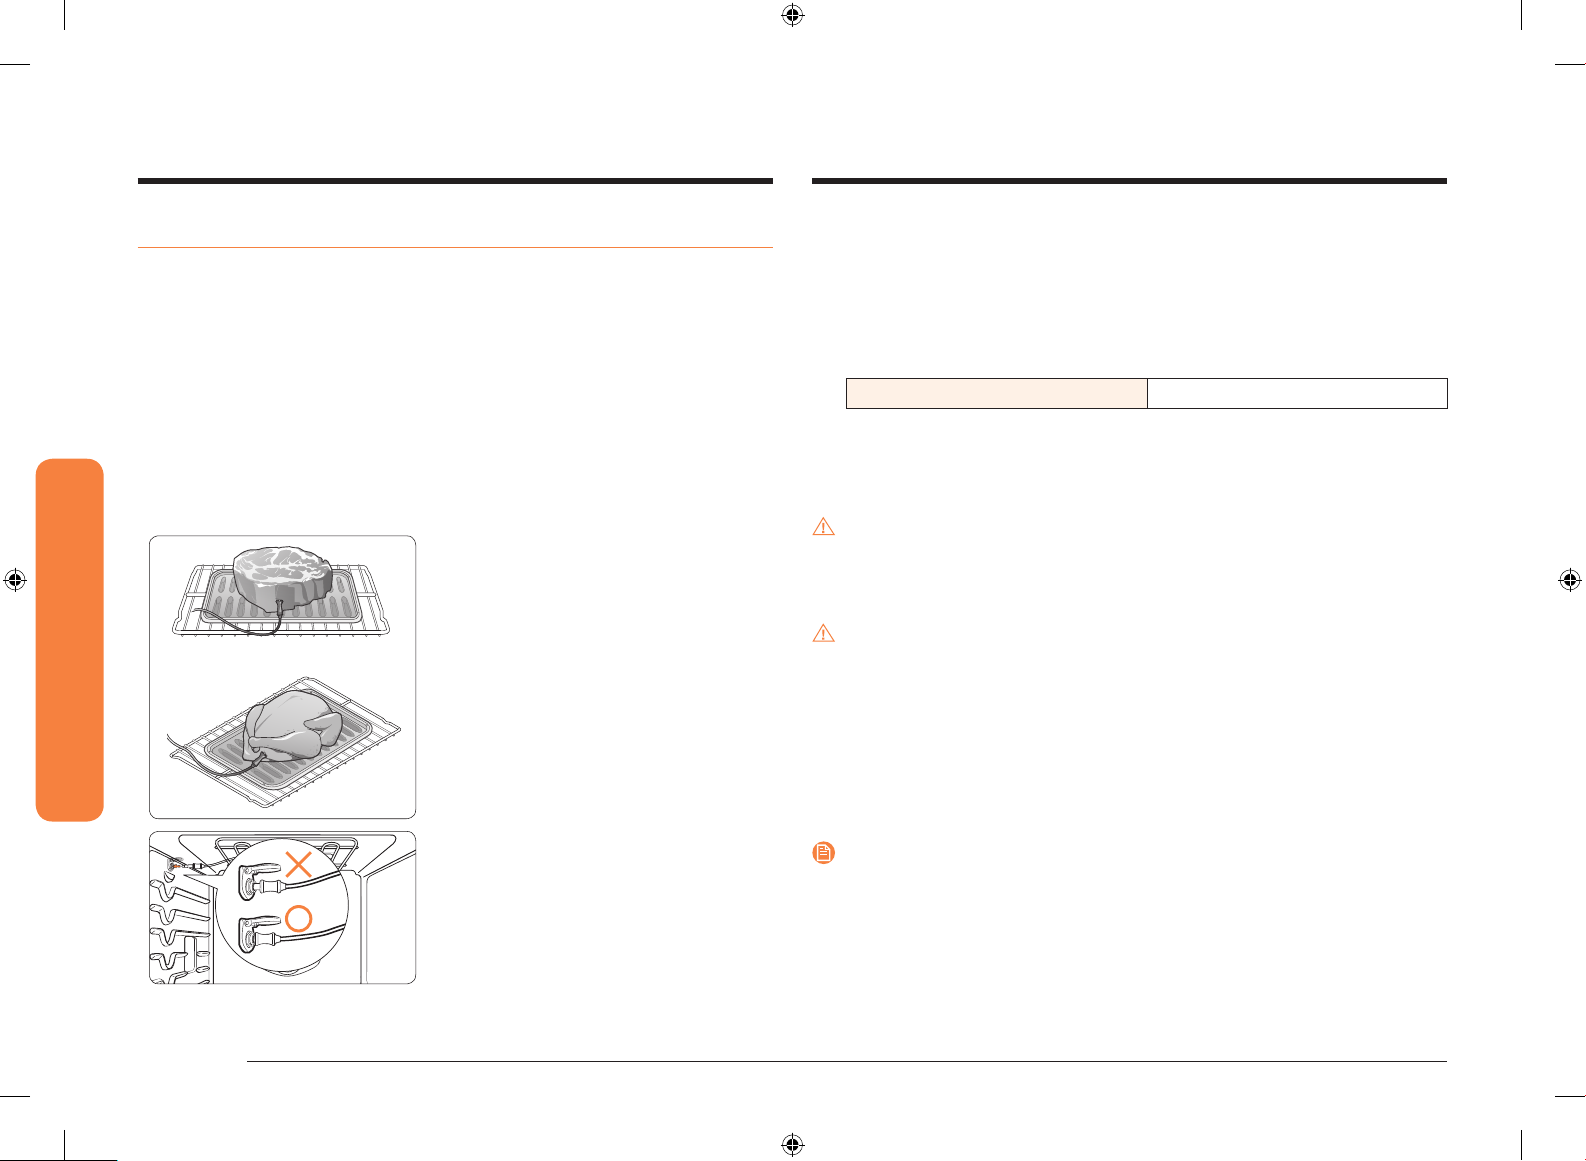
1. Push the tip of the Temp probe into the meat as fully as possible, so that the
tip is in the center of the meat.
• Insert the probe completely into the
meat as shown in the illustrations. It
should not touch bone, fat, or gristle.
• If you do not fully insert the probe into
the meat, the Temp Probe function will
not work correctly because the probe
will sense the oven temperature, not
the temperature of the meat.
• For bone-in meats, insert the probe into
the center of the lowest and thickest
portion of the piece.
• For whole poultry (turkey, large
chickens, etc.), insert the probe into the
thickest part of the inner thigh, parallel
to the leg.
• If you activate the Keep Warm
function to keep the meat warm
after you have cooked it using the
Temp Probe function, the meat’s
internal temperature will exceed the
temperature you want.
2. Insert the temp probe plug into the socket on the top side wall of the oven as
far as it will go.
3. Turn the upper or lower oven Mode knob to select the desired cooking mode
(Bake, Convection Bake or Convection Roast). Set the cooking temperature.
(See pages 21 and 32.)
4. Tap Temp Probe.
5. Set the desired internal temperature using the numeric pad.
Available temperatures 100 °F to 200 °F
6. If you want to use the Cook time or Delay start, set each function.
7. Tap START.
8. When the desired internal temperature is reached, the function automatically
stops and an alarm sounds.
CAUTION
To protect the Temp probe’s tip, be careful not to insert the probe so that the tip
protrudes through the surface of the meat. Make sure that the tip is in or near the
center of the meat.
CAUTION
• Do not store the probe in the oven.
• Do not leave the probe inside the oven during a self-cleaing or broiling cycle.
You can permanently damage the probe and it will no longer work.
• To avoid breaking the probe’s tip, defrost your food completely.
• Do not use tongs when inserting or removing the probe. Tongs can damage
the probe.
• Use the Temp probe for Temp Probe function cooking only. Do not use the
Temp probe for any other purpose.
NOTE
• If you remove the Temp probe while the Temp Probe function is operating
or insert the Temp probe while baking or cooking normally, cooking will stop
after 1 minute.
• If you use the probe to cook frozen food, there will be times when the oven
will not be able to detect it. (The probe icon won't appear in the display.)
26 English
NV51M9770DS_AA_DG68-01001A-00_EN+MES+CFR.indb 26 2017-07-26 4:07:25
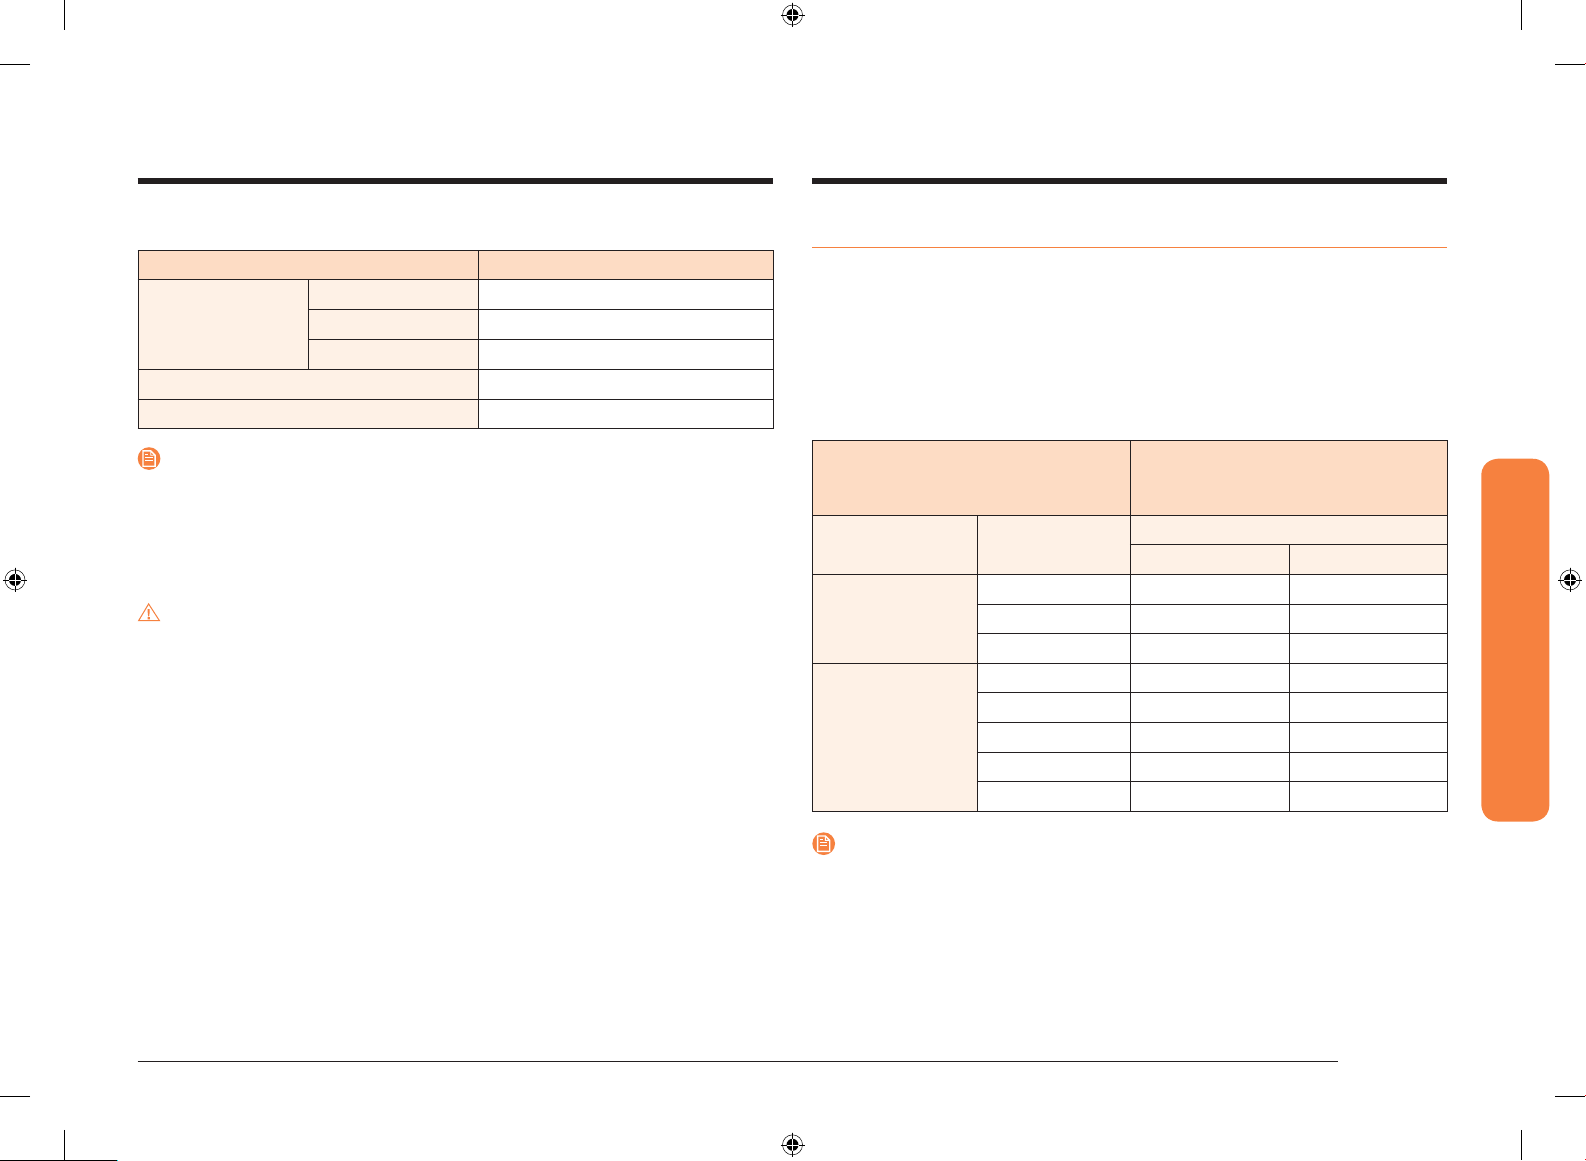
Temp probe table
Type of Food Internal temperature
Rare 140 °F
Beef / Lamb
Pork 170 °F
Poultry 180-185 °F
Medium 160 °F
Well done 170 °F
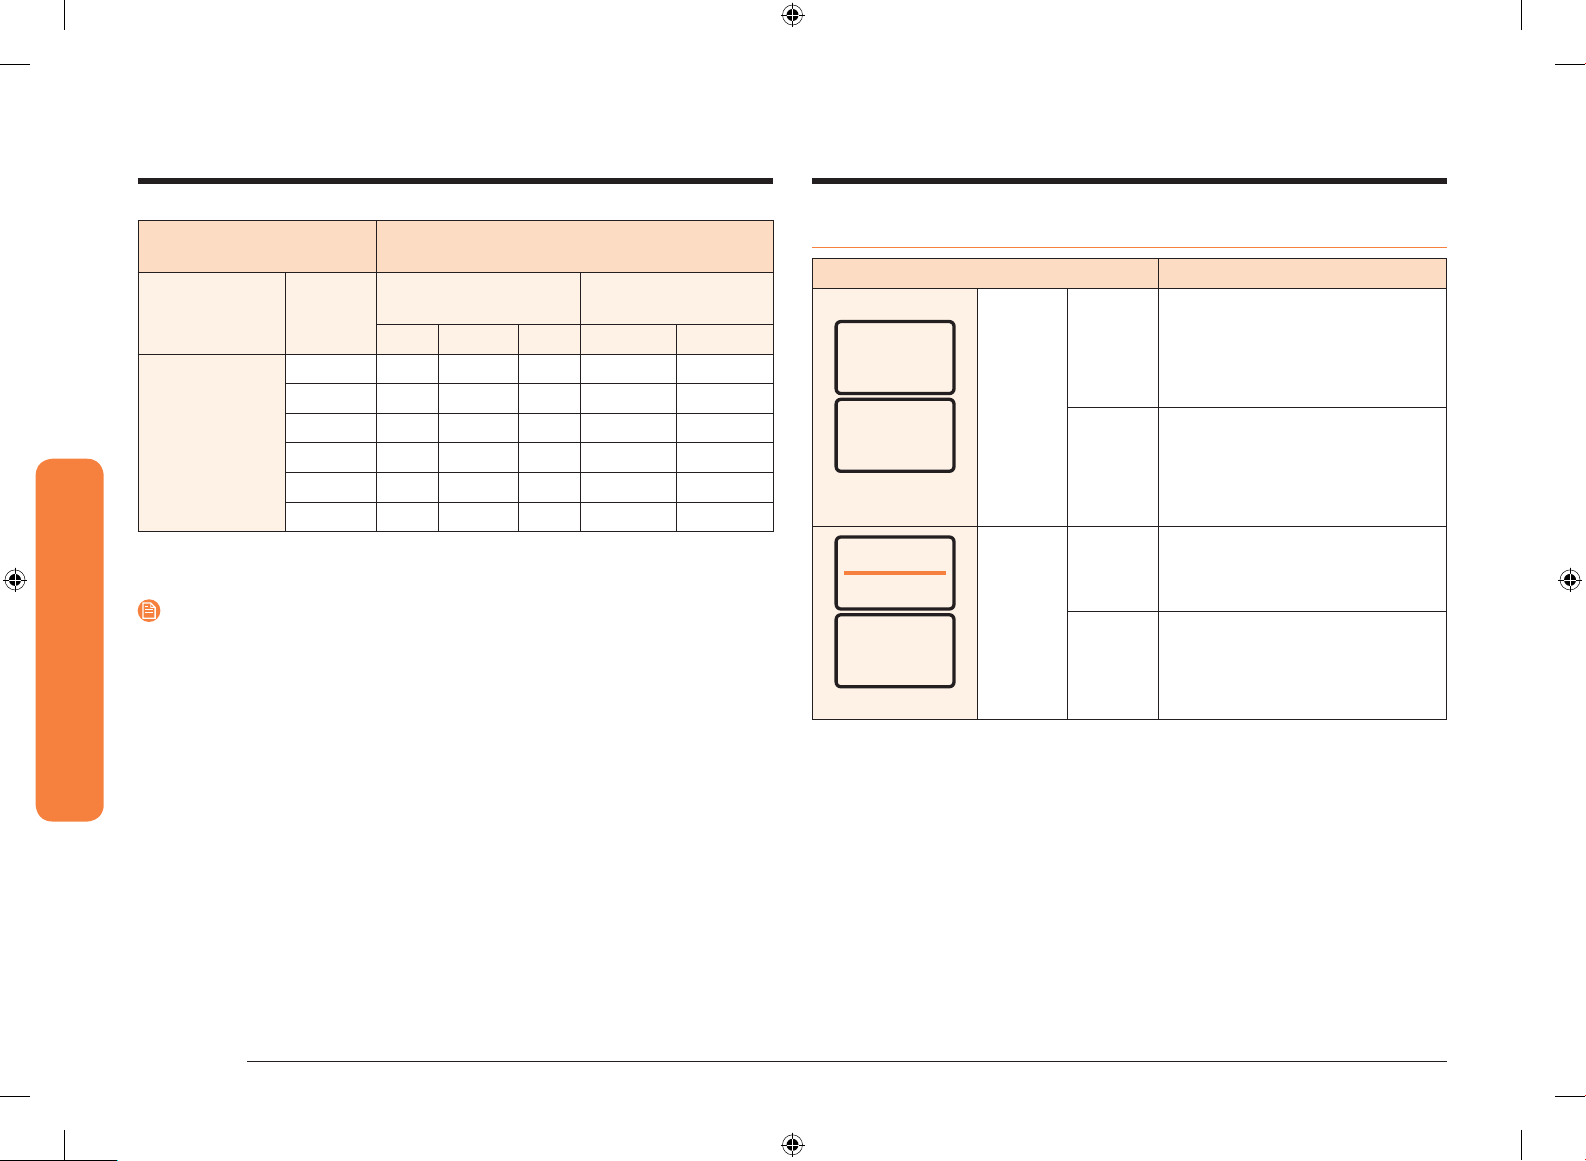
Twin cooking mode temperature setting ranges
Using the divider, you can divide, the upper oven into two compartments, ex
upper and ex lower. This is also called twin mode. When you use the ex upper
and ex lower compartments in the upper oven at the same time, each oven has
a minimum and maximum amount of power available and consequently minimum
and maximum temperature settings.
Oven temperatures in the ex lower compartment also limit broil settings in the
ex upper compartment. The temperature and broil setting limitations are shown
in the table below and on the next page.
NOTE
If you cover the meat with aluminum foil and allow it to stand for 10 minutes after
cooking, the Internal temperature will rise 5-10 degrees.
Removing the Temp probe
Remove the temp probe plug from the socket.
CAUTION
After cooking, the Temp probe is hot enough to cause burns. Let it cool sufciently
before attempting to remove it.
FLEX UPPER COMPARTMENT
Mode Set Temp.
High 400 °F 480 °F
Broil
Convection Bake &
Convection Roast
NOTE
To insert the divider, see page 41.
Medium 350 °F 480 °F
Low 325 °F 480 °F
480 °F 400 °F 480 °F
450 °F 350 °F 480 °F
300 °F 250 °F 375 °F
250 °F 225 °F 300 °F
175 °F 175 °F 200 °F
FLEX LOWER COMPARTMENT
(Available function settings and
temperatures)
Bake, Convection Bake
Min Max
Operating the oven
English 27
NV51M9770DS_AA_DG68-01001A-00_EN+MES+CFR.indb 27 2017-07-26 4:07:25
Operating the oven
Operating the oven
FLEX LOWER
COMPARTMENT
Mode Set Temp.
480 °F O O O 400 °F 480 °F
450 °F O O O 350 °F 480 °F
Bake &
Convection Bake
NOTE
The twin cooking mode lets you use different settings for the upper and lower
compartments, such as different switch off times, cooking times, and temperatures
settings.
To apply or modify settings in either compartment, tap the respective touch pad.
350 °F O O X 275 °F 450 °F
325 °F O X X 275 °F 400 °F
250 °F X X X 225 °F 300 °F
175 °F X X X 175 °F 200 °F
(Available function settings and temperatures)
Low Medium High Min Max
FLEX UPPER COMPARTMENT
Broil
O = Available X = Not Available
Convection Bake,
Convection Roast
Oven functions
Oven Oven functions
Bake, Broil, Convection Bake,
Convection Roast, Steam Bake,
Single Upper
Single
oven
Single Lower
Without a divider
Flex Upper
Flex Lower
*Twin
oven
Single Lower
With a divider
* To use the twin ex oven functionality, you must insert the divider into the upper
oven and divide it into an upper and lower compartment. See page 41.
Upper
Lower
Upper
Lower
Steam Roast, Steam Bread Proof,
Healthy Cook, Favorite Recipes,
Gourmet Cook, Clean
Bake, Broil, Convection Bake,
Convection Roast, Convection Broil,
Dehydrate, Keep Warm, Bread
Proof, Healthy Cook, Gourmet Cook,
Clean
Broil, Convection Bake, Convection
Roast, Steam Bake, Healthy Cook
Bake, Convection Bake, Healthy
Cook
28 English
NV51M9770DS_AA_DG68-01001A-00_EN+MES+CFR.indb 28 2017-07-26 4:07:25
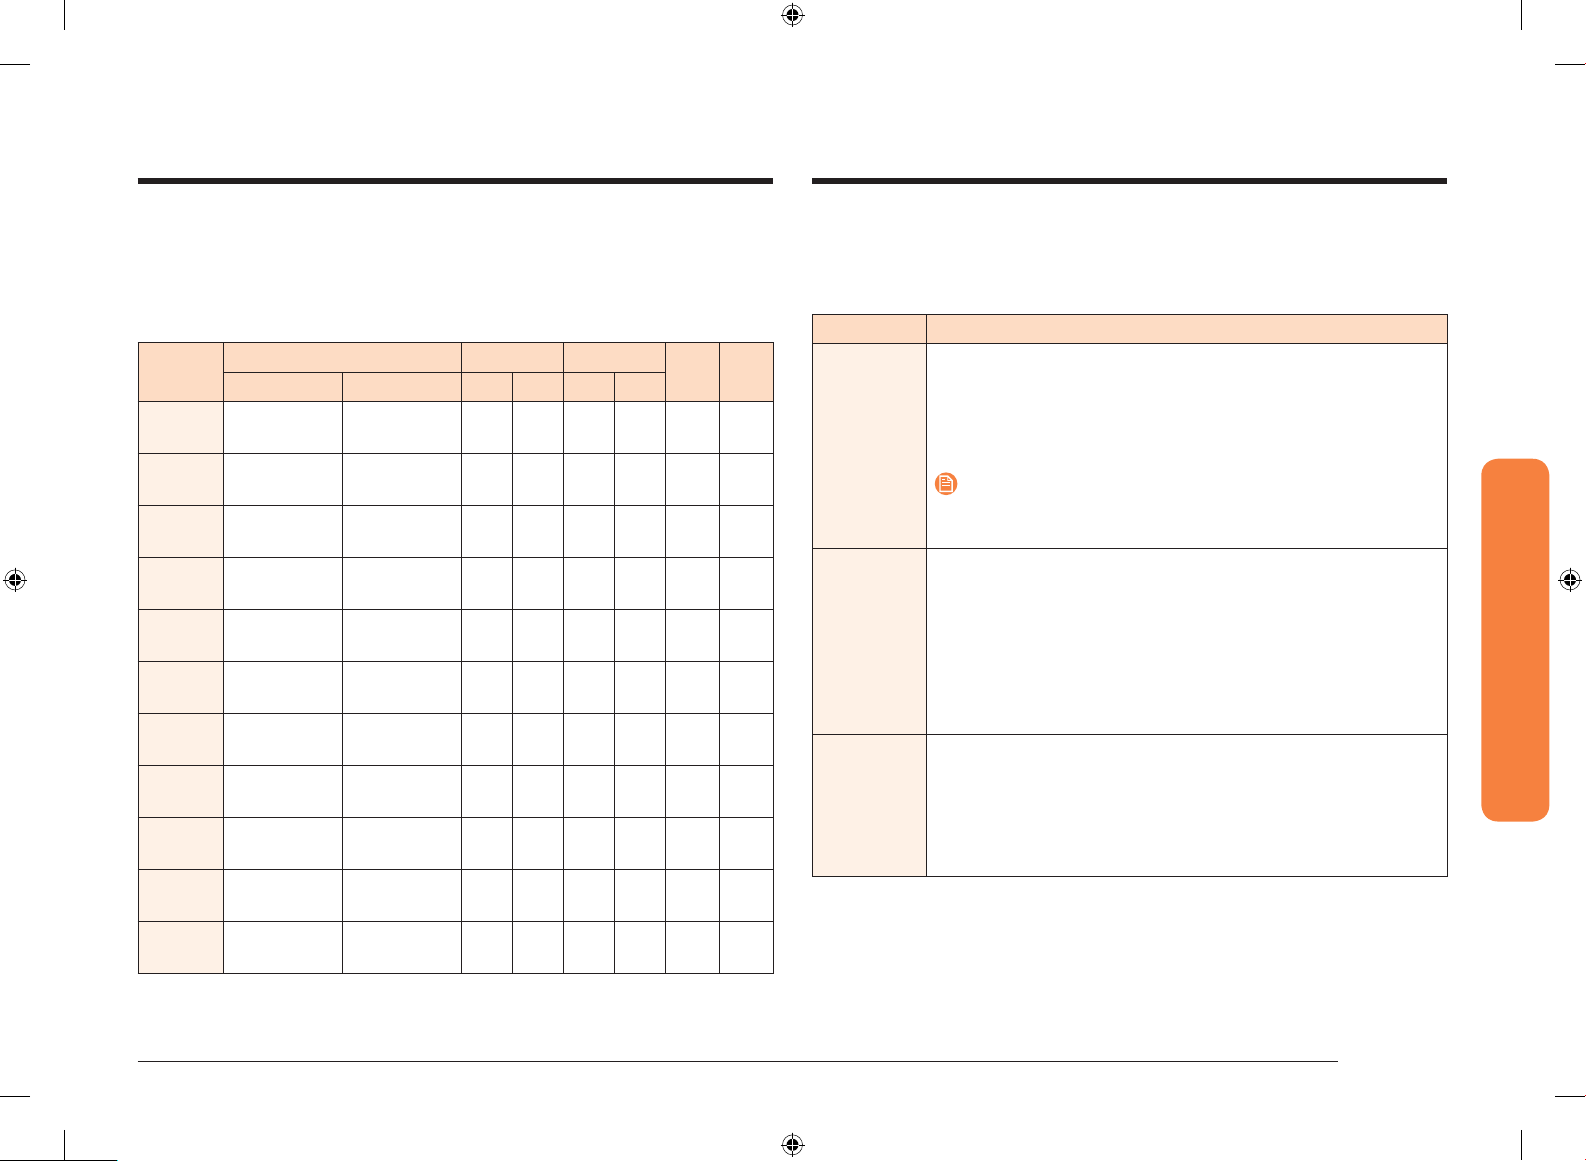
Cooking mode
Turn the Upper or Lower oven mode knob to select the cooking mode. Set the
temperature using the Upper or Lower oven Temp knob, or the numeric pad.
See Setting the Temperature on pages 21 and 22 and Basic baking and broiling
instructions starting on page 32.
Mode
Bake
Broil
Convection
Bake
Convection
Roast
Steam Bake
Steam
Roast
Steam
Bread Proof
Convection
Broil
Dehydrate
Temperature range Single oven *Twin oven
Single oven *Twin oven Upper Lower Upper Lower
175 °F (80 °C) 570 °F (300 °C)
LOW / MEDIUM
/ HIGH
175 °F (80 °C) 550 °F (285 °C)
175 °F (80 °C) 550 °F (285 °C)
230 °F (110 °C) -
550 °F (285 °C)
230 °F (110 °C) -
550 °F (285 °C)
95 °F (35 °C) 105 °F (40 °C)
175 °F (80 °C) 550 °F (285 °C)
100 °F (40 °C) 225 °F (105 °C)
175 °F (80 °C) 480 °F (250 °C)
LOW / MEDIUM
/ HIGH
175 °F (80 °C) -
480 °F (250 °C)
175 °F (80 °C) -
480 °F (250 °C)
230 °F (110 °C) -
480 °F (250 °C)
O O - O O -
O O O - - -
O O O O O O
O O O - O O
O - O - O -
- O - - - O -
- O - - - - -
- - O - - - -
- 0 O - - - -
Temp
probe
preheat
No
* To use the twin ex oven functionality, you must insert the divider into the
upper oven and divide it into an upper and lower compartment. See page 41.
** None means that a factory set temperature is applied for the best performance.
You cannot adjust this temperature.
Mode Instruction
• Bake is used to cook cakes, cookies, and casseroles. Always
preheat the oven rst.
• Baking temperatures and times will vary depending on the
ingredients and the size and shape of the baking pan used.
Bake
• Dark or nonstick coatings may cook faster with more browning.
NOTE
For performance reasons, the convection fan may turn on or off
during baking.
• Broiling is a method of cooking tender cuts of meat by direct
heat under the broil element of the oven.
• The high heat cooks quickly and gives a rich, brown outer
Broil
appearance. Broil mode is best for meats, sh, and poultry up
to 1 inch thick.
• Always preheat the oven for 5 minutes before broiling.
• See the Broiling recommendation guide section starting on
page 31.
• Convection Bake uses a fan to circulate the oven’s heat
evenly and continuously within the oven.
Convection
Bake
• This improved heat distribution allows for even cooking and
excellent results when you are using multiple racks at the
same time.
• Breads and pastries brown more evenly.
Operating the oven
Keep Warm **None - O O - - - -
Bread Proof
95 °F (35 °C) 105 °F (40 °C)
- - O - - - -
O = Available - = Not Available
English 29
NV51M9770DS_AA_DG68-01001A-00_EN+MES+CFR.indb 29 2017-07-26 4:07:25
Operating the oven
Operating the oven
Mode Instruction
• Convection Roast is good for cooking large tender cuts of
meat, uncovered. The convection fan circulates the heated air
evenly over and around the food.
Convection
Roast
Steam Bake
Steam Roast
Steam Bread
Proof
• Meat and poultry are browned on all sides as if they were
cooked on a rotisserie.
• The heated air seals in juices quickly for moist and tender
results while, at the same time, creating a rich golden brown
exterior.
• Steam Bake provides excellent baking conditions for breads,
pastries, and desserts by increasing moisture content and
improving texture and avor.
• See the Steam cook recommendation guide section starting
on page 32.
• Steam Roast provides excellent cooking conditions for
roasted meats or poultry by maintaining a crispy surface
while sealing in the juices for a moist and tender result.
• See the Steam cook recommendation guide section starting
on page 32.
• For bread dough (yeast dough and sour dough), added steam
shortens fermentation time and keeps the surface of the
dough from drying out.
• Place the dough on rack position 1 or 2. There is no need to
cover it with cloth or with plastic wrap.
• For the best result, always start the Steam Bread Proof
option with a cool oven.
• Do not use Steam Bread Proof for warming food. The
proong temperature is not hot enough to keep food warm.
Mode Instruction
• Convection Broil is similar to Broil, but with the additional
benet of air circulation by the motorized fan in the rear of
the oven.
• During Convection Broil mode, the broil element will cycle on
Convection
Broil
Dehydrate
and off in intervals to maintain oven temperature while the
fan circulates the hot air.
• Use this mode for thicker cuts of meat, sh, and poultry.
Convection Broil gently browns the exterior and seals in the
juices.
• For optimum browning, preheat the broil element for 5
minutes.
• Dehydrate dries food or removes moisture from food via
heat circulation.
• After drying the food, keep it in a cool and dry place.
• For fruit, adding lemon or pineapple juice or sprinkling sugar
on the fruit helps the fruit retain sweetness.
• See the table below for Dehydrate settings.
Category Rack position Temperature (°F)
Vegetables or Fruit 3 or 4 100-150
Meat 3 or 4 145-225
NOTE
Dehydrate is also included in the Healthy Cook mode for the
upper oven.
30 English
NV51M9770DS_AA_DG68-01001A-00_EN+MES+CFR.indb 30 2017-07-26 4:07:26
 Loading...