


Samsung CLP-500 Setup Guide

COLOR LASER PRINTER
Setup Guide

C
ONTENTS
Step 1.
Step 2.
Step 3.
Step 4.
Step 5.
Step 6.
Step 7.
Step 8.
Unpacking ............................................. 3
Understanding Your Printer ................... 5
Installing the Imaging Unit, Transfer Belt
and Toner Cartridges ............................. 7
Loading Paper ..................................... 16
Connecting a Printer Cable .................. 19
Using a Parallel Cable .................................19
Using a USB Cable .....................................20
For Networking Printing ..............................21
Turning the Printer On ........................ 22
Printing a Demo Page .......................... 23
Changing the Display Language .......... 23
Step 9.
Installing the Printer Software ............ 24
Installing Printer Software in Windows ..........24
Reinstalling Printer software ........................26
Removing Printer software ..........................26
Changing the Display Language ...................26
Step 10.
Viewing the User’s Guide ................... 27
In Windows ..............................................27
In Linux ...................................................28
2
S
ETUP
G
UIDE
:
Step 1.
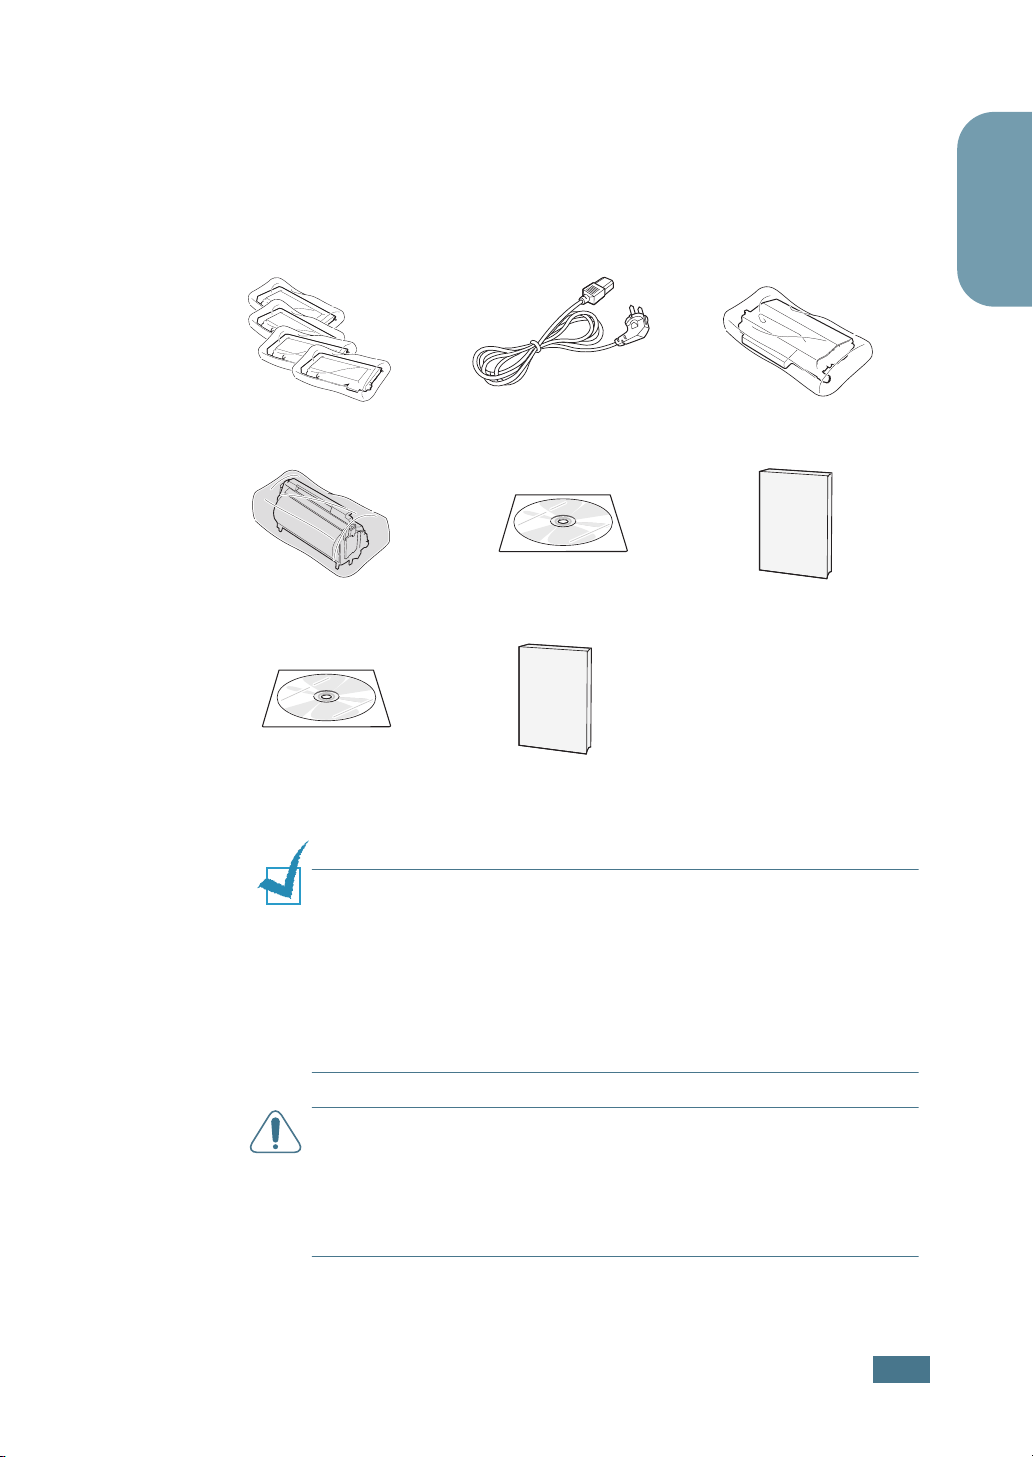
Toner Cartridges Power Cord Transfer Belt
Unpacking
1
Remove the printer and all of the accessories from the
packing carton. Make sure that the printer has been packed
with the following items:
Imaging Unit CD-ROM Setup Guide
English
SyncThru CD-ROM
(CLP-500N only)
N
OTES
:
• If any items are missing or damaged, notify your dealer
immediately.
• Components may differ from one country to another.
• The CD-ROM contains the printer driver, the User’s Guide, and
the Adobe Acrobat Reader program.
• The power cord may be different depending on your country.
C
AUTION
and cassette. Use safe lifting and handling techniques. If you need
to move the printer it must be moved by two people. Use the
lifting handles located as shown in the diagram (see page 5). Back
injury could be caused if a single person attempts to lift the
printer.
SyncThru Quick Guide
(CLP-500N only)
This printer weighs 35kg including developer cartridge
S
ETUP
G
UIDE
3
:
2
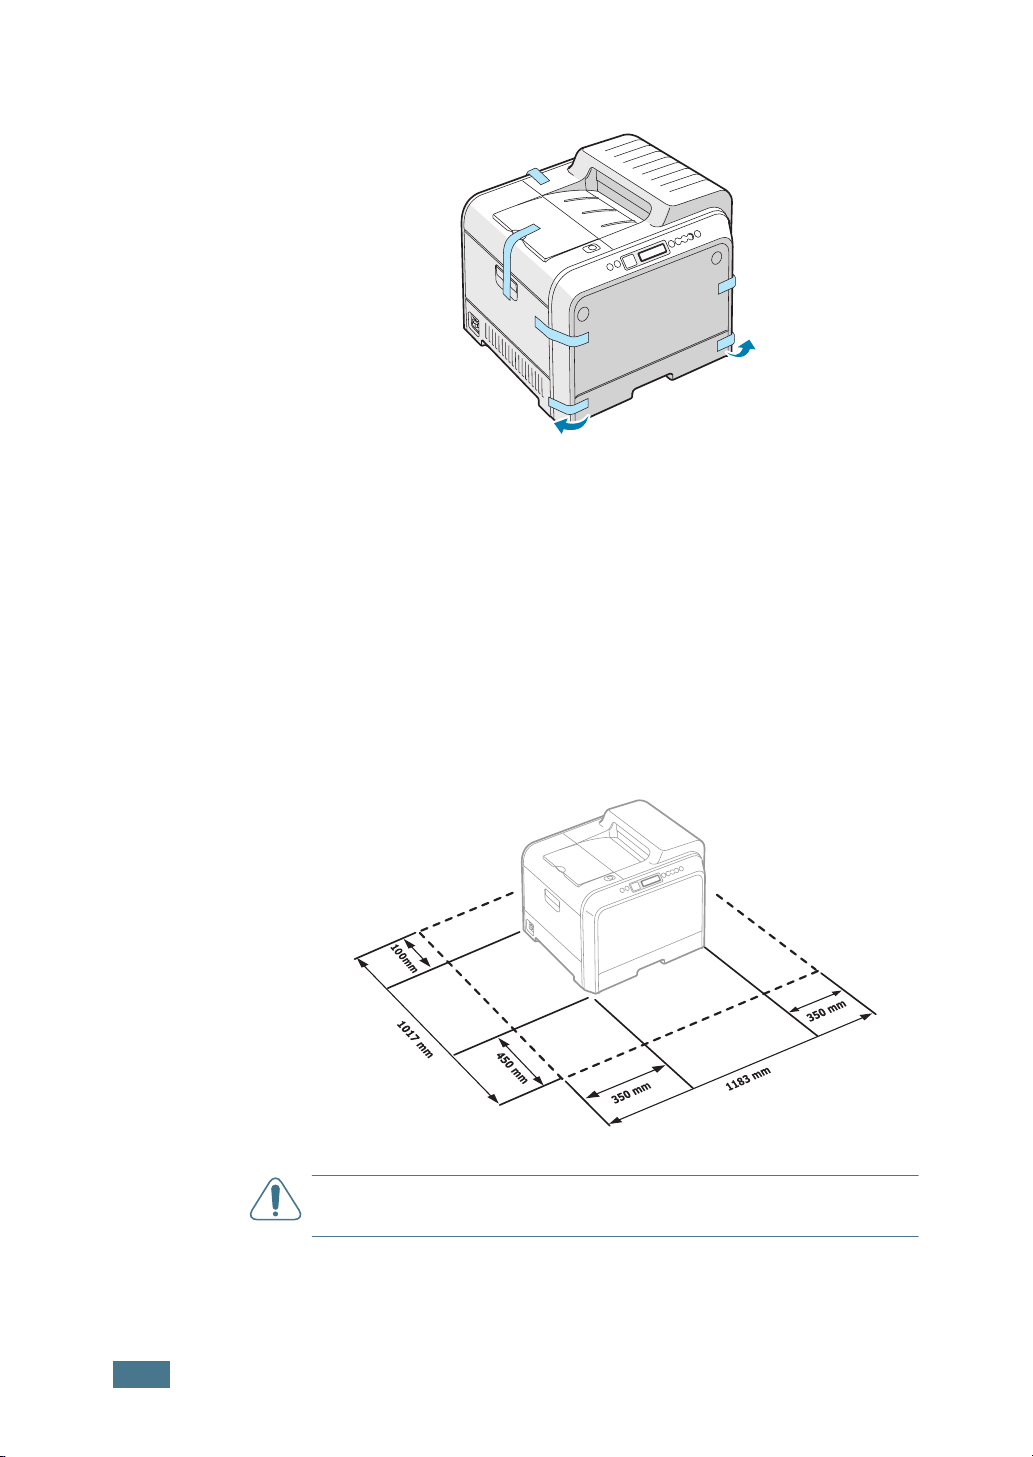
Carefully remove all of the packing tapes from the printer.
3
Pull the paper tray out of the printer and remove the
packing tapes from the tray.
4
Select a location for the printer:
•Leave enough room to open the printer trays, covers, and
allow for proper ventilation.
•Provide the proper environment:
– A firm, level surface
– Away from direct airflow of air conditioners, heaters, or
ventilators
– Free of temperature, sunlight, or humidity extremes or
fluctuations
– Clean, dry, and free of dust
C
AUTION
do not, the print quality problems can occur.
4
S
ETUP
G
UIDE
You must place your printer in the level surface. If you
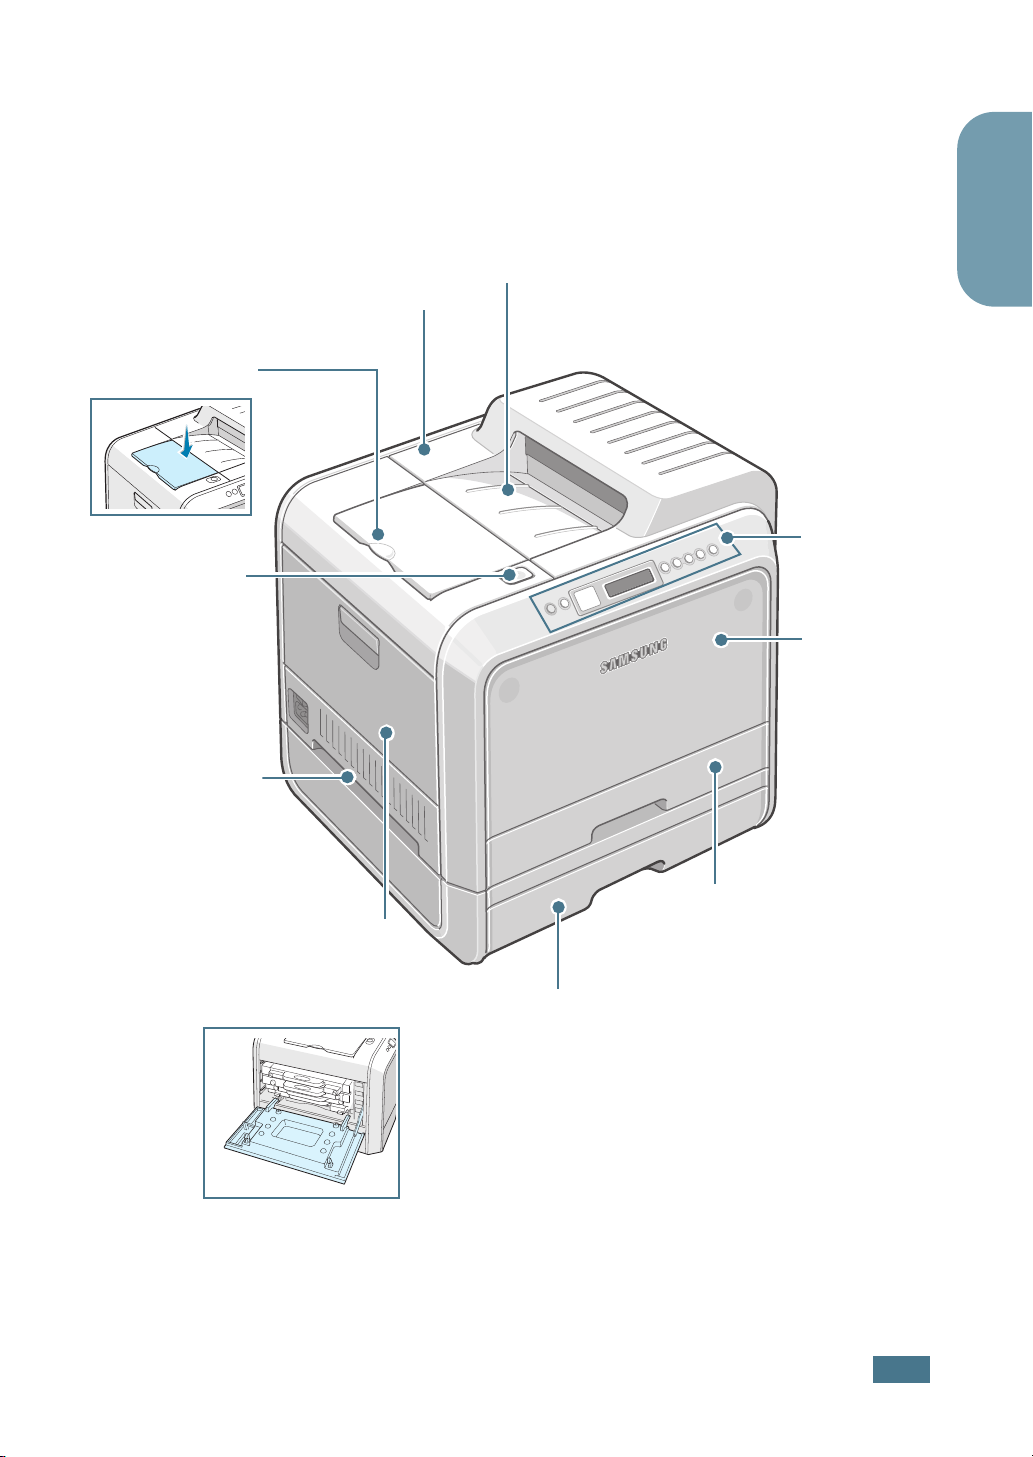
Step 2.
(Open to install the imaging unit,
Output Support
Top Cover
Release Button
Understanding Your Printer
These are the main components of your printer:
Top Cover
and transfer belt.)
Paper Output Tray
English
Control Panel
(refer to Chapter
5 in the User’s
Guide which is
on the CDROM.)
Front Cover
(Open to replace
the waste toner
container.)
Handle
(Lifting handles are
located at the lower
edge of both sides
of the printer.)
(To install the toner cartridges
press the top cover release
button and open fully.)
Tray 1
(250-sheet paper feeder)
Left Cover
Optional Tray 2
(500-sheet paper feeder)
S
ETUP
G
UIDE
5
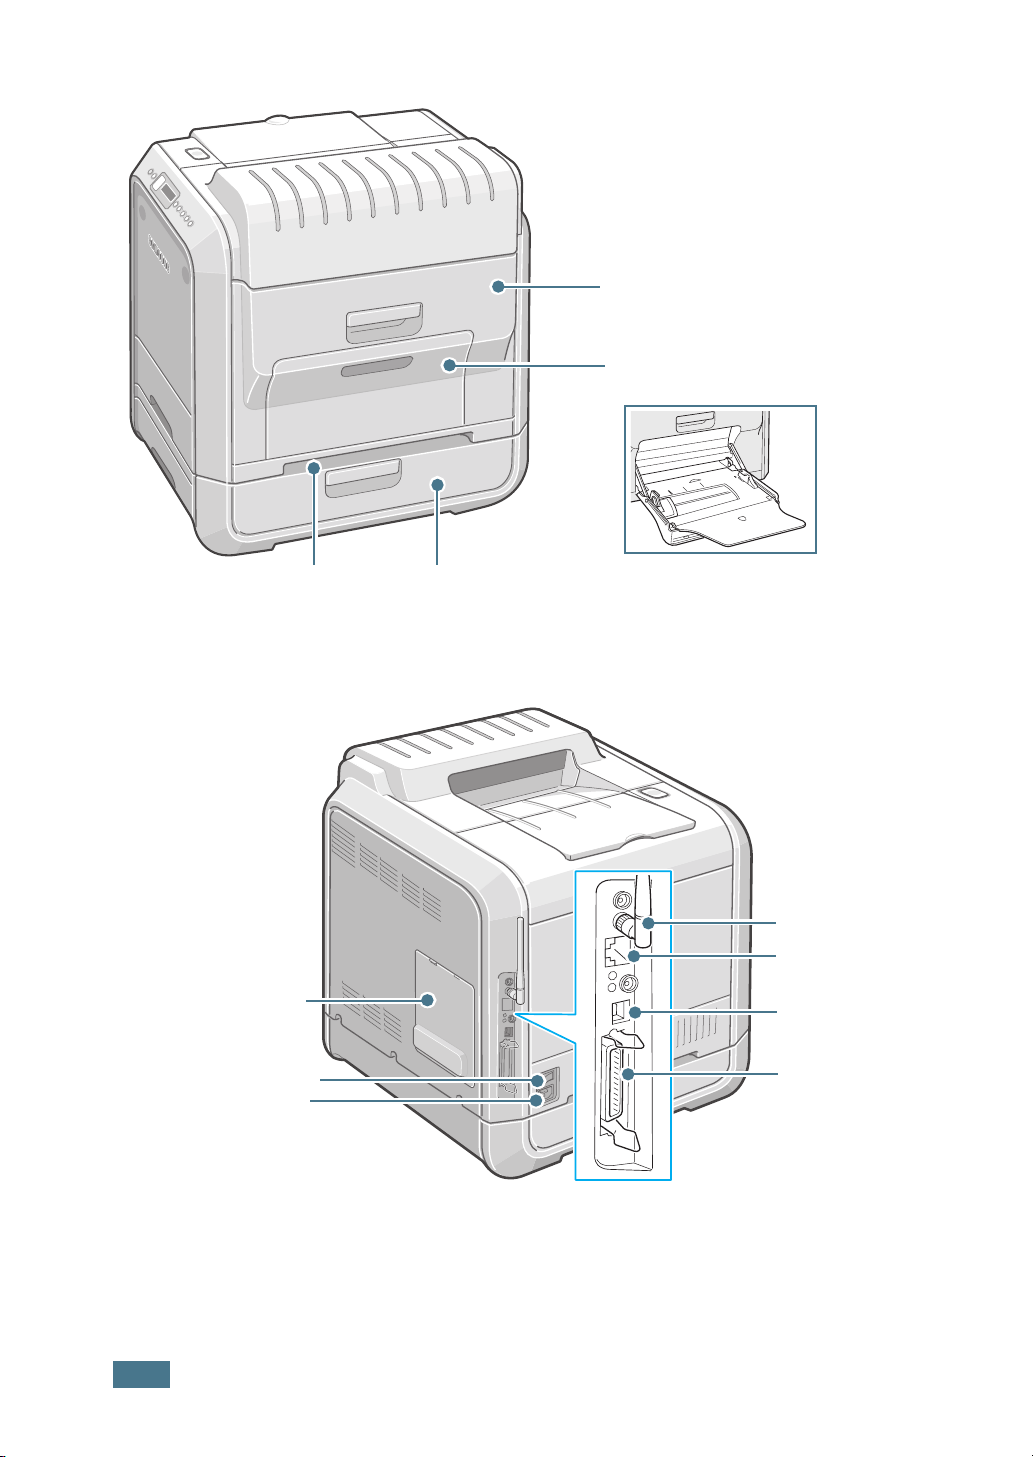
Right Cover
(Open to remove paper jams.)
Muti-purpose Tray
(Open to load special print materials.)
Handle
(Use it to lift the printer.)
Control Board
Cover
(Open to install optional
accessories.)
Power Switch
Power Receptacle
Optional Tray 2 Jam Cover
(Open to remove jams in the optional tray 2.)
Wireless Network
Antenna
Network Port
*
**
USB Port
Parallel Port
***
* This wireless network port is not supplied with the printer. It is an option that must be purchased and
installed separately.
** The network port is fitted as standard on the CLP-500N. CLP-500 users can purchase and install
separately an optional Network Card. For details, see the User's Guide of the printer in the CD-ROM.
*** The parallel port may not be available depending on your country.
6
S
ETUP
G
UIDE

:
Step 3.
Installing the Imaging Unit, Transfer
Belt and Toner Cartridges
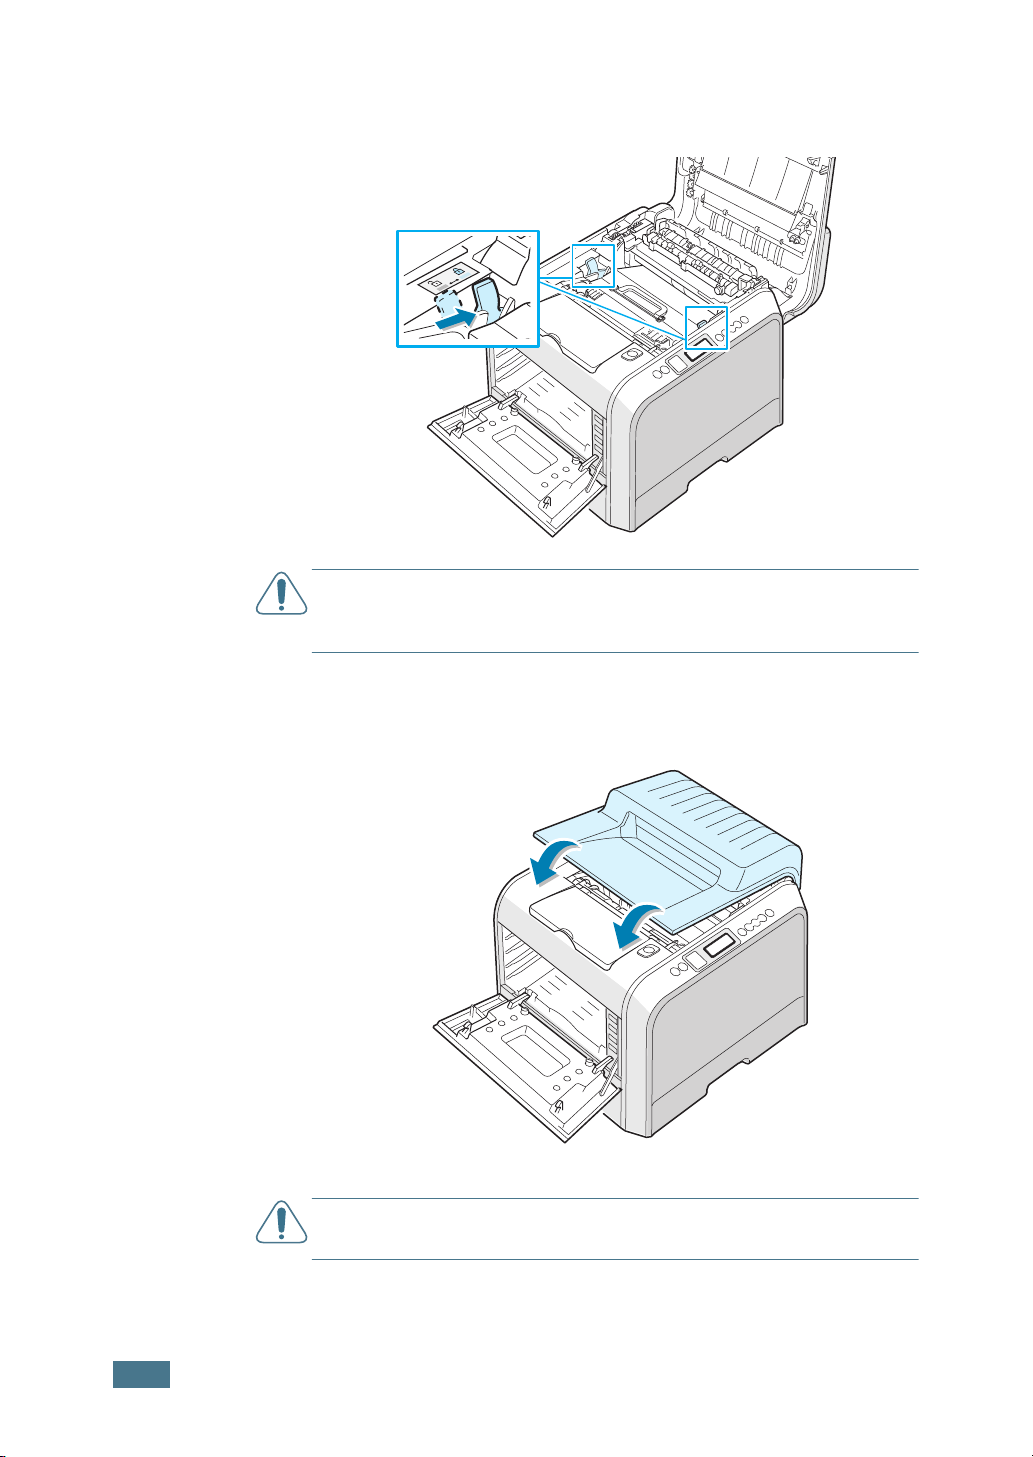
1
Using the handle, completely open the left cover until it is at
right angles to the main frame.
English
C
AUTION
release button does not press.
2
Press the top cover release button to unlatch the top cover
and open it all the way.
If the left cover is not completely open, the top cover
Top cover release
button
S
ETUP
G
UIDE
7
3
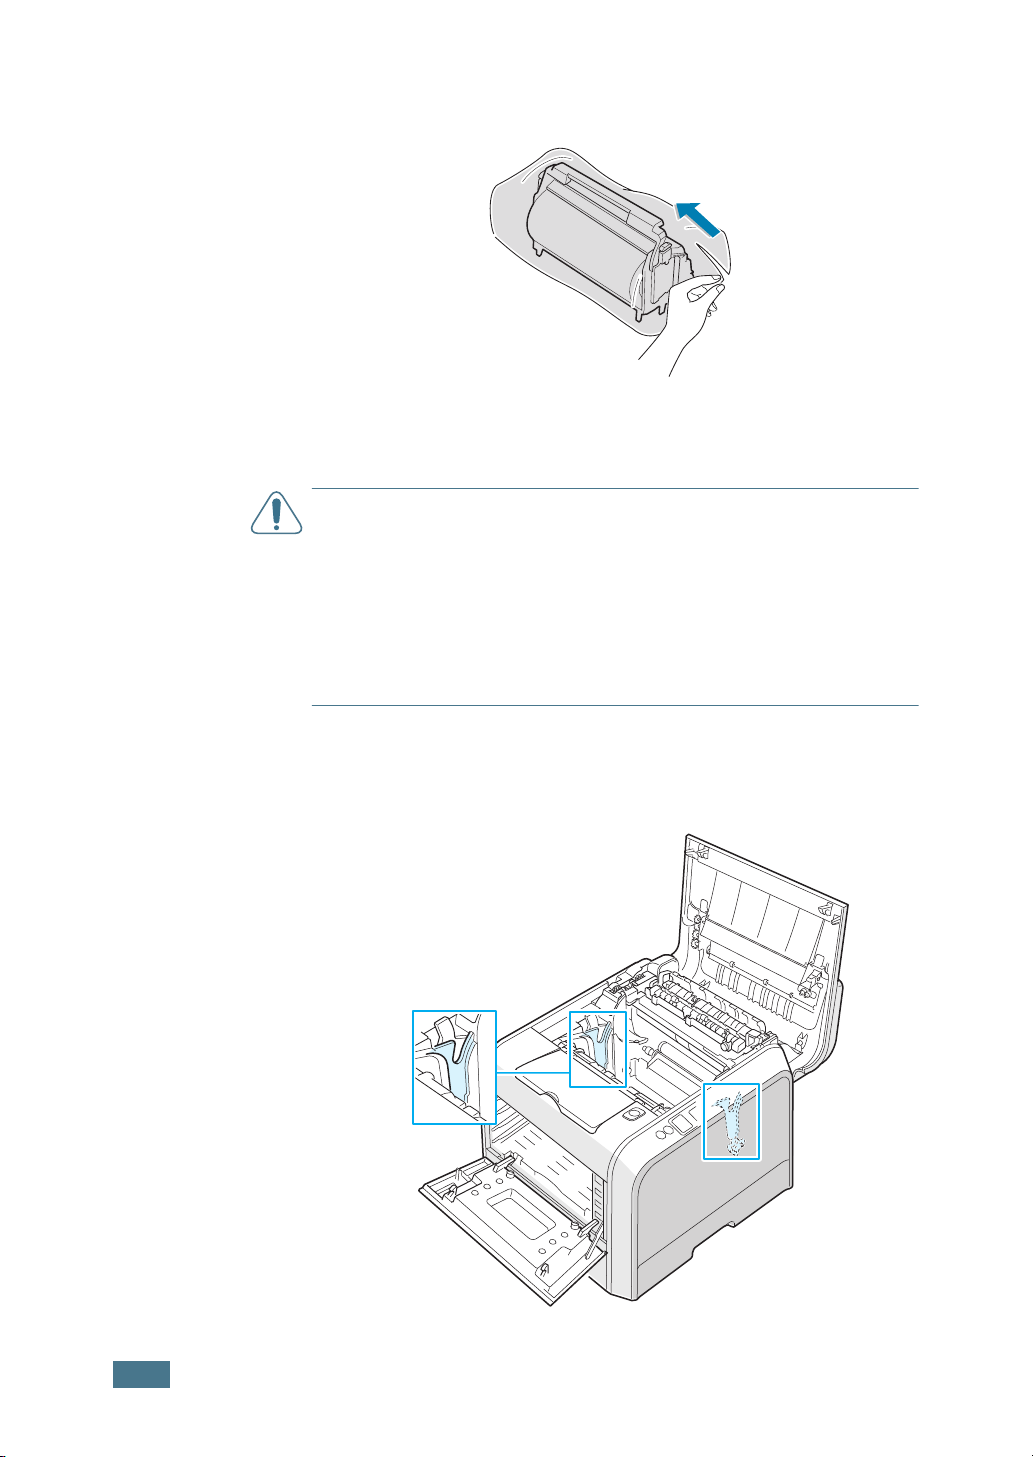
Take the imaging unit out of the package using the handle.
4
Remove the paper covering the imaging unit by removing
the tape under the handle of the imaging unit.
C
AUTIONS
• Do not use sharp objects, such as a knife or scissors, to open the
imaging unit package and tape on the protective paper liner. You
could damage the surface of the imaging unit.
• To prevent damage, do not expose the imaging unit to light for
more than a few minutes. Cover it with black paper, if necessary.
• Do not touch the surface of the green roller on the imaging unit
or print quality problems can occur.
:
5
Locate the imaging unit slots inside the printer, one on each
side.
8
S
ETUP
G
UIDE
6
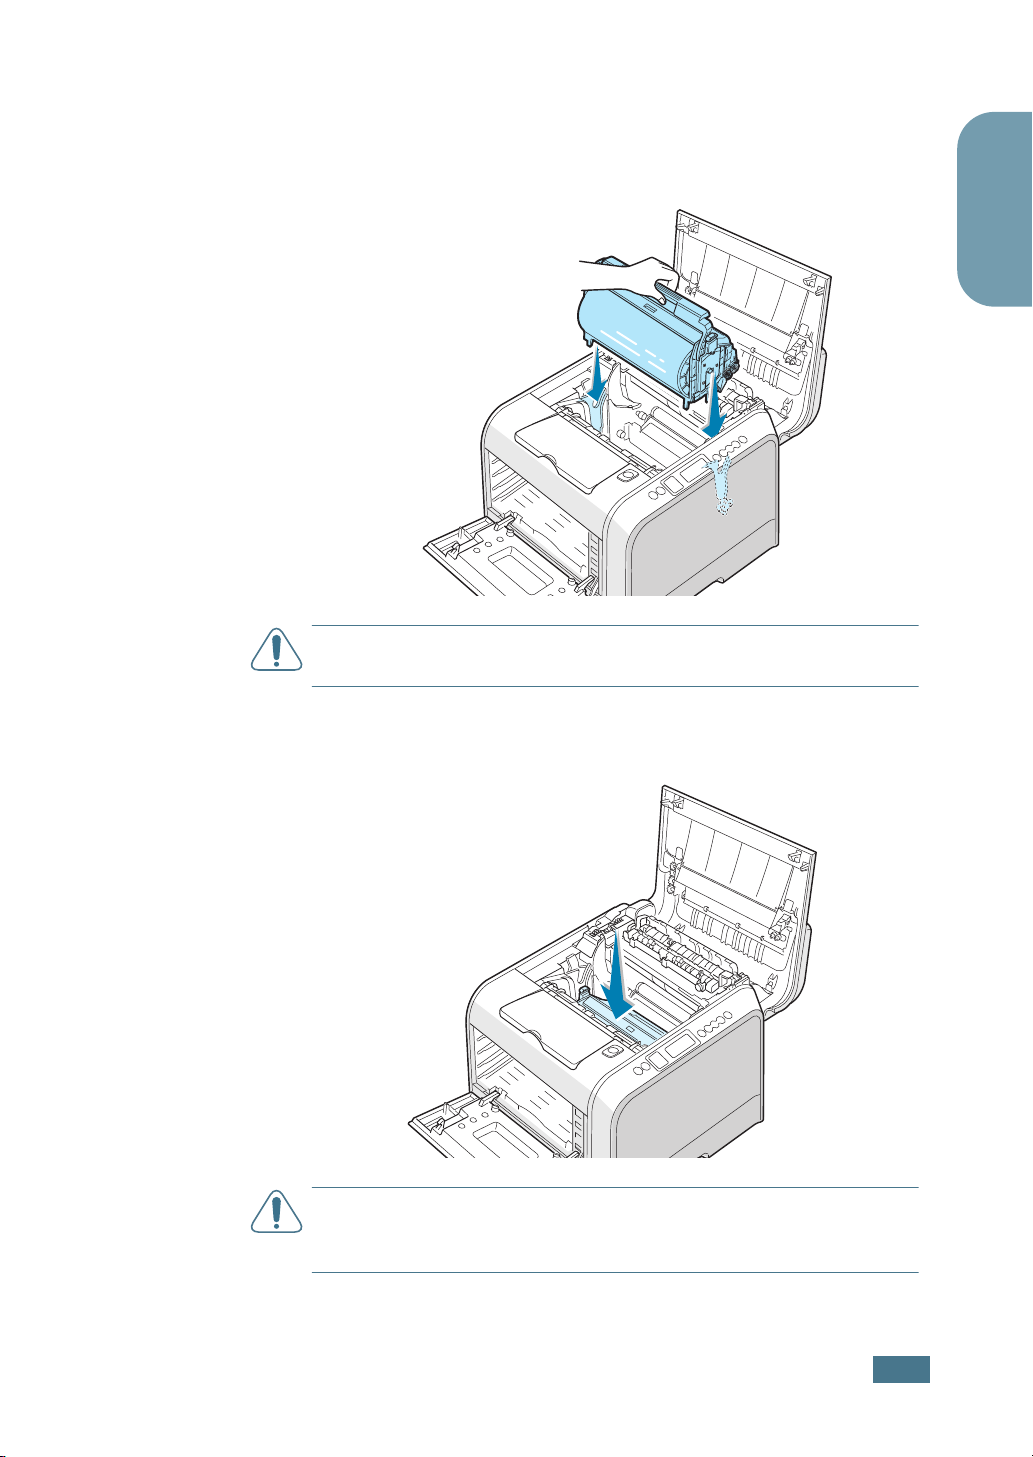
Hold the handle on the imaging unit with the green roller
facing you. Align the imaging unit with the slots in your
printer so that the colors on both sides of the imaging unit
slide into the corresponding colors of the slots.
C
AUTION
and damage the surface of the green roller.
: Insert the imaging unit carefully so as not to scratch
English
7
Slide the imaging unit down into the printer until it cannot
be pushed in any further and fold the handle down.
C
AUTION
to light for more than a few minutes. Close the top and left
cover should the setup need to be halted for any reason.
:
To prevent damage, do not expose the imaging unit
S
ETUP GUIDE
9
8
Take the transfer belt out of the package.
9
Remove the paper covering the transfer belt by removing
the tape.
C
AUTION
open the transfer belt package. You could damage the surface of
the transfer belt.
10
: Don’t use sharp objects, such as a knife or scissors, to
Pinch the transfer belt tention levers on both sides of the
transfer belt. Then, pull them out, as shown below.
10
S
ETUP GUIDE
11
Locate the transfer belt slots inside the printer, one on each
side.
12
Hold the handle on the transfer belt and align it with the
slots in your printer.
N
OTE
: Keep the transfer belt level, do not turn the transfer belt
over otherwise looses toner may be spilled.
English
13
Slide the transfer belt down into the printer. Press it firmly
to make sure that it latches into place.
S
ETUP GUIDE
11
14
Firmly push the lock levers on each side towards the top
cover, as shown below, to lock the transfer belt into place.
C
AUTION
imaging unit can be exposed to light. This causes damage to the
imaging unit.
: If you open the left cover for a few minutes, the
15
After making sure that the left cover is open, close the top
cover. Make sure that it is securely latched.
C
AUTION
open. This may cause damage to the printer.
: Do not try to close the left cover with the top cover
12
S
ETUP GUIDE
16
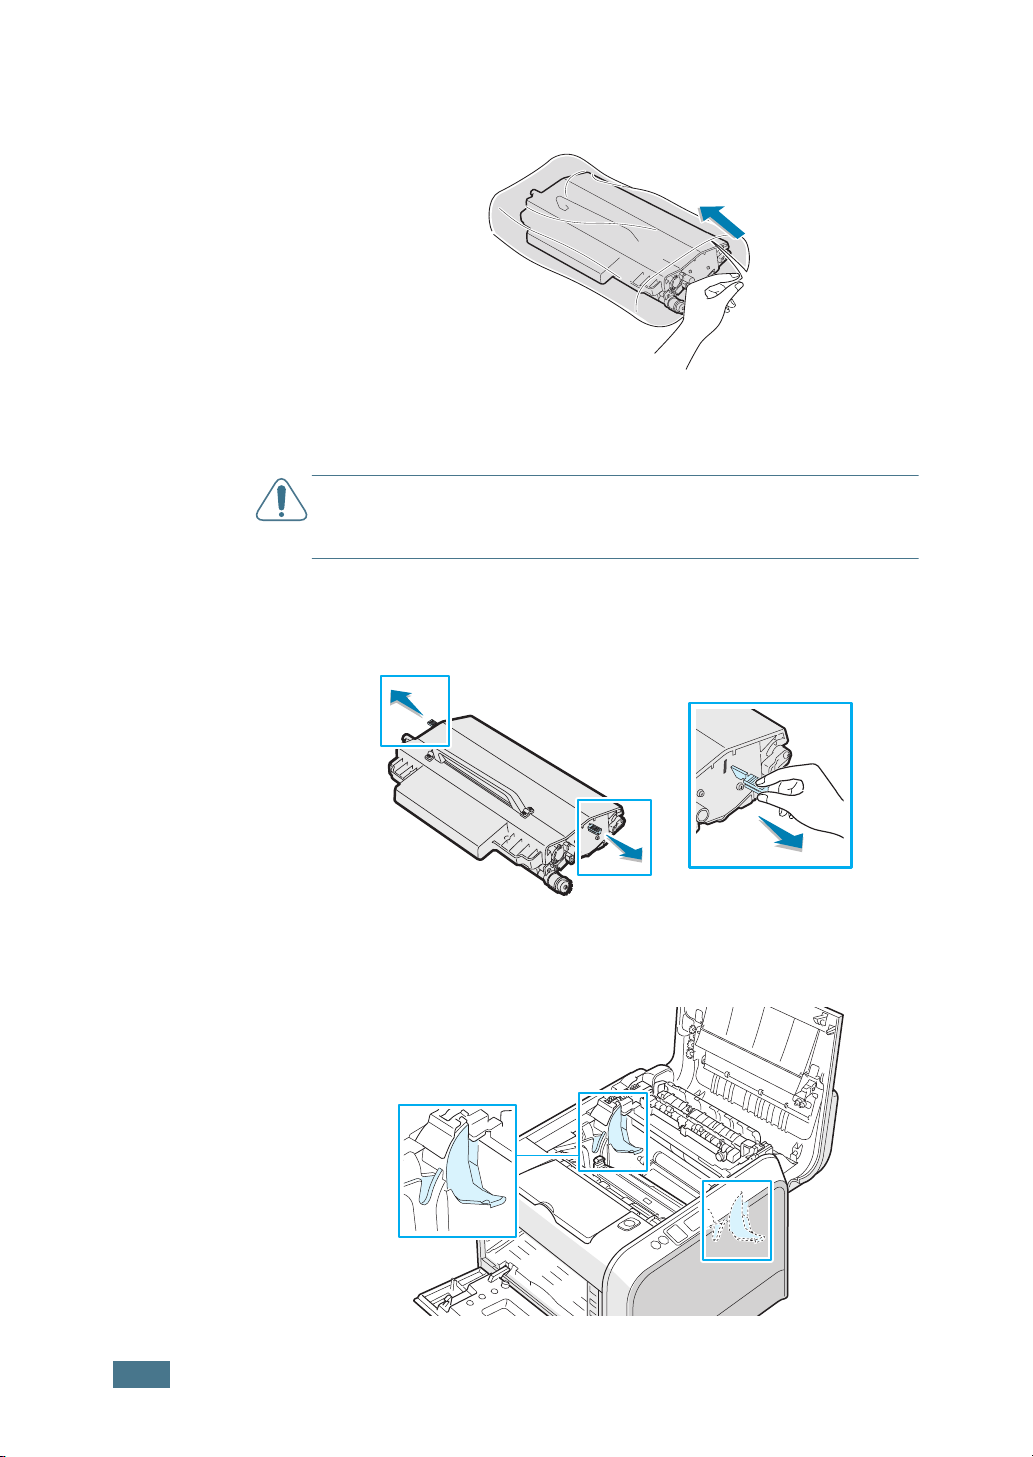
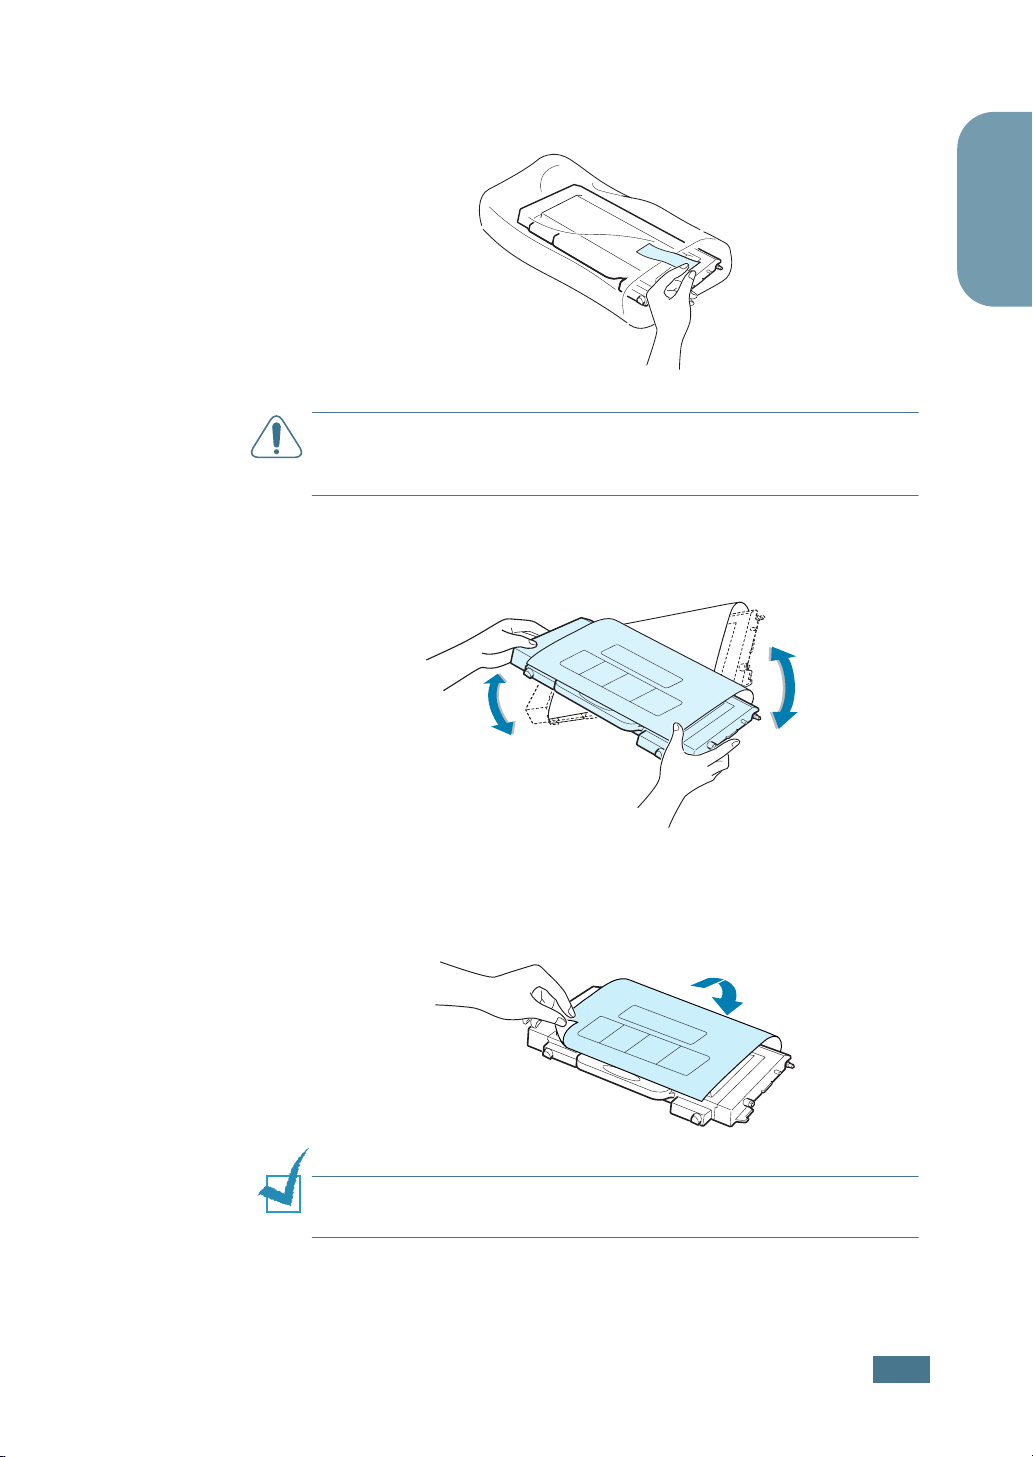
Take the toner cartridges out of their packages.
C
AUTION
to open the toner cartridges packages. You could damage the
surface of the toner cartridges.
17
: Do not use sharp objects, such as a knife or scissors,
Holding both sides of the cartridges, gently roll them from
side to side to distribute the toner.
English
18
Place the toner cartridges on a flat surface as shown and
remove the paper covering the toner cartridge by removing
the tape.
N
OTE
: If toner gets on your clothing, wipe it off with a dry cloth
and wash it in cold water. Hot water sets toner into fabric.
S
ETUP GUIDE
13
19
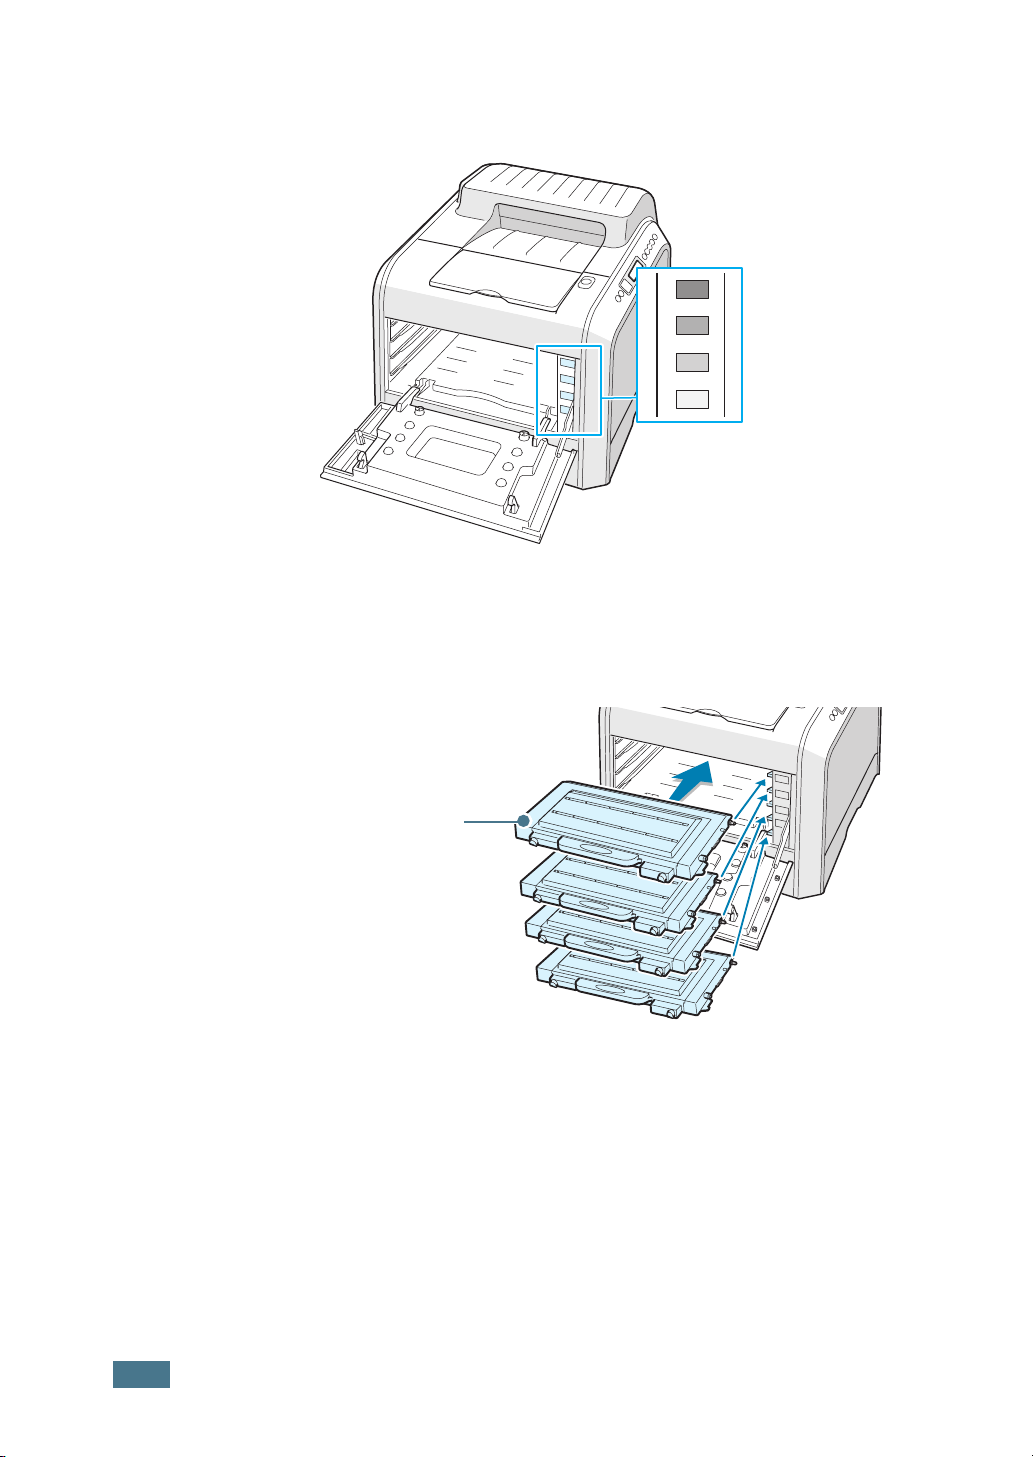
On the right hand side of the toner cartridge slot is a label
that identifies which color cartridge to fit into each slot.
K
Y
M
C
20
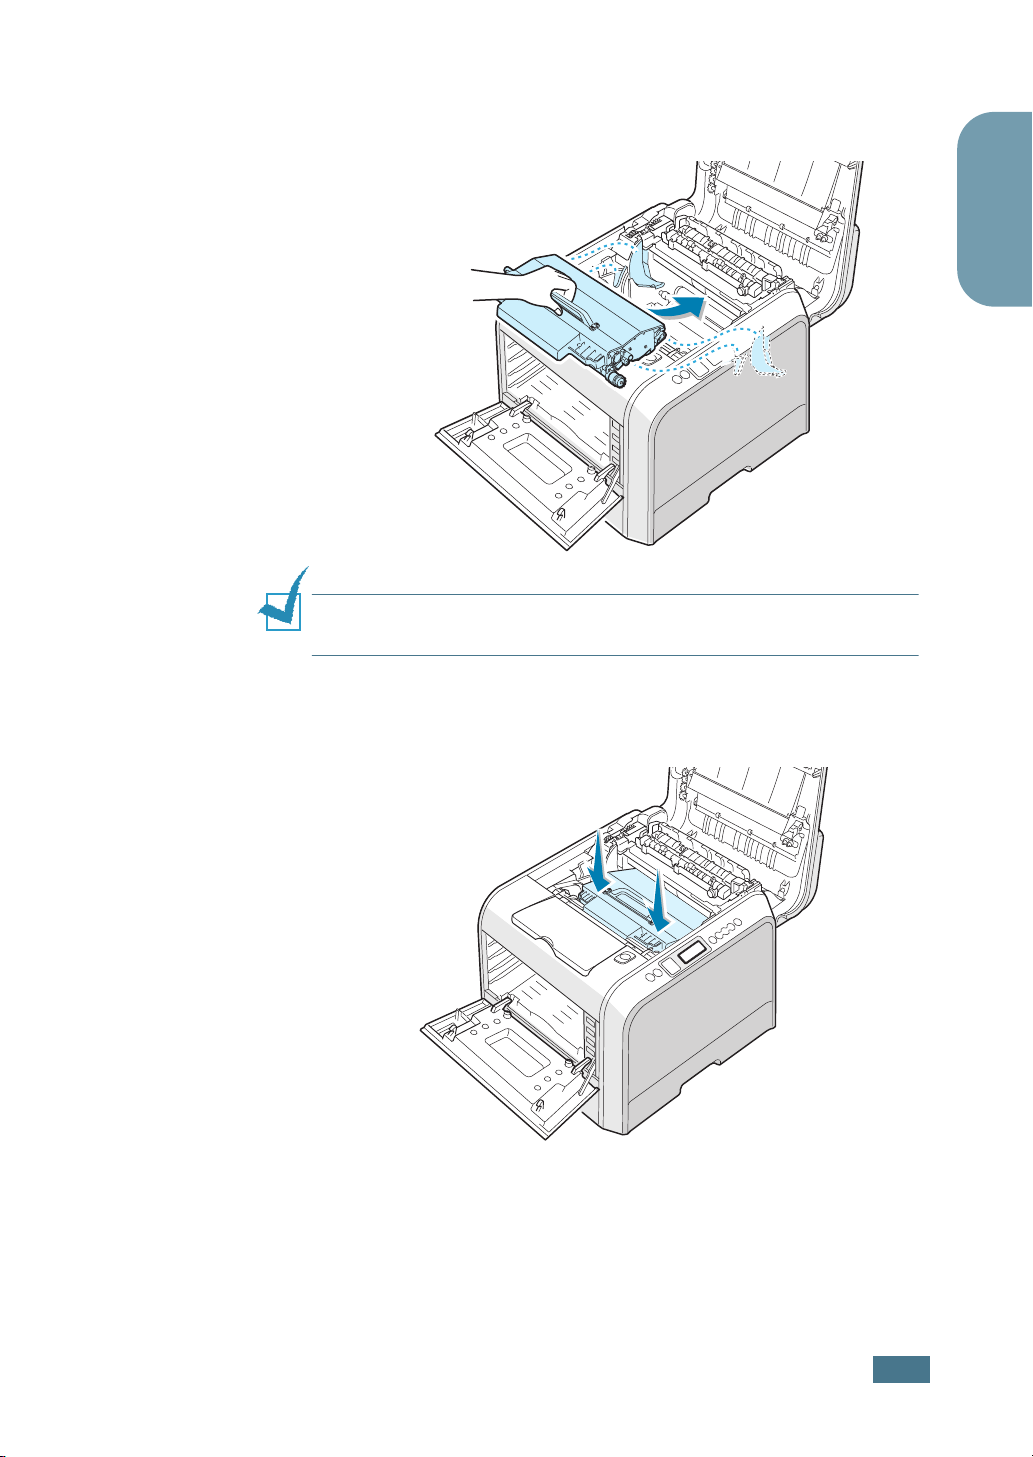
Holding each toner cartridge, insert them into their
Black
Yellow
Magenta
Cyan
corresponding positions shown in order of Cyan, Magenta,
Yellow and then Black. Using both hands, grip the cartridge
to insert into the slot. Then hold the handle to slide the
cartridge in.
Grip here.
14
S
ETUP GUIDE
K
Y
M
C
•When the toner cartridges are correctly installed the yellow
and black cartridges are not fully inserted. These will be
pushed into place when you close the left cover.

21
Close the left cover. Make sure that it is securely latched.
If you have installed the toner cartridges wrongly, the left
cover will not close properly. Check again to make sure the
cartridge colors correspond to those marked on the right
hand side. Never use force to close the cover.
N
OTE
: When printing text at 5% coverage, you can expect a
toner cartridge life of about 7,000 pages for black and 5,000 pages
for color. However, the toner cartridge that is shipped with the
printer prints 2,000 pages for black and white, 1,500 pages for
color.
English
S
ETUP GUIDE
15
Step 4. Loading Paper
The tray (Tray 1) can hold a maximum of 250 sheets of plain
paper. You can use A4 and letter-sized paper.
To load paper:
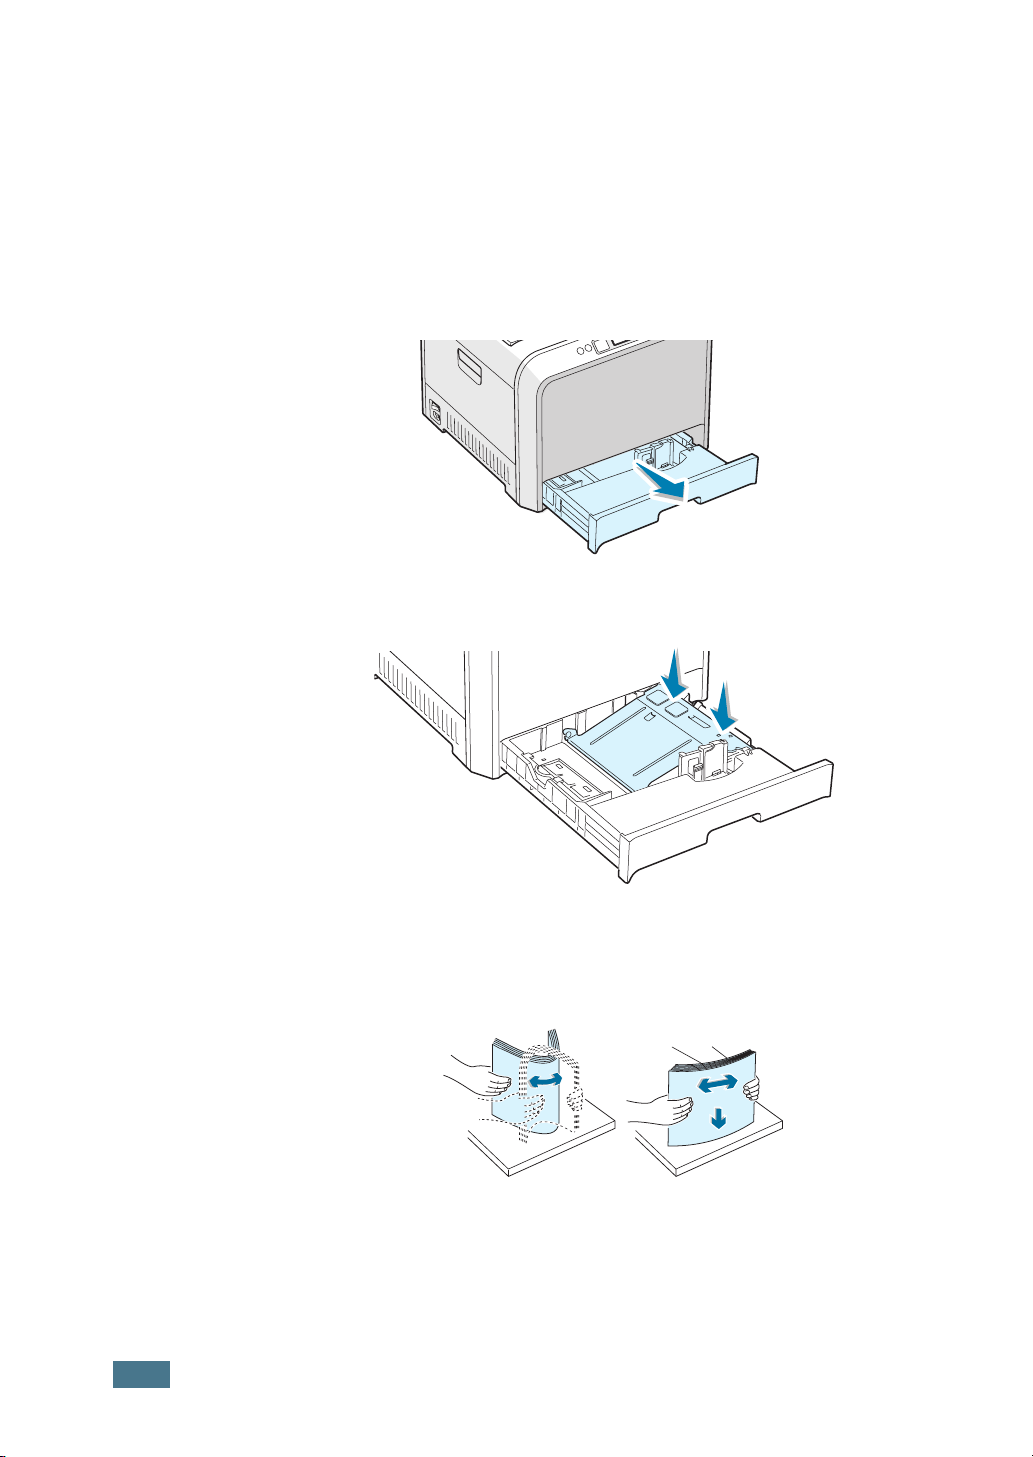
1
Pull the tray out of the printer.
2
Push down on the metal plate until it locks into position.
16
S
ETUP GUIDE
3
Flex the paper sheets back and forth to separate the pages
and then fan them while holding one edge. Tap the edges of
the stack on a flat surface to even it up.
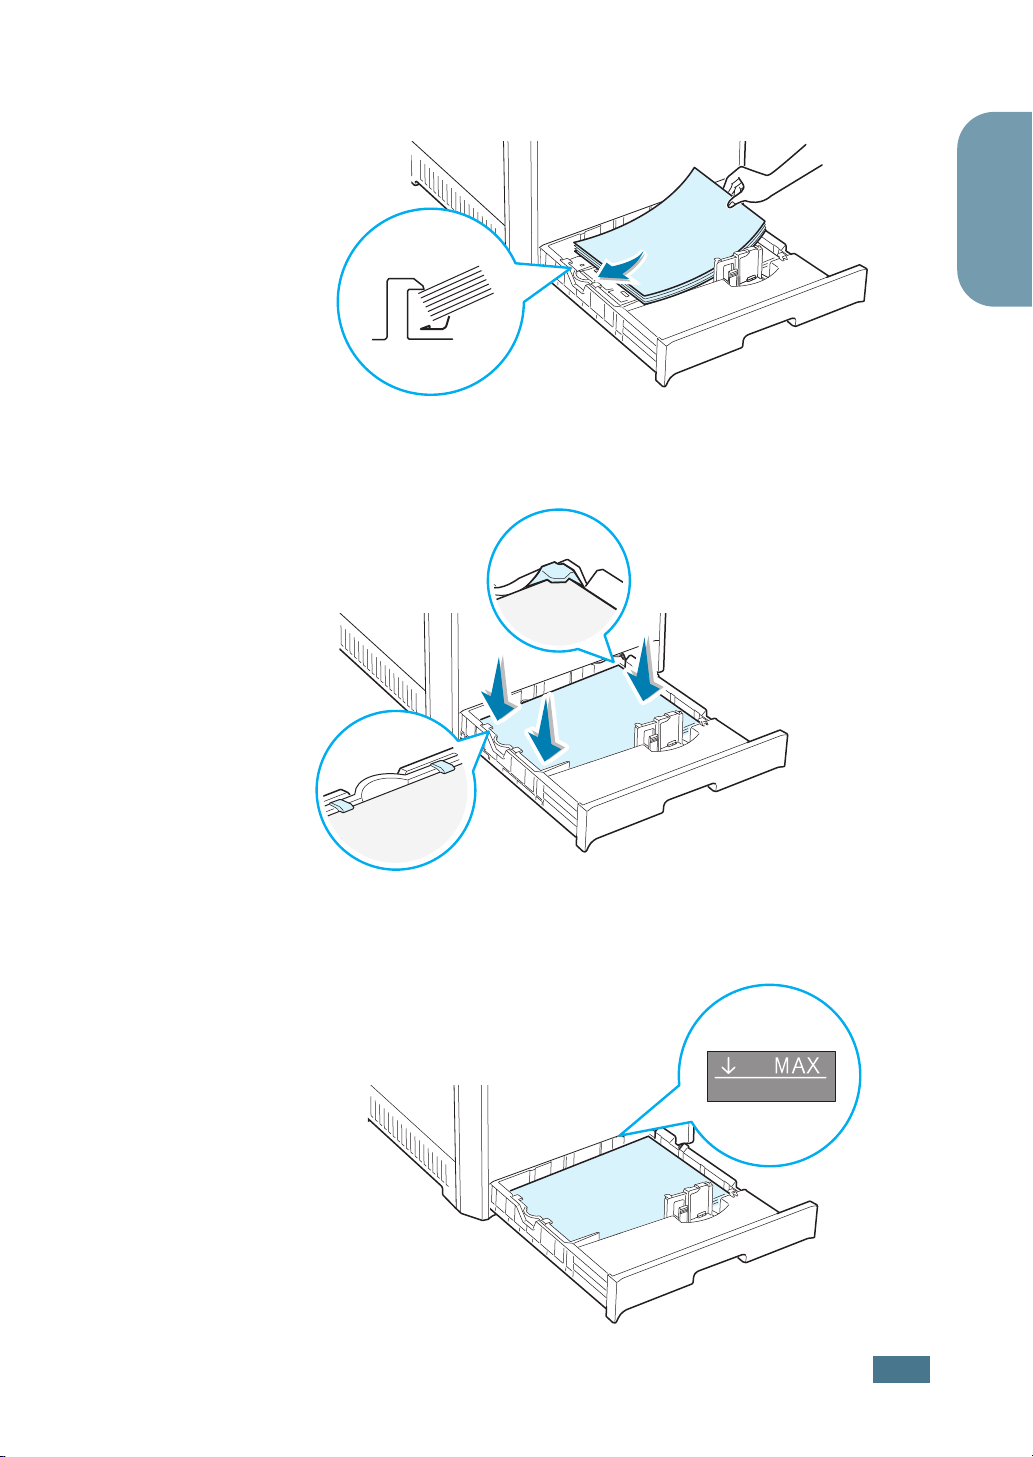
4
Load paper with the print side facing up.
Make sure that all four corners are flat in the tray and under
the corner brackets as shown below.
English
5
Do not exceed the maximum stack height. Overfilling the
tray may cause a paper jam.
S
ETUP GUIDE
17
6
Pinch the paper guide as shown and move it toward the
paper until it lightly touches the side of the stack. Do not
press the guide too tightly against the edge of the paper;
the guide may bend the paper.
N
OTE
: If you want to change the paper size in the tray, refer to
the User’s Guide of your printer supplied in the CD-ROM.
7
Slide the tray back into the printer.
18
S
ETUP GUIDE
N
OTES
:
• Do not push the width guide far enough to cause the material to
warp.
• If you do not adjust the width guide, it may cause paper jam.
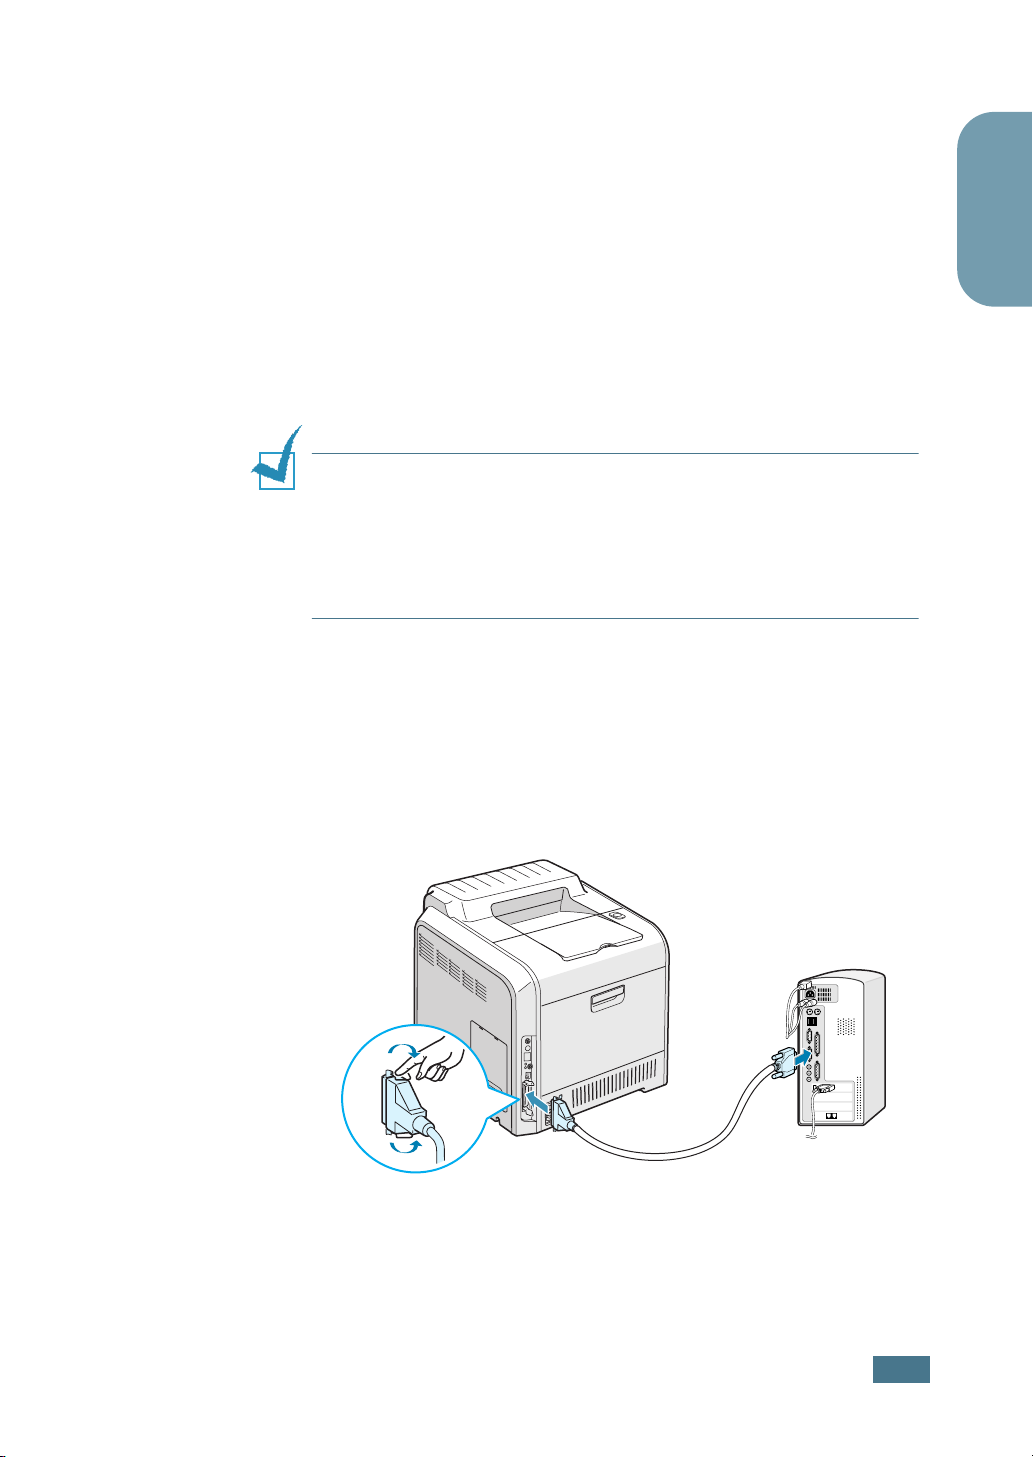
Step 5. Connecting a Printer Cable
You need to connect your printer to the computer with either a
parallel interface cable or a Universal Serial Bus (USB) cable.
Using a Parallel Cable
N
OTES
:
• The parallel port may not be available depending on your
country.
• To connect the printer to the parallel port of the computer
requires a certified parallel cable. You need to buy a IEEE1284
compliant cable that is within 3m in length.
1
Make sure that both the printer and the computer are
turned off.
English
2
Plug the parallel printer cable into the connector on the
back of the printer.
Push the metal clips down to fit inside the notches on the
cable plug.
To the parallel port on
your computer
3
Connect the other end of the cable to the parallel interface
port on your computer, and tighten the screws.
See the User’s Guide of your computer, if you need help.
S
ETUP GUIDE
19

Using a USB Cable
N
OTE
: Connecting the printer to the USB port of the computer
requires a certified USB cable. You will need to buy a USB 2.0
compliant cable that is within 3m in length.
1
Make sure that both the printer and the computer are
turned off.
2
Plug the USB printer cable into the connector on the back of
the printer.
To the USB port on
your computer
3
Connect the other end of the cable to the USB port on your
computer.
See the User’s Guide of your computer, if you need help.
N
OTE
: To print using the USB interface, you must run Windows
98/Me/2000/XP.
20
S
ETUP GUIDE
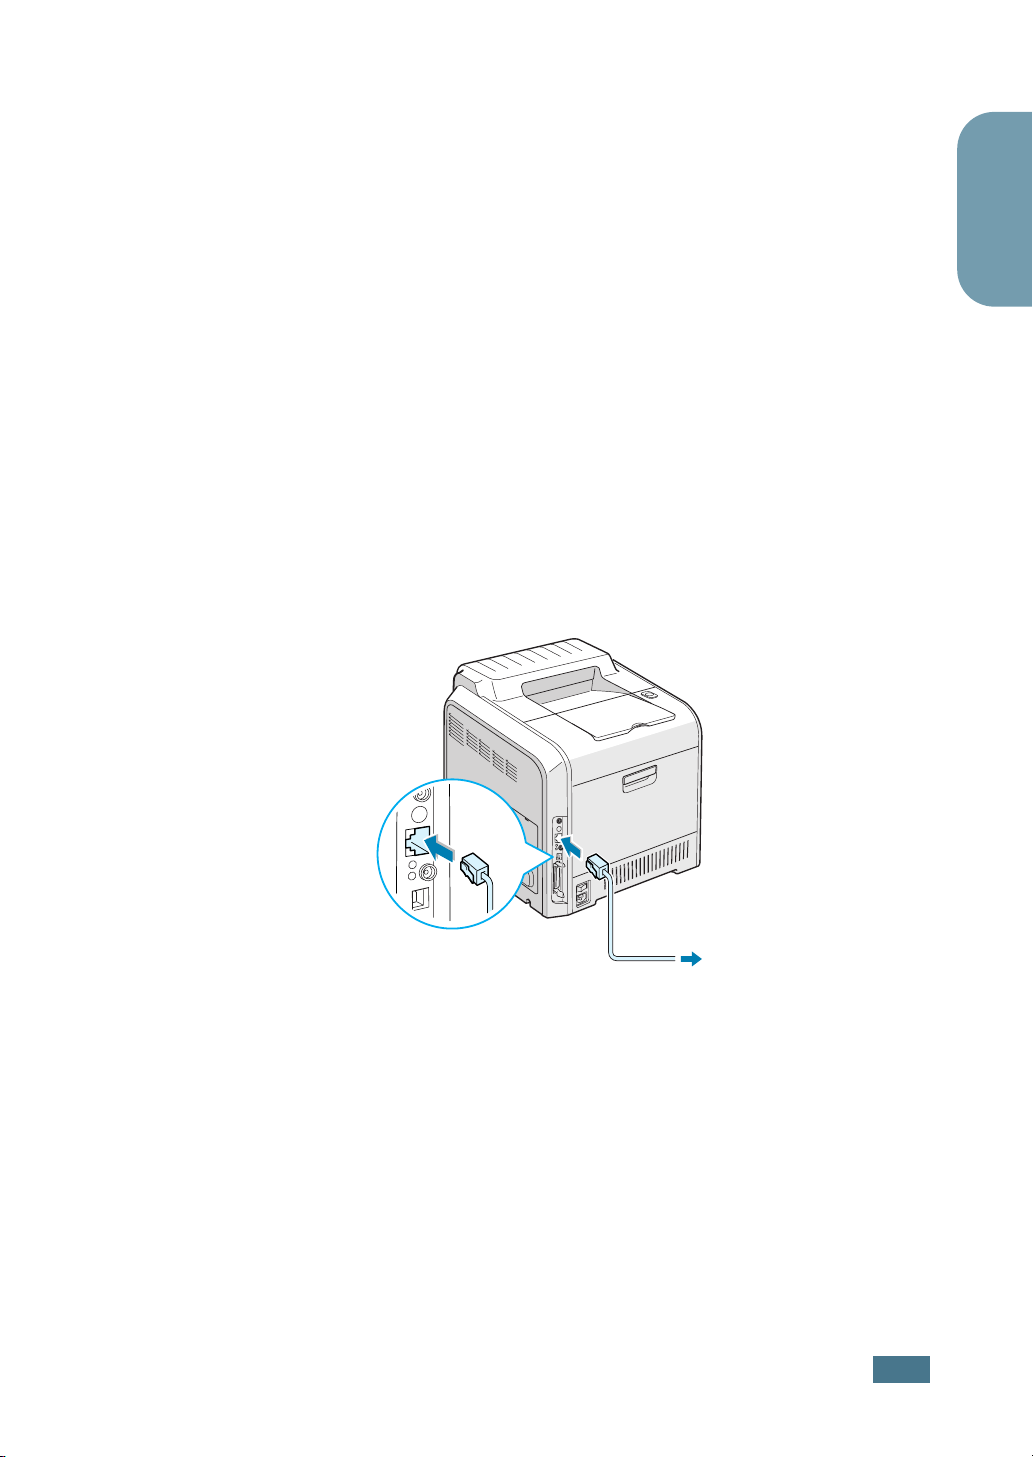
For Networking Printing
You can attach your CLP-500 or CLP-500N printer to a network
using an Ethernet cable (UTP cable with RJ.45 connector).
CLP-500N has a built-in network interface card. If you are a
CLP-500 user, you need to install an optional network interface
card.
If you want to use the printer in both a wired and a wireless
network environments, you need to install an optional wired/
wireless network interface card. For details about installing the
card, see the User’s Guide of your printer in the CD-ROM.
Using an Ethernet cable
1
Make sure that both the printer and the computer are
turned off.
2
Plug one end of the Ethernet cable into the Ethernet
network port on the Printer.
English
To the network
LAN connection
3
Plug the other end of the cable into a network LAN
connection.
For details about installing the network card, see the User’s
Guide of your printer in the CD-ROM.
S
ETUP GUIDE
21
Using a network antenna
1
If you install the wired/wireless network card, you can use
your printer in wireless environment.
For details about installing the wired/wireless network card,
see the User’s Guide of your printer in the CD-ROM.
N
OTE
: After connecting the printer you need to configure the
network parameters on the control panel. See the User’s Guide of
your printer. You can use the software supplied with the card.
Refer to the software User’s Guide.
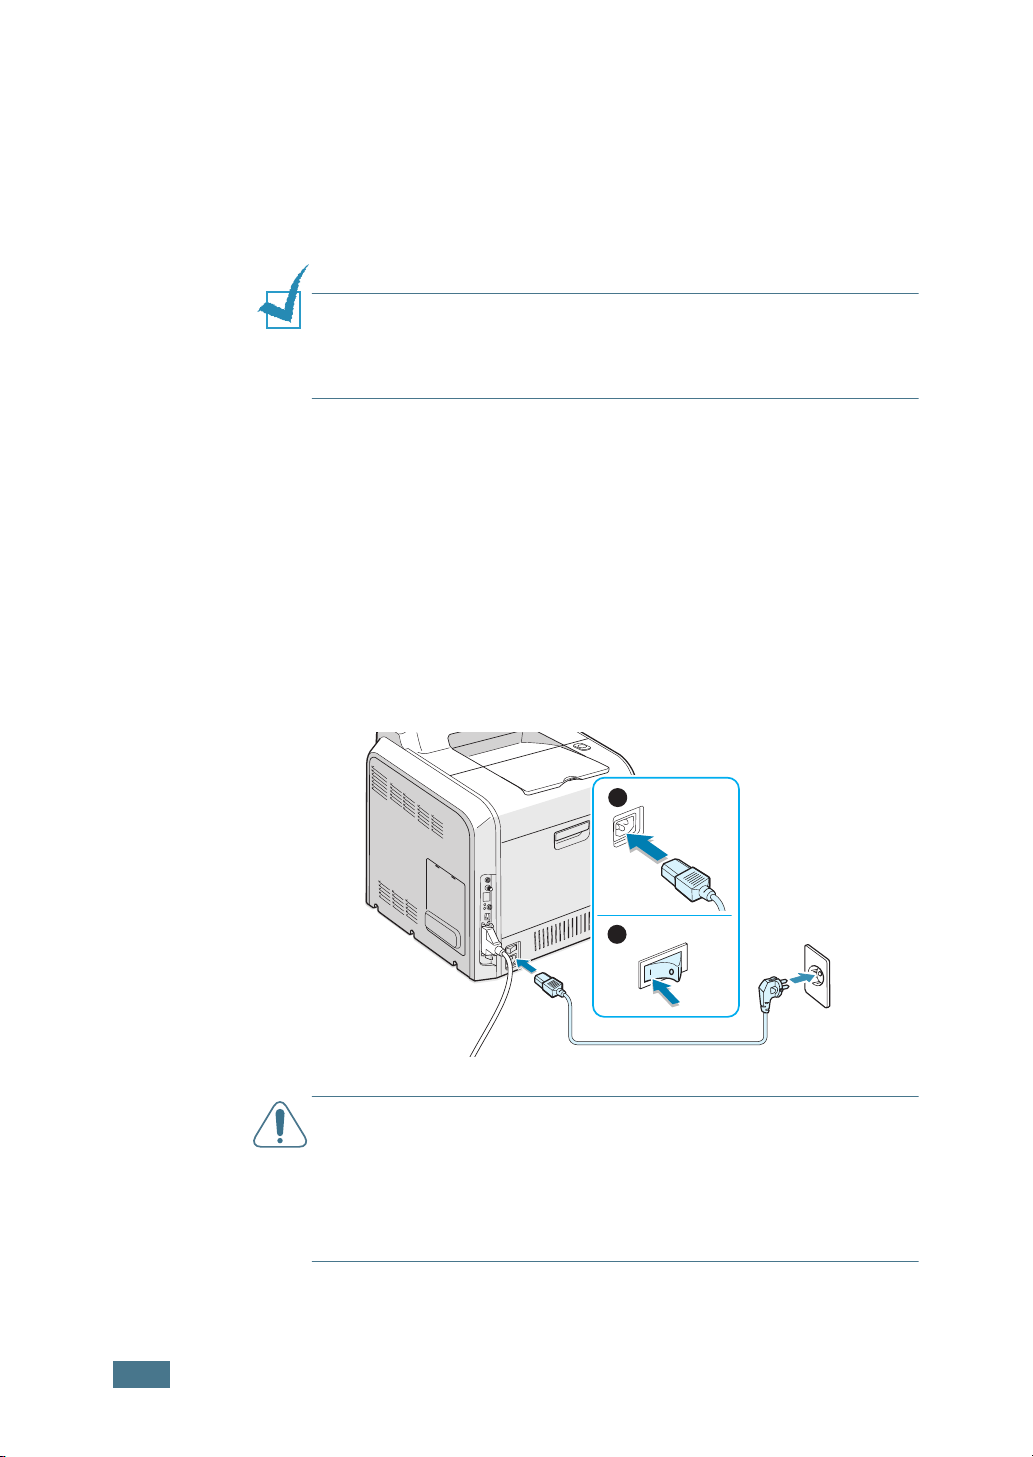
Step 6. Turning the Printer On
1
Plug the power cord into the power receptacle on the back
of the printer.
2
Plug the other end into a properly grounded AC outlet and
turn on the power.
22
S
ETUP GUIDE
1
2
C
AUTIONS
• Some parts inside of the printer may be hot when power is on or
after printing. Be careful not to burn yourself when working
inside the printer.
• Do not disassemble the printer when it is powered on. Doing so
may give you an electric shock.
:

Step 7. Printing a Demo Page
Print a demo page to make sure that the printer is operating
correctly.
1
In ready mode, press and hold the Upper Level button
( ) on the control panel for 2 seconds to print a demo
page.
A demo page showing the printer’s features and capabilities
prints out.
Step 8. Changing the Display Language
To change the language that is displayed on the control panel,
take the following steps:
1
In ready mode press the Menu button ( ) on the control
panel until you see ‘Setup’ on the bottom line of the display.
English
2
Press the Enter button ( ) to access the menu.
3
Press the scroll button ( or ) until you see ‘LCD
Language’ on the bottom line.
4
Press the Enter button ( ) to confirm the menu item.
5
Press the scroll button ( or ) to display the language
you want to use.
6
Press the Enter button ( ) to save the selection.
7
Press the On Line/Continue button ( ) to return to
ready mode.
S
ETUP GUIDE
23

Step 9. Installing the Printer Software
The supplied CD-ROM contains Windows printing software,
Linux printing software, on-line User's Guide and
Acrobat Reader to view the User’s Guide.
If you are printing from Windows:
You can install the following printer software using the CD-ROM.
• Printer Driver for windows. Use this driver to take full
advantage of your printer’s features. See page 25.
• USB driver only for Windows 98/Me/2000/XP. For details
about installing the USB driver, see page 25.
If you are printing in Linux:
For information about installing the Linux driver, refer to
Appendix A in the User’s Guide. To view the User’s Guide, see
page 28.
Installing Printer Software in Windows
Verify the following before you install the printer software:
Item Requirements
Operating system
RAM
Free disk space
Internet Explorer 5.0 or higher
N
OTE
: For Windows NT 4.0/2000/XP, the system administrator
should install the software.
Windows 95/98/Me/NT 4.0/2000/XP
95/98/Me 32 MB
NT 4.0/2000 64 MB
XP 128 MB
95/98/Me/NT 4.0/
2000/XP
300 MB
24
S
ETUP GUIDE
All applications should be closed on your PC before beginning
installation.
1
Place the CD-ROM in the CD-ROM drive. Installation will
start automatically.
If the CD-ROM drive does not automatically run:
Select Run from the Start menu, and type
x:\cdsetup.exe in the Open box (where x is the drive
letter for the CD-ROM drive), then click OK.
N
OTE
: If the New Hardware Found window appears during the
installation procedure, click in the upper right corner of the box,
or click Cancel.
2
When the language selection window appears, select the
appropriate language.
If you can’t find the desired language from the screen,
scroll through the screen using the scroll button on the
bottom right of the screen.
3
Click Install the Samsung Software on your PC.
English
4
The installation window opens. Click Next.
5
Follow the instructions on the window to complete the
installation.
N
OTE
: If you connect the printer with the USB cable at first and
then you want to use the parallel interface, remove the USB cable
and connect the parallel cable. Then reinstall the printer driver.
S
ETUP GUIDE
25

Reinstalling Printer software
Reinstallation is required if your installation fails.
1
From the Start menu, select Programs.
2
Select Samsung CLP-500 Series, and then Samsung
CLP-500 Series Driver Maintenance.
3
The Samsung CLP-500 Series Driver Maintenance window
appears. Click Repair and then click Next.
4
When reinstallation is done, click Finish.
Removing Printer software
1
From the Start menu, select Programs.
2
Select Samsung CLP-500 Series, and then Samsung
CLP-500 Series Driver Maintenance.
3
The Samsung CLP-500 Series Driver Maintenance window
appears. Check Remove and then click Next.
4
When you are asked to confirm your selection, click OK.
The Samsung CLP-500 Series printer driver and all of its
components are removed from your computer.
5
When removing is completed, click Finish.
Changing the Display Language
After installation of the software, you can change the display
language.
1
From the Start menu, select Programs.
2
Select Samsung CLP-500 Series, and Language
Selection.
3
Select the desired language from the language selection
window, and click OK.
26
S
ETUP GUIDE

Step 10. Viewing the User’s Guide
The Samsung CLP-500 Series User’s Guide, which is in the
software CD-ROM, is in Adobe Acrobat PDF format. The manual
will give you flexibility and convenience when you have to access
information.
You can view the manuals on-screen in different formats
(viewing a single page, continuous single page or continuous
facing page, zooming in up to 1600% or out up to 12.5%,
scrolling two-up page or article flow). You can also print the
manual, if necessary.
In Windows
1
Place the CD-ROM in the CD-ROM drive.
2
When the language selection window appears, select the
appropriate language.
3
Click View User’s Guide.
English
The Adobe Acrobat program opens and you can view the
User’s Guide.
N
OTE
: To open the User’s Guide, you should install the Adobe
Acrobat Reader program on your computer. If you do not have the
program, click Install the Bonus Software on your PC to install
the program.
S
ETUP GUIDE
27
In Linux
1
When the Administrator Login window appears, type in
“root” in the login field and enter the system password.
2
Insert the printer software CD-ROM.
3
Click the icon at the bottom of the screen. When the
terminal screen appears, type in:
[root@local /root]# cd /mnt/cdrom
[root@local cdrom]# gv manual/EnGuide.pdf
N
OTE
: If your ghostscript version is old, you may not be able to
see the pdf file. Then, install Acrobat Reader on your system or try
to read the User’s Guide on a Windows system.
1. Click the icon at the bottom of the screen. When the
terminal screen appears, type in:
[root@local /root]# cd /mnt/cdrom
[root@local cdrom]# manual/acrobat4/INSTALL
2. After reading the license agreement, type accept .
3. When you are asked of the installation directory, just type the
enter key.
4. You need to make a symbolic link to execute Acrobat Reader
without full path:
[root@local cdrom] # ln -s/ usr/local/acrobat4/bin/
acroread /usr/bin/acroread
5. Now, you can read the pdf files with Acrobat Reader.
[root@local cdrom]# acroread /mnt/cdrom/manual/
EnGuide.pdf
(the CD-ROM directory)
(the CD-ROM directory)
28
S
ETUP GUIDE

Home
Visit us at:
www.samsungprinter.com
Rev.3.00
COLOR LASER PRINTER