

Page 1

C3235 Checkweigher
User Instructions
1.0 Introduction
The C3235 is a checkweighing scale for the rapid indication of over, under
or acceptable weight in a production environment. This manual covers the
introduction to the unit, its use, configuration and calibration.
Front Panel
Figure 1.1 shows the front panel of the unit. The front panel includes the
display window, the annunciators arrayed around the display, the four keys
and the bubble level.
Figure 1.1 C3235 front panel
NOTE: This product is rated to IP54. Care must be taken to ensure that the
power/mains plug does not become wet. If the product is required to be
used while plugged into the outlet/mains, the plug must either be located
outside the wet area, or must be plugged into a socket which provides
suitable IP rating with the plug mated.
1
Page 2
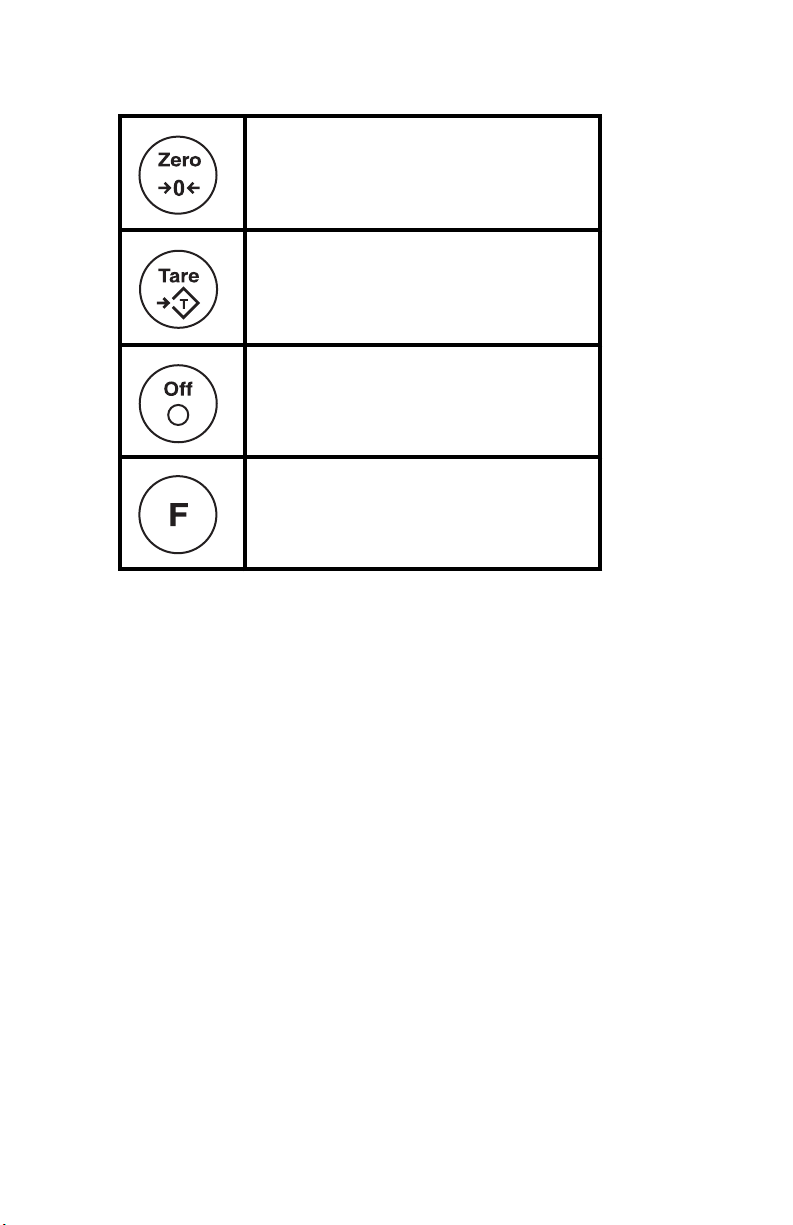
Keys and Annunciators
ZERO key. Press this key to turn the scale on
and zero the display.
TARE key. Press this key to tare the weight
on the scale. Also accepts the displayed item
in the menu structure or during numeric entry.
OFF key. Press this key to turn the scale off.
F key. Use this key to access the
Configuration menu. Also used in the menu to
move between choices.
Display Messages
dc x.xx This is the voltage of the battery in volts.
------ This is displayed and a beep sounds when the scale is
overloaded. A weight more than 9 divisions over capacity is
an overload condition.
-BATLo- This is displayed when the battery voltage is low. You can use
the scale for a while, but must recharge the battery soon.
CAEnd This is displayed when calibration is finished.
Err-0 A zero point error has occurred.
C_End This is displayed when the battery is fully recharged.
2
Page 3

2.0 General Scale Information
Read this user manual before using the scale so you understand the
operating features.
Do not overload the scale or throw heavy things on the scale. Damage
from overloading and abuse is not covered by the guarantee.
Keep the scale clean with a damp cloth and mild cleaning solution.
1. Set the scale on a level, solid surface and screw the base feet in or
out to bring the bubble to the center of the level.
2. Turn the unit on by pressing the ZERO key.
The beeper will sound, the display will show the version number
and the battery voltage level (dc-x.xx), then goes into the display
self-check ends with the ZERO annunciator lighting. The scale is
now ready to use.
3. To turn the scale off, press the OFF key. The scale will turn off
automatically after 10 minutes if the scale display is at zero and
there is no keypad operation. You can set the auto-off time in the
Configuration menu. See A-oFF on page 9. There is also a power
saving feature. After 40 seconds of scale inactivity the scale goes
into auto power saving mode and the display shows a small o. To
wake the scale up, place a weight on the scale platform.
4. If the battery voltage drops below 5.6V, the scale will turn off
automatically. There is a battery level annunciator on the left side of
the display. If three of the lights are lit, the voltage is 6.3V or higher.
If two lights are lit, the voltage is between 6.0V and 6.3V. If only one
light is lit, the voltage is lower than 6.0V and the unit should be
recharged.
5. Battery charging: Power is supplied by a built-in rechargeable lead
acid battery (6V/4.5Ah). It shows -bAtLo- when the voltage is low
and the scale is at zero. The scale can be used for a while, but the
battery should be charged as soon as possible.
To charge the battery, plug the AC power cord into an appropriate,
grounded outlet and charge for 12 hours.
If the scale is unused for a long period of time, charge the battery at
least every 3 months.
If after charging the battery life is very short, install a new battery.
6. If there is no active tare, you can zero the displayed weight if it is
lower than 4% of full capacity. To zero the scale, press the ZERO
key. The ZERO annunciator will light.
3
Page 4

The steps for various kinds of weighing are explained in the following
pages. To set parameters and calibrate the unit, see Accessing the
Configuration Menu and Setting Parameters on page 6 and Calibration on
page 11.
3.0 Gross Weighing
1. Power up the scale.
2. Zero the scale if necessary by pressing the ZERO key…
0 is displayed.
3. Place the item(s) on the scale platform.
4. Remove the item(s) and repeat steps 2 through 4 for the next
item(s).
4.0 Tare weighing
1. Power up the scale.
2. Zero the scale if necessary by pressing the ZERO key…
0 is displayed.
3. Place the item to be tared on the scale platform.
4. Press the TARE key…
0 weight is displayed and the TARE annunciator lights.
5. Place the item to be weighed on the scale platform…
Net weight of the item is displayed.
6. Remove the item and repeat steps 2 through 5 for other items.
Removing a Tare
Take everything off the scale and press the TARE key…
0 is displayed and the TARE annunciator turns off.
4
Page 5
5.0 Checkweighing
1. Power up the scale.
2. Zero the scale if necessary by pressing the ZERO key…
0 is displayed.
3. Place the item to be checkweighed on the scale platform.
The weight is displayed and the Over, Accept or Under
annunciator lights. You must set the acceptable window
parameters in the Configuration menu which is described in
rAnGE on page 6.
4. Remove item from the scale platform and repeat steps 3 and 4 for
each item to be checkweighed.
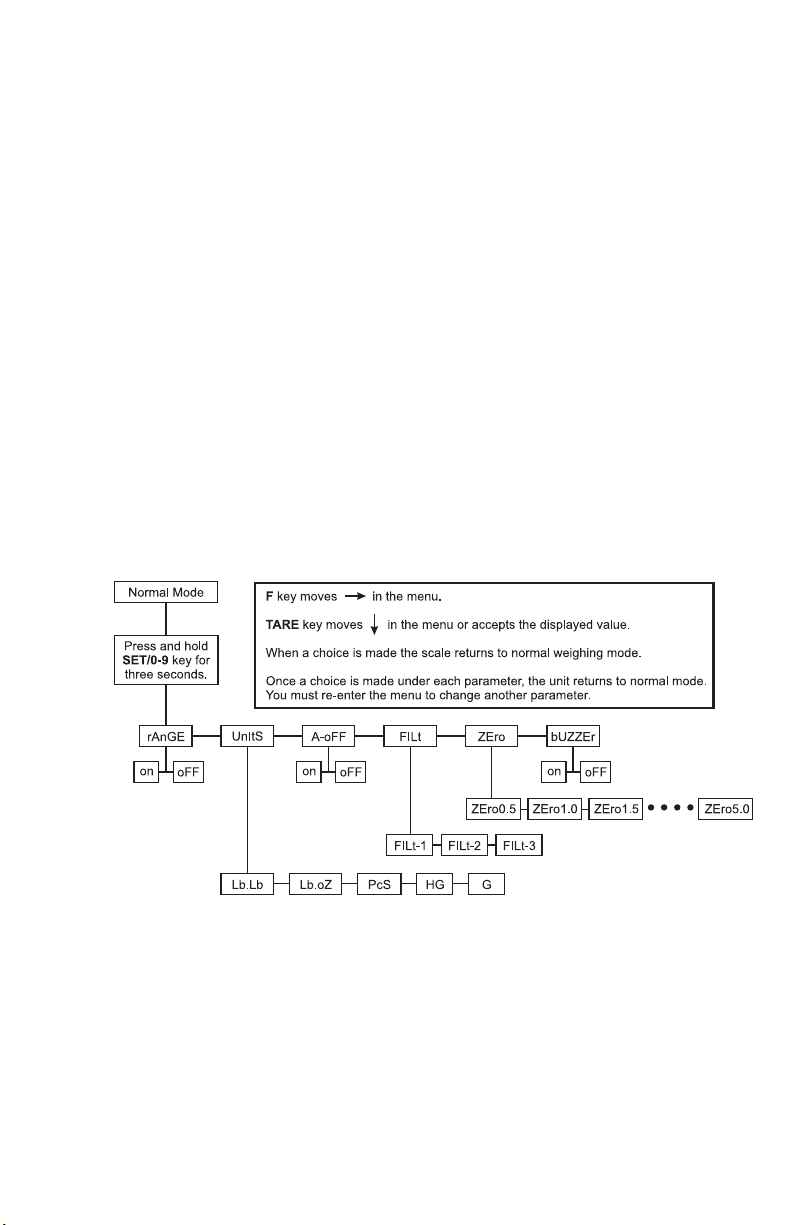
6.0 Configuration Menu
The Configuration menu is shown in Figure 1.2.
Figure 1.2 Configuration menu
5
Page 6

You use the Configuration menu to set the following parameters:
rAngE Use this to set the Over/Accept/Under ranges.
Units Use this to set the unit of measure and to enter the count
mode.
A-OFF Use this to enable or disable the auto-off function. If enabled
the scale will power off automatically after 10 minutes of
inactivity.
FILt Use this to set the level of filtering.
Zero Use this to set the automatic zero tracking window.
bUZZEr Use this to enable or disable the beeper.
How to set each of these parameters is described below.
Accessing the Configuration Menu and Setting Parameters
To access the Configuration menu, press and hold the F key for three
seconds…
rAnGE, the first menu item, is displayed.
rAnGE
Use this item to set the weight ranges which will trigger the Over/Accept/
Under annunciators.
1. Press and hold the F key for three seconds to access the
Configuration menu …
rAnGE is displayed.
2. Press the TARE key…
on or oFF is displayed.
3. Press the F key to toggle between the choices. To enable the range,
press the TARE key with on displayed. (Go to step 4) To disable the
range function, press the TARE key with oFF displayed. (Go to step
7)
4. If you enabled the range function…
6
Page 7

The current value for the lower range is displayed, the Under
annunciator flashes, and the first digit flashes. What you set with
the following steps is the lowest acceptable weight for the item to
be weighed.
Remember as you set the values for the lower and upper ranges
that the decimal does not appear on the display but you enter the
values as if it were.
For example: If you want 2.55 pounds as the lower value, enter
02550 on the display.
5. Press the F key to increment the digits and the TARE key to accept a
digit and move to the next position. Repeat this until you’ve entered
the lowest acceptable weight value…
The current value for the upper range is displayed, the Over
annunciator flashes, and the first digit flashes. What you set with
the following steps is the highest acceptable weight for the item to
be weighed.
Remember as you set the values for the lower and upper ranges
that the decimal does not appear on the display but you enter the
values as if it were.
For example: If you want 2.85 pounds as the high value, enter
02850 on the display.
6. Press the F key to increment the digits and the TARE key to accept a
digit and move to the next position. Repeat this until you’ve entered
the highest acceptable weight value…
The scale returns to normal weighing mode when you’ve finished
entering the high value.
7. When you select oFF for the rAnGE…
The scale returns to the normal weighing mode.
The upper limit should be larger than lower limit. If you attempt to set other
than this, the scale will show oFF and return to the normal weighing mode.
Performing a Checkweighment
1. After setting a lower and upper limit, place the item to be weighed on
the scale.
When the weight is stable, the weight will be displayed and the
Over, Under or Accept annunciator will light. If the weight is in the
acceptable range, the beeper will sound.
7
Page 8

2. Remove the item from the scale and repeat steps 1 and 2.
Units
Use the Units menu item to set the unit of measure to Lbs, Kgs or Grams.
You can also choose to set the scale to the counting function. Follow these
steps to set the Units item.
1. Press and hold the F key for three seconds to access the
Configuration menu …
If the unit is not in the counting mode, rAnGE is displayed. If the
unit is in the counting mode the display will show Units and you
can skip to step 3 below.
2. Press the F key…
Units is displayed.
3. Press the TARE key…
The current unit of measure or PcS is displayed.
4. Press the F key to scroll through the choices:
Lb.Lb This is the pounds unit of measure.
Lb.oZ This is the pounds/ounce unit of measure.
PcS This is the counting function.
HG This stands for KG or kilogram
G This is the gram unit of measure.
5. When your choice is displayed, press the TARE key…
If you choose a unit of measure the scale returns to normal
weighing mode with that unit of measure active and its
annunciator lit.
If you choose PcS, the scale shows Zt-oFF . This stands for Zero
Tracking Off. Press the F key to toggle between Zt-oFF and Zt-on.
Press the TARE key to accept the displayed choice. For small
piece weights it is a good idea to leave the Zero Tracking off.
When you’ve made your selection, the scale is in counting mode
with the Count annunciator lit. Follow the steps in the next section
to use the scale as a counting scale:
8
Page 9

Counting Operation
Enter the counting mode by selecting PCS as the unit of measure. This is
explained in the previous section. If your scale has no pieceweight in
memory, the Count annunciator will flash. If you want to use this
pieceweight, skip to step 3 below to count items.
If you need to establish a new pieceweight, start at step 1 below.
1. While in the counting mode, press and hold the ZERO key until…
The word count appears briefly on the scale, then the Count
annunciator flashes and six zeroes appear on the display.
2. Place a known number of items on the scale platform and press the
TARE key…
Five zeroes appear on the display with the first one flashing. Use
the F key and the TARE key to enter the number of items on the
scale.
For example: To enter 25, you must press the TARE key three
times to move the flashing digit to the right three times, then enter
2 and 5 so the display looks like this: 00025.
After the last digit is entered, the scale calculates the pieceweight
and displays the count on the scale.
3. You can now place other similar items on the scale and see the
displayed counts. If you want to start counting other items with a
different pieceweight, clear the scale platform and repeat steps 1
and 2 above.
The minimum pieceweight is approximately 0.0011 pounds. This
translates to maximum counts of aprroximately 900 pieces per pound of
scale capacity.
A-oFF
A-oFF is the next menu item. Use this to enable or disable the auto-off
function. Follow these steps to set this function:
1. Press and hold the F key for three seconds to access the
Configuration menu …
rAnGE is displayed.
2. Press the F key twice…
A-oFF is displayed.
3. Press the TARE key…
Current setting, on or oFF, is displayed.
9
Page 10

4. Press the F key to toggle between the choices. If you choose on, the
scale will automatically power off after 10 minutes. If you choose
oFF, the scale will not automatically shut off. When your choice is
displayed, press the TARE key…
The function is set and the scale returns to normal weighing
mode.
FILt
FILt is the next menu item. Use this to enable or disable the auto-off
function. Follow these steps to set this function:
1. Press and hold the F key for three seconds to access the
Configuration menu …
rAnGE is displayed.
2. Press the F key three times…
FILt is displayed.
3. Press the TARE key…
Current setting, FILT-1, FILT-2, or FILT-3, is displayed.
This is the filter setting. The “noisier” the environment the scale is
in, the higher the filter setting you should choose. This means if
the scale sits in a place that is subjected to vibrations, the higher
the vibrations the higher the filter setting.
4. Press the F key repeatedly to scroll through the choices. When your
choice is displayed, press the TARE key…
5. The function is set and the scale returns to normal weighing mode.
Zero
Zero is the next menu item. Use this to set the automatic zero tracking.
This means small weights on the scale are zeroed automatically if they fall
within the window set under this item. Follow these steps to set this
function:
1. Press and hold the F key for three seconds to access the
Configuration menu …
rAnGE is displayed.
2. Press the F key four times…
Zero is displayed.
3. Press the TARE key…
10
Page 11

Current setting, Zero0.5 through Zero5.0, is displayed.
4. Press the F key repeatedly to scroll through the choices. Choices
are in 1/2 division increments. When your choice is displayed, press
the TARE key…
5. The function is set and the scale returns to normal weighing mode.
bUZZEr
Use this item to set the Accept buzzer or beeper on or off. If you choose
on, the unit will beep when a steady weight is in the Accept range. If you
choose oFF, the beeper will not sound.
Set using the directions below.
1. Press and hold the F key for three seconds to access the
Configuration menu …
rAnGE is displayed.
2. Press the F key five times…
bUZZEr is displayed.
3. Press the TARE key…
Current setting, on or oFF, is displayed.
4. Press the F key to toggle between the choices. When your choice is
displayed, press the TARE key…
5. The function is set and the scale returns to normal weighing mode.
7.0 Calibration
You can calibrate this scale using single point or multpoint calibration.
Single point calibration uses just the empty scale and a test weights equal
to full capacity to calibrate the scale. During multipoint calibration, you can
choose between a powerup zero range of 20% or 100% and use zero
weight, 1/3 capacity, 2/3 capacity and full capacity test weights.
Single Point Calibraiton:
Follow these steps for single point calibration of the scale. You will need
test weights equal to full capacity.
1. Place the calibration switch, located on the bottom of the scale into
the ON position. The ON position is when the switch is pulled
towards the front of the scale. You may need to remove the small
cover to access the calibration switch. Use a small screwdriver to
remove the two screws holding the cover.
11
Page 12

2. Place the scale on stable, level surface and turn the unit on.
3. After the self-check is complete, press and hold the TARE key
until…
CAL is briefly displayed, then 0.
4. Empty the scale and press the TARE key to set the zero point.
Hg or Lb is displayed.
5. Toggle between the choice of calibration weight unit of measure
using the F key. When the unit of measure you want to use is
displayed, press the TARE key…
The full capacity will flash.
6. Load the full capacity weight onto the scale platform and press the
TARE key.
CAEnd (calibration end) will briefly display, then the unit returns
to normal weigh mode.
If you replace the PCB or loadcell, the scale requires recalibration. If the
display shows Err-0 after power up, it means there is a problem with
calibration. Press and hold the TARE key to enter calibration and repeat
the calibration process.
Multipoint Calibration:
Follow these steps for multipoint calibration of the scale. You will need test
weights equal to 1/3, 2/3 and full capacity.
1. Place the calibration switch, located on the bottom of the scale into
the ON position. You may need to remove the small cover to access
the calibration switch. Use a small screwdriver to remove the two
screws holding the cover.
2. Place the scale on stable, level surface and turn the unit on.
3. After the self-check is complete, press and hold the F and ZERO
keys until…
20 or 100 is displayed. This stands for the powerup zero range.
4. Repeatedly press the F key to toggle between the two choices: 20
and 100. When your choice is displayed, press the TARE key…
Lb or Kg is displayed. This is the calibration unit of measure.
5. Press the F key to toggle between the two choices. When your
choice is displayed, press the TARE key…
Scale full capacity is displayed.
12
Page 13

6. Repeatedly press the F key to scroll through the choices. When your
choice is displayed, press the TARE key…
The display will briefly show 1/3 capacity, (10Lb for a 30 lb
capacity scale), and then display 0. Press the ZERO key if the
display is not at 0.
7. Load weight equal to 1/3 of the scale capacity on the center of
platter, and press the TARE key when the display becomes stable…
2/3 capacity weight is displayed.
8. Load weight equal to 2/3 of the scale capacity on the center of
platter, and press the TARE key when the display becomes stable…
Full capacity weight is displayed.
9. Load weight equal to 100% of the scale capacity on the center of
platter, and press the TARE key when the display becomes stable…
The display shows c 0, with the c flashing. At this point you can
input a gravity adjustment.
10. Press ZERO to increment the factor by one. Press and hold the
ZERO key for 3 seconds to begin a rapid incrementing of the factor.
Press ZERO again to stop the automatic incrementing. Press F key
to decrease the factory by one. When you have the factor you want
displayed, press the TARE key to accept it…
CAEnd (calibration end) will briefly display, then the unit returns
to normal weigh mode.
11. Unload the weight, and turn off the scale. Turn on the scale again to
check the accuracy. If the scale is not accurate, please recalibrate
the scale as per above steps. If the scale is accurate, place
calibration switch to the off position, and replace the cover. If
needed, assemble the lead seal to lock the seal.
13
Page 14

8.0 Specifications
Models C3235-3/6 C3235-6/12 C3235-15/30
Max. Cap. 3kg/6lb 6kg/12 lb 15kg/30lb
Division Size 0.5g/0.01 lb 1g/ 0.02 lb 2g/0.05 lb
Max. Tare 100%
Accuracy Class III
Pan size 7.5” x 9”
Working Temperature 23° - 95° F (-5°+35°C)
Power 6V4.5Ah rechargeable sealed battery, with
built-in charger.
Net Weight 8 lb
14
Page 15

15
Page 16

16
Salter Brecknell Weighing Products
1000 Armstrong Dr.
Fairmont, MN 56031
Toll free: 800-637-0529
Tel: 507-238-8702 Fax: 507-238-8271
e-mail: sales@salterbrecknell.com
www.salterbrecknell.com
October, 2014 C3235_u.fm AWT35-500149 Issue AC
 Loading...