

Page 1
r
Owner’s Manual
Page 2
WARNING
– To reduce the risk of fire or electric shock, do not expose this device to rain or moisture.
This product complies with the requirements of European Directive EMC 2004/108/EC.
For EU countries
For EU Countries
For the USA
For the USA
FEDERAL COMMUNICATIONS COMMISSION
RADIO FREQUENCY INTERFERENCE STATEMENT
This equipment has been tested and found to comply with the limits for a Class B digital device, pursuant to Part 15 of the
FCC Rules. These limits are designed to provide reasonable protection against harmful interference in a residential
installation. This equipment generates, uses, and can radiate radio frequency energy and, if not installed and used in
accordance with the instructions, may cause harmful interference to radio communications. However, there is no guarantee
that interference will not occur in a particular installation. If this equipment does cause harmful interference to radio or
television reception, which can be determined by turning the equipment off and on, the user is encouraged to try to correct the
interference by one or more of the following measures:
— Reorient or relocate the receiving antenna.
— Increase the separation between the equipment and receiver.
— Connect the equipment into an outlet on a circuit different from that to which the receiver is connected.
— Consult the dealer or an experienced radio/TV technician for help.
This device complies with Part 15 of the FCC Rules. Operation is subject to the following two conditions:
(1) This device may not cause harmful interference, and
(2) This device must accept any interference received, including interference that may cause undesired operation.
Unauthorized changes or modification to this system can void the users authority to operate this equipment.
This equipment requires shielded interface cables in order to meet FCC class B Limit.
For Canada
For Canada
NOTICE
This Class B digital apparatus meets all requirements of the Canadian Interference-Causing Equipment Regulations.
AVIS
For the UK
For the U.K.
IMPORTANT: THE WIRES IN THIS MAINS LEAD ARE COLOURED IN ACCORDANCE WITH THE FOLLOWING CODE.
BLUE:
BROWN:
As the colours of the wires in the mains lead of this apparatus may not correspond with the coloured markings identifying
the terminals in your plug, proceed as follows:
The wire which is coloured BLUE must be connected to the terminal which is marked with the letter N or coloured BLACK.
The wire which is coloured BROWN must be connected to the terminal which is marked with the letter L or coloured RED.
Under no circumstances must either of the above wires be connected to the earth terminal of a three pin plug.
NEUTRAL
LIVE
For the USA
For the USA
DECLARATION OF CONFORMITY
Compliance Information Statement
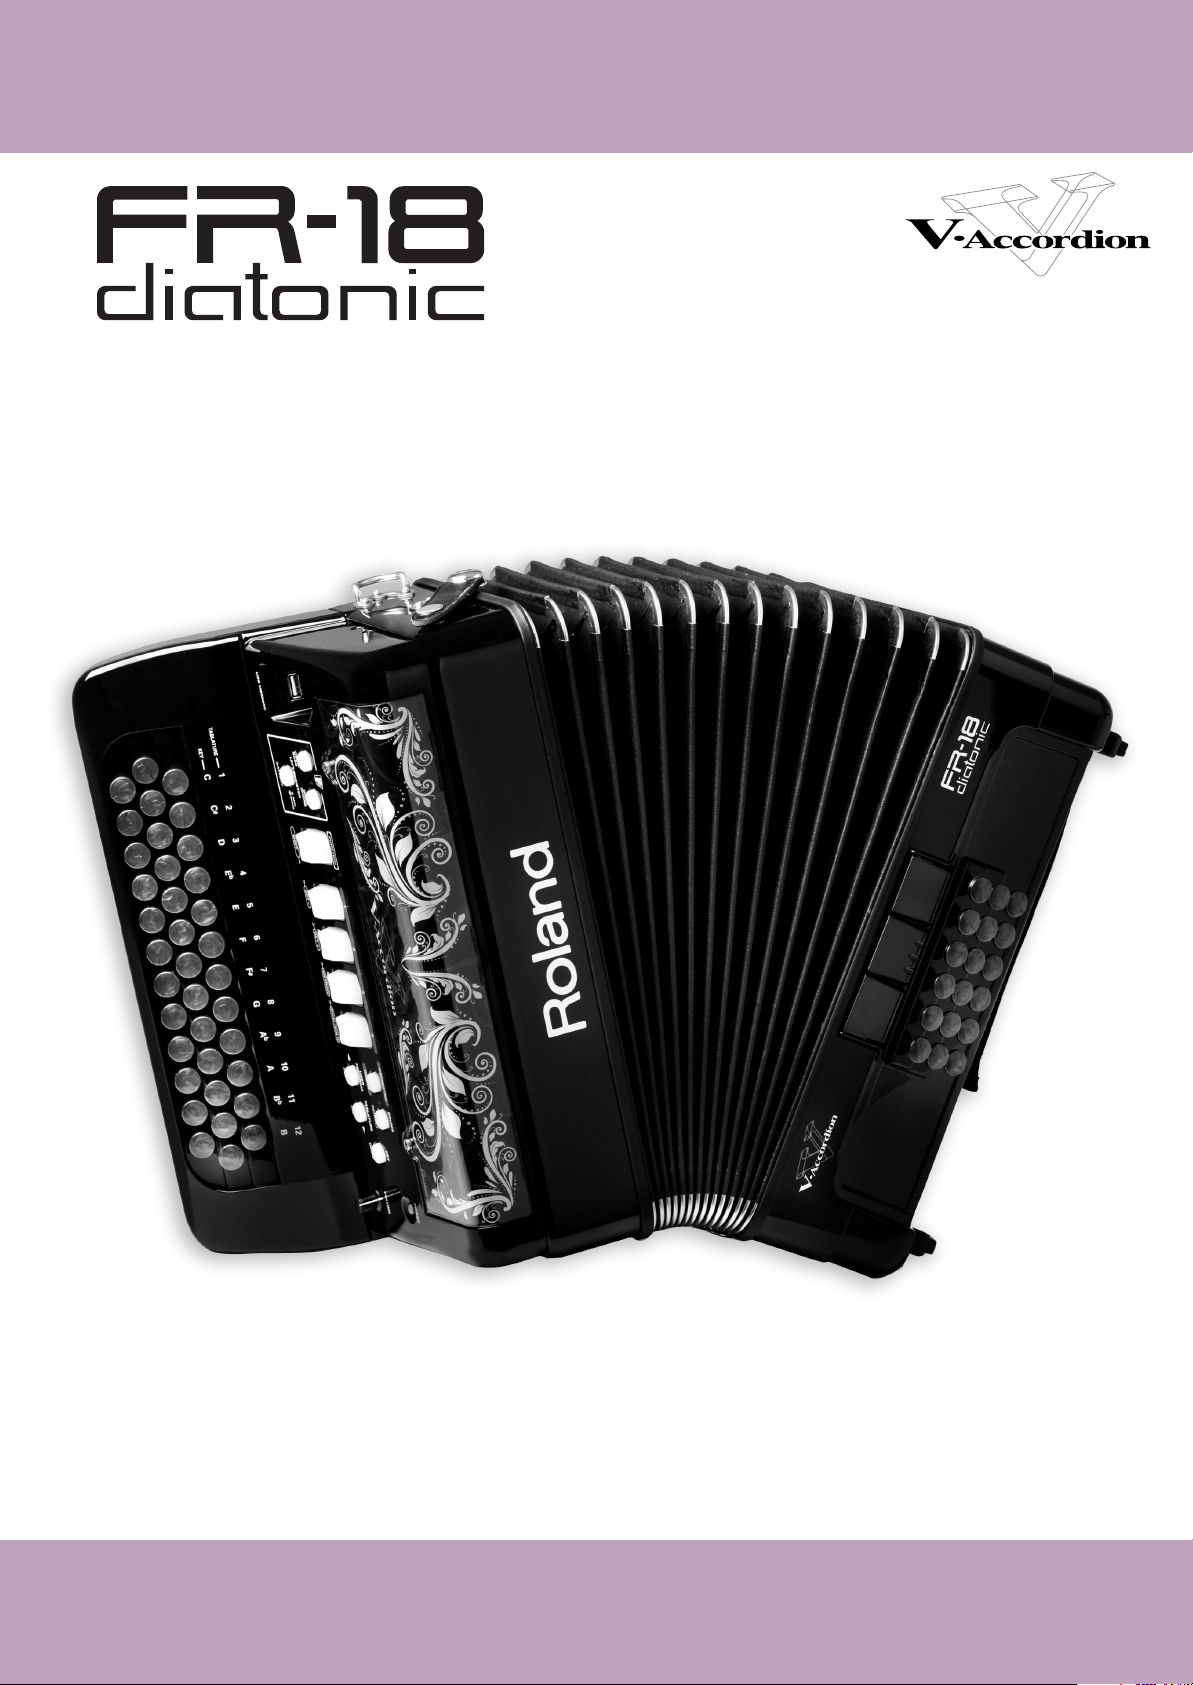
V-Accordion FR-18 diatonic
Digital accordion
The technology used in the FR-18 diatonic is covered by U.S. Patent No. 6.946.594.
Page 3

r
Copyright © 2011 ROLAND EUROPE. All rights reserved. No part of this publication may be reproduced in any form without the written permission of Roland Europe S.p.a.
Roland is either a registered trademark or a trademark of Roland Corporation in the United States and/or other countries.
Owner’s Manual
ENGLISH ENGLISH
Thank you and congratulations on your choice of the Roland FR-18 diatonic V-Accordion.
The FR-18 diatonic is an amazingly versatile electronic instrument that can emulate the sounds of a vast array of dia-
tonic accordions. Its major advantage is that it allows you to change sounds, keyboard layouts (tablatures) and key note
without changing instruments. Apart from the financial benefit, this also means that you can use your familiar playing
style and techniques while covering a host of different musical genres.
To ensure that you obtain the maximum enjoyment and take full advantage of your FR-18 diatonic, please read this
owner’s manual carefully.
About this manual
You should first read the chapter “Before you start playing” on p. 15. It explains how to connect the AC adaptor or
install batteries and turn on the power. This owner’s manual explains everything, from the basic functions of the FR-18
diatonic to more advanced functions.
Conventions in this manual
In order to explain the operations as clearly as possible, this manual uses the following conventions:
•Text enclosed in square brackets [ ] indicates the name of a button or knob. Example: the [USER PROG.] button.
• Paragraphs that begin with “NOTE” are cautionary statements that you must read.
•The numbers of pages that you can turn to for additional or related information are given like this: (p. **).
Before using this instrument, carefully read “USING THE UNIT SAFELY” on p. 5 and “Important notes” on p. 9. Those sections provide
information concerning the proper operation of the FR-18 diatonic. Additionally, in order to feel assured that you have gained a
good grasp of every feature provided by your new unit, the manual should be read in its entirety. The manual should be saved and
kept on hand as a convenient reference.
ENGLISH ENGLISH
Page 4

V-Accordion
Features
FR-18 diatonic
1. Features
Adjustable keyboard layout (tablature) and key
note
The FR-18 diatonic grants you the possibility to easily
configure your favorite keyboard layout. You can
choose from among 12 factory tablatures.
Changing the instrument’s tonality is also possible, so
that you can play in any key with your FR-18
diatonic. There are 12 different musical keys that can
be selected at the press of a button.
Super realistic accordion simulations
The FR-18 diatonic contains sounds that were
obtained by sampling popular traditional acoustic
diatonic accordions. This diatonic V-Accordion allows
you to switch from a traditional Italian “Organetto”
to a typical “Tex-Mex” sound without changing
instruments, for instance.
Different tuning systems and scales are also available.
Orchestral sounds
8 orchestral sounds are available and can be used in
combination with traditional diatonic accordion
sounds—complete with full bellows articulation, and
unique keyboard modes (Solo, Dual).
In addition, the FR-18 diatonic provides 3 orchestral
bass and orchestral chord sounds for the bass and
chord sections.
Virtual Tone Wheel organ sounds
The FR-18 diatonic allows you to play amazing organ
parts in almost the same way as an organ player
using the treble section. Every organ sound features a
Rotary effect (both slow and fast).
Drum sounds
You can also use the FR-18 diatonic to play simple
drum parts with your left hand (bass and chord sections).
• possibility to choose among a variety of sounds.
• you can play with headphones, i.e. without disturbing
your neighbors or family.
•tuning stability over time and wear resistance of all
mechanical parts.
•reduced overall weight.
Superb performance flexibility
The FR-18 diatonic allows you to control external
MIDI-compatible instruments. The treble buttons are
velocity-sensitive, while the bellows controller provides more articulation possibilities than any other
MIDI keyboard, MIDI wind instrument, etc., you may
know.
Sophisticated bellows response
You will love the instrument’s fast response, high
sensitivity and detection accuracy of opening/closing
movements of the bellows, which have become possible thanks to a new bellows pressure sensing circuitry.
A bellows resistance regulator knob allows you to
adjust the bellows’ inertia to your preference.
Save your settings (User Programs) to a USB
memory
You can save your settings (User Programs) by connecting an optional USB memory to the FR-18
diatonic’s USB port, allowing you to use them on
another FR-18 diatonic, or to share your settings
with other FR-18 diatonic users.
Useful accessory
The FR-18 diatonic has a compartment for
optional rechargeable Ni-MH (AA-type) batteries, so that you don’t need to connect it to a
wall outlet. Consider purchasing such batteries
(you will need 8) when performing on stage.
Sound expansion
The FR-18 diatonic provides two internal memory
banks that allow you to add new sounds.
PBM (Physical Behavior Modeling)
The FR-18 diatonic is based on Roland’s sound generation technology called “PBM” (Physical Behavior
Modeling) whose sonic result is very close to the
sound of traditional diatonic accordions.
The digital advantage
The FR-18 diatonic includes all functions and sounds
of a traditional diatonic instrument, thus conveying a
truly natural feel and sound. Yet it also provides the
advantages only an electronic musical instrument
can give you:
• you can play using any desired keyboard layout (tablature) and in any key.
r
4
Page 5
USING THE UNIT SAFELY
V-Accordion FR-18 diatonic
USING THE UNIT SAFELY
r
Used for instructions intended to alert
the user to the risk of death or severe
injury should the unit be used
improperly.
Used for instructions intended to alert
the user to the risk of injury or material
damage should the unit be used
improperly.
* Material damage refers to damage or
other adverse effects caused with
respect to the home and all its
furnishings, as well to domestic
animals or pets.
• Do not open (or modify in any way) the unit or its AC
adaptor.
...................................................................................................................................
• Do not attempt to repair the unit, or replace parts within
it (except when this manual provides specific instructions
directing you to do so). Refer all servicing to your retailer,
the nearest Roland Service Center, or an authorized Roland distributor, as listed on the “Information” page.
...................................................................................................................................
• Never install the unit in any of the following locations.
• Subject to temperature extremes (e.g., direct sunlight
in an enclosed vehicle, near a heating duct, on top of
heat-generating equipment); or are
• Damp (e.g., baths, washrooms, on wet floors); or are
• Exposed to steam or smoke; or are
• Subject to salt exposure; or are
• Humid; or are
• Exposed to rain; or are
• Dusty or sandy; or are
• Subject to high levels of vibration and shakiness.
...................................................................................................................................
•Make sure you always have the FR-18 diatonic placed so
it is level and sure to remain stable. Never place it on
stands that could wobble, or on inclined surfaces.
...................................................................................................................................
• Be sure to use only the AC adaptor supplied with the
unit. Also, make sure the line voltage at the installation
matches the input voltage specified on the AC adaptor's
body. Other AC adaptors may use a different polarity, or be
designed for a different voltage, so their use could result in damage, malfunction, or electric shock.
...................................................................................................................................
• Use only the supplied power-supply cord. Also, the supplied power cord must not be used with any other device.
The symbol alerts the user to important instructions
or warnings.The specific meaning of the symbol is
determined by the design contained within the
triangle. In the case of the symbol at left, it is used for
general cautions, warnings, or alerts to danger.
The symbol alerts the user to items that must never
be carried out (are forbidden). The specific thing that
must not be done is indicated by the design contained
within the circle. In the case of the symbol at left, it
means that the unit must never be disassembled.
The ● symbol alerts the user to things that must be
carried out. The specific thing that must be done is
indicated by the design contained within the circle. In
the case of the symbol at left, it means that the powercord plug must be unplugged from the outlet.
• The FR-18 diatonic, either alone or in combination with
an amplifier and headphones or speakers, may be capable
of producing sound levels that could cause permanent
hearing loss. Do not operate for a long period of time at a high
volume level, or at a level that is uncomfortable. If you experience
any hearing loss or ringing in the ears, you should immediately
stop using the unit, and consult an audiologist.
....................................................................................................................................
• Do not allow any objects (e.g., flammable material, coins,
pins); or liquids of any kind (water, soft drinks, etc.) to
penetrate the FR-18 diatonic.
....................................................................................................................................
•Immediately turn the power off, remove the AC adaptor
from the outlet, and request servicing by your retailer,
the nearest Roland Service Center, or an authorized
Roland distributor, as listed on the “Information” page when:
• The AC adaptor, the power-supply cord, or the plug has been
damaged; or
• If smoke or unusual odor occurs
• Objects have fallen into, or liquid has been spilled onto the unit;
or
• The unit has been exposed to rain (or otherwise has become
wet); or
• The unit does not appear to operate normally or exhibits a
marked change in performance.
....................................................................................................................................
• In households with small children, an adult should provide supervision until the child is capable of following all
the rules essential for the safe operation of the FR-18
diatonic.
....................................................................................................................................
• Protect the FR-18 diatonic from strong impact.
(Do not drop it!)
...................................................................................................................................
• Do not excessively twist or bend the power cord, or place
heavy objects on it. Doing so can damage the cord, producing severed elements and short circuits. Damaged
cords are fire and shock hazards!
...................................................................................................................................
....................................................................................................................................
5
Page 6
V-Accordion
FR-18 diatonic
USING THE UNIT SAFELY
• Do not force the FR-18 diatonic’s power-supply cord to
share an outlet with an unreasonable number of other
devices. Be especially careful when using extension
cords—the total power used by all devices you have connected to
the extension cord's outlet must never exceed the power rating
(watts/amperes) for the extension cord. Excessive loads can cause
the insulation on the cord to heat up and eventually melt through.
...................................................................................................................................
• Before using the FR-18 diatonic in a foreign country,
consult with your retailer, the nearest Roland Service
Center, or an authorized Roland distributor, as listed on
the “Information” page.
...................................................................................................................................
• Batteries must never be heated, taken apart, or thrown
into fire or water.
...................................................................................................................................
• Never expose batteries to excessive heat such as sunshine, fire or the like.
...................................................................................................................................
• Incorrect handling of batteries, rechargeable batteries, or
battery charger can cause leakage, overheating, fire, or
explosion. Before use, you must read and strictly observe
all of the precautions that accompany the batteries, rechargeable
batteries, or battery charger.
When using rechargeable batteries and a charger, use only the
combination of rechargeable batteries and charger specified by
battery manufacturer.
• The unit and the AC adaptor should be located so its
location or position does not interfere with their proper
ventilation.
...................................................................................................................................
•Always grasp only the plug on the AC adaptor cord when
plugging into, or unplugging from, an outlet or this unit.
• Before cleaning the unit, turn off the power and unplug
the AC adaptor from the outlet (see p. 15).
....................................................................................................................................
•Whenever you suspect the possibility of lightning in your
area, disconnect the AC adaptor from the outlet.
....................................................................................................................................
•If used improperly, batteries may explode or leak and
cause damage or injury. In the interest of safety, please
read and observe the following precautions.
• Carefully follow the installation instructions for bat-
teries, and make sure you observe the correct polarity.
• Avoid using new batteries together with used ones. In
addition, avoid mixing different types of batteries.
• Remove the batteries whenever the unit is to remain
unused for an extended period of time.
• If a battery has leaked, use a soft piece of cloth or paper towel
to wipe all remnants of the discharge from the battery compartment. Then install new batteries. To avoid inflammation of
the skin, make sure that none of the battery discharge gets onto
your hands or skin. Exercise the utmost caution so that none of
the discharge gets near your eyes. Immediately rinse the
affected area with running water if any of the discharge has
entered the eyes.
• Never keep batteries together with metallic objects such as ball-
point pens, necklaces, hairpins, etc.
....................................................................................................................................
• Used batteries must be disposed of in compliance with
whatever regulations for their safe disposal that may be
observed in the region in which you live.
....................................................................................................................................
• Keep any button caps and screws you may remove in a
safe place out of children's reach, so there is no chance
of them being swallowed accidentally.
....................................................................................................................................
...................................................................................................................................
• At regular intervals, you should unplug the AC adaptor
and clean it by using a dry cloth to wipe all dust and
other accumulations away from its prongs. Also, disconnect the power plug from the power outlet whenever the unit is to
remain unused for an extended period of time. Any accumulation
of dust between the power plug and the power outlet can result in
poor insulation and lead to fire.
...................................................................................................................................
• Try to prevent cords and cables from becoming entangled. Also, all cords and cables should be placed so they
are out of the reach of children.
...................................................................................................................................
• Never climb on top of, or place heavy objects on the unit.
...................................................................................................................................
• Never handle the AC adaptor or its plugs with wet hands
when plugging into, or unplugging from, an outlet or this
unit.
...................................................................................................................................
• Before moving the unit, disconnect the AC adaptor and
all cords coming from external devices.
...................................................................................................................................
r
6
Page 7

Contents
1. Features . . . . . . . . . . . . . . . . . . . . . . . . . . . . . . . . . . . . . . . . . . . . . . . . . . . . . . . . . . . . . . . . . . . . . . . . . . . . . 4
2. Important notes . . . . . . . . . . . . . . . . . . . . . . . . . . . . . . . . . . . . . . . . . . . . . . . . . . . . . . . . . . . . . . . . . . . . . . 9
3. A first look at your FR-18 diatonic . . . . . . . . . . . . . . . . . . . . . . . . . . . . . . . . . . . . . . . . . . . . . . . . . . . . . .11
4. Panel descriptions . . . . . . . . . . . . . . . . . . . . . . . . . . . . . . . . . . . . . . . . . . . . . . . . . . . . . . . . . . . . . . . . . . . .12
5. Before you start playing. . . . . . . . . . . . . . . . . . . . . . . . . . . . . . . . . . . . . . . . . . . . . . . . . . . . . . . . . . . . . . .15
6. Listening to the demo songs . . . . . . . . . . . . . . . . . . . . . . . . . . . . . . . . . . . . . . . . . . . . . . . . . . . . . . . . . . . 23
7. Using Sets . . . . . . . . . . . . . . . . . . . . . . . . . . . . . . . . . . . . . . . . . . . . . . . . . . . . . . . . . . . . . . . . . . . . . . . . . .24
8. Selecting and playing sounds . . . . . . . . . . . . . . . . . . . . . . . . . . . . . . . . . . . . . . . . . . . . . . . . . . . . . . . . . .25
9. Highlighting some practical functions . . . . . . . . . . . . . . . . . . . . . . . . . . . . . . . . . . . . . . . . . . . . . . . . . . .31
10. Saving your settings (User Programs). . . . . . . . . . . . . . . . . . . . . . . . . . . . . . . . . . . . . . . . . . . . . . . . . . . . 35
V-Accordion
The sections of your FR-18 diatonic . . . . . . . . . . . . . . . . . . . . . . . . . . . . . . . . . . . . . . . . . . . . . . . . . . . . 11
Bellows resistance regulator . . . . . . . . . . . . . . . . . . . . . . . . . . . . . . . . . . . . . . . . . . . . . . . . . . . . . . . . . . . 11
Treble control panel . . . . . . . . . . . . . . . . . . . . . . . . . . . . . . . . . . . . . . . . . . . . . . . . . . . . . . . . . . . . . . . . . . 12
Getting ready to play . . . . . . . . . . . . . . . . . . . . . . . . . . . . . . . . . . . . . . . . . . . . . . . . . . . . . . . . . . . . . . . . . 15
Connecting the AC adaptor. . . . . . . . . . . . . . . . . . . . . . . . . . . . . . . . . . . . . . . . . . . . . . . . . . . . . . . . . . 15
Installing and removing batteries. . . . . . . . . . . . . . . . . . . . . . . . . . . . . . . . . . . . . . . . . . . . . . . . . . . . . . . 16
Energy saving function . . . . . . . . . . . . . . . . . . . . . . . . . . . . . . . . . . . . . . . . . . . . . . . . . . . . . . . . . . . . . 16
Connecting the FR-18 diatonic to an amplifier, mixer, etc.. . . . . . . . . . . . . . . . . . . . . . . . . . . . . . . . . 17
Attaching the straps. . . . . . . . . . . . . . . . . . . . . . . . . . . . . . . . . . . . . . . . . . . . . . . . . . . . . . . . . . . . . . . . . . 17
Bass strap . . . . . . . . . . . . . . . . . . . . . . . . . . . . . . . . . . . . . . . . . . . . . . . . . . . . . . . . . . . . . . . . . . . . . . . . . 18
Securing the adapter and/or MIDI cable. . . . . . . . . . . . . . . . . . . . . . . . . . . . . . . . . . . . . . . . . . . . . . . . . 19
Personalizing your FR-18 diatonic. . . . . . . . . . . . . . . . . . . . . . . . . . . . . . . . . . . . . . . . . . . . . . . . . . . . . . 20
Switching the power on and off . . . . . . . . . . . . . . . . . . . . . . . . . . . . . . . . . . . . . . . . . . . . . . . . . . . . . . . 21
Turning on the power. . . . . . . . . . . . . . . . . . . . . . . . . . . . . . . . . . . . . . . . . . . . . . . . . . . . . . . . . . . . . . . 21
Turning off the power . . . . . . . . . . . . . . . . . . . . . . . . . . . . . . . . . . . . . . . . . . . . . . . . . . . . . . . . . . . . . . 21
Using headphones. . . . . . . . . . . . . . . . . . . . . . . . . . . . . . . . . . . . . . . . . . . . . . . . . . . . . . . . . . . . . . . . . . . . 21
Treble section. . . . . . . . . . . . . . . . . . . . . . . . . . . . . . . . . . . . . . . . . . . . . . . . . . . . . . . . . . . . . . . . . . . . . . . . 25
Selecting sounds for the right hand . . . . . . . . . . . . . . . . . . . . . . . . . . . . . . . . . . . . . . . . . . . . . . . . . . 25
Selecting the ORCHESTRA/ORGAN mode . . . . . . . . . . . . . . . . . . . . . . . . . . . . . . . . . . . . . . . . . . . . . . 26
Transposing the treble section in octave steps . . . . . . . . . . . . . . . . . . . . . . . . . . . . . . . . . . . . . . . . .27
Bass and chord section. . . . . . . . . . . . . . . . . . . . . . . . . . . . . . . . . . . . . . . . . . . . . . . . . . . . . . . . . . . . . . . . 27
Selecting accordion sounds for the left hand . . . . . . . . . . . . . . . . . . . . . . . . . . . . . . . . . . . . . . . . . .27
Selecting orchestral sounds for the left hand . . . . . . . . . . . . . . . . . . . . . . . . . . . . . . . . . . . . . . . . . .28
Orchestral sounds for the bass section and the chord section . . . . . . . . . . . . . . . . . . . . . . . . . . . . 29
Switching off sections you don’t need (Mute function) . . . . . . . . . . . . . . . . . . . . . . . . . . . . . . . . . . .30
Playing drum/percussion sounds . . . . . . . . . . . . . . . . . . . . . . . . . . . . . . . . . . . . . . . . . . . . . . . . . . . . . . . 30
Selecting a Drum Set . . . . . . . . . . . . . . . . . . . . . . . . . . . . . . . . . . . . . . . . . . . . . . . . . . . . . . . . . . . . . . . . . 30
How to balance the various sections. . . . . . . . . . . . . . . . . . . . . . . . . . . . . . . . . . . . . . . . . . . . . . . . . . . . 31
Adjusting the chorus and reverb effects. . . . . . . . . . . . . . . . . . . . . . . . . . . . . . . . . . . . . . . . . . . . . . . . . 32
Changing the key note of the keyboard . . . . . . . . . . . . . . . . . . . . . . . . . . . . . . . . . . . . . . . . . . . . . . . . . 32
Saving the ‘Key’ setting . . . . . . . . . . . . . . . . . . . . . . . . . . . . . . . . . . . . . . . . . . . . . . . . . . . . . . . . . . . . . 32
Changing the configuration of the keyboards (Tablature). . . . . . . . . . . . . . . . . . . . . . . . . . . . . . . . . . 33
Selecting a tablature with its original key . . . . . . . . . . . . . . . . . . . . . . . . . . . . . . . . . . . . . . . . . . . . . 33
Saving your preferred tablature . . . . . . . . . . . . . . . . . . . . . . . . . . . . . . . . . . . . . . . . . . . . . . . . . . . . . . 33
Using the metronome . . . . . . . . . . . . . . . . . . . . . . . . . . . . . . . . . . . . . . . . . . . . . . . . . . . . . . . . . . . . . . . . 34
Checking the battery status . . . . . . . . . . . . . . . . . . . . . . . . . . . . . . . . . . . . . . . . . . . . . . . . . . . . . . . . . . . 34
Musette Detune. . . . . . . . . . . . . . . . . . . . . . . . . . . . . . . . . . . . . . . . . . . . . . . . . . . . . . . . . . . . . . . . . . . . . . 34
Using User Programs during your performance . . . . . . . . . . . . . . . . . . . . . . . . . . . . . . . . . . . . . . . . . . 35
Saving your current settings. . . . . . . . . . . . . . . . . . . . . . . . . . . . . . . . . . . . . . . . . . . . . . . . . . . . . . . . . . . 35
Editing a User Program . . . . . . . . . . . . . . . . . . . . . . . . . . . . . . . . . . . . . . . . . . . . . . . . . . . . . . . . . . . . . . . 36
r
7
Page 8

FR-18 diatonic
11. Data management via the USB port . . . . . . . . . . . . . . . . . . . . . . . . . . . . . . . . . . . . . . . . . . . . . . . . . . . . .37
12. Editing Function settings . . . . . . . . . . . . . . . . . . . . . . . . . . . . . . . . . . . . . . . . . . . . . . . . . . . . . . . . . . . . . .41
13. Connecting to MIDI devices . . . . . . . . . . . . . . . . . . . . . . . . . . . . . . . . . . . . . . . . . . . . . . . . . . . . . . . . . . . .47
14. Miscellaneous. . . . . . . . . . . . . . . . . . . . . . . . . . . . . . . . . . . . . . . . . . . . . . . . . . . . . . . . . . . . . . . . . . . . . . . .51
15. Specifications. . . . . . . . . . . . . . . . . . . . . . . . . . . . . . . . . . . . . . . . . . . . . . . . . . . . . . . . . . . . . . . . . . . . . . . .53
16. Appendix. . . . . . . . . . . . . . . . . . . . . . . . . . . . . . . . . . . . . . . . . . . . . . . . . . . . . . . . . . . . . . . . . . . . . . . . . . . .54
17. Index. . . . . . . . . . . . . . . . . . . . . . . . . . . . . . . . . . . . . . . . . . . . . . . . . . . . . . . . . . . . . . . . . . . . . . . . . . . . . . .69
V-Accordion
Saving a User Program Set to a USB memory (optional). . . . . . . . . . . . . . . . . . . . . . . . . . . . . . . . . . . 37
Loading User Program Sets from a USB memory (optional) . . . . . . . . . . . . . . . . . . . . . . . . . . . . . . . . 38
Loading User Set memories from a USB memory . . . . . . . . . . . . . . . . . . . . . . . . . . . . . . . . . . . . . . . . . 38
Importing Tablature sets . . . . . . . . . . . . . . . . . . . . . . . . . . . . . . . . . . . . . . . . . . . . . . . . . . . . . . . . . . . . . . 39
Importing optional expansion sounds. . . . . . . . . . . . . . . . . . . . . . . . . . . . . . . . . . . . . . . . . . . . . . . . . . . 39
Selecting the desired function . . . . . . . . . . . . . . . . . . . . . . . . . . . . . . . . . . . . . . . . . . . . . . . . . . . . . . . . . 42
About the indications provided by the treble registers . . . . . . . . . . . . . . . . . . . . . . . . . . . . . . . . . . 42
Parameters . . . . . . . . . . . . . . . . . . . . . . . . . . . . . . . . . . . . . . . . . . . . . . . . . . . . . . . . . . . . . . . . . . . . . . . . . . 43
Connecting an external MIDI device to the FR-18 diatonic . . . . . . . . . . . . . . . . . . . . . . . . . . . . . . . . 47
About MIDI channels . . . . . . . . . . . . . . . . . . . . . . . . . . . . . . . . . . . . . . . . . . . . . . . . . . . . . . . . . . . . . . . 47
Communication via the USB MIDI port. . . . . . . . . . . . . . . . . . . . . . . . . . . . . . . . . . . . . . . . . . . . . . . . . . 48
MIDI parameters . . . . . . . . . . . . . . . . . . . . . . . . . . . . . . . . . . . . . . . . . . . . . . . . . . . . . . . . . . . . . . . . . . . . . 48
Restoring the factory defaults . . . . . . . . . . . . . . . . . . . . . . . . . . . . . . . . . . . . . . . . . . . . . . . . . . . . . . . . . 51
Recovering the factory User Set data . . . . . . . . . . . . . . . . . . . . . . . . . . . . . . . . . . . . . . . . . . . . . . . . . . . 51
Troubleshooting. . . . . . . . . . . . . . . . . . . . . . . . . . . . . . . . . . . . . . . . . . . . . . . . . . . . . . . . . . . . . . . . . . . . . . 52
Tablatures (default: key of G unless specified otherwise) . . . . . . . . . . . . . . . . . . . . . . . . . . . . . . . . . . 54
Demo Songs. . . . . . . . . . . . . . . . . . . . . . . . . . . . . . . . . . . . . . . . . . . . . . . . . . . . . . . . . . . . . . . . . . . . . . . . . 60
Sounds contained in the various Sets . . . . . . . . . . . . . . . . . . . . . . . . . . . . . . . . . . . . . . . . . . . . . . . . . . . 60
Program Change numbers. . . . . . . . . . . . . . . . . . . . . . . . . . . . . . . . . . . . . . . . . . . . . . . . . . . . . . . . . . . . . 64
Bank Select and Program Change RX/TX . . . . . . . . . . . . . . . . . . . . . . . . . . . . . . . . . . . . . . . . . . . . . .65
r
8
Page 9

V-Accordion FR-18 diatonic
2. Important notes
In addition to the items listed under “USING THE UNIT SAFELY” on p. 5, please read and observe the following:
r
Important notes
Power supply
• Do not connect this unit to same electrical outlet that is being
used by an electrical appliance that is controlled by an inverter
(such as a refrigerator, washing machine, microwave oven, or air
conditioner), or that contains a motor. Depending on the way in
which the electrical appliance is used, power supply noise may
cause this unit to malfunction or may produce audible noise. If it is
not practical to use a separate electrical outlet, connect a power
supply noise filter between this unit and the electrical outlet.
• The AC adaptor will begin to generate heat after long hours of
consecutive use. This is normal, and is not a cause for concern.
•When installing or replacing batteries, always turn off the power
on this unit and disconnect any other devices you may have connected. This way, you can prevent malfunction and/or damage to
speakers or other devices.
• Before connecting this unit to other devices, turn off the power to
all units. This will help prevent malfunctions and/or damage to
speakers or other devices.
Placement
• Using the unit near power amplifiers (or other equipment containing large power transformers) may induce hum. To alleviate the
problem, change the orientation of this unit; or move it farther
away from the source of interference.
• This device may interfere with radio and television reception. Do
not use this device in the vicinity of such receivers.
• Noise may be produced if wireless communications devices, such
as cell phones, are operated in the vicinity of this unit. Such noise
could occur when receiving or initiating a call, or while conversing.
Should you experience such problems, you should relocate such
wireless devices so they are at a greater distance from this unit, or
switch them off.
• Do not expose the unit to direct sunlight, place it near devices that
radiate heat, leave it inside an enclosed vehicle, or otherwise subject it to temperature extremes. Excessive heat can deform or discolor the unit.
•When moved from one location to another where the temperature
and/or humidity is very different, water droplets (condensation)
may form inside the unit. Damage or malfunction may result if
you attempt to use the unit in this condition. Therefore, before
using the unit, you must allow it to stand for several hours, until
the condensation has completely evaporated.
• Do not allow objects to remain on top of the keyboard. This can be
the cause of malfunction, such as keys ceasing to produce sound.
• Depending on the material and temperature of the surface on
which you place the unit, its rubber feet may discolor or mar the
surface.
You can place a piece of felt or cloth under the rubber feet to prevent this from happening. If you do so, please make sure that the
unit will not slip or move accidentally.
• Avoid the use of insecticides, perfumes, alcohol, nail polish, spray
cans, etc., near the unit. Swiftly wipe away any liquid that spills on
the unit using a dry, soft cloth.
Maintenance
• For everyday cleaning wipe the FR-18 diatonic with a soft, dry
cloth or one that has been slightly dampened with water. To
remove stubborn dirt, use a mild, non-abrasive detergent. Afterwards, be sure to wipe the instrument thoroughly with a soft, dry
cloth.
• Never use benzine, thinner, alcohol or solvents of any kind, to
avoid the possibility of discoloration and/or deformation.
Repairs and data
•Please be aware that all data contained in the unit’s memory may
be lost when the unit is sent for repairs. Important data should
always be backed up on a USB memory or written down on paper
(when possible). During repairs, due care is taken to avoid the loss
of data. However, in certain cases (such as when circuitry related
to memory itself is out of order), we regret that it may not be possible to restore the data, and Roland Europe S.p.a. assumes no liability concerning such loss of data.
Precautions for batteries (not supplied)
• The temperature range for use of the batteries depends on the
battery type being used. Please see the documentation that came
with the batteries.
• Do not use or store batteries at high temperature, such as in
strong direct sunlight, in cars during hot weather or directly in
front of heaters. This may cause battery fluid leakage, impaired
performance and shorten the batteries’ service life.
• Do not splash fresh or saltwater on a battery or allow the terminals to become damp. This may cause heat generation and formation of rust on the battery and its terminals.
• Keep the batteries out of reach of babies or small children.
• Do no strike or drop the batteries. Strong impact can cause leakage of battery fluid, heat generation, bursting or fire.
• Never try to connect several batteries in parallel as this may cause
leakage of battery fluid, heat generation, bursting or fire.
• Do not alter or remove protective mechanisms or other parts.
Never disassemble the batteries.
Additional precautions
•Please be aware that the contents of memory can be irretrievably
lost as a result of a malfunction, or the improper operation of the
unit. To protect yourself against the risk of loosing important data,
we recommend that you periodically save a backup copy of important data you have stored in the unit's memory to a USB memory.
• Unfortunately, it may be impossible to restore the contents of data
that was stored on a USB memory once it has been lost. Roland
Europe S.p.a. assumes no liability concerning such loss of data.
• Use a reasonable amount of care when using the unit's buttons,
sliders, or other controls; and when using its jacks and connectors.
Rough handling can lead to malfunctions.
•When connecting/disconnecting all cables, grasp the connector
itself—never pull on the cable. This way you will avoid causing
shorts, or damage to the cable's internal elements.
• To avoid disturbing your neighbors, try to keep the unit's volume
at reasonable levels. You may prefer to use headphones, so you do
not need to be concerned about those around you (especially
when it is late at night).
•When you need to transport the unit, package it in the box
(including padding) that it came in, if possible. Otherwise, you will
need to use equivalent packaging materials.
• Some connection cables contain resistors. Do not use cables that
incorporate resistors for connecting to this unit. The use of such
cables can cause the sound level to be extremely low, or impossible
to hear. For information on cable specifications, contact the manufacturer of the cable.
9
Page 10

V-Accordion
Important notes
FR-18 diatonic
Storage devices that can be connected to the
FR-18 diatonic’s USB port
• The FR-18 diatonic allows you to connect commercially available
USB memories. You can purchase such devices at a computer
store, a digital camera dealer, etc.
• Use USB memory sold by Roland. We cannot guarantee operation
if any other USB memory is used.
Before using external USB memories
•When connecting a USB memory, firmly insert it all the way into
the FR-18 diatonic’s USB port.
• Do not touch the pins of the FR-18 diatonic’s USB port or allow
them to become dirty.
•While using an external USB memory, please observe the following
points when handling it:
• To prevent damage from static electrical charges, discharge any
static electricity that might be present in your body before handling a USB memory.
• Do not touch the terminals with your fingers or any metal
object.
• Do not bend or drop a USB memory, or subject it to strong
impact.
• Do not leave a USB memory in direct sunlight or in locations
such as a closed-up automobile.
• Do not allow a USB memory to become wet.
• Do not disassemble or modify your external USB memory.
• Do not insert anything other than a USB memory (e.g., wire, coins,
other types of device) into the USB port. Doing so will damage the
FR-18 diatonic’s USB port.
• Do not apply excessive force to the connected USB memory or the
FR-18 diatonic’s USB port.
• Never connect your USB memory to the FR-18 diatonic via a USB
hub.
• Never insert or remove a USB memory while this unit's power is
on. Doing so may corrupt the unit's data or the data on the USB
memory.
• Carefully insert the USB memory all the way in—until it is firmly in
place.
Notice
• Roland and V-Accordion are either registered trademarks or trademarks of Roland Corporation in the United States and/or other
countries.
• MMP (Moore Microprocessor Portfolio) refers to a patent portfolio
concerned with microprocessor architecture, which was developed
by Technology Properties Limited (TPL).
Roland has licensed this technology from the TPL Group.
•All product names mentioned in this document are trademarks or
registered trademarks of their respective owners.
r
10
Page 11
V-Accordion FR-18 diatonic
3. A first look at your FR-18 diatonic
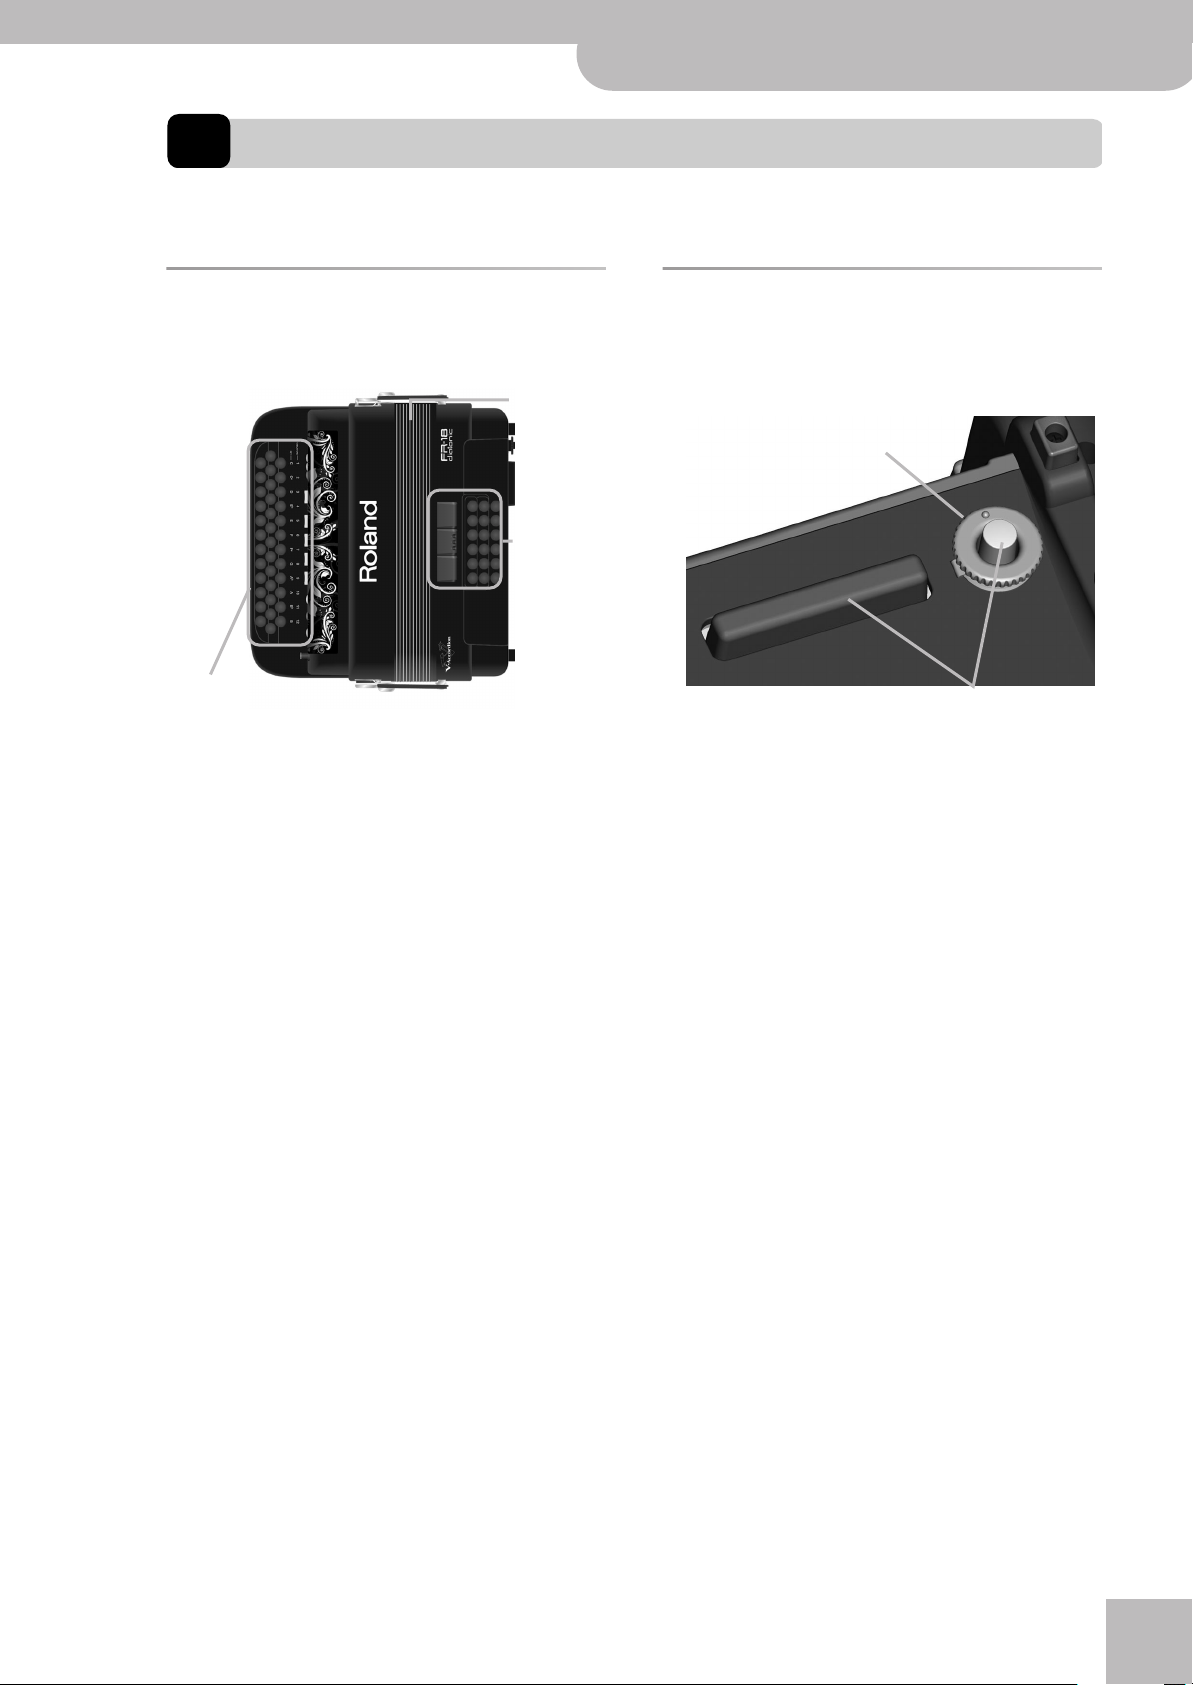
Let us first take a look at how the FR-18 diatonic is organized and how it is operated.
A first look at your FR-18 diatonic
r
The sections of your FR-18 diatonic
Let’s briefly look at the various “sections” of your instrument, as that will help you understand how your FR-18
diatonic works.
Bellows
Bass and chord
section
Treble section
A
Treble section (right-hand manual)
This section is normally used for playing the melody.
It is velocity sensitive.
B
Bass and chord section (left-hand manual)
This section is normally used to play the accompaniment. The FR-18 diatonic’s bass and chord section is
velocity sensitive.
C
Bellows
The bellows is an extremely important part of any
accordion. The movement of the bellows indeed lends
expression and dynamics to the sound.
The bellows of the FR-18 diatonic is so accurate and
responsive that you have perfect control over your
performance.
The bellows’ inertia can be set with the resistance
regulator and air button.
Bellows resistance regulator
Your FR-18 diatonic is equipped with a bellows resistance regulator and air button that allows you to specify
the bellows’ inertia (the force needed to push and pull
it).
Bellows resistance regulator. Press
and turn to select the bellows’
resistance.
B
A
Air buttons: press to purge
remaining air after playing.
It is located next to one of the bellows clips and
mounted onto the air button (which allows you to
release remaining air from the bellows without producing sound).
•Press the wheel and rotate it clockwise to select a
stronger inertia.
•Press the wheel and rotate it counterclockwise to
select a lighter inertia.
•Press either of the two air buttons (1, 2) to purge
the remaining air from the bellows and close it
without sound.
11
Page 12
V-Accordion FR-18 diatonic
Panel descriptions
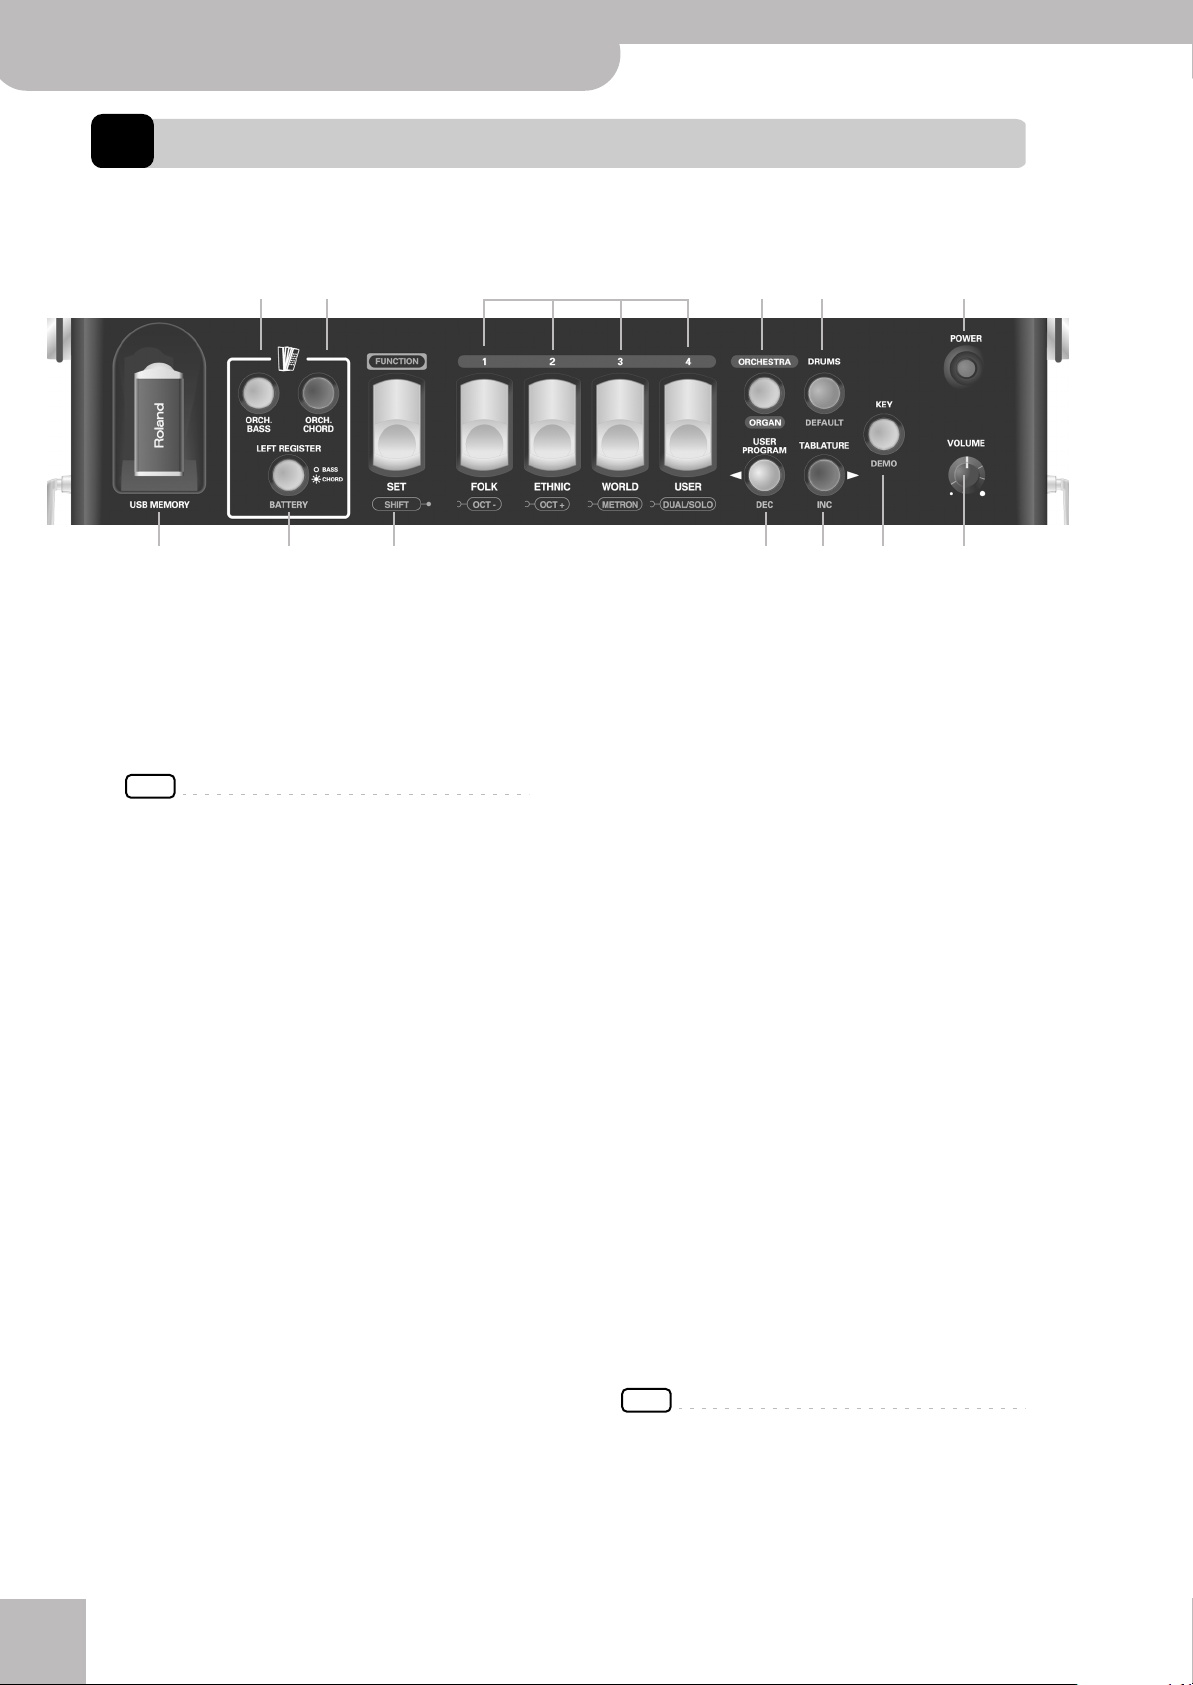
4. Panel descriptions
Treble control panel
B C
F GHI
A
Note: In addition to their main function (top legend), most buttons and registers shown here have a second (sometimes even a third) function (bottom legend), that is usually available in Function mode (see p. 41).
A
USB MEMORY port
The USB MEMORY port allows you to connect an
optional USB memory to the FR-18 diatonic. It can be
used to save and load User Programs, to load User
Sets as well as new sounds and new tablatures.
NOTE
Use a USB memory sold by Roland. We cannot guarantee
operation if any other USB memory is used.
B
ORCH. BASS button
This button allows you to switch orchestral bass
mode on/off. When it is on, the bass section plays the
selected orchestral sound.
C
ORCH. CHORD button
This button allows you to turn the orchestral chord
mode on/off. When it is on, the chord section plays
the selected orchestral sound.
D
LEFT REGISTER button
This button is used to assign the three bass registers
(the large gray registers) either to the BASS (light off)
or to the CHORD (light on) section. See p. 28 for
details. It also allows you to check the battery status
(page 34).
E
FUNCTION/SET register
This register allows you:
•to recall one of the 12 diatonic accordion types
(accordion SETs). There are 4 families.
• (FUNCTION mode) to access “hidden” parameter
and MIDI functions, such as:
‰ editing settings and MIDI parameters
‰ changing octaves (page 27)
F
Treble registers (1~4)
The Treble section provides 4 switches (“registers”)
allowing you to select:
•a diatonic accordion type (12 accordion types
divided over 4 families – “accordion sets”).
•the desired accordion sound of the selected accor-
r
dion family.
D
E
JLK
•the desired Orchestral/Organ sound (total 12).
•(FUNCTION mode) the desired preset parameter
value, User Program settings.
G
ORCHESTRA/ORGAN button
This button allows you to turn the Orchestral/Organ
sounds on/off.
H
USER PROGRAM/DEC button
This button allows you:
•to turn the User Program On/Off.
•(FUNCTION mode) to decrease parameter values.
I
DRUMS/DEFAULT button
This button allows you:
•to switch the Drums function (page 30) on and off.
•(FUNCTION mode) to recall the saved setting for
the selected parameter.
J
TABLATURE/INC button
This button allows you:
•to select your desired tablature.
•(FUNCTION mode) to increase parameter values.
K
KEY/DEMO button
This button allows you:
•to select the Key note in which you want to play
your music
•to listen to the FR-18 diatonic’s demo songs (press
and hold the button).
L
POWER button
Press this button to switch FR-18 diatonic on (the
button lights) and off (the button goes dark).
NOTE
If you need to turn off the power completely (when using
the supplied AC adaptor), first turn off the [POWER] switch,
then disconnect the AC adaptor’s plug from the wall outlet.
M
VOLUME knob
This knob allows you to set the overall volume.
M
12
Page 13
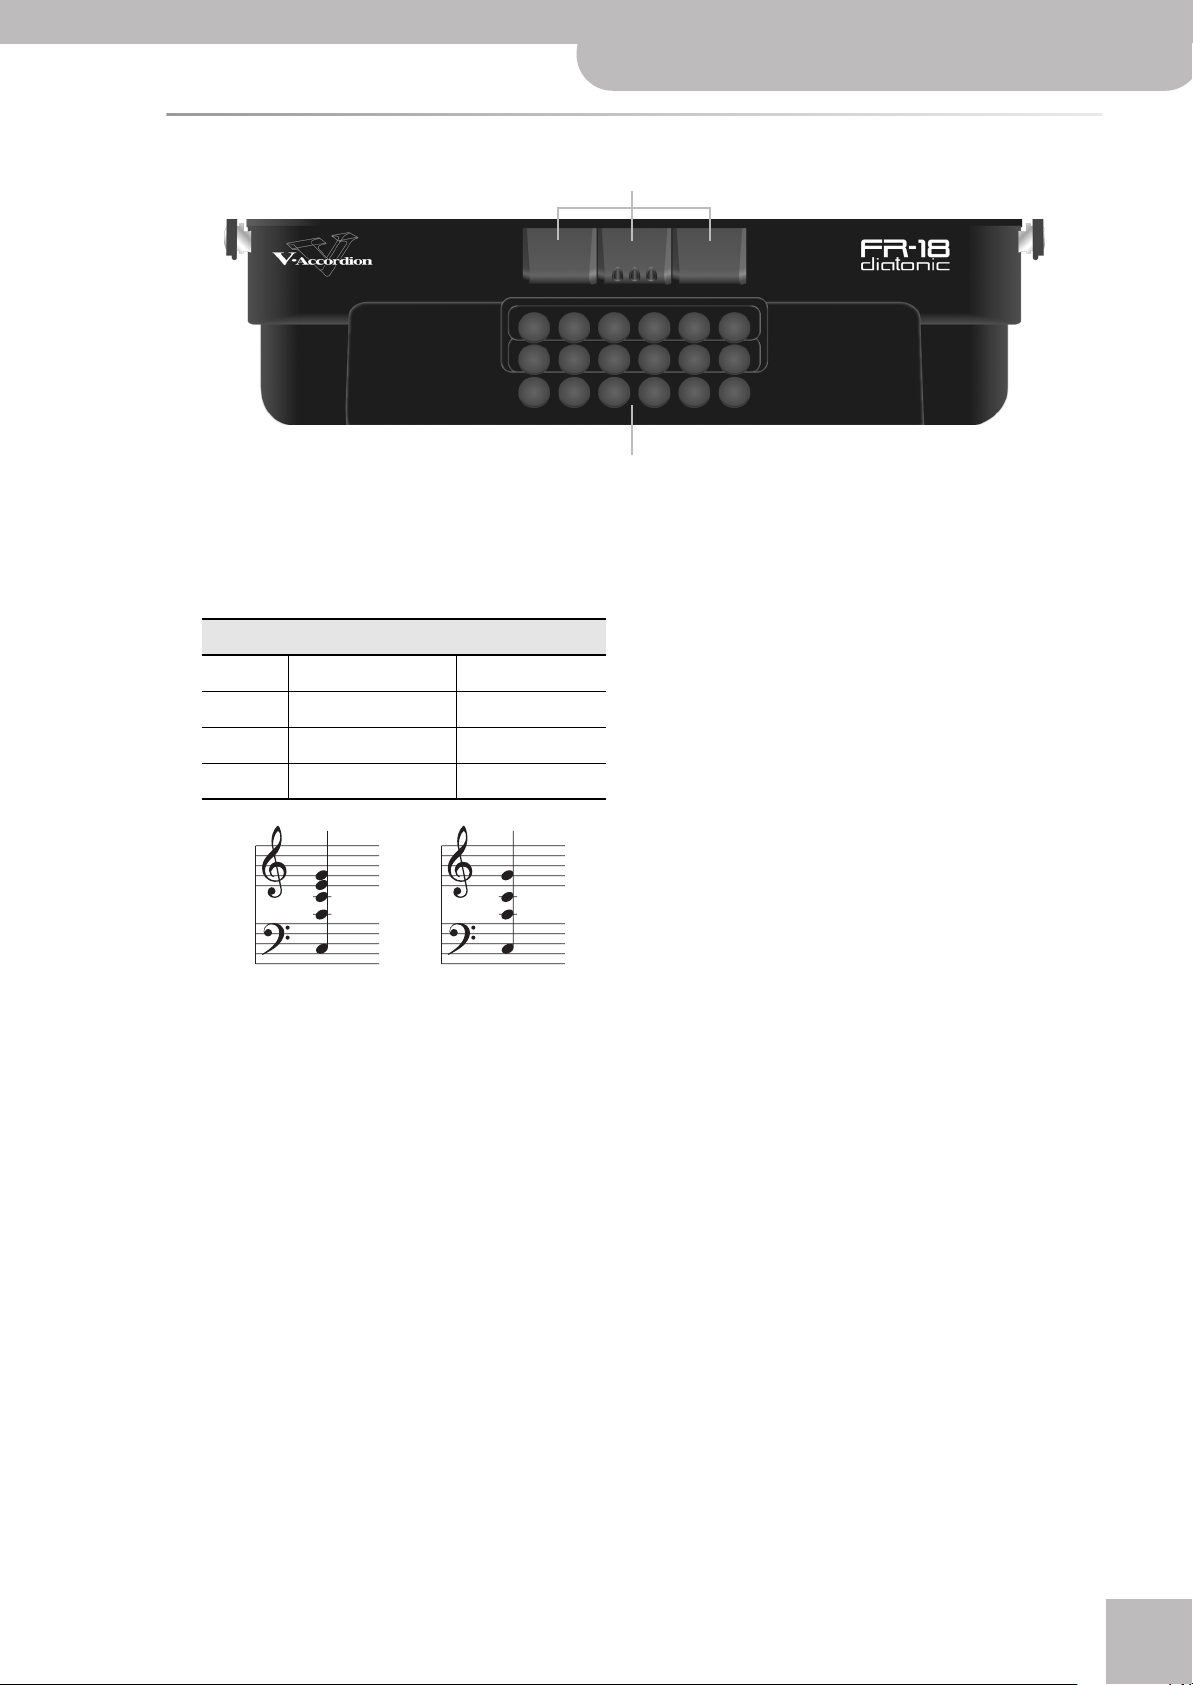
Bass control panel
N
Bass registers
These switches allow you to select the desired bass
and chord sounds. These registers do not illuminate.
They include the following types (footages) for accordion sounds:
Bass registers
Register Bass Chord
N
O
V-Accordion FR-18 diatonic
O
Bass and chord buttons
These 18 button keys are used to play:
• bass notes and chords (like on an acoustic diatonic
accordion).
•orchestral bass and orchestral chord sounds;
•drum sounds;.
They are velocity-sensitive.
Bass control panel
r
1 8’ 8’, 4’
2 16’, 8’, 4’ 8’, 4’
3 16’, 8’ 8’, 4’
16’/8’
Full Chord
The bass registers are also used to select orchestral
sounds for the bass or chord section.
16’/8’
Chord –3^
13
Page 14
V-Accordion FR-18 diatonic
Panel descriptions
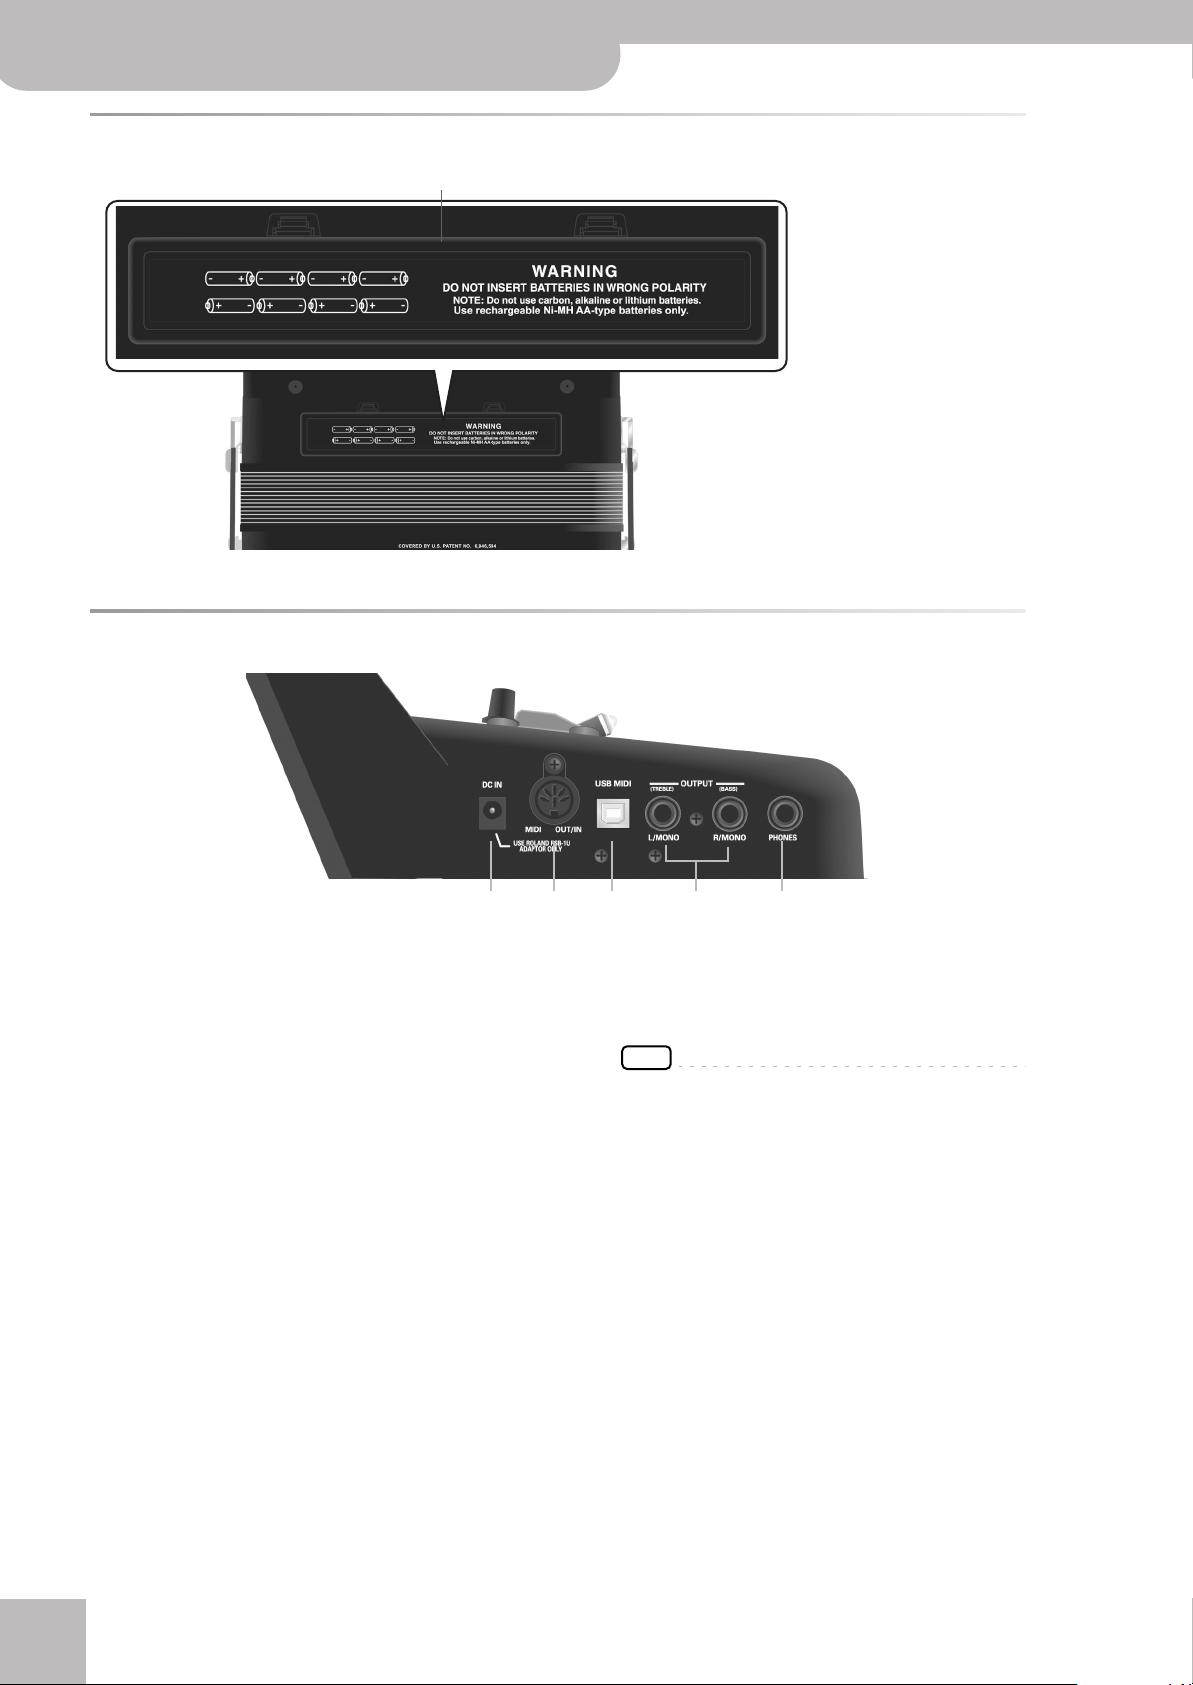
Battery compartment
P
P
Battery compartment
This is where you install 8 commercially
available rechargeable AA-type Ni-MH
batteries (see p. 16).
Connection panel
A
DC IN socket
This is where you need to connect the supplied power
adapter (PSB-1U). Note that you can also purchase 8
rechargeable AA-type Ni-MH batteries and use the
FR-18 diatonic without the adapter.
B
MIDI OUT/IN socket
This socket can be used to connect the FR-18
diatonic to an external MIDI device to receive or
transmit MIDI data. When the “MIDI OUT/IN” parameter (see p. 50) is set to “In”, the FR-18 diatonic doesn’t
play: it only receives MIDI messages.
C
USB MIDI port
This port can be connected to a USB port of your
computer (see p. 48). Please use a commercially available USB cable.
D
OUTPUT L/MONO (TREBLE) & R/MONO (BASS) sockets
These sockets can be connected to an amplifier, a
mixing console or a commercially available wireless
system. If you use both connectors, the FR-18
diatonic’s output is stereo. In that case the signals of
the Treble section is transmitted to the L/MONO
socket, while the R/MONO socket transmits the bass
(and chord) signals. If you only use one audio cable
(connected to the “L” or “R” socket), the FR-18
diatonic’s output is mono.
r
A B C D E
E
PHONES socket
This is where you can connect the supplied earphones
or optional stereo headphones (Roland RH-series).
Doing so does not mute the OUTPUT sockets.
NOTE
When using the supplied earphones, do not set the volume
too high (i.e. past “12 o’clock”) to avoid distortion.
■ Important handling notes
•After connecting any cable to the FR-18 diatonic,
be sure to never place it on the side when not
using it.
•Always let FR-18 diatonic stand on its rubber feet
(and in the corresponding direction) to avoid damaging the plugs.
•Always handle and move the FR-18 diatonic with
care and pay special attention to the cable slack to
avoid damaging or bending the cables.
• If you place the FR-18 diatonic on your lap, ensure
that the audio and adaptor cables run between
your legs (not sideways) to avoid damaging or
bending the cables.
14
Page 15
5. Before you start playing
Getting ready to play
The FR-18 diatonic is an electronic instrument that
requires some form of electrical power. This chapter
explains how to power your V-Accordion using the supplied adaptor or 8 commercially available rechargeable
batteries (AA type Ni-MH). Consider purchasing such
batteries when performing on stage.
In addition, since the FR-18 diatonic has no loudspeakers inside, you will learn how to connect it to an external amplification system.
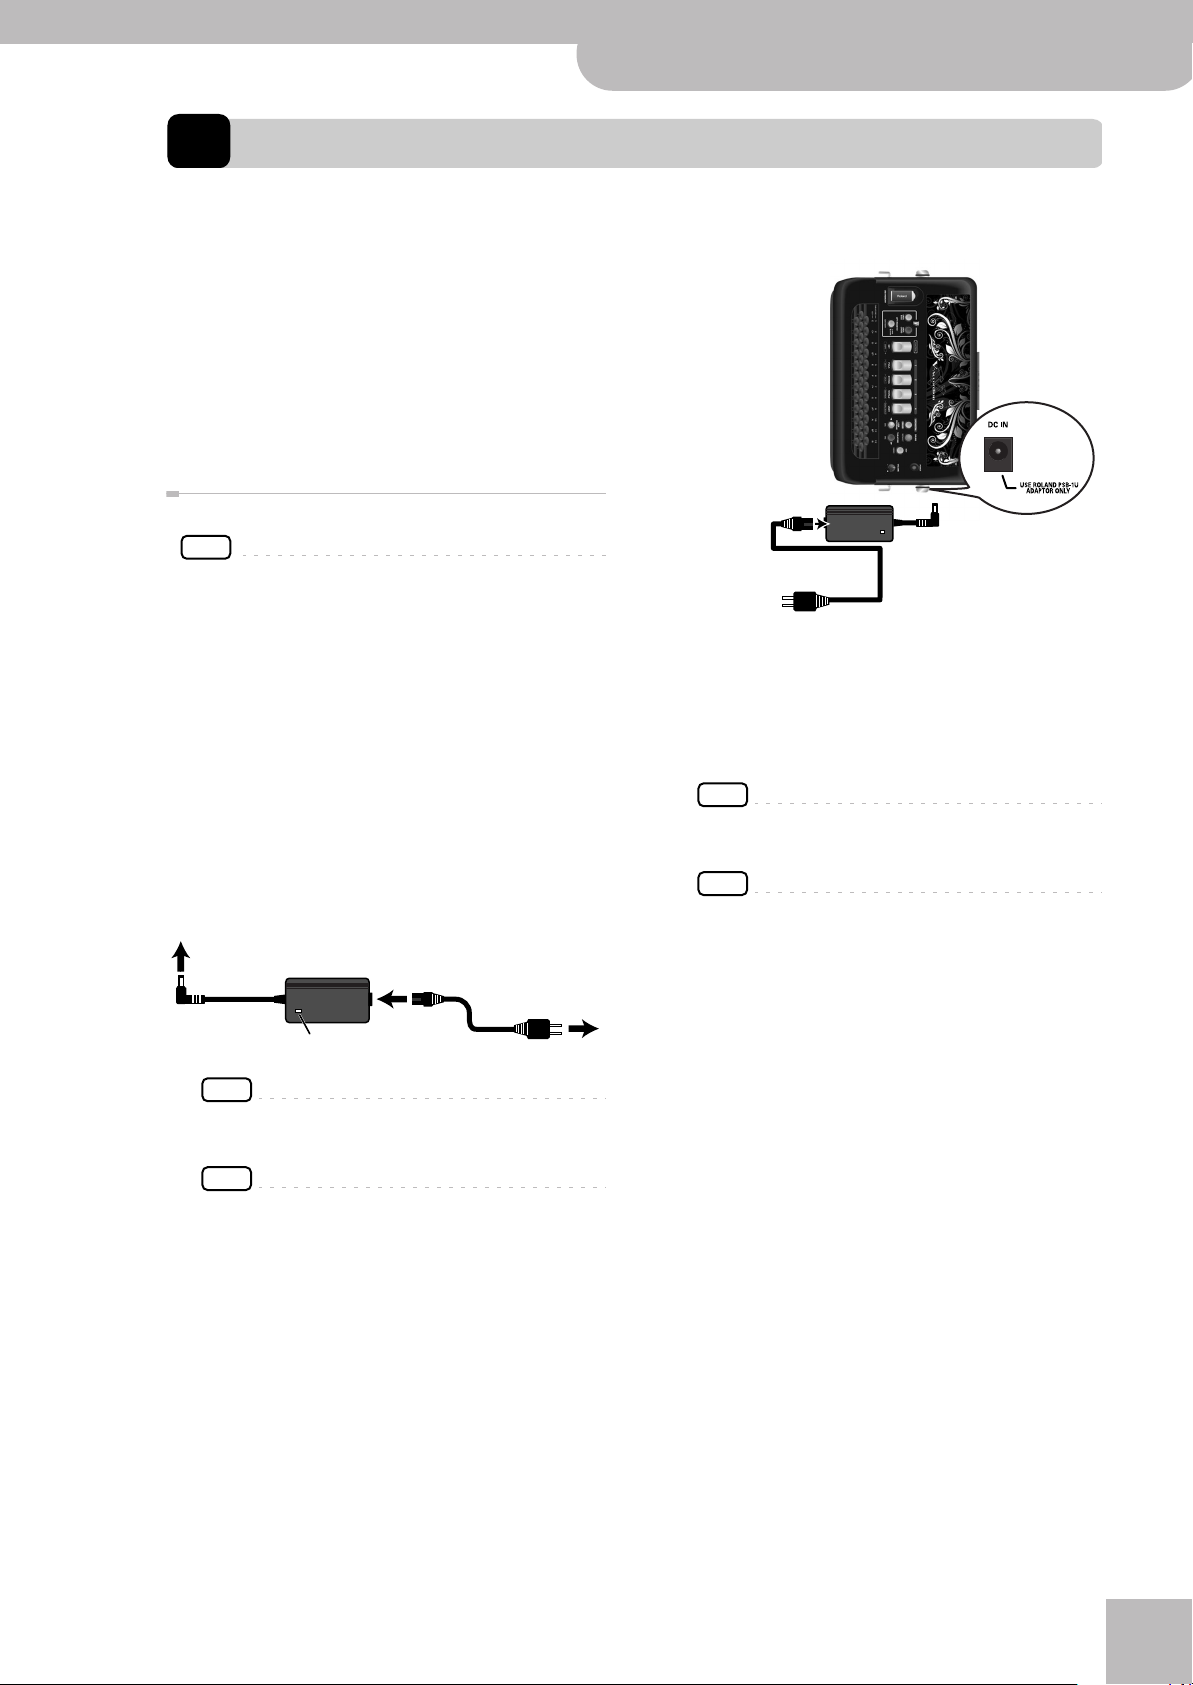
Connecting the AC adaptor
NOTE
To prevent malfunction and/or damage to speakers or other
devices, always turn down the volume, and turn off the power
on all devices before making any connections.
1.
Turn the [VOLUME] knob all the way
towards the small dot to minimize the volume.
2.
Connect the included power cord to the AC
adapter.
The indicator will light once you plug the AC adapter
into a wall outlet.
Place the AC adaptor so that the side with the indicator (see illustration) faces upwards and the side with
textual information faces downwards.
To the FR-18 diatonic’s DC IN connector
AC adaptor
Power cord
To a wall outlet
V-Accordion FR-18 diatonic
3.
Connect the AC adaptor to the FR-18
Before you start playing
diatonic’s DC IN jack.
To a wall outlet
4.
Plug the power cord into a power outlet.
Now that the FR-18 diatonic is connected to a wall
outlet, you can continue with the section “Switching
the power on and off” on p. 21. To use the FR-18
diatonic with batteries, see “Installing and removing
batteries” on p. 16.
NOTE
If the FR-18 diatonic is to remain unused for an extended
period of time, unplug the adaptor.
NOTE
To prevent the inadvertent disruption of power to your unit
(should the plug be pulled out accidentally), and to avoid
applying undue stress to the AC adaptor jack, anchor the
power cord. “Securing the adapter and/or MIDI cable” on
p. 19.
r
Indicator
NOTE
Depending on your region, the included power cord may
differ from the one shown above.
NOTE
Be sure to use only the AC adaptor supplied with the unit
(PSB-1U). Also, make sure the line voltage at the installation matches the input voltage specified on the AC adaptor’s body. Other AC adaptors may use a different polarity,
or be designed for a different voltage, so their use could
result in damage, malfunction, or electric shock.
15
Page 16

V-Accordion FR-18 diatonic
Before you start playing
Installing and removing batteries
Your FR-18 diatonic has a compartment into which you
can install 8 optional rechargeable AA-type Ni-MH batteries (not supplied). You can therefore play your instrument without connecting the supplied adapter.
1.
Switch off the FR-18 diatonic.
2.
Remove the cover from the FR-18 diatonic’s
battery compartment by pressing the two
tabs and lifting the cover.
3.
Insert 8 rechargeable AA-type batteries into
the compartment, taking care to orient
them in accordance with the “+” and “–”
indications.
NOTE
Actual battery life varies according to usage conditions, the
quality of the batteries and the number of charging cycles.
Energy saving function
NOTES
This unit has an Auto Power Off function, which
automatically switches off the power after a certain amount of time has passed without any
buttons being operated.
You can disable the Auto Power Off function. For
more about the Auto Power Off function, refer to
“Auto Power Off” on p. 46.
4.
Close the FR-18 diatonic’s battery compartment.
Note about rechargeable batteries
Certain batteries can be recharged several times before
they need to be replaced with a new ones. Note that it is
normal for the batteries to last increasingly shorter as
time goes by. At the end of their life cycle, they may
only last one hour, for example. But that is a gradual
process.
Battery duration
New or fully charged batteries should last about 5.5
hours (for 2000mAh Ni-MH batteries) during continuous operation.
NOTE
Though it is perfectly possible to use rechargeable batteries, be aware that they cannot be recharged simply by leaving them in the FR-18 diatonic’s compartment and connecting the adapter. You will need an external charging
unit.
NOTE
We recommend using rechargeable AA-type Ni-MH batteries.
NOTE
When replacing batteries, be sure to insert them correctly
(ensure correct polarity).
NOTE
Remove the batteries whenever FR-18 diatonic is to remain
r
unused for an extended period of time.
16
Page 17
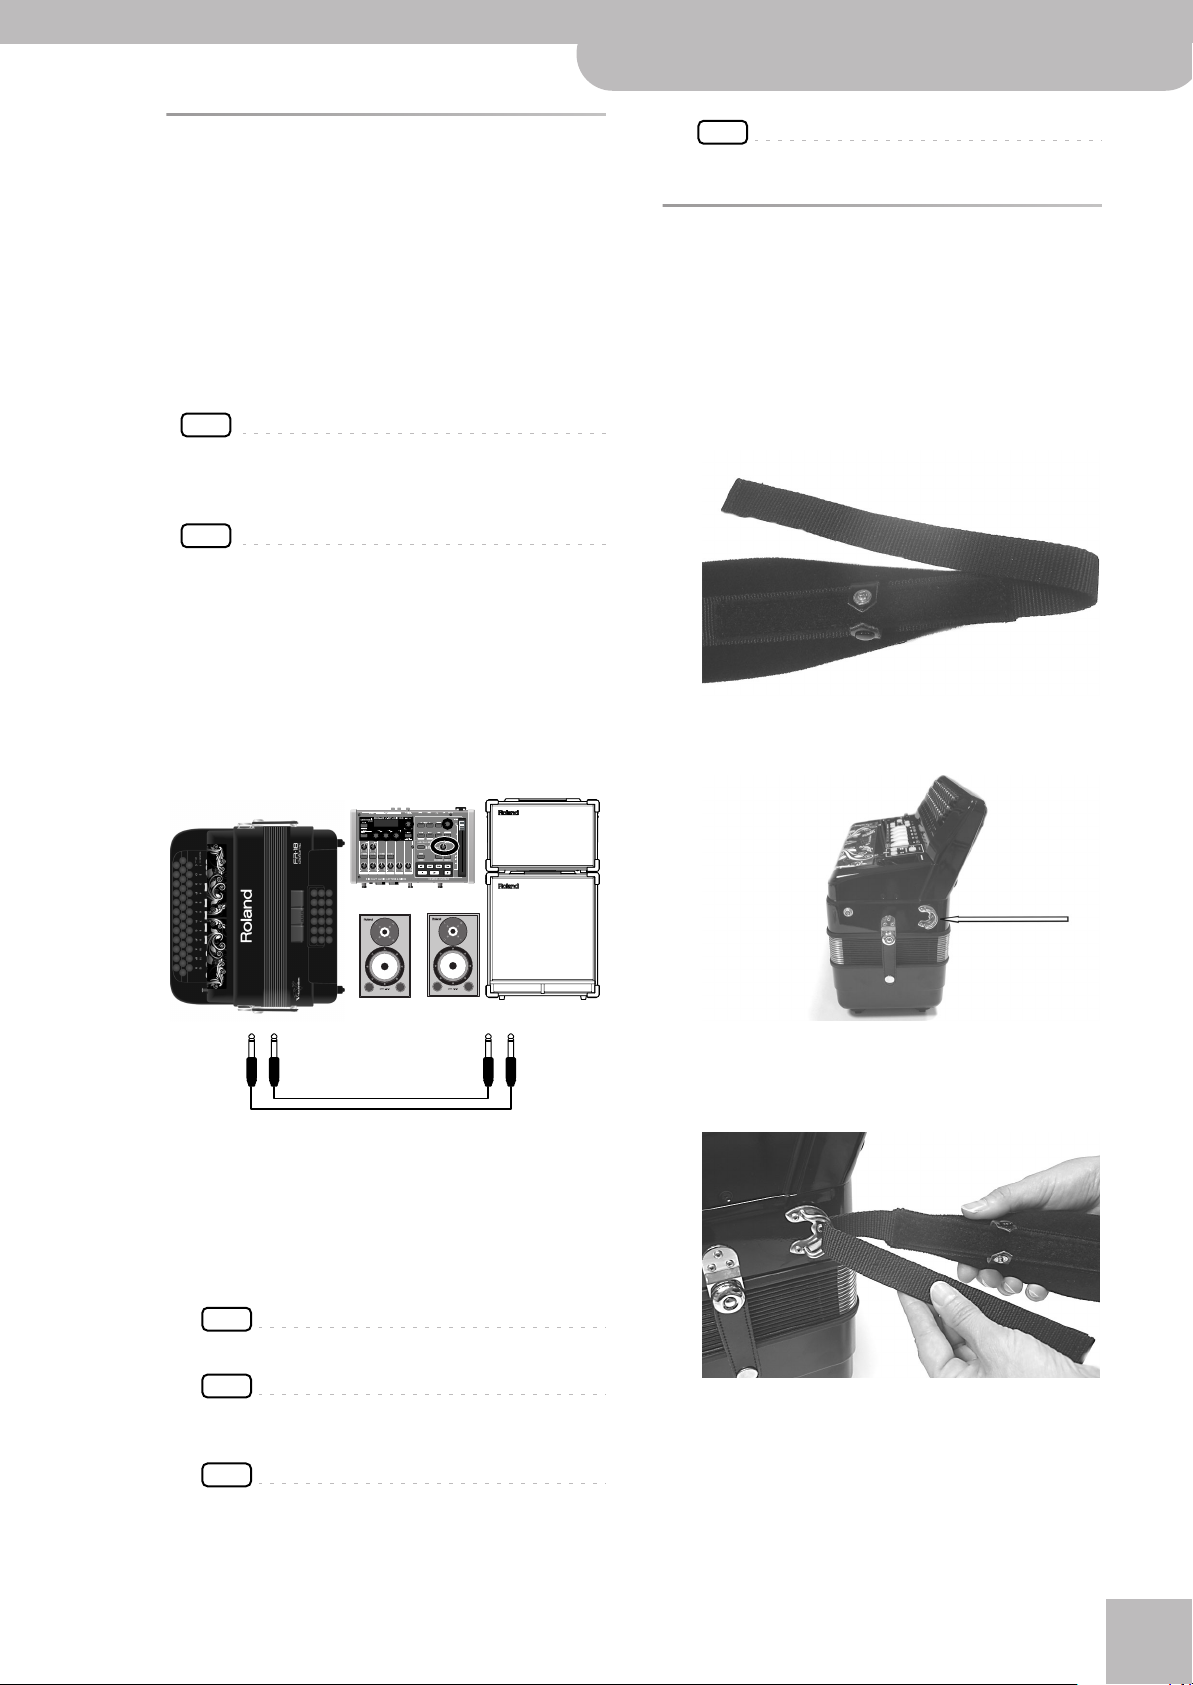
V-Accordion FR-18 diatonic
Left holder ring
Connecting the FR-18 diatonic to an amplifier, mixer, etc.
r
Connecting the FR-18 diatonic to
an amplifier, mixer, etc.
The FR-18 diatonic needs to be connected to an amplification system. If you are using optional batteries and
need to connect the FR-18 diatonic to a PA system or
mixer, we recommend using a commercially available
wireless system to avoid having to use excessively long
signal cables.
You can also use the supplied earphones or a pair of
optional headphones (Roland RH-series).
NOTE
To prevent malfunction and/or damage to speakers or other
devices, always turn down the volume, and turn off the power
on all devices before making any connections.
NOTE
When using the supplied earphones, do not set the volume too
high (i.e. past “12 o’clock”) to avoid distortion.
1.
Turn the [VOLUME] knob all the way
towards the small dot to minimize the volume.
2.
Switch off all devices.
3.
Connect the FR-18 diatonic’s OUTPUT jacks
to the inputs of your external device.
NOTE
You can also use a pair of headphones (Roland RH-series).
Attaching the straps
Proceed as follows to attach the straps to your FR-18
diatonic:
1.
Unpack the straps.
The FR-18 diatonic comes with two straps, each with
two ends: the upper end is fitted with a velcro strip
and the clip, the lower end is not. See the illustration
below:
2.
Put the FR-18 diatonic on a stable surface
as shown in the illustration below.
OUTPUT
L/MONO (Treble) + R/MONO (Bass)
Use either a long signal cable (10m or more) or a commercially available wireless system (recommended).
Please choose unbalanced (mono) cables with 1/4”
jacks at one end (for the FR-18 diatonic). The connectors at the other end need to match the input sockets
of the device to which you are connecting the FR-18
diatonic.
NOTE
Be sure to read “Important handling notes” on p. 14.
NOTE
If your amplifier is monaural, you only need to connect the
L/MONO socket.
NOTE
If you use a commercially available wireless transmitter,
the FR-18 diatonic’s output signals may distort. In that
case, change the FR-18 diatonic’s volume setting.
INPUT
L + R
3.
4.
Slide the upper end (with the velcro strip) of
one strap through the left holder ring (see
the illustration).
Attach the strap’s upper part to the velcro
layer below it.
17
Page 18
V-Accordion FR-18 diatonic
Before you start playing
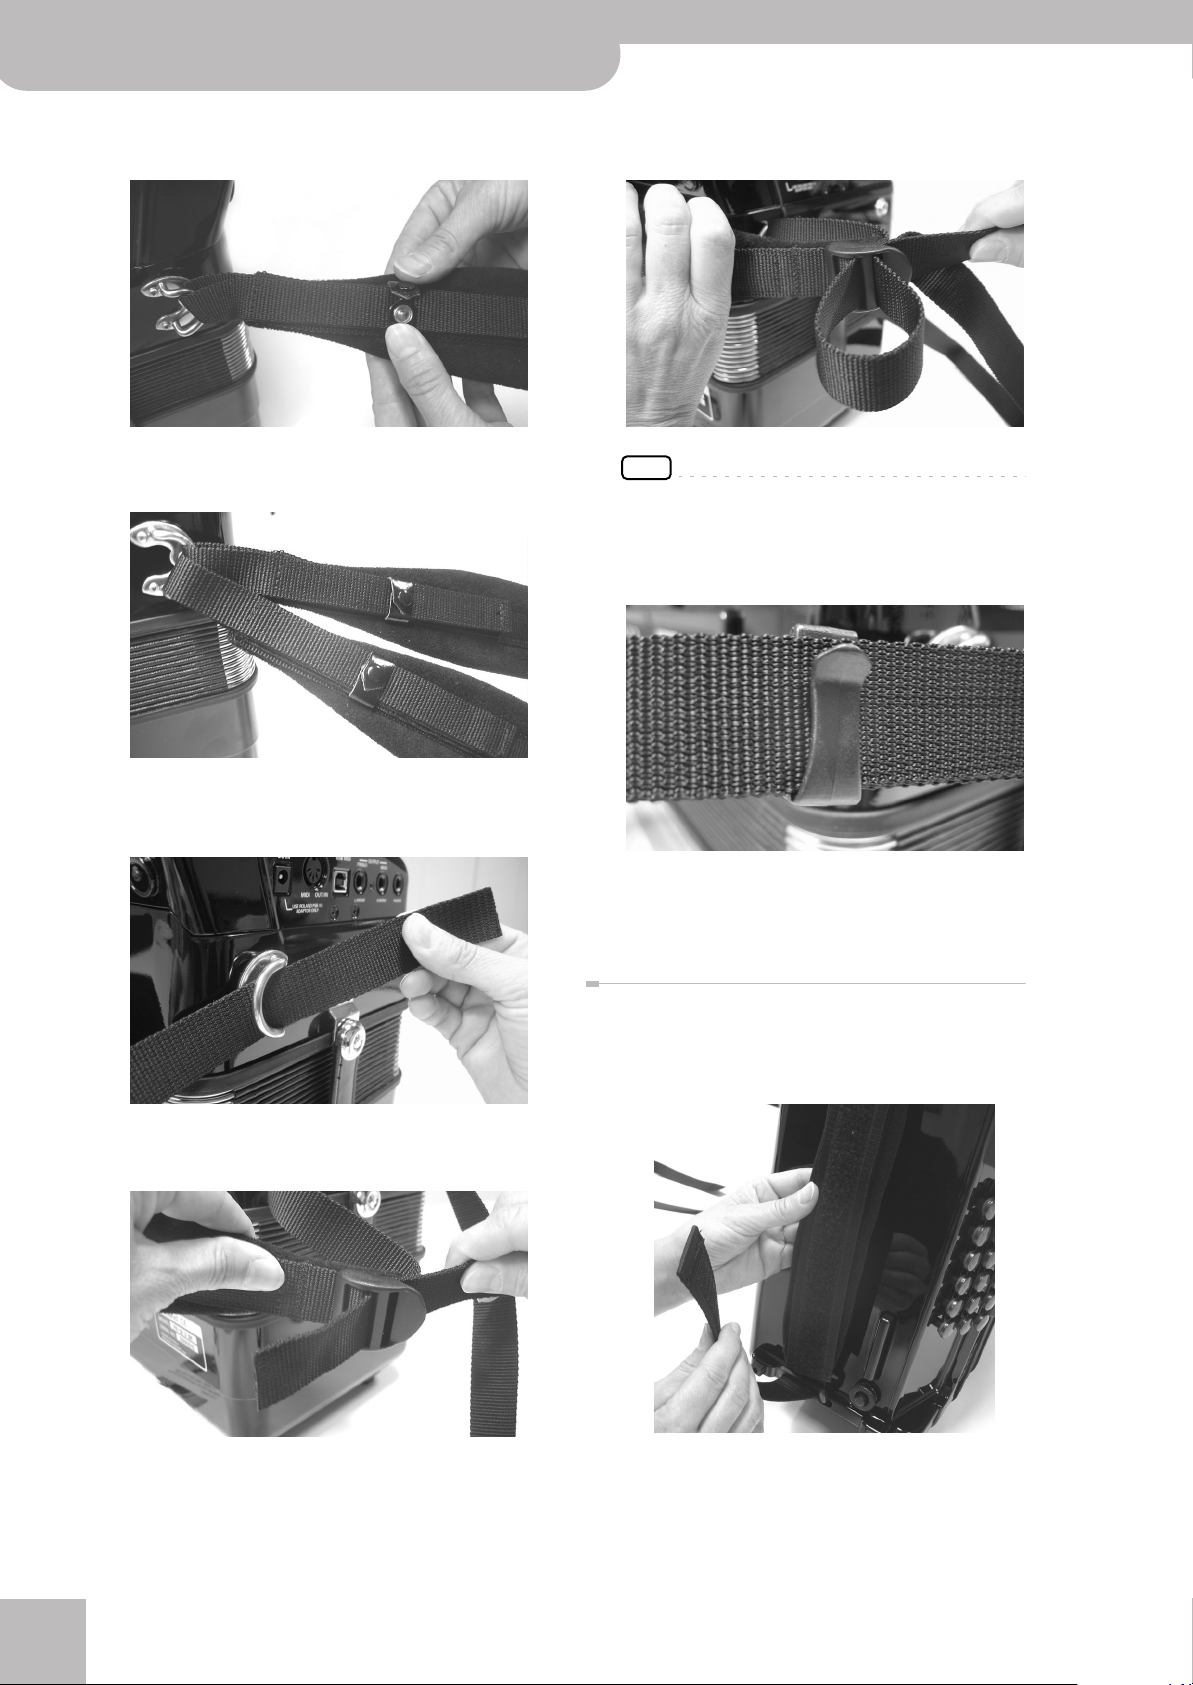
5.
Close the security clip to ensure that the
strap cannot come loose.
6.
Repeat steps (3)~(5) for the other strap.
The upper strap ends should look as follows:
9.
Turn the strap end around and insert it into
the lower eyelet, then pull it tight.
NOTE
You may want to adjust the length first to suit your preference.
10.
Slide the plastic clip over the loose and long
lower strap ends to secure the strap.
7.
Slide the lower end of one strap through the
right holder ring as shown.
8.
Slide the strap end through the upper eyelet
of its plastic buckle (see the illustration).
11.
Repeat steps (7)~(9) for the other lower
strap end.
Bass strap
The FR-18 diatonic’s bass strap (used to move the
bellows in and out) is made of fabric and fitted with a
velcro strip that allows you to adjust its slack.
r
18
Page 19
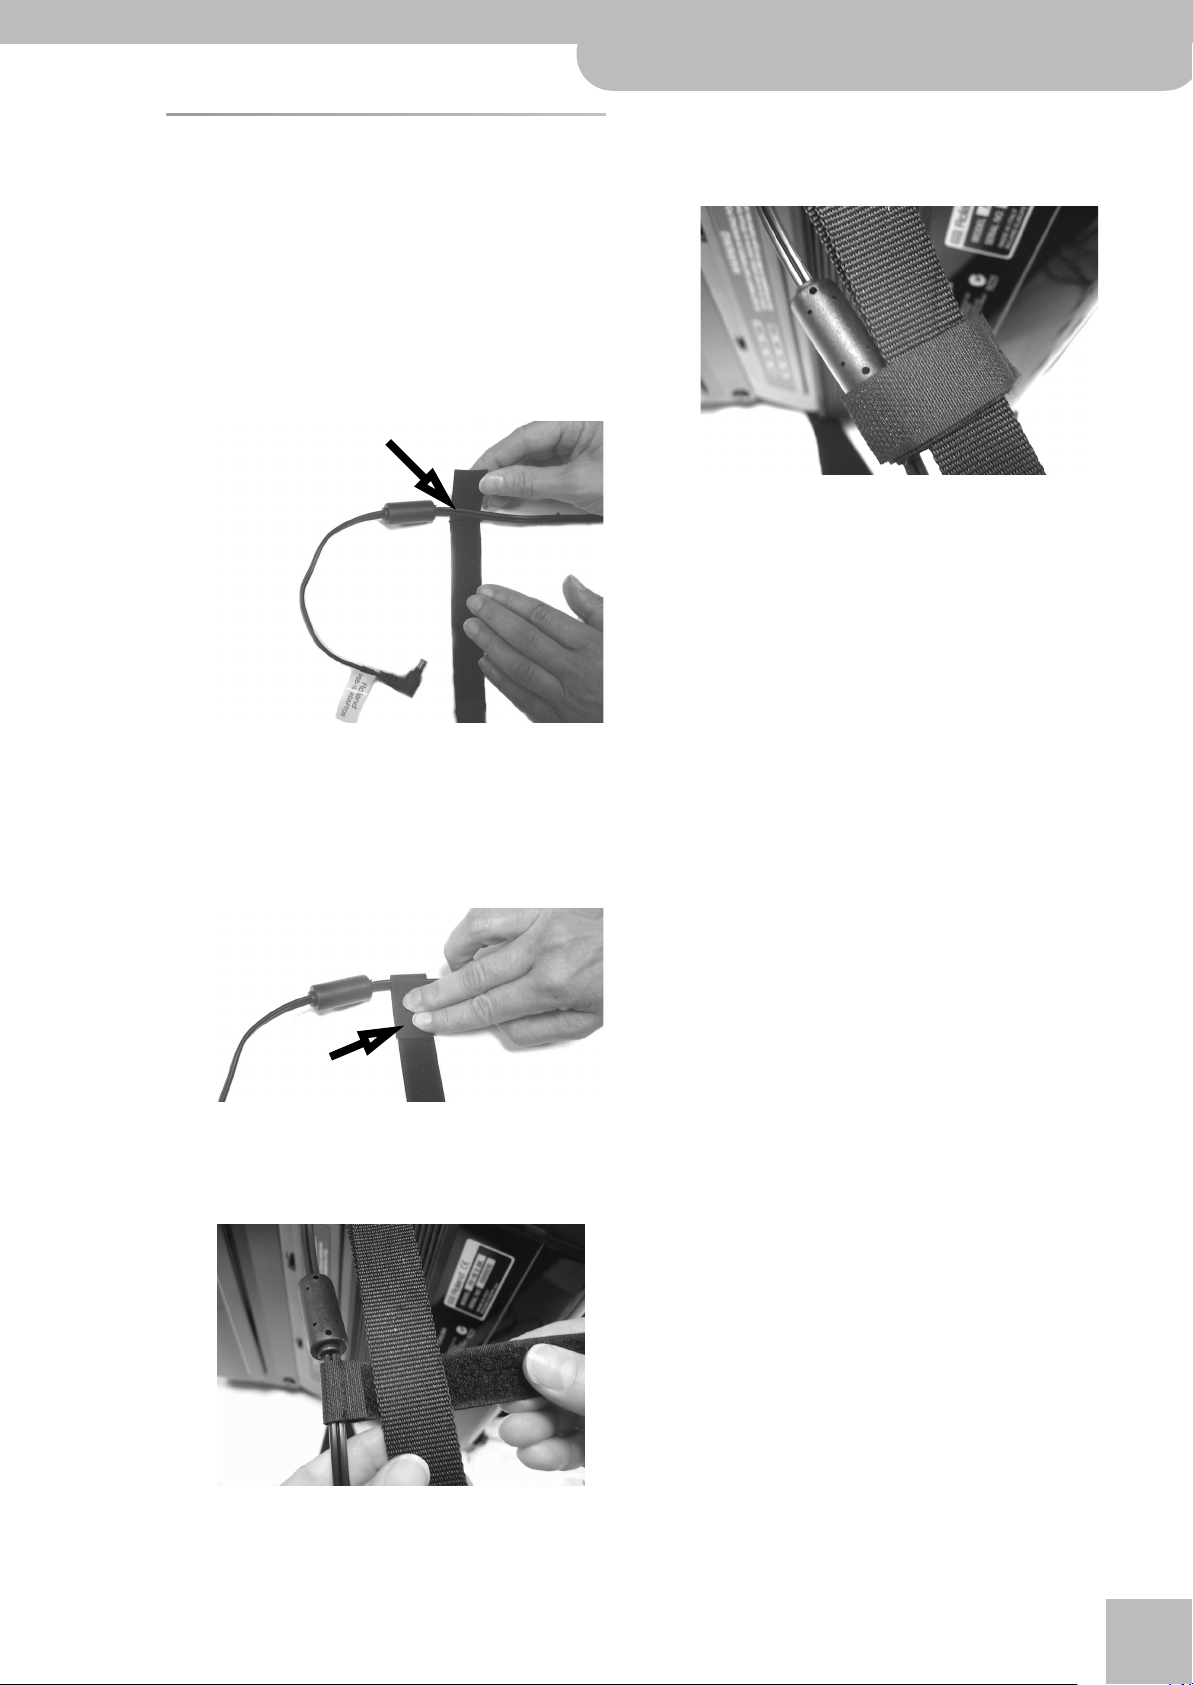
Securing the adapter and/or MIDI cable
Proceed as follows to ensure that the adapter cable –or
a MIDI cable– doesn’t come loose while you are playing.
Your FR-18 diatonic comes with an adapter and an
attachment strip that allows you to secure the adapter
cable and optional MIDI as well as audio cables to the
right strap.
1.
Prepare the adapter cable and the attachment strip as follows:
V-Accordion FR-18 diatonic
4.
Keep winding the attachment strip around
the strap until your assembly looks as follows:
5.
Reverse these steps to remove and disconnect the adapter and/or MIDI and audio
cables when you want to stop playing.
Securing the adapter and/or MIDI cable
r
Be sure to attach the strip before the ferrite core on
the adapter cable. If you like, you can also add the
MIDI cable and audio cables to this assembly.
2.
Secure the attachment strip as shown in the
illustration, making sure that the ferrite
core cannot slide out of the loop.
3.
Hold the adapter cable close to the right
strap and wind the attachment strip around
it as shown.
The strip is fitted with a Velcro layer that holds it in
place.
19
Page 20
V-Accordion FR-18 diatonic
Before you start playing
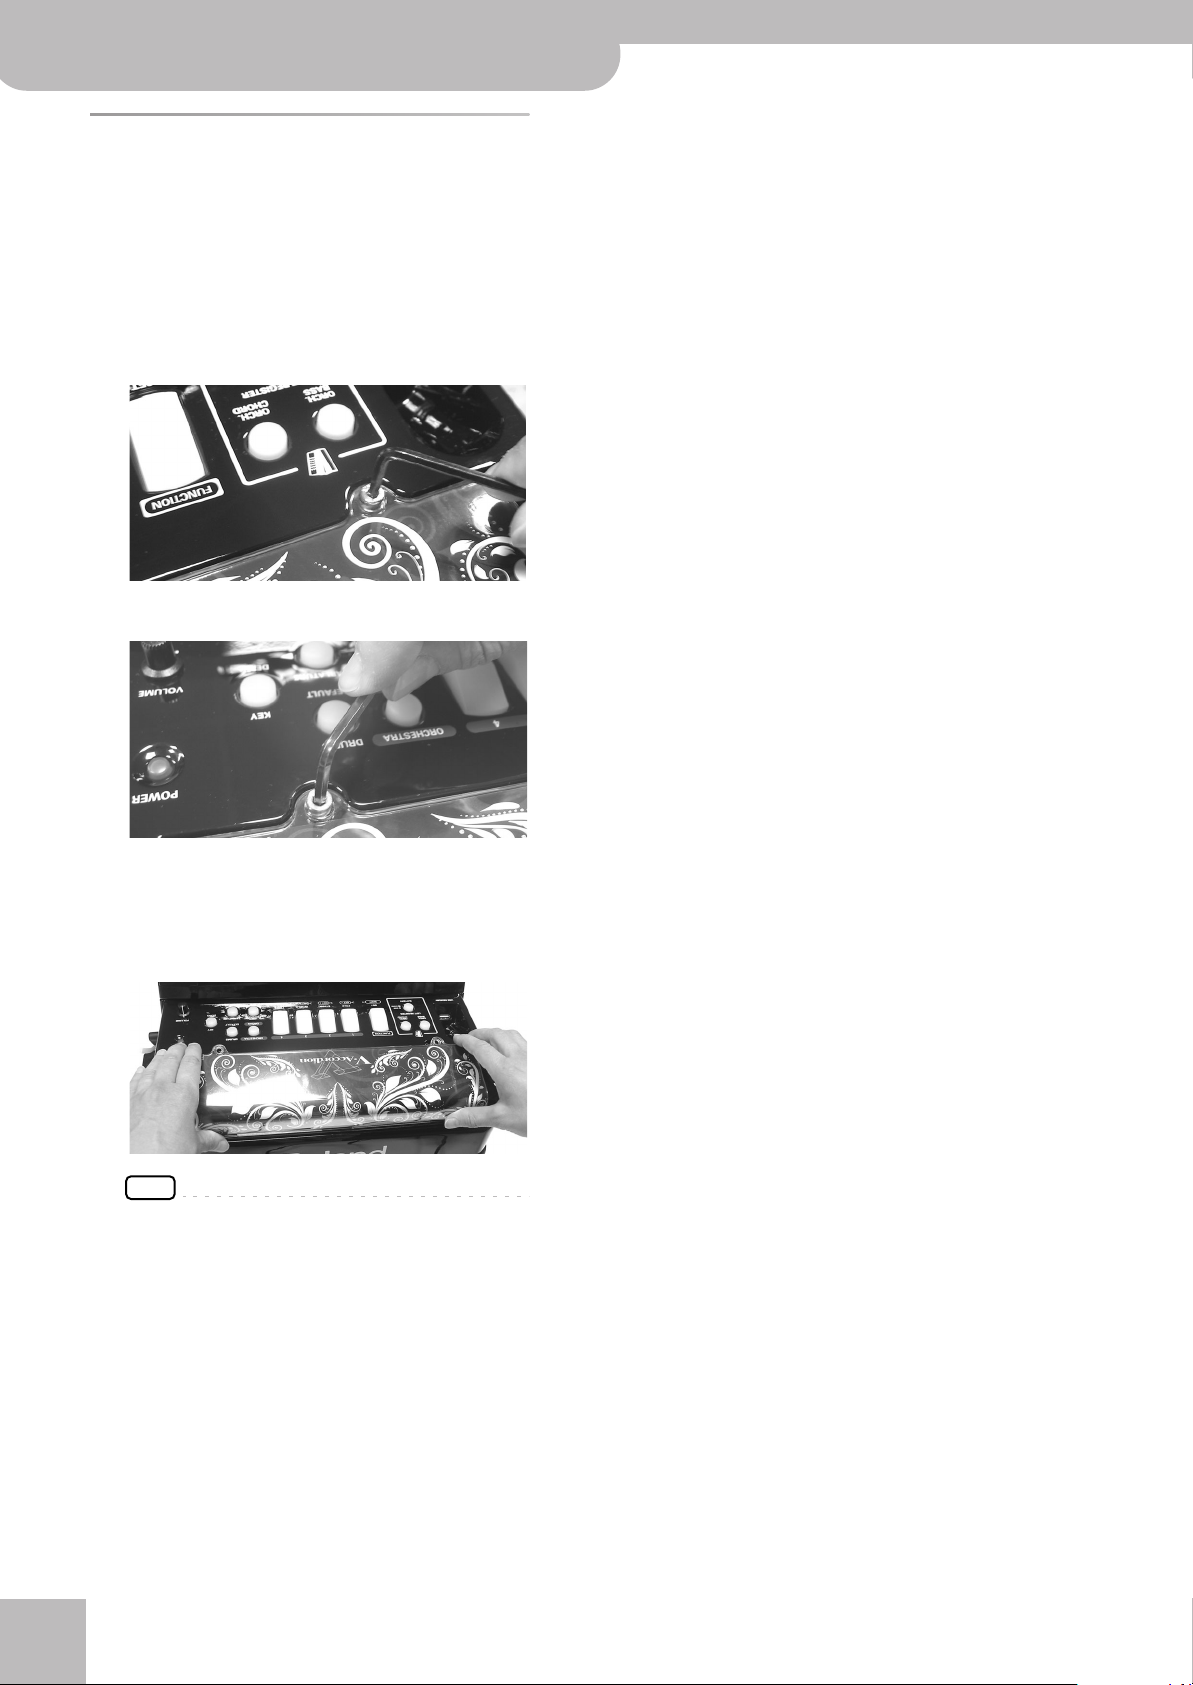
Personalizing your FR-18 diatonic
The artwork you see behind the treble registers (above
the Roland logo) can be replaced either with one of the
sheets supplied with the FR-18 diatonic or with a
graphic you create yourself. To do so, proceed as follows:
1.
Use the supplied hexagonal wrench to
loosen the two screws holding the “traforo”
cover:
There is one screw on either side.
4.
Secure the traforo cover by tightening the
two screws using the supplied hexagonal
wrench.
Be careful not to turn the screws too far—they
should remain in the traforo cover.
2.
After loosening both screws, you can open
the traforo cover:
NOTE
Be careful not to scratch the housing of your FR-18
diatonic.
3.
Remove the sheet from underneath the
traforo cover and insert another one.
While creating your own sheet, pay attention to the
following:
• You can use your color printer and a graphic program to create your own artwork.
• Be sure to use paper or rather thin media—cardboard is usually too thick.
•For a professional look, be sure to prepare a sheet
with the following dimensions: 297mm (L) x 89mm
(H).
r
20
Page 21
V-Accordion FR-18 diatonic
Switching the power on and off
r
Switching the power on and off
Once the connections have been completed (see p. 17),
turn on power to your various devices in the order specified. By turning on devices in the wrong order, you risk
causing malfunction and/or damage to speakers and
other devices.
Turning on the power
1.
Turn the [VOLUME] knob all the way
towards the small dot to minimize the volume.
2.
To switch the FR-18 diatonic on, press its
[POWER] button.
The [POWER] button lights.
3.
Switch on the external amplifier, mixing
console, etc.
4.
Turn the [VOLUME] knob clockwise to set
the volume to an appropriate level.
NOTE
This unit has a function that automatically switches off
the power after a certain amount of time has passed
without any buttons being operated.
You can disable this function. See “Auto Power Off” on
p. 46.
2.
Press the FR-18 diatonic’s [POWER] button
(its indicator goes dark).
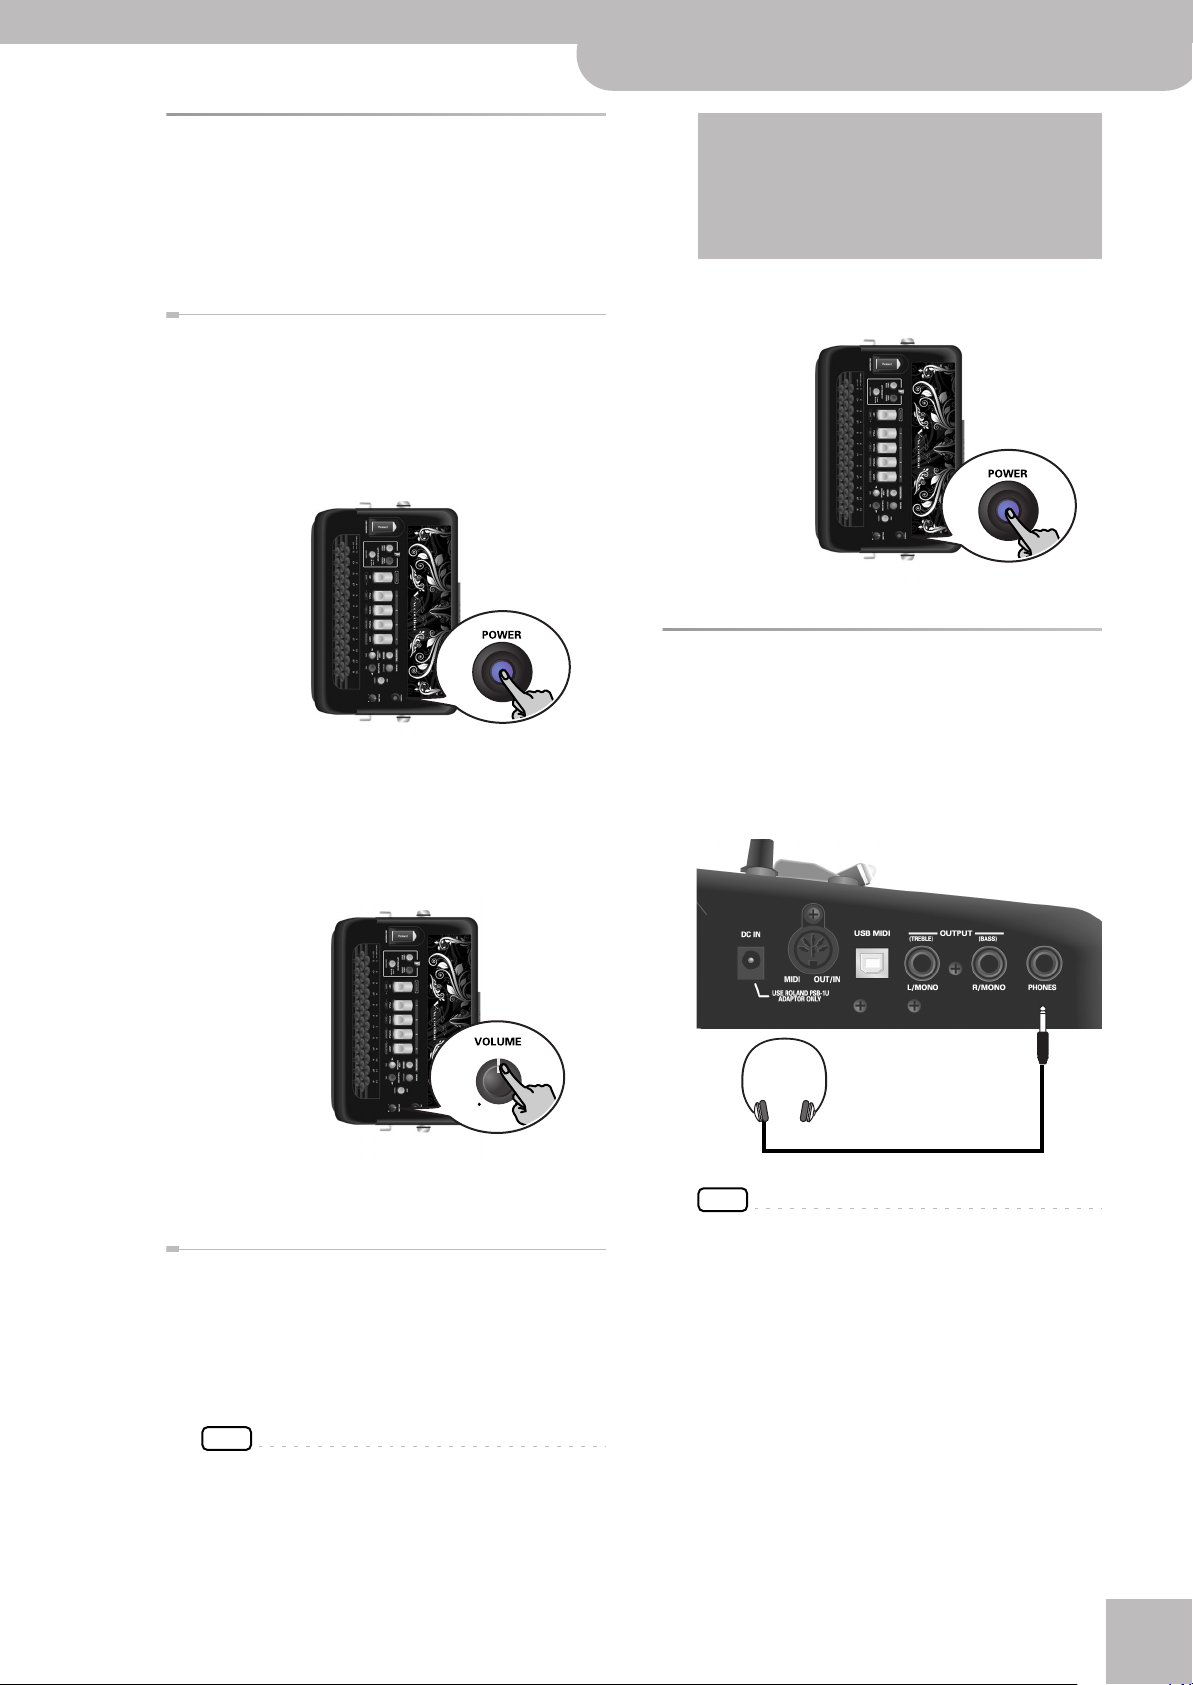
Using headphones
The FR-18 diatonic has a socket for plugging in headphones. This allows you to play without having to worry
about bothering others around you, even at night.
1.
Plug the headphones into the [PHONES] jack
located on the FR-18 diatonic’s connection
panel.
5.
Adjust the volume of the receiving audio
device.
Turning off the power
1.
Turn the [VOLUME] knob all the way
towards the small dot to minimize the volume.
If you connected the FR-18 diatonic to an amplifier,
etc., set its volume to the minimum value as well.
NOTE
This unit is equipped with a protection circuit. A brief interval (a few seconds) after power up is required before the
unit will operate normally.
NOTE
Use stereo headphones. Please use only Roland headphones. Headphones from other manufacturers may be
unable to provide sufficient volume.
2.
Use the FR-18 diatonic’s [VOLUME] knob to
adjust the headphone volume.
■ Cautions when using headphones
•To prevent damage to the cord’s internal conductors, avoid rough handling. When using headphones, mainly try to handle either the plug or the
headset.
21
Page 22

V-Accordion FR-18 diatonic
Before you start playing
• Your headphones may be damaged if the volume
of a device is already turned up when you plug
them in. Minimize the volume before you plug in
the headphones.
• Excessive input will not only damage your hearing,
but may also strain the headphones. Please enjoy
music at an appropriate volume.
r
22
Page 23

V-Accordion FR-18 diatonic
Listening to the demo songs
r
6. Listening to the demo songs
The FR-18 diatonic contains a series of demo songs that illustrate its wide variety of sounds and applications. Here is how
to listen to those demo songs and fully appreciate the sounds contained in your diatonic V-Accordion:
1.
Switch on the FR-18 diatonic.
See “Switching the power on and off” on p. 21.
2.
Press and hold the [KEY/DEMO] button,
which will start flashing yellow.
Playback starts automatically with the first demo
song. There are 8 demo songs in all. At the end of the
first song, the FR-18 diatonic starts playing songs 2, 3
etc.
You can also directly jump to the song you’re interested in:
3.
Press [DEC]/[INC] to select the demo song
you want to listen to.
4.
Use the [VOLUME] knob to change the volume if it is too loud or too soft.
5.
Press [KEY/DEMO] again to leave demo song
mode.
NOTE
During demo song playback, the FR-18 diatonic’s keyboards
cannot be used.
NOTE
All demo songs are copyright by Roland Europe. Public performance or recording of these songs is prohibited.
NOTE
No data for the music that is played will be output from
the MIDI OUT/IN socket.
NOTE
You can find the complete list of demo songs in the Appendix on page 60.
23
Page 24

V-Accordion FR-18 diatonic
Using Sets
7. Using Sets
The FR-18 diatonic is a “virtual” accordion. It recreates the sounds of various accordion instruments and can even generate orchestral sounds (like trumpet, flute, etc.), organ and drum sounds.
Recalling a Set is similar to switching to a different
accordion.
The FR-18 diatonic contains 12 Sets divided over 4 families. 3 Set families have been programmed at the factory (“FOLK”, “ETHNIC”, “WORLD”—see the legends below
the treble registers) and cannot be changed. One family
(“USER”) can be used to load User Sets from an optional
USB memory.
Each Set family may comprise several Sets (see below).
Recalling a Set immediately changes the settings of the
sections presented on p. 25 and configures the treble
and bass registers.
Family Accordion Sets
1 FOLK 1-1 Folk (red)
1-2 Classic (green)
1-3 Tradition (yellow)
2 ETHNIC 2-1 Organetto (red)
2-2 Diatonic Folk (green)
2-3 SP Folk (yellow)
3 WORLD 3-1 Alpine (red)
3-2 Cajun (green)
3-3 Tex Mex (yellow)
4 USER 4-1 User Set (red) [Bandoneon]
4-2 User Set (green) [D-Folk]*
4-3 User Set (yellow) [Concertina]*
[*] These Sets are supplied from the factory, but they can be replaced by the user.
*
2.
Press one of the treble registers [1]~[4] to
select the Set family.
Set selection is handled in the following way:
• If the Set family you select is the same as the one
you have been using so far, the FR-18 diatonic
selects the next Set within that family.
Example: To go from Set “1-1” to Set “1-3”, you
therefore need to press register [1] twice after pressing [SET].
Each Set inside a family (1, 2, 3) has a dedicated
color:
1= red, 2= green, 3= yellow
• If you select a different Set family, the FR-18
diatonic switches to the newly selected Set family
and recalls the last memory you selected within
that family.
NOTE
If you hold down [SET] for more than 2 seconds without
pressing another register, the FR-18 diatonic switches to
Function mode. In that case, press [SET] again to leave that
mode, then repeat step (1).
1.
Press the [SET] register. It lights blue.
NOTE
If you do not press a treble register after having pressed
[SET] once, Set selection is cancelled after a while.
r
24
Page 25

8. Selecting and playing sounds
V-Accordion FR-18 diatonic
Selecting and playing sounds
r
Treble section
The Treble section can be played
using the 37 treble buttons on the
right-hand side.
The sound it produces is determined by the register [1]~[4] you
pressed last. This section can be
used to play accordion, orchestral
and organ sounds.
NOTE
At power-on, the FR-18 diatonic
selects the key of G. See “Changing the key note of the keyboard” on p. 32 for how to select a different key.
Selecting sounds for the right hand
This section explains how to select accordion, orchestral
and organ sounds for the treble section (right hand). On
p. 26, you will learn how to combine accordion notes
with an orchestral or organ sound.
■ Accordion sounds
To make your selection:
1.
Connect the FR-18 diatonic to an amplifier
and switch it on.
See “Switching the power on and off” on p. 21.
2.
Press a treble register and start playing on
the keyboard.
The following 8 accordion sounds can be assigned to
the treble buttons using treble registers [1]~[4]:
Treble Register Color Sound
*
If you wish a different accordion treble sound, press
one of the 4 treble registers [1]~[4]. You can choose
among eight available sounds, by pressing a treble
register either once (green) or twice (red).
NOTE
The FR-18 diatonic has 12 different button layouts. If it
seems to sound the wrong notes, see “Changing the configuration of the keyboards (Tablature)” on p. 33 for how to
select a different button layout.
■ Orchestral/Organ sounds
Your FR-18 diatonic contains sounds of various
musical instruments that are not related to accordion
sounds. Those sounds allow you to expand your
musical endeavours.
The orchestral sound section available in your FR-18
diatonic comprises 8 sounds.
Every accordion sound set is combined with an
orchestral sound set whose 8 sounds are closely
related to the musical genre in question.
To select an orchestral sound:
1.
Press the [ORCHESTRA/ORGAN] button once.
1 (pressed once) Green 8’, 8’+
1 (pressed again) Red 16’, 8’, 8’+
2 (pressed once) Green 16’, 8’
2 (pressed again) Red 16’, 8’, 4’
3 (pressed once) Green 8’, 8’+, 8’–
3 (pressed again) Red 16’, 8’, 8’+, 8’–, 4’
4 (pressed once) Green 8’, 4’
4 (pressed again) Red 16’, 4’
[*] The accordion sounds that can be selected with the registers
depend on the currently selected Set. The sounds shown above
refer to Set 1. See page 60 for a list of the sounds available for
each Set.
Though the FR-18 diatonic is an electronic musical
instrument, it only produces sound when you move
the bellows.
3.
Play a few notes to audition the sound.
It lights red to signal that you have entered orchestral sound selection mode.
2.
Use treble registers [1]~[4] to select the
desired orchestral sound.
You can press each of them either once or twice to
choose one of the two orchestral sounds available
for each register (always starting from the first position).
Treble Register Color Sound
1 (pressed once) Green Strings
1 (pressed again) Red Ac. Piano
2 (pressed once) Green Oboe
2 (pressed again) Red Flute1
3 (pressed once) Green Ac. Guitar
3 (pressed again) Red Brass
4 (pressed once) Green Fat Saw Lead
*
25
Page 26

V-Accordion FR-18 diatonic
Selecting and playing sounds
Treble Register Color Sound
4 (pressed again) Red Poly Synth
[*] The orchestral sounds that can be selected with the registers
depend on the currently selected Set. The sounds shown above
refer to Set 1. See page 60 for a list of the sounds available for
each Set.
NOTE
This table is only an example of all available orchestral
sound sets, as every orchestral sound set is combined with
its corresponding accordion set. For the complete list,
please see “Sounds contained in the various Sets” on p. 60.
The orchestral sound section of your FR-18 diatonic
includes also 4 organ sounds, each with a slow/fast
rotary effect.
Register Color Sound
1 (pressed once) Green Blues Slow
1 (pressed again) Red Blues Fast
3.
*
Press the [ORCHESTRA/ORGAN] button
again to exit selection mode and go back to
the state where the treble accordion section
sounds.
Selecting the ORCHESTRA/ORGAN mode
The orchestral or organ sound assigned to the treble
section can be played in isolation or together with the
treble diatonic sound.
1.
Press and hold [SET/SHIFT] while pressing
the [4] (DUAL/SOLO) treble register to alternate between DUAL and SOLO modes.
2 (pressed once) Green Distortion Slow
2 (pressed again) Red Distortion Fast
3 (pressed once) Green Full Draw Slow
3 (pressed again) Red Full Draw Fast
4 (pressed once) Green 3rd Percussion Slow
4 (pressed again) Red 3rd Percussion Fast
To select an organ sound:
1.
Press the [ORCHESTRA/ORGAN] button
twice.
It flashes red to signal that you have entered organ
sound selection mode.
In SOLO mode, the treble keyboard only plays the
selected accordion, orchestral or organ sound. DUAL
mode means that the orchestral or organ sound is
added to the treble accordion sound.
NOTE
If you hold down [SET] for more than 2 seconds without
pressing another register, the FR-18 diatonic switches to
Function mode. In that case, press [SET] again to leave that
mode, then repeat step (1).
NOTE
Each time you switch on your FR-18 diatonic, it selects
SOLO mode.
NOTE
If you press [ORCHESTRA/ORGAN] button a third time, the
treble registers will let you select accordion sounds again.
2.
Use treble registers [1]~[4] to select the
desired organ sound.
You can press them either once or twice to choose
either the Slow or the Fast Rotary effect of the same
organ sound.
NOTE
Do not forget to move the bellows in order to hear the
notes you are playing.
r
26
Page 27

V-Accordion FR-18 diatonic
Bass and chord section
r
Transposing the treble section in octave steps
The FR-18 diatonic’s treble keyboard has a maximum
range of 3 octaves. There may be times, however, when
you need to play higher or lower notes than its keyboard
allows. Unlike an acoustic diatonic accordion, the FR-18
diatonic allows you to transpose the treble keyboard one
octave up or down.
1.
First specify the section (treble accordion or
orchestra/organ) you wish to transpose in
octave steps by selecting a sound for it.
2.
To transpose one octave down, hold down
the [SET/SHIFT] register and press treble
register [1] (OCT–).
NOTE
If you hold down [SET] for more than 2 seconds without
pressing another register, the FR-18 diatonic switches to
Function mode. In that case, press [SET] again to leave that
mode, then repeat step (2).
3.
To transpose one octave up, hold down the
[SET/SHIFT] register and press treble register
[2] (OCT+).
Bass and chord section
The Bass section can be played via buttons for the left
hand.
The buttons in this section allow you to play both bass
notes and chords. By default, each of the three rows
alternates between a bass note and the related chord.
You can, however, change these assignments (tablatures) to better meet your requirements. You can specify
for each button whether it should play a bass note, a
chord or neither.
The chords use the (sound) register selected for the Bass
section—hence the name of this section.
The overall sound the bass and chord section produces is
determined by the register you pressed last. The bass
and chord buttons can also be used to play accordion or
orchestral sounds.
Selecting accordion sounds for the left hand
Here is how to select an accordion sound for the bass
and chord section (left hand). Accordion sounds for the
left hand can be selected using the 3 registers shown
below.
[3] [2] [1]
NOTE
The numbers shown in the illustrations above and below do
not appear on the registers themselves. They have been added
for your reference.
1.
Switch on the FR-18 diatonic.
See “Switching the power on and off” on p. 21.
NOTE
After switching on the FR-18 diatonic, the bass registers
select accordion sounds.
2.
Press one of the 3 bass registers (1~3) to
select the desired sound.
These registers do not illuminate.
The following accordion sounds can be selected for
the bass and chord buttons:
27
Page 28

V-Accordion FR-18 diatonic
Selecting and playing sounds
Bass registers
Register Bass Chord
4.
Use the 3 bass registers to choose one of the
orchestral bass sounds.
1 8’ 8’, 4’
2 16’, 8’, 4’ 8’, 4’
3 16’, 8’ 8’, 4’
16’/8’
Full Chord
3.
Choose the desired behavior for the chord
16’/8’
Chord –3^
buttons:
Press the three bass registers simultaneously to alternate between full chord and “drop third” chords.
The chord buttons can either play full chords or
chords where the third (i.e. the constituent note that
determines whether a chord is major or minor) has
been omitted.
NOTE
The selected chord mode also applies to orchestral chord
section.
Selecting orchestral sounds for the left hand
Besides the common accordion bass sounds, the FR-18
diatonic’s bass and chord sections allow you to play
orchestral sounds. These can be assigned to only the
bass buttons, only the chord buttons, or both (in which
case you can select different orchestral sounds for the
bass and chord buttons). Here is how to select an
orchestral sound for the left hand.
■ Selecting an orchestral bass sound
1.
Switch on the FR-18 diatonic.
See “Switching the power on and off” on p. 21.
2.
Select Set 1.
See “Using Sets” on p. 24.
3.
Press the [ORCH.BASS] button on the treble
control panel to select orchestral bass mode.
[3] [2] [1]
Orchestral bass sounds
1 Acoustic Bass
2 Fretless
3 Picked Bass
[*] The orchestral sounds that can be selected with
the registers depend on the currently selected Set.
See page 60 for a list of the sounds available for
each Set.
NOTE
The orchestral sounds that can be selected with the registers depend on the currently selected Set. See page 60 for a
list of the sounds available for each Set.
The orchestral bass sound you select replaces the
accordion sound played by the bass buttons and has
no effect on the chord buttons.
5.
Press the [ORCH.BASS] button again (it goes
*
dark) to exit orchestral bass mode.
■ Selecting an orchestral chord sound
As stated earlier, the orchestral chord sound can be
played with the left-hand buttons defined as chord
buttons.
1.
Switch on the FR-18 diatonic.
See “Switching the power on and off” on p. 21.
2.
Select Set 1.
See “Using Sets” on p. 24.
3.
Press the [ORCH. CHORD] button on the treble control panel to select orchestral chord
mode.
The [ORCH. BASS] button lights red.
r
28
The [ORCH. CHORD] button lights red.
Page 29

4.
Use the 3 bass registers to choose one of the
orchestral chord sounds.
[3] [2] [1]
Orchestral chord sounds
1 Ac. Piano
2 Str & Choir
3 Super Poly
[*] The orchestral sounds that can be selected with the
registers depend on the currently selected Set. See
page 60 for a list of the sounds available for each Set.
*
V-Accordion FR-18 diatonic
Bass and chord section
r
Orchestral sounds for the bass section and the chord section
The FR-18 diatonic allows you to swiftly assign one
orchestral sound to the bass buttons, and another to the
chord buttons.
1.
Press the [ORCH BASS] and/or [ORCH
CHORD] buttons (they will light).
2.
Use the bass registers to select the desired
sound.
If [LEFT REGISTER] lights, you can select an orchestral
sound for the chord buttons (left-hand keyboard). If
it is dark, you can select an orchestral sound for the
bass buttons. Refer to the tables above for the sounds
you can select.
NOTE
The orchestral sounds that can be selected with the registers depend on the currently selected Set. See p. 60 for a
list of the sounds available for each Set.
The orchestral chord sound replaces the accordion
sound played by the chord buttons and has no effect
on the bass buttons.
5.
Press the [ORCH. CHORD] button again to
exit ORCH. CHORD mode.
The [ORCH. CHORD] button goes dark.
While orchestral chord mode is active, you can assign
a different accordion register to the bass buttons by
pressing [LEFT REGISTER] (it must go dark) and the
desired Bass register.
NOTE
The [LEFT REGISTER] button has no function when neither
the [ORCH BASS] nor the [ORCH CHORD] button lights.
Whenever you press [LEFT REGISTER], it changes to lit/dark.
The bass registers affect parts, depending on the status of the [ORCH BASS], [ORCH CHORD] and [LEFT REGISTER] buttons.
ORCH BASS
Dark Dark Dark The bass registers select accordion sounds
Lights Dark Dark The bass registers select orchestral bass sounds
Dark Lights Lights The bass registers select orchestral chord sounds.
Lights Lights Lights The bass registers select orchestral chord sounds.
ORCH
CHORD
LEFT
REGISTER
Remarks
If you switch off [LEFT REGISTER], you can select accordion sounds for the bass buttons.
If you switch off [LEFT REGISTER], you can select orchestral sounds for the bass buttons.
29
Page 30

V-Accordion FR-18 diatonic
Selecting and playing sounds
Switching off sections you don’t need (Mute function)
If, for some reason, you do not want one of the currently active parts to respond to your playing, you can
switch it off.
To do it press and hold a single register for a while, as
follows:
1.
Press and hold a register in the Treble section ([1]~[4]) to mute the treble or Orchestra part.
2.
Press and hold a Bass register (1~3) to mute
the Bass&Chord, Orchestra Bass, or Orchestra Chord part.
This depends on the part that is currently assigned to
the bass registers.
3.
A next selection of any register in the Treble
or Bass section will switch that part on
again.
Playing drum/percussion sounds
Your FR-18 diatonic contains a drum part that can be
played in real time in addition to the bass&chord part.
There are 4 sets of one or more drum and/or percussion
sounds each. Those sounds can be played in real-time
using the bass and chord buttons.
1.
Press the [DRUMS] button to enter DRUM
mode.
The percussion sounds are now added to the bass and
chord parts.
2.
Press the [DRUMS] button again to exit
DRUM mode.
Selecting a Drum Set
Here is how to add drum/percussion sounds to each bass
note and chord you play with your left hand.
NOTE
The chosen Drum Set will remain until you change Drum Sets
again.
1.
Press the [DRUMS] button to enter DRUM
mode.
The percussion sounds are now added to the bass and
chord parts.
2.
Press and hold the [DRUMS] button to enter
DRUM Edit mode.
The [DRUMS] button flashes.
The lit treble register shows the currently selected
Drum Set.
3.
Use treble registers [1]~[4] to select
another Drum Set.
Drum Set [1] (Folk) Drum Set [3] (Tarantel)
1 Bass Drum + HiHat 1 Tamorra 2
2 Snare + Tambourine 2 Tamorra 1
Drum Set [2] (Jazz) Drum Set [4] (Latin)
1Ride Cymbal 1 Pandeiro 3 +
Bass Drum
2 Jazz Snare +
Pedal HiHat
2 Pandeiro 5
r
30
The bass buttons will play the first sound of the Drum
Set, while the buttons used to play chords trigger the
second sound of the Drum Set.
4.
Press the [DRUMS] button again to leave
DRUM Edit mode (the button lights
steadily).
5.
Press the [DRUMS] button again to leave
DRUM mode, when you no longer want to
use the drum sounds (the button goes dark).
NOTE
See “Drum Sound Level” on p. 44 for how to set the volume
of the drum/percussion sounds.
Page 31

V-Accordion FR-18 diatonic
Button number 3
Highlighting some practical functions
9. Highlighting some practical functions
This chapter discusses some useful functions, like changing your keyboard layout (tablature), changing your playing
tonality, using the metronome, checking the battery status, and so on.
3.
Use registers [1]~[4] to select one of the
How to balance the various sections
Here is how to change the volume balance between the
bass/chord and treble sections.
1.
Press and hold the [SET] register (it flashes
slowly).
The treble keyboard no longer plays.
following settings:
Treble/Bass&Chord balance
Treble
register
1
Value
60 (Bass &
Chord)
On a DJ mixer, this setting
would look like this…
0306060 30
r
2.
Press button number 3 of the treble keyboard to select the function that allows you
to change the volume balance between
bass/chord and treble sections.
Button no. 3
2
3 30 (Treble)
4 60 (Treble)
These are presets prepared at the factory. If the balance sounds right with one of these settings, you are
done, otherwise, continue with step (4).
NOTE
When you increase the volume of the Bass&Chord section,
the volume of the Treble section is automatically decreased
correspondingly and vice versa. See also “Treble/
Bass&Chord Balance” on p. 43.
4.
(If necessary) Press the [DEC] button to
0 (Equal
balance)
0306060 30
0306060 30
0306060 30
move the balance towards the Bass & Chord
section, or the [INC] button to to move the
balance towards the Treble section.
You are now in Function mode—and the Balance
parameter is already selected.
The [SET] register flashes rapidly and the treble keyboard can now be used to play notes.
The lit treble register indicates which preset is currently selected.
31
Page 32

V-Accordion FR-18 diatonic
Highlighting some practical functions
Each time you press the [DEC] button, the volume will
fall by 1 unit. If you continue holding the button, the
volume will continue falling.
Each time you press the [INC] button, the volume will
rise by 1 unit. If you continue holding the button, the
volume will continue rising.
5.
Press the [DEFAULT] button to return to the
last saved value of the currently selected
parameter.
6.
Press the [SET] register once to return to
Function mode (see p. 41), or twice to leave
Function mode.
1.
Press the [KEY] button (it lights).
The first button row of the treble keyboard doesn’t
play.
2.
Press any of the 12 treble buttons in the
first row to select the desired key.
Button no. 4
b
KEY= E
Adjusting the chorus and reverb effects
The FR-18 diatonic contains two digital effects: Chorus
and Reverb. The chorus effect gives the impression that
several instruments of the same type are playing at the
same time (it is similar to detuning several reeds of a
register). The reverb effect gives the impression that you
are playing in a concert hall, a church or a room. It adds
“depth” to the sound.
You can change the type and the level settings of these
two effects (see p. 44). Those settings apply to all sections and all Sets.
Changing the key note of the keyboard
The KEY function lets you play the FR-18 diatonic in any
key. This is convenient when you are asked to play certain songs in a different key than the one currently
assigned to the selected tablature.
The FR-18 diatonic allows you to choose among 12 keys:
C, C#, D, Eb, E, F, F#, G, Ab, A, Bb, B
At power-on, the FR-18 diatonic automatically selects
the key of G. To change the key, proceed as follows:
See the key indications above the treble button keyboard. The [KEY] button goes dark.
To check the current selection, press the [KEY] button.
Color
Green C C# D Eb
Red E F F# G
Yellow Ab A Bb B
Press [KEY] again if you don’t need to select another
key at this stage.
Treble register
1 2 3 4
Saving the ‘Key’ setting
The FR-18 diatonic allows you to save your preferred key
permanently, so that you don’t need to select it again
each time you switch it on:
1.
Press and hold the [SET] register (it flashes).
The Treble keyboard doesn’t play.
2.
Press the [KEY] button (it lights).
The [SET] register flashes rapidly.
3.
Press a treble button in the first row to
select your preferred key.
The numbers above the first row of the treble button
keyboard will help you choose and save the right key.
4.
Press the [SET] register once to exit Function mode.
r
32
Page 33

NOTE
Button no. 4
Every time you switch on the FR-18 diatonic, the saved key
note will be recalled.
Changing the configuration of the keyboards (Tablature)
A diatonic accordion plays different notes depending on
whether the bellows is pushed or pulled. The note mapping in the treble (right hand) and bass (left hand) sections of a diatonic accordion is usually configured by its
manufacturer according to a requested keyboard layout
commonly referred to as “tablature”.
The FR-18 diatonic allows you to change the note configuration of the treble and bass keyboards, because the
FR-18 diatonic has no real reeds and no corresponding
fixed mechanical parts inside. Consequently you can
swiftly set a certain keyboard layout by pressing a couple of buttons and handily change from one tablature to
another. (This is impossible on an acoustic diatonic
accordion.)
The FR-18 diatonic contains 12 tablatures. See page 54
for details. To recall any of them, either while practising
at home or during your performance:
1.
Press the [TABLATURE] button (it lights).
V-Accordion FR-18 diatonic
Changing the configuration of the keyboards (Tablature)
2.
Press a button in the first row of the treble
r
keyboard (see the silk-screened number
above it).
(In this example, we have decided to use tablature
number 4.)
You can now change the key of the selected tablature. See “Changing the key note of the keyboard” on
p. 32.
Selecting a tablature with its original key
The following procedure allows you to select the tablature’s original key.
1.
Press the [TABLATURE] button (it lights).
2.
Press the [KEY] button (it lights).
You can now check which tablature is currently
selected. The FR-18 diatonic’s four treble registers
use the following system to indicate the selected tablature. Please pay attention to the color:
Color
Green
Red Tabl. 5 Tabl. 6 Tabl. 7 Tabl. 8
Yellow Tabl. 9 Tabl. 10 Tabl. 11 Tabl. 12
Example: if you selected tablature 10, treble register
[2] will light in yellow. when you press the [TABLATURE] button.
Tabl. 1 Tabl. 2 Tabl. 3 Tabl. 4
Treble register
1 2 3 4
The first button row of the treble keyboard doesn’t
play.
3.
Use the first row in the button keyboard to
select the new tablature.
See the silk-screened numbers above the first row of
the treble button keyboard. The tablature you select
will use its factory-set key.
The [TABLATURE] and [KEY] buttons go dark.
Saving your preferred tablature
1.
Press and hold the [SET] register (it flashes
slowly).
The treble keyboard doesn’t play.
33
Page 34

V-Accordion
Highlighting some practical functions
2.
Press the [TABLATURE] button (it lights).
The [SET] register flashes rapidly.
3.
Select the desired tablature by pressing a
FR-18 diatonic
button in the first row of the treble keyboard.
The numbers above the first row of the treble button
keyboard will help you choose and save the right tablature.
4.
Press the [SET] register once to exit Function mode.
NOTE
Each time you switch on the FR-18 diatonic, it will load the
tablature whose number you saved.
Using the metronome
Your FR-18 diatonic contains a metronome that may
come in handy when you are practising new pieces, or
during your accordion classes.
1.
To start or stop the metronome, press and
hold the [SET] register and press register [3]
(METRON).
Checking the battery status
If you are using batteries, to check the current charge
status of the batteries:
1.
Press and hold the [LEFT REGISTER] button.
Depending on the battery charge status, register [1]~
[4] will progressively light for a short while. After ±2
seconds, the registers return to the following situation.
If all (red and green) registers are lit, the batteries are
fully charged. If only the red registers light, the
remaining battery life is about 1 hour.
NOTE
To check how your FR-18 diatonic is currently powered,
press and hold the [LEFT REGISTER] button:
If the [DRUM] button and the first two registers light during operation, the FR-18 diatonic is powered by the supplied adaptor.
If the [ORCHESTRA] button lights, batteries are used to
power the FR-18 diatonic.
NOTE
The battery charge indication is only an approximation.
NOTE
See “Metronome Time Signature” on p. 44, “Metronome
Tempo” on p. 44 and “Metronome Level” on p. 44 for how
to set the metronome’s time signature, tempo and level.
NOTE
If you hold down [SET] for more than 2 seconds without
pressing another register, the FR-18 diatonic switches to
Function mode. In that case, press [SET] again to leave that
mode, then repeat step (1).
r
Musette Detune
An accordion’s 8’ treble register may consist of 2 or even
3 reeds that are usually tuned apart to provide a richer
sound (accordionists call it the “musette effect”). One
reed is tuned slightly above, the other slightly below the
correct pitch (and the third, if available, is tuned “properly”).
The FR-18 diatonic allows you to choose from among 15
different detune settings. These are called “1” (Dry),
“2” (Classic), “3” (F-Folk), “4” (American L),
“5” (American_H), “6” (North Eur), “7” (German L),
“8” (D-Folk L), “9” (Italian L), “10” (German H),
“11” (Alpine), “12” (Italian H), “13” (D-Folk H),
“14” (French), “15” (Scottish).
See “Musette Detune ” on p. 43 for how to select the
desired Musette detuning.
NOTE
“Musette Detune” only affects registers that use the 8’ reed.
34
Page 35

V-Accordion FR-18 diatonic
Saving your settings (User Programs)
r
10. Saving your settings (User Programs)
Your FR-18 diatonic contains 4 User Program memories where you can store the settings listed below. Working with
those memories has the advantage that you can recall frequently used settings at the press of a button. The User Program settings also include the “address” of the last Set you selected.
The following settings are saved to the User Programs:
Set
Treble section
Orchestra/Organ
Bass & Chord section
Orchestral Bass
Orchestral Chord
Drum mode
Chord Mode
Key
Tablature
Orchestra Mode
Number of the current Set
Register
Octave setting
Register
Octave setting
Level
Register
On/Off
Register
Level
On/Off
Register
Level
On/Off
Drum Set number
Level
Full Chord, –3^
Selected key
Selected tablature number
Dual, Solo
2.
Press the treble register ([1]~[4]) that is
assigned to the User Program whose settings you want to use.
The register you press lights red.
3.
Press the [USER PROGRAM/DEC] button
again to exit User Program mode.
The [USER PROGRAM/DEC] button goes dark. At this
point, the FR-18 diatonic returns to the settings you
were using before selecting User Program mode.
Saving your current settings
1.
Press and hold the [USER PROGRAM/DEC]
button (it flashes).
Using User Programs during your performance
1.
Press the [USER PROGRAM/DEC] button to
enter User Program mode (the button
lights).
The treble register corresponding to the last User
Program you selected lights.
One treble register lights to indicate the User Program that is currently in use.
2.
Press the treble register ([1]~[4]) that is
assigned to the User Program memory
where you want to save your settings.
The register you press lights and the [USER PROGRAM/DEC] button lights steadily.
35
Page 36

V-Accordion FR-18 diatonic
Saving your settings (User Programs)
Editing a User Program
You can also change the settings of an existing User
Program.
1.
Press the [USER PROGRAM/DEC] button to
enter User Program mode.
The button lights.
2.
Press the treble register ([1]~[4]) that is
assigned to the User Program whose settings you want to use.
The register you press lights red.
3.
Press and hold the [USER PROGRAM/DEC]
button again (it flashes).
4.
Change the desired settings (accordion,
orchestra registers, etc.).
5.
Press the [USER PROGRAM/DEC] button (it
flashes rapidly).
One treble register lights to indicate the User Program that is currently in use.
6.
Press the treble register ([1]~[4]) that is
assigned to the User Program memory
where you want to save your settings.
The register you press lights and the [USER PROGRAM/DEC] button lights steadily.
NOTE
See also “Saving a User Program Set to a USB memory
(optional)” on p. 37 and “Saving your current settings” on
p. 35.
r
36
Page 37

V-Accordion FR-18 diatonic
Data management via the USB port
r
11. Data management via the USB port
The FR-18 diatonic allows you to save and import User Program settings to/from an optional USB memory connected to
its USB port. You can also import Sets, new sounds and new tablatures you copied to your USB memory using your PC.
The Sets and sounds are stored internally.
Saving a User Program Set to a USB memory (optional)
Here is how to archive the contents of the FR-18
diatonic’s 4 internal User Program memories (file extension “.USD”) to an optional USB memory. The FR-18
diatonic can save up to 4 User Program Sets (U01.USD~
U04.USD). Each User Program Set contains 4 User Programs.
NOTE
Be sure to connect your USB memory before proceeding.
1.
Connect an optional USB memory to the
FR-18 diatonic’s USB MEMORY port.
In the example above, the USB memory contains one
file (U01.USD).
NOTE
You can overwrite files whose treble register lights red, but
in this case you loose the settings of that file.
U01.USDFile name:
Red
Green
2.
Press and hold the [SET] register (it flashes
slowly).
The treble keyboard doesn’t play.
3.
Press button “34” on the treble keyboard to
select the “Save User Program” parameter.
See page 42 for the location of that button.
4.
The [SET] register flashes quickly and registers [1], [2], [3], [4] light green or red:
Green means that the USB memory contains no set-
tings for the corresponding User Program Set
(U01.USD~U04.USD).
Red means that the USB memory already contains a
User Program Set.
The “Save User Program” function saves the 4 internal User Programs to a file named “U0$.USD” on the
USB memory (where “$” is a number from 1 to 4):
Register number File name
1 “U01.USD”
2 “U02.USD”
3 “U03.USD”
4 “U04.USD”
5.
Press treble register [1], [2], [3] or [4] to
select the name of the file.
See the illustration above for the correspondence of
the file names.
6.
Press the [SET] register again to exit Function mode.
NOTE
If one of the treble registers flashes red, the FR-18 diatonic
has noticed an error:
• Missing USB memory
• Write error
• The USB memory is full
37
Page 38

V-Accordion FR-18 diatonic
Data management via the USB port
Loading User Program Sets from a USB memory (optional)
The function discussed here allows you to load one of 4
User Program Sets (U01.USD~U04.USD) from a USB
memory to the FR-18 diatonic’s internal memory.
NOTE
Be sure to connect your USB memory before proceeding.
1.
Connect an optional USB memory to the
FR-18 diatonic’s USB MEMORY port.
2.
Press and hold the [SET] register (it flashes
slowly).
5.
Press treble register [1], [2], [3] or [4] to
load the corresponding User Program Set.
You can only select registers that light yellow.
6.
Press the [SET] register again to exit Function mode.
NOTE
If one of the treble registers flashes red, the FR-18 diatonic
has noticed an error:
• Missing USB memory
• Load error
Loading User Set memories from a USB memory
The FR-18 diatonic allows you to copy individual Sets
from a USB memory to the three internal “USER” Set
locations. The Set files (with the extension “.STD”) must
first be copied to a USB memory’s root directory before
loading them into the FR-18 diatonic’s “USER” area.
The treble keyboard doesn’t play.
3.
Press button “35” on the treble keyboard to
select the “Load User Program” parameter.
See page 42 for the location of that button.
4.
The [SET] register flashes quickly and registers [1], [2], [3], [4] light yellow or red:
Red means that the USB memory contains no set-
tings for the corresponding User Program Set location.
Yellow means that the USB memory does contain a
User Program Set.
U02.USD U03.USD U04.USDFile name:
Red
Yellow
In the example above, the USB memory contains the
User Program Set files U02.USD, U03.USD and
U04.USD.
The “Load User Program” function loads the User Program Set files depending on the register numbers:
Register number File name
1 “U01.USD”
2 “U02.USD”
3 “U03.USD”
4 “U04.USD”
1.
Connect an optional USB memory to the
FR-18 diatonic’s USB MEMORY port.
2.
Press and hold the [SET] register (it flashes
slowly).
The treble keyboard doesn’t play.
3.
Press button “36” on the treble keyboard to
select the “User Set” parameter.
See page 42 for the location of that button.
4.
The [SET] register flashes quickly and registers [1], [2], [3], [4] light yellow or red:
Red means that the USB memory contains no User
Set file (the corresponding treble register does nothing).
Yellow means that the USB memory does contain a
User Set file (1, 2, 3 or 4).
S02.STD S03.STD S04.STDFile name:
Red (empty)
Yellow (existing file)
In the example above, the file “S01.STD” doesn’t exist
on the USB memory.
5.
Press treble register [1], [2], [3] or [4] to
select the User Set settings you want to
load.
Select with register File name
1 “S01.STD”
2 “S02.STD”
3 “S03.STD”
r
38
Page 39

V-Accordion FR-18 diatonic
Importing Tablature sets
r
Select with register File name
4 “S04.STD”
You can only select registers that light yellow.
6.
Now select the internal Set memory to
which you want to load the selected “User
Set” file: press register [1], [2] or [3] that
lights yellow.
Register [4] is not available here, because there are
only three User Set memories.
All registers go dark to confirm that the selected User
Set was imported.
7.
Press the [SET] register again to exit Function mode.
NOTE
If one of the treble registers flashes red, the FR-18 diatonic
has noticed an error:
• Missing USB memory
• Load error
NOTE
See “Recovering the factory User Set data” on p. 51 to load
the original factory Sets.
Importing Tablature sets
1.
Connect an optional USB memory to the
FR-18 diatonic’s USB MEMORY port.
2.
Press and hold the [SET] register (it flashes
slowly).
The treble keyboard doesn’t play.
3.
Press button “37” on the treble keyboard to
select the “Import Tablatures” parameter.
See page 42 for the location of that button.
IMPORTANT REMARK: Each tablature file contains
12 tablature settings. Loading one of them will overwrite the existing tablatures. You cannot select just a
single setting from a Tablature Set file.
4.
The [SET] register flashes quickly and registers [1], [2], [3], [4] light yellow or red:
Red means that the USB memory contains no tabla-
ture file (the corresponding treble register does nothing).
Yellow means that the USB memory does contain
settings for the corresponding tablature file (1, 2, 3 or
4).
In the example above, the USB memory doesn’t contain the “RDCK1.XML” file.
5.
Press treble register [1], [2], [3] or [4] to
select the Tablature Set (12 settings!) you
want to load.
Select with register File name
1 “RDKC1.XML”
2 “RDKC2.XML”
3 “RDKC3.XML”
4 “RDKC4.XML”
6.
Press the [SET] register again to exit Function mode.
NOTE
If one of the treble registers flashes red, the FR-18 diatonic
has noticed an error:
• Missing USB memory
• Load error
Importing optional expansion sounds
The FR-18 diatonic allows you to add new sounds to the
internal sounds. The new sounds (files with the “.BID”
extension) must be copied to a USB memory, after
which you can load them with the FR-18 diatonic.
“Loading” means that they will be copied to a permanent internal memory area. There are two such memory
areas (“A” and “B”).
1.
Connect an optional USB memory to the
FR-18 diatonic’s USB MEMORY port.
2.
Press and hold the [SET] register (it flashes
slowly).
The treble keyboard doesn’t play.
3.
Press button “33” on the treble keyboard to
select the “Import expansion sounds”
parameter.
See page 42 for the location of that button.
IMPORTANT REMARK: Loading a sound expansion
file will overwrite the selected memory bank and
replace the sounds that were previously stored there.
You cannot select just a single sound from an expansion file.
4.
The [SET] register flashes quickly and registers [1], [2], [3] and [4] light yellow or red:
Red means that the USB memory contains no sound
expansion file (the corresponding treble register does
nothing).
File name:
RDKC2.XML RDKC3.XML RDKC4.XML
Red
Yellow
39
Page 40

V-Accordion FR-18 diatonic
Data management via the USB port
Yellow means that the USB memory does contain a
sound expansion file.
File name:
In the example above, the USB memory doesn’t contain the file “W01.BID”.
5.
Press treble register [1]~[4] to select the
W02.BID
Red
Yellow
W03.BID W04.BID
sound expansion file you want to load.
Select with register File name
1 “W01.BID”
2 “W02.BID”
3 “W03.BID”
4 “W04.BID”
Treble registers [1]~[4] now light red or green.
NOTE
You can only select registers that light yellow.
6.
Now select the internal sound expansion
bank to which you want to load the selected
expansion file: press register [1] or [2].
Green means that the internal bank in question con-
tains no expansion sounds.
Red means that the bank in question already con-
tains expansion sounds. But you can overwrite them
if you like.
During the operation, all treble registers flash green.
When they go dark, the selected sound expansion file
has been imported.
NOTE
If all four treble registers flash red, the FR-18 diatonic has
noticed an error:
• Missing USB memory
• The sound expansion file is already available inside the
FR-18 diatonic
• The file is corrupt
NOTE
The load operation may take a few minutes.
NOTE
The FR-18 diatonic does not allow you to load the same
sound expansion file for both banks.
7.
Press the [SET] register again to exit Function mode.
r
40
Page 41

V-Accordion FR-18 diatonic
Editing Function settings
r
12. Editing Function settings
The FR-18 diatonic provides a series of specialized parameters that may come in handy when you need to fine-tune the
FR-18 diatonic’s response to your playing style. Some of these settings can be saved to the FR-18 diatonic’s User Programs (see p. 35).
Button Function Setting range Default See
1 Master Tune 415~440~466Hz 440 p. 43
2 Musette Detune Dry, Classic, F-Folk, American L, American
H, Nord Eur, German L, D-Folk L, Italian L,
German H, Alpine, Italian H, D-Folk H,
French, Scottish
3 Treble/Bass&Chord Balance Bass & Chord 1~63, 0, 1~63 Treble 0 p. 43
4Orchestra/Organ Level –40~0~+40 0 p. 43
5Orchestra Bass Level –40~0~+40 0 p. 43
6Orchestra Chord Level –40~0~+40 0 p. 43
7Drum Set Folk, Jazz, Tarantel, Latin Folk p. 43
8Drum Sound Level Fix Low, Fix Med, Fix High, –40~0~+40 0 p. 44
9 Metronome Time Signature 1/4, 2/4, 3/4, 4/4, 5/4, 6/4, 6/8, 7/8, 9/8 4/4 p. 44
10 Metronome Tempo 20~0~250 120 p. 44
11 Metronome Level Off, Low, Medium, High Medium p. 44
12 Reverb Level 0~127 48 p. 44
13 Reverb Type Room 1, Room 2, Room 3, Hall 1, Hall 2,
Plate, Delay, Panning Dly
14 Chorus Level 0~127 16 p. 44
15 Chorus Type Chorus 1, Chorus 2, Chorus 3, Chorus 4,
FBackChr, Flanger, Short Delay, Short Dly
FB
16 Bellows Curve Fixed Low, Fixed Med, Fixed High, X-
Light, Light, Standard, Heavy, X-Heavy
17 Bellows Legato Off, On On p. 45
18 Treble Valve Noise Off, –40~0~+40 0 p. 45
19 Bass Button Noise Off, –40~0~+40 0 p. 46
20 MIDI TX/RX Channel Treble 1~16, Off 1 p. 48
21 MIDI TX/RX Channel Bass 1~16, Off 2 p. 49
22 MIDI TX/RX Channel Chord 1~16, Off 3 p. 49
23 MIDI TX/RX Channel Orchestra 1~16, Off 4 p. 49
24 MIDI TX/RX Channel Orch. Bass 1~16, Off 5 p. 49
25 MIDI TX/RX Channel Orch. Chord 1~16, Off 6 p. 49
26 Basic MIDI Channel 1~16, Off 13 p. 49
27 Bellows Expression TX Off, On, Right hand, Left hand Right hand p. 49
28 Program Change TX Off, On Off p. 50
29 Auto Power Off Off, 10, 15, 20 minutes 10 minutes p. 46
30 MIDI OUT/IN Out, In Out
[*] Reset to “Out” when the FR-18 diatonic is switched on.
Depending on
the SET you
select.
Plate p. 44
Short Delay p. 45
Standard p. 45
*
p. 43
p. 50
41
Page 42

V-Accordion FR-18 diatonic
Editing Function settings
The “Function” group also contains the following commands that apply to the FR-18 diatonic’s memory or a USB memory
you may have connected. These are explained on the indicated pages.
Button Function See
31 Load factory Set p. 51
32 USB driver p. 46
33 Import expansion sounds p. 39
34 Save User Program p. 37
35 Load User Programs p. 38
36 Import User Sets p. 38
37 Import Tablatures p. 39
You can also press and hold the [DEC]/[INC] buttons
Selecting the desired function
1.
Press and hold the [SET] register (it flashes
slowly).
The Treble keyboard can now be used to select the
desired function. Please refer to the following illustration for the treble buttons you need to press.
to quickly select a significantly higher or lower value.
Each time you select a setting that is also assigned to
a treble register, the register in question lights. While
changing the setting with the [DEC]/[INC] buttons,
use the treble registers as a guide. You will notice
that one of the registers lights for each setting that
can also be selected by pressing a register.
26
27
28
29
30
31
32
33
34
35
36
37
13
14
15
16
17
18
19
20
21
22
23
24
25
1
2
3
4
5
6
7
8
9
10
11
12
NOTE
Press the [DRUMS/DEFAULT] to return to the last setting
you saved for the currently selected parameter.
4.
Press the [SET] register twice to leave the
FR-18 diatonic’s Function mode.
About the indications provided by the treble registers
While the FR-18 diatonic’s four treble registers are used
to select some of the available “Function” settings, each
parameter usually provides more settings than there are
treble registers. Settings not directly available need to be
selected using the [DEC]/[INC] buttons.
That is why the FR-18 diatonic uses the following system to provide at least a clue of the value you selected:
The register lights. The register flashes. Off.
1234
The setting assigned to
register
[1]
is selected.
1234
A smaller value than the setting assigned to
register
[1]
is selected.
2.
Press the indicated treble button.
The [SET] register now flashes rapidly, and the Treble
keyboard can once again be used to play notes.
3.
Use treble registers [1]~[4] to select one of
the suggested values. Alternatively, use the
[DEC] or [INC] button to select the desired
value.
(Sometimes, there are more options than can be
selected with the 4 registers.)
r
42
1234
The setting assigned to
[2]
is selected.
register
1234
A smaller value than the setting assigned to
register
[2]
is selected. (But it is more than the
setting assigned to
[1]
.)
Page 43

V-Accordion FR-18 diatonic
456
7
r
Parameters
Parameters
All parameters except “MIDI OUT/IN” can be saved in the
Global area (common to all Sets).
NOTE
The small dot “•” means “factory setting”.
Master Tune
415~440~466 (Hz)
Default setting: 440
This parameter allows you to change the FR-18
diatonic’s overall tuning. The factory default, “440”,
represents the reference pitch used by all electronic
musical instruments. The settings you can select with
the registers are:
Register Value Register Value
1 415 3 448
2• 440 4 466
Musette Detune
Dry, Classic, F-Folk, American L,
American H, Nord Eur, German L,
D-Folk L, Italian L, German H,
Alpine, Italian H, D-Folk H, French,
Scottish
Default setting:
Depends on the selected
Set
This parameter allows you to choose the system used
for detuning the 8’ reeds of the selected register. The
settings you can select with the registers are:
Register Value Register Value
1 Classic 3 Italian L
2 Nord Eur 4 French
1
2
Orchestra/Organ Level
–40~0~+40
Default setting: 0
This parameter allows you to set the level of the
orchestral sounds. It can be useful to create the
desired “mix” (volume balance) with the treble accordion sounds.
Register Value Register Value
1 –40 3 +20
2• 0 4 +40
Orchestra Bass Level
–40~0~+40
Default setting: 0
This parameter allows you to set the level of the
orchestral bass section. It can be useful to create the
desired “mix” (volume balance) with the sound
assigned to the chord section (page 29).
Register Value Register Value
1 –40 3 +20
2• 0 4 +40
Orchestra Chord Level
–40~0~+40
Default setting: 0
This parameter allows you to set the level of the
orchestral chord section. It can be useful to create
the desired “mix” (volume balance) with the sound
assigned to the bass section (page 29).
Register Value Register Value
1 –40 3 +20
2• 0 4 +40
Treble/Bass&Chord Balance
Bass & chord 1~63,0, 1~63 Treble
Default setting: 0
This parameter is used to set the balance between the
Treble and Bass sections. When you press register [1],
the treble section is inaudible, while pressing register
[4] means that the bass and chord section is no
longer audible. The settings you can select with the
registers are:
Register Value Register Value
1 Bass &
Chord (60)
2• Equal
balance (0)
NOTE
See also “How to balance the various sections” on p. 31.
3 Treble 30
4 Treble 60
Drum Set
3
Folk, Jazz, Tarantel, Latin
Default setting: Folk
This parameter allows you to select the type of drum/
percussion instruments you wish to play simultaneously with the bass and chord section. See also
“Playing drum/percussion sounds” on p. 30.
Register Setting Register Setting
1• Folk 3 Tarantel
2 Jazz 4 Latin
43
Page 44

V-Accordion FR-18 diatonic
Editing Function settings
Drum Sound Level
Fix Low, Fix Med, Fix High,
–40~0~+40
Default setting: 0
This parameter allows you to set the audio level of
the drum sounds. Select “Fix Low” (low), “Fix Med”
(medium) or “Fix High” (high) to use a preset level
value. If you select a value, it is added to, or subtracted from, the standard value (“0”).
Register Value Register Value
1 Fix Med 3• 0
2 –40 4 +40
Metronome Time Signature
1/4, 2/4, 3/4, 4/4, 5/4, 6/4, 6/8, 7/8,
9/8
Default setting: 4/4
This parameter allows you to set the metronome’s
time signature. See page 34 for how to activate the
metronome.
Register Value Register Value
1 1/4 3• 4/4
2 3/4 4 5/4
Metronome Tempo
20~250
Default setting: 120
This parameter allows you to set the metronome
tempo. See page 34 for how to activate the metronome.
Register Setting Register Setting
1 Adagio
(72 BPM)
2• Moderato
(120 BPM)
3 Allegro (144
BPM)
4 Presto (192
BPM)
10
8
Reverb Level
0~127
Default setting: 48
12
This parameter allows you to set the volume of the
reverb effect with respect to the accordion and/or
orchestral sounds. It applies to all sections that are
currently switched on. The settings you can select
with the registers are:
Register Value Register Value
1 0 (no reverb) 3 96
2• 48 4 127
9
Room 1~3, Hall 1~2, Plate, Delay,
Panning Dly
Default setting: Plate
Reverb Type
13
This parameter allows you to specify what kind of
effect the Reverb processor should generate. The
available options are:
Type Explanation
Room1
Room2
Room3
Hall1
Hall2
Plate This effect type simulates a plate reverb (a
Delay This is a conventional delay that produces
PanningDly This is a special delay in which the delayed
Register Value Register Value
These effects simulate the reverberation of
a room. They provide a well-defined spacious reverberation.
These types simulate the reverberation of
a concert hall with a deeper reverberation
than the Room reverbs.
studio device using a metal plate to simulate natural Reverb).
echo effects.
sounds move left and right. It is effective
when you are listening in stereo.
Metronome Level
Off, Low, Medium, High
This parameter allows you to change the metronome’s level when it is too loud or too soft. See
page 34 for how to activate the metronome.
Register Value Register Value
1 Off 3• Medium
2 Low 4 High
r
44
11
Default setting: Medium
1 Room1 3• Plate
2 Hall 1 4 Panning Dly
Chorus Level
0~127
Default setting: 16
This parameter allows you to set the volume of the
chorus effect. It applies to all sections that are currently switched on. The settings you can select with
the registers are:
Register Value Register Value
1 0 (no chorus) 3 64
2• 16 4 127
14
Page 45

V-Accordion FR-18 diatonic
17
18
r
Parameters
Chorus Type
Chorus 1~4, FBack Chr, Flanger,
Short Delay, Short Dly FB
Default setting: Short
Delay
Chorus broadens the spatial image of the sound, adding richness. You can choose from 8 types of chorus.
The available options are:
Type Explanation
Chorus 1
Chorus 2
Chorus 3
Chorus 4
FBack Chr This is a chorus with a flanger-like
Flanger This is an effect that sounds some-
Short Delay This is a delay with a short delay
ShortDly FB This is a short delay with many
Register Value Register Value
1 Chorus 1 3• Short Delay
2 Flanger 4 ShortDly FB
These are conventional chorus
effects that add spaciousness and
depth to the sound.
effect and a soft sound.
what like a jet airplane taking off or
landing.
time.
repeats.
Bellows Curve
Fixed Low, Fixed Med, Fixed High,
X-Light, Light, Standard, Heavy,
X-Heavy
Default setting:
Standard
This parameter allows you to adapt the FR-18
diatonic’s expressive potential to your playing style. If
you think the sounds don’t respond the way you
would like them to, try another curve that better
“translates” your movements.
There are three “Fixed” curves that always use the
same value, no matter how hard or lightly you push/
pull the bellows (no dynamic control). “Low” means
that a low value is used, “Med” represents a medium
value and “High” a high value.
The remaining settings do depend on the strength
with which you push/pull the bellows, but in different ways: “Light” means that you do not need to
push/pull hard to achieve a meaningful effect. “X-
Light” requires even less strength (the “X” stands for
“extra”). “Standard” refers to a normal response.
“Heavy” provides a greater variety of nuances and
“X-Heavy” is even more detailed. It would be a good
idea to select each curve without the “Fixed” addition, play a few notes, select the next curve, etc. until
you find the response that feels just right.
15
16
Bellows Legato
Off, On
Default setting: On
This parameter only applies to percussive orchestral
sounds, like piano, guitar, xylophone, etc. It lets you
choose what kind of behavior is most suited to the
music you wish to play when you press and hold a
button while opening and closing the bellows.
Register Setting Meaning
1 Off Percussive orchestral sounds
are controlled by the bellows.
When you change the direction of the bellows, the new
note will restart from the
beginning and sound percussive.
2• On Percussive orchestral sounds,
like piano, vibe, guitar, and so
on, are played in a “legato”
fashion: when you change
the direction of the bellows
while holding a treble button,
the new note will be the continuation of the note you
started with the opposite bellows direction. In most cases,
this means that the new note
will not sound very percussive (no noticeable attack).
Treble Valve Noise
Off, –40~0~+40
Default setting: 0
You will probably agree that electronic sounds must
not only reproduce the basic timbre of an existing
signal, but also the original instrument’s behavior
and typical “noises” in order to be perceived as
authentic. In the case of a guitar that would be the
sliding noise of the fingers. An accordion, on the
other hand, produces mechanical valve noises that
cannot be suppressed on an acoustic instrument.
Use this parameter to specify how prominent the
noise produced by the simulated Treble valves should
be. The settings you can select with the registers are:
Register Value Register Value
1 Off 3• 0
2 -20 4 +20
Register Value Register Value
1 Fixed High 3• Standard
2 Light 4 Heavy
45
Page 46

V-Accordion FR-18 diatonic
Editing Function settings
Bass Button Noise
Off, –40~0~+40
The bass section of almost all accordion instruments
can be played via buttons. Such buttons produce a
typical noise when pressed. Use this parameter to
specify how prominent that button noise should be.
The settings you can select with the registers are:
Register Value Register Value
1 Off 3• 0
2 -20 4 +20
Auto Power Off
Off, 10, 15, 20 minutes
This parameter allows you to specify how long the
FR-18 diatonic should wait before switching itself off
while you are not using it.
Register Value Register Value
1 Off 2 15 minutes
Default setting: 0
Default setting:
10 minutes
19
29
• Switch off the FR-18 diatonic (see p. 21), wait a
few seconds, then switch it back on again.
NOTE
See also “Communication via the USB MIDI port” on p. 48.
2• 10 minutes 3 20 minutes
WARNING: Be aware that any unsaved changes are
lost when the FR-18 diatonic is switched off by this
function. Be sure to save all important settings as
soon as you can (page 35).
USB Driver
Generic, Vendor
Normally, you don’t need to install a driver in order
to connect the FR-18 diatonic to your computer via
the USB connector.
However, if some problem occurs, or if the performance is poor, using the original Roland driver may
solve the problem. If you do so, make the following
setting to specify the USB driver you intend to use
before you install the driver on your computer.
The procedure is as follows:
•Press and hold the [SET] register until its blue indicator starts flashing.
•Press treble button 32.
•Press register [1] or [2]:
Register Value Meaning
Default setting: Generic
32
1• Generic Choose this if you want to use
2 Original Choose this if you want to use
r
46
the standard USB driver that
was included with your computer. Normally, you should
use this mode.
a USB driver downloaded
from the Roland website
(www.roland.com).
Page 47

V-Accordion FR-18 diatonic
Connecting to MIDI devices
r
13. Connecting to MIDI devices
Your FR-18 diatonic can also transmit or receive MIDI data, thus providing an even greater versatility. In this section, we’ll
look at what MIDI is and does and which MIDI functions are available on the FR-18 diatonic.
■ What’s MIDI?
MIDI, short for “Musical Instrument Digital Interface”,
was developed as a universal standard for exchange
of performance data with external devices. By connecting the FR-18 diatonic to an external MIDI device
and exchanging performance data, you can control
one device from another. For instance, you can output sound from other instruments, switch sounds or
receive MIDI data from an external sequencer that
cause your FR-18 diatonic to play.
Connecting an external MIDI device
to the FR-18 diatonic
The FR-18 diatonic has one MIDI socket that can be
used to either transmit (OUT) or receive (IN) MIDI data.
1.
Turn the volume all the way down on the
FR-18 diatonic and the MIDI device you are
about to connect.
Connection to receive MIDI data from an external
device:
External MIDI device: MIDI OUT
3.
Adjust the volume level on the FR-18
diatonic and the connected device.
4.
Set the “MIDI OUT/IN” parameter.
See “MIDI OUT/IN” on p. 50. Select “OUT” to transmit
MIDI data to an external device. (This is the default
setting.)
Set it to “IN” to receive MIDI data from an external
device.
2.
Use a MIDI cable (sold separately) to connect the MIDI sockets to each other.
Connection to transmit MIDI data to an external
device:
External MIDI device: MIDI IN
About MIDI channels
MIDI can simultaneously transmit and receive messages
on 16 channels, so that up to 16 instruments (or parts of
a module or synthesizer) can be controlled. Nowadays,
most instruments –like your FR-18 diatonic– are multitimbral, which means that they can play several musical
parts with different sounds. This requires the use of several MIDI channels. The FR-18 diatonic, for instance, has
several accordion and orchestral sections that can be
played simultaneously. They can transmit and receive on
different channels.
The FR-18 diatonic’s sections use the following MIDI
channels:
Part Channel
Treble 1
Bass 2
Chords 3
Orchestra (Treble) or Organ 4
Orchestra Bass 5
Orchestra Chord 6
DRUMS sounds (see p. 30) 10
Basic channel (for selecting Sets) 13
47
Page 48

V-Accordion FR-18 diatonic
Connecting to MIDI devices
However, if you wish or need to, you can assign the sections of your FR-18 diatonic different channels than
those assigned at the factory.
Communication via the USB MIDI port
If you use a USB cable (commercially available) to connect the FR-18 diatonic’s USB MIDI port to a USB port
of your computer, you’ll be able to do the following.
By transferring MIDI data between the FR-18 diatonic
and your sequencer software, you’ll be able to enjoy a
wide range of possibilities for music production and
editing.
1.
Use a standard USB cable (A‰B-type connectors, commercially available) to connect
the FR-18 diatonic to your computer as
shown below.
USB MIDI port
USB connector
USB cable
Computer
2.
Select the USB driver you want to use (see
p. 46).
3.
Refer to the Roland website for system
requirements.
Roland website: http://www.roland.com/
If the computer doesn’t “see” the FR-18 diatonic
Normally, you don’t need to install a driver in order
to connect the FR-18 diatonic to your computer.
However, if some problem occurs, or if the performance is poor, using the Roland original driver may
solve the problem.
For details on downloading and installing the Roland
original driver, refer to the Roland website:
http://www.roland.com/
Specify the USB driver you want to use, and then
install the driver. For details, refer to page 46.
■ Caution
•To avoid the risk of malfunction and/or damage to
external speakers, always turn the volume all the
way down and switch off the power on all devices
before you make any connections.
• Only MIDI data can be transmitted and received via
USB. Audio data cannot be transmitted or received.
• Switch on the power to the FR-18 diatonic before
you start up the MIDI application on your computer. Never turn the FR-18 diatonic’s power on/
off while your MIDI application is running.
MIDI parameters
The MIDI parameters belong to the “Function” environment. The setting procedure is therefore the same. See
p. 42 for details.
General remark: MIDI data are only transmitted when
“MIDI OUT/IN” (see p. 50) is set to “Out”. The “RX” part
mentioned below is only used when “MIDI OUT/IN” is set
to “In”.
MIDI TX/RX Channel Treble
1~16, Off
This parameter allows you to set the MIDI channel for
the treble (accordion) section. This assignment
applies both to the transmission (“TX”) and reception
(“RX”) of MIDI data. Select “Off” if the treble section
should neither receive nor transmit MIDI data.
The procedure for setting (and checking) the MIDI
channel using the registers is slightly different from
the usual procedure, because it also involves using
the [ORCHESTRA/ORGAN] button.
Press [ORCHESTRA/ORGAN] once (it lights):
Register Status MIDI channel
1 lights 1
flashes 2
dark Off
2 lights 3
flashes 4
dark Off
3 lights 5
flashes 6
dark Off
4 lights 7
flashes 8
dark Off
Press [ORCHESTRA/ORGAN] twice (it flashes):
Register Status MIDI channel
1 lights 9
flashes 10
dark Off
Default setting: 1
20
r
48
Page 49

V-Accordion FR-18 diatonic
242526
27
MIDI parameters
r
Register Status MIDI channel
2 lights 11
flashes 12
dark Off
3 lights 13
flashes 14
dark Off
4 lights 15
flashes 16
dark Off
You could press [ORCHESTRA/ORGAN] a third time (it
goes dark) to quickly select “Off” (no MIDI channel).
MIDI TX/RX Channel Bass
1~16, Off
Default setting: 2
This parameter allows you to set the MIDI channel for
the bass buttons (i.e. all left-hand buttons that do
not play chords). Select “Off” if the bass section
should neither receive nor transmit MIDI data.
NOTE
See “MIDI TX/RX Channel Treble” for the setting procedure
using the treble registers and the [ORCHESTRA/ORGAN]
button.
21
MIDI TX/RX Channel Orch. Bass
1~16, Off
Default setting: 5
This parameter allows you to define the MIDI channel
for the ORCH BASS part.
NOTE
See “MIDI TX/RX Channel Treble” on p. 48 for the setting
procedure using the treble registers and the [ORCHESTRA/
ORGAN] button.
MIDI TX/RX Channel Orch. Chord
1~16, Off
Default setting: 6
This parameter allows you to define the MIDI channel
for the ORCH CHORD part.
NOTE
See “MIDI TX/RX Channel Treble” for the setting procedure
using the treble registers and the [ORCHESTRA/ORGAN]
button.
Basic MIDI Channel
1~16, Off
Default setting: 13
This parameter allows you to set the basic MIDI channel. The “Basic Channel” can be used for selecting
Sets from an external MIDI device (using program
change numbers). Please see “Program Change numbers” on p. 64 for the program change numbers of
the Sets.
MIDI TX/RX Channel Chord
1~16, Off
Default setting: 3
This parameter allows you to set the MIDI channel for
the chord buttons when they are used to play the
selected accordion register. Select “Off” if the chord
section should neither receive nor transmit MIDI
data.
NOTE
See “MIDI TX/RX Channel Treble” for the setting procedure
using the treble registers and the [ORCHESTRA/ORGAN]
button.
MIDI TX/RX Channel Orchestra
1~16, Off
Default setting: 4
This parameter allows you to set the MIDI channel for
the Treble section’s orchestral/organ part. Select “Off”
if the Orchestra/Organ section should neither receive
nor transmit MIDI data.
NOTE
See “MIDI TX/RX Channel Treble” for the setting procedure
using the treble registers and the [ORCHESTRA/ORGAN]
button.
22
23
NOTE
See “MIDI TX/RX Channel Treble” on p. 48 for the setting
procedure using the treble registers and the [ORCHESTRA/
ORGAN] button.
Bellows Expression TX
Off, On, Right hand, Left hand
Default setting:
Right hand
The strength/speed with which the bellows is pressed
or pulled influences the sound – which corresponds
to an acoustic accordion’s response. This effect can
be translated into a MIDI message most external
instruments understand.
The MIDI standard provides a message (“control
change”) for remotely controlling the volume of an
external instrument: CC11. It is chiefly used for
expression purposes (similar to the way in which a
guitarist or organ player uses a volume pedal).
The FR-18 diatonic can manage expression messages
in the following ways:
■ Off
No expression messages are sent via MIDI.
■ On
Expression messages are sent via MIDI.
■ Right hand
Only the “right-hand” MIDI channels transmit expression messages.
49
Page 50

V-Accordion FR-18 diatonic
Connecting to MIDI devices
■ Left hand
Only the “left-hand” MIDI channels transmit expression messages.
Register Setting Register Setting
1 Off 3• Right hand
2 On 4 Left hand
Program Change TX
Off, On
This is a MIDI filter, i.e. a parameter that allows you to
specify whether or not the given MIDI data type
should be transmitted. “TX” is short for “transmission”. This means two things: (1) the filter only
applies to program changes sent by the FR-18
diatonic, and (2) it is only meaningful when the “MIDI
OUT/IN” parameter is set to “Out”.
Program change messages are used to select sounds
or memories on the receiving instrument simply by
recalling another sound (or memory) on the transmitting instrument. The FR-18 diatonic transmits
program changes when you select Sets (on the Basic
Channel) and registers (on the MIDI channel assigned
to the section for which you are selecting a different
register). Select “Off” if you don’t need that.
Default setting: Off
NOTE
“MIDI OUT/IN” is reset to “Out” when you switch off the
FR-18 diatonic.
28
Register Value Register Value
1• Off 2 On
NOTE
All of the FR-18 diatonic’s registers transmit program
change/bank select clusters when pressed. And when you
set the “MIDI OUT/IN” parameter to “In”, the FR-18 diatonic
also receives those messages.
MIDI OUT/IN
Out, In
This parameter allows you to set the function of the
FR-18 diatonic’s MIDI OUT/IN socket.
Register Value Register Value
1• Out 2 In
■ Out
Select this setting if you want to play on the FR-18
diatonic’s keyboards and transmit the MIDI data generated by your playing to an external device.
Default setting: Out
■ In
Select this setting if you want to receive MIDI data
generated by an external device. In this case, the
FR-18 diatonic can only be played from an external
MIDI device.
30
NOTE
See p. 47 for the MIDI channels the FR-18 diatonic’s parts
use.
r
50
Page 51

14. Miscellaneous
Restoring the factory defaults
You can reset the FR-18 diatonic to its factory settings,
which means that your own settings (including the User
Programs) are replaced by the settings the FR-18
diatonic contained when you first got it. Consider
archiving your settings on a USB memory before loading the factory defaults.
1.
Switch off the FR-18 diatonic (see p. 21).
2.
Hold down treble registers [1] and [4] while
switching the FR-18 diatonic back on.
V-Accordion FR-18 diatonic
–User– –factory– –factory– –not used–
Red
Green
4.
Press treble register [1], [2] or [3] to select
the Set memory you want to initialize.
The FR-18 diatonic loads the factory data for the
selected Set memory.
5.
Press the [SET] register twice to exit Function mode.
r
Miscellaneous
3.
Wait until treble registers [1]~[4] start
flashing, then release them.
The FR-18 diatonic starts the initialization process.
While the initialization is in progress, the
[ORCH. BASS], [ORCH. CHORD] and [LEFT REGISTER]
buttons as well as the four treble registers flash.
When it is complete, the four treble registers stop
flashing.
NOTE
This operation does not erase the expansion sounds.
Recovering the factory User Set data
There may be times when you no longer need your User
Set settings and prefer to use the Set data the FR-18
diatonic contained when you first bought it. To do so,
proceed as follows:
1.
Press and hold the [SET] register (it flashes
slowly).
The treble keyboard doesn’t play.
2.
Press button “31” on the treble keyboard to
select the “Load factory Set” parameter.
See page 42 for the location of that button.
3.
The [SET] register flashes quickly and registers [1], [2], [3] light red or green:
Green means that the corresponding Set memory
contains no User Set data and therefore doesn’t need
to be initialized.
Red means that Set memory in question contains
User Set data and can be initialized if you like.
51
Page 52

V-Accordion FR-18 diatonic
Miscellaneous
Troubleshooting
This section provides an overview of points to check and
actions to take when the FR-18 diatonic does not function as you expect. Feel free to contact your Roland
dealer if your issue remains unsolved after reading
through this section.
No sound
■Did you turn the [VOLUME] knob all the way to
the small dot?
Set it to a higher value.
■ Did you set the balance all the way to one section?
Change this setting and try again. See “How to balance the various sections” on p. 31 and “Treble/
Bass&Chord Balance” on p. 43.
■ Are you moving the bellows while triggering
accordion sounds?
The Treble and Bass & Chord sections only produce
sound if you move the bellows while playing notes
(like on an acoustic diatonic accordion).
No sound is heard when an external amplifier is
connected
■Did you switch on the connected amplifier?
Please check this.
■ Did you connect the audio cables to the correct sockets?
If so, check the cables for possible damage.
The bellows exhibits an erratic behavior
If the bellows doesn’t work as expected, causing
notes to sound even while it is not moved, its sensors
may need resetting.
To do so, switch off the FR-18 diatonic, then press
and hold the [ORCH.BASS] and [TABLATURE/INC] buttons while switching the FR-18 diatonic back on. If
this operation doesn’t solve the problem, contact
your Roland dealer.
■Did the FR-18 diatonic go off after several seconds?
The “Auto Power Off” function may be active. Set it to
“Off” (page 46).
The FR-18 diatonic does not respond to your
playing
■Did you set the “MIDI OUT/IN” parameter to “In”?
In that case, the FR-18 diatonic only responds to
MIDI messages. Set the parameter to “Out” (page 50).
■ Are you moving the bellows while triggering
accordion sounds?
The Treble and Bass sections only produce sound if
you move the bellows while playing notes (like on an
acoustic diatonic accordion).
Issues related to the bass buttons
■Why do some bass buttons trigger chords?
Because you changed the assignments by selecting a
different tablature (see p. 33).
■ Why are the chords played with the chord buttons incomplete?
Because you selected the behavior where the third is
omitted. Select full chord mode (see p. 28).
MIDI-related issues
■What MIDI channels does the FR-18 diatonic use
by default?
See the table on page 47.
■ The FR-18 diatonic does not change sounds
when my sequencer transmits program change
numbers.
The program change number probably lies outside
the range of the FR-18 diatonic’s registers (see “Program Change numbers” on p. 64). Such “excess” program numbers are ignored by the FR-18 diatonic.
■ The FR-18 diatonic does not receive the MIDI
messages I recorded for it.
That’s because the “MIDI OUT/IN” parameter is currently set to “Out”. Set it to “In” (page 50).
The button keyboards play the wrong notes
You may have selected the wrong tablature setting or
the wrong key. See “Selecting a tablature with its
original key” on p. 33.
Alternatively, you may have loaded different tablature settings and are now using one of those (see
p. 39). Please check the file in question on your computer.
No sound when you play on a button keyboard
You may have muted the section in question. See
“Switching off sections you don’t need (Mute function)” on p. 30 for how to activate it again.
No power
■Did you disconnect the adapter?
Connect the supplied adapter, or install commercially
available batteries.
r
52
■ The external sequencer keeps displaying a
“MIDI Buffer Overflow” message
The bellows sends too many data at once (its data are
transmitted on five channels simultaneously). You
may be able to solve the problem by setting the “Bellows Expression TX” parameter (see p. 49) to “Right
hand” or “Left hand”, depending on which section
needs to transmit expression messages for the bellows.
Other issues
■Can’t read the/write to USB memory
Are you using a USB memory made by another manufacturer than Roland?
Page 53

15. Specifications
V-Accordion FR-18 diatonic
r
Specifications
■ Keyboards
Right hand: 37 buttons, velocity sensitive, selectable tablature and key.
Left hand: 18 bass buttons, velocity sensitive, selectable
tablature and key (same as for right hand), selectable chord
button behavior (full chord or omitted third)
■ Bellows
Real pneumatic detection of the bellows pressure (highresolution pressure sensor), high-resolution bellows resistance regulator
■ Sound source
Max polyphony: 128 voices
Wave ROM: 64MB of waveforms (8+8MB expansion
sounds)
Tones: 12 accordion Sets, each including:
8 treble registers, 8 orchestral sounds, 4 organ sounds
(slow/fast Rotary settings for each)
3 bass & chord registers, 3 Orchestra Bass registers, 3
Orchestra Chord registers
Treble reed footages: 5
Bass reed footages: 3
Chord reed footages: 2
■ PBM (Physical Behavior Modeling)
Noises: stopping-reed growl, closing valve noise, left button noise
Individual reed simulation: hysteresis threshold, expression
curve, pressure-variant filter, pressure-variant pitch deviation
Reed sound wave switching: by bellows acceleration, by
note repetition speed
■ Musette tuning
Micro tuning presets: 15 (Dry, Classic, F-Folk, American L/H,
North Europe, German L/H, D-Folk L/H, Alpine, Italian L/H,
French, Scottish)
■ Effects
Reverb: 8 types, Chorus: 8 types
Rotary (Slow/Fast) for organ sounds
■ Panel controls
Knobs: VOLUME
Panel switches: 4 Treble registers + ORCHESTRA/ORGAN
button, SET/FUNCTION register, 3 bass registers, ORCH.
BASS button, ORCH. CHORD button, LEFT REGISTER button,
KEY/DEMO button, USER PROGRAM button, DRUMS button, TABLATURE button, POWER button
■ Current draw
500mA
■ Expected battery life under continuous use (using
Ni-MH 2000mAh batteries):
±5.5 hours
Actual battery life varies according to usage conditions, the
quality of the batteries and the number of charging cycles.
Be sure to use only rechargeable Ni-MH batteries.
■ Connectors
OUTPUT sockets (L/Mono, R/Mono), PHONES socket
USB MIDI port (computer connection)
USB MEMORY port (storage devices)
MIDI OUT/IN socket (function adjustable via parameter)
DC IN socket: for supplied Roland PSB-1U AC adaptor
■ Dimensions
375 (H) x 365 (W) x 195 (D) mm
14-13/16 (H) x 14-3/8 (W) x 7-11/16 (D) inches
■ Weight
5.3kg/11 lbs 11 oz (without straps or optional batteries)
■ Supplied accessories
PSB-1U AC adaptor
Owner’s Manual
Straps
1/4”‰1/4” phone (guitar) cable
Earphones (with 1/8”‰1/4” adaptor plug)
Strip for securing the adapter, MIDI and/or audio cables
Hexagonal wrench
Replaceable “traforo” inlay sheets
■ Options
Accordion soft bag
NOTE
In the interest of product improvement, the specifications
and/or appearance of this unit are subject to change without prior notice.
■ Operation modes
ORCHESTRA/ORGAN modes: Solo, Dual
Key: 12 possible keys (C, C#, D, Eb, E, F, F#, G, Ab, A, Bb, B)
Tablatures: 12 types
Bass & Chord with drum/percussion sounds: On/off
Octave: Down, 0, Up (for Treble and Orchestra/Organ)
4 User Program memories
■ Power supply
AC adaptor (PSB-1U)
Batteries (AA-type rechargeable Ni-MH x 8)
53
Page 54

V-Accordion FR-18 diatonic
Appendix
16. Appendix
Tablatures (default: key of G unless specified otherwise)
Tablature 1
—
—
Tablature 2
—
—
B2
E3
Ab3
Bb3
E3
G3
D3
F#3G3A3
G3
B3
A3
C#4
Eb4G4Ab4
C4
D4
B3
C4
Ab+
Bb+
B–
Eb+
—
—
Ab4A4Bb4
E4
F4
D4
E4
G4
A4
Ab
B
Eb
Bb
—
—
Eb5
C#5
C5
B4
G4
F#4B4A4
G+
D+
E+
A–
—
—
Ab5G5A5
E5
D5
D5
C5
G
D
E
A
—
—
G5
F5
C+
G+
F+
F+
—
—
Ab5
G5
E5
Eb6
Bb5
C6
A5
B5
F#5D6A5
C
G
F
F
—
—
Ab5
C#6
E6
B5G6D6
—
—
—
—
G6
C6
—
Ab3
—
Bb3
—
—
E3
G3
B2
E3
G3
B3
D3
F#3G3A3
r
Bb3
C#4
Eb4G4Ab4
C4
D4
B3
C4
Ab+
B–
Eb+
Bb+
—
—
E4
F4
Ab4
D4
E4
G4
A4
Ab
B
Eb
Bb
—
—
Bb4
Bb4
G4
F#4B4A4
Eb5
C#5
C5
B4
G+
D+
E+
A–
—
—
Ab5G5Bb5
E5
D5
D5
C5
G
D
E
A
—
—
G5
F5
C+
G+
F+
F+
—
—
Ab5
G5
E5
Eb6
Bb5
C6
A5
B5
F#5D6A5
C
G
F
F
—
—
Ab6
C#6
E6
B5G6D6
Closing the bellows
Opening the bellows
—
—
G6
C6
—
—
54
Page 55

Tablature 3
—
—
—
—
B2
D3
E3
F3
Ab3
G3
D3
F#3
G3
B3
A3
Bb3
G3
A3
C4
D4
Eb4
C#4
B3
C4
Ab4G4A4
E4
F4
D4
E4
Bb4
G4
A4
G4
F#4B4A4
C5
B4
Eb5
C#5
Ab5G5A5
E5
D5
D5
C5
V-Accordion FR-18 diatonic
r
Tablatures (default: key of G unless specified otherwise)
Bb5
G5
F5
Eb6C6A6
C6
A5
G5E5B5
F#5
E6
E6B5Ab6
D6A5G6
—
—
Eb6——
D6
Tablature 4
—
—
—
—
E3G3Ab3
B2
D3
A3
C4
D3
F#3
B–
Ab+
Bb+
Eb+
G–
E–
C#4
Eb4F4G4A4Bb4
G3
A3
C4
D4
B3
C4
B3
B
Ab
Bb
Eb
G
E
E4F4Ab4A4C5
D4
E4
C+
G+
A–
E+
D–
A–
C#5D5F5
B4
G4
F#4B4A4
D
G
A
E
D
A
Eb5A5G5
E5D5Ab5
D5
C5
G+
C+
F+
F+
F#–
C#+
C#6
Bb5F6D6
F5
G5
E5
G
C
F
F
F#
C#
C6
A5
B5
F#5D6A5
A6
Eb6
E6B5Ab6
C#6
—
—
—
—
G6
C6
D+
G+
A–
E+
B–
Ab+
Ab
D
G
A
E
B
G+
C+
D–
A+
F#+
C#+
F#
C#
G
C
D
A
C+
F+
Bb+
Bb+
Eb+
Ab+
C
F
Bb
Bb
Eb
Ab
Closing the bellows
Opening the bellows
55
Page 56

V-Accordion FR-18 diatonic
Appendix
Tablature 5
—
—
—
—
—
—
——Bb3
C#3
—
Bb2D3F#3G3A3
—
Tablature 6 (key of B)
F#3
C#4
Ab2A3B3
Eb4
Eb4F4G4
C4
D4
B3
C4
F#–
C#+
E+
A+
—
—
G+
D+
E+
A+
—
—
E4
F4
F#4
Bb4
A4
Ab4C5B4
D4
E4
G
D
E
A
—
—
Eb5
C#5F5Eb5
G4
F#4B4A4
C+
G+
F+
F+
—
—
F#5G5Eb6
E5
D5
D5
C5
C
G
F
F
Bb
Eb
Bb5F6C#6
A5
F5
G5
E5B5F#5
Eb+
Bb+
Ab+
B+
Ab
B
C6
Ab5E6B5
—
—
—
—
D6
A5
—
—
—
—
B2
E3
—
—
C3F3E3
A3
Eb3
Ab3
—
—
F#3
Bb3B3C#4
—
—
G3
B3
—
—
—
—
—
—
—
—
C4
D4
Eb4E4F#4
E4
F4
—
—
—
—
—
—
—
—
Ab4B4Bb4
—
—
G4
A4
G+
D+
E+
A+
—
—
—
—
C5
B4
G
D
E
A
—
—
Eb5
C#5
E5
D5
G+
D+
F+
C+
—
—
—
—
F#5
E5
G5
F5
C
G
D
F
—
—
—
—
B5
Ab5
—
—
C6
A5E6B5
Eb6
Bb5
Closing the bellows
Opening the bellows
—
—
—
—
F#6
C#6
r
56
Page 57

Tablature 7
V-Accordion FR-18 diatonic
r
Tablatures (default: key of G unless specified otherwise)
—
—
Tablature 8
—
—
G2
C3
C3
F3
Bb3
Ab3
B2
E3
C#4
Bb3
E3
G3
D3
F#3G3A3
A3
B3
Eb4
C#4
D–
F#+
B–
E–
F#+
B+
C4
D4
Ab4
Eb4
B3
C4
Bb4
Ab4
E4
F4
D4
E4
D
F#
B
E
F#
B
C#5
Bb4
A4G4C5
G4
F#4B4A4
G+
D+
E+
A–
A+
Bb+
Eb5
C#5F5Eb5
B4
G
D
E
A
A
Bb
E5
D5
C+
G+
F+
F+
Bb+
C+
Bb5
Ab5
A5
F5
D5C5G5
E5
C
G
F
F
Bb
C
C#6
Bb5
C6
G5E6B5
B5
F#5
—
—
—
—
D6
A5
—
—
—
—
—
—
——Ab4
C#4
—
Eb4D3F#3G3A3
—
Bb4
—
—
G3
B3
—
—
—
—
—
—
—
—
C4
D4
—
—
B3
C4
—
—
—
—
—
—
E4
F4
—
—
G4A4C5
D4
E4
G+
D+
E+
A–
—
—
—
—
—
—
B4
G4
F#4B4A4
G
D
E
A
—
—
E5
D5
C+
G+
F+
F+
—
—
—
—
G5
F5
D5C5G5
E5
C
G
F
F
—
—
—
—
—
—
C6
A5E6B5
B5
F#5
Closing the bellows
Opening the bellows
—
—
—
—
D6
A5
57
Page 58

V-Accordion FR-18 diatonic
Appendix
Tablature 9
—
—
B2
C3
Tablature 10
—
—
F3
G3
C3
D3
Ab3E3D3
A3
C#4
E3
F3
F#3G3A3
Bb3
Eb4F4G4A4Bb4
G3
B3
C4
D4
B3
C4
G–
D–
E+
A–
C#
Ab
Ab
C#
Ab4
C#5F5Eb5
E4
F4
G
D
E
A
G4
A4C5B4
D4
E4
C+
G+
F+
F+
D
Bb
G4
F#4B4A4
C
G
F
F
F#
F#
A5G5Ab5C6Bb5
E5
D5
Bb+
D5C5G5
B+
A–
C+
B
E
G5
F5
E5
Bb
B
A
C
Eb
Eb
Eb6
C6
A5E6B5
B5
F#5D6C#6
—
—
—
—
—
—
—
—
—
—
—
—
—
—
—
—
—
—
—
—
D3
F#3G3A3
—
—
—
—
—
—
—
—
—
—
—
—
—
—
B3
C4
—
—
—
—
—
—
—
—
—
—
A4
G4C5B4
D4
E4
G+
D+
—
—
—
—
—
—
—
—
G4
F#4B4A4
G
D
—
—
—
—
E5
D5
G+
C+
—
—
—
—
—
—
D5C5G5
—
—
—
—
E5
G
C
—
—
—
—
—
—
—
—
B5
F#5D6A5
Closing the bellows
Opening the bellows
—
—
—
—
—
—
r
58
Page 59

Tablature 11 (Default selection)
V-Accordion FR-18 diatonic
r
Tablatures (default: key of G unless specified otherwise)
Eb5
C#5
F#4
Ab4
C#4
Eb4
C4
E4
G3
B3
G3
A3
Tablature 12 (key of C)
F4
G4A4Bb4C5D5
C4
D4
B3
C4
E4
F4
D4
E4
G+
D+
E+
A–
—
—
G4
A4
G4
F#4B4A4
—
—
F5
E5
C5
B4
G
D
E
A
A5
G5C6Bb5F6D6
E5
G5
D5
C+
G+
A+
D–
—
—
F5
D5C5G5
C
G
A
D
—
—
C6
A5
E5B5F#5
F+
C+
Bb+
Bb+
—
—
E6
B5
Bb
Bb
—
—
A6
E6
D6
A5
F
C
C7
G6F7Bb6
G6
D6
G6
C6
C7
F6
E7
A6
B6
E6
C3
E3
F3
A3
F3
Bb3A3C4
C3
F3
Bb3
Eb4
E3
G3
D4
F4
G3
B3
F4A4Bb4
C4E4F4
G4A4Bb4C5C5
C4
D4
C+
G+
—
—
—
—
C5
E4
F4
C
G
G
E
—
—
D5
Eb5
G4A4C5
F+
C+
A+
D+
—
—
F5F5Bb5A5D6
F5
E5
B4
D5
F
C
A
D
—
—
E5
C6
A5
G5
G5
Bb+
F+
D+
Eb+
—
—
F5
C6
Bb5
F6
Eb6
F6
C6A6Eb6C7G6
C6
A5
Bb
F
D
Eb
—
—
Closing the bellows
Opening the bellows
Bb6
G6
E6
B5
—
—
G6
D6
59
Page 60

V-Accordion FR-18 diatonic
Appendix
Demo Songs
No. SONG TITLE
01 Flower Carpet Danilo Di Paolonicola
02 Funny Jump Danilo Di Paolonicola
03 Heart & Tradition Danilo Di Paolonicola
04 Joyful Round Dance Danilo Di Paolonicola
05 Ireland’s Sky Danilo Di Paolonicola
06 Home Fun Danilo Di Paolonicola
07 Sunshine’s Life Danilo Di Paolonicola
08 Hidden Heart Danilo Di Paolonicola
[*] Copyright ©2011 Roland Europe Spa. All rights reserved.
Unauthorized use of the demo songs for purposes other
than private enjoyment is a violation of applicable laws. The
performance data of the demo songs are not transmitted
via MIDI.
*
PERFORMED BY
Sounds contained in the various Sets
The following lists show the FR-18 diatonic’s internal
Sets and the sounds that are available within each Set.
SET 1.1 Folk
Register Number
1 (pressed once) O O
1 (pressed again) O O O
2 (pressed once) O O
2 (pressed again) O O O
3 (pressed once) O O O
3 (pressed again) O O O O O
4 (pressed once) O O
4 (pressed again) O O
Register Number Orchestra
1 (pressed once) Strings
1 (pressed again) Ac. Piano
2 (pressed once) Oboe
2 (pressed again) Flute1
3 (pressed once) Ac. Guitar
3 (pressed again) Brass
4 (pressed once) Fat Saw Lead
4 (pressed again) Poly Synth
Treble Registers
16’ 8’ 8’+ 8’- 4’
Register Number Orchestra Chord
1 Ac Piano
2 Str & Choir
3 Super Poly
Register Number Orchestra Bass
1 Acoustic Bass
2 Fretless
3 Picked Bass
SET 1.2 Classic
Treble Registers
Register Number
16’ 8’ 8’+ 8’- 4’
1 (pressed once) O O O
1 (pressed again) O O O
2 (pressed once) O O O
2 (pressed again) O
3 (pressed once) O
3 (pressed again) O
4 (pressed once) O O
4 (pressed again) O O
Register Number Orchestra
1 (pressed once) Ac. Piano
1 (pressed again) Steel Gtr
2 (pressed once) Strings
2 (pressed again) Brass
3 (pressed once) Alto Sax
3 (pressed again) Tenor Sax1
4 (pressed once) Clarinet
4 (pressed again) Flute1
Register Number Orchestra Chord
1 GTR Chord
2 Ac. Piano
3 Str & Choir
Register Number Orchestra Bass
1 Finger Bass
2 Tuba
3 Bass & Lead
r
60
Page 61

V-Accordion FR-18 diatonic
Sounds contained in the various Sets
r
SET 1.3 Tradition
Treble Registers
Register Number
16’ 8’ 8’+ 8’- 4’
1 (pressed once) O O O O
1 (pressed again) O O O
2 (pressed once) O
2 (pressed again) O O O
3 (pressed once) O O
3 (pressed again) O O
4 (pressed once) O O
4 (pressed again) O
Register Number Orchestra
1 (pressed once) Harmonica
1 (pressed again) Mandolin
2 (pressed once) Banjo
2 (pressed again) Harpsi Str
3 (pressed once) Zampogna
Register Number Orchestra
1 (pressed once) Harmonica
1 (pressed again) Mandolin
2 (pressed once) Banjo
2 (pressed again) Bouzouki
3 (pressed once) Whistle
3 (pressed again) Zampogna
4 (pressed once) Violin
4 (pressed again) Trumpet
Register Number Orchestra Chord
1 GTR Chord
2 Strings
3 Ac.Piano
Register Number Orchestra Bass
1 Acous Bs
2 Bowed
3 Ac.Piano
3 (pressed again) Whisle
4 (pressed once) Panflute
4 (pressed again) Ocarina
Register Number Orchestra Chord
1 Bouzouki
2 Harpsi Str
3 GTR Chord
Register Number Orchestra Bass
1 Acoustic Bass
2 Fretless
3 Tuba Mix
SET 2.1 Organetto
Treble Registers
Register Number
16’ 8’ 8’+ 8’- 4’
1 (pressed once) O
1 (pressed again) O O
SET 2.2 Diatonic
Treble Registers
Register Number
16’ 8’ 8’+ 8’- 4’
1 (pressed once) O
1 (pressed again) O O
2 (pressed once) O O O
2 (pressed again) O O O O
3 (pressed once) O O O O O
3 (pressed again) O O O
4 (pressed once) O O O O
4 (pressed again) O O O O
Register Number Orchestra
1 (pressed once) El.Piano
1 (pressed again) Vibe
2 (pressed once) Alto Sax
2 (pressed again) Clav2
2 (pressed once) O O
2 (pressed again) O O
3 (pressed once) O O O
3 (pressed again) O O O
4 (pressed once) O O
4 (pressed again) O O O
3 (pressed once) Xylophone
3 (pressed again) Twin Trump
4 (pressed once) Mute Harm
4 (pressed again) Steel Gtr
61
Page 62

V-Accordion FR-18 diatonic
Appendix
Register Number Orchestra Chord
1 Oct.Piano
2 Vibe
3 80s PolySy
Register Number Orchestra Bass
1 Fretless
2 Finger Bs
3 Rubb Bs
SET 2.3 SP Folk
Treble Registers
Register Number
16’ 8’ 8’+ 8’- 4’
1 (pressed once) O
1 (pressed again) O O
2 (pressed once) O O O O
2 (pressed again) O O O
3 (pressed once) O
SET 3.1 Alpine
Treble Registers
Register Number
16’ 8’ 8’+ 8’- 4’
1 (pressed once) O
1 (pressed again) O O
2 (pressed once) O O
2 (pressed again) O O O O O
3 (pressed once) O O
3 (pressed again) O O O
4 (pressed once) O O
4 (pressed again) O O O O
Register Number Orchestra
1 (pressed once) Brass
1 (pressed again) Trumpet
2 (pressed once) Twin Trumpet
2 (pressed again) Trombone
3 (pressed once) Alt Sax
3 (pressed again) O O O
4 (pressed once) O O
4 (pressed again) O O O
Register Number Orchestra
1 (pressed once) Strings
1 (pressed again) Clarinet
2 (pressed once) 80s PolySy
2 (pressed again) El. Piano
3 (pressed once) Vibe
3 (pressed again) Ocarina
4 (pressed once) Kanoun
4 (pressed again) Bouzouki
Register Number Orchestra Chord
1 Strings
2 Ac. Piano
3 Steel Gtr2
Register Number Orchestra Bass
3 (pressed again) Tenor Sax1
4 (pressed once) Tenor Sax2
4 (pressed again) Clarinet
Register Number Orchestra Chord
1 GTR Chord
2 Banjo
3 El. Piano
Register Number Orchestra Bass
1 Acous. Bass
2 Finger Bass
3 Tuba Mix
SET 3.2 Cajun
Treble Registers
Register Number
16’ 8’ 8’+ 8’- 4’
1 (pressed once) O
1 (pressed again) O O
1 Acoustic Bass
2 Finger Bass
3 Tuba Mix
r
62
2 (pressed once) O O O
2 (pressed again) O O
3 (pressed once) O O O
3 (pressed again) O O
4 (pressed once) O
4 (pressed again) O
Page 63

V-Accordion FR-18 diatonic
Sounds contained in the various Sets
r
Register Number Orchestra
1 (pressed once) Trumpet
1 (pressed again) Clarinet
2 (pressed once) Harmonica
2 (pressed again) Flute1
3 (pressed once) TW Upper
3 (pressed again) Mandolin
4 (pressed once) Ac.Guitar
4 (pressed again) Ac. Piano
Register Number Orchestra Chord
1 Ac. Guitar
2 TW Lower
3 Clarinet
Register Number Orchestra Bass
1 Acoustic Bass
2 Finger Bass
3 Tuba
Register Number Orchestra Chord
1 Str & Choir
2 Xylophone
3 FM Ep26 A
Register Number Orchestra Bass
1 Picked Bs
2 Tuba Mix
3 Bass & Lead
SET 4.1 User Set1 (Bandoneon)
Treble Registers
Register Number
16’ 8’ 8’+ 8’- 4’
1 (pressed once) O
1 (pressed again) O
2 (pressed once) O
2 (pressed again) O O O
3 (pressed once) O O
SET 3.3 Tex Mex
Treble Registers
Register Number
16’ 8’ 8’+ 8’- 4’
1 (pressed once) O
1 (pressed again) O O
2 (pressed once) O O O
2 (pressed again) O O
3 (pressed once) O
3 (pressed again) O O
4 (pressed once) O
4 (pressed again) O O
Register Number Orchestra
1 (pressed once) Violin
1 (pressed again) Twin Trump
2 (pressed once) Horn & Orc
2 (pressed again) Highland
3 (pressed again) O O
4 (pressed once) O O
4 (pressed again) O O O
Register Number Orchestra
1 (pressed once) Ac. Guitar
1 (pressed again) Mandolin
2 (pressed once) Banjo
2 (pressed again) Finger Bass
3 (pressed once) HarpsiStr
3 (pressed again) Ocarina
4 (pressed once) Xylophone
4 (pressed again) Tenor Sax1
Register Number Orchestra Chord
1 Ac. Guitar
2 Ac. Piano
3 Banjo
Register Number Orchestra Bass
3 (pressed once) Phase Clav
3 (pressed again) Harp St
4 (pressed once) Nylon & Steel
4 (pressed again) 80s PolySy
1 Tuba
2 Finger Bass
3 Fretless
63
Page 64

V-Accordion FR-18 diatonic
Appendix
SET 4.2 User Set2 (D-Folk)
Treble Registers
Register Number
16’ 8’ 8’+ 8’- 4’
1 (pressed once) O
1 (pressed again) O O
2 (pressed once) O O
2 (pressed again) O O O O O
3 (pressed once) O O
3 (pressed again) O O O
4 (pressed once) O O
4 (pressed again) O O O O
Register Number Orchestra
1 (pressed once) French Horn
1 (pressed again) Horn & Orchestra
2 (pressed once) Vibe
2 (pressed again) Flute1
3 (pressed once) PanFlute
Register Number Orchestra
1 (pressed once) El. Piano
1 (pressed again) Xylophone
2 (pressed once) Nylon & Steel
2 (pressed again) Strings
3 (pressed once) Alto Sax
3 (pressed again) Clarinet
4 (pressed once) Oboe
4 (pressed again) Violin
Register Number Orchestra Chord
1 Ac. Piano
2 Strings
3 GTR Chord
Register Number Orchestra Bass
1 Ac. Piano
2 Acoustic Bass
3 Fretless
3 (pressed again) Violin
4 (pressed once) Strings
4 (pressed again) Sl. Strings
Register Number Orchestra Chord
1 GTR Chord
2 Xylophone
3 Ac. Piano
Register Number Orchestra Bass
1 Acoustic Bass
2 Finger Bass
3 Bowed
SET 4.3 User Set3 (Concertina)
Treble Registers
Register Number
16’ 8’ 8’+ 8’- 4’
1 (pressed once) O
1 (pressed again) O
2 (pressed once) O O
2 (pressed again) O O
3 (pressed once) O O O
3 (pressed again) O
Program Change numbers
Below please find the program change numbers for the
FR-18 diatonic’s Sets and registers.
Bank Select
MSB CC00 LSB CC32
-- -- 1 1.1 Folk
-- -- 2 1.2 Classic
-- -- 3 1.3 Tradition
-- -- 4 2.1 Organetto
-- -- 5 2.2 Diatonic Folk
-- -- 6 2.3 SP Folk
-- -- 7 3.1 Alpine
-- -- 8 3.2 Cajun
-- -- 9 3.3 Tex Mex
-- -- 10 4.1 User Set 1
-- -- 11 4.2 User Set 2
-- -- 12 4.3 User Set 3
Program
Change
Set
(Bandoneon)
(D-Folk)
(Concertina)
4 (pressed once) O O O
4 (pressed again) O O
r
64
Page 65

Bank Select and Program Change RX/TX
V-Accordion FR-18 diatonic
Program Change numbers
r
Bank Select
MSB CC00 LSB CC32
0 0 1~8 Treble Registers
0 0 1~3 Bass Registers
0 0 1~3 Orch Bass Registers
0 0 1~3 Orch Chord Registers
0 0 1~8 Orchestra Registers
0 0 9~16 Organ Registers
0 0 1~12 Sets
Program
Change
Section
65
Page 66

V-Accordion FR-18 diatonic
Appendix
MIDI Implementation Chart
[V-Accordion] Date: December 2010
Model: FR-18 diatonic Version: 1.00
Function... Transmitted Recognized Remarks
7 Parts: 1= Treble, 2= Bass,
Basic
Channel
Mode
Note
Number True Voice
Vel ocity
After
Touch
Pitch Bend X X
Default
Changed
Default
Message
Altered
Note ON
Note OFF
Key’s
Ch’s
1~16, Off
1~16, Off
Mode 3
*****
*****
18~124
*****
O
O
X
X
1~16, Off
1~16, Off
Mode 3
*****
0~127
0~127
O
O
X
X
3= Chord, 4= Orchestra/Organ,
5= Orchestra Bass, 6= Orchestra
Chord, 10= Drums,
1 Logical part: 13= Basic MIDI
Channel for SET change
00,32
O
07
O
10
Control
Change
Program
Change True #
System Exclusive X X
System
Common
System
Real Time
Aux
Messages
Song Position Pointer
Song Sel
Tune
Clock
Commands
All Sounds Off
Reset All Controllers
Local On/Off
All Notes Off
Active Sense
Reset
O
11
O*1
64
X
91
O
93
O
O*1
1~16
X
X
X
X
X
X
X
X
X
O
X
*1 O X is selectable
O
X
X
O
X
X
X
O
1~16
X
X
X
X
X
X
X
X
X
O
X
Bank Select
Vol um e
Panpot
Expression
Hold 1
Reverb Send
Chorus Send
Recognized: 1~16:
1~8: Treble Registers
1~3 Bass & chord registers
1~3 Orchestra Bass registers
1~3 Orchestra Chord registers
1~16 Orchestra/Organ registers
1~12 Set
Notes
Mode 1: OMNI ON, POLY
Mode 3: OMNI OFF, POLY
r
66
Mode 2: OMNI ON, MONO
Mode 4: OMNI OFF, MONO
O: Yes
X: No
Page 67

Information
Information
V-Accordion FR-18 diatonic
When you need repair service, call your nearest Roland Service Center or authorized Roland distributor in
your country as shown below.
r
Information
67
Page 68

V-Accordion FR-18 diatonic
Appendix
MEMO
r
68
Page 69

17. Index
V-Accordion
r
Index
A
Adapter . . . . . . . . . . . . . . . . . . . . . . . . . . . .19
Adaptor . . . . . . . . . . . . . . . . . . . . . . . . . . . .15
Alpine. . . . . . . . . . . . . . . . . . . . . . . . . . . . . .34
American. . . . . . . . . . . . . . . . . . . . . . . . . . .34
Auto Power Off . . . . . . . . . . . . . . . . . . . . .46
B
Balance . . . . . . . . . . . . . . . . . . . . . . . . . . . .31
Basic channel . . . . . . . . . . . . . . . . . . . . . . .49
Bass . . . . . . . . . . . . . . . . . . . . . . . . . . . . . . .27
Off. . . . . . . . . . . . . . . . . . . . . . . . . . . . . . .30
Using. . . . . . . . . . . . . . . . . . . . . . . . . . . . .27
Bass Button Noise . . . . . . . . . . . . . . . . . . .46
Bass strap . . . . . . . . . . . . . . . . . . . . . . . . . .18
Batteries . . . . . . . . . . . . . . . . . . . . . 9, 16, 34
Installing . . . . . . . . . . . . . . . . . . . . . . . . .16
Bellows
Resistance regulator . . . . . . . . . . . . . . .11
Bellows Curve. . . . . . . . . . . . . . . . . . . . . . .45
Button Noise . . . . . . . . . . . . . . . . . . . . . . .46
C
Chord. . . . . . . . . . . . . . . . . . . . . . . . . . 27, 47
Off. . . . . . . . . . . . . . . . . . . . . . . . . . . . . . .30
Chorus . . . . . . . . . . . . . . . . . . . . . . . . . . . . .44
Classic . . . . . . . . . . . . . . . . . . . . . . . . . . . . .34
Connections . . . . . . . . . . . . . . . . . . . . . . . .17
D
Decoration . . . . . . . . . . . . . . . . . . . . . . . . .20
Default. . . . . . . . . . . . . . . . . . . . . . . . . . . . .32
Delay . . . . . . . . . . . . . . . . . . . . . . . . . . . . . .44
Demo songs . . . . . . . . . . . . . . . . . . . . . . . .23
Detune. . . . . . . . . . . . . . . . . . . . . . . . . . . . .34
D-Folk . . . . . . . . . . . . . . . . . . . . . . . . . . . . .34
Driver. . . . . . . . . . . . . . . . . . . . . . . . . . 46, 48
Drumming. . . . . . . . . . . . . . . . . . . . . . . . . .30
Drums . . . . . . . . . . . . . . . . . . . . . . . . . . . . .30
Dry . . . . . . . . . . . . . . . . . . . . . . . . . . . . . . . .34
Dual . . . . . . . . . . . . . . . . . . . . . . . . . . . . . . .26
E
Editing . . . . . . . . . . . . . . . . . . . . . . . . . . . . .41
Effects . . . . . . . . . . . . . . . . . . . . . . . . . 32, 44
Expansion . . . . . . . . . . . . . . . . . . . . . . . . . .39
F
Factory Setup . . . . . . . . . . . . . . . . . . . . . . .51
F-Folk. . . . . . . . . . . . . . . . . . . . . . . . . . . . . .34
Flanger. . . . . . . . . . . . . . . . . . . . . . . . . . . . .45
French . . . . . . . . . . . . . . . . . . . . . . . . . . . . .34
Function . . . . . . . . . . . . . . . . . . . . . . . . . . .41
I
Initialize. . . . . . . . . . . . . . . . . . . . . . . . . . . .51
Italian. . . . . . . . . . . . . . . . . . . . . . . . . . . . . .34
K
Key . . . . . . . . . . . . . . . . . . . . . . . . . . . . 32, 33
L
Left hand. . . . . . . . . . . . . . . . . . . . . . . . . . .27
Left Register . . . . . . . . . . . . . . . . . . . . . . . .29
Level. . . . . . . . . . . . . . . . . . . . . . . . . . . . . . .21
M
Master Tune . . . . . . . . . . . . . . . . . . . . . . . .43
Memories . . . . . . . . . . . . . . . . . . . . . . . . . .35
Memorize . . . . . . . . . . . . . . . . . . . . . . . . . .35
Metronome. . . . . . . . . . . . . . . . . . . . . . . . .44
MIDI . . . . . . . . . . . . . . . . . . . . . . . . . . . . . . .47
Channels. . . . . . . . . . . . . . . . . . . . . . . . . .47
Parameters. . . . . . . . . . . . . . . . . . . . . . . .48
USB . . . . . . . . . . . . . . . . . . . . . . . . . . . . . .48
Musette Detune . . . . . . . . . . . . . . . . . . . . .34
Musical key . . . . . . . . . . . . . . . . . . . . . . . . .32
Mute . . . . . . . . . . . . . . . . . . . . . . . . . . . . . .30
N
North Eur . . . . . . . . . . . . . . . . . . . . . . . . . .34
O
OCT. . . . . . . . . . . . . . . . . . . . . . . . . . . . . . . .27
Orch
Bass. . . . . . . . . . . . . . . . . . . . . . . . . . . . . .29
Chord . . . . . . . . . . . . . . . . . . . . . . . . . . . .29
Orchestral sounds
Bass and chord . . . . . . . . . . . . . . . . . . . .28
Treble . . . . . . . . . . . . . . . . . . . . . . . . . . . .25
Organ. . . . . . . . . . . . . . . . . . . . . . . . . . . . . .25
P
Pan Delay . . . . . . . . . . . . . . . . . . . . . . . . . .44
Percussion. . . . . . . . . . . . . . . . . . . . . . . . . .30
Personalize . . . . . . . . . . . . . . . . . . . . . . . . .20
Phones. . . . . . . . . . . . . . . . . . . . . . . . . . . . .21
Plate. . . . . . . . . . . . . . . . . . . . . . . . . . . . . . .44
Power on/off. . . . . . . . . . . . . . . . . . . . . . . .21
R
Register
Colors . . . . . . . . . . . . . . . . . . . . . . . . . . . .25
Resetting. . . . . . . . . . . . . . . . . . . . . . . . . . .51
Resistance regulator . . . . . . . . . . . . . . . . .11
Reverb . . . . . . . . . . . . . . . . . . . . . . . . . . . . .44
Room . . . . . . . . . . . . . . . . . . . . . . . . . . . . . .44
Shift . . . . . . . . . . . . . . . . . . . . . . . . . . . . . . 27
Solo . . . . . . . . . . . . . . . . . . . . . . . . . . . . . . 26
Sounds. . . . . . . . . . . . . . . . . . . . . . . . . . . . 25
Left hand . . . . . . . . . . . . . . . . . . . . . . . . 27
Specifications . . . . . . . . . . . . . . . . . . . . . . 53
Straps. . . . . . . . . . . . . . . . . . . . . . . . . . . . . 17
Switching on/off . . . . . . . . . . . . . . . . . . . 21
T
Tablature . . . . . . . . . . . . . . . . . . . . . . . 33, 39
Traforo . . . . . . . . . . . . . . . . . . . . . . . . . . . . 20
Transpose . . . . . . . . . . . . . . . . . . . . . . . . . 27
Treble
Off . . . . . . . . . . . . . . . . . . . . . . . . . . . . . . 30
Using. . . . . . . . . . . . . . . . . . . . . . . . . . . . 25
Valve Noise. . . . . . . . . . . . . . . . . . . . . . . 45
U
USB. . . . . . . . . . . . . . . . . . . . . . . . . . . . 37, 48
Driver . . . . . . . . . . . . . . . . . . . . . . . . 46, 48
MIDI. . . . . . . . . . . . . . . . . . . . . . . . . . . . . 48
User Program . . . . . . . . . . . . . . . . . . . 35, 38
User Set . . . . . . . . . . . . . . . . . . . . . . . . . . . 38
V
Valve Noise . . . . . . . . . . . . . . . . . . . . . . . . 45
Volume. . . . . . . . . . . . . . . . . . . . . . . . . . . . 21
Headphones. . . . . . . . . . . . . . . . . . . . . . 21
W
Write . . . . . . . . . . . . . . . . . . . . . . . . . . . . . 35
G
German . . . . . . . . . . . . . . . . . . . . . . . . . . . .34
H
Hall. . . . . . . . . . . . . . . . . . . . . . . . . . . . . . . .44
Headphones . . . . . . . . . . . . . . . . . . . . . . . .21
S
Save . . . . . . . . . . . . . . . . . . . . . . . . . . . . . . .35
Scottish . . . . . . . . . . . . . . . . . . . . . . . . . . . .34
Sections. . . . . . . . . . . . . . . . . . . . . . . . . . . .11
Sets. . . . . . . . . . . . . . . . . . . . . . . . . . . . . . . .24
Program change . . . . . . . . . . . . . . . . . . .49
69
Page 70

FR-18 diatonic V-Accordion
r
70
Page 71

For EU Countries
For EU countries
V-Accordion
r
For China
For China
For C.A. US (Proposition 65)
For C.A. US (Proposition 65
WARNING
This product contains chemicals known to cause cancer, birth defects and other reproductive harm, including lead.
)
Page 72

r
602.00.0462.02 RES 849-11 FR-18 diatonic Owner's Manual - E
 Loading...