

Page 1

Installation Instructions
Real-Time Clock Module for PanelView Terminals
English............................................................................................................... page 3
Module horloge temps réel pour terminaux PanelView
Français............................................................................................................. page 7
Echtzeituhr-Modul für PanelView-Terminals
Deutsch ........................................................................................................... page 11
Modulo orologio in tempo reale per terminali PanelView
Italiano............................................................................................................. page 15
Módulo de reloj en tiempo real para terminales PanelView
Español ...........................................................................................................page 19
Publication 2711-IN038D-MU-P - September 2003
Page 2

2
Publication 2711-IN038D-MU-P - September 2003
Page 3
Installation Instructions
Real-Time Clock Module for PanelView
Terminals
(Catalog No. 2711-NB3)
The Real-Time Clock (RTC) Module contains a small lithium battery which has a life
expectancy of 7 years. The clock module must be replaced when the lithium
battery wears down.
ATTENTION
ATTENTION
Replacing the RTC Module will cause the currently loaded
application to become unusable. Before replacing the RTC
Module, backup the application. Be prepared to reload the
application after the RTC Module is replaced.
The clock module contains lithium. Do not dispose the battery in
a fire or incinerator or the clock module may explode. Follow
disposal regulations in your area for lithium battery disposal.
Replacing the Real-Time Clock
The instructions that follow describe how to replace the Real-Time Clock (RTC)
Module in PanelView 550 (Series E and F), PanelView 600, PanelView 900,
PanelView 1000 and PanelView 1400. This does not apply to PanelView 550,
PanelView 600 touch screen terminals, PanelView 600 (Series C or later), PanelView
1000 Color (Series D or later) and PanelView 1000 Grayscale (Series B or later).
IMPORTANT
If you have a PanelView 550 Series D or earlier terminal, you must
use the Catalog No. 2711-NB2 RTC module instructions.
Publication 2711-IN038D-MU-P - September 2003
Page 4
4 Real-Time Clock Module for PanelView Terminals
To replace the RTC module:
TIP
1. Turn power off to the PanelView terminal.
ATTENTION
2. Remove power cable and all communication cables.
ATTENTION
3. Place an ESD protective band on your wrist before proceeding.
4. Remove the screws that secure the back cover and remove the back cover.
TIP
Backup the currently loaded application. The application will
become unusable after the RTC is replaced.
Disconnect all power from the PanelView terminal
before replacing the RTC module. Failure to disconnect
power may result in electrical shock and/or damage to
the terminal.
To prevent damage to terminal components from
electrostatic discharge (ESD), wear an ESD protective
wrist band.
On PanelV iew 550 terminals, remo ve the lamp access
cover, disconnect the lamp cable connector, and
remove the fiber optic cable from the mounting clip.
Refer to the backlight replacement instructions as
required to perform these procedures.
5. Locate the RTC module. The module location varies slightly between
terminals but is located near the LED indicators. The RTC module has
“DALLAS Timekeeping RAM” printed on the top.
IMPORTANT
Note the orientation of the RTC module before removing. The
new module has to be installed the same way.
6. Carefully remove the old RTC module.
Publication 2711-IN038D-MU-P - September 2003
Page 5
Real-Time Clock Module for PanelView Terminals 5
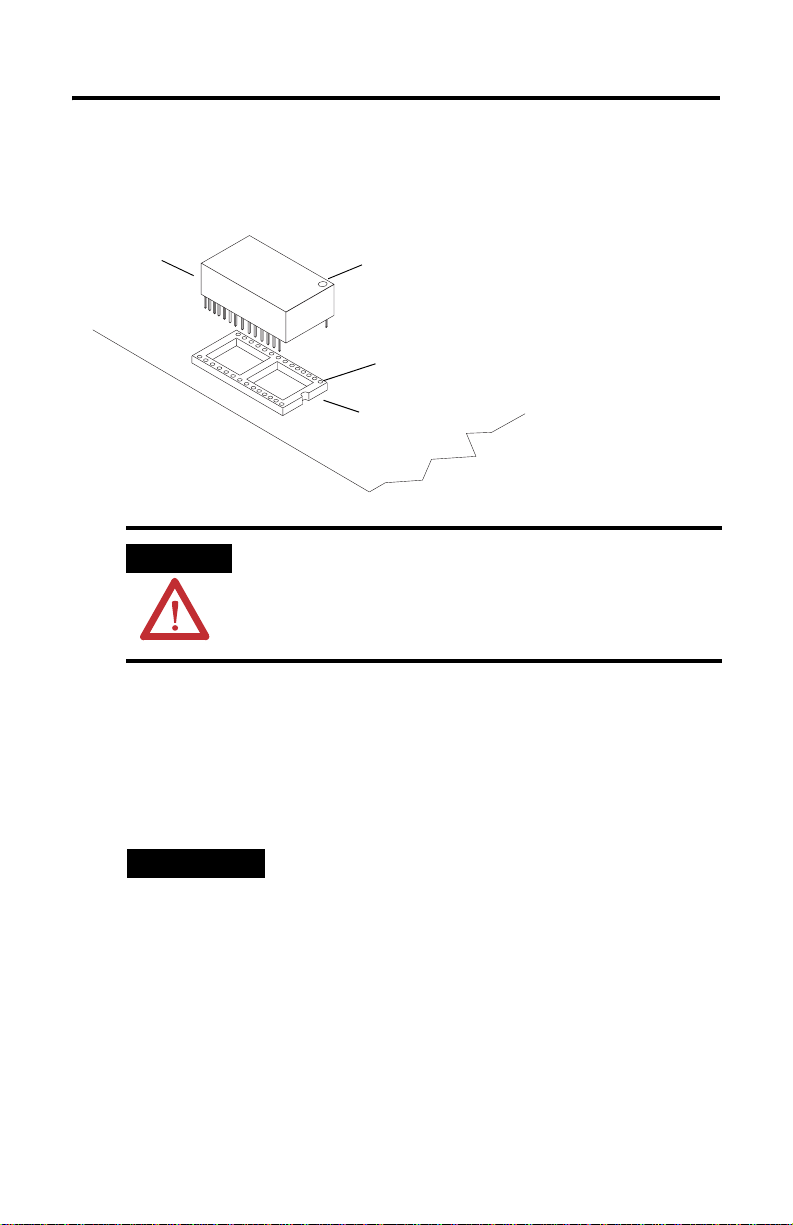
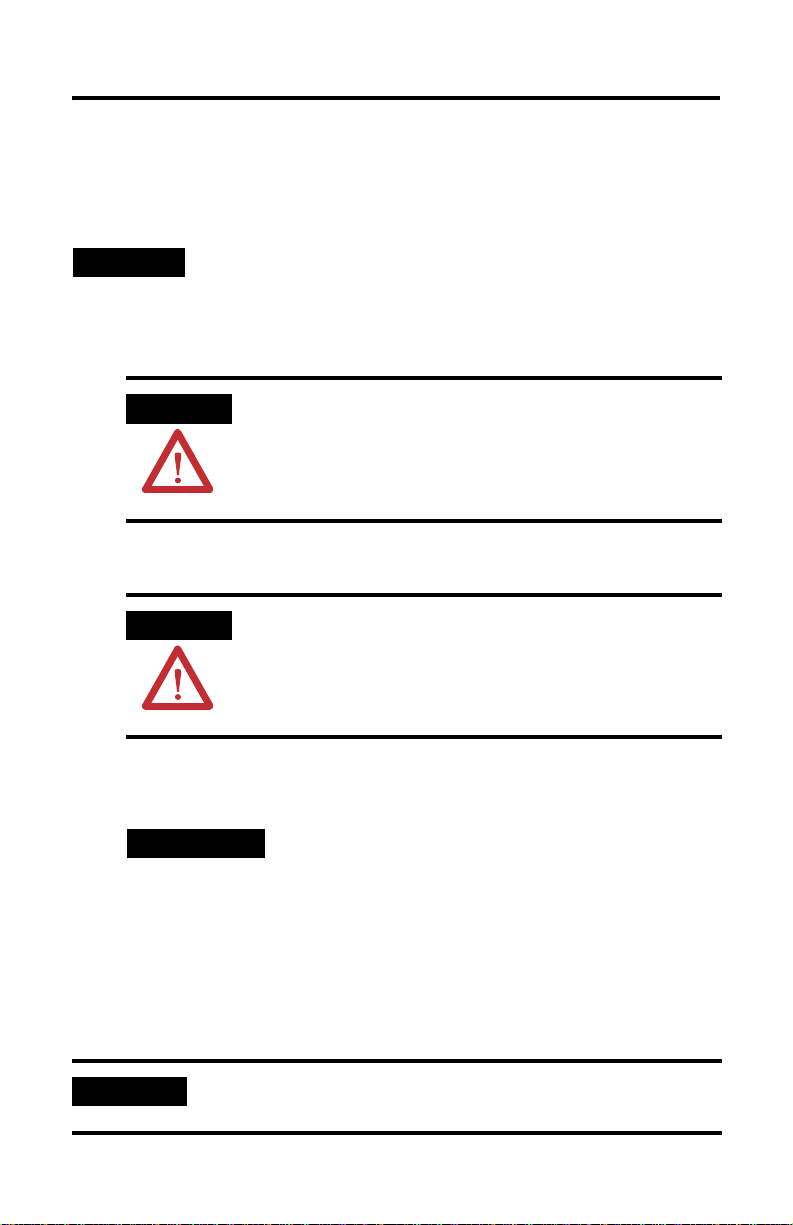
7. Install the new RTC module. Verify that pin 1 is oriented correctly (see
illustration) to avoid damage to the RTC module. The notch on the socket
must be on the same side as the marking for pin #1. Make sure you do not
bend any pins.
RTC Module
ATTENTION
8. The RTC module is held in its socket by a foam retainer pad attached to the
inside of the rear cover. Remove the old foam pad from the rear cover.
9. Remove the adhesive liner on the new retainer pad and install the new pad
in the same location as the old pad.
10. Secure the rear cover.
TIP
Pin 1 of the RTC module must be in the correct
orientation before you install the module or the module
may be damaged.
On the PanelView 550 terminals, you must guide the
Circular Mark
Indicates Pin #1
Pin #1 Socket
RTC Module
with Plastic Tie
backlight lamp cable and fiber optic bundle through
the openings in the back cover. Insert the fiber optic
bundle into the mounting clip and reconnect the lamp
cable at the connector. Refer to the backlight
replacement instructions as required to perform these
procedures.
11. Apply power to the PanelView terminal.
12. Refer to the PanelView Operator Terminal manual for instructions on how to
set the real-time clock.
Publication 2711-IN038D-MU-P - September 2003
Page 6

6 Real-Time Clock Module for PanelView Terminals
Publication 2711-IN038D-MU-P - September 2003
Page 7
Notice d’installation
Module horloge temps réel pour terminaux
PanelView
(Référence 2711-NB3)
Le module horloge temps réel (RTC) contient une petite pile au lithium dont la
durée de vie est de 7
lithium est usagée.
ans. Le module horloge doit être remplacé quand la pile au
ATTENTION
ATTENTION
Le remplacement du module RTC rend l’application chargée
inutilisable. Avant de remplacer le module RTC, faites une
sauvegarde de l’application. Soyez prêt à recharger l’application
une fois le module
Le module horloge contient du lithium. Ne jetez pas la pile dans
un feu ou un incinérateur au risque de faire exploser le module
horloge. Conformez-vous à la réglementation locale en vigueur
pour la mise au rebut des piles au lithium.
RTC remplacé.
Remplacement de l’horloge temps réel
Les instructions ci-après expliquent comment remplacer le module horloge temps
(RTC) dans les PanelView 550 (série E et F), les PanelView 600, les
réel
PanelView 900, les PanelView 1000 et les PanelView 1400. Cette notice ne
s’applique pas aux terminaux PanelView 550 et 600 à dalle tactile, aux
PanelView
ultérieure) et aux PanelView 1000 en niveaux de gris (série B ou ultérieure).
IMPORTANT
600 (série C ou ultérieure), aux PanelView 1000 couleur (série D ou
Si vous avez un terminal PanelView 550 série D ou antérieure,
vous devez utiliser la notice d’installation du module RTC
référence 2711-NB2.
Publication 2711-IN038D-MU-P - Septembre 2003
Page 8
8 Module horloge temps réel pour terminaux PanelView
Remplacement du module RTC
CONSEIL
1. Mettez le terminal PanelView hors tension.
ATTENTION
2. Retirez le câble d’alimentation et tous les câbles de communication.
ATTENTION
3. Avant de commencer, fixez un bracelet antistatique à votre poignet.
4. Otez les vis de fixation qui maintiennent le capot arrière et retirez-le.
CONSEIL
Sauvegardez l’application actuellement chargée. L’application sera
inutilisable une fois le module RTC remplacé.
Coupez toute alimentation du terminal PanelView avant
de remplacer le module RTC. En cas de non-respect de
cette consigne, vous risquez de vous électrocuter et/ou
d’endommager le terminal.
Pour éviter d’endommager les composants du terminal
par des décharges électrostatiques, portez un bracelet
antistatique.
Sur les terminaux PanelView 550, retirez le couvercle
d’accès à la lampe, débranchez le câble de la lampe du
connecteur et dégagez le câble en fibre optique du
collier de fixation. Pour ce faire, reportez-vous au
besoin aux instructions de remplacement du
rétroéclairage.
5. Localisez le module RTC. L’emplacement du module varie légèrement d’un
terminal à l’autre, mais il est situé près des voyants DEL. Le dessus du
module RTC porte la mention « DALLAS Timekeeping RAM ».
IMPORTANT
Publication 2711-IN038D-MU-P - Septembre 2003
Notez l’orientation du module RTC avant de le retirer. Le nouveau
module doit être installé de la même manière.
Page 9

Module horloge temps réel pour terminaux PanelView 9
6. Retirez l’ancien module RTC avec précaution.
7. Mettez en place le nouveau module RTC. Vérifiez que la broche 1 est
orientée correctement (voir la figure ci-dessous) pour éviter d’endommager
le module RTC. L’encoche sur le support doit être du même côté que le
repère de la broche
n° 1. Veillez à ne plier aucune broche.
Module RTC
ATTENTION
Vous devez orienter correctement la broche 1 du
module
Repère circulaire
Indiquant la broche n° 1
Prise pour la brochen° 1
Module RTC
avec support
en plastique
RTC avant d’installer le module, sinon vous
risquez d’endommager ce dernier.
8. Le module RTC est maintenu dans son support par un petit coussin en
mousse fixé à l’intérieur du capot arrière. Retirez l’ancien coussin en mousse
du capot arrière.
9. Retirez la protection adhésive du nouveau coussin et installez-le à la place
de l’ancien.
10. Fixez le capot arrière.
CONSEIL
Sur les terminaux PanelView 550, vous devez faire
passer le câble de la lampe du rétroéclairage et le câble
en fibre optique par les ouvertures du capot arrière.
Insérez le câble en fibre optique dans le collier de
fixation et rebranchez le câble de la lampe dans le
connecteur. Pour ce faire, reportez-vous au besoin aux
instructions de remplacement du rétroéclairage.
11. Mettez le terminal PanelView sous tension.
12. Pour savoir comment régler l’horloge temps réel, consultez le manuel du
terminal opérateur PanelView.
Publication 2711-IN038D-MU-P - Septembre 2003
Page 10

10 Module horloge temps réel pour terminaux PanelView
Publication 2711-IN038D-MU-P - Septembre 2003
Page 11

Installationsanleitung
Echtzeituhr-Modul für PanelView-Terminals
(Bestellnummer 2711-NB3)
Das Echtzeituhr-Modul (RTC) enthält eine kleine Lithiumbatterie mit einer
Lebensdauer von 7 Jahren. Das Uhr-Modul muss ersetzt werden, wenn die
Batterieleistung aufgebraucht ist.
ACHTUNG
ACHTUNG
Das Ersetzen des RTC-Moduls führt dazu, dass die derzeit
geladene Anwendung nicht mehr verwendet werden kann.
Sichern Sie die Anwendung daher, bevor Sie das RTC-Modul
ersetzen. Nach dem Ersetzen des RTC-Moduls muss die
Anwendung neu geladen werden.
Das Uhr-Modul enthält Lithium. Werfen Sie die Batterie nicht ins
Feuer oder in einen Verbrennungsofen, da das Uhr-Modul
explodieren könnte. Halten Sie sich bei der Entsorgung der
Lithiumbatterie an die jeweils gültigen Entsorgungsrichtlinien.
Austausch der Echtzeituhr
Im Folgenden erfahren Sie, wie Sie ein Echtzeituhr-Modul (RTC) in Terminals des
Typs PanelView 550 (Serien E und F), PanelView 600, PanelView 900,
PanelView
die Touchscreen-Terminals der Reihen PanelView 550 und PanelView 600 sowie für
PanelView 600 (Serie C oder höher), PanelView 1000 (Farbe, Serie
und PanelView 1000 (Graustufe, Serien B oder höher).
1000 und PanelView 1400 ersetzen. Die Anweisungen gelten nicht für
D oder höher)
WICHTIG
Wenn Sie über ein PanelView 550-Terminal bis zur Serie D
verfügen, verwenden Sie bitte die Anweisungen zum RTC-Modul
mit der Bestellnummer 2711-NB2 RTC.
Publikation 2711-IN038D-MU-P – September 2003
Page 12

12 Echtzeituhr-Modul für PanelView-Terminals
So ersetzen Sie das RTC-Modul:
TIPP
1. Schalten Sie das PanelView-Terminal aus.
ACHTUNG
2. Entfernen Sie das Stromkabel und sämtliche Kommunikationskabel.
ACHTUNG
3. Legen Sie zum Schutz vor elektrostatischer Entladung ein Erdungsband am
Handgelenk an, bevor Sie fortfahren.
4. Entfernen Sie die Sicherungsschrauben der hinteren Abdeckung und
nehmen Sie die hintere Abdeckung ab.
TIPP
Sichern Sie die derzeit geladene Anwendung. Die Anwendung
kann nicht mehr verwendet werden, nachdem das RTC-Modul
ersetzt wurde.
Trennen Sie das PanelView-Terminal von allen
Stromquellen, bevor Sie das RTC-Modul ersetzen. Wenn das
Terminal bei diesem Vorgang an eine Stromquelle
angeschlossen bleibt, besteht die Gefahr eines elektrischen
Stromschlags und das Terminal kann beschädigt werden.
Um Schäden durch elektrostatische Entladung an den
Terminalkomponenten zu vermeiden, tragen Sie ein
Erdungsband am Handgelenk.
Entfernen Sie bei PanelView 550-Terminals die
Lampenabdeckung, ziehen Sie den Stecker des
Lampenkabels ab, und entfernen Sie das LWL-Kabel
von der Montageklammer. Weitere Informationen zu
dieser Vorgehensweise finden Sie in den Anweisungen
zum Auswechseln der Hintergrundbeleuchtung.
5. Suchen Sie das RTC-Modul. Der Einbauort des Moduls variiert je nach
Terminal, es befindet sich jedoch immer in der Nähe der LED-Anzeige. Auf
der Oberseite des RTC-Moduls ist “DALLAS Timekeeping RAM” aufgedruckt.
WICHTIG
6. Entfernen Sie vorsichtig das alte RTC-Modul.
Publikation 2711-IN038D-MU-P – September 2003
Merken Sie sich vor dem Ausbau die Ausrichtung des
RTC-Moduls. Das neue Modul muss auf die gleiche Weise
eingebaut werden.
Page 13

Echtzeituhr-Modul für PanelView-Terminals 13
7. Installieren Sie das neue RTC-Modul. Vergewissern Sie sich, dass der Stift 1
richtig ausgerichtet ist (siehe Abbildung), um Schäden am RTC-Modul zu
vermeiden. Die Einkerbung an der Fassung muss sich auf derselben Seite
befinden wie die Markierung für den Stift
1. Geben Sie Acht, dass Sie keine
Stifte verbiegen.
RTC-Modul
ACHTUNG
Der Stift 1 des RTC-Moduls muss richtig ausgerichtet sein,
bevor Sie das Modul installieren. Andernfalls kann das
kreisförmige Markierung
kennzeichnet Stift 1
Pin 1-Fassung
RTC-Modul
mit Kunststoffverbindung
Modul beschädigt werden.
8. Das RTC-Modul wird mithilfe eines an der Innenseite der hinteren
Abdeckung angebrachten Schaumstoffkissens in der Fassung gehalten.
Entfernen Sie das alte Schaumstoffkissen von der hinteren Abdeckung.
9. Entfernen Sie die Schutzschicht vom neuen Haltekissen, und bringen Sie das
neue Kissen in derselben Position an, in der das alte angebracht war.
10. Schrauben Sie die hintere Abdeckung fest.
TIPP
Bei PanelView 550-Terminals müssen Sie das Lampenkabel und den LWL-Kabelstrang für die Hintergrundbeleuchtung durch die Öffnungen in der hinteren
Abdeckung führen. Führen Sie den LWL-Kabelstrang in
die Montageklammer ein und verbinden Sie das Lampenkabel wieder mit dem Stecker. Weitere Informationen zu
dieser Vorgehensweise finden Sie in den Anweisungen
zum Auswechseln der Hintergrundbeleuchtung.
11. Verbinden Sie das PanelView-Terminal mit einer Stromquelle.
12. Anweisungen zum Einstellen der Echtzeituhr finden Sie im Handbuch zum
PanelView-Bedienerterminal.
Publikation 2711-IN038D-MU-P – September 2003
Page 14

14 Echtzeituhr-Modul für PanelView-Terminals
Publikation 2711-IN038D-MU-P – September 2003
Page 15

Istruzioni per l'installazione
Modulo orologio in tempo reale per terminali
PanelView
(Num. di cat. 2711-NB3)
Il modulo orologio in tempo reale (RTC- Real Time Clock) contiene una piccola
batteria al litio con una durata stimata di circa 7 anni. Il modulo deve essere
sostituito quando la batteria al litio si scarica.
ATTENZIONE
ATTENZIONE
La sostituzione del modulo RTC rende inutilizzabile l'applicazione
caricata. Prima di sostituire il modulo RTC, eseguire un backup
dell'applicazione. Dopo la sostituzione del modulo RTC, ricaricare
l'applicazione.
Il modulo orologio contiene litio. Non gettare la batteria nel fuoco
o in un inceneritore in quanto il modulo può esplodere. Per lo
smaltimento delle batterie al litio attenersi alle normative vigenti.
Sostituzione dell'orologio in tempo reale
Le istruzioni che seguono descrivono come sostituire il modulo RTC nei terminali
PanelView 550 (Serie E ed F), PanelView 600, PanelView 900, PanelView 1000 e
PanelView 1400. Le istruzioni non sono valide per i terminali PanelView 550,
PanelView 600 touch screen, PanelView 600 (Serie C e seguenti), PanelView 1000
Color (Serie D e seguenti) e PanelView 1000 Grayscale (Serie B e seguenti).
IMPORTANTE
Se si dispone di un terminale PanelView 550 Serie D o
precedente, seguire le istruzioni del modulo RTC, numero di
catalogo 2711-NB2 .
Pubblicazione 2711-IN038D-IT-P - Settembre 2003
Page 16

16 Modulo orologio in tempo reale per terminali PanelView
Per sostituire un modulo RTC:
CONSIGLIO
1. Spegnere il terminale PanelView.
ATTENZIONE
2. Scollegare il cavo di alimentazione e tutti i cavi di comunicazione.
ATTENZIONE
3. Prima di procedere, indossare il braccialetto antistatico.
4. Rimuovere le viti che fissano il coperchio posteriore e rimuoverlo.
CONSIGLIO
Eseguire un backup dell'applicazione caricata. L'applicazione
sarà inutilizzabile dopo la sostituzione dell'RTC.
Scollegare l'alimentazione dal terminale PanelView
prima di sostituire il modulo RTC. In caso contrario,
esiste il pericolo di scosse elettriche e/o danni al
terminale.
Per evitare danni ai componenti del terminale causati
da scariche elettrostatiche (ESD), indossare un
braccialetto di protezione contro le ESD.
Nei terminali PanelView 550, rimuovere il coperchio di
accesso alla lampada, scollegare il connettore del cavo
della lampada e rimuovere il cavo in fibra ottica dalla
clip di montaggio. Per maggiori informazioni su queste
procedure, consultare le istruzioni per la sostituzione
ella retroilluminazione.
5. Individuare il modulo RTC. La posizione del modulo varia leggermente da
terminale a terminale, ma in genere esso è collocato vicino agli indicatori
LED. Il modulo RTC riporta la scritta “DALLAS Timekeeping RAM” stampata
sopra.
IMPORTANTE
6. Rimuovere con attenzione il vecchio modulo RTC.
Pubblicazione 2711-IN038D-IT-P - Settembre 2003
Prima di rimuovere il modulo RTC, notare il suo orientamento. Il
nuovo modulo deve essere installato nella stessa direzione.
Page 17

Modulo orologio in tempo reale per terminali PanelView 17
7. Installare il nuovo modulo RTC. Verificare che il pin 1 sia orientato
correttamente (vedere figura) per evitare danni al modulo RTC. La tacca
sullo zoccolo deve trovarsi sullo stesso lato del segno del pin numero 1.
Assicurarsi di non piegare i pin.
Modulo RTC
ATTENZIONE
Il pin 1 del modulo RTC deve essere orientato in modo
corretto prima di installare il modulo, altrimenti il
Segno circolare
indica il pin num. 1
Zoccolo pin num. 1
Modulo RTC
con base in plastica
modulo potrebbe danneggiarsi.
8. Il modulo RTC viene trattenuto nel suo zoccolo da un cuscinetto in schiuma
applicato all'interno del coperchio posteriore. Rimuovere il vecchio
cuscinetto dal coperchio.
9. Rimuovere la striscia adesiva del nuovo cuscinetto ed installarlo nella stessa
posizione di quello vecchio.
10. Chiudere e bloccare il coperchio posteriore.
CONSIGLIO
Nei terminali PanelView 550 , è necessario fare passare il
cavo della lampada di retroilluminazione ed il gruppo in
fibra ottica attraverso le aperture del coperchio
posteriore. Inserire il gruppo in fibra ottica nella clip di
montaggio e collegare il cavo della lampada al
connettore. Per maggiori informazioni su queste
procedure, consultare le istruzioni per la sostituzione
della retroilluminazione.
11. Accendere il terminale PanelView.
12. Per informazioni su come impostare l'orologio in tempo reale, consultare il
manuale Terminale operatore PanelView.
Pubblicazione 2711-IN038D-IT-P - Settembre 2003
Page 18

18 Modulo orologio in tempo reale per terminali PanelView
Pubblicazione 2711-IN038D-IT-P - Settembre 2003
Page 19

Instrucciones de instalación
Módulo de reloj en tiempo real para terminales
PanelView
(Núm. de catálogo 2711-NB3)
El módulo de reloj en tiempo real (RTC) contiene una pequeña batería de litio con
una vida útil de 7 años. Es necesario reemplazar el módulo de reloj cuando se
agote la batería de litio.
ATENCIÓN
ATENCIÓN
Cuando se reemplaza el módulo RTC, la aplicación cargada
actualmente queda inutilizable. Antes de reemplazar el módulo
RTC, haga una copia de seguridad de la aplicación. Una vez
reemplazado el módulo RTC, puede volver a cargar la aplicación.
El módulo de reloj contiene litio. No deseche la batería en el
fuego o un incinerador ya que podría provocar la explosión del
módulo de reloj. Siga la normativa sobre eliminación de residuos
de su zona para desechar baterías de litio.
Cómo reemplazar el reloj en tiempo real
Las instrucciones siguientes describen cómo se debe reemplazar el módulo de reloj
en tiempo real (RTC) en PanelView 550 (serie E y F), PanelView 600, PanelView
900, PanelView 1000 y PanelView 1400. Estas instrucciones no corresponden a
PanelView 550, los terminales de pantalla táctil PanelView 600, PanelView 600
(serie C o posterior), PanelView 1000 Color (serie D o posterior) y PanelView 1000
a escala de grises (serie B o posterior).
IMPORTANTE
Si dispone de un terminal PanelView 550 serie D o anterior, debe
utilizar las instrucciones del módulo RTC núm. de catálogo
2711-NB2.
Publicación 2711-IN038D-MU-P - Septiembre 2003
Page 20

20 Módulo de reloj en tiempo real para terminales PanelView
Para reemplazar el módulo RTC:
CONSEJO
1. Apague el terminal PanelView.
ATENCIÓN
2. Retire el cable de alimentación y todos los cables de comunicaciones.
ATENCIÓN
3. Antes de proseguir, póngase la muñequera antiestática.
4. Retire los tornillos de sujeción de la cubierta posterior y luego extráigala.
CONSEJO
Haga una copia de la aplicación cargada actualmente. Tras
reemplazar el RTC, la aplicación quedará inutilizable.
Antes de reemplazar el módulo RTC, desconecte la
alimentación eléctrica del terminal PanelView. Si no
desconecta la alimentación eléctrica, puede sufrir una
descarga eléctrica y/o el terminal puede sufrir daño.
A fin de evitar que se produzcan daños en los
componentes del terminal a consecuencia de una
descarga electroestática (ESD), use una muñequera
antiestática.
En los terminales PanelView 550, retire la cubierta de
acceso a la bombilla, desconecte el conector del cable
de la bombilla y extraiga el cable de fibra óptica de la
abrazadera de montaje. Para realizar estos
procedimientos, consulte las instrucciones para
reemplazar la luz de retroiluminación.
5. Localice el módulo RTC. Su ubicación puede variar ligeramente de un
terminal a otro, pero se encuentra cerca de los indicadores LED. El módulo
RTC tiene el texto “DALLAS Timekeeping RAM” impreso en la parte superior.
IMPORTANTE
6. Retire con precaución el módulo RTC antiguo.
Publicación 2711-IN038D-MU-P - Septiembre 2003
Antes de retirar el módulo RTC, observe cuál es su orientación. El
módulo nuevo debe instalarse del mismo modo.
Page 21

Módulo de reloj en tiempo real para terminales PanelView 21
7. Instale el módulo RTC nuevo. Compruebe que el pin 1 esté correctamente
orientado (consulte la ilustración) para evitar que se produzcan daños en el
módulo RTC. La muesca del socket debe encontrarse en el mismo lado que
la marca del pin núm. 1. Asegúrese de no doblar los pines.
Módulo RTC
ATENCIÓN
El pin 1 del módulo RTC debe tener la orientación
correcta antes de instalar el módulo o éste podría
Marca circular
Indica el pin núm. 1
Socket de pin núm. 1
Módulo RTC
con sujeción
de plástico
dañarse.
8. El módulo RTC queda fijado en el socket mediante un retén protector de
caucho esponjoso colocado en el interior de la cubierta posterior. Retire el
protector antiguo de la cubierta posterior.
9. Retire la lámina adhesiva del nuevo retén protector de caucho esponjoso e
instale el protector nuevo donde estaba el antiguo.
10. Fije la cubierta posterior.
CONSEJO
En los terminales PanelView 550, debe guiar el cable
de la bombilla de luz de retroalimentación y el
conjunto de fibra óptica a través de las aberturas de la
cubierta posterior. Inserte el conjunto de fibra óptica en
la abrazadera de montaje y vuelva a conectar el cable
de la bombilla en el conector. Para realizar estos
procedimientos, consulte las instrucciones para
reemplazar la luz de retroiluminación.
11. Conecte la alimentación eléctrica al terminal PanelView.
12. Para obtener instrucciones sobre cómo ajustar el reloj en tiempo real,
consulte el manual del terminal de operador del PanelView.
Publicación 2711-IN038D-MU-P - Septiembre 2003
Page 22

22 Módulo de reloj en tiempo real para terminales PanelView
Publicación 2711-IN038D-MU-P - Septiembre 2003
Page 23

23
Publication 2711-IN038D-MU-P - September 2003
Page 24

Rockwell Automation Support
Rockwell Automation provides technical information on the web to assist you in
using our products. At http://support.rockwellautomation.com, you can find
technical manuals, a knowledge base of FAQs, technical and application notes,
sample code and links to software service packs, and a MySupport feature that you
can customize to make the best use of these tools.
For an additional level of technical phone support for installation, configuration and
troubleshooting, we offer TechConnect Support programs. For more information,
contact your local distributor or Rockwell Automation representative, or visit
http://support.rockwellautomation.com.
Installation Assistance
If you experience a problem with a hardware module within the first 24 hours of
installation, please review the information that's contained in this manual. You can
also contact a special Customer Support number for initial help in getting your
module up and running:
United States 1.440.646.3223
Outside United
States
Monday – Friday, 8am – 5pm EST
Please contact your local Rockwell Automation representative for any
technical support issues.
New Product Satisfaction Return
Rockwell tests all of our products to ensure that they are fully operational when
shipped from the manufacturing facility. However, if your product is not
functioning and needs to be returned:
United States Contact your distributor. You must provide a Customer Support case number
Outside United
States
Publication 2711-IN038D-MU-P - September 2003 PN 41061-007-01(4)
Supersedes Publication XXXX-X.X.X - Month Year Copyright © 2003 Rockwell Automation, Inc. All rights reserved. Printed in the U.S.A.
(see phone number above to obtain one) to your distributor in order to
complete the return process.
Please contact your local Rockwell Automation representative for return
procedure.
 Loading...