

Page 1

DeviceNet Starter
Kit
1787-GEN2SKIT, -2, -3, -4, -5, -6, -7
User Manual
Page 2
Important User Information
Because of the variety of uses for the products described in this
publication, those responsible for the application and use of this
control equipment must satisfy themselves that all necessary steps
have been taken to assure that each application and use meets all
performance and safety requirements, including any applicable laws,
regulations, codes and standards.
The illustrations, charts, sample programs and layout examples shown
in this guide are intended solely for purposes of example. Since there
are many variables and requirements associated with any particular
installation, Allen-Bradley does not assume responsibility or liability
(to include intellectual property liability) for actual use based upon
the examples shown in this publication.
Allen-Bradley publication SGI-1.1, Safety Guidelines for the
Application, Installation and Maintenance of Solid-State Control
(available from your local Allen-Bradley office), describes some
important differences between solid-state equipment and
electromechanical devices that should be taken into consideration
when applying products such as those described in this publication.
Reproduction of the contents of this copyrighted publication, in whole
or part, without written permission of Rockwell Automation, is
prohibited.
Throughout this manual we use notes to make you aware of safety
considerations:
ATTENTION
Identifies information about practices or
circumstances that can lead to personal injury or
death, property damage or economic loss
!
Attention statements help you to:
• identify a hazard
• avoid a hazard
• recognize the consequences
IMPORTANT
Allen-Bradley is a trademark of Rockwell Automation
Identifies information that is critical for successful
application and understanding of the product.
Page 3

European Communities (EC) Directive Compliance
If this product has the CE mark it is approved for installation within
the European Union and EEA regions. It has been designed and
tested to meet the following directives.
EMC Directive
This product is tested to meet the Council Directive 89/336/EC
Electromagnetic Compatibility (EMC) by applying the following
standards, in whole or in part, documented in a technical
construction file:
• EN 50081-2 EMC — Generic Emission Standard, Part 2 —
Industrial Environment
• EN 50082-2 EMC — Generic Immunity Standard, Part 2 —
Industrial Environment
This product is intended for use in an industrial environment.
Low Voltage Directive
This product is tested to meet Council Directive 73/23/EEC Low
Voltage, by applying the safety requirements of EN 61131-2
Programmable Controllers, Part 2 - Equipment Requirements and
Tests. For specific information required by EN 61131-2, see the
appropriate sections in this publication, as well as the Allen-Bradley
publication Industrial Automation Wiring and Grounding Guidelines
For Noise Immunity, publication 1770-4.1.
This equipment is classified as open equipment and must be
mounted in an enclosure during operation to provide safety
protection.
Page 4

Page 5
Preface
In This Manual
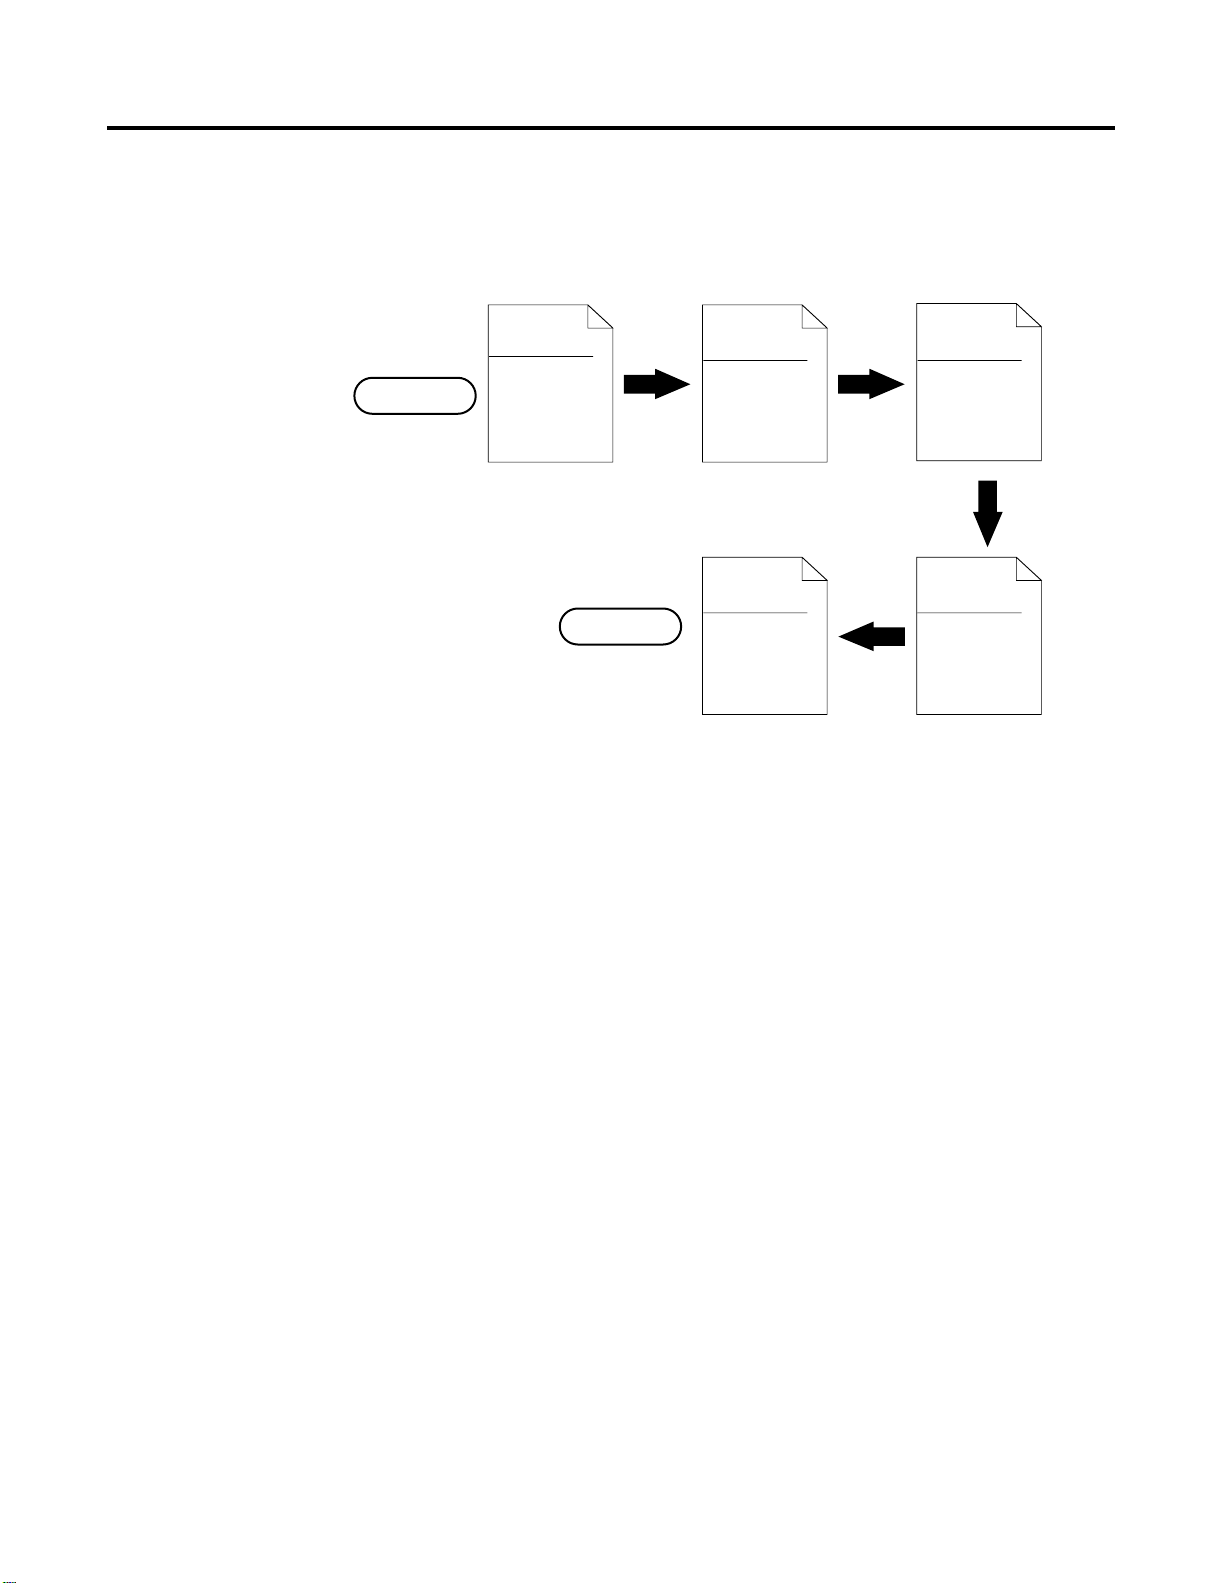
Start
The following chapters describe how to set up a simple DeviceNet
network and perform basic operations with RSNetWorx for DeviceNet:
Chapter 1
Before You
Begin
Finish
Chapter 2
Construct Your
Starter Kit
Chapter 5
RSNetWorx for
DeviceNet
Starter Kit
Demonstration
Chapter 3
Connect Devices
and Commission
Nodes
Chapter 4
Build the
Scanlist
42032
Conventions
We use the following conventions:
• Bulleted lists provide information, not procedural steps.
• Numbered lists provide sequential steps.
• Pictures of keys and/or screens represent the actual keys you
press or the screens you use.
5 Publication DNET-UM003A-EN-P - August 2000
Page 6

Preface 6
Your Questions or Comments About This Manual
If you find a problem with this manual, please notify us of it on the
enclosed Publication Problem Report (at the back of this manual).
If you have any suggestions about how we can make this manual
more useful to you, please contact us at the following address, or
complete the Publication Problem Report at the end of this manual:
Marketing Communications
Rockwell Automation
1 Allen-Bradley Drive
Mayfield Heights, OH 44124-6118
fax: (440) 646-3525
Publication DNET-UM003A-EN-P - August 2000
Page 7

Table of Contents
Preface
Before You Begin
Construct Your Starter Kit
In This Manual . . . . . . . . . . . . . . . . . . . . . . . . . . . . . . . . . . . 5
Conventions . . . . . . . . . . . . . . . . . . . . . . . . . . . . . . . . . . . . . 5
Your Questions or Comments About This Manual . . . . . . . 6
Chapter 1
What This Chapter Contains . . . . . . . . . . . . . . . . . . . . . . . 1-1
What is DeviceNet? . . . . . . . . . . . . . . . . . . . . . . . . . . . . . . 1-1
Set up Your Starter Kit. . . . . . . . . . . . . . . . . . . . . . . . . . . . 1-2
The Hardware and Software You Need for Your Starter Kit. 1-3
What You Must Know and Have Done . . . . . . . . . . . . . . . 1-6
Identify the StarterKit Components. . . . . . . . . . . . . . . . . . . 1-6
Rockwell Automation Support . . . . . . . . . . . . . . . . . . . . . 1-10
Obtain Pre-Sales Product Support . . . . . . . . . . . . . . . . . 1-10
Obtain Technical Product Support . . . . . . . . . . . . . . . . 1-10
Related Publications . . . . . . . . . . . . . . . . . . . . . . . . . . . . . 1-11
Summary and What’s Next. . . . . . . . . . . . . . . . . . . . . . . . . 1-12
Chapter 2
What This Chapter Contains . . . . . . . . . . . . . . . . . . . . . . . 2-1
What Your Network Will Look Like . . . . . . . . . . . . . . . . . . 2-1
SKITS 1, 3, and 5 . . . . . . . . . . . . . . . . . . . . . . . . . . . . . 2-2
SKITS 2, 4, and 6 . . . . . . . . . . . . . . . . . . . . . . . . . . . . . 2-3
SKIT 7
Assemble the KwikLink Media System . . . . . . . . . . . . . 2-4
Install the ArmorBlock MaXum Base . . . . . . . . . . . . . . . . . 2-9
Mount the Cable Base . . . . . . . . . . . . . . . . . . . . . . . . . 2-9
Prepare the Flat Media Cables . . . . . . . . . . . . . . . . . . . 2-9
Attach the Flat Media Cables . . . . . . . . . . . . . . . . . . . . 2-11
Attach the Seal Block . . . . . . . . . . . . . . . . . . . . . . . . . . 2-12
Connect Your Power Supply . . . . . . . . . . . . . . . . . . . . . . . 2-14
Ground Your Network . . . . . . . . . . . . . . . . . . . . . . . . . . . 2-15
Set up the 1771-SDN Scanner for SKITs 3 and 4 . . . . . . . . . 2-15
Set Node Address Switches for Channel 1 . . . . . . . . . . . 2-16
Install Your Scanner . . . . . . . . . . . . . . . . . . . . . . . . . . 2-16
Connect the 1770-KFD for SKITs 1, 3, and 5. . . . . . . . . . . . 2-17
Install the 1784-PCD for SKITs 2, 4, and 6 . . . . . . . . . . . . . 2-19
Connect the 1784-PCD to Your Network for
SKITs 2, 4, and 6 . . . . . . . . . . . . . . . . . . . . . . . . . . . . . 2-20
Remove the 1784-PCD Card . . . . . . . . . . . . . . . . . . . . . 2-22
Set up the 1784-PCIDS for SKIT7 . . . . . . . . . . . . . . . . . . . . 2-23
Install the 1784-PCIDS Card . . . . . . . . . . . . . . . . . . . . . 2-23
Install the 1784-PCIDS Drivers . . . . . . . . . . . . . . . . . . . 2-25
Connect to the Network . . . . . . . . . . . . . . . . . . . . . . . . 2-26
Install RSNetWorx for DeviceNet and RSLinx . . . . . . . . . . . 2-27
Follow these instructions:. . . . . . . . . . . . . . . . . . . . . . . 2-27
Summary and What’s Next. . . . . . . . . . . . . . . . . . . . . . . . . 2-29
i Publication DNET-UM003A-EN-P - August 2000
Page 8

Table of Contents ii
Connect Devices and Commission
Nodes
Chapter 3
What This Chapter Contains . . . . . . . . . . . . . . . . . . . . . . . 3-1
What is Node Commissioning?. . . . . . . . . . . . . . . . . . . . . . 3-1
RSNetWorx for DeviceNet Node Commission Tool . . . . . . . 3-2
RSNetWorx Communicates via RSLinx. . . . . . . . . . . . . . 3-3
Device Configuration . . . . . . . . . . . . . . . . . . . . . . . . . . 3-3
Electronic Data Sheets (EDS) . . . . . . . . . . . . . . . . . . . . 3-3
Prepare to Add Nodes. . . . . . . . . . . . . . . . . . . . . . . . . . . . 3-4
Set up Your Network . . . . . . . . . . . . . . . . . . . . . . . . . . . . 3-5
Configure Drivers . . . . . . . . . . . . . . . . . . . . . . . . . . . . . . . 3-6
Commission Nodes . . . . . . . . . . . . . . . . . . . . . . . . . . . . . . 3-13
Commission the ArmorBlock MaXum I/O Module . . . . . 3-14
Connect and Commission the CompactBlock
I/O Module . . . . . . . . . . . . . . . . . . . . . . . . . . . . . . . . . 3-17
Connect and Commission the ControlTower
Stack Light. . . . . . . . . . . . . . . . . . . . . . . . . . . . . . . . . . 3-24
Connect and Commission the Inductive
Proximity Switch . . . . . . . . . . . . . . . . . . . . . . . . . . . . . 3-26
Connect and Commission the RightSight
Photoelectric Sensor. . . . . . . . . . . . . . . . . . . . . . . . . . . 3-30
What Your Network Will Look Like in RSNetWorx . . . . . . . 3-35
If You Use the Provided .dnt File . . . . . . . . . . . . . . . . . 3-39
Edit the Properties (not required) . . . . . . . . . . . . . . . . . 3-40
Build the Scanlist
Chapter 4
What This Chapter Contains . . . . . . . . . . . . . . . . . . . . . . . 4-1
Introduction . . . . . . . . . . . . . . . . . . . . . . . . . . . . . . . . . . . 4-1
What is a Scanlist? . . . . . . . . . . . . . . . . . . . . . . . . . . . . . . . 4-2
Configure Your Scanner . . . . . . . . . . . . . . . . . . . . . . . . . . 4-3
If You Want to Use the Pre-mapped .dnt File . . . . . . . . 4-3
If You Want to Use the .dnt File You Created
in Chapter 3 . . . . . . . . . . . . . . . . . . . . . . . . . . . . . . . . 4-6
Edit I/O Parameters for the Inductive Proximity Switch . 4-13
Map Input Devices. . . . . . . . . . . . . . . . . . . . . . . . . . . . 4-17
Map Output Devices . . . . . . . . . . . . . . . . . . . . . . . . . . 4-22
Publication DNET-UM003A-EN-P - August 2000
Page 9

RSNetWorx for DeviceNet Starter
Kit Demonstration
Numeric Code Display Summary
Table of Contents iii
Chapter 5
What This Chapter Contains . . . . . . . . . . . . . . . . . . . . . . . 5-1
What Does the DeviceNet Starter Kit Demonstration Do? . . 5-1
Files to Use With Your Starter Kit . . . . . . . . . . . . . . . . . 5-2
Run the Demonstration . . . . . . . . . . . . . . . . . . . . . . . . . . . 5-3
Ladder Logic for SKITs 1 and 2 . . . . . . . . . . . . . . . . . . . . . 5-4
Ladder Logic for SKITs 3 and 4 . . . . . . . . . . . . . . . . . . . . . 5-5
Ladder Logic for SKITs 5 and 6 . . . . . . . . . . . . . . . . . . . . . 5-6
Ladder Logic for SKIT 7. . . . . . . . . . . . . . . . . . . . . . . . . . . 5-7
Monitor the I/O Data . . . . . . . . . . . . . . . . . . . . . . . . . . . . 5-8
Appendix A
Index
Publication DNET-UM003A-EN-P - August 2000
Page 10

Table of Contents iv
Notes:
Publication DNET-UM003A-EN-P - August 2000
Page 11

Before You Begin
Chapter
1
What This Chapter Contains
What is DeviceNet?
This chapter describes what you must know and do before you begin
to use your Starter Kit. The following table describes what this chapter
contains and where to find specific information.
For information about: See page:
DeviceNet 1-1
the hardware and software you need for your Starter Kit 1-3
what you need to know and do before you use your Starter Kit 1-6
the Starter Kit components 1-6
the set-up of your Starter Kit 1-2
Rockwell Automation support 1-10
related publications 1-11
DeviceNet is a low-end, open network that provides connections
between simple, primarily discrete industrial devices and controllers.
The connections can exist without the need of intervening I/O
modules or blocks.
The DeviceNet network provides an alternative way for control
engineers to connect simple devices to their control systems. The
DeviceNet network:
• supports devices that are becoming more intelligent
• facilitates increasingly precise troubleshooting that reduces
down-time, for example, a communication fault can be traced to
a single device rather than to the rack or block level as with an
I/O network
• reduces installation and startup costs and time
(compared to traditional I/O wiring, especially when devices are
spread over long distances)
1 Publication DNET-UM003A-EN-P - August 2000
Page 12

1-2 Before You Begin
Set up Your Starter Kit
Chapter 1
Chapter 2
The following table lists the steps you need to take to get your Starter
Kit constructed and operating properly. Copy the list and use it as a
reference or checklist to help you keep track of your work. Refer to
Chapters 2, 3, 4, and 5 for detailed instructions.
Table 1.A Follow these steps to set up your Starter Kit
Check Steps to follow:
r
r
r
r
r
r
1. Organize your Starter Kit contents.
2. Assemble the KwikLink Media System.
3. Attach the flat media cables to the Armor MaXum
base and attach the seal block.
4. Connect your 24V dc power supply and properly
ground the network.
5. Connect your PC to the controller interface.
a. 1770-KFD (SKITs 1, 3, & 5)
b. 1784-PCD (SKITs 2, 4, & 6)
c. 1784-PCIDS (SKIT 7)
6. Connect the controller interface to scanner.
a. 1770-KFD (SKITs 1, 3, 5)
b. 1784-PCD (SKITs 2, 4, 6)
c. 1784-PCIDS (SKIT 7)
Chapter 3
r
r
r
r
r
r
r
7. Install the demo version of RSNetWorx for
DeviceNet.
8. Start RSLinx.
9. Select the DeviceNet Driver for your controller
interface.
10. Go online and browse your network.
11. Minimize RSLinx.
12. Start RSNetworx and browse your DeviceNet
network.
13. Node Commission.
a. Set node address on the ArmorBlock MaXum to
01.
b. Attach the module to the base.
c. Connect the Standard Proximity Switch to the
ArmorBlock Maxum.
d. Browse your network.
Publication DNET-UM003A-EN-P - August 2000
Page 13

Table 1.A Follow these steps to set up your Starter Kit
Check Steps to follow:
Before You Begin 1-3
Chapter 4
Chapter 5
The Hardware and
Software You Need for Your
r
r
r
r
r
r
The following tables list the materials you need in order to follow the
procedures described in this manual.
14. Connect and node commission one device at a time.
a. CompactBlock I/O
b. ControlTower Stack Light
c. Inductive Proximity Switch
d. RightSight Photoelectric Sensor
15. Automap a scanlist, modify the scanlist and
download the configuration to the scanner or use
the .dnt file provided with your Starter Kit.
16. Edit the I/O Parameters for the Inductive Proximity
Switch to send a strobed signal vs. a cyclic signal.
17. Start RSLogix 5, 500, 5000 or other ladder logic
software.
18. Open the provided demonstration ladder logic, go
online and download the program to the processor.
19. Experiment with your network.
Starter Kit
Become familiar with which products come with the DeviceNet Starter
Kits and which you must provide. A set of “base” products are
provided for use with your DeviceNet Starter Kit. The following
products are common to all seven SKITs:
Base products provided in the SKITS: Catalog Number:
DEMO VERSION
RightSight Photoelectric Sensor 42EF-D1LDAK-F5
DeviceNet Inductive Proximity Switch 871TM-D5ED18-D5
CompactBlock I/O (8 In / 8 Out) 1791D-8B8P
ArmorBlock MaXum (4 In / 4 Out) 1792D-4BVT4D
ArmorBlock MaXum Base for Flat Media 1792D-CBFM
DeviceNet ControlTower Stack Light Base 855T-DM1BSB
Stack Light green 855T-B24DN3
Stack Light red 855T-B24DN4
Standard Proximity Switch 872C-D3NP8-D4
Termination Resistor for Flat Media (2) 1485A-T1H4
Probe Cable 1787-PCABL
Cable, micro 90 to conductor (2) 1485K-P1F5C
Sensor cable, works with ArmorBlock MaXum I/O 889D-F4ACDM-1
Cable, micro male to micro female (2) 1485K-P1F5-R5
, RSNetWorx™ for DeviceNet 9357-DNET-L3
Publication DNET-UM003A-EN-P - August 2000
Page 14
1-4 Before You Begin
Base products provided in the SKITS: Catalog Number:
KwikLink tap (IDC), open-style for power (1) 1485P-P1H4-T4
KwikLink tap (IDC), micro quick-disconnect (5) 1485P-P1H4-R5
Application disk n/a
Gym bag n/a
Pocket knife n/a
Screw driver n/a
IMPORTANT
The Starter Kit catalog numbers are 1787-GEN2KIT1,
2, 3, 4, 5, 6, and 7. For simplicity, we are referring to
the Starter Kits in this manual as SKIT1 through
SKIT7.
SKIT1 also contains:
DeviceNet Scanner for SLC 1
1747-SDN
DeviceNet Serial Interface 1 1770-KFD
1
SKIT1 is the configuration that we use throughout this manual.
SKIT2 also contains:
DeviceNet Scanner for SLC 1
1747-SDN
DeviceNet PCMCIA Interface 1 1784-PCD
1
SKIT3 also contains:
DeviceNet Scanner for PLC-5 1
1771-SDN
DeviceNet Serial Interface 1 1770-KFD
2
Publication DNET-UM003A-EN-P - August 2000
SKIT4 also contains:
DeviceNet Scanner for PLC-5 1
DeviceNet PCMCIA Interface 1 1784-PCD
SKIT5 also contains:
DeviceNet Scanner for ControlLogix 1
DeviceNet Serial Interface 1 1770-KFD
1771-SDN
1756-DNB
2
3
Page 15

SKIT6 also contains:
DeviceNet Scanner for ControlLogix 1 1756-DNB
DeviceNet PCMCIA Interface 1 1784-PCD
SKIT7 also contains:
Before You Begin 1-5
DeviceNet PCI bus interface/scanner
1
ControlPak CD-ROM
1
The 1747-SDN works with an SLC™ 5/02, 5/03, 5/04, or 5/05 processor.
2
The 1771-SDN works with the PLC-5® family processors.
3
The 1756-DNB works with ControlLogix 5550 processors.
4
The 1784- PCIDS works with PC based control systems such as SoftLogix 5.
.
You Must Provide:
1.PLC, SLC 5/02, 5/03, 5/04, 5/05 or ControlLogix processor and software
2.PLC, SLC or ControlLogix chassis power supply
3.PLC, SLC or ControlLogix interface module (for PLC programming)
4.24V dc power supply (minimum 3A) that meets DeviceNet specifications.
Refer to the DeviceNet power supply specifications in publication,
DN-6.7.2, DeviceNet Cable System Planning and Installation Manual.
compatible PC with Microsoft
5.IBM
required for PCIDS) operating system
Windows 95/98 or Windows NT (NT
1784-PCIDS
4
6.PC-to-SLC, PLC, or ControlLogix processor
1
Due to the varied possibilities, the components for your PC-to-processor communication link do not
appear in this table or the following illustrations. Your existing PC-to-processor connection is
compatible with this document’s procedures and configurations.
IMPORTANT
All SKITs are identical except for the scanner and/or
PC interface card used. This manual shows examples
1
using SKIT1 (w/SLC and 1747-SDN). Differences are
based on PLC processor technology (scanner
mapping and PLC processor programming). These
variations are described where applicable in this
manual.
Publication DNET-UM003A-EN-P - August 2000
Page 16

1-6 Before You Begin
What You Must Know and Have Done
Identify the Starter Kit Components
The descriptions in this user manual assume that you know how to
install and use all of the hardware and software that you must provide
(listed above). If you do not, read the documentation associated with
these items for guidance.
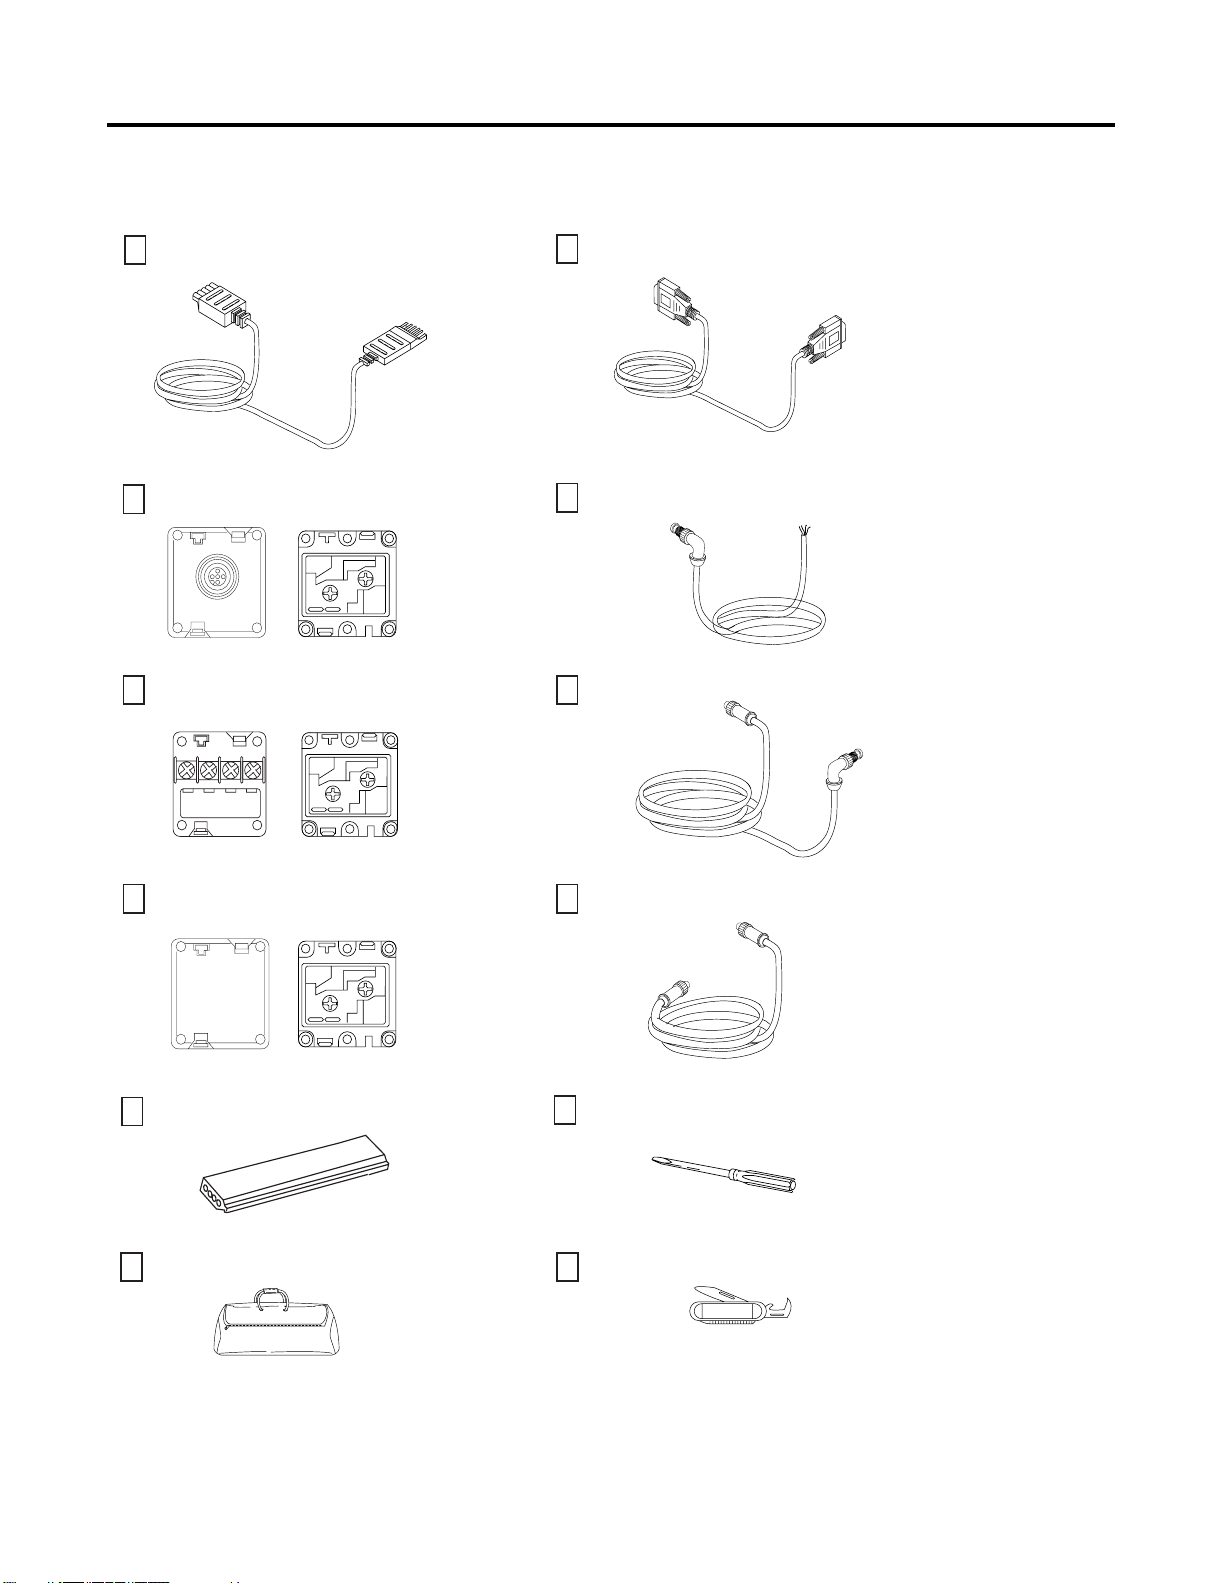
Unpack your Starter Kit and use the following illustrations to identify
all of the components shipped. Contact your local Rockwell
Automation representative if an item is missing
Publication DNET-UM003A-EN-P - August 2000
Page 17
Before You Begin 1-7
.
Probe cable
Cat. no.1787-PCABL
KwikLink tap (IDC), micro quick-disconnect (5)
Cat. no. 1485P-P1H4-R5
KwikLink tap (IDC), open-style (1)
Cat. no. 1485P-P1H4-T4
Serial cable for use with 1770-KFD in SKITs 1, 3 and 5
P/N 96881501
Cable micro 90 to conductor (2)
Cat. no. 1485K-P1F5C
Cable micro male to
micro female (2)
Cat. no.
1485K-P1F5-R5
KwikLink termination resistor (2)
Cat. no. 1485A-T1H4
KwikLink trunk cable (1m)
Gym bag
Sensor cable for use with Standard Proximity Switch
and ArmorBlock MaXum I/O Cat. no. 889D-F4ACD-M1
Screw driver
Knife
42022
Publication DNET-UM003A-EN-P - August 2000
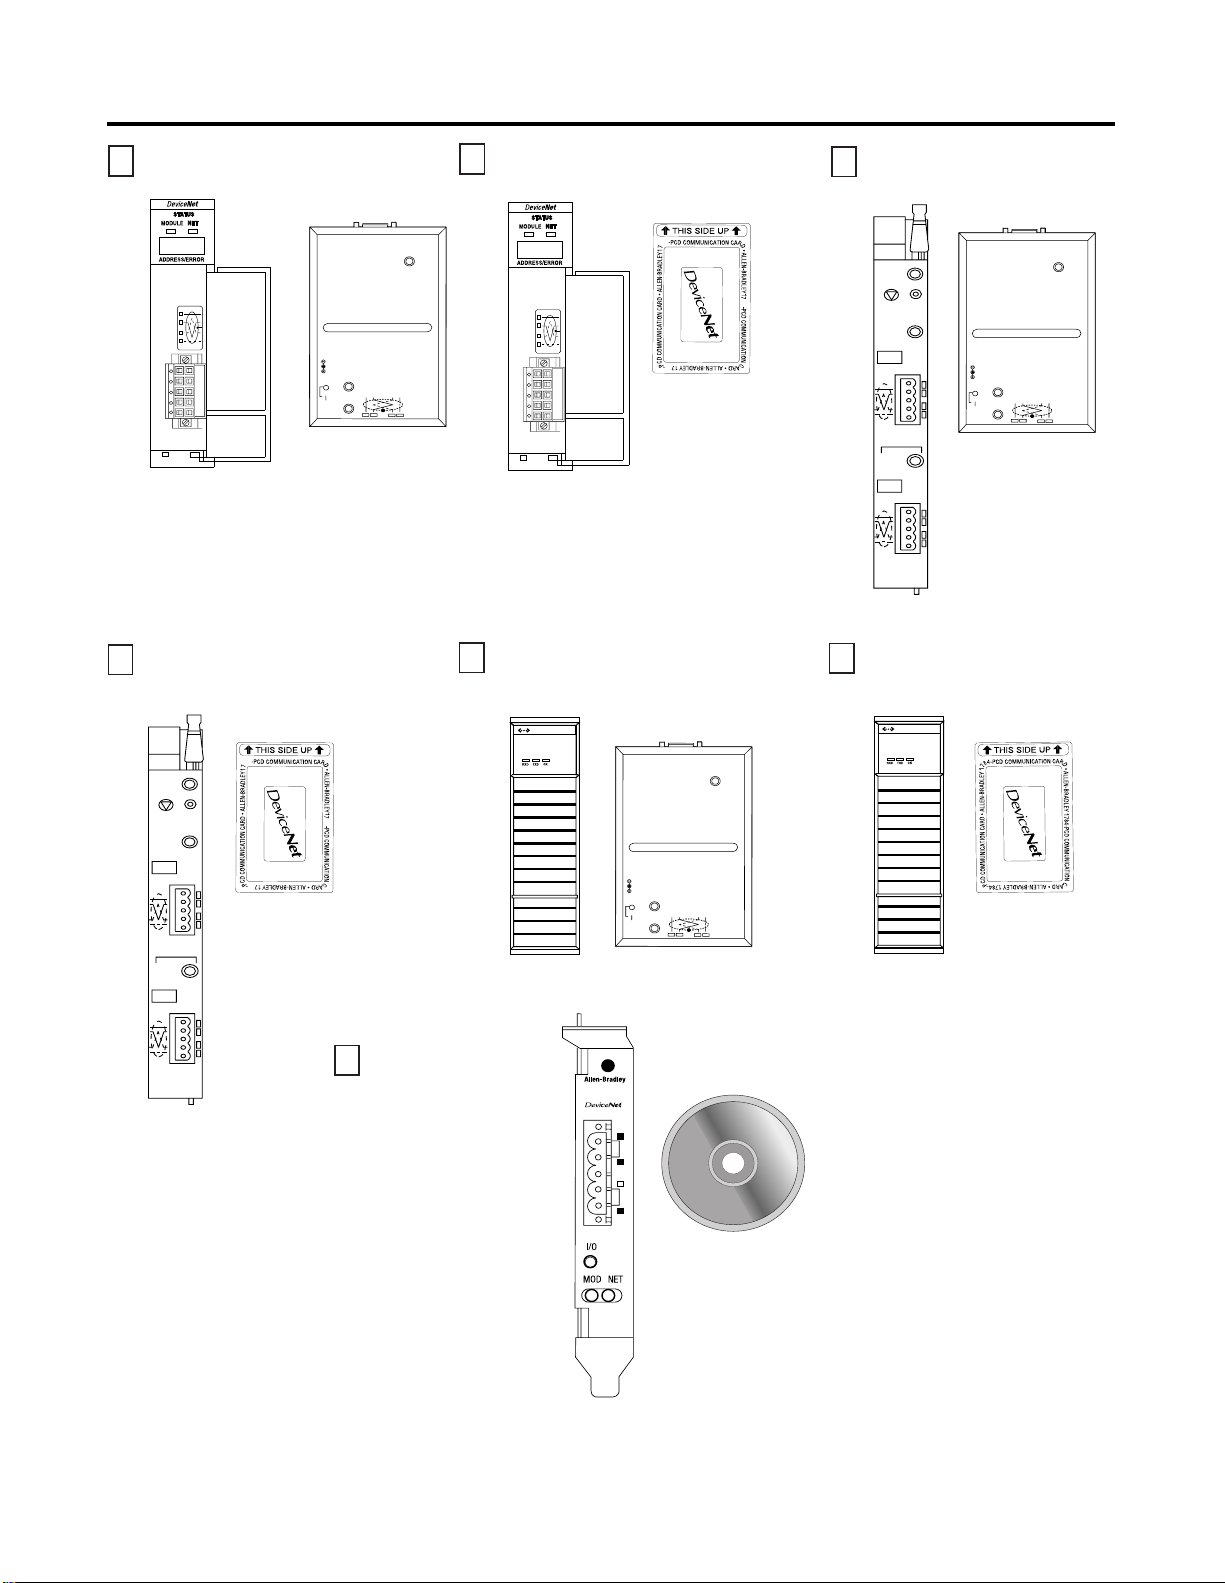
Page 18
1-8 Before You Begin
SKIT1: 1747-SDN and 1770-KFD
SKIT4: 1771-SDN and 1784-PCD
4
8
SKIT2: 1747-SDN and 1784-PCD
4
8
84
84
SKIT3: 1771-SDN and 1770-KFD
SKIT5: 1756-DNB and 1770-KFD SKIT6: 1756-DNB and 1784-PCD
DEVICENET
DEVICENET
84
84
SKIT7: 1784-PCIDS
with CDROM
S
1784-PCIDS
Scanner
42073
Publication DNET-UM003A-EN-P - August 2000
Page 19
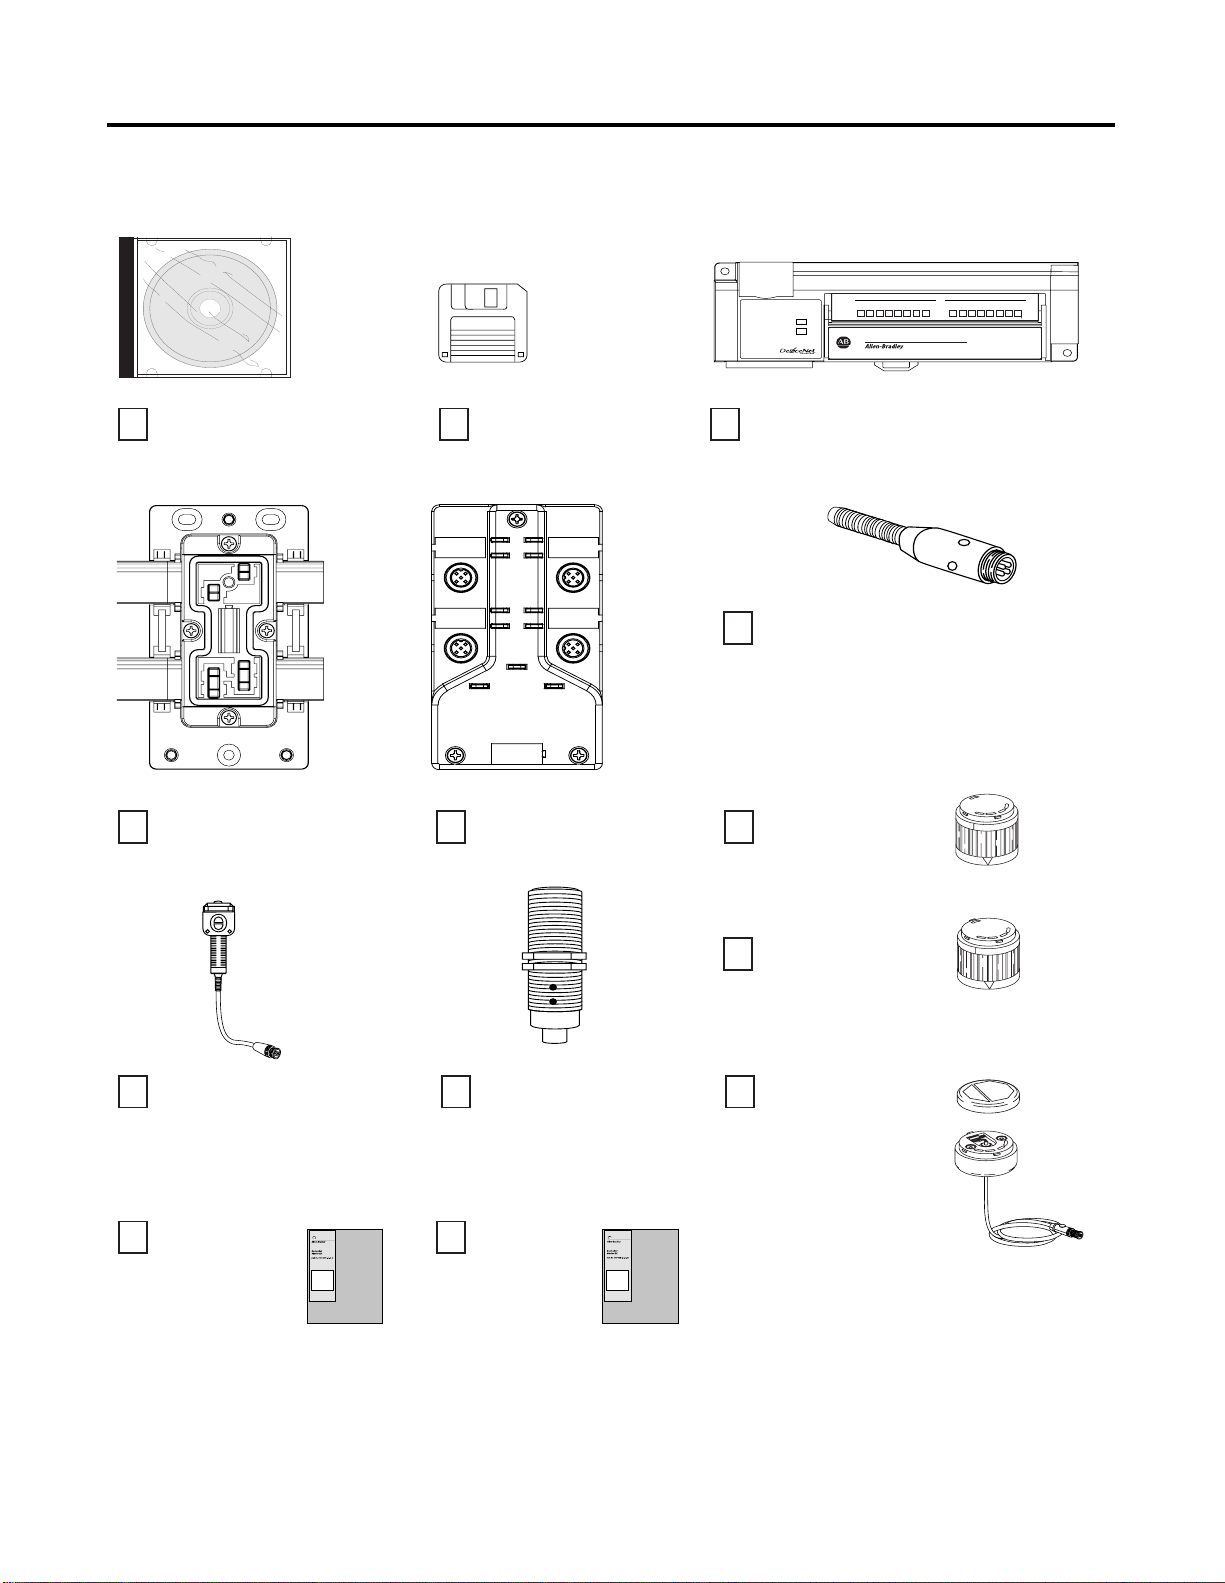
Serial #: 0123456789
(any 10 digit number)
Before You Begin 1-9
DEMO VERSION
, RSNetWorx for
DeviceNet Cat. no. 9357-DNET-L3
MaXum Base for flat media
Cat. no. 1792D-CBFM
Floppy disk containing
files for demonstration
ArmorBlock MaXum I/O
(4 In / 4 Out)
Module
Network
Status
Status
01234567 01234567
CompactBlock I/O (8 IN / 8 Out)
Cat. no. 1791D-8B8P
Standard Proximity Switch for use
with ArmorBlock MaXum I/O
Cat. no. 872C-D3NP8-D4
Stack Light, red
Cat. no. 855T-B24DN4
CompactBlock
8 INPUTS / 8 OUTPUTS • DC POWER
1791D-888P
I/O
RightSight Photoelectric Sensor
Cat. no. 42EF-D1LDAK-F5
DeviceNet Cable
Planning and
Installation Guide
Pub. no. DN-6.7.2
DeviceNet Inductive
Proximity Switch
Cat. no. 871TM-D5ED18-D5
DeviceNet Starter
Kit Pub. no.
DN-6.5.16
Stack Light, green
Cat. no. 855T-B24DN3
DeviceNet ControlTower
Stack Light base and cap
Cat. no. 855T-DM1BSB
41990
Publication DNET-UM003A-EN-P - August 2000
Page 20

1-10 Before You Begin
Rockwell Automation
Support
Rockwell Automation offers support services worldwide, with over 75
sales/support offices, over 500 authorized distributors, and 260
authorized systems integrators located throughout the United States
alone, plus Rockwell Automation representatives in every major
country around the world.
Contact your local Rockwell Automation representative for:
• sales and order support
• product technical training
• warranty support
• support service agreements
Obtain Pre-Sales Product Support
If you need to contact Rockwell Automation for pre-sales product
support, try one of the following methods:
• Call your local Rockwell Automation representative
• Network Pre-sales support line, 1.440.646.3638 (3NET)
• Pre-Sales e-mail, RACle3net@ra.rockwell.com
Obtain Technical Product Support
If you need to contact Rockwell Automation for technical assistance,
try one of the following methods:
• Call your local Rockwell Automation representative
• DeviceNet Post-Sales Technical Support, 1.440.646.5800
• Fax Back system, 1.440.646.5436 (requires a touch-tone
telephone)
• Web Links: http://www.ab.com
http://www.ab.com/mem/technotes/techmain.html
• Electronic Data Sheets: http://www.ab.com/networks/eds/
index.html
• RSNetWorx and RSLinx Software Demos and Tutorials
as a registered member, open to
Publication DNET-UM003A-EN-P - August 2000
Page 21

Before You Begin 1-11
Related Publications
The following table is a list of reference publications for the
DeviceNet network. You can access these publications on the web at
www.theautomationbookstore.com
For information about how to: Catalog Number: Publication Name: Publication Number:
plan and install a DeviceNet
cable system
select DeviceNet products DNET DeviceNet Product Selection Guide DNET-SO00IA-EN
design DeviceNet systems DNET DeviceNet System Design Guide DNET-AT001A-EN
configure the 1771-SDN scanner 1771-SDN DeviceNet Scanner Configuration Manual
configure the 1747-SDN scanner 1747-SDN DeviceNet Scanner Configuration Manual
configure the 1784-PCIDS scanner 1784-PCIDS DeviceNet Scanner Configuration Manual
install the 1784-PCIDS scanner 1784-PCIDS DeviceNet PCI Communication Interface Card
configure the 1756-DNB scanner 1756-DNB DeviceNet Scanner Installation Instructions
configure the 1784-PCD
interface card
use RSNetWorx™ for DeviceNet 9357-DNET-L3 Refer to the RSNetWorx™ online manual
configure the CompactBlock I/O
(8 In / 8 Out)
install the ArmorBlock MaXum
(4 In / 4 Out)
install the ArmorBlock MaXum Base for
flat media
use and install the termination resistors
for flat media
use the probe cables 1787-PCABL DeviceNet Cable System Planning and
use the micro 90 to conductor cables 1485K-P1F5C DeviceNet Cable System Planning and
use the sensor cable 889D-F4ACDM-1 DeviceNet Cable System Planning and
use the micro male to micro female cables 1485K-P1F5-R5 DeviceNet Cable System Planning and
use and install the KwikLink (IDC) taps,
open-style for power
use and install the KwikLink (IDC) tap,
micro quick-disconnect
DNET DeviceNet Cable System Planning and
Installation Manual
(1771-SDN)
(1747-SDN)
(1784-PCIDS)
Installation Instructions
(1756-DNB)
DeviceNet Scanner User Manual (1756-DNB)
1784-PCD
Series A and B
1791D-8B8P CompactBlock I/O for DeviceNet Modules
1792D-4BVT4D ArmorBlock MaXum 4 Input/4 Output Module
1792D-CBFM ArmorBlock MaXum I/O Cable Bases
1485A-T1H4 DeviceNet Cable System Planning and
1485P-P1H4-T4 DeviceNet Cable System Planning and
1485P-P1H4-R5 DeviceNet Cable System Planning and
DeviceNet PC Card Installation Instructions 1784-5.29
located in the Help Menu
Installation Instructions
Installation Instructions
Installation Instructions
Installation Manual
Installation Manual
Installation Manual
Installation Manual
Installation Manual
Installation Manual
Installation Manual
.
DN-6.7.2
1771-6.5.118
1747-6.5.2
1784-6.5.28
1784-5.31
1756-5.66
1756-6.5.19
N/A
1791D-5.42
1792D-5.12
1792-5.9
DN-6.7.2
DN-6.7.2
DN-6.7.2
DN-6.7.2
DN-6.7.2
DN-6.7.2
DN-6.7.2
Publication DNET-UM003A-EN-P - August 2000
Page 22

1-12 Before You Begin
Summary and What’s Next
In this chapter, we described:
• the DeviceNet network
• what you need to use this Starter Kit
• how to identify the Starter Kit components
• the steps you need to take to get your kit constructed and
operating properly
• Rockwell Automation support services
Move on to Chapter 2 to:
• construct your network
• install the ArmorBlock MaXum base and seal block
• connect your power supply
• ground your network
• connect your scanner and interface
• install RSNetWorx for DeviceNet software
Publication DNET-UM003A-EN-P - August 2000
Page 23

Construct Your Starter Kit
Chapter
2
What This Chapter Contains
Read this chapter to construct your Starter Kit, connect the scanner
and interface, install software, and properly ground the network
before setting up an online connection with your PC. The following
table describes what this chapter contains and where to find specific
information.
To: See page:
identify what your network will look like 2-1
assemble the KwikLink media system 2-4
install the ArmorBlock MaXum I/O 2-9
connect your power supply 2-14
ground your network 2-15
set up the 1771-SDN for SKITs 3 and 4 2-15
connect the 1770-KFD for SKITs 1, 3, and 5 2-17
install the 1784-PCD for SKITs 2, 4, and 6 2-19
set up the 1784-PCIDS for SKIT7 2-23
DEMO
install the
version of RSNetWorx 2-27
What Your Network Will
Refer to the illustrations below when you connect the devices your
DeviceNet network.
Look Like
1 Publication DNET-UM003A-EN-P - August 2000
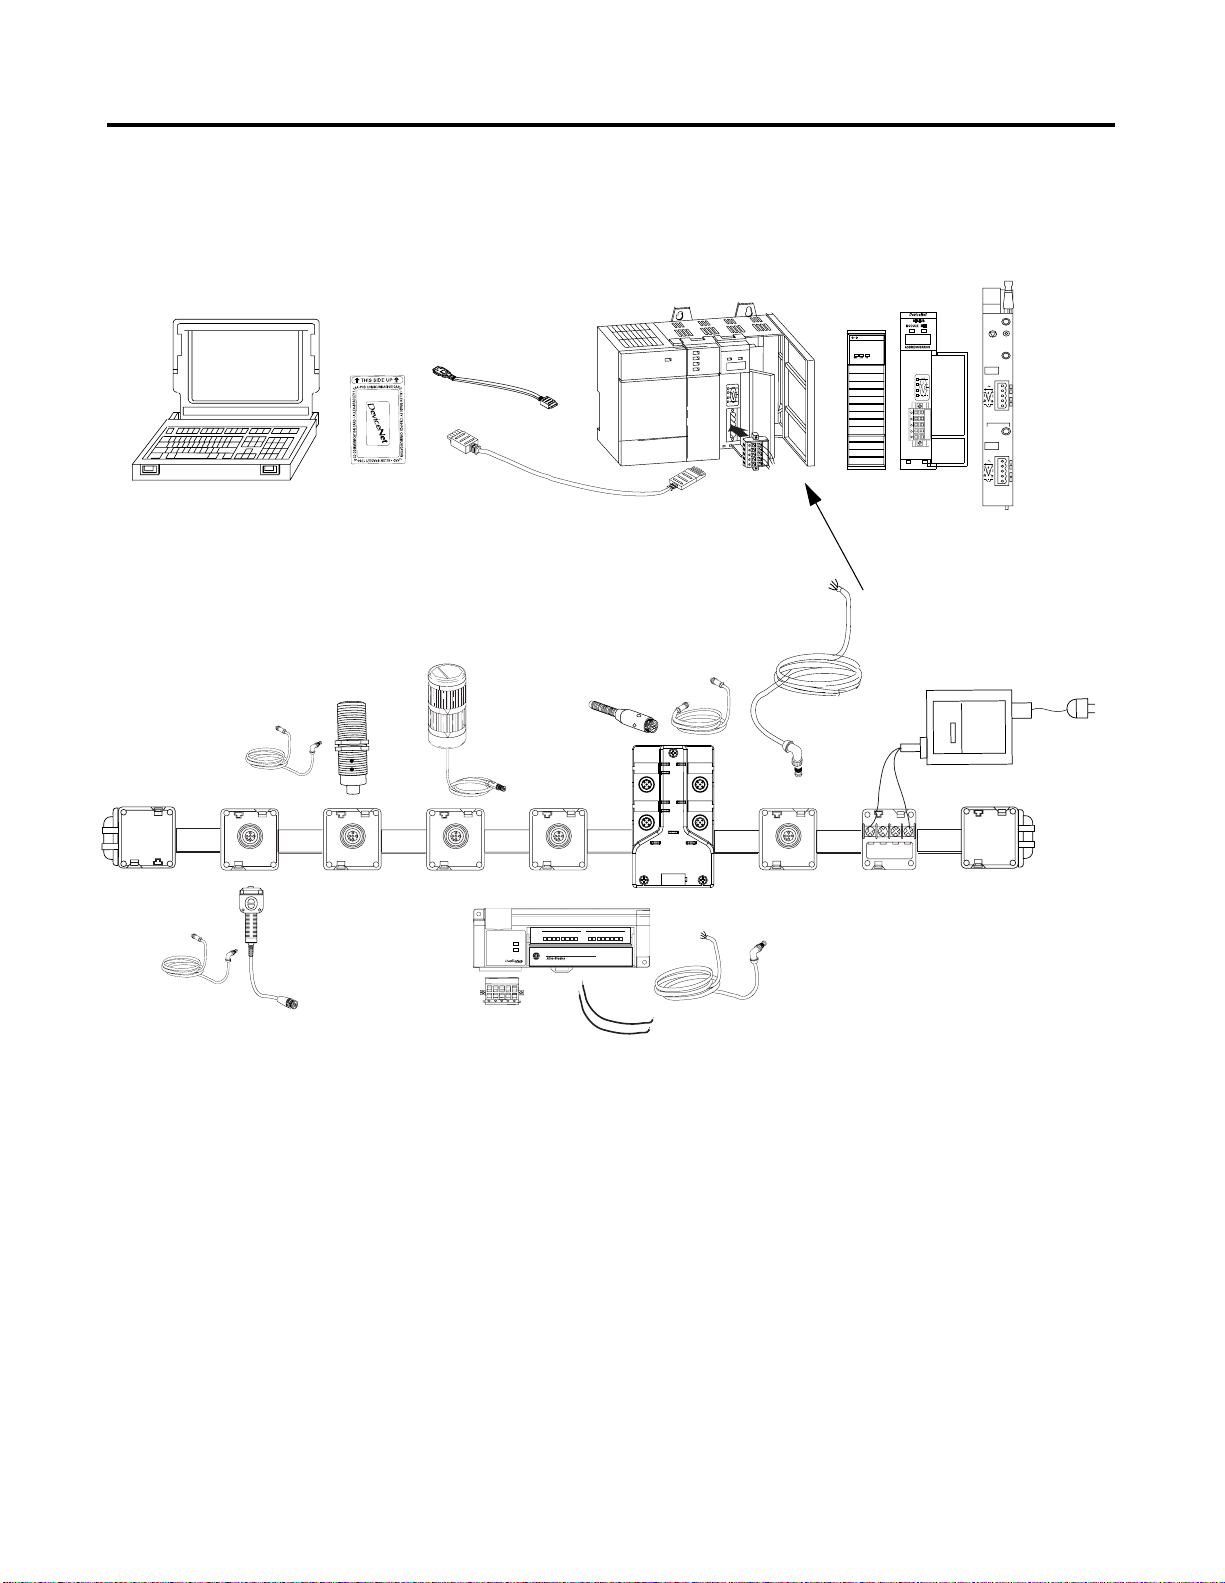
Page 24

2-2 Construct Your Starter Kit
Your c o m puter
connected with serial
cable to 1770-KFD.
Inductive Proximity
Switch with micro cable
Terminator
1770-KFD
SKITS 1, 3, and 5
Your PLC-5, SLC-500, or
ControlLogix chassis
Probe Cable
1787-PCABL
ControlTower
Stack Light
Standard Proximity Switch with
sensor cable to ArmorBlock
MaXum I/O
I-0
O-0
A-0
O-1
I-1
A-1
Auxiliary Power
Network Status
Module Status
DEVICENET
1756-DNB,
1747-SDN, or
1771-SDN
micro to conductor cable
connected to the PLUG10R
inserted into the scanner
Your power supply connected
to an open style tap (IDC)
Ter mi nat or
RightSight Photoelectric
Sensor with micro cable
Publication DNET-UM003A-EN-P - August 2000
Module
Status
Network
Status
01234567 01234567
CompactBlock I/O
8 INPUTS / 8 OUTPUTS • DC POWER
CompactBlock I/O, PLUG10R, micro to
1791D-888P
conductor cable and two 24V insulated wires
42074
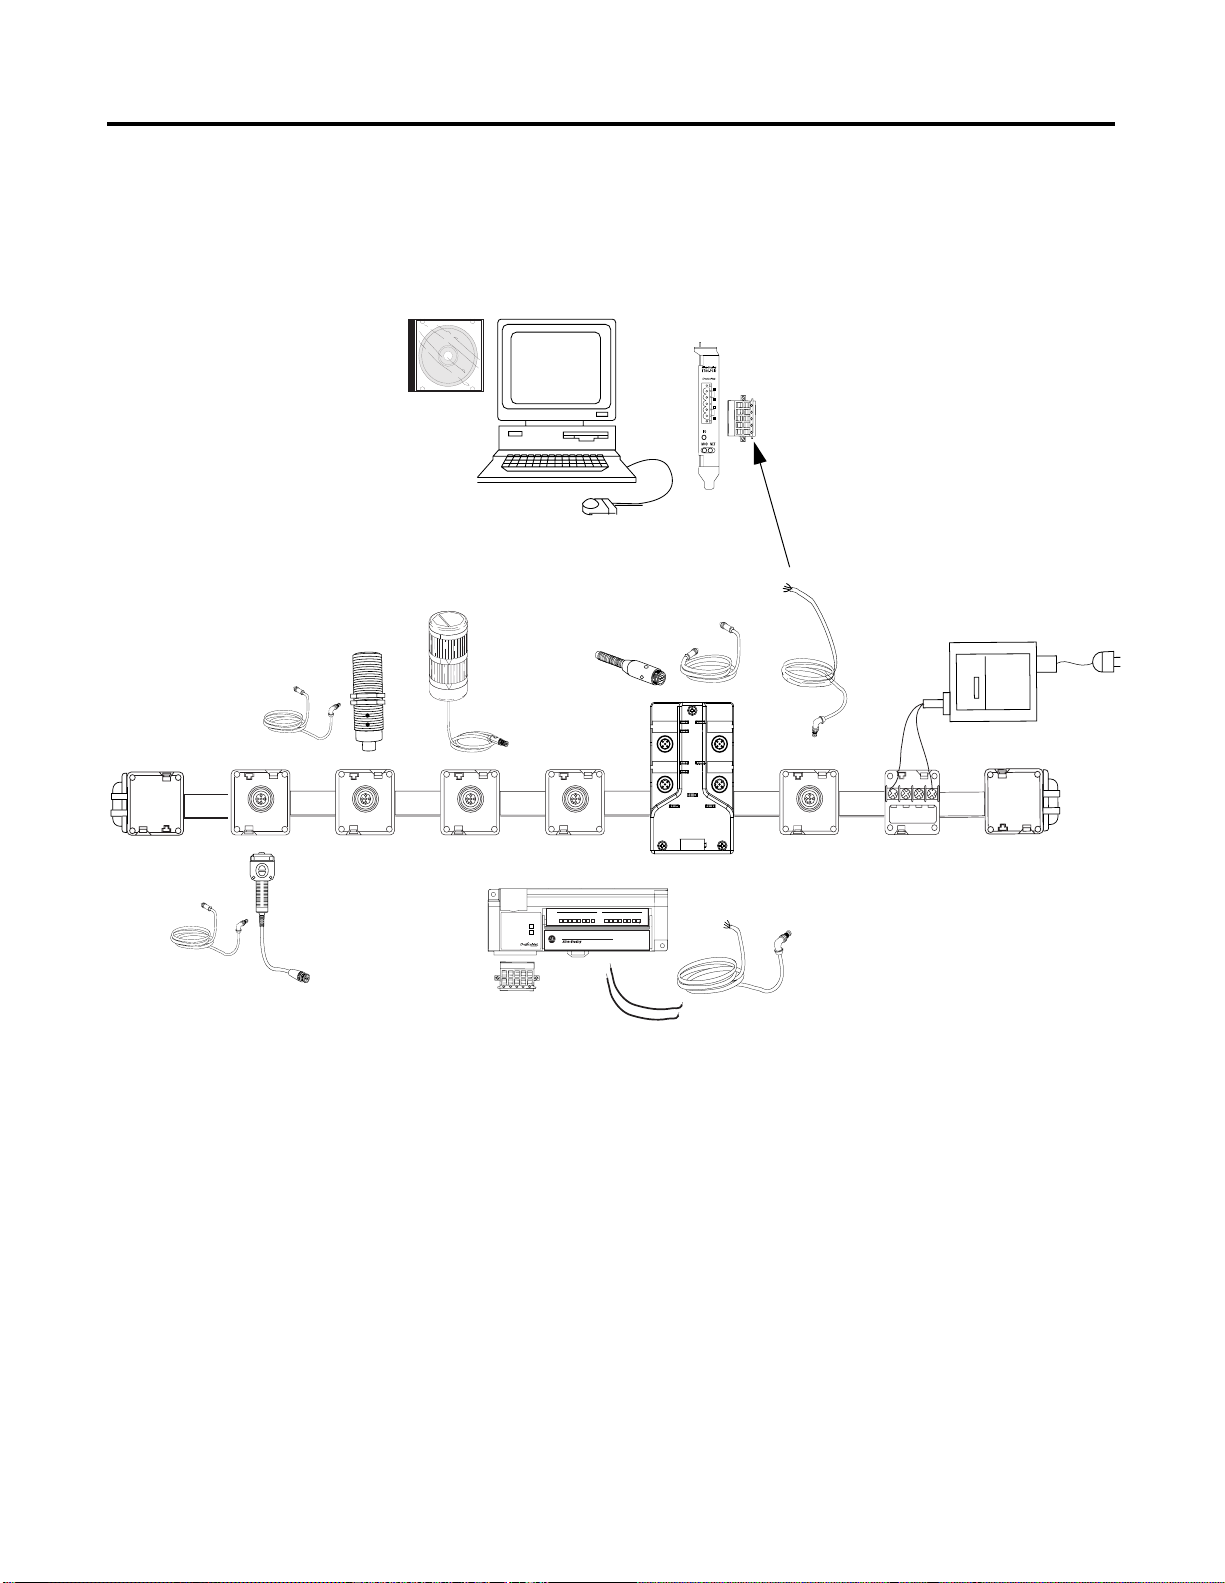
Page 25
SKITS 2, 4, and 6
Construct Your Starter Kit 2-3
Your PLC-5, SLC-500, or
ControlLogix chassis
Your laptop connected to a
1784-PCD1 and probe cable
Inductive Proximity Switch
with micro cable
Terminator
RightSight
Photoelectric Sensor
with micro cable
1784-PCD
1784-PCD1 cable
Probe cable
ControlTower
Stack Light
01234567 01234567
Module
Status
Network
Status
Standard Proximity
Switch with sensor
cable to ArmorBlock
MaXum I/O
I-0
O-0
A-0
O-1
I-1
A-1
Auxiliary Power
Network Status
Module Status
CompactBlock I/O
1791D-888P
8 INPUTS / 8 OUTPUTS • DC POWER
DEVICENET
1756-DNB,
1747-SDN, or
1771-SDN
Your power supply connected
to an open style tap
micro conductor
cable
Ter mi na tor
CompactBlock I/O, PLUG10R, micro to
conductor cable and two 24V insulated wires
42075
Publication DNET-UM003A-EN-P - August 2000
Page 26
2-4 Construct Your Starter Kit
SKIT 7
Your computer with the
1784-PCIDS
Terminator
Inductive Proximity Sensor
with micro cable
RightSight
Photoelectric Sensor
with micro cable
CDROM
Standard Proximity Sensor with sensor
cable to ArmorBlock MaXum I/O
ControlTower
Stack Light
I-0
O-0
A-0
O-1
I-1
A-1
Auxiliary Power
Network Status
Module Status
01234567 01234567
Module
Status
Network
Status
CompactBlock
8 INPUTS / 8 OUTPUTS • DC POWER
I/O
1791D-888P
PLUG10R
micro to
conductor
cable
Your power supply
connected to an open
style tap
Term inat or
CompactBlock I/O and PLUG10R with micro
conductor cable and two 24V insulated wires
42076
Publication DNET-UM003A-EN-P - August 2000
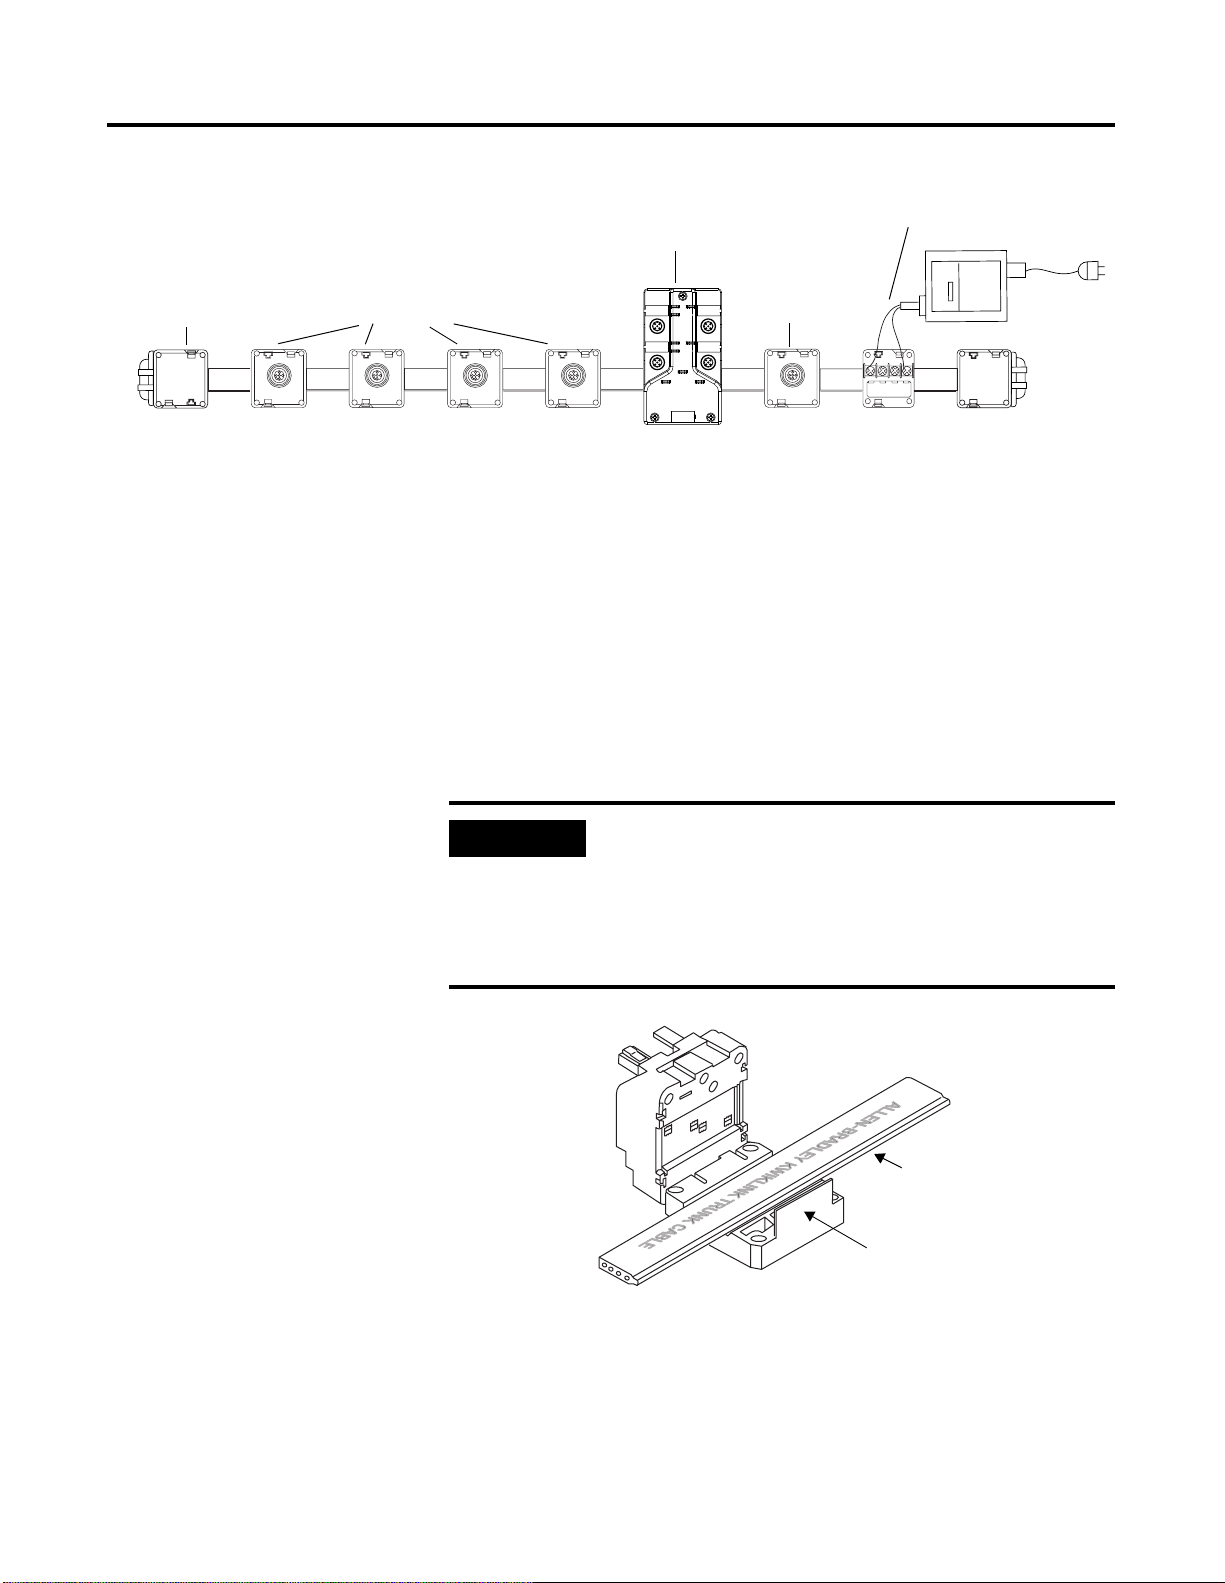
Assemble the KwikLink Media System
Follow the figure below for placement of the KwikLink IDC taps and
the ArmorBlock MaXum base and seal block (2-9 through 2-12). Also
refer to the instructions that are printed on the outside of the IDC tap
package, and to the DeviceNet Cable Planning and Installation Guide
publication no. DN-6.7.2. Don’t connect any devices yet, you’ll be
doing that in Chapter 3.
Page 27
ArmorBlock MaXum I/O
Construct Your Starter Kit 2-5
KwikLink open-style tap
connected to your power supply
KwikLink Termination
Resistor and end cap
Node 05
RightSight
Photoelectronic
Sensor
KwikLink Taps (IDC)
Node 04
Inductive
Proximity
Switch
Node 03
ControlTower
Stack Light
The KwikLink taps are also called Insulation Displacement Connectors
(IDC). Follow these steps attach the KwikLink taps (IDC) to the flat
KwikLink cable:
I-0
O-0
KwikLink Tap (IDC)
O-1
Module Status
Node 00
Scanners: 1756-DNB
1747-SDN
1771-SDN
1784-PCIDS
Node 02
Compact
Block I/O
A-0
I-1
A-1
Auxiliary Power
Network Status
Node 01
Standard Proximity
Switch connected
to Input 1
1. Lay the cable in the hinged base. Pay attention to the keyed
profile. The unkeyed edge is closer to the hinge; the keyed edge
is toward the latch.
IMPORTANT
Prior to closing the connector, be certain that the IDC
blades do not protrude from th e housing. If t he blades are
exposed, gently push them back into the base. In the
event that the blades do not retract easily (or retract only
partially), verify that the IDC screws are not partially
driven.
Termination
Resistor and
end cap
42079
Keyed edge is
toward the latch
latch
30474
Publication DNET-UM003A-EN-P - August 2000
Page 28
2-6 Construct Your Starter Kit
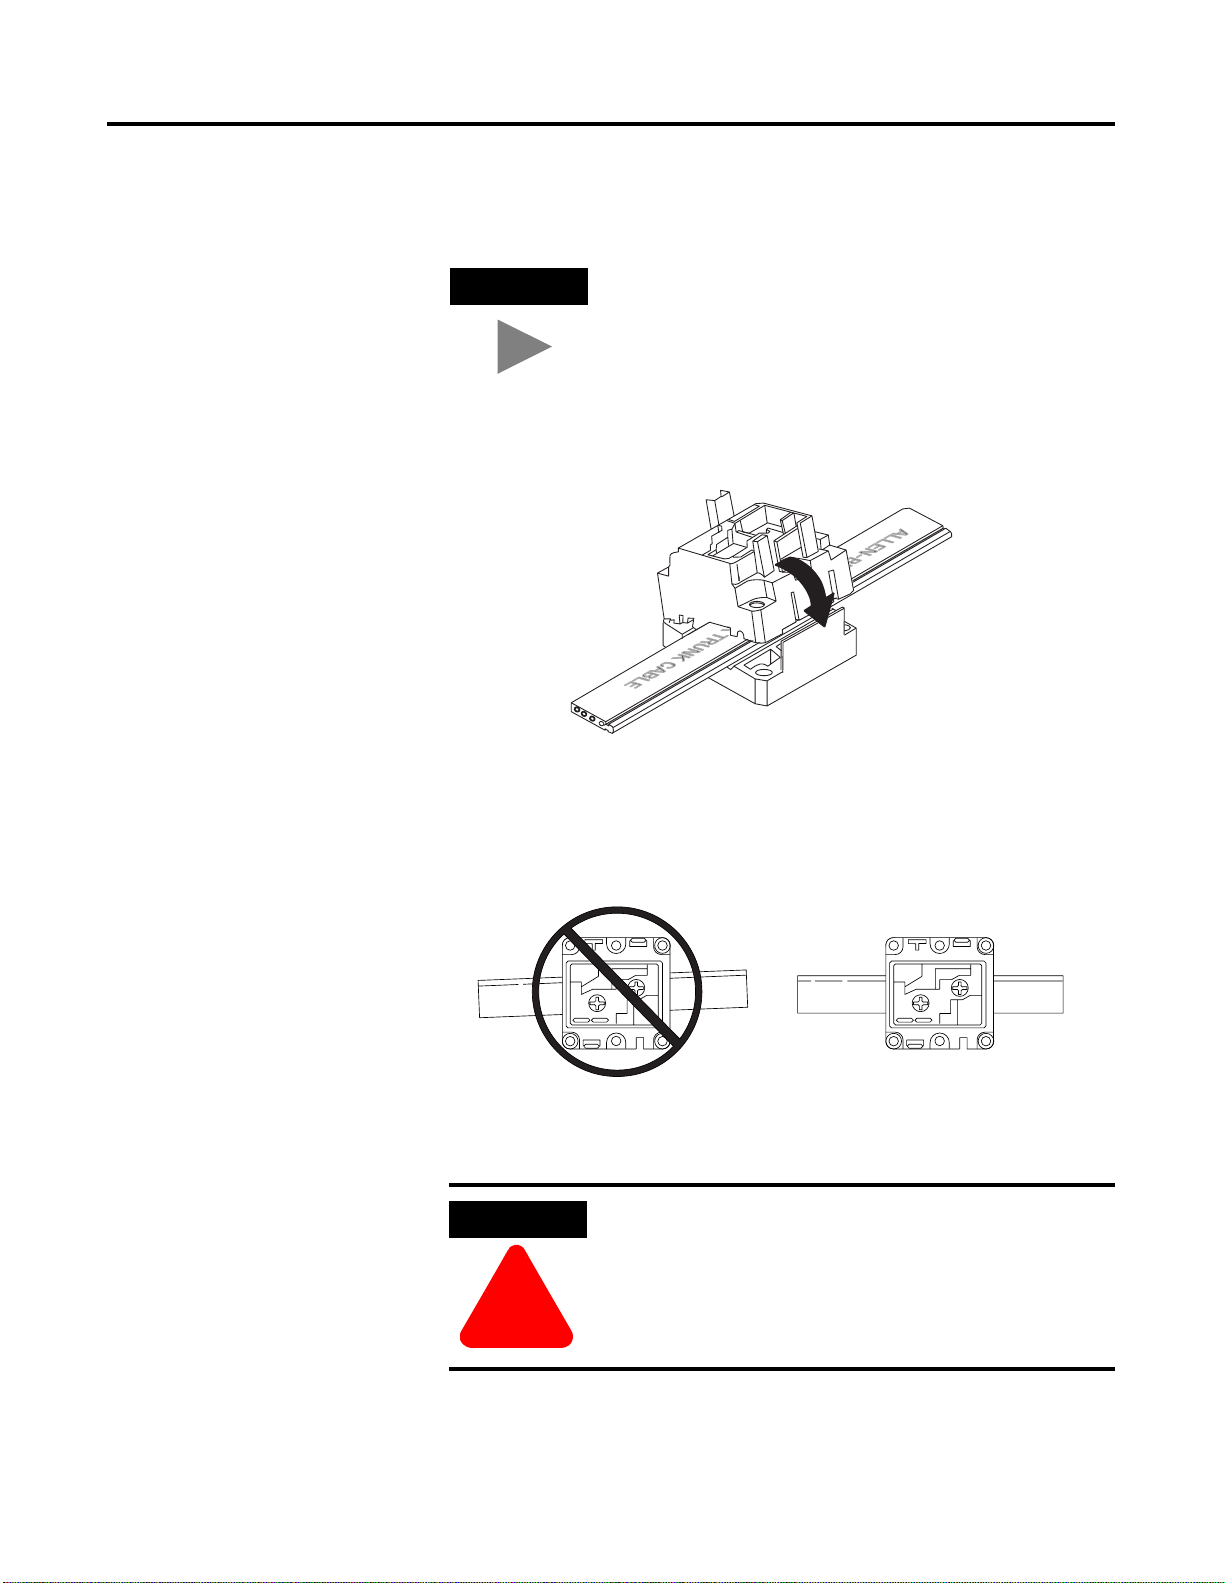
2. Close the hinged assembly, apply pressure until the latch locks into
place.
TIP
3. Be certain that the cable is straight before moving on to step
four.
The latch has two catches.The first catch loosely holds
the connector on the cable. The second catch needs more
pressure applied to close the connector tightly. If the
cable is not in the correct position, the connec tor wi ll no t
close.
30475
Publication DNET-UM003A-EN-P - August 2000
30492
.
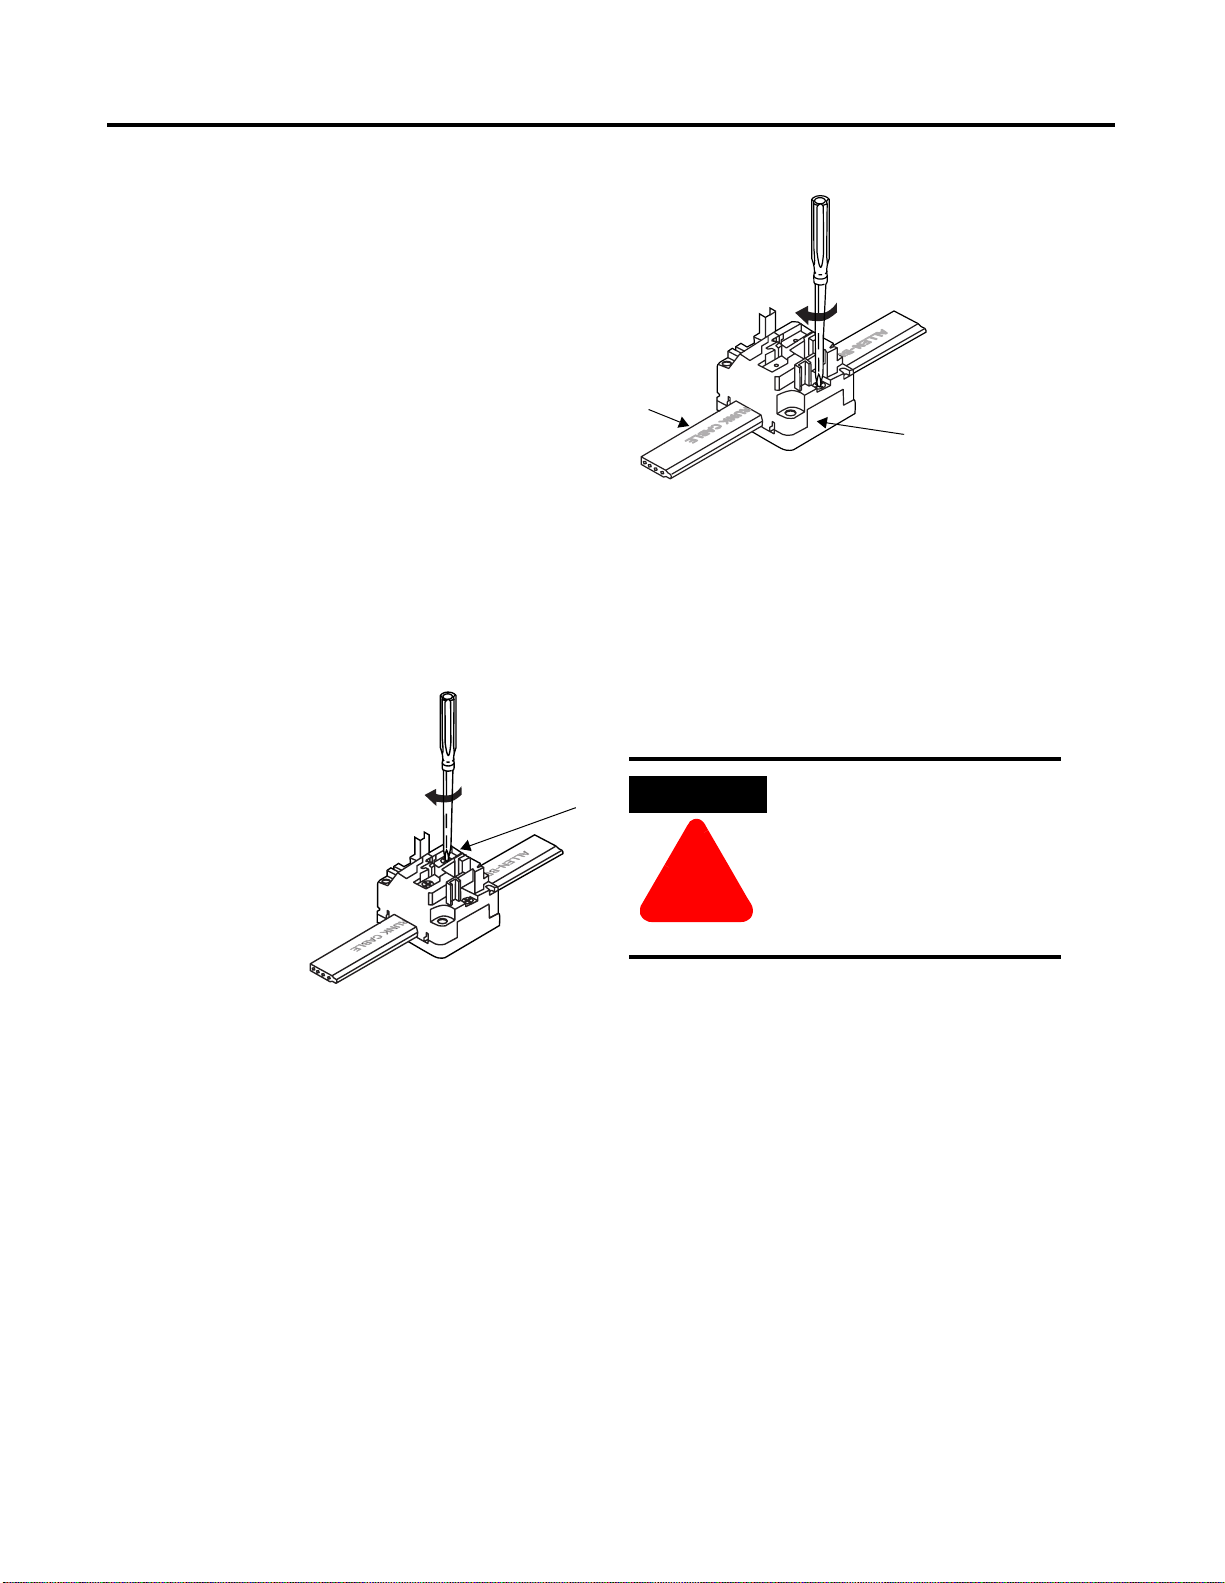
ATTENTION
Be certain that the cable is straight before tightening
the screws. Improper seating of the cable may cause
a weak seal and impede IP67 requirements.
!
4. Tighten down the two screws at the center points of the hinge and latch
sides of the base; tighten down the latch side first. Take care to avoid
stripping, ample torque should be 5.56 N (15 in-lbs).
Page 29
Construct Your Starter Kit 2-7
Check the cable
position before you
tighten the screws.
5. Drive the IDC contacts i nto the cable by tig hte ning down the two s crews
all the way into the center of the base assembly.
Tighten screws by
the latch first
30476-M
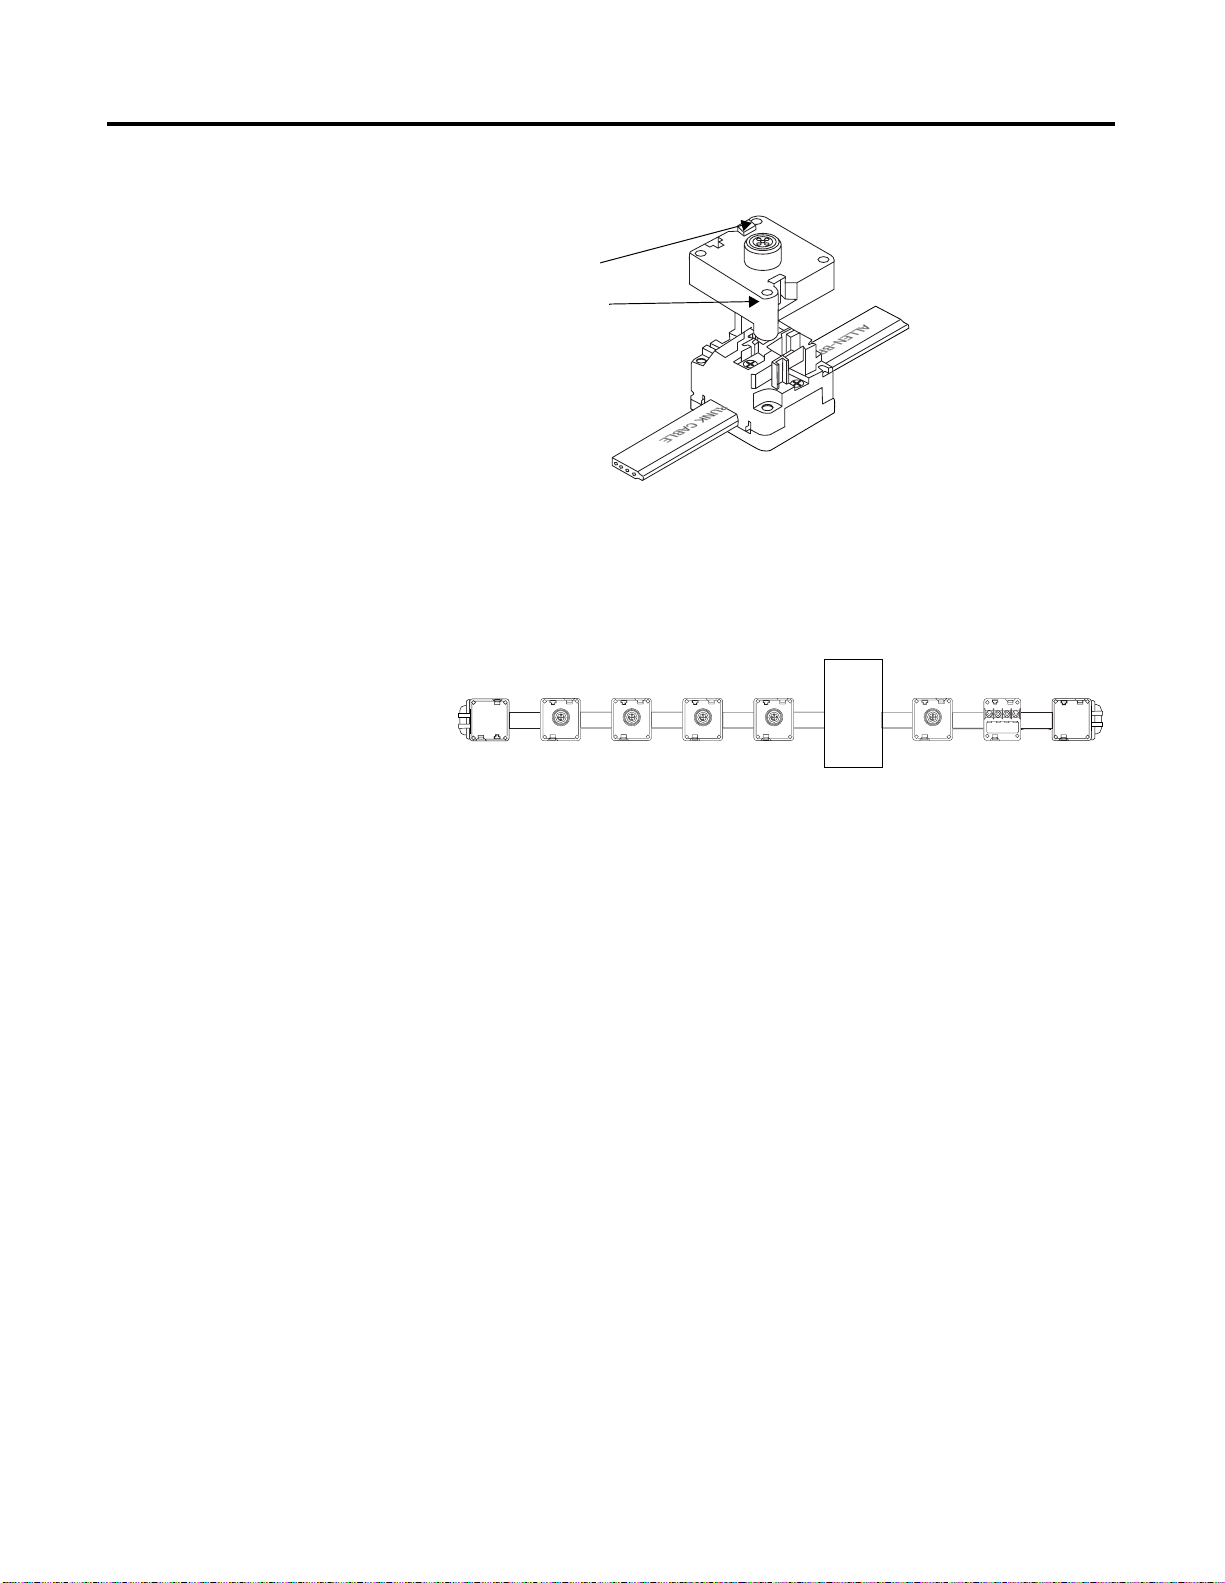
Determine the exact
placement of the connector
before you engage the IDC
contacts
ATTENTION
Once the IDC contacts are
driven into the cable, the
module should not be
removed.
!
30477
6. Line up the keyed rectangular holes of the micro/open/terminator
connection interface with the matching posts on the base and snap the
micro module into place.
7. Secure the micro/open/te rmi nat or modul e by dr iving screws through the
two remaining mounting holes.
Publication DNET-UM003A-EN-P - August 2000
Page 30
2-8 Construct Your Starter Kit
two remaining
mounting holes
30478
8. Connect all the taps, repeating steps 1 through 7. Refer to the tap
package instructions for additional information.
Your network should look like this:
Leave room
for the
ArmorBlock
MaXum
42165
Publication DNET-UM003A-EN-P - August 2000
Page 31

Construct Your Starter Kit 2-9
Install the ArmorBlock MaXum Base
Follow these instructions to install the ArmorBlock MaXum base onto the
KwikLink medi a. Refer to ins tallation instructions that c ome with the
MaXum Base for additional information.
Mount the Cable Base
For the Starter Kit example you do not need to mount the base. The
KwikLink media system will remain as a moveable table top object.
The section “Mount the Cable Base” for the Starter Kit application is
for informational purposes only.
You can mount the cable base either vertically or horizontally. Cable bases
accommodate either 4 or 8 po int Armor Block MaXum modu les. Additiona l
space allowances must be made for 8 point ArmorBlock MaXum modules.
When you
install a
cable base
with an 8
point
module,
allow for
the
additional
length.
6.85in
174mm
8 connector
module
1.90in
48.18mm
4.72in
120mm
4 connector
module
2.70in
68.5mm
1.42in
36mm
POWER
NETWORK
0.64in
16.25mm
4.21in
107mm
4,72in
120mm
0.26in
6.5mm
41536
Flat Media
0.18in
04.6mm
1.35in
34.25mm
Some network installations may subject the cables to a great deal of
flex. In this case, we recommend that you clamp the flat media cable
at a specific distance from the base. Refer to publication, DN-6.7.2,
DeviceNet Cable Planning and Installation Manual for more
information.
Prepare the Flat Media Cables
For the Starter Kit example, you only use the cable through the
network seat. The power seat will not be used. The power seat is
used to power the network and output devices. You cannot draw
power from the network to power output devices such as motors.
Publication DNET-UM003A-EN-P - August 2000
Page 32

2-10 Construct Your Starter Kit
They need to have another 24v power source. The Starter Kit power
will come from the open style tap connected to your power supply.
IMPORTANT
For the Starter Kits, you will not be using the power
option for the AmorBlock MaXum I /O. Install the caps to
seal the power opening.
IMPORTANT
Because the Starter Kit is a simple application, you
are going to power an output, such as the
CompactBlock off the DeviceNet Network. In a real
world application you would not do this. You would
use the power cable from the ArmorBlock MaXum to
power your outputs. Refer to Appendix B in
publication DN- 6.7.2, DeviceNet Cable Planning and
Installation Manual for more information.
The 1792D-CBFM cable base using a KwikLink flat media system
accommodates the following cable routings while maintaining full
IP67 sealing integrity. Determine if your network system will pass
through or end at this cable base. These options are available:
• DeviceNet and Auxiliary Power cables both pass through the
base.
• DeviceNet cable only passes through the base.
• DeviceNet passes through, and Auxiliary Power ends at this
base.
• Both DeviceNet and Auxiliary Power end at this base.
Publication DNET-UM003A-EN-P - August 2000
IMPORTANT
If you place the ArmorBlock at the end of a cable
run, you must apply end caps to cables that end at
the base prior to installation. The caps seal the
cables. The cable, with the end cap applied, must
end between the two lines on the cable base as
shown below. When Auxiliary Power is not used,
seal both openings to the power slot.
Page 33

Construct Your Starter Kit 2-11
Pass through
If a power cable
is not used, seal
the cable slots.
Place the two
end caps in the
slots to seal
them.
End cap
The cable must end between these two lines. The clear
end cap allows you to see the cable position.
Apply End cap before
you install cable.
30827-M
Attach the Flat Media Cables
The KwikLink DeviceNet flat media cable is a four-conductor cable.
It has a key design feature that allows it to “seat” in the cable base in
only one direction. Labels indicate which slot to use for the Auxiliary
Power and DeviceNet connection.
Follow these steps to attach the flat media cable:
1. Remove the end cap
covers from the storage
area. These are used to
cover the cables when
they end.
End cap storage
(2 caps are provided)
2. Apply an end cap to
cables that end at this
point in your network. End
caps cannot be applied
after the cables are
attached to the base.
POWER
NETWORK
3. Align the key features of
the cable and base. The cable
and cable slots are angled.
The cables can only be
placed in one direction.
4. Modules with outputs
require an Auxiliary Power
cable. If the module you use
has outputs, snap the black
power cable into the slot
labeled POWER. (not
applicable to the Starter Kits)
5. Snap the gray
DeviceNet cable into
the slot labeled
NETWORK.
POWER and NETWORK labels indicate Auxiliary
Power and DeviceNet cable placement.
Publication DNET-UM003A-EN-P - August 2000
30829-M
41530
Page 34

2-12 Construct Your Starter Kit
Attach the Seal Block
The seal block contains the contacts that pierce the cable. Contact
occurs when you attach the seal block to the cable base. The seal
block is designed to attach to the base in only one direction.
ATTENTION
!
To install the seal block:
The seal block has extremely sharp contacts. Do not
press against them with your fingers. You may be
injured.
Be certain to properly align the seal block when you
attach it to the base. This will maintain the integrity
of the sealed base. You can only pierce the cable
once. Once pierced, the seal block must not be
removed. This will ensure the inner conductors are
not exposed.
Avoid injury.
Pierce
contacts are
extremely
sharp.
Only one attempt to pierce the
cable is allowed.
41534
Publication DNET-UM003A-EN-P - August 2000
1. Position the seal block over the cable base.
a. Match the arrows on the bottom of the base and seal block.
b. Align the four captive screws in the seal block with the
receptacles in the base.
2. Tighten the screws with a torque of 8 to10 inch-pounds to
secure the module to the base. To assure that the cable is
pierced evenly, tighten each screw a little at a time.
IMPORTANT
There are 3 seat lines on the sides of the seal block,
under the captive screws. As the screws are
tightened these lines meet the cable base. At this
point the seal block is fully seated
Page 35

Construct Your Starter Kit 2-13
.
When the
lines of the
seal block
meet the
base it is
fully seated.
IMPORTANT
Seal Block
Match arrows
so the seal
block is in the
correct
position over
the cable
base.
Base
41533
You will set the node address and place the top of the
ArmorBlock MaXum I/O onto the seal block when you
commission the node in Chapter 3.
ATTENTION
Be certain that all screws and end caps are securely
tightened to properly seal the base against leaks and
maintain IP67 requireme nts.
!
At this point, your network should look like this:
2
3
4
1
5
0
9
6
8
7
2
3
4
1
5
0
9
6
8
7
42166
Publication DNET-UM003A-EN-P - August 2000
Page 36

2-14 Construct Your Starter Kit
Connect Your Power Supply
The power supply that you select to use with your Starter Kit must be
within the DeviceNet specifications. Refer to the DeviceNet power
supply specifications in publication, DN-6.7.2, DeviceNet Cable
System Planning and Installation Manual for detailed information.
Follow these steps to connect your power supply:
1. Connect your 24V dc power supply to the KwikLink open style
tap.
2. Connect +24V dc to red (+).
3. Connect -24V dc to black (
TIP
Both the white and blue terminals are unused.
-).
Publication DNET-UM003A-EN-P - August 2000
your
Power
Supply
red
black
42033
Page 37

Construct Your Starter Kit 2-15
Ground Your Network
You only need to ground a flat media DeviceNet network at one
location. Follow the guidelines below:
• Ground the V- conductor
at one place.
• Make this ground connection with a 25 mm (1 in.) copper braid
or a #8 AWG wire up to a maximum 3m (10 ft) in length.
• Use the same ground for the V- conductor of the cable system
and the chassis ground of the power supply. Do this at the
power supply.
Flat media
Wire
Color
white CAN_H signal
blue CAN_L signal
black V- power
red V+ power
Wire
Identity
Usage
CAN_H
CAN_L
VV+
Set up the 1771-SDN Scanner for SKITs 3 and 4
V-
power supply
V+
41677
The scanner is the DeviceNet master (controller interface)
coordinating all control data to and from all devices on the DeviceNet
network. This DeviceNet data is transferred between:
• the SLC-500 and 1747-SDN via M1/M0 and discrete I/O transfers
• PLC-5 and 1771-SDN via block transfers and discrete I/O
transfers
• PCIDS and logic engine (such as SoftLogix 5 or your own
application) via I/O Linx driver running in the NT kernel
This data is then used in the ladder logic program to do the actual
control logic.
Publication DNET-UM003A-EN-P - August 2000
Page 38

2-16 Construct Your Starter Kit
set
from
factory
set for
SKITs
3 & 4
Channel 1 DIP switches
on
12345678
Node 63
on
12345678
Node 0
8
Off=0
30292
On=1
On=1
Off=0
Set Node Address Switches for Channel 1
You must set the node address for the 1771-SDN before you install the
scanner and go online. To set the I/O chassis addressing node
switches:
1. Locate the switch bank labeled “Channel 1” on the left side of
the module.
The address range is from 0 to 63. It will be set to 63 from the
factory as shown in the illustration. All autobaud devices are
internally set to node 63. The node address for DeviceNet
Channel 1 must not conflict with the node address of any other
device on the network. For this demonstration, you want to set
the address to 0.
2. Use a ball point pen or a similar object to adjust switches 3
through 8 to match the illustration. All of the switches should be
in the off, in the 0 position.
IMPORTANT
Do not use a lead pencil because the tip can break
off and jam or short out the switch.
Install Your Scanner
IMPORTANT
After you set the dip switches and with the chassis power off, insert
the 1771-SDN scanner into slot 2 of your PLC-5 processor chassis.
IMPORTANT
Be certain to turn the power to your chassis off
before inserting your scanner.
Refer to installation instructions that come with your
1771-SDN for installation details.
Publication DNET-UM003A-EN-P - August 2000
Page 39

Construct Your Starter Kit 2-17
Connect the 1770-KFD for SKITs 1, 3, and 5
1. Connect the RS-232
cable to your computer.
Your Computer
To connect the 1770-KFD interface module:
Refer to the installation instructions that are included with your
hardware for additional information. The driver for the 1770-KFD is
included in the RSLinx software.
1. Connect the RS-232 cable from the 1770-KFD to a serial port on
your computer.
2. Connect the RS-232 cable to the 1770-KFD interface module.
2. Connect the RS-232
cable to the 1770-KFD
5. Connect the probe cable from the
1770-KFD into the PLUG10R attached to the
1771-SDN, 1747-SDN, or the 1756-DNB
located in your processor chassis.
3. Connect the
probe cable to the
1770-KFD.
DEVICENET
4. Connect the
PLUG10R to the
micro to conductor
cable.
42173
Publication DNET-UM003A-EN-P - August 2000
Page 40

2-18 Construct Your Starter Kit
3. Connect the probe cable to the 1770-KFD interface module.
ATTENTION
Do not wire the 1771-SDN Scanner Module with the
network power supply on. Wiring the module with
the network power supply on may short your
network or disrupt communication.
!
4. Connect the micro to conductor cable to the PLUG10R.
Most open-style devices ship with an open-style connector
included. These connectors are also shipped in packages of 10.
probe holes
mechanical key
Black
Blue
10-pin linear plug (open)
1787-PLUG10R
mechanical key
jack screwjack screw
Red
White
Shield or Bare
41708
probe
connection
1771-SDN,
1747-SDN, or
1756-DNB
micro to
conductor
cable
42034
Publication DNET-UM003A-EN-P - August 2000
Page 41

Construct Your Starter Kit 2-19
42103
5. Connect the other end of the probe cable to PLUG10R and
insert into the 1771-SDN, 1747-SDN, or the 1756-DNB.
Install the 1784-PCD for SKITs 2, 4, and 6
Use the 1784-PCD Installation Utility Disk that comes with the PCD to
install the PCD driver software. If the drivers are not installed, you will
not be able to select your interface in RSLinx.
IMPORTANT
You can insert or remove the card from a powered
or unpowered computer as long as the driver for the
card is already installed.
The diagrams below show a PCMCIA 2.1-compliant system. If you use
a different computer, your installation may be different. See the
installation manual for your computer if you are not using a PCMCIA
2.1-compliant system.
1. Access the PCMCIA slot.
19869
2. Grasp the card by the edges with the DeviceNet logo facing
upward and the 68-pin connector facing into the PCMCIA slot.
Publication DNET-UM003A-EN-P - August 2000
Page 42

2-20 Construct Your Starter Kit
20718-M
3. Insert the card into the PCMCIA slot and slide it in until it is
firmly seated in the connector. Some computers have an ejector
button that pops out when the card is seated in the connector.
Your laptop
4. Connect the cable to the card.
Connect the 1784-PCD to Your Network for SKITs 2, 4, and 6
Follow these steps to connect the 1784-PCD to you network:
1. Connect the 1784-PCD1
cable to the card.
1784-PCD
2. Connect the 1784-PCD1 cable to the probe cable.
20720
DEVICENET
1756-DNB,
1747-SDN, or
1771-SDN
Publication DNET-UM003A-EN-P - August 2000
3. Wire the micro to conductor cable
to the PLUG10R and insert into the
scanner.
4. Insert the probe cable into the PLUG10R.
5. Insert the PLUG10R into the scanner.
42078
Page 43

Construct Your Starter Kit 2-21
1. Locate the 1784-PCD1 cable and connect it to the PCD card installed in
your laptop computer.
2. Attach the probe cable to the other end of the 1784-PCD1 cable.
3. Connect the micro to conductor cable to the PLUG10R.
Most open-style devices ship with an open-style connector included.
These connectors are also shipped in packages of 10.
probe holes
mechanical key
Black
Blue
10-pin linear plug (open)
1787-PLUG10R
mechanical key
jack screwjack screw
Red
White
Shield or Bare
42103
41708
4. Connect the other end of the probe cable to PLUG10R and insert into
the 1771-SDN, 1747-SDN, or the 1756-DNB.
Publication DNET-UM003A-EN-P - August 2000
Page 44

2-22 Construct Your Starter Kit
probe
connection
1771-SDN,
1747-SDN, or
1756-DNB
micro to
conductor
cable
42034
IMPORTANT
Be certain to install the required drivers for your
1784-PCD or RSLinx will not know to look for the
hardware when you go online with your network.
Refer to your 1784-PCD documentation for details.
The 1784-PCD is now a part of your network.
Remove the 1784-PCD Card
If you want to remove the card on most computers, you press the
release button and remove the card from the slot. If this is not
applicable to your computer, follow the instructions specified in the
card’s user manual
Publication DNET-UM003A-EN-P - August 2000
20722-M
Page 45

Construct Your Starter Kit 2-23
Set up the 1784-PCIDS for SKIT7
The 1784-PCIDS is part of the I/OLinx family of real-time hardware
drivers for Allen-Bradley NetLinx scanner modules. The 1784-PCIDS
communication interface card, with appropriate software, is a
peripheral component interconnect (PCI) open-bus interface card that
provides DeviceNet configuration and I/O scanner capabilities. The
IOLinx Application Programming Interface (API) lets software-based
control applications read and write I/O data in real-time to PC
hardware and scanners.
Install the 1784-PCIDS Card
IMPORTANT
Be certain that you know how to:
• install hardware in your computer
• configure the computer’s options before you
install the 1784-PCIDS
Consult your computer’s documentation for specific
information.
You need a Phillips-head or a flat-head screwdriver, depending on
your system.
To install the card:
1. Gain access to the computer’s expansion slots.
2. Insert the card into an open PCI slot in the computer
Publication DNET-UM003A-EN-P - August 2000
Page 46

2-24 Construct Your Starter Kit
.
TIP
The 1784-PCIDS card is 4.2” (10.7 cm) high and 4.721” (12
cm) long.
´
FP
30138-M
´
FP
Access the computer’s expansion slots
To install the 1784-PCIDS card, you must access the computer’s
expansion slots. Refer to your computer’s user guide for instructions
on how to:
1. Turn off your computer.
2. Remove the computer’s cover.
3. Select a vacant PCI expansion slot.
4. Remove the slot’s expansion cover by loosening the screw on
the back (rear bracket) of the computer.
Insert the Card
To insert the card inside the computer:
1. Follow the card handling instructions included with your card.
2. Insert the 1784-PCIDS card into the edge connector and tighten
the expansion slot screw.
3. Turn on the computer to make sure it powers up correctly.
4. Replace the CPU cover (when computer comes up correctly).
Publication DNET-UM003A-EN-P - August 2000
Page 47

Construct Your Starter Kit 2-25
Install the 1784-PCIDS Drivers
Follow these steps to install the PCID(S) drivers:
1. Insert the CD in the CD-ROM drive.
IMPORTANT
TIP
Exit all Windows programs before you run this Setup
program.
The CD-ROM has the Windows Autorun loaded.
Once the CD is inserted into the CD-ROM drive, if
you have Autorun configured, the installation will
automatically start at the first setup screen.
If Autorun is configured, go to step 5.
If Autorun is not configured:
1. From the Start menu, choose Run.
You see the Run pop-up window.
2. Type d:\setup (if it doesn’t appear automatically), where d is
your CDROM drive letter.
3. Click OK.
You see the progress bar, followed by the welcome screen.
If you want to: click on:
continue with this Setup Next
You see “Enter name and
company.”
cancel Setup (because
you have not exited
other Windows
programs)
Cancel
Close those programs then run
Setup again.
4. Enter your name and company.
5. Click Next.
Publication DNET-UM003A-EN-P - August 2000
Page 48

2-26 Construct Your Starter Kit
You see the “Choose Destination Location” screen.
If you want to: click on:
install software in this directory
C:\Program Files\Rockwell
Automation\IOLinx\DeviceNet
install software in a different
directory
exit Setup Cancel
Next
Browse and select the
directory
6. Choose a destination location.
You see the Setup progress bar, followed by the “Setup
Complete” screen.
7. Click Finish to complete Setup.
Connect to the Network
This figure and table show the necessary network connections you
make to the card. The label (on the retaining bracket) is color-coded
for easy wiring.
Publication DNET-UM003A-EN-P - August 2000
30139-M
Page 49

Construct Your Starter Kit 2-27
pin number: wire color: abbreviation: description:
1 black V- 24V dc power return
2 blue CAN_L data low - data line
3 bare DRAIN shield
4 white CAN_H data high - data line
5 red V+ +24V dc
8. Wire the 90° micro male to conductor cable to the PLUG10R and
insert into the 1784-PCIDS card.
Install RSNetWorx for DeviceNet and RSLinx
42120
9. Connect the 90
Your 1784-PCIDS scanner is now connected to your network.
RSNetWorx for DeviceNet software configures parameters of
DeviceNet devices from multiple vendors and helps you troubleshoot
the network and performs network diagnostics. This demo version of
RSNetWorx for DeviceNet
seven nodes on your network. Refer to Chapter 3 for more
information on the node commission limits.
° micro male end of the cable to a KwikLink tap.
only allows you to commission up to
Follow these instructions:
1. Start Windows, if it does not start automatically.
We recommend that you quit all Windows application programs
before you install RSNetWorx for DeviceNet. If Autorun is
Publication DNET-UM003A-EN-P - August 2000
Page 50

2-28 Construct Your Starter Kit
configured on your computer, the installation screen appears
automatically.
2. Insert the RSNetWorx CD into the CD drive and run the file
autorun.exe.
You see:
3. Select Install RSNetWorx and follow the instructions.
4. Select Install RSLinx and follow the instructions.
IMPORTANT
TIP
When prompted for a serial number use, 9876543210
or any 10 digit number.
Descriptions on how to navigate through the
software as well as the software screens are
contained in Help. Refer to the online manuals
“Getting Results” and “Quick Start” for information
on navigation. They are located on the Help menu.
Publication DNET-UM003A-EN-P - August 2000
Page 51

Construct Your Starter Kit 2-29
Summary and What’s Next
In this chapter, you:
• constructed your network
• installed the ArmorBlock MaXum base and seal block
• connected your power supply
• grounded your network
• connected your scanner and interface
• installed RSNetWorx for DeviceNet software
• Move on to Chapter 3 to:
• select your scanner in RSLinx
• go online and browse your network
• connect the devices to your network
• commission and assign node addresses for your devices
Publication DNET-UM003A-EN-P - August 2000
Page 52

2-30 Construct Your Starter Kit
Notes:
Publication DNET-UM003A-EN-P - August 2000
Page 53

Chapter
Connect Devices and Commission Nodes
3
What This Chapter Contains
What is Node Commissioning?
Read this chapter to connect the devices for your Starter Kit and
perform node commissioning on the devices. The following table
describes what this chapter contains and where to find specific
information.
To: See page:
read about how to node commission 3-2
edit node addresses 3-4
set up your network 3-5
connect and commission the ArmorBlock MaXum I/O with the
Standard Proximity Switch
connect and commission the CompactBlock I/O 3-17
connect and commission the ControlTower Stack Light 3-24
connect and commission the Inductive Proximity Switch 3-26
connect and commission the RightSight Photoelectric Sensor 3-30
see what your network should look like in RSNetWorx 3-35
Before you can add any device to a DeviceNet network, it must be
commissioned via hardware or software. This means that a node
address and a data rate must be programmed into the device.
3-14
Node commissioning is the process of setting the node address (0-63)
and the data rate (125k, 250k, 500k) for a device. Most devices have
their node address pre-commissioned to 63. The data rate is usually
set to 125 kbits/second. All devices on any given network MUST be at
the same baud rate. You cannot mix devices at different baud rates on
the same network.
DeviceNet requires a unique node address for each device. This
requirement protects against assigning devices with the same address
which could cause unpredictable control behavior. RSNetWorx
prevents you from assigning the same node address to devices.
1 Publication DNET-UM003A-EN-P - August 2000
Page 54

3-2 Connect Devices and Commission Nodes
The node commission process can be done via hardware (dip
switches, rotary switches, thumbwheels) or software (RSNetWorx).
Once you commission a device via hardware, you cannot overwrite
the settings via software. Many devices support “autobaud”. This
allows a device to “set itself” to the proper data rate when it is
connected to an operational DeviceNet network. This shortens the
steps you need to take when adding or replacing devices on your
network.
The Starter Kit devices are all autobaud at a rate of 125kbits/second.
The address of 63 and the data rate of 125k are programmed into the
device at the factory. Other devices will need to be commissioned in
the field. Once a device has been commissioned and attached to a
network, you are ready to go.
The Starter Kits have 7 nodes which need to be addressed as follows:
00 Scanner, scanners are required to take the lowest possible
address
RSNetWorx for DeviceNet Node Commission Tool
01-05 Devices
62 Interface, interfaces are required to take the highest
possible address. 63 is reserved for factory set devices that
have their addresses set by RSNetWorx.
The Demo Version of RSNetWorx allows up to 7 nodes to be
commissioned in a network file. This Demo version of RSNetWorx can
be converted into a full version when you purchase a full version
license from Rockwell.
One function of RSNetWorx for DeviceNet software is to provide a
way for you to assign node addresses and set data rate parameters for
devices that are either:
• connected to a DeviceNet network, or
• connected via a point-to-point connection.
RSNetWorx uses a graphical interface to build your network. Windows
navigation provides an easy way to add, delete, and configure devices
on your network. RSNetWorx (along with RSLinx communication
software) lets you quickly configure your network allowing you to
focus more on application attributes and less on hardware
configuration and compatibility.
Publication DNET-UM003A-EN-P - August 2000
Page 55

Connect Devices and Commission Nodes 3-3
RSNetWorx Communicates via RSLinx
RSNetWorx communicates to the network through RSLinx. RSNetWorx
does not have to be online (connected to an operating network) to
setup your network. You can setup your network offline and then
download the device scanlist to your scanner. The nodes are not
commissioned until you are online communicating to the network.
Device Configuration
Device configuration is the ability to set parameters in a device to
establish its behavior on a network.
You can set device parameters by:
• hardware: dip switches, rotary switches, thumbwheels
• software: RSNetWorx via Electronic Data Sheets (EDS) or custom
configuration applications
Electronic Data Sheets (EDS)
EDS files allow different devices to be added to a project offline.
These same EDS files also allow devices to be configured both online
or offline. New EDS files can be quickly and easily installed into the
RSNetWorx software for any devices, regardless of vendor, that will be
connected to your DeviceNet network.
You have all the EDS files you need for your Starter Kit. The
RSNetWorx you installed already comes with all the EDS files for
Rockwell products currently available. You can obtain new Rockwell
Automation DeviceNet device EDS files from our website:
www.ab.com/networks/EDS.
Publication DNET-UM003A-EN-P - August 2000
Page 56

3-4 Connect Devices and Commission Nodes
Prepare to Add Nodes
At this point you should have read and performed tasks in Chapters 1
& 2. Review your checklist from Chapter 1. You should have:
• read about a DeviceNet network
• identified, organized and secured what you need to use this
Starter Kit
• located Rockwell Automation support services
• assembled the KwikLink media
• connected the ArmorBlock MaXum I/O base to the KwikLink
media and attached the seal block
• connected and grounded your power supply
• installed the scanner into your chassis
• connected your interface
• installed the required software drivers for PC cards
• connected your PC
• installed the Demo Version of RSNetWorx for DeviceNet
Publication DNET-UM003A-EN-P - August 2000
Page 57

Connect Devices and Commission Nodes 3-5
Set up Your Network
Follow these directions to set up your scanner using RSLinx and
RSNetWorx.
For our demonstration, we are using a DH-485 connection between
the SLC-5 and the PC (via an Allen-Bradley PIC module). The
screens you see may be different than the screens provided in this
manual.
1. Check to be certain that you have installed the required drivers
and that the your scanner is not displaying any error codes. See
Appendix A: Numeric Code Display Summary.
2. Check to be certain that your scanner and interface has power.
TIP
• Remember to use the RSNetWorx for DeviceNet
and RSLinx online help systems and
manuals for additional information.
• Click the Help buttons on dialog boxes to display
step-by-step procedures, or press F1 while on
individual controls, such as check boxes, edit
boxes, grids, and list boxes to display pop up
definitions of those controls.
IMPORTANT
If your Starter Kit is SKIT7, you must have 2 devices
on your network before you select the 1784-PCIDS
driver in RSLinx.
Publication DNET-UM003A-EN-P - August 2000
Page 58

3-6 Connect Devices and Commission Nodes
Configure Drivers
1. Start RSLinx.
2. Configure Driver by clicking or by using the menus:
Publication DNET-UM003A-EN-P - August 2000
Page 59

Connect Devices and Commission Nodes 3-7
You see:
3. Select DeviceNet Drivers by clicking once.
4. Click .
You see:
5. Click on your interface.
SKITS 1, 3, and 5 1770-KFD
SKITS 2, 4, and 61784-PCD
SKIT71784-PCIDS
If your interface is not listed, check to be certain that you properly
installed the driver for your interface.
6. Click .
Publication DNET-UM003A-EN-P - August 2000
Page 60

3-8 Connect Devices and Commission Nodes
You will see a different screen for all three interfaces. Below is an
example of the 1770-KFD Driver Configuration screen:
7. Change the Driver configuration if needed. Serial port setup may
vary, depending on the PC you are using. For the Starter Kit
demonstrations you want the DeviceNet node address to be 62
and the data rate to be 125.
TIP
If your Starter Kit is SKIT7, the node address for the
1784-PCIDS must be 00.
8.Click .
9.Please wait while RSLinx is initializing your interface.
Publication DNET-UM003A-EN-P - August 2000
Page 61

Connect Devices and Commission Nodes 3-9
If you receive this message, be certain that your network is powered
and your interface is connected properly.
The version of RSLinx may display a slightly different screen.
10. Your interface is now configured. Click .
You see:
You should see your interface module listed. For SKITs 1, 3, and 5 the
1770-KFD, for SKITs 2, 4, and 6 the 1784-PCD and for SKIT7 the
1784-PCIDS.
Publication DNET-UM003A-EN-P - August 2000
Page 62

3-10 Connect Devices and Commission Nodes
If you do not see your scanner, check your connections and repeat
the process. You will get an error if the drivers are not installed. Exit
RSLinx and refer to the interface installation instructions to install the
driver.
11. Click on the
+ next to your interface module.
RSLinx will browse your network and graphically displays what
it finds. At this point, you should see your PC and scanner.
You see:
12. Minimize RSLinx.
13. Start RSNetWorx for DeviceNet.
TIP
If you start RSNetWorx before you start and minimize
RSLinx you can click “Browse Network” and
RSLinx will start automatically and browse.
14. You should see a blank project window. If not, select File/New
to clear the project window.
15. Go online by clicking on the tool bar.
Publication DNET-UM003A-EN-P - August 2000
Page 63

You see
Connect Devices and Commission Nodes 3-11
16. Click
+ next to your DeviceNet interface.
You see:
17. Click .
Publication DNET-UM003A-EN-P - August 2000
Page 64

3-12 Connect Devices and Commission Nodes
You see:
18.Click to upload information from your network.
Wait for RSNetWorx to poll the network to see what is connected.
When RSNetWorx has browsed your network you see:
Notice that your scanner has been given the node address of 00.
Scanners take the lowest position possible. For SKITs 1 through 6 the
interface is at node 62 as assigned when the interface was configured.
(Since SKIT7 (1784-PCIDS) is both the scanner and interface, it does
not have a node 62, only node 00.) The PC interface should take the
highest node address available which is usually 62. Node 63 is the
Publication DNET-UM003A-EN-P - August 2000
Page 65

Connect Devices and Commission Nodes 3-13
highest but is reserved for devices when they are first added to your
network.
You can change the description of the devices by with the Properties
function on the menu Device/Properties. Refer to Edit the Properties
on page 3-40 for more information.
Commission Nodes
In this demonstration, you will set the node address for the Stack
Light, ArmorBlock I/O, and the CompactBlock I/O using hardware
switches. A device is considered “switchless” when it is internally set
or when the hardware is set to 99.
The Inductive Proximity Switch and RightSight Photoelectric Sensor
are internally “switchless” – their node addresses will be set using
RSNetWorx via RSLinx over the network. The CompactBlock will be
hardware set to 99. The device data rates will be automatically set by
the Autobaud feature.
TIP
The Stack Light and ArmorBlock can be “switchless”
also if you set them to 99.
In our SKIT1 example, the scanner and interface are commissioned.
The devices that you now need to connect and commission are the:
Device: Node Address:
ArmorBlock MaXum I/O with the
Standard Proximity Switch
Set with rotary switches to 01
CompactBlock I/O
Set rotary switches to 99
ControlTower Stack Light
Set with rotary switches to 03
Inductive Proximity Switch
Internal to 99
RightSight Photoelectric Sensor
Internal to 99
01
02
03
04
05
Let’s connect and commission the devices, one at a time.
Publication DNET-UM003A-EN-P - August 2000
Page 66

3-14 Connect Devices and Commission Nodes
Commission the ArmorBlock MaXum I/O Module
You can set the node address with the rotary switches, RSNetWorx,
or other software configuration tool. Valid node addresses are 00 to
63. Each module is shipped set for node address 63. The rotary
switches are located on the underside of the module.
The two switches are:
• MSD (most significant digit)
• LSD (least significant digit)
To reset the node address, use a small blade screwdriver to rotate the
switches. Line up the small black dot on the switch with the number
you wish to use.
NODE ADDRESS
(00-63 PGM)
Set MSD=0
0
1
9
2
8
7
3
6
4
5
0
9
1
2
8
7
3
6
4
5
Set LSD=1
LSDMSD
Bottom View of Module
30703-M
Example: Node Address is set at 01, see small black dots.
The module is equipped with AutoBaud detect. AutoBaud lets the
module read the settings already in use on your DeviceNet network
and automatically adjust its data rate to follow those settings.
1. Set the node address with the rotary switches to 01 (under the
MaXum, marked “MSD”= 0 and “LSD” =1)
Publication DNET-UM003A-EN-P - August 2000
Page 67

Attach the Module
Connect Devices and Commission Nodes 3-15
IMPORTANT
Be certain to properly align the screws to complete
the connections between the module contacts and
the cable contacts.
1. Position the module over the mounted cable base. Align the
three captive screws in the module with the accepting
receptacles in the base.
2. Tighten the screws with a torque of 8 inch-pounds (0.904 NM)
to secure the module to the base.
30704-M
ArmorBlock MaXum I/O modules are described in the publications:
• 1792D-5.12 through 5.23 ArmorBlock MaXum Installation
Instructions
• 1792-2.1 - ArmorBlock Product Data
3. Connect the Standard Proximity Switch to input 1 on the
ArmorBlock MaXum I/O.
Your network should look like this:
To the scanner:
I-0
O-0
A-0
O-1
I-1
A-1
T
Network Status
Auxiliary Power
Module Status
T
42036
Publication DNET-UM003A-EN-P - August 2000
Page 68

3-16 Connect Devices and Commission Nodes
4. Browse the network, Click .
You see:
RSNetWorx has found the ArmorBlock MaXum at node 01.
5. Save your network file. Select File/Save and use a filename that
relates to your work, such as 1747StarterKit.dnt.
Publication DNET-UM003A-EN-P - August 2000
Page 69

Connect Devices and Commission Nodes 3-17
Connect and Commission the CompactBlock I/O Module
1. Open the switch cover on the CompactBlock I/O and check to
see if the rotary switches are set to the “switchless” setting of 99.
If they are not, set them to 99. You will be setting the node
address to 02 in RSNetWorx over the DeviceNet network.
switch cover
Module
Network
Status
Status
01234567 01234567
CompactBlock I/O
8 INPUTS / 8 OUTPUTS • DC POWER
1791D-888P
41985
2. Locate a micro to conductor cable and wire the conductor end
to the PLUG10R. Use a small screwdriver to open and close the
wire clamp on the PLUG10R. Refer to the publication
1791D-5.42, CompactBlock I/O for DeviceNet Modules
Installation Instructions for details.
Blue
Black
White
Red
42120
3. Attach two 24V insulated wires to the output section on the
CompactBlock. The top bank is positive and the bottom bank is
negative.
Publication DNET-UM003A-EN-P - August 2000
Page 70

3-18 Connect Devices and Commission Nodes
4. Attach the other ends of the insulated wires to a power supply.
Module
Status
Network
Status
01234567 01234567
+
-
Attach the wires to the
6th screw in each bank
Attach the 24V insulated wires
to a 24V power supply
We do not recommend that you use the DeviceNet power to power
I/O devcies. For the Starter Kit, use an alternative power supply to
power the CompactBlock I/O, if possible.
5. Insert the PLUG10R into the CompactBlock I/O module.
6. Connect the micro end of the cable to a KwikLink tap.
Your network should look like this:
42168
To scanner and interface
I-0
O-0
A-0
O-1
I-1
A-1
Module
Status
Network
Status
Auxiliary Power
Network Status
01234567 01234567
Module Status
T
42038
T
7. Watch the LEDs. After the unit cycles you should see a flashing
green light at Module Status. Network Status should be off or
red. Once you have communicated with the scanner, it should
be green. If you don’t, check your connections and refer to the
installation instructions.
8. Go to RSNetworx.
Publication DNET-UM003A-EN-P - August 2000
Page 71

Connect Devices and Commission Nodes 3-19
Commission the CompactBlock I/O Module
Now, place the CompactBlock on the network. Select the device on
the “Hardware” side of the RSNetWorx window and drag it over to the
network view side and then node commission.
1. Click the + next to General Purpose Discrete I/O to expand
selections.
2. Click 1791D Block I/O 8Input/8Output to select and then drag it
over to the view side of the window.
You see:
Publication DNET-UM003A-EN-P - August 2000
Page 72

3-20 Connect Devices and Commission Nodes
The CompactBlock currently states that it has an address of 63. It
shows up as 63 because it is set for the “switchless” setting of 99. You
need to commission this device to be node 2.
3. Select Tools/Node Commissioning.
You see:
Publication DNET-UM003A-EN-P - August 2000
4. Click .
Page 73

You see:
Connect Devices and Commission Nodes 3-21
5. Click the
+ next to your interface. RSLinx performs a Network
Who and returns the current devices on the network.
Select
6. Click once on to select CompactBlock and click
.
RSLinx browses the network and returns the current device settings.
Publication DNET-UM003A-EN-P - August 2000
Page 74

3-22 Connect Devices and Commission Nodes
You see:
Displays message when
‘Apply’ is successful.
7. Change Node Address to 02, leave data rate as 125 kb and click
and .
You will see the CompactBlock I/O still at node 63.
Publication DNET-UM003A-EN-P - August 2000
Page 75

Connect Devices and Commission Nodes 3-23
8. Click to browse the network.
You see the CompactBlock I/O at node 02.
TIP
If your nodes are not in order, press F5 to refresh the
window.
9. Save your network file.
When you are node commissioning, you may see a copy of a
device with a red X in either RSLinx or RSNetworx. This simply
means that RSLinx and RSNetworx can no longer find the device at
node address 63. You need to tell RSLinx not to look for that device
at node address 63. This “error” will continue to appear until you go
to RSLinx and delete the red X copy of the device from the list.
Publication DNET-UM003A-EN-P - August 2000
Page 76

3-24 Connect Devices and Commission Nodes
Connect and Commission the ControlTower Stack Light
1. Assemble the ControlTower Stack Light. Refer to the instructions
provided with the device. For our demonstration, we placed the
red Stack Light on the top and the green on the bottom.
2. Set the node address by hand to 03.
Use tool provided with the ControlTower Stack Light to set these
switches and refer to the instructions provided with the device
for details.
3. Connect the ControlTower Stack Light to a KwikLink tap.
Your network should look like this:
To scanner and interface
I-0
O-0
A-0
O-1
I-1
A-1
Module
Status
Network
Status
Auxiliary Power
Network Status
01234567 01234567
Module Status
T
42039
T
4. You should see a quick blink of each Stack Light when you
connect to the network.
Publication DNET-UM003A-EN-P - August 2000
Page 77

Connect Devices and Commission Nodes 3-25
Commission the ControlTower Stack Light
5. Go to RSNetWorx and click .
The ControlTower Stack Light automatically displays as node 03.
TIP
If your nodes are not in order, press F5 to refresh the
window.
Since the ControlTower Stack Light came up as node 03 when you
browsed the network, you don’t need to do the Tools/Node
Commissioning step. You are done with this device.
6. Save your network file.
Publication DNET-UM003A-EN-P - August 2000
Page 78

3-26 Connect Devices and Commission Nodes
Connect and Commission the Inductive Proximity Switch
1. Locate the 90° micro male to micro female cable and connect
the female end to the Inductive Proximity Switch and the 90
male end to a KwikLink tap.
Your network should look like this:
To scanner and interface
I-0
O-0
A-0
O-1
I-1
A-1
Module
Status
Network
Status
Auxiliary Power
Network Status
01234567 01234567
Module Status
T T
°
42040
2. Select the “871TM Shielded 18mm with micro” switch in the
hardware window and drag it over to your network.
Publication DNET-UM003A-EN-P - August 2000
Page 79

Connect Devices and Commission Nodes 3-27
You see:
Commission the Inductive Proximity Switch
3. Select Tools/Node Commissioning.
You see:
4. Click .
Publication DNET-UM003A-EN-P - August 2000
Page 80

3-28 Connect Devices and Commission Nodes
You see:
5. Click the
+ next to your interface. RSLinx returns the current
devices on the network.
You see:
6. Select the Inductive Proximity Switch at node 63 and click
.
Publication DNET-UM003A-EN-P - August 2000
RSLinx browses the network and returns the current device settings.
Page 81

You see:
7. Change Node Address to 04.
Connect Devices and Commission Nodes 3-29
8. Click and .
You will see the Inductive Proximity Switch still at node 63.
9. Click to browse the network.
You see the Inductive Proximity Switch at node 04.
Publication DNET-UM003A-EN-P - August 2000
Page 82

3-30 Connect Devices and Commission Nodes
If they are not in order, press F5 to refresh the display.
10.Save your network file.
Connect and Commission the RightSight Photoelectric Sensor
1. Locate a 90° micro male to micro female cable and connect the
female end to the RightSight Photoelectric sensor and then the
° male end to a KwikLink tap.
90
To the scanner
I-0
O-0
A-0
O-1
I-1
A-1
Module
Status
Network
Status
Auxiliary Power
Network Status
01234567 01234567
Module Status
T
42164
T
Publication DNET-UM003A-EN-P - August 2000
Commission the RightSight Photoelectric Sensor
2. Select Tools/Node Commissioning.
Page 83

You see:
Connect Devices and Commission Nodes 3-31
3. Click .
You see:
4. Click the + next to your interface. RSLinx returns the current
devices on the network.
Publication DNET-UM003A-EN-P - August 2000
Page 84

3-32 Connect Devices and Commission Nodes
You see:
Publication DNET-UM003A-EN-P - August 2000
Page 85

Connect Devices and Commission Nodes 3-33
5. Select the RightSight Photoelectric Sensor and click .
RSLinx browses the network and returns the current device
settings.
You see:
6. Change Node Address to 05 and click and
.
You will see the RightSight Photoelectric Sensor still at node 63.
7. Click to browse the network.
You see the devices and node addresses updated.
Publication DNET-UM003A-EN-P - August 2000
Page 86

3-34 Connect Devices and Commission Nodes
If they are not in order, press F5 to refresh the display.
8. Save your network file.
You now have all the devices of your Starter Kit connected and
commissioned. At this point, in the real world, you would configure
each device for your application. For the Starter Kits we provide an
RSNetworx for DeviceNet (.dnt) network configuration file which has
the scanlist created and the devices mapped. We also provide
associated Rockwell Software ladder logic programming file for each
Starter Kit.
Publication DNET-UM003A-EN-P - August 2000
Page 87

Connect Devices and Commission Nodes 3-35
What Your Network Will Look Like in RSNetWorx
Use the illustration below to see how your DeviceNet network will
look after you connect and commission all the devices. Your device
descriptions may be different.
SKIT1
SKIT2
Publication DNET-UM003A-EN-P - August 2000
Page 88

3-36 Connect Devices and Commission Nodes
SKIT3
SKIT4
Publication DNET-UM003A-EN-P - August 2000
Page 89

SKIT5
Connect Devices and Commission Nodes 3-37
SKIT6
Publication DNET-UM003A-EN-P - August 2000
Page 90

3-38 Connect Devices and Commission Nodes
SKIT7
Publication DNET-UM003A-EN-P - August 2000
Page 91

Connect Devices and Commission Nodes 3-39
If You Use the Provided .dnt File
We provide the file SKIT1.dnt on the floppy disk. You can use this file
to commission your network. After you connect your devices and
configure your interface you can open this file and browse the network.
If there are any errors you might see a screen like this.
RSNetWorx
RSLinx
When you see this error message (red block with a yellow line
in the center in RSNetWorx or a Red X in RSLinx), the device
shown is either offline or it is not connected to the network. If
Publication DNET-UM003A-EN-P - August 2000
Page 92

3-40 Connect Devices and Commission Nodes
you no longer wish to have the software look for that device at
that address, select the device and delete it.
To fix the error, you would need to:
• check device connections
• re-browse your network
• close the software, re-power your network, and go online
• re-commission the devices
• if the above does not solve your problems, start the Starter Kit
process over. If that does not work, contact your Rockwell
representative.
You can use the provided file, but we recommend that you
follow the step by step instructions provided so you can gain
practical experience using the media and software.
Edit the Properties (not required)
1. Right mouse click on the ArmorBlock MaXum icon on the
network and you see:
2. Click Properties to edit the properties of the ArmorBlock MaXum
you just placed on your network.
Publication DNET-UM003A-EN-P - August 2000
Page 93

You see:
Connect Devices and Commission Nodes 3-41
3.Change the name to “ArmorBlock MaXum” (or other name you
desire).
4.Add “Standard Proximity Switch” (or other description) to the
description field.
5.Click and for the changes to take effect.
Publication DNET-UM003A-EN-P - August 2000
Page 94

3-42 Connect Devices and Commission Nodes
You return to the main project screen. Notice that the ArmorBlock
MaXum I/O name has changed.
6.Place the cursor over the ArmorBlock MaXum icon on the
network diagram.
You see the device description that you entered appear at the lower
left-hand corner of the screen.
7. Save your network file.
Publication DNET-UM003A-EN-P - August 2000
Page 95

Summary and What’s Next In this chapter, you:
• connected devices
• commissioned nodes
• viewed your network
Move on to Chapter 4 to:
• open the .dnt provided with your Starter Kit
• review the automap function
• build the scanlist
• review device parameters
• download the scanlist to your scanner
Connect Devices and Commission Nodes 3-43
Publication DNET-UM003A-EN-P - August 2000
Page 96

3-44 Connect Devices and Commission Nodes
Notes:
Publication DNET-UM003A-EN-P - August 2000
Page 97

Build the Scanlist
Chapter
4
What This Chapter Contains
Introduction
Read this chapter to configure the scanner by building the scanlist.
The following table describes what this chapter contains and where to
find specific information.
To: See page:
learn about scanlists 4-2
configure your scanner 4-3
map input devices 4-17
map output devices 4-22
With the Starter Kit, you are not required to create a scanlist and map
the device input and outputs. You can simply open the provided
network file (.dnt) for your Starter Kit and download the scanlist.
Everything is already done for you.
If you wish to create your own scanlist and map your devices to work
with the provided ladder logic, follow the steps in this chapter. If you
do not want to create your own scanlist and map the devices, open
the file, follow steps on pages 4-3 through 4-5 and go to Chapter 5.
For the Starter Kits, we first automapped all the scanlist devices, next
we made a few minor adjustments to the word allocations and made
only one change to the I/O parameters of one device. The Inductive
Proximity Switch I/O parameters have been changed from Change of
State/Cyclic to Strobed. This allows the switch to send an analog
value.
The ladder logic for each of the Starter Kits programs the devices in
exactly the same way. Although, each ladder programming tool uses
different addressing schemes and input/output filenames.
1 Publication DNET-UM003A-EN-P - August 2000
Page 98

4-2 Build the Scanlist
What is a Scanlist?
Before a scanner can successfully communicate to the devices on a
DeviceNet network, it must first be configured. There are module
level parameters and also the scanlist. The scanlist contains all of the
information to tell the scanner how to communicate to the devices.
The scanner uses the information contained in the scanlist table (SLT)
to determine:
• what devices to scan
• how often to scan each device
• what memory locations in the device contain the desired input
or output data; and, the size of the data
• the number of bytes to send or transmit (Tx size)
• the number of bytes to receive (Rx size)
• how to communicate with each device (strobed, polled, change
of state, cyclic, or any valid combination of these I/O
parameters)
• where to map input data and output data so that the processor
can read and write it
• how to communicate with the processor (DIO, BTR/BTW, or
M1/M0 data transfer)
You can automatically configure most of the data by using the
automapping feature of RSNetWorx. This manual describes both
manual and automatic mapping procedures.
Publication DNET-UM003A-EN-P - August 2000
Page 99

Build the Scanlist 4-3
Configure Your Scanner
For this example we are using SKIT1. If you do not know how to map
the device inputs and outputs in relation to where your ladder logic
wants to find the devices, simply use the .dnt files provided.
We recommend using the provided files first. Get your network up
and running and then go back to the file you created and practice
mapping the inputs and outputs as outlined here.
Here’s an overview of what you need to do to configure your scanner.
1. Open the SKIT.dnt you created in Chapter 3 or the SKIT.dnt that
is provided for your Starter Kit. If you use the file provided the
scanlist and I/O mapping is already done for you.
2. Build the scanlist.
3. Edit the I/O parameters of the Inductive Proximity Switch.
4. Map the network inputs and outputs for each device.
5. Review the scanner summary window.
6. Download the software configuration to the scanner.
If You Want to Use the Pre-mapped .dnt File
If you are going to use the provided .dnt file that is already mapped,
follow these procedures:
1. Open the SKIT1.dnt (or the file for your SKIT) file. with the
scanlist already created and mapped for use with the associated
ladder logic file.
2. Click .
3. Click .
Publication DNET-UM003A-EN-P - August 2000
Page 100

4-4 Build the Scanlist
You see:
4. Please wait while RSNetWorx is browsing your network.
You see:
Publication DNET-UM003A-EN-P - August 2000
5. Double-click the scanner (node 00) on your DeviceNet network
to display the Properties dialog box. (You can also right click on
the device to bring up a menu and then choose Properties).
 Loading...