

Page 1

160-RS1
Serial
Communication
Module
FRN 1.xx
User Manual
R
S232
Serial C
om
m
READ
Y
FAULT
CO
M
M
CAT
160-RS1
SER
.A.
.S
U
IN
DE
A
M
Page 2

Important User Information
Solid state equipment has operational characteristics differing from
those of electromechanical equipment. “Safety Guidelines for the
Application, Installation and Maintenance of Solid State Controls”
(Publication SGI-1.1) describes some important differences between
solid state equipment and hard-wired electromechanical devices.
Because of this difference, and also because of the wide variety of
uses for solid state equipment, all persons responsible for applying
this equipment must satisfy themselves that each intended application
of this equipment is acceptable.
In no event will the Allen-Bradley Company be responsible or liable
for indirect or consequential damages resulting from the use or
application of this equipment.
The examples and diagrams in this manual are included solely for
illustrative purposes. Because of the many variables and requirements
associated with any particular installation, the Allen-Bradley
Company cannot assume responsibility or liability for actual use
based on the examples and diagrams.
No patent liability is assumed by Allen-Bradley Company with
respect to use of information, circuits, equipment, or software
described in this manual.
Reproduction of the contents of this manual, in whole or in part,
without written permission of the Allen-Bradley Company is
prohibited.
Throughout this manual we use notes to make you aware of safety
considerations.
ATTENTION: Identifies information about practices or
!
circumstances that can lead to personal injury or death,
property damage, or economic loss.
Attentions help you:
• identify a hazard
• avoid the hazard
• recognize the consequences
Important:
Identifies information that is especially important for
successful application and understanding of the product.
Shock Hazard labels may be located on or inside the drive
to alert people that dangerous voltage may be present.
DriveExplorer, DriveTools, DriveTools32, MicroLogix and SLC are trademarks of Rockwell Automation.
PLC and PLC-5 are registered trademarks of Rockwell Automation.
RSLinx and RSLogix 500 are trademarks of Rockwell Software, Inc.
Windows and Windows NT are registered trademarks of Microsoft Corporation
Page 3

Using This Manual
Product Overview
Quick Start for Experienced
Users
Installation and Wiring
Table of Contents
Preface
Who Should Use This Manual? . . . . . . . . . . . . . . . . . . . . . . . . . . . . . . . . p–i
Conventions . . . . . . . . . . . . . . . . . . . . . . . . . . . . . . . . . . . . . . . . . . . . . . . p–i
RS1 Compatibility . . . . . . . . . . . . . . . . . . . . . . . . . . . . . . . . . . . . . . . . . . . p–i
Reference Manuals. . . . . . . . . . . . . . . . . . . . . . . . . . . . . . . . . . . . . . . . . . p–ii
Safety Precautions . . . . . . . . . . . . . . . . . . . . . . . . . . . . . . . . . . . . . . . . . . p–ii
Chapter 1
Module Description . . . . . . . . . . . . . . . . . . . . . . . . . . . . . . . . . . . . . . . . . . 1–1
Configuration DIP Switches . . . . . . . . . . . . . . . . . . . . . . . . . . . . . . . . . . . . . . 1–2
Chapter 2
Required Tools and Equipment. . . . . . . . . . . . . . . . . . . . . . . . . . . . . . . . . 2–1
Procedures . . . . . . . . . . . . . . . . . . . . . . . . . . . . . . . . . . . . . . . . . . . . . . . . 2–2
Chapter 3
EMC Directive 89/336/EEC Compliance. . . . . . . . . . . . . . . . . . . . . . . . . . 3–1
Low Voltage Directive 73/23/EEC Compliance . . . . . . . . . . . . . . . . . . . . . 3–1
Module Configuration Switches . . . . . . . . . . . . . . . . . . . . . . . . . . . . . . . . 3–2
Setting the Baud Rate – SW1 & SW2 . . . . . . . . . . . . . . . . . . . . . . . . . . . . . . . 3–2
Setting the Protocol – SW3 . . . . . . . . . . . . . . . . . . . . . . . . . . . . . . . . . . . . . . . 3–3
Selecting the Checksum Mode – SW4 . . . . . . . . . . . . . . . . . . . . . . . . . . . . . . 3–3
Module Installation/Removal. . . . . . . . . . . . . . . . . . . . . . . . . . . . . . . . . . . 3–4
Keypad or Ready/Fault Panel Removal . . . . . . . . . . . . . . . . . . . . . . . . . . . . . . 3–4
Installing the RS1 Module . . . . . . . . . . . . . . . . . . . . . . . . . . . . . . . . . . . . . . . . 3–4
Removing the RS1 Module . . . . . . . . . . . . . . . . . . . . . . . . . . . . . . . . . . . . . . . 3–5
Wiring the Connector . . . . . . . . . . . . . . . . . . . . . . . . . . . . . . . . . . . . . . . . 3–6
Connecting the Communication Cable to the Module. . . . . . . . . . . . . . . . 3–8
Modes of Operation
RS1 Data Table Interface
Parameter Descriptions
Chapter 4
Powering Up the Drive . . . . . . . . . . . . . . . . . . . . . . . . . . . . . . . . . . . . . . . 4–1
LED Indicators . . . . . . . . . . . . . . . . . . . . . . . . . . . . . . . . . . . . . . . . . . . . . 4–1
Modes of Operation . . . . . . . . . . . . . . . . . . . . . . . . . . . . . . . . . . . . . . . . . 4–2
Power-up Mode . . . . . . . . . . . . . . . . . . . . . . . . . . . . . . . . . . . . . . . . . . . . . . . . 4–2
Run Mode . . . . . . . . . . . . . . . . . . . . . . . . . . . . . . . . . . . . . . . . . . . . . . . . . . . . 4–2
Error Mode . . . . . . . . . . . . . . . . . . . . . . . . . . . . . . . . . . . . . . . . . . . . . . . . . . . 4–2
Chapter 5
Supported PCCC Command List . . . . . . . . . . . . . . . . . . . . . . . . . . . . . . . 5–1
Data Table Structure . . . . . . . . . . . . . . . . . . . . . . . . . . . . . . . . . . . . . . . . . 5–1
Chapter 6
RS1 Parameters . . . . . . . . . . . . . . . . . . . . . . . . . . . . . . . . . . . . . . . . . . . . 6–1
Page 4

toc–ii Table of Contents
Using the RS1 Module with
DriveExplorer™ Software
Using the RS1 Module with a
Programmable Controller
Chapter 7
Required Items. . . . . . . . . . . . . . . . . . . . . . . . . . . . . . . . . . . . . . . . . . . . . 7–1
Example Network . . . . . . . . . . . . . . . . . . . . . . . . . . . . . . . . . . . . . . . . . . . 7–1
Setting Baud Rates and Configuring the Communications Port . . . . . . . 7–2
Monitoring and Editing Parameters . . . . . . . . . . . . . . . . . . . . . . . . . . . . . 7–2
Monitoring Parameters . . . . . . . . . . . . . . . . . . . . . . . . . . . . . . . . . . . . . . . . . . 7–2
Editing Parameters . . . . . . . . . . . . . . . . . . . . . . . . . . . . . . . . . . . . . . . . . . . . . 7–2
Uploading Editable Parameters . . . . . . . . . . . . . . . . . . . . . . . . . . . . . . . . 7–3
Downloading Parameters . . . . . . . . . . . . . . . . . . . . . . . . . . . . . . . . . . . . . 7–3
Chapter 8
Required Tools . . . . . . . . . . . . . . . . . . . . . . . . . . . . . . . . . . . . . . . . . . . . . 8–1
Example Network . . . . . . . . . . . . . . . . . . . . . . . . . . . . . . . . . . . . . . . . . . . 8–1
Setting the Drive to Enable Network Control . . . . . . . . . . . . . . . . . . . . . . 8–2
Setting the Baud Rate and Checksum Mode . . . . . . . . . . . . . . . . . . . . . . 8–2
Connecting the Drive to the Programmable Controller. . . . . . . . . . . . . . . 8–2
Controlling the Drive. . . . . . . . . . . . . . . . . . . . . . . . . . . . . . . . . . . . . . . . . 8–2
Program the Ladder . . . . . . . . . . . . . . . . . . . . . . . . . . . . . . . . . . . . . . . . . 8–3
Reading and Writing Parameters . . . . . . . . . . . . . . . . . . . . . . . . . . . . . . . 8–4
Program the Ladder for Parameter Reads and Writes. . . . . . . . . . . . . . . 8–5
Troubleshooting
Specifications
RS1 Module Compatibility
Chapter 9
LED Indicators and Troubleshooting . . . . . . . . . . . . . . . . . . . . . . . . . . . . 9–1
READY LED . . . . . . . . . . . . . . . . . . . . . . . . . . . . . . . . . . . . . . . . . . . . . . . . . . 9–2
COMM LED . . . . . . . . . . . . . . . . . . . . . . . . . . . . . . . . . . . . . . . . . . . . . . . . . . . 9–2
FAULT LED . . . . . . . . . . . . . . . . . . . . . . . . . . . . . . . . . . . . . . . . . . . . . . . . . . . 9–2
RS1/DF1 Error Codes . . . . . . . . . . . . . . . . . . . . . . . . . . . . . . . . . . . . . . . 9–3
Appendix A
Electrical . . . . . . . . . . . . . . . . . . . . . . . . . . . . . . . . . . . . . . . . . . . . . . . . . . . . . A–1
Environmental . . . . . . . . . . . . . . . . . . . . . . . . . . . . . . . . . . . . . . . . . . . . . . . . . A–1
Communications . . . . . . . . . . . . . . . . . . . . . . . . . . . . . . . . . . . . . . . . . . . . . . . A–1
Mechanical . . . . . . . . . . . . . . . . . . . . . . . . . . . . . . . . . . . . . . . . . . . . . . . . . . . A–1
Appendix B
Page 5

Preface
Using This Manual
The purpose of this manual is to provide you with the necessary
information to apply the Bulletin 160-RS1 Communication Module.
Described in this manual are methods for installing, configuring, and
troubleshooting the RS1 Communication Module.
For information on specific drive features, refer to the Bulletin 160
User Manual.
Who Should Use This Manual?
Conventions
Important:
This manual is intended for qualified personnel. To make efficient use
of the Communication Module, you must be able to program and
operate serial communications devices, as well as have an
understanding of the parameter settings and functions of the 160
Drive.
In this manual we refer to the:
• 160 RS1 Communication Module as Communication Module,
RS1 Module or Module.
• 160 SSC Adjustable Frequency AC Drive as the 160 Drive or
drive.
In addition, parameter numbers and names (both 160 Drive and RS1
Module) are shown in bold typeface and follow the format PXX - [*]
where P denotes parameter, XX denotes the two digit parameter
number, and * represents the parameter name.
For example, P01 - [Output Frequency].
Read this manualin its entiretybefore installing, operating,
servicing, or initializing the RS1 Module.
RS1 Compatibility
The RS1 Module is compatible with all series of 160 Drives. When
properly connected, the module communicates via RS-232 using the
Allen-Bradley DF1 protocol.
Page 6

p–ii Preface
Reference Manuals
For Read This Document
Information about the DF1 protocol DF1 Protocol and Command Set Reference Manual 1770-6.5.16
Additional information about networking and the SLC™ 500 SLC 500 Modular Hardware Style Manual 1747-6.2
Information about the AIC+ AIC+ Advanced Interface Converter User Manual 1761-6.4
Instruction set information for the SLC 500 and MicroLogix™
1000
For general MicroLogix 1000 information MicroLogix 1000 User Manual 1761-6.3
For DriveExplorer™ information DriveExplorer User Manual 9306-5.0
For 160 SSC Drive Information: 160 SSC User Manual Series A
A complete listing of current Allen-Bradley documentation,
including ordering instructions. Also indicates whether the
documents are available on CD-ROM or in multi-languages.
A glossary of industrial automation terms and abbreviations Allen-Bradley Industrial Automation Glossary AG-7.1
Safety Precautions
The following documents contain additional information concerning
Allen-Bradley products. To obtain a copy, contact your local AllenBradley Sales Office or visit the “On-Line Publications” area of the
Allen-Bradley home page on the World Wide Web at:
SLC 500 and MicroLogix 1000 Instruction Set
Reference Manual
160 SSC User Manual Series B
160 SSC User Manual Series C
Allen-Bradley Publication Index SD499
www.ab.com
Publication
Number
1747-6.15
0160-5.0
0160-5.9
0160-5.15
ATTENTION: Only personnel familiar with 160 Drives,
!
Communication Modules andassociated machinery should
plan or implement the installation, start-up, configuration
and subsequent maintenanceof this module.Failure to comply may result in personal injury and/or equipment damage.
.
ATTENTION: This module contains ESD (Electrostatic
!
Discharge) sensitive parts and assemblies. Static control
precautions are required when installing, testing, servicing,
or repairing this assembly. Component damage may result
if ESD control procedures are not followed. If you are not
familiar with static control procedures, reference AllenBradley Publication 8000-4.5.2, Guarding Against Electro-
static Damage or any other applicable ESD protection
handbook.
ATTENTION: The drive contains high voltage capacitors
!
which take time to discharge after removalofACline power.
Before installing or removing the CommunicationModule,
ensure isolation of mains supply from line inputs L1, L2,
L3 (R, S, T). Wait the recommended amount of time for the
capacitors to discharge to safe voltage levels (refer to the
160 User Manual for recommended time). Failure to do so
may result in personal injury or death.
ATTENTION: When a system is configured for the first
!
time, the motor must be disconnected from the machine or
process during initial system testing. Hazard of injury or
equipment damage may occur due to unintended or incorrect machine motion.
Page 7
Product Overview
This chapter contains the following information:
• The physical layout of the module.
• Location of configuration switches.
• Overview and components.
Chapter
1
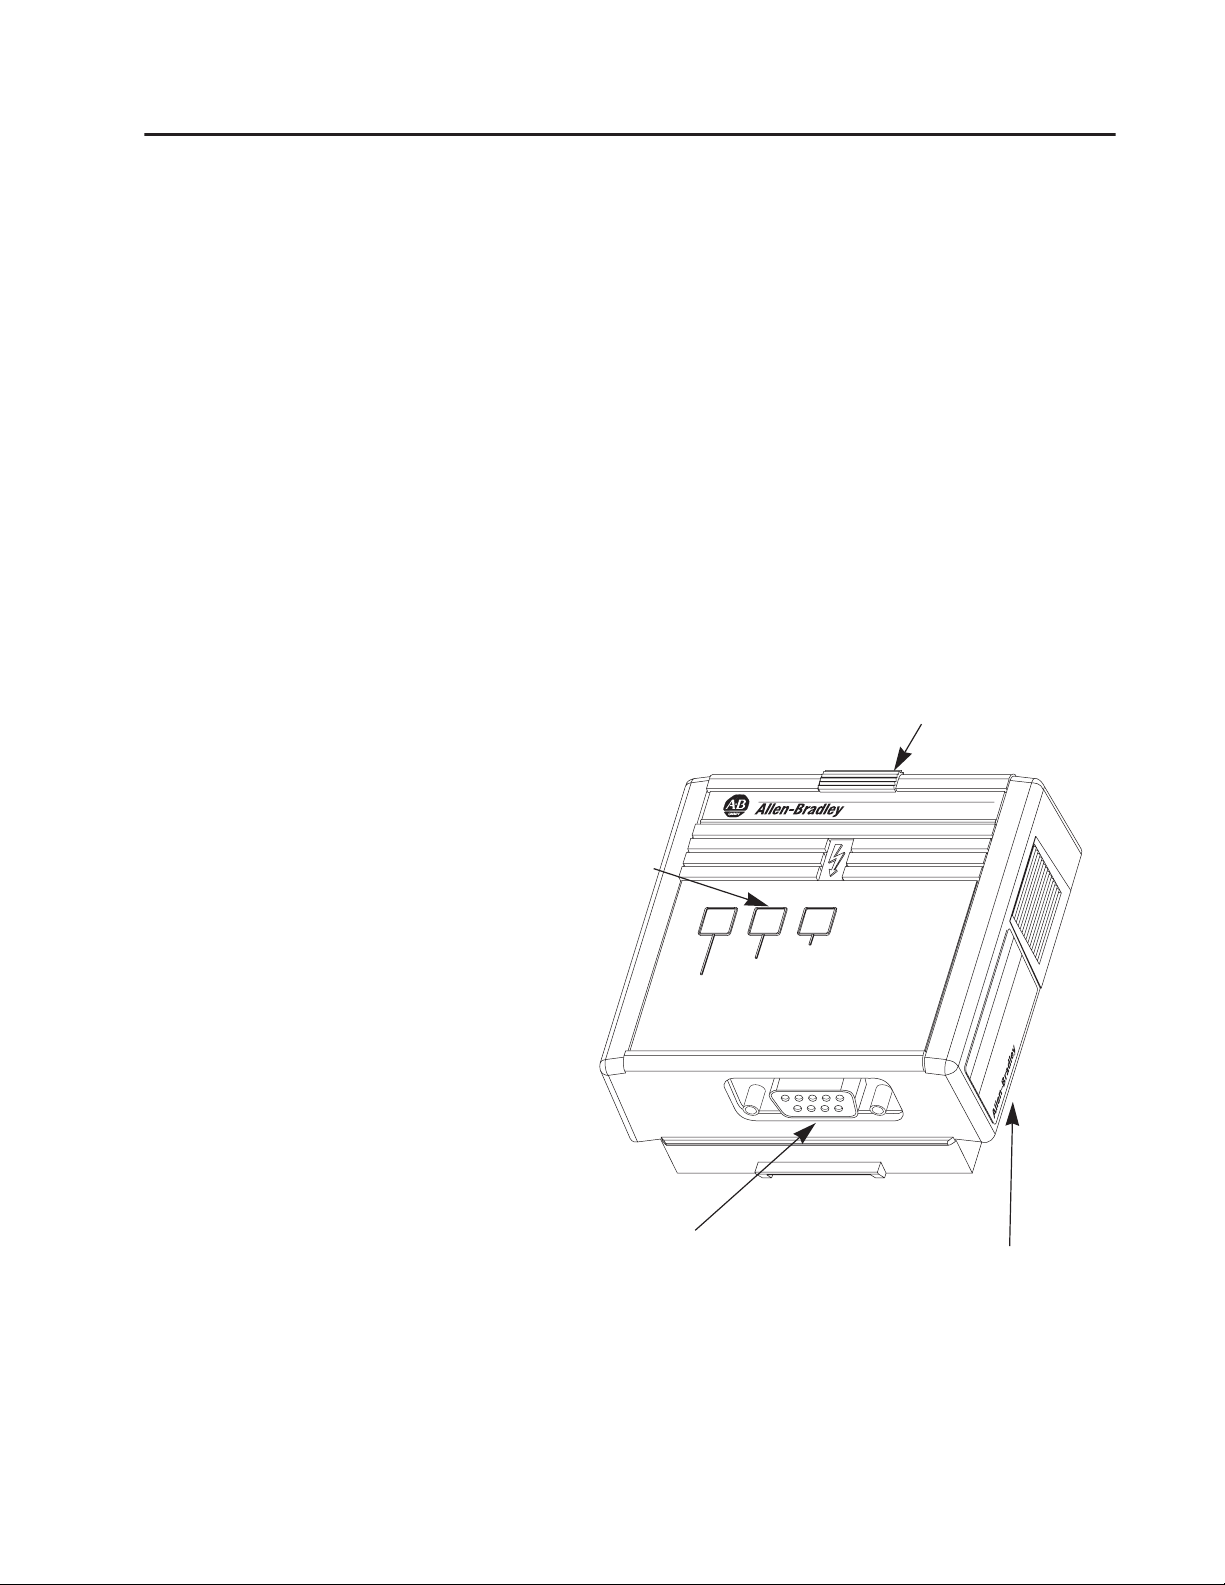
Module Description
The RS1 Module is an optional interface device designed to provide a
direct, digital link between RS-232 devices and the 160 Drive. The
module connects to the drive through the expansion/keypad port on
the front of the drive. Refer to the figures 1.1 and 1.2 for general
layout of the module and Chapters 4 or 9 for details on the LED
indicators.
Figure 1.1
Module Front View
Module Installation Latch
Status LEDs
Refer to Chapters 4 & 9
for Further Information
COMM
FAULT
READY
RS232
Serial Comm
SER
MADE IN U.S.A.
9 Pin, Female D-Shell Connector
Refer to Chapter 3 for Details
CAT
160-RS1
Nameplate
Provides Firmware Version
and Series Letter
Page 8
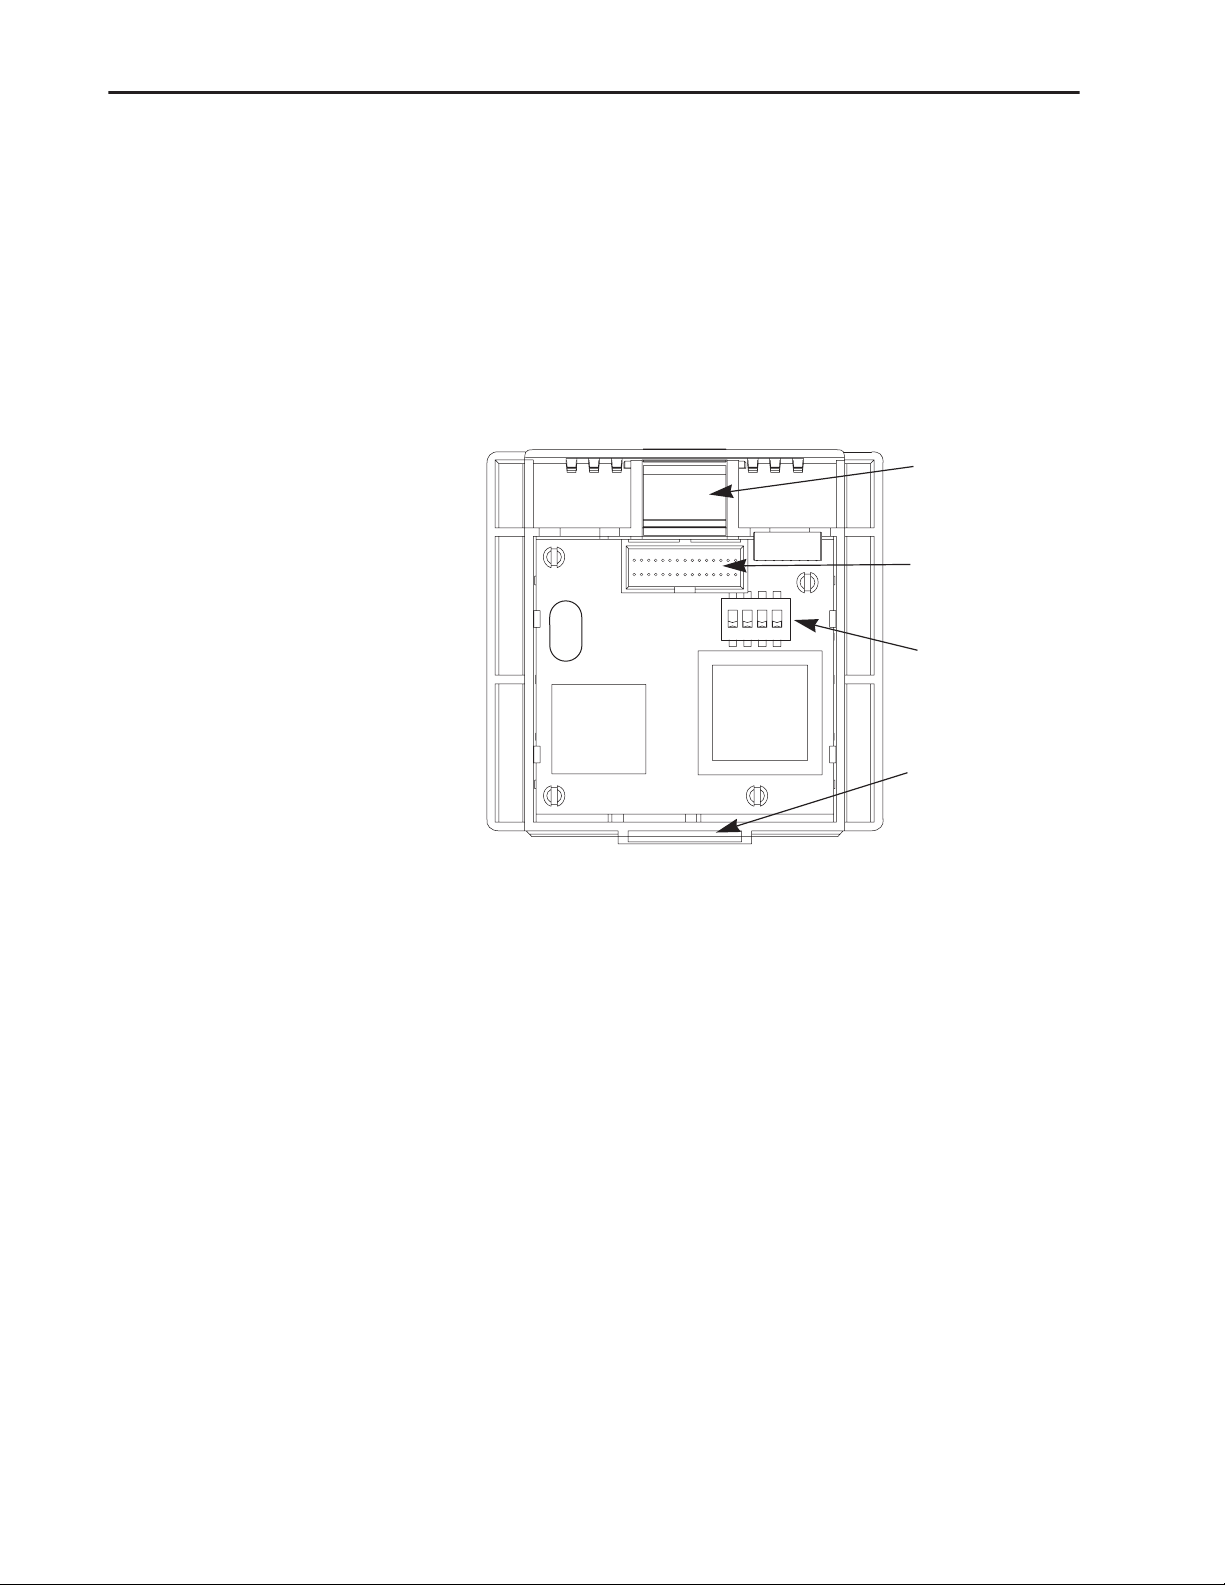
1–2 Product Overview
Configuration DIP Switches
The Communication Module has one four position DIP switch for
setting the baud rate, protocol and checksum type. DIP switches are
located on the rear of the module (see below) and are only accessible
when the module is removed from the 160 Drive. Refer to Chapter 3
for switch configuration information.
Figure 1.2
Module Rear View
Module Latch
Expansion/Keypad Port
Connector
ON
1234
SW1 - SW4
DIP Switches
D-Shell Connector
Page 9

Chapter
2
Quick Start for Experienced Users
This chapter can help you start using the RS1 Communication
Module. If you have installed or configured a network previously and
are familiar with Allen-Bradley communication modules and drives,
this information can help reduce the time of installation. If you are
uncertain, use the full installation/configuration information
beginning in Chapter 3.
We base the procedures here on the assumption that you understand
the basic concepts and know how to program the 160 Drive. In
addition, you should understand electronic process control and be
able to interpret the ladder logic instructions required to generate the
electronic signals that control your application.
Because it is a start-up guide for experienced users, this chapter does
not contain detailed explanations about the procedures listed. It does,
however, reference other chapters in this book where you can get
more information.
Required Tools and Equipment
If you have any questions or are unfamiliar with the terms used or
concepts presented in the procedural steps, always read the
referenced chapters and other recommended documentation before
trying to apply the information.
This chapter contains the following information:
• What tools and equipment you need.
• When to address, configure and program the module.
• How to install and wire the Communication Module.
• System power-up procedures.
Have the following tools and equipment ready:
• 1/8 in. (3.2 mm) flat blade screwdriver.
• Blunt, pointed instrument (not pen or pencil) for setting the DIP
switches.
Page 10

2–2 Quick Start for Experienced Users
Procedures
Step Action
10.
11. Check for proper operation.
For Further Information
Refer to . . .
1. Review Attention statements in the Preface.
Ensure that power has been removed to the 160 Drive. 160 Drive
2.
Verify that the 160 Drive is correctly installed and
3.
wired. Stop Input (TB3-7, TB3-8) must be jumpered
together to start drive.
Remove Program Keypad Module or Ready/Fault
4.
Indicating Panel from the drive.
Set the RS1 Module’s baud rate, protocol and check-
5.
sum type DIP switches.
6. Install the RS1 Module.
7. Connect communication cable.
8. Power up the drive and the network.
Configure the 160 Drive for the RS1 Module so the
9.
drive can accept control logic and speed reference via
the network.
Set P46 - [Input Mode] to a value of “2.” This will configure
the drive to accept the logic commands from the network.
Set P59 - [Frequency Select] to “1.” This will configure the
drive to accept speed commands from the network.
Configure the RS1 Module parameters for your
application.
P114 - [Application Timeout], etc.
For Example:
P103 - [Fault Mode],
User Manual
User Manual
(Installation)
(Installation)
(Installation)
(Installation)
(Installation)
(Using the RS1 Module
with a Programmable
Controller)
(Using the RS1 Module
with DriveExplorer
(Parameter Descriptions)
160 Drive
Chapter 3
Chapter 3
Chapter 3
Chapter 3
Chapter 3
Chapter 8
or
Chapter 7
Software)
Chapter 6
Page 11

Chapter
3
Installation and Wiring
This chapter contains information needed to:
• Meet the requirements of the EMC and Low Voltage directives
for CE compliance.
• Remove a pre-installed Program Keypad Module or Ready/Fault
Indicating Panel.
• Configure and install the RS1 Module.
• Wire the communication cables.
• Remove the RS1 Module from the drive.
Read this chapter completely before you attempt to install or
configure your module. Before applying power, review the Attention
statements presented throughout this manual. Verify that all
connections are secure and that all selections are correct.
ATTENTION: Unpredictable operation may occur if you
!
fail to check connections and DIP switch settings for compatibility with your application. Unpredictable operation
may result inpersonal injury, death, and equipment damage.
EMC Directive 89/336/EEC
Compliance
Low Voltage Directive 73/23/
EEC Compliance
This product complies with Electromagnetic Compatibility (EMC)
Directive 89/336/EEC when conforming with the following
installation requirements:
• The essential requirements for a conforming EMC installation for
the Bulletin 160 SSC are employed. Refer to the Bulletin 160 SSC
User Manual.
This product complies with Low Voltage Directive 73/23/EEC when
conforming with the following installation requirements:
• The essential requirements for a conforming Low Voltage
Directive installation for the Bulletin 160 SSC are employed.
Refer to the Bulletin 160 SSC User Manual.
• Review the Attention statements in the Preface, and other areas
throughout this manual prior to installation of the module.
Page 12
3–2 Installation and Wiring
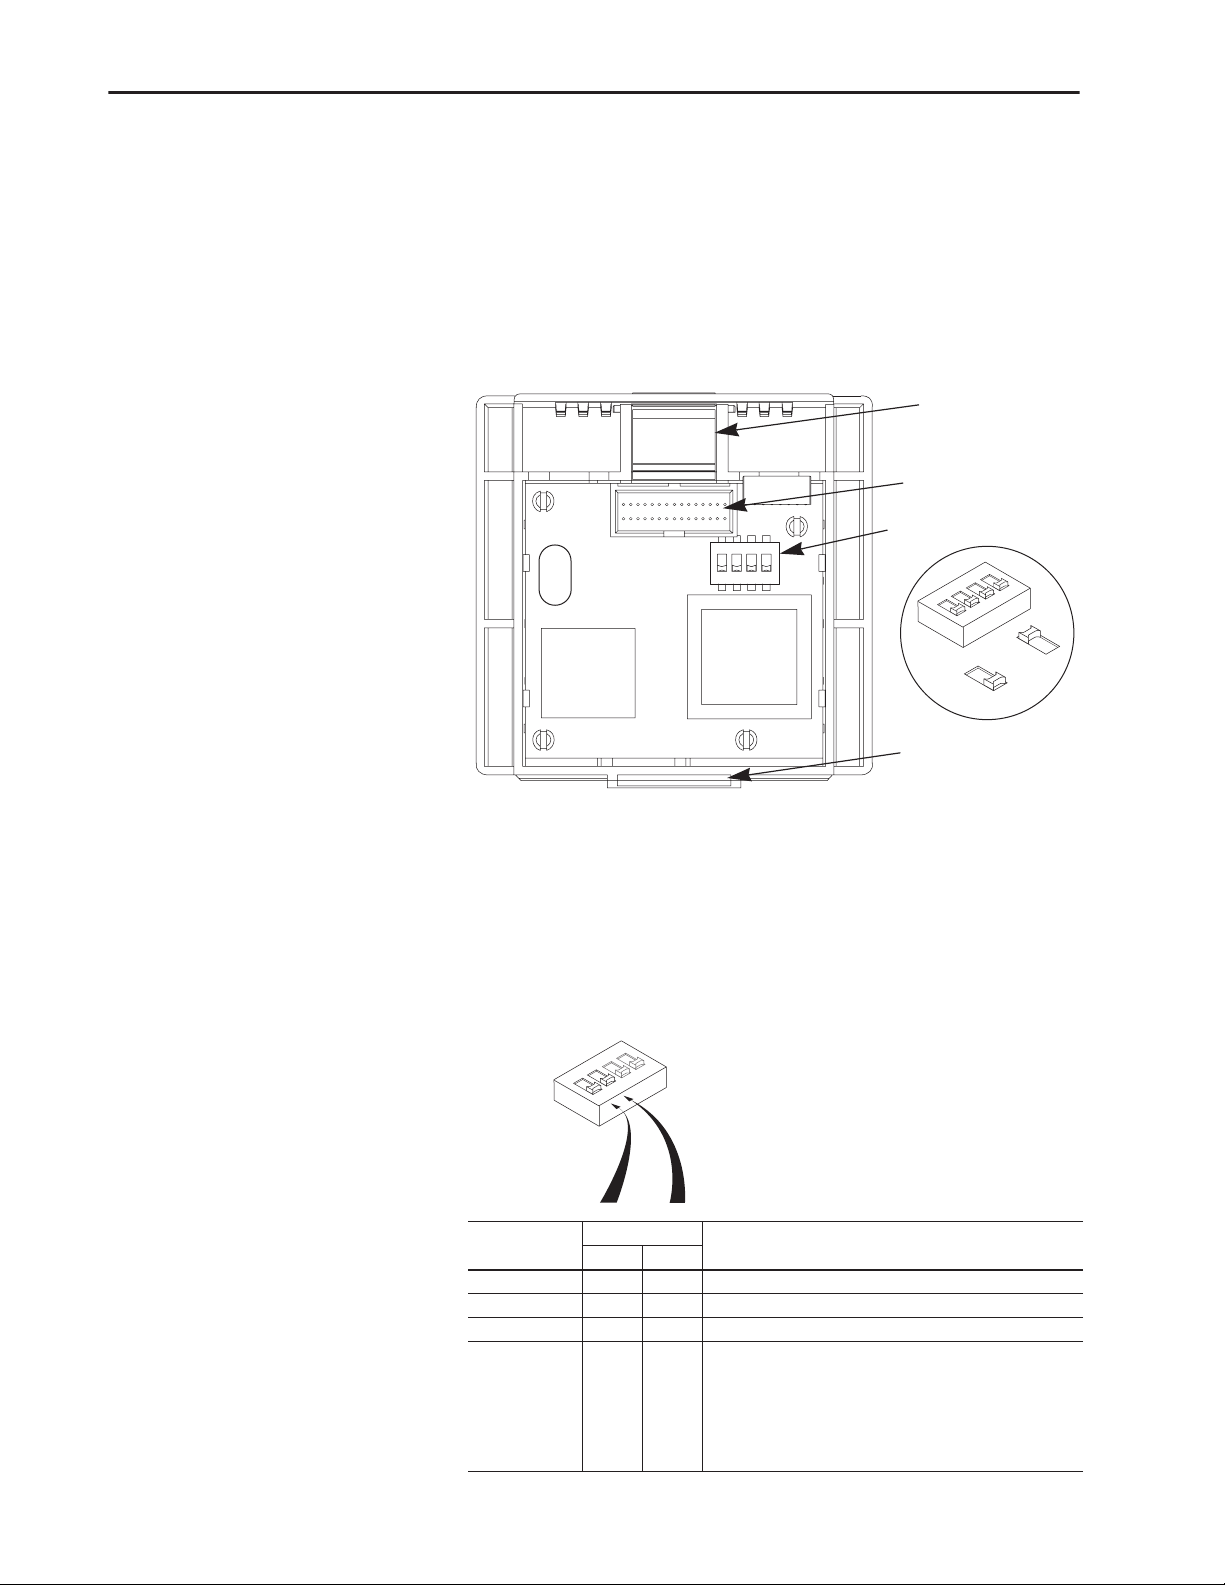
Module Configuration Switches
The RS1 Module utilizes a four position DIP switch (see figure
below) to configure the baud rate, protocol and checksum. These
switches must be set to match the application settings. Refer to the
paragraphs that follow for details.
Important:
When you makechanges to theswitch settings, use a blunt,
pointed instrument (not a pen or pencil).
Figure 3.1
DIP Switch Location (Back of Module)
Module Latch
Expansion/Keypad
Port Connector
SW1 - SW4 DIP Switches
ON
1234
ON
Off / 0 =
1
3
2
On / 1 =
4
D-Shell Connector
Setting the Baud Rate – SW1 & SW2
DIP switches SW1 and SW2 set the baud rate. Using the table below,
configure the module for your application. Selection of the “EPROM
Mode” (SW1 & SW2 are On) will cause the baud rate, protocol and
checksum settings to be read from the RS1 parameters listed below.
Note that these parameters must be programmed for correct
operation.
ON
Switch Setting
Baud Rate
9600 (Default) Off Off
2400 On Off
1200 Off On
EPROM Mode On On Baud Rate will be read from P110 - [EPROM Baud]
4
3
2
1
Switches SW1 & SW2
Special NotesSW1 SW2
Checksum will be read from P109 - [EPROM Checksum]
Protocol will be read from P108 - [EPROM Protocol]
Important: If an “AIC+” is being used and “EPROM
Mode” is selected, SW3 must be set to “On” to enable
software handshaking.
Page 13
Installation and Wiring 3–3
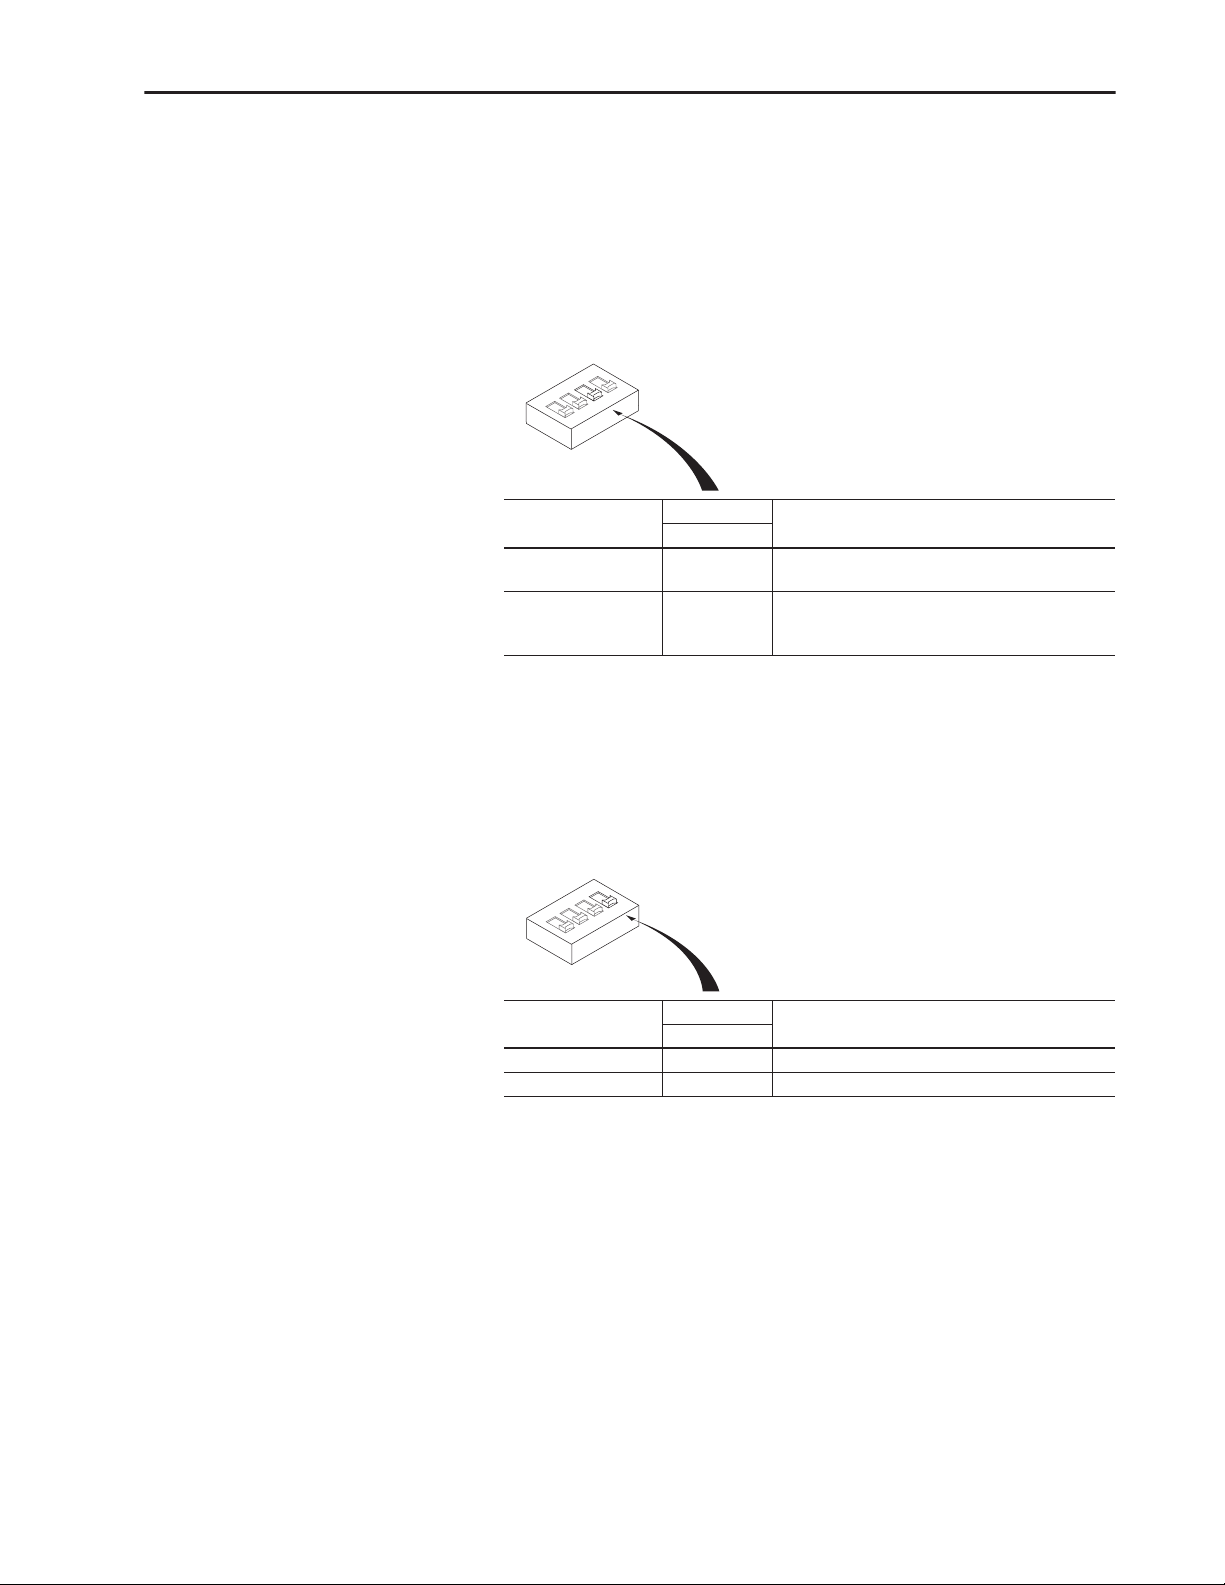
Setting the Protocol – SW3
As shown in the table below, SW3 sets the protocol being used (pointto-point or multi-drop). If EPROM Mode is active (SW1 & SW2 are
On), the protocol will be read from P108 - [EPROM Protocol].
Important:
If an “AIC+” is being used and “EPROM Mode” is
selected, SW3 must be set to “On.”
4
ON
2
1
Options
DF1 Point-to-Point
(Default)
DF1 Multi-Drop On Used for RS-232 applications between a number of
3
Switch SW3
Switch Setting
Special NotesSW3
Off Typically used for RS-232 applications between two
devices.
devices. Additional module (i.e. AIC+) is required
for RS-485 applications/networking.
Selecting the Checksum Mode – SW4
Switch SW4 sets the checksum mode. Configure this mode to be
consistent with your communications and application. If EPROM
Mode is active (SW1 & SW2 are On), the checksum mode will be
read from P109 - [EPROM Checksum] (SW4 will have no effect).
Switch SW4
ON
Options
BCC (Default) Off Block checksum.
CRC On 16 bit algorithm.
4
3
2
1
Switch Setting
Special NotesSW4
Page 14
3–4 Installation and Wiring
Module Installation/Removal
ATTENTION: The drive contains high voltage capacitors
!
which take time to discharge after removalof mains supply.
Before installing or removing a keypad/module, ensure isolation of mains supply from line inputs L1, L2, L3 (R, S,
T). Waitthe recommended amount of time forthe capacitors
to discharge to safe voltage levels (refer to the 160 User
Manual for recommended time). Failure to do so mayresult
in personal injury or death.
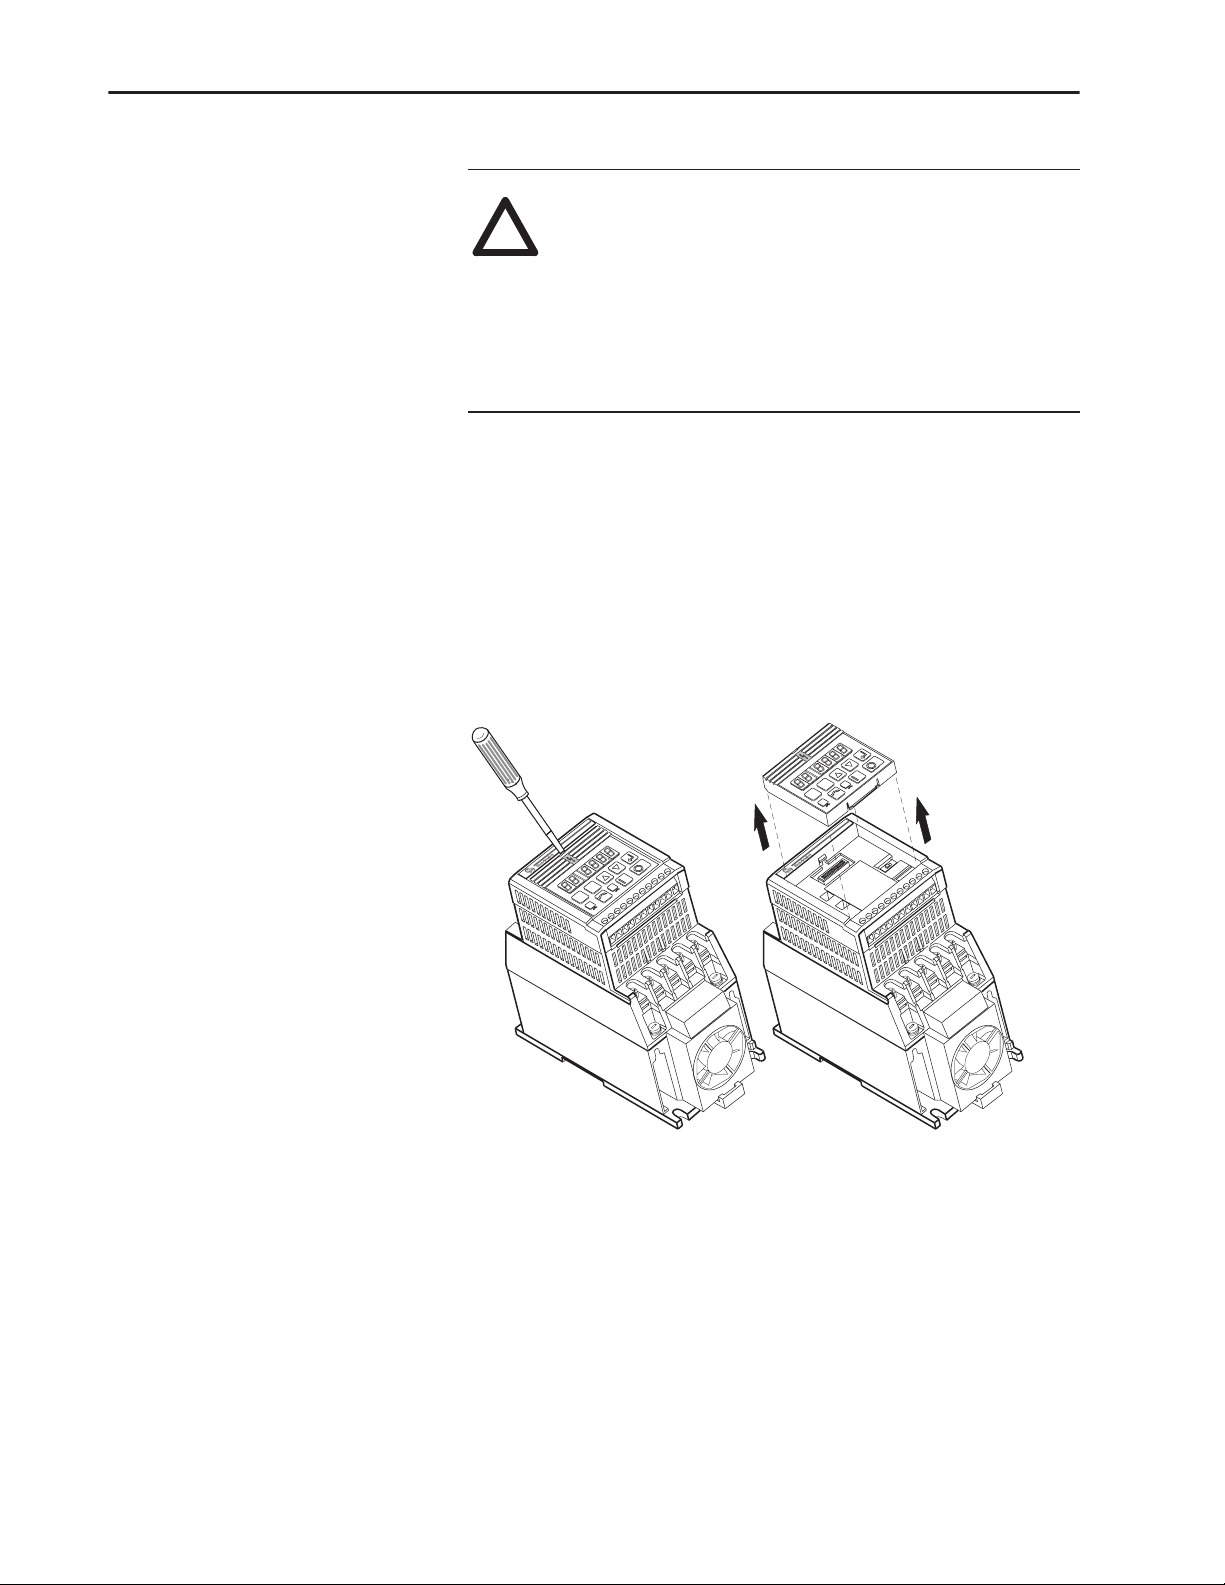
Keypad or Ready/Fault Panel Removal
Before installing the RS1 Module, it may be necessary to remove a
previously installed Program Keypad Module or Ready/Fault panel.
1. Verify that all power to the drive is removed.
2. Insert a small screwdriver into slot, pry back and pivot module
out. Avoid bending or twisting the contact pins located under the
module.
Figure 3.2
Removing Program Keypad Module
Program Keypad Module
(or Ready/Fault Panel)
50 | 60
1 2 3 4 5 6 7 8 9 10 11
+
–
DC
T3
W
T2
V
T1
U
DC
SEL
ESC
1 2 3 4 5 6 7 8 9 10 11
T2
T1
U
SEL
ESC
+
DC
–
DC
T3
W
V
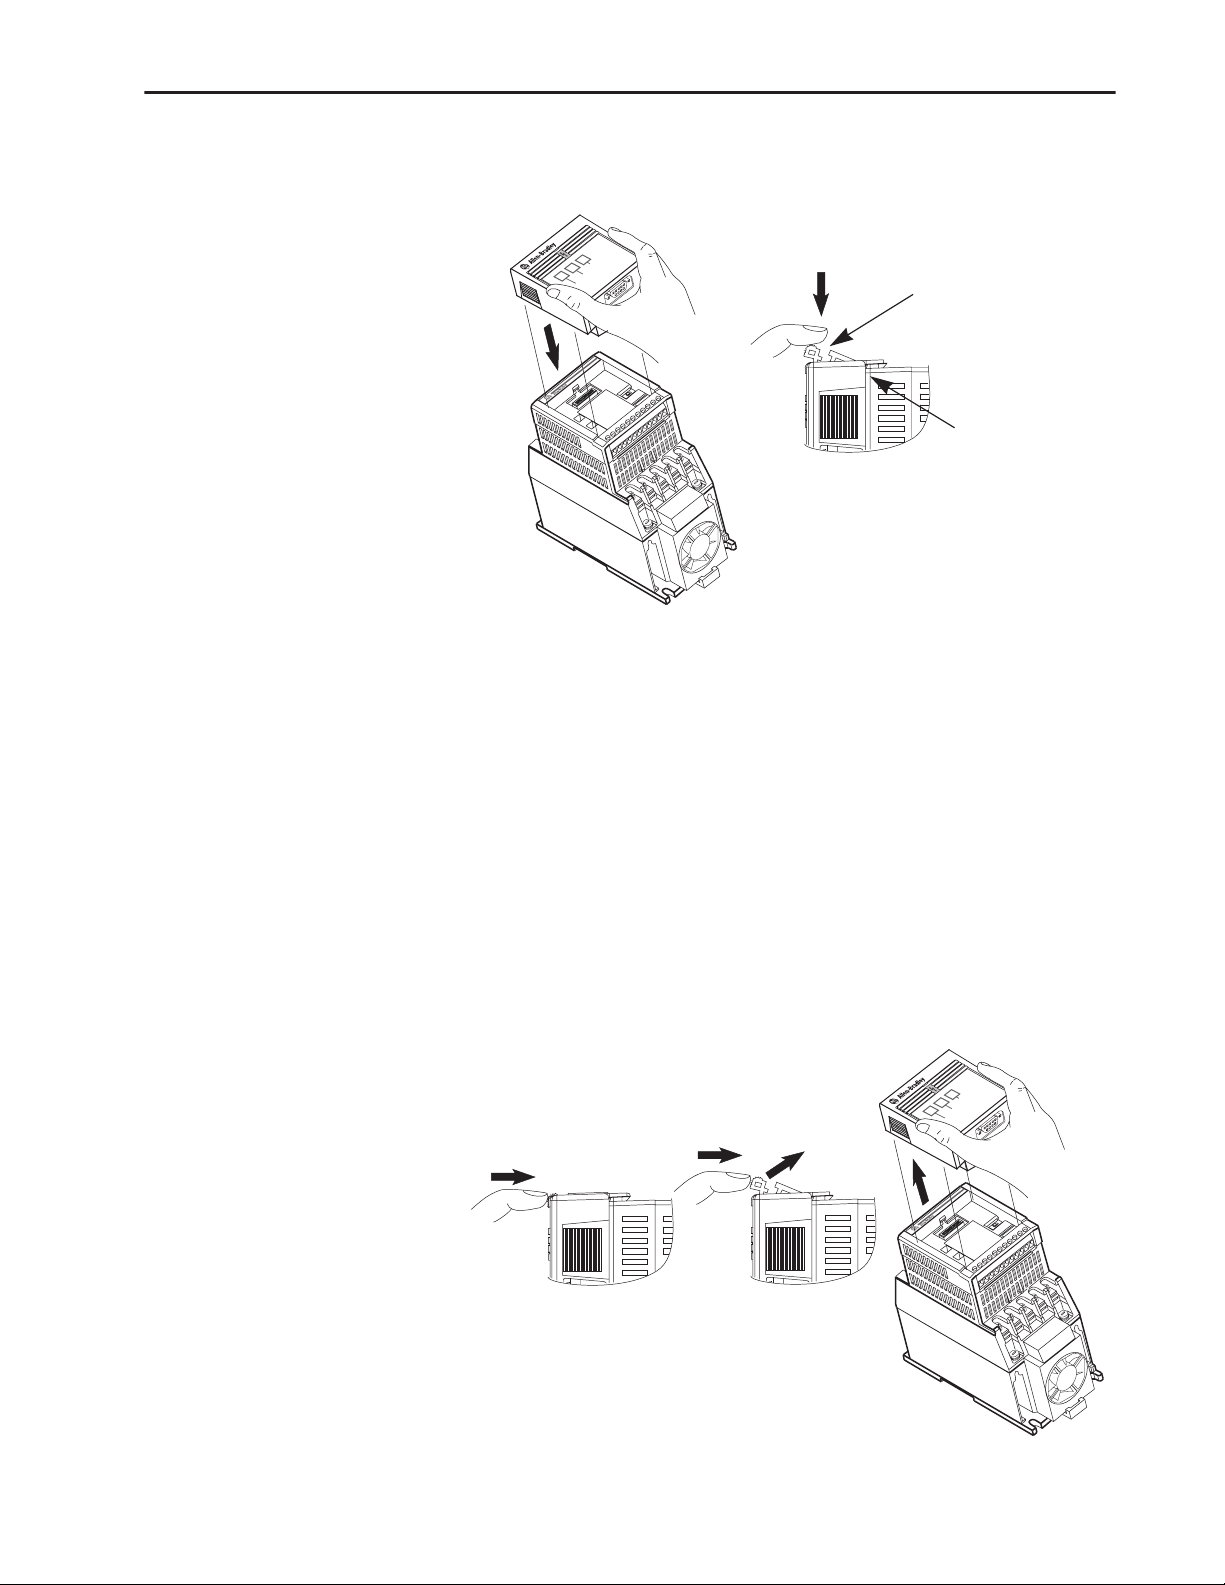
Installing the RS1 Module
After setting the DIP switches, install the RS1 Module in the drive by
following these steps:
1. Verify that all power to the drive is removed.
2. Verify that the latch is up (see Figure 3.3). Insert the module,
ensuring that the pins on the back of the module line up with the
drive connector/expansion port.
3. Press the module down until it is fully seated (sides are flush with
the top surface of the drive).
4. Press the latch down until it snaps into place.
Page 15
Installation and Wiring 3–5
Figure 3.3
Communication Module Installation
RS232
Serial Comm
READY
FAULT
COMM
Latch must be in this position
before installation. Once installed,
push the latch down until it locks
into place.
1 2 3 4 5 6 7 8 9 10 11
+
–
DC
T3
W
T2
V
T1
U
DC
Module should be flush
with top surface of drive
Removing the RS1 Module
If you need to reconfigure the RS1 Module DIP switches, you must
remove the module from the drive.
1. Verify that all power to the drive is removed. Review Attention
statement on page 3–4.
2. Disconnect the cable/connector from the module (if present).
3. Press in on the module’s latch and then push away and up.
4. Grasp the module and pull straight up. Avoid bending or twisting
the contact pins located underneath the center portion of the
module.
Figure 3.4
Removing the Communication Module
RS232
Serial Comm
READY
FAULT
COMM
1 2 3 4 5 6 7 8 9 10 11
T1
+
DC
–
DC
T3
W
T2
V
U
Page 16

3–6 Installation and Wiring
Wiring the Connector
The examples below can be used as a guide when wiring.
Important:
Keepcommunication wiring awayfrom high noisesources
such as motor cables.
Figure 3.5
Wiring the RS1 Connector
RS232
Serial Comm
CAT
160-RS1
Pin 9
SER
MADE IN U.S.A.
READY
FAULT
COMM
Pin 1
9 Pin, Female D-Shell Connector
Personal Computer Serial Connections
RS232
Serial Comm
READY
FAULT
COMM
N.C.
N.C.
N.C.
N.C.
Adapter Cable to MicroLogix Serial Communications Cable
RS232
Serial Comm
READY
FAULT
COMM
N.C.
N.C.
1761-CBL-PM02
Adapter Cable
N.C.
N.C.
RS1 Module
9 Pin, Male
COM
TX
RX
N.C.
COM
RS1 Module
9 Pin, Male
COM
TX
RX
N.C.
COM
1
, D-Shell Connector
1
6
2
7
33
8
4
9
5
1
, D-Shell Connector
1
6
2
7
33
8
4
9
5
PC RS-232 Port
9 Pin, Female1, D-Shell Connector
5
COM
9
4
8
7
2
6
1
DTR
TX
RX
DCD
RI
CTS
RTS
DSR
to A-B Cable 1761-CBL-PM02
9 Pin, Male1, D-Shell Connector
1
N.C.
6
2
7
8
4
9
5
TX
RX
N.C.
COM
N.C.
N.C.
N.C.
N.C.
1
Gender specified refers to the cable connectors
Refer to the MicroLogix 1000 User Manual,
publication 1761-6.3 for further details
Page 17

Figure 3.5
Wiring the RS1 Connector
SLC 500 Port 1 Serial Communications
Installation and Wiring 3–7
- continued
RS1 Module
9 Pin, Male
RS232
Serial Comm
READY
FAULT
COMM
N.C.
N.C.
N.C.
N.C.
1
, D-Shell Connector
COM
COM
1
2
TX
33
RX
4
N.C.
5
6
7
8
9
SLC RS-232 Port
9 Pin, Female1, D-Shell Connector
5
COM
9
4
8
7
2
6
1
DTR
TX
RX
DCD
N.C.
CTS
RTS
DSR
1761-NET-AIC+ Connections
RS1 Module
1
9 Pin, Male
RS232
Serial Comm
READY
FAULT
COMM
N.C.
N.C.
N.C.
N.C.
, D-Shell Connector
COM
COM
1
2
TX
33
RX
4
N.C.
5
6
7
8
9
AIC+ RS-232 Port 1
9 Pin, Female1, D-Shell Connector
5
COM
9
4
8
7
2
6
1
N.C.
TX
RX
DCD
N.C.
N.C.
N.C.
®
Channel 0 Serial Communications
PLC-5
RS1 Module
9 Pin, Male
RS232
Serial Comm
READY
FAULT
COMM
N.C.
N.C.
N.C.
N.C.
1
, D-Shell Connector
TX
RX
N.C.
1
2
3
4
5
COM
COM
6
7
8
9
to Channel 0
1
Gender specified refers to the cable connectors
PLC RS-232 Port
25 Pin, Male
1
, D-Shell Connector
1
C. GND
14
2
TXD
15
3
RXD
16
4
RTS
17
5
CTS
18
6
DER
19
7
SG. GND
20
8
DCD
21
9
RES
22
10
N.C.
23
11
RES
24
12
RES
25
13
N.C.
N.C.
RES
N.C.
RES
RES
N.C.
DTR
RES
N.C.
N.C.
RES
RES
Page 18

3–8 Installation and Wiring
Connecting the Communication
Cable to the Module
Follow these steps to connect your module.
1. Verify that the cable/connector is correctly wired (See Figure
3.5).
2. Locate the D-shell connector at the base of the RS1 Module.
3. Plug cable/connector into the RS1 D-shell connector and secure.
Page 19

Chapter
Modes of Operation
Chapter 4 contains the following information:
• Powering up the drive with the RS1 Module installed.
• The modes of operation and LED indications.
4
Powering Up the Drive
LED Indicators
After you have installed the RS1 Module, apply power to the drive
and to the connected device. The READY LED should illuminate. If
it does not, refer to Chapter 9, Troubleshooting.
The RS1 Module has three LEDs (see figure below) which provide
module status.
READY LED
FAULT LED
COMM LED
RS232
Serial Comm
READY
FAULT
COMM
The LEDs are defined as follows:
• COMM – The COMM LED has four possible states:
Green (solid) The cable is connected (both ends) and module is ready to
communicate.
Green (flashing) The module is on-line and communicating.
Red (solid) Connection was lost or application timed out.
Red (flashing) Device is transmitting & receiving data but application has timed out.
•FAULT – This LED tracks the fault status of the 160 Drive.
When no faults are present, the LED will be off. The LED will
illuminate (red) if a drive fault occurs.
• READY – The Ready LED will illuminate (green) whenever the
module is connected to the drive and power is applied.
Page 20

4–2 Modes of Operation
Modes of Operation
The RS1 Module has three modes of operation.
• Power-up mode
• Run mode
• Error mode
Power-up Mode
The following sequence of operation occurs:
1. During power-up, the READY LED illuminates.
2. The module reads and stores the DIP switch settings.
If the power-up sequence is successful, the module enters the run
mode and the COMM LED flashes green or turns solid green.
If the power-up sequence fails, the COMM LED will go to solid red
and the module will enter the Error Mode. See the Error Mode
description in this section.
Run Mode
After a successful power-up, the RS1 Module enters the run mode
and operates as a slave device to a master device. In run mode, the
module:
• Accepts and responds to messages from the master on the
network.
• Monitors cable integrity.
If an error is detected, the module enters error mode (see below).
Error Mode
If the module detects an error, the COMM LED flashes red or turns
solid red. Refer to Chapter 9 for details on how to recover from an
error.
Page 21

Chapter
RS1 Data Table Interface
This chapter provides you with the following information:
• Supported PCCC commands of the RS1 Module.
• RS1 Module Data Table Structure.
5
Supported PCCC Command
List
Data Table Structure
The RS1 Module communicates over RS-232 using the
Allen-Bradley DF1 protocol. The DF1 protocol uses PCCC
(Programmable Controller Communication Commands) to determine
the data format. PCCC describes the action of the message (set or get)
and the location of the data involved. For further PCCC information,
refer to DF1 Protocol and Command Set Reference Manual,
publication 1770-6.5.16.
The RS1 Module responds to the PCCC types shown in the following
table.
Table 5.A
PCCC Types
CMD Code FNC Code Command Name
0x06 0x03 Identify Host and some Status
0x0F 0x67 Typed Write (Logical ASCII Addressing only)
0x0F 0x68 Typed Read (Logical ASCII Addressing only)
0x0F 0xA2 Protected Type Logical Read with 3 Address Fields
0x0F 0xAA Protected Type Logical Write with 3 Address Fields
0x0F 0xA1 Protected Type Logical Read with 2 Address Fields
0x0F 0xA9 Protected Type Logical Write with 2 Address Fields
The RS1 Module maintains a data table that allows DF1 devices (such
as an SLC 500 or MicroLogix 1000) to set or request data using
standard PCCC. The data table in the RS1 Module contains:
• Drive parameter information
• RS1 parameter information
• Logic command & status data
• Speed command & status data
• Communication status information.
The data table is formatted as integer files and follows the form
shown on the next page.
Page 22

5–2 RS1 Data Table Interface
Table 5.B
Data Table Format
Parameter Number File Address Description
None N10:0 Total number of drive & RS1 parameters (R/W -
Parameters 1-1xx N10:1 - N10:1xx Drive parameter value read or write. 160 drive
None N13:0 Total number of RS1 parameters (R/W - values only).
RS1 Parameters
1-xx
None N30:0 Total number of drive parameters (Read Only - Full/
Parameters 1-1xx N30:1 - N30:1xx Read Full/All Info for drive parameters. 160 drive
None N33:0 Total number of RS1 parameters (Read Only - Full/
RS1 Parameters
1-xx
None N41:0 Logic Command/Status – Writing sends a logic
None N41:1 Reference/Feedback – Writing sends a speed
111 N42:0 Number of ENQs to transmit before retrying
112 N42:1 Number of NAKs received before message is
113 N42:2 Message timeout
114 N42:3 Application timeout.
N13:1 - N13:xx Read/write value for RS1 parameters 1-xx.
N33:1 - N33:xx Read Full/All Info for RS1 parameters 1-xx.
values only).
parameters 1-99 and RS1 parameters 100-1xx.
All information).
parameters 1-99 and RS1 parameters 100-1xx.
All information).
command to drive. Reading supplies logic status.
command to drive. Reading supplies speed
feedback from drive.
message.
canceled.
The “File Address” section of the data table is divided into eight
areas, each having a different purpose.
1. Parameter Value Read or Write (N10). Reading data from files
in this area will cause the module to read parameter values from
the device and send those values as the response to the read
message. Writing data to files in this area will cause the module
to write that data into device parameters.
2. RS1 Parameter Value Read or Write (N13). Reading data from
files in this area will cause the module to read parameter values
from the RS1 and send those values as the response to the read
message. Writing to N13 will cause changes to RS1 parameters.
3. Parameter Read Full (N30). This area is read-only. When read,
the data returned consists of 20 words of information about each
parameter including scaling, parameter text, units text, minimum,
maximum, and default values. When reading this area, set the
number of elements to twenty times the number of parameters to
be read.
Refer to table on next page.
Page 23

RS1 Data Table Interface 5–3
Parameter Read Full Response Format
Data Word Description Character
1 Parameter Value or Status Word
2 Descriptor
3 Multiply Value
4 Divide Value
5 Base Value
6 Offset Value
7 Parameter Text 2 1
8 Parameter Text 4 3
9 Parameter Text 6 5
10 Parameter Text 8 7
11 Parameter Text 10 9
12 Parameter Text 12 11
13 Parameter Text 14 13
14 Parameter Text 16 15
15 File, Group, Element
16 Minimum Value
17 Maximum Value
18 Default Value
19 Unit Text 2 1
20 Unit Text 4 3
4. Logic Command (N41:0). Writing sends a logic command to the drive. The format is:
Logic Bits
Command Description15 14 13 12 11 10 9 8 7 6 5 4 3 2 1 0
X Stop 1 = Stop, 0 = Not Stop
X Start 1 = Start, 0 = Not Start
X N/A Reserved
X Clear Faults 1 = Clear Faults, 0 = Not Clear Faults
X X Direction 00 = No Command 10 = Reverse Command
X X N/A Reserved
X X X X N/A Reserved
X X X Reference
X N/A Reserved
1
Presets 0, 1 & 2 are not available when commanding over a network.
Presets 3, 6 & 7 are only available with Preset Speed drives that are commanded over a network.
Presets 4 & 5 are always available when commanding over a network.
Series A & B Analog Signal Follower drives have no presets.
Select
1
01 = Forward Command 11 = Hold Direction Command.
000 = No Command 011 = Preset 3 110 = Preset 6
001 = TB3 Control 100 = Preset 4 111 = Preset 7
010 = Network Control 101 = Preset 5
5. Logic Status (N41:0). Reading supplies logic status. Data is formatted as follows:
Logic Bits
Command Description15 14 13 12 11 10 9 8 7 6 5 4 3 2 1 0
X Enabled 1 = Enabled, 0 = Not Enabled
X Running 1 = Running, 0 = Not Running
X Command Direction 1 = Forward, 0 = Reverse
X Rotating Direction 1 = Forward, 0 = Reverse
X Accel 1 = Accelerating, 0 = Not Accelerating
X Decel 1 = Decelerating, 0 = Not Decelerating
X N/A Reserved
X Fault 1 = Faulted, 0 = Not Faulted
X At Speed 1 = At Speed, 0 = Not At Speed
X X X Local 000 = TB3 Control, 001 = Network Control
X X X X Frequency Source 0000 = Preset 0 0100 = Preset 4 1000 = TB3
0001 = Preset 1 0101 = Preset 5 1001 = Network
0010 = Preset 2 0110 = Preset 6 1010 = Not Defined
0011 = Preset 3 0111 = Preset 7 1111 = Not Defined
Page 24

5–4 RS1 Data Table Interface
6. Reference Command (N41:1) Writing sends a speed reference
to the 160 drive. This is a scaled speed reference from 0 to 32767,
where 0 = 0 Hz and 32767 = P33 - [Maximum Frequency].
7. Feedback Command (N41:1) Reading supplies speed feedback
from the drive. This is the actual drive speed scaled from 0 to
32767, where 0 = 0 Hz and 32767 = P33 - [Maximum
Frequency].
8. RS1 Module Parameters (N42). This area contains information
about the communication configuration.
• Number of ENQ's (N42:0). The number of ENQ's sent by
the module before giving up on receiving ACK or NAK.
• Number of NAK's (N42:1). The number of times the module
will resend a message if the response is always NAK.
• Message Timeout (N42:2). The number of milliseconds the
module will wait before sending an ENQ.
• Application Timeout (N42:3). The number of seconds the
module will wait between messages before faulting the 160
drive.
Page 25

Chapter
6
Parameter Descriptions
This chapter provides a listing and description of the RS1 Parameters.
Important:
RS1 Parameters
The RS1 Module contains a set of parameters that are used to define
how the module will interact with the network. These parameters may
be used to set the module’s baud rate, protocol, etc. Parameters may
also be read to attain status from the module.
Parameter Number
Drive
(N10:, N30:)
101 1 Read/Write [Node Address]
102 2 Read Only [DF1 Adapter Ver]
103 3 Read/Write [Fault Mode]
104 4 Read Only [Active Protocol]
105 5 Read Only [DIP BAUD Rate]
106 6 Read Only [DIP Checksum]
107 7 Read Only [DIP Protocol]
108 8 Read/Write [EPROM Protocol]
109 9 Read/Write [EPROM Checksum]
RS1
(N13:, N33:)
Access [Parameter Name] and Description
Address that the RS1 Module will respond to.
Drive power must be cycled before changes will take affect.
Firmware Version of the RS1 Module.
Enables forcing a drive fault for communication errors.
0 = Fault Drive Enabled
1 = Fault Drive Disabled
The current communication protocol that the RS1 is using.
0 = DF1 Point-to-Point
1 = DF1 Multi-drop
2 = Used by Rockwell Automation Field Service Personnel
Selected baud rate from DIP switches SW1-SW2.
0 = 9600 Baud
1 = 2400 Baud
2 = 1200 Baud
3 = EPROM Mode
Current checksum switch setting (selected by SW4).
BCC = 0 (OFF)
CRC = 1 (ON)
Current protocol selected by SW3.
0 = DF1 Point-to-Point
1 = DF1 Multi-drop
The communications protocol used when SW1 & SW2 are set to “On”
(EPROM Mode).
0 = DF1 Point-to-Point
1 = DF1 Multi-drop
Drive power must be cycled before changes will take affect.
The checksum mode used when SW1 & SW2 are set to “On” (EPROM
Mode).
0 = BCC
1 = CRC
Drive power must be cycled before changes will take affect.
Refer to your 160 User Manual for drive parameter
descriptions.
Min./Max.
Values Default
0 to 254 1
– None
0 to 1 0
0 to 2 0
0 to 3 0
0 to 1 0
0 to 1 0
0 to 1 0
0 to 1 0
Page 26

6–2 Parameter Descriptions
Parameter Number
Drive
(N10:, N30:)
RS1
(N13:, N33:)
Access [Parameter Name] and Description
110 10 Read/Write [EPROM BAUD]
The baud rate used when SW1 & SW2 are set to “On” (EPROM Mode).
1 = 1200 Baud
2 = 2400 Baud
3 = 4800 Baud
4 = 9600 Baud
Drive power must be cycled before changes will take affect.
111 11 Read/Write [Max ENQs]
The number of ENQs sent while waiting for a ACK or NAK.
112 12 Read/Write [Max NAKs]
Number of times module resends a message if response is NAK.
113 13 Read/Write [Message Timeout]
Amount of time (milliseconds) RS1 Module waits before sending an ENQ.
114 14 Read/Write [Comm App Timeout]
When logic command/status and reference/feedback messaging is active,
length of time in seconds from last DF1 message before faulting the drive.
115 15 Read [Packets Sent]
Number of DF1 packets sent.
116 16 Read [Packets Received]
Number of DF1 packets received.
117 17 Read [Undelivered Msgs]
Number of undelivered messages.
118 18 Read [ENQs Sent]
Number of ENQs sent.
119 19 Read [ENQs Received]
Number of ENQs received.
120 20 Read [NAKs Received]
Number of NAKs received.
121 21 Read [Bad Packets Rcvd]
Number of bad packets received (NAKed).
122 22 Read [Duplicate Packet]
Number of duplicate packets received.
123 23 Read [Out Memory NAKs]
Number of out of memory NAKs (messages coming faster than they can
be processed).
124 24 Read [AppTimeout Cnt]
Number of application timeouts.
125 25 Read/Write [Overrun Errors]
Action of the RS1 Module on a data rx overrun.
0 = Ignore
1 = Clear UART buffer
126 26 Read Only [Overrun Err Cnt]
Data Overrun Count.
127 27 Read/Write [Force Fault]
Setting this parameter will fault the drive.
0 = No Action
1 = Fault the Drive
128 28 Read/Write [Reset RS1]
Setting this parameter to 1 will only reset the RS1 Module parameters to
factory settings.
Important: Drive parameters can be reset using P56 - [Reset Functions].
0 = No Action
1 = Resets RS1 parameters to defaults
129 29 Read/Write [Clr Comm Stats]
Setting this parameter to 1 will clear all diagnostic counters.
0 = No Action
1 = Clear all DF1 diagnostic counters (P115-124, 126)
Min./Max.
Values Default
1 to 4 9600 Baud
0 to 255 3
0 to 255 3
100 to 65535 100 Milliseconds
0 to 65535 5 Seconds
0 to 65535 0
0 to 65535 0
0 to 65535 0
0 to 65535 0
0 to 65535 0
0 to 65535 0
0 to 65535 0
0 to 65535 0
0 to 65535 0
0 to 65535 0
0 to 1 0
0 to 65535 0
0 to 1 0
0 to 1 0
0 to 1 0
Page 27

Parameter Number
Drive
(N10:, N30:)
RS1
(N13:, N33:)
Access [Parameter Name] and Description
130 30 Read [DIP Switches]
Displays the current DIP switch settings.
Bit
0 0 9600 (Default) SW1,
0 1 2400
1 0 1200
1 1 EPROM Mode
0 DF1 Point-to-Point (Default) SW3
1 DF1 Multi-Drop
0
1
131 31 Read [Actual Speed]
Returns speed feedback from the drive. This is the actual drive speed
scaled from 0 to 32767, where 0 = 0 Hz and 32767 = P33 - [Maximum
Frequency].
132 32 Read [Logic Status]
Returns logic status (N41:0). Refer to page 5–3 for data format.
133 33 Read/Write [Logic Mask]
This parameter determines the source of the drive control logic.
A value of “1” corresponds to terminal block control, and any drive input
mode (P46 - [Input Mode]) value
A value of “2” corresponds to RS1 Module logic control. The input mode
value is “2” or “6.”
If the Logic Mask value is changed from “1” to “2,” the terminal block logic
control is masked out by the RS1 Module. The module does this by
changing the Input Mode to the last previously active network mode, “2” or
“6” (if a network mode has not been active since drive power was applied,
it is set to “2”).
If the Logic Mask value is changed from “2” to “1,” the RS1 logic control is
masked out by the RS1 Module. The module does this by changing the
Input Mode to the last previously active non-network mode (if a nonnetwork mode has not been active since drive power was applied, it is set
to “0”).
IMPORTANT: Power must be cycled or P56-[Reset Functions] must be
set to “2” for this change to take affect.
Description Switch3210
SW2
BCC (Default) SW4
CRC
except “2” or “6.”
Parameter Descriptions 6–3
Min./Max.
Values Default
0 to 0xF
0000
0 to 15
0 to 32767 0
0 to 65535 0
1 to 2 1
Page 28

6–4 Parameter Descriptions
End of Chapter 6
Page 29

Chapter
7
Using the RS1 Module with
DriveExplorer™ Software
The purpose of this chapter is to provide an overview of the steps
needed to use the Bulletin 9306 DriveExplorer software program with
the RS1 Module and 160 Drive. DriveExplorer is a Windows® 95/
Windows NT®/Windows® CE based software program that allows
you to upload/download parameter sets from a computer to the 160
Drive using the RS1 Module as an interface. For detailed
DriveExplorer information, refer to the DriveExplorer User Manual,
publication 9306-5.0.
This chapter will guide through . . .
• Configuring the communication port of the computer and
connection to the RS1 Module.
• Downloading a parameter set to the 160 Drive.
• Uploading the 160 parameter set.
• Saving and retrieving parameter sets.
Required Items
Example Network
Before continuing with this chapter, you should have read the
DriveExplorer User Manual. Understanding the concepts in this
manual will be important in completing this chapter.
The following items will be required:
• A personal computer with the DriveExplorer software installed.
• A 160 SSC Drive and RS1 Communication Module.
• A standard straight-thru serial cable
The following setup is used in this chapter. Refer to Chapter 3 for
connection details.
RS232
Serial Comm
READY
FAULT
COMM
Page 30
7–2 Using the RS1 Module with DriveExplorer™ Software
Setting Baud Rates and
Configuring the
Communications Port
Monitoring and Editing
Parameters
1. Before proceeding, the RS1 Module baud rate should be set as
desired and the module installed as explained in Chapter 3.
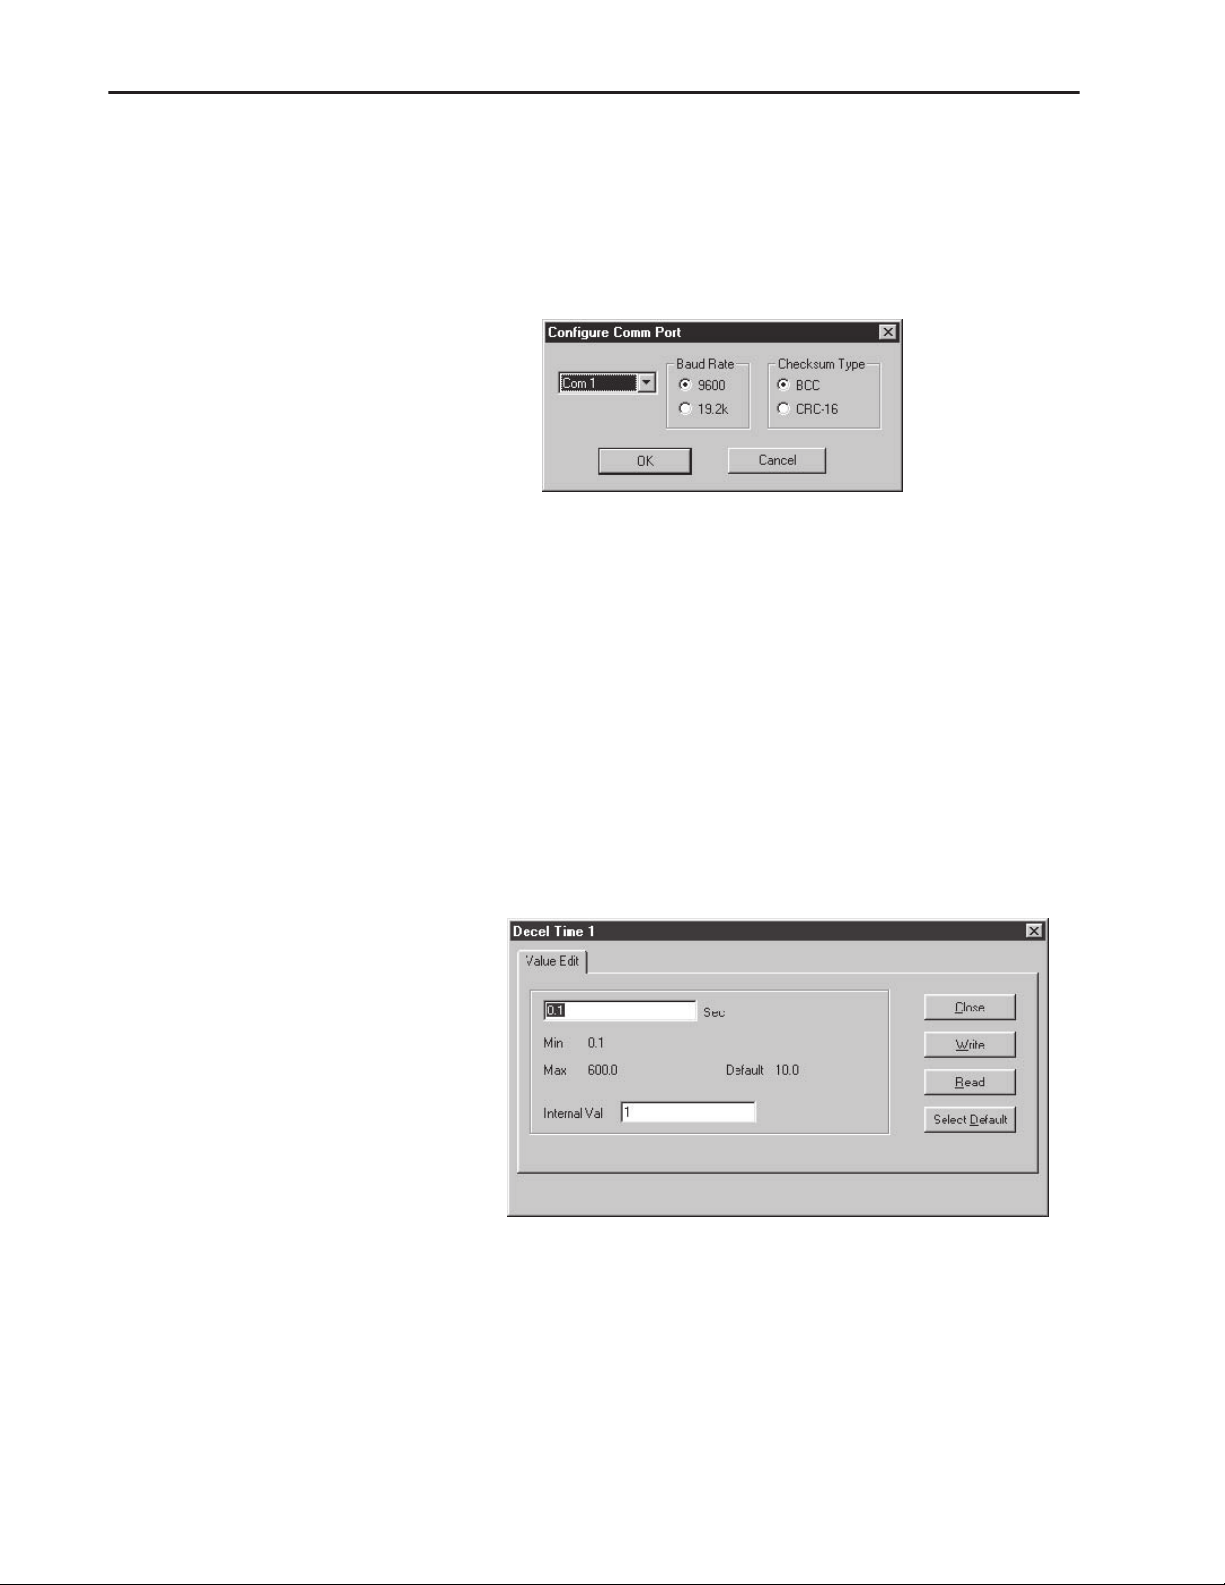
2. The PC serial port must now be configured using DriveExplorer.
A. Start DriveExplorer.
B. The Configure Comm Port window appears.
C. Select the communications port that your computer is using.
Next select the correct Baud Rate and Checksum Type – then
choose OK.
D. From the Explore menu, select
appear in the left pane of the main DriveExplorer window
under “Devices.”
Connect -> Local
. A node will
Monitoring Parameters
To monitor parameters, double-click the drive in the left pane of the
main DriveExplorer window – drive parameters appear on the right.
Editing Parameters
1. Double-click the parameter name to display the edit dialog box.
Important:
2. Edit the parameter as necessary. To retrieve the current parameter
value, select Read. To retrieve the factory default parameter value
choose Select Default.
3. Selecting Write updates the parameter value. Choose Close.
Important:
The edit dialogbox will varybased on the type of value
that you are editing.
In some cases the drive must be reset or power cycled
before changes take effect. Refer to your user manual.
Page 31

Using the RS1 Module with DriveExplorer™ Software 7–3
Uploading Editable Parameters
Downloading Parameters
It is possible to upload editable parameters and their values (in
internal units) from the drive and store them in a file. There are three
upload options: upload all parameters, upload selected parameters,
and upload links.
1. If you want to upload selected parameters, you must select them
in the right pane of DriveExplorer.
2. Select
3. Select All Parameters or Selected Parameters. Choose OK to
4. In the Save in box, navigate to where you want to save the
5. In the File Name box, type a name.
6. In the Save As type box, select DE Parameter Data Files (*.dep)
7. Choose Save to save the file.
To transfer values saved in a parameters (*.dep) file to the drive, you
must download the file.
Actions -> Upload and Save
dialog box.
upload the parameters and display the Save As dialog box.
parameter file.
for parameters.
to display the Save Parameters
Important:
1. To download the file – select
A prompt appears to warn you that setup values may change.
2. Select Ye s to display the Open dialog box.
3. Select the desired file with a .dep extension.
4. Choose Open to download the values in the file.
Do not download a fileuploaded from onedrive(or device)
to a different drive or device.
Actions -> Download -> Archive File
.
Page 32

7–4 Using the RS1 Module with DriveExplorer™ Software
End of Chapter 7
Page 33
Chapter
8
Using the RS1 Module with a
Programmable Controller
This chapter provides an overview of the steps needed to use the RS1
Module with a MicroLogix 1000 (or other Allen-Bradley
programmable controllers). The programmable controller can send
control messages to the RS1 Module and receive status messages
back. The device also allows a ladder logic program to configure and
read parameters from the 160 Drive.
This chapter contains the following information:
• How to setup the RS1 Module with a programmable controller.
• A sample ladder logic program to control the 160 Drive.
• A description of reading parameters using the Message (MSG)
Command.
• A sample ladder logic program to read parameters.
The MicroLogix 1000 Programmable Controller was used with
RSLogix 500™ software for the examples shown in this chapter – the
concepts demonstrated apply to other programmable controllers as
well, including the SLC 500 and PLC-5.
Required Tools
Example Network
Before continuing, the user should have read and understood:
• MicroLogic 1000 Programmable Controller User Manual,
Publication 1761-6.3 (or appropriate controller User Manual).
• SLC 500 and MicroLogix 1000 Instruction Set Reference Manual,
publication 1747-6.15.
The following tools will be needed to complete this chapter:
• 160 Drive equipped with an RS1 Communication Module.
• MicroLogix 1000 Programmable Controller.
160 Drive with RS1
MicroLogix 1000
RS232
Serial Comm
READY
FAULT
COMM
Page 34

8–2 Using the RS1 Module with a Programmable Controller
Setting the Drive to Enable
Network Control
Setting the Baud Rate and
Checksum Mode
The 160 drive must be configured to accept logic and speed
commands from the network. This can be done by configuring two of
the 160 parameters:
1. Set P46 - [Input Mode] to a value of “2.” This will configure the
drive to accept the logic commands from the network.
2. Set P59 - [Frequency Select] to “1.” This will configure the drive
to accept speed commands from the network.
Changing the above parameters can be done with the 160 Keypad
Module or configuration software such as the DriveExplorer.
Important:
The baud rate and checksum mode on the RS1 Module should be
configured to the desired setting for the network (and other devices).
After configuration, install the RS1 Module into the 160 Drive as
explained in Chapter 3. Note that the MicroLogix uses CRC as the
checksum mode.
For a new Input Mode to take affect, drive power must be
cycled.
Connecting the Drive to the
Programmable Controller
Controlling the Drive
The RS1 Module is connected to the programmable controller
through the 9-pin D-shell connector. Since each programmable
controller may have different wiring requirements, Figure 3.5 should
be referenced as a guide.
Important:
Controlling the 160 Drive from a programmable controller is
accomplished using Message Commands to communicate through the
RS1 Module to the drive. To send a Start or Stop command to the
drive, the Message Command (MSG) is set up to write to N41:0. To
read the drive status, the Message Command is set up to read from
N41:0. Refer to Chapter 6 for the logic command and status format.
Drive speed can be controlled or read in the same manner by
accessing N41:1.
The communication port of the programmable controller
may also be used to program the controller, thus the user
may haveto disconnect the cable going to the RS1 Module
before programming the controller.
Page 35

Using the RS1 Module with a Programmable Controller 8–3
Program the Ladder
The example ladder program in Figure 8.2 demonstrates writing a
Logic Command to the drive and reading the Logic Status from the
drive.
In the following example ladder program, B3:0/0 is set every 2
seconds. This enables a Logic Command write to be done followed
by the Logic Status read. The data for the Logic Command is stored
in N7:8 of the MicroLogix and is written to location N41:0 of the RS1
Module. For the Logic Status, data from the RS1 Module at location
N41:0 is read by the MicroLogix and stored in N7:9. This ladder
program could be modified to read and write speed commands for the
160 Drive by changing the read and write location in the RS1 Module
from N41:0 to N41:1.
Figure 8.1
MSG Commands Setup – Logic Command/Status
Page 36

8–4 Using the RS1 Module with a Programmable Controller
Figure 8.2
Writing Logic Command and Reading Logic Status
LAD 3 - DF 1 LOGIC --- Total Rungs in File = 5
This rung writes the Logic Command - Data in N7:8 is written to the Drive at N41:0
Enable for the Logic
command Write
B3:0
0000
0
MSG
Read/Write Message
Read/Write Write
Target Device 500CPU
Control Block N7:0
Control Block Length 7
Setup Screen
EN
DN
ER
0001
0002
0003
Enable for the Logic
command Write
B3:0
0
This rung reads the Logic Status from the drive - Data from N41:0 is read and placed in N7:9
Enable for Logic
Command Read
B3:0
1
Enable for Logic
Command Read
B3:0
1
Done Bit - Logic
Command Write
N7:0
13
Error Bit - Logic
Command Write
N7:0
12
MSG
Read/Write Message
Read/Write Read
Target Device 500CPU
Control Block N7:10
Control Block Length 7
Done Bit - Logic
Command Read
N7:10
13
Error Bit - Logic
Command Read
N7:10
12
Enable for the Logic
command Write
B3:0
U
0
Enable for Logic
Command Read
B3:0
L
1
EN
DN
ER
Setup Screen
Enable for Logic
Command Read
B3:0
U
1
0004
Reading and Writing
Parameters
END
Reading or writing parameters can be accomplished using message
commands to communicate through the RS1 Module to the drive. The
drive parameters are accessed at location N10:XX, with the XX being
the parameter number to read or write (i.e. N10:30 accesses
parameter P30 - [Accel Time]).
Page 37
Using the RS1 Module with a Programmable Controller 8–5
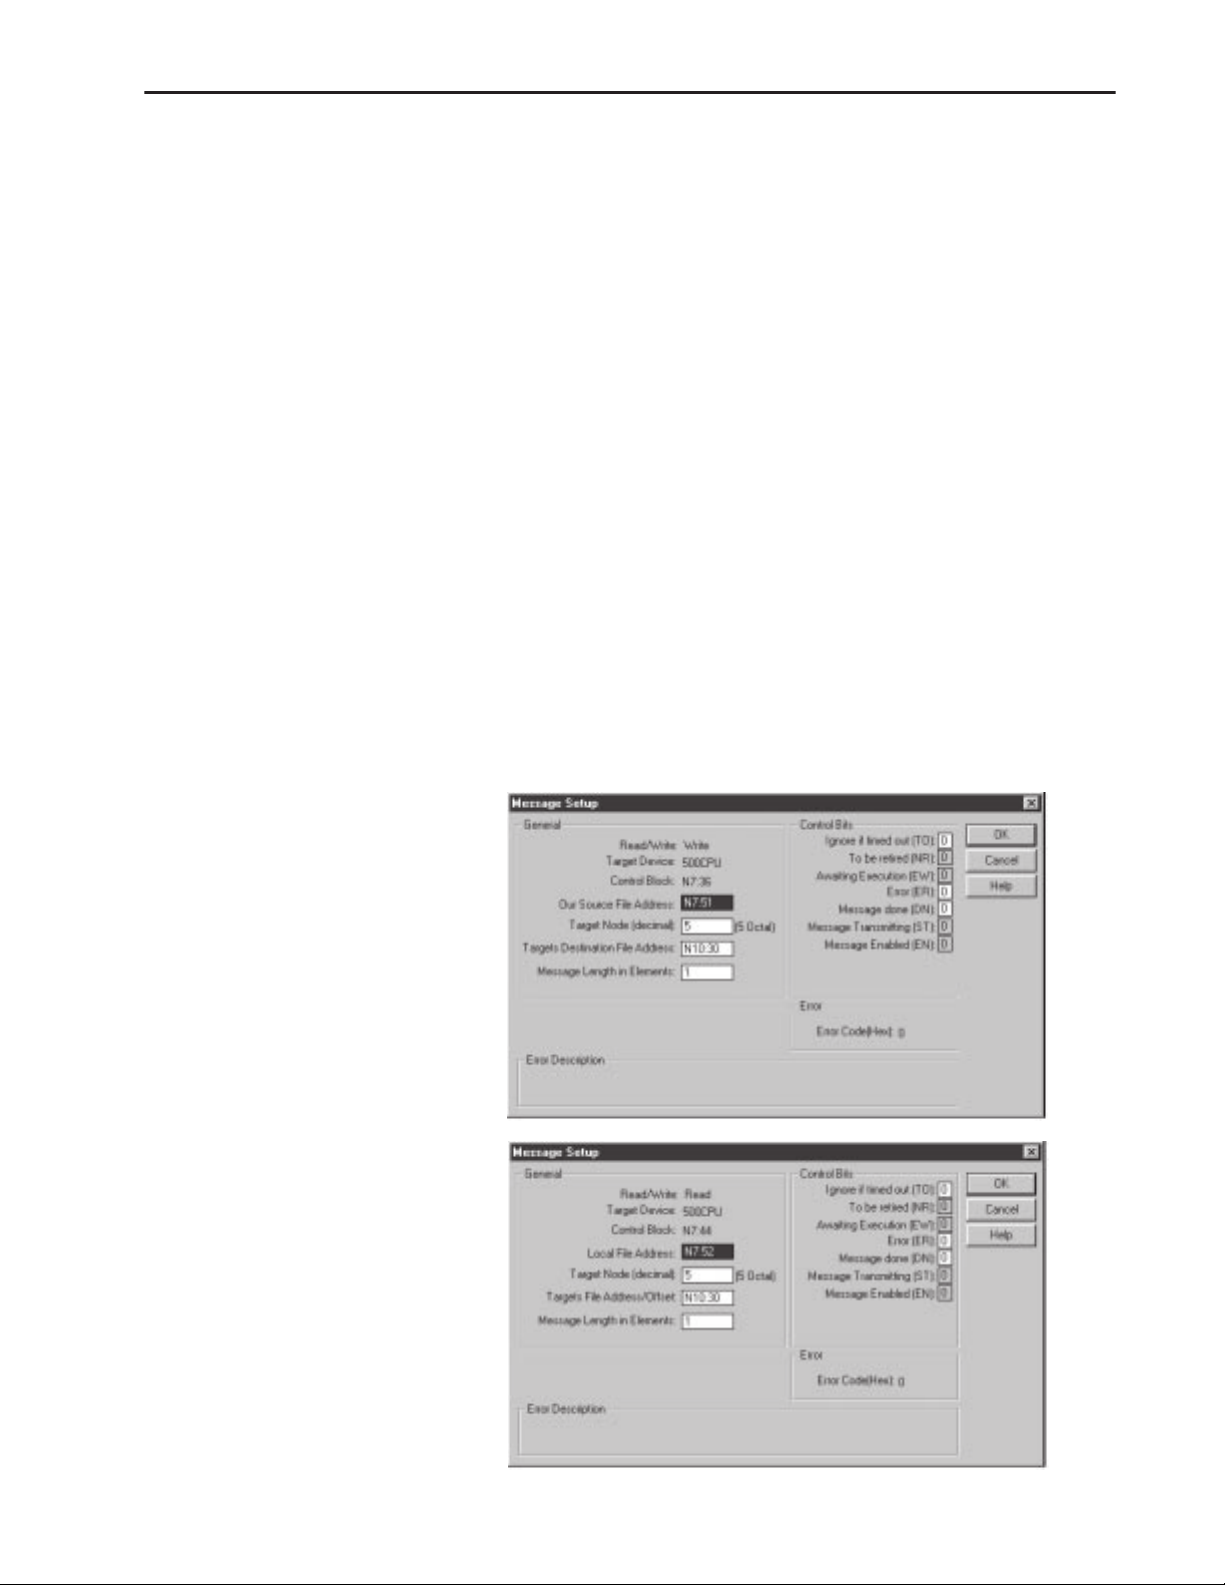
You can read or write RS1 Module parameters through location N10
or N13. For location N10, the RS1 parameters start at N10:101, thus
accessing location N10:101 reads or writes RS1 parameter P1 -
[Node Address]. For location N13, the RS1 parameters start at N13:1
(N13:1 also accesses RS1 parameter P1 - [Node Address]).
Program the Ladder for
Parameter Reads and Writes
The example ladder program in Figure 8.4 accomplishes reading and
writing drive parameters.
In the following ladder program, B3:1/4 is set when requesting a
parameter write. When no other Message Commands are enabled,
B3:0/4 will be set, starting the parameter write. For the parameter
write, data from N7:51 is written by the MicroLogix to location
N10:30 (P30 - [Accel Time]) of the RS1 Module. Bits B3:0/4 and
B3:1/4 are cleared when the Message Command is completed.
B3:1/5 is set when requesting a read of a parameter. When no other
Message Commands are enabled, B3:0/5 will be set, starting the
parameter read. For the parameter read, location N10:30 (P30 -
[Accel Time]) of the RS1 Module is read by the MicroLogix and the
data is placed in N7:52. Bits B3:0/5 and B3:1/5 are cleared when the
Message Command is completed.
Figure 8.3
MSG Commands Setup – Parameter Read/Write
Page 38

8–6 Using the RS1 Module with a Programmable Controller
Figure 8.4
Reading and Writing Drive Parameters
LAD 5 - PARAMETER --- Total Rungs in File = 5
Parameter Write - when it's time to perform a parameter write B3:0.4 and B3:1.4 will be set. Data from N7:51 will written out Channel 0
to the 160 - RS1 module at location N10:30 (parameter 30). To write to a different parameter, change word 5 of the control word (N7:41)
to the new parameter number.
Enable Bit Parameter write
control
B3:0
0000
4
Parameter Write
Request Bit
B3:1
4
Parameter WriteData N7:51 is wrote
to RS1 module N10:30
MSG
Read/Write Message
Read/Write Write
Target Device 500CPU
Control Block N7:36
Control Block Length 7
Setup Screen
EN
DN
ER
0001
0002
0003
Enable Bit Parameter write
control
B3:0
4
Parameter Read - when it's time to perform a parameter read B3:0.5 and B3:1.5 will be set. Data from the RS1 module
N10:30 (parameter 30) will be read through Channel 0 back to the controller and placed in N7:52 . To read a different parameter,
change word 5 of the control word (N7:49) to the new parameter number.
Enable Bit Parameter Read
control
B3:0
5
Enable Bit Parameter Read
control
B3:0
5
Done Bit Parameter Write
N7:36
Error Bit Parameter Write
N7:36
Parameter Read
Request Bit
B3:1
5
Done Bit Parameter Read
N7:44
13
Error Bit Parameter Read
N7:44
12
13
12
MSG
Read/Write Message
Read/Write Read
Target Device 500CPU
Control Block N7:44
Control Block Length 7
Setup Screen
Enable Bit Parameter write
control
B3:0
U
4
Parameter Write
Request Bit
B3:1
U
4
Enable Bit Parameter Read
control
B3:0
U
5
Parameter Read
Request Bit
B3:1
U
5
EN
DN
ER
0004
END
Page 39

Chapter
Troubleshooting
The purpose of this chapter is to help you troubleshoot your RS1
Module.
ATTENTION: Servicing energized industrial control
!
!
equipment can be hazardous. Electrical shock, burns, or unintentional actuation of controlled industrial equipment
may cause death or serious injury. Follow the safety-related
practices of NPFA 70E, Electrical Safety for Employee
Workplaces, when working on or near energizedequipment.
Do not work alone on energized equipment.
ATTENTION: Do not attempt to defeat or override fault
circuits. The cause of a fault indication must be determined
and corrected before attempting operation. Failure to
correct a drive or systemmalfunction may resultin personal
injury and/or equipment damage due to uncontrolled
machine system operation.
9
LED Indicators and
Troubleshooting
The RS1 Status LEDs can help you troubleshoot the module in the
event that problems occur. Refer to the paragraphs that follow for
details.
Status LEDs
Refer to Chapter 4 for
detailed LED descriptions
RS232
Serial Comm
READY
FAULT
COMM
Page 40

9–2 Troubleshooting
READY LED
The green READY LED will illuminate whenever the RS1 Module is
connected to the drive and power is applied.
COMM LED
The COMM LED provides status information on module operations.
Table 9.A shows how to use the LED to detect and correct common
operating problems.
Table 9.A
COMM LED Indications
Color State What It Means: What To Do:
Red Solid Cable disconnected or bad connection. Connect cable/check connections.
Application timed out. Application did not access N41:0
before parameter 114 expired –
verify parameter 114 setting.
Green Solid Cable is connected and module is ready. No action required.
Flashing Device is on-line and communicating. No action required.
FAULT LED
When the FAULT LED is Red, a drive fault is present. Drive fault
codes can be read by accessing drive parameter P07 - [Last Fault].
Refer to Tables 9.B and 9.C for fault descriptions/actions.
Table 9.B
1
160 Drive
Fault Code Fault Indication Description Corrective Action
00 No Fault The drive is currently not faulted. No action required.
03 Power Loss Fault DC Bus voltage remains below 85% nominal on
04 Undervoltage Fault DC Bus voltage fell below the minimum value
05 Overvoltage Fault DC Bus maximum voltage exceeded. Bus overvoltage caused by motor regeneration.
06 Motor Stall Fault Motor has stalled. Motor load is excessive. Longer accel time or reduced load required.
07 Motor Overload Fault Internal electronic overload trip. Excessive
08 Overtemperature Fault Excessive heat detected. Clear blocked or dirty heat sink fins. Check ambient
12 Overcurrent Fault Overcurrent detected in hardware trip circuit. Check short circuit at the drive output or excessive
20 Drive Overload Fault An internal electronic overload trip has
22 Drive Reset Stop input not present. Check stop input at TB3 terminal 8.
32 EPROM Fault EPROM has invalid data. Reset EPROM using P56 - [Reset RS1].
33 Max Retries Fault Drive did not reset fault within the max retries
38 Phase U Fault Phase to ground fault detected between drive
39 Phase V Fault Phase to ground fault detected between drive
power up for longer than 5 seconds.
while the motor was running.
motor load exists.
occurred. The drive is overheating.
specified.
and motor phase U.
and motor phase V.
1
Refer to the
Fault Codes
160 User Manual
Monitor incoming AC line for low voltage or line power
interruption.
Monitor incoming AC line for low voltage or line power
interruption.
Extend the decel time, or install dynamic brake option
or external capacitor module.
Reduce motor load.
temperature. Check for blocked or non-operating fan.
load conditions at the motor.
Clear blocked or dirty heat sink fins. Check ambient
temperature. Check for blocked or non-operating fan.
Repair system fault.
Check wiring between drive and motor. Check motor
for grounded phase.
Check wiring between drive and motor. Check motor
for grounded phase.
for the most current fault code information.
Page 41

Troubleshooting 9–3
Table 9.B (continued)
160 Drive1 Fault Codes
Fault Code Fault Indication Description Corrective Action
40 Phase W Fault Phase to ground fault detected between drive
41 UV Short Fault Excessive current has been detected between
42 UW Short Fault Excessive current has been detected between
43 VW Short Fault Excessive current has been detected between
48 Reprogramming Fault Occurs when reset defaults is performed. Clear fault.
49 Zero Overload Fault Occurs when load requires excessive current at
and motor phase W.
these two drive output terminals.
these two drive output terminals.
these two drive output terminals.
zero hertz.
1
Refer to the
160 User Manual
for the most current fault code information.
Check wiring between drive and motor. Check motor
for grounded phase.
Check the motor and external wiring to the drive
output terminals for a shorted condition.
Check the motor and external wiring to the drive
output terminals for a shorted condition.
Check the motor and external wiring to the drive
output terminals for a shorted condition.
Reduce motor load and/or motor dwell time at zero
hertz.
Table 9.C
RS1 Fault Codes
Fault Code Fault Indication Description Corrective Action
51 RS1 Module EPROM Fault Module EPROM has invalid data. Reset to factory defaults P128 - [Reset RS1].
52 RS1 Lost I/O Connection Application timed out. Check master for correct operation (i.e., powered up,
55 Force Fault P127 - [Force Fault] was set to “1.” Clear fault.
run mode, etc.).
RS1/DF1 Error Codes
The following error codes could be returned over DF1 (with the
Message Command) when accessing the RS1 Module.
Table 9.D
Error Codes
Message STS EXT STS Problem Problem
All Messages 10h N/A Illegal command or format. The RS1 does not support this command.
F0h 06h Address does not point to anything usable. The address does not exist, or does not point to anything usable
F0h 0Ah Transaction size plus word address is too large. Trying to read/write multiple parameters with one command.
F0h 12h Invalid parameter or data. Data out of range.
F0h 1Eh Data table element protection violation. Write to Read Only parameter.
F0h 1Fh Temporary internal problem. Unable to execute due to temporary internal conditions –
by this command.
Writing one parameter at a time or reading past end of last
parameter is only supported.
Parameter Read Only when drive is running.
Page 42

9–4 Troubleshooting
End of Chapter 9
Page 43

Appendix
Specifications
Electrical
Supply Voltage Supplied by Drive
Power Consumption 1.25 Watts maximum
Environmental
Ambient Temperature
Operating 0 to 50
Storage –40 to 85
Relative Humidity 0 to 95% non-condensing
Vibration 1.0 G Operational
Shock 15.0 G Operational
Altitude 1,000 m (3,300 ft.) without derating
Communications
Baud Rates 1200, 2400, 4800, 9600 BPS
Checksum BCC or CRC
Protocol DF1 Point-to-Point
°
C (32 to 122° F)
°
C (–40 to 185° F)
2.5 G Non-operational
30.0 G Non-operational
DF1 Multi-Drop
A
Mechanical
Dimensions are in Millimeters and (inches)
70.0
(2.76)
RS232
Serial Comm
READY
FAULT
COMM
1
Required for module removal.
2
Module adds this dimension to the overall drive depth.
67.5
(2.68)
17.34
(0.68)
1
21.4
(0.85)
SER
CAT
160-RS1
2
MADE IN U.S.A.
Page 44

A–2 Specifications
End of Appendix A
Page 45

Appendix
RS1 Module Compatibility
The 160-RS1 Module has been tested and found to be compatible
with the following Allen-Bradley products:
• MicroLogix 1000
Protocol Point-to-Point
PCCC Command 0xA1 Protected Type Logical Read with 2 Address Fields
0xA9 Protected Type Logical Write with 2 Address Fields
Hand Shaking None
Cable
Versions Series D, FRN 1.0 or later
• SLC 500
Protocol Point-to-Point/Multi-Drop Master
PCCC Command 0xA2 Protected Type Logical Read with 3 Address Fields
Hand Shaking None
Cable 9 Pin - 9 Pin (
Versions Series B, FRN 7 (OS 4.01) or later
• 1761-NET-AIC+
Protocol Multi-Drop
PCCC Command All
Hand Shaking None
Cable 9 Pin - 9 Pin
Versions Series A
• PLC-5 Enhanced
Protocol Point-to-Point/Multi-Drop Master
PCCC Command 0x67 Typed Write (Logical ASCII Addressing only)
Hand Shaking None
Cable 9 Pin - 25 Pin (
Versions Series C, FRN E or later
• RSLinx™
Protocol Point-to-Point/Multi-Drop
PCCC Command 0xA1 Protected Type Logical Read with 2 Address Fields
Hand Shaking None
Cable PC Cable (
Versions 1.7.62.00 or later
• DriveExplorer
Protocol Point-to-Point
PCCC Command 0x67 Typed Write (Logical ASCII Addressing only)
Hand Shaking None
Cable PC Cable (
Versions 1.01.10 or later
• DriveTools32™
Protocol Point-to-Point
PCCC Command 0x67 Typed Write (Logical ASCII Addressing only)
Hand Shaking None
Cable PC Cable (
Versions 2.01 or later
See Chapter 3 for details
0xAA Protected Type Logical Write with 3 Address Fields
see Chapter 3 for details)
(see Chapter 5 for details)
0x68 Typed Read (Logical ASCII Addressing only)
see Chapter 3 for details)
0xA9 Protected Type Logical Write with 2 Address Fields
see Chapter 3 for details)
0x68 Typed Read (Logical ASCII Addressing only)
see Chapter 3 for details)
0x68 Typed Read (Logical ASCII Addressing only)
see Chapter 3 for details)
B
Page 46

B–2 RS1 Module Compatibility
End of Appendix B
Page 47

Index
B
Baud Rate, Setting, 3–2
BCC Checksum, 3–3
C
Cabling, 3–6
CE Compliance, 3–1
Checksum Mode
Setting, 3–3
CRC Checksum, 3–3
D
Data Table Interface, 5–1
Data Table Structure, 5–1
Defaults, Factory, 6–2
DF1 Error Codes, 9–3
Dimensions, A–1
DIP Switch
Configuration, 3–2
Location, 1–2, 3–2
Downloading Parameters, 7–3
DriveExplorer, 7–1
E
EPROM Mode, 3–2
Error Codes
RS1/DF1, 9–3
Error Mode, 4–2
Logic Command/Status, 5–3
M
Modes of Operation
Error Mode, 4–2
Power-up Reset, 4–2
Run Mode, 4–2
Module Installation, 3–4
P
Parameter Descriptions, 6–1
Parameters
Downloading, 7–3
Monitoring, 7–2
Saving to a file, 7–3
Uploading, 7–3
PCCC Command List, 5–1
Power-up Mode, 4–2
Protocol, Setting, 3–3
Publications
Related, p–ii
Q
Quick Start, 2–1
R
Removal, Module, 3–5
Reset Defaults, 6–2
Run Mode, 4–2
F
Factory Defaults, Resetting, 6–2
Fault Codes
Drive, 9–2
RS1 Module, 9–3
RS1/DF1, 9–3
Fault LEDs, 9–1
I
Installation, 3–1
K
Keypad Removal, 3–4
L
LEDs
Comm, 9–2
Fault, 9–2
Ready, 9–2
S
Saving parameters to a file, 7–3
Specifications
Communications, A–1
Electrical, A–1
Environmental, A–1
Mechanical, A–1
T
Troubleshooting, 9–1
LEDs, 9–1
U
Uploading Parameters, 7–3
Page 48

I–2 Index
Notes
Page 49

Page 50

Publication 0160-5.14 – March, 1999 P/N 189177 (02)
Supersedes October, 1998 Copyright 1999 Rockwell International Corporation. All rights reserved. Printed in USA
 Loading...