

Page 1

Allen-Bradley
User Manual
Benutzerhandbuch
Manuel d’utilisation
Manual del Usuario
Manuale dell’utente
Manual do Utilizador
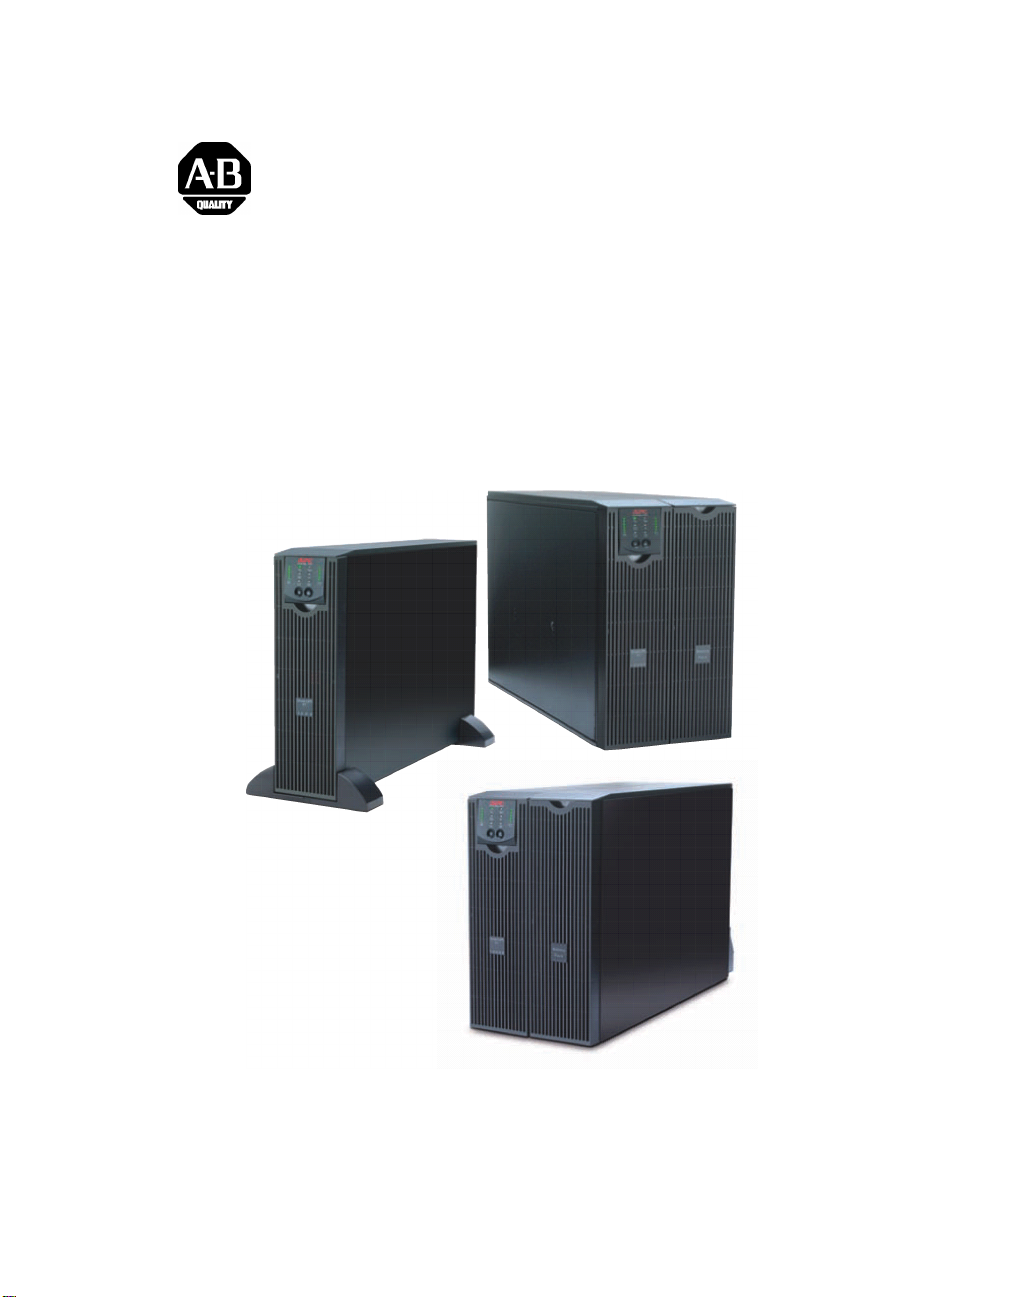
External Battery Pack 1609-PXBP
Externe Batterie-Einheit 1609-PXBP
Bloc-batterie externe 1609-PXBP
Paquete de baterías externo 1609-PXBP
Pacco batteria esterno 1609-PXBP
Jogo de Baterias Externo 1609-PXBP
41063-262-01(1) 990-2673 09/2005
Page 2
Allen-Bradley
User Manual
External Battery Pack
1609-PXBP
41063-262-01(1) 990-2673 09/2005
Page 3

INSTALLATION
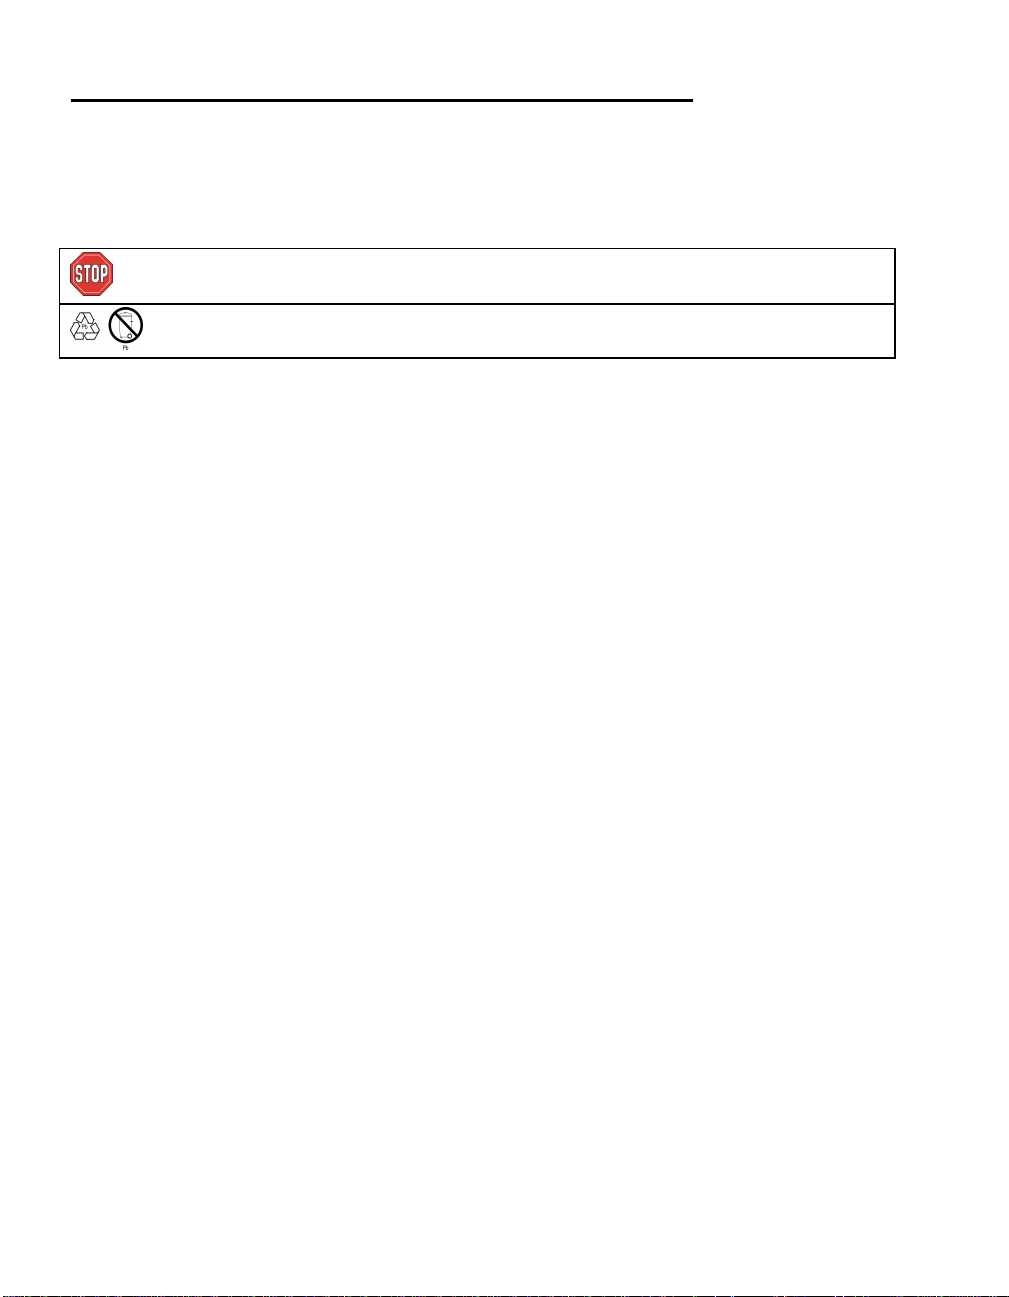
Refer to the Safety Instruction sheet included with the UPS before installing the batteries.
Unpacking
Inspect the unit upon receipt. Notify the carrier and dealer if there is damage.
The packaging is recyclable; save it for reuse or dispose of it properly.
Check the package contents:
q External battery pack
q Front bezel
q Three tie brackets and six screws
q Product documentation, Safety Guide
q Bulletin 1609-P Series User Manual CD
Environmental Specifications
TEMPERATURE
OPERATING
STORAGE
MAXIMUM
ELEVATION
OPERATING
STORAGE
HUMIDITY 0% to 95% relative humidity, non -condensing
32° to 104° F (0° to 40° C)
-4° to 140° F (-20 to 60 ° C) charge UPS battery every six months
10,000 ft (3,000 m)
50,000 ft (15,000 m)
This unit is intended for
indoor use only. Select a
location sturdy enough to
handle the weight.
Do not operate the UPS where
there is excessive dust or the
temperature and humidity are
outside the specified limits.
Ensure the air vents on the
front and rear of the unit are
not blocked.
1
Page 4

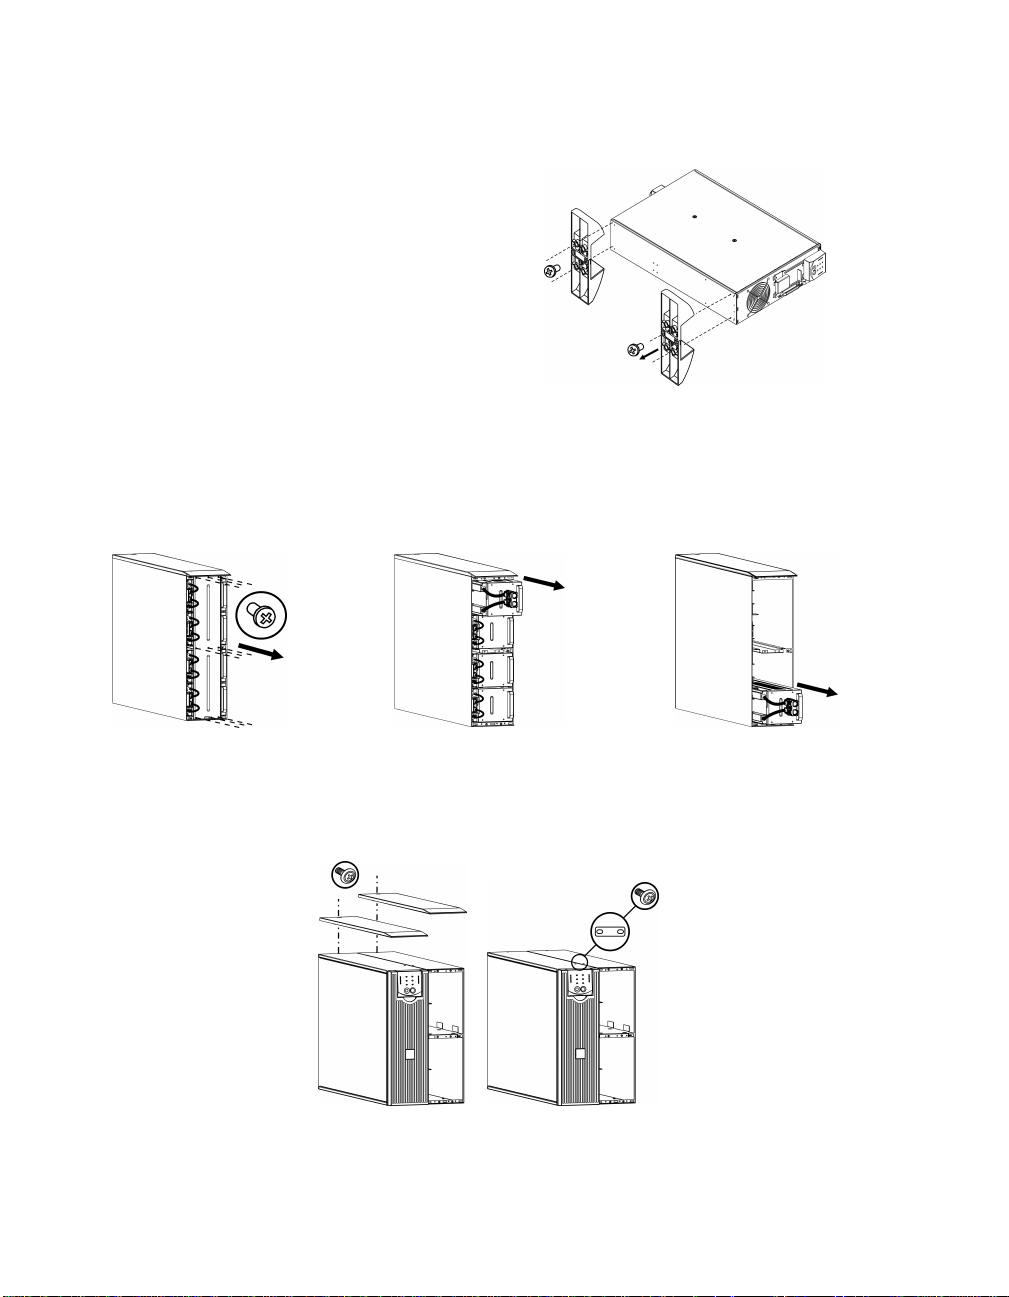
Installing the External Battery Pack(s)
3 2 1
Your UPS model may vary from the model depicted in the diagram. The battery installation
procedure is identical for all models.
Prior to connecting the batteries, and tie brackets
(when used), remove the feet (if installed), from
the bottom of the UPS. See diagram.
x4
x4
REMOVING BATTERIES FROM THE EXTERNAL BATTERY PACK
This unit is heavy. To lighten the unit, remove the batteries. Refer to the unpacking instructions on
the carton the unit is shipped in or see instructions below.
1 2 3
x9
4
TOWER CONFIGURATION
Installing and Connecting the External Battery Pack(s)
NOTE: The external battery packs must be installed to the right of the UPS when facing the
front of the units, (see diagrams below).
1. Remove the screws that
secure the top covers.
2
2. Install the tie bracket
securing the UPS and
external battery pack
(screws included).
Page 5
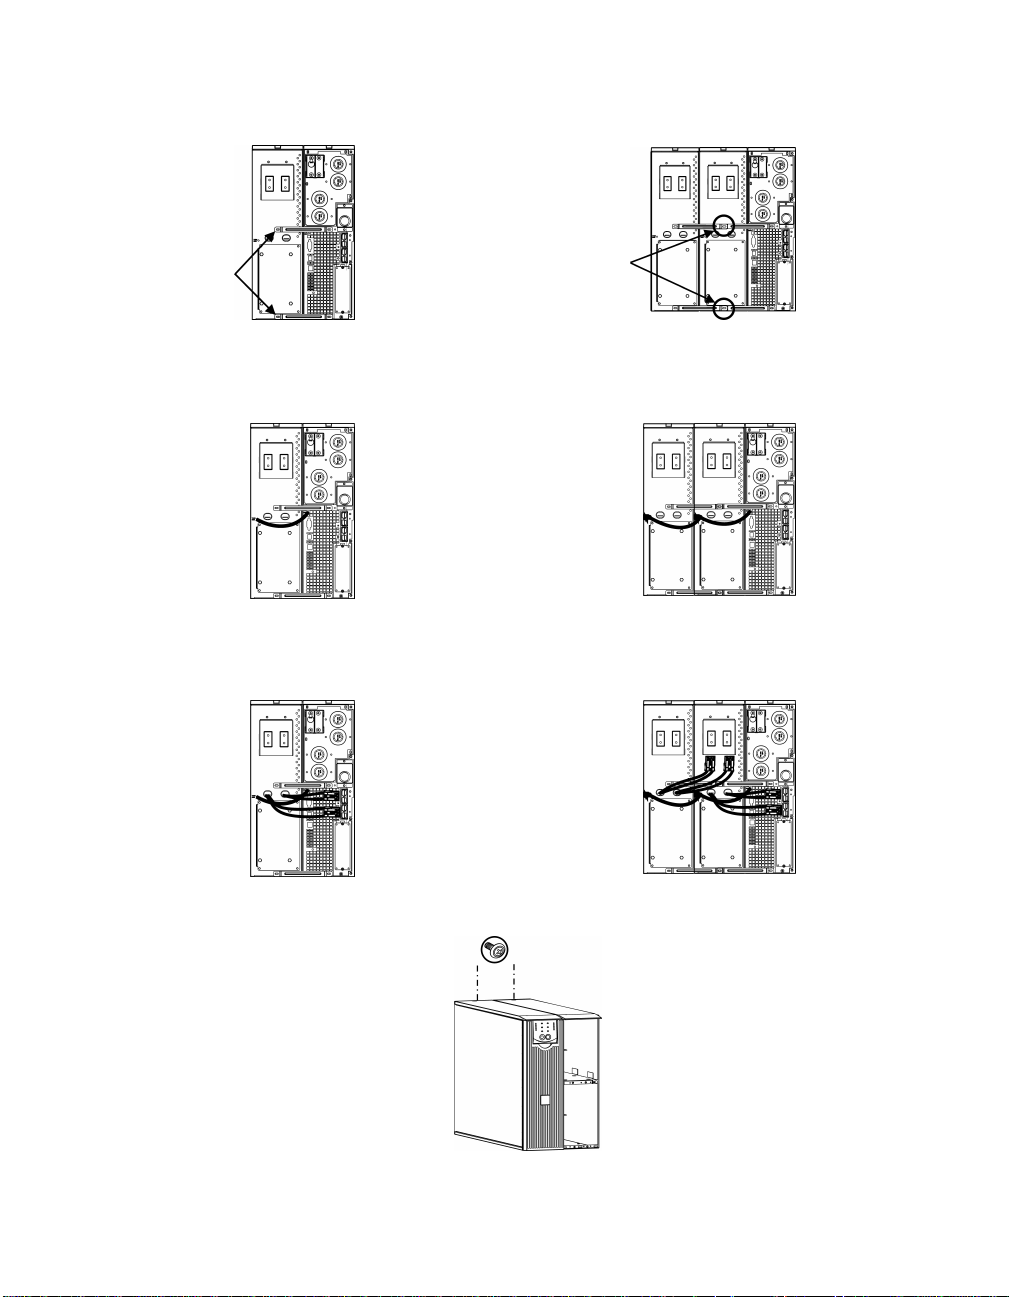
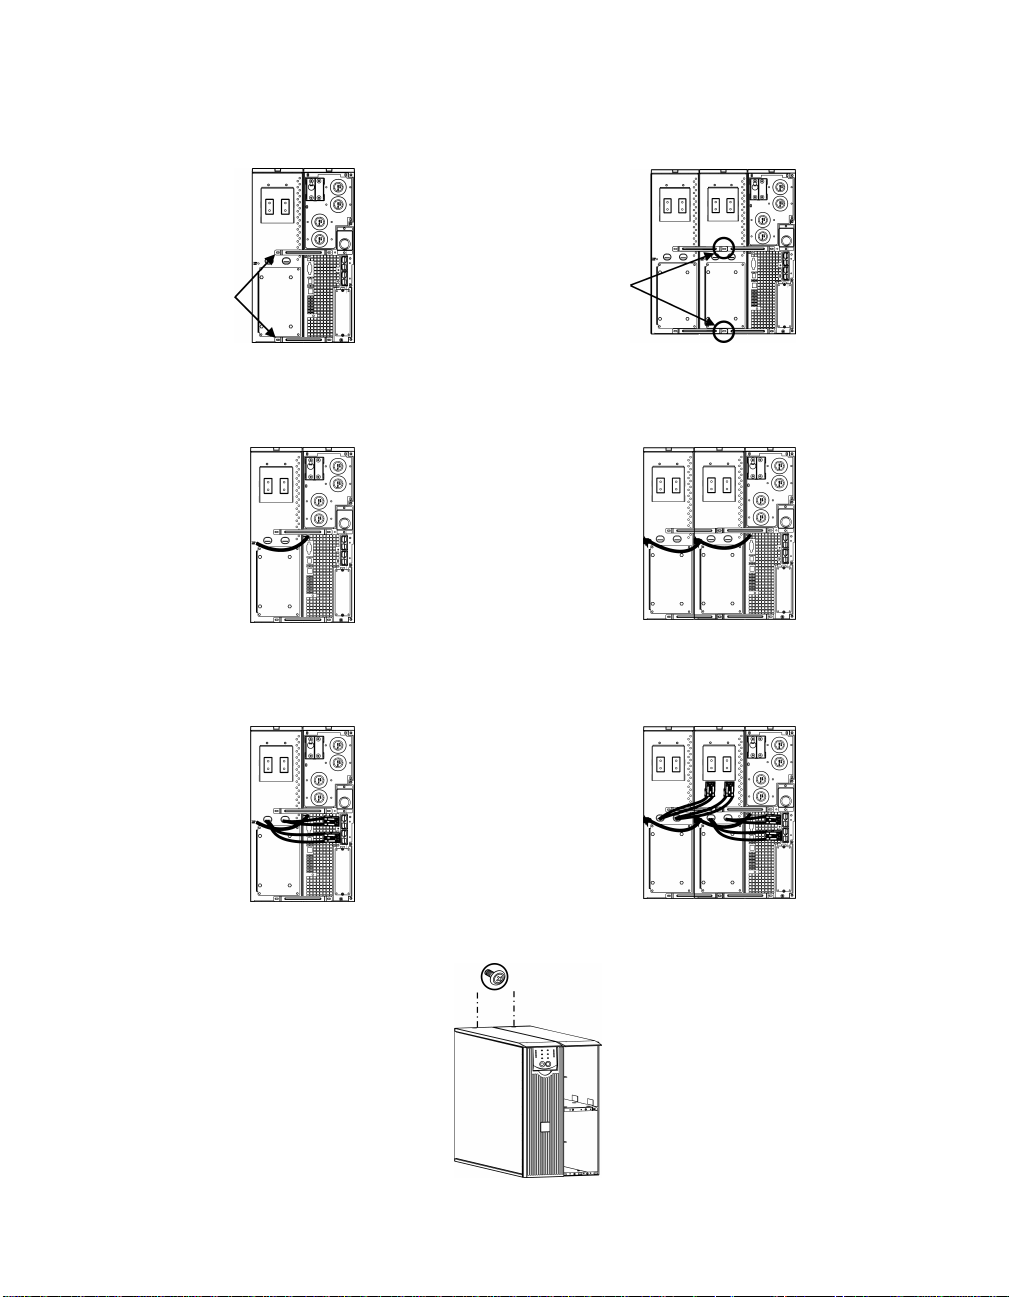
3. Install the rear tie brackets (screws included), as shown in the diagrams below.
UPS and One External Battery Pack UPS and Two External Battery Packs
Note: Tie brackets on
the center XLBP share
Secure tie
a common screw.
brackets
4. Connect the green/yellow ground wires (screws included), as shown in the diagrams below.
TVSS Ground Wire Connections
5. Connect the rear panel batteries as shown in the diagrams below.
Rear Battery Connections
6. Replace the top covers and secure with the screws removed in step 1.
3
Page 6
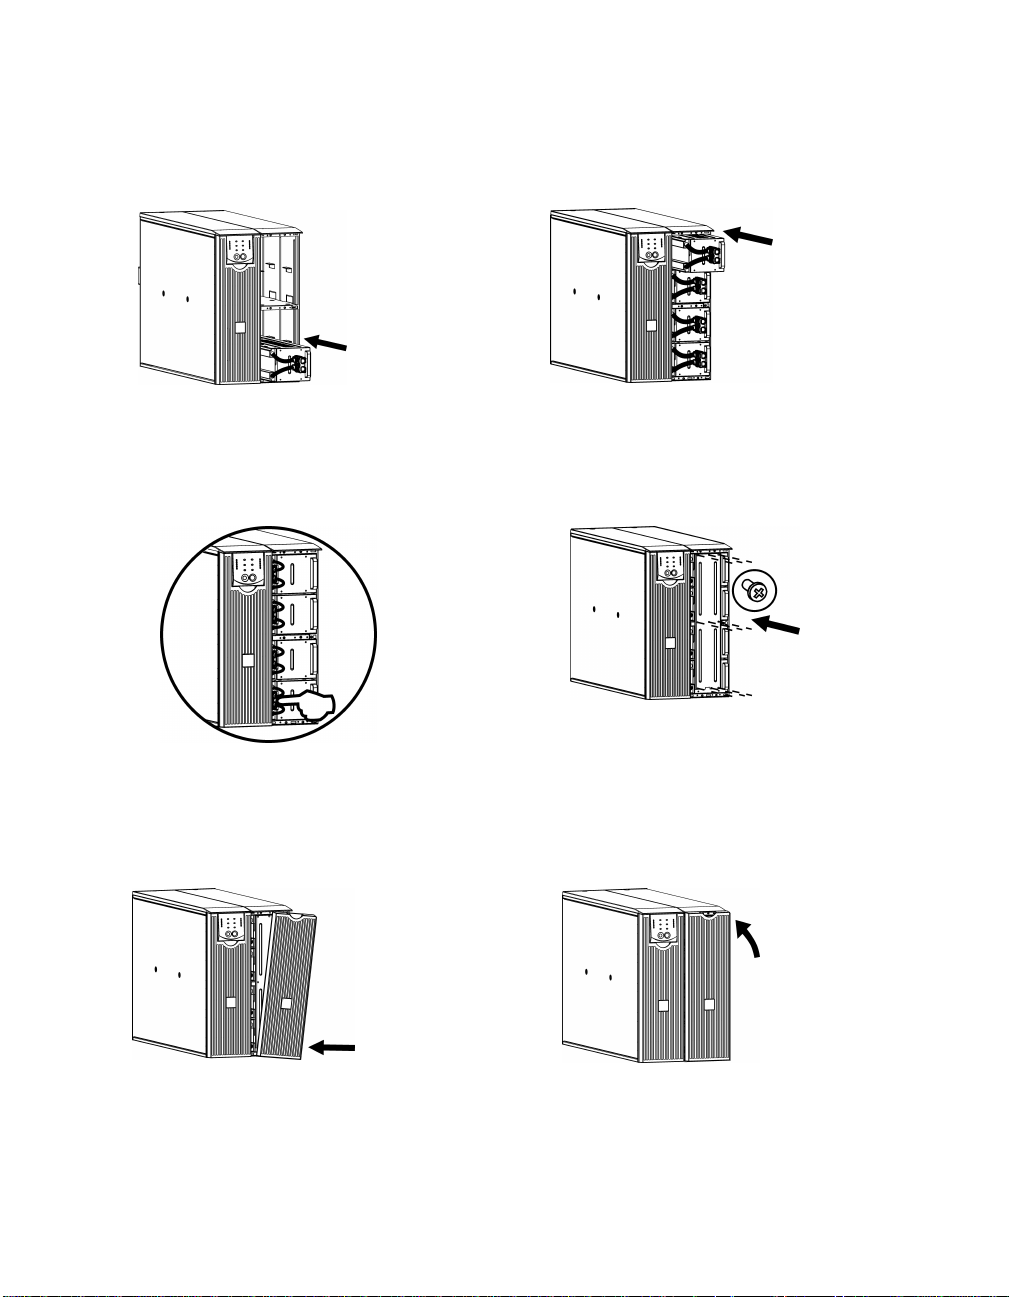
1 3 2
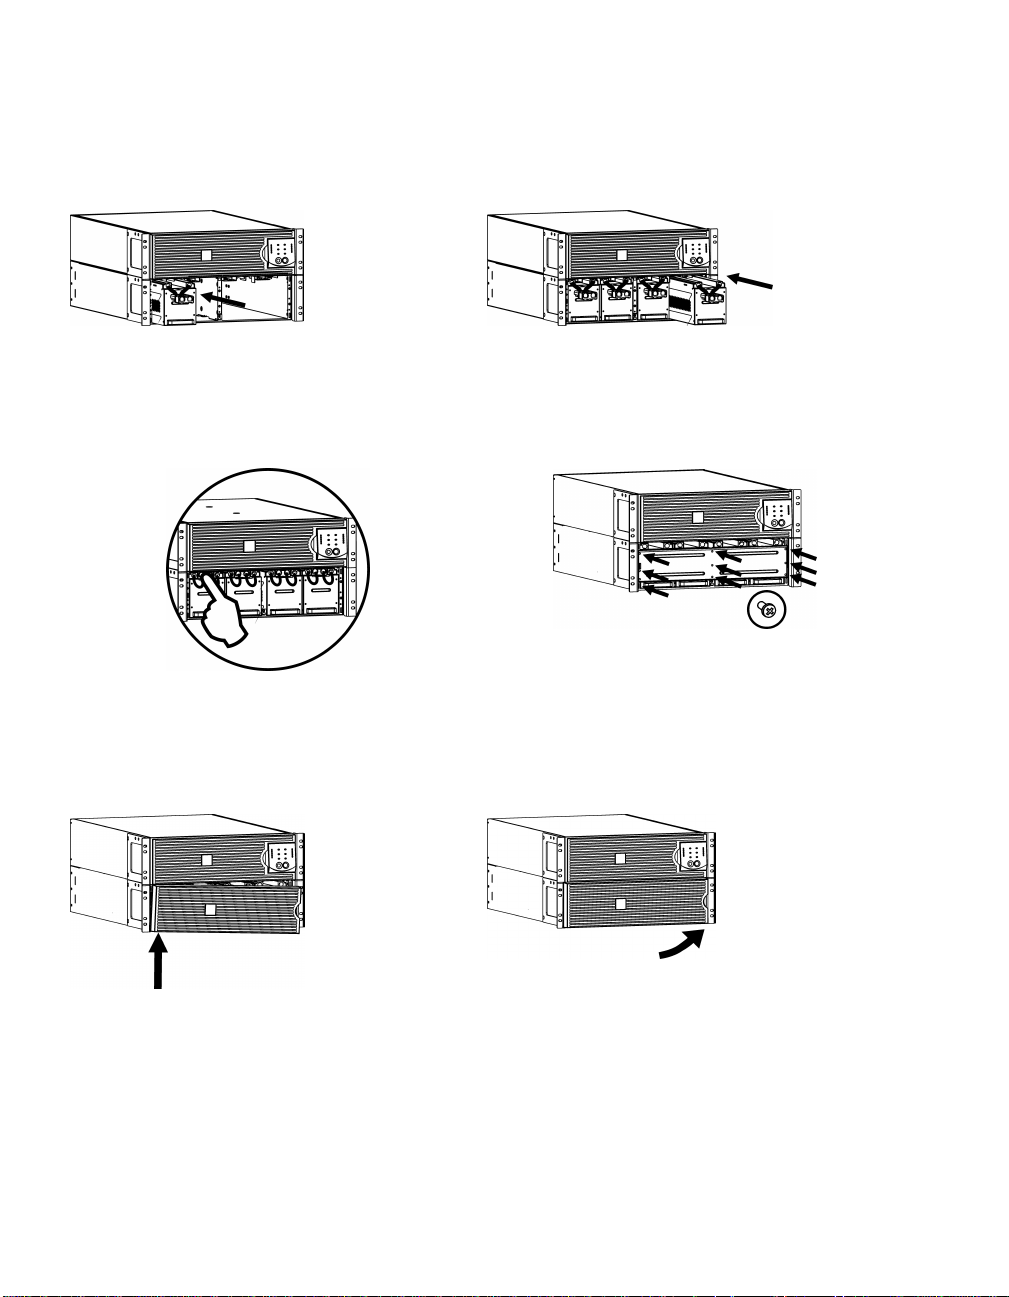
Installing and Connecting the Front Batteries and Attaching the Bezel
1 2
4
3 4
5 6
x9
4
Page 7
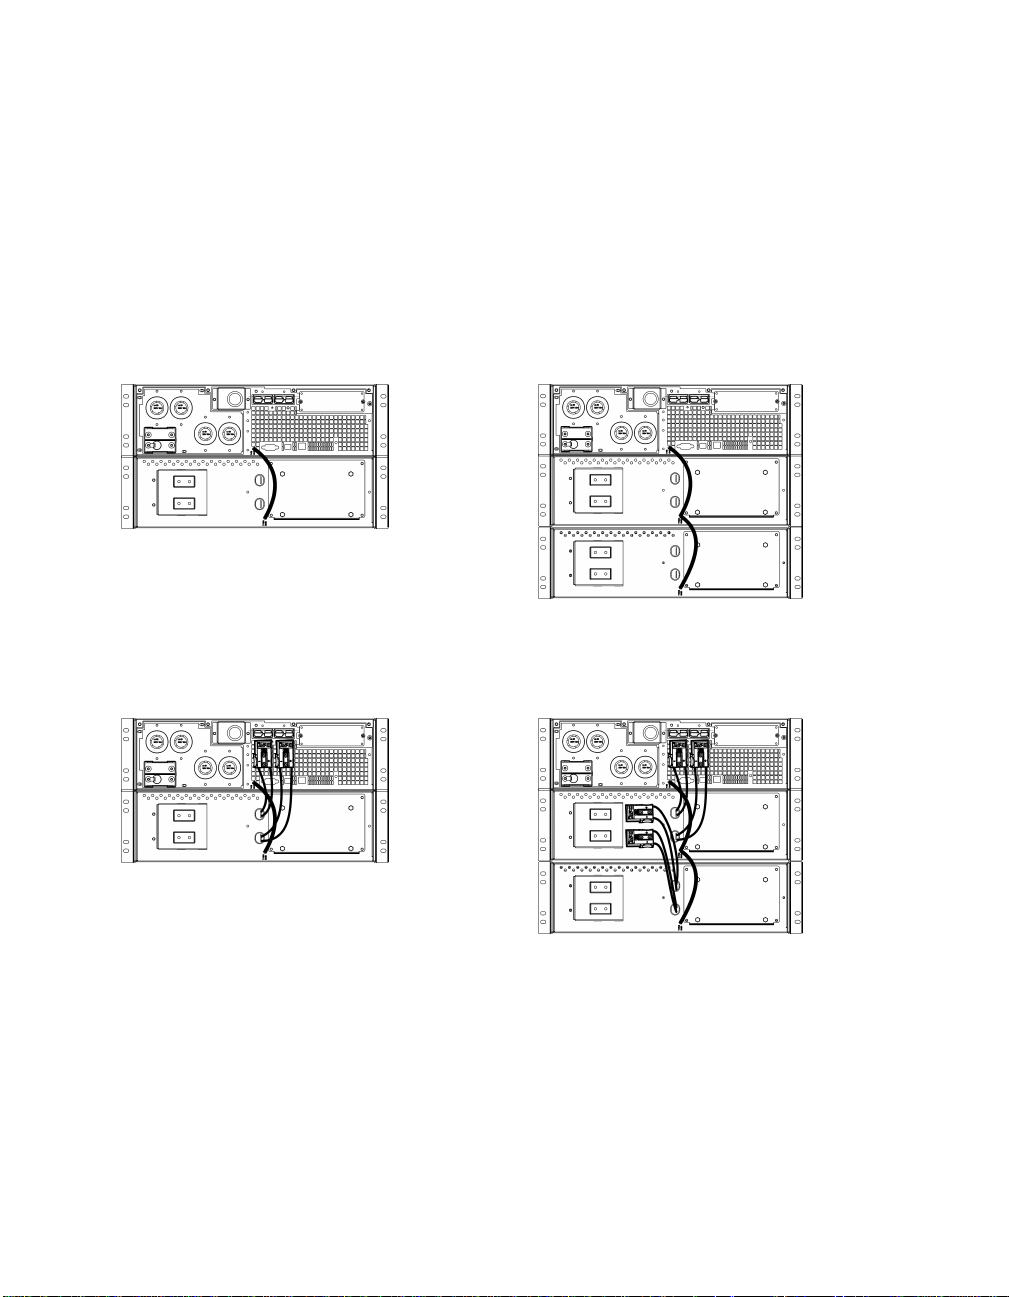
RACK MOUNT CONFIGURATION
Refer to the Installation Guide included in the Rail Kit for instructions on mounting the UPS and the
external battery packs into a rack.
NOTE: The external battery packs must be mounted below the UPS in the rack.
Installing and Connecting the External Battery Pack(s)
1. Connect the green/yellow ground wires (screws included), as shown in the diagrams below.
TVSS Ground Wire Connections
2. Connect the rear panel batteries as shown in the diagrams below.
Battery Connections
5
Page 8

Installing and Connecting the Front Batteries and Attaching the Bezel
1 2 3 4
1 2
3 4
5 6
x9
6
Page 9

Setting the UPS to Recognize the Battery Pack(s)
This configuration affects the accuracy of the runtime calculations that the UPS performs
while running on battery power.
Settings are made through supplied PowerChute® Business Edition, or PowerChute® Network
Shutdown software, or Terminal Mode.
Refer to the instructions included with the software or accessory cards. See Terminal Mode
instructions below.
TERMINAL MODE TO CONFIGURE UPS PARAMETERS
3000 VA models:
Terminal Mode is a menu driven interface that enables enhanced configuration of the UPS.
Connect the serial cable to the serial com connector on the back of the UPS.
1. EXIT the PowerChute Business Edition using the following steps:
• From the Desktop, go to Start => Settings => Control Panel => Administrative Tools =>
Services.
• Select APC PCBE Server and APC PCBE Agent – right click the mouse and select Stop.
2. Open a terminal program. Example: HyperTerminal
• From the Des ktop, go to Start => Programs => Accessories => Communication
=>HyperTerminal.
3. Double-click on the HyperTerminal icon.
• Follow the prompts to choose a name and select an icon. Disregard the message, “...must
install a modem,” if it is displayed. Click OK.
• Select the COM port that is connected to your UPS. The port settings are:
ü bits per second - 2400
ü data - bits 8
ü parity - none
ü stop bit - 1
ü flow control - none
• Press E NTER
4. Example for setting the number of external battery packs:
Once the blank terminal window is open, follow these steps to enter the number of battery packs:
• Press E NTER to initiate terminal mode. Follow the prompts:
• Press 1 to modify UPS Settings. Press e (or E) to modify the number of battery
packs. Enter the number of battery packs, including the internal battery pack
(Number of packs: 1= internal battery module,
2 = 1 external battery pack , 3 = 2 external battery packs, etc.).
Press E NTER.
• Follow the prompts.
5. Exit the terminal program.
7
Page 10
M AINTENANCE, SERVICE, AND CONTACT INFORMATION
Replacing the Battery Module
This UPS has an easy to replace, hot-swappable battery module. Replacement is a safe procedure,
isolated from electrical hazards. You may leave the UPS and connected equipment on during the
procedure. See your dealer for information on replacement battery modules.
Once the battery is disconnected, the connected equipment is not protected from
power outages
Be sure to deliver spent batteries to a recycling facility or ship to the manufacturer
in the re placement battery packing material.
Service
If the UPS requires service do not return it to the dealer. Follow these steps:
1. Review the problems discussed in the Troubleshooting section of this manual to eliminate
common problems.
2. If the problem persists, contact Rockwell Automation Customer Support.
Refer to Contact Information below.
3. Pack the UPS in its original packaging.
§ Pack the UPS properly to avoid damage in transit. Never use Styrofoam beads for
packaging.
§ Damage sustained in transit is not covered under warranty.
Always DISCONNECT THE BATTERY(S) before shipping in compliance with U.S.
Department of Transportation (DOT) and IATA regulations.
The battery(s) may remain in the UPS.
Contact Information
Refer to Rockwell Automation at 440-646-5800.
8
Page 11
Safety Information - SAVE THIS GUIDE
This Safety Guide contains important instructions that should be followed during installation and maintenance of the
equipment and batteries. It is intended for customers who setup, install, relocate, or maintain equipment.
Changes and modifications to this unit not expressly approved could void the warranty.
Handling Safety
<18 kg (<40 lb) 32 –55 kg (70–120 lb)
18 –32 kg (40–70 lb) >55 kg (>120 lb)
>10º
CAUTION! Electrical Safety
• Do not work alone under hazardous conditions.
• High current through conductive materials could cause severe burns.
• Check that the power cord(s), plug(s), and sockets are in good condition.
• Use qualified service personnel to change the plug on the UPS and to install permanently wired equipment.
• When grounding cannot be verified, disconnect the equipment from the utility power outlet before installing or
connecting to other equipment. Reconnect the power cord only after all connections are made.
• Do not handle any metallic connector before the power has been disconnected.
• Connect the equipment to a three wire utility outlet (two poles plus ground). The receptacle must be connected to
appropriate branch circuit/mains protection (fuse or cir cuit breaker). Connection to any other type of receptacle may
result in risk of electrical shock.
• 230V models only: In order to maintain compliance with the Electro Magnetic Compliance directive for products sold in
Europe, output cords attached to the UPS should not exceed 10 meters in length.
• 230V models only: Total leakage current from connected equipment and the UPS must not exceed 3.5 mA for a
pluggable A Type UPS.
CAUTION! Deenergizing Safety
• If the UPS has an internal energy source (battery), the output may be energized when the unit is not connected to a utility
power outlet.
• To deenergize a pluggable UPS, press the OFF button or switch to shut the equipment off. Unplug the UPS from the
utility power outlet. Disconnect the external batteries where a pplicable and disconnect the internal battery (see User
Manual). Push the ON button to deenergize the capacitors.
To deenergize a permanently wired UPS, press the OFF button or switch to shut the equipment off. Switch off the
utility circuit breaker that supplies power to the UPS. Disconnect the external batteries where applicable and disconnect
the internal battery (see User Manual).
WARNING! Battery Safety
• This equipment contains potentially hazardous voltages. Do not attempt to disassemble the unit. The only exception
is for a UPS containing batteries. Refer to the battery replacement procedures detailed in the User’s Manual. Except for
the battery, the unit contains no user serviceable parts . Repairs are to be performed only by qualified service
personnel.
• Do not dispose of batteries in a fire. The batteries may explode.
• Do not open or mutilate batteries. They contain an electrolyte that is toxic and harmful to the skin and eyes.
• To avoid personal injury due to energy hazard, remove wrist watches and jewelry such as rings when replacing the
batteries. Use tools with insulated handles.
• Replace batteries with the same number and type of batteries as originally installed in the equipment.
Replacement and Recycling of Batteries
See your dealer or contact Rockwell Automation at 440 -646-5800, for information on replacement battery kits and battery
recycling.
Be sure to deliver the spent battery to a recycling facility in the r eplacement battery packing material.
41063-262-01(1)
9
Page 12

Allen-Bradley
Benutzerhandbuch
Externe Batterie-Einheit
1609-PXBP
41063-262-01(1) 990-2673 09/2005
Page 13

INSTALLATION
Beachten Sie vor dem Einsetzen der Batterien das der USV beiliegende Blatt mit den
Sicherheitsanweisungen.
Auspacken
Überprüfen Sie die Einheit bei Erhalt. Sollten Sie Schäden feststellen, benachrichtigen Sie bitte Ihren
Spediteur und Händler.
Die Verpackung ist wiederverwertbar; bewahren Sie sie zur Wiederverwendung auf oder entsorgen
Sie sie umweltgerecht.
Überprüfen Sie den Packungsinhalt:
q Externe Batterie -Einheit
q Frontblende
q Drei Verbindungsklammern und sechs Schrauben
q Produktdokumentation, Sicherheitsrichtlinien
q Bulletin 1609-P Serie Benutzerhandbuch-CD
Umgebunsspezifikationen
TEMPERATUR
BETRIEB
LAGERUNG
MAXIMALE
HÖHE Ü. NN
BETRIEB
LAGERUNG
FEUCHTIGKEIT 0 bis 95% relative Feuchtigkeit,
32° bis 104° F (0 ° bis 40° C)
-4° bis 140° F (-20 bis 60 ° C) USV-Batterie alle
sechs Monate aufladen
3.000 m (10.000 Fuß)
15.000 m (50.000 Fuß)
nichtkondensierend
Dieses Gerät ist ausschließlich zur
Verwendung in Innenräumen vorgesehen.
Wählen Sie einen Installationsort, der das
Gewicht des Geräts aushält.
Verwenden Sie die USV nicht in einer
sehr staubigen Umgebung oder bei
Temperatur- und
Feuchtigkeitsbedingungen außerhalb der
angegebenen Grenzwerte.
Stellen Sie sicher, dass die Luftschlitze
an der Vorder- und Rückseite des
Geräts nicht blockiert sind.
1
Page 14
Einbau der externe(n) Batterie-Einheit(en)
3 2 1
Ihr USV-Modell ist nicht unbedingt mit dem abgebildeten Modell identisch. Das Verfahren zum
Einbau der Batterien ist bei allen Modellen gleich.
Entfernen Sie vor dem Anschließen der Batterien
und dem Anbringen der (gegebenenfalls
verwendeten) Verbindungsklammern die Füße
(sofern vorhanden) von der Unterseite der USV.
Siehe Abbildung.
ENTFERNEN DER BATTERIEN AUS DER EXTERNEN BATTERIE-EINHEIT
Die Anlage ist schwer. Nehmen Sie die Batterien heraus, um das Gewicht zu verringern. Beachten
Sie die Auspackanleitung auf dem Versandkarton des Geräts oder halten Sie sich an die
nachfolgende Anleitung.
1 2 3
x9
x4
x4
4
TOWER-KONFIGURATION
Einbau und Anschluss der externe(n) Batterie-Einheit(en)
HINWEIS: Die externen Batterie-Einheiten müssen rechts neben der USV eingebaut werden
(bei Blick auf die Vorderseite der Einheit, siehe die nachstehenden Abbildungen).
1. Entfernen Sie die
Schrauben, die zur
Befestigung der oberen
Abdeckungen dienen.
2
2. Befestigen Sie mit den
mitgelieferten Schrauben
die Verbindungsklammer
zum Zusammenhalten
der USV und der
externen BatterieEinheit.
Page 15
3. Befestigen Sie die hinteren Verbindungsklammern mit den mitgelieferten Schrauben, wie in den
nachstehenden Abbildungen gezeigt.
USV und eine externe Batterie -Einheit USV und zwei externe Batterie-Einheiten
Hinweis: Die
Verbindungsklammern
befestigen
4. Schließen Sie die Massekabel (grün/gelb) mit den mitgelieferten Schrauben an, wie in den
nachstehenden Abbildungen gezeigt.
Anschluss der TVSS-Massekabel
Verbindungsklammern
am mittleren XLBP
teilen sich eine
Schraube.
5. Schließen Sie die Batterien wie in den nachstehenden Abbildungen gezeigt an der Rückseite des
Geräts an.
Batterieanschlüsse an der Rückseite
6. Bringen Sie die oberen Abdeckungen wieder an und sichern Sie diese mit den in Schritt 1
entfernten Schrauben.
3
Page 16

1 3 2
Einsetzen und Anschließen der Batterien an der Vorderseite und Anbringen der Frontblende
1 2
4
3 4
5 6
x9
4
Page 17
RACKMOUNT-KONFIGURATION
Eine Anleitung zum Einbau der USV und der externen Batterie-Einheiten in ein Rack finden Sie in
der dem Schienenset beiliegenden Installationsanleitung.
HINWEIS: Die externen Batterie-Einheiten müssen unterhalb der USV-Anlage in das Rack
eingebaut werden.
Einbau und Anschluss der externe(n) Batterie-Einheit(en)
1. Schließen Sie die Masse kabel (grün/gelb) mit den mitgelieferten Schrauben an, wie in den
nachstehenden Abbildungen gezeigt.
Anschluss der TVSS-Massekabel
2. Schließen Sie die Batterien wie in den nachstehenden Abbildungen gezeigt an der Rückseite des
Geräts an.
Batterieanschlüsse
5
Page 18
Einsetzen und Anschließen der Batterien an der Vorderseite und Anbringen der Frontblende
1 2 3 4
1 2
3 4
5 6
x9
6
Page 19

Einstellen der USV zur Erkennung der Batterie-Einheit(en)
Diese Konfigurationsänderung wirkt sich auf die Genauigkeit der von der USV im
Batteriebetrieb durchgeführten Laufzeitberechnungen aus.
Die entsprechenden Einstellungen werden über das mitgelieferte Programm PowerChute® Business
Edition bzw. PowerChute® Network Shutdown oder im Terminalmodus vorgenommen.
Beachten Sie bitte die mit der Software oder Erweiterungskarte gelieferte Anleitung. Siehe die
nachstehende Anleitung zur Verwendung des Terminalmodus.
TERMINALMODUS ZUM K ONFIGURIEREN VON USV-PARAMETERN
3000 VA-Modelle:
Der Terminalmodus ist eine menügesteuerte Schnittstelle, die eine besonders flexible Konfiguration
der USV ermöglicht.
Verbinden Sie das serielle Kabel mit dem seriellen Anschluss an der Rückseite der USV.
1. BEENDEN Sie PowerChute Business Edition wie folgt:
• Wählen Sie am Windows-Desktop Start => Einstellungen => Systemsteuerung =>
Verwaltung => Dienste.
• Wählen Sie APC PCBE Server und APC PCBE Agent – klicken Sie mit der rechten
Maustaste und wählen Sie Stop.
2. Öffnen Sie ein Terminalprogramm, z. B. HyperTerminal.
• Wählen Sie auf dem Windows-Desktop Start => Programme => Zubehör =>
Kommunikation => HyperTerminal.
3. Doppelklicken Sie auf das Symbol HyperTerminal.
• Folgen Sie den Aufforderungen zur Auswahl eines Namens und eines Symbols. Ignorieren
Sie die Meldung, wonach ein Modem installiert werden muss, falls diese Meldung angezeigt
wird. Klicken Sie auf OK.
• Wählen Sie den COM-Anschluss, an dem Ihre USV angeschlossen ist. Folgende
Einstellungen werden benötigt:
ü Bit pro Sekunde - 2400
ü 8 Datenbits
ü Keine Parität
ü 1 Stoppbit
ü Keine Flusskontrolle
• Drücken Sie die EINGABETASTE.
4. Beispiel für das Einstellen der Anzahl vorhandener externer Batterie-Einheiten:
Wenn das leere Terminalfenster angezeigt wird, gehen Sie wie folgt vor, um die Anzahl der
Batterie-Einheiten anzugeben:
• Drücken Sie die EINGABETASTE, um den Terminalmodus aufzurufen. Folgen Sie den
Anweisungen am Bildschirm:
• Drücken Sie 1, um die USV-Einstellungen zu ändern. Drücken Sie ‘e’ (oder ‘E’),
um die Anzahl der Batterie-Einheiten zu verändern. Geben Sie die Anzahl der
Batterie-Einheiten ein, einschließlich der internen Batterie-Einheit (Anzahl der
Einheiten: 1= internes Batteriemodul,
2 = 1 externe Batterie -Einheit, 3 = 2 externe Batterie-Einheiten usw.).
Drücken Sie die EINGABETASTE.
• Folgen Sie den Anweisungen am Bildschirm.
5. Beenden Sie das Terminalprogramm.
7
Page 20

WARTUNG, INSTANDHALTUNG UND KONTAKTINFORMATIONEN
Auswechseln des Batteriemoduls
Die USV verfügt über ein Batteriemodul, das ohne großen Aufwand und während des Betriebs
ausgetauscht werden kann. Das Auswechseln der Batteriemodule ist vollk ommen gefahrlos und mit
keinerlei Stromschlaggefahr verbunden. Sie können die USV und die angeschlossenen Geräte
während des Austausches eingeschaltet lassen. Bei Fragen zu Austausch-Batteriemodulen wenden
Sie sich bitte an Ihren Fachhändler.
Sobald die Batterie abgetrennt ist, sind die angeschlossenen Geräte bei einem
Stromausfall nicht mehr geschützt.
Liefern Sie verbrauchte Batterien bitte bei einem Recycling -Betrieb ab oder senden
Sie sie in der Verpackung der neuen Batterie an den Hersteller zurück.
Service
Senden Sie die USV bei etwaigen Problemen bitte nicht sofort an den Fachhändler zurück. Gehen Sie
vielmehr wie folgt vor:
1. Sehen Sie sich die unter Fehlersuche behandelten Punkte an, um Probleme allgemeiner Natur
auszuschließen.
2. Sollte das Probl em fortbestehen, wenden Sie sich bitte an den Kundendienst von Rockwell
Automation.
Entsprechende Kontaktinformationen finden Sie weiter unten.
3. Verpacken Sie die Einheit in der Originalverpackung.
§ Verpacken Sie die USV fachmännisch, um Transportschäden zu vermeiden. Verwenden Sie
keine Styroporchips als Verpackungshilfsmittel.
§ Transportschäden sind nicht von der Garantie abgedeckt.
Vergewissern Sie sich, das die Batterie beim Transport NICHT an die USV angeschlossen ist,
gemäß den Bestimmungen des U.S. Department of Transportation (DOT) und der IATA.
Die Batterie kann zum Transport in der USV verbleiben.
Kontaktinformationen
Telefonnummer von Rockwell Automation: +1 440 -646-5800.
8
Page 21

Sicherheitsinformationen - BEWAHREN SIE DIESE ANLEITUNG GUT AUF
Dieser Sicherheitsleitfaden enthält wichtige Anweisungen, die bei der Installation und Instandhaltung des Geräts und der
Batterien befolgt werden müssen. Er richtet sich an alle Personen, die Geräte konfigurieren, installieren, transportieren oder
warten.
Durch nicht ausdrücklich gebilligte Änderungen und Abwandlungen dieses Geräts kann die Garantie erlöschen.
Sicherheit beim Transport
<18 kg (<40 lb) 32 –55 kg (70–120 lb)
18 –32 kg (40–70 lb) >55 kg (>120 lb)
>10º
ACHTUNG! Elektrische Sicherheitshinweise
• Niemals unter gefährlichen Bedingungen alleine arbeiten.
• Durch leitfähige Materialien fließender Starkstrom kann schwere Verbrennungen verursachen.
• Sicherstellen, dass sich alle Stromkabel, Netzstecker und Steckdosen in einwandfreiem Zustand befinden .
• Der Austausch des USV- Steckers und die Installation festverdrahteter Geräte darf nur durch qualifizierte Service-
Mitarbeiter erfolgen.
• Wenn keine Erdung nachweisbar ist, das Gerät vor der Installation oder dem Anschluss an andere Geräte von der
Netzstromversorgung trennen. Das Netzkabel erst wieder anschließen, wenn alle Anschlüsse hergestellt wurden.
• Nicht mit metallischen Anschlusselementen hantieren, solange die Stromzufuhr noch nicht getrennt wurde.
• Das Gerät an eine dreipolige Netzsteckdose anschließen (zwei Phasen und Erde). Diese Steckdose muss durch eine
entsprechende Stromkreis-/Netzabsicherung (Sicherung oder Überlastschalter) geschützt sein. Bei Anschluss des Geräts
an einen anderen Steckdosentyp besteht Stromschlaggefahr.
• Nur für 230 -V-Modelle: Die EU-Richtlinie für elektromagnetische Verträglichkeit schreibt für in Europa verkaufte
Produkte vor, dass an die USV angeschlossene Ausgangskabel eine Länge von 10 m nicht überschreiten dürfen.
• Nur für 230 -V-Modelle: Der Gesamtfehlerstrom aus angeschlo ssenen Geräten und der USV darf bei einer mit Stecker
ausgestatteten USV vom Typ A 3,5 mA nicht überschreiten.
ACHTUNG! Abschaltsicherheit
• Wenn die USV mit einer internen Stromquelle (Batterie) ausgestattet ist, darf der Geräteausgang bestromt werden, wen n
das Gerät nicht über eine Steckdose an das Stromnetz angeschlossen ist.
• Zum Abschalten einer USV mit Stecker die Taste oder den Schalter OFF (AUS) drücken. Den Stecker der USV aus der
Steckdose herausziehen. Die gegebenenfalls vorhandenen externen Batterien und die interne Batterie trennen (siehe
Benutzerhandbuch). Die Taste ON (EIN) drücken, um die Kondensatoren zu entladen.
Zum Abschalten einer festverdrahteten USV die Taste oder den Schalter OFF (AUS) drücken. Den Überlastschalter
zum Stromnetz, aus de m die USV mit Strom versorgt wird, abschalten. Die gegebenenfalls vorhandenen externen
Batterien und die interne Batterie trennen (siehe Benutzerhandbuch).
WARNUNG! Sicherheitshinweis zur Batterie
• In diesen Geräten können hohe Spannungen herrschen. Versuchen Sie nicht, die Einheit zu öffnen. Einzige
Ausnahme hiervon ist eine USV, die Batterien enthält. Beachten Sie die Anleitung zum Auswechseln der Batterie in
diesem Benutzerhandbuch. Mit Ausnahme der Batterie enthält das Gerät keine Teile, die vom Benutzer gewartet werden
können. Reparaturen dürfen nur von qualifiziertem Service-Personal durchgeführt werden.
• Batterien nicht durch Verbrennen entsorgen. Die Batterien könnten explodieren.
• Batterien nicht öffnen oder zerstören. Die Batterien enthalten ein giftiges Elektrolyt, das der Haut und den Augen
schadet.
• Zur Vermeidung von Verletzungen durch Stromeinwirkung müssen Uhren und Schmuckstücke wie z. B. Ringe beim
Auswechseln der Batterien abgelegt werden. Stets Werkzeuge mit isolierten Griffen verwenden.
• Batterien nur durch Batterien derselben Anzahl und desselben Typs wie die ursprünglich installierten Batterien ersetzen.
Austausch und Wiederverwertung von Batterien
Bitte fragen Sie Ihren Fachhändler oder Rockwell Automation unter der Telefonnummer +1440-646-5800 nach AustauschBatteriesätzen und Batterie-Recycling.
Liefern Sie die verbrauchte Batterie bitte in der Verpackung der Austauschbatterie bei einem Recycling-
41063-262-01(1)
Betrieb ab.
9
Page 22

Allen-Bradley
Manual del Usuario
Paquete de baterías externo
1609-PXBP
41063-262-01(1) 990-2673 09/2005
Page 23

INSTALACIÓN
Consulte la hoja de Instrucciones de Seguridad incluida con el SAI antes de instalar las
baterías.
Desembalaje
Inspeccione la unidad inmediatamente después de recibirla. Si observa daños, informe a su
distribuidor y a la compañía de transporte.
El material de embalaje es reciclable; guárdelo para volver a usarlo o deséchelo en forma adecuada.
Verifique el contenido de la caja:
q Paquete de baterías externo
q Marco delantero
q Tres soportes de enlace y seis tornillos
q Documentación del producto, Guía de Seguridad
q CD del Manual del Usuario del Bulletin Serie 1609-P
Especificaciones ambientales
TEMPERATURA
FUNCIONAMIENTO
ALMACENAMIENTO
ELEVACIÓN
MÁXIMA
FUNCIONAMIENTO
ALMACENAMIENTO
HUMEDAD 0 a 95% humedad relativa, sin condensación
32° a 104° F (0° a 40° C)
-4° a 140 ° F (-20° a 60° C) cargue la batería del
SAI cada seis meses
10.000 pies (3.000 m)
50.000 pies (15.000 m)
Esta unidad está diseñada únicamente
para uso en interiores. Seleccione un
lugar que sea suficientemente resistente
para soportar el peso.
No utilice el SAI en lugares en los que
haya polvo en exceso, o si la temperatura
y la humedad exceden los límites
especificados.
Compruebe que las ventilaciones de
aire situadas la parte delantera y en la
parte trasera de la unidad no estén
bloqueadas.
1
Page 24

Instalación de los paquetes de baterías externos
3 2 1
Es posible que el modelo de su SAI no sea igual al modelo ilustrado en el diagrama. El
procedimiento de instalación de la batería es idéntico para todos los modelos.
Antes de conectar las baterías y los soportes de
enlace (cuando se usan), retire los pies (si están
instalados) desde la parte inferior del SAI.
Consulte el diagrama.
x4
x4
EXTRACCIÓN DE LAS BATERÍAS DEL PAQUETE DE BATERÍAS EXTERNO
Esta unidad es pesada. Para que sea más liviana, quite las baterías. Consulte las instrucciones de
desembalaje que se encuentran en la caja de cartón en la que se envió la unidad o consulte las
instrucciones que se detallan a continuación.
1 2 3
x9
4
CONFIGURACIÓN EN TORRE
Instalación y conexión de los paquetes de baterías externos
NOTA: Los paquetes de baterías externos deben instalarse a la derecha del SAI, mirando a las
unidades de frente (consulte el diagrama a continuación).
1. Retire los tornillos que
sujetan las tapas superiores.
2
2. Instale el soporte de
enlace que sujeta el SAI
y el paquete de baterías
externo (se incluyen los
tornillos).
Page 25

3. Instale los soportes de enlace posteriores (se incluyen los tornillos), como se muestra en los
diagramas que figuran a continuación.
SAI y un paquete de baterías externo SAI y dos paquetes de baterías externos
Nota: Los soportes de
Asegure los
soportes de
enlace
4. Conecte los cables de conexión a tierra verde/amarillo (se incluyen los tornillos), como se
muestra en los di agramas que figuran a continuación.
Conexiones del cable de conexión a tierra TVSS
enlace situados en el
XLBP central tienen
un tornillo en común.
5. Conecte las baterías del panel posterior como se muestra en los diagramas que figuran a
continuación.
Conexiones de la batería posterior
6. Vuelva a colocar las tapas superiores y sujételas con los tornillos que retiró en el paso 1.
3
Page 26

1 3 2
Instalación y conexión de las baterías delanteras y colocación del marco
1 2
4
3 4
5 6
x9
4
Page 27

CONFIGURACIÓN PARA MO NTAJE EN BASTIDOR
Consulte la Guía de Instalación incluida en el conjunto de rieles para obtener instrucciones sobre el
montaje del SAI y de los paquetes de baterías externos en un bastidor.
NOTA: Los paquetes de baterías externos deben montarse debajo del SAI en el bastidor.
Instalación y conexión de los paquetes de baterías externos
1. Conecte los cables de conexión a tierra verde/amarillo (se incluyen los tornillos), como se
muestra en los diagramas que figuran a continuación.
Conexiones del cable de conexión a tierra TVSS
2. Conecte las baterías del panel posterior como se muestra en los diagramas que figuran a
continuación.
Conexiones de las baterías
5
Page 28

Instalación y conexión de las baterías delanteras y colocación del marco
1 2 3 4
1 2
3 4
5 6
x9
6
Page 29

Configurar el SAI para que reconozca los paquetes de baterías
Esta configuración afecta la exactitud de los cálculos del tiempo de funcionamiento que realiza
el SAI cuando funciona a batería.
La selección de las opciones se realiza por medio del programa provisto PowerChute® Business
Edition o PowerChute® Network Shutdown, o del Modo Terminal.
Consulte las instrucciones incluidas con el programa o las tarjetas de accesorios. Consulte las
instrucciones del Modo Terminal que figuran a continuación.
MODO TERMINAL PARA CONFIGU RAR LOS PARÁMETROS DEL SAI
Modelos de 3000 VA:
El Modo Terminal es una interfaz controlada por medio de menús que permite configurar mejor el
SAI.
Conecte el cable en serie al conector de comunicaciones en serie situado en la parte posterior del
SAI.
1. SALGA de PowerChute Business Edition siguiendo los pasos descritos a continuación:
• Desde el escritorio, seleccione Inicio => Configuración => Panel de control =>
Herramientas administrativas => Servicios.
• Seleccione APC PCBE Server y APC PCBE Agent – haga clic con el botón derecho del
mouse y seleccione Stop (Detener).
2. Abra un programa de terminal. Por ejemplo: HyperTerminal
• Desde el escritorio, seleccione Inicio => Programas => Accesorios => Comunicación =>
HyperTerminal.
3. Haga doble clic en el icono de HyperTerminal.
• Siga las instrucciones para seleccionar un nombre y seleccione un icono. Si se visualiza el
mensaje “...must install a modem” (...debe instalar un módem) no le preste atención y haga
clic en Aceptar.
• Seleccione el puerto COM conectado a su SAI. Los parámetros del puerto son los
siguientes:
ü bits por segundo - 2400
ü datos – 8 bits
ü paridad - ninguna
ü bit de parada - 1
ü control de flujo - ninguno
• Presione INTRO .
4. Ejemplo para configurar el número de paquetes de baterías externos:
Cuando se abra la ventana de la terminal en blanco, siga los pasos descritos a continuación para
introducir el número de paquetes de baterías:
• Presione INTRO para iniciar el Modo Terminal. Siga las instrucciones:
• Presione 1 para modificar los valores del SAI. Presione e (o E) para modificar el
número de paquetes de baterías. Introduzca el número de paquetes de baterías e
incluya el paquete de baterías interno (Número de los paquetes: 1= módulo de
batería interno,
2 = 1 paquete de baterías externo, 3 = 2 paquetes de baterías externos, etc.).
Presione INTRO.
• Siga las instrucciones.
5. Salga del programa de terminal.
7
Page 30

M ANTENIMIENTO, SERVICIO TÉCNICO E INFORMACIÓN DE CONTA CTO
Reemplazo del módulo de batería
Este SAI tiene un módulo de batería fácilmente reemplazable en funcionamiento. El reemplazo es un
procedimiento seguro, exento de peligros eléctricos. Se puede dejar el SAI y el equipo conectado
encendidos durante el siguiente procedimiento. Consulte a su distribuidor para obtener información
sobre el reemplazo de los módulos de batería.
Una vez que la batería esté desconectada, el equipo conectado no está protegido
contra interrupciones en el suministro eléctrico.
No olvide enviar las baterías usadas a un centro de reciclado o al fabricante, en el
material de embalaje de la batería de reemplazo.
Servicio técnico
Si necesita reparar el SAI, no lo devuelva al distribuidor. Siga los pasos descritos a continuación:
1. Lea los problemas descritos en la sección Resolución de problemas de este manual para
comprobar que no se trata de un problema común.
2. Si el problema continúa, comuníquese con el Servicio de Atención al Cliente de Rockwell
Automation.
Consulte la Información de contacto que figura a continuación.
3. Embale el SAI en el material de embalaje original.
§ Embale el SAI correctamente para evitar que se dañe durante el transporte. No use nunca
cuentas de plástico esponjoso (Styrofoam) para el embalaje.
§ Los daños producidos durante el transporte no están cubiertos por la garantía.
Las reglamentaciones del Departamento de Transporte de los EE.UU. y de la IATA exigen que
DESCONECTE SIEMPRE LA BATERÍA DEL SAI antes de enviarla.
La batería puede permanecer en el SAI.
Información de contacto
Consulte a Rockwell Automation llamando al 440-646-5800.
8
Page 31

Información de seguridad - GUARDE ESTA GUÍA
Esta Guía de Seguridad contiene instrucciones importantes que deben seguirse durante la instalación y el mantenimiento del
equipo y de las baterías. Está diseñada para los clientes que configuran, instalan, reubican o mantienen el equipo.
Los cambios y modificaciones a esta unidad que no hayan sido expresamente aprobados pueden anular la garantía.
Seguridad en el manejo
<18 kg (<40 lb) 32 –55 kg (70–120 lb)
18 –32 kg (40–70 lb) >55 kg (>120 lb)
>10º
¡PRECAUCIÓN! Medidas de seguridad respecto de la electricidad
• No trabaje solo en condiciones peligrosas.
• Las corrientes altas que circulan por materiales conductores pueden producir quemaduras graves.
• Verifique los cables eléctricos, las tomas de corriente y los enchufes para comprobar que estén en buen estado.
• Solicite al personal de servicio técnico autorizado que cambie la toma de corriente del SAI y que instale equipos con
cableado permanente.
• Si no se puede comprobar la correcta conexión a tierra, desconecte el equipo del tomacorriente de la red pública antes de
instalarlo o conectarlo a otro equipo. Vuelva a conectar el cable eléctrico sólo después de haber realizado todas las
conexiones.
• No manipule ningún conector metálico antes de haber desconectado el suministro de energía.
• Conecte el eq uipo a un tomacorriente de la red pública de tres patas (dos polos más tierra). El receptáculo debe estar
conectado a un protector del circuito secundario/red de alimentación principal adecuado (fusible o disyuntor). Si conecta
el equipo a cualquier otro tipo de receptáculo, puede ocasionar riesgos de descarga eléctrica.
• Sólo en los modelos de 230 V: Para cumplir con la Directiva de Compatibilidad Electromagnética (Electro Magnetic
Compliance) para los productos vendidos en Europa, los cables de salida cone ctados al SAI no deben exceder los 10
metros de longitud.
• Sólo en los modelos de 230 V: La corriente de fugas total proveniente del equipo conectado y del SAI no debe exceder
los 3,5 mA para un SAI de tipo A conectable.
¡PRECAUCIÓN! Medidas de seguridad respecto de la desactivación del equipo
• Si el SAI tiene una fuente de energía interna (la batería), se puede activar la salida cuando la unidad no está conectada al
tomacorriente de la red pública.
• Para desactivar un SAI conectable, presione el botón o interruptor OFF para apagar el equipo. Desenchufe el SAI del
tomacorriente de la red pública. Desconecte las baterías externas, si corresponde, y la batería interna (consulte el Manual
del Usuario). Presione el botón ON para desactivar los capacitores.
Para de sactivar un SAI con cableado permanente, presione el botón o interruptor OFF para apagar el equipo. Apague el
disyuntor de la red pública que suministra energía al SAI. Desconecte las baterías externas, si corresponde, y la batería
interna (consulte el Man ual del Usuario).
¡ADVERTENCIA! Medidas de seguridad respecto de la batería
• Este equipo funciona a voltajes potencialmente peligrosos. No intente desmontar la unidad. La única excepción es
para un SAI que contenga baterías. Consulte los procedimientos de reemplazo de la batería detallados en el Manual del
Usuario. A excepción de la batería, la unidad no contiene piezas que puedan ser reparadas por el usuario . Las
reparaciones deben ser realizadas únicamente por personal de servicio técnico autorizado.
• No abra ni mutile las baterías. Contienen un electrolito tóxico y perjudicial para la piel y los ojos.
• Para evitar lesiones personales debidas a peligros eléctricos, quítese los relojes de pulsera y las alhajas, como anillos,
cuando cambie las baterías. Utilice herramientas con mangos aislados.
• Reemplace las baterías por otras del mismo número y tipo que las instaladas originalmente en el equipo.
Reemplazo y reciclado de las baterías
Consulte a su distribuidor o comuníquese con Rockwell Automation llamando al 440 -646-5800, para obtener información
sobre el reemplazo de los paquetes de baterías y el reciclado de las baterías.
No olvide enviar la batería usada a un centro de reciclado en el material de embalaje de la batería de
41063-262-01(1)
reemplazo.
9
Page 32

Allen-Bradley
Manuel d’utilisation
Bloc-batterie externe
1609-PXBP
41063-262-01(1) 990-2673 09/2005
Page 33

INSTALLATION
Veuillez lire le document sur les consignes de sécurité avant d'installer les batteries.
Déballage
Inspectez l’unité dès sa réception. Informez le transporteur et le revendeur si vous constatez des
dommages.
L’emballage est recyclable ; conser vez-le donc pour réemploi ou jetez-le conformément au respect de
l'environnement.
Vérifiez le contenu du paquet :
q Bloc-batterie externe
q Panneau avant
q Trois fixations et six vis
q Documentation sur le produit, guide de sécurité
q CD du guide d'utilisation des onduleurs de la série Bulletin 1609-P
Caractéristiques environnementales
TEMPERATURE
FONCTIONNEMENT
STOCKAGE
ALTITUDE
MAXIMUM
FONCTIONNEMENT
STOCKAGE
HUMIDITE 0 à 95 % d'humidité relative, sans condensation
32° à 104° F (0° à 40° C)
-4° à 140 ° F (-20° à 60° C) rechargez la batterie de
l'onduleur tous les six mois
10 000 pieds (3 000 m)
50 000 pieds (15 000 m)
Cette unité est conçue uniquement pour
un usage intérieur. Sélectionnez un
endroit assez stable et solide pour son
poids.
Évitez d’utiliser l'onduleur dans un
environnement excessivement
poussiéreux ou hors des limites de
température et d’humidité spécifiées.
Assurez-vous que les fentes d’aération
à l’avant et à l’arrière de l’appareil
ne sont pas bloquées.
1
Page 34

Installation du (des) bloc(s)-batterie(s) externe(s)
3 2 1
Votre modèle d'onduleur peut être différent de celui représenté dans l'illustration. La procédure
d'installation de la batterie est la même pour tous les modèles.
Avant de connecter les batteries et les fixations
(le cas échéant), retirez les pieds (s'ils sont
installés) du dessous de l'onduleur. Voir
l'illustration.
x4
x4
DEMONTAGE DES BATTERIES DU BLOC-BATTERIE EXTERNE
L’unité est lourde. Pour l'alléger, retirez les batteries. Suivez les instructions de déballage indiquées
sur le carton d' emballage de l'appareil ou consultez les instructions ci-dessous.
1 2 3
x9
4
CONFIGURATION EN TOUR
Installation et connexion du (des) bloc(s)-batterie(s) externe(s)
REMARQUE : les blocs-batteries externes doivent être installés à droite de l'onduleur lorsque
vous êtes placé devant les unités (reportez-vous à l'illustration ci-dessous).
1. Enlevez les vis de
fixation des capots
supérieurs.
2
2. Installez la fixation de
l'onduleur et du blocbatterie externe (vis
fournies).
Page 35

3. Installez les fixations arrière (vis fournies), comme indiqué dans les illustrations ci -dessous.
fixations
Onduleur avec un bloc -batterie
externe
Installez les
4. Connectez les fils de terre vert/jaune (vis incluses) comme indiqué dans les illustrations ci-
dessous.
Connexion des fils de terre à la vis TVSS
5. Connectez les batteries sur le panneau arrière comme indiqué ci-dessous.
Connexions des batteries à l’arrière
Onduleur avec deux blocs-batteries externes
Remarque : les
fixations sur le XLBP
central partagent une
vis commune.
6. Replacez les capots supérieurs et fixez-les avec les vis enlevées à l'étape 1.
3
Page 36

1 3 2
Installation et connexion des batteries avant et fixation du panneau avant
1 2
4
3 4
5 6
x9
4
Page 37

CONFIGURATION EN BAIE
Reportez-vous au Guide d'installation inclus dans le kit de rails pour des instructions sur l'installation
de l'onduleur et des blocs-batteries externes dans une baie.
REMARQUE : les blocs-batteries externes doivent être installés dans la baie sous l'onduleur.
Installation et connexion du (des) bloc(s)-batterie(s) externe(s)
1. Connectez les fils de terre vert/jaune (vis incluses) comme indiqué dans les illustrations ci-
dessous.
Connexion des fils de terre à la vis TVSS
2. Connectez les batteries sur le panneau arrière comme indiqué ci-dessous.
Connexions des batteries
5
Page 38

Installation et connexion des batteries à l’ avant et fixation du panneau avant
1 2 3 4
1 2
3 4
5 6
x9
6
Page 39

Reconnaissance par l'onduleur des blocs -batteries externes
Cette configuration affecte l’exactitude des calculs d’autonomie prévue réalisés par l’onduleur
lors du fonctionnement sur batterie.
Les réglages se font par le biais du logiciel PowerChute® Business Edition ou PowerChute® Network
Shutdown fourni, ou en mode Terminal.
Consultez les instructions fournies avec le logiciel ou les cartes accessoires. Voir les instructions sur
le mode Terminal ci-dessous.
INTERFACE MODE TERMINAL POUR CONFIGU RER LES PARAMETRES DE L'ONDULEUR
Modèles 3000 VA :
Le Mode Terminal est une interface pilotée par menus qui permet d’améliorer la configuration de
l’onduleur.
Connectez le câble série au connecteur Com série à l’arrière de l’onduleur.
1. QUITTEZ le logiciel PowerChute Business Edition en procédant comme suit :
• Depuis le Bureau, utilisez Démarrer => Paramètres => Panneau de configuration =>
Outils d'administration => Services.
• Sélectionnez APC PCBE Server et APC PCBE Agent – cliquez sur le bouton droit de la
souris et sélectionnez Stop.
2. Ouvrez un programme de terminal. Exemple : HyperTerminal
• Depuis le Bureau, utilisez Démarrer => Programmes => Accessoires =>
Communications => HyperTerminal.
3. Double-cliquez sur l’icône HyperTerminal.
• Suivez les invites pour choisir un nom et sélectionnez une icône. Ignorez le message,
« ...installer un modem », s’il apparaît. Cliquez sur OK.
• Sélectionnez le port COM connecté à votre onduleur. Les paramètres de port sont les
suivants :
ü bits per second – 2400 (bits par seconde - 2400)
ü bits de données - 8
ü parité - aucune
ü bit d’arrêt - 1
ü contrôle de flux - aucun
• Appuyez sur ENTREE.
4. Exemple pour définir le nombre de blocs-batteries externes :
Lorsque la fenêtre vide de terminal est ouverte, procédez comme suit pour entrer le nombre de
blocs-batteries :
• Appuyez sur ENTREE pour passer en mode term inal. Observez les invites :
• Appuyez sur 1 pour modifier les valeurs de paramètres de l’onduleur. Appuyez sur
e (ou E) pour modifier le nombre de blocs -batteries. Entrez le nombre de blocsbatteries, y compris le bloc-batterie interne (nombre de blocs : 1= batterie interne,
2 = 1 bloc-batterie externe, 3 = 2 blocs-batteries externes, etc.).
Appuyez sur ENTREE.
• Suivez les invites.
5. Quittez le programme de terminal.
7
Page 40

INFORMATIONS SUR LE DEPANNAGE, L'ENTRETIEN ET LA GARANTIE
Remplacement d'une batterie
Cet onduleur comporte un module de batterie facile à remplacer (« à chaud »). Le remplacement
d’une batterie est une procédure ne présentant aucun risque d’électrocution. Vous pouvez laisser en
marche l’onduleur et le matériel connecté pendant la procédure décrite ci-après. Consultez votre
distributeur pour des informations sur le remplacement des batteries.
Lorsque la batterie est débranchée, l'équipement connecté n'est plus protégé contre
les coupures de courant.
Veillez à rapporter les batteries usagées dans un lieu prévu pour le recyclage ou à
les renvoyer au fabricant dans l'emballage prévu à cet effet.
Service après-vente
Si l’onduleur nécessite des réparations, ne le renvoyez pas au revendeur. Procédez comme suit :
1. Passez en revue les problèmes décrits à la section Dépannage pour éliminer les problèmes les
plus courants.
2. Si le problème persiste, contactez l'assistance clientèle de Rockwell Automation.
Consultez la rubrique Contacts ci-dessous.
3. Emballez l’onduleur dans le carton d’origine.
§ Emballez correctement l’onduleur pour éviter tout dégât pendant le transport. N’utilisez
jamais de grains de polystyrène pour l’emballage.
§ Tout dégât survenu lors du transport n’est pas couvert par la garantie.
DÉCONNECTEZ toujours les BATTERIES avant l’expédition, conformément aux régulations
du U.S. Department of Transportation (DOT) et aux réglementations de l'IATA.
Les batteries peuvent rester dans l’onduleur.
Contacts
Contactez Rockwell Automation au +1 440-646-5800 (ou contact local s’il existe) .
8
Page 41

Informations sur la sécurité - CONSERVEZ CE GUIDE
Ce Guide de sécurité contient des instructions importantes que vous devez respecter lors de l'installation et de l'entretien de
l'équipement et des batteries. Il est destiné aux clients qui configurent, installent, dépla cent ou entretiennent l'équipement.
Toute modification apportée à cette unité et non approuvée expressément peut annuler la garantie.
Précautions de manutention
<18 kg (<40 lb) 32 –55 kg (70–120 lb)
18 –32 kg (40–70 lb) <55 kg (<120 lb)
>10º
ATTENTION ! Sécurité électrique
• Évitez de travailler tout seul dans des conditions dangereuses.
• Une forte intensité traversant des matériaux conducteurs peut provoquer des brûlures graves.
• Vérifiez que le(s) cordon(s) d'alimentation, la (les) prise(s) mâle(s) et femelle(s) sont en bon état.
• Faites appel à du personnel d'entretien qualifié pour changer la prise de l'onduleur et pour installer un équipement en
câblage permanent.
• Lorsque la mise à la terre ne peut pas être vérifiée, déconnectez l'équipeme nt de l'alimentation secteur avant de l'installer
ou de le connecter à un autre équipement. Reconnectez le cordon d'alimentation uniquement après avoir effectué toutes
les connexions.
• Ne manipulez aucun connecteur métallique avant d'avoir déconnecté l'alimentation secteur.
• Connectez l'équipement à une prise murale à trois fils (deux pôles et la terre). La prise murale doit être connectée à un
circuit secteur/disjoncteur général approprié (fusible ou disjoncteur). Toute connexion à un autre type de prise peut
présenter des risques de choc électrique.
• Modèles 230 V uniquement : afin de maintenir la conformité avec la directive sur la Conformité électromagnétique des
produits vendus en Europe, la longueur des cordons de sortie raccordés à l'onduleur ne doit pas dépasser 10 mètres.
• Modèles 230 V uniquement : pour un onduleur enfichable de type A, le courant de fuite total de l'équipement connecté et
de l'onduleur ne doit pas excéder 3,5 mA.
ATTENTION ! Mise hors tension
• Si l'onduleur comprend une source d'énergie interne (batterie), la sortie peut être alimentée lorsque l'unité n'est pas
connectée à une prise secteur.
• Pour mettre un onduleur enfichable hors tension, appuyez sur le bouton ou sur l'interrupteur d'arrêt (OFF) pour éteindre
l'équipement. Débranchez l’onduleur de la prise de courant de secteur. Déconnectez les batteries externes le cas échéant
et la batterie interne (voir le Manuel d'utilisation). Appuyez sur le bouton de marche (ON) pour décharger les
condensateurs.
Pour mettre un onduleur en câblage permanent hors tension, appuyez sur le bouton ou sur l'interrupteur d'arrêt (OFF)
pour éteindre l'équipement. Déclenchez le disjoncteur secteur qui alimente l'onduleur.Déconnectez les batteries externes
le cas échéant et la batterie interne (voir le Manuel d'utilisation).
AVERTISSEMENT ! Précautions concernant les batteries
• Cet équipement contient des tensions potentiellement dangereuses. Ne tentez pas de démonter l’onduleur. La seule
exception concerne les onduleurs équipés de batteries. Veuillez vous référer aux procédures de remplacement des
batteries détaillées dans le Manuel d'utilisation. À l'exception de la batterie, l'unité ne contient aucune pièce nécessitant
un entretien. Les réparations doivent être effectuées uniquement par du personnel d'entret ien qualifié.
• Ne jetez pas les batteries dans un feu. Elles pourraient exploser.
• Ne cherchez pas à ouvrir ou à détruire les batteries. Elles contiennent un électrolyte toxique et dangereux pour les yeux
et la peau.
• Pour éviter toute blessure due à des chocs électriques, ôtez les montres et bijoux (bagues, etc.) lorsque vous remplacez
les batteries. Utilisez des outils dont les poignées sont isolées.
• Remplacez les batteries avec des batteries de même type et référence que celles installées à l'origine.
Remplacement et recyclage des batteries
Consultez votre distributeur ou contactez Rockwell Automation au 440-646-5800 pour des informations sur les kits de
batteries de remplacement et le recyclage des batteries.
Veillez à rapporter la batterie usagée dans un lieu prévu pour le recyclage dans l'emballage prévu à cet
41063-262-01(1)
effet.
9
Page 42

Allen-Bradley
Manuale dell’utente
Pacco batteria esterno
1609-PXBP
41063-262-01(1) 990-2673 09/2005
Page 43

INSTALLAZIONE
Prima di installare le batterie, consultare la Guida per la sicurezza allegata al gruppo di
continuità.
Disimballaggio
Ispezionare l'unità alla consegna. Informare il corriere e il rivenditore qualora si riscontrino danni
alla consegna.
Il materiale d'imballo è riciclabile; conservarlo per l'eventuale riutilizzo o smaltirlo in modo
appropriato.
Verificare il contenuto della confezione.
q Pacco batteria esterno
q Mascherina anteriore
q Tre staffe di fissaggio e sei viti
q Documentazione del prodotto e Guida per la sicurezza
q CD con manuale dell'utente per le serie 1609-P
Dati tecnici ambientali
TEMPERATURA
DI ESERCIZIO
DI IMMAGAZZINAGGIO
ALTEZZA MASSIMA
DI ESERCIZIO
DI IMMAGAZZINAGGIO
UMIDITÀ Da 0 a 95% di umi dità relativa, senza
da 0 a 40 °C (da 32 a 104 °F)
da -20 a 60 °C (da -4 a 140 °F) caricare la batteria
del gruppo di continuità ogni 6 mesi
3000 m (10000 ft)
15000 m (50000 ft)
condensazione
Questa unità è stata progettata
esclusivamente per uso interno.
Collocarla su una superficie
sufficientemente solida da sorreggerne
il peso.
Non utilizzare il gruppo di continuità
in ambienti eccessivamente polverosi o
con temperatura o umidità non
comprese nei limiti specificati.
Assicurarsi che le aperture di
ventilazione poste sulla parte
anteriore e posteriore dell'unità non
siano ostruite.
1
Page 44

Installazione dei pacchi batteria esterni
3 2 1
Il modello del gruppo di continuità può essere di verso da quello raffigurato. La procedura di
installazione della batteria è identica per qualsiasi modello.
Prima di collegare le batterie e le eventuali staffe
di fissa ggio, è necessario rimuovere i piedini
eventualmente installati dalla base del gruppo di
continuità. Fare riferimento alla figura.
x4
x4
INSTALLAZIONE DEL PACCO BATTERIA ESTERNO
L'unità è pesante; rimuovere le batterie in modo da alleggerirla. Fare riferimento alle istruzioni di
disimballaggio riportate sulla confezione di cartone dell'unità o alle istruzioni riportate di seguito.
1 2 3
x9
4
CONFIGURAZIONE A TORRETTA
Installazione e collegamento dei pacchi batteria esterni
NOTA: i pacchi batteria esterni vanno installati a destra rispetto al gruppo di continuità
osservando le unità dal lato anteriore (fare riferimento alle figure riportate di seguito).
1. Rimuovere le viti che
fissano i coperchi superiori.
2
2. Montare la staffa che
fissa il gruppo di
continuità e il pacco
batteria esterno (viti
comprese).
Page 45

3. Installare le staffe di fissaggio posteriori (viti comprese), come illustrato nelle figure riportate di
seguito.
Gruppo di continuità e un pacco
batteria esterno
Fissare le
staffe di
fissaggio
4. Collegare i cavi della massa di colore verde/giallo (viti comprese), come illustrato nelle figure
riportate di seguito.
Collegamenti dei cavi della massa TVSS
5. Collegare le batterie del pannello posteriore, come illustrato nel le figure riportate di seguito.
Collegamenti delle batterie posteriori
Gruppo di continuità e due pacchi batteria esterni
Nota: le staffe di
fissaggio dell'XLBP
centrale utilizzano la
medesima vite.
6. Riposizionare i coperchi superiori e fissarli con le viti rimosse al punto 1.
3
Page 46

1 3 2
Installazione e collegamento delle batterie anteriori e montaggio della mascherina
1 2
4
3 4
5 6
x9
4
Page 47

CONFIGURAZIONI PER IL MONTAGGIO A RACK
Per i dettagli sulle modalità di montaggio nel rack del gruppo di continuità e dei pacchi batteria
esterni, fare riferimento alla Guida all'installazione allegato al Kit rotaie.
NOTA: il pacco batteria esterno deve essere montato nel rack sotto il gruppo di continuità.
Installazione e collegamento dei pacchi batteria esterni
1. Collegare i cavi della massa di colore verde/giallo (viti comprese), come illustrato nelle figure
riportate di seguito.
Collegamenti dei cavi della massa TVSS
2. Collegare le batterie del pannello posteriore, come illustrato nelle figure riportate di seguito.
Collegamenti delle batterie
5
Page 48

Installazione e collegamento delle batterie anteriori e montaggio della mascherina
1 2 3 4
1 2
3 4
5 6
x9
6
Page 49

Impostazione del gruppo di continuità per il riconoscimento dei pacchi
batteria
Questa configurazione influisce sulla precisione dei calcoli di autonomia che il gruppo di
continuità esegue quando è alimentato a batteria.
Le impostazioni vengono effettuate tramite il software PowerChute® Business Edition, PowerChute®
Network Shutdown o in modalità Terminal.
Consultare le istruzioni fornite con il software o la scheda degli accessori in dotazione. Fare
riferimento alle istruzioni relative alla modalità Terminal riportate di seguito.
MODALITÀ TERMINAL PER LA CONFI GURAZIONE DEI PARAMETRI DEL GRUPPO DI CONTINUITÀ
Modelli 3000 VA
La modalità Terminal indica un’interfaccia software basata sui menu che consente una
configurazione avanzata del gruppo di continuità.
Collegare il cavo seriale al connettore della porta COM sul retro del gruppo di continuità.
1. Chiudere il server PowerChute Business Edition, attenendosi alla procedura riportata di seguito.
• Dal desktop, selezionare Start => Pannello di controllo => Strumenti di
amministrazione => Servizi.
• Selezionare APC PCBE Server e APC PCBE Agent , quindi fare clic con il pulsante destro
del mouse e selezionare Stop.
2. Aprire un programma di emulazione del terminale. Ad esempio, HyperTerminal.
• Dal desktop, aprire Start => Programmi => Accessori => Comunicazione =>
HyperTerminal.
3. Fare doppio clic sull’icona HyperTerminal.
• Il sistema invit a a specificare un nome e a selezionare un’icona. Se compare, ignorare il
messaggio che indica la necessità di installare un modem. Fare clic su OK.
• Selezionare la porta COM a cui è collegato il gruppo di continuità. Le impostazioni della
porta sono le seguenti:
ü bit al secondo - 2400
ü bit di dati - 8
ü parità - nessuna
ü bit di stop - 1
ü controllo di flusso - nessuno
• Premere INVIO .
4. Esempio di impostazione del numero di pacchi batteria esterni:
Quando si apre la finestra di Terminal, procedere nel modo seguente per immettere il numero di
pacchi batteria:
• Premere INVIO per attivare la modalità terminale. A seguito di ogni prompt:
• Premere 1 per modificare le impostazioni UPS. Premere “e” (o “E”) per cambiare
il numero di pacchi batteria. Immettere il numero di pacchi batteria, compreso il
pacco batteria interno. (Numero di pacchi batteria: 1 = modulo batteria interno,
2 = 1 modulo batteria esterno, 3 = 2 modulo batteria interno, ecc.).
Premere INVIO.
• Attenersi ai prompt.
5. Uscire dal program ma di emulazione del terminale.
7
Page 50

M ANUTENZIONE, ASSISTENZA E CONTATTI
Sostituzione del modulo batteria
Il gruppo di continuità è dotato di un pacco batteria di agevole sostituzione, anche sotto tensione. La
sostituzione è una procedura del tutto sicura, con isolamento totale da eventuali pericoli di natura
elettrica. Per la procedura descritta di seguito, è possibile lasciare accesi il gruppo di continuità e le
apparecchiature collegate. Per informazioni sulla sostituzione dei moduli batteria, rivolgersi al
proprio rivenditore.
Una volta scollegata le batteria, le apparecchiature non sono più protette da
eventuali interruzioni di corrente.
Le batterie esaurite vanno consegnate a un centro di riciclaggio o spedite al
produttore utilizzando l'imballo della batteria di ricambio.
Servizio
Se il gruppo di continuità richiede interventi di riparazione, non restituirlo al rivenditore. Seguire i
passaggi riportati di seguito.
1. Fare riferimento ai problemi riportati nella sezione Problemi e soluzioni di questo manuale per
eliminare i problemi più comuni.
2. Se il problema persiste, contattare l'assistenza clienti di Rockwell Automation.
Fare riferimento a Contatti .
3. Imballare il gruppo di continuità con i materiali d’imballo originali.
§ Imballare il gruppo di continuità con cura, onde evitare di danneggiarlo durante il trasporto.
Non utilizzare mai fiocchi di polistirolo come materiale d’imballo.
§ I danni subiti durante il trasporto non sono coperti dalla garanzia.
Prima di rispedire il gruppo di continuità, SCOLLEGARE sempre LA BATTERIA in
conformità alle normative del Ministero dei trasporti (DOT, Department of Transportation)
degli Stati Uniti e alle normative IATA.
Non è necessario estrarre le batterie dal gruppo di continuità.
Clienti residenti negli Stati Uniti:
Rivolgersi al numero telefonico 440 -646-5800 di Rockwell Automation.
8
Page 51

Informazioni sulla sicurezza - Conservare la presente guida
La Guida per la sicurezza contiene istruzioni importanti ai fini dell'installazione e manutenzione dell'apparecchiatura e delle
batterie. È stata ideata per gli utenti che configurano, installano, trasferiscono o eseguono la manutenzione delle
apparecchiature.
Eventuali cambiamenti o modifiche apportati a questa unità senza espressa approvazione, rendono nulla la garanzia.
Sicurezza nel maneggiare l'apparecchiatura
<18 kg ( <40 lb) 32–55 kg (70–120 lb)
18–32 kg (40–70 lb) >55 kg (>120 lb)
>10º
ATTENZIONE Sicurezza a livello elettrico
• Non lavorare da soli in condizioni di pericolo.
• Il passaggio di corrente elevata attraverso materiali conduttivi potrebbe causare gravi ustioni.
• Verificare che i cavi di alimentazione, le spine di alimentazione e le prese siano in buone condizioni.
• Per sostituire la spina di alimentazione del gruppo di continuità e per installare le apparecchiature a collegamento
continuo, rivolgersi a pers onale di assistenza qualificato.
• Se non è possibile verificare il collegamento a terra, scollegare l’apparecchiatura dalla presa elettrica prima di installare o
collegare altre apparecchiature. Ricollegare il cavo di alimentazione soltanto dopo avere effettuato tutti gli altri
collegamenti.
• Non maneggiare i connettori metallici prima di avere scollegato l’alimentazione.
• Collegare l’apparecchiatura ad una presa elettrica a tre fili (due poli più la terra). La presa deve essere collegata ad
un’appropriata protezione per circuito derivato/alimentazione principale (fusibile o interruttore automatico). Il
collegamento ad altro tipo di presa potrebbe causare rischi di shock elettrico.
• Solo modelli a 230 V: per conformità alla direttiva EMC (Electro Magnetic Compliance) per i prodotti venduti in
Europa, i cavi in uscita collegati al gruppo di continuità non devono superare i 10 metri di lunghezza.
• Solo modelli a 230 V: la corrente di dispersione totale dell’apparecchiatura collegata e dell’UPS non deve superare i
3,5 mA per un UPS collegabile di tipo A.
ATTENZIONE Sicurezza in fase di scollegamento energetico
• Se il gruppo di continuità è dotato di una fonte energetica interna (batteria), potrebbe essere sotto tensione anche se
l’unità non è collegata ad una presa elettrica.
• Per togliere corrente a un gruppo di continuità collegabile , premere il pulsante OFF in modo da spegnere
l’apparecchiatura. Scollegare l’UPS dalla presa elettrica. Se necessario, scollegare le eventuali batterie esterne e quindi la
batteria interna (consultare il Manuale dell'utente). Premere il pulsante ON per togliere corrente ai condensatori.
Per togliere corrente a un gruppo di continuità a collegamento continuo , premere il pulsante OFF in modo da spegnere
l’apparecchiatura. Spegnere l’interruttore automatico che fornisce corrente al gruppo di continuità. Se necessario,
scollegare le eventuali batterie esterne e quindi la batteria interna (consultare il Manuale dell'utente).
AVVERTENZA Sicurezza con le batterie
• La tensione dell’apparecchiatura è potenzialmente pericolosa. Non tentare di smontare l'unità, salvo nel caso di gruppi di
continuità contenenti batterie. Fare riferimento alle procedur e per la sostituzione delle batterie riportate nel Manuale
dell'utente. Se si eccettua la batteria, l'unità non contiene componenti su cui l'utente possa effettuare operazioni di
manutenzione. Le riparazioni devono essere condotte esclusivamente da personale tecnico qualificato.
• Non aprire o alterare le batterie. L’elettrolita in esse contenuto è tossico e pericoloso per la pelle e per gli occhi.
• Per evitare lesioni personali a causa del rischio di scosse elettriche, durante la sostituzione della batterie togliersi
eventuali orologi e gioielli (ad esempio gli anelli). Utilizzare utensili con manici isolati.
• Sostituire le batterie con batterie dello stesso numero e tipo di quelle originariamente installate.
Sostituzione e riciclaggio delle batterie
Per ulteriori informazioni sui kit per la sostituzione della batteria e sul riciclaggio delle batterie, rivolgersi al proprio
rivenditore oppure contattare Rockwell Automation al numero telefonico 440 -646-5800.
Le batterie esaurite vanno consegna te a un centro di riciclaggio utilizzando l'imballo della batteria di
41063-262-01(1)
ricambio.
9
Page 52

Allen-Bradley
Manual do Utilizador
Jogo de Baterias Externo
1609-PXBP
41063-262-01(1) 990-2673 09/2005
Page 53

INSTALAÇÃO
Consulte a folha de Instruções de Segurança incluída com a UPS antes de instalar as baterias.
Desembalagem
Inspeccione a unidade no momento da sua recepção. Notifique o transportador e o distribuidor se
houver danos.
A embalagem é reciclável; guarde-a para a sua reutilizaçãou ou elimine-a da forma adequada.
Verifique o conteúdo da embalagem:
q Jogo de Baterias Externo
q Engaste dianteiro
q Três braçadeiras e seis parafusos
q Documentação do produto, Guia de Segurança
q CD Manual do Utilizador Série Boletim 1609-P
Especificações Ambientais
TEMPERATURA
EM SERVIÇO
ARMAZENAMENTO
ELEVAÇÃO
MÁXIMA
EM SERVIÇO
ARMAZENAMENTO
HUMIDADE 0% a 95% de humidade relativa, sem
0° a 40° C
-20º a 60° C carregue a bateria da UPS cada
seis meses
3,000 m
15,000 m
condensação
Esta unidade foi concebida exclusivamente
para o seu uso no interior. Seleccione uma
localização suficientemente robusta para
aguentar o seu peso.
Não utilize a UPS em locais onde haja
muito pó ou em locais nos quais a
temperatura e a humidade excedam os
limites especificados.
Certifique-se de que as saídas de
ventilação dianteiras e traseiras da
unidade não estão bloquea das.
1
Page 54

Instalação do(s) Jogo(s) de Bateria Externo(s)
3 2 1
O seu modelo de UPS poderá variar em relação ao modelo que se mostra na figura. O procedimento
de instalação da bateria é idêntico para todos os modelos.
Antes de ligar as baterias e as braçadeiras
(quando se utilizam), retire as patas (se
instaladas) da parte inferior da UPS. Consulte a
figura.
x4
x4
RETIRADA DAS BATERIAS DO JOGO DE BATERIAS EXTERNO
Esta unidade é pesada. Para aligeirar o peso da unidade, retire as baterias. Consulte as instruções de
desembalagem na caixa em que a unidade é fornecida ou consulte as instruções abaixo.
1 2 3
x9
4
CONFIGURAÇÃO EM TORRE
Instalação e Ligação do(s) Jogo(s) de Bateria Externo(s)
NOTA: Os jogos de baterias externos têm de ser instalados do lado direito da UPS estando
virado para a parte dianteira das unidades, (ver as figuras abaixo).
1. Retire os parafusos que
fixam as tampas superiores.
2
2. Instale a braçadeira
para fixar a UPS e o jogo
de baterias externo
(parafusos incluídos).
Page 55

3. Instale as braçadeiras de fixação traseiras (parafusos incluídos), tal como se mostra nas figuras
abaixo.
UPS e um Jogo de Baterias Externo UPS e dois Jogo de Bateria Externos
Nota: As braçadeiras
Fixe as
braçadeiras
4. Ligue os fios de massa verdes/amarelos (parafusos incluídos), tal como se mostra nas figuras
abaixo.
Ligações dos Fios de Massa das TVSS
no centro do XLBP
compartilham um
parafuso comum.
5. Ligue as baterias d painel traseiro tal como se mostra nas figuras abaixo.
Ligações das Baterias Traseiras
6. Coloque as tampas superiores novamente no se lugar e fixe-as com os parafusos retirados no
passo 1.
3
Page 56

1 3 2
Instalação e Ligação das Baterias Dianteiras e Fixação do Engaste
1 2
4
3 4
5 6
x9
4
Page 57

CONFIGURAÇÃO EM RACK
Consulte no Guia de Instalação incluído no Kit de Calhas as instruções para a montagem da UPS e
dos jogos de baterias externos num rack.
NOTA: Os jogos de baterias externos devem ser montados debaixo da UPS no rack.
Instalação e Ligação do(s) Jogo(s) de Bateria Externo(s)
1. Ligue os fios de massa verdes/amarelos (parafusos incluídos), tal como se mostra nas figuras
abaixo.
Ligações dos Fios de Massa das TVSS
2. Ligue as baterias d painel traseiro tal como se mostra nas figuras abaixo.
Ligações das Baterias
5
Page 58

Instalação e Ligação das Baterias Dianteiras e Fixação do Engaste
1 2 3 4
1 2
3 4
5 6
x9
6
Page 59

Ajuste da UPS para Reconhecer o(s) Jogo(s) de Baterias
Esta configuração afecta a precisão dos tempos de fncionamento que a UPS realiza enquanto
está a funcionar à base de baterias.
Os ajustes realizam -se através do software PowerChute® Business Edition ou dor PowerChute®
Network Shutdown fornecidos, ou do Modo Terminal.
Consulte as instruções incluídas com o software ou as placas de acessórios. Consulte abaixo as
instruções do Modo Terminal.
MODO TERMINAL PARA CONFIGURAR OS PARÂMETROS DA UPS
Modelos de 3000 VA:
O Modo Terminal é uma interface accionada por um menu que permite uma configuração melhorada
da UPS.
Ligue o cabo série à ficha série com na parte traseira da UPS.
1. SAIA do PowerChute Business Edition fazendo o seguinte:
• A partir do Escritório, vá a Start => Settings => Control Panel => Administrative
Tools => Services.
• Seleccione APC PCBE Server e APC PCBE Agent – faça clique com o botão direito do
rato e seleccione Stop.
2. Abra um programa de terminal. Exemplo: HyperTerminal
• A partir do Escritório, vá a Start => Programs => Accessories => Communication =>
HyperTerminal.
3. Faça duplo clique no ícone HyperTerminal.
• Siga as instruções para escolher um nome e seleccione um ícone. Ignore a mensagem,
“...must install a modem,” (...tem de instalar um modem) no caso desta aparecer. Clique
OK.
• Seleccione a porta COM que está ligada à sua UPS. Os parâmetros da porta são:
ü bits per second (bits por segundo) - 2400
ü data (dados) - bits 8
ü parity (paridade) - none (nenhuma)
ü stop bit (bit de paragem) - 1
ü flow control (controlo de fluxo) - none (nenhum)
• Prima ENTER.
4. Exemplo para configurar o número de jogos de bateria externos:
No momento em que a janela em branco do terminal estiver aberta, siga os seguintes passos para
introduzir o número de jogos de baterias:
• Prima ENTER para iniciar o modo terminal. Siga as instruções:
• Prima 1 para modificar os Ajustes da UPS. Prima e (ou E) para modificar o número
de jogos de baterias. Introduza o número de jogos de baterias, incluindo o jogo de
baterias interno (Número de jogos: 1= módulo de baterias interno,
2 = 1 jogo de baterias externo, 3 = 2 jogos de baterias externos, etc.).
Prima ENTER.
• Siga as instruções.
5. Saia do programa terminal.
7
Page 60

M ANUTENÇÃO, ASSISTÊNCIA E INFORMAÇÃO DE CONTACTO
Substituição do Módulo de Baterias
Esta UPS dispõe de um módulo de bateria fácil de substituir, que pode ser trocado em quente. A
substituição é um procedimento seguro, isolado de perigos eléctricos. Pode deixar a UPS e o
equipamento ligado a ela aceso durante o procedimento. Consulte o seu distribuidor para
informações sobre a substituição dos módulos de baterias.
No momento em que a bateria se encontra desligada, o equipamento ligado já não
está protegido contra cortes de corrente eléctrica
Certifique-se de que entrega as baterias gastas a uma entidade de reciclagem ou
envie-as ao fabricante na embalagem da bateria de substituição.
Assistência
Se a UPS necessitar de assistência, não a devolva ao distribuidor. Faça o seguinte:
1. Torne a verificar os problemas discutidos na secção de Localização e Resolução de Avarias
deste manual para descartar problemas correntes.
2. Se o problema persistir, contacte o Serviço de Atenção ao Cliente da Rockwell Automation.
Consulte a Informação de Contacto abaixo.
3. Embale a UPS na sua embalagem original.
§ Embale a UPS adequadamente para evitar danos durante o transporte. Nunca utilize pérolas
de Styrofoam para embalar.
§ Os danos que possa haver durante o transporte não estão cobertos pela garantia.
DESLIGUE SEMPRE A(S) BATERIA(S) antes do transporte, de acordo com os regulamentos
do Departamento de Transportes Americano (DOT) e da IATA.
A(s) bateria(s) podem permanecer na UPS.
Informação de Contacto
Consulte a Rockwell Automation através do número telefónico 440-646-5800.
8
Page 61

Informação de Segurança - CONSERVE ESTE GUIA
Este Guia de Segurança contém instruções importantes que devem ser cumpridas durante a instalação e a manutenção do
equipamento e das baterias. Está destinado a clientes que configuram, instalam, relocalizam ou realizam a manutenção do
equipamento.
As alterações e mdificações realizadas nesta unidade que não tenham sido autorizadas especificamente poderiam
deixar a garantia sem efeito.
Segurança durante o Transporte
<18 kg 32 –55 kg
18 –32 kg >55 kg
>10º
PRECAUÇÃO! Segurança eléctrica
• Não trabalhe sozinho sob condições perigosas.
• A corrente alta que passa através de materiais condutores pode causar queimaduras graves.
• Verifique que o(s) fio(s) eléctrico(s), a(s) ficha(s) e as tomadas estão em boas condições.
• Utilize pessoal de manutenção qualificado para substituir a ficha na UPS e para instalar equipamento permanentemente
ligado.
• Quando não for possível verificar se existe uma ligação à massa, desligue o equipamento da tomada de alimentação de
corrente antes de instalar ou de o ligar a outro equipamento. Torne a ligar o fio de alimentação eléctrica somente depois
de ter realizado todas as ligações.
• Não manuseie qualquer outra ficha metálica antes de ter desligado a corrente eléctrica.
• Ligue o equipamento a uma tomada eléctrica de três pólos (dois pólos e massa). O receptáculo deve estar ligado a uma
protecção do circuito de derivação/rede (fusível ou disjuntor). A ligação a qualquer outro tipo de receptáculo poderia ter
como resultado um risco de choque eléctrico.
• Apenas para os modelos de 230 V: A fim de respeitar as disposições da directiva de Cumprimento Electromagnético para
os produtos vendidos na Europa, os fios eléctricos de saída ligados à UPS não deveriam exceder os 10 m de
comprimento.
• Apenas para os modelos de 230 V: A corrente de fuga total do equipamento ligado e da UPS não deve superar os 3.5 mA
para uma UPS Tipo A de ligação a uma tomada de corrente.
PRECAUÇÃO! Segurança ao Desligar da Corrente
• Se a UPS possuir uma fonte de energia interna (bateria), a saída poderá ter corrente quando a unidade não se encontra
ligada a uma tomada de corrente de rede.
• Para desligar a corrente de uma UPS ligada a uma tomada de corrente, prima o botão ou o interruptor OFF para
desligar o equipamento. Desligue a UPS da tomada de corrente de rede. Desligue as baterias externas quando aplicável e
desligue a bateria interna (ver Manual do Utilizador). Prima o botão ON para desligar a corrente dos condensadores.
Para desligar a corrente de uma UPS ligada permanentemente à corrente, prima o botão ou o interruptor OFF para
desligar o equipamento. Desligue o disjuntor da rede que fornece corrente eléctrica à UPS. Desligue as baterias externas
quando aplicável e desligue a bateria interna (ver Manual do Utilizador).
AVISO! Segurança da Bateria
• Este equipamento contém tensões potencialmente perigosas . Não tente desmontar a unidade. A única excepção é
para uma UPS que contenha baterias. Consulte os procedimentos de substituição das baterias especificados no Manual
do Utilizador. À excepção da bateria, a unidade não contém quaisquer peças cuja manutenção possa ser realizada pelo
utilizador. As reparações devem ser realizadas apenas por pessoal de manutenção qualificado.
• Não abra nem mutile as baterias. Contêm um electrólito que é tóxico e nocivo para a pele e os olhos.
• Para evitar ferimentos pessoais devido a um perigo de corrente, retire o relógio e jóias, como por exemplo anéis, quando
substituir as baterias. Utilize ferramentas com pegas isoladas.
• Substitua as baterias com baterias da mesma referência e tipo que aquelas instaladas originalmente no equipamento.
Substituição e Reciclagem de Baterias
Contacte o seu distribuidor ou a Rockwell Automation ligando 440-646-5800, para informações sobre os kits de baterias de
substituição e a reciclagem de baterias.
Certifique-se de que entrega a bateria gasta a uma entidade de reciclagem na embalagem da bateria de
41063-262-01(1)
substituição.
9
 Loading...