

Page 1
r
1609-PSB1
Service Bypass Switch
Entire contents copyright © 2006 by Rockwell Automation corporation. All rights
reserved. Reproduction in whole or in part without permission is prohibited.
A-B and Allen-Bradley are registered trademarks of Rockwell Automation Corporation.
All other trademarks are the property of their respective owners.
90-007 rev 1
Note: Read the safety information sheet before installation.
Illustrations in this document may differ slightly from the actual hardware.
Attention: This product is for use in a controlled environment. Refer to product
specifications for environmental limits.
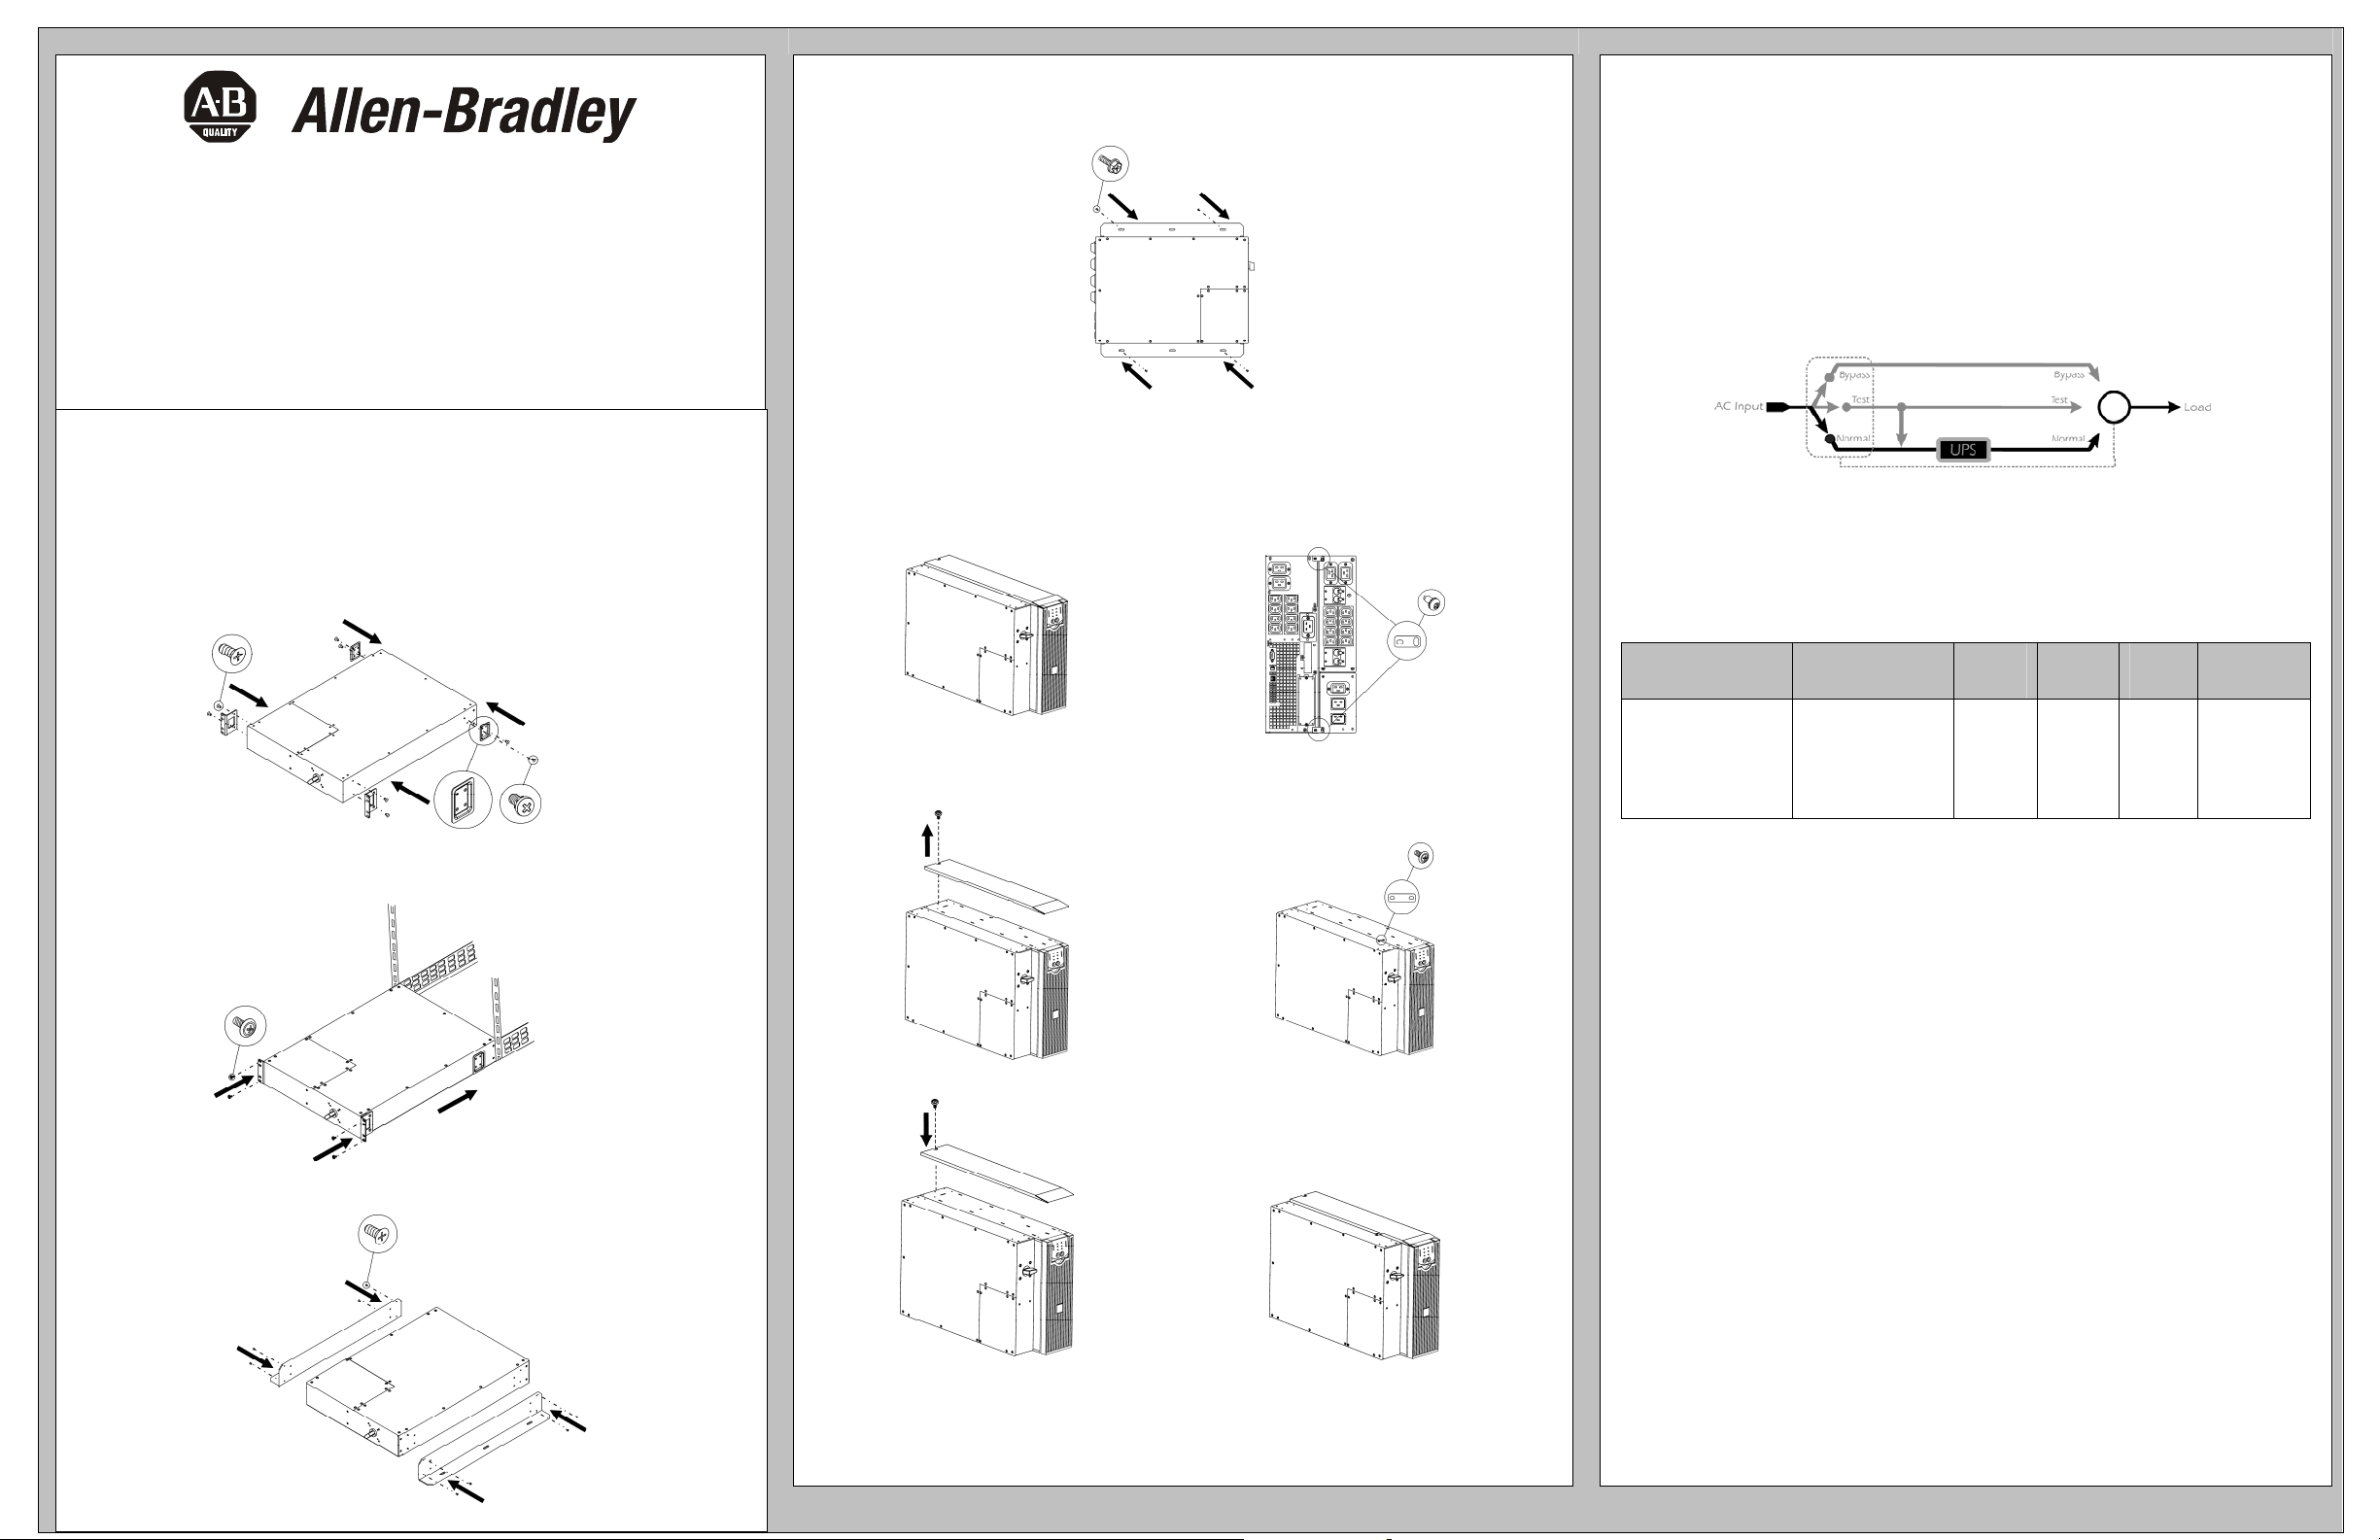
RACK MOUNTING
n
x4
x8
x2
o Set SBP in the rack. If hardwiring is required, see Connecting Power
section before screwing into the rack.
o Whenever possible, attach one top screw and one bottom screw into a wall stud. If stud
mounting is not possible, use an expandable wall anchor. Screws are not included; .25” x
2” lag bolts are recommended.
x4
TOWER OPTION
n Remove screw from the top and bottom rear of both the UPS and SBP. Install tie
brackets and reattach screws.
Front
Rea
x4
x2
o Unscrew and remove top cover of the
UPS.
p Attach bracket to top of UPS and SBP.
x2
x1
USER CONFIGURABLE
Attention: When using an online UPS, put the UPS in automatic bypass mode before
rotating the SBP switch.
1. Normal: Power is directed from the utility outlet, through the Bypass Panel and UPS,
and to connected equipment. For use during normal UPS operation.
2. Test: Power supplied to the UPS is not output. Use when tests are being conducted on
the UPS, and connected equipment is not yet desired.
3. Bypass: Power from the utility outlet is filtered through the Bypass Panel, and to the
connected equipment. Use to bypass the UPS, when functioning improperly.
Note: While operating in ‘Test’ or ‘Bypass’ mode, power to the connected equipment is
not conditioned by the UPS. At this time, the “Equipment Protection Policy” is not valid.
IDENTIFYING THE PANEL
Service Bypass Panels will differ. Refer to chart for unit specifications.
Note: HW= Hardwire
Service Bypass
Panel
1609-PSB1
Corresponding
UPS Systems
1609-P3000A
1609-P3000H
1609-P5000E
1609-P8000E
1609-P10000E
Bypass
Input
HW (1Ph) HW (1Ph) HW HW
UPS
Input
UPS
Output
PDU
Panel
*For loads exceeding 3kVA, hardwiring is necessary.
n WALL MOUNTING
x4
x8
q Reattach top cover of the UPS.
Note: The 1609-SBP1, when used in conjunction with an 1609-P3000A or 1609-P5000E UPS in a tower
configuration without an external battery pack 1609-PXBP, is suitable for mounting on concrete or other
non-combustible smooth surfaces only.
41063-300-01(1)
41063-300-01(1)
41063-300-01(1)
Page 2
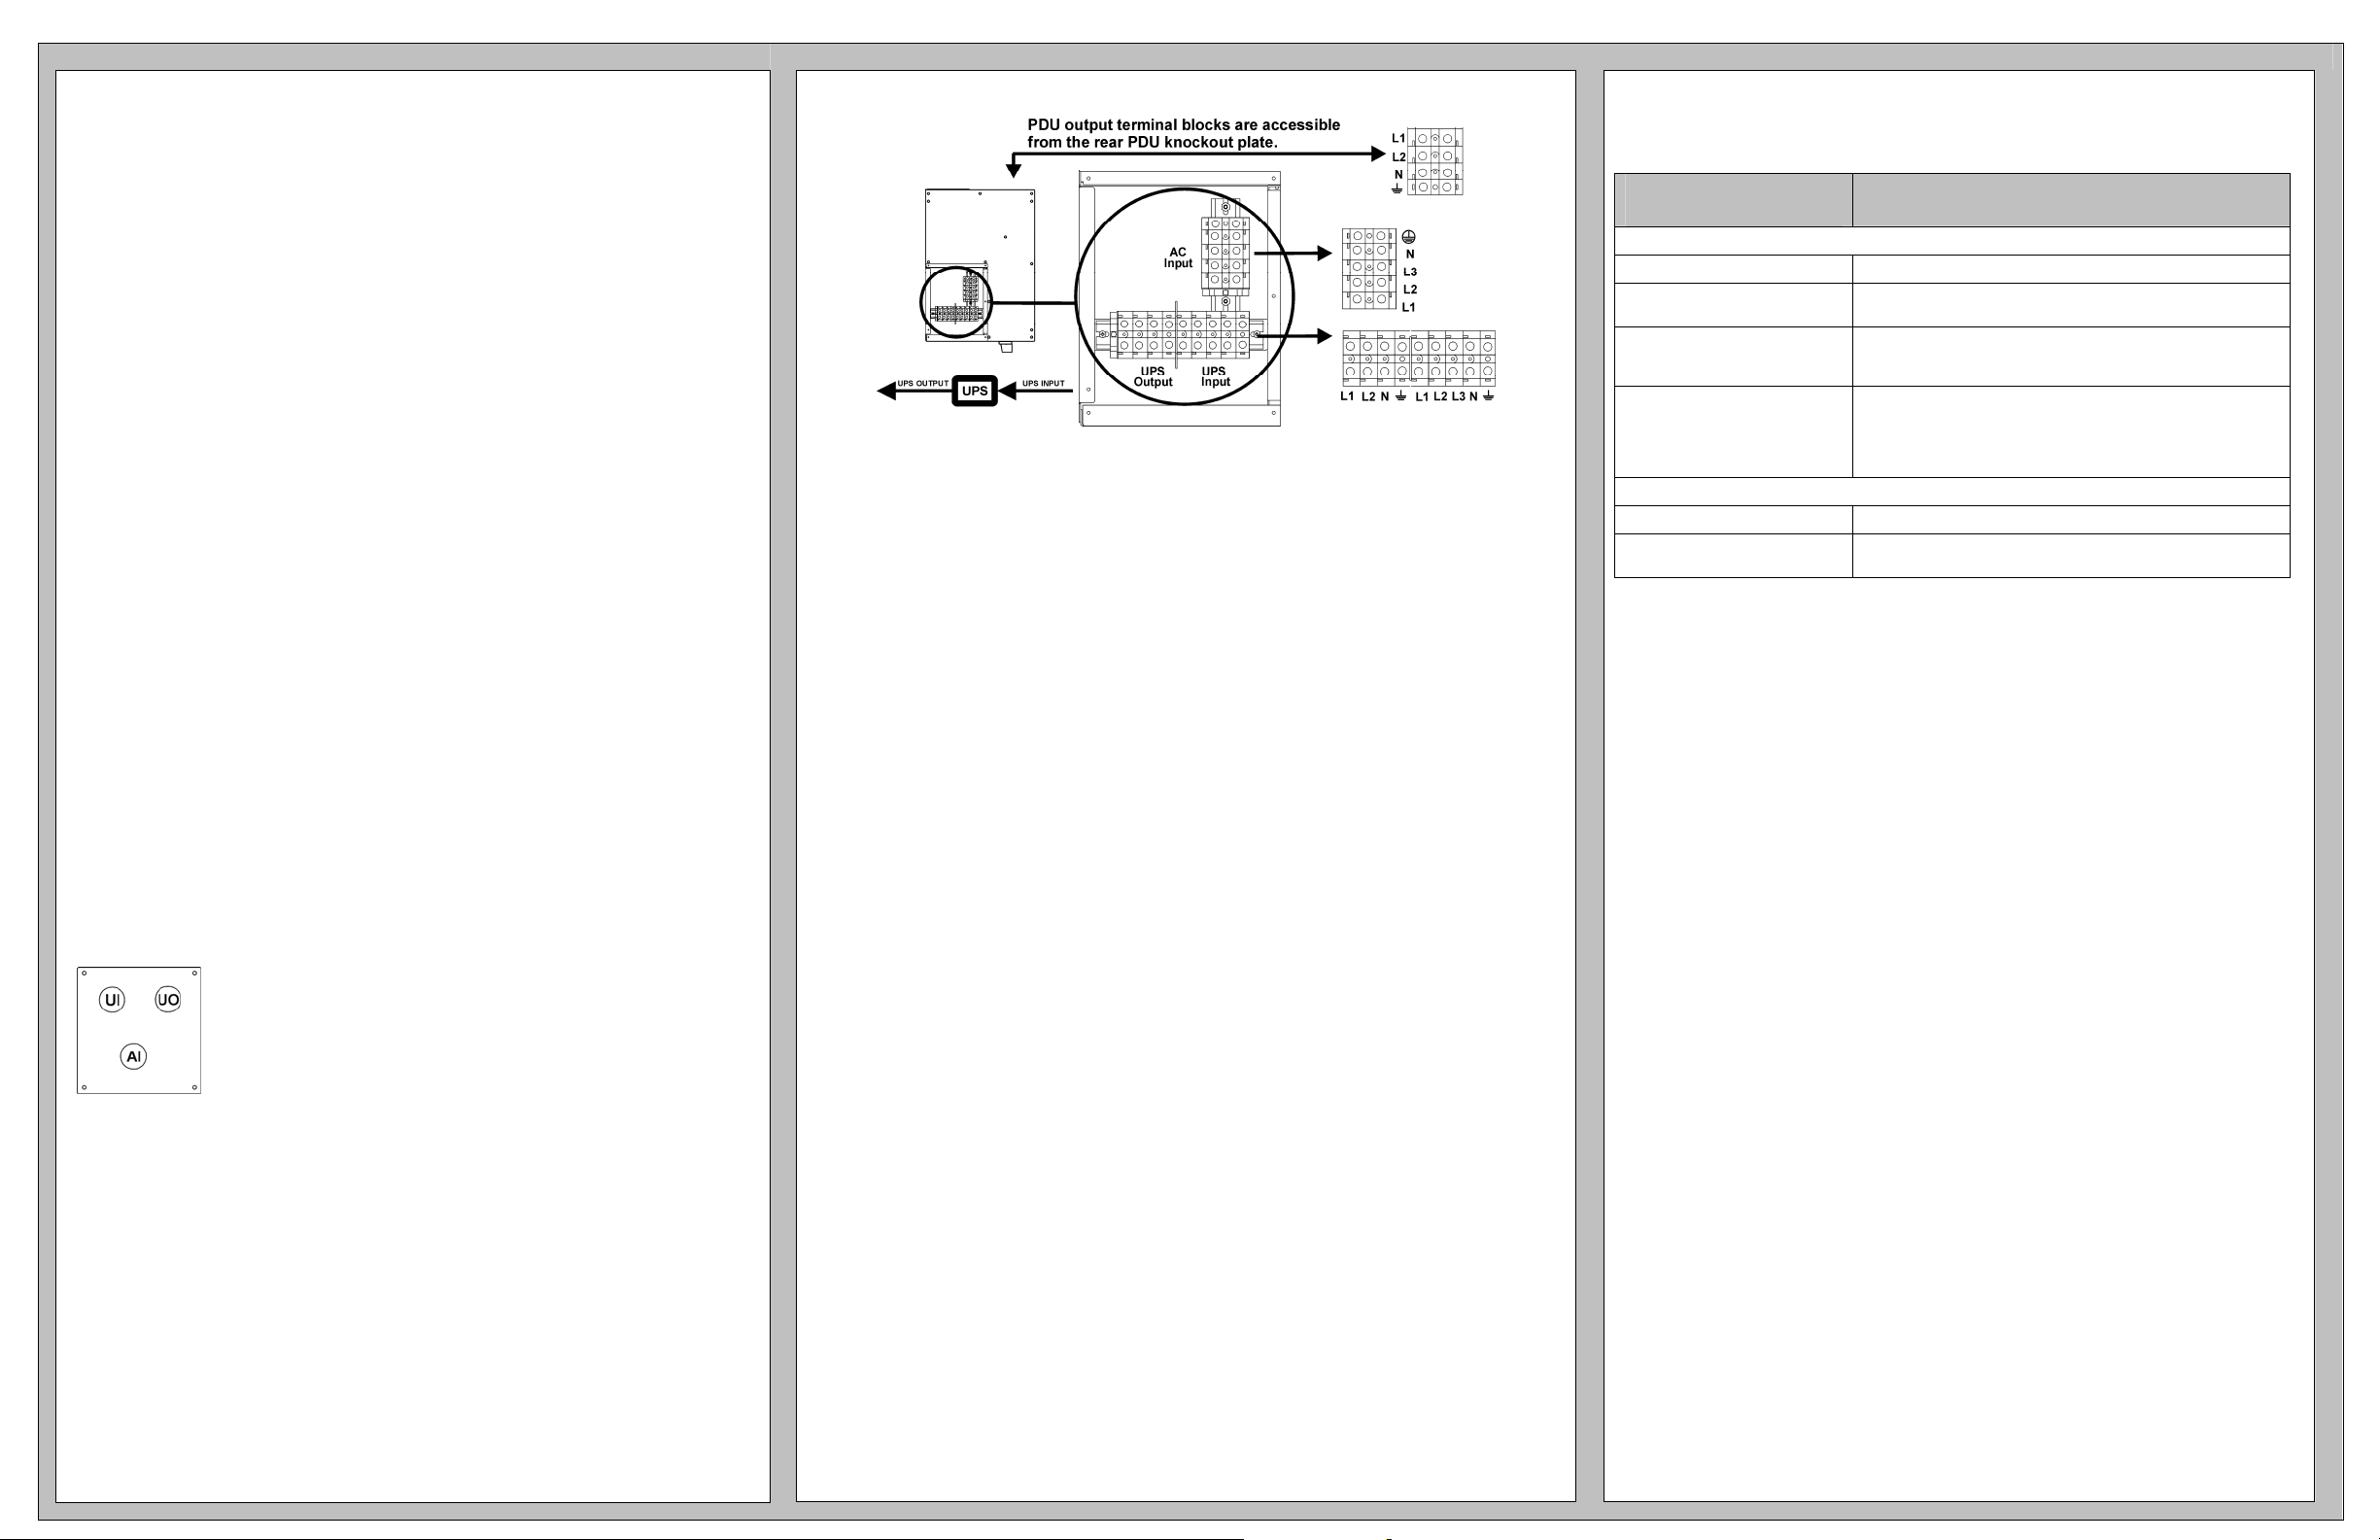
CONNECTING POWER
Warning: Do not modify inlets or outlets. The SBP and UPS plugs and receptacles
should match. For more information, contact Rockwell Automation.
1. Non-Hardwired Panels
1. Plug SBP UPS output cord into UPS PDU panel.*
2. Plug UPS input cord to SBP UPS input receptacle.*
3. Plug customer equipment into SBP PDU panel.
4. Plug SBP into utility power outlet.
*Units with IEC receptacles: Use jumper cables.
2. Hardwired Panels
Attention: Wiring must be performed by a qualified electrician.
1. Switch input circuit breaker off.
2. SBP units that will be rack-mounted: Set SBP in the rack.
3. Unscrew and remove top access panel.
4. If using 1609-P5000E or 1609-P8000E with a hardwired UPS: Unscrew existing
terminal block wiring. Do not touch fact ory wi ri n g (see E).
5. If using 1609-P5000E or 1609-P8000E with a hardwired UPS: Unscrew and
remove rear input/output panel.
6. Remove circular knockouts from hardwiring input/output panel (see A: UO= UPS
Output; UI= UPS Input; AI= AC Input; LD= Load).
1609-PSB1 units: Also, remove circular knockouts from PDU output panel.
7. Connect wires to terminal blocks (see B). Adhere to all national and local
electrical codes.
8. Reinstall access panel.
9. Install hardwiring input/output panel.
10. SBP units that will be rack-mounted: Screw SBP into the rack.
A.
41063-300-01(1)
B. 1609-PSB1
41063-300-01(1)
TROUBLESHOOTING
Use the chart below to solve minor SBP installation problems. Also, refer to the UPS User
Manual Troubleshooting section.
Problem and
Possible Cause
UPS WILL NOT TURN ON AFTER ON BUTTON IS PUSHED
SBP handle is in ‘Bypass’ position. Rotate the SBP handle to the ‘Normal’ position.
There is no power at UPS input. Check that the power cables from the SBP to the utility power, and
UPS is faulty or damaged. Rotate the SBP handle into the ‘Test’ position. If the connected
There is no power at the utility
power outlet.
UPS IS ONLINE; NOT POWERING ALL CONNECTED EQUIPMENT
SBP output circuit breaker tripped. Reduce the load by unplugging equipment. Reset the breaker.
There is no power at SBP output. Check that the power cable from the SBP to the UPS output is
from the SBP to the UPS Input are securely connected.
equipment becomes energized, the UPS may be faulty. To confirm
this, refer to UPS User Manual Troubleshooting.
Rotate the SBP handle into the ‘Test’ position. If the connected
equipment fails to become energized, the utility power outlet may be
faulty. Check the utility power supply by plugging a table lamp into
the suspect outlet. If the utility outlet fails to power the lamp, contact
qualified service personnel to restore power.
securely connected.
Solution
41063-300-01(1)
 Loading...