

Page 1

Medium Voltage
Drive Harmonic
Filter and Power
Factor Correction
Units
Bulletin 1519
2300 - 4160 volts
250 - 3500 hp
User Manual
Page 2
Important User Information
IMPORTANT
Read this document and the documents listed in the Additional Resources section about installation, configuration, and
operation of this equipment before you install, configure, operate, or maintain this product. Users are required to
familiarize themselves with installation and wiring instructions in addition to requirements of all applicable codes, laws,
and standards.
Activities including installation, adjustments, putting into service, use, assembly, disassembly, and maintenance are required
to be carried out by suitably trained personnel in accordance with applicable code of practice.
If this equipment is used in a manner not specified by the manufacturer, the protection provided by the equipment may be
impaired.
In no event will Rockwell Automation, Inc. be responsible or liable for indirect or consequential damages resulting from the
use or application of this equipment.
The examples and diagrams in this manual are included solely for illustrative purposes. Because of the many variables and
requirements associated with any particular installation, Rockwell Automation, Inc. cannot assume responsibility or
liability for actual use based on the examples and diagrams.
No patent liability is assumed by Rockwell Automation, Inc. with respect to use of information, circuits, equipment, or
software described in this manual.
Reproduction of the contents of this manual, in whole or in part, without written permission of Rockwell Automation,
Inc., is prohibited.
Throughout this manual, when necessary, we use notes to make you aware of safety considerations.
WARNING: Identifies information about practices or circumstances that can cause an explosion in a hazardous environment,
which may lead to personal injury or death, property damage, or economic loss.
ATTENTION: Identifies information about practices or circumstances that can lead to personal injury or death, property
damage, or economic loss. Attentions help you identify a hazard, avoid a hazard, and recognize the consequence.
Identifies information that is critical for successful application and understanding of the product.
Labels may also be on or inside the equipment to provide specific precautions.
SHOCK HAZARD: Labels may be on or inside the equipment, for example, a drive or motor, to alert people that dangerous
voltage may be present.
BURN HAZARD: Labels may be on or inside the equipment, for example, a drive or motor, to alert people that surfaces may
reach dangerous temperatures.
ARC FLASH HAZARD: Labels may be on or inside the equipment, for example, a motor control center, to alert people to
potential Arc Flash. Arc Flash will cause severe injury or death. Wear proper Personal Protective Equipment (PPE). Follow ALL
Regulatory requirements for safe work practices and for Personal Protective Equipment (PPE).
Allen-Bradley, Rockwell Software, Rockwell Automation, and TechConnect are trademarks of Rockwell Automation, Inc.
Trademarks not belonging to Rockwell Automation are property of their respective companies.
Page 3

Introduction Chapter 1
1519-IN050B-EN-P June 2013
Functional Description................................................................................ 1-1
Theory of Operation ................................................................................... 1-1
Application Considerations......................................................................... 1-2
Protective Features ..................................................................................... 1-3
Reactor Overtemperature.................................................................. 1-3
Reactor/Capacitor Overload ............................................................. 1-3
Short-Circuit Protection for Capacitors ............................................ 1-4
Blown Capacitor Fuse Detection ...................................................... 1-4
Schematic Diagrams
Typical Schematic • 5th Filter Fed from Drive Input Contactor
(Figure 1.1) .................................................................................. 1-5
Physical Layout and Chapter 2
Component Identification
Component I.D. and Functional Descriptions............................................. 2-1
Filter Reactor ................................................................................... 2-1
Filter Capacitor ................................................................................ 2-1
Current Transformer ........................................................................ 2-1
SMP-3 Overload Relay .................................................................... 2-1
592 Overload Relay ......................................................................... 2-2
Reset Relay/Pushbutton ................................................................... 2-2
Surge Suppressor ............................................................................. 2-2
Cooling Fans .................................................................................... 2-2
Strip Heater and Thermostat ............................................................ 2-2
Component Identification (Figure 2.1)....................................................... 2-3
Control Components (Figure 2.2).............................................................. 2-4
Overall Dimensions (Figure 2.3) ............................................................... 2-5
Table Of Contents
Performance Specifications Chapter 3
and Design Assumptions
Installation Chapter 4
Performance Specifications and Design Assumptions............................... 3-1
Handling .................................................................................................... 4-1
Power and Control Wiring......................................................................... 4-1
Routing ............................................................................................ 4-1
Cable Terminal Access .................................................................... 4-2
Ground Bus ...................................................................................... 4-2
Auxiliary Components ..................................................................... 4-2
Page 4

ii Table of Contents – Medium Voltage Drive Harmonic Filter and Power Factor Correction Units User Manual
Commissioning Chapter 5
Pre-start-up Inspection............................................................................... 5-1
Settings ...................................................................................................... 5-2
Annual Inspection Chapter 6
Physical Inspection .................................................................................... 6-1
Bolts ................................................................................................. 6-1
Structure .......................................................................................... 6-1
Cable ................................................................................................ 6-1
Components ..................................................................................... 6-2
Interlocks ......................................................................................... 6-2
Foreign Material .............................................................................. 6-2
Troubleshooting and Repair Chapter 7
Troubleshooting ......................................................................................... 7-1
Harmonic Filter Fault ...................................................................... 7-1
SMP-3 Relay ................................................................................... 7-1
592 Thermal Overload Relay........................................................... 7-2
Component Replacement Instructions........................................................ 7-2
Current Transformers ...................................................................... 7-2
Filter Reactors.................................................................................. 7-3
Cooling Fans .................................................................................... 7-3
Capacitors and Capacitor Fuses ...................................................... 7-3
Renewal Parts Chapter 8
Control Components .................................................................................. 8-1
Power Components .................................................................................... 8-2
Reactors (5th filter only – 6-pulse drives) • Table 8.B ..................... 8-2
Reactors (5th, 7th & 11th filters – 12-pulse drives) • Table 8.C......... 8-2
Current Transformers (5th filter only – 6-pulse drives)
• Table 8.D ................................................................................. 8-3
Current Transformers (5th, 7th & 11th filters – 12-pulse drives)
• Table 8.E .................................................................................. 8-3
Capacitors (5th filter only – 6-pulse drives) • Table 8.F................... 8-4
Capacitors (5th, 7th & 11th filters – 12-pulse drives) • Table 8.G ........ 8-4
Capacitor Fuses (5th filter only – 6-pulse drives) • Table 8.H ............ 8-5
Capacitor Fuses (5th, 7th & 11th filters – 12-pulse drives) • Table 8.J ... 8-5
)."%.0*UNE
Page 5

Chapter 1
1519-IN050B-EN-P June 2013
Introduction
Functional Description A harmonic filter consists of one or more tuned inductor/capacitor circuits. A
three-phase, iron core reactor is wired in series with three single-phase
individually fused capacitors. These harmonic filters are designed for use with
Bulletin 1557 Medium Voltage Drives.
There are two basic types of standard harmonic filters. Filter Type 1 consists
of an inductor/capacitor combination tuned to the 5th harmonic (5 times the
fundamental power system frequency) which is designed to reduce harmonics
and provide power factor correction when used in conjunction with a drive
with a 6-pulse rectifier. These Type 1 filters may also be used in conjunction
with drives that have 12-pulse rectifiers. When a 5th harmonic filter is applied
with a 12-pulse drive it will primarily provide power factor correction and may
provide some degree of harmonic reduction.
Type 2 harmonic filters consist of series inductor/capacitor combinations tuned
for approximately the 5th, 7th, and 11th harmonics and are designed specifically
for use with 12-pulse drives. Drives with 12-pulse rectifiers do not produce
significant amounts of 5th or 7th harmonic current, however, the 5th and 7
filters are designed to prevent a potentially detrimental resonance condition
from occurring. Type 2 filters provide harmonic reduction as well as power
factor correction.
Harmonic filters of Type 1 or Type 2 are designed to correct the power factor
to between 0.95 lagging and 0.95 leading over the 50-60% to 100% speed
range for a typical variable torque load.
A particular harmonic filter may or may not allow compliance with the
harmonic current limits specified in IEEE Std 519-1992 (IEEE Recommended
Practices and Requirements for Harmonic Control in Electrical Power
Systems). Calculations need to be carried out which take into account specific
power system data in order to assess compliance with IEEE 519 harmonic
limits for a particular drive application.
th
Theory of Operation Operating the rectifier of any drive will create harmonic currents that flow
back towards the power source and to other plant loads. These harmonics
result from the non-linearity of the rectifier, which draws a non-sinusoidal
current from a sinusoidal voltage source. The magnitude of the harmonic
currents generated by the rectifier is primarily related to the pulse number of
the rectifier.
1519-5.0 – May 1998
Page 6

1-2 Introduction
Theory of Operation (cont.) These harmonic currents can result in distortion of the voltage waveform. In
rare instances, excessive voltage distortion on the power system can have ill
effects on the system. These effects can include overheating of motors or
transformers, capacitor failure, misoperation of relays, computer system
disruption, and telephone system interference.
The purpose of a harmonic filter is to shunt certain harmonic currents that are
produced by the rectifier away from the power system. The result is a
reduction in distortion of the voltage waveform on the power system and a
reduction in the likelihood of harmonics affecting plant or utility system
components.
Application Considerations Switching with Drive Input Contactor versus Dedicated Harmonic Filter
Contactor
To simplify the system and reduce capital cost, a harmonic filter can be
switched using the same contactor or breaker that feeds the input power to the
associated drive. In this configuration, the harmonic filter is energized as long
as the drive input contactor is closed. The input contactor is usually configured
to close when the Emergency Stop string is completed. The contactor would
then stay closed regardless of whether the drive is running or stopped.
If the system is configured as described above, the user should consider
whether the leading kilovolt-ampere rating (kvar) provided by the filter when
the drive is not running (and thus not drawing any lagging kvar) result in an
acceptable system power factor. In this configuration it is necessary to shut
down the drive in the event of a harmonic filter fault condition since the drive
input contactor is the only means by which the filter can be taken off line. If a
harmonic filter fault were to occur and it was necessary to operate the drive
without the filter it would be necessary to physically disconnect and isolate
power cables from the harmonic filter while the drive system is shut off. It is
necessary to prevent reclosure of the drive input contactor within approximately
five minutes of opening to prevent energizing a harmonic filter capacitor
which may still have a DC charge on it.
Alternatively, a harmonic filter can be switched with a dedicated vacuum
contactor. In general, the vacuum contactor would be configured to energize
the filter when the associated drive receives a start command. The vacuum
contactor would be configured to de-energize the filter when the drive has
stopped. In this way the leading kvar from the filter is only present when the
drive is operating and power factor correction is required.
)."%.0*UNE
NOTE: Re-energization of the harmonic filter should be delayed until the
filter has had adequate time to discharge – typically 5 minutes.
Page 7

Introduction 1-3
1519-IN050B-EN-P June 2013
Application Considerations (cont.) In this scheme, energizing the filter can be a permissive to allow starting the
drive or the drive can be configured to operate independently of the harmonic
filter. Similarly, a harmonic filter fault can be configured to shut down the
drive or it can be configured to create an alarm only and allow the drive to
continue to operate. The isolation switch associated with the harmonic filter
contactor can be opened to allow servicing of the filter without necessarily
affecting operation of the associated drive.
Protective Features There are a number of protective features that are incorporated in each tuned
circuit of the harmonic filter to cover the following functions:
• reactor overtemperature
• reactor/capacitor overload
• short-circuit protection for capacitors
• blown capacitor fuse detection
Reactor Overtemperature
Reactor overtemperature is implemented in the form of a normally closed
thermal switch, one of which is embedded in each of the three windings of a
particular harmonic filter reactor. The thermal switches operate at a temperature
somewhat below the maximum allowable temperature for the reactor
insulation. The three switches are wired out individually to a terminal strip on
the top of the reactor where the switches are then connected in series. These
contacts are typically configured to open a dedicated harmonic filter contactor
and/or shut down an associated drive.
Reactor/Capacitor Overload
An Allen-Bradley Bulletin 592 Thermal Overload relay is driven by windowtype current transformers which are installed on each of the phases feeding
each set of three capacitors. The heater elements are factory selected to
protect the filter reactors and capacitors from an overload condition. If there is
one capacitor per phase in a particular harmonic filter then the heater elements
are selected on the basis of the root-mean-square (rms) current rating of the
reactor in the filter. This heater element sizing also allows protecting the
capacitors against overload. If there are two identical capacitors per phase in
the harmonic filter then the heater elements are chosen based on half of the
rms current rating of the associated reactor. A contact from the 592 overload
relay is wired to either open a dedicated harmonic filter contactor and/or shut
down the associated drive.
1519-5.0 – May 1998
Page 8

1-4 Introduction
Protective Features (cont.) Short-circuit Protection for Capacitors
Short-circuit protection for harmonic filter capacitors is addressed by
individual fusing of each capacitor. The intent of the capacitor fusing is to
clear a short-circuit-type fault condition on a failed capacitor. The fuses are
chosen to prevent a capacitor from rupturing. The fuses are not designed to
prevent the capacitor from failing. These fuses are generally chosen at 175%
to 200% of the capacitor rms current rating. The thermal overload described
above prevents operation of the fuse in the overload region.
Blown Capacitor Fuse Detection
Blown capacitor fuse detection is performed by an Allen-Bradley SMP-3 relay.
This relay is also fed by window-type current transformers which are used on
each phase for every capacitor. The phase loss function of this relay is used to
detect a blown capacitor fuse. If a capacitor fuse has blown then there will be
no current flow in that particular phase. It is undesirable for a harmonic filter
to continue to operate with a blown fuse on one or more capacitors since this
significantly alters the tuned frequency of the filter. A contact from the SMP-3
relay is wired to open a dedicated harmonic filter contactor and/or shut down
the associated drive. Note that the SMP-3 relay is not used as an overload relay
in this application since it is designed for a sinusoidal waveform. It determines
the rms value of a current waveform by repetitively sampling to find the peak
of the waveform. It then assumes that the rms current is the peak value divided
by the square root of two. This relationship between peak and rms current is
not correct when there is significant harmonic content in the waveform. For
this reason the DIP switches for overload protection are set substantially above
the current ratings of the filter components to prevent nuisance tripping due to
overload and allow phase loss detection to reliably take place.
)."%.0*UNE
Page 9
Introduction 1-5
1519-IN050B-EN-P June 2013
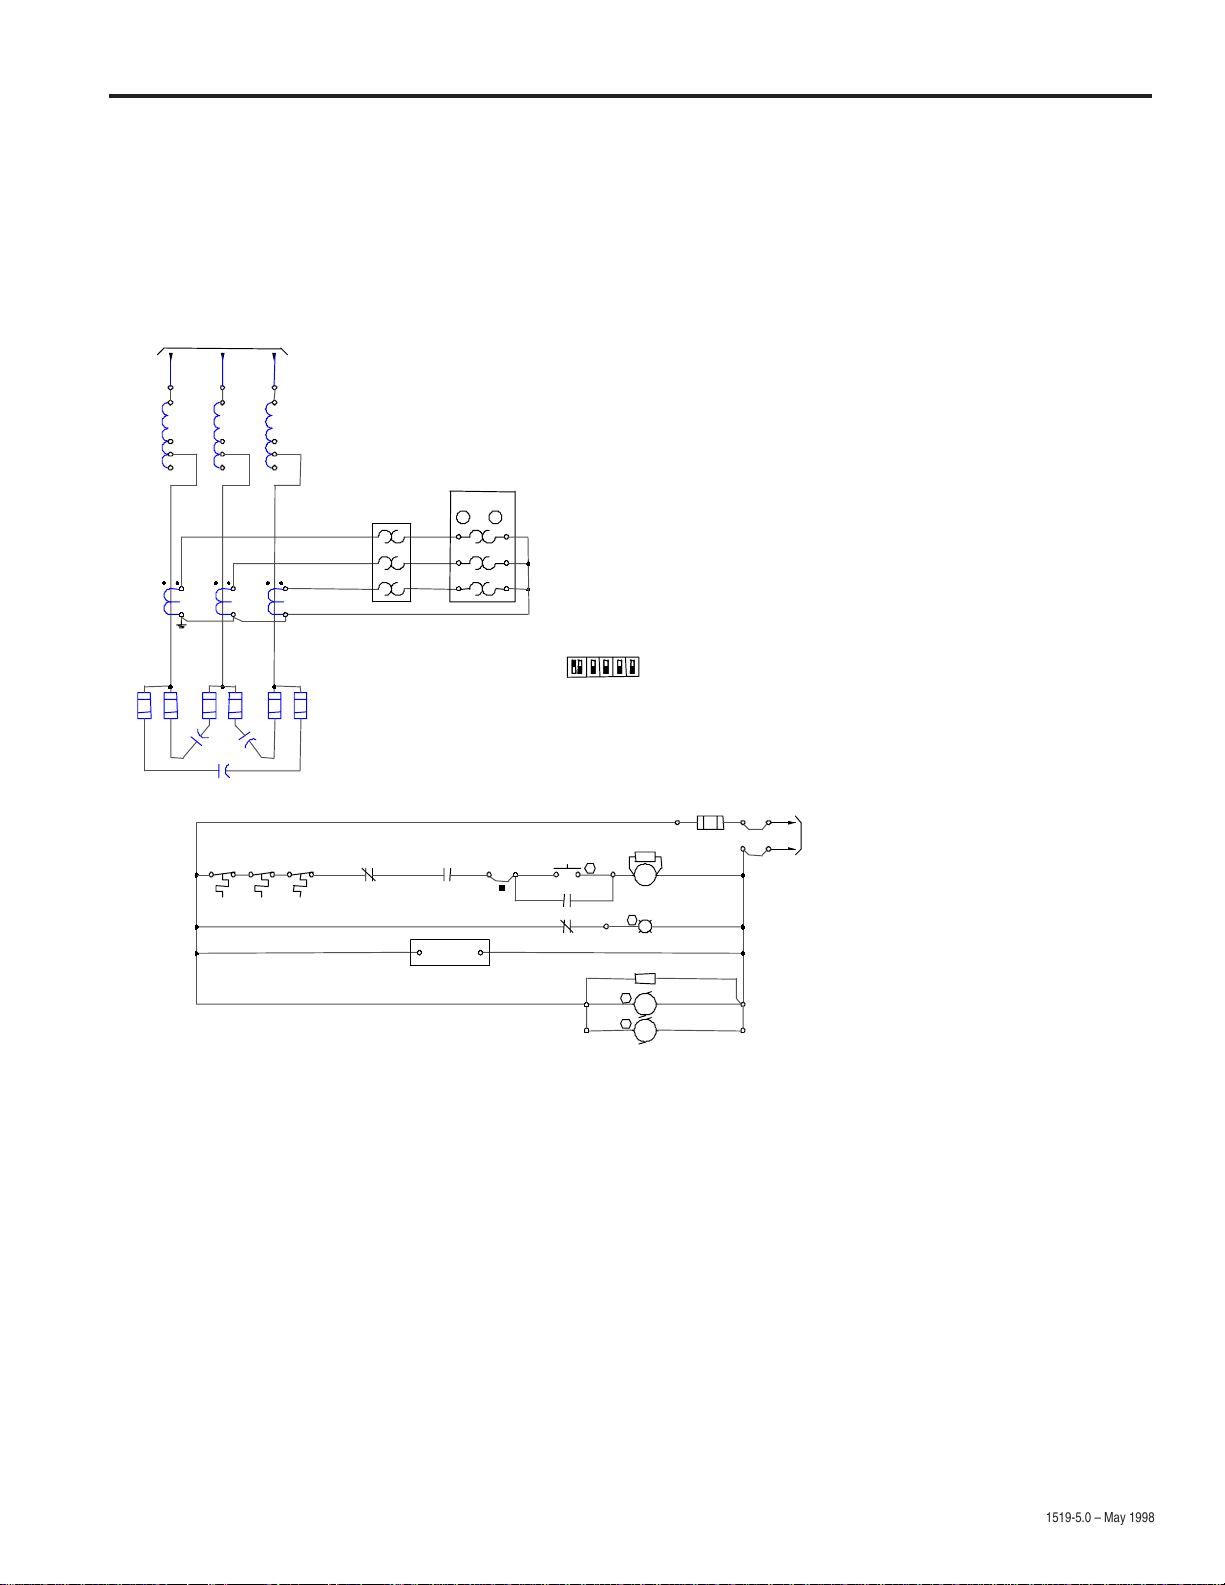
Schematic Diagrams Figure 1.1
Typical schematic • 5
FROM VFD INPUT CONTACTOR UNIT
2400V, 3, 60Hz
FT2FT1 FT3
0%
0%
95%
95%
100%
100%
105%
105%
CT1 CT2 CT3
C2 C3
C1
5th HARMONIC FILTER
REACTOR
THERMOSTATS
0%
REACTOR
95%
100%
105%
2
3
4
CAPACITO R FUSES
CAPACITO RS
59 2
OVE RL OA D
15 15A
SOLID STATE
PHASE LOSS RELAY
COMM
1A1
L1
2A
3A
L3L2T3
SMP-3592
(40)
(30)
SMP-3
60
50
SMP-3
REMOTE
RESET
T1
T2
15C15B
th
Filter fed from drive input contactor
SMP-3 SWITCH SETTINGS
AUTO
ON
TRIP
CLASS
FOR FLC SETTING
SEE DIMENSI O N DRAWING
FILTER RESET
5HFPR
5HFPR
13A
13A
OFF
GF
MAN
TESTJAM
SS
D
15D
16
D
SS
D
D
13A
5HFPR
5th FILTER
TRIPPED
FAN
55 0 CFM
FAN
55 0 CFM
13
D122
TO VFD CUSTO MER TERMINAL BLOCKS (DCTB)
14
ON VFD DRAWING SHT.4
D123
(CONTROL POWER FROM VFD INPUT CONTACTOR UNIT)
14
14
1519-5.0 – May 1998
Page 10

1-6 Introduction
1)."%.0*UNE
Page 11

Chapter 2
1519-IN050B-EN-P June 2013
Physical Layout and Component Identification
Component Identification Refer to Figures 2.1 and 2.2 to identify the functional components described in
and Functional Descriptions this section.
Note: For illustrative purposes, a 5
shown. In a 5th, 7th and 11th configuration, there will be two (2) cabinets as
shown with the 7th and 11th filter legs in the right-hand cabinet. Customer load
terminals and low voltage control components are always located in the 5
filter-leg cabinet (left-hand side).
th
harmonic filter with six (6) capacitors is
th
Filter Reactor
A three-phase, iron-core reactor with ±5% taps on the inductance is wired in
series with capacitors to create a specific tuned frequency for the filter. Each
winding has a normally closed thermal switch that opens when the temperature
reaches an excessive level.
Filter Capacitor
Single phase, individually fused capacitors are used in combination with a
reactor to tune the filter to a specific frequency. The capacitors also serve the
purpose of providing leading kvar to correct the power factor of the associated
drive.
Current Transformer
Window-type current transformers are used around the conductors feeding
each capacitor. The 5A CT secondary drives a 592 thermal overload relay and
an SMP-3 relay.
SMP-3 Overload Relay
Only the phase loss function of this relay is used to detect a blown fuse on a
capacitor. A blown fuse on a capacitor generally indicates that the associated
capacitor has failed in a short-circuit condition. The overload setting on this
relay is intentionally set high since the overload function is not used. The
SMP-3 relay is a manually reset device.
1519-5.0 – May 1998
Page 12

2-2 Physical Layout and Component Identification
Component Identification 592 Overload Relay and Functional Descriptions (cont.)
A Bulletin 592 thermal overload relay is used to prevent an excessive current
condition in the reactor and capacitors. This is a manually reset, eutectic alloytype device. The ratchet stud assembly is heated by current flowing through
the heater element. Relay operation occurs when the temperature of the ratchet
stud reaches the melting point of the eutectic alloy, freeing the ratchet wheel
and opening the normally closed contact.
Reset Relay/Pushbutton
The reset relay is used to latch in a fault that occurs on the harmonic filter.
The reactor thermal switches, 592 overload contact, and SMP-3 relay contact
for a filter leg are wired in series with the reset relay. When one of these
devices operates the reset relay latches open until the individual device(s) are
reset and the reset pushbutton associated with the reset relay is depressed.
Surge Suppressor
Acts to reduce voltage transients associated with de-energization of a reset
relay coil.
Cooling fan
Each cabinet has two continuously running cooling fans each with a 550 CFM
capacity. They are supplied either 110/120 V or 220 V depending on the
control voltage available. The fans are oriented to blow air out of the top,
forward-facing vent.
Strip Heater and Thermostat (Optional)
Strip heaters are located in each cabinet for preventing condensation which
may occur if the cabinet temperature is lower than the ambient temperature.
They are available for either a 110/120 V or 220 V separate source.
)."%.0*UNE
Page 13

Figure 2.1
1519-IN050B-EN-P June 2013
Component Identification
(top, side and bottom door removed)
Physical Layout and Component Identification 2-3
Current Transformers
Thermostat
Cooling Fans
Customer Terminals
Capacitor Fuses
Capacitors
Strip Heater
Assembly
Low Voltage Wire Duct
Reactor
1519-5.0 – May 1998
Page 14

2-4 Physical Layout and Component Identification
Figure 2.2
Control Components
Bul. 592 Overload Relays
Reset Relays
Shorting Blocks (Optional)
SMP-3 Overload Relays
Terminal Blocks
1)."%.0*UNE
Page 15

Note: Dimensions are in inches (mm).
1519-IN050B-EN-P June 2013
4.25 x 9 (108 x 229)
Power Cable Opening
3 x 6 (76 x 152)
Control Wire Opening
Figure 2.3
Overall Dimensions
10.4
(264)
30.1 (765)
Physical Layout and Component Identification 2-5
5.4 (137)
+
+
36 (914)
44 (1118)
Customer Terminals
3 x 3 (76 x 76)
Control Wire Opening
4.25 x 9 (108 x 229)
Power Cable Opening
4.6 (117)
25 (635)
15.5 (394)
2.3
(58)
39.4 (1001)
Anchor Holes
++
6.5
(165)
+
Holes
+
Anchor
23.7 (602)
+
9.3
(236)
4 (102)
5 (127)
6.5
(165)
56 (1422)
91 (2311)
16 (406)
19 (482)
12
(305)
1519-5.0 – May 1998
Page 16

2-6 Physical Layout and Component Identification
)."%.0*UNE
Page 17

Chapter 3
1519-IN050B-EN-P June 2013
Performance Specifications and
Design Assumptions
These harmonic filters are designed to limit rms currents to fall within the
reactor rms current ratings assuming that the associated drive is operated
within its ratings and other harmonic producing loads do not exceed the levels
listed below. In addition, filters are designed to allow the capacitors to operate
within their published voltage and current ratings as follows:
• rms capacitor voltage limit: 125% of nameplate voltage
• peak capacitor voltage limit: 135% of peak nameplate voltage
• rms capacitor current limit: 180% of rated 60 Hz current
For variable torque loads the reactors and capacitors have been selected on the
basis that other harmonic producing loads, up to 50% of the drive rating, may
exist on the user or utility power systems. For constant torque loads it is
assumed that there are no other significant harmonic producing loads.
If power factor correction capacitors are present on the plant or utility power
system, consideration should be given to resonant frequencies and potential
harmonic amplification that could occur.
These harmonic filters are NEMA type 1 construction rated for ambient
temperatures between 0 and 40°C (32 and 104°F). They are available with
110/120 V or 220 V control. Standard units are available to compliment the
following drive power ratings:
Power Factor
Harmonic Filter Correction Controller
• 6-pulse drives (5th filter only)
2400V 60 Hz – 200-1500 hp 2400V – 250-2500 hp
3300V 50 Hz – 200-1500 hp 3300V – 350-3000 hp
4160V 60 Hz – 200-1750 hp 4160V – 250-3500 hp
• 12-pulse drives (5th, 7th and 11th filters)
2400V 60 Hz – 500-2500 hp
3300V 50 Hz – 500-3000 hp
4160V 60 Hz – 500-3500 hp
See Chapter 8 (Renewal Parts) for specific horsepower breakdowns for each
voltage level.
1519-5.0 – May 1998
Page 18

3-2 Performance Specifications and Design Assumptions
1)."%.0*UNE
Page 19

Chapter 4
1519-IN050B-EN-P June 2013
Installation
ATTENTION: Installation of industrial control equipment
must only be performed by qualified personnel. Failure to do so
may result in damage to equipment, injury to personnel and/or
delays in commissioning the equipment.
Handling Please refer to the handling publication received with your shipment for details
regarding receiving, unpacking, initial inspection, handling, storage and
installation site preparation. These units are certified for seismic zone 4
conditions; however, this is only in effect if the unit is properly anchored with
½-in. anchor bolts to a concrete pad at floor level. Any other mounting situation
that requires seismic certification must be analyzed and approved separately.
Power and Control Wiring ATTENTION: Ensure main power has been disconnected and
locked out before starting the power and control wiring procedure.
Verify with a hot stick or meter that all circuits are voltage-free.
Failure to do so may result in electrical shock causing severe
burns, injury or death.
Routing
See Figure 2.3 for locations of access holes in the top and bottom of the cabinet
for incoming power cables and control wiring. Also shown is the location of
the customer power terminals. The customer terminals are always located in
the 5th filter cabinet (i.e. the left cabinet in a 5th, 7th and 11th configuration).
Cabling to the 7th and 11th filter legs is done internal to the cabinets. The
maximum recommended cable size entering the unit is (1) 500 or (2) 250 MCM
per phase at the factory. You must use ½-in. bolts for connecting the lugs to
the terminals. The bolts must be torqued to 48 ft-lb (65 N-m) for proper
contact pressure. Phase 1 is located closest to the front of the cabinet.
ATTENTION: Ensure bolts are tightened to specified torque.
Failure to correctly torque the bolts on the incoming cable lugs
may result in overheating of the connections and damage to the
equipment.
1519-5.0 – May 1998
Page 20

4-2 Installation
Power and Control Wiring Cable Terminal Access (cont.)
Cable terminals are accessible from the front of the unit with the medium
voltage doors open. If more working space is required for connecting
incoming cables, swing out the low voltage compartment by removing the top
medium voltage door and then removing the self-tapping screws which
connect the vertical channel to the structure. In order to remove the medium
voltage door, the control wires for the fans must be disconnected and
temporarily removed from the inside surface of the door. Remember to reinstall the self-tapping screws and the fan control wires.
ATTENTION: Replace all components and hardware as
shipped before re-energizing equipment. Failure to do so may
result in electrical shock, causing severe burns, injury or death.
Ground Bus
The ground bus is accessible through openings on either side at the rear of the
cabinet. It is the responsibility of the installer to ensure the filter unit is
properly grounded in accordance with the Canadian Electrical Code (CEC) or
the National Electrical Code (NEC) and any local codes.
ATTENTION: Ensure that the filter unit is properly grounded.
Failure to do so may result in electrical shock, causing severe
burns, injury or death.
Auxiliary Components
A low voltage (115 V or 230 V as specified) power supply is required for
auxiliary components. Terminal blocks are accessible when the low voltage
door is opened. Low voltage wiring may enter the cabinet through the
designated openings in the top or bottom of the cabinet (see Figure 2.3). When
entering through the bottom, use the wire duct provided to route wires into the
low voltage compartment.
)."%.0*UNE
Page 21

Chapter 5
1519-IN050B-EN-P June 2013
Commissioning
Pre-start-up Inspection ATTENTION: Ensure main power has been disconnected and
locked out before commissioning the unit. Verify with a hot
stick or meter that all circuits are voltage-free. Failure to do so
may result in electric shock causing severe burns, injury or death.
• Visually inspect all bolted power connections to ensure they are secure. Do
not apply a wrench to any connection unless it is obvious that the connection
has not been tightened (over torquing will cause damage to bolts as well as
components). If a bolt must be tightened, the following torques must be used:
¼-in. hardware 6 ft-lb (8 N-m)
5/16-in. hardware 12 ft-lb (16 N-m)
3/8-in. hardware 20 ft-lb (27 N-m)
½-in. hardware 48 ft-lb (65 N-m)
Important: If torquing a cable connection to the top of a capacitor fuse or
directly to a capacitor terminal, a reduced torque of 10 ft-lb (13.5 N-m) must
be used to avoid over-stressing the capacitor. In addition, if torquing
connection at the top of a capacitor fuse, hold the lower nut in place while
tightening the upper nut.
• Visually inspect all power wires and lugs for any signs of damage from
assembly or shipping. Contact Rockwell Automation immediately if any
damage is discovered (see page 1 for phone numbers).
• Check for proper functioning of all door interlocks (clip type and key-type).
They must prevent medium voltage doors from being opened if there is
power applied to the filter. Contact Rockwell Automation immediately if
any malfunction is discovered (see inside cover page for phone numbers).
ATTENTION: Ensure the mechanical interlocking
mechanisms are in place and functioning properly before
energizing the equipment. Improper interlocking could expose
personnel to energized components causing severe burns, injury
or death.
1519-5.0 – May 1998
Page 22

5-2 Commissioning
Pre-start-up Inspection (cont.) • For future reference, record component data on the table below:
Table 5.A
Component Specifications
Fifth Filter Seventh Filter Eleventh Filter
Capacitor kVAR (3) @ (3) @ (3) @
(3) @
Capacitor Farads (3) @ (3) @ (3) @
(3) @
Reactor Amps
Reactor mH
Reactor Tap Connection
CT Ratio (3) @ (3) @ (3) @
(3) @
O/L Elements
SMP-3 Setting (FLC)
Settings The SMP-3 relay(s) are factory set to allow detection of a blown capacitor fuse
(phase loss detection). No adjustment should be required on the SMP-3 relay(s).
The overload elements are factory selected and installed to provide proper
overload protection. No adjustment should be required on the heater elements.
The reactor(s) are factory set on the nominal inductance tap. The reactor(s)
have ±5% taps to allow increasing or decreasing the inductance and thus
changing the tuned frequency of the filter.
In general, Rockwell Automation should be consulted when considering a
change to a reactor tap setting, SMP-3 setting or 592 heater elements.
)."%.0*UNE
Page 23

Chapter 6
1519-IN050B-EN-P June 2013
Annual Inspection
ATTENTION: Ensure annual inspections are performed on the
unit. Failure to perform inspections may result in poor equipment
performance, possible damage and/or injury to personnel.
Physical Inspection On an annual basis, harmonic filter units should be physically inspected for
any signs of damage, component breakdown, misadjustment, stress (electrical,
mechanical or thermal) or foreign material. Specifically, check the following:
ATTENTION: Ensure main power has been disconnected and
locked out before starting the inspection. Verify with a hot stick
or meter that all circuits are voltage-free. Failure to do so may
result in electric shock causing severe burns, injury or death.
Bolts
Check tightness of all bolted power connections with a torque wrench. Set the
wrench to the nominal torque as specified on page 5-1 and apply the set torque
to the connection. Do not tighten beyond the set torque. For inspecting
connections to capacitor terminals, a reduced torque of 10 ft-lb (13.5 N-m)
must be used. Visually inspect all component mounting bolts and tighten any
which are obviously loose.
Structure
Check the cabinet and internal structure for any damage (dents, holes, etc.)
which could reduce electrical clearances or allow direct access to live parts
from outside the cabinet. Repair the damage or order replacement parts as
required.
Cable
Check for cut or worn insulation or damaged lugs due to electromechanical
stress or improper routing (cables will move when subjected to high current).
Replace any damaged cables and re-position any cables that may have moved
from their proper position. Make sure cables do not contact any sharp edges.
1519-5.0 – May 1998
Page 24

6-2 Annual Inspection
Physical Inspection (cont.) Components
Check all components for any signs of damage or overheating. Any
components displaying physical damage or severe discoloration should be
replaced (see Chapter 8). In particular, check the capacitors for ruptures and
make sure there is no leaking dielectric fluid.
Interlocks
Check for proper functioning of all door interlocks (clip type and key type).
They must prevent medium voltage doors from being opened if there is power
applied to the filter.
Foreign Material
Check for dust, dirt, iron filings etc. that may have entered the structure and
vacuum clean if necessary. In particular, check the cooling fans and vents to
make sure they are unobstructed.
)."%.0*UNE
Page 25

Chapter 7
1519-IN050B-EN-P June 2013
Troubleshooting and Repair
Troubleshooting Annunciation and action in the event of a harmonic filter fault will vary
depending on the particular drive/harmonic filter system. If the drive input
starter is used as the harmonic filter switching device, then a harmonic filter
fault will have the effect of creating an external fault described as “HF FAULT”
(for Harmonic Filter Fault) on the associated drive. Any fault on the drive
results in opening of the associated input starter, which de-energizes the filter.
This Harmonic Filter Fault will be annunciated on the Panelview operator
terminal under “ALARMS”.
Harmonic Filter Fault
The contacts for reactor overtemperature, SMP-3 blown capacitor fuse
detection, and Bulletin 592 thermal overload are generally wired in series and
any one of these conditions can create a Harmonic Filter Fault. If a Harmonic
Filter Fault occurs then the SMP-3 relay(s) and 592 overloads should be
checked to see if they are in the tripped condition. Both the SMP-3 and the
592 are manually reset relays.
SMP-3 Relay
If an SMP-3 relay has tripped this generally indicates that one or more
capacitors in the harmonic filter have failed in a short-circuit condition. Reset
the SMP-3 relay by pressing its reset push button. For your safety, wait five
minutes before accessing the capacitors to allow them to discharge. Verify
with a hot stick and meter that the capacitors are voltage-free.
The fuses mounted on top of each of the capacitors associated with the tripped
SMP-3 relay should be checked with an ohmmeter for continuity. If a very
high resistance is seen on one or more fuses, this indicates that the fuse has
blown. It is also likely that the associated capacitor has failed. To check a
capacitor an ohmmeter can be connected to the capacitor terminals. If a
gradual change in resistance is seen on the meter then the capacitor is good. If
a very low resistance and no gradual change in resistance is seen this indicates
that the capacitor has shorted internally and must be replaced.
1519-5.0 – May 1998
Page 26

7-2 Troubleshooting and Repair
Troubleshooting (cont.) 592 Thermal Overload Relay
If a 592 thermal overload relay has tripped this indicates that an excessive
current has occurred in the harmonic filter. An overload condition means that
the reactor and/or the capacitors in the filter have been subjected to a current
higher than they were designed for. Some investigation should be carried out
to determine why the overload occurred. An overload could occur if excessive
harmonic currents are present due to non-linear loads other than the drive it
was designed for. The heater element sizing should be confirmed with Rockwell
Automation to make sure that it coincides with the reactor current. Nuisance
tripping could result if the heater elements are undersized for the particular filter.
Component Replacement If any damaged components are discovered, check your customized parts list
Instructions or see Chapter 8 (Renewal Parts) to determine the appropriate replacement
part. See page 1 for parts supply contacts. Generally, all components are
easily accessible and simply require removal of cables and mounting hardware.
Make sure to label wire and cable terminations before disconnecting and
properly torque power connections when reassembling per page 5-1. The
following are some specific details to note regarding certain components:
ATTENTION: Damaged components must be replaced with
those bearing the same part number or equivalent. Failure to use
correct replacement parts, or to follow the specified replacement
guidelines, may result in equipment damage or poor equipment
performance.
ATTENTION: Ensure main power has been disconnected and
locked out before replacing any components. Verify with a hot
stick or meter that all circuits are voltage-free. Failure to do so
may result in electric shock causing severe burns, injury or death.
Current Transformers
The orientation is important for proper current sensing. Make sure the
replaced unit is physically oriented the same way as the others in the grouping
as indicated by the position of the control wire terminals. You will need to
disconnect the power cable associated with the particular current transformer at
one end as well as the control wires from the Bul. 592 overload relay in order
to remove the unit being replaced.
)."%.0*UNE
Page 27

Troubleshooting and Repair 7-3
1519-IN050B-EN-P June 2013
Component Replacement
Instructions (cont.)
Filter Reactors
The mounting provision for the reactors is variable in the left-to-right direction.
There are sliding nuts under the mounting slots that may move while the
reactor is being removed. When the new reactor is placed in position, simply
slide the nuts into position with a screwdriver and reinstall the mounting bolts.
Make sure there is a minimum of 3 in. of clearance between reactors and
between any reactor and the cabinet. There are lifting channels on top of each
reactor suitable for forklifts that will accommodate a single fork for smaller
reactors and two forks for larger reactors. Make sure the capacity of the
forklift is sufficient before lifting reactors (the reactor weight is specified on
the nameplate).
Cooling Fans
When replacing cooling fans, make sure they are oriented in the proper
direction. The airflow direction is indicated by an arrow on the outside surface
of the fan housing and should be pointing outward (out through the door).
Also, make sure the leads are not reversed as this will reverse the fan rotation.
Capacitors and Capacitor Fuses
Before beginning any disassembly to replace capacitors, take note of the
jumper configuration and cable termination locations (i.e. wye or delta
configuration). When torquing connections on a capacitor terminal or on the
top of a fuse, remember to use only 10 ft-lb (13.5 N-m).
1519-5.0 – May 1998
Page 28

7-4 Troubleshooting and Repair
1)."%.0*UNE
Page 29

Chapter 8
1519-IN050B-EN-P June 2013
Renewal Parts
Control Components The following control components are common to all variations of Harmonic
Filters regardless of power ratings and options. Select the appropriate part
number based on your control voltage. A customized, detailed parts list was
shipped with your unit and should be used as a primary reference.
Table 8.A
Control Components
Part Number
Description
Cooling Fan 22610-101-02 22610-101-03 2 4
Strip Heater Assy. 80160-695-52 80160-695-53 1 2
Thermostat Assy. 80160-696-51 80160-696-51 1 2
SMP-3 O/L Relay 193-C1F1 193-C1F1 1 or 2
Relay Adapter 193-BPM4 193-BPM4 1 or 2
Bul. 592 O/L Relay 592-BOV16 592-BOV16 1 or 2
Reset Relay 700-F220A1 700-F220A2 1 or 2
Reset Relay Contact
Adder
Surge Suppressor 199-FSMA1 199-FSMA2 1 or 2
Reset Button Assy. 800T-A2D1 800T-A2D1 1 1
Reset Button Contact
Block
1 required for each set of 3 capacitors (some 5
u
115 V 50 Hz or
120 V 60 Hz
Control
195-FA20 195-FA20 1 or 2
800T-XD1 800T-XD1 Not required 2
th
only filters have 6 capacitors)
220 V 50 Hz
Control
Qty. per 5th filter
u
u
u
u
u
u
Qty. per 5
th
& 11th filter
3
3
3
3
3
3
, 7
th
1519-5.0 – May 1998
Page 30

8-2 Renewal Parts
Power Components The following power components must be chosen specifically for the voltage
and horsepower ratings of the unit. A customized, detailed parts list was
shipped with the unit and should be used as a primary reference.
)."%.0*UNE
Table 8.B
th
Reactors (5
filter only – 6-pulse drives)
or (Power Factor Correction – 6 or 12-pulse drives
(1 required per unit)
Voltage
2400 V
60 Hz
3300 V
50 Hz
4160 V
60 Hz
Maximum
Horsepower
225 X X 80022-428-01
450 X X 80022-428-02
600 X X 80022-428-03
800 X X 80022-428-04
1250 X X 80022-428-05
1500 X X
1750 X
2250 X 80022-428-07
2500 X 80022-428-08
350 X X 80022-429-01
500 X X 80022-429-02
700 X X 80022-429-03
1000 X X 80022-429-04
1250 X X 80022-429-05
1500 X X
1750 X
2500 X 80022-429-08
3000 X 80022-429-09
225 X X 80022-430-01
450 X X 80022-430-02
600 X X 80022-430-03
900 X X 80022-430-04
1250 X X 80022-430-05
1750 X X 80022-430-06
2250 X 80022-430-07
2750 X 80022-430-08
3500 X 80022-430-10
6-pulse 12-pulse Part Number
Table 8.C
Voltage
2400 V
60 Hz
3300 V
50 Hz
4160 V
60 Hz
th
, 7th & 11th filters – 12-pulse drives)
Maximum
Horsepower
900 80022-431-01 80022-434-01 80022-437-01
1000 80022-431-02 80022-434-01 80022-437-02
1750 80022-431-02 80022-434-02 80022-437-02
2000 80022-431-03 80022-434-02 80022-437-03
2500 80022-431-03 80022-434-03 80022-437-03
900 80022-432-01 80022-435-01 80022-438-01
1750 80022-432-02 80022-435-02 80022-438-02
2500 80022-432-03 80022-435-03 80022-438-03
3000 80022-432-04 80022-435-04 80022-438-04
900 80022-433-01 80022-436-01 80022-439-01
1000 80022-433-02 80022-436-01 80022-439-02
1750 80022-433-02 80022-436-02 80022-439-02
2000 80022-433-03 80022-436-02 80022-439-03
2750 80022-433-03 80022-436-03 80022-439-03
3000 80022-433-04 80022-436-03 80022-439-04
3500 80022-433-04 80022-436-04 80022-439-04
Part Numb e r
th
Filter
5
Reactors (5
(1 of each requi red per unit)
Part Numb e r
7th Filter
80022-428-06
80022-429-06
Part Numb e r
11th Filter
Page 31

Renewal Parts 8-3
1519-IN050B-EN-P June 2013
Power Components (cont.)
Table 8.D
th
Current Transformers (5
filter only – 6-pulse drives)
or (Power Factor Correction – 6 or 12-pulse drives)
(3 required per unit unles s not ed oth erwis e)
Voltage
2400 V
60 Hz
3300 V
50 Hz
4160 V
60 Hz
Maximum
Horsepower
6-pulse 12-pulse Part Number
225 X X 80025-046-01
450 X X 80025-046-01
600 X X 80025-046-01
800 X X 80025-046-02
1250 X X 80025-046-03
1500 X X
1750 X
2250 X
2500 X 80025-046-03 (6)
350 X X 80025-046-01
500 X X 80025-046-01
700 X X 80025-046-01
1000 X X 80025-046-02
1250 X X 80025-046-02
1500 X X
1750 X
2500 X 80025-046-02 (6)
3000 X 80025-046-02 (6)
225 X X 80025-046-01
450 X X 80025-046-01
600 X X 80025-046-01
900 X X 80025-046-01
1250 X X 80025-046-02
1750 X X 80025-046-02
2250 X
2750 X 80025-046-02 (6)
3500 X 80025-046-02 (6)
80025-046-05
80025-046-03 (3)
80025-046-02 (3)
80025-046-02 (3)
80025-046-01 (3)
80025-046-02 (3)
80025-046-01 (3)
Table 8.E
Current Transformers (5
(3 of each requi red per unit)
Voltage
2400 V
60 Hz
3300 V
50 Hz
4160 V
60 Hz
Maximum
Horsepower
1000 80025-046-01 80025-046-01 80025-046-02
1750 80025-046-01 80025-046-01 80025-046-02
2000 80025-046-01 80025-046-01 80025-046-03
2500 80025-046-01 80025-046-01 80025-046-03
1750 80025-046-01 80025-046-01 80025-046-01
2500 80025-046-01 80025-046-01 80025-046-02
3000 80025-046-01 80025-046-01 80025-046-02
1000 80025-046-01 80025-046-01 80025-046-01
1750 80025-046-01 80025-046-01 80025-046-01
2000 80025-046-01 80025-046-01 80025-046-02
2750 80025-046-01 80025-046-01 80025-046-02
3000 80025-046-01 80025-046-01 80025-046-02
3500 80025-046-01 80025-046-01 80025-046-02
th
, 7th & 11th filters – 12-pulse drives)
Part Numb e r
th
Filter
5
Part Numb e r
7th Filter
Part Numb e r
11th Filter
900 80025-046-01 80025-046-01 80025-046-01
900 80025-046-01 80025-046-01 80025-046-01
900 80025-046-01 80025-046-01 80025-046-01
1519-5.0 – May 1998
Page 32

8-4 Renewal Parts
Power Components (cont.)
Table 8.F
Capacitors (5
or (Power Factor Correction – 6 or 12-pulse drives)
(3 required per unit unless noted othe rwi s e)
th
filter only – 6-pulse drives)
Volta g e
2400 V
60 Hz
3300 V
50 Hz
4160 V
60 Hz
Maximum
Horsepower
225 X X 80025-927-02
450 X X 80025-957-02
600 X X 80025-926-02
800 X X 80025-958-02
1250 X X 80025-959-02
1500 X X
1750 X
2250 X
2500 X 80025-959-02 (6)
350 X X 80025-957-01
500 X X 80025-926-01
700 X X 80025-958-01
1000 X X 80025-959-01
1250 X X 80025-960-01
1500 X X
1750 X
2500 X
3000 X 80025-960-01 (6)
225 X X 80025-927-02
450 X X 80025-957-02
600 X X 80025-926-02
900 X X 80025-958-02
1250 X X 80025-959-02
1750 X X 80025-960-02
2250 X
2750 X 80025-959-02 (6)
3500 X 80025-960-02 (6)
6-pulse 12-pulse Part Number
80025-960-02
80025-959-02 (3)
80025-958-02 (3)
80025-959-01 (3)
80025-958-01 (3)
80025-960-01 (3)
80025-959-01 (3)
80025-959-02 (3)
80025-958-02 (3)
)."%.0*UNE
Table 8.G
th
Capac itors (5
(3 of each requi red per unit)
Voltage
2400 V
60 Hz
3300 V
50 Hz
4160 V
60 Hz
, 7th & 11th filters – 12-pulse drives)
Maximum
Horsepower
Part Numb e r
th
Filter
5
Part Numb e r
7th Filter
Part Numb e r
11th Filter
900 80025-927-02 80025-927-02 80025-957-02
1000 80025-957-02 80025-927-02 80025-958-02
1750 80025-957-02 80025-957-02 80025-958-02
2000 80025-926-02 80025-957-02 80025-959-02
2500 80025-926-02 80025-926-02 80025-959-02
900 80025-927-01 80025-927-01 80025-957-01
1750 80025-957-01 80025-957-01 80025-958-01
2500 80025-926-01 80025-926-01 80025-959-01
3000 80025-958-01 80025-958-01 80025-960-01
900 80025-927-02 80025-927-02 80025-957-02
1000 80025-957-02 80025-927-02 80025-958-02
1750 80025-957-02 80025-957-02 80025-958-02
2000 80025-926-02 80025-957-02 80025-959-02
2750 80025-926-02 80025-926-02 80025-959-02
3000 80025-958-02 80025-926-02 80025-960-02
3500 80025-958-02 80025-958-02 80025-960-02
Page 33

Renewal Parts 8-5
1519-IN050B-EN-P June 2013
Power Components (cont.)
Table 8.H
th
Capacitor Fuses (5
filter only – 6-pulse drives)
or (Power Factor Correction – 6 or 12-pulse drives)
(Quantities as noted)
Voltage
2400 V
60 Hz
3300 V
50 Hz
4160 V
60 Hz
Maximum
Horsepower
6-pulse 12-pulse Part Number
225 X X 80025-834-01 (6)
450 X X 80025-834-02 (6)
600 X X 80025-834-02 (6)
800 X X 80025-834-03 (6)
1250 X X 80025-834-04 (6)
1500 X X
1750 X
2250 X
2500 x 80025-834-04 (12)
350 X X 80025-834-02 (3)
500 X X 80025-834-03 (3)
700 X X 80025-834-03 (3)
1000 X X 80025-834-05 (3)
1250 X X 80025-834-06 (3)
1500 X X
1750 X
2500 X
3000 X 80025-834-06 (6)
225 X X 80025-834-01 (3)
450 X X 80025-834-02 (3)
600 X X 80025-834-02 (3)
900 X X 80025-834-03 (3)
1250 X X 80025-834-04 (3)
1750 x X 80025-834-06 (3)
2250 X
2750 X 80025-834-04 (6)
3500 X 80025-834-06 (6)
80025-834-06 (6)
80025-834-04 (6)
80025-834-03 (6)
80025-834-05 (3)
80025-834-03 (3)
80025-834-06 (3)
80025-834-05 (3)
80025-834-04 (3)
80025-834-03 (3)
Table 8.J
Capacitor Fuses (5
(Quantities as noted)
Voltage
2400 V
60 Hz
3300 V
50 Hz
4160 V
60 Hz
th
, 7th & 11th filters – 12-pulse drives)
Maximum
Horsepower
Part Numb e r
th
Filter
5
Part Numb e r
7th Filter
Part Numb e r
11th Filter
900 80025-834-01 (6) 80025-834-01 (6) 80025-834-02 (6)
1000 80025-834-02 (6) 80025-834-01 (6) 80025-834-03 (6)
1750 80025-834-02 (6) 80025-834-02 (6) 80025-834-03 (6)
2000 80025-834-02 (6) 80025-834-02 (6) 80025-834-04 (6)
2500 80025-834-02 (6) 80025-834-02 (6) 80025-834-04 (6)
900 80025-834-01 (3) 80025-834-01 (3) 80025-834-02 (3)
1750 80025-834-02 (3) 80025-834-02 (3) 80025-834-03 (3)
2500 80025-834-03 (3) 80025-834-02 (3) 80025-834-05 (3)
3000 80025-834-03 (3) 80025-834-03 (3) 80025-834-06 (3)
900 80025-834-01 (3) 80025-834-01 (3) 80025-834-02 (3)
1000 80025-834-02 (3) 80025-834-01 (3) 80025-834-03 (3)
1750 80025-834-02 (3) 80025-834-02 (3) 80025-834-03 (3)
2000 80025-834-02 (3) 80025-834-02 (3) 80025-834-05 (3)
2750 80025-834-02 (3) 80025-834-02 (3) 80025-834-05 (3)
3000 80025-834-03 (3) 80025-834-02 (3) 80025-834-06 (3)
3500 80025-834-03 (3) 80025-834-03 (3) 80025-834-06 (3)
1519-5.0 – May 1998
Page 34

8-6 Renewal Parts
)."%.0*UNE
Page 35

Rockwell Automation Support
Rockwell Automation provides technical information on the Web to assist you in using its products.
At http://www.rockwellautomation.com/support
code and links to software service packs, and a MySupport feature that you can customize to make the best use of these
tools. You can also visit our Knowledgebase at http://www.rockwellautomation.com/knowledgebase
information, support chat and forums, software updates, and to sign up for product notification updates.
, you can find technical manuals, technical and application notes, sample
for FAQs, technical
For an additional level of technical phone support for installation, configuration, and troubleshooting, we offer
SM
Te c hC o n n e c t
representative, or visit http://www.rockwellautomation.com/support/
support programs. For more information, contact your local distributor or Rockwell Automation
.
Installation Assistance
If you experience a problem within the first 24 hours of installation, review the information that is contained in this
manual. You can contact Customer Support for initial help in getting your product up and running.
United States or Canada 1.440.646.3434
Outside United States or Canada Use the Wo rld wide Loca tor at http://www.rockwellautomation.com/rockwellautomation/support/overview.page, or contact your local
Rockwell Automation representative.
New Product Satisfaction Return
Rockwell Automation tests all of its products to help ensure that they are fully operational when shipped from the
manufacturing facility. However, if your product is not functioning and needs to be returned, follow these procedures.
United States Contact your distributor. You must provide a Customer Support case number (call the phone number above to obtain one) to your
Outside United States Please contact your local Rockwell Automation representative for the return procedure.
distributor to complete the return process.
Documentation Feedback
Your comments will help us serve your documentation needs better. If you have any suggestions on how to improve this
document, complete this form, publication RA-DU002
Medium Voltage Products, 135 Dundas Street, Cambridge, ON, N1R 5X1 Canada, Tel: (1) 519.740.4100, Fax: (1) 519.623.8930
Online: www.ab.com/mvb
Allen-Bradley, Rockwell Software, Rockwell Automation, and TechConnect are trademarks of Rockwell Automation, Inc.
Trademarks not belonging to Rockwell Automation are property of their respec tive companies.
Publication 1519-IN050B-EN-P - June 2013
Supersedes Publication 1519-5.0 - May 1998 Copyright © 2013 Rockwell Automation, Inc . All rights reserved. Printed in Canada.
, available at http://www.rockwellautomation.com/literature/.
 Loading...