


Introduction
1
Screens
2
VM Card
Operating Instructions
Extended Feature Settings
Web Reference
Startup Setting
3
Extended Feature Info
4
Install
5
Uninstall
6
Administrator Tools
7
Appendix
8
Read this manual carefully before you use this product and keep it handy for future reference.


TABLE OF CONTENTS
Notice..................................................................................................................................................................3
Important.........................................................................................................................................................3
How to Read This Manual.................................................................................................................................4
Symbols...........................................................................................................................................................4
Notes...............................................................................................................................................................4
About IP Address............................................................................................................................................4
1. Introduction
What are Extended Features?...........................................................................................................................5
Types of Extended Features...........................................................................................................................5
This Manual.........................................................................................................................................................6
2. Screens
Displaying the Operation Screen......................................................................................................................7
Logging in as an Administrator......................................................................................................................7
Web Image Monitor Operations Screens........................................................................................................9
Startup Setting Screen....................................................................................................................................9
Extended Feature Info Screen.....................................................................................................................11
Install Screen................................................................................................................................................12
Uninstall Screen...........................................................................................................................................13
Administrator Tools Screen.........................................................................................................................15
Other Screens..............................................................................................................................................16
3. Startup Setting
Starting and Stopping Extended Features......................................................................................................21
Starting Extended Features.........................................................................................................................21
Stopping Extended Features.......................................................................................................................23
Setting Priority...................................................................................................................................................25
4. Extended Feature Info
Displaying Extended Feature Information......................................................................................................27
5. Install
Installing Extended Features............................................................................................................................29
6. Uninstall
Uninstalling Extended Features.......................................................................................................................31
1

7. Administrator Tools
Setting Heap / Stack Size...............................................................................................................................33
Web Service Settings.......................................................................................................................................35
Enabling/Disabling Communication Protocols.........................................................................................35
8. Appendix
Trademarks.......................................................................................................................................................37
INDEX.............................................................................................................................................................39
2

Notice
Important
In no event will the company be liable for direct, indirect, special, incidental, or consequential damages
as a result of handling or operating the machine.
3
How to Read This Manual
Symbols
This manual uses the following symbols:
Indicates points to pay attention to when using the machine, and explanations of likely causes of paper
misfeeds, damage to originals, or loss of data. Be sure to read these explanations.
Indicates supplementary explanations of the machine's functions, and instructions on resolving user errors.
This symbol is located at the end of sections. It indicates where you can find further relevant information.
[ ]
Indicates the names of keys on the machine's display or control panels.
Notes
Contents of this manual are subject to change without prior notice.
Some illustrations in this manual might be slightly different from the machine.
Certain options might not be available in some countries. For details, please contact your local dealer.
Depending on which country you are in, certain units may be optional. For details, please contact your
local dealer.
About IP Address
In this manual, “IP address” covers both IPv4 and IPv6 environments. Read the instructions that are relevant
to the environment you are using.
4
1. Introduction
1
What are Extended Features?
"Extended features" are features (applications) that enable you use this device more easily.
The extended features installed on a device differ according to user's requirements. For details about which
extended features are installed on your device, ask the device manager.
Types of Extended Features
Extended features are classified into two types, Type-J *1, and Type-C *2, depending on the development
environment.
Type-J *1 extended features
These are features (applications) that are developed using Java.
Type-C *2 extended features
These are features (applications) that are developed using C language.
You can confirm which type of extended features are in use from the "Type" column of the list displayed in
the operation screen of Web Image Monitor.
For details, see "Web Image Monitor Operations Screens".
*1
Embedded Software Architecture Application Java language version
*2
Embedded Software Architecture Application C language version
• p.9 "Web Image Monitor Operations Screens"
5

1. Introduction
1
This Manual
This manual explains the [Startup Setting], [Extended Feature Info], [Install], [Uninstall], and [Administrator
Tools] regarding extended features installed in your devices.
If operating methods differ according to the type of extended feature, separate descriptions are given.
• The [Additional Program Startup Setting], [Install Additional Program], [Uninstall Additional Program],
[Copy Extended Features], and [Copy Card Save Data] of the Extended Feature Settings are not used
and are therefore not explained in this manual. For information about these settings, consult your
nearest sales or service representative.
• Confirm general extended feature operations with the administrator.
• p.5 "Types of Extended Features"
6
2. Screens
2
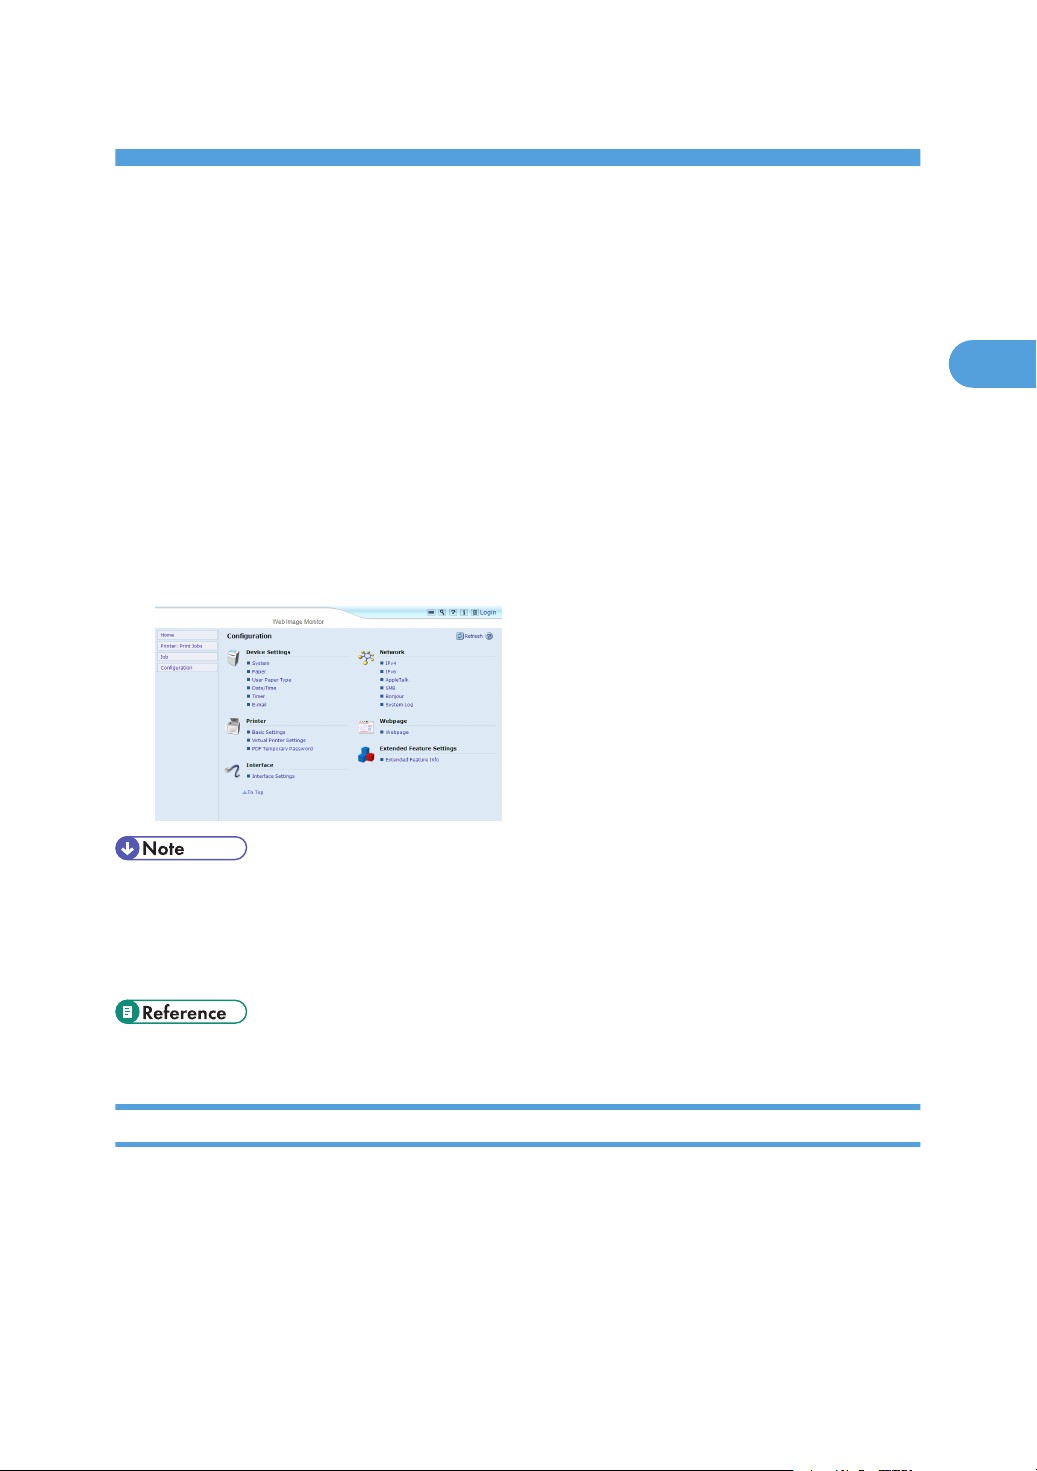
Displaying the Operation Screen
Use the [Configuration] menu of Web Image Monitor to display the operation screen.
1. Activate the web browser.
2. In the address bar, enter http://(IP address of device whose status you want to display)/
and press Enter key of the keyboard.
The initial screen of Web Image Monitor appears.
3. Click [Configuration] in the menu on the left side of Web Image Monitor screen.
The configuration menu is displayed on the right side of the screen.
4. "Extended Feature Settings", click the items you want to use.
• For details about the settings you must make to use Web Image Monitor, see the Network and System
Settings Reference or Software Guide.
• To set [Startup Setting], [Install], [Uninstall], or [Administrator Tools], you must login as an
administrator. For details, see "Logging in as an Administrator".
• p.7 "Logging in as an Administrator"
Logging in as an Administrator
To set [Startup Setting], [Install], [Uninstall], or [Administrator Tools], you must login as an administrator.
Enter a login user name and login password, and then log in.
7
2. Screens
2
1. Click [Login] in the upper right-hand corner of Web Image Monitor initial screen.
2. Enter a login user name and password, and then click [Login].
• For details about the login user name and password, consult your administrator.
• You do not have to log in as an administrator to use Extended Feature Info only.
8
12 3
4
1
BXX001
Web Image Monitor Operations Screens
2
Web Image Monitor Operations Screens
The following explanation covers [Startup Setting], [Extended Feature Info], [Install], [Uninstall], and
[Administrator Tools] screen items.
• The [Additional Program Startup Setting], [Install Additional Program], [Uninstall Additional Program],
[Copy Extended Features], and [Copy Card Save Data] screens are unavailable.
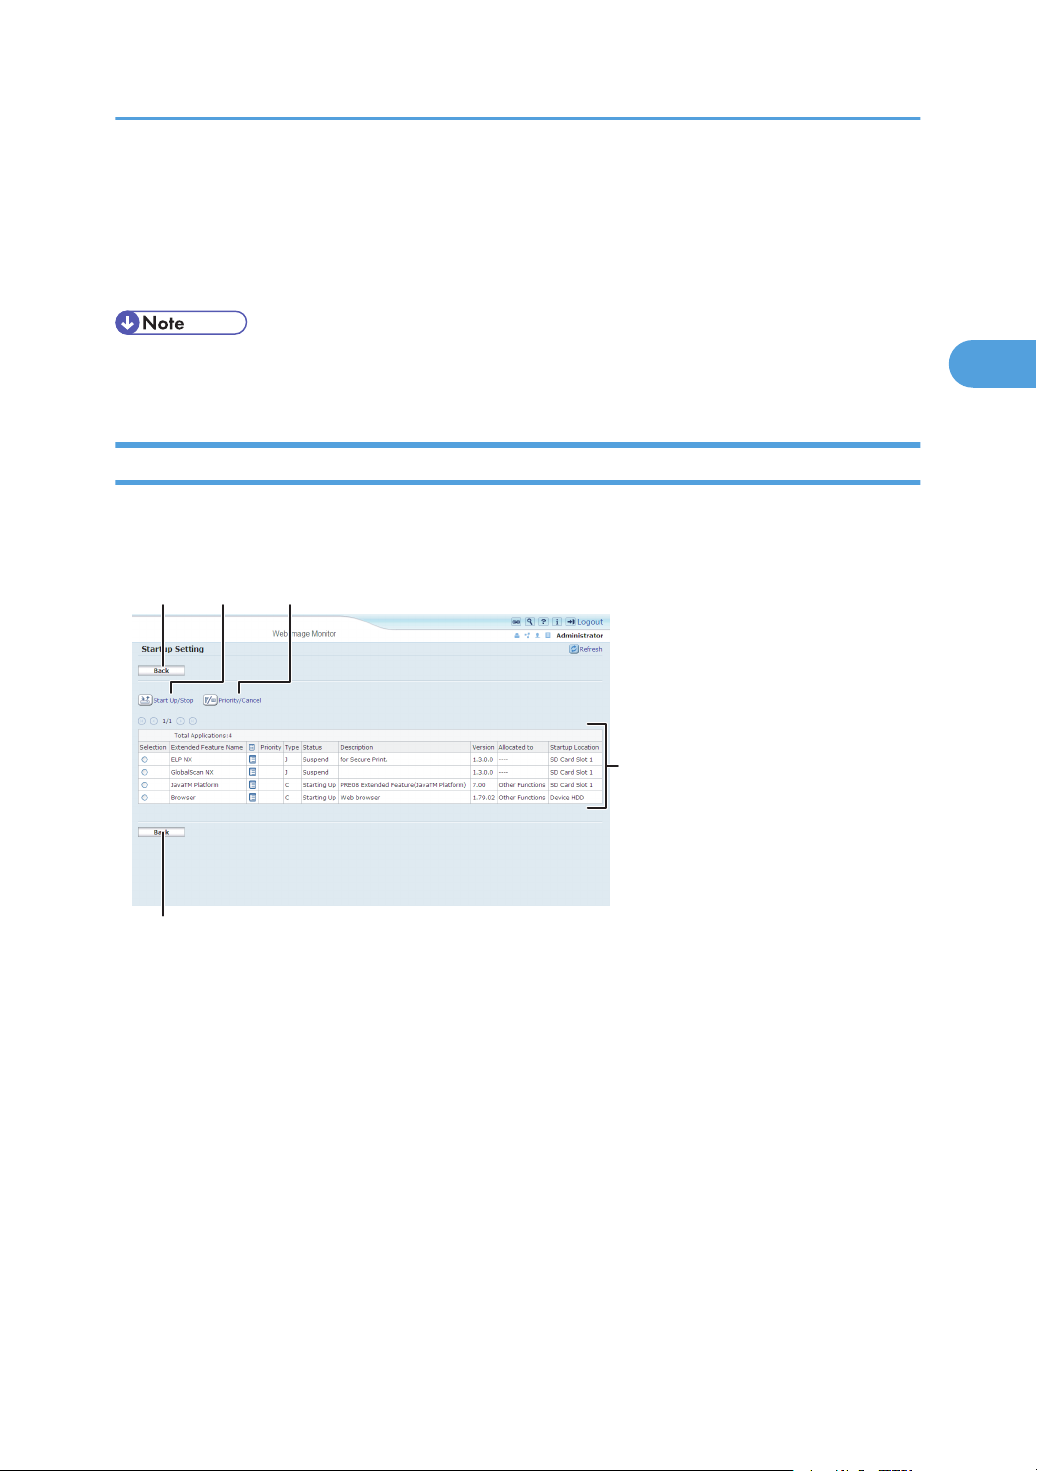
Startup Setting Screen
This section explains the various items on the Startup Setting screen.
For details about operations you can perform using this screen, see "Startup Setting".
1. [Back]
Click this to return to the [Configuration] menu of Web Image Monitor.
2. [Start Up/Stop]
Click this to set the selected extended feature to either "Starting Up" or "Stop".
3. [Priority/Cancel]
Click this button to set the "Priority" of the selected Type-J extended feature, or cancel the "Priority" setting. For
details, see "Setting Priority".
4. Extended feature list
Displays a list of installed extended features.
Selection
• Click the radio button of the extended feature you want to set to "Starting Up" or "Stop". Click [Start
Up/Stop] after selecting.
9

2. Screens
2
• Click the radio button of the Type-J extended feature to set or whose "Priority" setting you want to
cancel. Click [Priority/Cancel] after selecting.
Extended Feature Name
Displays the names of extended features.
Properties
Displays an information screen for the extended feature, which allows you to check its [Properties] icon.
For details, see "Extended Feature Info".
Priority
If multiple Type-J *1 extended features are installed, they are displayed according to "Priority".
Type
Displays the types of extended features. For details, see "Types of Extended Features".
Status
Displays the status of extended features.
• Starting Up
Extended features are activated.
• Stop
Extended features are deactivated.
• Suspend
Only Type-J *1 extended features are displayed.
Extended features are activated but are in standby status.
• Waiting
Only Type-C *2 extended features are displayed.
Extended features are activated once the device is rebooted.
• Ending
Only Type-C *2 extended features are displayed.
Extended features are shut down once the device is rebooted.
10
Description
Displays brief summaries of extended features.
Version
Displays the versions of extended features.
Allocated to
Displays the name of the function key allocated to the extended feature.
Startup Location
Displays the locations where extended features are installed.
*1
Embedded Software Architecture Application Java language version
*2
Embedded Software Architecture Application C language version
1
2
1
BXX002
Web Image Monitor Operations Screens
2
• To set Startup Setting, you must login as an administrator. For details, see "Logging in as an
Administrator".
• p.5 "Types of Extended Features"
• p.7 "Logging in as an Administrator"
• p.21 "Startup Setting"
• p.25 "Setting Priority"
• p.27 "Extended Feature Info"
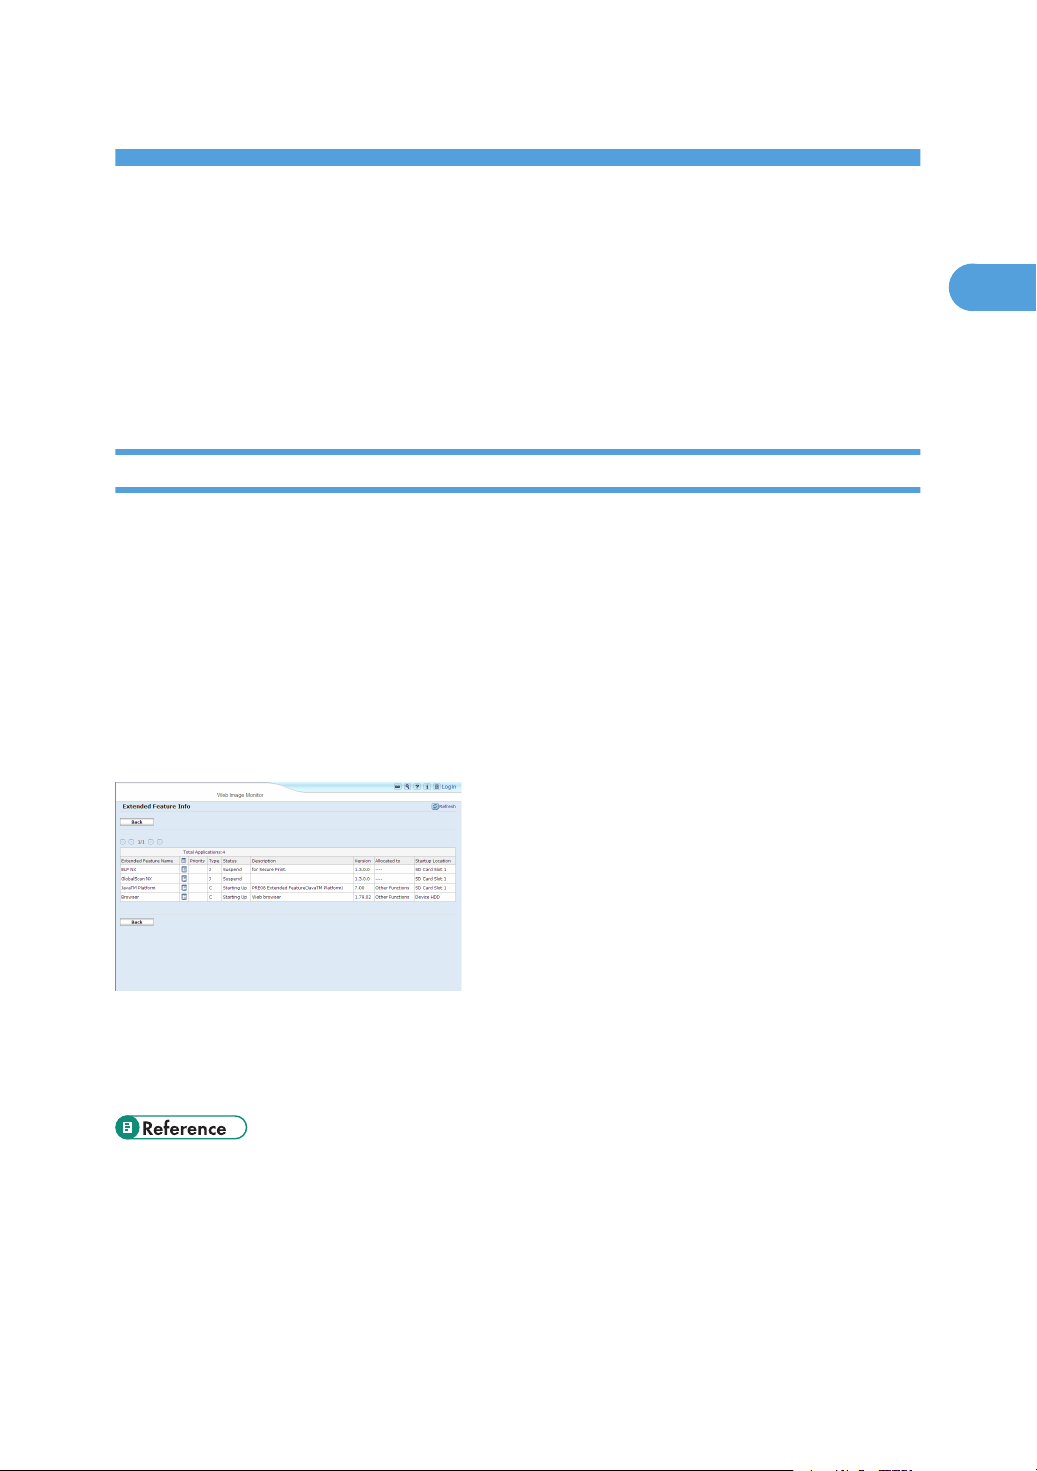
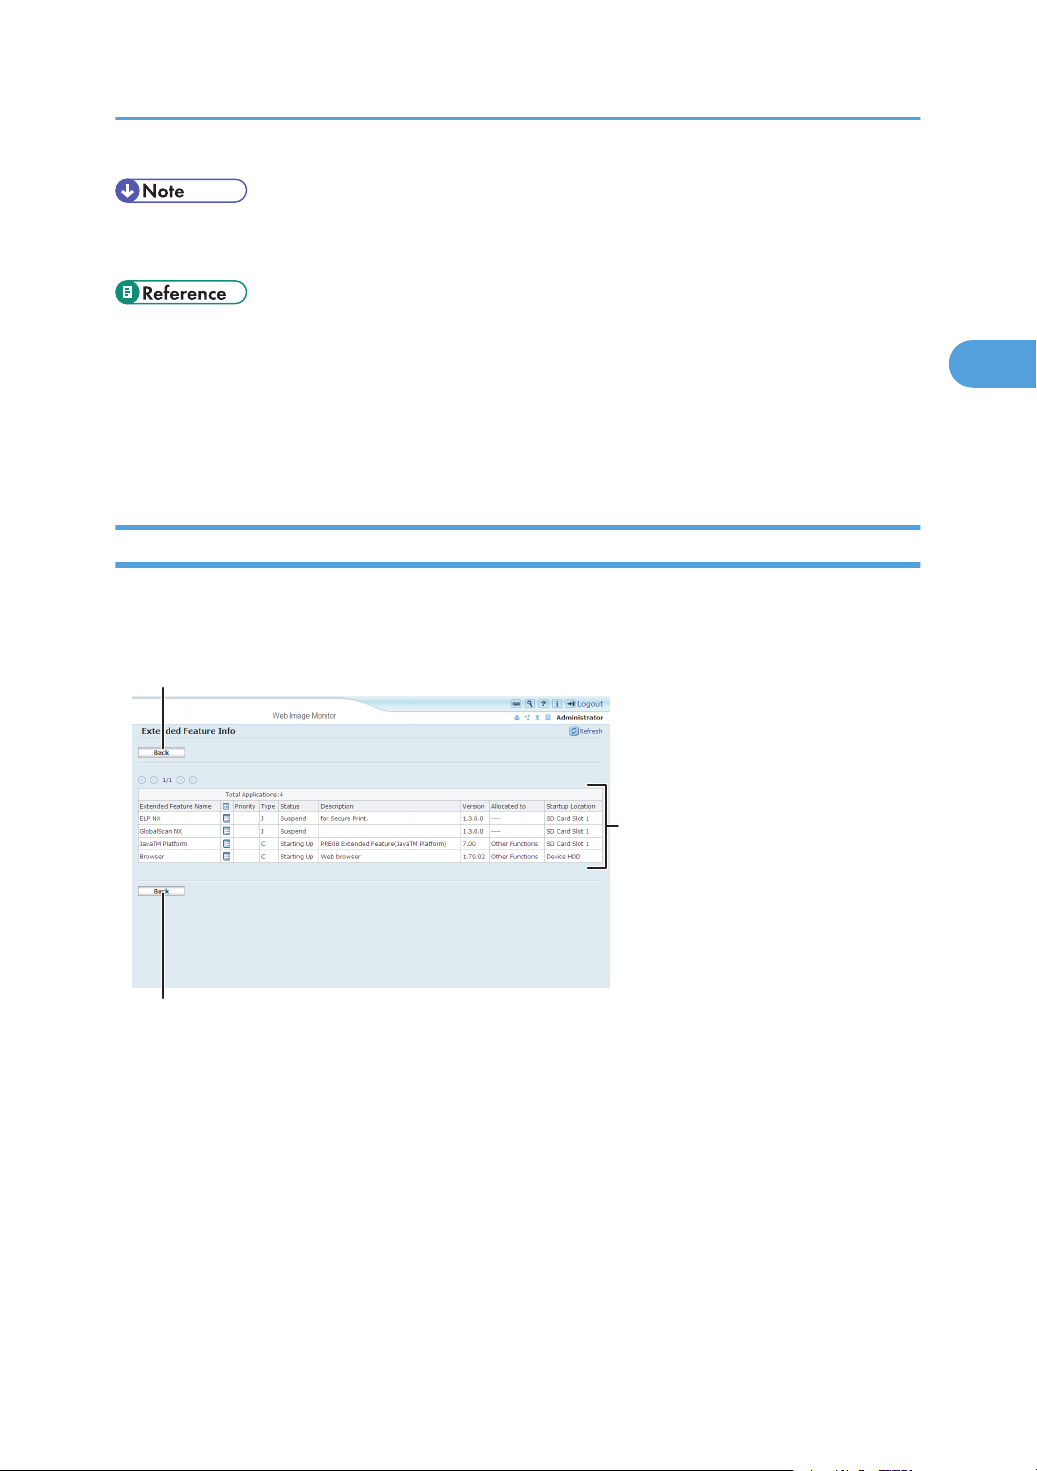
Extended Feature Info Screen
This section explains the various items on the Extended Feature Info screen.
For details about operations you can perform using this screen, see "Extended Feature Info".
1. [Back]
Click this to return to [Configuration] menu of Web Image Monitor.
2. Extended feature list
Displays a list of installed extended features.
Extended Feature Name
Displays the names of extended features.
Properties
Displays the extended feature information screen, allowing you check the [Properties] icon about the
extended features. For details, see "Extended Feature Info".
11

2. Screens
2
Priority
Type
Status
If multiple Type-J *1 extended features are installed, the extended feature displayed "Priority" is prioritized.
Displays the types of extended features. For details, see "Types of Extended Features".
Displays the status of extended features.
• Starting Up
Extended features are activated.
• Stop
Extended features are deactivated.
• Suspend
Only Type-J *1 extended features are displayed.
Extended features are activated but are in standby status.
• Waiting
Only Type-C *2 extended features are displayed.
Extended features are activated once the device is rebooted.
• Ending
Only Type-C *2 extended features are displayed.
Extended features are shut down once the device is rebooted.
Description
Displays brief summaries of the extended features.
Version
Displays the versions of extended features.
Allocated to
The name of function key allocated to extended features are displayed.
Startup Location
Displays the locations where extended features are installed.
*1
Embedded Software Architecture Application Java language version
*2
Embedded Software Architecture Application C language version
• p.5 "Types of Extended Features"
• p.27 "Extended Feature Info"
Install Screen
This section explains the various items on the Install screen.
This screen allows you to install extended features.
12

12 3
1
BYK705
Web Image Monitor Operations Screens
2
For details about operations you can perform using this screen, see "Install".
1. [Back]
Click this to return to [Configuration] menu of Web Image Monitor.
2. Source Media
Select the storage media to use for performing installation of the extended features.
3. [Display Extended Feature List]
If you click [Display Extended Feature List], a list of the installable extended features stored in the source media
(selected in Source Media) will appear.
• To set [Install], you must login as an administrator. For details, see "Logging in as an Administrator".
• p.7 "Logging in as an Administrator"
• p.29 "Install"
Uninstall Screen
This section explains the various items on the Uninstall screen.
This screen allows you to uninstall extended features.
For details about operations you can perform using this screen, see "Uninstall".
13

12
3
1
BXX006
2. Screens
2
1. [Back]
Click this to return to [Configuration] menu of Web Image Monitor.
2. [Uninstall]
If you click [Uninstall], the extended features selected in the Extended Features list will be uninstalled.
3. Extended feature list
Displays a list of installed extended features.
Selection
Click the radio button(s) of the extended feature that you want to uninstall, and then click [Uninstall] to
begin the uninstall process.
Extended Feature Name
Displays the names of extended features.
Type
Displays the types of extended features. For details, see "Types of Extended Features".
Status
Displays the status of extended features.
• Starting Up
Extended features are activated.
• Stop
Extended features are deactivated.
• Suspend
Only Type-J*1 extended features are displayed.
Extended features are activated but are in standby status.
• Waiting
Only Type-C*2 extended features are displayed.
Extended features are activated once the device is rebooted.
14

1
3
2
BXX004
Web Image Monitor Operations Screens
2
• Ending
Only Type-C*2 extended features are displayed.
Extended features are shut down once the device is rebooted.
*1
Embedded Software Architecture Application Java language version
*2
Embedded Software Architecture Application C language version
Description
Displays brief summaries of the extended features.
Version
Displays the versions of extended features.
Startup Location
Displays the locations where extended features are installed.
• To set [Uninstall], you must login as an administrator. For details, see "Logging in as an Administrator".
• p.5 "Types of Extended Features"
• p.7 "Logging in as an Administrator"
• p.31 "Uninstall"
Administrator Tools Screen
This section explains the various items on the Administrator Tools screen.
For details about operations you can perform using this screen, see "Administrator Tools".
15
2. Screens
2
1. [Apply]
Click this to apply changes made to settings.
2. [Back]
Click this to return to the [Configuration] menu of Web Image Monitor.
3. Settings list
Displays a list of settings.
• Web Installation Settings
Specify installation of extended features through the network.
• Heap / Stack Size Settings
Specify the heap and stack size necessary for extended features.
• Select Available Functions
Specify enable/disable for JavaTM Platform functions from the list.
• Web Service Settings
Configure the network-related settings.
• To set [Administrator Tools], you must login as an administrator. For details, see "Logging in as an
Administrator".
• You can specify Heap / Stack Size Settings and Web Service Settings.
• p.7 "Logging in as an Administrator"
• p.33 "Administrator Tools"
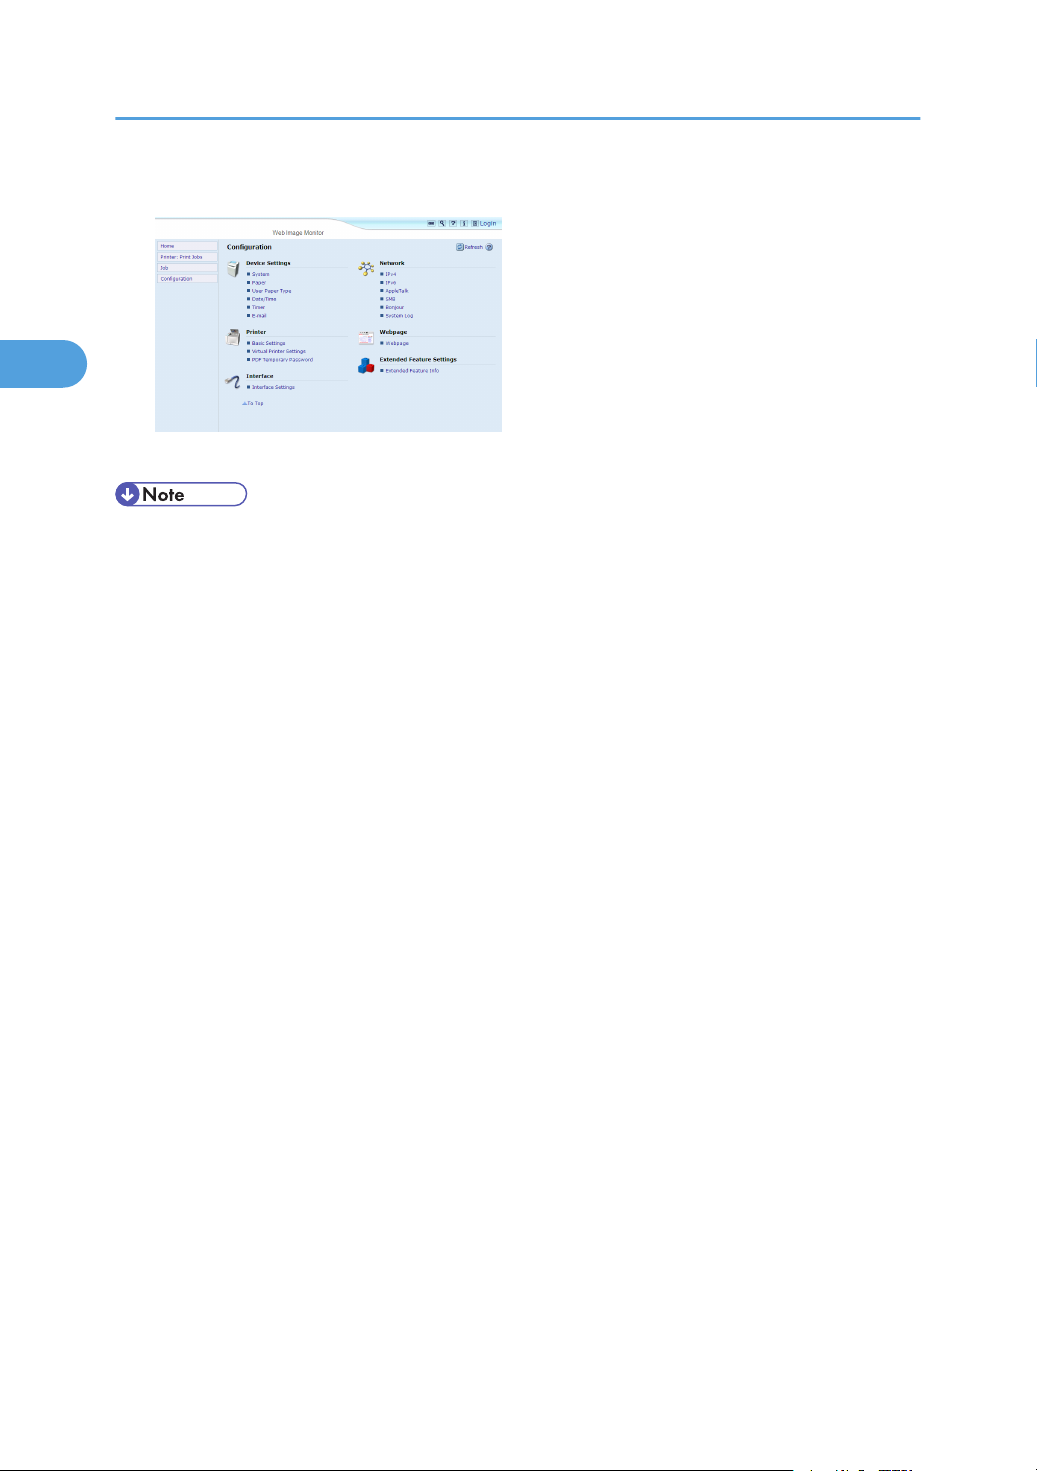
Other Screens
The following explanation covers [Additional Program Startup Setting], [Install Additional Program], and
[Uninstall Additional Program] screen items.
• The [Additional Program Startup Setting], [Install Additional Program], [Uninstall Additional Program],
[Copy Extended Features], and [Copy Card Save Data] screens are unavailable.
• For information about these settings, consult your nearest sales or service representative.
Additional Program Startup Setting screen
This section explains the various items on the Additional Program Startup Setting screen.
This screen allows you to start and stop installed additional programs.
16

12
3
1
BXX007
1. [Back]
2
Click this to return to the [Configuration] menu of Web Image Monitor.
2. [Start Up/Stop]
Click this to set the selected additional program to either "Starting Up" or "Stop".
3. Additional program list
Displays a list of installed additional program.
Web Image Monitor Operations Screens
Selection
Click the radio button of the additional program you want to set to "Starting Up" or "Stop". Click [Start Up/
Stop] after selecting.
Additional Program Name
Displays the names of additional program.
Properties
Displays an information screen for the additional program, which allows you to check its [Properties] icon.
No.
Displays the ID of each additional program that is installed.
Status
Displays the status of additional program.
• Starting Up
Additional program are activated.
• Stop
Additional program are deactivated.
• Suspend
Additional program are activated but are in standby status. You must reboot before you can use these
features.
17

12 3
1
BXX008
2. Screens
2
Description
Displays brief summaries of additional program.
Version
Displays the versions of additional program.
Install Additional Program screen
This section explains the various items on the Install Additional Program screen.
This screen allows you to install additional program.
1. [Back]
Click this to return to [Configuration] menu of Web Image Monitor.
2. Source Media
Select the storage media to use for performing installation of the additional program.
3. [Display Additional Program List]
If you click [Display Additional Program List], a list of the installable additional programs stored in the source
media (selected in Source Media) will appear.
Uninstall Additional Program screen
This section explains the various items on the Uninstall Additional Program screen.
This screen allows you to uninstall additional program.
18

12
3
1
BXX009
Web Image Monitor Operations Screens
2
1. [Back]
Click this to return to [Configuration] menu of Web Image Monitor.
2. [Uninstall]
If you click [Uninstall], the extended features selected in the additional programs list will be uninstalled.
3. Additional program list
Displays the status of additional program.
Selection
Click the radio button(s) of the additional program that you want to uninstall, and then click [Uninstall] to
begin the uninstall process.
Additional Program Name
Displays the names of additional program.
No.
Displays the ID of each additional program that is installed.
Status
Displays the status of additional program.
• Starting Up
Additional program are activated.
• Stop
Additional program are deactivated.
• Suspend
Additional program are activated but are in standby status. You must reboot before you can use these
features.
Description
Displays brief summaries of the additional program.
19

2. Screens
2
Version
Displays the versions of additional program.
20

3. Startup Setting
3
This chapter explains the operations that are available from the Startup Setting screen of Web Image
Monitor.
Starting and Stopping Extended Features
For details about items on the Startup Setting screen, see "Startup Setting Screen".
• To set [Startup Setting], you must login as an administrator. For details, see "Logging in as an
Administrator".
• p.7 "Logging in as an Administrator"
• p.9 "Startup Setting Screen"
Starting Extended Features
1. Display the configuration menu screen on Web Image Monitor.
2. In "Extended Feature Settings", click [Startup Setting].
A list of installed extended features appears.
3. Select the extended features you want to start, from those whose status is "Stop", "Suspend",
or "Ending". Select the radio button at the "Selection" in the list.
21

3. Startup Setting
3
4. Click [Start Up/Stop].
Depending on the type and status of the extended features you select, the machine responds as follows:
Type-J *1 extended features
• If "Suspend" is displayed:
"Status" changes to "Stop".
If you click [Start Up/Stop] again, "Status" changes to "Starting Up". The extended features
start and become usable.
• If "Stop" is displayed:
"Status" changes to "Starting Up". The extended features start and become usable.
Type-C *2 extended features
• If "Ending" is displayed:
"Status" changes to "Starting Up". The extended features start and become usable.
• If "Stop" is displayed:
"Status" changes to "Waiting".
After rebooting the device, "Status" changes to "Starting Up". The extended features start
and become usable.
If you click [Start Up/Stop] again without rebooting, "Status" changes back to "Stop".
*1
Embedded Software Architecture Application Java language version
*2
Embedded Software Architecture Application C language version
5. Click [Back].
• If "Waiting" is displayed, "Status" changes to "Starting Up" after rebooting the device. The extended
features start and become usable.
• p.7 "Displaying the Operation Screen"
22

Starting and Stopping Extended Features
3
Stopping Extended Features
Normally it is not necessary to stop extended features.
Extended features that are required for communication with the server may stop if the server is deactivated.
1. Display the configuration menu screen on Web Image Monitor.
2. In "Extended Feature Settings", click [Startup Setting].
A list of installed extended features is displayed.
3. Select the extended features you want to stop, from those whose status is "Starting Up",
"Suspend", or "Waiting". Select the radio button at the "Selection" in the list.
4. Click [Start Up/Stop].
Depending on the type and status of the extended features you select, the machine responds as follows:
Type-J *1 extended features
• If "Suspend" is displayed:
"Status" changes to "Stop". The extended features stop and become unusable.
• If "Starting Up" is displayed:
"Status" changes to "Stop". The extended features stop and become unusable.
Type-C *2 extended features
• If "Waiting" is displayed:
"Status" changes to "Stop". The extended features stop and become unusable.
• If "Starting Up" is displayed:
23

3. Startup Setting
3
"Status" changes to "Ending".
After rebooting the device, "Status" changes to "Stop". The extended features stop and
become unusable.
If you click [Start Up/Stop] again without rebooting, "Status" changes back to "Starting
Up".
*1
Embedded Software Architecture Application Java language version
*2
Embedded Software Architecture Application C language version
5. Click [Back].
• If "Ending" is displayed, "Status" changes to "Stop" after rebooting the device. The extended features
stop and become unusable.
• p.7 "Displaying the Operation Screen"
24

Setting Priority
3
Setting Priority
You can set priority for Type-J extended features only.
If multiple Type-J extended features are installed, you can specify their activation priority.
1. Display the configuration menu screen on Web Image Monitor.
2. In "Extended Feature Settings", click [Startup Setting].
A list of installed extended features appears.
3. Select the Type-J extended features you want to priority activate. Select the radio button at
the "Selection" in the list.
4. Click [Priority/Cancel].
"Priority" is displayed at the "Priority" for the selected Type-J extended feature in the list.
• To cancel "Priority", select a Type-J extended feature that is set to "Priority", and then click [Priority/
Cancel].
25

3. Startup Setting
3
• p.7 "Displaying the Operation Screen"
26

4. Extended Feature Info
4
This chapter explains the operations that are available from the Extended Feature Info screen of Web
Image Monitor.
Displaying Extended Feature Information
1. Display the configuration menu screen on Web Image Monitor.
2. In the "Extended Feature Settings", click the [Extended Feature Info].
A list of installed extended features appears.
For details about items on the Extended Feature Info screen, see "Extended Feature Info Screen".
3. Click the [Properties] icon of the extended feature whose details you want to display.
4. Check the information, and then click [Back].
5. Click [Back].
• p.7 "Displaying the Operation Screen"
• p.11 "Extended Feature Info Screen"
27

4. Extended Feature Info
4
28

5. Install
5
This chapter explains the operations that are available from the Install screen of Web Image Monitor.
Installing Extended Features
Use the following procedure to install extended feature.
For details about the install screen, see “Install Screen”.
1. Display the configuration menu screen on Web Image Monitor.
2. In "Extended Feature Settings", click [Install].
3. Select either [SD Card Slot] or [Local File] as the location of the installation source file.
If you select [Local File], you must then specify the location of the zip file containing the extended
features.
4. Click [Display Extended Feature List].
5. Specify the installation destination for extended feature.
6. Select whether or not to run Type-J features automatically.
29

5. Install
5
7. In the list, select the extended features you want to install, and then click [Install].
A confirmation message appears.
8. Click [OK].
9. Click [Back].
• To set [Install], you must login as an administrator. For details, see "Logging in as an Administrator".
• If you have installed an extended feature on the SD Card that contains the installation source file, the
installed extended feature will disappear from the list. To make the extended feature reappear,
uninstall it. Note however that if you have installed a different version of an extended feature by
overwriting the previous installation, you cannot restore the previous version by uninstalling the newer
version.
30
• p.7 "Displaying the Operation Screen"
• p.7 "Logging in as an Administrator"
• p.12 "Install Screen"

6. Uninstall
6
This chapter explains the operations that are available from the Uninstall screen of Web Image Monitor.
Uninstalling Extended Features
Use the following procedure to uninstall extended features.
For details about the Uninstall screen, see “Uninstall Screen”.
1. Display the configuration menu screen on Web Image Monitor.
2. In "Extended Feature Settings", click [Uninstall].
A list of installed extended features appears.
3. In the "Selection" area of the list, select the radio button of the extended features you want
to uninstall.
4. Click [Uninstall].
A confirmation message appears.
5. Click [OK].
If a selected extended feature is currently running, a confirmation message will appear. To proceed
with the uninstallation, click [OK].
6. Click [Back].
• To set [Uninstall], you must login as an administrator. For details, see "Logging in as an Administrator".
• p.7 "Displaying the Operation Screen"
• p.7 "Logging in as an Administrator"
• p.13 "Uninstall Screen"
31

6. Uninstall
6
32

7. Administrator Tools
7
This chapter explains the operations that are available from the Administrator Tools screen of Web Image
Monitor.
Setting Heap / Stack Size
Change the settings of "Heap Size" *1 and "Stack Size" *2 for Type-J extended features.
*1
"Heap" refers to a memory area used by JavaTM Platform and related applications.
*2
"Stack" refers to a memory area used to store temporary data for an application.
1. Display the configuration menu screen on Web Image Monitor.
2. In "Extended Feature Settings", click [Administrator Tools].
The screen for setting "Heap Size" and "Stack Size" appears. The current "Free" and "Total" capacity
of System Memory and Heap appear at the bottom of the screen.
For details about items on the Administrator Tools screen, see "Administrator Tools Screen".
3. Enter the values for "Heap Size" and "Stack Size".
4. Click [Apply].
A confirmation message appears.
5. Click [OK].
6. Click [Back].
33

7. Administrator Tools
7
• To set [Administrator Tools], you must login as an administrator. For details, see "Logging in as an
Administrator".
• You can specify Heap / Stack Size Settings and Web Service Settings.
• Changed settings are activated after the device has been rebooted.
• p.7 "Displaying the Operation Screen"
• p.7 "Logging in as an Administrator"
• p.15 "Administrator Tools Screen"
34

Web Service Settings
7
Web Service Settings
This section explains Web Service Settings. These settings allow you to enable and disable the
communication protocols used by extended features.
• You can specify Heap / Stack Size Settings and Web Service Settings.
• [Remote Installation Password] is unavailable.
Enabling/Disabling Communication Protocols
Use the following procedure to select the communication protocols (HTTP/HTTPS) used by extended
features.
1. Display the configuration menu screen on Web Image Monitor.
2. In "Extended Feature Settings", click [Administrator Tools].
For details about items on the Administrator Tools screen, see "Administrator Tools Screen".
3. Under "Web Service Settings", select whether to enable or disable [HTTP] or [HTTPS].
[HTTP] and [HTTPS] cannot be disabled at the same time.
4. Click [Apply].
A confirmation message appears.
5. Click [OK].
6. Click [Back].
• To set [Administrator Tools], you must login as an administrator. For details, see "Logging in as an
Administrator".
• p.7 "Displaying the Operation Screen"
• p.7 "Logging in as an Administrator"
35

7. Administrator Tools
7
• p.15 "Administrator Tools Screen"
36

8. Appendix
8
Trademarks
Java and all Java-based trademarks and logos are trademarks or registered of Sun Microsystems, Inc. in
the United States and other countries.
37

8. Appendix
8
38

INDEX
A
Additional Program Startup Setting screen.........16
Administrator Tools screen....................................15
D
Displaying extended feature information............27
Displaying the operation screen.............................7
E
Extended Feature Info screen...............................11
I
Install......................................................................29
Install Additional Program screen........................18
Install screen..........................................................12
L
Logging in as an administrator...............................7
P
protocols................................................................35
S
Setting Heap / Stack Size....................................33
Setting priority........................................................25
Starting and Stopping extended features............21
Starting extended features....................................21
Startup Setting screen..............................................9
Stopping extended features.................................23
T
This manual..............................................................6
Type-C extended features.......................................5
Type-J extended features........................................5
Types of extended features.....................................5
U
Uninstall..................................................................31
Uninstall Additional Program screen...................18
Uninstall screen......................................................13
W
Web Image Monitor operations screens...............9
Web service settings.............................................35
What are extended features?.................................5
39

MEMO
GB
US
AU
40 EN
EN
EN
M066

Copyright © 2009

VM Card Operating Instructions Extended Feature Settings Web Reference
EN GB
EN US
EN AU
M066-8515
 Loading...