

Page 1
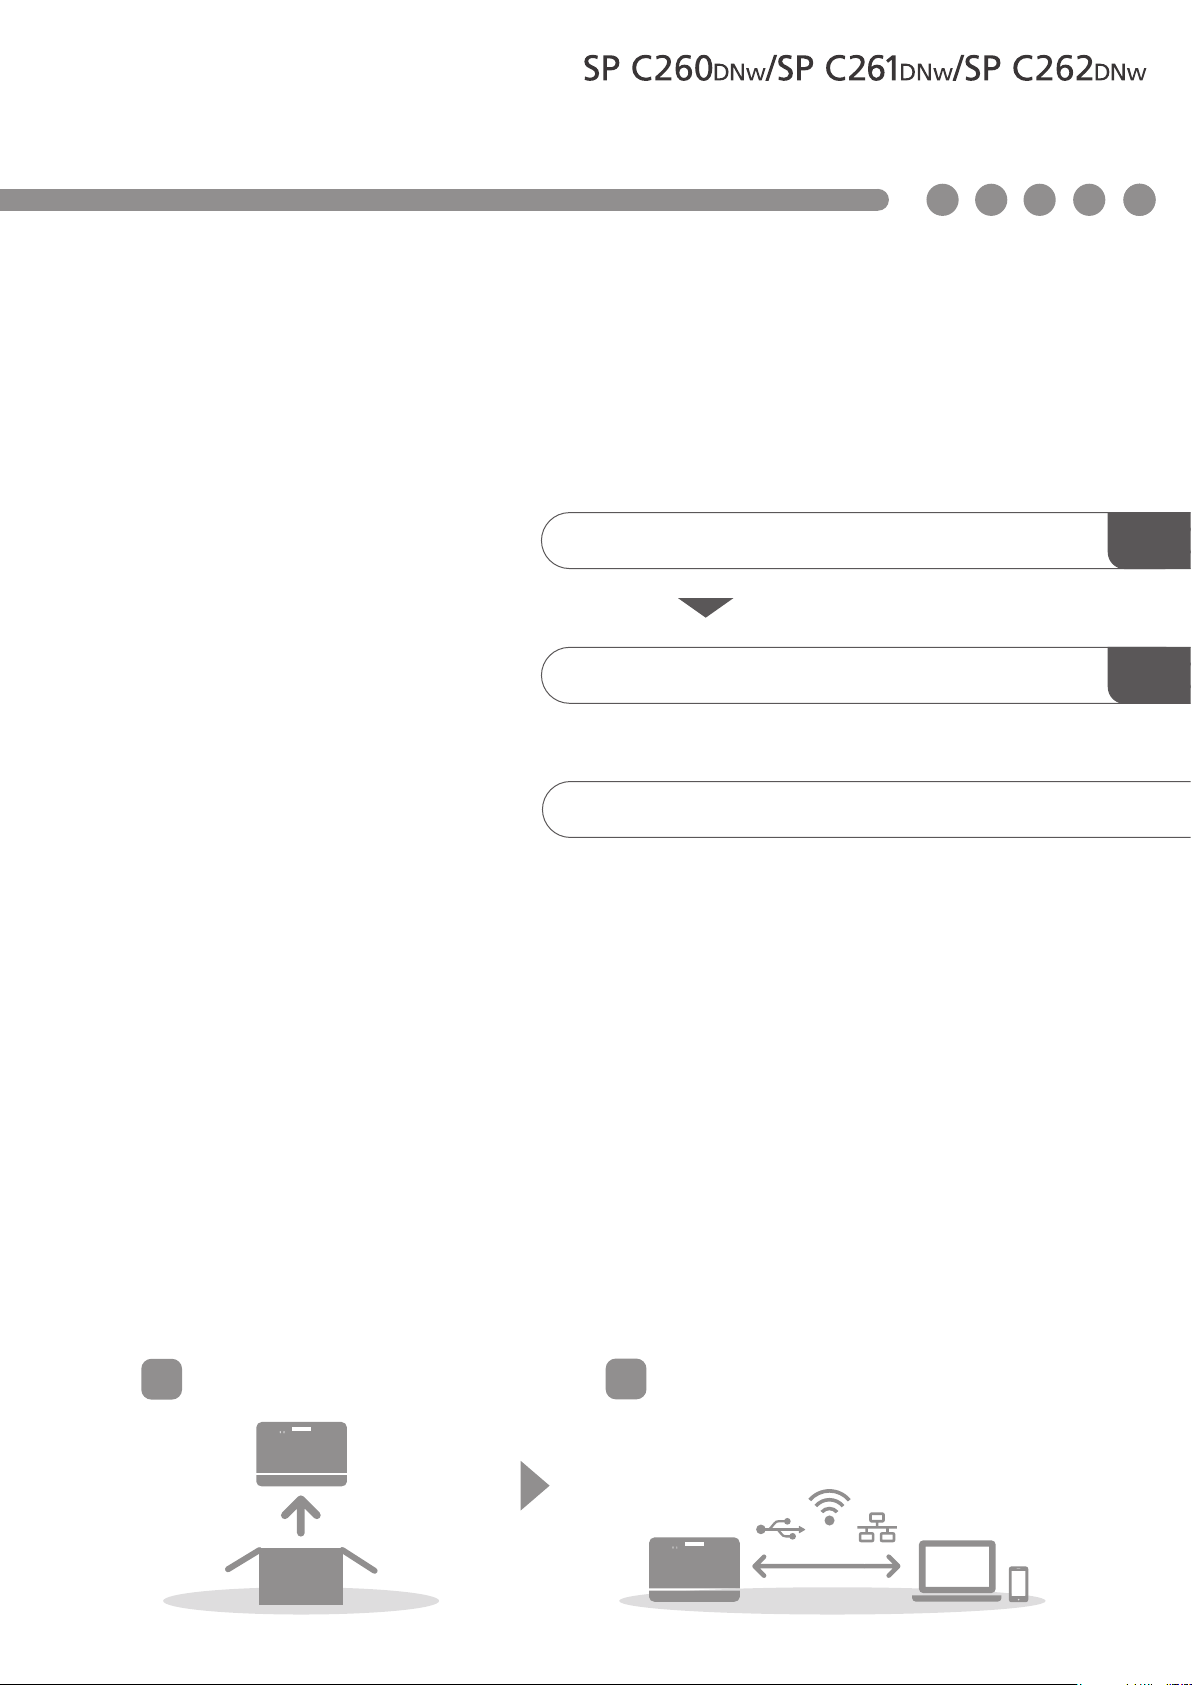
Setup Guide
Setting Up the Machine
Installing the Software
Control Panel Sheet
1
2
1
2
Page 2

Page 3
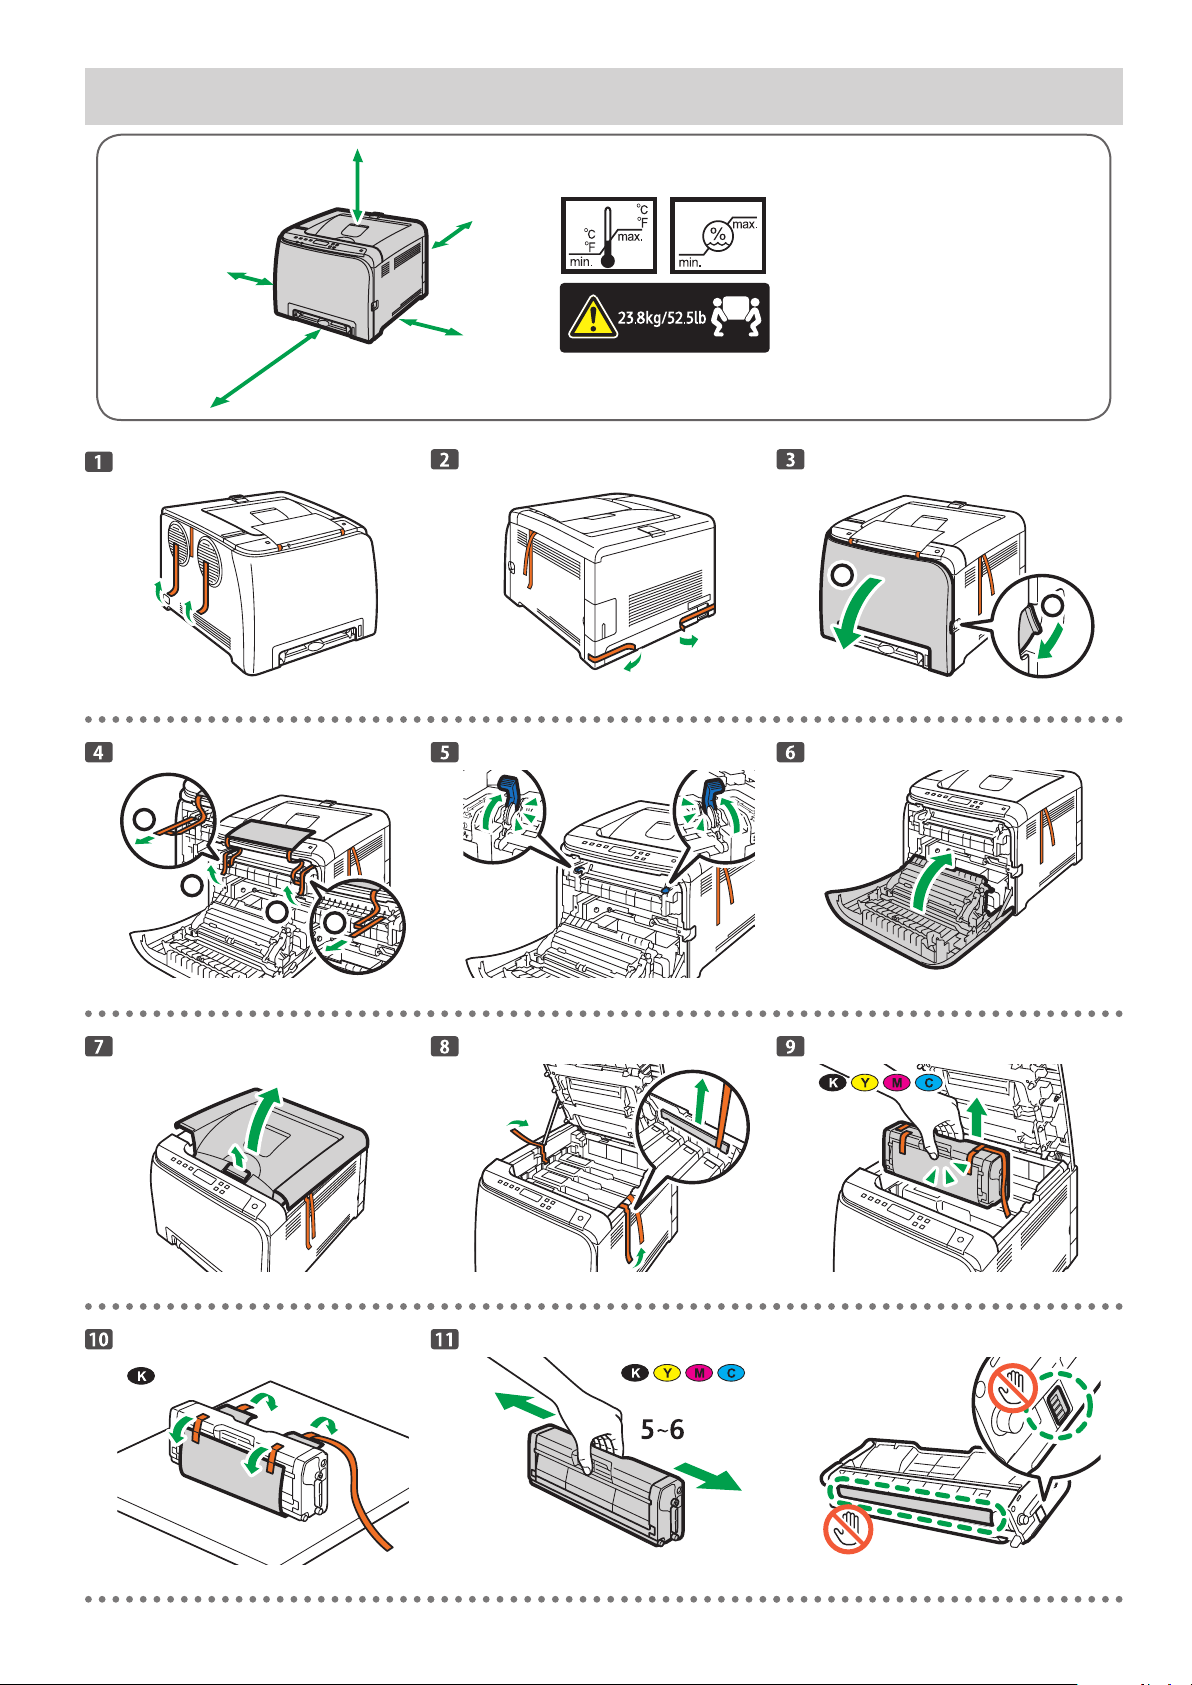
1. Setting Up the Machine
33 cm
(13 inches)
10 cm
(4.0 inches)
70 cm
(27.6 inches)
20 cm
(7.9 inches)
20 cm
(7.9 inches)
DUE051
32
89.6
10
50
15
80
DAC502
Power Source
120 - 127 V, 60 Hz, 11 A
220 - 240 V, 50/ 60 Hz, 6 A
2
1
DUE053
DUE054
DUE055
2
1
1
2
DUE056
DUE057
DUE058
DUE059
DUE060
DUE061
DUE013 DUE014 DUE015
1
Page 4
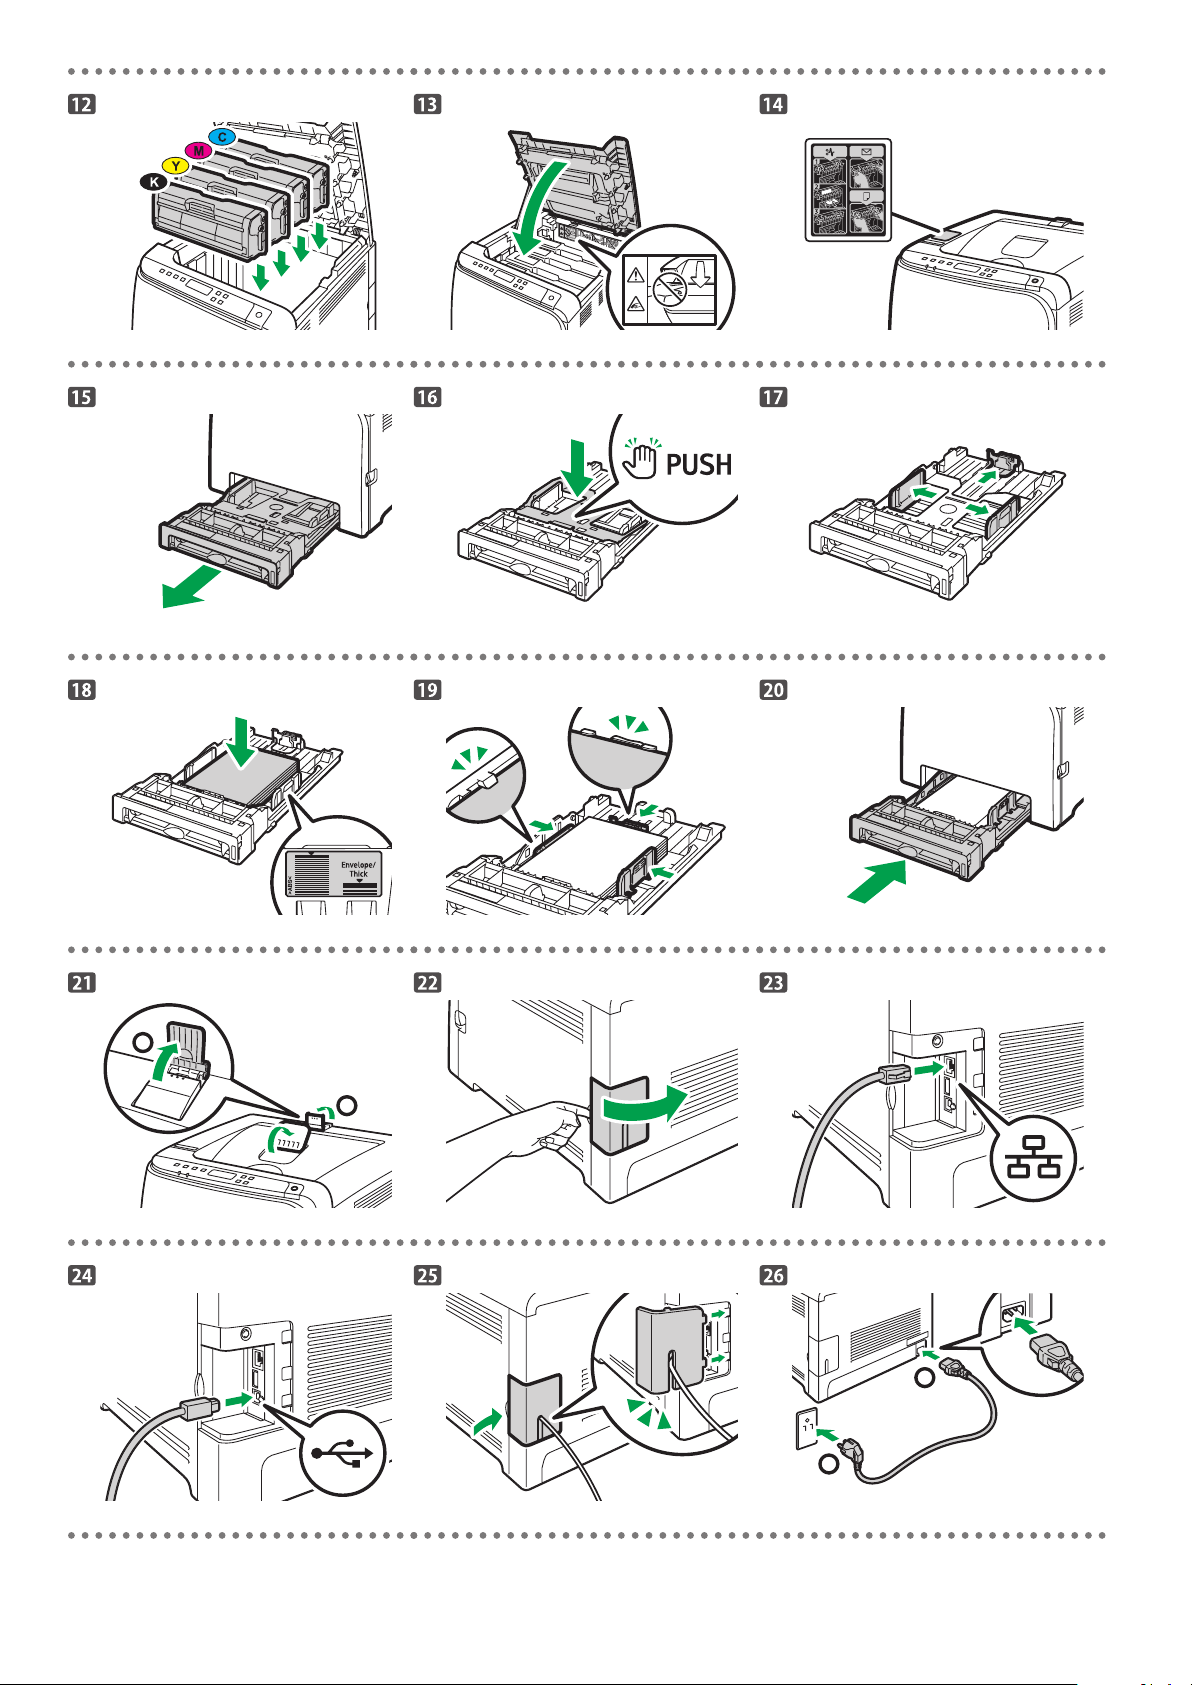
DUE062 DUE064 DUD080
DUE066 DUE021 DUE022
DUE023 DUE024
DUE067
2
1
DUE074
DUE068 DUE069
1
2
DUE070
DUE071
DUE072
2
Page 5
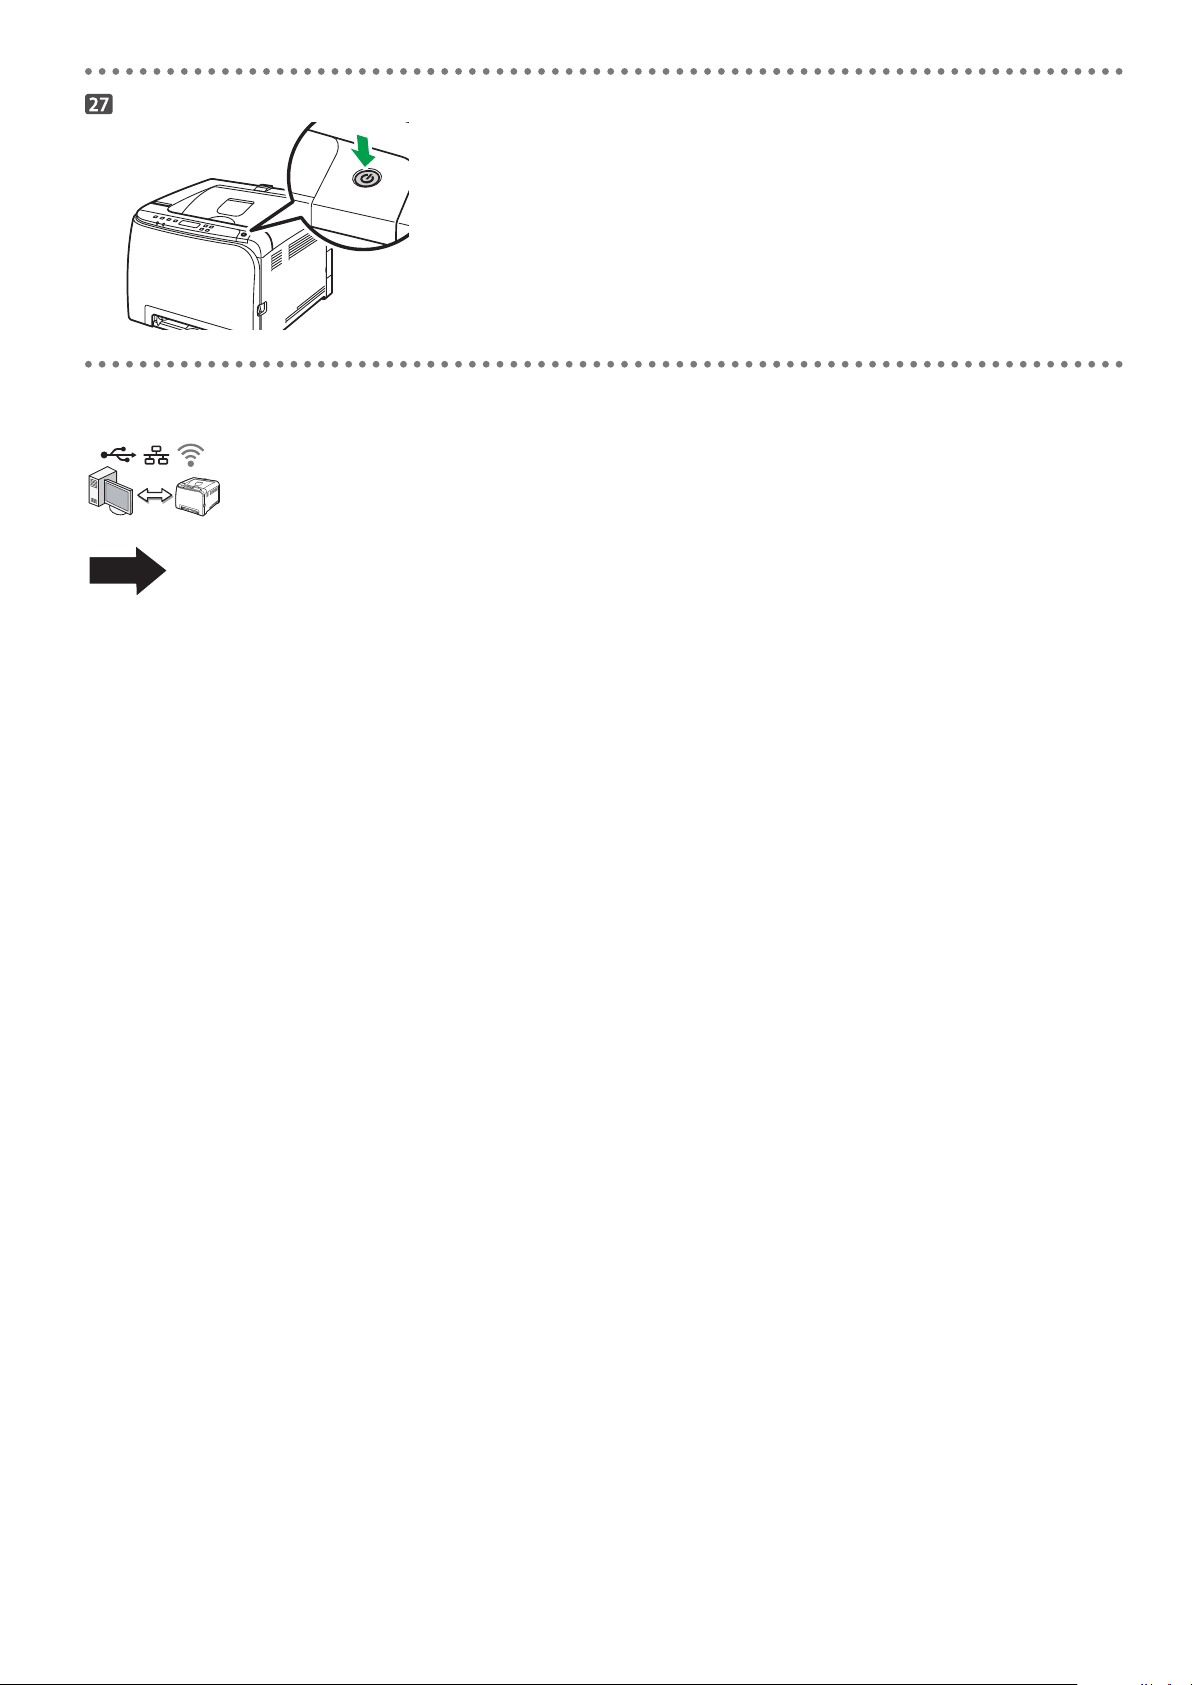
DUE073
Install the software to use the machine.
Go to page 4 “2. Installing the Software”. For OS X, see User’s Guide in the
provided CD-ROM or our website.
3
Page 6
2. Installing the Software
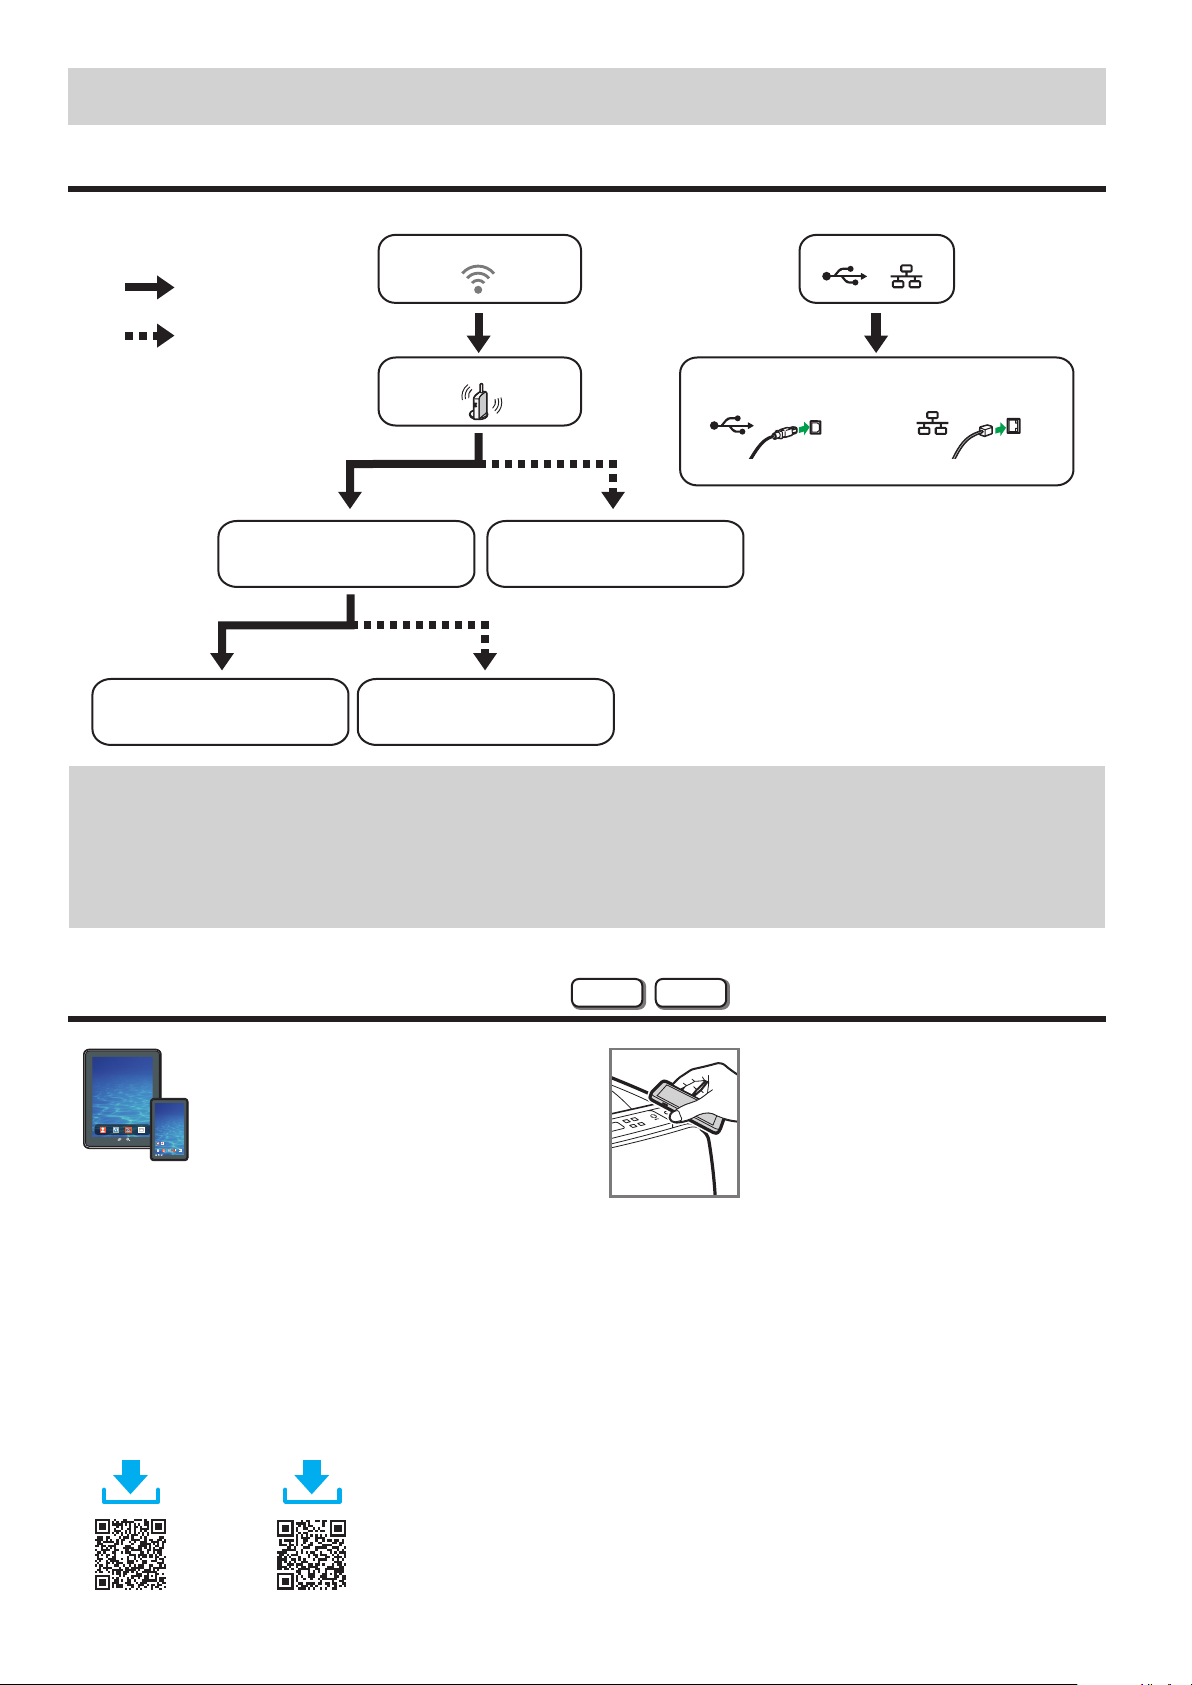
Check how the computer is connected
Specify how to connect to your computer according to the communication environment of your system.
connect by wireless?
Yes
No
connect by wire?
use a router (access point)?
use your computer for setup?
connect using a CD-ROM
Go to page 6 "Easy Setup
Using the CD-ROM".
•You can use both the CD-ROM and Wi-Fi Setup Wizard to configure the wireless settings for the machine.
•To connect using the WPS button, go to page 9 “Easy Setup Using the WPS Button”.
•To connect using a PIN code, go to page 10 “Easy Setup Using a PIN Code”.
•To set up manually, see User’s Guide in the provided CD-ROM or our website.
•When the Wi-Fi Direct function is enabled, a Wi-Fi Direct compliant device is recognized as a router (access point), and direct
communication among Wi-Fi Direct-compliant devices becomes possible.
When communicating using the Wi-Fi Direct function, you cannot connect to the Internet at the same time.
connect using Wi-Fi Setup Wizard
Go to page 7 "Easy Setup Using
the Wi-Fi Setup Wizard".
connect via Wi-Fi Direct
See Wi-Fi Direct Guide in our website
connect using a
USB interface cable
Go to page 5 "Connecting the Machine (USB/Network)".
.
connect using an
Ethernet interface cable
DUE035
Use the machine from a smart device
■How to use the machine from a
smart device
From a smart device application, you can use the
following function of the machine:
•Printing photographs and documents stored on
a smart device
After scanning the following QR code with your
smart device, search for the "RICOH Smart
Device Connector" application and download it
from the site that appears.
Android iOS
Android iOS
■How to use the NFC tag
(Android smart devices only)
1. Configure the network connection of
the machine. For details, see page 6
"Connecting the Machine via Wi-Fi".
2. After scanning the following QR code with
your smar t device, search for the "RICOH
Smart Device Connector" application and
download it from the site that appears.
3. Start "RICOH Smar t Device Connector",
and write the machine's network
information on the NFC tag using the
application.
4. Perform printing by touching the NFC tag
from "RICOH Smart Device Connector".
4
Page 7
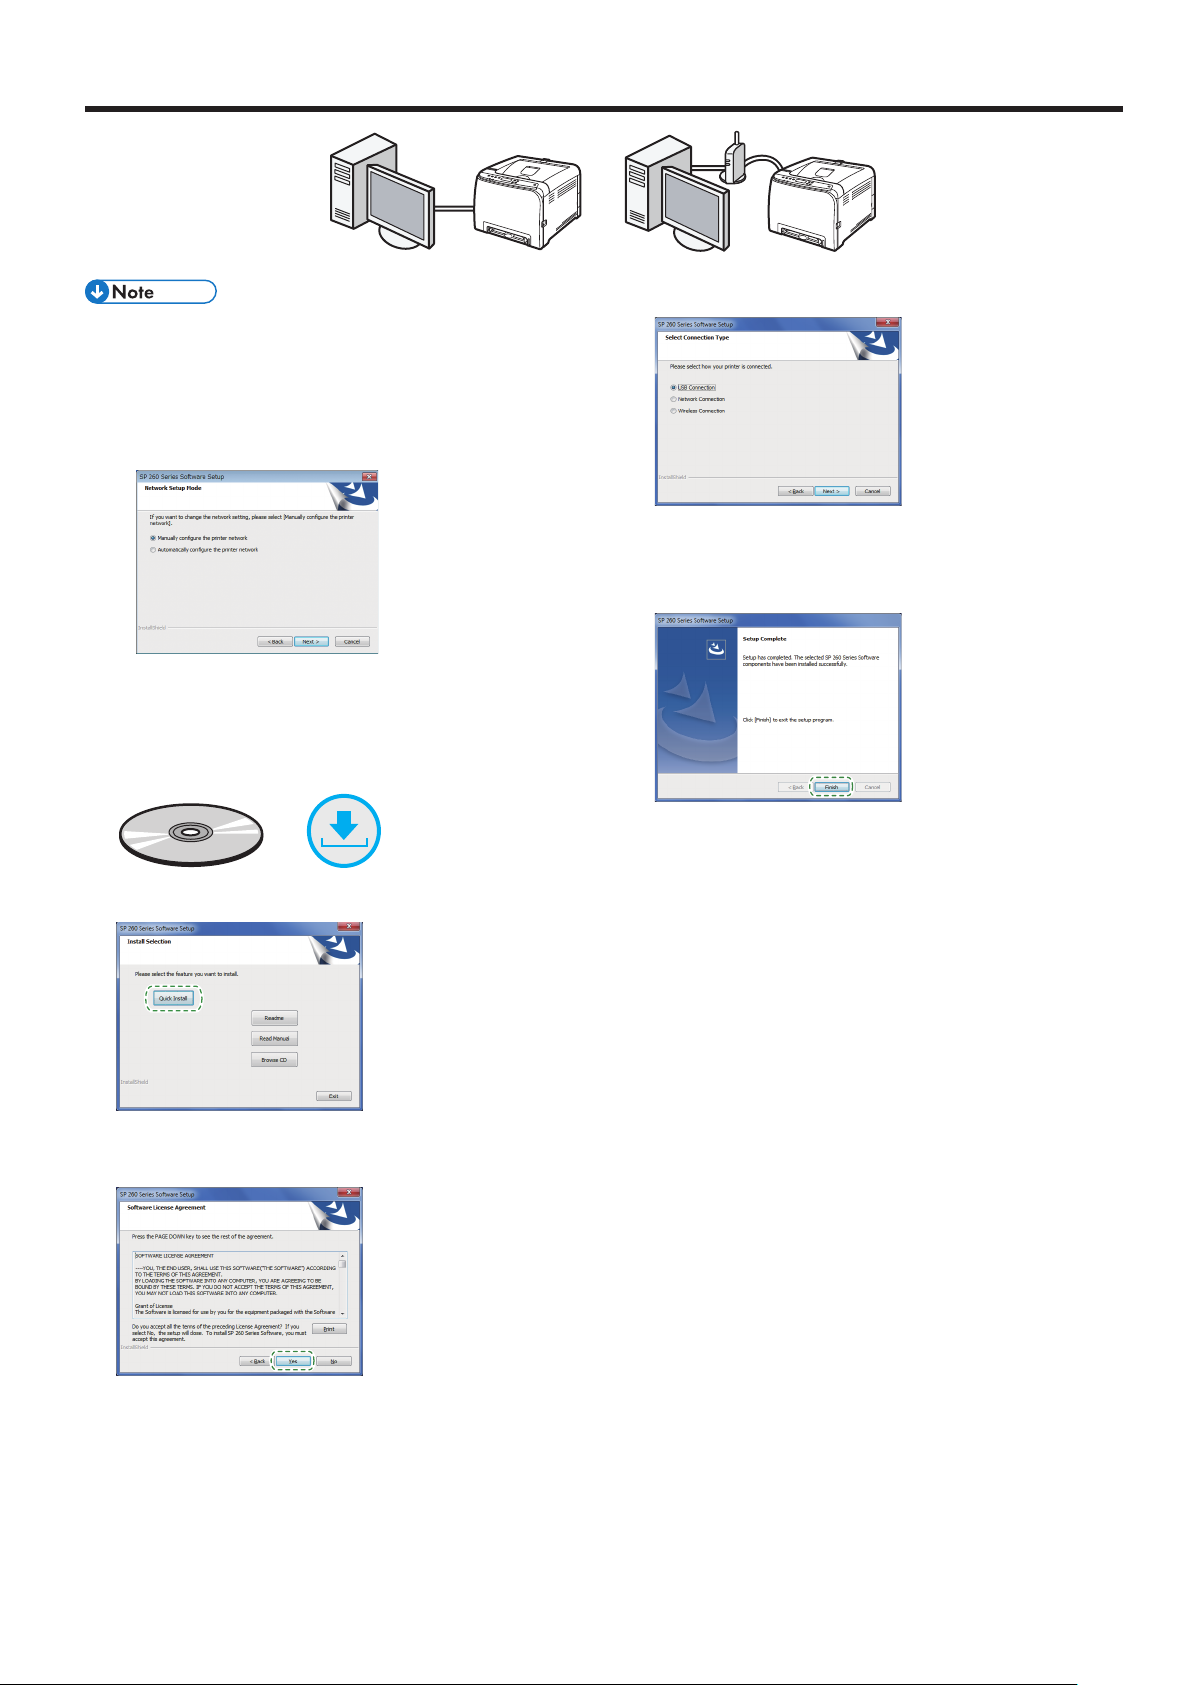
Connecting the Machine (USB/Network)
Windows
DUE077
● The following items are necessary to set up a wired
connection.
● USB interface cable or Ethernet interface cable
● CD-ROM supplied with the machine
● To install the software for network connection, quick
installation and manual installation can be used. Using
the manual installation, you can specify data to be
installed as you prefer.
1. Turn on your computer.
2. Inser t the provided CD-ROM into the CD-ROM drive of the
computer.
If your computer does not have a CD-ROM drive, download a
setup file from our website.
or
DUE078
5. Select [USB Connection] or [Network Connection]
according to communication environment or your device.
6. Follow the instructions in the setup wizard.
7. Click [Finish] in the [Setup Complete] dialog box. If the
installer prompt you to restart Windows, reboot your
computer.
Setup is completed.
3. Click [Quick Install].
4. The sof tware license agreement appears in the [Software
License Agreement] dialog box. Af ter reading the agreement,
click [Yes].
5
Page 8
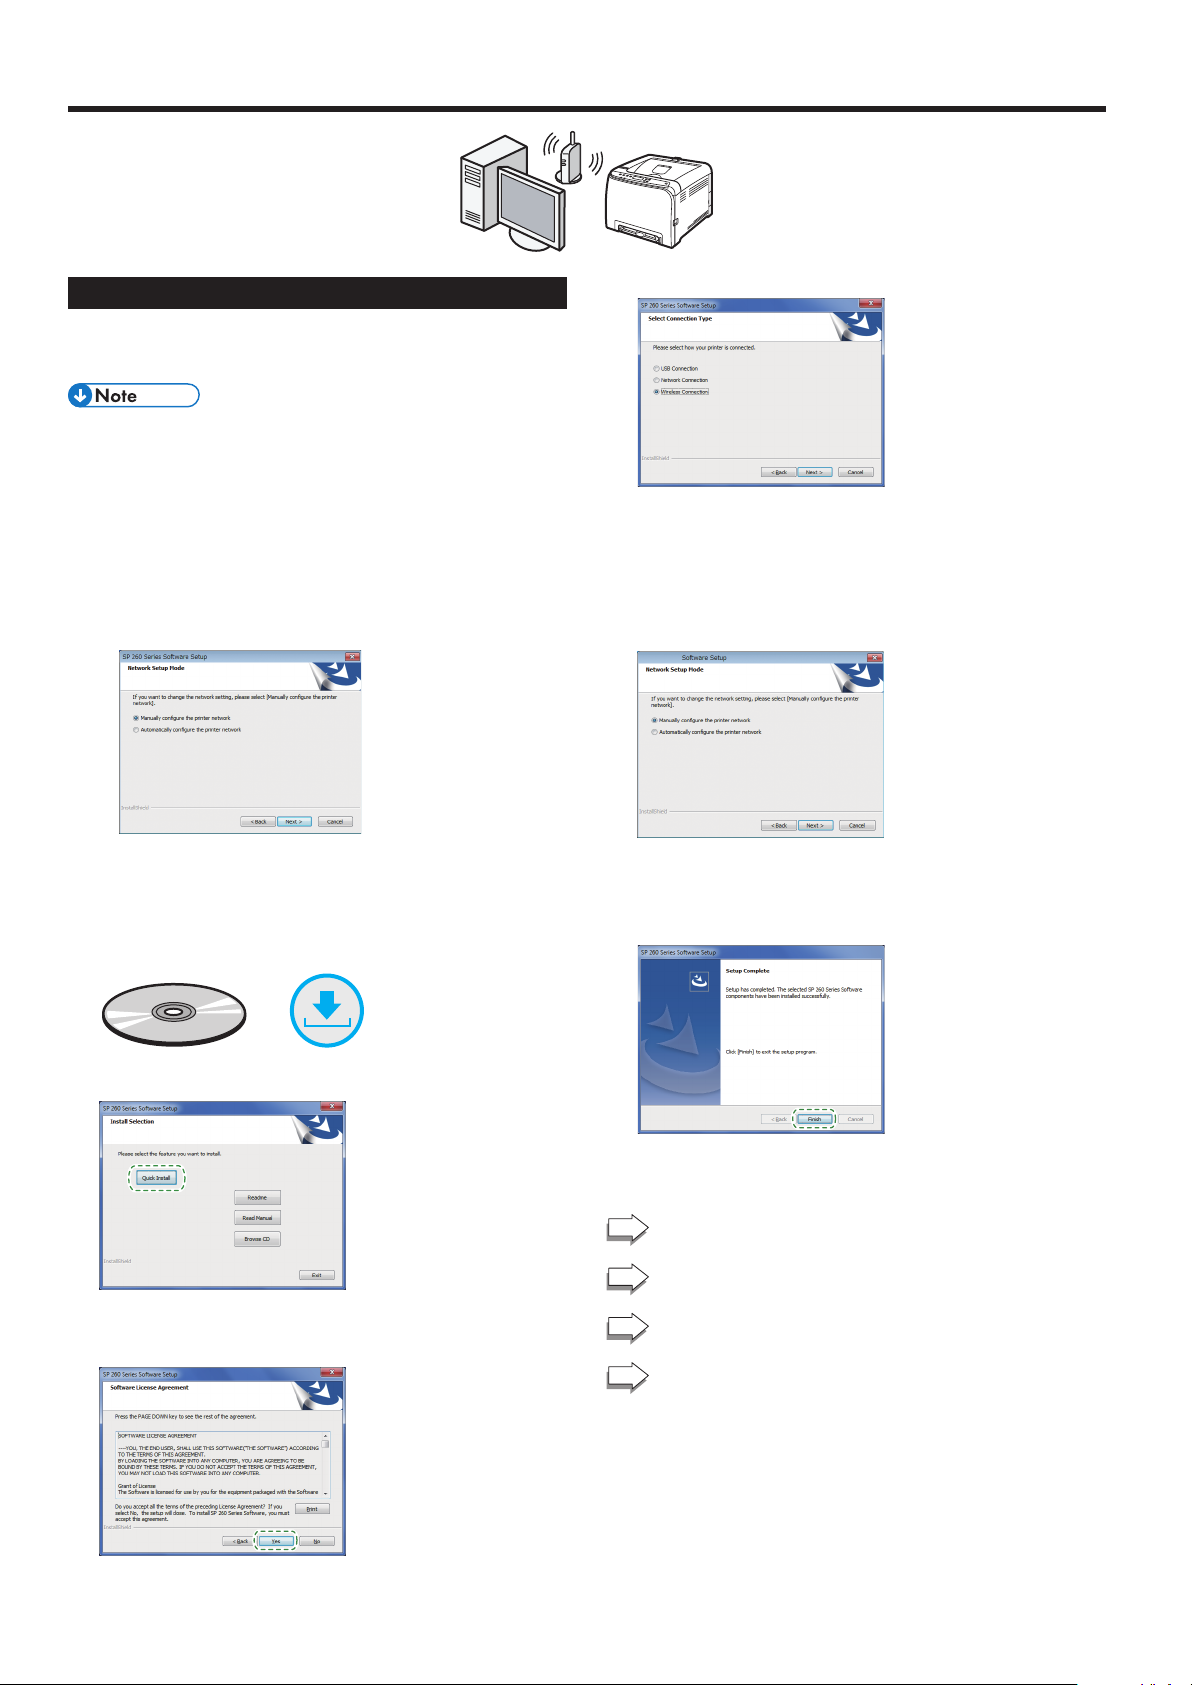
Connecting the Machine via Wi-Fi
Easy Setup Using the CD-ROM
Using the CD -ROM supplied with this machine, you can install the
driver from your computer and configure the wireless LAN settings
for this machine.
● The following items are necessary to set up a wireless
connection.
● USB interface cable
Using the USB cable is needed to update the settings of
this machine when it is installed or the wireless LAN
settings change in your environment. See Step 6 to
connect your computer to this machine.
● Router (access point)
● CD-ROM supplied with the machine
● To install the software, quick installation and manual
installation can be used. Using the manual installation,
you can specify data to be installed as you prefer.
Windows
DUE079
5. Select [Wireless Connection].
6. Select [Manually configure the printer network] when
installing this machine.
Connect your computer and this machine by using the USB
cable.
Select [Automatically configure the printer network] when
configuring the wireless LAN settings for this machine is
completed.
1. Turn on your computer.
2. Inser t the provided CD-ROM into the CD-ROM drive of the
computer.
If your computer does not have a CD-ROM drive, download a
setup file from our website.
or
3. Click [Quick Install].
4. The software license agreement appears in the [Software
License Agreement] dialog box. Af ter reading the
agreement, click [Yes].
7. Follow the instructions in the setup wizard.
8. Click [Finish] in the [Setup Complete] dialog box. If the
installer prompt you to restart Windows, reboot your
computer.
Setup is completed.
To connect using the Wi-Fi Setup Wizard, go to page 7
“Easy Setup Using the Wi- Fi Setup Wizard”.
To connect using the WPS button, go to page 9 “Easy
Setup Using the WPS Button”.
To connect using a PIN Code, go to page 10 “Easy
Setup Using a PIN Code”.
To connect using Wi-Fi Direct, see Wi-Fi Direct Guide in
our website.
6
Page 9
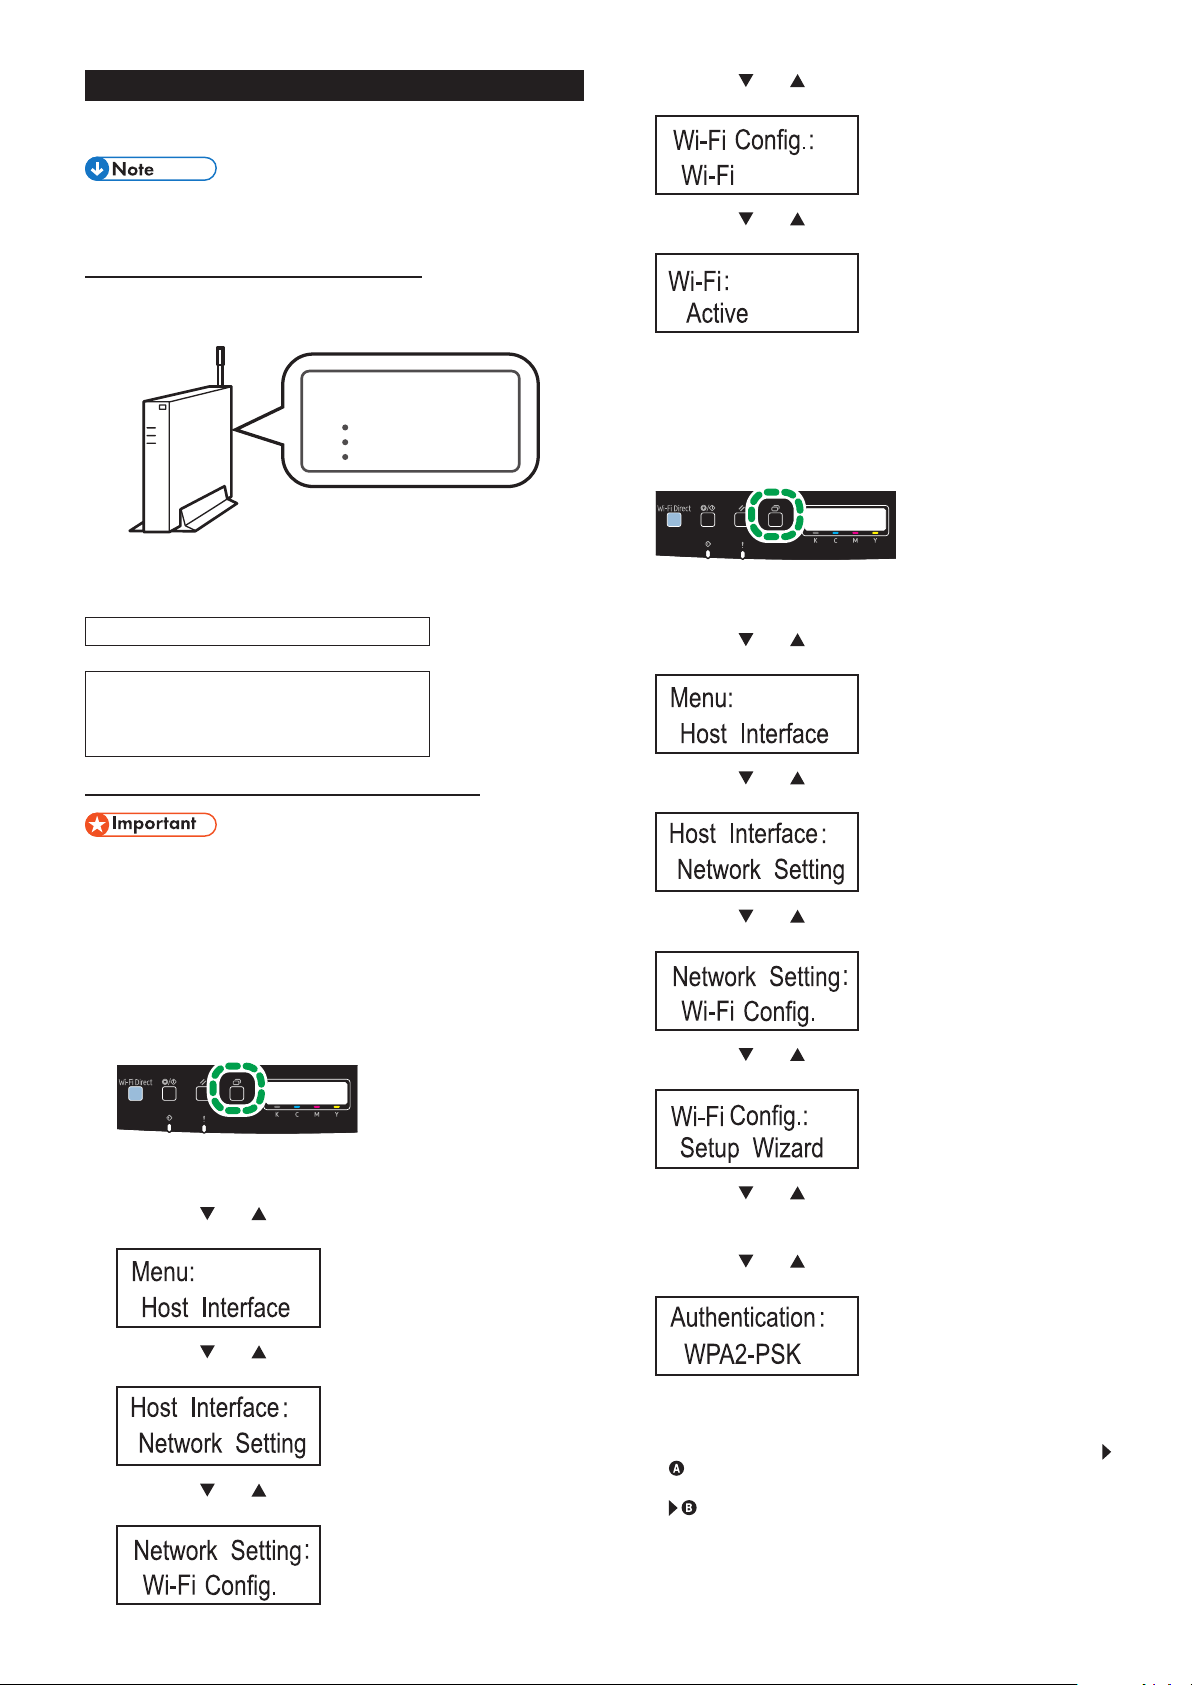
Easy Setup Using the Wi-Fi Setup Wizard
From the control panel of this machine, you can also configure the
wireless LAN settings for the machine.
The following item is necessar y to set up a wireless
connection.
● Router (access point)
Checking the SSID and Encryption key
The SSID and Encryption key for the router (access point) may be
printed on a label affixed to the router (access point). For details about
the SSID and Encryption key, refer to the router (access point) manual.
SSID
:XXXXXXXXXXXXX
Encryption key
Confirm the SSID and Encryption key, and write them down on the
blank space as shown below.
SSID:
Encryption key:
:XXXXXXXXXXXXX
DSG099
6. Press the [ ] or [ ] key to select [Wi-Fi], and then press
the [OK] key.
7. Press the [ ] or [ ] key to select [Active], and then press
the [OK] key.
8. Press the [Menu] key to return to the Initial screen.
9. Turn off the machine, and then turn it back on.
10. Press the [Menu] key.
DUE129
11. Press the [ ] or [ ] key to select [Host Inter face], and then
press the [OK] key.
Configuring Settings Using the Control Panel
● Before doing the following procedure, install the printer
driver according to the procedure on page 5
"Connecting the Machine (USB/Network)".
● Make sure the Ethernet cable is not connected to the
machine.
1. Check that the router (access point) is working correctly.
2. Press the [Menu] key.
DUE129
3. Press the [ ] or [ ] key to select [Host Inter face], and then
press the [OK] key.
4. Press the [ ] or [ ] key to select [Net work Setting], and
then press the [OK] key.
12. Press the [ ] or [ ] key to select [Net work Setting], and
then press the [OK] key.
13. Press the [ ] or [ ] key to select [Wi-Fi Config.], and then
press the [OK] key.
14. Press the [ ] or [ ] key to select [Setup Wizard], and then
press the [OK] key.
15. Press the [ ] or [ ] key to select SSID of the router (access
point) from the searched SSID list, and then press the [OK]
key.
16. Press the [
] or [ ] key to select the authentication
method, and then press the [OK] key.
The next steps differ depending on the authentication method
that you have selected. Proceed to Step 17 of the appropriate
section.
• If the authentication method is set to [WPA2-PSK ] or [Mixed Mode]
5. Press the [ ] or [ ] key to select [Wi-Fi Config.], and then
press the [OK] key.
• If the authentication method is set to [Open System] or [Shared Key]
7
Page 10
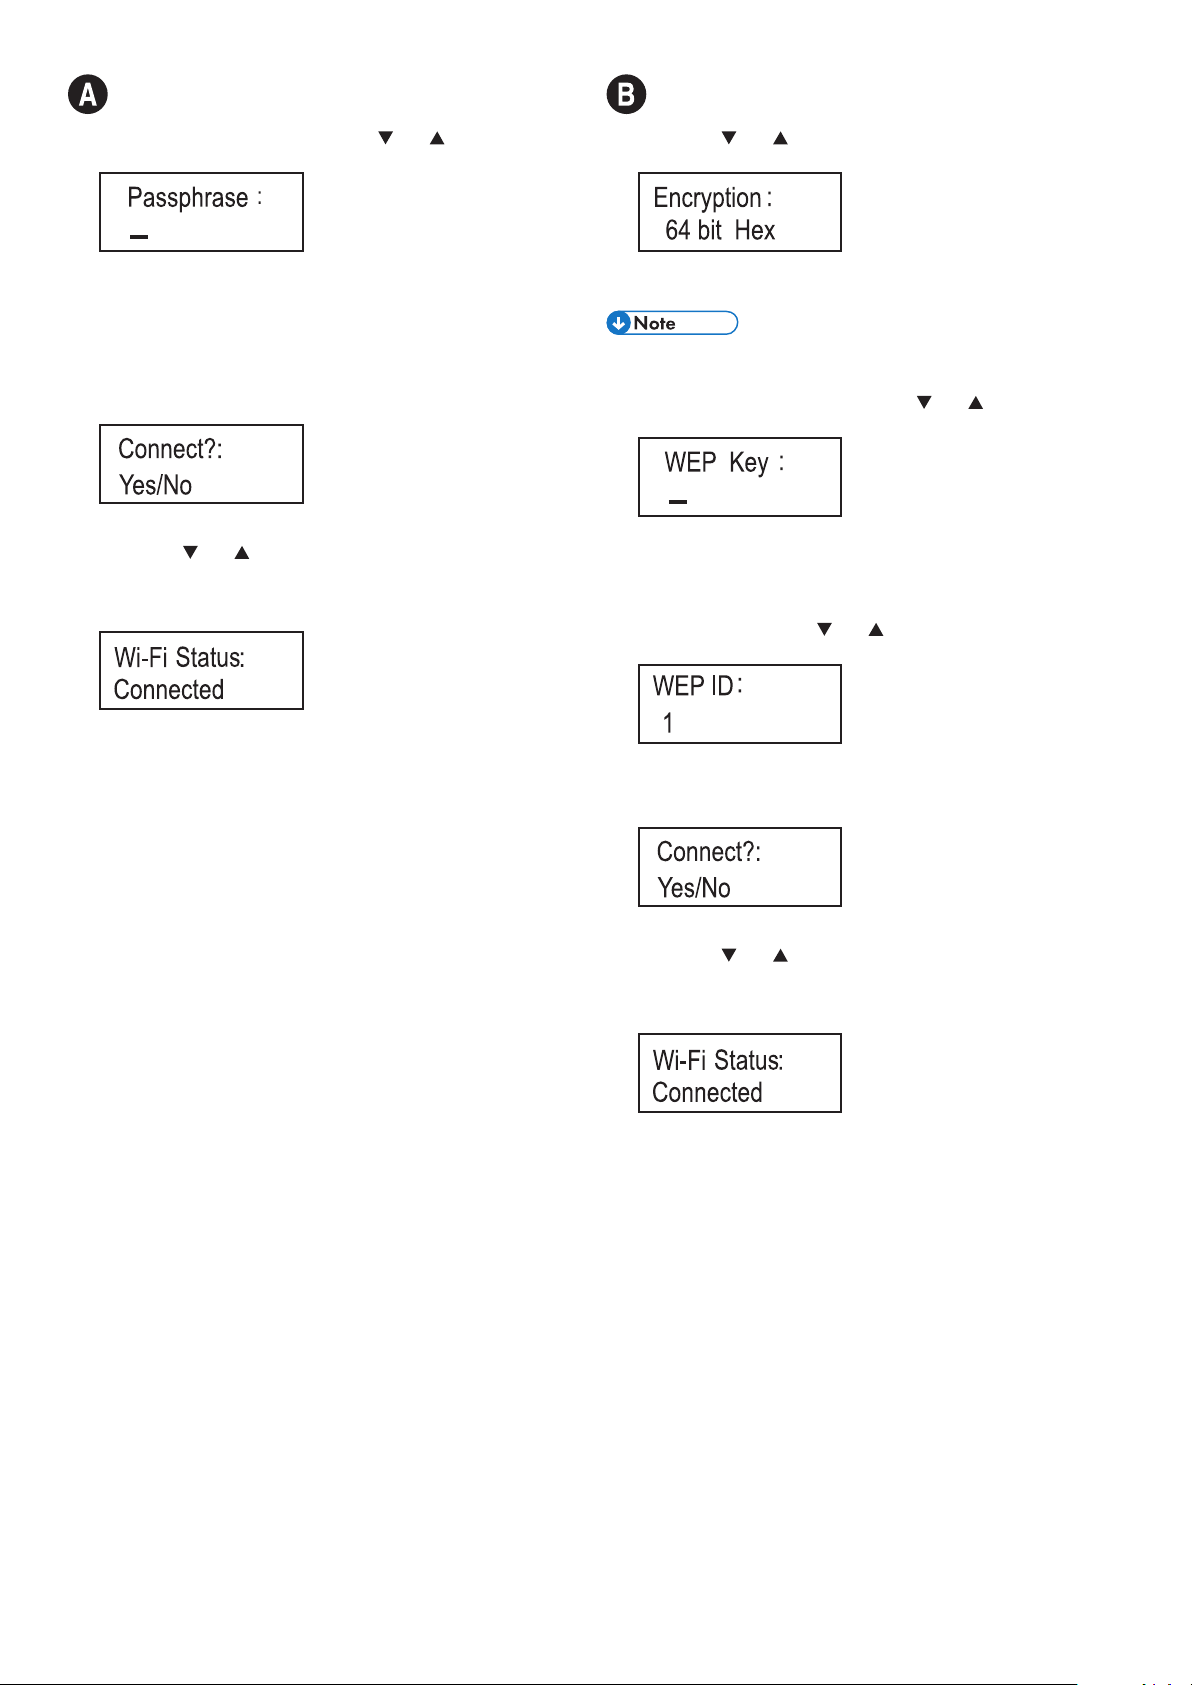
Connecting to devices using the WPA2-PSK or
Mix Mode WPA2/WPA authentication
17. Enter the encryption key using the [ ] or [ ] key, and then
press the [OK] key.
Connecting to the devices using the Open
System or Shared Key authentication
17. Press the [ ] or [ ] key to select the encryption method,
and then press the [OK] key.
As the passphrase, you can enter either 8 to 63 ASCII
characters (0x20-0x7e) or 64 hexadecimal digits (0-9, A-F, a-f).
• To go to the next characters, press the [OK ] key.
• Press the [Esc ape] key to clear all characters.
For details about checking the encryption key, see "Checking the
SSID and Encryption key".
18. Press the [OK] key.
After connecting to the network, the Wi-Fi screen is displayed.
19. Press the [
] or [ ] key to select [Wi-Fi Status], and then
press the [OK] key.
When "Connected" is displayed, the connection has been
established.
• When "Connecting" is displayed, the connection is being est ablished.
• When " Disconne ct ed " is displa yed, th e co nn ec ti on has not be en
established. Start again from the beginning.
The maximum number of characters that can be entered in the
encryption key field depends on the encryption method settings.
Do not select [None] except in special cirmunstances. If
selected, the security system will not work.
18. Enter the encr yption key using the [
] or [ ] key, and then
press the [OK] key.
• To go to the next characters, press the [OK ] key.
• Press the [Back] key to clear all characters.
For details about checking the encryption key, see "Checking the
SSID and Encryption key".
19. Enter the ID using the [
] or [ ] key, and then press the
[OK ] key.
The ID is used for identifying the encryption key. You can
register four encryption keys (ID 1 to 4).
20. Press the [OK] key.
After connecting to the network, the Wi-Fi screen is displayed.
21. Press the [
] or [ ] key to select [Wi-Fi Status], and then
press the [OK] key..
When "Connected" is displayed, the connection has been
established.
• When "Connecting" is displayed, the connection is being est ablished.
• When " Disconne ct ed " is displa yed, th e co nn ec ti on has not be en
established. Start again from the beginning.
8
Page 11
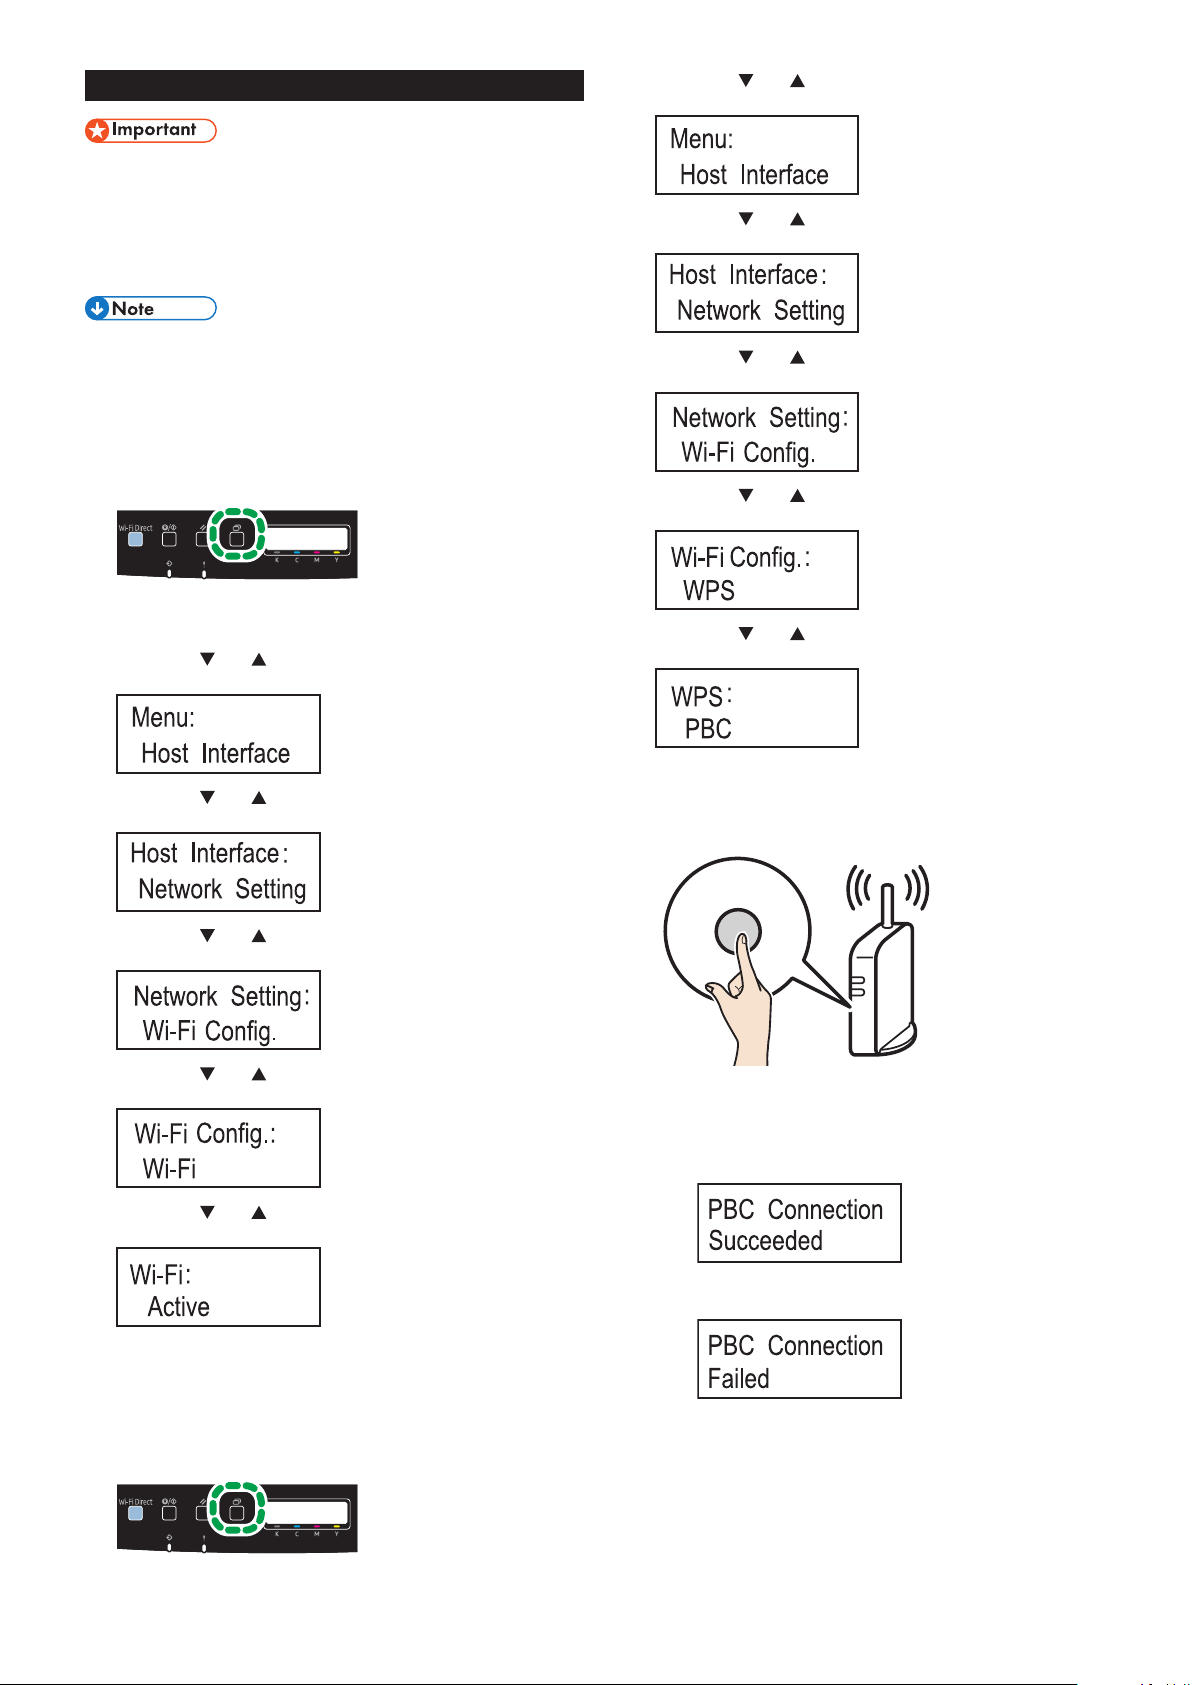
Easy Setup Using the WPS Button
● Before doing the following procedure, install the printer
driver according to the procedure on page 5
"Connecting the Machine (USB/Network)".
● Make sure the Ethernet cable is not connected to the
machine.
● In Steps 15 to 17, congure each setting within two
minutes.
The following item is necessar y to set up a wireless
connection.
● Router (access point)
1. Check that the router (access point) is working correctly.
2. Press the [Menu] key.
11. Press the [ ] or [ ] key to select [Host Inter face], and then
press the [OK] key.
12. Press the [ ] or [ ] key to select [Net work Setting], and
then press the [OK] key.
13. Press the [ ] or [ ] key to select [Wi-Fi Config.], and then
press the [OK] key.
14. Press the [ ] or [ ] key to select [WPS], and then press the
[OK ] key.
DUE129
3. Press the [ ] or [ ] key to select [Host Inter face], and then
press the [OK] key.
4. Press the [ ] or [ ] key to select [Net work Setting], and
then press the [OK] key.
5. Press the [ ] or [ ] key to select [Wi-Fi Config.], and then
press the [OK] key.
6. Press the [ ] or [ ] key to select [Wi-Fi], and then press
the [OK] key.
15. Press the [ ] or [ ] key to select [PBC], and then press the
[OK ] key.
"Connecting..." appears, and the machine starts to connect in
PBC method.
16. Press the WPS button on the router (access point) within
two minutes.
WPS
CHV607
• For details about how to use the WPS button, refer to the manuals for
the router (access point).
17. Check the result.
Connection has succeeded:
7. Press the [ ] or [ ] key to select [Active], and then press
the [OK] key.
8. Press the [Menu] key to return to the Initial screen.
9. Turn off the machine, and then turn it back on.
10. Press the [Menu] key.
DUE129
• Pressthe [Menu] key to return to the initial screen.
Connection has failed:
• Press the [Back] key to return to the screen displayed in Step
15.Check thec onguration forthe router(access point),then
try the connection again.
18. Configuring the Wi- Fi settings is complete.
9
Page 12
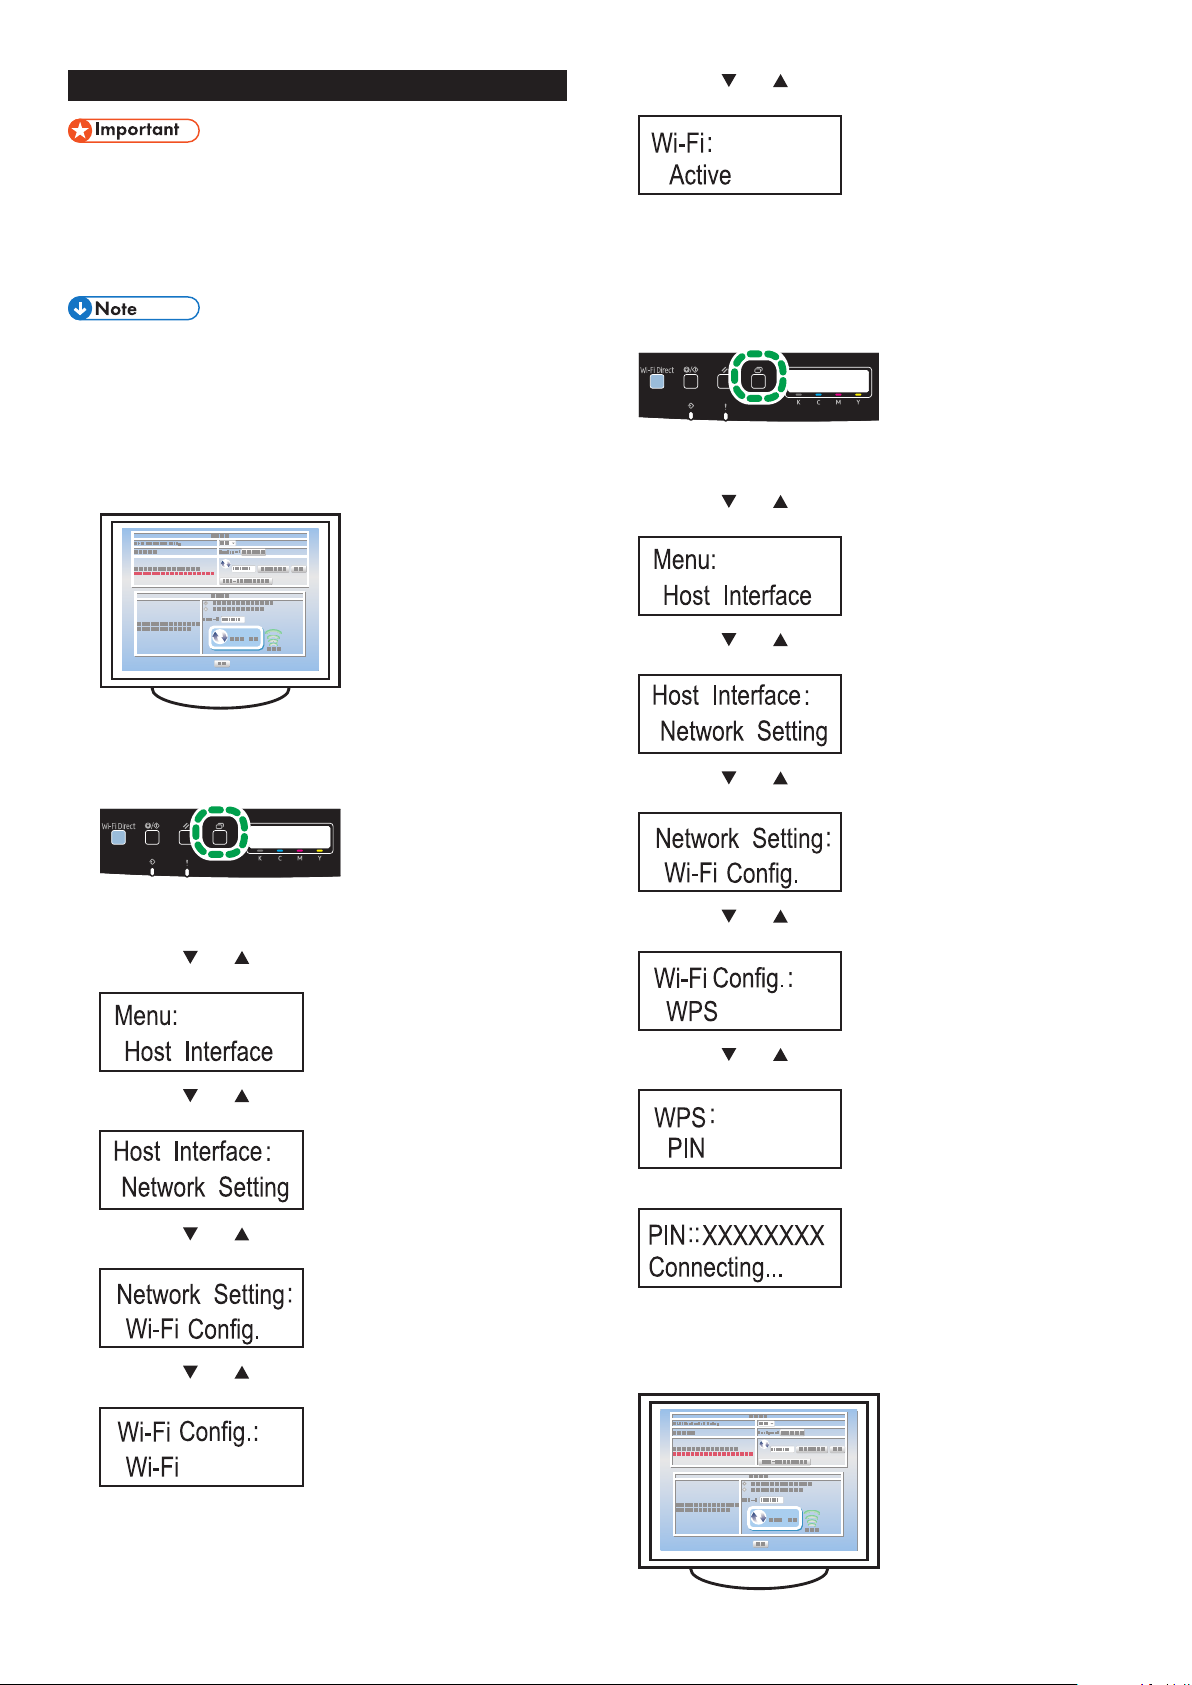
Easy Setup Using a PIN Code
● Before doing the following procedure, install the printer
driver according to the procedure on page 5
"Connecting the Machine (USB/Network)".
● Make sure the Ethernet cable is not connected to the
machine.
● In Steps 17 to 20, congure each setting within two
minutes.
● To establish a connection using the PIN code, use a
computer that is connected to the router (access point).
● The following item is necessar y to set up a wireless
connection.
● Router (access point)
1. Check that the router (access point) is working correctly.
2. Open the PIN code configuration window (web page) for the
router (access point) on your computer.
8. Press the [ ] or [ ] key to select [Active], and then press
the [OK] key.
9. Press the [Menu] key to return to the Initial screen.
10. Turn off the machine, and then turn it back on.
11. Press the [Menu] key.
DUE129
12. Press the [ ] or [ ] key to select [Host Inter face], and then
press the [OK] key.
13. Press the [ ] or [ ] key to select [Net work Setting], and
then press the [OK] key.
3. Press the [Menu] key.
DUE129
4. Press the [ ] or [ ] key to select [Host Inter face], and then
press the [OK] key.
5. Press the [ ] or [ ] key to select [Net work Setting], and
then press the [OK] key.
6. Press the [ ] or [ ] key to select [Wi-Fi Config.], and then
press the [OK] key.
7. Press the [ ] or [ ] key to select [Wi-Fi], and then press
the [OK] key.
14. Press the [ ] or [ ] key to select [Wi-Fi Config.], and then
press the [OK] key.
15. Press the [ ] or [ ] key to select [WPS], and then press the
[OK ] key.
16. Press the [ ] or [ ] key to select [PIN], and then press the
[OK ] key.
17. Check the PIN code.
Write down the PIN code in case you might forget it.
18. Enter the machine’s PIN code (8 digits) on the router
(access point)’s web page.(The web page accessed in Step
2)
10
Page 13
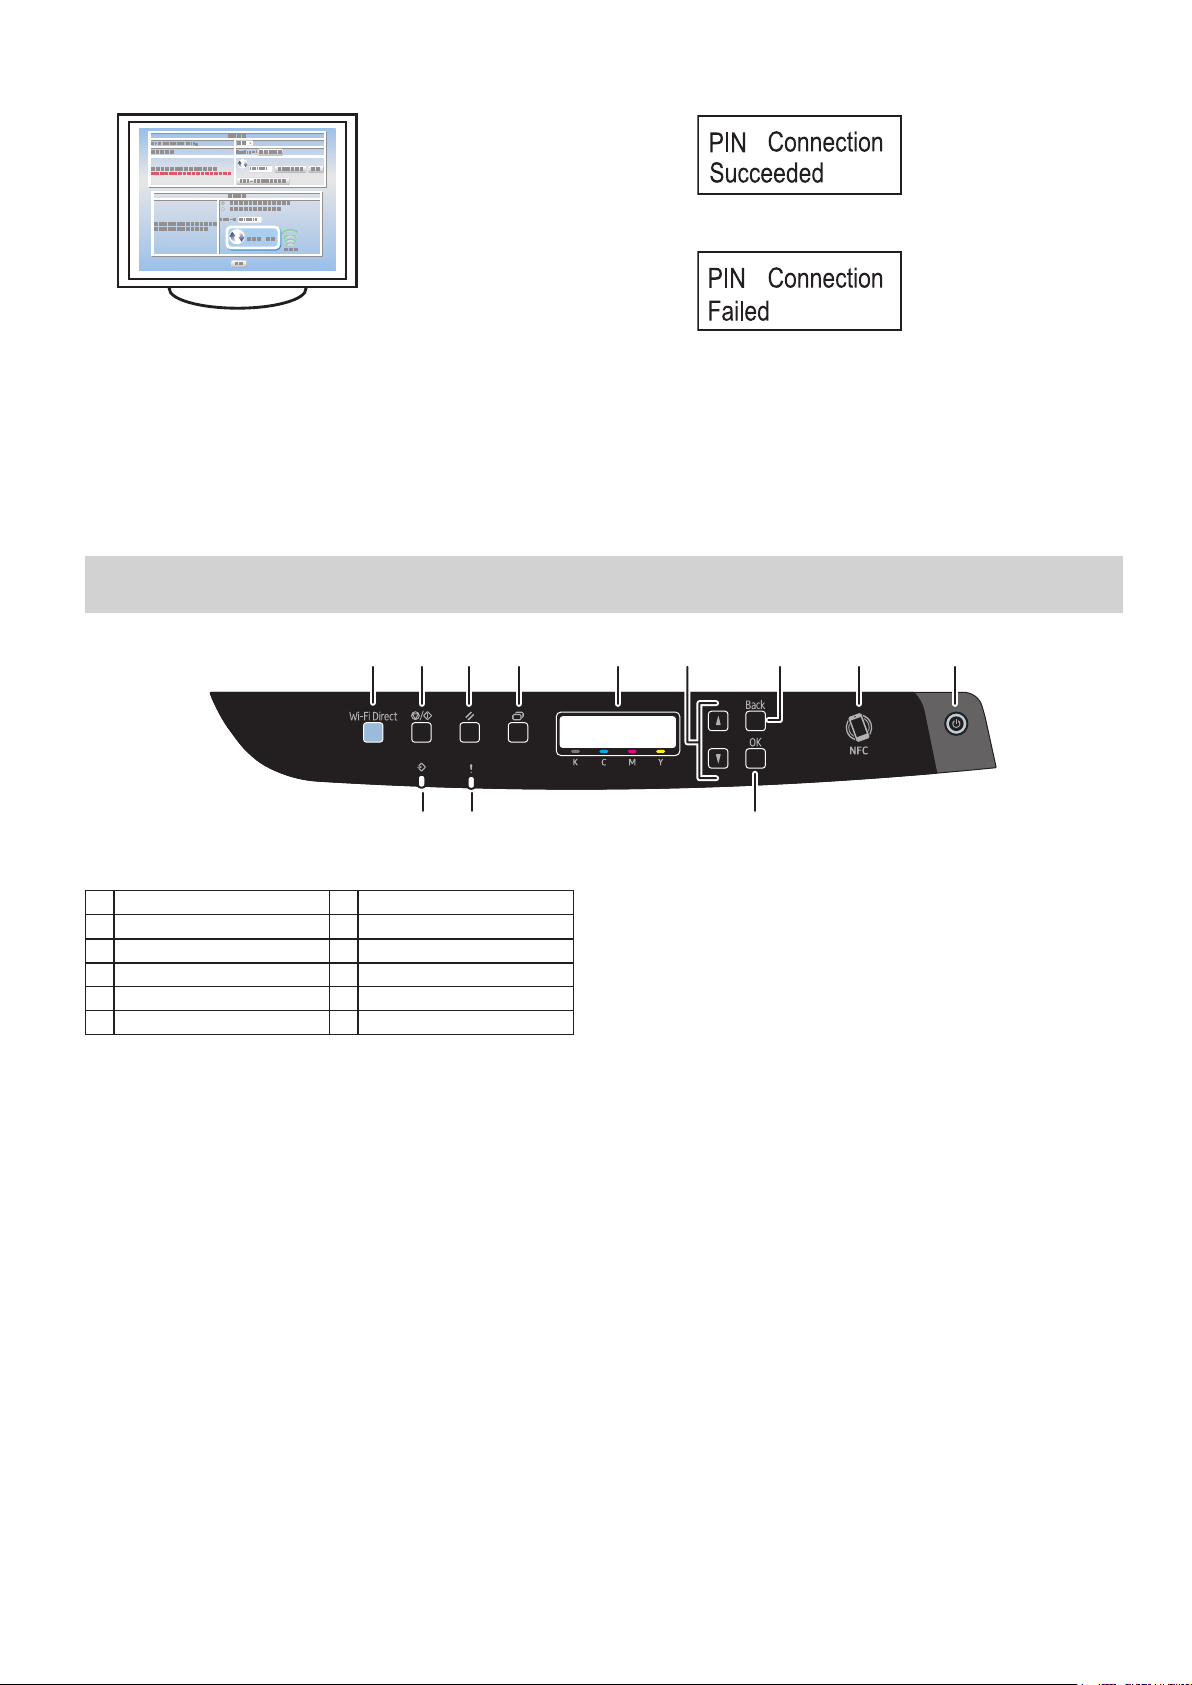
19. Execute WPS (PIN system) from the router (access point)’s
web page.
Control Panel Sheet
1
2 3 4 5 6 78
20. Check the result.
Connection has succeeded:
• Press the [Menu] key to return to the initial screen.
Connection has failed:
• Press the [Back] key to return to the screen displayed in Step
16.Check theconguration forthe router(access point),then
try the connection again.
21. Configuring the Wi- Fi settings is complete.
9
10 11
1 [Wi-Fi Direct] key 7 [Back] key
2 [Stop/Start] key 8 NFC tag
3 [Job Reset] key 9 [Power] key
4 [Menu] key 10 Data In Indicator
5 Display 11 Alert Indicator
6 Scroll Keys 12 [OK] key
12
DUE130
For safe and correct use, please be sure to read the Safety Information before using the machine.
11
Page 14

Trademark
Android is a trademark of Google Inc.
IOS is a trademark or registered trademark of Cisco in the U.S. and other
countries and is used under license.
Wi-Fi, Wi-Fi Direct, Wi-Fi Protected Setup, WPA, Wi-Fi Protected Access,
WPA2, and Wi-Fi Protected Access 2 are registered trademarks of Wi-Fi
Alliance.
Linux is a registered trademark of Linus Torvalds in the United States and
other countries.
Mac OS is a trademarks or registered trademarks of Apple Inc., in the
United States and other countries.
Microsoft®, Windows®, Windows Server® and Windows Vista® are either
registered trademarks or trademarks of Microsoft Corporation in the United
States and/or other countries/regions.
Red Hat and Red Hat Enterprise Linux are trademarks of Red Hat, Inc.,
registered in the United States and other countries.
SUSE is a registered trademark of SUSE Linux AG.
SUSE and openSUSE are registered trademarks of Novell, Inc.
Ubuntu and Canonical are registered trademarks of Canonical Ltd.
Other product names used in this manual are for identification purposes only
and may be trademarks of their respective companies.
We do not have any or all rights to these marks.
All Microsoft product screenshots are reprinted with permission from the
Microsoft Corporation.
© 2017
Page 15

EN
GB
EN
US
EN
M0AS-8603AAU
 Loading...