

Ricoh SP 221S, SP 221SNw, SP 220SNw, SP 221SFNw, SP 221SF User Manual
...
For safe and correct use, be sure to read Safety Information before
using the machine.
User Guide

TABLE OF CONTENTS
How to Find Information about Operations and Troubleshooting...............................................................10
Operating Manual (Printed)....................................................................................................................... 10
Operating Manual (Digital Format)........................................................................................................... 10
Help.............................................................................................................................................................. 11
How to Read This Manual...............................................................................................................................12
Introduction...................................................................................................................................................12
Symbols Used in This Manual.....................................................................................................................12
Model-Specific Information........................................................................................................................ 12
Disclaimer.....................................................................................................................................................13
Notes............................................................................................................................................................ 14
Note to Administrator.................................................................................................................................. 14
About IP Address......................................................................................................................................... 15
Differences in Performance/Functions between Different Models.......................................................... 15
Differences in Performance/Functions between Different Models.......................................................... 16
1. Guide to the Machine
Guide to Components......................................................................................................................................17
Exterior..........................................................................................................................................................17
Exterior..........................................................................................................................................................21
Interior...........................................................................................................................................................22
Control Panel (When Using SP 221S, SP 220SNw, or SP221SNw)....................................................22
Control Panel (When Using SP 221SF, SP 220SFNw, or SP221SFNw).............................................. 24
Control Panel................................................................................................................................................26
Changing Operation Modes.......................................................................................................................... 29
Multi-access......................................................................................................................................................30
Assigning a Setting to the Short Cut Key........................................................................................................33
Assigning a Setting Using the Control Panel..............................................................................................33
Assigning a Setting Using Web Image Monitor........................................................................................33
Accessing the Function Assigned to the Short Cut Key.............................................................................34
Entering Characters..........................................................................................................................................35
About Operation Tools....................................................................................................................................37
2. Paper Specifications and Adding Paper
Workflow for Loading Paper and Configuring Paper Sizes and Types...................................................... 39
Loading Paper.................................................................................................................................................. 41
1

Loading Paper into Tray 1...........................................................................................................................41
Loading Paper into the Bypass Tray...........................................................................................................46
Specifying Paper Type and Paper Size Using the Control Panel.................................................................49
Specifying the Paper Type.......................................................................................................................... 49
Specifying the Standard Paper Size...........................................................................................................50
Specifying a Custom Paper Size................................................................................................................ 50
Specifying Paper Type and Paper Size Using Smart Organizing Monitor.................................................52
Specifying a Custom Paper Size................................................................................................................ 52
Specifying Paper Type and Paper Size Using Web Image Monitor...........................................................53
Specifying a Custom Paper Size................................................................................................................ 53
Specifying Paper Type and Paper Size Using the Printer Driver..................................................................54
Supported Paper.............................................................................................................................................. 55
Specifications of Paper Types.....................................................................................................................56
Non-Recommended Paper Types.............................................................................................................. 58
Paper Storage.............................................................................................................................................. 59
Print Area......................................................................................................................................................59
Placing Originals..............................................................................................................................................62
Placing Originals on the Exposure Glass...................................................................................................62
Placing Originals in the Auto Document Feeder....................................................................................... 62
About Originals............................................................................................................................................63
3. Printing Documents
What You Can Do with the Printer Function...................................................................................................67
Configuring Option Settings and Paper Settings for the Printer....................................................................68
When Using Windows................................................................................................................................ 68
When Using Mac OS X...............................................................................................................................69
Displaying the Printing Preferences Dialog Box.............................................................................................70
Displaying the Printing Preferences Dialog Box from the [Start] Menu...................................................70
Displaying the Printing Preferences Dialog Box in an Application.......................................................... 70
Basic Operation of Printing............................................................................................................................. 72
If a Paper Mismatch Occurs....................................................................................................................... 72
Canceling a Print Job...................................................................................................................................73
4. Copying Originals
What You Can Do with the Copier Function..................................................................................................75
2

Copier Mode Screen.......................................................................................................................................76
Basic Operation of Copying........................................................................................................................... 77
Canceling a Copy....................................................................................................................................... 78
Making Enlarged or Reduced Copies............................................................................................................80
Specifying Reduce/Enlarge....................................................................................................................... 80
Making Combined/2-sided Copies.............................................................................................................. 82
Specifying Combined and 2-sided Copies............................................................................................... 86
Copying an ID Card........................................................................................................................................ 87
Specifying the Scan Settings for Copying......................................................................................................89
Adjusting Image Density..............................................................................................................................89
Selecting the Document Type According to Original............................................................................... 89
5. Scanning Originals
What You Can Do with the Scanner Function............................................................................................... 91
Send Scanned Documents to a Folder on a Client Computer................................................................. 91
Send Scanned Documents by E-mail......................................................................................................... 91
Scanning Documents from a Client Computer.......................................................................................... 91
Scanner Mode Screen.....................................................................................................................................92
Registering Scan Destinations......................................................................................................................... 93
Modifying Scan Destinations......................................................................................................................98
Deleting Scan Destinations..........................................................................................................................99
Testing Transmission.....................................................................................................................................99
Basic Operation of Scan to Folder...............................................................................................................101
Step 1: Printing the Check Sheet.............................................................................................................. 101
Step 2: Confirming the User Name and Computer Name.................................................................... 102
Step 3: Creating a Shared Folder on a Computer................................................................................. 104
Step 4: Specifying Access Privileges for the Created Shared Folder................................................... 105
Step 5: Registering a Shared Folder in the Machine's Address Book.................................................. 106
Step 6: Send Scanned Files to a Shared Folder.....................................................................................107
Basic Operation of Scan to E-mail...............................................................................................................109
Step 1: Configuring SMTP and DNS Settings.........................................................................................109
Step 2: Registering Destination E-mail Addresses in the Address Book................................................109
Step 3: Sending Scanned Files by E-mail................................................................................................110
Basic Operation of Scan to FTP....................................................................................................................113
3

Step 1: Configuring SMTP and DNS Settings.........................................................................................113
Step 2: Sending Scanned Files to an FTP Server.................................................................................... 113
Specifying the Scan Destination Using the One Touch Buttons or [Pause/Redial] Key (only SP 221SF, SP
220SFNw, and SP 221SFNw)....................................................................................................................116
Basic Procedure for Saving Scan Files on a USB Flash Memory Device..................................................118
Basic Operation for TWAIN Scanning........................................................................................................120
Using TWAIN scanner..............................................................................................................................120
TWAIN scanning.......................................................................................................................................120
Settings you can configure in the TWAIN dialog box........................................................................... 121
Basic Operation for WIA Scanning............................................................................................................. 123
Using SANE scanning................................................................................................................................... 124
Specifying the Scan Settings for Scanning.................................................................................................. 125
Specifying the Scanning Size According to the Size of the Original....................................................125
Adjusting Image Density........................................................................................................................... 125
Specifying Resolution................................................................................................................................126
6. Sending and Receiving a Fax
What You Can Do with the Fax Function.....................................................................................................127
Fax Settings Workflow.................................................................................................................................. 128
Types of Transmission and Reception Modes............................................................................................. 129
Transmission Mode Selection...................................................................................................................129
Reception Mode Selection....................................................................................................................... 129
Fax Mode Screen..........................................................................................................................................131
Setting the Date and Time............................................................................................................................. 132
Registering Fax Destinations......................................................................................................................... 133
Registering Fax Destinations Using the Control Panel............................................................................133
Registering Fax Destinations Using Web Image Monitor...................................................................... 135
Sending a Fax................................................................................................................................................138
Selecting Transmission Mode...................................................................................................................138
Basic Operation for Sending a Fax......................................................................................................... 139
Specifying the Fax Destination................................................................................................................. 141
Useful Sending Functions..........................................................................................................................145
Specifying the Scan Settings for Faxing.................................................................................................. 148
Using the Fax Function from a Computer (LAN-Fax)..................................................................................151
4

Basic Operation for Sending Faxes from a Computer...........................................................................151
Configuring Transmission Settings............................................................................................................153
Configuring the LAN-Fax Address Book................................................................................................. 153
Editing a Fax Cover Sheet........................................................................................................................ 156
Receiving a Fax..............................................................................................................................................157
Selecting Reception Mode....................................................................................................................... 157
Forwarding or Storing Faxes in Memory................................................................................................ 160
Lists/Reports Related to Fax......................................................................................................................... 164
7. Configuring the Machine Using the Control Panel
Basic Operation.............................................................................................................................................165
Menu Chart.................................................................................................................................................... 167
Copier Features Settings............................................................................................................................... 168
Scanner Features Settings............................................................................................................................. 172
Fax Transmission Features Settings...............................................................................................................174
Fax Features Settings.....................................................................................................................................176
Address Book Settings...................................................................................................................................181
System Settings...............................................................................................................................................182
Tray Paper Settings........................................................................................................................................187
Administrator Settings....................................................................................................................................189
Printing Lists/Reports..................................................................................................................................... 195
Printing the Configuration Page................................................................................................................195
Types of Lists/Reports............................................................................................................................... 195
Network Settings............................................................................................................................................197
8. Configuring the Machine Using Utilities
Available Setting Functions Using Web Image Monitor and Smart Organizing Monitor...................... 201
Using Web Image Monitor...........................................................................................................................202
Displaying Top Page..................................................................................................................................... 203
Changing the Interface Language........................................................................................................... 204
Checking the System Information................................................................................................................. 205
Status Tab...................................................................................................................................................205
Counter Tab............................................................................................................................................... 206
Machine Information Tab......................................................................................................................... 207
Configuring the System Settings................................................................................................................... 208
5

Sound Volume Adjustment Tab (only SP 221SF, SP 220SFNw, and SP 221SFNw).........................208
Tray Paper Settings Tab............................................................................................................................208
Copier Tab.................................................................................................................................................209
Fax Tab (only SP 221SF, SP 220SFNw, and SP 221SFNw)...............................................................210
Toner Management Tab...........................................................................................................................211
Interface Tab..............................................................................................................................................211
Shortcut to Function Tab............................................................................................................................211
Registering Destinations................................................................................................................................ 213
Configuring the Network Settings................................................................................................................ 214
Network Status Tab...................................................................................................................................214
IPv6 Configuration Tab.............................................................................................................................215
Network Application Tab......................................................................................................................... 216
DNS Tab.................................................................................................................................................... 217
Auto E-mail Notification Tab.................................................................................................................... 218
SNMP Tab................................................................................................................................................. 218
SMTP Tab...................................................................................................................................................219
POP3 Tab...................................................................................................................................................220
Wireless Tab (only SP 220SNw, SP 221SNw, SP 220SFNw, and SP 221SFNw).......................... 221
Google Cloud Tab....................................................................................................................................222
Configuring the IPsec Settings.......................................................................................................................223
IPsec Global Settings Tab.........................................................................................................................223
IPsec Policy List Tab...................................................................................................................................223
Printing Lists/Reports..................................................................................................................................... 227
Configuring the Administrator Settings.........................................................................................................228
Administrator Tab...................................................................................................................................... 228
Rest Settings Tab........................................................................................................................................228
Backup Setting Tab................................................................................................................................... 229
Restore Setting Tab....................................................................................................................................230
Set Date/Time Tab....................................................................................................................................231
Energy Saver Mode Tab.......................................................................................................................... 232
Using Web Image Monitor...........................................................................................................................233
Displaying Top Page.................................................................................................................................233
Changing the Interface Language........................................................................................................... 234
6

Installing the Help Source File..................................................................................................................235
Displaying Help.........................................................................................................................................235
Menu.......................................................................................................................................................... 235
Home..........................................................................................................................................................236
System Settings.......................................................................................................................................... 236
Network Settings....................................................................................................................................... 237
IPsec Settings............................................................................................................................................. 240
Print List/Report......................................................................................................................................... 243
Administrator Tools....................................................................................................................................243
Using Smart Organizing Monitor.................................................................................................................246
Displaying Smart Organizing Monitor Dialog....................................................................................... 246
Checking the Status Information...............................................................................................................246
Checking the Status Information...............................................................................................................248
Configuring the Machine Settings............................................................................................................249
Configuring the IPv6 Settings................................................................................................................... 250
9. Maintaining the Machine
Replacing the Print Cartridge........................................................................................................................253
Cautions When Cleaning..............................................................................................................................255
Cleaning the Inside of the Machine............................................................................................................. 256
Cleaning the Exposure Glass........................................................................................................................257
Cleaning the Auto Document Feeder (When Using SP 221SF, SP 220SNw, SP 221SNw, SP
220SFNw, and SP 221SFNw)....................................................................................................................258
Moving and Transporting the Machine....................................................................................................... 259
Disposal......................................................................................................................................................260
Where to Inquire....................................................................................................................................... 260
10. Troubleshooting
Error and Status Messages on the Screen...................................................................................................261
Error and Status Indicate on the Control Panel........................................................................................... 269
Error and Status Messages Appear on Smart Organizing Monitor..........................................................271
Clearing Misfeeds......................................................................................................................................... 273
Removing Jammed Paper from Tray 1.....................................................................................................273
Removing Jammed Paper from the Bypass Tray.....................................................................................275
Opening the Rear Cover to Remove Jammed Paper............................................................................. 276
7

Removing Scanning Jams......................................................................................................................... 277
When You Cannot Print Test Page............................................................................................................... 279
Paper Feed Problems.....................................................................................................................................280
Print Quality Problems................................................................................................................................... 282
Checking the Condition of the Machine..................................................................................................282
Checking the Printer Driver Settings.........................................................................................................283
Printer Problems............................................................................................................................................. 284
When You Cannot Print Properly.............................................................................................................284
When You Cannot Print Clearly...............................................................................................................285
When Paper is Not Fed or Ejected Properly...........................................................................................287
Copier Problems............................................................................................................................................ 288
When You Cannot Make Clear Copies..................................................................................................288
When You Cannot Make Copies as Wanted.........................................................................................289
Scanner Problems..........................................................................................................................................290
When You Cannot Browse the Network to Send a Scan File............................................................... 290
When Scanning Is Not Done As Expected............................................................................................. 290
Fax Problems..................................................................................................................................................291
When You Cannot Send or Receive Fax Messages As Wanted.......................................................... 291
When an error code appears on the fax journal or transmission status report....................................292
Common Problems.........................................................................................................................................295
11. Appendix
Functions and Network Settings Available in an IPv6 Environment.......................................................... 297
Available Functions................................................................................................................................... 297
Transmission Using IPsec...............................................................................................................................299
Encryption and Authentication by IPsec.................................................................................................. 299
Security Association.................................................................................................................................. 300
Encryption Key Exchange Settings Configuration Flow......................................................................... 301
Specifying Encryption Key Exchange Settings........................................................................................301
Specifying IPsec Settings on the Computer............................................................................................. 302
Enabling and Disabling IPsec Using the Control Panel..........................................................................304
Notes About the Toner.................................................................................................................................. 305
Specifications of the Machine...................................................................................................................... 306
General Function Specifications.............................................................................................................. 306
8

Printer Function Specifications..................................................................................................................308
Copier Function Specifications.................................................................................................................308
Scanner Function Specifications...............................................................................................................309
Fax Function Specifications...................................................................................................................... 310
Consumables..................................................................................................................................................312
Print Cartridge............................................................................................................................................312
Information for This Machine........................................................................................................................313
User Information on Electrical & Electronic Equipment (mainly Europe and Asia)..........313
Note for the Battery and/or Accumulator Symbol (For EU countries only) (mainly Europe)
.................................................................................................................................................................... 314
Environmental Advice for Users (mainly Europe)............................................................... 314
Notice To Wireless LAN Interface Users (mainly Europe).................................................315
Notes to users in the state of California (Notes to Users in USA) (mainly North America)....
.................................................................................................................................................................... 316
Notes to users in the United States of America (mainly North America)......................... 316
Notes to Canadian Users of Wireless Devices (mainly North America)......................... 317
Caution.......................................................................................................................................................317
ENERGY STAR Program........................................................................................................................... 318
Saving Energy............................................................................................................................................319
Copyright Information about Installed Applications...................................................................................321
expat...........................................................................................................................................................321
JPEG LIBRARY............................................................................................................................................321
OpenLDAP 2.1.......................................................................................................................................... 321
OpenSSL 0.9.8g....................................................................................................................................... 322
Trademarks.....................................................................................................................................................325
INDEX...........................................................................................................................................................327
9

How to Find Information about Operations
and Troubleshooting
You can find support information about operating the machine and troubleshooting in the Operating
Manual (printed), Operating Manual (digital format), and Help (online).
Operating Manual (Printed)
The following manuals are provided with this machine.
Safety Information
This manual explains the safety precautions that should be followed when using the machine. Be
sure to read this manual before using the machine.
Setup Guide
This manual explains how to setup this machine.
It explains the instructions of taking out the machine from the packing box and connecting it to a
computer.
MF
Initial Guide for FAX (only SP 221SF, SP 220SFNw, and SP221SFNw)
MF
This manual explains how to set up the machine. It also explains how to remove the machine
from the packaging and how to connect it to a computer.
Operating Manual (Digital Format)
Operating manuals can be viewed from Ricoh's website or from the provided CD-ROM.
Viewing from a web browser
Access the Internet from a web browser.
Confirm that the computer or the machine is connected to the network.
Download the operating manuals from http://www.ricoh.com/.
Viewing from the provided CD-ROM
Operating manuals can also be viewed from the provided CD-ROM.
• When using Windows
1. Insert the CD-ROM into the CD-ROM drive.
2. Click [Read Manual] and follow the instructions on the screen.
The PDF file manual opens.
• When using Mac OS X
10
opal-p3_mf3_com_user_guide_gb_00228413_eng.xml

1. Insert the CD-ROM into the CD-ROM drive.
2. Double-click [Manuals.htm] file, located on the CD-ROM root directory.
3. Select the language.
4. Click [Read PDF manuals].
5. Click the manual you want to refer to.
The PDF file manual opens.
Help
Use the following procedure to open the Help files learn about the printer driver, Web Image Monitor,
and Smart Organizing Monitor functions.
MF
For details about using Web Image Monitor, see page 201 "Configuring the Machine Using
Utilities".
P
For details about using Web Image Monitor, see page 233 "Using Web Image Monitor".
Printer driver
1. Click [Help] on the printing preferences dialog box.
For the procedure on how to open the printing preferences dialog box, see page 70
"Displaying the Printing Preferences Dialog Box".
P
Web Image Monitor
1.
P
Click on the top right of the screen.
P
To display Help, install the help source file beforehand. For details about installing the
file, see page page 233 "Using Web Image Monitor".
Smart Organizing Monitor
1. Click [Help] on the [Printer Configuration] screen.
opal-p3_mf3_com_user_guide_gb_00228413_eng.xml 11
How to Read This Manual
Introduction
This manual contains detailed instructions and notes on the operation and use of this machine. For your
safety and benefit, read this manual carefully before using the machine. Keep this manual in a handy
place for quick reference.
Symbols Used in This Manual
This manual uses the following symbols:
Indicates points to pay attention to when using the machine, and explanations of likely causes of paper
misfeeds, damage to originals, or loss of data. Be sure to read these explanations.
Indicates supplementary explanations of the machine’s functions, and instructions on resolving user
errors.
[ ]
Indicates the names of keys on the machine's display or control panels.
Model-Specific Information
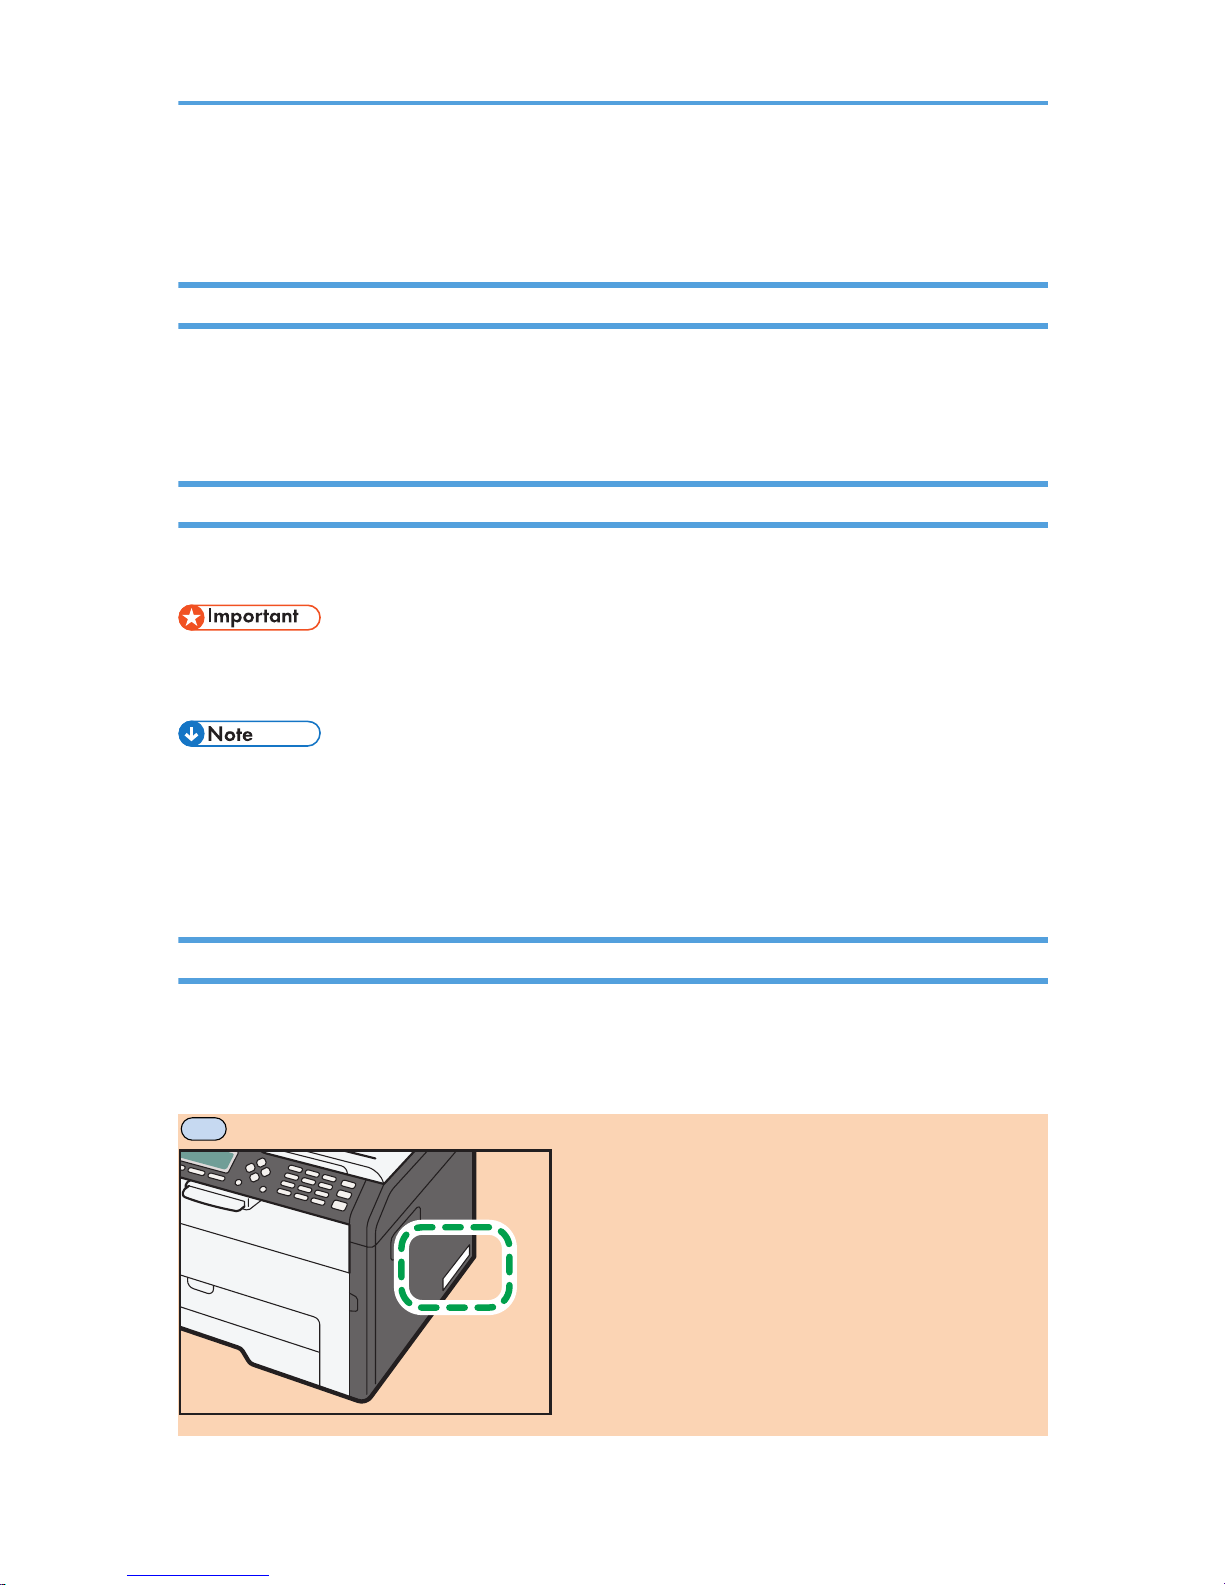
This section explains how you can identify the region your machine belongs to.
There is a label on the rear of the machine, located in the position shown below. The label contains
details that identify the region your machine belongs to. Read the label.
MF
DCT065
12 opal-p3_mf3_com_user_guide_gb_00228414_eng.xml
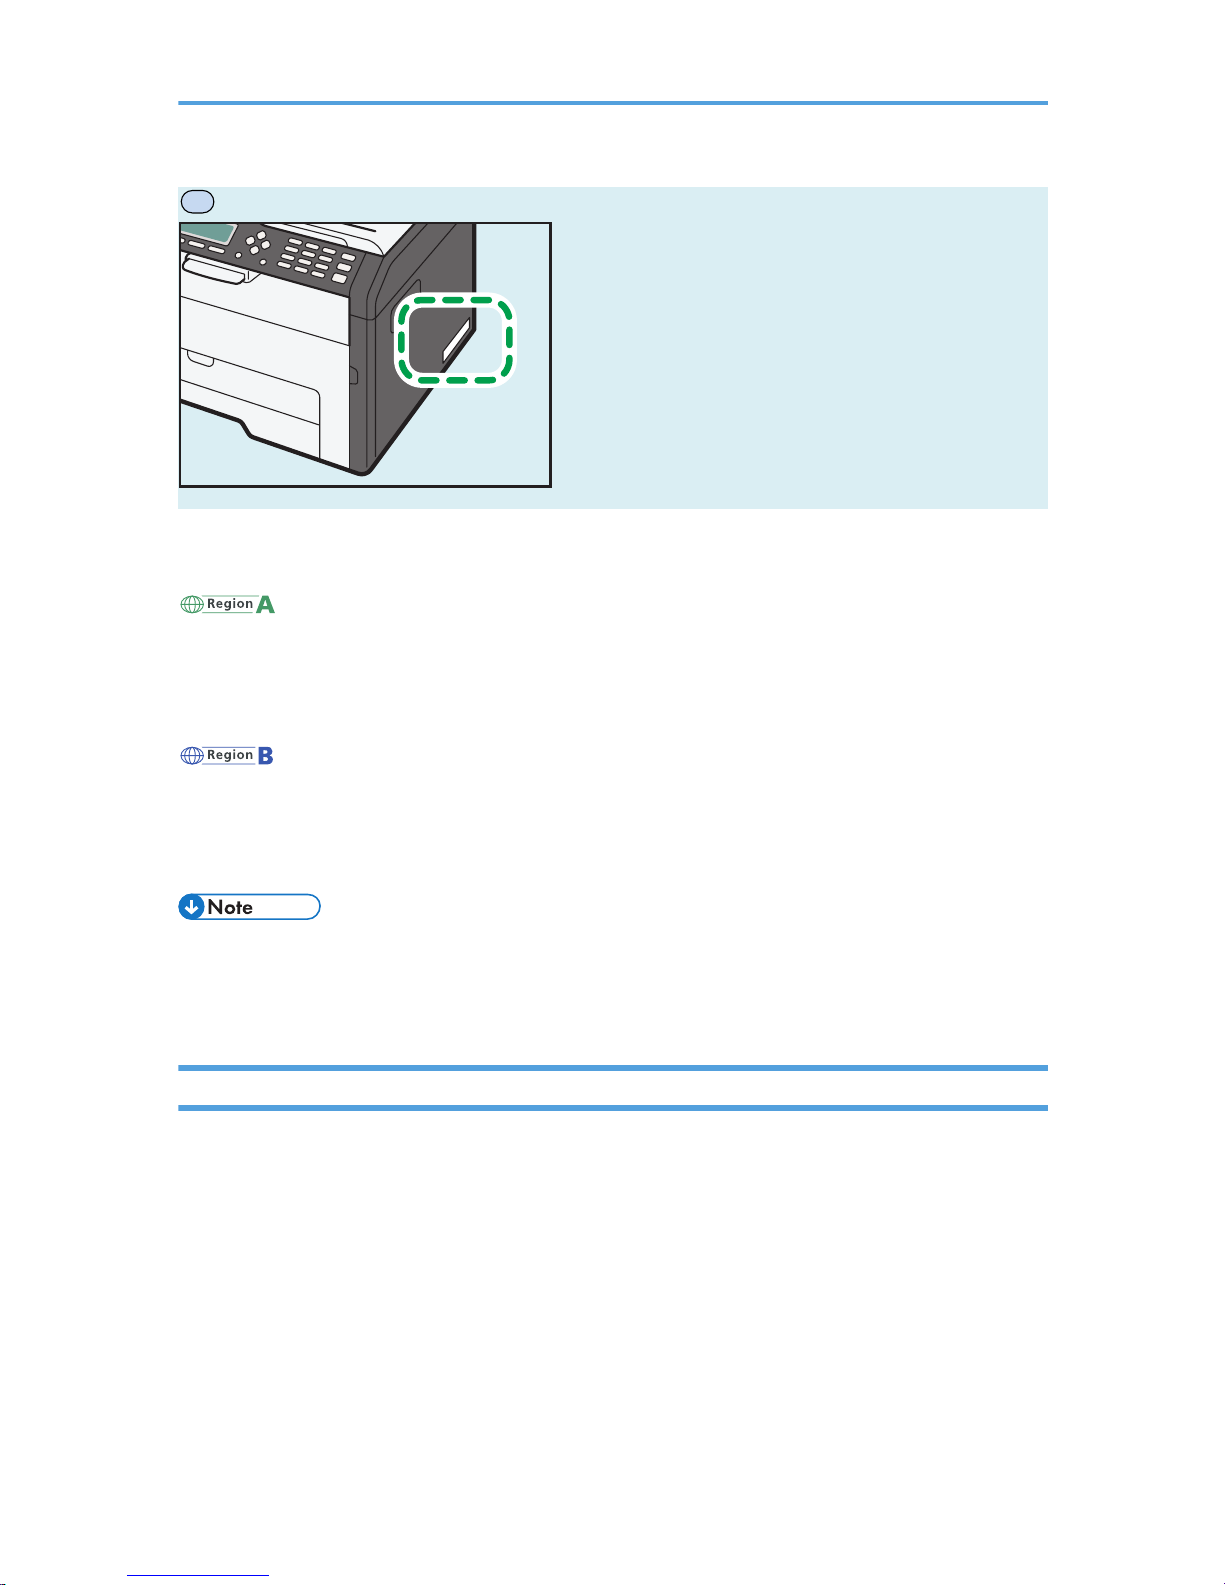
P
DCT065
The following information is region-specific. Read the information under the symbol that corresponds to
the region of your machine.
(mainly Europe and Asia)
If the label contains the following, your machine is a region A model:
• CODE XXXX -27
• 220–240 V
(mainly North America)
If the label contains the following, your machine is a region B model:
• CODE XXXX -17
• 120–127 V
• Dimensions in this manual are given in two units of measure: metric and inch. If your machine is a
Region A model, refer to the metric units. If your machine is a Region B model, refer to the inch
units.
Disclaimer
To the maximum extent permitted by applicable laws, in no event will the manufacturer be liable for any
damages whatsoever arising out of failures of this machine, losses of the registered data, or the use or
non-use of this product and operation manuals provided with it.
Make sure that you always copy or have backups of the data registered in this machine. Documents or
data might be erased due to your operational errors or malfunctions of the machine.
In no event will the manufacturer be responsible for any documents created by you using this machine or
any results from the data executed by you.
For good output quality, the manufacturer recommends that you use genuine toner from the
manufacturer.
opal-p3_mf3_com_user_guide_gb_00228414_eng.xml
13

Notes
Contents of this manual are subject to change without prior notice.
The manufacturer shall not be responsible for any damage or expense that might result from the use of
parts other than genuine parts from the manufacturer with your office products.
Some illustrations in this manual might be slightly different from the machine.
Note to Administrator
MF
Password
Certain configurations of this machine can be password-protected to prevent unauthorized modifications
by others. We strongly recommend you to create your own password immediately.
The following are the operations that can be password-protected:
• Entering the [Address Book], [Network Settings], or [Admin. Tools] menu using the control panel
You can access these menus without a password by factory default.
The setting for creating a password can be found in [Admin. Tools].
• Configuring the machine using Web Image Monitor
You can configure the machine using Web Image Monitor without a password by factory default.
The setting for creating a password can be found in [Administrator Settings].
For details about creating passwords, see page 189 "Administrator Settings" or page 165
"Configuring the Machine Using the Control Panel".
P
Password
When you log in to this printer, you will be prompted to enter the password. We strongly recommend
you to change the factory default password immediately to prevent information leakage and
unauthorized operations by others.
You will be prompted to enter your password when you attempt to change printer settings configured
using Web Image Monitor.
To use the factory default password, leave the password blank when using Web Image Monitor.
To Change password for Web Image Monitor, you need to log on as an Administrator, and then make
the necessary settings.
For details about setting a password, see page 233 "Using Web Image Monitor".
14 opal-p3_mf3_com_user_guide_gb_00228414_eng.xml

About IP Address
In this manual, "IP address" covers both IPv4 and IPv6 environments. Read the instructions that are
relevant to the environment you are using.
MF
Differences in Performance/Functions between Different Models
The differences in main performance/functions between different models are as follows:
SP 221S
SP 220SNw
SP 221SNw
SP 221SF
SP 220SFNw
SP 221SFNw
Fax Not available Not available Available
(Standard)
Available
(Standard)
ADF Not available Available
(Standard)
Available
(Standard)
Available
(Standard)
PCL driver Not available Available Not available Available
Ethernet Port
(Network)
Not available Available Not available Available
Wireless LAN Not available Available Not available Available
Scan to
Email/FTP/Folder
Not available Available Not available Available
Toner
Management
(Toner Level
Indication)
Not available Not available Available
*1
Available
*1
Paperless FAX
*2
Not available Not available Not available Available
SP 221S SP 221SF
Fax Not available Available
(Standard)
ADF Not available Available
(Standard)
opal-p3_mf3_com_user_guide_gb_00228414_eng.xml 15

SP 221S SP 221SF
Ethernet Port
(Network)
Not available Not available
Wireless LAN Not available Not available
Scan to
Email/FTP/Folder
Not available Not available
Toner
Management
(Toner Level
Indication)
Not available
Available
Available
*1
Paperless FAX
*2
Not available Not available
*1
Depending on the [Toner End Option] setting, the toner management (toner level indication) function may not
be available. For [Toner End Option], see page 182 "System Settings".
*2
"Paperless FAX" refers to the function that allows you to store faxes in memory and print only the ones you
want, thus saving paper. "Paperless FAX" refers to [Reception File Processing] and [Notify Forward Status]
that can be specified using the machine's control panel and [Fax Received File Processing] that can be
specified using Web Image Monitor. For details, see page 176 "Fax Features Settings" and page 208
"Configuring the System Settings".
P
Differences in Performance/Functions between Different Models
The differences in main performance/functions between different models are as follows:
SP 221
SP 220Nw
SP 221Nw
Ethernet Port (Network) Not available Available
Wireless LAN Not available Available
16 opal-p3_mf3_com_user_guide_gb_00228414_eng.xml

1. Guide to the Machine
This chapter describes preparations for using the machine and its operating instructions.
Guide to Components
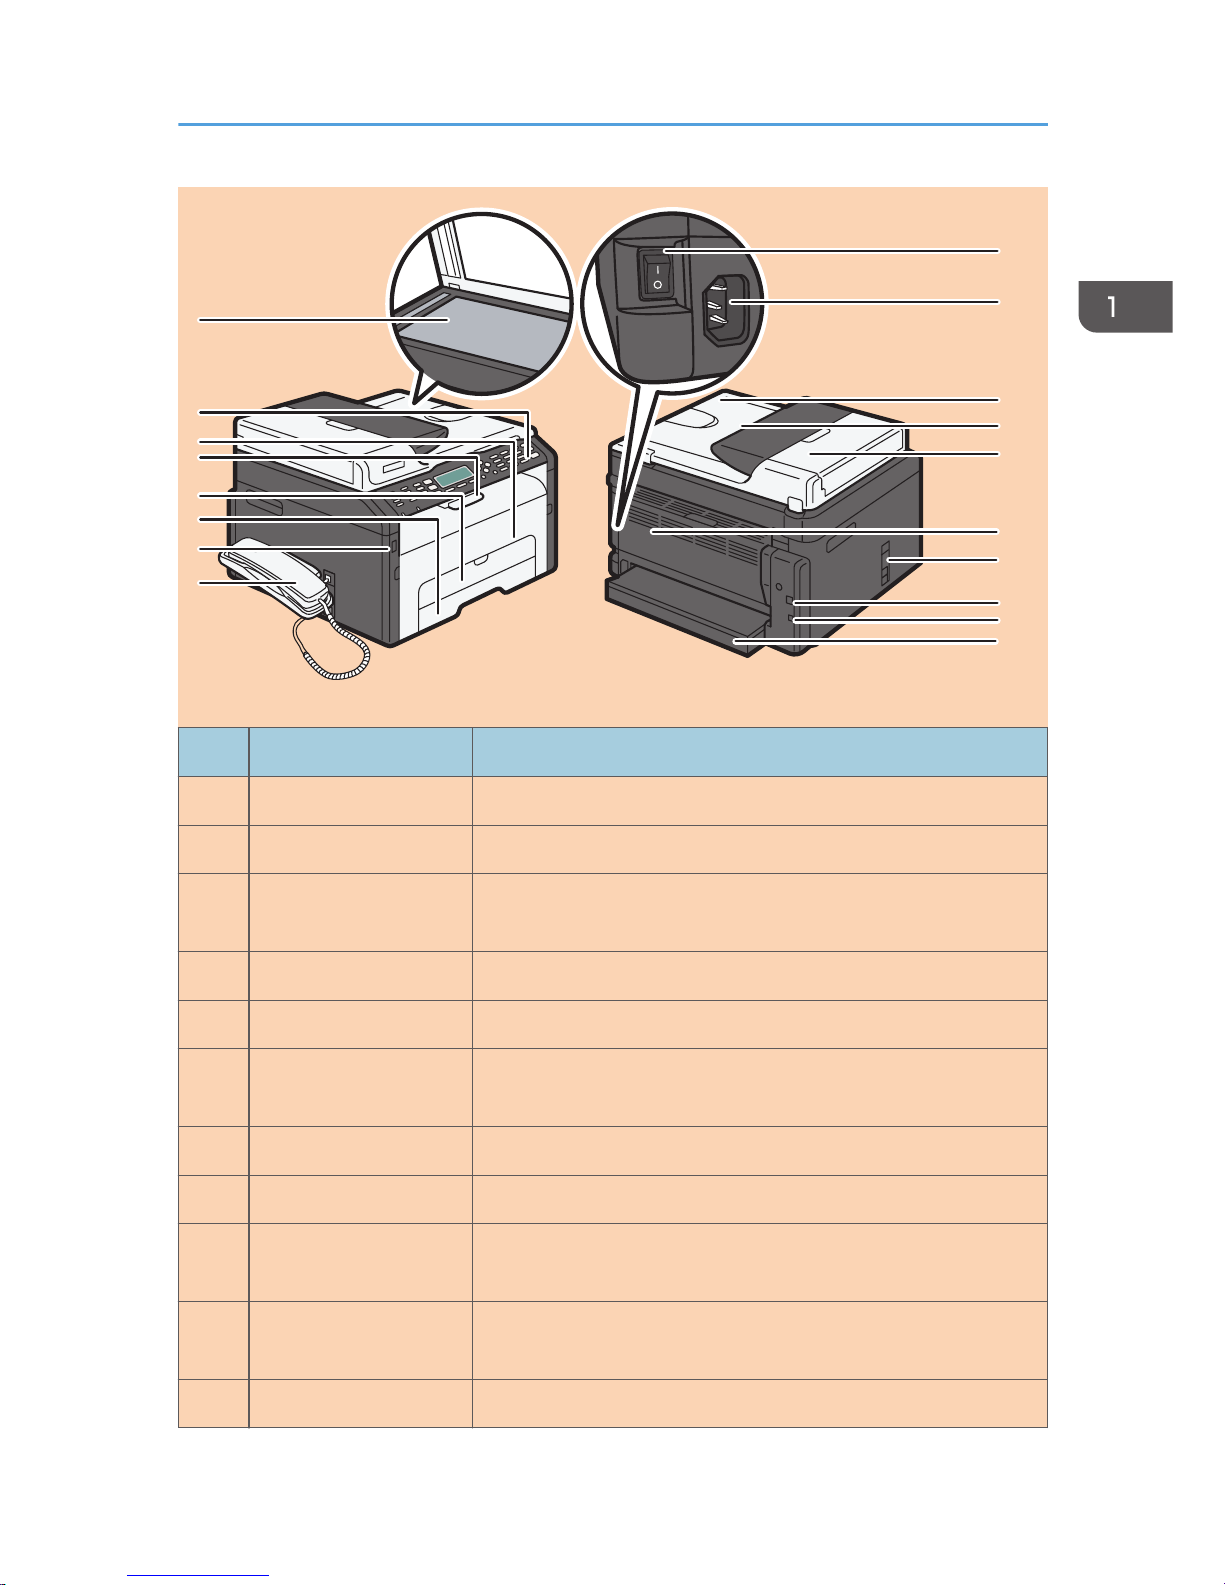
This section introduces the names of the various parts on the front and rear side of the machine and
outlines their functions.
MF
Exterior
DCT067
2
8
1
6
3
7
4
5
9
10
11
14
13
12
16
15
17
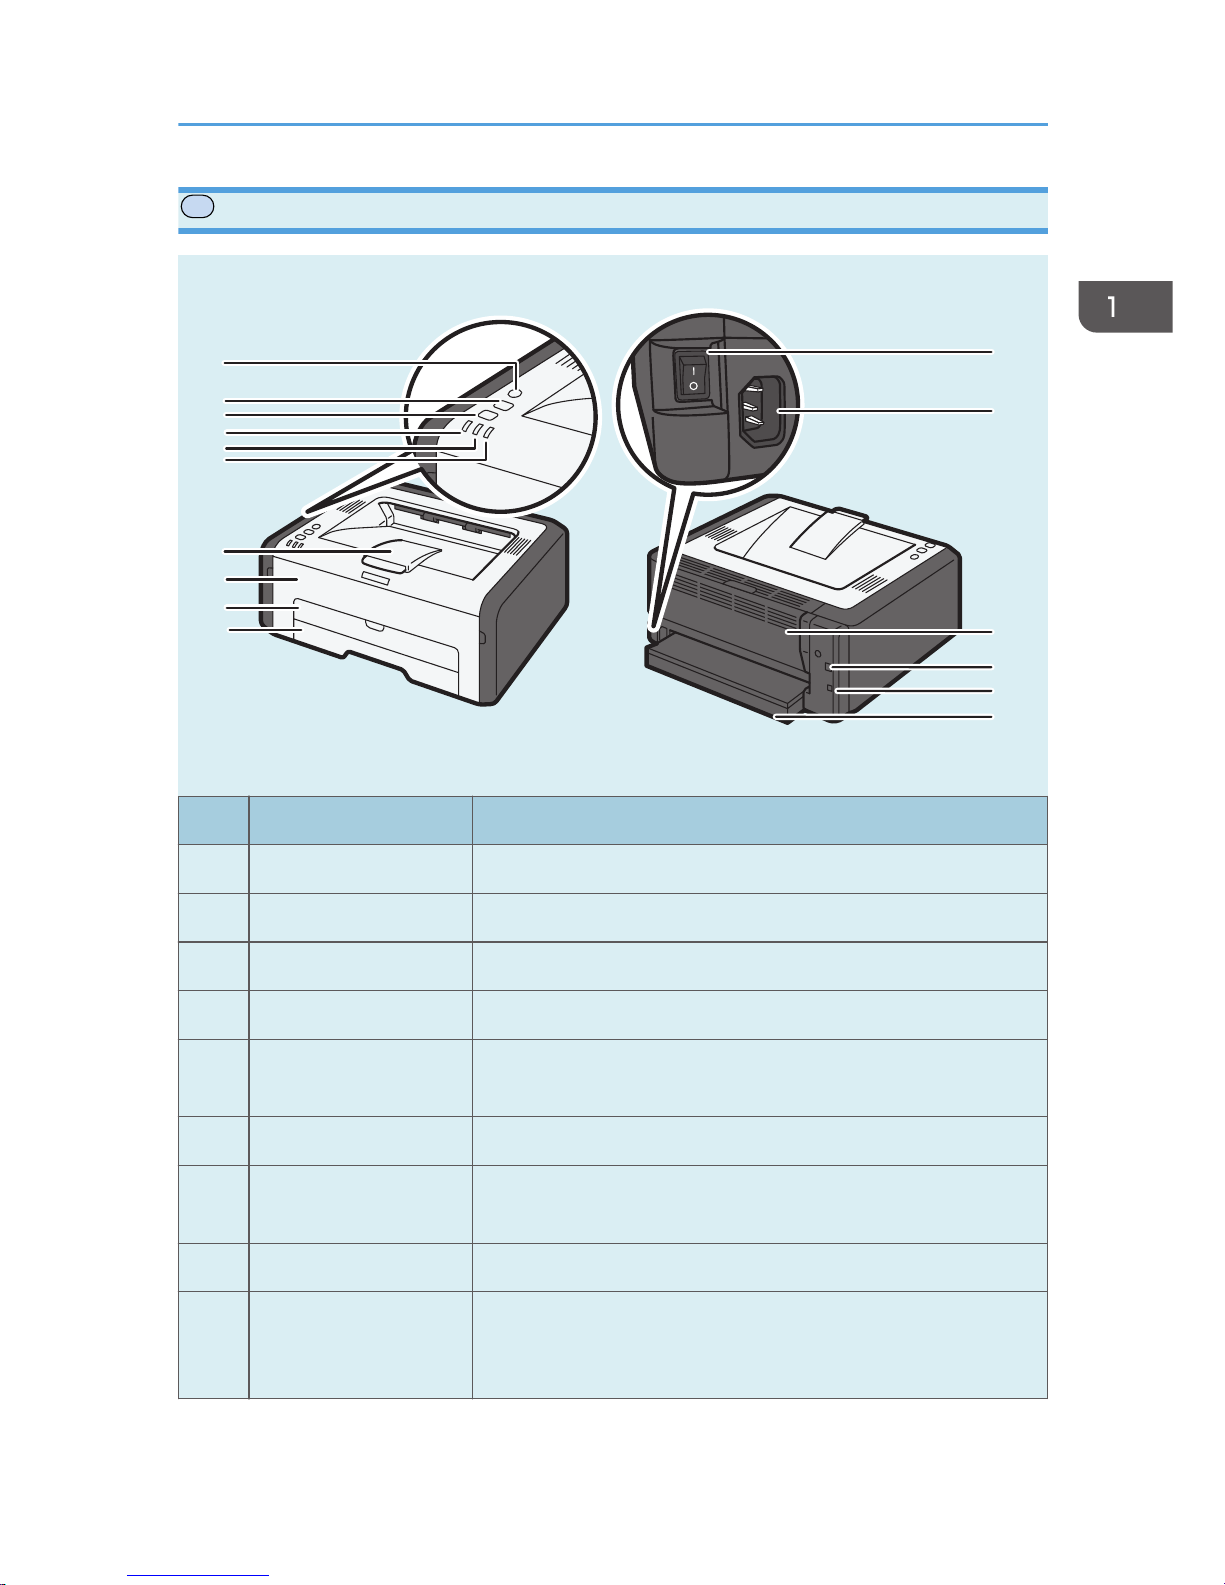
No. Name Description
1 Exposure Glass Place originals here sheet by sheet.
2 Control Panel Contains a screen and keys for machine control.
3 Front Cover Open this cover to replace the print cartridge or remove jammed
paper.
4 Stop Fences Raise this fence to prevent paper from falling off.
5 Bypass Tray This tray can hold one sheet of plain paper.
opal-p3_mf3_com_user_guide_gb_00228417_eng.xml 17

No. Name Description
5 Cover for the Exposure
Glass
Open this cover to place originals on the exposure glass.
6 Tray 1 This tray can hold up to 150 sheets of plain paper.
10 Auto Document Feeder
(Exposure Glass Cover)
The ADF is integrated with the exposure glass cover. Open this
cover to place documents on the exposure glass.
11 Input Tray for the ADF Place stacks of originals here. They will feed in automatically. This
tray can hold up to 35 sheets of plain paper.
11 Tray Cover Attach this cover when you extend the tray.
12 ADF Cover Open this cover to remove originals jammed in the ADF.
13 Rear Cover Open this cover to remove jammed paper.
14 External Telephone
Connector
For connecting an external telephone.
14 G3 (analog) Line
Interface Connector
For connecting a telephone line.
15 USB Port For connecting the machine to a computer using a USB cable.
16 Ethernet Port For connecting the machine to the network using a network
interface cable.
1. Guide to the Machine
18 opal-p3_mf3_com_user_guide_gb_00228417_eng.xml
DCT881
2
9
1
6
3
7
8
4
5
11
10
12
15
14
13
17
16
18
No. Name Description
1 Exposure Glass Place originals here sheet by sheet.
2 Control Panel Contains a screen and keys for machine control.
3 Front Cover Open this cover to replace the print cartridge or remove jammed
paper.
4 Stop Fences Raise this fence to prevent paper from falling off.
5 Bypass Tray This tray can hold one sheet of plain paper.
5 Cover for the Exposure
Glass
Open this cover to place originals on the exposure glass.
6 Tray 1 This tray can hold up to 150 sheets of plain paper.
8 Handset Enables you to use the machine as a telephone.
10 Auto Document Feeder
(Exposure Glass Cover)
The ADF is integrated with the exposure glass cover. Open this
cover to place documents on the exposure glass.
11 Input Tray for the ADF Place stacks of originals here. They will feed in automatically. This
tray can hold up to 35 sheets of plain paper.
11 Tray Cover Attach this cover when you extend the tray.
Guide to Components
opal-p3_mf3_com_user_guide_gb_00228417_eng.xml 19
No. Name Description
12 ADF Cover Open this cover to remove originals jammed in the ADF.
13 Rear Cover Open this cover to remove jammed paper.
14 External Telephone
Connector
For connecting an external telephone.
14 G3 (analog) Line
Interface Connector
For connecting a telephone line.
15 USB Port For connecting the machine to a computer using a USB cable.
16 Ethernet Port For connecting the machine to the network using a network
interface cable.
• If it is difficult to take printed paper out of the output tray, you can lift the control panel and make it
easier to take the printed paper out.
DSG102
1. Guide to the Machine
20 opal-p3_mf3_com_user_guide_gb_00228417_eng.xml
P
Exterior
DCT831
2
1
11
5
6
7
8
9
10
12
13
15
14
16
4
3
No. Name Description
1 Stop Fences Raise this fence to prevent paper from falling off.
2 Front Cover Lift up this cover to replace consumables or clear a paper jam.
3 Bypass Tray This tray can hold one sheet of plain paper.
4 Tray 1 This tray can hold up to 150 sheets of plain paper.
6 Rear Cover Open this cover to deliver sheets face up or remove jammed
paper.
7 USB Port Use a USB cable to connect the printer to the host computer.
8 Ethernet Port Use a network interface cable to connect the printer to the
network.
9 Tray 1 Cover Attach this cover when you extend the tray.
xx Control Panel The keys to operate the machine and the indicators for checking
the status of the machine are on this control panel. For details, see
page 26 "Control Panel".
Guide to Components
opal-p3_mf3_com_user_guide_gb_00228417_eng.xml 21
Interior
DCT064
1
No. Name Description
1 Print Cartridge A replacement consumable that is required to make prints on
paper. It needs to be replaced when the Toner/Paper End
indicator flashes red. For details about replacing the cartridge, see
page 253 "Replacing the Print Cartridge".
MF
Control Panel (When Using SP 221S, SP 220SNw, or SP221SNw)
DSH107
12345 6 7 8 9 10 11
12
1713 14 15 16 18
DSH107
12345 6 7 8 9 10 11
12
1713 14 15 16 18
1. Guide to the Machine
22 opal-p3_mf3_com_user_guide_gb_00228417_eng.xml

No. Name Description
1 [Image Quality] key Press to select the scan quality for the current job.
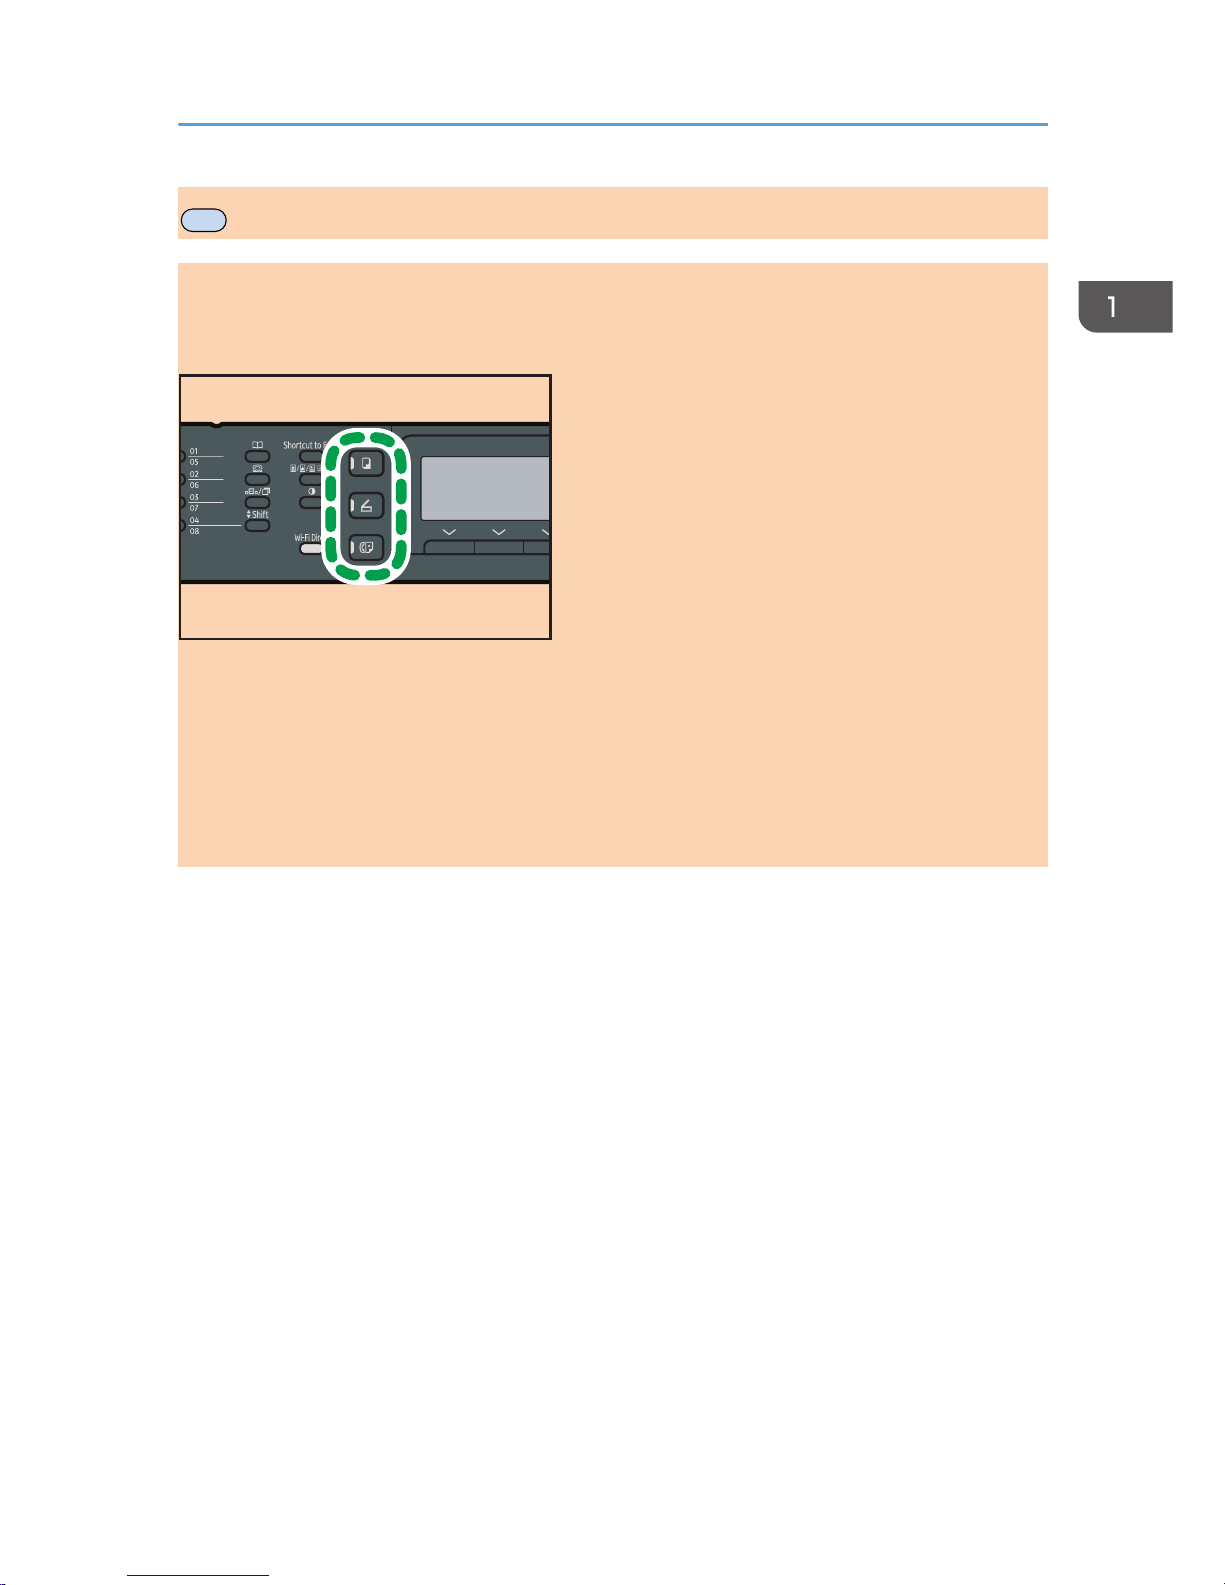
2 [Shortcut to Func.] key Press to use the function pre-assigned to this key.
3 [Density] key Press to adjust the image density for the current job.
4 [Copy] key Press to switch the machine to copier mode.
5 [Scanner] key Press to switch the machine to scanner mode.
6 Screen Displays the current status and messages.
7 Scroll Keys Press to move the cursor in the direction indicated by the key.
8 Number Keys Press to enter numerical values when specifying settings such as
fax numbers and copy quantities or to enter letters when specifying
names.
9 [Clear/Stop] key Press to cancel or stop print jobs, document copying, scanning,
fax transmission/reception, and other actions in progress.
10 [User Tools] key Press to display the menu for configuring the machine's system
settings.
11 [Power] key This indicator lights up blue when the machine is turned on. It
flashes when a print job is received and during printing, scanning,
or fax transmission/reception.
12 [Wi-Fi Direct] key (only
SP 220SNw and SP
221SNw)
Press this key to activate or deactivate the Wi-Fi Direct function.
Pressing this key while Wi-Fi is disabled activates Wi-Fi and
reboots the machine automatically. This indicator lights blue when
the Wi-Fi Direct function is active.
14 Selection keys Press the key underneath an item shown on the bottom line of the
screen to select it.
15 Data In Indicator This indicator lights blue when the machine receives print data
from the host device.
16 [Back] key Press to cancel the last operation or to return to the previous level
of the menu tree.
17 Alert Indicator This indicator lights up red when the machine runs out of paper or
consumables, when the paper settings do not match the settings
specified by the driver, or when other errors occur. It flashes when
the toner is nearly empty.
Guide to Components
opal-p3_mf3_com_user_guide_gb_00228417_eng.xml 23
No. Name Description
18 [OK] Key Press to confirm settings and specified values, or to move to the
next menu level.
19 [Start] key Press to start fax transmission/reception, scanning, or copying.
MF
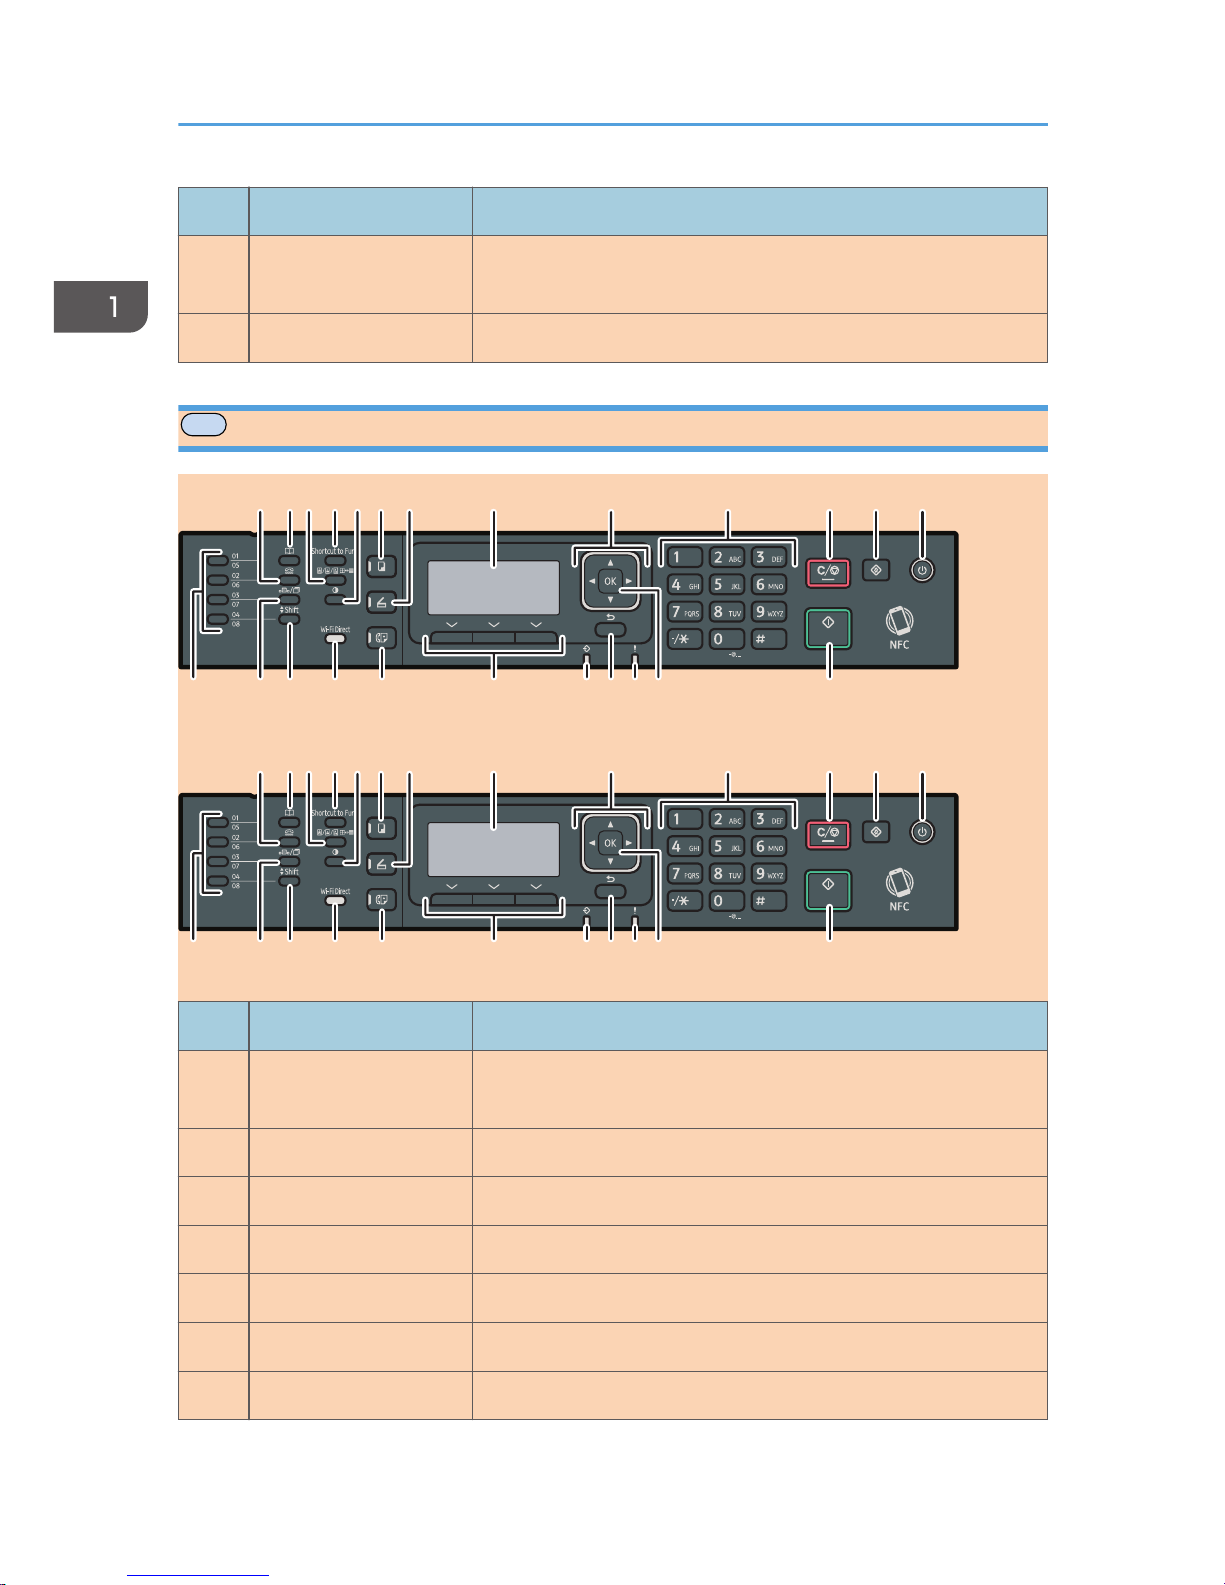
Control Panel (When Using SP 221SF, SP 220SFNw, or SP221SFNw)
1234567 8 9 10 11 12 13
14 15 16 17 18 19 20 21 22 24
DSH108
23
1234567 8 9 10 11 12 13
14 15 16 17 18 19 20 21 22 24
DSH108
23
No. Name Description
1 [On Hook Dial] key Press to use on-hook dialing to check the destination's status when
sending a fax.
2 [Address Book] key Press to select a scan or fax destination from the Address Book.
3 [Image Quality] key Press to select the scan quality for the current job.
4 [Shortcut to Func.] key Press to use the function pre-assigned to this key.
5 [Density] key Press to adjust the image density for the current job.
6 [Copy] key Press to switch the machine to copier mode.
7 [Scanner] key Press to switch the machine to scanner mode.
1. Guide to the Machine
24 opal-p3_mf3_com_user_guide_gb_00228417_eng.xml

No. Name Description
8 Screen Displays the current status and messages.
9 Scroll Keys Press to move the cursor in the direction indicated by the key.
10 Number Keys Press to enter numerical values when specifying settings such as
fax numbers and copy quantities or to enter letters when specifying
names.
11 [Clear/Stop] key Press to cancel or stop print jobs, document copying, scanning,
fax transmission/reception, and other actions in progress.
12 [User Tools] key Press to display the menu for configuring the machine's system
settings.
13 [Power] key This indicator lights up blue when the machine is turned on. It
flashes when a print job is received and during printing, scanning,
or fax transmission/reception.
14 One Touch buttons Press to select a scan or fax Quick Dial destination.
15 [Pause/Redial] key Press to insert a pause in a fax number or to display the last used
scan or fax destination.
16 [Shift] key Press to use the Quick Dial numbers 5 to 8 when specifying a scan
or fax destination using the One Touch buttons.
17
[Wi-Fi Direct] key (only
SP 220SFNw and SP
221SFNw)
Press this key to activate or deactivate the Wi-Fi Direct function.
Pressing this key while Wi-Fi is disabled activates Wi-Fi and
reboots the machine automatically. This indicator lights blue when
the Wi-Fi Direct function is active.
19 [Facsimile] key Press to switch the machine to fax mode.
20 Selection keys Press the key underneath an item shown on the bottom line of the
screen to select it.
21 Data In Indicator This indicator lights blue when the machine receives print data
from the host device.
22 [Back] key Press to cancel the last operation or to return to the previous level
of the menu tree.
23 Alert Indicator This indicator lights up red when the machine runs out of paper or
consumables, when the paper settings do not match the settings
Guide to Components
opal-p3_mf3_com_user_guide_gb_00228417_eng.xml 25
No. Name Description
specified by the driver, or when other errors occur. It flashes when
the toner is nearly empty.
24 [OK] Key Press to confirm settings and specified values, or to move to the
next menu level.
25 [Start] key Press to start fax transmission/reception, scanning, or copying.
P
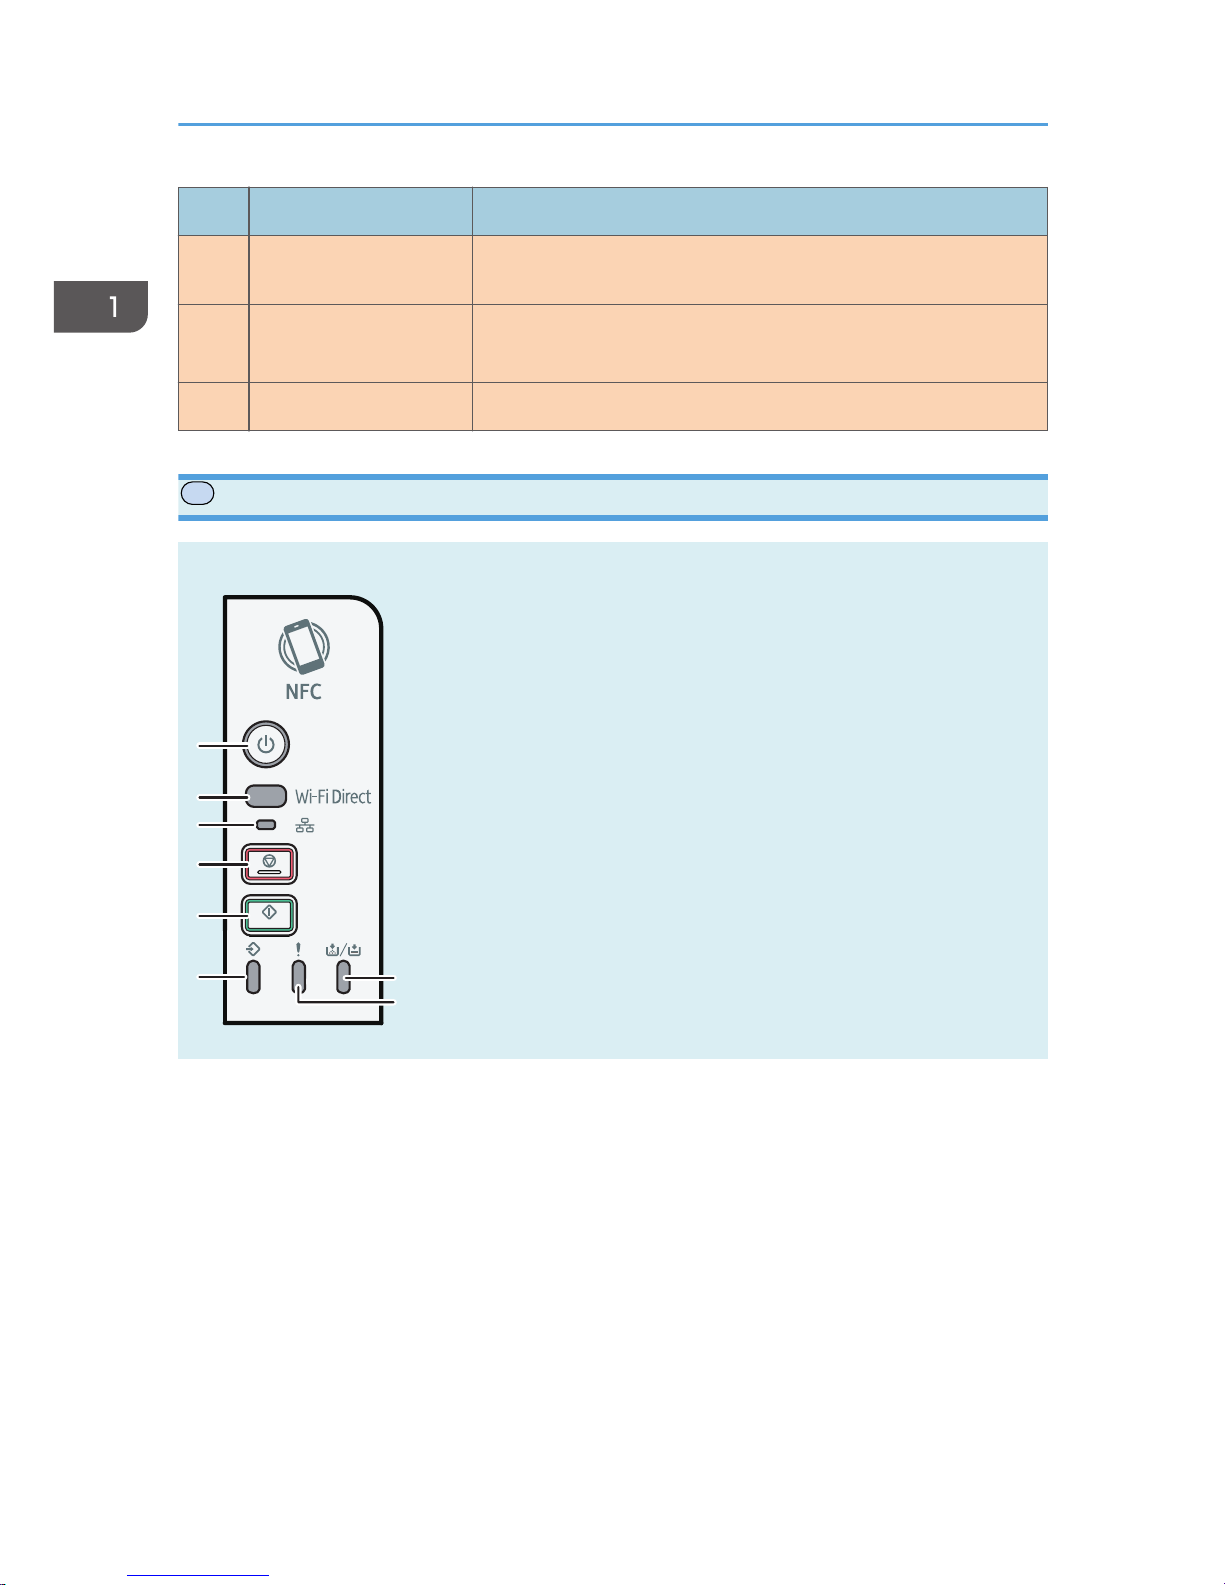
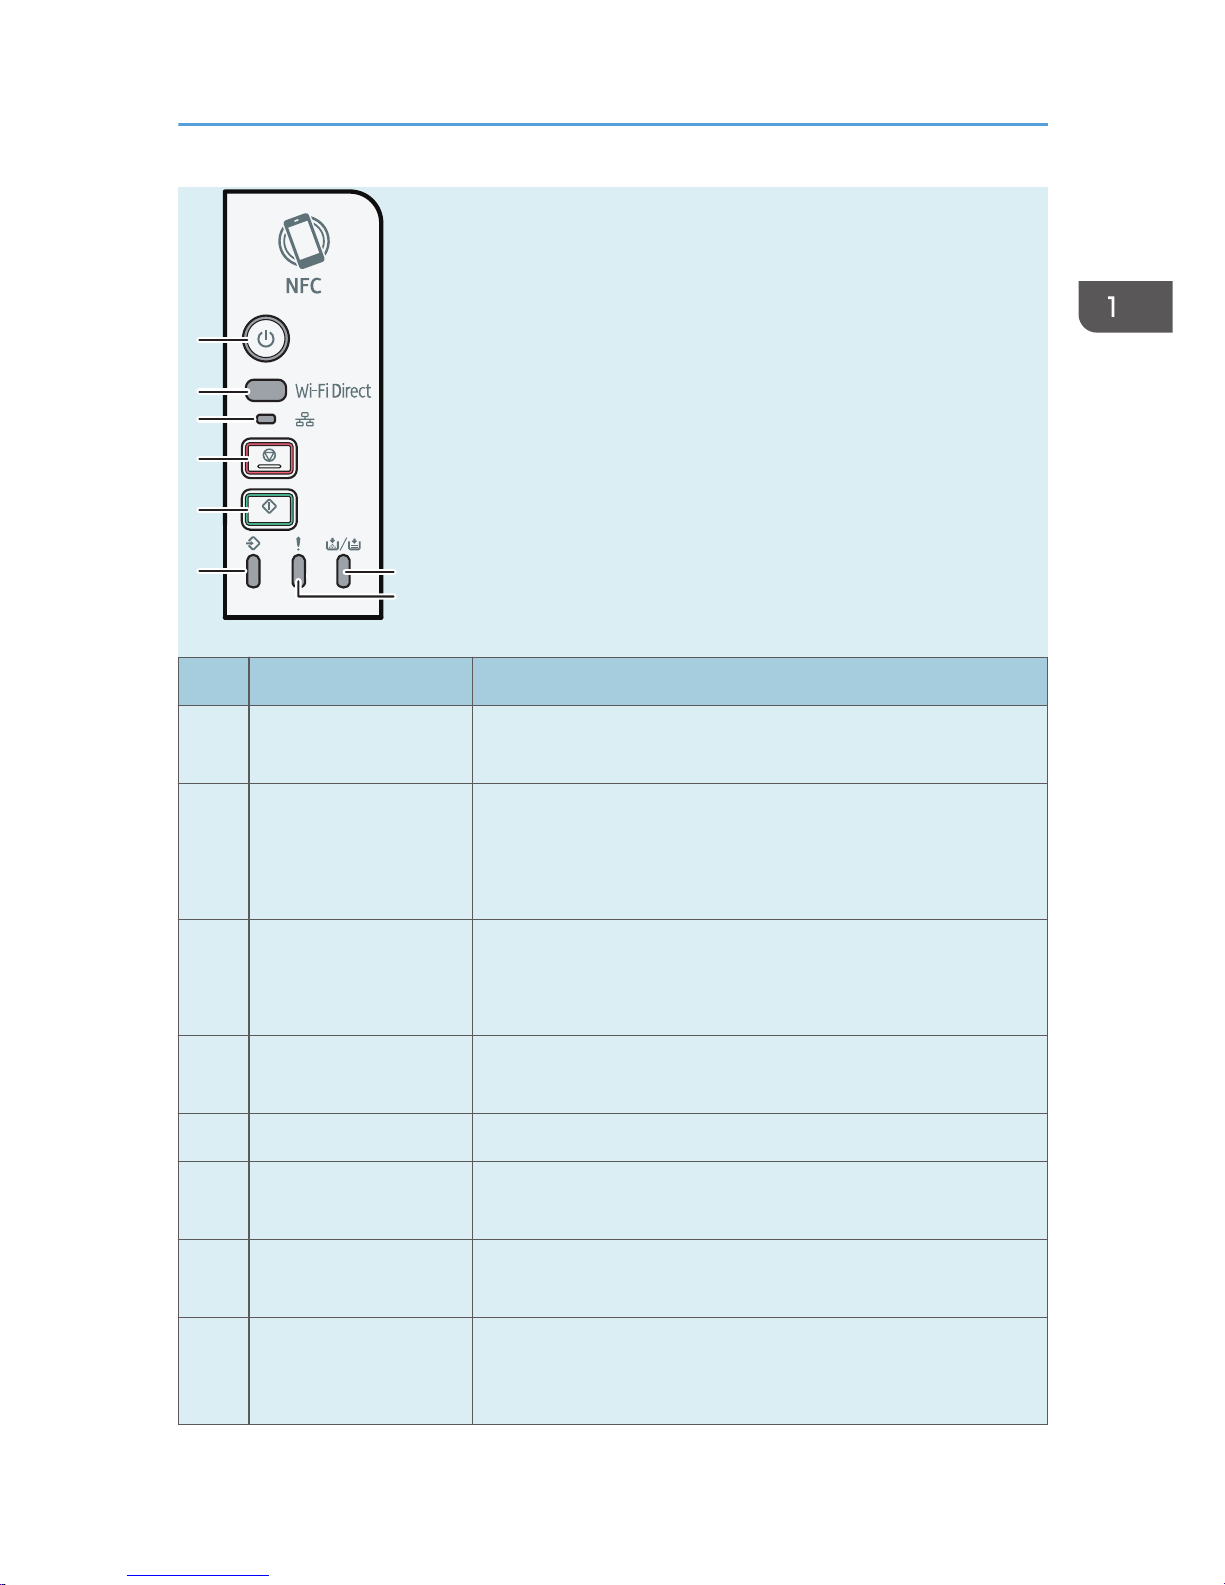
Control Panel
This section introduces the names of the parts of the control panel and explains their functions.
1
2
3
4
5
6
7
8
DSH109
1. Guide to the Machine
26 opal-p3_mf3_com_user_guide_gb_00228417_eng.xml
1
2
3
4
5
6
7
8
DSH109
No. Name Description
1 [Power] key This indicator lights blue when the machine is turned on. It flashes
when a print job is received.
2 [Wi-Fi Direct] key (only
SP 220Nw and SP
221Nw)
Press this key to activate or deactivate the Wi-Fi Direct function.
Pressing this key while Wi-Fi is disabled activates Wi-Fi and
reboots the machine automatically. This indicator lights blue when
the Wi-Fi Direct function is active.
3 Network Indicator
(only SP 220Nw and
SP 221Nw)
This indicator lights blue when the network is connected.
4 [Stop] key Press this key once to pause a job that is currently printing. To
cancel a job, press it again.
5 [Start] key Press to restart the printing job.
6 Data In Indicator This indicator lights blue when the machine receives print data
from the host device.
7 Toner/Paper End
Indicator
This indicator lights red when the machine runs out of paper or
toner. It flashes when the toner is nearly empty.
8 Alert Indicator This indicator flashes red when paper jams occur, and it lights
when the paper settings do not match the settings specified by the
driver, and when other errors occur.
Guide to Components
opal-p3_mf3_com_user_guide_gb_00228417_eng.xml 27

• For details about printing a list of the machine's configurations or about doing a test print using
Smart Organizing Monitor, see page 246 "Using Smart Organizing Monitor".
1. Guide to the Machine
28 opal-p3_mf3_com_user_guide_gb_00228417_eng.xml
MF
Changing Operation Modes
You can switch between copier, scanner, and fax modes by pressing the corresponding keys.
Press the [Copy], [Scanner], or [Facsimile] (only SP 221SF, SP 220SFNw, and SP 221SFNw) key to
activate each mode. While in each mode, the corresponding key lights up.
DSH140
Function Priority
By default, copy mode is selected when the machine is turned on, or if the preset [System Auto
Reset Timer] time passes with no operation while the initial screen of the current mode is displayed.
You can change the selected mode using [Function Priority] under [Admin. Tools].
For details about [System Auto Reset Timer] or [Function Priority], see page 189 "Administrator
Settings".
Changing Operation Modes
opal-p3_mf3_com_user_guide_gb_00228418_eng.xml 29
 Loading...