


 Loading...
User Guide
(English)

Table of Contents |
|
Introduction................................................................................................................................. |
3 |
Box Contents......................................................................................................................... |
3 |
Support .................................................................................................................................. |
3 |
Setup............................................................................................................................................ |
4 |
Features ...................................................................................................................................... |
5 |
Front Panel ............................................................................................................................ |
5 |
Rear Panel ............................................................................................................................. |
6 |
Operation .................................................................................................................................... |
7 |
Editing Input Settings ........................................................................................................... |
7 |
Stream.................................................................................................................................... |
9 |
Bluetooth ........................................................................................................................... |
9 |
AirPlay.............................................................................................................................. |
10 |
UPnP and DLNA .............................................................................................................. |
10 |
Editing Output (Zone) Settings .......................................................................................... |
11 |
Paging .................................................................................................................................. |
14 |
Info........................................................................................................................................ |
16 |
Controlling Zonetech Remotely......................................................................................... |
18 |
Computer......................................................................................................................... |
18 |
Master Remote ................................................................................................................ |
24 |
Zones............................................................................................................................... |
24 |
Troubleshooting ....................................................................................................................... |
25 |
Appendix ................................................................................................................................... |
26 |
Technical Specifications .................................................................................................... |
26 |
Trademarks & Licenses...................................................................................................... |
27 |
2 |
|

Introduction
Thank you for purchasing the Zonetech. At Rane, performance and reliability mean as much to us as they do to you. That’s why we design our equipment with only one thing in mind—to make your performance the best it can be.
Box Contents
Zonetech
(1) 6-pin 3.8 mm Euroblock inputs (green, for audio inputs)
(3) 6-pin 3.8 mm Euroblock outputs (orange, for zone outputs)
(1) 3-pin 3.8 mm Euroblock outputs (orange, for zone outputs)
(1) 3-pin 3.8 mm Euroblock inputs (black, for logic input)
Bluetooth® Antenna
Power Cable
Quickstart Guide
Safety & Warranty Manual
Support
For the latest information about this product (documentation, technical specifications, system requirements, compatibility information, etc.) and product registration, visit rane.com.
For additional product support, visit rane.com/support.
3

Setup
Items not listed under Introduction > Box Contents are sold separately.
1.Use the included Euroblock connectors or stereo RCA cables to connect the inputs on the rear panel to your audio sources.
2.Use the included Euroblock connectors to connect the outputs on the rear panel to your zone amplifiers or powered loudspeakers.
3.Use shielded Cat5e or Cat6 RJ45 cables to connect optional remotes or paging devices (e.g., Rane DR6, Rane DRZH, Rane RAD devices) to the Master Remote Port, Zone Remotes Ports, and Pager Port on the rear panel.
4.Attach the Bluetooth antenna (included) to the Bluetooth antenna connector on the rear panel. For best results, place Zonetech and the Bluetooth antenna so that it is not obstructed by walls, furniture, etc.
5.Use standard Ethernet cables to connect the Computer Ethernet port on the rear panel to a DHCP-enabled router or similar access point, and then connect your computer to another port on the same router or access point.
6.Power on all of your audio sources (media players, stereos, microphones, amplifiers, etc.).
7.Use a standard IEC cable (included) to connect the power input to a power outlet.
8.Power on all of your audio outputs.
Example
|
|
|
Mono Audio Inputs |
|
Bluetooth |
Paging |
(Microphones) |
|
Device |
Stereo Audio |
|
|
Remote |
Inputs |
|
|
|
||
|
|
(e.g., Rane |
(Receiver, DVD |
Power |
|
RAD16z) |
Player, etc.) |
|
|
|
Zone Amplifier |
|
|
|
and Speakers |
Computer
Router |
Master |
Zone |
Powered |
|
Remote |
Remote |
Stereo |
|
(e.g., Rane |
(e.g., Rane |
Speakers |
|
DR6) |
DRZH) |
|
4

Features
Front Panel
9 |
7 |
6 |
4 |
|
1 |
5 |
|
|
|
|
3 |
10 |
8 |
|
2 |
1.Display: This display shows information about Zonetech’s current status and options.
2.Power Light: This light is on when Zonetech is powered on.
3.Computer Link Light: This light is on when the Computer Ethernet port on the rear panel is connected to a computer (powered on). You can then use the computer to control Zonetech remotely using a web-based interface.
4.Stream Light: When the Stream Source is set to Bluetooth, this light will flash to indicate Zonetech is in Pairing Mode and be lit solidly when Zonetech is paired with an active Bluetooth device. When the Stream Source is set to AirPlay or UPnP/DLNA, this light will be lit solidly to indicate a successful connection. You can then send the device's audio signal to Zonetech wirelessly.
5.Info: Press this knob to cycle through the Info pages shown in the display. Turn this knob to adjust the value of each setting in the display.
6.Left/Right (/): Press each of these buttons to select the previous or next option (respectively) shown in the display.
Note: To reset Zonetech to factory default settings, press and hold both Left/Right (/) buttons while powering on. Keep holding the buttons until the factory reset message appears on the display, then release the buttons to continue.
7.Stream: Press this button to show the Stream settings in the display.
8.Page: Press this button to show the Pager settings in the display.
9.Input 1–6: Press each of these buttons to select the corresponding input. Its information will appear in the display. You can then use the Info knob and Left/Right (/) buttons to edit its settings.
10.Zone 1–6: Press each of these buttons to select the corresponding zone. Its information will appear in the display. You can then use the Info knob and Left/Right (/) buttons to edit its settings.
5
Rear Panel
1 |
2 |
|
|
4 |
3 |
3 |
3 |
3 |
|
|
|
|
|
|
|
|
|
10 |
9 |
8 |
7 |
6 |
5 |
5 |
5 |
5 |
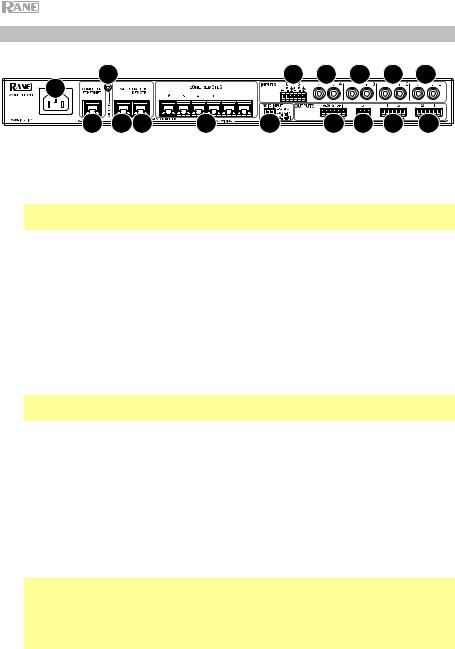
1.Power Input (IEC): Use a standard IEC cable to connect this input to a power outlet.
2.Bluetooth Antenna Connector (SMA): Connect the included Bluetooth antenna here.
Important: For compliance, you must use the included antenna only. No substitutions or modifications to the antenna are permitted.
3.Inputs (stereo RCA): Connect audio sources to these stereo input pairs.
4.Inputs (Euroblock): Connect balanced or unbalanced audio sources to these mono inputs.
5.Outputs (Euroblock): Connect line-level (-10 dBV to +4 dBu) devices to these balanced outputs. The outputs for Zones 1–5 are mono; the Zone 6 output is stereo. Alternatively, you can configure the Zone 6 output for mono use with a subwoofer (connected to the R(LO) output) and main loudspeaker (connected to the L(HI) output).
6.Logic Input (Euroblock): Connect normally open external control contacts (relay or equivalent) to these terminals. When the terminals are connected to each other (i.e., when the switch is closed), all outputs will be muted. This would typically be used with a fire alarm system to silence audio output during an emergency.
Note: When this mute function is active, all front-panel controls will be locked. Mute will appear in the display with a red background.
7.Zone Remotes Ports (RJ45, shielded Cat5e or Cat6 cables): Connect optional Rane DRZH devices to these ports, which will allow you to select sources and adjust levels for the zones remotely.
8.Master Remote Port (RJ45, shielded Cat5e or Cat6 cables): Connect an optional Rane DR6 remote control to this port, which will allow you to select sources and adjust levels for all zones remotely.
9.Pager Port (RJ45, shielded Cat5e or Cat6 cables): Connect an optional Rane RAD device (e.g., RAD16z, RAD26, etc.) to provide analog audio and logic inputs. Available functions will depend on the RAD model. Please see rane.com/zonetech for additional information.
Note: When using the pager function, make sure to activate the 1 logic input on your connected RAD to allow the audio to pass.
Note: If you do not need the pager function, you can connect an optional Rane DR6 to this port instead. This will provide the same functions as a DR6 connected to the Master Remote port (see #8 above).
10.Computer Ethernet Port (Ethernet): Connect this port to a router or similar access point during setup. After Zonetech is properly configured, you can connect a computer to another port on the same router or access point, allowing you to use a web browser to access an interface to control Zonetech. See Operation > Controlling Zonetech Remotely for more information.
6
Operation
Editing Input Settings
You can use Zonetech’s display, Info knob, and Left/Right (/) buttons to edit the settings of each input.
To select an input to edit, press the corresponding Input button (1–6) or the Stream button. The display will indicate which input is selected: Input 1–6 or Stream.
To show the previous or next setting for the selected input, use the Left/Right (/) buttons (respectively). Turn the Info knob to adjust the value of each setting.
Note: To control the input settings remotely, you can also use a web-based interface on your computer (connected to the Computer Ethernet port), or up to two Rane DR6 master remote controls (connected to the Master Remote and Pager port).
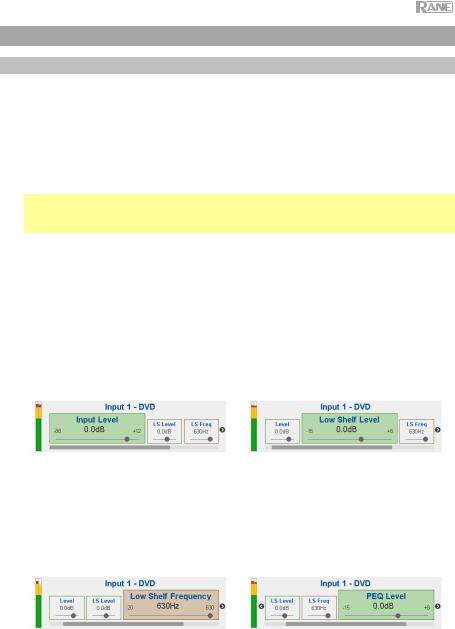
These are the editable input settings. The abbreviated name (shown when the setting is not selected) is in parentheses.
|
Input Level (Level) |
|
Low Shelf Level (LS Level) |
||||
|
This is the volume level at the input stage: |
|
This is the amount of “boost” (increase) or |
||||
|
-88.0 to +12.0 dB. |
|
“cut” (decrease) of the low-frequency |
||||
|
|
|
|
|
shelving filter: -15.0 to +8.0 dB. |
||
|
Tip: If you are unsure of what this level |
||||||
|
|
|
|
|
|||
|
should be, it is better to use a lower setting |
|
|
|
|
||
|
to allow for headroom and to prevent |
|
|
|
|
||
|
clipping/distortion. |
|
|
|
|
||
|
|
|
|
|
|
|
|
|
|
|
|
|
|
|
|
|
|
|
|
||||
|
Low Shelf Frequency (LS Freq) |
|
PEQ Level |
||||
|
This is the center frequency of the low- |
|
This is the amount of “boost” (increase) or |
||||
|
frequency shelving filter: 40–630 Hz |
|
“cut” (decrease) of the mid-range |
||||
|
(default: 630 Hz). |
|
parametric equalization band: -15.0 to +8.0 |
||||
|
|
|
|
|
dB. |
||
|
Tip: Higher values allow you to boost bass |
||||||
|
|
|
|
|
|||
|
frequencies more but also require more |
|
|
|
|
||
|
amplifier power. |
|
|
|
|
||
|
|
|
|
|
|
|
|
|
|
|
|
|
|
|
|
|
|
|
|
|
|
|
|
|
|
|
|
7 |
|||
|
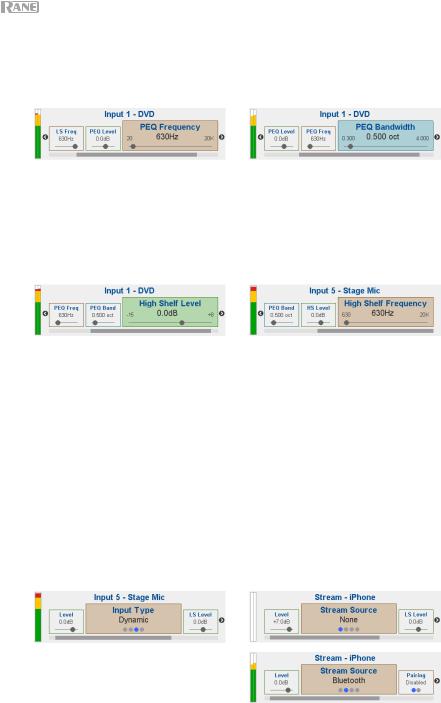
PEQ Frequency (PEQ Freq) |
|
PEQ Bandwidth (PEQ Band) |
|
|||||
|
This is the center frequency of the mid- |
|
This is the width of the mid-range |
|
|||||
|
range parametric equalization band: 40 Hz |
|
parametric equalization band: 0.300– |
|
|||||
|
– 16 kHz (default: 630 Hz). |
|
4.000 oct (octaves) (default: 0.500 oct). |
|
|||||
|
|
|
|
|
|
|
|
|
|
|
|
|
|
|
|
|
|
|
|
|
|
|
|
|
|
|
|
||
|
High Shelf Level (HS Level) |
|
High Shelf Frequency (HS Freq) |
|
|||||
|
This is the amount of “boost” (increase) or |
|
This is the center frequency of the high- |
|
|||||
|
“cut” (decrease) of the high-frequency |
|
frequency shelving filter: 630 Hz – 16 kHz |
|
|||||
|
shelving filter: -15.0 to +8.0 dB. |
|
(default: 630 Hz). |
|
|||||
|
|
|
|
|
|
|
|
|
|
|
|
|
|
|
|
Tip: Lower values allow you to boost |
|
||
|
|
|
|
|
|
treble frequencies more but increases the |
|
||
|
|
|
|
|
|
risk of overdriving the tweeters. |
|
||
|
|
|
|
|
|
|
|
||
|
|
|
|
|
|
|
|
|
|
|
|
|
|
|
|
|
|||
|
Input Type (Type) (Inputs 5 and 6 only) |
|
Stream Source (Source) |
|
|||||
|
This is the type of device connected to Input |
|
This is the source from which Zonetech |
|
|||||
|
5 and Input 6: Dynamic (microphone), |
|
will play streamed audio: None (off), |
|
|||||
|
Condenser (microphone), Unbalanced |
|
Bluetooth, AirPlay, UPnP/DLNA. |
|
|||||
|
Line+, Balanced Line (default: Balanced |
|
|
|
|
|
|||
|
Line). |
|
|
|
|
|
|||
|
|
|
|
|
|
|
|||
|
Note: Phantom power is enabled only |
|
|
|
|
|
|
||
|
when Condenser is selected. |
|
|
|
|
|
|
||
|
Tip: Unbalanced Line+ sums two |
|
|
|
|
|
|
||
|
unbalanced signals (such as left and right |
|
|
|
|
|
|
||
|
RCA lines) when one is connected to the |
|
|
|
|
|
|
||
|
positive (+) input and one is connected to |
|
|
|
|
|
|
||
|
the negative (-) input. |
|
|
|
|
|
|
||
|
Tip: Balanced Line is a typical fully |
|
|
|
|
|
|
||
|
balanced line-level input (e.g., TRS or XLR) |
|
|
|
|
|
|
||
|
as used with commercial audio equipment. |
|
|
|
|
|
|
||
|
|
|
|
|
|
|
|
|
|
|
|
|
|
|
|
|
|
|
|
|
|
|
|
|
|
|
|
|
|
|
|
|
|
|
|
|
|
|
|
|
|
|
|
|
|
|
|
|
|
8

Stream
In addition to the six audio inputs on the rear panel, you can send an audio signal wirelessly through Zonetech to any zone using Bluetooth®, AirPlay®, UPnP and DLNA®. This signal uses its own input channel.
Bluetooth
To pair/connect your Bluetooth device to Zonetech:
1.On Zonetech, press the Stream button to access the Stream settings.
2.Use the Left/Right (/) buttons to select the Stream Source (Source) setting. Then, turn the Info knob to select the Bluetooth option.
3.Use the Left/Right (/) buttons to select the Bluetooth Pairing (Pairing) setting. Then, turn the Info knob to select Enabled. Zonetech's Stream Light will begin flashing.
4.On your Bluetooth device, enter its Bluetooth settings, find Zonetech and connect to it. The Stream Light will be solid blue when it is connected.
Notes:
•IMPORTANT: Bluetooth and WiFi may not both be in use at the same time. When Bluetooth is enabled, WiFi will be disabled.
•If your device requires a passcode or PIN, enter 0000.
•If your Bluetooth device is not able to connect to Zonetech, set the Stream Source (Source) to None to disconnect previous Bluetooth connections, and try the above steps again.
•If you experience trouble connecting or playing music, make sure your Bluetooth device’s operating system is up to date.
To unpair/disconnect your Bluetooth device from Zonetech, set the Stream Source
(Source) setting to None. Zonetech will disconnect from your Bluetooth device. Alternatively, disconnect using the Bluetooth settings on your device.
To stream the Bluetooth audio signal to an output on Zonetech:
1.On Zonetech, press the Stream button to access the Stream settings.
2.Follow the directions above to pair your Bluetooth device to Zonetech.
3.Press and release the Zone button (1–6) for the zone where you want to send the Bluetooth audio signal.
4.Use the Left/Right (/) buttons to select the
Input Source (In Source) setting.
5.Turn the Info knob to select the Stream option. That zone is now receiving the audio signal from your Bluetooth device.
9
Loading...