


 Loading...
Setting the standard for professional djs
RANE SL1 FOR SERATO SCRATCH LIVE • OPERATOR’S MANUAL 2.4.4

Important Safety Instructions
For the continued safety of yourself and others we recommend that you read the following safety and installation
instructions. Keep this document in a safe location for future reference. Please heed all warnings and follow all instructions.
Do not use this equipment in a location where it might become wet. Clean only with a damp cloth. This equipment may be used as a table top device, although stacking of the equipment is dangerous and not recommended.
Equipment may be located directly above or below this unit, but note that some equipment (like large power amplifiers) may cause an unacceptable amount of hum or may generate too much heat
and degrade the performance of this equipment. Only use attachments and accessories specified by Rane. Refer all servicing to qualified service personnel. Servicing is required when the apparatus has been damaged in any way, such as spilled liquid, fallen objects into an opened chassis, exposure to rain or moisture, a dropped unit, or abnormal operation.
FCC Statement
This equipment has been tested and found to comply with the limits for a Class B digital device, pursuant to part 15 of the FCC Rules. These limits are designed to provide reasonable protection against harmful interference in a residential installation. This equipment generates, uses and can radiate radio frequency energy and, if not installed and used
in accordance with the instructions, may cause harmful interference to radio communications. However, there is no guarantee that interference will not occur in a particular installation.
If this equipment does cause harmful interference to radio or television reception, which can be determined by turning the equipment off and on, the user is encouraged to try to correct the interference by one or more of the following measures:
•Reorient or relocate the receiving antenna.
•Increase the separation between the equipment and receiver.
•Connect the equipment into an outlet on a circuit different from that to which the receiver is connected.
•Consult the dealer or an experienced radio/TV technician for help.
CAUTION: Changes or modifications not expressly approved by Rane Corporation could void the user’s authority to operate the equipment.
This Class B digital apparatus complies with Canadian ICES-003.
Cet appareil numérique de la classe B est conforme à la norme NMB-003 du Canada.
FCC Declaration of Conformity
Brand: Rane
Model: SL1
This device complies with part 15 of the FCC Rules. Operation is subject to the following two conditions: (1) This device may not cause harmful interference, and (2) this device must accept
any interference received, including interference that may cause undesired operation.
Responsible Party:
Rane Corporation
10802 47th Avenue West
Mukilteo WA 98275-5000 USA
Phone: 425-355-6000
2 |
RANE SL1 FOR SERATO SCRATCH LIVE • OPERATOR’S MANUAL 2.4.4 |
|
|

Copyright Notices
©2013 Rane Corporation. All rights reserved. Scratch Live and the Scratch Live logo are trademarks of Serato. Trademarked in the U.S. and other countries. Licensed exclusively to Rane Corporation. This software is based in part on the work of the Independent JPEG Group, and uses libpng code, copyright
©2000-2002 Glenn Randers-Pehrson. The Scratch Live Control Tone, the audio pressed on Scratch Live Control vinyl and Control CDs, is copyright ©20042013 Serato. The Control Vinyl and Control CDs are licensed for personal use only. The creation of personal backups of the Control CD is allowed, however duplicating Control CDs for commercial benefit is strictly prohibited. For avoidance of doubt the duplication or creation of Control vinyl for any use is strictly prohibited. Please respect our copyright. Windows XP, Windows Vista and Windows 7 is either a registered trademark or a trademark of Microsoft Corporation in the United States and/or other countries. Apple, Mac, Macintosh and iTunes are trademarks of Apple
Computer, Inc., registered in the US and/ or other countries.
Wear Parts
The SL1 interface contains no wear parts. The vinyl records and CDs are wear parts as described in the Limited Domestic Warranty section at the end of this manual.
Introduction
Refer to the separate Quick Start guide that was included in the box. If you lose yours, a new copy (along with this manual and all other documentation) may be downloaded at rane.com/scratch.html. To keep up with the latest tips, and to check for Scratch Live software updates, visit the Official Scratch Live Forum at serato. com
Minimum System
Requirements
•Available USB port.
•1280 x 720 screen resolution or higher.
•2 GB RAM, more for a large library.
•Hard drive space for music:
5400 RPM minimum, 7200 RPM recommended for high resolution audio playback.
PC
•2.2 GHz Intel Core Duo.
•Windows XP with Service Pack 3 or higher, or Vista with Service Pack 2 or higher, or Windows 7. We recommend Windows 7 over Vista.
Mac
•1.83 GHz Intel Core Duo.
•OSX 10.5.8 or higher.
PLEASE NOTE: These are the minimum requirements to run Serato Scratch Live without optional plugins. For best performance
or when using optional plugins we recommend you use a higher spec computer. For more
information please visit serato.com/ scratchlive#minspecs.
Check List
These items are included in the box:
•SL1 interface.
•Scratch Live software install disc.
•2 (two) control CDs.
•2 (two) control records.
•1 USB cable.
•4 stereo RCA cables.
•Package of 4 rubber feet.
•Quick Start Guide.
•This manual.
RANE SL1 FOR SERATO SCRATCH LIVE • OPERATOR’S MANUAL 2.4.4 |
3 |
|
|

Contents
Important Safety Instructions |
2 |
FCC Statement |
2 |
FCC Declaration of Conformity |
2 |
Copyright Notices |
3 |
Wear Parts |
3 |
Introduction |
3 |
Minimum System Requirements |
3 |
Check List |
3 |
Getting Started |
6 |
Installing Scratch Live |
6 |
Mac |
6 |
Windows |
6 |
Additional Windows Drivers |
6 |
Starting the Software |
6 |
Using the Tool Tips |
6 |
Connecting Your Hardware |
7 |
Connecting the SL1 |
7 |
Turntable Setup |
7 |
CD Player setup |
7 |
Connecting A Mic |
8 |
Optional Power Supply |
8 |
Kensington Security Slot |
8 |
Calibrating Scratch Live |
8 |
Scratch Live Modes |
15 |
The Noise Threshold |
8 |
Absolute Mode |
15 |
How to Calibrate Scratch Live |
8 |
Relative Mode |
15 |
The Scopes |
8 |
Internal Mode |
16 |
Calibration Troubleshooting |
9 |
Temporary Cue |
16 |
|
|
More Controls |
16 |
Importing and Playing Music |
9 |
|
|
Importing Your Music |
9 |
Cue Points |
17 |
Supported File Types |
9 |
Setting Cue Points |
17 |
|
|
Enable Hot Cues |
17 |
Whitelabel.net |
10 |
Triggering Cue Points |
17 |
|
|
Editing Cue Points |
17 |
Preparing Your Files |
10 |
Customizing Cue Points |
17 |
How to Analyze Files |
10 |
|
|
About Corrupt Files |
10 |
Looping |
17 |
Playing Music |
10 |
Auto Looping |
18 |
Track Display |
10 |
The A - Slot |
18 |
Set Auto-BPM |
11 |
Loop Roll |
18 |
The Offline Player |
11 |
Loop Roll with MIDI |
18 |
Playback Control |
11 |
SP-6 Sample Player |
19 |
The Control Record |
11 |
Loading the SP-6 |
19 |
Vinyl Scroll |
11 |
Playing Samples |
19 |
|
|
SP-6 Instant Doubles |
19 |
Main Screen Overview |
12 |
SP-6 Play Modes |
19 |
Virtual Deck |
12 |
SP-6 Pitch Controls |
20 |
Visual Aids |
12 |
SP-6 ‘Play From’ Selector |
20 |
Tempo Matching Display |
12 |
SP-6 Track Overviews |
20 |
Track Overview Display |
12 |
SP-6 Slot Volumes |
20 |
Main Waveform Display |
12 |
SP-6 Output Selector |
20 |
Beat Matching Display |
13 |
Individual Output Selectors |
20 |
Master Gain |
13 |
SP-6 Sample Banks |
20 |
33 / 45 Speeds |
13 |
SP-6 Mute Buttons |
20 |
Tracking Indicator |
13 |
SP-6 MIDI |
20 |
Tap Tempo |
13 |
|
|
Key Lock |
13 |
DJ-FX Plugin |
21 |
Repeat |
13 |
Ultra Knob Mode |
21 |
Censor |
13 |
Super Knob Mode |
21 |
Eject |
13 |
Effects BPM Multiplier |
21 |
Autoplay |
13 |
Deck Assign |
21 |
Reverse Input Control |
13 |
Show Parameters |
21 |
Track Gain |
14 |
Macro Edit Mode |
21 |
USB Dropout Indicator |
14 |
|
|
Display Modes |
14 |
|
|
Library Views |
14 |
|
|
4 |
RANE SL1 FOR SERATO SCRATCH LIVE • OPERATOR’S MANUAL 2.4.4 |
|
|

MIDI Control |
22 |
MIDI Controller Setup |
22 |
Assigning Controls |
22 |
MIDI Platters |
22 |
Assigning MIDI to Other Controls |
|
22 |
|
Ctrl-Click Functionality |
22 |
Presets |
23 |
Native Controller Support |
23 |
MIDI Devices |
23 |
Technical Information |
23 |
Organizing Your Music |
23 |
Grouping Tracks into Crates |
23 |
Subcrates |
23 |
Smart Crates |
23 |
Sorting Your Files |
24 |
Using the Song Browser |
24 |
Searching |
24 |
Prepare Window |
24 |
History |
24 |
Serato Playlists |
25 |
Uploading Serato Playlists |
25 |
Live Playlists |
25 |
File Management |
26 |
Rescan ID3 Tags |
26 |
Relocate Lost Files |
26 |
Editing ID3 Tags |
26 |
Library Zoom |
26 |
Display Album Art |
26 |
Adding Album Art |
26 |
Status Icons |
26 |
More Info on Corrupt Files |
26 |
Deleting Crates and Tracks |
27 |
Copy & Move Files & Folders |
27 |
Copy & Move Crates |
27 |
Scratch Live Backup |
27 |
Recording |
27 |
LiveFeed |
28 |
Mixing With One Turntable Or |
|
CD Player |
28 |
Menu Settings |
28 |
Record Gain Knob |
28 |
Sampling from Vinyl |
28 |
Keyboard Shortcuts |
29 |
Additional Setup |
30 |
Hardware |
30 |
USB Buffer Size (Latency) |
30 |
Audio Input Level |
30 |
Playback |
30 |
Track End Warning |
30 |
Playback Keys Use Shift |
30 |
Lock Playing Deck |
30 |
Sort Cues Chronologically |
30 |
Enable Hot Cues |
30 |
Use Auto Gain |
31 |
Hi-Fi Resampler |
31 |
Play From Start |
31 |
Instant Doubles |
31 |
Play From First Cue Point |
31 |
Braking (INT Mode) |
31 |
Audio Output |
31 |
Vinyl Control |
31 |
Adjust Loops with Vinyl |
31 |
Next Song on Flip |
31 |
Enable Vinyl Scroll |
31 |
Reverse Vinyl Scroll |
31 |
Vinyl Scroll Speed |
31 |
Drop To Absolute Position (REL |
|
Mode) |
31 |
Drop To Cue Points (REL Mode) 32 |
|
Vinyl Start Offset |
32 |
Library |
32 |
Read iTunes Library |
32 |
Protect Library |
32 |
Customize Crate Views |
32 |
Center on Selected Song |
32 |
Show All File Types |
32 |
Include Subcrate Tracks |
32 |
AutoFill Overviews |
32 |
Font Size |
33 |
Album Art Size |
33 |
Display |
33 |
Maximum Screen Updates |
33 |
Audio Cache |
33 |
Show Album Art On Deck |
33 |
Plugins |
33 |
Enable SP-6 Sample Player |
33 |
Enable DJ-FX |
33 |
Serato Playlists |
33 |
Serato Video |
33 |
Troubleshooting and Frequently |
|
|
|
Asked Questions |
34 |
Corrupt File Descriptions and |
|
Diagnoses |
35 |
Scope Reading and Fixes |
36 |
Declaration of Conformity |
38 |
Limited Warranty |
39 |
RANE SL1 FOR SERATO SCRATCH LIVE • OPERATOR’S MANUAL 2.4.4 |
5 |
|
|

Getting
Started
Installing Scratch Live
Mac
1. Insert the Software Installation CDROM and double-click the installer icon.
or
Launch the installer you just downloaded from serato.com.
2. Follow the on-screen instructions. Once the installation is complete, Scratch Live will appear in your applications list. You may like to drag the Scratch Live icon to your dock for quick launching.
3. Plug in your SL1. No extra hardware or driver installation is required.
Windows
It is important that Windows users install the SL1 drivers as well as the Scratch Live software. The easiest way to do this is to allow the Scratch Live installer to do all the work.
1. Connect your SL1 before you insert your installation CD. When you first connect it, Windows will attempt to install the drivers via the hardware wizard. Cancel and close the hardware wizard.
2. Insert the Software Installation CDROM. Make sure your SL1 is connected first. If a window doesn’t open automatically, browse to the CD drive. Run setup.exe.
or
Launch the installer you just downloaded from serato.com.
3. Follow the on-screen instructions. Once the installation is complete, Scratch Live appears in the Start Menu under All Programs > Serato > Scratch Live.
Because the SL1 was connected prior to installing Scratch Live, no extra hardware installation is required.
NOTE: Select the custom install option if you wish to change the installation location of Scratch Live.
Additional Windows Drivers
Once Scratch Live is installed, any additional hardware that is connected will be recognized and the drivers will be automatically installed.
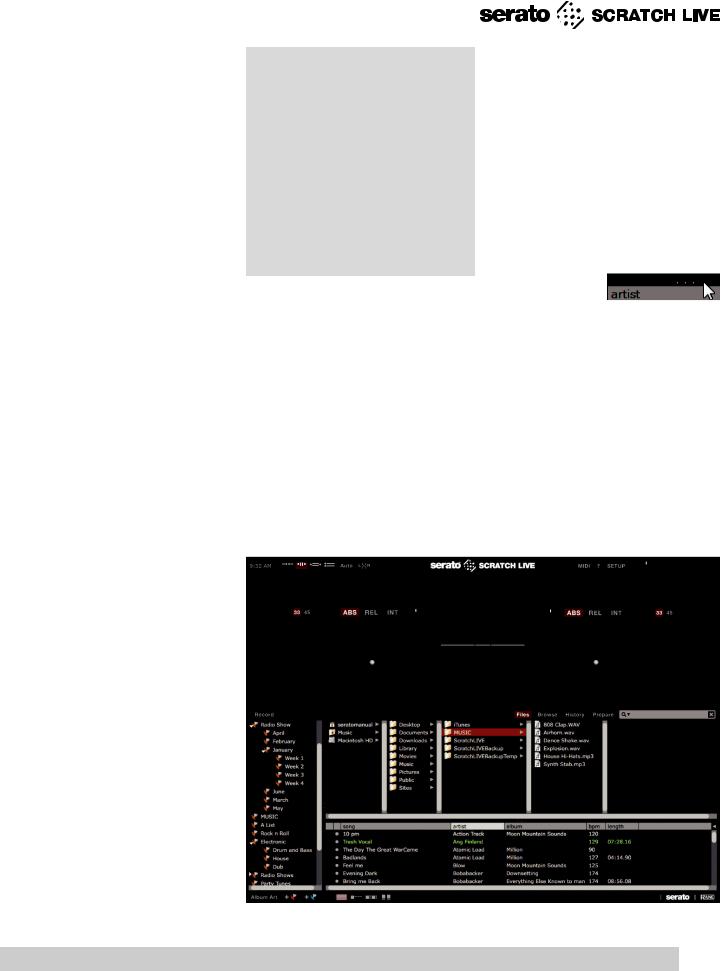
Starting the Software
Close all other programs on your Mac or PC. When you load Scratch Live for the first time, you will see the screen shown above.
Using the Tool Tips
Click on the ? icon to enable tool tips. Tool tips provide a handy way to learn the various features of Scratch Live.
Move the mouse over a section of the screen to bring up a context-sensitive tool tip. Holding the mouse over the ? button with tool tips turned on will show you a list of all keyboard shortcuts. Tool tips are available in several languages. Scratch Live will display the tool tips in the language that your computer is set to. If your language is not available, the tool tips will be displayed in English.
6 |
RANE SL1 FOR SERATO SCRATCH LIVE • OPERATOR’S MANUAL 2.4.4 |
|
|

TO MIC |
|
USB TO COMPUTER |
|||||||||||||
FROM TURNTABLE |
|
|
|
|
|
|
|
|
|
|
|
|
|
FROM TURNTABLE |
|
OR CD PLAYER OUT |
|
|
|
|
|
|
|
|
|
|
|
|
|
OR CD PLAYER OUT |
|
|
|
|
|
|
|
|
|
|
|
|
|
|
|
|
|
|
|
|
|
|
|
|
|
|
|
|
|
|
|
|
|
|
|
|
|
|
|
|
|
|
|
|
|
|
|
|
|
|
|
|
|
|
|
|
|
|
|
|
|
|
|
|
|
|
|
|
|
|
|
|
|
|
|
|
|
|
|
|
|
|
|
|
|
|
|
|
|
|
|
|
|
|
|
|
|
|
|
|
|
|
|
|
|
|
|
|
|
|
|
|
|
|
|
|
|
|
|
|
|
|
|
|
|
|
|
|
|
|
|
|
|
|
|
|
|
|
|
|
|
|
|
|
|
|
|
|
|
|
|
|
|
|
|
|
|
|
|
|
|
|
|
|
|
|
|
|
|
|
|
|
|
|
|
|
|
|
|
|
|
|
|
|
|
|
|
|
|
|
|
|
|
|
|
|
|
|
|
|
|
|
|
|
|
|
|
|
|
|
|
|
|
|
|
|
|
|
|
|
|
|
|
|
|
FROM TURNTABLE GROUND |
|
|
|
|
|
|
|
|
|
|
|
FROM TURNTABLE GROUND |
|||||
|
|||||||||||||||||
|
|
|
|
|
|
|
|
|
|
|
|
|
|
|
|
|
|
|
|
|
|
|
|
|
|
|
|
|
|
|
|
|
|
|
|
|
|
|
|
|
|
|
|
|
|
|
|
|
|
|
|
|
|
|
MIC IN PHONO LINE PHONO LINE |
GROUND |
|
||||||||||||||
|
|
|
|
|
|
|
|
|
|
|
|
|
|
|
|
|
|
Connecting Your Hardware
The Scratch Live control records and CDs are pressed with an audible tone specifically developed for controlling the Scratch Live software application.
The SL1 interface converts the control signal coming from each deck into digital audio, to be sent via USB to the Scratch Live software, which decodes that signal into a stream of information based on what the DJ is doing with the control disc. A ‘Virtual Deck’ replicates the movements of the control disc. Audio files loaded onto the Virtual Decks are then played back through the outputs of the hardware, with any manipulation of the control discs reproduced on the audio, effectively emulating vinyl control of the files loaded in software.
Connecting the SL1
To integrate an SL1 unit into a typical DJ setup, connect it to your turntables (or CD players) and mixer as follows:
Connect the Turntables or CD Players.
Plug the cables from your decks, into the input sockets of the SL1, plugging the left deck into input 1 and right deck into input 2.
Connect the Line Outputs to your Mixer.
The output from Scratch Live comes from the OUTPUTS on the SL1. Using the included RCA cables, Connect the LEFT DECK LINE OUTPUTS into a left line input your mixer, and the RIGHT DECK LINE OUTPUTS into a right Line Input of your mixer. If your mixer has selectable input levels, set these to Line level.
Connect your Thru Outputs to your Mixer. The THRU outputs on the SL1 are used if you want to play regular vinyl or CDs during your set. They allow you to bypass your Scratch Live software, sending audio direct from the SL1 inputs to your mixer (i.e. the sound from your records or CDs). Connect these to your mixer inputs, matching the level of your decks. In general, turntables are phono level, and CD players are line level.
Once your THRUS are connected, you can switch to your vinyl or CD’s using the phono/line switch or transform switch on the top of your mixer.
If you hear the sound of your control discs instead of music from Scratch Live, you are listening to the thrus rather than the line outputs.
The thrus only work when the SL1 is powered, either by a computer over USB, or by the optional DC power supply.
Connect the SL1 to your computer.
Using the provided USB cable, connect your SL1 to an available USB port on your computer. Connect it directly to your computer and not through a hub or splitter.
Turntable Setup
Set the tone arms to the recommendations of the cartridge, such that the needle never leaves the record, but not heavy enough that it heats up significantly. Both produce poor tracking.
Grounding is extremely important when using Scratch Live. Make sure you have good connections from the ground wires of your turntables to the grounding post of your DJ mixer. All DJ mixers with turntable inputs have built in grounding points for this purpose. If you do not ground your turntables properly, the control signal will be noisy and the tracking of the record position will be erratic.
CD Player setup
Disable all built-in effects on the CD player, including keylock/master tempo. Ensure the input level in Scratch Live is set correctly to accept a LINE level signal.
See “Audio Input Level” on page 30.
RANE SL1 FOR SERATO SCRATCH LIVE • OPERATOR’S MANUAL 2.4.4 |
7 |
|
|
Connecting A Mic
Connect an optional standard dynamic microphone to the SL1 Mic Input using a ¼" unbalanced Tip-Sleeve cable or
adaptor. Connect the Mic THRU output to a Mic input on your DJ mixer.
Use the MIC GAIN knob on the SL1 to attenuate the mic input level. This is only a trim control, and will not turn off the mic when turned all the way down (counterclockwise). Use the Mic controls on your mixer to turn the mic off.
Optional Power Supply
Connect an external power supply to the SL1 to power the THRU channels when USB power is not present. This allows you to play vinyl or CDs without a host computer;usefulforpermanentinstallations or using more than one computer. The power supply is 9 volts DC, 300 mA, using a P6 type barrel plug. Any substitute must meet these specifications.
-(5.5mm) +(2.5mm)
Kensington Security Slot
You can use a Kensington security cable to attach the SL1 to an immovable object. Each side of the SL1 has a Kensington
Security Slot. Refer to the instructions provided with your Kensington Lock.
Calibrating
Scratch Live
Since Scratch Live is controlled by an analogue signal, there is no guarantee of what state that signal will be in by the time the software gets to interpret it. Therefore, Scratch Live needs to be able to handle a wide range of signals, and be configurable to use them optimally. Calibrating is just configuring the software to your situation.
Calibration is equally important for both vinyl and CD users of Scratch Live.
There are two parts to the Scratch Live control signal: The directional tone, and the noise map.
Listening to the control vinyl, the directional tone is the 1 kHz tone. The noise map sounds like random noise over the top of the tone.
The directional tone provides the current speed and direction of the record, while the noise map tells the software precisely where on the record the needle is currently.
The Noise Threshold
A threshold is a lower limit, below which a process will not occur. In the case of Scratch Live, the noise threshold is the limit below which the input signal will not be interpreted as control signal; in other words if it’s below the threshold, it is considered noise and ignored.
This setting is necessary because a stylus is very sensitive, and will inevitably pick up noise from the environment as well as the signal on the record, especially in the noisy environment of a live show.
How to Calibrate Scratch Live
With music playing in the background (from any source), put your needle on record with the turntable stopped. If you are using CD players, the same rules apply. Have the CD deck paused or stopped while calibrating. Ensure the input level in Scratch Live is set correctly
to accept a LINE level signal. See “Audio Input Level” on page 30.
Click and hold the estimate button until the slider stops moving. Moving the threshold slider to the left will make
Scratch Live more sensitive to slow record movement, but also more sensitive to background noise.
Repeat the process for each deck.
Things to remember:
•Your needle must be on the record.
•Your turntable (or CD player) must be stationary.
•The background music playing must be at a similar level to which you will play your set at.
•You should calibrate Scratch Live every time you play.
TIP: If the slider jumps to the far right, then you have a problem with noise in your turntables/CD players/mixer. Check all your connections and make sure your equipment is well earthed. In some situations you will not be able to improve the signal quality, and you will have to play on regardless. In this situation, stick to rel mode.
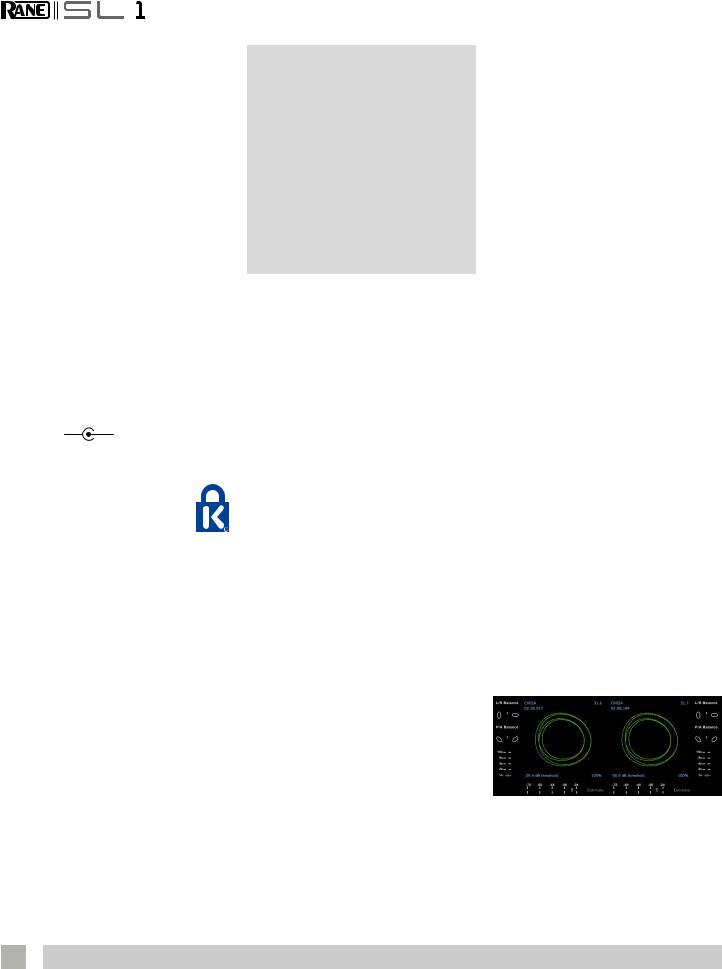
The Scopes
The scopes on the Setup screen in Scratch Live display the input signal as a phase diagram. The key factors to look at on the scope display are crisp clean lines, round shape, and the tracking percentage in the lower right corner.
8 |
RANE SL1 FOR SERATO SCRATCH LIVE • OPERATOR’S MANUAL 2.4.4 |
|
|
Start both turntables or CD players. You will see green rings appear in the scope view, as shown above.
For optimal performance the inner ring should be as close to circular as possible. Use the scope zoom slider (1x to 16x)
to zoom in or out as necessary. Use the scope L/R balance and P/A balance controls to adjust the shape of the inner ring.
The number in the top left corner of the scope view gives the current absolute position within the control record or CD. The number in the top right corner is
the current speed in RPM. In the bottom left is the current threshold setting, and the number in the bottom right shows the percentage of readable signal – this number should be close to 85% when your system is calibrated properly.
Calibration Troubleshooting
After calibration, the number in the upper right corner of the scope view should say 0.0 while the needle is on the record and the turntable is stopped.
If that number is fluctuating then manually move the estimate slider to the right until that number is stable at 0.0.
If you’ve moved the slider all the way to -24 and its still fluctuating then you
have a grounding or interference problem somewhere in the chain.
If so, the first thing to check is that the grounding wire coming from your turntable is connected to your mixer’s grounding posts.
Next, make sure that the SL1 isn’t sitting next to a power source such as a power strip or power box and that the rca cables connected to the SL1 aren’t laying across other power conducting cables.
If you are still experiencing issues, you might have to adjust the placement of your setup. For example, make sure bass bins aren’t directly under the turntables. for more calibration troubleshooting help see “Scope Reading and Fixes” on page 36.
Importing
and Playing
Music
Importing Your Music
The easiest way to load music into your library is by using the Files button:
1. Click on the Files button to open the files panel. The left side of this window displays various locations on your computer hard drive (and external drives if you have one). Click on these locations to navigate your computer and find your music.
By default, your music will usually be found in either “Music” (Mac) or “My Music” (Windows).
2. Once you have located your music, drag the folder or files you want to import onto the purple “ All...” icon. This is located to the left of your screen at the top of the crates and playlist window. If you wish to import all of your music, just drag your whole music folder onto this icon.
TIP: You can also import by dragging files and folders directly from Windows Explorer (PC version) or Finder (Mac version) into the Scratch Live library.
TIP: Adjust the size of the Files window by
clicking and dragging near the three dots up or down. The vertical crates window adjusts left and right.
Supported File Types
Scratch Live supports fixed and variable bit rate .MP3, .MP4, Ogg Vorbis, .AAC,
.AIFF, .ALAC, .FLAC, .WAV and Whitelabel (wl.mp3) file types. M3U playlists are also supported. For more on Whitelabel.net audio files, see “Whitelabel.net” on page 10.
RANE SL1 FOR SERATO SCRATCH LIVE • OPERATOR’S MANUAL 2.4.4 |
9 |
|
|

NOTE: iTunes Music Store DRM files cannot be played back by Scratch Live. iTunes Plus files are DRM-free.
Playing Music
Click on the “ All...” icon to show all the tracks in your library. Use the keyboard shortcut Shift + Left Arrow to load the highlighted track on to the left deck, and Shift + Right Arrow to load the highlighted track on to the right deck.
TIP: You can also load tracks to Virtual Decks using the mouse. Click and drag a track from the track list area on to either Deck.
To start playing a track, simply put the needle on the record and start the
turntable. The track will start playing as soon as it detects the signal from the control vinyl (or CD).
In ABS mode, the track will play from the position dictated by the placement of the needle on the record. If you place the needle at the beginning of the record, the track will start playing from the beginning. You can skip through the track by picking up the needle and placing it further into the record, just as with regular records (this is known as needle dropping). See “Scratch Live Modes” on page 15.
Track Display
When a track is loaded, the track name, artist and length are displayed in the track title bar, and the Virtual Deck shows a solid black line. If the track has BPM or key information written in the tag this will also be displayed. See “Set Auto-BPM” on page 11.
Whitelabel. |
|
Preparing |
net |
|
Your Files |
|
|
|
The Serato Whitelabel Delivery Network is a unique system that allows record labels to digitally deliver promotional releases directly to DJs.
To download Whitelabel audio files and to sign up to receive updates on the latest promotional releases, visit whitelabel.net.
Whitelabel Audio Files
Whitelabel.net audio files are a unique format (file extension wl.mp3) developed by Serato. They are specially prepared for use in Scratch Live; pre-analyzed, tagged with song and artist info, BPM and album art where possible.
Whitelabel audio files play as high quality 320 kbps stereo audio in Scratch Live when Rane Scratch Live hardware is connected. Without Scratch Live hardware connected, or when playing these files through other mp3 software and devices, they will play as low quality 32 kbps mono audio.
Whitelabel audio files are promotional releases from records labels available to Scratch Live DJs for free from Whitelabel. net.
Before you play your music in Scratch Live, It is important to first analyze your files.
The analyze files function processes the songs in your library to detect file corruption, saves the waveform overview to an ID3 tag*, and calculates auto-gain and BPM values.
How to Analyze Files
To analyze files start Scratch Live with the SL1 disconnected. On the left side of the main screen, click the Analyze Files button to automatically build the overviews for all the tracks in your library.
TIP: You can drag and drop individual folders, crates or files onto this button to force the building of overviews at any time.
About Corrupt Files
If Scratch Live detects a corrupt file it will tag it with a corrupt file icon:
It is very important that you delete ANY corrupt files from your library as they can cause Scratch Live to crash regardless
if you play the file or not. See “Status Icons” on page 26 and “Corrupt File Descriptions and Diagnoses” on page 35.
10 |
RANE SL1 FOR SERATO SCRATCH LIVE • OPERATOR’S MANUAL 2.4.4 |
|
|
Set Auto-BPM
If this option is checked while analyzing files, Scratch Live will calculate the estimated tempos of your files. If Scratch Live is confident that the auto-BPM estimate for a file is accurate, it will be written to an ID3 tag* in the file. The autoBPM function will not be applied if the track already contains BPM information. To re-analyze these files and use autoBPM or auto gain on them, drag them onto the Analyze Files button. If you know your files BPM will fall within a certain range, use the range drop down to avoid double or half value BPMs being calculated.
*ID3 tags contain data about your tracks and are saved inside the files themselves. Genre, track name and artist are examples of common tag information. See “Editing ID3 Tags” on page 26.
The Offline Player
The offlline player is a useful tool for preparing crates, auditioning tracks, and setting cue and loop points. The offlline player is available when Scratch Live hardware is not connected, and outputs through the current default audio device. Load a track to the offlline player by dragging and dropping onto the deck, or pressing shift + left arrow. If the end of the loaded track is reached, the next track in the current playlist is played automatically. Click the Offline Player Controls button (outlined below) to expand and hide the offline player controls.
For information on rescanning, moving, copying, deleting and backing up files, see “File Management” on page 26.
Playback
Control
The Control Record
The control record has two sides. The first side is 10 minutes long and contains the Vinyl Scroll section. The second side is 15 minutes long. Scratch Live can be configured to work with records playing at either 33 RPM or 45 RPM, depending on your preference. The record has thin marks every minute, and a thicker mark every 5 minutes (when playing at 33 RPM). These marks are to assist you when using needle dropping to move through the track. These marks do not affect the playback of the track.
The mode will switch when it reaches the end of the record so your track won’t stop. See”Absolute Mode” on page 15.
The Control CD
The control CD has two tracks. The first track is 15 minutes long and controls playback. The second track is 40 seconds long and controls vinyl scroll.
Vinyl Scroll
Vinyl Scroll allows you to select and load tracks using only your turntables (or CD player) – no contact with the computer necessary! To use Vinyl Scroll with turntables, lift the needle off the record and drop it into special “bonus track” section at the end of the record’s A side. The movement of the control disk now controls the selected track within your library. Lift the needle out of the Vinyl Scroll section of the record and into the lead out (between the Vinyl Scroll area and the end of the record) to change crates
or iTunes playlists. Go back to the Vinyl Scroll area of the record to choose a track within the crate or playlist. Once you have found the track you wish to play, put the needle back at the beginning of the record and it will load automatically. This feature is available to CD users. Go to track 2 on the control CD to access Vinyl Scroll. Find the track you want to load, and go back to track 1.
The track you selected will be loaded and ready to play. You can reverse the direction of Vinyl Scroll and set the sensitivity in the Setup screen.
TIP: You can also use Vinyl Scroll in the prepare window. See the options for “Vinyl Control” on page 31.
RANE SL1 FOR SERATO SCRATCH LIVE • OPERATOR’S MANUAL 2.4.4 |
11 |
|
|
Main Screen
Overview
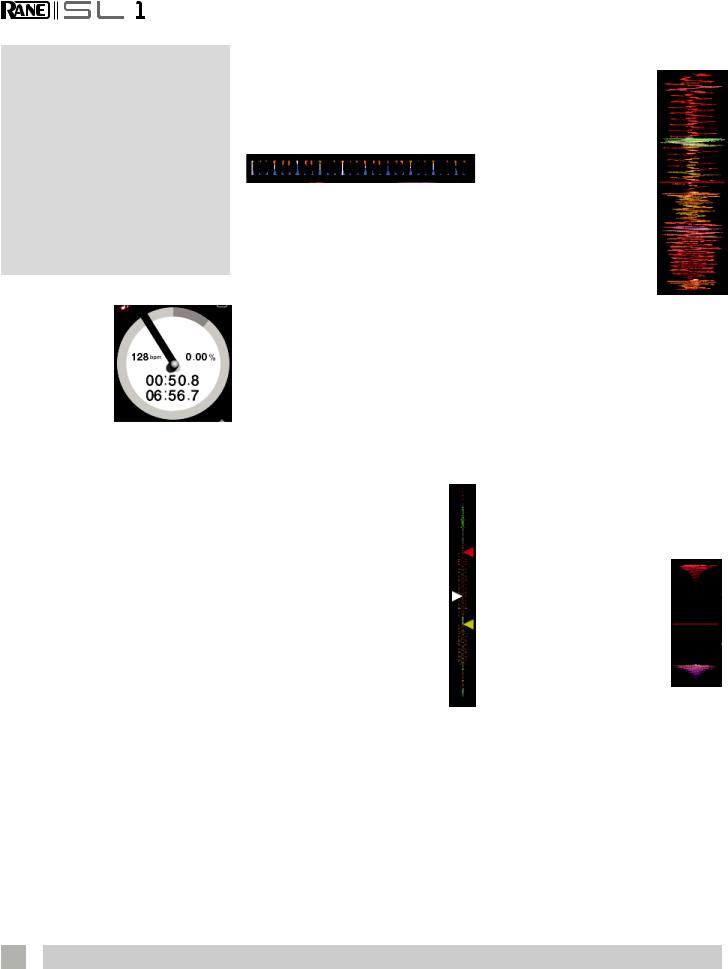
Virtual Deck
The Virtual Deck shows everything about the speed and position of a track. As the vinyl rotates, so does the line on the label. The circular
progress bar around the edge is a visual representation of the position within the song, and can be set to flash to warn you that the track is nearing its end. The time and remaining time are displayed in minutes and seconds. The pitched BPM (BPM with pitch adjustment multiplier added) is shown on the left of the Virtual Deck, and the turntable speed as a percentage pitch shift is shown on the right of the Virtual Deck. If the track has no BPM information, pitched BPM will not be shown.
If you are playing regular vinyl, notice that the Virtual Deck behaves strangely as Scratch Live attempts to decode the incoming signal. This will not cause any problems, but you may find it distracting. You can unload the currently loaded track using the eject button next to each Virtual Deck.
TIP: Use the keyboard shortcut shift- alt-arrow to unload a track from the Virtual Deck.
Visual Aids
When the track is playing several waveforms are displayed. Each shows a different aspect of the track being played.
Tempo Matching Display
The Tempo Matching display area provides a helpful tool for beat matching. Scratch Live detects the beats within the track, and places a row of orange peaks (for the track on the left side) above a row of blue peaks (for the track on the right side) in the Tempo Matching display area. When the two tracks are matched to the same tempo, the peaks will line up. Note that the tempo display is aligned with the beginning of the bar, so the peaks keep their relative position as the track plays. This display does not show the relative timing of the beats, only the track tempos. The peaks still line up when the tracks are at the same tempo, but are out of sync.
Track Overview Display
This view provides a complete overview of the track waveform, and includes a marker to show the current position within the track. This view is useful for finding transitions within the track. The waveform is colored according to the sound spectrum
– red representing low frequency bass sounds, green representing mid frequency sounds and blue representing high frequency treble sounds.
You can jump to different
positions within the track by clicking on the Track Overview display (disabled
in ABS Mode). Grey lines behind the overview show the length of the track – a thin grey line every minute, and a thick grey line every 5 minutes. The overview will be filled when you load the track onto a Virtual Deck. On slower computers, you should disable Autofill overviews in the Library tab of the Setup screen. See “Preparing Your Files” on page 10
and “AutoFill Overviews” on page 32.
Main Waveform Display
This view provides a closeup of the track, including color coding to show the frequency of the sound; red representing low frequency bass sounds, green representing midfrequency sounds and blue representing high-frequency treble sounds. You can also switch to a three-band spectrum view by holding the ctrl key and clicking
on the waveform. Click on the waveform to ‘scrub’ or
make fine adjustments to your position within the track. This applies to INT mode only, and may be useful if you wish to set cue points in your tracks without your turntables or CD players connected. The Main Waveform is zoomed around the current position in the track. See “Cue Points” on page 17 and “Scratch Live Modes” on page 15.
TIP: Use the + and – keys to zoom in and out.
TIP: Waveform can be either vertical or horizontal. See “Display Modes” on page 14.
Kick Drum
In this example, the red part of the wave represents a kick drum, while the purple part represents a snare drum.
Snare Drum
12 |
RANE SL1 FOR SERATO SCRATCH LIVE • OPERATOR’S MANUAL 2.4.4 |
|
|
Loading...