


 Loading...
DRZH
User Guide
Guía del usuario
Guide d’utilisation
Guida per l’uso
Benutzerhandbuch
Appendix
English (3–8)
Español (9–14)
Français (15–20)
Italiano (21–26)
Deutsch (27–32)
English (34)

2

User Guide (English)
Introduction
Thank you for purchasing the DRZH. At Rane, performance and reliability mean as much to us as they do to you. That’s why we design our equipment with only one thing in mind—to make your performance the best it can be.
Box Contents
DRZH
Mounting Screws
User Guide
Safety & Warranty Manual
Support
For the latest information about this product (documentation, technical specifications, system requirements, compatibility information, etc.) and product registration, visit rane.com.
For additional product support, visit rane.com/support.
3
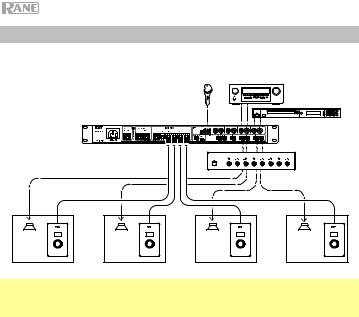
Setup
Items not listed under Introduction > Box Contents are sold separately.
Audio
Inputs
Zonetech
Zone
Amplifier
Zone |
Zone |
Zone |
Zone |
4 |
3 |
2 |
1 |
Note: Use a shielded Ethernet cable (Cat5e or Cat6) to connect the RJ45 port on the rear panel to the main audio processing unit (e.g., a Rane Zonetech, HAL3s, or Terminal 1010x).
4
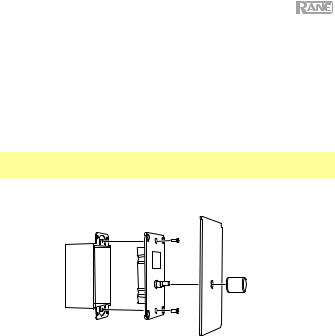
Installation
DRZH can be mounted in a standard 1-gang US electrical box:
1.Run a shielded Ethernet cable (Cat5e or Cat6) from the audio processing unit to the electrical box, and then connect it to the RJ45 port on DRZH's rear panel. DRZH can be located up to 300 meters (984 feet) from the processing unit.
2.Use the included screws to secure the DRZH rear housing to the electrical box and wall.
Note: A minimum 1/4" diameter by 1" depth (6.35 x 25.4 mm) pilot hole is required for the included wall anchors.
3.Make sure the knob has been removed, then place the faceplate over the DRZH housing and reattach the knob.
Screws
Knob
1-gang US |
DRZH Rear |
DRZH |
Electrical Box |
Housing |
Faceplate |
5
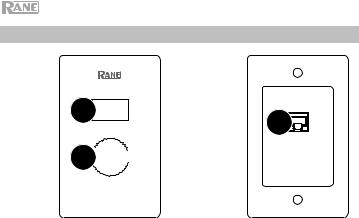
Features
Front |
|
Rear |
Panel |
|
Panel |
|
1 |
3 |
|
|
2

1.Display: This screen shows the setting that the knob on DRZH is currently adjusting. Push the knob to select the next setting.
2.Knob: Turn this knob to adjust the setting currently shown in the display. Push the knob to select the next setting.
3.RJ-45 Port: Use a shielded Ethernet cable (Cat5e or Cat6) to connect this port to the main audio processing unit (e.g., a Rane Zonetech, HAL3s, or Terminal 1010x).
6

Operation
By default, the display on DRZH will show the volume setting for the current room (zone): Volume.
To adjust the volume, turn the knob.
You can access and adjust other settings, as well, depending on the system DRZH is connected to.
To select another setting, push the knob. The current setting will be shown in the display.
The adjust the current setting, turn the knob.
7

Troubleshooting
If you encounter a problem, try doing these things first:
•Make sure all cables and other connected devices are properly and securely connected.
•Make sure you are using DRZH as described in this user guide.
•Make sure your other devices or media are working properly.
•If you believe DRZH is not working properly, check the following for your problem and solution.
Problem: Power does not turn on.
Solution: Make sure DRZH’s RJ45 port is properly connected to and located within 300 meters (984 feet) from your audio processing unit.
Please see: Setup
8

Guía del usuario (Español)
Introducción
Gracias por comprar el DRZH. En Rane, el rendimiento y la confiabilidad significan tanto para nosotros como para usted. Por eso es que diseñamos nuestros equipos con una sola cosa en mente—hacer que pueda tocar su mejor interpretación.
Contenido de la caja
DRZH
Tornillo de montaje
Guía del usuario
Manual sobre la seguridad y garantía
Soporte
Para obtener la información más reciente acerca de este producto (documentación, especificaciones técnicas, requisitos de sistema, información de compatibilidad, etc.) y registrarlo, visite rane.com.
Para obtener soporte adicional del producto, visite rane.com/support.
9

Configuración
Los elementos que no se enumeran en Introducción > Contenido de la caja se venden por separado.
Entradas
de audio
Zonetech
Amplificadore
de zona
Zona |
Zona |
Zona |
Zona |
4 |
3 |
2 |
1 |
Nota: Utilice un cable Ethernet blindado (Cat5e o Cat6) para conectar el puerto RJ45 al panel trasero de la unidad de procesamiento de audio principal (por ej., un Zonetech, HAL3s, o Terminal 1010x de Rane).
10
Instalación
El DRZH se puede montar en caja eléctrica simple estándar de EE.UU.:
1.Conecte un cable Ethernet blindado (Cat5e o Cat6) desde la unidad de procesamiento de audio a la caja eléctrica y luego conéctelo al puerto RJ45 del panel trasero del DRZH. El DRZH se puede colocar a una distancia de hasta 300 m (984 pies) de la unidad de procesamiento.
2.Utilice los tornillos incluidos para sujetar la carcasa trasera del DRZH a la caja eléctrica y la pared.
Nota: Se requiere un orificio guía de 1/4 pulg. de diámetro por 1 pulg de ancho como mínimo para los anclajes de pared incluidos.
3.Asegúrese de que haber extraído la perilla, coloque la placa frontal sobre la carcasa del DRZH y vuelva a colocar la perilla.
|
Tornillos |
|
|
|
Knob |
Caja eléctrica |
Carcasa trasera |
Placa frontal |
simple de EE.UU. |
del DRZH |
del DRZH |
11
Loading...