

Page 1
Page 2

Page 3
1
ES
FR
ENGLISH
Thank you for choosing Jongo S340B. This manual will
get you up and running in no time, and explains how
to make the most of your Jongo. We’re constantly
improving and adding new features to our products.
To take advantage of any enhancements made since
your product was shipped, please visit www.pure.com
where you can check for any updated versions of
software and download the latest version of this user
guide in PDF format.
Page 4
2
Jongo Safety Instructions
1. Read these instructions – All the safety and operating instructions should be read before this
product is operated.
2. Keep these instructions – The safety and operating instructions should be retained for future
reference.
3. Heed all warnings – All warnings on the appliance and in the operating instructions should be
adhered to.
4. Follow all instructions – All operating and use instructions should be followed.
5. Clean only with dry cloth.
6. Do not install near any heat sources such as radiators, heat registers, stoves, or other apparatus
(including amplifiers) that produce heat.
7. Only use attachments/accessories specified by the manufacturer.
8. Unplug the apparatus during lightning storms or when unused for long periods of time.
9. Refer all servicing to qualified personnel. Servicing is required when the apparatus has been
damaged in any way, does not operate normally, or has been dropped.
10. To reduce the risk of electric shock, do not Remove plastic cover or screws as there are no userserviceable parts inside. Refer servicing to qualified personnel.
11 Avoid liquids getting into Jongo. Should not be immersed in water, or used where this may
happen, such as a bathroom.
12. Do not install this equipment in a confined or building-in space such as a book case or similar
unit, and remain a well ventilation conditions at open site. The ventilation should not be impeded
by covering the ventilation openings with items such as newspaper, table-cloths, curtains etc.
13. WARNING Please refer the information on exterior bottom enclosure for electrical and safety
information before installing or operating the apparatus.
14. WARNING To reduce the risk of fire or electric shock, do not expose this apparatus to rain or
moisture. The apparatus shall not be exposed to dripping or splashing and that objects filled with
liquids, such as vases, shall not be placed on apparatus.
15. CAUTION: Danger of explosion if battery is incorrectly replaced. Replace only with the same or
equivalent type.
16. WARNING: The direct plug-in adapter is used as disconnect device, the disconnect device shall
remain readily operable.
17. This equipment is a Class II or double insulated electrical appliance. It has been designed in
such a way that it does not require a safety connection to electrical earth.
18. Separation distance of at least 20cm must be maintained between the antenna of the product
and all persons.
19. The power rating marking is located on the rear of the main unit.
ChargePAK F1 Safety Instructions
1. Read the instructions for ChargePAK use in this document.
2. Only use your ChargePAK with original Pure products.
3. Store ChargePAK in a cool, dry place at normal room temperature. Remove from devices that will
be stored unused for extended periods.
4. Do not puncture, modify, drop, throw, or cause other unnecessary shocks to your ChargePAK.
May present a risk of fire, explosion, or chemical burn if mistreated.
5. Do not dispose of ChargePAK in a fire or incinerator, or leave in hot places such as a motor car
under direct sunlight. Do not store near oven, stove, or other heat source.
6. Do not connect ChargePAK directly to an electrical source, such as a building outlet or
automobile power-point. Do not place into a microwave oven, or any other high-pressure
container.
7. Do not immerse ChargePAK in water or otherwise expose it to liquids.
8. Do not short circuit ChargePAK.
9. Do not use or charge a ChargePAK that appears to be leaking, discolored, rusty, deformed;
emitting an odor; or is otherwise abnormal.
10. Do not touch a leaking ChargePAK directly; wear protective material to remove and dispose of it
properly immediately.
11. Do not store where children may have access.
12. Dispose of ChargePAK as per normal rechargeable batteries according to the local laws and
regulations of your region. Some batteries may be recycled, and may be accepted for disposal at
your local recycling center.
Page 5

3
EN
Contents
4 Getting started
4 Introduction
5 Front panel controls
6 Rear panel controls and connectors
7 Symbols on the rear display
8 Switching between Sleep, On and Off
8 Power light states
8 Network setup
9 Preparing Jongo to connect to a wireless
network
10 Connecting Jongo to your wireless network
using Push Button Configuration
10 Manually connecting Jongo to your wireless
network
10 Stage 1: Connecting your setup device to Jongo
11 Stage 2: Accessing Jongo Setup Manager
12 Stage 3: Adding Jongo to your wireless network
13 Streaming from a smartphone or tablet
13 Streaming from a Pure wireless music and radio
system
14 Using Bluetooth
14 Using the auxiliary input
15 Changing audio profiles
16 Using Jongo Setup Manager
19 Replacing the ChargePAK F1
20 Technical specifications
Page 6
4
Getting started
Introduction
Jongo S340B is a Wi-Fi/Bluetooth speaker that can be placed
wherever you like thanks to its built-in rechargeable battery pack.
Once connected to your Wi-Fi network you can enjoy synchronised
music, radio and much more, streamed from your smartphone, tablet
or compatible Pure products. For more casual audio streaming, you
can also use Bluetooth to stream one-to-one from a huge range of
mobile devices.
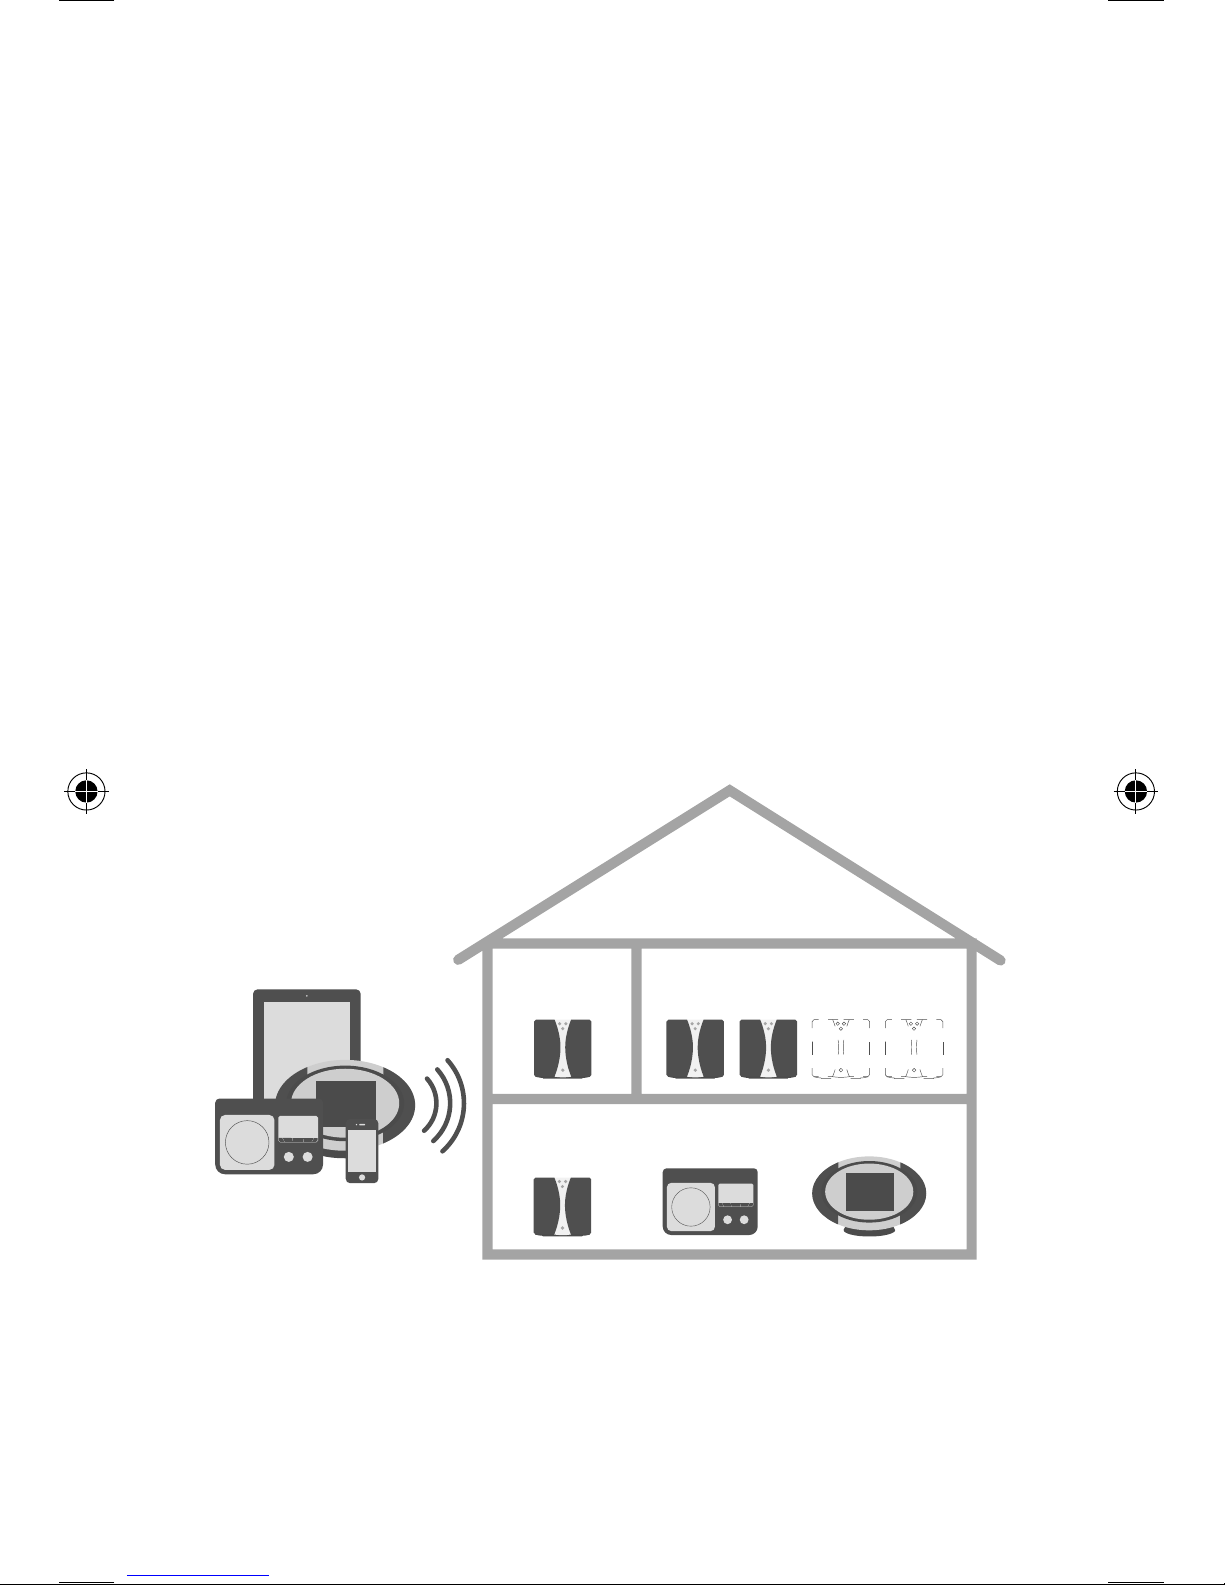
Jongo S340B is part of the Pure Jongo system. The Pure Jongo
system lets you start with a single Jongo S340B and expand within
a single room, or across multiple rooms, by adding more devices.
You can control all the devices using the Pure Connect app on your
iPad, iPhone or Android device, or by using a compatible Pure music
streaming and radio system*.
Note: Jongo S340B will be referred to as Jongo throughout the rest of
this user guide.
*Visit www.pure.com for more information on Jongo compatible Pure music
streaming and radio systems.
Page 7
5
EN
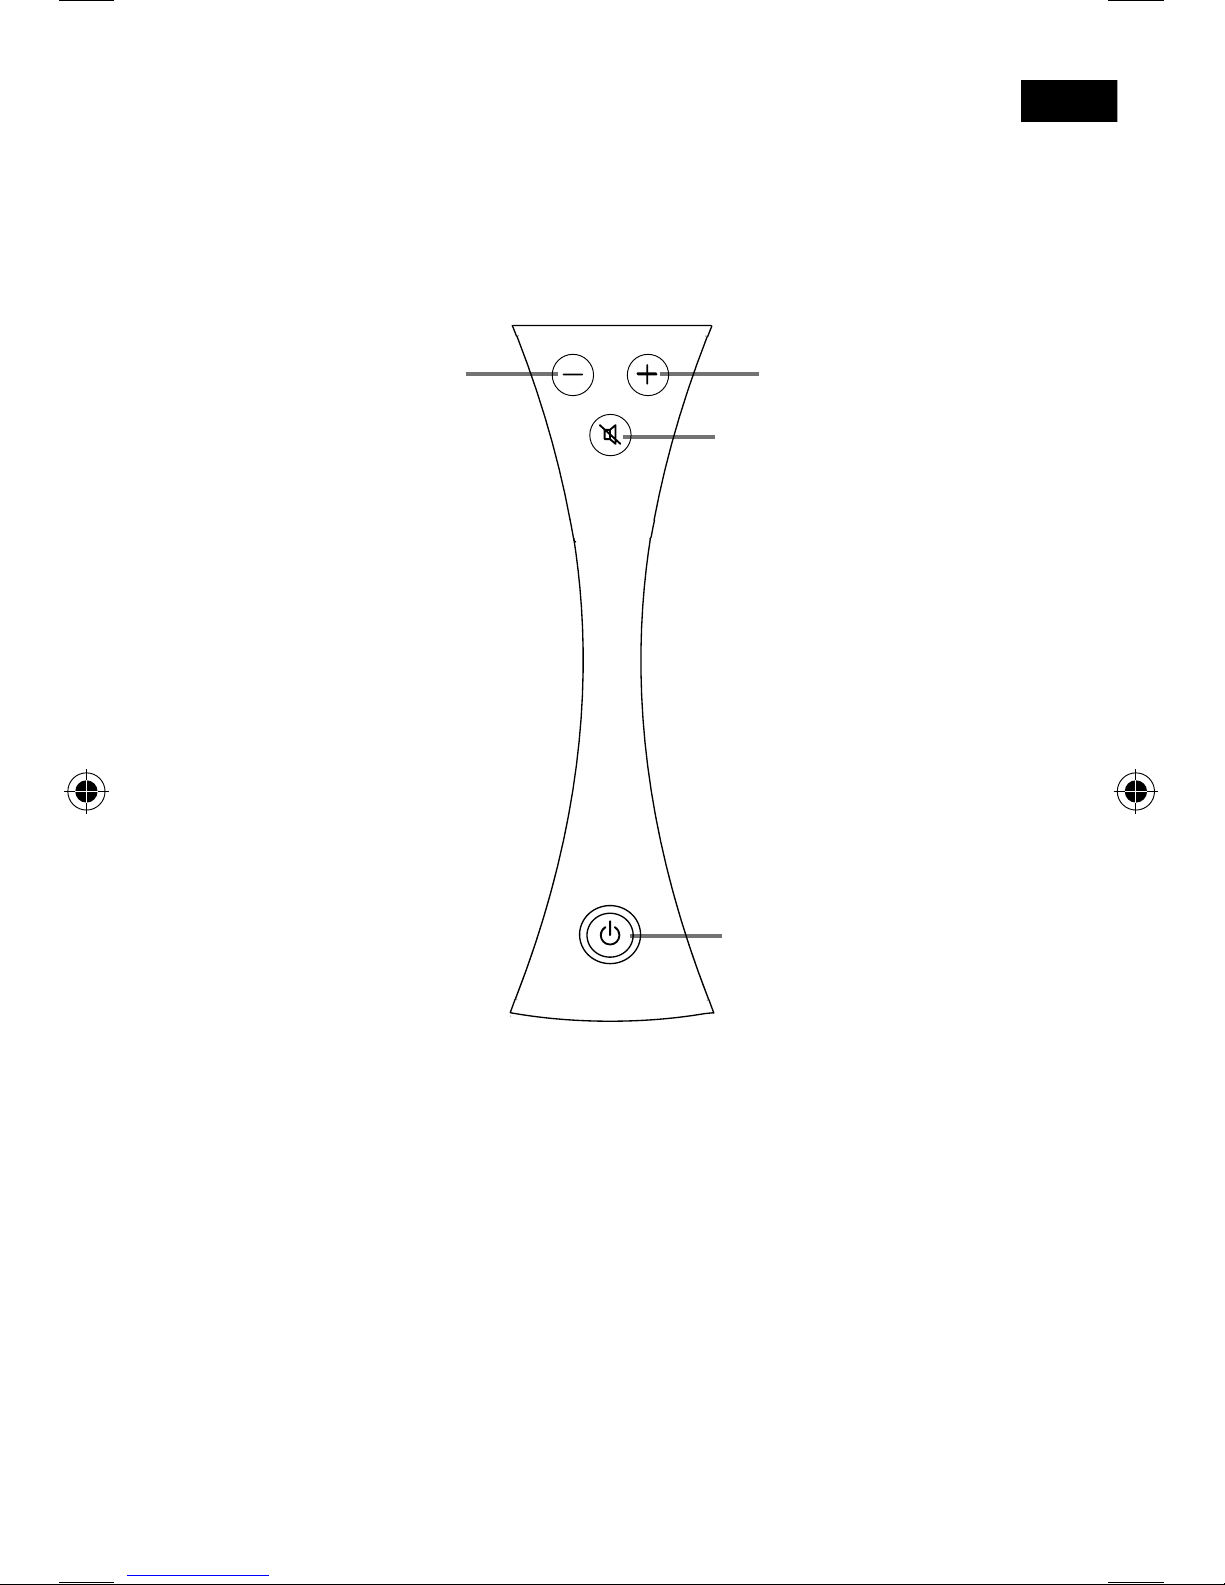
Front panel controls
Volume upVolume down
Mute
Press to mute the volume on
Jongo. Also used to trigger
software updates. See
support.pure.com for more
information on how to update
the software on Jongo.
Power
Press to switch between
Sleep, On and Off. Power
light also changes color
to indicate various states.
See page 8 for more
information.
Page 8
6
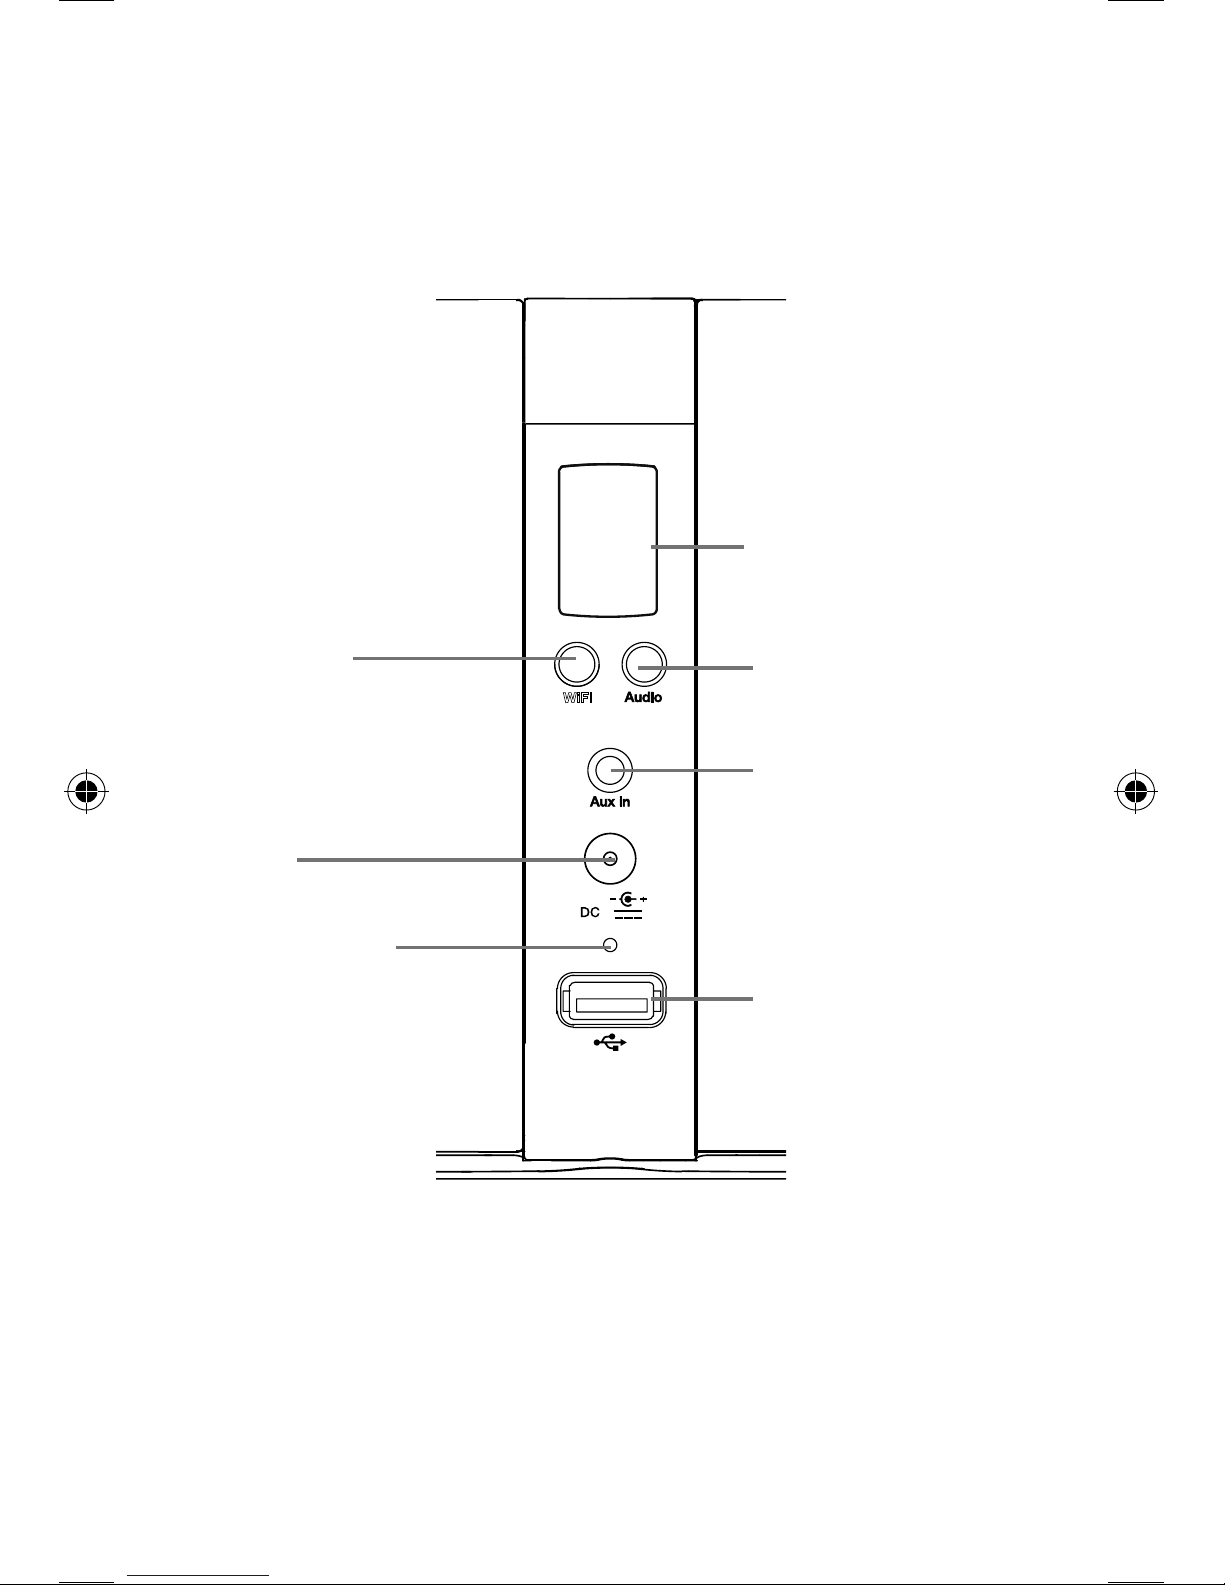
Rear panel controls and connectors
WiFi
9V
Rear LCD display
See page 7 for more
information.
Audio profile button
Press to switch between
audio profiles. See page
15 for more information.
WiFi button
Press to switch between Wi-Fi
Setup and Wi-Fi Connected
mode. Press and hold to setup
Jongo using Push Button
Configuration. See page 10
for more information.
Aux In
Connector for analogue
stereo input from an
MP3 player or similar.
DC In
Connector for supplied
mains adapter.
Reset button
Press to reset Jongo
to default settings.
USB
Connector for Bluetooth
adapter or optional USB
Ethernet adapter.
Page 9
7
EN
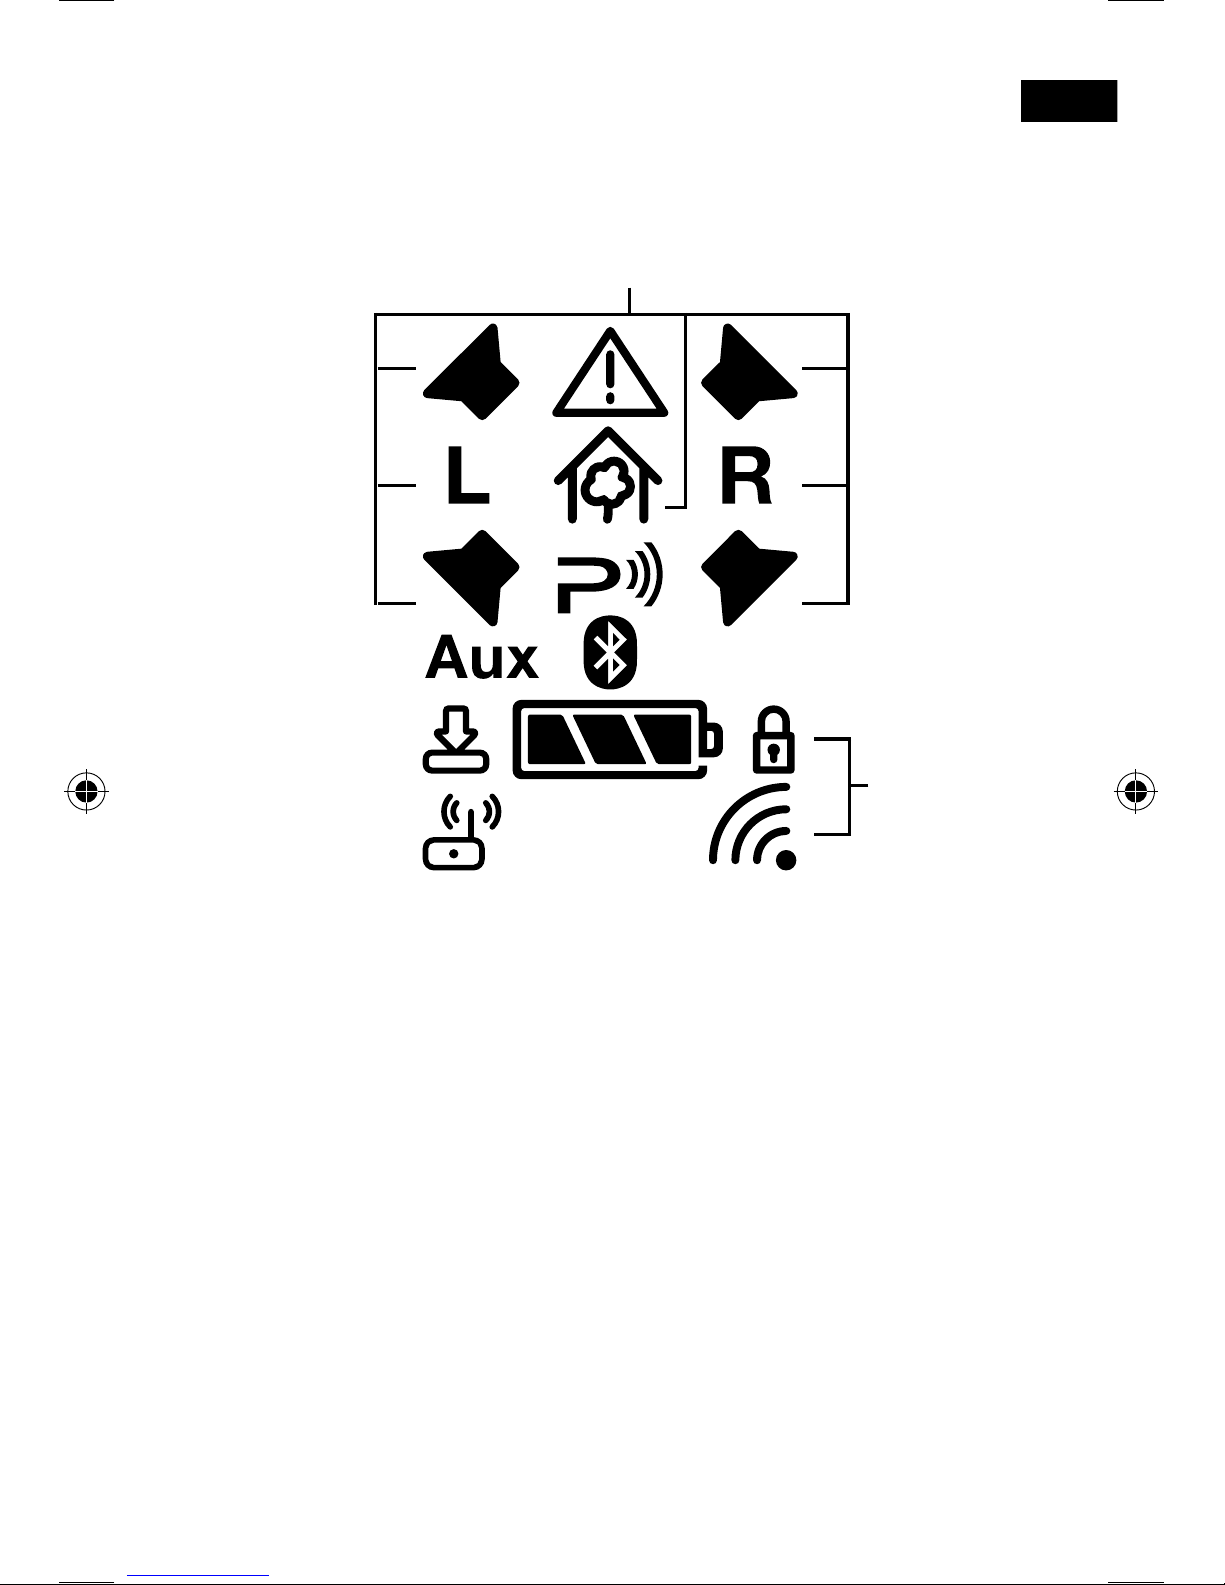
Symbols on the rear display
2
4
6
5
6 7
8
11
3
1.
Audio profile indicators (see
page 15 for more information).
2. Warning indicator. If a problem
occurs on Jongo, this icon
flashes along with the icon that
corresponds to the problem.
3. Indicates that Jongo is ready
to stream a track from the
Pure Connect app or from a
compatible Pure product. Icon
flashes when a track is being
streamed to Jongo.
4. Icon flashes to indicate that
an Aux device has been
connected. Icon stops
flashing if Aux device remains
connected and Jongo changes
audio source. If the Aux device
is disconnected from Jongo,
icon turns off.
5. Indicates that Jongo has
been successfully connected
to another device using
Bluetooth. Icon flashes if
playing a track via Bluetooth.
6. Indicates that a software
update is taking place.
7. Indicates how much power is
left in ChargePAK. Icon flashes
when ChargePAK only has five
minutes of charge remaining.
8. Indicates that Jongo is in Wi-Fi
Setup mode.
9. Indicates the Wi-Fi signal
strength. Padlock icon
indicates that Wi-Fi network
requires a password.
1
9
Page 10

8
Switching between Sleep, On and Off
Jongo has three power states, Sleep, On and Off. In Sleep, Jongo
remains connected to the wireless network and waits to receive audio.
If the Bluetooth adapter is inserted, Jongo is also ready and waiting
to receive Bluetooth pairing / connection / playback requests in Sleep
(Power light is amber).
To enter Sleep, briefly press the Power button (Power light turns
amber).
Once in Sleep, press the Power button to switch to On (Power light
turns green).
To turn Jongo off, hold the Power button until Jongo turns off.
Note: Before switching off completely, Jongo will check to see if your
ChargePAK needs additional time to charge fully. The Power light will
light red while the ChargePAK is charging.
Power light states
The Power light on Jongo is also used to indicate the various states of
Jongo, by color.
Green
(Pulsing) Indicates that Jongo is preparing to stream audio.
Also indicates that Jongo is busy connecting to a wireless
network.
Red (Pulsing) Indicates that Jongo is booting up.
Amber (Flashes twice) Indicates that you have tried to increase
the volume but Jongo is already at maximum volume.
(Flashes continuously (slowly)) Indicates that Jongo is
in Wi-Fi Setup mode.
(Flashes continuously (rapidly)) Indicates that Jongo is
waiting for a file before carrying out a software upgrade.
Network setup
Jongo can be connected to your network using a wireless or wired
connection.
We recommend using the wireless connection method, which allows
you to position your Jongo anywhere within range of your wireless
network. See page 9 for more information.
If you want to use the wired connection method, you will need to
remove the Bluetooth adapter and plug in an optional Pure USB
Ethernet adapter. See the Pure website for more information.
Page 11
9
EN
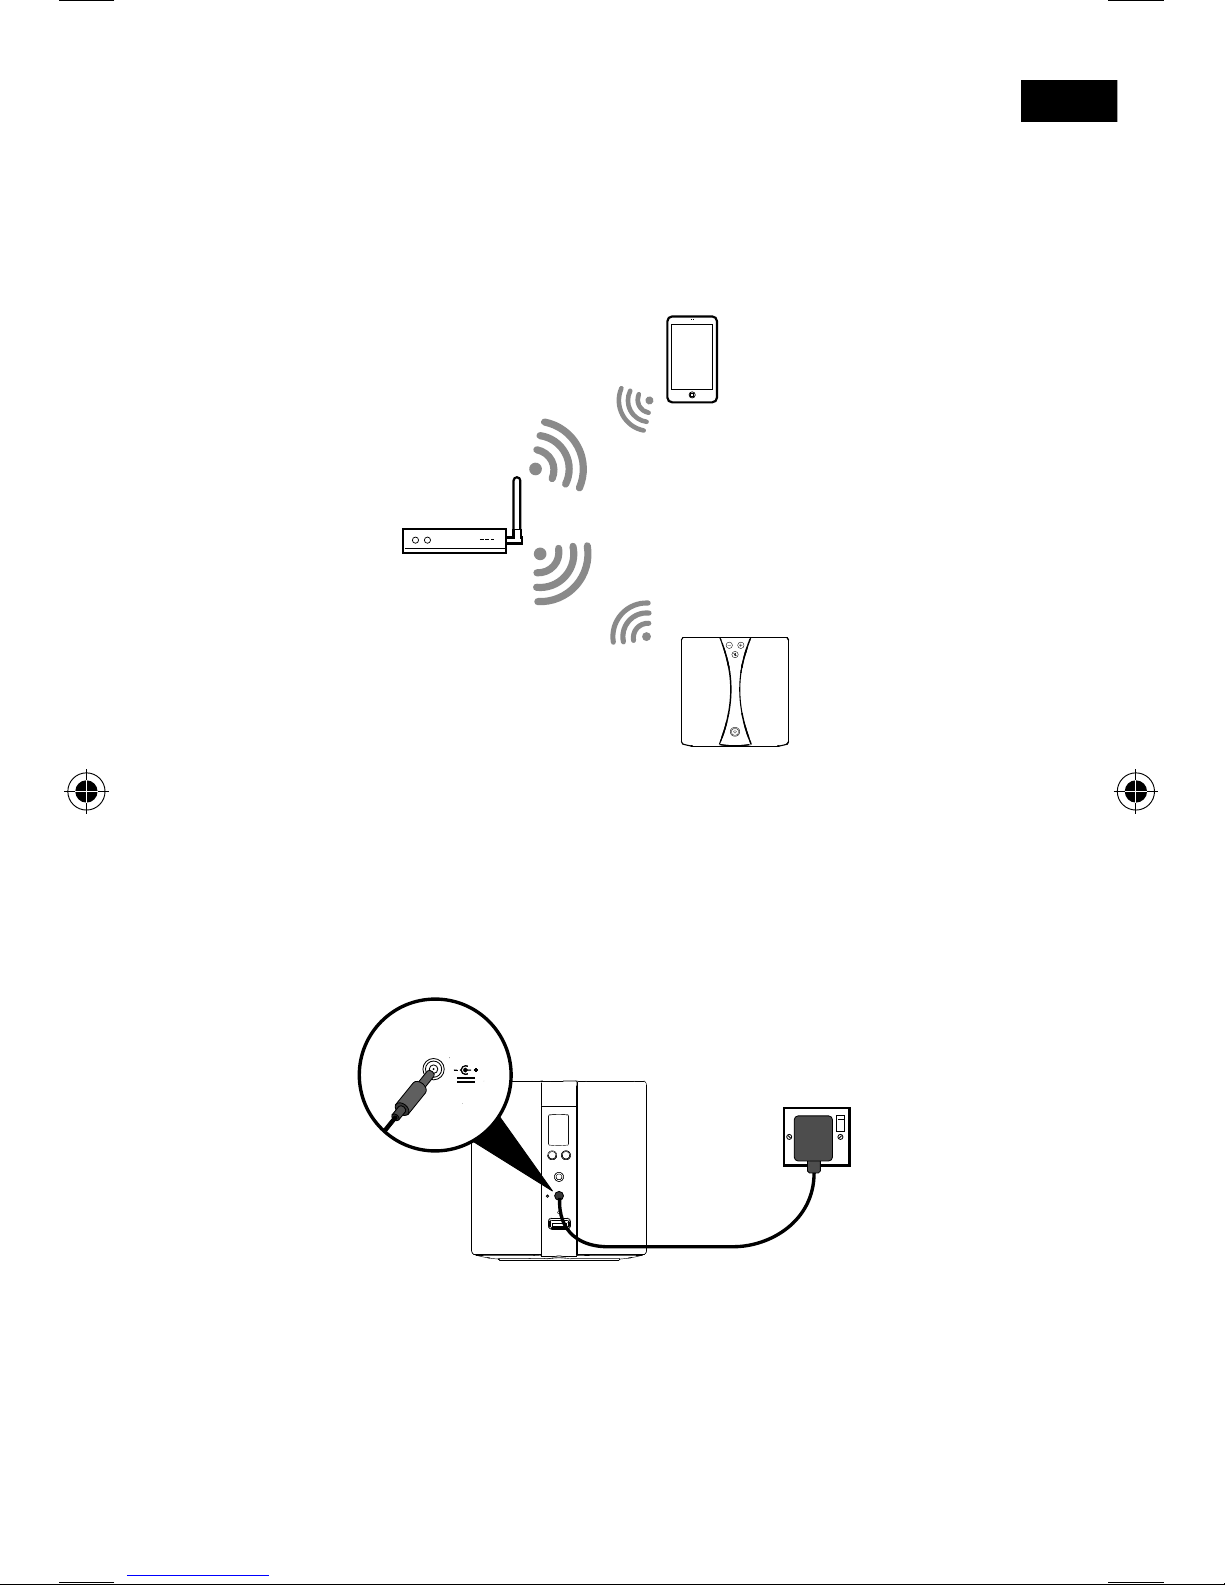
1. Position Jongo in range of your wireless network.
2. Insert the connector of the mains power adapter into the socket on
the rear of Jongo.
3.
Plug in to the mains supply. The Power light will pulse red while
Jongo is switching on.
4. When Jongo is first powered on, the Power light will pulse green.
Jongo’s Power light will then flash amber and start up in Wi-Fi
Setup mode.
Note: If the Power light does not turn amber, press the WiFi button
on the back of Jongo to put Jongo into Wi-Fi Setup mode.
5. Jongo supports two wireless connection methods. See page 10
to finish setting up your wireless connection.
9V DC
Preparing Jongo to connect
to a wireless network
Typical wireless setup
Page 12

10
Stage 1: Connecting your setup device to Jongo
In the first setup stage you need to establish a temporary wireless
connection between your setup device (iPod touch, iPhone, iPad,
laptop or Android device) and Jongo. Your setup device needs to
include a web browser and support a Wi-Fi connection.
Carry out the following to create a temporary wireless network to
connect Jongo to your iPod touch, iPhone, iPad, laptop or Android
device:
1.
Ensure that Jongo is in Wi-Fi Setup mode (see page 6 for more
information).
2.
On your setup device (iPod, iPhone, iPad or Android device etc),
the Jongo S340B ****** wireless network should now be visible.
Select this network. No password is required.
3.
Once you have connected to the Jongo S340B ****** wireless
network, you can access the Jongo Setup Manager on your setup
device’s web browser. Use Jongo Setup Manager to add Jongo to
your own wireless network.
Manually connecting Jongo
to your wireless network
Connecting Jongo to your
wireless network using
Push Button Configuration
You can use Push Button Configuration to connect Jongo to you
wireless network if WPS is supported by your router. Refer to your
router user guide for more information on WPS.
1. Press the WPS button on your router.
2. Press and hold the WiFi button on Jongo. Jongo’s Power light will
pulse green while Jongo attempts to connect to your network.
3. When Jongo’s Power light is steady green, Jongo has successfully
connected to your network using Push Button Configuration. You will
now be able to start streaming tracks to Jongo. See page 13.
Note: The WPS function in some WPS-compatible routers may be
disabled by default. Consult your router documentation for more
information.
Page 13
11
EN
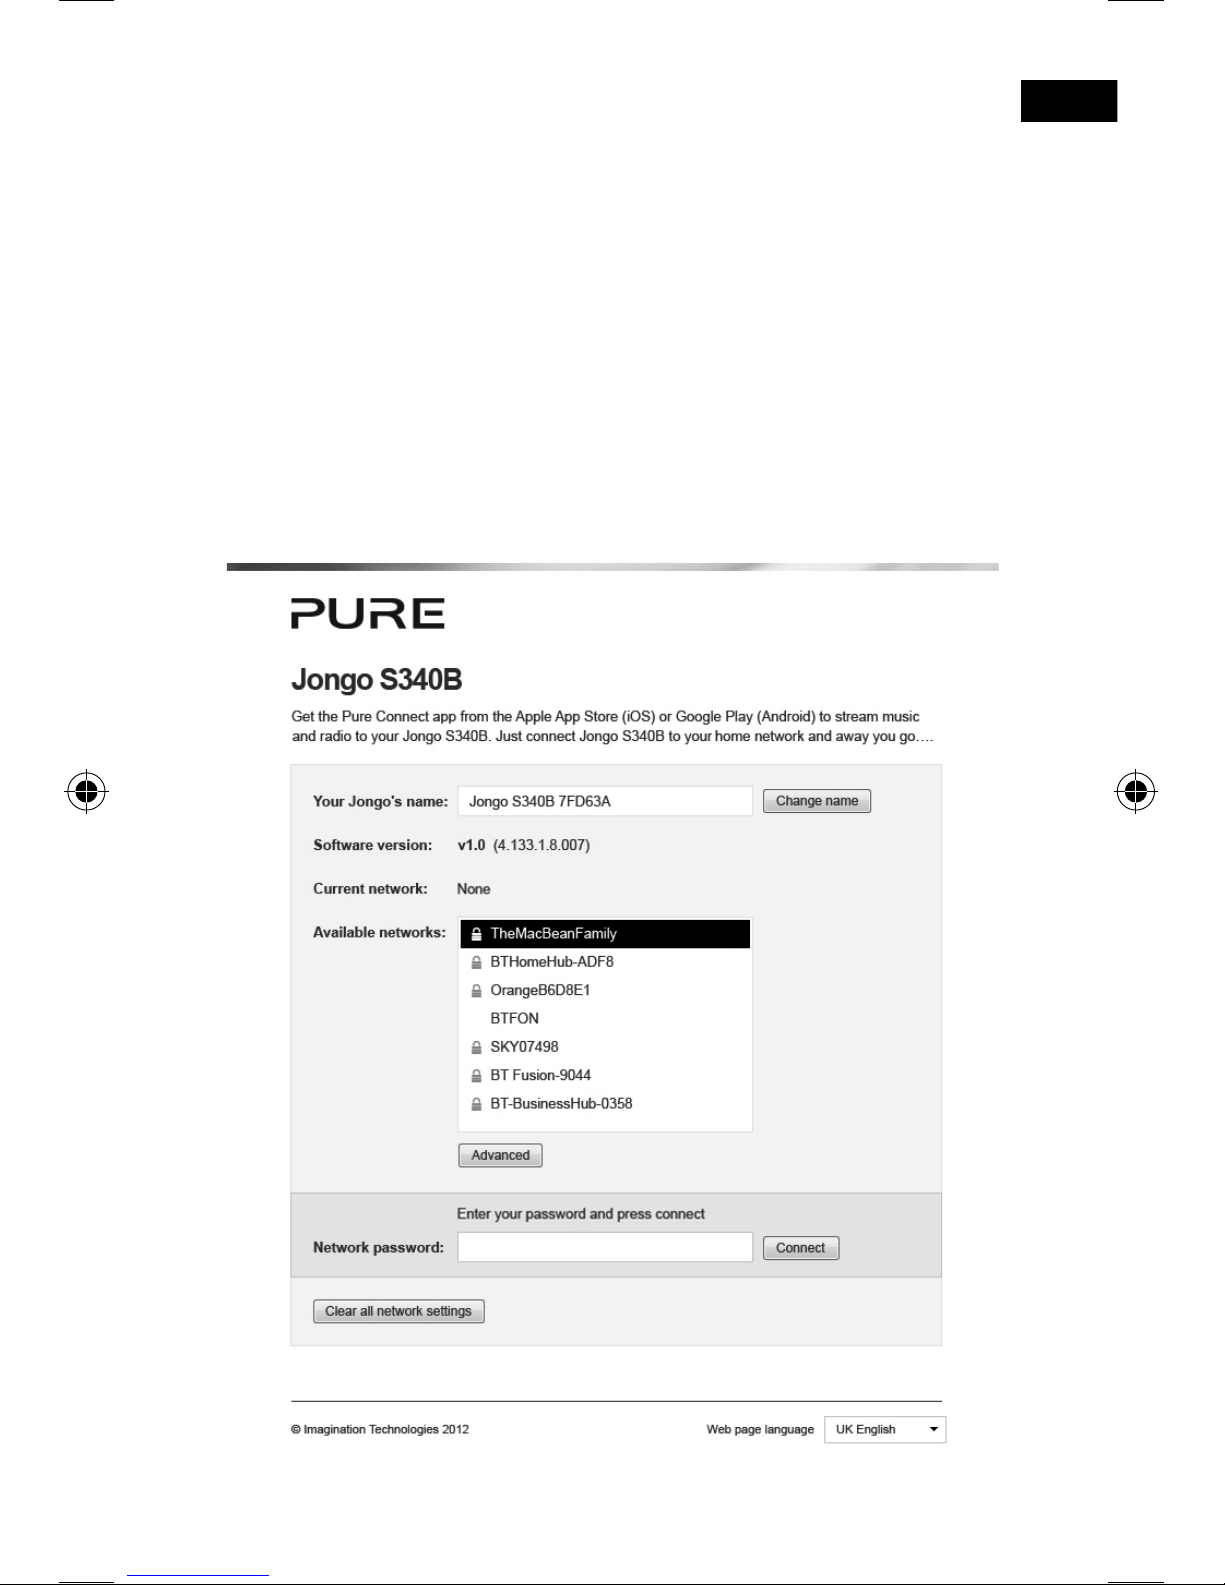
Stage 2: Accessing Jongo Setup Manager
Once you have established the temporary connection between your
setup device and Jongo, you can access Jongo Setup Manager as
follows:
1.
On your setup device, start your web browser (e.g. Safari, Google
Chrome, Microsoft Internet Explorer, Mozilla Firefox).
2.
Enter the following address:
http://192.168.1.1
3. The Jongo Setup Manager will be displayed:
Page 14

12
Stage 3: Adding Jongo to your wireless network
Jongo will automatically scan for available networks. If you want to
enter your wireless network settings manually see page 18.
Note: You may need to manually enter your wireless network settings
if your wireless network has a hidden SSID.
1.
Select the name of your own wireless network from the list of
Available networks. The encryption method will be automatically
detected.
2.
If required, enter the security key used by your network.
3.
Click Connect. Jongo’s Power light will pulse green while Jongo
attempts to connect to your network.*
4.
When Jongo’s Power light is steady green, Jongo has successfully
connected to your network. You will now be able to start streaming
tracks to Jongo. See page 13. If the Power light flashes red,
there is a problem with Jongo’s network connection. Check that
you have entered your network settings correctly and repeat the
steps outlined in “Manually connecting Jongo to your wireless
network” on page 10.
Note: We recommend that you contact your IT department before
attempting to connect Jongo to a corporate wireless network.
Page 15

13
EN
Streaming from a
smartphone or tablet
You can use the Pure Connect app to stream music stored on your
smartphone or tablet, internet radio stations, on-demand radio
programmes, podcasts and music from the Pure Music subscription
service to Jongo. The Pure Connect app also allows you to select the
devices that you want to send your audio to and control their volume
individually.
You can download the Pure Connect app on your smartphone or
tablet from the Apple App Store or Google Play.
Streaming is controlled entirely from the Pure Connect app. Please
see the help supplied with the app if you need further details of how
to use it.
Streaming from a Pure
wireless music and radio
system
You can also stream music and radio from selected Pure products
compatible with the Jongo system. Just like using the app you can
select the devices you want to send your audio to and control their
volume individually. Visit www.pure.com to get more information on
Pure products that can function as a Jongo system controller.
Page 16

14
Using Bluetooth
Using the auxiliary input
Connecting an auxiliary device
Connect the line out or headphone socket of your auxiliary device to
the Aux in socket on your Jongo using a suitable cable. Jongo will
automatically play any track that is playing on the auxiliary device.
Note: Any audio that you stream to Jongo will interrupt any audio
currently playing on a device connected to the auxiliary input. To
restart auxiliary playback, disconnect and reconnect the auxiliary
cable. Alternatively, use the power button to switch Jongo between
Sleep and On. See page 8 for more information.
You can also stream audio to Jongo from a Bluetooth device.
Note:
The procedure for adding a Bluetooth device varies on different
mobile devices. See your Bluetooth device manual for specific information.
Preparing Jongo to stream audio using Bluetooth
1.
Ensure that the Bluetooth adapter is inserted into Jongo’s USB connector.
2.
Enable the Bluetooth option on your mobile device.
3.
On your mobile device, select the option to add a new Bluetooth device. On
some mobile devices you may need to select the search or scan option.
4.
Start the pairing process on your mobile device. Do this by selecting
Jongo from the list of available devices that appear on the mobile device’s
screen. This will connect automatically once paired.*
5.
When Jongo has successfully paired and connected with your mobile
device, the Bluetooth icon will show on the rear display panel.
You will now be able to start streaming audio to Jongo from your
Bluetooth device.
Note: You will need to disconnect any connected Bluetooth devices
from Jongo to stream using Wi-Fi or to stream from a different Bluetooth
device. Bluetooth will automatically disconnect if you go out of range of
Jongo. To manually disconnect you will usually need to go through your
Bluetooth settings on your mobile device.
*Some legacy Bluetooth devices may prompt you to enter a passcode when trying
to pair with Jongo. If this occurs, enter the code 0000.
Page 17

15
EN
Jongo features four audio profiles. You can change the audio profile by
pressing the Audio button on the rear of Jongo. Each audio profile is
represented by a set of icons on the LCD screen as shown below.
Mono 360º
Select this profile to activate all five speakers
in Jongo. This option is ideal if placing Jongo
in the middle of a room or table.
Outdoor boost
Select this profile to boost all five speakers in
Jongo for outdoor use.
Stereo 360º
Select this profile to enable the four speakers
to play Stereo Left and Right audio - and
enable the subwoofer. This option is ideal for
creating a big stereo sound.
Stereo forward facing
Select this profile to enable stereo on the front
two speakers and enable the subwoofer. This
option is ideal if placing Jongo on a bookshelf
or in a corner.
Changing audio profiles
Page 18

16
Using Jongo Setup Manager
Introduction
The Jongo Setup Manager allows you to change various Jongo
settings, such as changing the name of the Jongo speaker (see page
17) and view the software version. To access Jongo Setup Manager,
put Jongo in Wi-Fi Setup mode (see page 6) and connect to the
Jongo S340B ****** wireless network. Enter http://192.168.1.1 into
your web browser to access Jongo Setup Manager.
Wireless network setup
The Wireless network setup page is divided into two main sections,
Jongo Name and Wireless Network Settings.
Wireless
Network
Settings
Jongo
Name
Page 19

17
EN
Changing Jongo’s name
If you prefer, you can change the name that the Pure Connect app,
Pure Stream and Bluetooth uses to identify Jongo.
Note: If you have already used Bluetooth to pair Jongo with another
device, you will need to carry out the pairing process again. See page
14 for more information on the Bluetooth pairing process.
1. Type the name (e.g. ‘Jongo Bedroom 1’) that you want to assign
Jongo in the Your Jongo’s Name box and click Change name.
2. Wait for the page to refresh to confirm that the new name has been
assigned to Jongo.
3. Push the WiFi button on the back of Jongo to put Jongo back into
Wi-Fi Connected mode (see page 6 for more information).
Wireless setup
See page 12 for more information on wireless setup.
Clear all network settings
To clear all network settings, click the Clear all network settings
button.
Note: You will need to reconnect to Jongo in Wi-Fi Setup mode
to re-configure the network settings. See page 6 for more
information.
Changing Jongo Setup Manager language
Use the Web page language drop-down menu to select the
language (UK English, US English, French, Italian, German, Spanish,
Danish, Dutch, Swedish, Norwegian, Russian, Portuguese, Arabic or
Turkish) that you want to use for Jongo Setup Manager.
Push the WiFi button on the back of Jongo to put Jongo back into
Wi-Fi Connected mode after changing the language settings (see
page 6 for more information).
Page 20

18
Advanced setup
If your wireless network is not broadcasting an SSID, you will need to
configure your wireless settings manually.
1. Click the Advanced button to open the Advanced window.
2. Enter the SSID of your router and select the encryption type of your
wireless network from the drop-down list below.
Note: Please check your wireless router configuration to find out
the type of encryption that is being used on your wireless network.
3. Enter the key/password needed to connect to your network in the
box below, if one is required.
4. Choose whether to assign a Static IP or DHCP IP address to
Jongo by clicking the appropriate radio button. If assigning a static
IP address, enter the IP address settings in their respective fields.
5. Click Connect. Jongo will restart and switch on in Wi-Fi
Connected mode.
You will now be able to stream audio from your smartphone or tablet
(see page 13 for more information).
Page 21

19
EN
1. Switch Jongo off and disconnect from the mains power supply.
2. Turn Jongo upside down and use a screwdriver to open the
battery compartment on the base of Jongo.
3. Replace ChargePAK so that the Pure label is facing the battery
compartment lid and the ChargePAK contacts line up with the
three terminals in the battery compartment.
4. Replace the battery cover and secure with the screw, ensuring
that the screw is not over-tightened, and connect your product
to a power supply.
5. ChargePAK will begin charging.
Note: When charging your ChargePAK for the first time or
after an extended period of inactivity it is recommended that
it is charged for around 24 hours to ensure full battery power.
If ChargePAK is completely flat, there may be a slight delay
before the battery charging indicator is displayed.
Note: It is normal for your ChargePAK to get warm, especially
during charging. Your ChargePAK will give years of trouble-free use
under normal circumstances, but like all rechargeable batteries its
efficiency will gradually reduce with age.
Important: Jongo can only be powered with a Pure ChargePAK F1
and is not compatible with any other batteries, either disposable or
rechargeable, or any other ChargePAK model.
Replacing the ChargePAK F1
Page 22

20
Speakers 4 x Mylar ¾" high frequency drivers, 1 x
Neodymium motor upward firing 3.5" mid/
bass driver
Audio output 4 x 2.5W + 10W RMS
Input connectors
9V DC power adaptor socket (110-230V
supplied), ChargePAK connector, 3.5mm
line-in for auxiliary devices. USB for product
upgrades, Bluetooth (dongle supplied) and
Ethernet connectivity (optional adapter
available).
Controls Power, Vol+, Vol-, Mute, Audio profile, Wi-Fi
setup, Reset.
Display 1" LCD display.
Network Wi-Fi: 802.11b and 802.11g supported
with WEP and WPA/WPA2.
Ethernet (requires optional adapter): 10/100
Mbps.
Bluetooth: A2DP supported via supplied USB
dongle.
Codec support Includes WMA (Standard V9), AAC, MP3, MP2
Mains power supply
Adapter:
Input AC 100-240V, 50/60Hz, 0.5A;
Output DC9V, 1500mA
Main unit: DC9V, 1500mA.
Battery ChargePAK F1 (supplied).
Dimensions 131 mm wide x 139 mm deep x 135 mm high
Weight 1.25 kg with ChargePAK, 1.0 kg without
ChargePAK
Approvals CE marked. Compliant with the EMC and
Low Voltage Directives (2004/108/EC and
2006/95/EC). ETSI EN 300 401 compliant.
Australian C-Tick N1600 and Electrical Safety.
Hereby, Pure declares that this Band II LPD
device is in compliance with the essential
requirements and other provisions of the
Directive 1999/5/EC. Please go to
www.pure.com for the full Declaration of
Conformity.
Technical specifications
Page 23

21
EN
Warranty information
Imagination Technologies Ltd. warrants to the end user that this product will be
free from defects in materials and workmanship in the course of normal use for
a period of two years from the date of purchase (One year for ChargePAK). This
guarantee covers breakdowns due to manufacturing or design faults; it does
not apply in cases such as accidental damage, however caused, wear and tear,
negligence, adjustment, modification or repair not authorised by us. Should
you have a problem with your unit please contact your supplier or contact Pure
Support at http://support.pure.com.
Disclaimer
Imagination Technologies Limited makes no representation or warranties with
respect to the content of this document and specifically disclaims any implied
warranties of merchantability or fitness for any particular purpose. Further,
Imagination Technologies Limited reserves the right to revise this publication
and to make changes in it from time to time without obligation of Imagination
Technologies Limited to notify any person or organization of such revisions or
changes.
Trademarks
Jongo, ChargePAK, Pure, the Pure logo, Imagination Technologies, and the
Imagination Technologies logo are trademarks or registered trademarks of
Imagination Technologies Limited.
Copyright
Copyright © 2012 Imagination Technologies Limited. All rights reserved. No part
of this publication may be copied or distributed, transmitted, transcribed, stored
in a retrieval system, or translated into any human or computer language, in any
form or by any means, electronic, mechanical, magnetic, manual or otherwise, or
disclosed to third parties without the express written permission of Imagination
Technologies Limited. Version 2 November 2012.
Disposal of Waste Electrical & Electronic Equipment
This symbol on the product or on its packaging indicates that
this product should not be treated as household waste. Instead
it should be handed over to a suitable collection point for the
recycling of electrical and electronic equipment. By ensuring this
product is disposed of correctly, you will help prevent potential
negative consequences for the environment and human health,
which could otherwise be caused by inappropriate waste handling
of this product. The recycling of materials will help to conserve
natural resources. For more detailed information about recycling
of this product, please contact your local council office, your
household waste disposal service or the shop where you purchased
the product.
Page 24

22
FCC NOTICE TO A USER IN THE UNITED STATES
This equipment has been tested and found to comply with the limits for a Class
B digital device, pursuant to Part 15 of the FCC Rules. These limits are designed
to provide reasonable protection against harmful interference in a residential
installation. This equipment generates, uses, and can radiate radio frequency
energy and, if not installed and used in accordance with the instructions,
may cause harmful interference to radio communications. However, there is
no guarantee that interference will not occur in a particular installation. If this
equipment does cause harmful interference to radio or television reception, which
can be determined by turning the equipment off and on, the user is encouraged to
try to correct the interference by one or more of the following measures:
•
Reorient or relocate the receiving antenna.
•
Increase the separation between the equipment and receiver..
•
Connect the equipment into an outlet on a circuit different from that to which the
receiver is connected.
•
Consult the dealer or an experienced radio/TV technician for help.
Warning! Any modification or changes to this device, unless explicitly approved by
Pure, will invalidate the authorisation of the device. Operation of an unauthorized
device is prohibited under Section 302 of the Communications Act of 1934,
as amended, and Subpart 1 of Part 2 of Chapter 47 of the Code of Federal
Regulations.
This device complies with part 15 of the FCC rules. Operation is subject to the
following two conditions: (1) This device may not cause harmful interference, and
(2) this device must accept any interference received, including interference that
may cause undesired operation.
This Class B digital apparatus complies with Canadian ICES-003.
IC NOTICE TO A USER IN CANADA
Since digital circuitry may cause interference to other radio or television tuners
nearby, switch this unit off when not in use or move it away from the affected radio/
television tuner.
NOTE: This digital apparatus does not exceed the Class B limits for radio noise
emissions from digital apparatus as set out in the Radio Interference Regulations
of Industry Canada. These limits are designed to provide reasonable protection
against harmful interference in a residential installation. This equipment generates,
uses and can radiate radio frequency energy and, if not installed and used
in accordance with the instructions, may cause harmful interference to radio
communications. However, there is no guarantee that interference will not occur in
a particular installation. If this equipment does cause harmful interference to radio
or television operation (which can be determined by turning the equipment off), the
user is encouraged to try to correct the interference by one or more of the following
measures:
•
Reorient or relocate the receiving antenna.
• Increase the separation between the equipment and receiver.
• Connect the equipment into an outlet on a circuit different from that to which the
receiver is connected.
•
Consult the dealer or an experienced radio / TV technician for help.
Page 25

1
ES
EN
FRANÇAIS
Merci d'avoir choisi l'enceinte Jongo S340B. L'objectif
de ce manuel est de vous permettre de mettre en
service votre appareil en un rien de temps et de
tirer parti de la plupart des fonctionnalités de votre
Jongo. Nous optimisons et ajoutons de nouvelles
fonctionnalités à nos produits en permanence. Pour tirer
parti des améliorations apportées depuis la sortie de
notre produit, rendez-vous sur le site www.pure.com,
où vous pourrez vérifier la disponibilité de mises à jour
logicielles et télécharger la dernière version de ce guide
utilisateur au format PDF.
Page 26

2
Instructions de sécurité relatives au Jongo
1. Veuillez lire les présentes instructions – vous devez lire toutes les instructions de sécurité et d'utilisation
avant d'utiliser cet appareil.
2. Veuillez conserver les présentes instructions – vous devez conserver les instructions de sécurité et
d'utilisation en lieu sûr pour toute référence ultérieure.
3. Veuillez respecter tous les avertissements – vous devez respecter tous les avertissements figurant sur
l'appareil ou dans le mode d'emploi.
4. Veuillez suivre toutes les instructions – vous devez suivre toutes les instructions d'utilisation.
5. Nettoyez l'appareil uniquement avec un chiffon sec.
6.
N'installez pas l'appareil à proximité de sources de chaleur, telles que les radiateurs, bouches de diffusion
d'air chaud, poêles, ou tout autre appareil (y compris des amplificateurs) produisant de la chaleu
r.
7. N'utilisez que des fixations/accessoires spécifiés par le fabricant.
8. Débranchez l'appareil en cas d'orages ou avant toute période d'inutilisation prolongée.
9. Faites exécuter toutes les tâches de service après-vente par des techniciens qualifiés. Le service-après
vente doit être sollicité si l'appareil a été endommagé, par exemple suite à une chute, ou s'il ne fonctionne
pas correctement.
10. Afin de réduire le risque de choc électrique, n'ôtez pas le capot plastique ni les vis, car aucune pièce à
l'intérieur de l'appareil n'est susceptible de requérir une intervention de la part de l'utilisateur. Les tâches
de maintenance doivent être exécutées par des techniciens qualifiés.
11.
Évitez toute projection de liquide sur le Jongo. L'appareil ne doit pas non plus être plongé dans l'eau, ou
utilisé dans une pièce où ce scénario est possible, par exemple la salle de bains.
12.
N’installez pas cet équipement dans un espace intérieur confiné, tel qu’une bibliothèque ou tout autre
espace similaire, mais plutôt dans un endroit aéré. Ne couvrez et n’obstruez pas les orifices de ventilation
de l’appareil avec des éléments tels que du journal, une nappe ou des rideaux.
13. AVERTISSEMENT : veuillez lire les informations indiquées en-dessous de l’appareil concernant les
branchements électriques et la sécurité avant d’installer ou de mettre l’appareil en marche.
14. AVERTISSEMENT : afin de réduire le risque d’incendie ou de choc électrique, n’exposez pas l’appareil à
la pluie ou à l’humidité.
L’appareil ne doit pas être exposé aux égouttements ou éclaboussements ; les objets
contenant des liquides, tels que les vases ne doivent pas être placés sur l’appareil.
15. ATTENTION : danger d’explosion si la batterie n’est pas remise en place correctement. Utilisez un
modèle identique ou équivalent pour remplacer les piles.
16. AVERTISSEMENT : l’adaptateur directement enfichable est utilisé comme appareil de sectionnement,
l’appareil de sectionnement doit être prêt à fonctionner à tout moment.
17. Cet appareil est de classe 2 ou dispose d’un équipement à double isolation électrique. Il a été
conçu de sorte à ne requérir aucune connexion de sécurité pour la mise à la terre.
18. U
ne distance de séparation d’au moins 20 cm doit être maintenue entre l’antenne du produit et les
personnes.
19. La mention de puissance nominale figure sur le retour de l’appareil.
Instructions de sécurité relatives à la batterie ChargePAK F1
1. Prenez connaissance des instructions liées à l'utilisation de la batterie ChargePAK, figurant dans ce
document.
2. Utilisez votre ChargePAK uniquement avec des produits originaux Pure.
3. Stockez votre ChargePAK dans un endroit sec, à température ambiante. Retirez-la des appareils amenés
à être stockés et non utilisés pendant une période prolongée.
4. Assurez-vous de ne pas percer, modifier, laisser tomber, lancer ou causer tout autre choc inutile à votre
ChargePAK, qui peut constituer un risque d’incendie, d’explosion ou de brûlures chimiques en cas de
mauvaise utilisation.
5. Ne jetez pas votre ChargePAK dans les flammes ni dans un incinérateur, ne la laissez pas directement
exposée aux rayons du soleil ou dans des endroits chauds, par exemple à proximité d’un moteur de voiture.
Ne conservez pas votre ChargePAK près d’un four, d’une cuisinière ou de toute autre source de chaleur.
6. Ne branchez pas votre ChargePAK directement à une source électrique telle qu’une prise de courant ou
l’allume-cigare d’une voiture. Ne la mettez pas dans un four à micro-ondes ni dans tout autre conteneur
haute pression.
7. Ne plongez pas votre ChargePAK dans l'eau. De manière générale, évitez toute projection de liquide sur
votre ChargePAK.
8. Ne placez pas votre ChargePAK en court-circuit.
9. N'utilisez ou ne rechargez pas votre ChargePAK si elle présente des traces de fuite, de décoloration, de
rouille ou de déformation, si elle émet une odeur suspecte ou si elle présente une autre anomalie, quelle
qu'elle soit.
10. Ne touchez pas directement votre ChargePAK si elle fuit. Portez des équipements de protection
individuelle pour l'évacuer et la mettre au rebut dans les plus brefs délais.
11. Ne conservez pas votre ChargePAK en un lieu où elle serait accessible par des enfants.
12. En fin de vie, procédez à la mise au rebut de votre ChargePAK comme vous le feriez avec des piles
rechargeables standard, en vous conformant aux lois et réglementations locales applicables. Certaines
batteries peuvent être recyclées et sont donc susceptibles d'être acceptées par votre centre de
recyclage local.
Page 27

3
FR
Table des matières
4 Pour commencer
4 Introduction
5 Commandes de la façade
6 Connectique et commandes du panneau arrière
7 Symboles utilisés sur l'écran LCD de contrôle
8 Sélection du mode Veille, Marche ou Arrêt
8 Les différents états du témoin d'alimentation
8 Paramètres réseau
9 Préparation de votre Jongo pour la connexion
à un réseau sans fil
10 Connexion de votre Jongo à votre réseau sans
fil en utilisant la configuration instantanée
10 Connexion de votre Jongo à votre réseau sans
fil en utilisant la configuration manuelle
10 Étape 1 : connexion de votre Jongo à l'appareil de configuration
11 Étape 2 : accès au gestionnaire de configuration Jongo
12 Étape 3 : ajout de votre Jongo à votre réseau sans fil
13 Diffusion en streaming à partir d'un smartphone
ou d'une tablette
13 Diffusion en streaming à partir d'un système
sans fil ou d'une radio Pure
14 Utilisation de la connexion Bluetooth
14 Utilisation de l'entrée auxiliaire
15 Modification des profils audio
16 Utilisation du gestionnaire de configuration
Jongo
19 Remplacement de la batterie ChargePAK F1
20 Caractéristiques techniques
Page 28

4
Pour commencer
Introduction
Jongo S340B est une enceinte Wi-Fi/Bluetooth pouvant être disposée
partout où vous le souhaitez, grâce à sa batterie rechargeable qui lui permet
de s'affranchir de toute liaison filaire. Une fois connecté à votre réseau Wi-Fi,
votre Jongo vous permet de profiter de musique synchronisée, de la radio
et de bien d'autres choses encore, à partir de votre smartphone, tablette
ou de vos produits compatibles Pure. Pour le streaming audio occasionnel,
vous pouvez également vous servir du Bluetooth pour la diffusion one-toone à partir d'une large gamme de périphériques mobiles.
Le Jongo S340B fait partie du système évolutif Pure Jongo, qui vous
permet de commencer par une simple enceinte Jongo S340B, puis
d'ajouter d'autres éléments au fur et à mesure afin d'optimiser le son
qui sera diffusé dans une ou plusieurs pièces. Vous pouvez piloter
tous ces appareils à partir de l'application Pure Connect sur votre
iPad, iPhone ou périphérique Android, ou bien en utilisant un système
ou une radio Pure compatible*.
Remarque : l'enceinte Jongo S340B sera communément dénommée
« le Jongo » dans le reste de ce guide utilisateur.
* Rendez-vous sur www.pure.com pour plus d'informations sur les systèmes et
radios Pure compatibles Jongo.
Page 29

5
FR
Commandes de la façade
Augmentation du volumeRéduction du volume
Silence
Appuyez sur ce bouton
pour couper le son émis
par le Jongo. Ce bouton
permet également de lancer
les mises à jour logicielles.
Rendez-vous sur support.
pure.com pour obtenir plus
d'informations sur la mise à
jour logicielle du Jongo.
Marche/arrêt
Permet de basculer entre
les modes Veille, Marche et
Arrêt. Le témoin lumineux
change de couleur afin
d'indiquer les différents états
de l'appareil. Reportez-vous
à la page 8 pour obtenir
plus d'informations.
Page 30

6
Connectique et commandes du panneau arrière
WiFi
9V
Écran LCD de contrôle
Reportez-vous à la
page 7 pour obtenir
plus d'informations.
Bouton d'accès aux
profils audio
Permet de commuter
entre les différents profils
audio. Reportez-vous à la
page 15 pour obtenir
plus d'informations.
Bouton Wi-Fi
Permet de passer du mode
Configuration Wi-Fi au
mode Connexion Wi-Fi.
Maintenez ce bouton
enfoncé pour paramétrer
automatiquement le Jongo
grâce à la configuration
instantanée. Reportez-vous
à la page 10 pour obtenir
plus d'informations.
Entrée auxiliaire
Connecteur d'entrée
pour le signal stéréo
analogique délivré par
un lecteur MP3 ou un
appareil similaire.
Port d'alimentation
Prise pour relier
l'adaptateur secteur fourni.
Bouton de
réinitialisation
Permet de restaurer
le Jongo sur sa
configuration d'usine.
Port USB
Permet de connecter
l'adaptateur Bluetooth*,
ou bien un adaptateur
USB Ethernet, proposé
en option.
Page 31

7
FR
Symboles utilisés sur l'écran LCD de contrôle
2
4
6
5
6 7
8
11
3
1.
Icônes de profils audio (reportezvous à la page 15 pour plus
d'informations).
2. Icône d'avertissement. Si un
problème survient sur le Jongo,
cette icône ainsi que celle liée à
l'anomalie se mettent à clignoter.
3. Indique que le Jongo est prêt à
diffuser un morceau à partir de
l'application Pure Connect ou
d'un produit Pure compatible.
Cette icône clignote pour
indiquer qu'un morceau est en
cours de diffusion sur le Jongo.
4. L’icône clignote pour indiquer
qu’un appareil auxiliaire a été
connecté. L’icône cesse de
clignoter si l’appareil auxiliaire
reste connecté et si Jongo
modifie la source audio.
Si l’appareil auxiliaire est
déconnecté de Jongo, l’icône
s’éteint.
5. Indique qu'une connexion a été
établie avec un périphérique
exploitant une connexion
Bluetooth. Cette icône clignote
pour indiquer qu'un morceau
est en cours de diffusion via la
connexion Bluetooth.
6. Indique qu'une mise à jour
logicielle est en cours.
7. Indique l'autonomie restante
pour la batterie ChargePAK.
Cette icône clignote pour
indiquer que la batterie
ChargePAK ne dispose plus que
de cinq minutes d'autonomie.
8. Indique que le Jongo est en
mode Configuration Wi-Fi.
9. Indique la puissance du signal
Wi-Fi. L'icône Cadenas indique
que la connexion au réseau
Wi-Fi nécessite de saisir un mot
de passe.
1
9
Page 32

8
Sélection du mode Veille, Marche ou Arrêt
Le Jongo peut revêtir trois états vis-à-vis de son alimentation électrique
: Veille, Marche ou Arrêt. En Veille, Jongo reste connecté au réseau
sans fil et attend la réception d’un flux audio. Si l’adaptateur Bluetooth
est inséré, Jongo est aussi prêt et attend de recevoir des demandes
de lecture/de connexion/d’appairage Bluetooth en Veille (le témoin
d’alimentation est jaune).
Pour passer en mode Veille, appuyez brièvement sur le bouton
Marche/arrêt (le témoin d'alimentation devient jaune).
Lorsque vous êtes en mode Veille, appuyez normalement sur le bouton
Marche/arrêt pour passer en mode Marche (le témoin d'alimentation
devient vert).
Pour mettre le Jongo hors tension, maintenez le bouton Marche/arrêt
enfoncé jusqu'à ce que le Jongo s'éteigne.
Remarque :avant de s’éteindre, Jongo vérifie si votre batterie
ChargePAK nécessite un délai supplémentaire pour se recharger
complètement. La DEL du mode Veille est rouge lorsque la batterie
ChargePAK est en charge.
Les différents états du témoin d'alimentation
Le témoin d'alimentation du Jongo permet d'indiquer ses différents
états, grâce à différentes couleurs et différents modes d'allumage.
Vert
(clignotements rapides) Indique que le Jongo se prépare à
diffuser un flux audio. Indique également que Jongo est en train
d’établir la connexion à un réseau sans fil.
Rouge (clignotements rapides) Indique que le Jongo est en phase
d'initialisation.
Jaune (2 clignotements) Indique que vous avez tenté d’augmenter le
volume alors que le Jongo est déjà réglé sur le volume maximal.
(clignotements permanents (lents)) Indique que le Jongo est en
mode Configuration Wi-Fi.
(clignotements permanents (rapides)) Indique que le Jongo est en
attente de réception d’un fichier avant d’effectuer une mise à jour
logicielle.
Paramètres réseau
Le Jongo peut être connecté à votre réseau en utilisant une liaison filaire
ou sans fil.
Nous vous recommandons d'utiliser la méthode de connexion sans fil,
qui vous permet de placer votre Jongo à l'endroit de votre choix,sous
réserve de rester dans le périmètre de portée de votre réseau.
Reportez-vous à la page 9 pour obtenir plus d'informations.
Si vous souhaitez utiliser une liaison filaire, vous devrez retirer l'adaptateur
Bluetooth et brancher l'adaptateur Pure USB Ethernet, proposé en option.
Consultez le site Web Pure pour obtenir plus d'informations.
Page 33

9
FR
1. Placez votre Jongo dans le périmètre de portée de votre réseau
sans fil.
2.
Insérez le connecteur de l'adaptateur secteur dans le port
d'alimentation situé à l'arrière du Jongo.
3.
Branchez l'adaptateur sur une prise secteur. Le témoin
d'alimentation va clignoter rapidement en rouge tout au long de la
phase d'initialisation du Jongo.
4. À la première mise sous tension du Jongo, le témoin d'alimentation
va clignoter rapidement en vert. Il va ensuite clignoter en jaune puis
va passer en mode Configuration Wi-Fi.
Remarque : si le témoin d'alimentation ne s'allume pas en jaune,
appuyez sur le bouton Wi-Fi situé à l'arrière de votre Jongo afin de
le placer en mode Configuration Wi-Fi.
5. Votre Jongo est compatible avec deux types de liaison filaire. Reportez-
vous à la page 10 pour finaliser la configuration de votre liaison sans fil.
9V DC
Préparation de votre Jongo pour la
connexion à un réseau sans fil
Configuration sans fil classique
Page 34

10
Étape 1 : connexion de votre Jongo à l'appareil
de configuration
La première étape de configuration consiste à établir une connexion
sans fil provisoire entre votre appareil de configuration (iPod touch,
iPhone, iPad, ordinateur portable ou périphérique Android) et votre
Jongo. Votre appareil de configuration doit disposer d'un navigateur
Web et autoriser une connexion Wi-Fi.
Procédez comme suit pour créer un réseau sans fil provisoire afin de
relier votre Jongo à votre iPod touch, iPhone, iPad, ordinateur portable
ou périphérique Android :
1.
Assurez-vous que le Jongo est en mode Configuration Wi-Fi
(reportez-vous à la page 6 pour plus d'informations).
2.
Le réseau sans fil Jongo S340B ****** doit apparaître sur votre appareil de
configuration (iPod touch, iPhone, iPad, ordinateur portable, périphérique
Android, etc.). Sélectionnez ce réseau. Aucun mot de passe n'est requis.
3.
Une fois la connexion établie avec le réseau sans fil Jongo S340B
******, vous pouvez accéder au gestionnaire de configuration Jongo
à partir du navigateur Web de votre appareil de configuration. Vous
allez maintenant utiliser le gestionnaire de configuration Jongo pour
ajouter votre Jongo à votre propre réseau sans fil.
Connexion de votre Jongo à votre
réseau sans fil en utilisant la
configuration manuelle
Connexion de votre Jongo à
votre réseau sans fil en utilisant
la configuration instantanée
La configuration instantanée vous permet de connecter automatiquement
votre Jongo à votre réseau sans fil, sous réserve que votre routeur prenne
en charge le protocole WPS. Pour plus d'informations sur le protocole
WPS, reportez-vous à la documentation de votre routeur.
1. Appuyez sur le bouton d'activation du protocole WPS sur votre routeur.
2. Maintenez enfoncé le bouton Wi-Fi de votre Jongo. Le témoin
d'alimentation va alors clignoter rapidement en vert, indiquant que
votre Jongo essaie de se connecter au réseau.
3. Le témoin d'alimentation du Jongo doit ensuite rester allumé en
vert, indiquant que la connexion du Jongo à votre réseau a bien été
établie via la configuration instantanée. Voir page 13.
Remarque : la fonction WPS peut être désactivée par défaut sur
certains routeurs compatibles WPS. Consultez la documentation de
votre routeur pour obtenir plus d'informations.
Page 35

11
FR
Étape 2 : accès au gestionnaire de configuration
Jongo
Une fois que vous avez établi une connexion provisoire entre votre
appareil de configuration et votre Jongo, vous pouvez accéder au
gestionnaire de configuration Jongo en procédant comme suit :
1. Sur votre appareil de configuration, lancez le navigateur Web (ex. :
Safari, Google Chrome, Microsoft Internet Explorer, Mozilla Firefox).
2.
Entrez l'adresse suivante :
http://192.168.1.1
3. Le gestionnaire de configuration Jongo s'affiche à l'écran :
Page 36

12
Étape 3 : ajout de votre Jongo à votre réseau
sans fil
Votre Jongo va automatiquement rechercher les réseaux disponibles.
Reportez-vous à la page 18.
Remarque : vous serez peut-être contraint de passer par une
configuration manuelle si votre réseau sans fil dispose d'un identifiant
SSID masqué.
1.
Sélectionnez le nom de votre réseau sans fil dans la liste Available
networks (Réseaux disponibles). Le mode de cryptage va être
automatiquement détecté.
2. Si nécessaire, saisissez la clé de sécurité utilisée par votre réseau.
3. Cliquez sur Connect (Se connecter). Le témoin d'alimentation
va alors clignoter rapidement en vert, indiquant que votre Jongo
essaie de se connecter au réseau.*
4.
Le témoin d'alimentation du Jongo doit ensuite rester allumé en
vert, indiquant que la connexion du Jongo à votre réseau a bien
été établie. Voir page 13. En revanche, le clignotement en rouge
du témoin d'alimentation indique qu'un problème est survenu
lors de la connexion réseau du Jongo. Vérifiez que vous avez
correctement défini vos paramètres réseau et répétez les étapes
dans “Connexion de votre Jongo à votre réseau sans fil en utilisant
la configuration manuelle” en page 10.
Remarque : avant de tenter de connecter votre Jongo à un réseau
sans fil d'entreprise, nous vous recommandons de prendre contact
avec votre service informatique.
Page 37

13
FR
Diffusion en streaming à partir
d'un smartphone ou d'une
tablette
Vous pouvez utiliser l'application Pure Connect pour diffuser sur votre
Jongo de la musique en streaming stockée sur votre smartphone ou
votre tablette, vos stations radio Internet, des programmes radio à
la demande, des podcasts et des flux audio obtenus via le service
d'abonnement Pure Music. L'application Pure Connect vous permet
également de sélectionner les périphériques vers lesquels vous
souhaitez diffuser vos flux audio, et de régler individuellement le
volume de ceux-ci.
L'application Pure Connect est téléchargeable sur votre smartphone ou
votre tablette à partir de l'Apple App Store ou de Google Play.
La diffusion en streaming est entièrement pilotée à partir de l'application
Pure Connect. Veuillez consulter l'aide fournie avec l'application si vous
avez besoin de plus amples informations sur son utilisation.
Diffusion en streaming à partir
d'un système sans fil ou d'une
radio Pure
Vous pouvez également diffuser de la musique et des programmes
radio à partir de certains produits Pure compatibles avec le système
Jongo. Ces derniers autorisent exactement les mêmes fonctions que
l'application Pure Connect, à savoir sélectionner les périphériques vers
lesquels vous souhaitez diffuser vos flux audio, et régler individuellement
le volume de ceux-ci. Rendez-vous sur www.pure.com pour obtenir
plus d'informations sur les produits Pure pouvant faire office de
contrôleur Jongo.
Page 38

14
Utilisation de la connexion Bluetooth
Utilisation de l'entrée auxiliaire
Connexion d'un lecteur auxiliaire
Reliez la sortie ligne ou la prise casque de votre lecteur auxiliaire à
l’entrée auxiliaire de votre Jongo, en utilisant le câble idoine. Votre
Jongo va automatiquement diffuser les morceaux en cours de lecture
sur le lecteur auxiliaire.
Remarque : si vous diffusez du flux audio sur Jongo, cela aura pour
effet d’interrompre le flux audio en cours de lecture sur un appareil
connecté à l’entrée auxiliaire. Pour relancer la lecture auxiliaire,
débranchez, puis rebranchez le câble auxiliaire. Vous pouvez aussi
utiliser le bouton d’alimentation pour passer Jongo du mode Veille à
Marche. Reportez-vous à la page 8 pour plus d’informations.
Vous pouvez également diffuser de l’audio en continu sur votre Jongo
depuis un appareil Bluetooth.
Remarque : la procédure d’ajout d’un appareil Bluetooth varie selon les
appareils mobiles. Reportez-vous au manuel de votre appareil Bluetooth
pour obtenir des informations spécifiques.
Préparation de votre Jongo pour diffuser de
l’audio en continu via Bluetooth
1. Assurez-vous que l’adaptateur Bluetooth est inséré dans le
connecteur USB de votre Jongo.
2. Activez l’option Bluetooth sur votre appareil mobile.
3. Sur ce dernier, sélectionnez l’option permettant d’ajouter un nouvel
appareil Bluetooth. Sur certains appareils mobiles, vous devrez peutêtre sélectionner l’option de recherche ou d’analyse.
4. Démarrez le processus de couplage sur votre appareil mobile. Pour
ce faire, sélectionnez votre Jongo à partir de la liste des appareils
disponibles qui s’affiche sur votre appareil mobile. Ce processus
vous connectera automatiquement une fois le couplage réalisé.*
5. Une fois que votre Jongo est correctement associé et connecté à
votre appareil mobile, l’icône du Bluetooth apparaît sur le panneau
d’affichage arrière.
Vous pouvez alors commencer à diffuser de l’audio en continu sur votre
Jongo depuis votre appareil Bluetooth.
Remarque : vous devrez déconnecter tout appareil Bluetooth connecté
de Jongo pour diffuser en Wi-Fi ou à partir d’un autre appareil Bluetooth.
Le Bluetooth se déconnecte automatiquement si vous vous trouvez hors
de portée de votre Jongo. Pour vous déconnecter manuellement, vous
devez en général passer par les paramètres Bluetooth de votre appareil
mobile.
*Certains appareils Bluetooth existants vous invitent à saisir un mot de passe lorsque
vous tentez d’associer votre Jongo. Si tel est le cas, saisissez le code 0000.
Page 39

15
FR
Le Jongo propose quatre profils audio. Vous pouvez changer de profil
audio en appuyant sur le bouton Audio situé à l'arrière du Jongo.
Chaque profil audio est représenté par un ensemble d'icônes sur
l'écran LCD de contrôle, qui sont repris ci-après.
Son mono à diffusion
omnidirectionnelle
Sélectionnez ce profil pour activer les quatre
haut-parleurs du Jongo et son subwoofer.
Cette option est idéale si vous disposez votre
Jongo au milieu d'une pièce ou d'une table.
Optimisation pour environnement
extérieur
Sélectionnez ce profil pour dynamiser le son
délivré par les quatre haut-parleurs du Jongo
et son subwoofer, afin de l'adapter à une
écoute en extérieur.
Son stéréo à diffusion
omnidirectionnelle
Sélectionnez ce profil pour diffuser les deux
canaux d'un signal stéréo sur les quatre hautparleurs du Jongo, et activer le subwoofer.
Cette option est idéale pour générer un son
stéréo particulièrement puissant.
Son stéréo à diffusion
monodirectionnelle
Sélectionnez ce profil pour diffuser un signal
stéréo sur les deux haut-parleurs avant du
Jongo et activer le subwoofer. Cette option
est idéale si le Jongo est placé sur une
étagère ou dans un coin de la pièce.
Modification des profils audio
Page 40

16
Utilisation du gestionnaire de
configuration Jongo
Introduction
Le gestionnaire de configuration Jongo vous permet de modifier différents
paramètres de votre Jongo, tels que le nom sous lequel il est détecté
(voir en page 17), et aussi de consulter sa version logicielle. Pour accéder
au gestionnaire de configuration Jongo, placez le Jongo en mode
Configuration Wi-Fi (voir en page 6) et connectez-vous au réseau sans
fil Jongo S340B ******. Saisissez l’adresse http://192.168.1.1 dans votre
navigateur Web pour accéder au gestionnaire de configuration Jongo.
Configuration de réseau sans fil
La page Wireless network setup (Configuration de réseau sans fil) se
divise en deux grandes sections : l'identifiant de votre Jongo et les
paramètres de réseau sans fil.
Paramètres
de réseau
sans fil
Identifiant
Jongo
Page 41

17
FR
Modification de l'identifiant de votre Jongo
Vous pouvez si vous le souhaitez modifier le nom sous lequel votre Jongo
est identifié dans l'application Pure Connect et dans Pure Stream. Cet
identifiant est également utilisé dans le cadre des liaisons Bluetooth.
Remarque : si vous avez déjà appairé votre Jongo avec un
périphérique Bluetooth, vous devrez relancer l'appairage après avoir
modifié l'identifiant. Reportez-vous à la page 14 pour obtenir plus
d'informations sur le processus d'appairage Bluetooth.
1. Saisissez le nom (ex. : « Jongo 1 - Chambre ») que vous souhaitez
attribuer à votre Jongo dans le champ Your Jongo’s Name (Nom
de votre Jongo), puis cliquez sur Change name (Valider le
changement de nom).
2. Attendez que la page s'actualise pour vérifier que le nouvel
identifiant a bien été attribué à votre Jongo.
3. Appuyez sur le bouton Wi-Fi situé à l’arrière du Jongo (reportez-
vous à la page 6 pour plus d’informations).
Configuration sans fil
Reportez-vous à la page 12 pour obtenir plus d'informations sur la
configuration sans fil.
Effacement des paramètres réseau
Pour supprimer l'intégralité des paramètres réseau, cliquez sur le
bouton Clear all network settings (Effacer tous les paramètres
réseau).
Remarque : vous devrez vous reconnecter à votre Jongo en
mode Configuration Wi-Fi pour reconfigurer les paramètres réseau.
Reportez-vous à la page 6 pour obtenir plus d'informations.
Modification de la langue du gestionnaire de
configuration Jongo
Utilisez le menu déroulant Web page language (Langue de
l'interface) pour sélectionner la langue dans laquelle vous souhaitez
afficher le gestionnaire de configuration Jongo (parmi le français,
l'anglais britannique, l'anglais américain, l'italien, l'allemand,
l'espagnol, le danois, le néerlandais, le norvégien, le russe, le
portugais, l’arabe ou le turc).
Appuyez sur le bouton Wi-Fi situé à l’arrière du Jongo (reportez-vous à
la page 6 pour plus d’informations).
Page 42

18
Configuration avancée
Si votre réseau sans fil ne diffuse pas de SSID, vous devrez configurer
vos paramètres sans fil manuellement.
1. Cliquez sur Advanced (Avancé) pour accéder à la fenêtre des
propriétés avancées.
2. Saisissez le SSID de votre routeur et sélectionnez le mode de
cryptage de votre réseau sans fil dans la liste déroulante Encryption
type (Type de cryptage).
Remarque : vérifiez la configuration de votre routeur pour identifier
le mode de cryptage utilisé sur votre réseau sans fil.
3. Le cas échéant, saisissez la clé/le mot de passe permettant de
vous connecter à votre réseau dans le champ Key/password (Clé/
mot de passe).
4. Choisissez le type d'adresse IP à affecter à votre Jongo en
sélectionnant l'option Static IP (IP statique) ou DHCP (qui
correspond à une attribution dynamique d'adresse IP). Si
vous choisissez une adresse IP fixe, saisissez les paramètres
d'adressage IP dans les différents champs.
5. Cliquez sur Connect (Se connecter). Votre Jongo va redémarrer
et passer en mode Connexion Wi-Fi.
Vous pouvez maintenant diffuser des flux audio à partir de votre smartphone
ou de votre tablette (reportez-vous à la page 13 pour plus d'informations).
Page 43

19
FR
1. Éteignez votre Jongo et débranchez-le de la prise secteur.
2. Retournez votre Jongo et utilisez un tournevis pour ouvrir le
compartiment batterie, situé à la base du Jongo.
3. Remplacez la batterie ChargePAK en la disposant de sorte que
l'étiquette Pure soit visible avant de remettre le capot et que les
contacts de la batterie ChargePAK soient alignés sur les trois
bornes du compartiment batterie.
4. Remettez le capot et fixez-le à l'aide de la vis, en veillant à ne pas
serrer exagérément. Reliez ensuite votre Jongo à une prise secteur.
5. La batterie ChargePAK entre alors en début de charge.
Remarque : si vous chargez votre batterie ChargePAK pour la
première fois ou après une période d'inutilisation prolongée, il
est recommandé de respecter un temps de charge d'environ
24 heures pour qu’elle soit complètement rechargée. Si votre
batterie ChargePAK est complètement déchargée, il peut
s'écouler un petit laps de temps avant que le témoin de charge
de la batterie ne s'affiche.
Remarque : il est normal que votre ChargePAK s'échauffe, surtout
pendant la charge. Votre ChargePAK fonctionnera sans problème
pendant de longues années dans des conditions d'utilisation
normales, mais comme toutes les batteries rechargeables, son
autonomie diminuera progressivement au fil du temps.
Important : le Jongo n'accepte que les batteries ChargePAK F1 de Pure
et n'est pas compatible avec les autres piles et batteries, qu'elles soient
jetables ou rechargeables, ni avec aucun autre modèle ChargePAK.
Remplacement de la batterie
ChargePAK F1
Page 44

20
Caractéristiques techniques
Enceintes 4 tweeters ¾" à dôme en Mylar, 1 haut-parleur
de médiums/graves 3.5" à aimant néodyme
Sortie audio
4 x 2,5 W + 10 W RMS
Connectique d'entrée
Port d'alimentation 9 V CC pour adaptateur
secteur (compatible réseau 110-230 V),
connecteur ChargePAK, entrée ligne format
mini-jack pour lecteurs auxiliaires. Port USB
pour les mises à jour logicielles, connectivité
Bluetooth (via le dongle fourni) et Ethernet (via
un adaptateur proposé en option).
Commandes
Marche/arrêt, augmentation du volume,
réduction du volume, mode Silence,
sélection de profil audio, configuration Wi-Fi,
réinitialisation.
Affichage
Écran LCD 1" (2,5 cm).
Réseau
Wi-Fi : prise en charge des normes 802.11b et
802.11g, avec cryptage WEP et WPA/WPA2.
Ethernet (nécessite un adaptateur proposé en
option) : 10/100 Mbps
Bluetooth : A2DP pris en charge via le dongle
USB, fourni.
Codecs supportés
WMA V9, AAC, MP3, MP2
Alimentation secteur
Adaptateur :
Entrée 100-240 VCA, 50/60 Hz, 0,5 A ;
Sortie 9 VCC, 1 500 mA
Unité principale : 9 VCC, 1 500 mA.
Batterie ChargePAK F1 (fournie).
Dimensions
131 mm x 139 mm x 135 mm
(largeur x profondeur x hauteur)
Poids
1,25 kg avec batterie ChargePAK, 1,0 kg sans
batterie ChargePAK
Homologations
Certifié CE. Conforme aux directives CEM et
basse tension (2004/108/CE et 2006/95/CE).
Conformité ETSI EN 300 401. Marquage C-Tick
N1600 et de sécurité électrique pour l'Australie.
PURE déclare par la présente que cet appareil
LPD bande II est conforme aux exigences
essentielles et autres dispositions de la directive
1999/5/CE. Rendez-vous sur www.pure.com
pour accéder à l'intégralité de la Déclaration de
conformité.
Page 45

21
FR
Informations sur la garantie
Imagination Technologies Ltd. garantit à l’utilisateur final que le présent produit
est exempt de défauts de matière et de main-d’œuvre dans le cadre d’une
utilisation normale, pour une période de deux ans à compter de la date d’achat
(un an pour la batterie ChargePAK). La présente garantie couvre les pannes
dues à un défaut de conception ou de fabrication ; elle n'est pas applicable
aux dommages accidentels, quelle qu'en soit la cause, à l'usure normale du
produit, ainsi qu'à tous les dommages dus à la négligence et aux interventions,
modifications ou réparations effectuées sans notre autorisation. Si vous
rencontrez un problème avec votre appareil, veuillez contacter votre fournisseur
ou l'assistance technique de Pure à l'adresse http://support.pure.com.
Avis de non-responsabilité
Imagination Technologies Limited décline toute responsabilité et n'accorde
aucune garantie quant au contenu du présent document, notamment en ce qui
concerne les garanties implicites de valeur marchande ou d’adéquation à un
usage spécifique. En outre, Imagination Technologies Limited se réserve le droit
de réviser la présente publication et d’y apporter des modifications, quand elle le
souhaite, sans obligation de sa part d'aviser les personnes physiques ou morales
desdites révisions ou modifications.
Marques déposées
Jongo, ChargePAK, Pure, le logo Pure, Imagination Technologies et le logo
Imagination Technologies sont des marques ou des marques déposées
d'Imagination Technologies Limited.
Copyright
Copyright © 2012 Imagination Technologies Limited. Tous droits réservés. Aucune
partie de cette publication ne peut être copiée, distribuée, transmise, transcrite,
stockée dans un système de restauration ou traduite dans un langage humain ou
informatique, en tout ou partie, sous quelque forme et par quelque procédé que
ce soit, électronique, mécanique, magnétique, manuel ou autre, ni divulguée à des
tiers, sans le consentement écrit préalable d'Imagination Technologies Limited.
Version 2 novembre 2012.
Élimination en fin de vie des appareils électriques et électroniques
Ce symbole, apposé directement sur le produit ou sur son
emballage, indique que le produit ne doit pas être éliminé avec les
déchets ménagers. Il doit être remis à un point de collecte agréé
pour le recyclage des équipements électriques et électroniques.
En veillant à éliminer comme il se doit ce produit en fin de vie, vous
contribuez à prévenir les conséquences potentiellement négatives
pour l'environnement et la santé. Le recyclage des matériaux
contribue à la préservation des ressources naturelles. Pour tout
complément d'information sur le recyclage de ce produit, n'hésitez
pas à contacter votre municipalité, votre déchetterie ou le magasin
dans lequel vous avez acheté le produit.
Page 46

22
NOTIFICATION DE LA COMMISSION FÉDÉRALE DES COMMUNICATIONS
(FCC) À TOUT UTILISATEUR AUX ÉTATS-UNIS
Cet équipement a été testé et déclaré conforme aux limites établies pour les appareils
numériques de la classe B, conformément à la partie 15 des règlements FCC. Ces limites
ont été établies pour fournir une protection raisonnable contre toute interférence nuisible
dans une installation résidentielle. Cet équipement produit, utilise et peut irradier une
énergie de radiofréquence et, s’il n’est pas installé et utilisé conformément aux instructions,
peut causer des interférences nuisibles pour les radiocommunications. Cependant, il n’y
a aucune garantie qu’il ne produira pas d’interférences dans une installation particulière.
Si cet appareil provoque une interférence nuisible à la reception radio ou télévision,
laquelle peut être déterminée en allumant et en éteignant l’appareil, il est recommandé
que l’utilisateur tente de corriger l’interférence à l’aide d’une ou plusieurs des mesures
suivantes :
•
Réorienter ou déplacer l’antenne réceptrice.
•
Augmenter la distance entre l’appareil et le récepteur.
•
Brancher l’appareil dans une prise de courant ou un circuit autre que celui utilisé pour le
récepteur.
•
Consulter le revendeur ou un technicien compétent en radio/TV pour obtenir de l’aide.
Avertissement ! Tous changements ou modifications apportés à cet appareil sans
l’autorisation expresse de Pure annuleront le droit de faire fonctionner l’appareil. L’utilisation
d’un appareil non autorisé est interdite conformément à la section 302 du Communications
Act de 1934, tel que modifié, et à la sous-partie 1 de la partie 2 du titre 47 du Code des
règlements fédéraux.
Cet appareil est conforme à la partie 15 des règlements FCC. L’utilisation est soumise aux
deux conditions suivantes : (1) Cet appareil ne doit pas provoquer d’interférences nuisibles,
et (2) cet appareil doit accepter toute interférence reçue, y compris une interférence
pouvant provoquer un fonctionnement non voulu.
Cet appareil numérique de la classe B est conforme à la norme canadienne ICES-003.
NOTICE IC POUR UN UTILISATEUR AU CANADA
Les circuits numériques pouvant occasionner des interférences avec d’autres syntoniseurs
radio ou de television placés à proximité, éteignez cette unité lorsque vous ne l’utilisez pas
et éloignez-la des syntoniseurs radio ou de télévision concernés.
REMARQUE : le présent appareil numérique n’émet pas de bruits radioélectriques
dépassant les limites applicables aux appareils numériques de classe B prescrites dans le
Règlement sur le brouillage radioélectrique édicté par le ministère des Communications du
Canada. Ces limites ont été établies pour fournir une protection raisonnable contre toute
interférence nuisible dans une installation résidentielle. Cet équipement produit, utilise et
peut irradier une énergie de radiofréquence et, s’il n’est pas installé et utilisé conformément
aux instructions, peut causer des interférences nuisibles pour les radiocommunications.
Cependant, il n’existe aucune garantie qu’il ne produira pas d’interférences dans
une installation particulière. Si cet appareil provoque une interférence nuisible au
fonctionnement de la radio ou de la télévision, laquelle peut être déterminée en allumant et
en éteignant l’appareil, il est recommandé que l’utilisateur tente de corriger l’interférence à
l’aide d’une ou plusieurs des mesures suivantes :
•
Réorienter ou déplacer l’antenne réceptrice.
•
Augmenter la distance entre l’appareil et le récepteur.
•
Brancher l’appareil dans une prise de courant ou un circuit autre que celui utilisé pour le
récepteur.
•
Consulter le revendeur ou un technicien compétent en radio/TV pour obtenir de l’aide.
Page 47

23
Page 48

www.pure.com
connect.pure.com
www.facebook.com/pure
Pure North America
2269 Chestnut Street
Suite 455
San Francisco
CA 94123-2600
USA
www,pure.com/us
http://support.pure.com/us
Pure UK Headquarters
Imagination Technologies Ltd
Home Park Estate
Kings Langley
Herts, WD4 8LZ
United Kingdom
http://support.pure.com
104FV
 Loading...