

Page 1
S3
Quick start guide
Page 2
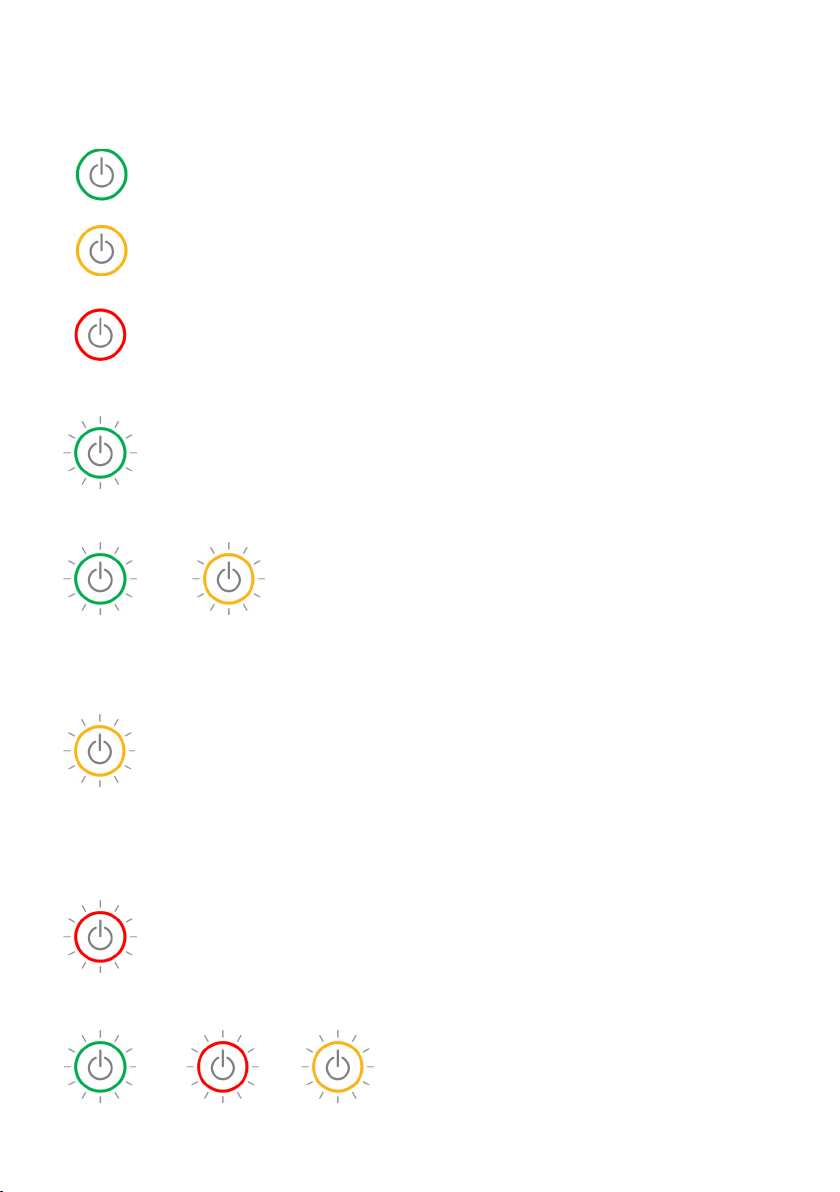
Power light states
Green (steady): Indicates that Jongo is on.
Amber (steady): Indicates that Jongo in in sleep.
Red (steady): Indicates that Jongo is in
standby/charging.
Green (pulsing x3): Indicates that Jongo is
preparing to stream audio.
Green (pulsing continuously): Indicates that
Jongo is busy connecting to a wireless network.
Green/amber (alternating): Indicates that you
have connected your device (smartphone/tablet)
/
to Jongo Setup Manager in Wi-Fi setup mode.
Amber (flashing x2): Indicates that you have
tried to increase the volume but Jongo is already
at maximum volume.
Amber (flashing continuously (slowly)):
Indicates that Jongo is in Wi-Fi Setup mode.
Amber (flashing continuously (rapidly)):
Indicates that Jongo is waiting for a file before
carrying out a software update.
/ /
Red (pulsing):
Red (flashing continuously): Indicates that
Jongo has an error (e.g. Jongo has failed to
connect to your Wi-Fi network).
Green/red/amber (flashing colour cycle):
Indicates that Jongo carrying out a software update.
DO NOT TURN JONGO OFF UNTIL UPDATE IS
COMPLETE.
Indicates that Jongo is booting up.
Page 3
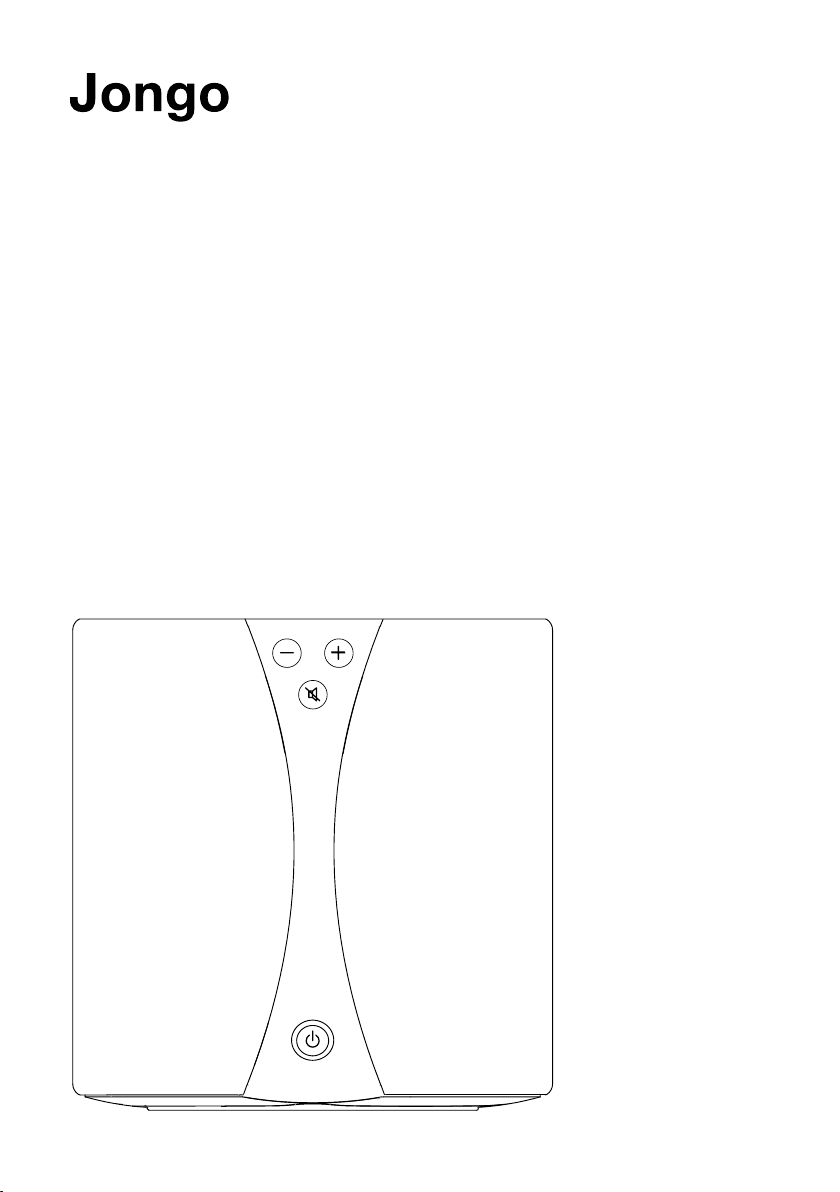
S3
Thank you for choosing Jongo S3.
This quick start guide will get you up and
running in no time. If you need more help
setting up your Jongo, you can access
our online help in the Pure Connect app
or watch our Jongo setup video at:
www.pure.com/jongo-setup-video
1
Page 4
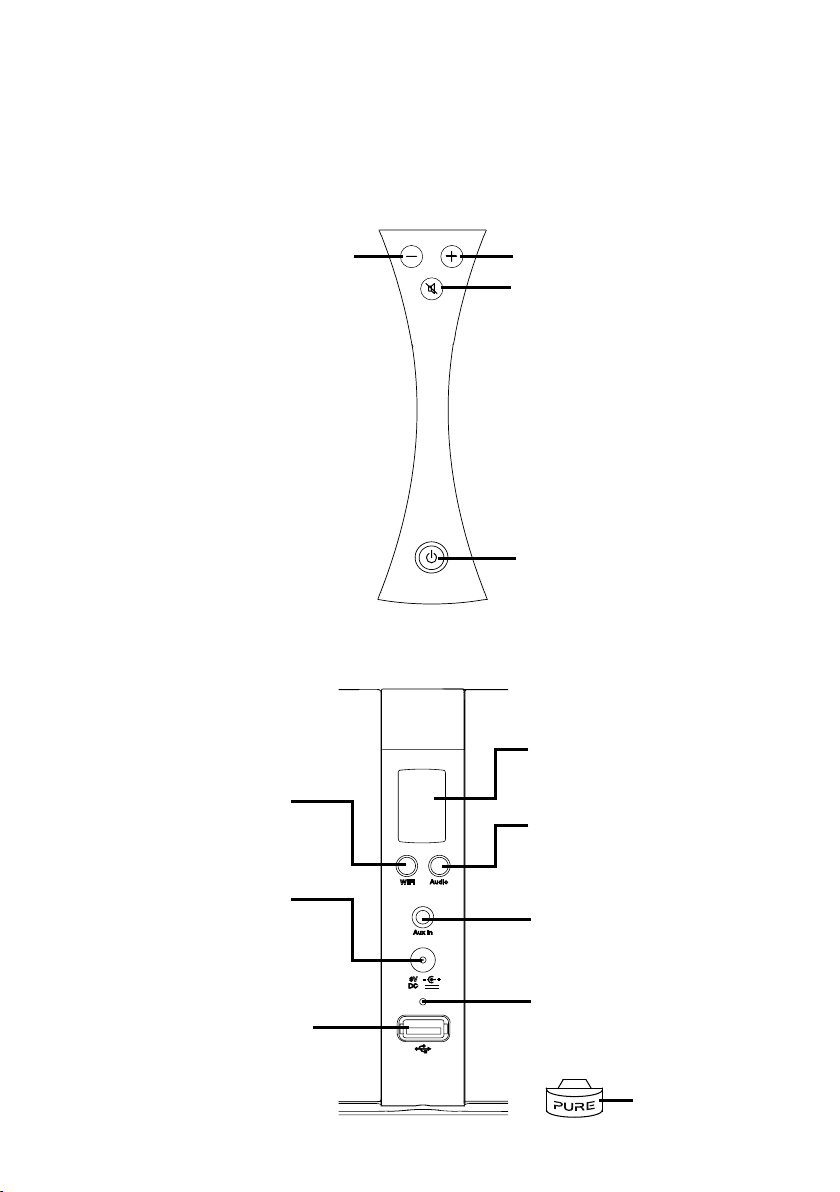
Hardware overview
Front panel controls
Rear panel controls and connectors
Volume upVolume down
Mute button
Power button
WiFi setup button
DC In
Connector for supplied
mains adapter.
USB
Connector for Bluetooth
adapter or optional USB
Ethernet adapter.
2
Rear LCD display
See the following page.
Audio profile button
Press to switch between audio
WiFi
9V
profiles. See page 11.
Aux In
Connector for analogue stereo
input from an MP3 player or similar.
Reset button
Press to reset Jongo to
default settings.
USB Bluetooth
adapter
Page 5
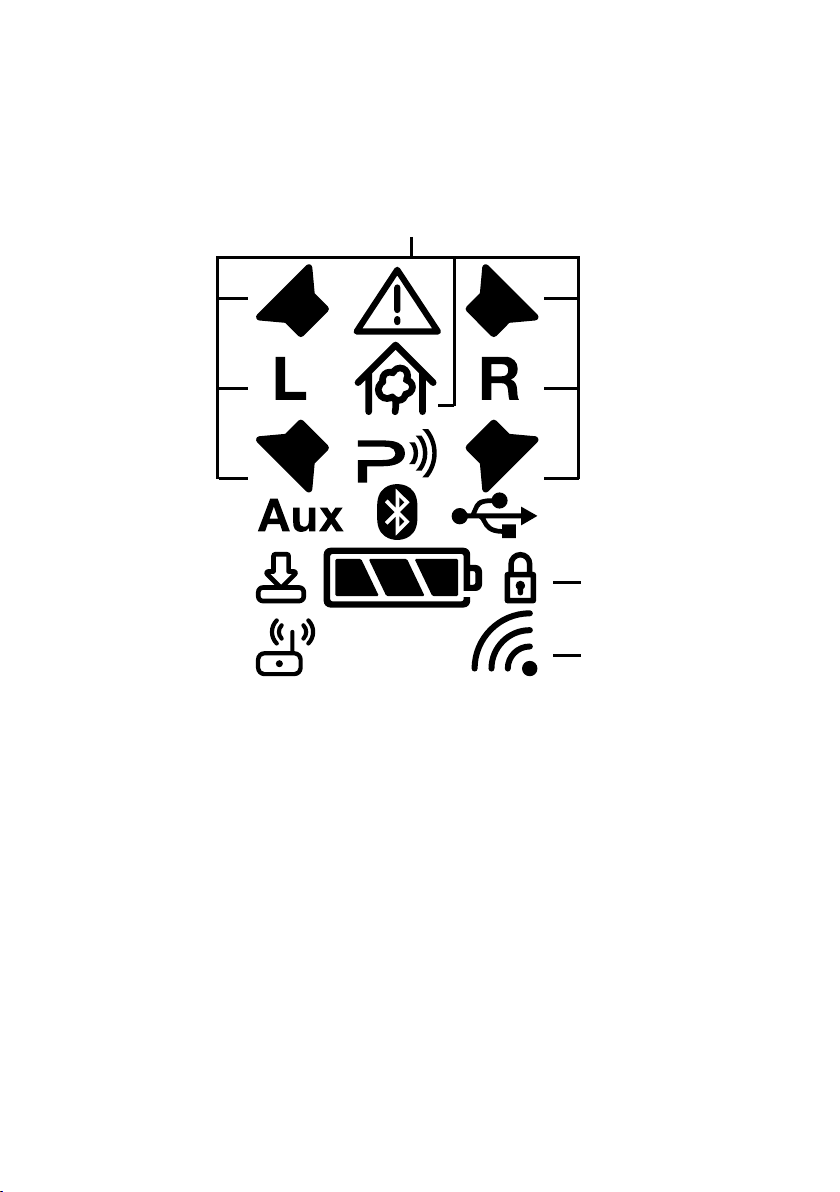
Symbols on the rear display
3
1
2
4
5
7 8
10
6
9
1. Audio profile indicators (see page 10 for more information).
2. Warning indicator. If a problem occurs on Jongo, this icon flashes along with the icon
that corresponds to the problem.
3. Indicates that Jongo is ready to stream a track from the Pure Connect app or from a
compatible Pure product. Icon flashes when a track is being streamed to Jongo.
4. Icon flashes to indicate that an Aux device has been connected. Icon stops flashing and
remains steady if Aux device remains connected and Jongo changes audio source.
5. Indicates that Jongo has been successfully connected to another device using
Bluetooth. Icon flashes if playing a track via Bluetooth.
6. Indicates that a USB drive has been connected to Jongo.
7. Indicates that a software update is taking place.
8. Indicates how much power is left in ChargePAK. Icon flashes when ChargePAK only
has five minutes of charge remaining.
9. Indicates that Jongo is in Wi-Fi Setup mode.
10. Padlock icon indicates that the Wi-Fi network that you are connected to is secured.
11. Indicates the signal strength of the Wi-Fi network you are connected to. Also indicates
that a mobile device is connected to Jongo in Wi-Fi setup mode.
11
11
3
Page 6

How do I set up my Jongo?
With our Jongo product range, you can stream audio from your smartphone or tablet
using Wi-Fi or Bluetooth.
Already have a Jongo on your network?
If you are using the Pure Connect app and have already set up your first Jongo, see
page 10.
New to Jongo?
I want to use my Jongo as part of a multiroom system
You can use the Pure Connect app to stream millions of tracks, access over 20,000 live
radio stations from across the world, podcasts and a library of over 200,000 on-demand
programmes as well as stream your own music collection.
We recommend using the Pure Connect app as this allows you to access additional
features, such as stereo paring.
To access Pure Connect on your Jongo you will need to use Wi-Fi, see page 5 for
more information.
I want to stream music to a single Jongo speaker
You can stream music to a single Jongo speaker using Wi-Fi or Bluetooth.
We recommend using Wi-Fi so that you can easily add additional Jongos to your network
and receive the latest software updates. See the following page to start setting up your
Jongo using Wi-Fi.
To use Bluetooth to stream to a single Jongo speaker, see page 10.
4
Page 7

Connect Jongo to your Wi-Fi
Insert the connector of the supplied mains
lead into Jongo and switch Jongo on .
When the Power light turns solid green, briefly
press the Wi-Fi button on the back and wait
for the Power light to flash amber.
Note: If you press and hold the Wi-Fi button,
your Jongo will start WPS compatible pairing
mode. To continue with the standard setup,
briefly press the Wi-Fi button on the back of
your Jongo and wait for the power light to
flash amber before proceeding to step 2.
5
Page 8

For iOS customers
For Android customers
Open the Wi-Fi settings on
your iOS device an
‘Jongo xxxxxx’ from the list
of wireless networks.
d select
Open the Wi-Fi settings
on your device and select
‘Jongo xxxxxx’ from the list
of wireless networks.
6
Page 9

For iOS customers
A. When the Power light on the front of your
Jongo flashes green and amber, the Jongo
setup page will open automatically on your
A
iOS device.
B. Scroll down to the list of wireless networks
and tap the name of your home wireless
network.
C. Enter the password of your wireless
network and press Save. When Jongo has
B
connected to your network the Power light
will light solid green.
C
For Android customers
A. When the Power light on the front of your
B
Jongo flashes green and amber, a ‘Sign in to
Wi-Fi network’ message will appear at the
top of your device.
B. Wait for the Jongo setup page to open.
Note: If you do not see the ‘Sign in to Wi-Fi
network’ message, open your web browser
and enter myjongo in the address bar.
C. Scroll down to the list of wireless networks
C
and tap the name of your home wireless network.
D. Enter the password of your wireless network
and press Save. When Jongo has connected to
your network the Power light will light solid green.
D
7
Page 10

For iOS customers
The Wi-Fi settings on your iOS device will
open and you will be connected back to your
home wireless network.
For Android customers
Open the Wi-Fi settings on your device and
check that it has connected back to your
home Wi-Fi network.
8
Page 11

Using the Pure Connect app
For iOS and Android customers
A. Download the Pure Connect app from the Apple App Store or Google Play. If you
already have the app installed check that you have the latest version (see the Pure
Connect app help for more information) to ensure best performance and gain
access to the latest features.
B. Open the Pure Connect app and follow the steps to complete the app tour.*
C. Select the content that you want to stream.
D. Tap in the player bar to view a list of available Jongo devices on
your network.
E. Tap next to the Jongos that you want to stream to.
F. Enjoy your music.
E
C
D
*When you open the Pure Connect app, the app will check to see if there is an available software update. If an update is available,
the Power light on the front of your Jongo will flash green/amber/red during the software update.
9
Page 12

Using Bluetooth
For all customers
You can also use Bluetooth to stream all your Pure Connect content, as well as content
from other music services, such as Spotify and Pandora, directly to your Jongo.
A. Enable the Bluetooth option on your mobile device and search for Bluetooth
devices.
B. Pair to one of your Jongos. If your device requires a key, enter ‘0000’.
C. Open the music streaming service that you want to listen to and play a track.
Your music will start to play on your Jongo.
Adding another Jongo to your
network?
Carry out the following steps to add a new Jongo to your network:
A. Switch on your new Jongo.
B. Press and hold the Wi-Fi button on any other Jongo that is already connected to
your network until the Power light pulses green.
C. Press and hold the Wi-Fi button on the back of the new Jongo until the Power light
pulses green.
After about 30 seconds, the Power lights on both Jongos will light solid green to
confirm that the new Jongo is connected to your network.
10
Page 13

Changing audio profiles
For all customers
Jongo features four audio profiles. You can change the audio profile by pressing the
Audio button on the rear of Jongo. Each audio profile is represented by a set of icons
on the LCD screen as shown below.
Mono 360º
Select this profile to activate all five speakers
in Jongo. This option is ideal if placing Jongo
in the middle of a room or table.
Outdoor boost
Select this profile to boost all five speakers in
Jongo for outdoor use.
Stereo 360º
Select this profile to enable the four speakers
to play stereo left and right audio - and enable
the subwoofer. This option is ideal for creating
a big stereo sound.
Stereo forward facing
Select this profile to enable stereo on the front
two speakers and enable the subwoofer. This
option is ideal if placing Jongo on a bookshelf
or in a corner.
11
Page 14

Warranty information
Imagination Technologies Limited warrants to the end user that this product will be free from
defects in materials and workmanship in the course of normal use for a period of two years from
the date of purchase. This guarantee covers breakdowns due to manufacturing or design faults; it
does not apply in cases such as accidental damage, however caused, wear and tear, negligence,
adjustment, modification or repair not authorised by us. Should you have a problem with your unit
please contact your supplier or contact Pure Support at http://support.pure.com.
Disclaimer
Imagination Technologies Limited makes no representation or warranties with respect to the
content of this document and specifically disclaims any implied warranties of merchantability or
fitness for any particular purpose. Further, Imagination Technologies Limited reserves the right to
revise this publication and to make changes in it from time to time without obligation of Imagination
Technologies Limited to notify any person or organization of such revisions or changes.
Trademarks
Jongo, Pure, the Pure logo, Imagination Technologies, and the Imagination Technologies logo are
trademarks or registered trademarks of Imagination Technologies Limited.
Caskeid is a superior synchronization technology, providing clear multi-speaker wireless audio.
Caskeid and the Caskeid logo are trademarks or registered trademarks of Imagination Technologies.
Copyright
Copyright © 2014 Imagination Technologies Limited. All rights reserved. No part of this publication
may be copied or distributed, transmitted, transcribed, stored in a retrieval system, or translated
into any human or computer language, in any form or by any means, electronic, mechanical,
magnetic, manual or otherwise, or disclosed to third parties without the express written permission of
Imagination Technologies Limited.
Version 1 April 2014.
Disposal of Waste Electrical & Electronic Equipment
This symbol on the product or on its packaging indicates that this product should not
be treated as household waste. Instead it should be handed over to a suitable collection
point for the recycling of electrical and electronic equipment. By ensuring this product
is disposed of correctly, you will help prevent potential negative consequences for the
environment and human health, which could otherwise be caused by inappropriate waste
handling of this product. The recycling of materials will help to conserve natural resources.
For more detailed information about recycling of this product, please contact your local
council office, your household waste disposal service or the shop where you purchased
the product.
12
Page 15

Pure
Imagination Technologies Limited
Home Park Estate
Kings Langley
Herts, WD4 8LZ
United Kingdom
http://support.pure.com
Pure
Friedrich-Ludwig-Jahn-Straße 2-14
64589 Stockstadt am Rhein
Deutschland
sales_gmbh@pure.com
http://support.pure.com/de
Pure - Vertrieb uber:
TELANOR AG
Unterhaltungselektronik
Bachstrasse 42
4654 Lostorf
Schweiz/Switzerland
info@telanor.ch
www.telanor.ch
Pure Australasia Pty Ltd
PO Box 5049
Wonga Park
Victoria 3115
Australia
sales.au@pure.com
http://support.pure.com/au
Pure North America
Imagination Technologies
955 East Arques Avenue
Sunnyvale, CA 94085
USA
www.pure.com/us
http://support.pure.com/us
Page 16

www.pure.com
connect.pure.com
105QL
 Loading...