

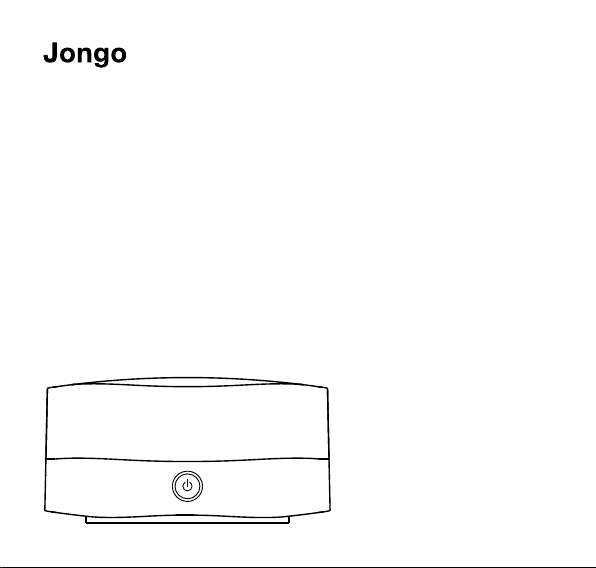
Page 1

A2
Page 2

Please register your product to receive the
following benefits:
• Notification of FREE product software updates
• FREE telephone and e-mail technical support
• 2 year warranty
www.pure.com/
register
Page 3
Thank you for choosing Jongo A2. This manual will get you up
A2
and running in no time and explains how to make the most of
your Jongo. We’re constantly improving and adding new features
to our products. To take advantage of any enhancements made
since your product was shipped, please visit support.pure.com
where you can check for any updated versions of software and
download the latest version of this user guide in PDF format.
1
Page 4

Jongo A2 Safety Instructions
1. Read these instructions – All the safety and operating instructions should be read before this product is operated.
2. Keep these instructions – The safety and operating instructions should be retained for future reference.
3. Heed all warnings – All warnings on the appliance and in the operating instructions should be adhered to.
4. Follow all instructions – All operating and use instructions should be followed.
5. Do not use this apparatus near water.
6. Clean only with dry cloth.
7. Do not block any ventilation openings. Install in accordance with the manufacturer’s instructions.
8. Do not install near any heat sources such as radiators, heat registers, stoves, or other apparatus (including amplifiers) that produce heat.
9. Only use attachments/accessories specified by the manufacturer.
10. Unplug the apparatus during lightning storms or when unused for long periods of time.
11. Refer all servicing to qualified service personnel. Servicing is required when the apparatus has been damaged in any way, such as power-supply
cord or plug is damaged, liquid has been spilled or objects have fallen into the apparatus, the apparatus has been exposed to rain or moisture,
does not operate normally, or has been dropped.
12. WARNING Please refer to the information on the bottom exterior of the enclosure for electrical and safety information before installing or
operating the apparatus.
13. WARNING To reduce the risk of fire or electric shock, do not expose this apparatus to rain or moisture. The apparatus shall not be exposed to
dripping or splashing and that objects filled with liquids, such as vases, shall not be placed on apparatus.
14. WARNING: The direct plug-in adapter is used as disconnect device, the disconnect device shall remain readily operable.
15. Use only power supplies listed in the user instructions (with model no. KSAA0550100W1UV-1, manufactured by Pure).
16. This equipment is a Class II or double insulated electrical appliance. It has been designed in such a way that it does not require a safety
connection to electrical earth.
2
Page 5

Contents
4 Introduction
5 Front panel
5 Base
6 Rear panel controls and connectors
7 Switching between Sleep, On and Off
8 Power light states
9 Getting started
9 Preparing Jongo to connect to a wireless network
11 Manually connecting Jongo to your wireless network
13 Streaming audio to your hi-fi
15 Using Jongo Setup Manager
17 Appendix
17 Connecting Jongo to your wireless network using Push Button Configuration
18 Technical specifications
3
Page 6

Introduction
Jongo A2 is an easy way to bring all the content available on the Pure Connect app
to your existing hi-fi and make it part of your Jongo multiroom system.
Get connected
Immersing yourself in music couldn’t be easier. Download the Pure Connect app via
your iOS or Android device and connect your Jongo to access a world or music.
Pure Connect is free, and lets you stream all your own music collection, gives you
access to over 20,000 live radio stations from around the world, podcasts and a
library of your favourite BBC radio programmes.
Subscribe to Pure Connect Blue or Violet* and you can also choose from a library of
over 15 million tracks, with unlimited streaming.
Go multiroom
Jongo makes it easy to expand your system. Add other Jongo products to go
multiroom with speakers wherever you like; all streaming synchronised music around
your home.
Express yourself
Easy-fit colour replacement trims are available for all our Jongo products. Choose
from White, Black, Lime Green, Burnt Orange or Mango.
*See connect.pure.com for more information.
4
Page 7
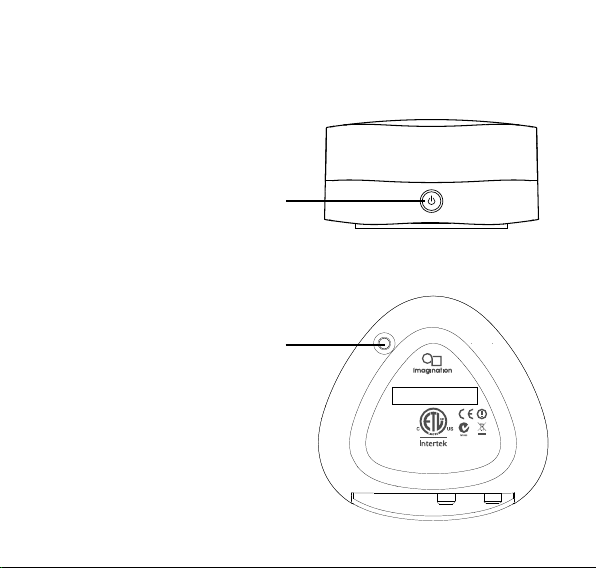
Front panel
Power
Press to switch between Sleep, On and Off.
See page 7 for more information.
Power light also changes colour to indicate
various states. See page 8 for more
information.
Base
WiFi button
Press to enter Wi-Fi Setup mode. Press
and hold to setup Jongo using Push Button
Configuration. See page 17 for more
information.
WiFi
This device complies
with Part 15 of the FCC
Rules. Operation is
subject to the following
two conditions: (1) This
device may not cause
harmful interferenc e, and
(2) this device must
accept any interferenc e
received, including
interference that may
cause undesired
operation.
FCC ID: X280068
IC: 8864A-0068
Model A240
4000696
Designed and engineered in the UK
Assembled in China
Conforms to UL
Std. 60065
Certified to CSA Std.
C22.2 No. 60065
5
Page 8
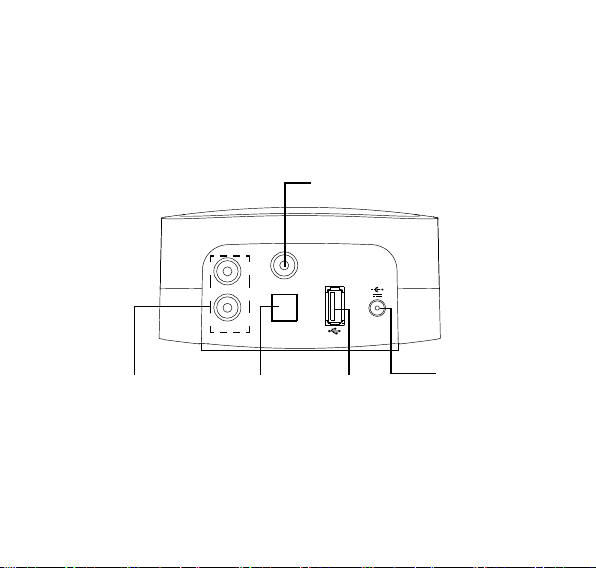
Rear panel controls and connectors
Digital coaxial out
Connect to digital coaxial (S/PDIF)
input on an amplifier or receiver
Analogue audio
Connect to 3.5mm
input of any audio
product, or to
analogue inputs on
an amplifier, receiver,
TV or monitor
6
R
Digital coaxial out
L
Line out Digital optical out
Digital optical out
Connect to digital
optical (S/PDIF)
input on an amplifier
or receiver
Jongo
A2
5.5V DC
USB
USB connector
for optional USB
Ethernet adapter
Mains
adapter
Connect to
mains power
supply
Page 9

Choosing your audio connection
Connector on Jongo Cable Output
Analogue audio Dual phono to 3.5mm,
Digital coaxial out Phono to phono Raw digital audio
Digital optical out TOSLINK Raw digital audio
Note: Audio output is dependant on the source file quality.
dual phono to dual phono
DAC-processed hi-fi audio
Switching between Sleep, On and Off
Jongo has three power states, Sleep, On and Off. In Sleep, Jongo remains connected to the
wireless network and waits to receive audio.
To enter Sleep, briefly press the Power button (Power light turns amber).
Once in Sleep, press the Power button to switch to On (Power light turns green).
To turn Jongo off, hold the Power button until the Jongo power light turns red, then release.
7
Page 10

Power light states
The Power light on Jongo is also used to indicate the various states of Jongo, by colour.
Green
(Pulsing continuously) Indicates that Jongo is busy connecting to a
wireless network.
Green/Amber (Alternating) Indicates that you have connected your setup device
(smartphone/tablet) to Jongo Setup Manager in Wi-Fi Setup mode.
Red (Pulsing) Indicates that Jongo is booting up.
(Flashing continuously) Indicates that Jongo has an error (e.g.
Jongo has failed to connect to your Wi-Fi network).
Amber (Flashes twice) Indicates that you have tried to increase the volume
but Jongo is already at maximum volume.
(Flashes continuously (slowly)) Indicates that Jongo is in Wi-Fi
Setup mode.
(Flashes continuously (rapidly)) Indicates that Jongo is waiting for a
file before carrying out a software update.
Green/Red/Amber (Flashing colour cycle) Indicates that Jongo is carrying out a
software update.
8
(Pulsing three times) Indicates that Jongo is preparing to stream audio.
Page 11

Getting started
Jongo can be connected to your network using a wireless or wired connection.
We recommend using the wireless connection method, which allows you to position your Jongo
anywhere within range of your wireless network.
If you want to use the wired connection method, you will need to plug in an optional Pure USB
Ethernet adapter. See the Pure website for more information.
Preparing Jongo to connect to a wireless network
1. Connect Jongo to your hi-fi or microsystem
(see page 7 to view the available
connection options) and ensure Jongo is in
range of your wireless network.
Typical Jongo setup
9
Page 12

2. Insert the connector of the mains power adapter into the socket on the rear of Jongo and plug
in to the mains supply. When Jongo is first plugged in, the Power light will pulse red. When
Jongo has finished booting up, the Power light will light green.
5.5V DC
Jongo
R
A2
Digital coaxial out
L
Line out Digital optical out
Jongo supports two wireless connection methods. See the following page to finish setting up your
wireless connection manually. If you have a router that supports WPS, you can use the simpler
Push Button Configuration method to connect Jongo to your wireless network. See page 17 for
more information.
5.5V DC
10
Page 13

Manually connecting Jongo to your wireless network
Stage 1: Connecting your setup device to Jongo
In the first setup stage you need to establish a temporary wireless connection between your setup
device (iPod touch, iPhone, iPad, laptop or Android device) and Jongo. Your setup device needs to
include a web browser and support a Wi-Fi connection.
To create a temporary wireless network:
1. Press the WiFi button on Jongo. Jongo’s Power light will flash amber.
2. On your setup device, the Jongo A2 ****** wireless network should now be visible. Select this
network. No password is required.
Once you have connected to the Jongo A2 ****** wireless network, Jongo’s Power light will
alternately flash amber and green.
Stage 2: Accessing Jongo Setup Manager
Jongo Setup Manager may be displayed automatically on some devices, if not follow the steps
below:
1. On your setup device, start your web browser.
2. Enter the following address: http://myjongo
3. The Jongo Setup Manager will be displayed.
11
Page 14

Stage 3: Adding Jongo to your wireless network
Jongo will automatically scan for available networks. If you want to enter your wireless network
settings manually click Advanced.
1. Select the name of your own wireless network from the list of Available networks.
2. If required, enter the security key used by your network and click Connect.
Jongo’s Power light will pulse green while Jongo attempts to connect to your network. When
Jongo’s Power light is steady green, Jongo has successfully connected to your network. You will
now be able to start streaming tracks to Jongo. See the following page.
If the Power light flashes red, there is a problem with Jongo’s network connection. Check that you
have entered your network settings correctly and repeat the steps outlined on the previous page.
Note: We recommend that you contact your IT department before attempting to connect Jongo to
a corporate wireless network.
12
Page 15

Streaming audio to your hi-fi
Streaming from a smartphone or tablet
After connecting Jongo to your hi-fi, you can use the Pure
Connect app to stream music stored on your smartphone or
tablet, internet radio stations, on-demand radio programmes,
podcasts and music from the Pure Connect music streaming
service to your hi-fi. The Pure Connect app also allows you
to select the devices that you want to send your audio to and
control their volume individually.
You can download the Pure Connect app on your smartphone
iOS Pure Connect App
Android Pure Connect App
or tablet from the Apple App Store or Google Play.
Streaming is controlled entirely from the Pure Connect app.
Please see the help supplied with the app if you need further
details of how to use it.
13
Page 16

Streaming from a compatible Pure product
You can also stream music and radio from selected Pure products compatible with the Jongo
system. Just like using the app you can select the devices you want to send your audio to and
control their volume individually. Visit www.pure.com to get more information on Pure products that
are compatible with the Jongo system.
Streaming audio to your hi-fi using Bluetooth
After connecting Jongo to your hi-fi, you can also stream audio to your hi-fi from a Bluetooth
device.
Note: The way that you add a Bluetooth device varies on different mobile devices. See your
Bluetooth device manual for specific information.
Preparing Jongo to stream audio using Bluetooth
1.
Enable the Bluetooth option on your mobile device.
2.
On your mobile device, select the option to add a new Bluetooth device. On some mobile devices you
may need to select the search or scan option.
3.
Start the pairing process on your mobile device. Do this by selecting Jongo from the list of available
devices that appear on the mobile device’s screen. This will connect automatically once paired.*
You will now be able to stream audio to Jongo from your Bluetooth device.
Note: You will need to disconnect any connected Bluetooth devices from Jongo to stream from a
different Bluetooth device. Bluetooth will automatically disconnect if you go out of range of Jongo.
To manually disconnect you will usually need to go through your Bluetooth settings on your mobile
device.
* Some legacy Bluetooth devices may prompt you to enter a passcode when trying to pair with Jongo. If this occurs,
enter the code 0000.
14
Page 17

Using Jongo Setup Manager
Introduction
The Jongo Setup Manager allows you to change
various Jongo settings (such as changing the
name of your Jongo) and view the software
version. To access Jongo Setup Manager, put
Jongo in Wi-Fi Setup mode by pressing the WiFi
Jongo Name
Wireless Network Settings
button on the base of Jongo and connect to the
Jongo A2 ****** wireless network.
Setup page should open automatically on your
device. If not, open your internet browser and
enter myjongo in the address bar.
Once you have connected to the
Jongo A2 ****** wireless network, Jongo’s
Power light will alternately flash amber and green.
Changing Jongo Setup
Manager’s language
Use the Web page language drop-down menu
to select the language that you want to use for
Jongo Setup Manager.
The Jongo
15
Page 18

Changing Jongo’s name
If you prefer, you can change the name that the Pure Connect app and Bluetooth uses to identify
Jongo.
1. Type the name (e.g. ‘Jongo Bedroom 1’) that you want to assign Jongo in the Your Jongo’s
Name box and click Change name. After Jongo’s name has changed, the Change name
button will grey out.
2. Push the WiFi button on the rear of Jongo to put Jongo back into Wi-Fi Connected mode (see
page 7 for more information).
Wireless network settings
See page 13 for more information on wireless setup.
Clearing all network settings
To clear all network settings, click the Clear all network settings button.
Note:
You will need to reconnect to Jongo in Wi-Fi Setup mode to re-configure the network
settings.
16
Page 19

Appendix
Connecting Jongo to your wireless network using Push
Button Configuration
You can use Push Button Configuration to connect Jongo to your wireless network if WPS is
supported by your router. Refer to your router user guide for more information on WPS.
1. Press and hold the WiFi button on Jongo. Jongo’s Power light will pulse green while Jongo
attempts to connect to your network.
2. When Jongo’s Power light is steady green, Jongo has successfully connected to your network
using Push Button Configuration. You will now be able to start streaming tracks to Jongo. See
page 13.
Note: The WPS function may be disabled by default in some WPS-compatible routers. Consult your
router documentation for more information.
17
Page 20

Technical specifications
Model A240
Input connectors
Output connectors Dual phono analogue output, Digital coax (S/PDIF), Digital optical (S/PDIF)
Controls Power, Wi-Fi setup
Network Wi-Fi: 802.11b and 802.11g supported with WEP and WPA/WPA2
Codec support Includes WMA (Standard V9), AAC, MP3, MP2
Mains power supply
Dimensions 108 mm wide x 106 mm deep x 55.5 mm high
Approvals
Correct disposal of this product
18
5.5V DC power adaptor socket (110-230V supplied), USB for product
upgrades and Ethernet connectivity (optional adapter available)
Ethernet (requires optional adapter):
Bluetooth: A2DP supported
Adapter: Input AC 100 - 240 V~, 50/60 Hz, 0.18 A; Output DC 5.5V 1.0A
Main unit: DC 5.5V, 1.0A
CE marked. Hereby, Pure, declares that this Band II LPD device is in
This marking indicates that this product should not be disposed with other household
waste throughout the EU. To prevent possible harm to the environment or human
health from uncontrolled waste disposal, recycle it responsibly to promote the
sustainable reuse of material resources. To return your used device, please use the
return and collection system or contact the retailer where the product was purchased.
They can take this product for environmental safe recycling.
compliance with the essential requirements and other relevant provisions
of Directive 1999/5/EC. The Declaration of Conformity may be consulted
at http://www.pure.com/R&TTE-DoC.
Australian C-Tick N1600 and Electrical Safety
10/100 Mbps
Page 21

Warranty information
Imagin ation Technolog ies Limited wa rrants to the end u ser that this pro duct will be fr ee from
defect s in materials a nd workmans hip in the cours e of normal use fo r a period of two ye ars
from the d ate of purchase. T his guarante e covers breakd owns due to manuf acturing or design
faults; i t does not apply in cases such a s accidental d amage, however caused, wear and tear,
negli
gence, adjustment, modification or repair not authorised by us. Should you have a problem
with your unit please contact your supplier or contact Pure Support at http://support.pure.com.
Disclaimer
Imagination Technologies Limited makes no representation or warranties with respect to the
content of this document and specifically disclaims any implied warranties of merchantability or
fitness for any particular purpose. Further, Imagination Technologies Limited reserves the right to
revise this publication and to make changes in it from time to time without obligation of Imagination
Technologies Limited to notify any person or organization of such revisions or changes.
Trademarks
Jongo, Pure, the Pure logo, Imagination Technologies, and the Imagination Technologies logo are
trademarks or registered trademarks of Imagination Technologies Limited.
Caskeid is a superior synchronization technology, providing clear multi-speaker wireless audio.
Caskeid and the Caskeid logo are trademarks or registered trademarks of Imagination Technologies.
Copyright
Copyright © 2014 Imagination Technologies Limited. All rights reserved. No part of this publication
may be copied or distributed, transmitted, transcribed, stored in a retrieval system, or translated
into any human or computer language, in any form or by any means, electronic, mechanical,
magnetic, manual or otherwise, or disclosed to third parties without the express written permission
of Imagination Technologies Limited. Version 1 April 2014.
Acknowledgement of License Agreements
Portions of the code used in Jongo A2 are subject to the GPL, LPGL, BSD, and other open source
licenses. For more details please refer to: http://www.pure.com/licensing
19
Page 22

20
Page 23

Pure
Imagination Technologies Limited
Home Park Estate
Kings Langley
Herts, WD4 8LZ
United Kingdom
http://support.pure.com
Pure
Friedrich-Ludwig-Jahn-Straße
2-14
64589 Stockstadt/Rhein
Deutschland
http://support.pure.com/de
Pure - Vertrieb uber:
TELANOR AG
Unterhaltungselektronik
Bachstrasse 42
4654 Lostorf
Schweiz/Switzerland
info@telanor.ch
www.telanor.ch
Page 24

www.pure.com
connect.pure.com
www.facebook.com/pure
105QM
 Loading...