

PURE Chronos iDock Series 2, Chronos iDock Owner's Manual
CHRONOS iDOCK
Info
Preset
Alarm
Menu
Volume −
Volume +
Select
+
Source Slee p Standby
Aux in
−
Menu
(iPod not included)
Owner’s manual
Printed on 100% recycled
paper using soya-based ink

Safety instructions
Keep t he radio away from hea t source s.
Do not use the radio near water.
Avoid o bje ct s or l iqui ds ge t tin g int o th e rad io.
Do not remove screws from or open the
radi o casing . Fit the ma ins adapt or to an
easily accessible socket located near
the r adio and ONLY u se the main s power
adapt er suppli ed. Keep t he supplie d iPod
Dock Adapters away from small children.
Copyright
Copy right 2007 by Imaginat ion Technologie s
Limited. All rights reserved. No part of this
publication may be copied or distributed,
transmitted, transcribed, stored in a retrieval
sys tem, or t ran slate d into a ny human o r compu ter
langu age, i n any fo rm or b y any me ans, e lec tr oni c,
mechanical, magnetic, manual or otherwise, or
disclosed to third parties without the express written
permission of Imagination Technologies Limited.
Trademarks
Chro nos iDoc k, tex tSCA N, PURE, t he PURE log o,
PURE D igita l, the PUR E Digit al logo, E coPlu s, the
EcoP lus logo, I magina tion Tech nologi es, and t he
Imagination Technologies logo are trademarks or
registered trademarks of Imagination Technologies
Limi ted. The ‘ DAB Digit al Radio’ lo go and the
stylised ‘r’ mark
®
and © Dig ital On e Limit ed.
iPod i s a tradema rk of Apple C ompute r, Inc .,
reg ister ed in the U.S. a nd other c ountri es. All
other pro duct name s are trad emarks o f their
respective companies. Version 1. September 2007.

Disposal of Waste Electrical & Electronic Equipment
This symbol on the product or on its packaging indicates that this product should
not be treated as household waste. Instead it should be handed over to a suitable
collection point for the recycling of electrical and electronic equipment. By ensuring
this product is disposed of correctly, you will help prevent potential negative
consequences for the environment and human health, which could otherwise be
caused by inappropriate waste handling of this product. The recycling of materials
will help to conserve natural resources. For more detailed information about recycling
of this product, please contact your local council office, your household waste
disposal service or the shop where you purchased the product.
Contents
Overview of the controls and connectors ................................2
Icons on the display .................................................................2
Quick set up .............................................................................4
Listening to DAB and FM ..........................................................5
Changing stations ................................................................................................... 5
Changing the information shown on screen ...........................................................5
textSCAN™ − pause and control scrolling text (DAB & FM) ...................................5
Setting and selecting presets ..................................................6
Docking and playing your iPod .................................................6
Docking your iPod .................................................................................................. 6
Selecting and playing tracks ..................................................................................7
Setting alarms .........................................................................8
Using the sleep timer ........................................................................................... 10
Changing your radio setup ..................................................... 10
DAB only options .................................................................................................. 10
FM only options .................................................................................................... 12
Help and specifications .......................................................... 12
Secondary and inactive stations .......................................................................... 12
Hints and tips ....................................................................................................... 12
Technical Specification s ....................................................................................... 13

2
Overview of the controls and connectors
Standby
Menu
Remote
9V DC
Underneath
x 7
Top
Info
Preset
Alarm
Menu
Volume −
Volume +
Select
+
Source Sleep Standby
Aux in
−
Front
Icons on the display
APSX^
=^f_[PhX]V)6[
iPod

3
Key to controls and connectors
1. Set and select preset stations. » Page 6
2. Cycle through on-screen information. » Page 5
3. Set and adjust alarms, when the unit is on or in standby. » Page 8
4. Access setup options » Page 10
5. In DAB Press +/- to scroll through radio stations. Press Select to listen. » Page 5
In FM Press and release +/- to manually tune up or down frequency range. Press and hold to scan up or
down to the next available station. » Page 5
In menus Press +/- to scroll or change options and press Select to confirm.
textSCAN Press Select to pause scrolling text. Press +/- to move left and right and Select to exit. » Page 5
6. Switch between DAB, FM, iPod or Auxiliary.
7. Set and adjust Sleep timer.
» Page 10
8. Switches between On and Standby.
9. Snooze an alarm.
» Page 9
10. iPod control (Menu) In iPod mode, press to go back up to the previous album or playlist, or press and hold
to access setup options. In all other modes, press to access setup options » Page 10
11. Volume up.
12.
iPod control (Skip/search ) Press to skip to the previous/next track on your iPod or press and
hold to search forwards or backwards through the current track. » Page 7
13. iPod control (Play/Pause ) Press to play or pause the currently playing track. » Page 7
14. Volume down.
15. 3.5mm headphone socket (mutes speakers).
16. Infrared sensor receives signal from remote control.
17. Light sensor for display auto-dimming (do not cover).
18. Analogue stereo input for auxiliary device.
19. Recess for insertion of an iPod Dock Adapter (supplied).
20. Interchangeable iPod Dock Adapter (7 different types supplied).
21. Connects to the 9V DC mains adapter (supplied).
Icons on the display
22. Alarm active indicators (1,2,3,4). » Page 9
23. Snooze active. » Page 9
24. Sleep timer active. » Page 10
25. DAB, FM, AUX and iPod source indicators.
26. Signal strength indicator (max=6 bars; DAB only)
27. Stereo indicator (DAB and FM only).
28. 16 x 2 character text area for station names, DAB scrolling text and other messages.
4
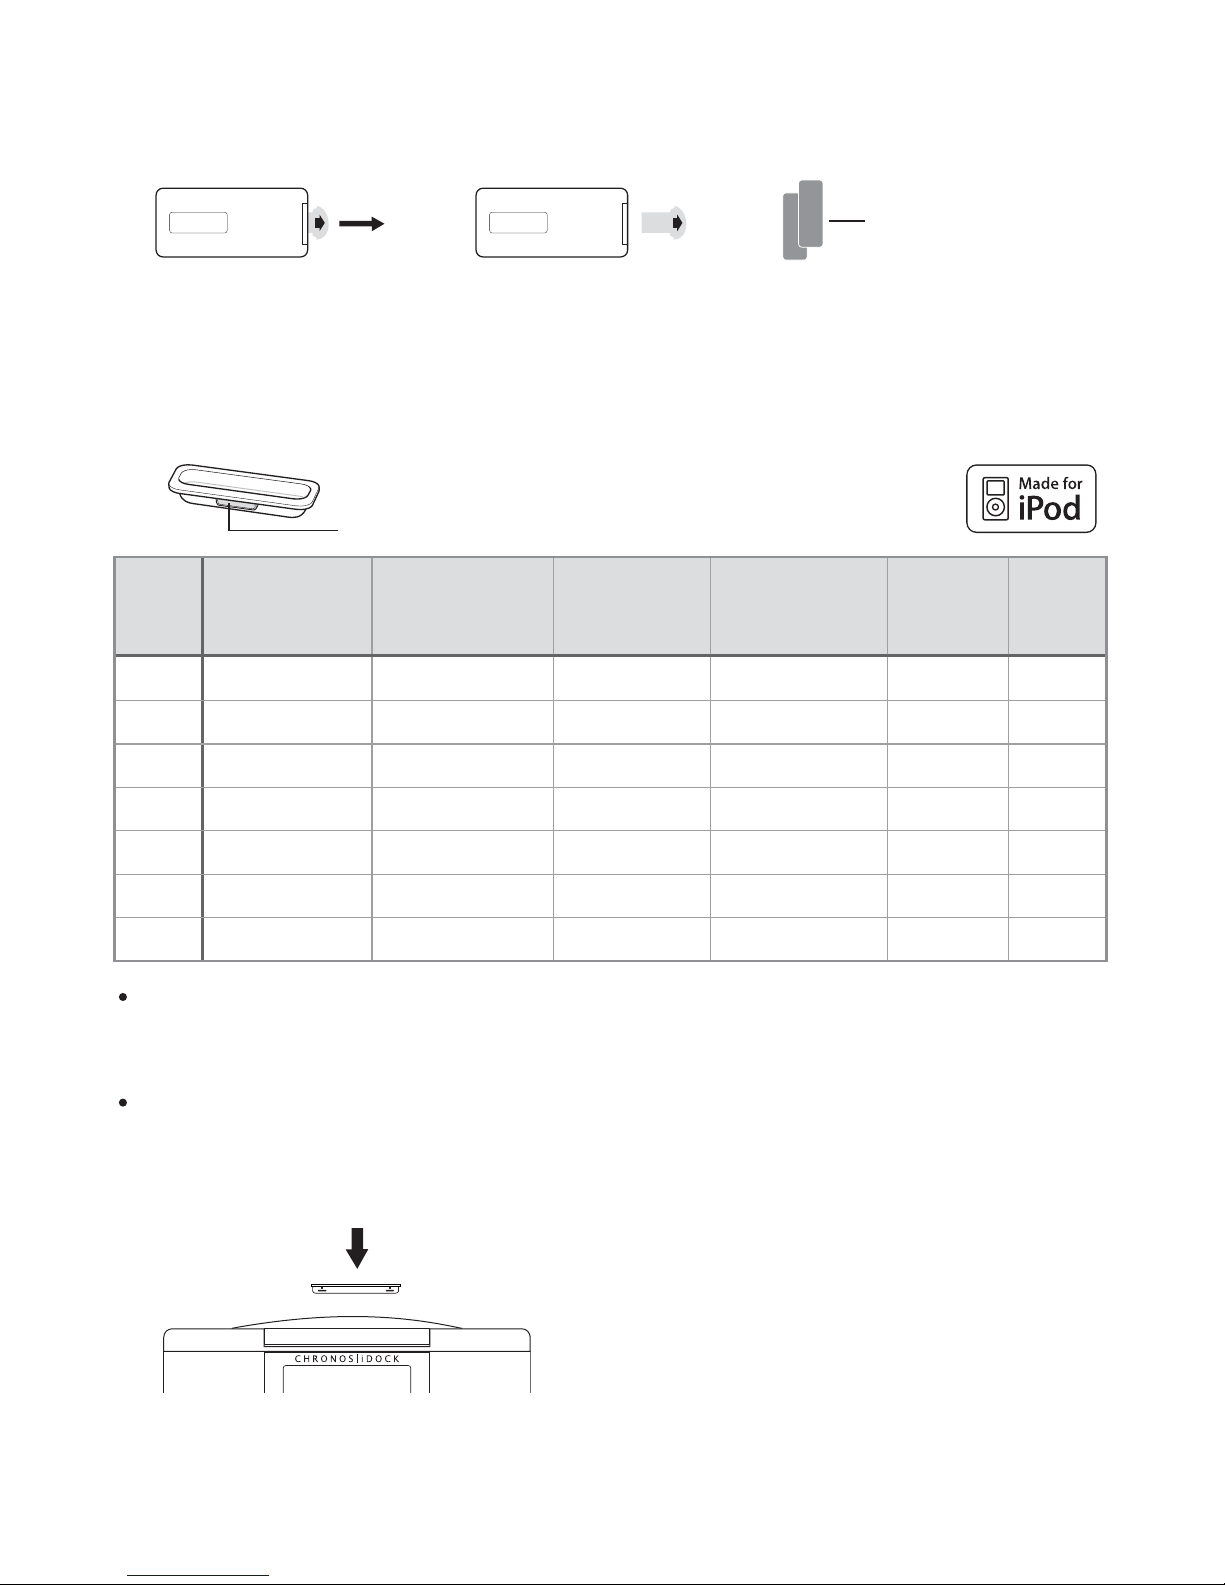
Dock Adapter number (3, 6-11)
Dock
Adapter
number
iPod
4th generation
(colour display)
iPod nano
1st generation
iPod
5th generation
(video)
iPod nano
2nd generation
(aluminium)
iPod mini iPod
classic
3 4GB, 6GB
620GB, 30GB
740GB, 60GB
8 1GB, 2GB, 4GB
9 30GB 80GB
10 60GB, 80GB 160GB
11 2GB, 4GB, 8GB
Quick set up
1. Pull out the plastic slip from the remote control battery compartment.
2. Open the box containing the iPod Dock Adapters and select the adapter that is compatible with
your model of iPod as detailed in the table below.
3. Fit the Dock Adapter to the top of the unit with the adapter number facing towards the rear.
5. Wait for Chronos iDock to complete an Autotune for all available DAB stations (takes about a minute).
The table above lists the seven included Dock Adapters and the iPod models they are compatible •
with. Chronos iDock is compatible with all iPod models that connect to the iPod Universal Dock,
except 3rd generation models.
A compatible Dock Adapter is provided with most iPod models. If your model of iPod is not listed •
in the table, and if you do not already have a compatible Dock Adapter, we recommend that you
purchase the correct type from Apple.
4. Hang the aerial wire vertically, connect the mains adapter to the underside of the unit and plug
the unit into the power supply.
The remote can be magnetically attached to the side of the unit for handy storage. If you’d like
to do so, affix one of the supplied adhesive magnetic strips to the recess on the reverse of the
remote and one to the side of the unit.
Magnetic strips (x2)
 Loading...