


Downloaded from
www . vandenborre . be
PCH460T-E
OPERATING AND INSTALLATION INSTRUCTIONS
BUILT-IN VITROCERAMIC HOB
Downloaded from
www . vandenborre . be
CONTENTS
1.DESCRIPTION OF THE HOB
2.SAFETY INSTRUCTIONS
3.INSTALLATION
4.ELECTRICAL CONNECTION
5.USAGE
6.TOUCH CONTROL SAFETY FUNCTIONS
7.CLEANING AND CARE

Downloaded from
www . vandenborre . be
Dear Customer,
Thank you for purchasing this Proline Cooking Hob.The safety precautions and recommendations in these instructions are for your own safety and that of others. They will also provide a means by which to make full use of the features offered by your appliance.
Please keep this booklet in a safe place. It may be useful infuture, either to yourself or to others in the event that doubts should arise relating to its operation.
This appliance must be used only for its intended purpose, that is for the
domestic cooking of foodstuffs. Any other form of usage is to be considered as inappropriate and therefore dangerous.
The manufacturer declines all responsibility in the event of damage caused by improper or incorrect use of the appliance.
CE Declaration of conformity
• This cooking hob has been designed to be used only for cooking. Any other u s e (s u c h a s h e a t i n g a r o o m ) i s i m p r o p e r a n d d a n g e ro u s .
•This cooking hob has been designed, constructed, and marketed incompliance with:
-Safety requirements of the "Low voltage" Directive 2006/95/EC;
-Safety requirements of the “EMC” Directive 89/336/EC;
-Requirements of the Directive 93/68/EC.
GB

1
Downloaded |
|
from |
|
|
www |
|
. |
DESCRIPTION OF THE HOB |
vandenborre |
|
. |
|
be |
BEFORE USING FOR THE FIRST TIME
Read the instructions carefully before installing and using the appliance. After unpacking the appliance, make sure it is not damaged. In case of doubt, do not use the appliance and contact your supplier or a qualified engineer.
Remove all packaging and do not leave the packing material (plastic bags, polystyrene, bands etc ) in easy reach of children as they may cause serious injury. The packaging materials are recyclable.
The appliance should be installed and all the electrical connections made by a qualified engineer in compliance with local regulations in force and following the manufacturers instructions.
Do not attempt to modify the technical properties of the appliance, as it may become dangerous to use.
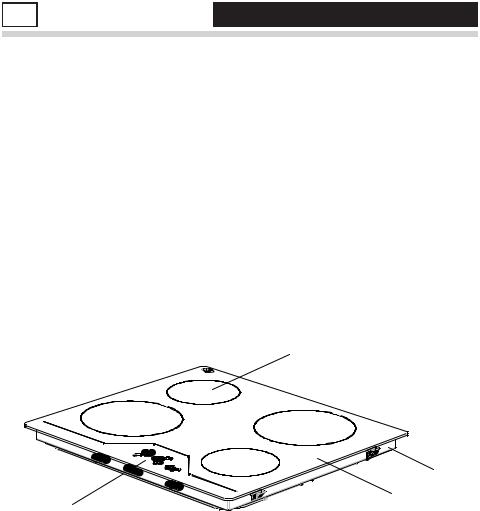
SINGLE ZONE
HEATER
HOB
FRAME
TOUCH CONTROL |
CERAMIC |
SURFACE |
|
PANEL |
|
Note: Appearance of your hob maybe different than the model shown above due to production changes.
1

|
Downloaded |
|
|
from |
|
|
|
www |
|
|
. |
2 |
SAFETY INSTRUCTIONS |
vandenborre |
|
||
|
|
. |
|
|
be |
Please comply with these instructions. If you do not, any damage resulting from improper, incorrect or negligent use or improper
connection or installation is not covered by the warranty.
· |
This appliance is intended for domestic use only, any other use may |
· |
i nva lid ate th e wa rranty and mi ght b e dang erou s. |
This appliance must only be used for the purpose of heating or cooking |
|
|
food, any other use, for example heating rooms, working surface or |
|
storage surface, is dangerous. |
·Additions or modifications to the appliance are not permitted.
·Do not place or store flammable liquids, highly inflammable materials or fusible objects on or near the appliance.
·Children must be kept away from the appliance.
·The appliance may only be installed and connected by an authorised and qualified installer.
·The electrical safety of this hob is guaranteed only if it is connected to a properly earthed system, which complies with the electrical safety standards.
·Built-in appliances may only be used after they have been installed in suitable built-in units and work surfaces that meet the standards.
·Do not put pressure on the power supply cable while fitting the hob.
·Power supply cable length should not exceed 2m for isolation safety.
·In the event of faults with the appliance or damage to the glass ceramic (cracks or splits), the appliance must be switched off and disconnected from the electrical supply to prevent the possibility of an electric shock.
·Repairs to the appliance must only be carried out by authorised service personal.
·Make sure all the packaging has been removed before you use the appliance.
·Cables from electrical appliances must not touch the hot surface of any appliance or hot cookware.
·Never leave the hob unattended when cooking with fat or oil. They can rapidly catch fire if overheated.
·Do not cut any food on the glass of the ceramic hob. Glass panels should not be used as working surfaces.
2

|
Downloaded |
|
|
from |
|
|
|
www |
|
|
. |
· |
Be careful when using small household appliances, such as irons, near |
vandenborre |
. |
||
|
the elements. |
be |
· |
|
|
Do not use the cooking zones with empty cookware or without cookware. |
|
|
· Make sure all the controls are in the off position when not in use. |
|
|
· For cleaning, the appliance must be switched off at the supply and cooled |
|
|
· |
down. |
|
Do not use a steam cleaner to clean the appliance as this could damage |
|
|
· |
the product and may invalidate the warranty. |
|
Use only stable flat-based pans. |
|
|
WARNING
When correctly installed, your product meets all safety requirements laid down for this type of product category. However special care should be taken around the underneath of the appliance as this area is not designed or intended to be touched and may contain sharp or rough edges, that may cause injury.
Fire Risk! Do not leave inflammable materials on the Hob top. Make sure that electrical cords connecting other appliances in the proximity cannot come in to contact with the hob top.
Do not allow heavy or sharp objects to drop on the ceramic hob. If the hob is cracked or damaged, unplug and call the after-sales service. Do not scratch the hob with sharp objects. Don't use the hob as a work surface.
Before disposing of an unwanted appliance, it is recommended that it is made inoperative and that all potentially hazardous parts are made harmless. Important: This appliance has been designed for domestic use only. The appliance is NOT suitable for use within a semi-commercial, commercial or communal environment.
If the supply cord is damaged, it must be replaced by the manufacturer, its service agent or similarly qualified person in order to avoid an electrical hazard.
3

3
Downloaded |
|
from |
|
|
www |
|
. |
INSTALLATION |
vandenborre |
|
. |
|
be |
The electrical connection of this hob should be carried out by an authorised service personal or a qualified electrician, according to the instructions in this guide and in compliance with the current regulations.
·Prior to installation, ensure that the local distribution conditions and the adjustment of the appliance are compatible.
·The laws, ordinances, directives and standards in force in the country of use are to be followed (safety regulations, proper recycling in accordance with the regulations, etc.)
Locating your built-in hob
After removing the packaging material from the appliance and its accessories, ensure that the hob is not damaged. If you suspect any damage, do not use the appliance, contact an authorised service personal or a qualified electrician immediately.
·This built-in hob is to be inserted into a cut out of a worktop. It will be electrically connected with the switch box below counter level, especially provided for this purpose.
·Cut an opening with the dimensions shown in the picture below.
4

Downloaded from
www . vandenborre .  be
be
·Apply the one-sided self-adhesive sealing tape supplied all the way round the lower edge of the cooking surface along the outer edge of the glass ceramic panel. Do not stretch it.
·Screw the 4 worktop mounting brackets on the side walls of product.
worktop mounting bracket
5

|
Downloaded |
|
|
from |
|
|
|
www |
|
|
. |
4 |
ELECTRICAL CONNECTION |
vandenborre |
|
|
. |
Electrical connection of your hob |
be |
|
|
||
·Before proceeding with the electrical connection, verify that the current carrying capacity of the system and the socket is adequate for the maximum power rating of the hob.
·Electrical installation of the residence and the electrical current plug in use must be earthed and conform with safety regulations.
·If there is no dedicated hob circuit and fused switch, they must be installed by a qualified electrician before the hob is connected.
·The fused switch must be easily accessible once the hob has been installed.
·Do not use adaptors, multiple sockets and/or extension leads.
·This appliance conforms with the requirements ofthe following EEC Directives:
1.Vitroceramic hob EEC/73/23 and 93/68, EEC/89/336 relating to radio interference,
2.EEC/89/109 relating to contact with foods.
·A circuit breaker with a contact opening of at least 3 mm, rated 20 A and delayed functioning type must be installed in the supply circuit.
E

2
2
2
*This appliance must be earthed.
*For this connetion a power lead
of wire type H05VV-F should be used.
·The supply cable must be H05VV-F 3X2,5 mm² / 60227 IEC 53. You will find the connection diagram shown on the back of your appliance.
·During installation, please insure that isolated cables are used. An incorrect connection might damage your appliance. The guarantee will not cover such damages.
·All repairs must be carried out by an authorised service personal or a qualified electrician.
·Unplug your appliance before each maintenance. For reconnection, follow the connection diagrams.
6

5
Downloaded |
|
from |
|
|
www |
|
. |
|
vandenborre |
|
. |
USAGE |
be |
|
|
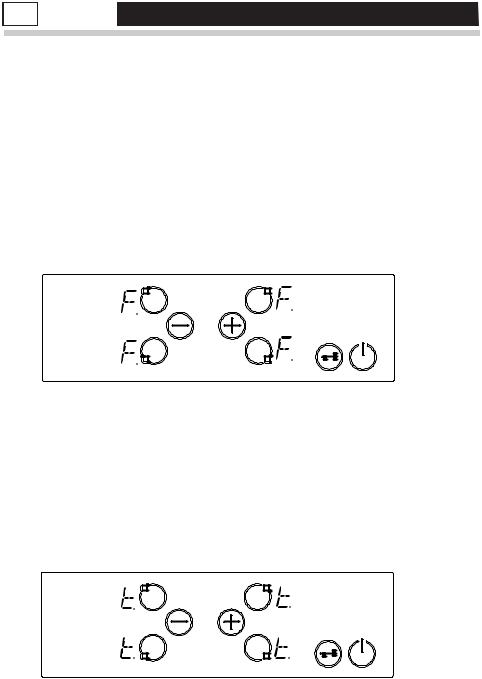
The appliance is operated by touching buttons and the functions are confirmed by displays and acoustic signals.
NOTE: See the section on HOB RESET if you see a flashing H in any of the displays.
Stand-By-Mode |
S-Mode |
The mains are applied to the hob control |
|
|
|
and all heater displays are off or a residual |
|
|
|
heat display is active. |
|
|
|
|
|
Operating-Mode |
B-Mode |
At least one heater display shows a heat |
|
setting between ´0`and ´9` |
|
||
|
|
|
|
Lock Mode |
VR-Mode |
The hob control is locked. |
|
|
|
|
|
Mode Descriptions
7
Downloaded from
www . vandenborre . be
Turning the appliance on / off .
If the appliance is in Stand-By-Mode, it is put in Operating-Mode by pressing
the On/Off button |
at least 1 second. A beep indicates a successful |
operation. |
|
On all heaters a ´0` appears and all Decimal Point of the heater flashes.
If there is no operation within 10 sec, the display of all heaters will turn off.
If the displays are turned off, the heater will be set to off.
If  is pressed more than 2 sec (in Operating-Mode), the appliance is switched off and is set into the off mode again. The appliance can be turned
off by pressing |
at any time; even if other buttons are pressed |
simultaneously. |
|
If there is residual heat remaining, this will be indicated by a flashing H in the corresponding Heater Display.
Select Heater
If a single heater is chosen with the corresponding Active/Deactive Heater Button , the Decimal Point of the related Heater Display flashes. For the
selected heater, you can set the heat level between 1-9 by touching the
Heat Setting Buttons  or
or  .
.
The buttons must be pressed within 3 sec, otherwise the heater selection
is erased and heat setting dot will disappear (Decimal Point). If there is no further operation within 10 sec, the heater falls back into off mode.
The heat setting can always be changed by pressing 

 or
or  between level 1-9.
Each button operation or each display change is accompanied by a beep.
8

Downloaded |
|
from |
|
www |
|
|
. |
|
vandenborre |
|
. |
Set Cooking Level With and Without Heat Boost |
be |
|
|
All heaters are equipped with heat boost functionality. |
|
If the heat boost is active, then the heater will be operated with maximum power for the period of the heat boost time, which is dependent on the
selected heat setting. This is indicated by a flashing ´A`, alternating with the
heat setting value (e.g. ´A` and then ´9`) in the heater display. Once the heat boost time has ended, only the heat setting will be displayed.
If you want to use heat boost level 9 must be selected by pressing starting from level 0. After setting the heat to level 9 , ´A`and the heat setting will
be displayed alternately. This means that level 9 and heat boost is active.
Continue to press the |
button to set |
a lower heat setting. |
The heat boost can be turned off by pressing |
until heat setting ´0` is |
|
selected. |
|
|
If the heat boost should be used, it can always be activated by actuating  again if the heat setting is set to level 9. In the heat display ´A/9` flashes.
Turn Off Individual Heaters
A selective heater can be turned off in two ways:
. Simultaneous operation of |
and |
buttons |
|
· Reduction of the heat setting to ´0` by operating |
button |
||
Simultaneous operation of  and
and  buttons
The corresponding heater must be chosen with one of the Active/Deactive Heater Button , the Decimal Point of the selected Heater Display flashes.
To turn off the heater, |
and must be pressed at the same time. A beep |
signal sounds and ´0` appears in the heat setting display.
If there is a residual heat for this heater remaining, this will be indicated by a static display ´H` in the heat setting display.
Reduction of the heat setting to ´0` by operating  button
9
|
|
Downloaded |
|
|
|
from |
|
|
|
|
www |
|
|
|
. |
|
|
|
vandenborre |
|
|
|
. |
The heater can also be turned off by reducing the heat setting to ´0`. |
be |
||
|
|||
When Heater Display indicates ´0`, the Decimal Point of the selected heater |
|
||
will also turn off. |
|
|
|
If there is a residual heat for this heater remaining, this will be indicated by |
|
||
a static display ´H` in the heat setting display. |
|
||
Key Lock |
|
|
|
Key lock functionality is for blocking and set the appliance into a save |
|
||
modus during operation. Touch modifications as for example rise heat |
|
||
settings and others should not be possible. It is only possible to switch the |
|
||
appliance off. |
|
|
|
To lock the current operating mode, press the Key Lock button for at |
|
||
least 2 seconds. This operation is acknowledged by a beep. The Key Lock |
|
||
Indicator flashes and the controls are locked. |
|
||
The heater can only be locked in Operating Mode. |
|
||
If the heater is locked, only |
can be operated, all other buttons are |
|
|
disabled. Only the On-Off switch |
will operate. If you switch off the |
|
|
appliance, you must switch it on again and press the lock button to unlock the appliance before you can use it.
After pressing 2 sec, the Key Lock Indicator disappears. Now, the hob control is unlocked and can be operated normally.
10
6
Downloaded |
|
|
from |
||
|
www |
|
|
. |
|
|
vandenborre |
|
TOUCH CONTROL SAFETY FUNCTIONS |
. |
|
be |
||
|
||
The following safety functions are available to avoid unintended operations of the hob control.
Sensor Safety Cut Off
To prevent the appliance from unwanted, random sensor operation, sensor monitoring is included.
In case of one or more buttons are pressed longer than 12 sec, the sensor monitoring routine indicates with a beep, that wrong operation (pot or other
object placed on the button, sensor failure, etc.) and switches off the appliance.
The safety turn off causes the hob to turn off to standby. An ´F` will flash in all heater displays once before switching to standby.
If residual heat is present, ´H` will be displayed in the appropriate heater displays.
Over Temperature Switch Off
Due to the control panel being close to the front two heaters it can get too hot to touch if the pans have been badly placed so the bottom edge of the pan is close to but not touching the control buttons.
To prevent the hob control unit from damage, the control monitors the
temperature and switches off, if the control panel exceeds 60ºC. All 4 heater displays show ´t`, until the hob cools down.
11

Downloaded |
|
from |
|
|
www |
|
. |
|
vandenborre |
After the hob cools the ´t` displays will be erased and the hob control enters |
. |
be |
|
standby mode. This means that the user can reactivate the appliance by touching .
.
Residual Heat Functions
After the hob is turned off when cooking is finished, there is some heat stored in the vitroceramic glass called residual heat. The hob can calculate roughly how hot the glass is. If the calculated temperature is higher than + 60 ° C, the corresponding heater display will flash an ´H` symbol. The residual heat display is shown as long as the calculated heater temperature is higher than + 60 ° C.
The display of the residual heat has the lowest priority and is overwritten by every other display value such as safety turn off's and displaying error codes.
HOB RESET
When the Hob is first turned on after installation or after a power outage during operation, the Hob will display a flashing ´H` on all or some heater displays.
Which displays flash an ´H` depends on mode of operation when the power outage happened.
This is due to the Hob retaining heater information in its memory, this is not a fault and is normal.
To reset the Hob, press and hold the top left heater, bottom left heater and the  buttons at the same time for roughly 2 seconds.
hold these buttons to reset the Hob.
12

|
Downloaded |
|
|
from |
|
|
|
www |
|
|
. |
Cookware with rough bottoms should not be used since these can scratch |
vandenborre |
|
7 |
CLEANING AND CARE |
|
the ceramic surface. The bottom of the cookware should be as thick and |
. |
|
be |
||
flat as possible. Before use, make sure that cookware bottoms are clean and dry.
Always place the cookware on the cooking zone before it is switched on. If possible, always place the lids on the cookware. Bottom of the cookware must not be smaller or larger than the cooking zones, they should be at the proper size as indicated below.
CORRECT |
|
FALSE |
|
FALSE |
|
FALSE |
|
|
|
|
|
|
|
Before cleaning the hob, first disconnect from the electrical supply socket. Then ensure that there is no residual heat stored in the appliance. Vitroceramic glass is very resistant to high temperature and overheating. If there is residual heat stored in the appliance, ´H` is flashing in the Heater Display. In order to avoid burns, let the appliance cool down.
CLEANING THE CERAMIC HOB
Before you begin cleaning make sure that the hob is switched off. Remove spillages and other types of encrustations.
Dust or food particles can be removed with a damp cloth. If you use a detergent, please make sure that it is not abrasive, Do not use abrasive cleaners or scouring powders as these can damage the ceramic surface of the hob.
All traces of the cleaner must be removed with a damp cloth. Dust, fat and liquids from food that has boiled over must be removed as soon as possible.
If they are allowed to harden they become increasingly difficult to remove.
13

|
|
Downloaded |
|
|
|
|
|
from |
|
|
|
|
www |
|
|
|
|
|
. |
This is especially true in the case of sugar/syrup mixtures which could |
vandenborre |
|||
permanently pit |
the surface of the hob |
if left |
to burn on it. |
. |
be |
||||
If any of these products has melted on the ceramic surface, you should |
|
|||
remove it immediately (when the surface is still hot) by using a scraper to |
|
|||
avoid any permanent damage to the surface of the hob (available from the |
|
|||
s t o r e w h e r e |
y o u p u r c h a s e d |
t h i s |
a p p l i a n c e ) . |
|
Do not put articles on the hob which can melt: i.e. plastic, aluminium foil, sugar, sugar syrup mixtures etc.
Avoid using a knife or other sharp utensil as these may damage the ceramic surface.
Do not use steel wool or an abrasive sponge which could scratch the surface permanently.
14
Downloaded from
www . vandenborre . be
Disposal
Waste electrical and electronic products must not be disposed
of with household waste. Please refer to the retailer from whom you purchased this item for disposal instructions.
Packaging materials should be recycled using local facilities.
If something doesn't seem to work
If there is something about your appliance which you do not understand and you live in the UK you can phone our help line during normal office
hours on: 0113 2793520 If you require service, call the number on your sales receipt.
Calls are charged at standard rates.
We apologise for any inconvenience caused by minor inconsistencies in these instructions, which may occur as a result of product improvement
and development.
Kesa U.K HU1 3AU 01/ 09/2007
52012436

Downloaded from
www . vandenborre . be
PCH460T-E
INSTRUCTIONS RELATIVES A L'UTILISATION ET A
L'INSTALLATION
TABLE DE CUISSON VITROCÉRAMIQUE ENCASTRABLE
Downloaded from
www . vandenborre . be
TABLE DES MATIÈRES
1.DESCRIPTION DE L'APPAREIL
2.CONSIGNES DE SÉCURITÉ
3.INSTALLATION
4.BRANCHEMENT ELECTRIQUE
5.UTILISATION
6.FONCTIONS SECURITAIRE DU BOUTON DE COMMANDE
7.NETTOYAGE ET ENTRETIEN
Downloaded from
www . vandenborre . be
Chère cliente, cher client,
Merci d'avoir acheté la présente table de cuisson de marque Proline. Les précautions de sécurité et les recommandations contenues dans les présentes
instructions sont destinées à votre propre sécurité et à celle de vos proches. Elles vous donneront par ailleurs un moyen avec lequel utiliser entièrement
toutes les fonctions offertes par votre appareil.
Veuillez conserver cette brochure dans un endroit sûr. En cas de doute relatif à son fonctionnement, elle peut être utile à l'avenir, à vous-même, ou à vos proches.
Le présent appareil doit être utilisé uniquement aux fins pour lesquelles il a été
conçu, à savoir pour la cuisson domestique des aliments. Toute autre forme d'utilisation doit être considérée comme inappropriée et, en conséquence,
dangereuse.
La responsabilité du fabricant ne saurait être engagée en cas de dommage provoqué par une utilisation inadaptée ou incorrecte de l'appareil.
Déclaration de conformité CE
•La présente table de cuisson a été conçue pour être utilisée uniquement pour la
cuisson. Toute autre utilisation (telle que le chauffage d'une pièce) est inappropriée et dangereuse.
•Cette table de cuisson a été conçue, construite, et commercialisée conformément aux :
-Consignes de sécurité de la directive 2006/95/CE portant sur la " basse tension " ;
-Consignes de sécurité de la directive 89/336/CE portant sur l' " EMC " ;
-Consignes relatives à la directive 93/68/CE.
FR
1
Downloaded |
|
from |
|
|
www |
|
. |
DESCRIPTION DE L'APPAREIL |
vandenborre |
|
. |
|
be |
AVANT D'UTILISER VOTRE APPAREIL POUR LA PREMIERE FOIS
Lisez attentivement les instructions avant d'installer cet appareil et de l'utiliser. Après l'avoir enlevé de son emballage, assurez-vous qu'il n'est pas endommagé. En cas de doute, n'utilisez pas l'appareil mais contactez plutôt votre fournisseur ou un technicien qualifié.
Enlevez l'emballage et ne laissez son matériel (sacs en plastique, polystyrène, bandes, etc.) à la portée des enfants car il peut provoquer des conséquences graves. Les matériaux d'emballage sont recyclables.
L'appareil doit être installé et tous les branchements électriques effectués par un technicien qualifié, conformément aux réglementations locales en vigueur et selon les instructions données par les fabricants. Évitez de modifier les propriétés techniques de l'appareil, dans la mesure où son utilisation peut devenir dangereuse.
ELEMENT CHAUFFANT MONOZONE
CADRE DE LA TABLE DE CUISSON
SURFACE EN CERAMIQUE
PANNEAU DE COMMANDES A TOUCHES SENSITIVES
Remarque: L'apparence de votre table de cuisson peut être différente du modèle présenté ci-dessus en raison des modifications apportées lors de la production.
1

|
Downloaded |
|
|
from |
|
|
|
www |
|
|
. |
2 |
CONSIGNES DE SÉCURITÉ |
vandenborre |
|
||
|
|
. |
Veuillez respecter ces consignes. Si vous ne le faites pas, tout dommage lié |
be |
|
|
||
à une utilisation inadaptée, incorrecte, ou négligente, voire d'un branchement ou d'une installation inadaptés, ne sera pas couvert pas la garantie.
·Le présent appareil est réservé uniquement à une utilisation domestique. Toute autre utilisation peut rendre la garantie nulle et de nul effet, et constituer un danger.
·Le présent appareil doit être utilisé uniquement pour réchauffer ou cuire les aliments. Toute autre utilisation de la surface de travail ou de la surface de conservation, aux fins de chauffage de la pièce, est dangereuse.
·Il est interdit d'effectuer des additions ou des modifications sur l'appareil.
·Évitez de mettre ou de conserver des liquides inflammables, des matériaux hautement inflammables ou encore des objets fusibles au-dessus ou tout près de l'appareil.
·Les enfants doivent être tenus à l'écart de l'appareil.
·L'appareil peut être installé et branché uniquement par un technicien
agrée et qualifié.
· La sécurité de cette table de cuisson en matière d'électricité n'est garantie que si la table en question est branchée à un système correctement mis à la terre et répondant aux normes de sécurité en vigueur en matière d'électricité.
·Les appareils encastrables ne peuvent être utilisés qu'après avoir été installés dans des unités encastrables appropriées et à des surfaces de travail appropriées qui respectent les normes établies.
·N'exercez pas de pression sur le câble d'alimentation électrique pendant l'installation de la table de cuisson.
·Pour des raisons de sécurité, la longueur du câble d'alimentation électrique ne doit pas dépasser 2 m .
·Dans l'éventualité de défaillances observées sur l'appareil ou de dommages encourus par la surface vitrocéramique (fissures ou rayures), il convient d'éteindre l'appareil et de le débrancher de la source d'alimentation électrique afin de prévenir la possibilité d'un choc électrique.
·Les éventuelles réparations à apporter à l'appareil doivent uniquement être effectuées par un personnel du service agrée.
·Assurez-vous que l'emballage a été entièrement enlevé avant d'utiliser votre appareil.
· |
Les câbles des appareils électriques ne doivent ni toucher la surface 2 |
· |
chaude de l'appareil, ni les ustensiles lorsque ceux-ci sont chauds. |
Ne laissez jamais la table de cuisson sans surveillance lorsque vous |
|
|
cuisinez avec de la graisse ou de l'huile. Il peut rapidement prendre feu |
|
en cas de surchauffe. |
·Ne coupez pas d'aliment sur la vitre de la table de cuisson en céramique. Les panneaux vitrés ne doivent pas être utilisés comme surfaces de travail.

|
Downloaded |
|
|
from |
|
|
|
www |
|
|
. |
· |
Soyez prudent lorsque vous utilisez de petits appareils électroménagers, |
vandenborre |
. |
||
|
comme les fers à repasser, tout près des éléments. |
be |
· |
|
|
N'utilisez pas les zones de cuisson sans ustensiles ou avec des ustensiles |
|
|
· |
vides. |
|
Assurez-vous que toutes les commandes se trouvent à la position Off |
|
|
· |
(Arrêt) lorsque l'appareil n'est pas en cours d'utilisation. |
|
Pour le nettoyage, l'appareil doit être éteint à l'alimentation et refroidi. |
|
|
· |
Évitez d'utiliser un nettoyant à vapeur pour votre appareil dans la mesure |
|
|
où ce produit peut endommager ledit appareil, et rendre ainsi la garantie |
|
· |
nulle et de nul effet. |
|
Utilisez uniquement des ustensiles de cuisine stables avec une base plate. |
|
|
AVERTISSEMENT
Une fois correctement installé, votre appareil remplit désormais toutes les consignes de sécurité prévues pour ce type de catégorie de produit. Toutefois, des précautions spéciales doivent être prises autour du dessous de l'appareil car cet endroit n'a ni été conçu, ni n'a été prévu pour être touché, et est susceptible à cet effet de contenir des bords pointus ou durs qui pourront à leur tour entraîner des blessures.
Risque d'incendie! Évitez de laisser les matériaux inflammables au-dessus de la table de cuisson.
Assurez-vous que les cordons électriques branchés aux autres appareils alentours ne seront pas en contact avec la partie supérieure de la table de cuisson.
Évitez de faire tomber des objets lourds ou pointus sur la table de cuisson en céramique. Au cas où la table de cuisson présente une fissure ou est endommagée, débranchez et appelez le service après vente. Évitez de rayer la table de cuisson avec des objets pointus N'utilisez pas la table de cuisson comme surface de travail.
Avant d'effectuer la mise au rebut d'un appareil, il est recommandé de le rendre inopérant et de faire en sorte que toutes les parties potentiellement dangereuses soient inoffensives.
Important: Le présent appareil a été conçu uniquement pour une utilisation domestique. L'appareil ne convient PAS à une utilisation dans un environnement semi commercial ou communal.
En cas de dommage du cordon d'alimentation, celui-ci doit être remplacé par le fabricant, son agent de service ou tout autre technicien qualifié afin d'éviter un choc électrique.
3

3
Downloaded |
|
from |
|
|
www |
|
. |
INSTALLATION |
vandenborre |
|
. |
|
be |
Le branchement électrique de cette table de cuisson doit être effectué par un
personnel du service agrée ou par un électricien qualifié, selon les instructions contenues dans ce guide et conformément aux réglementations en vigueur.
·Avant toute installation, assurez-vous que les conditions de distribution et le réglage de l'appareil sont compatibles.
·Les lois, ordonnances, directives et normes en vigueur dans le pays d'utilisation du produit doivent être respectées (réglementations en matière
de sécurité, recyclage adéquat conformément à la réglementation en vigueur, etc.)
Emplacement de votre table de cuisson encastrable
Après avoir enlevé le matériel d'emballage et ses accessoires de l'appareil, assurez-vous que la table de cuisson n'est pas endommagée. Si vous suspectez un dommage au niveau de l'appareil, ne l'utilisez pas. Contactez immédiatement un personnel du service agrée ou un technicien qualifié.
·Cette table de cuisson encastrable doit être insérée dans une fente, hors d'une surface de travail. Elle sera électriquement branchée au boîtier d'interruption en dessous du niveau du plan de travail, prévu essentiellement à cet effet.
·Créez une ouverture avec les dimensions présentées dans le schéma cidessous.
4

Downloaded from
www . vandenborre .  be
be
·Appliquez le ruban d'étanchéité autocollant unilatéral fourni tout autour du côté inférieur de la surface de cuisson, le long du côté extérieur du panneau vitrocéramique. Ne l'étirez pas.
·Vissez les 4 crochets de montage du plan de travail sur les parois latérales du produit.
Crochet de montage du plan de travail
5

|
Downloaded |
|
|
from |
|
|
|
www |
|
|
. |
4 |
BRANCHEMENT ELECTRIQUE |
vandenborre |
|
|
. |
Branchement électrique de votre table de cuisson |
be |
|
|
||
·Avant de procéder au branchement électrique, vérifiez que la capacité de transport actuelle du système et la prise sont appropriées pour la puissance nominale maximale de la table de cuisson.
·L'installation électrique de la résidence et le branchement du courant électrique utilisé doivent être mis à la terre et respecter la réglementation en matière de sécurité.
·S'il n'existe pas de circuit pour table de cuisson et d'interrupteur à fusibles spécialisés, l'installation doit être effectuée par un électricien qualifié avant tout branchement de la table de cuisson.
·L'interrupteur à fusibles doit être facilement accessible une fois la table de cuisson installée.
·Évitez d'utiliser des adaptateurs, de multiples prises et/ou câbles de raccord.
·Cet appareil est conforme à la réglementation des directives CEE suivantes :
1.Table de cuisson vitrocéramique. CEE/73/23 et 93/68, CEE/89/336 relatif à l'interférence radio,
2.CEE/89/109 relatif au contact avec les aliments.
·Un disjoncteur avec un écartement de contact d'un minimum de 3 mm 20 A, fonctionnement retardé, doit être installé à l'intérieur du circuit d'alimentation.
E

2
2
2
*Cet appareil doit être branché à une borne de mise à la terre.
*Pour ce branchement, un conducteur d'alimentationde type H05VV-Fdoitêtre utilisé.
·Le câble d'alimentation doit être de H05VV-F 3X2, 5 mm² / 60227 IEC 53. Le schéma de branchement figure à l'arrière de votre appareil.
·Pendant l'installation, veuillez vous assurer que les câbles isolés sont utilisés. Un branchement inadéquat pourrait endommager votre appareil. La garantie ne couvrira pas de tels dommages.
·Tout travail de réparation doit être effectué par un personnel du service agrée ou par un électricien qualifié.
·Débranchez votre appareil avant tout travail d'entretien. Pour brancher à nouveau, respectez les schémas de branchement.
6

5
Downloaded |
|
from |
|
|
www |
|
. |
|
vandenborre |
|
. |
UTILISATION |
be |
|
|
Pour faire fonctionner votre appareil, appuyez sur les touches et les fonctions sélectionnées seront confirmées par des affichages et des signaux acoustiques.
REMARQUE: Reportez-vous à la section relative au REGLAGE DE LA TABLE DE CUISSON dans le cas où vous voyez un H clignotant dans l'un
des affichages. |
Activer/Désacti |
|
|
|
||||||||||||||||
Affichage de |
ver l'élément |
|
Point |
|||||||||||||||||
l'élément chauffant |
chauffant |
|
décimal |
|||||||||||||||||
|
|
|
|
|
|
|
|
|
|
|
|
|
|
|
|
|
|
|
|
|
|
|
|
|
|
|
|
|
|
|
|
|
|
|
|
|
|
|
|
|
|
|
|
|
|
|
|
|
|
|
|
|
|
|
|
|
|
|
|
|
|
|
|
|
|
|
|
|
|
|
|
|
|
|
|
|
|
|
|
|
|
|
|
|
|
|
|
|
|
|
|
|
|
|
|
|
|
|
|
|
|
|
|
|
|
|
|
|
|
|
|
|
|
|
|
|
|
|
|
|
|
|
|
|
|
|
|
|
|
|
|
|
|
|
|
|
|
|
|
|
|
|
|
|
|
|
|
|
|
|
|
|
|
|
|
|
|
|
|
|
|
|
|
|
|
|
|
|
|
|
|
|
|
|
|
|
|
|
|
|
|
|
|
|
|
|
|
|
|
|
|
|
|
|
|
|
|
|
|
|
|
|
|
|
|
|
|
|
|
|
|
|
|
|
|
|
|
|
|
|
|
|
|
|
|
|
|
|
|
|
|
|
|
|
|
|
|
|
|
|
|
|
|
|
|
|
|
|
|
|
|
|
|
|
|
|
|
|
|
|
|
|
|
|
|
|
|
|
|
|
|
|
Réglage de chaleur/ |
Réglage de chaleur/ Indicateur Verrou |
Marche/ |
|
Diminution |
Augmentation |
de |
Arrêt |
|
|
verrouillage |
|
Mode de veille |
Mode S |
Les secteurs sont appliqués à la commande de la |
||
table de cuisson, et tous les affichages de l'élément |
||||
|
|
|||
|
|
chauffant sont éteints, ou alors un affichage de |
||
|
|
l'élément résiduel est actif. |
||
Mode de |
Mode B |
Au moins un affichage de l'élément chauffant présente |
|
|
fonctionnement |
un réglage de chaleur compris entre ´0` et ´9` |
|||
|
|
|
||
Mode verrouillé |
Mode VR |
La commande de la table de cuisson est verrouillée. |
||
|
|
|
|
|
Descriptifs du mode
7

Downloaded from
www . vandenborre . be
Allumer/Eteindre l'appareil.
Si l'appareil est en mode de veille, vous pouvez le mettre en mode de
fonctionnement si vous appuyez sur la touche On/Off (Marche/Arrêt) 
pendant au moins 1 seconde. Un bip sera émis pour indiquer que l'opération a été effectuée avec succès.
Sur tous les éléments chauffants, un ´0` apparaît et tout point décimal de l'élément chauffant clignote.
Si l'appareil n'enregistre aucune opération après 10 secondes, l'affichage de tous les éléments chauffants s'éteindra.
Si les affichages sont éteints, l'élément chauffant sera réglé à la position éteinte.
Si vous appuyez sur le bouton  pendant plus de 2 secondes (en Mode de fonctionnement), l'appareil est éteint, et bascule à nouveau en mode Off
(éteint). Vous pouvez éteindre l'appareil en appuyant sur le bouton  à tout m om e nt, mê me si d' au tre s b ou to ns so nt ap pu yé s
simultanément.
En cas de chaleur résiduelle restante, un H clignotant l'indiquera dans l'affichage de l'élément chauffant correspondant.
Sélectionner l'élément chauffant
Si un seul élément chauffant est sélectionné avec le bouton  Activer/Désactiver le bouton de l'élément chauffant, le Point décimal de
l'affichage de l'élément chauffant correspondant clignote. Pour l'élément
chauffant sélectionné, vous avez la possibilité de régler le niveau de chaleur entre 1 et 9 en appuyant sur les boutons de réglage de l'élément chauffant
 ou
ou .
.
Vous devez appuyer sur les boutons dans un intervalle de 3 secondes, faute de quoi la sélection de l'élément chauffant sera effacée et le point de
réglage de chaleur disparaîtra (Point décimal). Si aucune autre opération
ne se produit pendant 10 secondes, l'élément chauffant retourne en mode Off.
Le réglage de chaleur peut toujours être modifié en appuyant sur le bouton  ou
ou  entre les niveaux 1 et 9.
Le fonctionnement de chaque bouton ou chaque modification d'affichage s'accompagne d'un bip.
8

|
|
|
|
|
Downloaded |
|
|
|
|
|
|
from |
|
|
|
|
|
|
www |
|
|
|
|
|
|
|
. |
|
|
|
|
|
|
vandenborre |
|
|
|
|
|
|
. |
Réglez le niveau de cuisson avec ou sans pompe à chaleur |
be |
|||||
Tous les éléments chauffants comportent la fonctionnalité de la pompe à |
|
|||||
chaleur. |
|
|
|
|
||
Si la pompe à chaleur est active, le fonctionnement de l'élément chauffant |
|
|||||
se fera alors avec une puissance maximale pendant la période de la durée |
|
|||||
de la pompe à chaleur, qui dépend du réglage de chaleur sélectionné. |
|
|||||
L'indication se fait à ce niveau par un ´A` clignotant, qui alterne avec la |
|
|||||
valeur de réglage de la chaleur (ex : ´A` puis ´9`) dans l'affichage de l'élément |
|
|||||
chauffant. Une fois le temps de la pompe à chaleur terminé, seul le réglage |
|
|||||
de chaleur s'affiche. |
|
|
|
|
||
Si vous voulez utiliser la pompe à chaleur, le niveau 9 doit être sélectionné. |
|
|||||
Pour ce faire, appuyez sur le bouton |
|
à commencer par le niveau 0. Après |
|
|||
|
|
|||||
avoir réglé le niveau de chaleur à 9, ´A` et le réglage de chaleur s'afficheront |
|
|||||
alternativement. Ceci signifie que le niveau 9 et la pompe à chaleur sont |
|
|||||
actifs. Continuez à appuyer sur le bouton |
pour définir un réglage de |
|
||||
chaleur inférieur. |
|
|
|
|
||
Vous pouvez éteindre la pompe à chaleur en appuyant sur le bouton jusqu'à |
|
|||||
ce que le réglage de chaleur ´0` soit sélectionné. |
|
|||||
Si vous devez utiliser la pompe à chaleur, vous pouvez toujours l'activer en |
|
|||||
déclenchant à nouveau le bouton |
|
|
si le réglage de chaleur est défini au |
|
||
|
|
|||||
niveau 9. À l'écran d'affichage de chaleur, ´A/9` clignote. |
|
|||||
Eteignez les éléments chauffants individuels |
|
|||||
Un élément chauffant sélectif peut être éteint de deux manières : |
|
|||||
. Par un fonctionnement simultané des boutons et |
|
|||||
· Par une réduction du réglage de chaleur à ´0` en appuyant sur le bouton |
|
|||||
Fonctionnement simultané des boutons |
et |
|
||||
L'élément chauffant correspondant doit être sélectionné avec l'un des boutons
 Activer/Désactiver le bouton de l'élément chauffant, le Point décimal de l'affichage de l'élément chauffant sélectionné clignote.
Pour éteindre l'élément chauffant, les boutons  et
et  doivent être appuyés au même moment. Un bip est émis, et ´0` apparaît à l'écran d'affichage du réglage de chaleur.
S'il y a un reste de chaleur résiduelle pour cet élément chauffant, celui-ci sera
indiqué par un affichage statique de ´H` à l'écran d'affichage du réglage de chaleur.
Réduction du réglage de chaleur à ´0` en appuyant sur le bouton
9
 Loading...