


Downloaded from
www . vandenborre . be
CONTENT
Downloaded from
www . vandenborre . be
WARNINGS ............................................................................................................. |
1 |
IMPORTANT SAFETY INSTRUCTIONS ....................................................................... |
2 |
COOKING UTENSILS ................................................................................................ |
3 |
OTHER HELPFUL INSTRUCTIONS.............................................................................. |
4 |
OVEN OVERVIEW .................................................................................................... |
5 |
Names of Oven Parts ........................................................................................ |
5 |
Turntable.......................................................................................................... |
5 |
Control Panel.................................................................................................... |
6 |
MICROWAVE OVEN INSTALLATION......................................................................... |
7 |
OPERATION ............................................................................................................ |
8 |
Setting the Clock............................................................................................... |
8 |
Speed Cooking.................................................................................................. |
8 |
Microwave Cooking.......................................................................................... |
8 |
Grill .................................................................................................................. |
9 |
Microwave + Grill ............................................................................................. |
9 |
Convection Cooking........................................................................................ |
10 |
Microwave + Convection ................................................................................ |
10 |
Menu Cook..................................................................................................... |
11 |
Jet Defrost...................................................................................................... |
11 |
Multi Stage Cooking ....................................................................................... |
12 |
Preset............................................................................................................. |
12 |
Child Lock ....................................................................................................... |
13 |
Cooling Feature .............................................................................................. |
13 |
Automatic Protection Mechanism .................................................................. |
13 |
CLEANING AND MAINTENANCE ............................................................................ |
13 |
SPECIFICATIONS.................................................................................................... |
15 |
TROUBLESHOOTING.............................................................................................. |
15 |
|
Downloaded |
|
|
WARNINGS |
from |
|
|
www |
|||
IMPORTANT SAFETY INSTRUCTIONS |
|||
|
|
. |
|
READ CAREFULLY AND KEEP FOR FUTURE REFERENCE |
|
vandenborre |
|
|
|
||
This appliance can be used by children aged from 8 years and above and persons |
|
||
with reduced physical, sensory or mental capabilities or lack of experience and |
. |
||
|
|
be |
|
knowledge if they have been given supervision or instruction concerning use of the appliance in a safe way and understand the hazards involved. Children shall not play with the appliance. Cleaning and user maintenance shall not be made by children unless they are older than 8 and supervised.
Children should be supervised to ensure that they do not play with the appliance.
If the supply cord is damaged, it must be replaced by the manufacturer, its service
agent or similarly qualified persons in order to avoid a hazard.
WARNING: If the door or door seals are damaged, the oven must not be operated until it has been repaired by a competent person.
WARNING: It is hazardous for anyone other than a competent person to carry out any service or repair operation that involves the removal of a cover which gives protection against exposure to microwave energy.
WARNING: Liquids and other foods must not be heated in sealed containers since they are liable to explode.
WARNING: Only allow children to use the oven without supervision when adequate instructions have been given so that the child is able to use the oven in a safe way and understands the hazards of improper use.
Microwave heating of beverages can result in delayed eruptive boiling; therefore care must be taken when handling the container.
Only use utensils that are suitable for use in microwave ovens.
When heating food in plastic or paper containers, keep an eye on the oven due to
the possibility of ignition.
If smoke is emitted, switch off or unplug the appliance and keep the door closed in order to stifle any flames.
The contents of feeding bottles and baby food jars shall be stirred or shaken and the temperature checked before consumption, in order to avoid burns;
EN-1
Downloaded |
|
|
|
from |
|
||
Eggs in their shell and whole hard boiled eggs should not be heated in microwave |
|
||
ovens since they may explode, even after microwave heating has ended. |
www |
||
The oven should be cleaned regularly and any food deposits removed. |
|||
|
. |
||
|
vandenborre |
||
Failure to maintain the oven in a clean condition could lead to deterioration of |
|||
|
|||
the surface that could adversely affect the life of the appliance and possibly result |
|
||
in a hazardous situation. |
|
. |
|
|
|
be |
|
The appliance is not intended to be operated by means of an external timer or separate remote control system.
The microwave oven shall not be placed in a cabinet.
The door or the outer surface may get hot when the appliance is operating.
Keep the appliance and its cord out of reach of children less than 8 years.
The temperature of accessible surfaces may be high when the appliance is
operating.
The surfaces are liable to get hot during use.
IMPORTANT SAFETY INSTRUCTION
When the microwave oven is switched off, please disconnect it from the supply mains, to do this you must remove the plug from the supply outlet.
The plug shall be the main disconnection device and shall remain accessible at all times.
The microwave oven cannot be operated with the door open due to the safety interlocks built into the door mechanism which switch off the cooking functions when the door is opened. Operating the microwave oven with the door open could result in harmful exposure to microwave energy. It is important not to tamper with the door mechanism.
Do not let water or any other liquid enter the oven through the ventilation slots.
Do not place any object between the oven front face and the door or allow soil or cleaner residue to accumulate on sealing surfaces.
Avoid using straight sided containers with narrow necks.
Stir any liquid before placing the container back into the microwave oven half way through the heating time.
After heating, always allow standing time, stir or shake the contents and carefully check the temperatures before consumption.
Do not use harsh abrasive cleaners or sharp metal scrapers to clean the oven door glass since they can scratch the surface, which may result in shattering of the glass.
A steam cleaner is not to be used.
The microwave oven is intended to be used freestanding only.
EN-2
|
|
Downloaded |
|
COOKING UTENSILS |
from |
|
|
|
|
||
Utensils should be checked to ensure that they are suitable for use in the microwavewww |
|||
|
|
|
. |
oven. |
|
vandenborre |
|
|
|
||
1. |
The ideal material for a microwave utensil is transparent to microwave, it allows |
|
|
|
energy to pass through the container and heat the food. |
|
. |
|
|
|
|
2. |
Microwave cannot penetrate metal, so metal utensils or dishes with metallic trim |
be |
|
|
|||
|
should not be used. |
|
|
3. |
Do not use recycled paper products when microwave cooking, as they may |
|
|
|
contain small metal fragments which may cause sparks and/or fires. |
|
|
4. |
Round/oval dishes rather than square/oblong ones are recommended, as food in |
|
|
|
corners tends to overcook. |
|
|
5. |
Narrow strips of aluminium foil may be used to prevent overcooking of exposed |
|
|
|
areas. But be careful not to use too much and keep a distance of 1 inch (2.54 cm) |
|
|
|
between foil and cavity. |
|
|
The list below is a general guide to help you select the correct utensils.
Cookware |
Microwave |
Grill |
Convection |
Combination* |
Heat–Resistant Glass |
Yes |
Yes |
Yes |
Yes |
|
|
|
|
|
Non Heat–Resistant Glass |
No |
No |
No |
No |
|
|
|
|
|
Heat–Resistant Ceramics |
Yes |
Yes |
Yes |
Yes |
|
|
|
|
|
Microwave–Safe Plastic |
Yes |
No |
No |
No |
Dish |
|
|
|
|
|
|
|
|
|
|
|
|
|
|
Kitchen Paper |
Yes |
No |
No |
No |
|
|
|
|
|
Metal Tray |
No |
Yes |
Yes |
No |
|
|
|
|
|
Metal Rack |
No |
Yes |
Yes |
No |
|
|
|
|
|
Aluminium Foil & Foil |
No |
Yes |
Yes |
No |
Containers |
|
|
|
|
|
|
|
|
|
Combination*: The mode is applicable for microwave+grill and microwave+convection cooking.
NOTES:
Care should be taken when removing utensils or the glass turntable, as they may become hot during cooking.
Only use a thermometer that is designed for use in the microwave oven. Ensure the turntable is in place when you operate the oven.
EN-3
|
Downloaded |
|
|
|
OTHER HELPFUL INSTRUCTIONS |
from |
|
||
|
www |
|||
For best results and more enjoyable cooking, please read these comments |
||||
thoroughly. |
|
|
. |
|
|
|
vandenborre |
||
For Best Results: |
|
|
||
1. When determining the time for a particular food, begin by using minimum time |
||||
. |
||||
|
|
|
||
|
|
|
be |
|
and checking condition occasionally. It is easy to overcook food because microwaves cook very quickly.
2. Small quantities of food or foods with low water content may dry out and become hard if cooked too long.
Defrosting Frozen Food:
1.Foods that have been frozen can be placed directly in the oven for thawing. (Be certain to remove any metallic ties or wraps).
2.Defrost according to the Defrosting instructions in this manual.
3.For areas of the food thawing faster than others, cover with small pieces of aluminium foil. This helps slow down or stop the defrosting process.
4.Some foods should not be completely thawed before cooking. For example, fish cooks so quickly that it is sometimes better to begin cooking while still slightly frozen.
5.It may be necessary to increase or decrease the cooking time in some recipes, depending on the starting temperature of the food.
NOTE: Air from the vent may become warm during cooking.
Browning:
There are a few foods which are not cooked long enough in the microwave oven to brown and may need additional cooking.
Coatings such as paprika and browning agents such as Worcestershire sauce may be used on chops, meat patties or chicken pieces.
Roasts, poultry or ham, cooked for 10 15 minutes or longer, will brown without extra additives.
EN-4

OVEN OVERVIEW
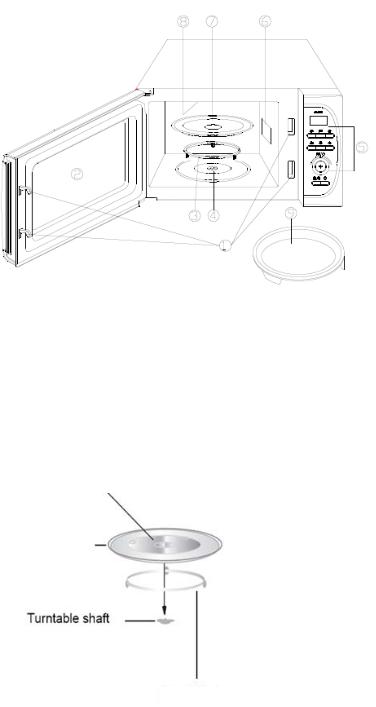
Names of Oven Parts
|
Downloaded |
|
|
from |
|
|
www |
|
|
|
. |
1. |
Door safety lock system |
vandenborre |
|
||
2. |
Oven window |
. |
|
|
|
3. |
Turntable ring |
be |
|
||
4. |
Shaft |
|
5. |
Control panel |
|
6. |
Wave guide cover |
|
7. |
Glass tray |
|
8. |
Grill heater |
|
9. |
Baking plate |
|
Turntable
a.Never place the glass tray upside down. The glass tray should never be restricted.
b.Both glass tray and turntable ring must always be used during cooking.
c.All food and containers of food are always placed on the glass tray for cooking.
d.If glass tray or turntable ring cracks or breaks, contact your nearest authorised service centre.
EN-5

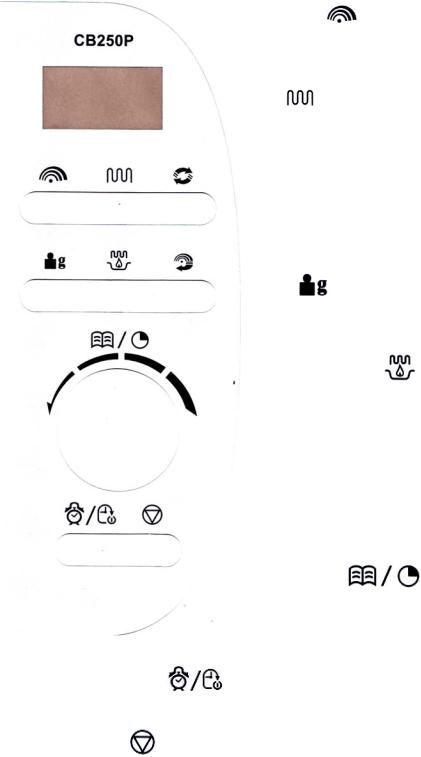
Control Panel
Downloaded |
|
from |
|
Power Level |
www |
|
|
|
. |
Press to set microwave power level. |
vandenborre |
|
|
Grill |
. |
|
|
Press to set a grill cooking program. |
be |
|
|
Convection
Press to program convection temperature.
Weight
Press to select the amount of food to be cooked.
Microwave + Grill
Press to select one of two combination cooking settings.
Microwave + Convection
Press to select one of four combination cooking setting.
Menu/Time
Turn the dial to set cooking time or select auto menu.
Press to start or quick start a cooking program.
Clock/Preset
Press to set clock time or the preset feature.
Pause/Cancel
Press to cancel setting or reset the oven before setting a cooking program.
Press once to temporarily stop cooking, or twice to cancel cooking.
It is also used for setting child lock.
EN-6

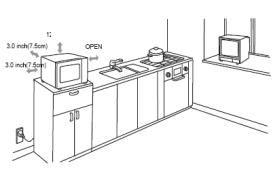
MICROWAVE OVEN INSTALLATION
Remove all packing material and accessories. Examine the oven for any damage such as dents or broken door. Do not install if the oven is damaged.
Downloaded |
|
from |
|
Cabinet: Remove any protective filmwww |
|
|
. |
found on the microwave oven cabinet |
vandenborre |
|
|
surface. |
|
Do not remove the light brown Mica |
|
cover that is attached to the inside of |
. |
|
|
the oven cavity to protect the |
be |
|
|
magnetron.
1.Select a level surface that provides enough open space for the intake and/or outlet vents.
A minimum clearance of 3.0 inches (7.5cm) is required between the oven and any adjacent walls. One side must be open.
(1)Leave a minimum clearance of 12 inches (30cm) above the oven.
(2)Do not remove the feet from the bottom of the oven.
(3)Blocking the intake and/or outlet
CAUTION: Outer surface gets hot.
openings can damage the oven.
(4) Place the oven as far away from radios and TV as possible.
Operation of microwave oven may cause interference to your radio or TV reception.
2.Plug your oven into a standard household outlet. Be sure the voltage and the frequency is the same as the voltage and the frequency on the rating label.
WARNING: Do not install the oven over a range cooktop or other heat producing appliance. If installed near or over a heat source, the oven could be damaged and the warranty would be void.
EN-7

|
|
|
Downloaded |
|
OPERATION |
|
|
from |
|
|
|
www |
||
Each time a button is pressed, a beep will sound to confirm the press. |
||||
|
|
|
|
. |
Setting the Clock |
|
vandenborre |
||
|
|
|||
1. |
In standby mode, press |
. |
. |
|
|
|
|
|
|
2. |
Turn the |
dial until the correct hour is displayed. |
be |
|
|
||||
3. |
Press |
to confirm. |
|
|
4. |
Turn the |
dial until the correct minutes are displayed. |
|
|
5. |
Press |
to confirm the setting. “:” blinks on the display. |
|
|
NOTE: You can check the clock time during cooking by pressing .
.
Speed Cooking
In standby mode, press to cook with 100% power level for 30 seconds. Each press of the button will increase the cooking time by 30 seconds. The longest cooking time is 10 minutes.
Microwave Cooking
You can select a power level by pressing .
.
Press Power Level |
Display |
Cooking Power |
|
|
once |
P100 |
100% |
|
|
|
|
|
twice |
P 90 |
90% |
|
|
|
|
3 |
times |
P 80 |
80% |
4 |
times |
P 70 |
70% |
|
|
|
|
5 |
times |
P 60 |
60% |
6 |
times |
P 50 |
50% |
|
|
|
|
7 |
times |
P 40 |
40% |
8 |
times |
P 30 |
30% |
|
|
|
|
9 times |
P 20 |
20% |
|
10 times |
P 10 |
10% |
|
|
|
|
|
11 times |
P 00 |
0% |
|
|
|
|
|
Suppose you want to cook for 5 minutes at 60% of microwave power.
1.In standby mode, press until “P 60” is shown on the display.
2.Turn the dial to 5:00. The longest cooking time is 95 minutes (95:00).
EN-8
|
Downloaded |
|
||
3. Press |
to start cooking. |
from |
|
|
www |
||||
|
|
|||
NOTE: You can check the cooking power during cooking by pressing |
. |
. |
||
vandenborre |
||||
Grill |
|
|
||
|
|
. |
||
The longest cooking time is 95 minutes (95:00). Grill cooking is particularly useful for |
||||
be |
||||
thin slices of meat, steaks, chops, kebabs, sausages and pieces of chicken. It is also suitable for hot sandwiches and au gratin dishes.
Suppose you want to program the grill cooking for 12 minutes.
1.Press .
.
2.Turn the dial clockwise to 12:00.
3.Press to start cooking.
Microwave + Grill
The longest cooking time is 95 minutes (95:00). This feature allows you to combine grill and microwave cooking on two different settings.
Combination 1
30% of cooking time for microwave cooking, 70% for grill cooking. Use for fish or au gratin.
Suppose you want to set combination 1 cooking for 25 minutes.
1.Press once.
once.
2.Turn the dial clockwise to 25:00.
3.Press to start cooking.
Combination 2
55% of cooking time for microwave cooking, 45% for grill cooking. Use for puddings, omelettes, baked potatoes and poultry.
Suppose you want to set combination 2 cooking for 12 minutes.
1.Press twice.
2.Turn the dial clockwise to 12:00.
3.Press to start cooking.
EN-9

|
|
|
Downloaded |
|
|
Convection Cooking |
from |
||||
|
|
|
|||
During convection cooking, hot air is circulated throughout the oven cavity to brown |
|||||
and make crisp foods quickly and evenly. This oven can be programmed for ten |
www |
||||
different cooking temperatures (110 ~200 ).Maximum cooking time for |
. |
||||
vandenborre |
|||||
convection is 9 hours and 30 minutes (9H: 30). |
|
||||
Suppose you want to cook at 180 for 40 minutes. |
|
||||
|
. |
||||
|
|
|
|
||
1. |
Press |
until “180” is shown on the display. |
|
be |
|
|
|
||||
2. |
Press |
to start preheating. |
|
|
|
3. |
Beeps will sound when oven temperature is reached to remind you of putting |
|
|||
|
food into the oven. |
|
|
||
4. |
Turn the |
dial clockwise to 0H:40. |
|
|
|
5. |
Press |
to start cooking. |
|
|
|
NOTE:
If you do not want to preheat the oven before cooking, skip step 2.
You can check the convection temperature during cooking by pressing .
.
Microwave + Convection
The longest cooking time is 9 hours and 30 minutes (9H: 30). This oven has four pre programmed settings that make it easy to cook with both convection heat and microwave automatically.
Press repeatedly to program convection temperature:
|
Temperature( ) |
|
|
COMB1 |
110 |
|
|
COMB2 |
140 |
|
|
COMB3 |
170 |
|
|
COMB4 |
200 |
|
|
Suppose you want to cook for 24 minutes on COMB3.
1.In standby mode, press until “170 ” is shown on the display.
2.Turn the dial to 0H: 24.
3.Press to start cooking.
NOTE: You can check the convection temperature during cooking by pressing .
.
EN-10

|
Downloaded |
Menu Cook |
from |
|
For the food in the following table, it is not necessary to program the duration and |
|
the cooking power. Take the following steps: |
www |
|
. |
1.In standby mode, turn the dial anti clockwise to select the desired food code to specify the food to be cooked.
2.Repeatedly press to select weight which should match the weight of food you have placed into the oven.
3.Press to start cooking.
Code |
Food |
Notes |
|
|
01 |
Baked Potato |
1. The user is required to set weight then the oven will |
||
(each 230g) |
set the cooking time accordingly. |
|
||
|
|
|||
02 |
Coffee |
2. For chicken, the oven will pause and beep during |
||
(each 200ml) |
cooking to remind you of turning food over for |
|||
|
||||
|
|
|
||
|
|
|
|
|
03 |
Popcorn (99g) |
uniform cooking then press |
to resume |
|
|
|
|||
04 |
Auto Reheat (g) |
|||
cooking. |
|
|||
|
|
|
||
05 |
Spaghetti (g) |
|
||
3. Power fluctuation and other factors may cause the |
||||
06 |
Pizza (g) |
auto cooking not done exactly to your taste; the |
||
07 |
Chicken (g) |
user may adjust cooking time accordingly. |
||
|
|
|
|
|
08 |
Cake (475g) |
|
|
|
|
|
|
|
|
09 |
Jet Defrost |
|
|
|
|
|
|
|
|
Jet Defrost
The longest defrosting time is 95 minutes (95:00).
1.In standby mode, turn the dial anti clockwise to select corresponding code (09).
2.Press once.
once.
3.Turn the dial clockwise to set the defrosting time.
4.Press to start defrosting.
NOTE: The oven pauses and beeps during defrosting to remind you of turning food over then press to resume defrosting.
vandenborre . be
EN-11

|
|
|
Downloaded |
|
|
Multi Stage Cooking |
from |
|
|||
|
|
|
|
||
Your oven can be programmed for up to 2 automatic cooking sequences. Jet defrost |
|
||||
can only be set in the first stage. |
www |
||||
NOTE: Speed cooking, menu cook and preheat program cannot be selected in a |
. |
||||
vandenborre |
|||||
|
cooking program. |
|
|||
Suppose you want to set the following cooking program: |
|
||||
|
|
Microwave cooking |
|
. |
|
|
|
|
be |
||
|
|
↓ |
|
|
|
|
|
Convection cooking |
|
|
|
1. |
Repeatedly press |
to set power level. |
|
|
|
2. |
Turn the |
dial to enter cooking time. |
|
|
|
3. |
Repeatedly press |
to set convection temperature. |
|
|
|
4. |
Turn the |
dial to enter cooking time. |
|
|
|
5. |
Press |
to start cooking. |
|
|
|
NOTE: When setting the feature, corresponding lights (1S and 2S) will be illuminated to indicate which stage the oven is operating in. After one cooking stage is finished, a beep sound is heard, indicating the next cooking stage has begun.
Preset
Preset function allows the oven to start at the desired time. Suppose the present time is 11:00 AM and you want to start cooking at 11:30 AM.
1.In standby mode, set a cooking program.
2.Press .
.
3.Turn the dial to set the hour digit 11.
4.Press to confirm.
5.Turn the dial to set the minute digit 30.
6.Press to confirm and start.
7.When the preset time is reached, a beep will sound then the cooking will start automatically.
NOTE: You can check the clock time by pressing . To cancel the preset function, press
 . Speed cooking, preheat and jet defrost cannot be preset.
EN-12

|
|
Downloaded |
|
|
Child Lock |
|
from |
|
|
|
|
|
||
The child lock prevents unsupervised operation by children. |
www |
|||
|
|
|||
To set the child lock, press and hold |
for 3 seconds then a beep sounds and the |
. |
||
vandenborre |
||||
lock indicator light will be illuminated. In the lock state, all buttons are disabled. |
||||
|
||||
To cancel the child lock, press and hold |
for 3 seconds then a beep sounds. The |
|
||
lock indicator light will go off. |
|
|
. |
|
|
|
|
be |
|
Cooling Feature
The controlling system of the microwave oven has the feature of cooling. When in any cooking mode cooking time is longer than 2 minutes, after finishing cooking the oven fan will work for about 3 minutes automatically to cool the oven for prolonging the life of the oven.
Automatic Protection Mechanism
1.During all cooking modes, when the oven cavity temperature is very high so that error code “E 01” will be shown on the display and the oven will automatically
enter into self protection mode with beeps until is pressed.
2.The system sensor error may also occur. Short circuit will make the oven enter into protection mode while error code “E 03” will be shown on the display with
beeps until is pressed.
CLEANING AND MAINTENANCE
Disconnect the electrical supply to the oven before cleaning.
General Advice
Frequent cleaning prevents smoke and bad odours during cooking and also sparking in the oven cavity and around the door seal.
Do not let food deposits or grease accumulate inside the oven cavity or on the door seal.
If your microwave oven is fitted with a waveguide cover (usually located inside the oven cavity on the right side wall) it must be kept clean at all times, should food deposits or grease be allowed to accumulate on the cover, sparking will occur and may damage your oven invalidating the warranty.
Before any maintenance or cleaning, disconnect the oven from the mains supply and wait for it to cool to room temperature.
EN-13
|
Downloaded |
|
|
|
Oven Door |
from |
|
|
|
|
|
|
||
Remove any food deposits and grease between the door seal and oven cavity using a |
|
|||
damp cloth, it is important to keep this area clean at all times. |
www |
|
||
Do not use harsh abrasive cleaners or sharp metal scrapers to clean the oven door |
. |
|
||
vandenborre |
||||
glass since they can scratch the surface, which may result in shattering of the glass. |
||||
|
|
|||
Interior Walls |
|
|
. |
|
Remove any grease splashes from the oven cavity walls with soap and water, then |
|
|||
|
be |
|||
|
|
|
||
rinse and dry.
The door seal and oven cavity have to be particularly well cleaned to ensure the door will close properly and to avoid sparking between the oven cavity and door assembly.
Do not use abrasive products such as scouring pads which will damage the surfaces of the oven cavity and door.
Only warm soapy water must be used to clean stainless steels surfaces.
Outer Surfaces
To clean the outside surface, use a damp cloth.
Avoid using abrasive products such as scouring pads that may damage the cosmetic surfaces. Make sure water does not seep into the ventilation slots.
Accessories should be washed in warm soapy water by hand.
CAUTION:
Some waveguide covers can be easily damaged take care when cleaning.
Do not wash accessories in a dishwasher.
Cleaning surfaces that come into contact with food
For hygiene safety the glass tray should be cleaned regularly as the item may come into contact with food.
The item should be cleaned with warm soapy water and dried thoroughly.
If the inside of the oven cavity and door seal are not kept perfectly clean there is a danger of damage due to sparking inside the oven cavity invalidating the warranty.
Never scrape the oven cavity walls with sharp objects.
EN-14

SPECIFICATIONS
Rating input (Microwave): 1400W Rating output (Microwave): 900W Voltage: 230 240V~ 50Hz
Grill power: 1350W Convection: 1350W
Microwave frequency: 2450MHz
Downloaded from
www . vandenborre . be
TROUBLESHOOTING
Normal Phenomena
Microwave oven interfering TV |
|
Radio and TV reception may be affected when |
||
reception |
|
|
the microwave oven is operating. It is similar |
|
|
|
|
to the interference of small electrical |
|
|
|
|
appliances, like mixer, vacuum cleaner and |
|
|
|
|
electric fan. It is normal. |
|
|
|
|
|
|
Dim oven light |
|
|
During low power microwave cooking, the |
|
|
|
|
oven light may become dim. It is normal. |
|
Steam accumulating on door, |
|
During cooking, steam may come out of food. |
||
hot air out of vents |
|
|
Most of steam will escape from the vents. But |
|
|
|
|
some of them may accumulate on positions |
|
|
|
|
like the oven door. It is normal. |
|
|
|
|
|
|
Oven operation accidentally |
|
It is forbidden to operate the appliance |
||
with no food in. |
|
|
without any food inside. It is very |
|
|
|
|
DANGEROUS. |
|
|
|
|
|
|
|
|
|
|
|
Problem |
|
Possible Cause |
Solution |
|
|
|
|
||
|
Power cord not plugged in |
Unplug the appliance |
||
|
tightly. |
then plug it in again after |
||
Oven cannot be |
|
|
|
10 seconds. |
operated. |
|
|
||
There is something wrong |
Test the mains socket by |
|||
|
with the mains socket. |
plugging another |
||
|
|
|
|
appliance in. |
Oven does not heat up. |
Door not closed well. |
Close door well. |
||
|
|
|
||
Glass turntable makes |
Dirty roller rest and oven |
Refer to ‘CLEANING AND |
||
noise when microwave |
bottom. |
MAINTENANCE’ to clean |
||
oven operates. |
|
|
|
dirty parts. |
|
|
|
|
|
We apologise for any inconvenience caused by minor inconsistencies in these instructions, which may occur as a result of product improvement and development.
Kesa Electricals © UK: EC1N 6TE 27/ 03 / 2012
EN-15
|
Downloaded |
|
|
TABLE DES MATIÈRES |
from |
|
|
www |
|||
|
|||
|
|
. |
|
MISES EN GARDE |
2 |
vandenborre |
|
. |
|||
|
|
||
CONSIGNES DE SÉCURITÉ IMPORTANTES |
4 |
be |
|
|
|||
UTENSILES DE CUISSON........................................................................................... |
5 |
|
|
INSTRUCTIONS UTILES COMPLÉMENTAIRES............................................................ |
6 |
|
|
DESCRIPTION DU FOUR........................................................................................... |
8 |
|
|
Nom des Pièces du Four ................................................................................... |
8 |
|
|
Plateau Rotatif ................................................................................................. |
8 |
|
|
Panneau de Contrôle ........................................................................................ |
9 |
|
|
INSTALLATION DU FOUR À MICRO ONDES.............................................................. |
8 |
|
|
UTILISATION ........................................................................................................... |
10 |
|
|
Régler l’horloge ................................................................................................ |
11 |
|
|
Cuisson Express ................................................................................................ |
11 |
|
|
Cuisson aux Micro ondes.................................................................................. |
11 |
|
|
Gril ................................................................................................................... |
12 |
|
|
Micro ondes + Gril........................................................................................... |
12 |
|
|
Convection ....................................................................................................... |
13 |
|
|
Micro ondes + Convection............................................................................. |
. 14 |
|
|
Menu de Cuisson ............................................................................................ |
14 |
|
|
Décongélation Express.................................................................................... |
15 |
|
|
Cuisson Séquentielle ...................................................................................... |
15 |
|
|
Programmation .............................................................................................. |
16 |
|
|
Verrou Enfant................................................................................................. |
16 |
|
|
Refroidissement Automatique........................................................................ |
16 |
|
|
Mécanisme de Protection Automatique ......................................................... |
17 |
|
|
NETTOYAGE ET ENTRETIEN .................................................................................... |
17 |
|
|
SPÉCIFICATIONS.................................................................................................... |
19 |
|
|
DÉPANNAGE .......................................................................................................... |
19 |
|
|
|
Downloaded |
|
|
INSTRUCTIONS DE SÉCURITÉS IMPORTANTES |
from |
|
|
|
|
||
LIRE AVEC ATTENTION ET GARDER POUR DE FUTURES UTILISATIONS |
|
||
|
www |
||
PRÉCAUTIONS VISANT À ÉVITER L’EXPOSITION EXCESSIVE À |
. |
||
vandenborre |
|||
L’ÉNERGIE DES MICRO-ONDES |
|
||
|
|
||
Cet appareil est destiné à un usage domestique uniquement. Toute utilisation |
. |
||
|
|
||
|
|
be |
|
autre que celle prévue pour cet appareil, ou pour une autre application que celle prévue, par exemple une application commerciale, est interdite.
Quand le four à micro-ondes est éteint, cela ne signifie pas qu’il est débranché de l’alimentation électrique. Pour le débrancher, vous devez sortir sa fiche de la prise électrique.
La fiche de l’appareil fait office de coupe-circuit principal de l'appareil et doit donc rester accessible en permanence.
Le mécanisme de la porte du four comporte des verrous de sécurité qui désactivent les fonctions de cuisson lorsque la porte n’est pas correctement fermée. Le four à micro-ondes ne peut donc pas cuire si sa porte est ouverte.
Le fonctionnement de l’appareil porte ouverte pourrait en effet provoquer une exposition dangereuse à l’énergie des micro-ondes. Il est important de ne pas modifier le mécanisme de verrouillage de la porte.
Veillez à ce qu’aucun liquide, eau ou autre, ne pénètre à l’intérieur du four par ses ouïes de ventilation.
Ne placez pas d’objet entre la face avant du four et sa porte. Veillez à ce que les salissures et les résidus de produit de nettoyage ne s’accumulent pas sur les surfaces d’étanchéité.
N’utilisez jamais le four à micro-ondes si son cordon d’alimentation ou sa fiche est endommagé, s’il présente des dysfonctionnements ou s’il a été endommagé de quelque manière que ce soit.
Il est particulièrement important que la porte du four puisse fermer correctement et qu’elle ne soit pas endommagée (tordue), que ses charnières et loquets ne soient pas détériorés (cassés ou desserrés), et que les joints de la porte et les surfaces d’étanchéité soient en bon état.
Évitez d’utiliser des récipients dont les bords sont verticaux et comportent un goulot étroit.
FR-1
Downloaded |
|
|
Mélangez les liquides au milieu de leur durée de cuisson, puis remettez-les |
|
|
from |
|
|
dans le four à micro-ondes pour effectuer la deuxième moitié de la cuisson. |
|
|
Une fois la cuisson terminée, vous devez impérativement les laisser reposer, |
|
|
www |
||
les mélanger ou les secouez, et vérifiez prudemment leur température avant |
. |
|
vandenborre |
||
de les consommer. |
||
Cet appareil et ses parties accessibles deviennent brûlants pendant son |
||
utilisation. Veillez à ne jamais toucher les résistances présentes à l'intérieur du |
||
. |
||
|
be |
|
four.
Les enfants de moins de 8 ans doivent être maintenus à l’écart de l’appareil sauf s’ils font l’objet d’une surveillance constante.
N’utilisez pas de nettoyant abrasif agressif, ni de tampon à récurer métallique agressif pour nettoyer le verre de la porte du four, car ceux-ci risquent de rayer sa surface et le verre risque de se briser.
N’utilisez pas de nettoyeur vapeur.
Le four à micro-ondes est conçu exclusivement pour être utilisé non encastré.
Mise en garde: Si l’appareil fonctionne en mode combiné, il est recommandé que les enfants n‘utilisent le four que sous la surveillance d’adultes en raison des températures générées.
La température des surfaces accessibles peut être élevée lorsque l'appareil est en fonctionnement.
Les surfaces sont susceptibles de devenir chaudes au cours de l'utilisation.
MISES EN GARDE :
Cet appareil peut être utilisé par des enfants âgés de 8 ans et plus, et par des personnes dont les capacités physiques, sensorielles ou mentales sont réduites ou des personnes dénuées d’expérience ou de connaissance, si elles ont pu bénéficier d’une surveillance ou d’instructions préalables concernant l’utilisation de l’appareil en toute sécurité et avoir compris les dangers impliqués. Les enfants ne doivent pas jouer avec l’appareil. Le nettoyage et la maintenance ne doivent pas être réalisés par les enfants sauf s’ils sont âgés de 8 ans et plus et s’ils sont supervisés.
ll convient de surveiller les enfants pour s’assurer qu’ils ne jouent pas avec l’appareil.
Si le câble d'alimentation est endommagé, il doit être remplacé par le fabricant, son service après-vente ou des personnes de qualification similaire afin d'éviter un danger.
MISE EN GARDE : Si la porte ou le joint de porte est endommagé, le four ne doit pas être mis en fonctionnement avant d’avoir été réparé par une personne compétente.
FR-2
|
Downloaded |
|
|
from |
|
La porte ou la surface extérieure peuvent devenir chaudes lorsque l'appareil |
|
|
fonctionne. |
www |
|
|
|
. |
L'appareil et son cordon d'alimentation doivent toujours être hors de portée |
vandenborre |
|
|
||
des enfants de moins de 8 ans. |
|
|
|
|
. |
MISE EN GARDE : ÉNERGIE MICRO-ONDES NE PAS ENLEVER CE |
be |
|
|
||
COUVERCLE.
Cet appareil n’est pas prévu pour être utilisé par des personnes (y compris les enfants) dont les capacités physiques, sensorielles ou mentales sont réduites ou des personnes dénuées d’expérience ou de connaissance, sauf si elles ont pu bénéficier, par l’intermédiaire d’une personne responsable de leur sécurité, d’une surveillance ou d’instructions préalables concernant l’utilisation de l’appareil.
Il convient de surveiller les enfants pour s’assurer qu’ils ne jouent pas avec l’appareil.
Appareil de groupe 2 Classe B
Cet appareil est un appareil de Groupe 2 car il produit intentionnellement de l' énergie à fréquence radioélectrique pour le traitement de la matière et il est destiné à être utilize dans un local domestique ou un établissement raccordé directement au réseau de distribution d'électricité à basse tension alimentant des bâtiments à usage domestique (Classe B).
Si de la fumée apparaît, arrêter ou débrancher le four et garder la porte fermée pour étouffer les flammes éventuelles.
Si de la fumée émet, arrêter ou débrancher le four et garder la porte fermée pour étouffer les flammes éventuelles
CONSIGNES DE SÉCURITÉ IMPORTANTES
Quand le four à micro ondes est éteint, débranchez le de l’alimentation électrique en sortant sa fiche de la prise électrique.
La fiche de l'appareil fait office de coupe circuit principal de l'appareil et doit donc rester accessible en permanence.
Le mécanisme de la porte du four à micro ondes comporte des verrous de sécurité qui stoppent la cuisson lorsque la porte n’est pas correctement fermée. Le four à micro ondes ne peut donc pas cuire si sa porte est ouverte. Le fonctionnement du four à micro ondes porte ouverte pourrait en effet provoquer
FR-4
|
Downloaded |
|
|
from |
|
l’exposition dangereuse à l’énergie des micro ondes. Il est important de ne pas |
|
|
modifier le mécanisme de verrouillage de la porte. |
www |
|
|
||
salissures et les résidus de produit de nettoyage ne s’accumulent pas sur les |
. |
|
vandenborre |
||
Veillez à ce qu’aucun liquide, eau ou autre, ne pénètre à l’intérieur du four par ses |
|
|
ouïes de ventilation. |
|
|
Ne placez pas d’objet entre la face avant du four et sa porte. Veillez à ce que les |
|
|
|
|
. |
|
|
be |
surfaces d’étanchéité.
Évitez d’utiliser des récipients dont les bords sont verticaux et comportent un goulot étroit.
Mélangez les liquides au milieu de leur durée de cuisson, puis remettez les dans le four à micro ondes pour effectuer la deuxième moitié de la cuisson.
Une fois la cuisson terminée, vous devez impérativement les laisser reposer, les mélanger ou les secouez, et vérifiez prudemment leur température avant de les consommer.
N’utilisez pas de nettoyant abrasif agressif, ni de tampon à récurer métallique agressif pour nettoyer le verre de la porte du four, car ceux ci risquent de rayer sa surface et le verre risque de se briser.
N’utilisez pas de nettoyeur vapeur.
Le four à micro ondes est conçu exclusivement pour être utilisé non encastré.
USTENSILES DE CUISSON
Il est nécessaire de s’assurer que les ustensiles conviennent à une utilisation dans un four à micro-ondes.
1.Idéalement, le matériau des ustensiles utilisés dans un four à micro-ondes doit être transparent aux micro-ondes, c'est-à-dire qu’il doit laisser passer l’énergie à travers les parois de l’ustensile pour qu’elle puisse cuire les aliments.
2.Le métal bloque les micro-ondes, c’est pourquoi les ustensiles et plats métalliques ou comportant des décorations métalliques ne doivent pas être utilisés dans un four à micro-ondes.
3.N’utilisez pas de produit en papier/carton recyclé lors de la cuisson dans un four à micro-ondes, car ils peuvent contenir d’infimes fragments métalliques, ce qui peut provoquer des étincelles et/ou un incendie.
4.Il est préférable d’utiliser des plats ronds ou ovales plutôt que carrés ou rectangulaires, car les aliments présents dans les coins ont tendance à trop cuire.
5.Vous pouvez utiliser de fines bandelettes de papier aluminium pour éviter que les zones exposées ne soient trop cuites. Veillez néanmoins à ne pas en utiliser trop et à les éloigner au minimum de 2,54 cm des parois internes du four.
FR-5
Ce tableau est un guide général destiné à vous aider ustensiles appropriés :
Downloaded
from à sélectionner des www .
Ustensiles de cuisine |
|
|
Micro ondes |
Gril |
Convection |
Cuisson |
|
|
|
|
|
|
|
combinée* |
|
|
|
|
|
|
|
|
|
|
|
|
|
|
|||
Verre résistant à la chaleur |
Oui |
Oui |
Oui |
Oui |
|||
|
|
|
|
|
|
|
|
Verre non |
résistant |
à |
la |
Non |
Non |
Non |
Non |
chaleur |
|
|
|
|
|
|
|
|
|
|
|
|
|
|
|
Céramique |
résistante |
à |
la |
Oui |
Oui |
Oui |
Oui |
chaleur |
|
|
|
|
|
|
|
|
|
|
|
|
|
|
|
|
|
|
|
|
|
|
|
Plat en plastique pour |
|
|
Oui |
Non |
Non |
Non |
|
micro ondes |
|
|
|
|
|
||
|
|
|
|
|
|
||
|
|
|
|
|
|
|
|
Papier essuie tout |
|
|
Oui |
Non |
Non |
Non |
|
|
|
|
|
|
|
|
|
Plateau métallique |
|
|
Non |
Oui |
Oui |
Non |
|
|
|
|
|
|
|
|
|
Grille métallique |
|
|
Non |
Oui |
Oui |
Non |
|
|
|
|
|
|
|
||
Papier aluminium et plats |
|
Non |
Oui |
Oui |
Non |
||
en aluminium |
|
|
|
|
|
|
|
|
|
|
|
|
|
|
|
Cuisson combinée* : Ce mode de cuisson combine les micro ondes et le gril ou les micro ondes et la convection.
vandenborre . be
REMARQUES :
zFaites attention lorsque vous sortez un plat ou le plateau rotatif en verre du four, car ils peuvent être devenus brûlants pendant la cuisson.
zUtilisez exclusivement un thermomètre conçu pour une utilisation dans un four à micro-ondes.
Veillez à ce que le plateau rotatif soit correctement positionné dans le four pendant l'utilisation.
INSTRUCTIONS UTILES COMPLÉMENTAIRES
Pour des résultats optimaux et une cuisine plus attrayante, lisez ces conseils minutieusement.
Pour des résultats optimaux :
1.Pour déterminer la durée de cuisson d’un plat spécifique, commencez avec une durée minimale et vérifiez de temps en temps la cuisson. Les micro-ondes cuisent les aliments très vite et on peut facilement trop les cuire.
2.De petites quantités d’aliments ou des aliments ayant une faible teneur en eau peuvent sécher et durcir s’ils sont cuits trop longtemps.
FR-6
|
|
Downloaded |
|
|
Décongeler des aliments congelés : |
from |
|
||
|
|
|||
1. |
Vous pouvez mettre les aliments congelés directement dans le four pour |
|
||
|
les décongeler. (Veillez à retirer toutes les attaches métalliques et touswwwles |
|||
|
éléments d’emballage métalliques). |
|
. |
|
|
|
vandenborre |
||
2. |
Décongelez les aliments en respectant les instructions de décongélation |
|||
|
||||
|
fournies dans ce mode d’emploi. |
|
|
|
3. |
Si des parties se décongèlent plus vite que d’autres, recouvrez-les avec |
. |
||
|
de petits morceaux de papier aluminium. Cela aide à ralentir ou à bloquer |
be |
||
|
|
|||
|
la décongélation. |
|
|
|
4. |
Certains aliments ne doivent pas être complètement décongelés avant |
|
||
|
d’être cuits. C’est par exemple le cas des poissons qui cuisent si vite qu’il |
|
||
|
est parfois préférable de commencer la cuisson quand ils ne sont pas |
|
||
|
encore complètement décongelés. |
|
|
|
5. |
Il peut être nécessaire d’augmenter ou de réduire la durée de cuisson lors |
|
||
|
de la préparation de certaines recettes en fonction de la température des |
|
||
|
aliments au début de la cuisson. |
|
|
|
Remarque : L’air sortant des ouïes de ventilation peut devenir chaud pendant la cuisson.
Brunissement :
Certains aliments ne brunissent pas suffisamment quand ils sont cuits dans un four à micro-ondes et peuvent nécessiter des opérations supplémentaires. Des enrobages, par exemple de paprika, et des agents de brunissement, par exemple la sauce Worcestershire, peuvent être utilisés sur les côtelettes, les steaks de viande hachée ou les morceaux de poulet.
Les rôtis, volailles et jambons cuits pendant 10 à 15 minutes ou plus brunissent sans l’ajout d’additif.
FR-7
DESCRIPTION DU FOUR
Dénominations des Pièces du Four
|
Downloaded |
|
|
from |
|
|
www |
|
|
|
. |
1. |
Verrous de porte |
vandenborre |
|
||
2. |
Fenêtre d’observation |
. |
|
|
|
3. |
Anneau guide |
be |
|
||
4. |
Arbre d’entraînement |
|
5. |
Panneau de contrôle |
|
6. |
Capot du guide d’ondes |
|
7. |
Plateau en verre |
|
8. |
Résistance |
|
9. |
Plaque de cuisson |
|
INSTALLATION DU PLATEAU ROTATIF
|
Connecteur (sous le plateau) |
a. |
Ne placez jamais le plateau en verre à |
|
|
|
|
|
l’envers. Veillez à ce que la rotation du |
|
|
|
|
plateau en verre ne soit pas gênée. |
Plateau en verre |
b. |
Utilisez toujours le plateau en verre et |
||
|
|
|
|
l'anneau guide pendant la cuisson. |
|
|
|
c. |
Tous les aliments et récipients contenant |
|
|
|
|
des aliments doivent toujours être placés |
|
Axe d’entraînement |
|
|
|
|
|
|
sur le plateau en verre pour la cuisson. |
|
|
|
|
|
|
|
|
|
|
|
|
|
|
d. |
Si le plateau en verre ou l’anneau guide se |
|
|
|
|
fissure ou se brise, contactez le centre de |
|
|
|
Anneau guide |
réparation agréé le plus proche. |
|
|
|
|
|
FR-8
Panneau de Contrôle
Downloaded |
|
from |
|
Puissance |
www |
|
|
|
. |
Régler la puissance des micro ondes. |
vandenborre |
|
|
Gril |
. |
|
|
Paramétrer la cuisson au gril. |
be |
|
|
Convection 
Régler la température de cuisson avec convection.
Poids
Paramétrer la quantité d’aliments à cuire.
Micro ondes + Gril
Sélectionner l’un des deux programmes de cuisson combinée.
Micro ondes + Convection 
Sélectionner l’un des quatre programmes de cuisson combinée.
Menu/Durée
Tournez le bouton pour régler la durée de cuisson ou sélectionner le menu Auto.
Appuyez pour démarrer un programme de cuisson ou une cuisson express.
Horloge/Programme
Régler l’horloge ou paramétrer un programme.
Pause/Annuler
Appuyez pour annuler un réglage ou réinitialiser le four avant de paramétrer un programme de cuisson.
Appuyez une fois pour arrêter momentanément la cuisson. Appuyez deux fois pour annuler la cuisson.
Cette touche sert également à activer/désactiver le verrou enfant.
FR-9
|
Downloaded |
|
|
INSTALLATION DU PLAN DE TRAVAIL |
from |
|
|
|
|
||
Retirez tous les accessoires et |
les films de protection présents surwww |
||
|
|
|
. |
éléments d’emballage. Inspectez le |
les surfaces du compartiment |
vandenborre |
|
|
|||
four pour vérifier qu'il n'est pas |
intérieur du four à micro-ondes. |
|
|
endommagé, par exemple que sa |
Ne retirez pas la plaque Mica |
|
|
porte n'est pas cassée et qu'il n’est |
marron claire fixée à l’intérieur du |
. |
|
pas cabossé. N’installez pas |
four, car elle sert à protéger le |
be |
|
|
|||
l’appareil s’il est endommagé. |
magnétron. |
|
|
Compartiment intérieur : Retirez tous
INSTALLATION DU FOUR
1.Sélectionnez une surface horizontale offrant un espace ouvert suffisant pour les ouïes d’entrée et/ou de sortie d’air.
|
|
30 cm |
|
7,5 cm |
|
|
Espace ouvert |
|
|
|
|
|
|
|
|
7,5 cm |
|
|
|
Il doit y avoir entre le four et les murs latéraux et arrière un espace vide de
7,5 cm au minimum. Un côté du four doit donner sur un espace complètement ouvert.
(1)Laissez un espace vide d'au moins 30 cm au dessus du four.
(2)N'enlevez pas les pieds présents sous le four à micro-ondes.
(3)Bloquer les ouïes d’entrée et/ou de sortie d’air peut provoquer la détérioration du four.
(4)Veillez à ce que le four à micro-ondes soit aussi éloigné
que possible des téléviseurs et radios.
L’utilisation d’un four à micro-ondes peut provoquer des interférences perturbant la réception de vos radios ou téléviseurs.
2.Branchez votre four sur une prise secteur standard. Assurez-vous que la tension et la fréquence du courant qu’elle fournit sont identiques à celles indiquées sur la plaque signalétique de l’appareil.
AVERTISSEMENT : N’installez pas le four au-dessus d’une table de cuisson ou d’un autre type d’appareil produisant de la chaleur. Si l’appareil est installé près ou au-dessus d’une source de chaleur, cela peut l’endommager et annule sa garantie.
FR-10

|
|
|
Downloaded |
|
UTILISATION |
|
from |
|
|
|
|
|
||
Chaque fois que vous appuyez sur une touche, un bip retentit pour indiquer quewwwla |
||||
|
|
|
|
. |
pression est effective. |
|
|
vandenborre |
|
|
|
|
||
Régler l'horloge |
|
|
|
|
|
|
|
|
. |
1. |
Dans le mode veille, appuyez sur |
. |
be |
|
|
||||
2. |
Tournez le bouton |
pour régler les chiffres des heures. |
|
|
3. |
Appuyez sur |
pour confirmer. |
|
|
4. |
Tournez le bouton |
pour régler les chiffres des minutes. |
|
|
5. |
Appuyez sur |
pour confirmer le réglage. « : » clignote à l’écran. |
|
|
REMARQUE : Vous pouvez vérifier l’heure pendant la cuisson en appuyant |
|
|||
sur |
. |
|
|
|
Cuisson Express
Dans le mode veille, appuyez sur  pour démarrer une cuisson de 30 secondes à une puissance de 100%. Chaque pression sur cette touche prolonge la durée de cuisson de 30 secondes. La durée de cuisson maximale est de 10 minutes.
Cuisson aux micro ondes
Réglez la puissance avec la touche .
.
Nombres de pressions |
Affichage |
Puissance de cuiss |
sur la touche Puissa |
|
on |
nce |
|
|
|
|
|
1 |
P100 |
100% |
|
|
|
2 |
P 90 |
90% |
|
|
|
3 |
P 80 |
80% |
|
|
|
4 |
P 70 |
70% |
|
|
|
5 |
P 60 |
60% |
|
|
|
6 |
P 50 |
50% |
|
|
|
7 |
P 40 |
40% |
|
|
|
8 |
P 30 |
30% |
|
|
|
9 |
P 20 |
20% |
|
|
|
10 |
P 10 |
10% |
|
|
|
11 |
P 00 |
0% |
|
|
|
FR-11

|
|
|
Downloaded |
|
|
|
|
|
|
from |
|
||
Par exemple, pour effectuer une cuisson de 5 minutes à 60% de la puissance |
www |
|||||
maximale des micro ondes, procédez comme suit : |
|
|||||
|
|
. |
||||
2. Tournez le bouton |
jusqu’à ce que l’écran affiche « 5:00 ». La durée |
|||||
vandenborre |
||||||
1. Dans le mode veille, appuyez sur |
jusqu’à ce que l’écran affiche « P 60 ». |
|
||||
|
|
|
|
|
. |
|
de cuisson maximale est de 95 minutes (95:00). |
|
|
be |
|||
|
|
|
||||
3. Appuyer sur |
pour démarrer la cuisson. |
|
|
|
||
REMARQUE : Vous pouvez vérifier la puissance des micro ondes sélectionnée
pendant la cuisson en appuyant sur .
.
Gril
La durée de cuisson maximale est de 95 minutes (95:00). La cuisson au gril est très utile pour cuire des tranches de viande, des steaks, de la viande hachée, des kebabs, des saucisses ou des morceaux de poulet. Elle convient également pour préparer des sandwichs chauds ou des gratins.
Par exemple, pour programmer une cuisson au gril d’une durée de 12 minutes, procédez comme suit :
1.Appuyez sur .
.
2.Tournez le bouton  jusqu’à ce que l’écran affiche « 12:00 ».
3.Appuyer sur  pour démarrer la cuisson.
Micro ondes + Gril
La durée de cuisson maximale est de 95 minutes (95:00). Ce mode de cuisson vous permet de combiner la cuisson aux micro ondes et au gril selon deux programmes prédéfinis.
Cuisson combinée 1
La durée de cuisson se divise comme suit : 30% aux micro ondes et 70% au gril. Ce programme convient pour cuire du poisson et des gratins.
Exemple : cuire avec le programme de cuisson combinée N° 1 pendant 25 minutes.
1.Appuyez une fois sur .
.
2.Tournez le bouton  jusqu’à ce que l’écran affiche « 25:00 ».
FR-12
 Loading...