


M-6

USER’S MANUAL y MANUALE D’USO
www.proelgroup.com
english italiano
2
ENG ITA
AVVERTENZE PER LA SICUREZZA
SAFETY AND PRECAUTIONS
Il marchio riportato sul prodotto o sulla documentazione indica che il prodotto non
deve essere smaltito con altri ri uti domestici al termine del ciclo di vita. Per evitare
eventuali danni all’ambiente si invita l’utente a separare questo prodotto da altri tipi
di ri uti e di riciclarlo in maniera responsabile per favorire il riutilizzo sostenibile delle
risorse materiali. Gli utenti domestici sono invitati a contattare il rivenditore presso il
quale è stato acquistato il prodotto o l’u cio locale preposto per tutte le informazioni
relative alla raccolta di erenziata e al riciclaggio per questo tipo di prodotto. Gli utenti aziendali sono
invitati a contattare il proprio fornitore e veri care i termini e le condizioni del contratto di acquisto.
Questo prodotto non deve essere smaltito unitamente ad altri ri uti commerciali.
Il simbolo del lampo con freccia in un triangolo equilatero intende avvertire
l'utilizzatore per la presenza di "tensioni pericolose" non isolate all'interno
dell'involucro del prodotto, che possono avere una intensità su ciente a costituire
rischio di scossa elettrica alle persone.
Il punto esclamativo in un triangolo equilatero intende avvertire l'utilizzatore
per la presenza di importanti istruzioni per l'utilizzo e la manutenzione nella
documentazione che accompagna il prodotto.
AVVERTENZE PER LA SICUREZZA
• ATTENZIONE - Durante le fasi di uso o manutenzione, devono essere prese alcune precauzioni
onde evitare danneggiamenti alle strutture meccaniche ed elettroniche del prodotto.
Prima di utilizzare il prodotto, si prega di leggere attentamente le seguenti istruzioni per la
sicurezza. Prendere visione del manuale d’uso e conservarlo per successive consultazioni:
– In presenza di bambini, controllare che il prodotto non rappresenti un pericolo.
– Posizionare l’apparecchio al riparo dagli agenti atmosferici e a distanza di sicurezza dall’acqua,
dalla pioggia e dai luoghi ad alto grado di umidità.
– Collocare o posizionare il prodotto lontano da fonti di calore quali radiatori, griglie di riscaldamento
e ogni altro dispositivo che produca calore.
– Collocare o posizionare il prodotto in modo che non ci siano ostruzioni alla sua propria ventilazione
e dissipazione di calore. Non installare in uno spazio limitato.
– Evitare che qualsiasi oggetto o sostanza liquida entri all’interno del prodotto.
– Il prodotto deve essere connesso esclusivamente alla rete elettrica delle caratteristiche descritte nel
manuale d’uso o scritte sul prodotto, usando esclusivamente il cavo rete in dotazione e controllando
sempre che sia in buono stato, in particolare la spina e il punto in cui il cavo esce dal prodotto.
– Non annullare la sicurezza garantita dall'uso di spine polarizzate o con messa a terra.
– Fare attenzione che il punto di alimentazione della rete elettrica sia dotato di una e ciente presa
di terra.
– Disconnettere il prodotto dalla rete elettrica durante forti temporali o se non viene usato per un
lungo periodo di tempo.
– Non disporre oggetti sul cavo di alimentazione, non disporre i cavi di alimentazione e segnale in
modo che qualcuno possa incianparci. Altresì non disporre l’apparecchio sui cavi di altri apparati.
Installazioni inappropriate di questo tipo possono creare la possibilità di rischio di incendio e/o
danni alle persone.
– Questo prodotto in combinazione con altoparlanti, auricolari e ampli catori, può essere capace
di produrre livelli sonori che possono causare perdite d’udito permanenti. Si raccomanda di evitare
l’esposizione ad alti livelli sonori o livelli non confortevoli per periodi di tempo lunghi. Se si notano
perdite d’udito o acufeni ( schii) consultare un audiologo.
IN CASO DI GUASTO
• In caso di guasto o manutenzione questo prodotto deve essere ispezionato da personale
quali cato quando:
– Ci sono difetti sulle connessioni o sui cavi di collegamento in dotazione.
– Sostanze liquide sono penetrate all’interno del prodotto.
– Il prodotto è caduto e si è danneggiato.
– Il prodotto non funziona normalmente esibendo una marcato cambio di prestazioni.
– Il prodotto perde sostanze liquide o gassose o ha l’involucro danneggiato.
• Non intervenire sul prodotto.
• Rivolgersi a un centro di assistenza autorizzato Proel.
CONFORMITÀ CE
• I Prodotti Proel sono conformi alla direttiva 89/336/EEC (EMC) e successive modi che 92/31/EEC
e 93/68/EEC, secondo gli standard EN 55103-1 ed EN 55103-2 ed alla direttiva 73/23/EEC (LVD) e
successive modi che 93/68/EEC, secondo lo standard EN 60065.
IMBALLAGGIO, TRASPORTO E RECLAMI
• L’imballo è stato sottoposto a test di integrità secondo la procedura ISTA 1A. Si raccomanda di
controllare il prodotto subito dopo l’apertura dell’imballo.
• Se vengono riscontrati danni informare immediatamente il rivenditore. Conservare quindi
l’imballo completo per permetterne l’ispezione.
• Proel declina ogni responsabilità per danni causati dal trasporto.
• Le merci sono vendute “franco nostra sede” e viaggiano sempre a rischio e pericolo del
distributore.
• Eventuali avarie e danni dovranno essere contestati al vettore. Ogni reclamo per imballi
manomessi dovrà essere inoltrato entro 8 giorni dal ricevimento della merce.
This marking shown on the product or its literature, indicates that it should not
be disposed with other household wastes at the end of its working life. To prevent
possible harm to the enviroment or human health from uncontrolled waste disposal,
please separate this from other types of wastes and recycle it responsibly to promote
the sustainable reuse of material resources. Household users should contact either the
retailer where they purchased this product, or their local government o ce, for details
of where and how they can take this item for environmentally safe recycling. Business users should
contact their supplier and check the terms and conditions of the purchase contract. This product
should not be mixed with other commercial wastes for disposal.
The lightning ash with arrowhead symbol within an equilateral triangle is intended
to alert the user to the presence of uninsulated “dangerous voltage” within the
product’s enclosure, that may be of su cient magnitude to constitute a risk of
electric shock to persons.
The exclamation point within an equilateral triangle is intended to alert the user to
the presence of important operating and maintenance (servicing) instructions in the
literature accompanying the appliance.
SAFETY AND PRECAUTIONS
• CAUTION - Before using this product read carefully the following safety instructions. Take a look
of this manual entirely and preserve it for future reference.
When using any electric product, basic precautions should always be taken, including the
following:
– To reduce the risk, close supervision is necessary when the product is used near children.
– Protect the apparatus from atmospheric agents and keep it away from water, rain and high
humidity places.
– This product should be site away from heat sources such as radiators, lamps and any other device
that generate heat.
– This product should be located so that its location or position does not interfere with its proper
ventilation and heating dissipation. Do not install in a con ned space.
– Care should be taken so that objects and liquids do not go inside the product.
– The product should be connected to a power supply mains line only of the type described on the
operating instructions or as marked on the product. Connect the apparatus to a power supply using
only power cord included making always sure it is in good conditions, specially the plug and the point
where it exit from the apparatus.
– Do not cancel the safety feature assured by means of a polarized line plug (one blade wider than
the other) or with a earth connection.
– Make sure that power supply mains line has a proper earth connection.
– Power supply cord should be unplugged from the outlet during strong thunderstorm or when left
unused for a long period of time.
– Do not place objects on the product’s power cord or place it in a position where anyone could
trip over, walk on or roll anything over it. Do not allow the product to rest on or to be installed over
power cords of any type. Improper installations of this type create the possibility of re hazard and/or
personal injury.
– This product in combination with loudspeakers, headphones and ampli ers may be capable of
producing sound levels that could cause permanent hearing loss. Exposure to extremely high noise
levels may cause permanent hearing loss. Individuals vary considerably in susceptibility to noise-
induced hearing loss, but nearly everyone will lose some hearing if exposed to su ciently intense
noise for a period of time. The U.S. Government’s Occupational Safety and Health Administration
(OSHA) has speci ed the permissible noise level exposures shown in the following chart. According
to OSHA, any exposure in excess of these permissible limits could result in some hearing loss. To
ensure against potentially dangerous exposure to high sound pressure levels, it is recommended
that all persons exposed to equipment capable of producing high sound pressure levels use hearing
protectors while the equipment is in operation. Ear plugs or protectors in the ear canals or over the
ears must be worn when operating the equipment in order to prevent permanent hearing loss if
exposure is in excess of the limits set forth here.
Duration Per Day
In Hours
Sound Level dBA
Slow Response
Typi ca l
Example
8 90 Duo in small club
692
4 95 Subway Train
397
2 100 Very loud classical music
1.5 102
1 105 Tra c noise
0.5 110
0.25 or less 115 Loudest parts at a rock concert
IN CASE OF FAULT
• In case of fault or maintenance this product should be inspected only by quali ed service
personnel when:
– There is a aw either in the connections or in the supplied connecting cables.
3
ENG ITA
SAFETY AND PRECAUTIONS
AVVERTENZE PER LA SICUREZZA
GARANZIE E RESI
• I Prodotti Proel sono provvisti della garanzia di funzionamento e di conformità alle proprie
speci che, come dichiarate dal costruttore.
• La garanzia di funzionamento è di 24 mesi dopo la data di acquisto. I difetti rilevati entro il
periodo di garanzia sui prodotti venduti, attribuibili a materiali difettosi o difetti di costruzione,
devono essere tempestivamente segnalati al proprio rivenditore o distributore, allegando evidenza
scritta della data di acquisto e descrizione del tipo di difetto riscontrato. Sono esclusi dalla garanzia
difetti causati da uso improprio o manomissione. Proel SpA constata tramite veri ca sui resi la
difettosità dichiarata, correlata all’appropriato utilizzo, e l’e ettiva validità della garanzia; provvede
quindi alla sostituzione o riparazione dei prodotti, declinando tuttavia ogni obbligo di risarcimento
per danni diretti o indiretti eventualmente derivanti dalla difettosità.
INSTALLAZIONE E LIMITAZIONI D’USO
• I Prodotti Proel sono destinati esclusivamente ad un utilizzo speci co di tipo sonoro: segnali di
ingresso di tipo audio (20Hz-20kHz). Proel declina ogni responsabilità per danni a terzi causati da
mancata manutenzione, manomissioni, uso improprio o installazione non eseguita secondo le norme
di sicurezza.
• La Proel S.p.a. si riserva di modi care il prodotto e le sue speci che senza preavviso.
• Proel declina ogni responsabilità per danni a terzi causati da mancata manutenzione,
manomissioni, uso improprio o installazione non eseguita secondo le norme di sicurezza e a regola
d'arte.
ALIMENTAZIONE E MANUTENZIONE
• Pulire il prodotto unicamente con un panno asciutto.
• Controllare periodicamente che le aperture di ra redamento non siano ostruite da accumuli di
polvere, provvedere alla rimozione della polvere mediante un pennello o aria compressa.
• I Mixer M6 ed M8 della Proel sono costruiti in CLASSE II e non prevedono collegamento di
terra, vengono alimentati a 18Vac tramite l'alimentatore AC ADAPTOR in CLASSE II fornito a
corredo, utilizzare i mixer con un alimentatore diverso o con una tensione DC può danneggiare gli
apparecchi.
• I Mixer M16, M20, M500, M1000 e M1500 della Proel sono costruiti in CLASSE I e prevedono
sempre il collegamento mediante presa di corrente con terminale di terra di protezione (terzo
terminale di terra).
• L’utilizzo di alimentatori e adattatori AC non originali faranno decadere i termini di responsabilità
della Proel S.p.a. sull’utilizzo e i termini di garanzia del prodotto.
• Prima di collegare l'apparecchio alla presa di corrente, accertatevi che la tensione di rete corrisponda
a quella indicata sul retro dell’apparato, è consentito un margine del ±10% rispetto al valore
nominale.
• Nei modelli M1000 e M1500 con ampli catore in classe D integrato sono presenti anche i seguenti
dispositivi di sicurezza:
soppressione dei transienti di tensione no a qualche kilovolt.
ltratura contro le interferenze EMI in ingresso e in uscita.
• CONTROLLARE LO STATO DEL FUSIBILE DI PROTEZIONE ACCESSIBILE DALL'ESTERNO
ESCLUSIVAMENTE AD APPARATO SPENTO E DISCONNESSO DALLA RETE ELETTRICA.
• RIMPIAZZ ARE IL FUSIBILE DI PROTEZIONE ESCLUSIVAMENTE CON UN FUSIBILE CON
LE MEDESIME CARATTERISTICHE RIPORTATE SUL PRODOTTO.
• SE DOPO LA SOSTITUZIONE, IL FUSIBILE INTERROMPE NUOVAMENTE IL
FUNZIONAMENTO DELL'APPARATO, NON INSISTERE E CONTATTARE IL SERVIZIO
ASSISTENZA PROEL.
• LA SOSTITUZIONE DI FUSIBILI ALL'INTERNO DELL'APPARATO È CONSENTITO
ESCLUSIVAMENTE A PERSONALE QUALIFICATO.
– Liquids have spilled inside the product.
– The product has fallen and been damaged.
– The product does not appear to operate normally or exhibits a marked change in performance.
– The product has been losted liquids or gases or the enclosure is damaged.
• Do not operate on the product, it has no user-serviceable parts inside.
• Refer servicing to an authorized maintenance centre.
CE CONFORMITY
• Proel products comply with directive 89/336/EEC (EMC) and following modi cations 92/31/EEC
and 93/68/EEC, as stated in EN 55103-1 and EN 55103-2 standards and with directive 73/23/EEC
(LVD) and following modi cations 93/68/EEC, as stated in EN 60065 standard.
PACKAGING, SHIPPING AND COMPLAINT
• This unit package has been submitted to ISTA 1A integrity tests. We suggest you control the unit
conditions immediately after unpacking it.
• If any damage is found, immediately advise the dealer. Keep all unit packaging parts to allow
inspection.
• Proel is not responsible for any damage that occurs during shipment.
• Products are sold “delivered ex warehouse” and shipment is at charge and risk of the buyer.
• Possible damages to unit should be immediately noti ed to forwarder. Each complaint for
manumitted package should be done within eight days from product receipt.
WARRANTY AND PRODUCTS RETURN
• Proel products have operating warranty and comply their specifications, as stated by
manufacturer.
• Proel warrants all materials, workmanship and proper operation of this product for a period of two
years from the original date of purchase. If any defects are found in the materials or workmanship
or if the product fails to function properly during the applicable warranty period, the owner should
inform about these defects the dealer or the distributor, providing receipt or invoice of date of
purchase and defect detailed description. This warranty does not extend to damage resulting from
improper installation, misuse, neglect or abuse. Proel S.p.A. will verify damage on returned units,
and when the unit has been properly used and warranty is still valid, then the unit will be replaced
or repaired. Proel S.p.A. is not responsible for any "direct damage" or "indirect damage" caused by
product defectiveness.
INSTALLATION AND DISCLAIMER
• Proel products have been expressly designed for audio application, with signals in audio
range (20Hz to 20kHz). Proel has no liability for damages caused in case of lack of maintenance,
modi cations, improper use or improper installation non-applying safety instructions.
• Proel S.p.A. reserves the right to change these speci cations at any time without notice.
• Proel S.p.A. declines any liability for damages to objects or persons caused by lacks of
maintenance, improper use, installation not performed with safety precautions and at the state of
the art.
POWER SUPPLY AND MAINTENANCE
• Clean only with dry cloth.
• Check periodically that the slots for its proper ventilation and heating dissipation are not
obstructed by dust, remove the dust using a dry brush or a compressed air gun.
• The M6 and M8 mixers of Proel have been designed with CLASS II construction and are provided
with a proper 18Vac AC ADAPTOR built in CLASS II, these units may be damaged when used with a
di erent power supply or a supplying DC power.
• The M16, M20, M500, M1000 and M1500 mixers of Proel have been designed with CLASS
I construction and must be connected always to a mains socket outlet with a proctetive earth
connection (the third grounding prong).
• The use of di erent power supply or adapters will expire terms of Proel S.p.A. liability as well as
the terms of warranty.
• Before connecting the product to the mains outlet make certain that the mains line voltage
matches that shown on the rear of the product, a tolerance of up to ±10% is acceptable.
• Inside the M1000 and M1500 ampli ed models within Class D ampli er are present special safety
devices such as:
transient voltage suppressors up to some kilovolt.
EMI lters for inputs and outputs.
• CHECK THE CONDITION OF THE PROTECTION FUSE, ACCESSIBLE OUTWARD, ONLY
WITH THE APPARATUS SWITCHED OFF AND DISCONNECTED FROM THE MAINS LINE
OUTLET.
• REPLACE THE PROTECTION FUSE ONLY WITH SAME TYPE AS SHOWN ON THE
PRODUCT.
• IF AFTER THE SUBSTITUTION, THE FUSE INTERRUPTS AGAIN THE APPARATUS
WORKING, DO NOT TRY AGAIN THEN CONTACT THE PROEL SERVICE CENTER.
• THE REPLACEMENT OF FUSES INSIDE THE APPARATUS MUST BE MADE ONLY BY
QUALIFIED PERSONNEL.

4
ENG ITA
CONTENTS
INDICE
CONTENTS
SAFETY AND PRECAUTIONS . . . . . . . . . . . . . . . . . . . . . . . . . . . . . . . . . .2
IN CASE OF FAULT . . . . . . . . . . . . . . . . . . . . . . . . . . . . . . . . . . . . . . . . . .2
CE CONFORMITY . . . . . . . . . . . . . . . . . . . . . . . . . . . . . . . . . . . . . . . . . . .3
PACKAGING, SHIPPING AND COMPLAINT . . . . . . . . . . . . . . . . . . . . . . .3
WARRANTY AND PRODUCTS RETURN . . . . . . . . . . . . . . . . . . . . . . . . . .3
INSTALLATION AND DISCLAIMER . . . . . . . . . . . . . . . . . . . . . . . . . . . . . .3
POWER SUPPLY AND MAINTENANCE . . . . . . . . . . . . . . . . . . . . . . . . . .3
INTRODUCTION . . . . . . . . . . . . . . . . . . . . . . . . . . . . . . . . . . . . . . . . . . . .5
QUICK START . . . . . . . . . . . . . . . . . . . . . . . . . . . . . . . . . . . . . . . . . . . . . .5
MONO CHANNEL STRIP (1-2 channels). . . . . . . . . . . . . . . . . . . . . . . . .6
STEREO CHANNEL STRIP (3/4-5/6 channels) . . . . . . . . . . . . . . . . . . . .7
DIGITAL EFFECT PROCESSOR . . . . . . . . . . . . . . . . . . . . . . . . . . . . . . . . .8
MASTER SECTION . . . . . . . . . . . . . . . . . . . . . . . . . . . . . . . . . . . . . . . . 10
REAR PANEL . . . . . . . . . . . . . . . . . . . . . . . . . . . . . . . . . . . . . . . . . . . . 11
TROUBLESHOOTING . . . . . . . . . . . . . . . . . . . . . . . . . . . . . . . . . . . . . . 12
TECHNICAL SPECIFICATIONS . . . . . . . . . . . . . . . . . . . . . . . . . . . . . . . 13
CONNECTIONS . . . . . . . . . . . . . . . . . . . . . . . . . . . . . . . . . . . . . . . . . . . 14
CONNECTION EXAMPLE . . . . . . . . . . . . . . . . . . . . . . . . . . . . . . . . . . . 15
TRACK SHEET . . . . . . . . . . . . . . . . . . . . . . . . . . . . . . . . . . . . . . . . . . . 16
BLOCK DIAGRAM. . . . . . . . . . . . . . . . . . . . . . . . . . . . . . . . . . . . . . . . . 17
INDICE
AVVERTENZE PER LA SICUREZZA . . . . . . . . . . . . . . . . . . . . . . . . . . . . . .2
IN CASO DI GUASTO . . . . . . . . . . . . . . . . . . . . . . . . . . . . . . . . . . . . . . . .2
CONFORMITÀ CE . . . . . . . . . . . . . . . . . . . . . . . . . . . . . . . . . . . . . . . . . . .2
IMBALLAGGIO, TRASPORTO E RECLAMI . . . . . . . . . . . . . . . . . . . . . . . .2
GARANZIE E RESI . . . . . . . . . . . . . . . . . . . . . . . . . . . . . . . . . . . . . . . . . .3
INSTALLAZIONE E LIMITAZIONI D’USO . . . . . . . . . . . . . . . . . . . . . . . . .3
ALIMENTAZIONE E MANUTENZIONE . . . . . . . . . . . . . . . . . . . . . . . . . . .3
INTRODUZIONE . . . . . . . . . . . . . . . . . . . . . . . . . . . . . . . . . . . . . . . . . . . .5
PER UN RAPIDO UTILIZZO . . . . . . . . . . . . . . . . . . . . . . . . . . . . . . . . . . .5
STRIP CANALE MONO (canali 1-2) . . . . . . . . . . . . . . . . . . . . . . . . . . . .6
STRIP CANALI STEREO (canali 3/4-5/6) . . . . . . . . . . . . . . . . . . . . . . . .7
DIGITAL EFFECT PROCESSOR . . . . . . . . . . . . . . . . . . . . . . . . . . . . . . . . .8
SEZIONE MASTER . . . . . . . . . . . . . . . . . . . . . . . . . . . . . . . . . . . . . . . . 10
PANELLO POSTERIORE . . . . . . . . . . . . . . . . . . . . . . . . . . . . . . . . . . . . 11
PROBLEMATICHE COMUNI . . . . . . . . . . . . . . . . . . . . . . . . . . . . . . . . . 12
SPECIFICHE TECNICHE . . . . . . . . . . . . . . . . . . . . . . . . . . . . . . . . . . . . 13
CONNESSIONI . . . . . . . . . . . . . . . . . . . . . . . . . . . . . . . . . . . . . . . . . . . 14
ESEMPIO DI CONNESSIONE . . . . . . . . . . . . . . . . . . . . . . . . . . . . . . . . 15
FOGLIO TRACCIA . . . . . . . . . . . . . . . . . . . . . . . . . . . . . . . . . . . . . . . . . 16
DIAGRAMMA A BLOCCHI . . . . . . . . . . . . . . . . . . . . . . . . . . . . . . . . . . 17

5
ENG ITA
QUICK START
PER UN RAPIDO UTILIZZO
INTRODUCTION
Thank you for having chosen a PROEL mixer.
These compact mixer consoles are designed to meet the needs of almost
any small to medium-sized sound reinforcement applications. To make
the best use of this mixing console, please read the manual thoroughly
before operating. Let's go!
QUICK START
In this chapter we have included some useful tips to quickly start to use a
mixing console, especially for beginners, please read them entirely.
Set the mixer to start
1. Turn down the channel GAIN, AUX and FADER controls, center the
channel EQ and PAN controls.
2. Set all push button switches to their "out" positions.
3. In the MASTER section (righ hand side), turn all the knobs "down", the
switches "out" and the MAIN MIX FADER down.
4. Turn the POWER switch o .
Connections
If you already know how you want to connect the mixer go ahead and
connect the inputs and outputs, otherwise in the following pages you can
nd some example of various connections.
If you want to get sound through the mixer immediately, follow these
steps:
1. Plug a microphone or other signal source into a channel using MIC or
LINE input.
2. Connect the supply cord to the mains outlet then switch on the
mixer.
3. Connect two signal cable from mixer MAIN MIX outputs to your
ampli er inputs.
4. Hook up speakers to the amp and turn it on. If the ampli er has level
controls, set them however the manufacturer recommends (usually all
way up).
Set the Levels
1. Set the FADER of the input channel at "0"dB position.
2. Set the MAIN MIX FADER at between "0" or a little bit down to "-5dB"
to leave more dynamic at the ampli er input.
3. While putting in some signal set the GAIN control so that the leds on
the meter stay around "0" and never go higher than "+6dB", never the
PEAK led of the channel must light on also.
4. If you'd like to apply some EQ do so now and return to step 3.
6. Repeat these operation for each channel.
Mixing
1. Connect all the instruments and set the levels as described above.
2. While playing all toghether set the MAIN MIX level to a confortable
listening level, then adjust each channel FADER to obtain your own mix.
Other Nuggets
• For optimum sonic performance the channel and main mix FADERS
should be set usually near the "0" marking.
• Always turn down MAIN MIX fader and C.ROOM knob before making
connections.
• When you shut down your equipment, turn o the ampli er rst.
• When powering up, turn on the ampli er last.
• Never listen to loud music for prolonged periods.
INTRODUZIONE
Grazie per aver scelto un mixer PROEL.
Questi mixer compatti sono progettati per venire incontro alle necessità
in ogni situazione media o piccola di rinforzo del suono. Per ottenere i
migliori risultati da questa consolle di missaggio, leggete attentamente
tutto il manuale prima dell'uso. Pronti ... Via!
PER UN RAPIDO UTILIZZO
In questo capitolo abbiamo cercato di includere qualche utile
suggerimento per un uso immediato di una consolle di missaggio.
Impostare il mixer per iniziare
1. Ruotare al minimo i controlli di GAIN, AUX e FADER e centrare i controlli
di EQ e PAN di ogni canale.
2. Impostare tutti i pulsanti nella posizione "disinserito".
3. Nella sezione di MASTER (alla destra), girare tutte le manopole al
minimo, i tasti "disinseriti" e il controllo MAIN MIX FADER al minimo.
4. Impostare l'interruttore POWER su o .
Connessioni
Se si è già a conoscenza di cosa e come connettere al mixer proseguite
collegando ingressi e uscite, altrimenti nelle pagine che seguono sono
riportati alcuni esempi di connessione.
Volendo ottenere da subito un suono dal mixer, procedere come segue:
1. Inserire un microfono o un'altra sorgente di segnale in un canale
usando l'ingresso MIC o LINE.
2. Collegare l'alimentazione al mixer e quindi accenderlo.
3. Collegare due cavi di segnale dall'uscita MAIN MIX del mixer agli
ingressi dell'ampli catore.
4. Connettere gli altoparlanti all'amplificatore e accenderlo. Se
l'amplificatore ha dei controlli di livello, impostarli nella posizione
consigliata dal costruttore (di solito al massimo).
Impostare i livelli
1. Impostare il FADER del canale di ingresso nella posizione a "0"dB.
2. Impostare il FADER del MAIN MIX tra "0"dB o lievemente sotto a "-
5dB" per lasciare più dinamica all'ingresso dell'ampli catore.
3. Con un segnale all'ingresso del canale, regolare il controllo di GAIN
a nchè i led del meter rimangano nei dintorni dello "0" senza eccedere
i "+6dB", attenzione: il led PEAK del canale non deve mai accendersi.
4. Se si desidera aggiungere qualche equalizzazione farlo ora e se
necessario ripetere il passo 3.
6. Ripetere queste operazioni per ogni canale collegato.
Missaggio
1. Collegare tutti gli strumenti e impostare i livelli come sopra.
2. Mentre suonano tutti assieme, impostare il livello del MAIN MIX a un
livello confortevole, quindi aggiustare ogni FADER di canale per ottenere
il vostro mix personale.
Altri Suggerimenti
• Per ottenere ottimi risultati sonori, tipicamente sia i FADER dei canali
che il FADER del MAIN MIX sono collocati attorno allo "0".
• Mettere al minimo il FADER del MAIN MIX e la manopola C.ROOM
sempre prima di fare nuove connessioni.
• Quando si spegne l'impianto sonoro, spegnere per primi gli
ampli catori.
• Quando si accende l'impianto sonoro, accendere gli ampli catori per
ultimi.
• Mai ascoltare musica ad alti livelli per lunghi periodi di tempo.
6
ENG ITA
MONO CHANNEL STRIP (1-2 channels)
The M6 mono channels are designed to obtain the highest
dynamic headroom and low noise possible in a wide range
of adjustable gain of 70dB.
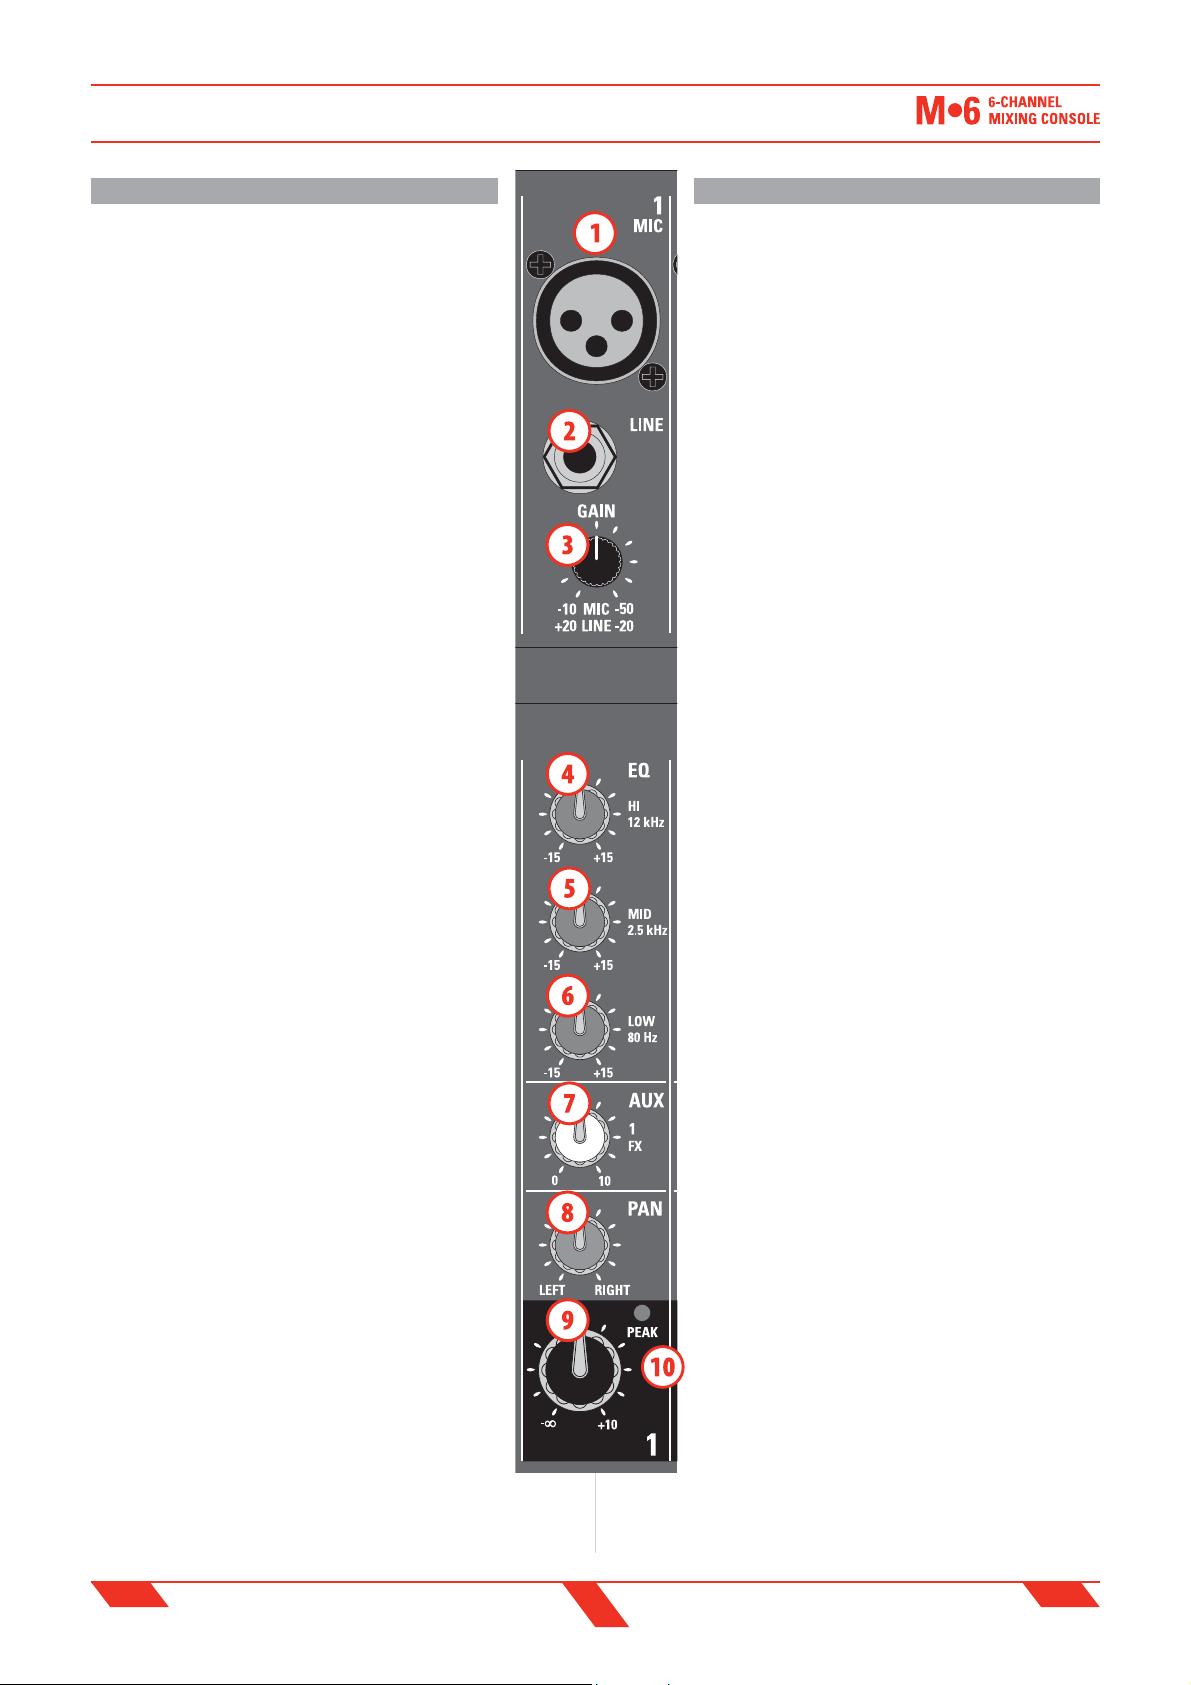
Each channel strip contains the following controls:
1. MIC Input
This is a female XLR connector, which accepts a balanced
microphone input from almost any type of microphone. The
XLR inputs are wire as follows:
Pin 1 = shield or ground
Pin 2 = + positive or "hot"
Pin 3 = - negative or "cold"
2. LINE Input
This is a ¼” (6.3mm) jack connector, which accepts a
balanced or unbalanced line level input signal from almost
any source. When connecting a balanced signal, wire them
as follows:
Tip = + positive or "hot"
Ring = - negative or "cold"
Sleeve = shield or ground
When connecting an unbalanced signal, wire them as
follows:
Tip = + positive or "hot"
Sleeve = shield or ground
3. GAIN Control
The gain control adjusts the input sensitivity of the mic and
line inputs. This allows the signal from mics and instruments
to be adjusted to optimal internal levels. If the signals are
plugged into the XLR input there is a 10 dB with the knob
turned all way down, ramping up to 50 dB of gain fully
up. When connected to the jack input, there is 20 dB of
attenuation all way down and 20 dB of gain fully up, with a
unity gain (0 dB) if centered.
4. EQ section HIGH control
This control gives you up to 15dB boost or cut at 12KHz with
a "SHELVING" curve shape. Use it to add or reduce the sound
"clarity" or "brightness".
5. EQ section MID control
This control gives you up to 15dB boost or cut at 2.5KHz with
a "PEAKING" curve shape. Use it to add or reduce the sound
"presence".
6. EQ section LOW control
This control gives you up to 15dB boost or cut at 80Hz with
a "SHELVING" curve shape. Use it to add or reduce the sound
"punch".
7. AUX 1 control (send to FX)
This control sends the signal to the AUX output and to the
internal DIGITAL EFFECT PROCESSOR, this signal is post-fader
or in other words it depends by the position of the FADER
LEVEL control.
8. PAN control
It adjusts the amount of channel signal sent to the left versus the right
outputs. Use it to positionate the signal in a panoramic stereo scene.
MONO CHANNEL STRIP
STRIP CANALE MONO
STRIP CANALE MONO (canali 1-2)
I canali mono M6 sono progettati per ottenere la miglior
dinamica possibile con il minor rumore di fondo con un
ampio margine di guadagno regolabile di 70dB.
Ogni strip di canale contiene i seguenti controlli:
1. MIC (ingresso microfono)
È un connettore femmina XLR, in grado di accettare un
segnale microfonico bilanciato da ogni tipo di microfono.
L'ingresso XLR ha i seguenti terminali:
Pin 1 = schermo o massa
Pin 2 = + positivo o "caldo"
Pin 3 = - negativo o "freddo"
2. LINE (ingresso linea)
È un connettore femmina da ¼” (6.3mm) tipo jack, in grado
di accettare un segnale a livello linea bilanciato o sbilanciato
da ogni tipo di sorgente. Quando si collega un segnale
bilanciato, le terminazioni sono le seguenti:
Tip (punta) = + positivo o "caldo"
Ring (anello) = - negativo o "freddo"
Sleeve (manicotto) = schermo o massa
Quando si collega un segnale sbilanciato, le terminazioni
sono le seguenti:
Tip (punta) = + positivo o "caldo"
Sleeve (manicotto) = schermo o massa
3. GAIN (controllo guadagno)
Il controllo GAIN regola la sensibilità di ingresso dell'ingresso
MIC o LINE. Questo permette di regolare il segnale in
ingresso da microfoni o strumenti al livello ottimale interno
del mixer. Se il segnale è collegato all'ingresso XLR si hanno
10 dB di guadagno con la manopola girata al minimo e
no a 50 dB girandola verso il massimo. Quando collegato
all'ingresso jack si hanno 20 dB di attenuazione con la
manopola girata al minimo e 20 dB di guadagno se girata
al massimo, con un guadagno unitario (0 dB) se posta al
centro.
4. EQ HIGH (equalizzatore controllo alti)
Questo controllo permette di guadagnare o attenuare no
a 15dB a 12KHz con una curva di tipo "SHELVING". Da usarsi
per aumentare o ridurre la "chiarezza" o "brillanza" del
suono.
5. EQ MID (equalizzatore controllo medi)
Questo controllo permette di guadagnare o attenuare no a
15dB a 2.5KHz con una curva tipo "PEAKING". Da usarsi per
aumentare o ridurre la "presenza" del suono.
6. EQ LOW (equalizzatore controllo bassi)
Questo controllo permette di guadagnare o attenuare no a
15dB a 80Hz con una curva di tipo "SHELVING". Da usarsi per
aumentare o ridurre il "vigore" del suono.
7. AUX 1 (controllo livello ausiliario e/o e etto)
Questo controllo invia il segnale all'uscita ausiliaria AUX
e all'e etto interno (DIGITAL EFFECT PROCESSOR), questo
segnale è post-fader o in altre parole dipende dalla posizione
del controllo FADER LEVEL.
 Loading...