

PRESONUS StudioLive RM32AI, StudioLive RM16AI Owner's Manual
StudioLive™ RM-Series Mixers
with UC Surface Control
Touch-Software-Controlled, Rack-Mount Digital Mixers
Owner’s Manual
www.presonus.com
®

Table of Contents
1.0 Overview — 1
1.1 Introduction — 1
1.2 About This Manual — 2
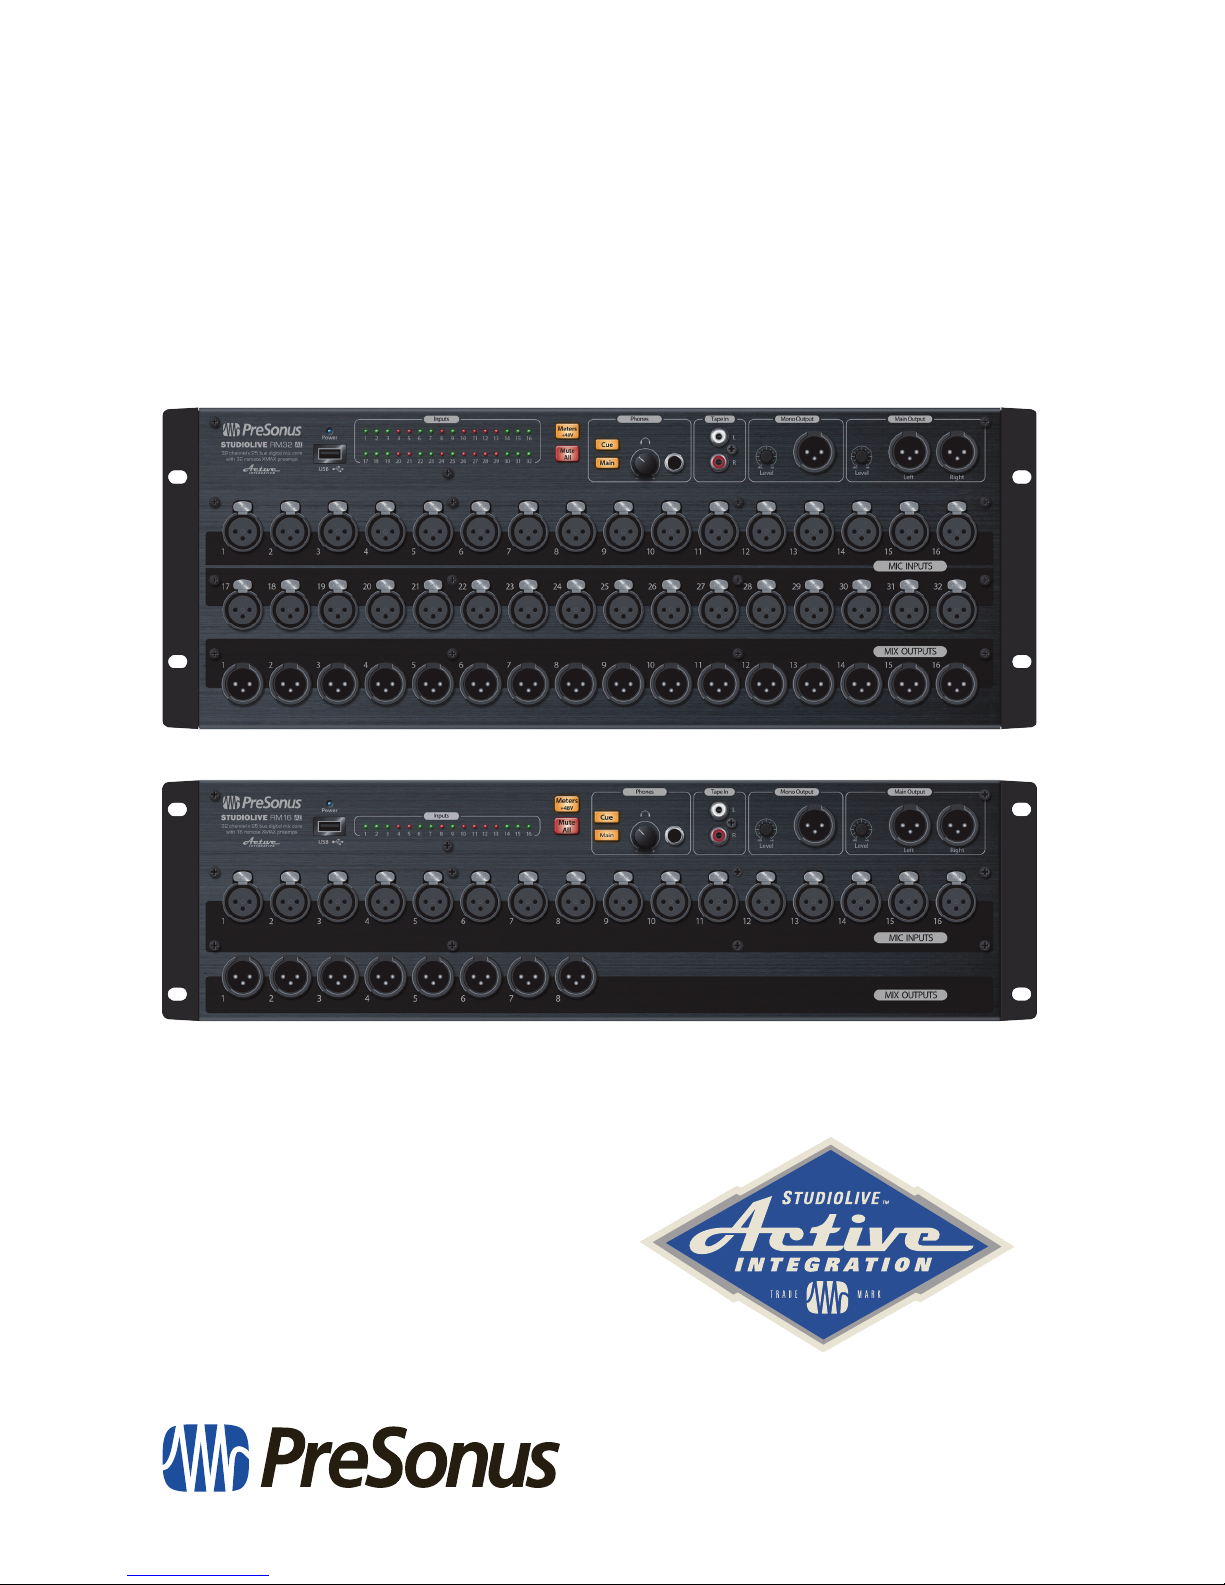
1.3 Meet the StudioLive RM32AI and RM16AI — 2
1.4 What’s In the Box — 3
2.0 Hookup — 4
2.1 Front-Panel Connections and Controls — 4
2.2 Rear-Panel Connections and Controls — 8
2.3 Typical Band Hookup — 10
2.4 Typical Church Hookup — 12
3.0 Installing the UC Surface
Touch-Control Software — 14
3.1 Minimum System Requirements — 14
3.2 Downloading UC Surface for iPad
and QMix-AI — 14
3.3 Wired Ethernet Control Setup — 15
3.4 Wireless Control Setup — 15
3.5 Computer Recording Setup — 16
3.6 Computer Hookups — 18
3.6.1 Command and Recording –
FireWire-equipped computer – Wireless
via Ethernet — 18
3.6.2 Command and Recording –
FireWire-equipped computer – Wireless
with dongle — 18
3.6.3 Command and Recording – FireWire-
equipped computer – Wired — 19
3.6.4 Separate Command and Recording –
Wireless via Ethernet — 19
3.6.5 Separate Command and Recording –
Wireless with Dongle — 20
3.6.6 Separate Command and Recording –
Wired — 20
3.6.7 Separate Touch Screen Command and
Recording – Wireless via Ethernet — 21
3.6.8 Separate Touch Screen Command and
Recording – Wireless via Dongle — 21
3.6.9 Separate Touch Screen Command and
Recording – Wired — 22
3.6.10 UC Surface iPad and QMix-AI
iPhone Connections for Any of
These Hookups — 22
4.0 Getting Started — 23
4.1 Level-Setting Procedure — 23
5.0 A Tour of UC Surface Features — 24
5.1 UC Surface Settings — 24
5.2 Mix Scroll View — 26
5.3 Meter Bridge — 28
5.4 Flex Fader and Mix Selection Area — 28
5.5 Filter DCAs — 30
5.6 Main Mix Area — 33
5.7 Fat Channel — 35
5.7.1 Channel Settings — 37
5.7.2 Channel Input — 38
5.7.3 Fat Channel Processing — 39
5.7.4 Compressor — 40
5.7.5 Limiter — 41
5.7.6 Parametric EQ — 41
5.7.7 Preset List/Editor Button — 42
5.7.8 Graphic EQ — 43
5.7.9 Effects — 45
5.8 Working With Presets — 47
5.9 Mix Scene Quick Recall — 48
5.10 Mute Groups — 49

6 Resources — 50
6.1 Stereo Microphone Placement — 50
6.2 Compression Setting Suggestions — 53
6.3 EQ Frequency Guides — 55
6.4 EQ Setting Suggestions — 56
7.0 Technical Specifications — 59
7.1 Computer system requirements: — 59
7.2 RM16 AI and RM32 AI Technical
Specifications — 60
8.0 Warranty — 62
8.1 Warranty Information — 62

1.0 Overview
1.1 Introduction
StudioLive™ RM-Series Mixers
Owner’s Manual
1
1.0 Overview
1.1 Introduction
Thank you for purchasing the PreSonus
®
StudioLive™ RM-series
Active Integration™ digital mixer. PreSonus Audio Electronics has
designed the RM32AI and RM16AI utilizing high-grade components
to ensure optimum performance that will last a lifetime.
The powerful, scalable, and compact, StudioLive RM32AI and RM16AI 32x16x3
rack-mount mixers combine the all new, battle-ready UC Surface touch-control
software for Windows®, Mac®, and iOS®, with 32 or 16 remote, fully recallable
XMAX™ Class A preamps; 32 internal channels; 25 buses; a 52x34 FireWire recording
interface; 96 kHz operation; and extensive Fat Channel signal processing.
Based on the StudioLive AI-series engine, the StudioLive RM series’ Active
Integration™ technology provides direct Wi-Fi and Ethernet networking,
along with a tightly integrated software suite that includes Capture™
recording software with virtual soundcheck and Studio One® Artist DAW
software for Mac and Windows. You also get a Nimbit® Free account for
online promotion and distribution. This combination provides a complete
“riff to release” solution for live-sound mixing and studio recording.
(See Section 8.1: Minimum System Requirements for complete
hardware and software compatibility information.)
We encourage you to contact us with questions or comments regarding
this product. PreSonus Audio Electronics, Inc., is committed to constant
product improvement, and we value your suggestions highly. We believe
the best way to achieve our goal of constant product improvement is by
listening to the real experts: our valued customers. We appreciate the
support you’ve shown us through the purchase of this product.
For technical support, please visit http://www.presonus.com/support.

1.0 Overview
1.2 About This Manual
StudioLive™ RM-Series Mixers
Owner’s Manual
2
1.2 About This Manual
We suggest using this manual to familiarize yourself with the features,
applications, and setup procedures for your mixer before trying to
connect it to your computer or iOS device. This helps avoid problems
during installation and setup. This manual covers hardware functions for
StudioLive RM32AI and RM16AI mixers; when functional differences are
called out, the RM32AI will be mentioned first, followed by the RM16AI.
Note: All illustrated examples use images of the StudioLive RM32AI.
This manual includes information for installing and using UC Surface; however,
separate documentation is also available for the StudioLive Software Library.
Throughout this manual you’ll find Power User Tips, providing mixing tricks, some
of which are unique to the StudioLive RM32AI and RM16AI, as well as explanations
of various audio terms. Additionally, to help you get the most from your mixer, you’ll
find an assortment of audio tutorials at the back of this manual that cover everything
from microphone placement to equalizer and compression-setting suggestions.
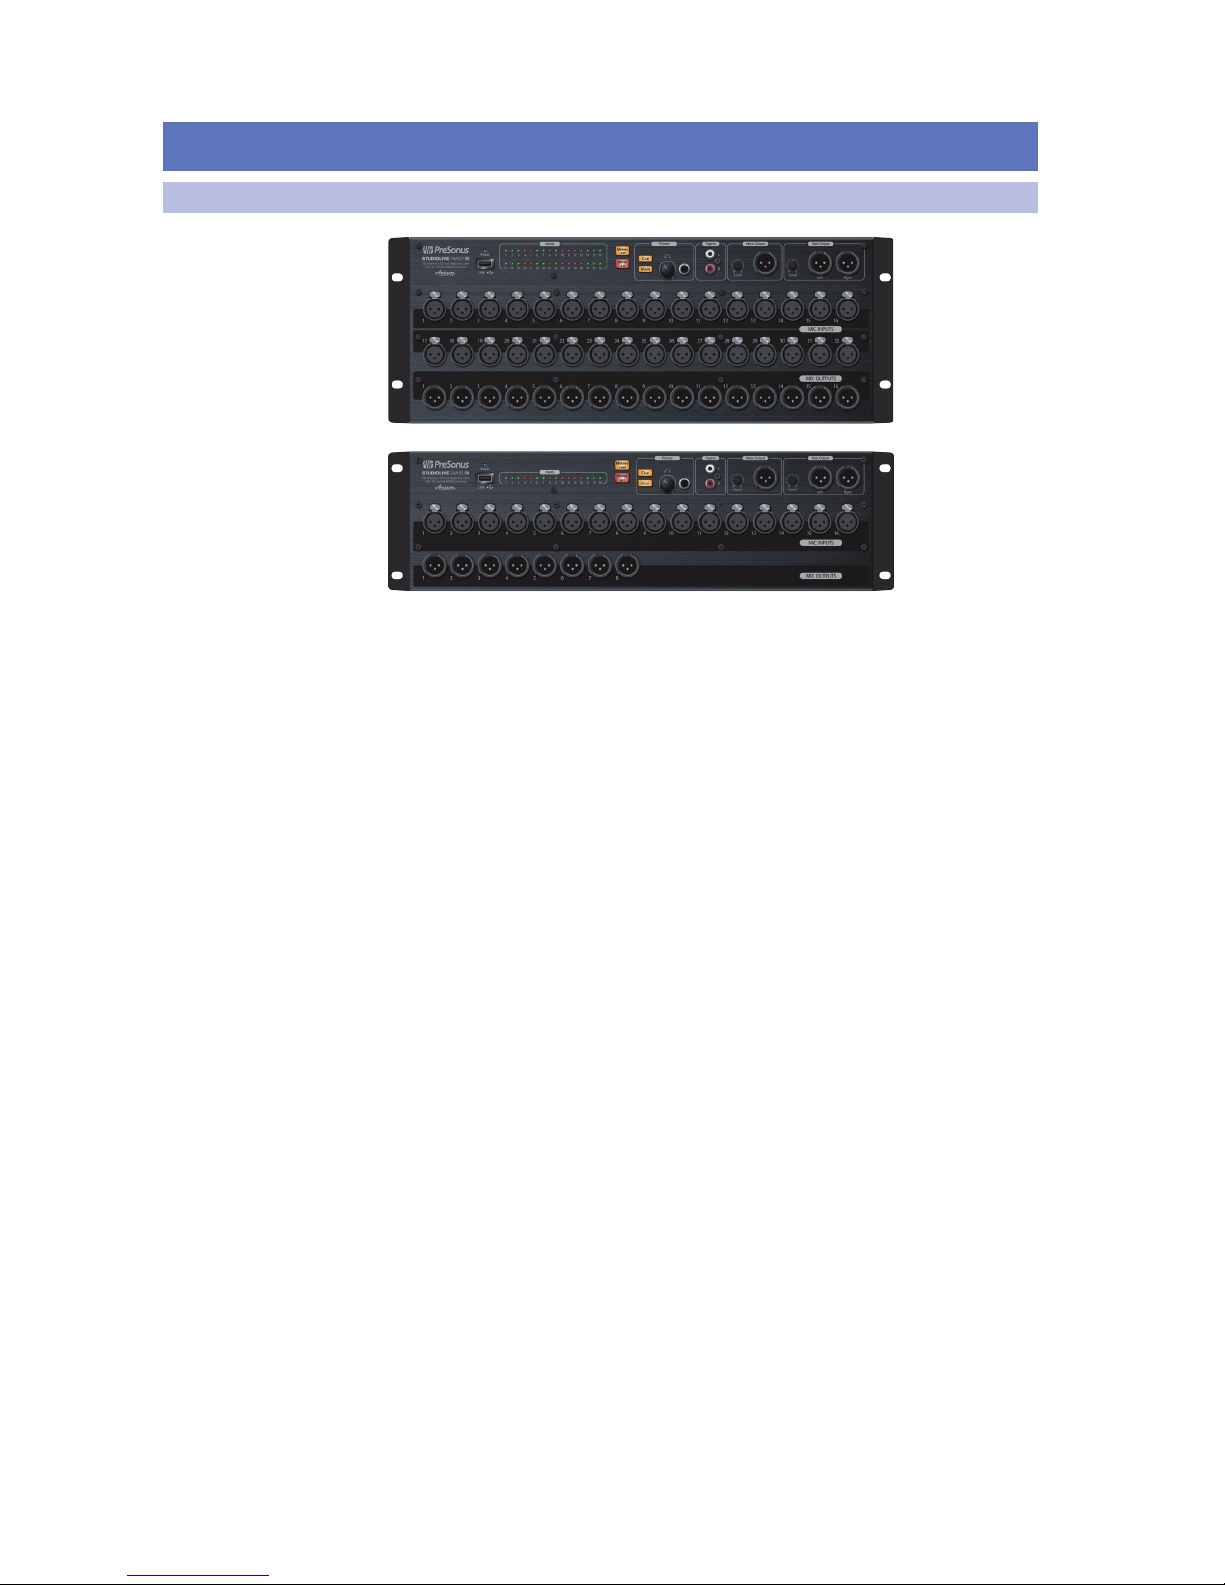
1.3 Meet the StudioLive RM32AI and RM16AI
The RM32AI and RM16AI mixers offer the following hardware and software features:
• Fully recallable mixer
• 32/16 locking XLR inputs with recallable XMAX™ Class
A mic preamps and +48V phantom power
• 16/8 XLR line outputs on the front, mirrored on rear-panel DB25 jacks
• 3 XLR main outputs (left, right, mono/center) with analog trim pots
• 32/16 LED meter grid
• 32 internal channels
• 25 mix buses
• 16 aux mix buses
• 3 main mix buses (left, right, mono/center)
• 4 internal FX buses (2 reverb, 2 delay)
• Stereo solo bus
• • Dual Fat Channel signal processing on all input channels and all buses,
with 4-band parametric EQ, compressor, gate, limiter, and more
• • 52x34 direct digital FireWire recording interface
• • UC Surface™ battle-ready, live mixing and control software
• Designed specifically for live sound mixing
• Multiplatform support for Mac, Windows, and iPad
(See Section 8.1: Minimum System Requirements.)
• Windows 8 multi-touch-compatible for large touchscreen mixing
• Contextual-based navigation for quick, intuitive
access to all mixing functions
• Compatible with free QMix™-AI personal monitoring
control app for iPhone®/iPod® touch
• Complete solution: Includes Capture™ live-recording software,
Studio One® Artist DAW for Mac and Windows, and Nimbit® Free
account for online music promotion and distribution.
• USB jack and included Wi-Fi LAN adapter provides wireless control
• 2 FireWire s800 ports, 1 Ethernet control port, and S/PDIF digital output
• Option card slot for future expansion (AVB, Dante,
and Thunderbolt cards coming soon)

1.0 Overview
1.4 What’s In the Box
StudioLive™ RM-Series Mixers
Owner’s Manual
3
• Up to 96 kHz operation
• Front-panel Mute All button
• Stereo tape input (RCA jacks)
• Headphone output with volume knob and selectable source
• +48V Meters button to display phantom power assignment on the meter grid
• 1x1 MIDI interface (for future implementation)
• 4U/3U rack-mount
Note: UC Surface, Capture, and Studio One Artist and for Windows and Mac
are available via download once you’ve set up and/or logged into your My
PreSonus account at https://my.presonus.com and registered your mixer.
UC Surface for iPad and QMix-AI for iPhone/iPod touch, are
available for download from the Apple App Store.
1.4 What’s In the Box
Your StudioLive RM-Seres package contains the following:
• PreSonus StudioLive RM32AI or RM16AI digital recording and performance mixer
• 5-foot (1.5 meter), 9-pin-to-9-pin FireWire s800 cable
• Ethernet cable
• IEC power cord
• USB Wi-Fi LAN adapter
• Product registration and software authorization card
• StudioLive RM-series Quick Start Guide
2.0 Hookup
2.1 Front-Panel Connections and Controls
StudioLive™ RM-Series Mixers
Owner’s Manual
4
2.0 Hookup
This section covers hardware connections and controls for both RM32AI
and RM16AI mixers. Whenever differences in certain features are called
out, the RM32AI will be mentioned first, followed by the RM16AI.
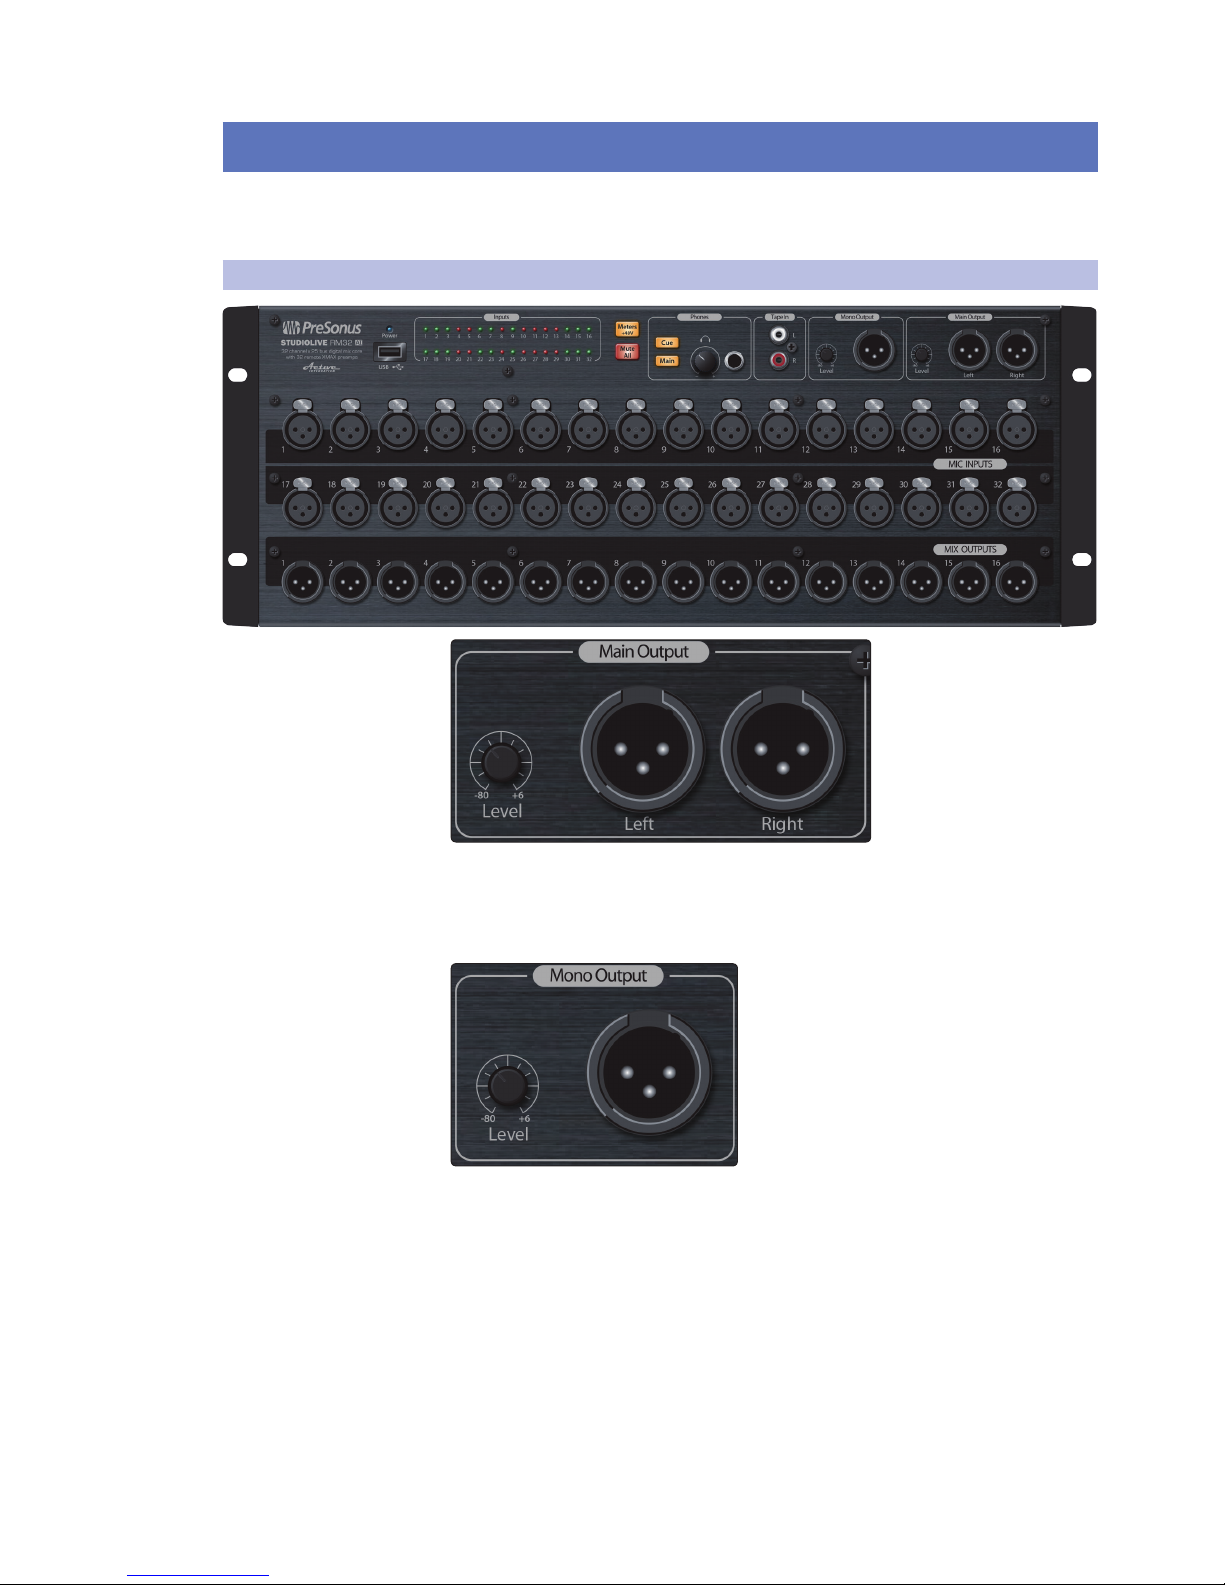
2.1 Front-Panel Connections and Controls
Main Outputs (Left and Right). The StudioLive RM features two XLR
main outputs that are parallel to each other and the mono output.
Main Output Level. This knob controls the maximum output level of the XLR
main outputs. The signal can be attenuated to -80 dB and boosted up to +6 dB.
Mono/Center Output. This balanced XLR output carries a mono bus
output for driving subwoofers or a center channel for LCR mixing.
Mono/Center Output Level. This knob controls the maximum
level of the Mono/Center Output signal. The signal can be
attenuated to -80 dB and boosted up to +6 dB.
Power User Tip: StudioLive RM-series main outputs (XLR stereo and XLR
mono) let you use Left/Center/Right panning (LCR). If you want to use LCR
panning, select LCR as the Pan mode in the settings in UC Surface, and bus
the channel to both the main L/R and Center outputs. If you want it to use
normal LR stereo panning on a channel, just route it to the L/R outputs.
2.0 Hookup
2.1 Front-Panel Connections and Controls
StudioLive™ RM-Series Mixers
Owner’s Manual
5
On the other hand, if you want to use a subwoofer in addition to the speakers
that are connected to the Main L/R outputs, leave the panning mode in LR
and route the channels you want sent to the subwoofer to the Mono bus
(Mono output). You can then use the Low Pass Filter that’s available on the
Mono bus Fat Channel to dial in your desired high-frequency cutoff point.
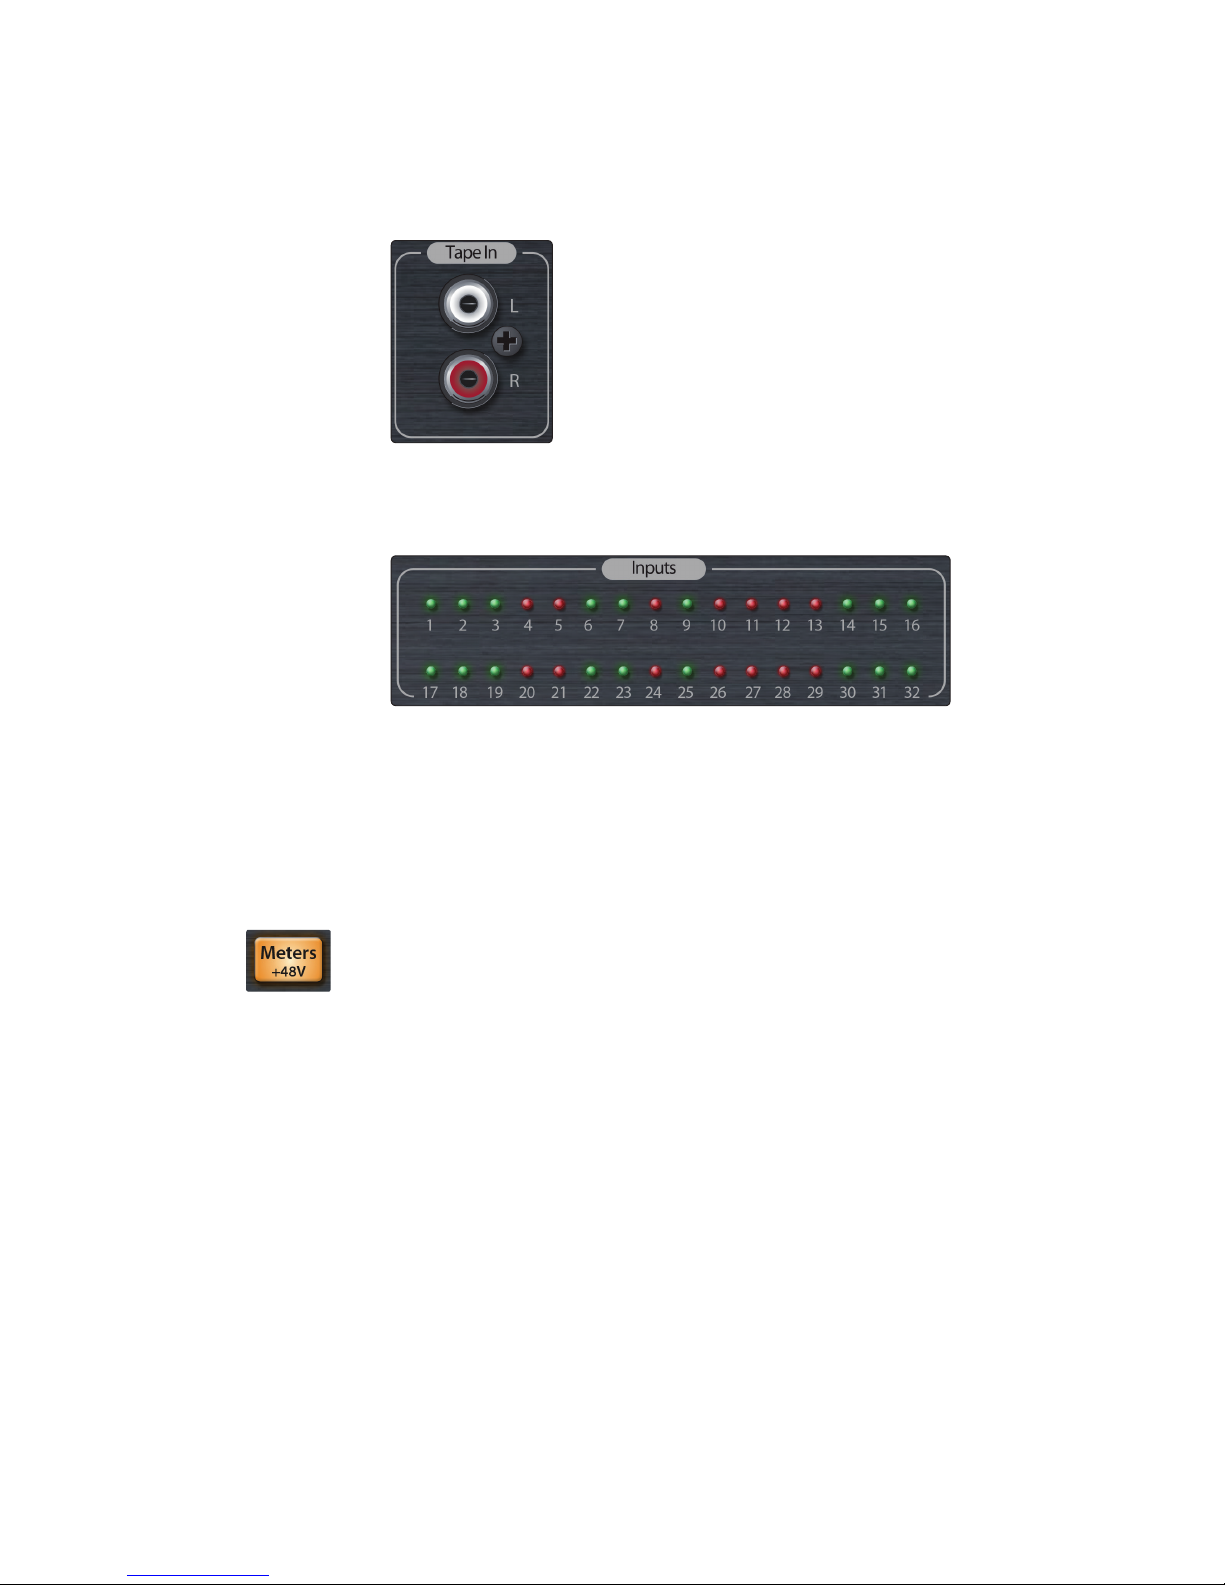
Tape Input. These RCA inputs accept audio signals from consumer
devices such as an mp3 player, tape deck, or CD player. You’ll find a
corresponding stereo channel strip in the Aux Inputs channels in UC
Surface for controlling the signal level to the main mix or aux mixes.
Input Meters. The StudioLive RM mixers offer 32/16 3-color LED input meters
that illuminate in green whenever a signal is present on the corresponding
input. The color turns red when the channel’s input signal reaches 0
dBFS, and you’ll start noticing that the sound is clipping (distorted).
Each of these LEDs turns yellow to indicate that phantom power
(+48V) is enabled on the corresponding channel.
These meters also display the progress during firmware recovery updates,
illuminating in yellow to show the progress and green when complete.
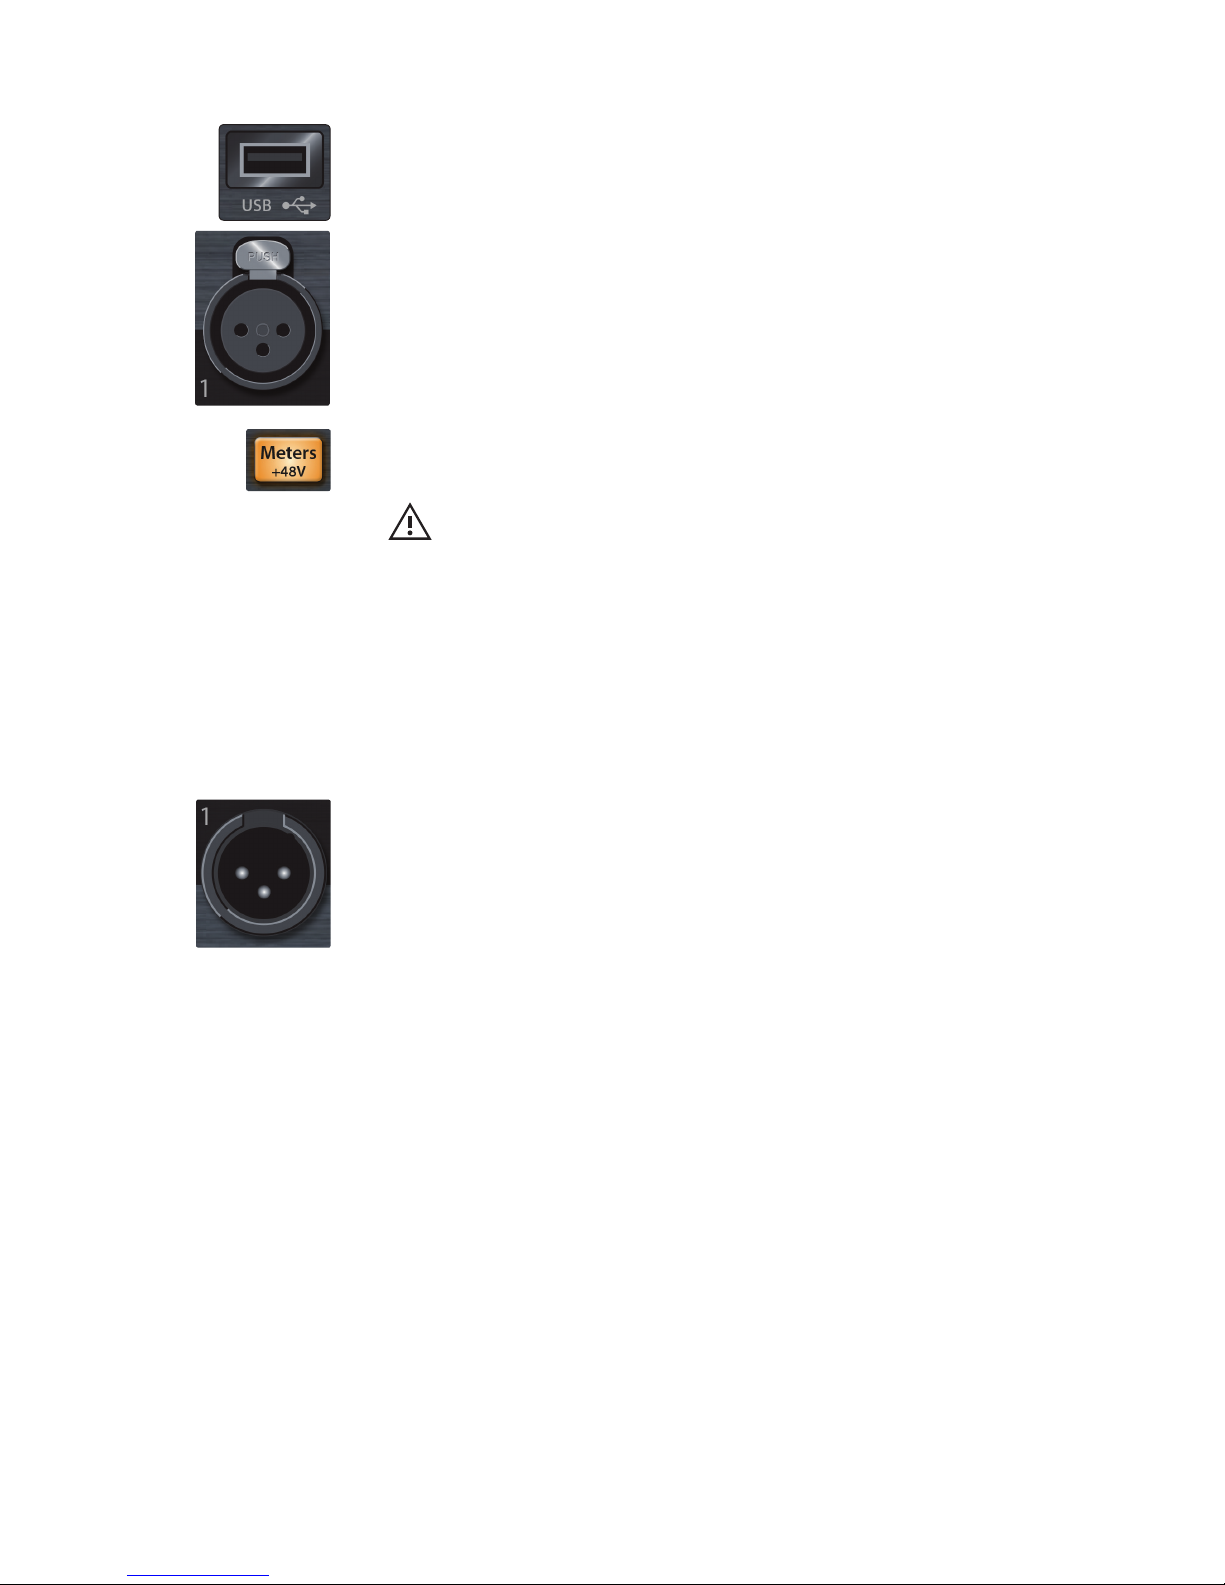
+48V Meter Button. This button is used for changing the mode of the input meters
so you can see which inputs are using +48V phantom power.
In its default state, the button is off, and the meters display the
signal levels. If you press and release the button, it will illuminate in
yellow, and the meters will display the +48V status (yellow = On) for
each input until the button is pressed and released again.
Pressing and holding the +48V Meter button causes it to illuminate in yellow
and switches the Input Meters to +48V mode until you’ve released the button.
2.0 Hookup
2.1 Front-Panel Connections and Controls
StudioLive™ RM-Series Mixers
Owner’s Manual
6
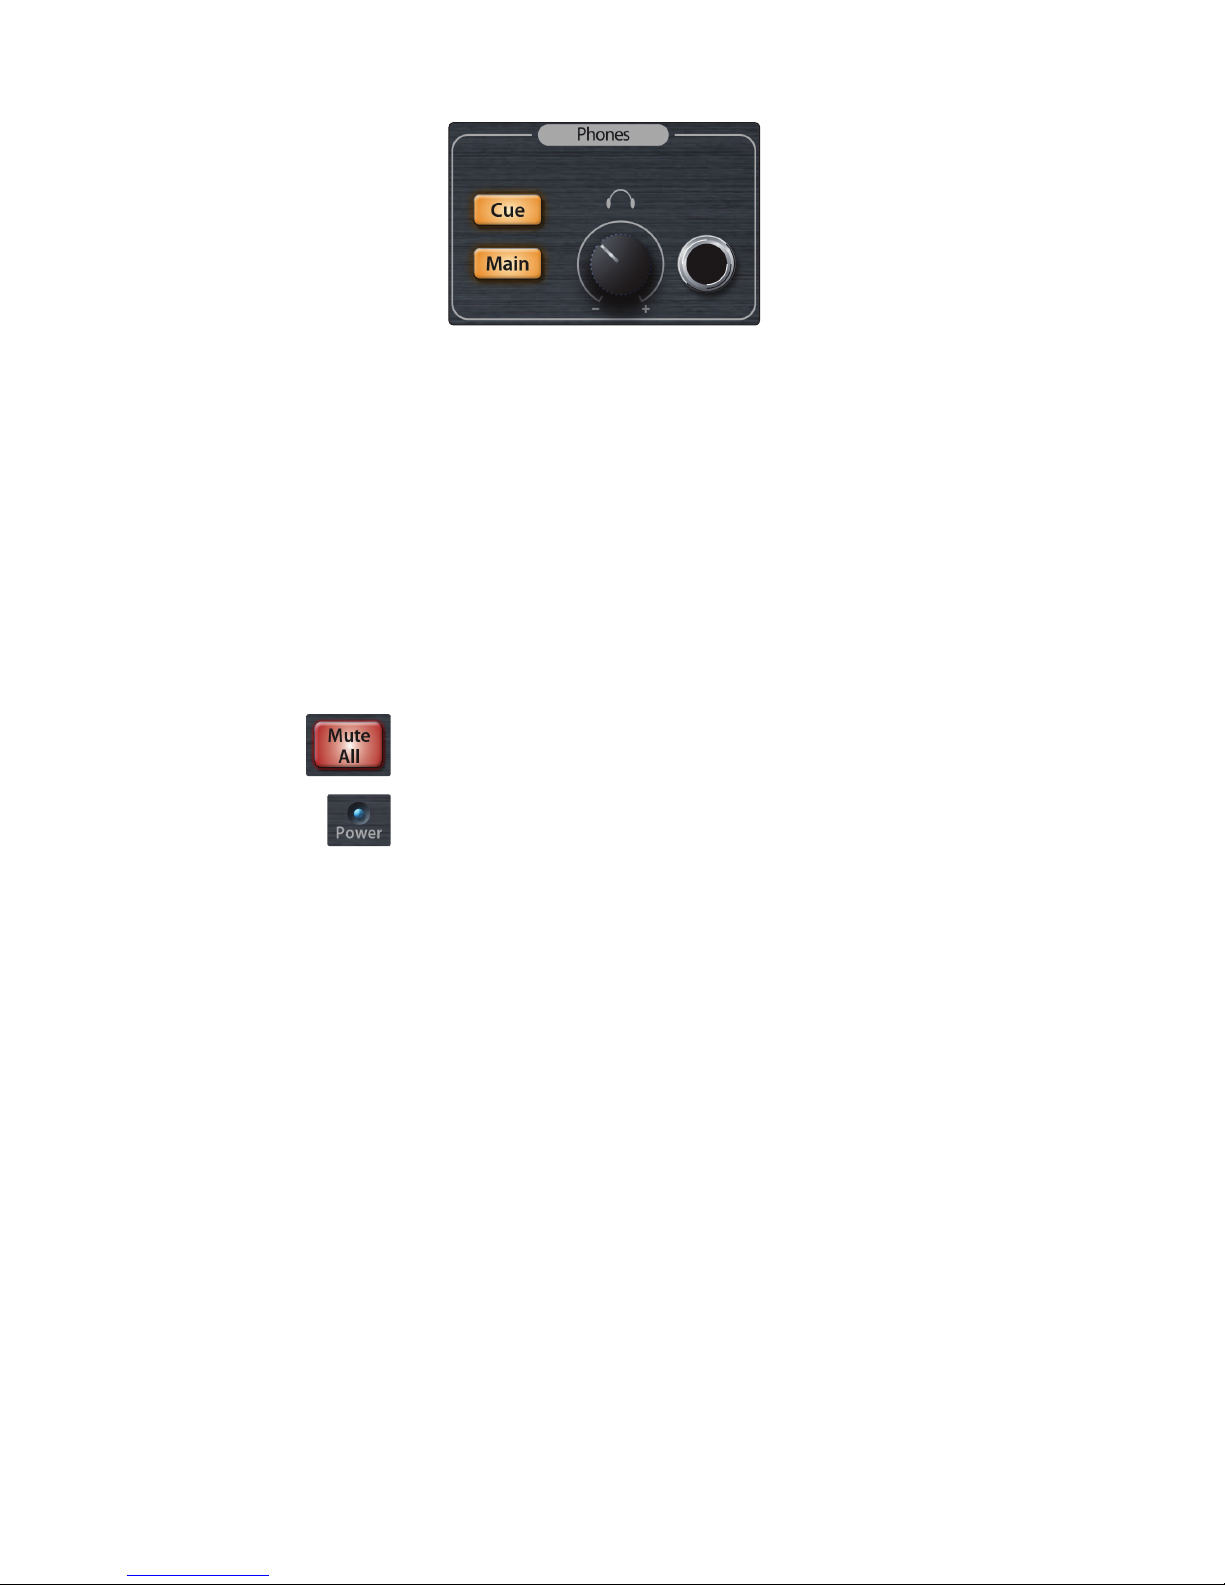
Headphone Cue Button. Whenever this button is pressed, it illuminates in yellow
and reroutes the mix assigned in the settings to Cue to the headphone output.
(By default this is set to the Solo bus.) The Headphone Cue and Main buttons are
radio buttons: Only one can be selected at a time, and selecting Cue will deselect
Main, while selecting Main will deselect Cue. Pressing and holding the Cue button
while Main is selected will temporarily select Cue until the button is released.
Headphone Main Button. Pressing and releasing this button, causes it
to illuminate in yellow and sends the Main mix to the headphone output.
The Headphone Cue and Main buttons are radio buttons: Only one can be
selected at a time, and selecting Cue will deselect Main, while selecting
Main will deselect Cue. Pressing and holding the Cue button while Main
is selected will temporarily select Cue until the button is released.
Headphone Level. This knob controls the volume of the headphone output.
Headphone Output. This ¼-inch TRS connector is where
you connect headphones to your mixer.
Mute All Button. Pressing and releasing this button causes it to illuminate in red and
mutes all of the inputs and outputs until it’s pressed a second time. Holding down
the button does the same thing until it’s released.
Power/Status Indicator. This displays the current state of your RM mixer as
described below:
• Off: The mixer is switched off.
• Solid Blue: Powered up, connected to a control
network, and functioning properly.
• Flashing Blue: In the process of booting up or loading a firmware update.
• Solid Red: On and functioning correctly but
with no control device connected.
• Flashing Red: Boot or update failure.
2.0 Hookup
2.1 Front-Panel Connections and Controls
StudioLive™ RM-Series Mixers
Owner’s Manual
7
USB. The USB port is for use with the included USB Wi-Fi module when connecting
your StudioLive RM AI-series mixer to a wireless network and controlling it remotely
using UC Surface, and QMix-AI.
It can also be used for installing firmware updates.
Recallable Microphone Inputs. Your StudioLive RM mixer is equipped with 32/16
PreSonus recallable XMAX microphone preamplifiers for use with all types of
microphones.
Each of these solid-state preamplifiers has a Class A input buffer, ultra-low noise,
and wide gain control, allowing you to boost signals without increasing unwanted
background noise.
48 Volt Phantom Power. These inputs also provide 48V phantom power for the
microphone input on each channel, when activated. This feature can be individually
enabled for each channel, using the UC Surface touch control software.
WARNING: Phantom power is required for condenser microphones but can
severely damage some dynamic mics, especially ribbon mics. Therefore, switch
phantom power off for all channels where it is not required.
Power User Tip: Dynamic and ribbon microphones are generally loweroutput devices that require no external power source. In fact, unless a ribbon
microphone calls specifically for phantom power, sending phantom power
to it can cause severe damage. Condenser microphones are generally more
sensitive than dynamic and ribbon microphones and typically require external
+48V phantom power. Always review your microphone’s documentation
to ascertain the manufacturer’s recommended operating practices.
XLR connector wiring for phantom power:
Pin 1 = GND Pin 2 = +48V Pin 3 = +48V
Line Outputs. StudioLive RM32AI offers 16 XLR line outputs and the RM16AI offers 8
XLR line outputs that are fixed to the aux mixes and mirrored on the rear panel with
DB25 output connectors.
2.0 Hookup
2.2 Rear-Panel Connections and Controls
StudioLive™ RM-Series Mixers
Owner’s Manual
8
2.2 Rear-Panel Connections and Controls
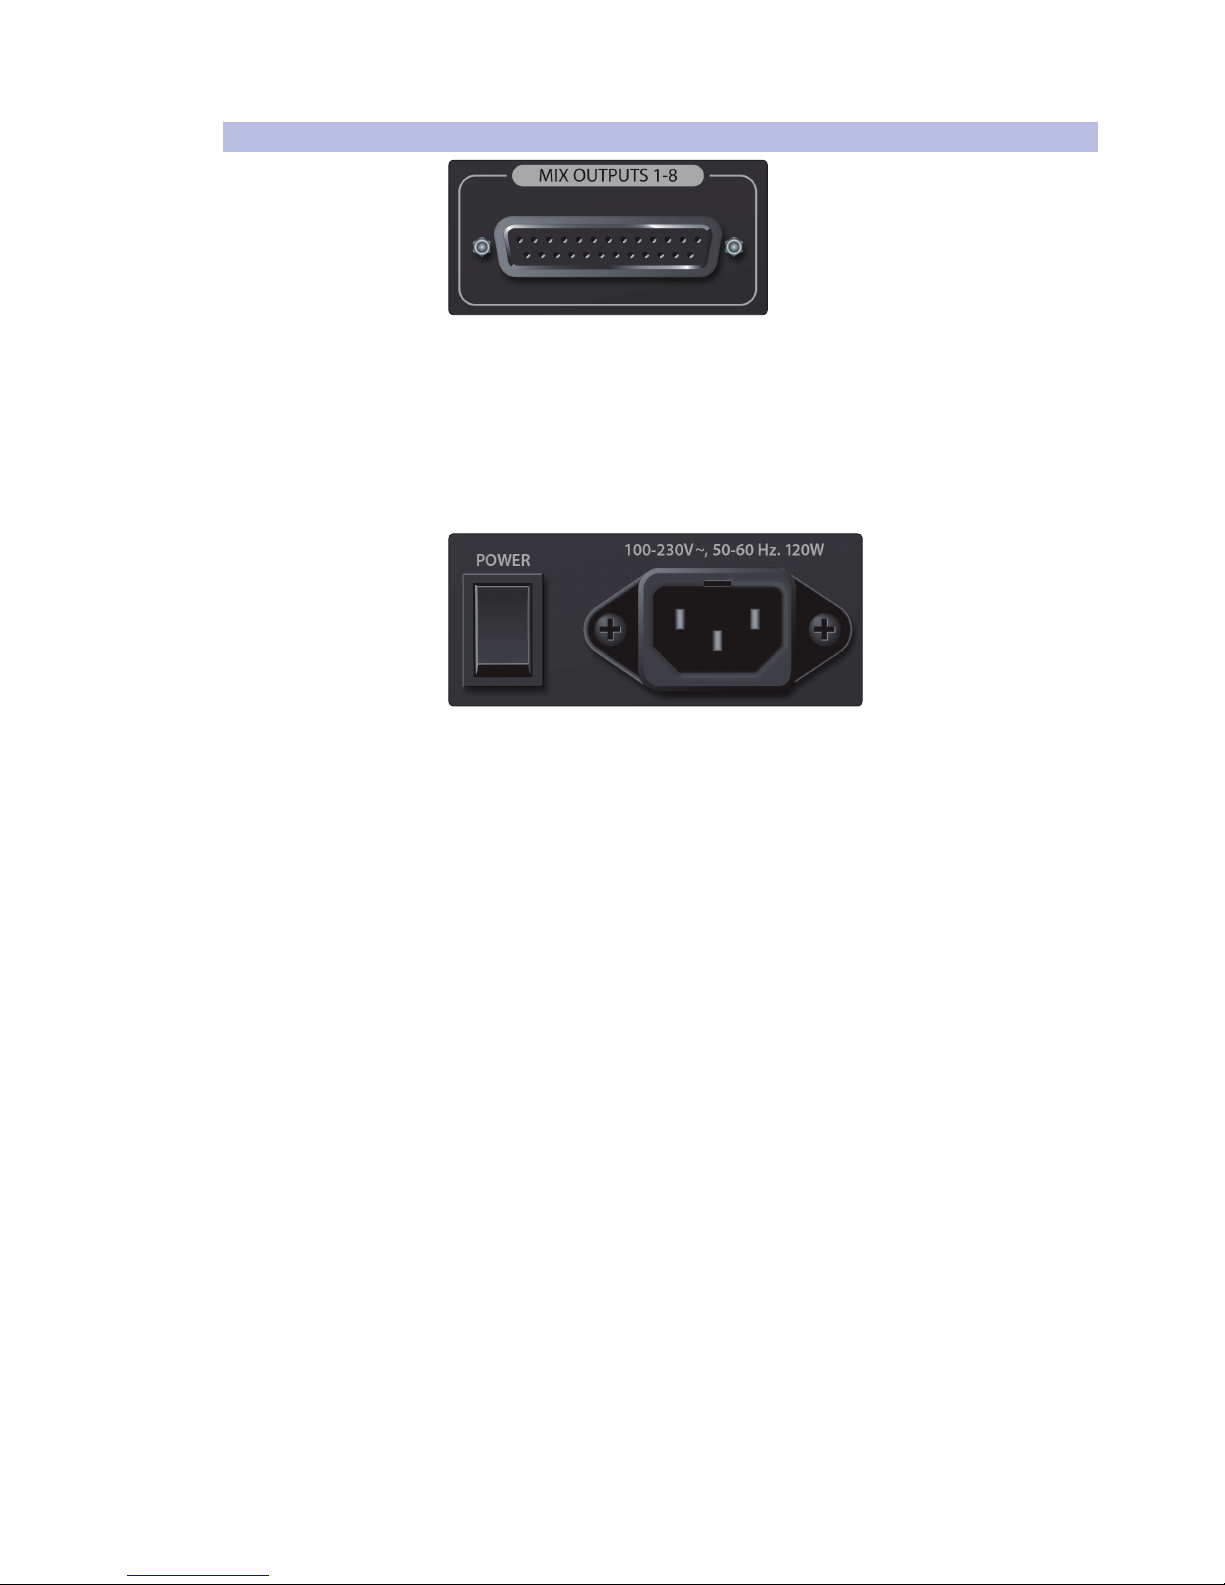
Line Outputs. These balanced line outputs on DB25
connectors mirror the front-panel outputs.
This comes in handy if you want to connect to wireless in-ear transmitters located
in the same rack. You can use these connections, rather than snake cables, from the
front of the mixer around to the back of the rack for your wireless transmitters.
Balanced DB25 fan-out snakes (breakout cables) can be obtained in various
configurations at most recording and live-sound retailers. Common fanout configurations are DB25 to (8) XLRM and DB25 to (8) ¼-inch TRS.
Power Switch. Push the top part of the switch ( | ) to turn on your
StudioLive RM. Push the bottom part of the switch ( O ) to turn it off.
Power Cable Input. This is where you plug in the provided IEC power cable.
2.0 Hookup
2.2 Rear-Panel Connections and Controls
StudioLive™ RM-Series Mixers
Owner’s Manual
9
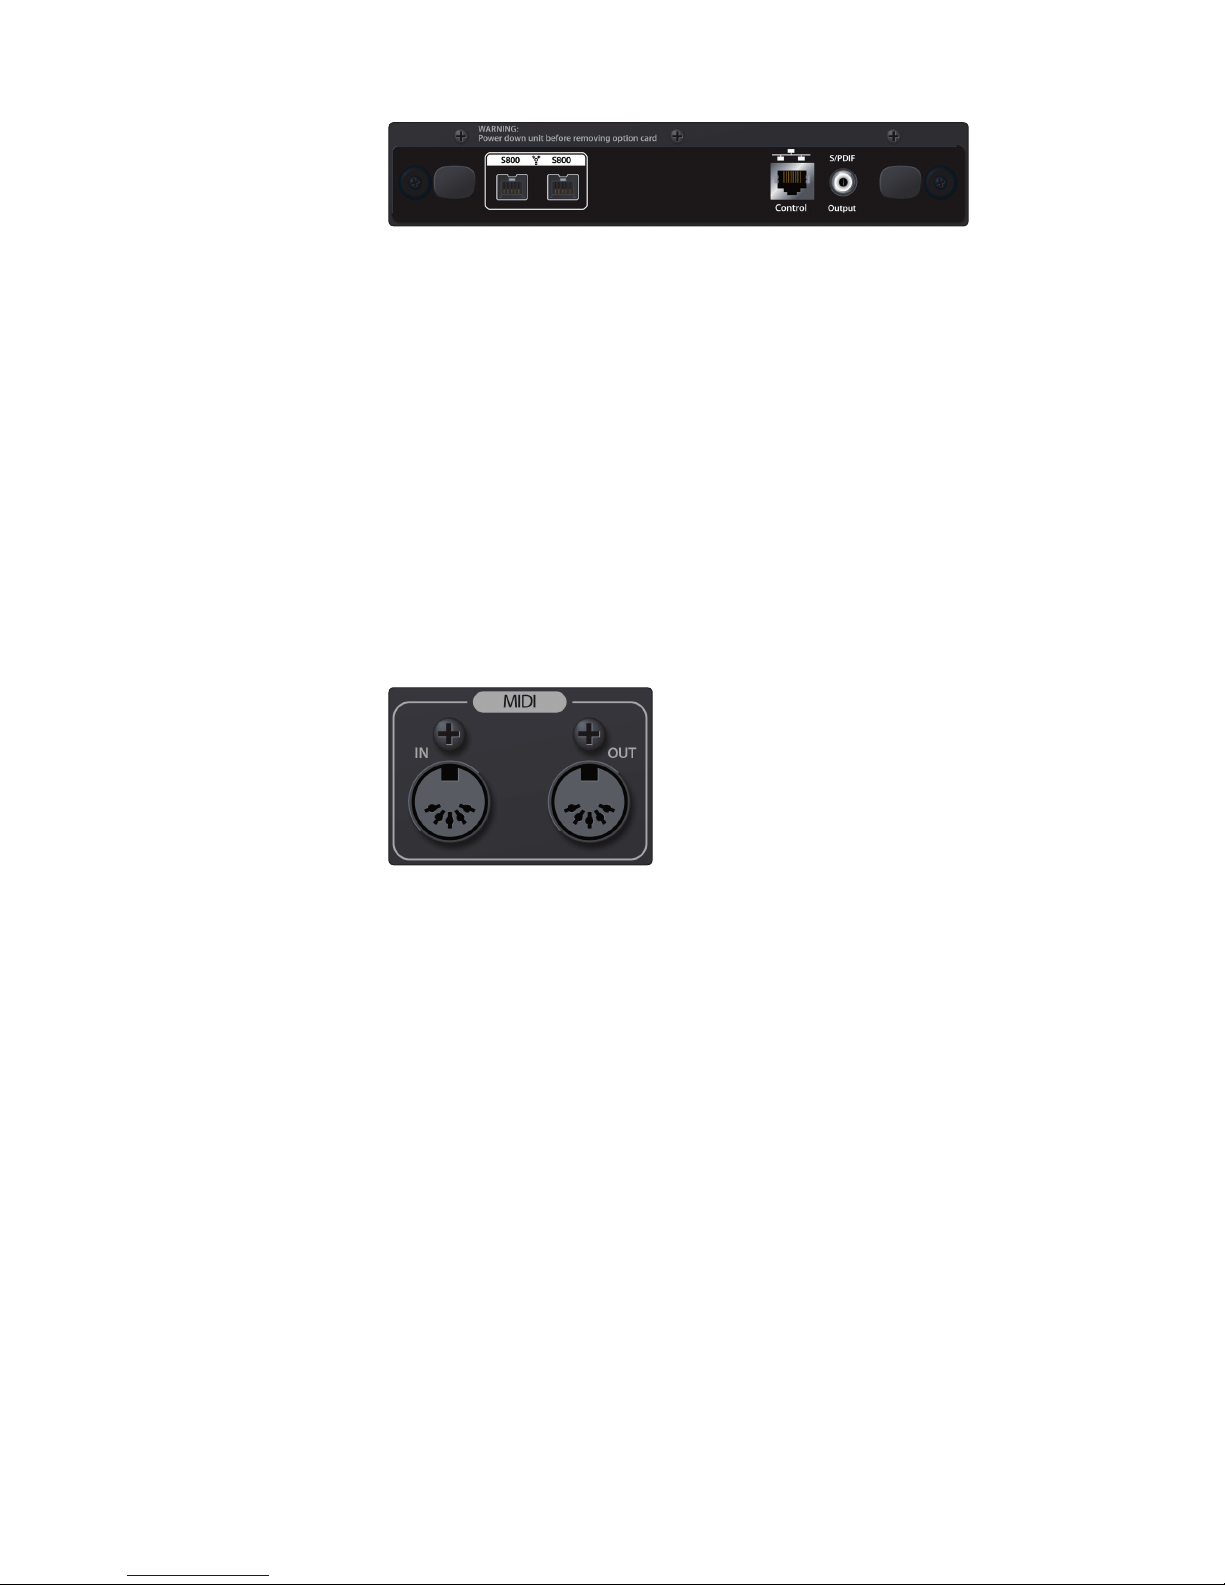
Option card slot. Your StudioLive RM-series mixer comes with a
FireWire s800 option card for digital input and output, network
control, and digital S/PDIF output. Additional option cards will be
available soon, including AVB, Dante, and Thunderbolt.
FireWire s800 Ports. There are two standard 9-pin FireWire s800 ports
on the included option card that can be used for connecting to your
computer. You can use the second FireWire s800 port to connect additional
s800 devices (such as external hard drives) to your computer.
Note: While connecting your StudioLive RM-series mixer to a FireWire 400 connection
on your computer and daisy chaining a FireWire 400 device to the secondary
s800 port are supported, this will reduce the bus speed of your mixer to 400 Mbps,
and you may experience reduced performance. To experience the full power of
your StudioLive RM AI-series mixer, we highly recommend connecting to a true
FireWire s800 connection or to a Thunderbolt connection, using an adapter.
Ethernet Port. This standard RJ45 port allows you to
connect your StudioLive to a wired LAN network.
S/PDIF Output. This digital output can be routed and assigned using UC Surface
touch-control software. By default the Main Left/Right mix is assigned to this output.
MIDI Input and Output (I/O). These inputs and outputs
allow connection to, and communication with, external MIDI
equipment for triggering mixer functions and events.
Note: The MIDI I/O feature will be activated as part of an upcoming firmware update.
2.0 Hookup
2.3 Typical Band Hookup
StudioLive™ RM-Series Mixers
Owner’s Manual
10
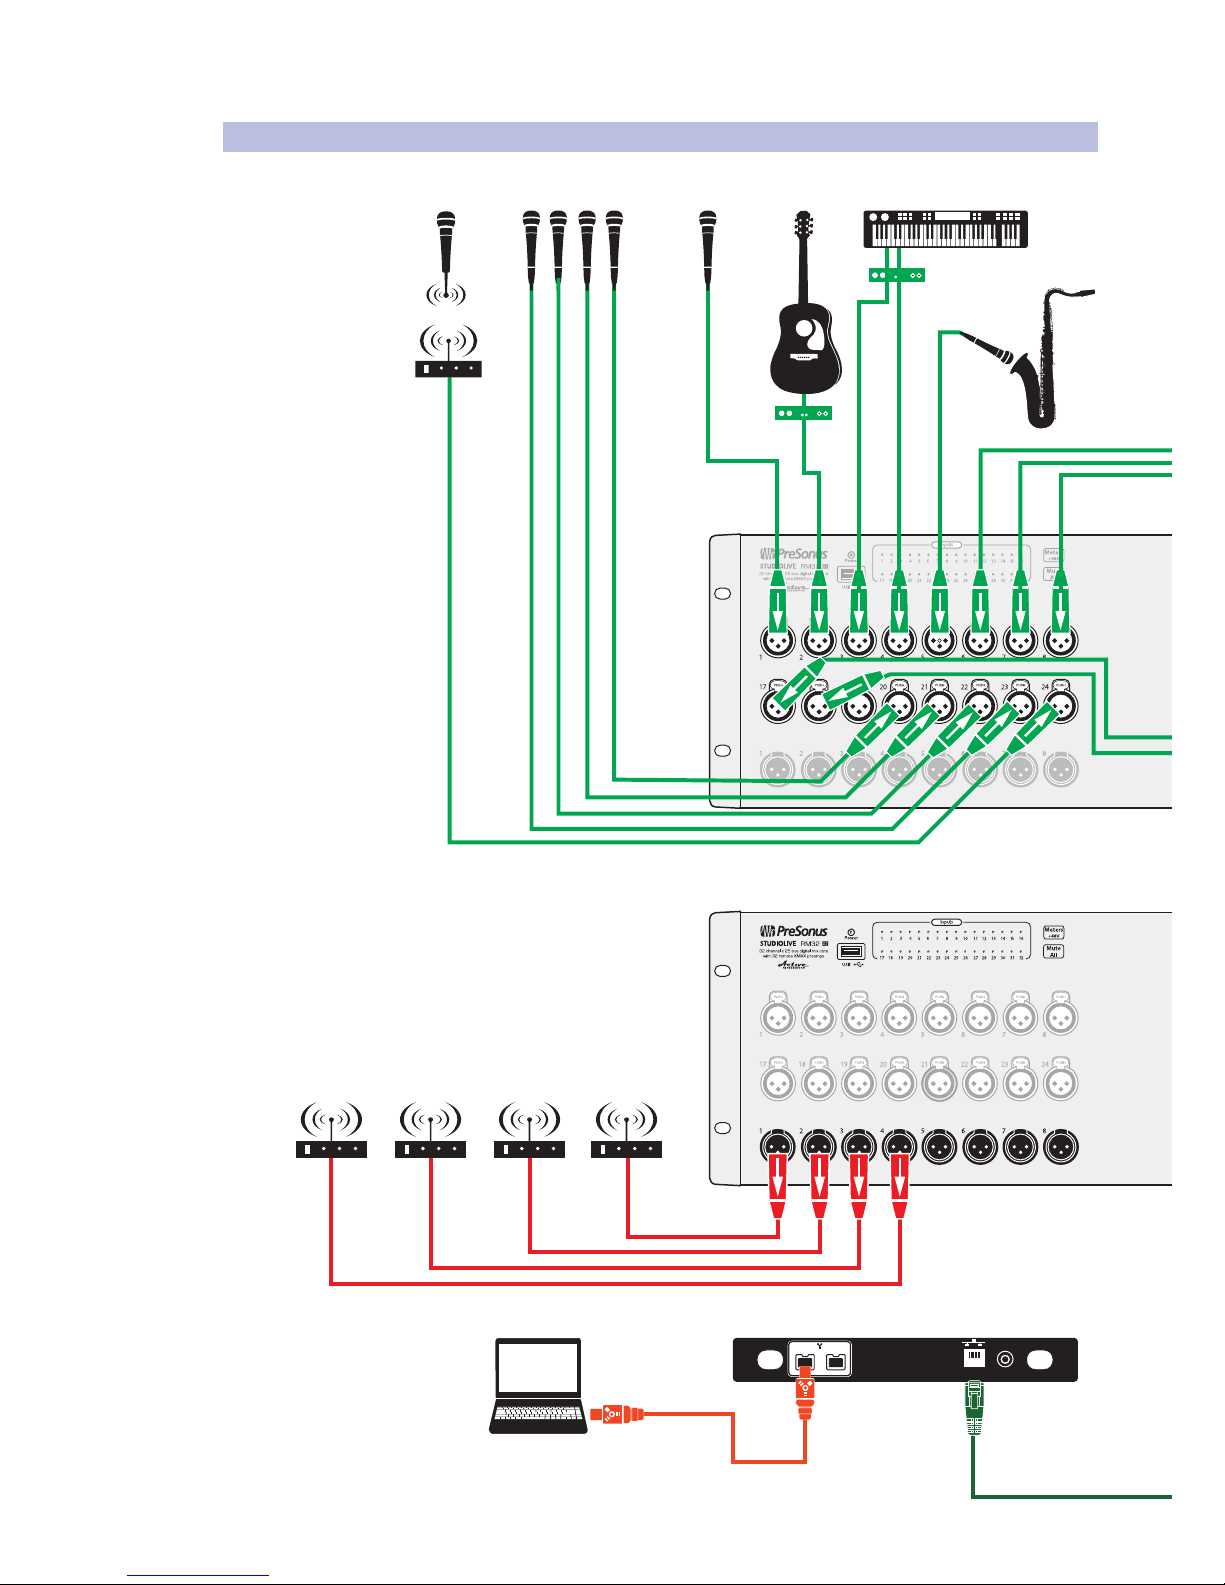
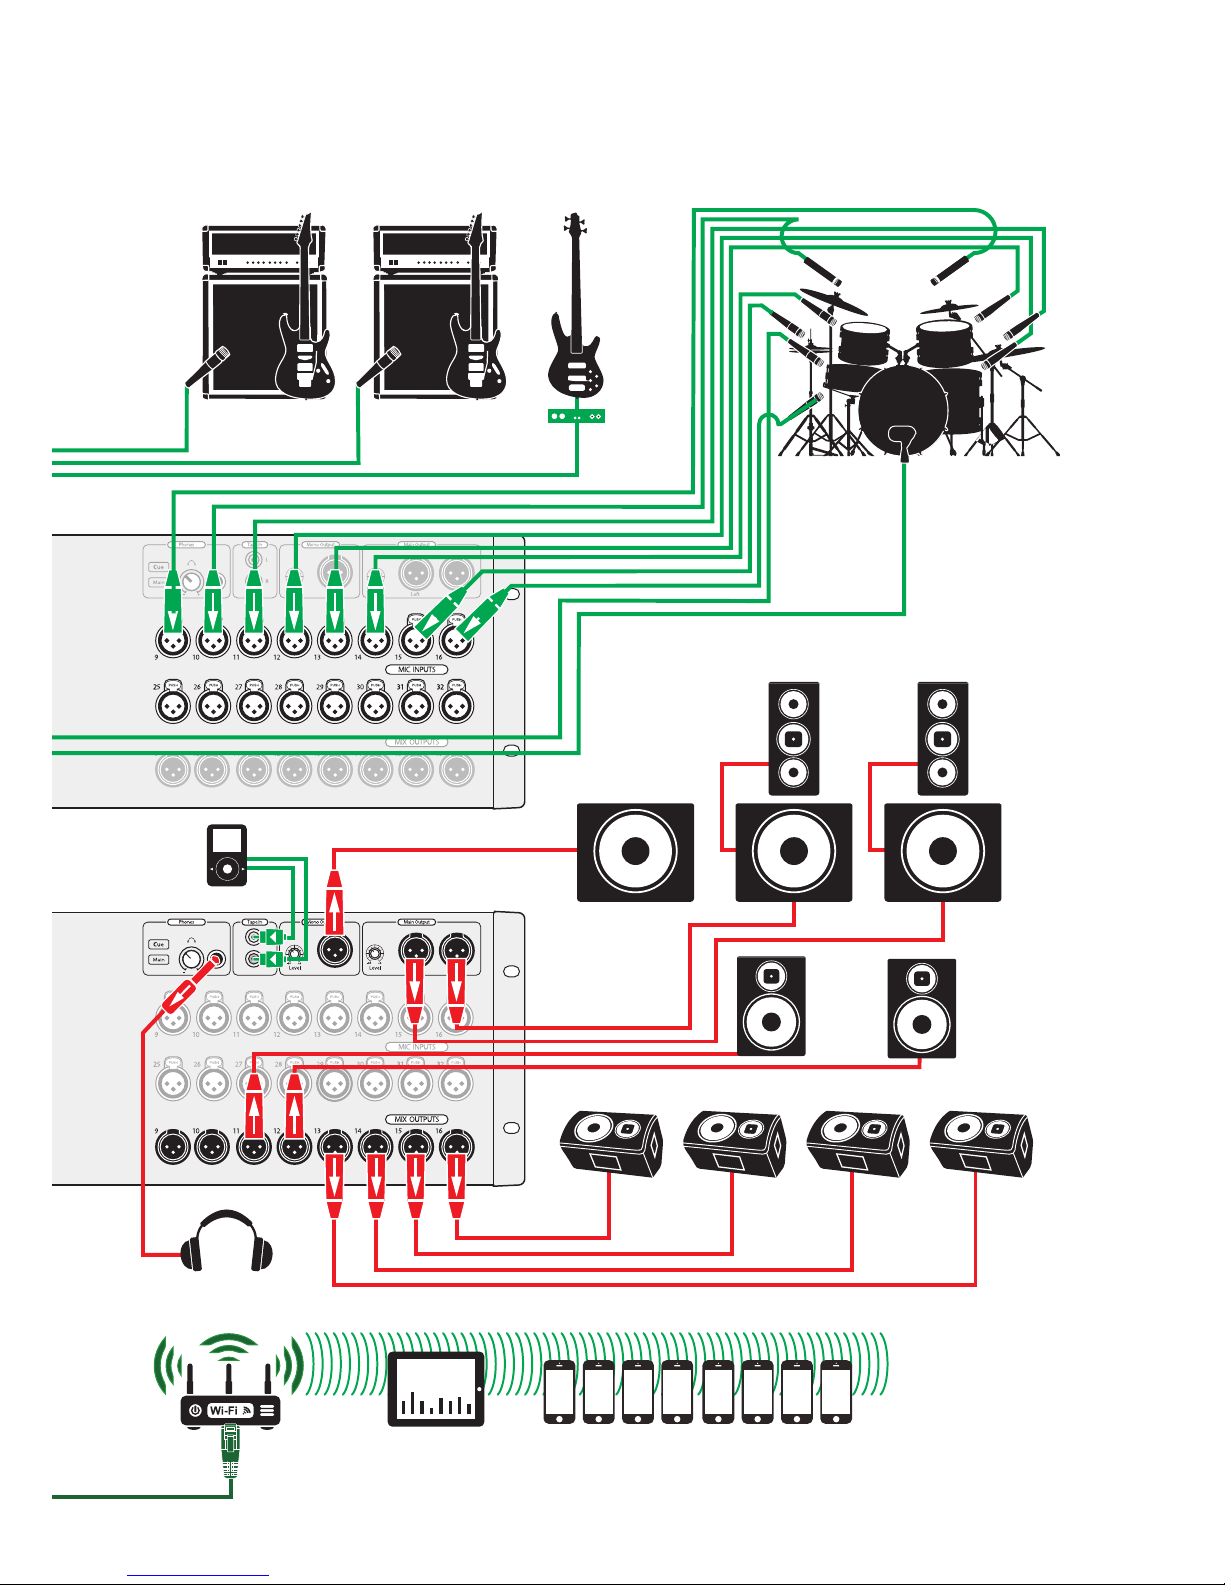
2.3 Typical Band Hookup
S800S800
S800S800
S800S800
S/PDIF
Control Output
S800S800
S800S800
S800S800
wireless in-ear
(lead guitar)
wireless in-ear
(bass)
wireless in-ear
(keys)
wireless in-ear
(lead vocals)
FireWire-equipped
laptop running
Capture 2.0
AI Mixer Option Card
headphones
music source
keyboard/DI
lead vocal
DI
Box
backup vocal micswireless mic
acoustic
guitar/DI
DI Box
electric guitar
amp (rhythm)
sax
2.0 Hookup
2.3 Typical Band Hookup
StudioLive™ RM-Series Mixers
Owner’s Manual
11
iPad running
UC Surface
iPhones running QMix-AI
floor wedges floor wedges
mo’ bass
drum
monitor
side
fill
main
speakers
and
subwoofers
headphones
music source
DI
Box
drum kit
bass/DI
electric guitar
amp (rhythm)
electric guitar
amp (lead)
2.0 Hookup
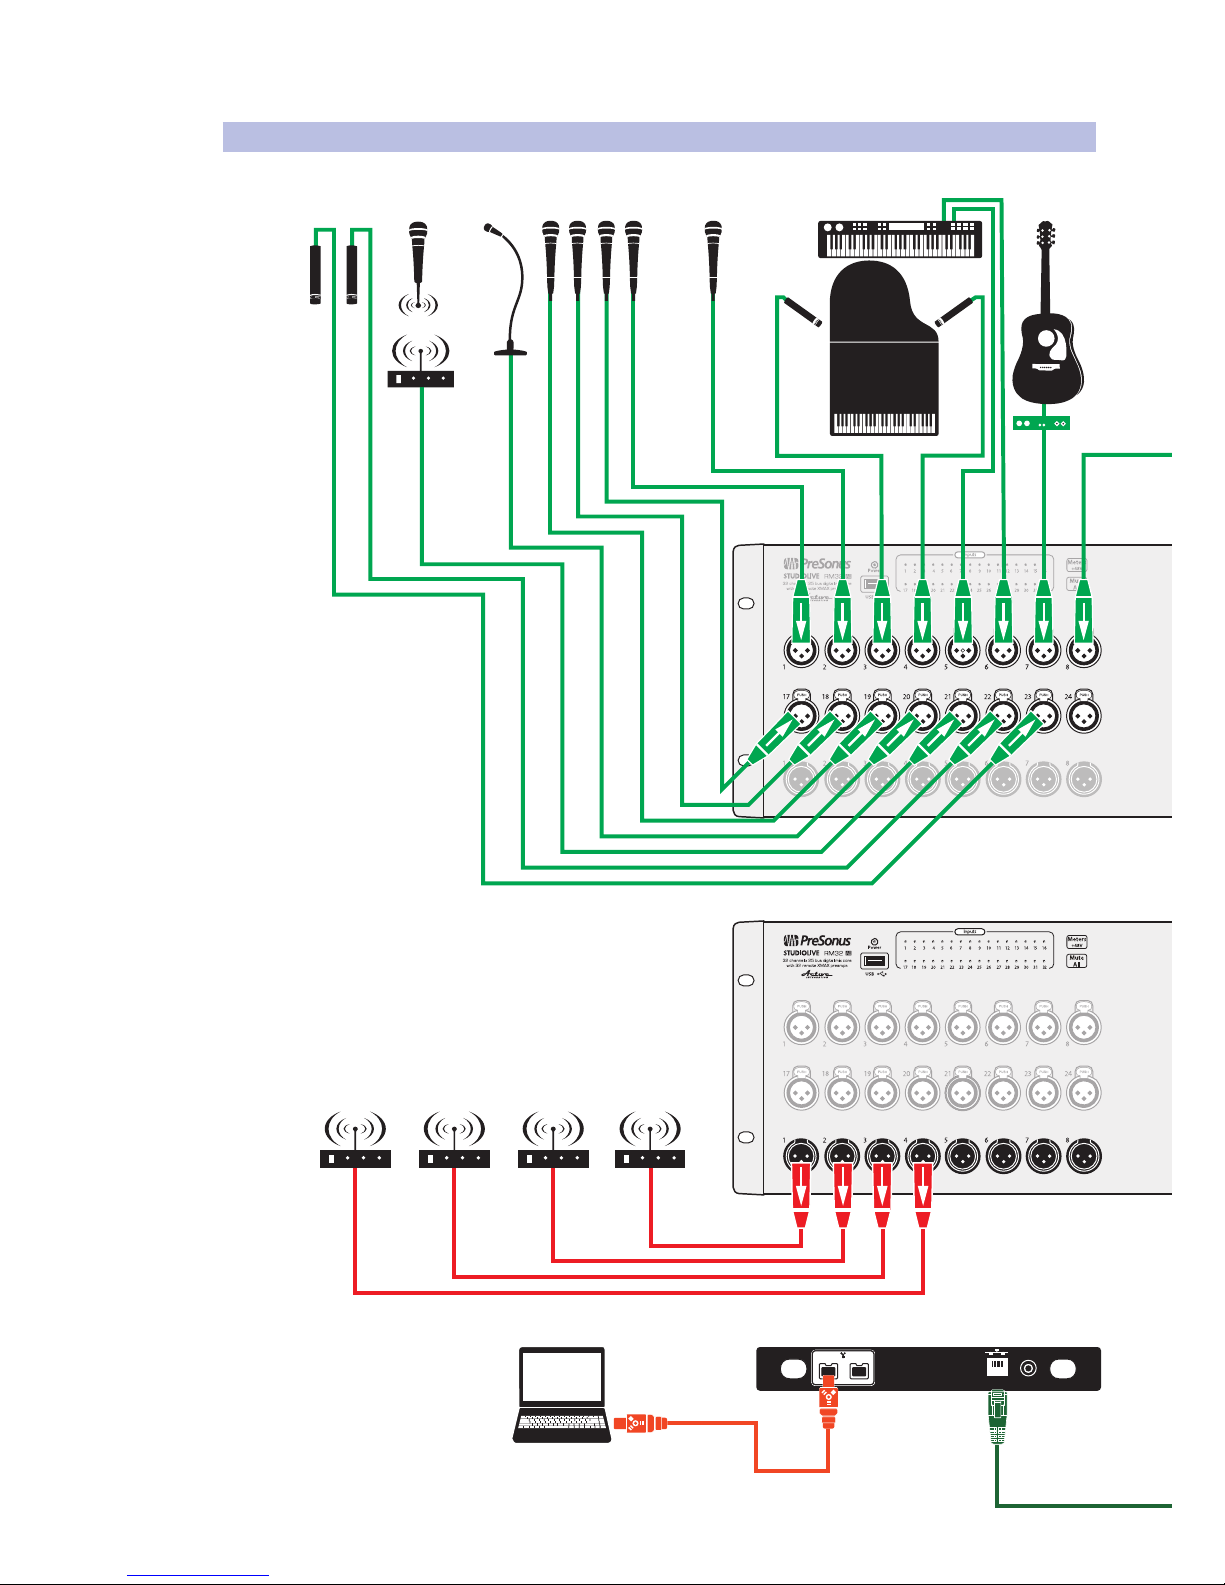
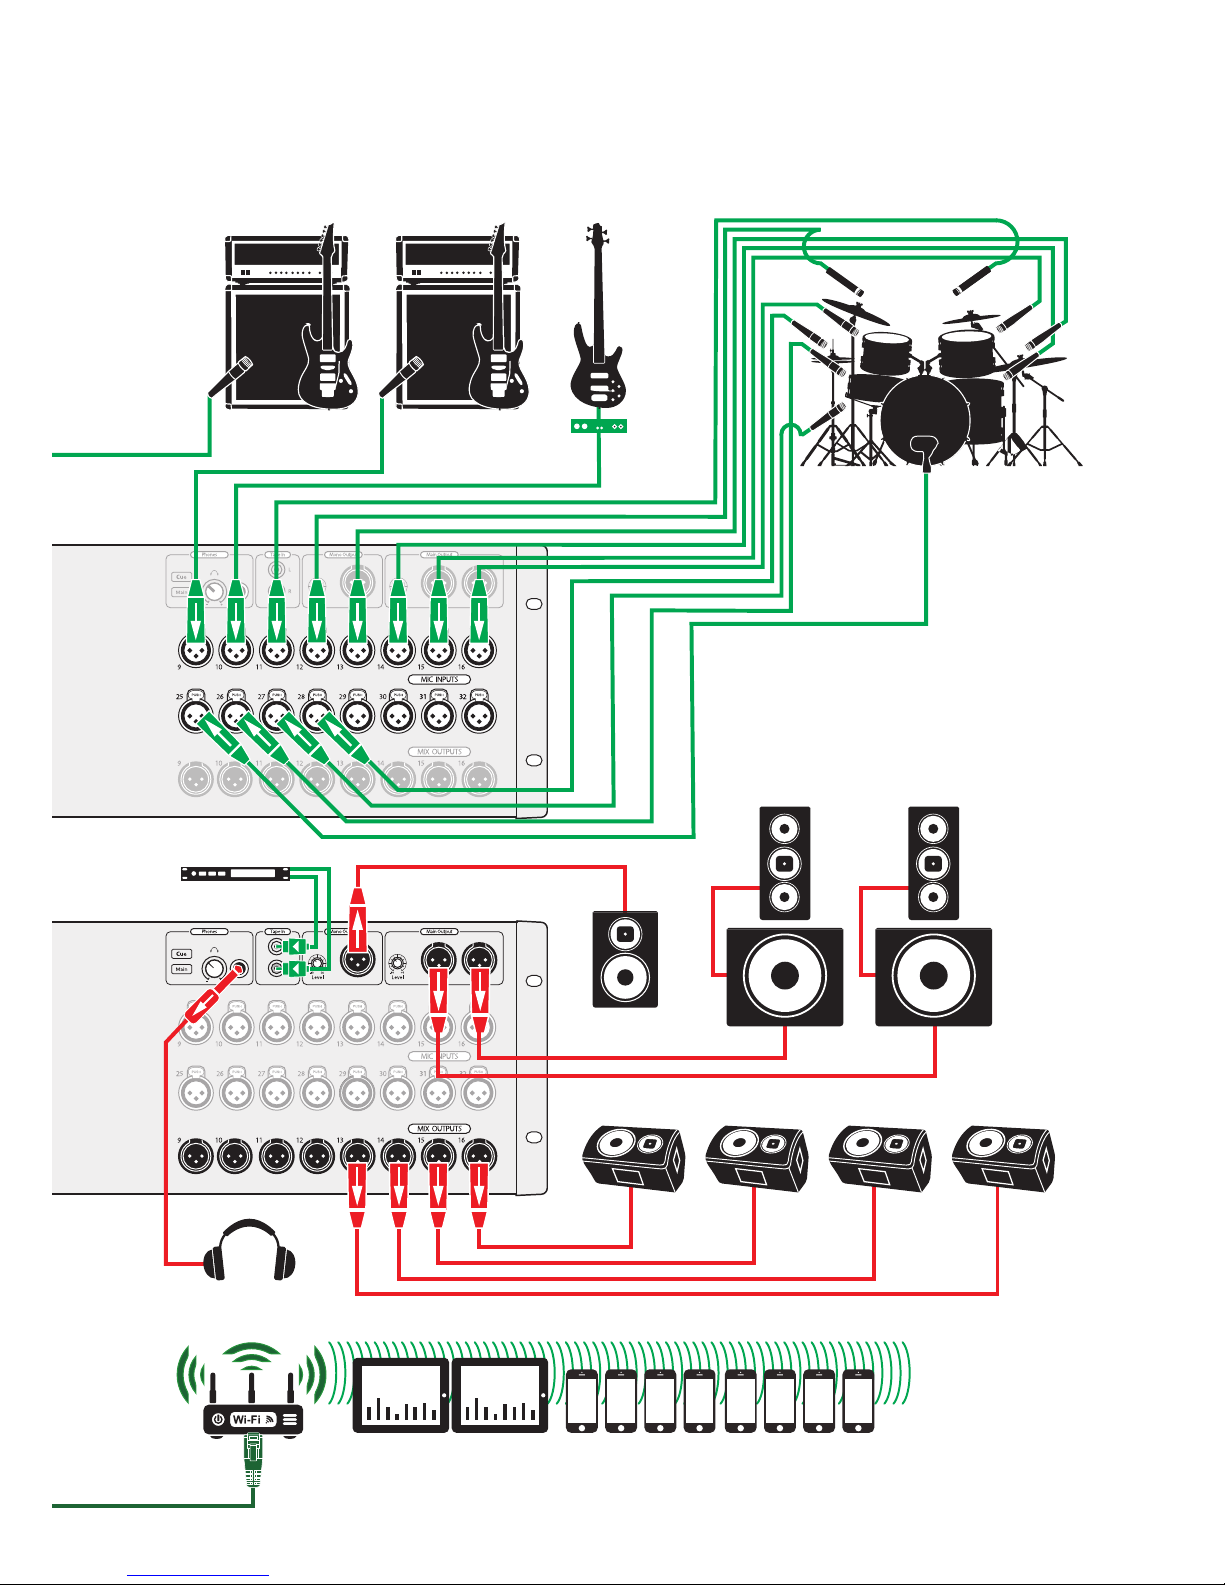
2.4 Typical Church Hookup
StudioLive™ RM-Series Mixers
Owner’s Manual
12
S800S800
S800S800
S800S800
S/PDIF
Control Output
S800S800
S800S800
S800S800
dvd player
wireless in-ear
(lead guitar)
wireless in-ear
(bass)
wireless in-ear
(keys)
wireless in-ear
(lead vocals)
FireWire-equipped
laptop running
Capture 2.0
AI Mixer Option Card
headphones
keyboard/DI
piano
lead vocal
DI
Box
backup vocal mics
podium
mic
hanging
choir mics
acoustic
guitar/DI
electric guitar
amp (rhythm)
2.4 Typical Church Hookup
2.0 Hookup
2.4 Typical Church Hookup
StudioLive™ RM-Series Mixers
Owner’s Manual
13
dvd player
iPads running
UC Surface
iPhones running QMix-AI
oor wedges oor wedges
front of
sanctuary
speakers
cry room
subwoofers
headphones
DI
Box
drum kit
bass/DI
electric guitar
amp (rhythm)
electric guitar
amp (lead)

3.0 Installing the UC Surface Touch-Control Software
3.1 Minimum System Requirements
StudioLive™ RM-Series Mixers
Owner’s Manual
14
3.0 Installing the UC Surface Touch-Control Software
Before you do anything else, please register your StudioLive RM-series
mixer online at https://my.PreSonus.com so you can download and
authorize the included software, manuals, and video guides.
Your StudioLive RM series is more than a mixer; it’s a powerful suite of integrated
hardware and software solutions that take you from stage to studio to fans.
The following software is included with the StudioLive RM32AI and RM16AI.
• UC Surface battle-ready mix-control application
• QMix-AI personal monitor control
• Capture™ multitrack recording with virtual soundcheck
• Studio One Artist professional DAW
• Nimbit Free publishing and marketing account
3.1 Minimum System Requirements
General
• Wireless or wired network connection
• Internet connection
• For Capture and Studio One:
• FireWire s800 (IEEE 1394b) port
• Internal or external 7200 RPM storage drive highly recommended
• Monitor with 1280x800 resolution
Windows
• Windows 7 32-bit/64-bit or Windows 8 32-bit/64-bit
• Intel® Core® i3 (Core i5 or faster recommended)
• 4 GB of RAM or more
Mac
• Mac OS X 10.8 64-bit or later
• Intel Core i3 (Core i5 or faster recommended)
• 4 GB of RAM or more
iOS Devices
• iOS 7.03 or higher
• iPad Air
• iPad mini with Retina display
• iPad (4th generation)
• iPad mini
• iPad (3rd generation)
• iPad 2
3.2 Downloading UC Surface for iPad and QMix-AI
PreSonus’ UC Surface mix-control app for iPad and QMix-AI aux-mix control app for
iPhone/iPod touch are free downloads from the Apple App Store. You’ll need this
software to control your StudioLive RM-series mixer, so please download it now.
3.0 Installing the UC Surface Touch-Control Software
3.3 Wired Ethernet Control Setup
StudioLive™ RM-Series Mixers
Owner’s Manual
15
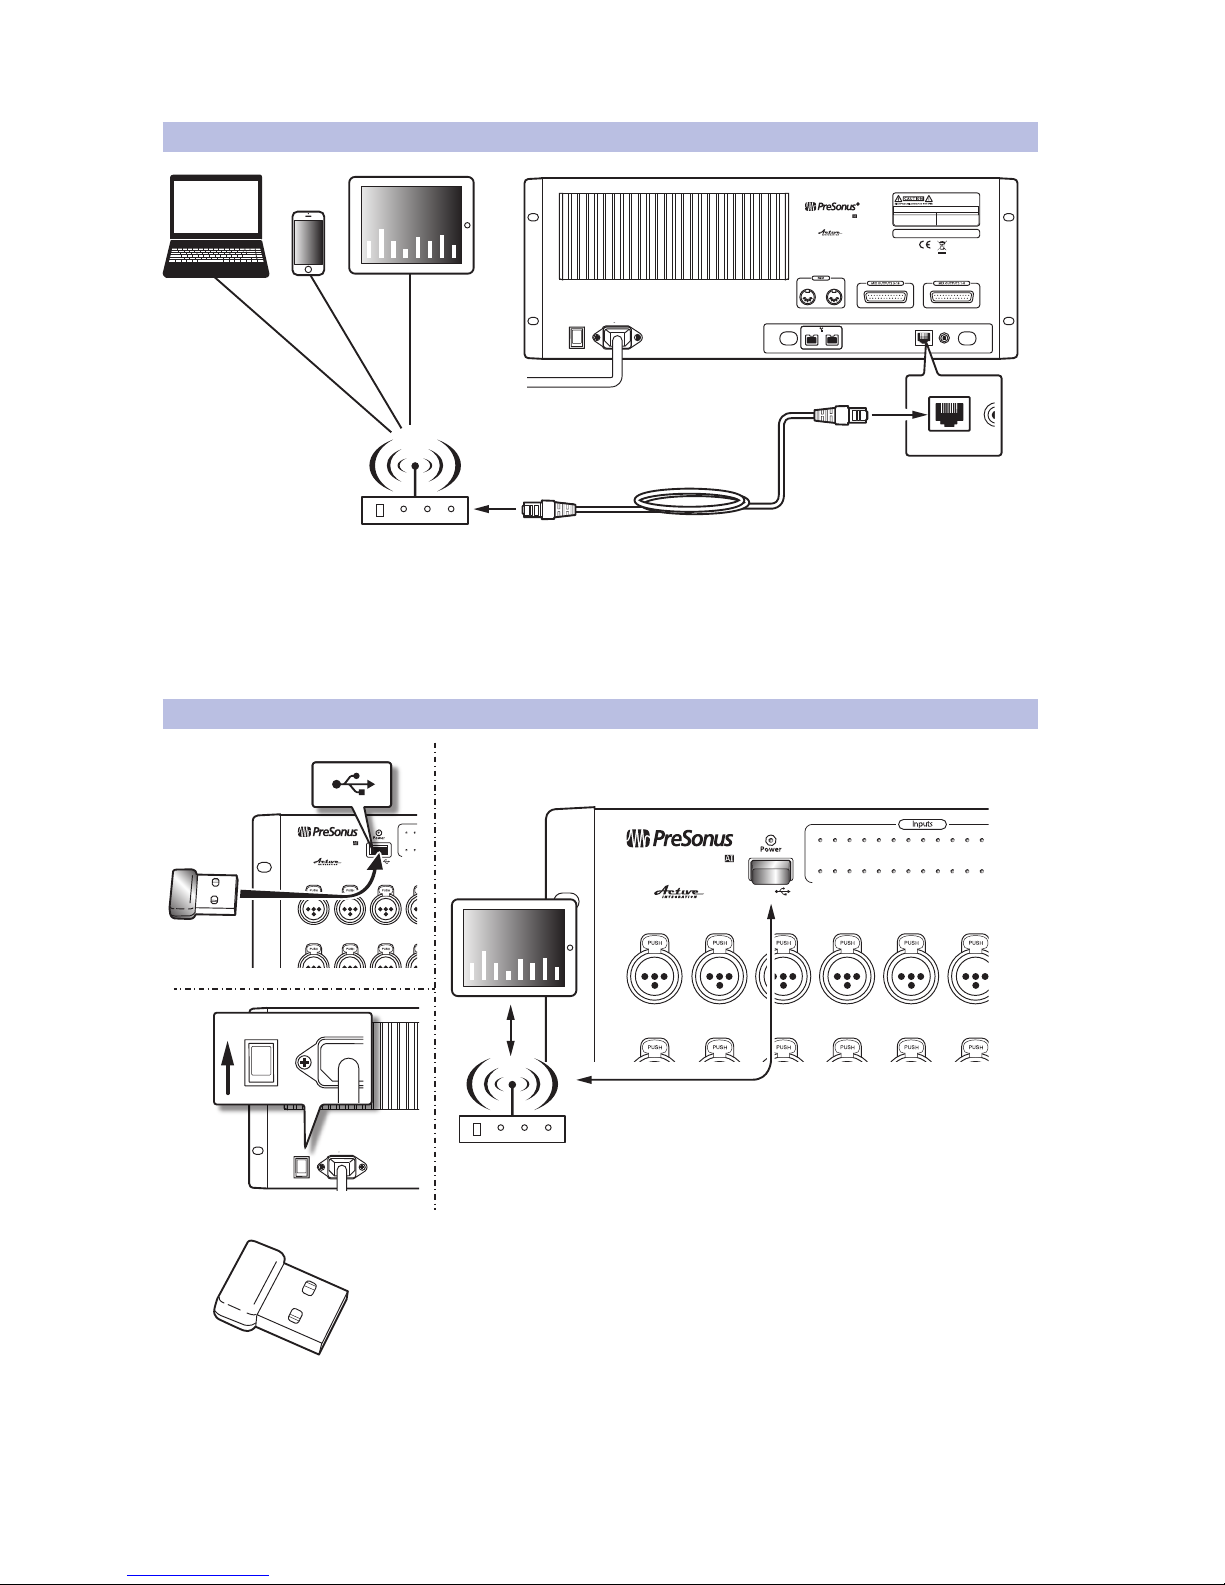
3.3 Wired Ethernet Control Setup
Your StudioLive RM32AI and RM16AI can be set up for control with a
wired Ethernet connection in seconds. Simply connect the included
Ethernet cable to the Ethernet control port on the back of the mixer and
to a network router that is also connected to your computer or iPad.
Power User Tip: When you launch UC Surface with the computer and StudioLive RM32AI
or RM16AI connected to the same network, the software will automatically see the mixer.
3.4 Wireless Control Setup
StudioLive AI mixers do not support hot-swapping the Wi-Fi LAN adapter so you
must have the adapter plugged into the front-panel USB port before turning on your
mixer.
By default, StudioLive mixers are configured to automatically connect to
a wireless network using the following username and password:
• Wireless network name: StudioLive
• Wireless network password: StudioLive
To connect to a custom wireless network, you first need to connect to the mixer
with a wired connection and configure the wireless network preferences.
POWER
100-230V , 50-60 Hz. 120W
MANUFACTURING DATE
SERIAL NUMBER
WARNING
:
TO REDUCE THE RISK OF FIRE OR E LECTRIC
SHOCK, DO NOT EXPOSE THIS EQUIPMENT T O RAIN OR
MOISTURE. DO NOT REMOVE COVER. NO USER SERVI CEABLE
PARTS INSIDE. REFER SERVICING TO QUALIF IED PE RSONNEL .
AVIS
:
RISQUE DE CHOC ELECTRIQUE — NE PAS OUVR IR
DESIGNED AND ENGINEERED BY PRESON US • MANU FACTURED IN CHINA • PATENTS PEN DING
“PreSonus”,“STUDIOLIVE” AND “ACTIVE INT EGRATION” ARE R EGISTERED TRADEMA RKS OF PRES ONUS AUD IO ELECTRO NICS
This device complies with Part 15 of the FCC Rules and ICES- 003 for Canada. Operation is subjected to th e
following two conditions: (1) this device may not cause harmful inter ference, an d (2) th is device mus t
accept any interference received, including interference that m ay cause un desired operation.
WARNING:
Power down unit before removing option card
32 channel x 25 bus digital mix core
with 32 remote XMAX preamps
R
STUDIOLIVE RM32
S800S800
S800S800
S800S800
S/PDIF
Control Output
S800S800
S800S800
S800S800
IN OUT
S/PDIF
O
utput
Ethernet cable
3.0 Installing the UC Surface Touch-Control Software
3.5 Computer Recording Setup
StudioLive™ RM-Series Mixers
Owner’s Manual
16
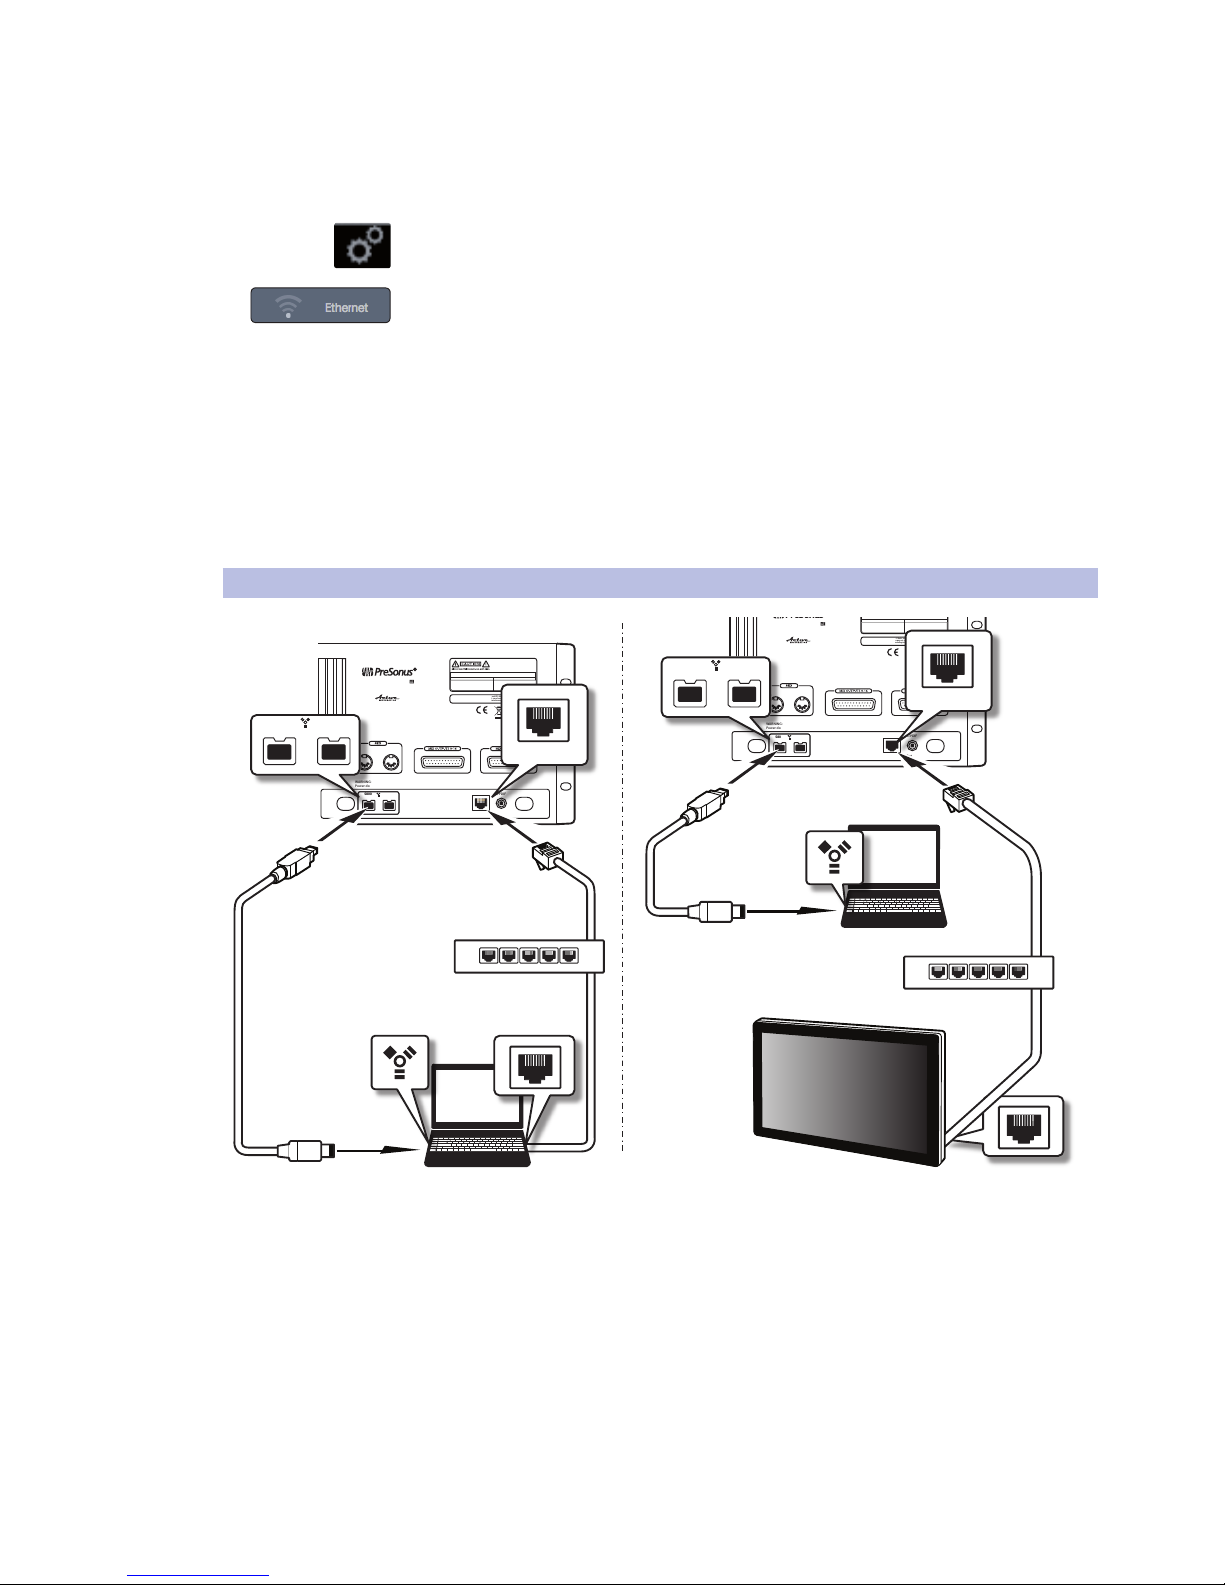
1. Connect to a wired control network, as described in Wired Ethernet control setup.
2. Launch UC Surface on a Mac or Windows computer or
iPad that’s connected to the same network.
3. Open the Settings page.
4. At the top of the settings page, select the wireless connection icon.
5. Choose the wireless network you would like to use from the list shown.
6. If a password is required you will be prompted to enter it.
7. You are now configured to connect to the new wireless network for control.
Every time you turn on your StudioLive AI mixer, if there is no wired
Ethernet connection, and the USB Wi-Fi dongle is plugged in, the
mixer will look for this network and attempt to connect to it.
Note: StudioLive AI only supports WPA and WPA2 security. Please be sure
that your router is configured using one of these security protocols.
3.5 Computer Recording Setup
StudioLive RM32AI and RM16AI have been designed for tight integration with the
included Capture and Studio One Artist software. You can record a live show quickly
and with confidence to Capture, save the StudioLive AI mixer scene with the Capture
Session, and then open that recording, complete with mixer scene, in Studio One.
The Studio One mixer will be set to match your StudioLive AI mixer scene,
including fader values, mutes, pan, and effects-send mixes. Fat Channel settings
will be loaded into Studio One’s Fat Channel Native Effects™ plug-in.
MANUFACTURING DATE
SERIAL NUMBER
DESIGNED AND ENGINEERED BY PRESON US • MANU FACTURED IN CHINA • PATENTS PEN DING
“PreSonus”,“STUDIOLIVE” AND “ACTIVE INT EGRATION” ARE R EGISTERED TRADEMA RKS OF PRES ONUS AUD IO ELECTRO NICS
This device complies with Part 15 of the FCC Rules and ICES- 003 for Canada. Operation is subjected to th e
following two conditions: (1) this device may not cause harmful inter ference, an d (2) th is device mus t
accept any interference received, including interference that m ay cause un desired operation.
WARNING:
Power down unit before removing option card
32 channel x 25 bus digital mix core
with 32 remote XMAX preamps
STUDIOLIVE RM32
S800S800
S800S800
S800S800
S/PDIF
Control Output
S800S800
S800S800
S800S800
IN OUT
S800S800
S800S800
S800S800
S800S800
S800S800
S800S800
MANUFACTURING DATE
SERIAL NUMBER
WARNING
:
TO REDUCE THE RISK OF FIRE OR E LECTRIC
SHOCK, DO NOT EXPOSE THIS EQUIPMENT T O RAIN OR
MOISTURE. DO NOT REMOVE COVER. NO USER SERVI CEABLE
PARTS INSIDE. REFER SERVICING TO QUALIF IED PE RSONNEL .
AVIS
:
RISQUE DE CHOC ELECTRIQUE — NE PAS OUVR IR
DESIGNED AND ENGINEERED BY PRESON US • MANU FACTURED IN CHINA • PATENTS PEN DING
“PreSonus”,“STUDIOLIVE” AND “ACTIVE INT EGRATION” ARE R EGISTERED TRADEMA RKS OF PRES ONUS AUD IO ELECTRO NICS
This device complies with Part 15 of the FCC Rules and ICES- 003 for Canada. Operation is subjected to th e
following two conditions: (1) this device may not cause harmful inter ference, an d (2) th is device mus t
accept any interference received, including interference that m ay cause un desired operation.
WARNING:
Power down unit before removing option card
32 channel x 25 bus digital mix core
with 32 remote XMAX preamps
R
STUDIOLIVE RM32
S800S800
S800S800
S800S800
S/PDIF
Control Output
S800S800
S800S800
S800S800
IN OUT
S800S800
S800S800
S800S800
S800S800
S800S800
S800S800
1
2
345
1
2
345
Ethernet
cable
Ethernet
cable
FireWire
cable
FireWire
cable
Network router
Network router
Touch screen
computer
3.0 Installing the UC Surface Touch-Control Software
3.5 Computer Recording Setup
StudioLive™ RM-Series Mixers
Owner’s Manual
17
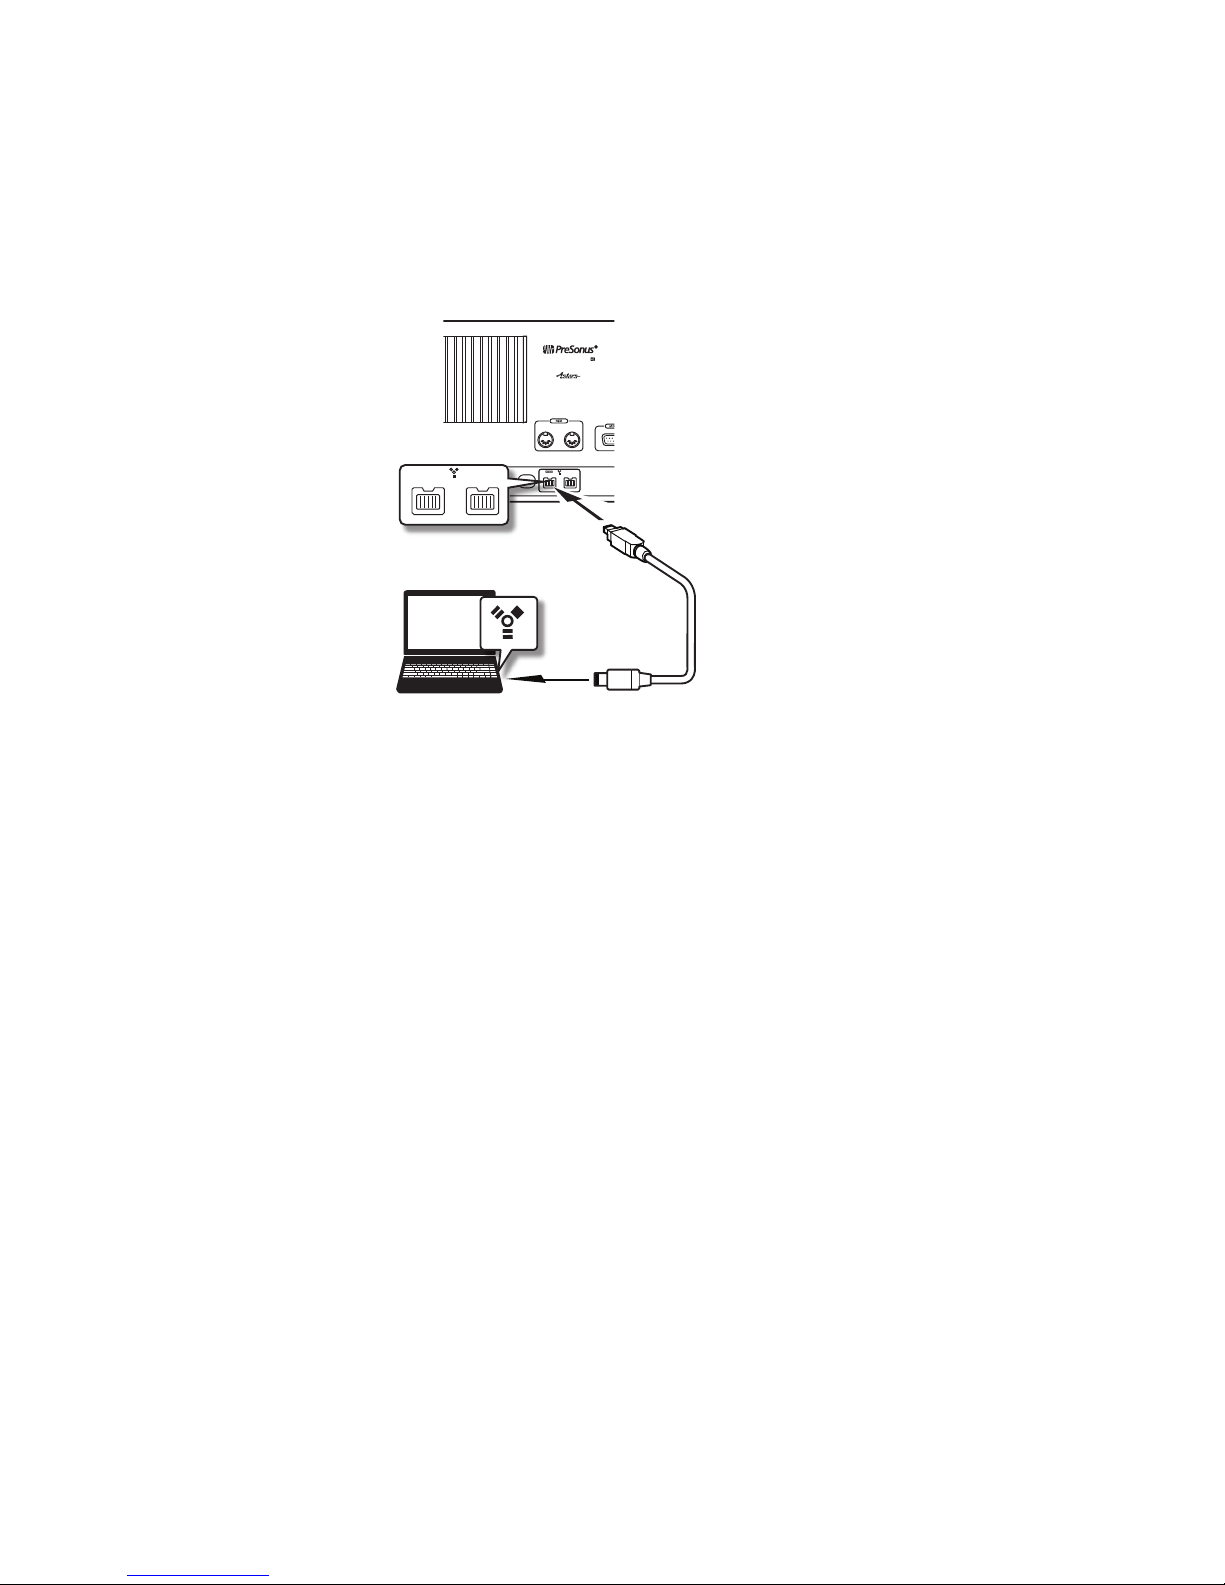
You can also use the StudioLive RM mixer as an audio
interface and monitor mixer for studio recording.
1. After registering your StudioLive RM mixer, download the Universal Control
installer for Windows or Mac from your My PreSonus account. This installer
includes the UC Surface mix-control software and necessary drivers.
2. Launch the installer and follow the onscreen instructions. When the
installer is finished, reboot your computer to complete the installation.
SERIAL NUMBER
WAR
SHOCK
MOIST
PARTS
AVIS
DESIGNED AND ENGINEERED BY PRESON US • MANU
“PreSonus”,“STUDIOLIVE” AND “ACTIVE INT EGRATION” ARE REGI S
This device complies with Part 15 of the FCC Rules and ICE
following two conditions: (1) this device may not cause
accept any interference received, including interference that
WARNING:
Power down unit before removing option card
32 channel x 25 bus digital mix core
with 32 remote XMAX preamps
R
STUDIOLIVE RM32
S800S800
S800S800
S800S800
S/PDIF
Control O
S800S800
S800S800
S800S800
IN OUT
FireWire 800
cable
S800S800
S800S800
S800S800
S800S800
S800S800
S800S800
3. When the installation is complete, connect your StudioLive mixer to your computer
with the included FireWire cable for audio and via Ethernet or Wi-Fi for control.
 Loading...