

Using USPS® Confi rmation Services
with Digital Mailing Systems
DM100i, DM125, DM225, DM200L, DM300c, DM400c, DM450c,
DM475, DP100i, DP200L, DP300C, DP400C, DP450C, DP475
Reference Manual

SV61156 Rev. F
June 2011
©2004, 2010, 2011 Pitney Bowes Inc.
All rights reserved. This book may not be reproduced in whole or in part in any fashion
or stored in a retrieval system of any type or transmitted by any means, electronically or
mechanically, without the express, written permission of Pitney Bowes.
We have made every reasonable effort to ensure the accuracy and usefulness of this manual;
however, we cannot assume responsibility for errors or omissions or liability for the misuse or
misapplication of our products.
Due to our continuing program of product improvement, equipment and material
specifi cations as well as performance features are subject to change without notice. Your
mailing system may not have some of the features described in this book. Some features are
optional and furnished at extra cost.
DM100i, DM200L, DM125, DM225, DM300c, DM400c, DM450c, DM475 and IntelliLink are
trademarks and Postage By Phone is a registered trademark of Pitney Bowes Inc. SECAP
is a trademark of SECAP, Inc. USPS and ZIP Code are registered trademarks and Certifi ed
Mail, Signature Confi rmation and Delivery Confi rmation are trademarks of the United States
Postal Service.

USING USPS®
C
ONFIRMATION
S
ERVICES
1. INTRODUCTION ..................................................2
2. A
BOUT USPS CONFIRMATION SERVICES ..............3
3. U
SING CONFIRMATION SERVICES—AN OVERVIEW ...8
4. S
TEP-BY-STEP INSTRUCTIONS .......................... 1 1
5. A
BOUT LABELS ...............................................22
6. T
RACKING MAIL ON THE INTERNET .....................24
7. F
REQUENTLY ASKED QUESTIONS ....................... 26

Digital Mailing Systems
1. Introduction
About this Book
Equipment
Covered
What You Should
Know
How to Use this
Book
This book explains how to use your mailing sys tem to take
full ad van tage of USPS
what these ser vic es are and how to use them.
This book provides instructions for using confirmation services with these mailing systems:
• DM100i, DM125, DM200L, DM225, DM300c, DM400c,
DM450c, and DM475.
• DP100i, DP200L, DP300C, DP400C, DP450C, DP475.
You should be thoroughly familiar with the operation of your
mailing system. Please refer to the op er at ing guides furnished with your equipment for com plete in struc tions. You
should also be familiar with the special ser vic es offered
by the United States Post al Service
pro vides general information about avail able confirmation
services. For the most current in for ma tion, visit the Postal
Ser vice’s web site at: www.usps.com
Please take a few minutes to read through this man u al and
familiarize yourself with the benefits of us ing your mailing
system as a gateway to the spe cial electronic ser vic es offered by the United States Postal Ser vice.
®
confirmation services. It explains
®
(USPS). This book
• Sec tion 2 de scribes these services in detail;
• Sec tion 3 pro vides quick instructions for using confirmation services;
• Section 4 has step-by-step instructions for all mailing
systems;
• Sec tion 5 explains how to apply and order la bels;
• Sec tion 6 tells you how to track your mail us ing the Internet; and
• Sec tion 7 has help ful an swers to a number of fre quent ly asked ques tions.
The USPS offers several services to confirm delivery of
™
your mail piece. Among these are Delivery Confirmation
™
Signature Confirmation
2
, and Certified Mail™.
SV61156 Rev. F
,

Using USPS® Confirmation Services
2. About USPS Confirmation Services
Delivery
Confirmation—
Green Label
Signature
Confirmation—
Pink Label
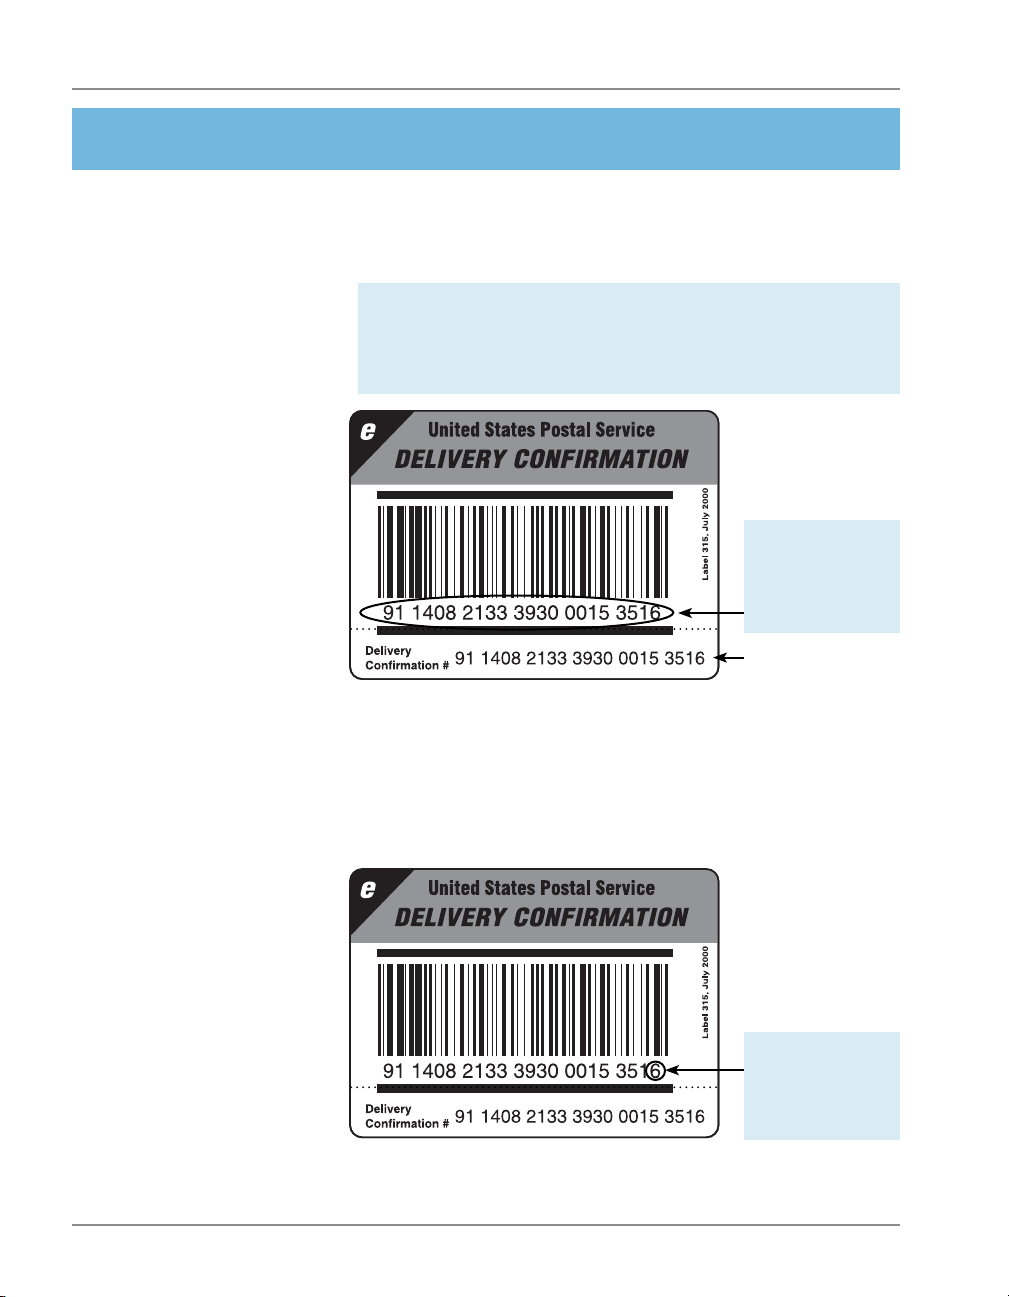
Delivery Confirmation allows you to verify the date and time
of delivery of your mail pieces or, if the de liv ery was un suc cess ful, the date and time of the delivery at tempt.
The service is currently available for First Class Mail parcels, Priority Mail parcels, Standard Mail parcels and Pack age Services parcels, which include Parcel Post, Library
Mail, Media Mail, and Bound Printed Matter.
You may combine Delivery Confirmation with other ser vic es
™
such as COD, insured mail, Registered Mail
ceipt for Merchandise, or special handling. Delivery Confirmation may be combined with restricted delivery or return
receipt, if purchased with either insurance for more than
$200, COD, or Registered Mail service.
There is no charge for Delivery Confirmation when you ship
by Priority Mail and provide an electronic file to the Postal
Service.
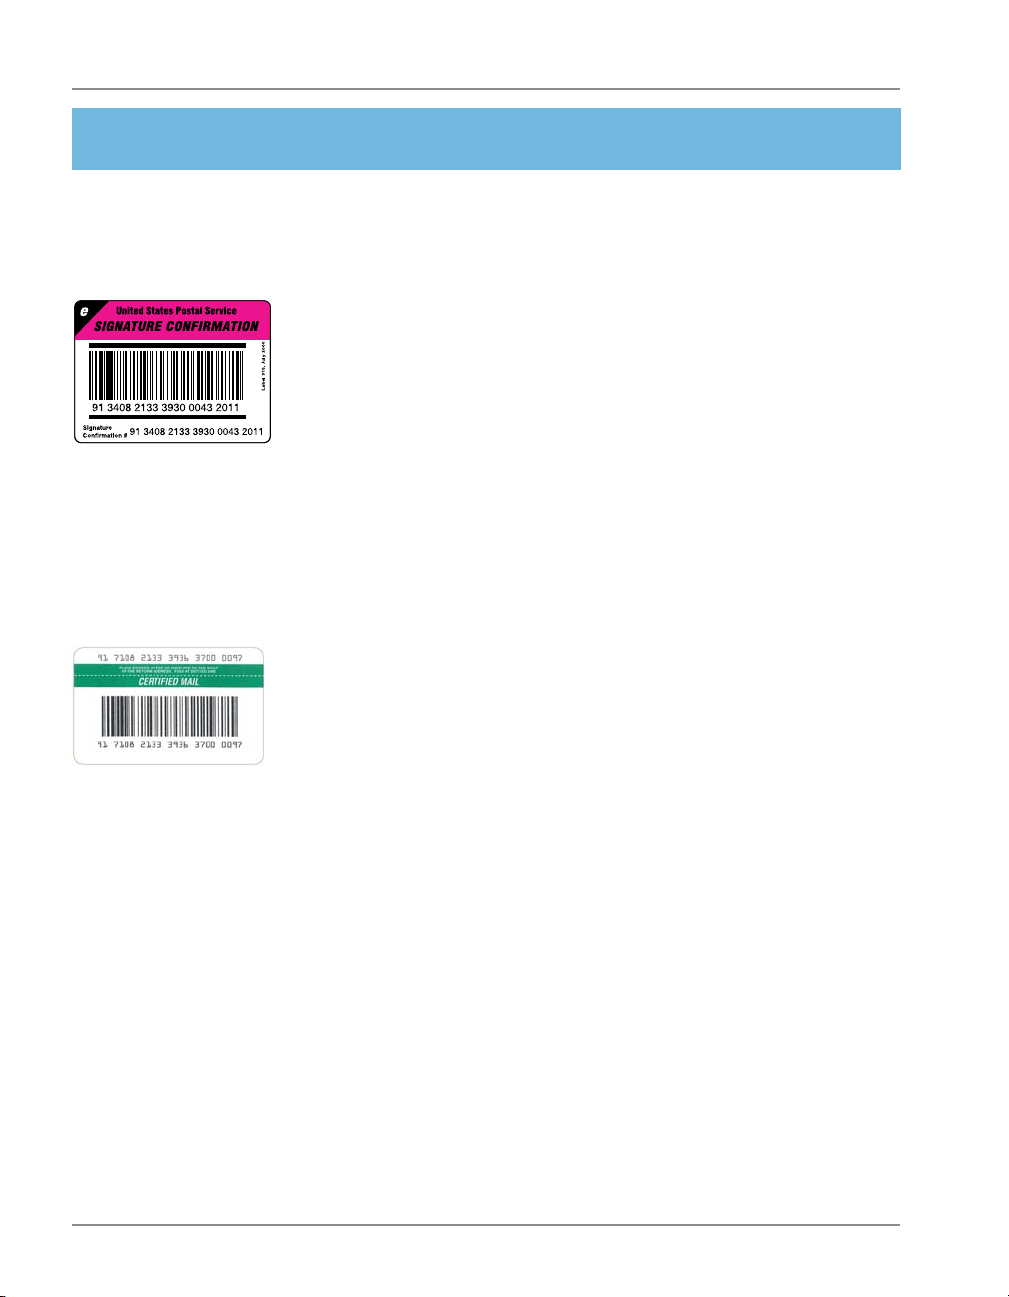
The USPS also offers a signature proof of delivery ser vice—Signature Confirmation. This provides mailers with
the first initial and last name of the re cip i ent, along with the
date, time and delivery ZIP Code.
This service is currently available for First Class Mail parcels, Priority Mail, and Package Services parcels which
include Parcel Post, Library Mail, Media Mail, and Bound
Printed Matter.
For se cu ri ty pur pos es, dig i tal sig na tures are not pub lic ly
dis played on the web site. You can get ac tu al sig na tures
from the USPS by fax, mail, or email.
This ser vice meets the needs of mailers who re quire a
sig na ture for high-value ship ments or who are spe cif i cal ly
con cerned with avoid ing fraud.
,Return Re-
SV61156 Rev. F
3
Digital Mailing Systems
2. About USPS Confirmation Services
Signature
Confirmation—
Pink Label (cont.)
Certified Mail—
Dark Hunter
Green Label
You may combine Signature Confirmation with COD Insured mail, Registered Mail, and special handling. It may
also be combined with restricted delivery if purchased with
insurance for more than $220, COD, or Registered Mail
service. This is an additional cost for Signature Confirmation service.
As an add-on ser vice to De liv ery Con fir ma tion, there is an
ad di tion al cost. When you upload (send) the trans ac tion
using your mailing system, the additional cost is slightly
lower than if your local Post Of fice han dles the transaction.
Certified Mail is a service offered by the USPS for a fee in
addition to postage, and may be combined with restricted
delivery and return receipt. This service is available for
Priority Mail and First Class Mail. Certified Mail provides a
delivery record that the Postal Service keeps for two years.
You can view the Certified Mail delivery record on the Track
and Confirm website at usps.com (see Section 6).
If you want hardcopy receipts or wish to specify restricted
delivery of your Certified Mail, there are options available
at your local Post Office (all at extra cost, payable to the
USPS). These are described below.
Return Receipts
Return receipt postcards are available from your local Post
Office.
When you buy the return receipt post card, sending a mail
piece by Certified Mail assures that you have legal proof of
receipt of the communication. The Postal Ser vice sends the
green return receipt post card back to you, the sender. This
is a very useful tool for collecting funds, re cov er ing checks
and making legal no ti fi ca tions. A return receipt for Certified
Mail serves as a le gal doc u ment prov ing the date and time
when the re cip i ent took pos ses sion of the mail piece.
4
SV61156 Rev. F

Using USPS® Confirmation Services
2. About USPS Confirmation Services
Certified Mail—
Dark Hunter
Green Label
(cont.)
HINT: Contact your
local Post Office or
www.usps.com for
conditions and fees
associated with Certified Mail options.
If you decide you want a return receipt after you’ve mailed
your Certified Mail piece, go to your local Post Office and
ask for this service. The Post Office will give you a scanned
image of the recipient’s signature, along with the date of
delivery. Be sure to provide the 22-digit barcode used on
the mail piece. There is a fee for this service.
Restricted De liv ery
You also have the option of requesting Restricted De liv ery
of your Certified Mail piece. This assures that only the spe cif ic person you sent the mail piece to can re ceive and sign
for it.
Certified Mail and Options
The Postal Service charges additional fees for the following:
• Certified Mail
• Return Receipt Requested at Time of Mail ing
Shows to whom the piece was delivered, the orig i nal
signature, date of delivery, and recipient's ad dress, if
different.
• Restricted Delivery
Only allows a spe cif ic person to re ceive and sign for
the mail piece.
• Return Receipt Requested after Mailing
Shows to whom the piece was delivered, scanned
sig na ture, date of delivery, and delivery address.
SV61156 Rev. F
For current fees, go to www.usps.com/prices or ask your
postal representative.
5

Digital Mailing Systems
2. About USPS Confirmation Services
USPS Forms
Obtaining a Mailer ID (MID) from USPS for
Electronic Return Receipt (ERR)
Meters that use an ERR (Electronic Return Receipt) feature must be programed with a MID number in order for the
mailer to receive e-receipt files from the USPS.
Before October 2010, the MID was requested from the
USPS via the 5053/5051 postal forms that were filled out
and faxed to the USPS. Now, an MID must be obtained
from the USPS via an online tool before the 5053/5051
forms are filled out and faxed to the USPS. The online tool
provides a new MID immediately, avoiding the up-to-72hours processing time it took previously.
Once this process is completed, the mailer can obtain ERR
signature files on My Account at www.pb.com.
To obtain a mailer ID (MID) from the USPS:
1. Go to www.usps.com
2. Select the Business Customer Gateway located on
the bottom right hand corner of the web page.
3. If you haven’t already, register as a new user to gain
access to the Business Customer Gateway.
4. Select the "Mailer ID" link to obtain a MID.
5. Enter the Mailer ID (MID) on USPS Form 5053 and/or
5051 (see next page) and fax to the USPS for recording.
6. Provide the Mailer ID (MID) to the Pitney Bowes Customer Service Representative upon system installation.
Form 5052, Printer Certification Submission
Customers who wish to complete print their own Delivery or
Signature Confirmation labels must complete this form.
6
SV61156 Rev. F

Using USPS® Confirmation Services
2. About USPS Confirmation Services
USPS Forms
PS Form 5051, Confirmation Services — Electronic
Option Application
This is an administrative application used to establish mailers in the confirmation services database. This form is
required of any customer who wishes to use Delivery Confirmation, Signature Confirmation or Certified Mail. Mailers
applying to use these services complete the application
and fax it to the number provided on the form or mail the
form to the address listed. A key element of the application
is the Mailer ID (MID) number for the company applying.
Form 5053, Bulk Proof of Delivery Application
Customers use this form to register for the Certified Electronic Return Receipt (ERR) service. Customers must
enter their 9-digit Mailer ID (MID) provided to them from
the USPS online tool (see previous page). This same MID
must also be entered into their postage meter to complete
the process.
Form 1357-S, Request for Computer Access
This is required only for those customers who wish to receive daily detail extract files from the USPS 16 times a
day. Such customers can update their own systems with
this tracking data.
SV61156 Rev. F
IMPORTANT! The application process cannot be completed
without Forms 5053 and 1357.
PS Form 109, Application to Print Special Services
Barcoded Forms/Labels
This form allows the USPS to verify your Mailer ID (MID)
number and check that your barcode printing software is
certified. This is for customers who want to print their own
certified labels. This form is required in addition to PS Form
5051.
7

Digital Mailing Systems
3. Using Confirmation Services—an Overview
How USPS
Confirmation
Services Work
HINT: When you use
De liv ery or Signature
confi rmation services
with your mailing system and send barcodes
elec tron i cal ly, you get a
discount on the cost of
the ser vice.
Remember: The dis-
count ap plies only if
you use the barcode la bels pro vid ed by Pitney
Bowes and send the
records elec tron i cal ly.
The diagrams on the next two pages show the con firm a tion
ser vic es process.
You be gin by applying a preprinted barcode label unique to
the specific service you desire. The barcode in each label
includes a unique Pack age Iden ti fi ca tion Code (PIC).
To process a mail piece, select the service and class of
mail you want, then enter the destination ZIP Code and
barcode num ber us ing your control panel’s nu mer ic key pad. Your mailing system stores a con fir ma tion data record
for each piece of mail you pro cess. It also prints the cor rect
post age on a tape strip or di rect ly on your en ve lope, then
prompts you for the next barcode.
Your mailing system sends con fir ma tion records to the
Data Center when you’ve fin ished pro cess ing, or when
you've pro cessed the max i mum num ber of piec es it can
store. Your mail ing sys tem also prints a re ceipt for each
trans ac tion.
You can drop the mail off any where mail is ac cept ed.
Using the Delivery Track ing System on our web site, you
can verify delivery of individual items at:
www.pb.com
See section 7. Tracking Mail on the Internet for more infor-
mation.
For complete description of confirmation services, see
USPS publication 91 available at:
www.usps.com
8
SV61156 Rev. F

Using USPS® Confirmation Services
3. Using Confirmation Services—an Overview
Before You Start
Make sure you have an adequate supply of pre -printed labels provided by your Pit-
ney Bowes or SECAP dealer (see Section 5 for ordering instructions). Please do not
use re tail la bels supplied by your Post Offi ce – they won’t work with your system.
Pre-Printed Label
(Correct)
Retail Label from Post Office
(Do NOT use)
X
• has “e” in upper left corner
• 22 digits for barcode
Be sure to se lect the green label for Delivery Confi rmation, the pink la bel for
Signature Confi rmation, or the dark hunter green label for Certifi ed Mail.
Make sure your mailing system is set up to connect to the Data Center, the
way you are normally connected when adding postage.
Note that confi rmation services are not available for In ter na tion al Mail, APO
or FPO mail, or for items ad dressed to U.S. territories, possessions, or freely
as so ci at ed states (with the exception of Puerto Rico and the U.S. Virgin Islands).
You should be thoroughly familiar with the operation of your mailing system
and electronic scale (if you’re us ing one). Please see the op er at ing guides
fur nished with your equip ment for com plete in struc tions.
• no “e” in upper left corner
• 20 digits for barcode
SV61156 Rev. F
9

√E-
e
Weigh the Envelope or Package
Weigh the mail piece on the scale.
1
Select Class
Select the class of mail, for example, Priority Mail.
2
Select Service
Select the service you want, for example, E-Del Con.
3
A check mark appears. Press Yes.
Enter Destination ZIP Code
4
Type in the 5-digit destination ZIP Code. Press Yes.
Enter Barcode
Enter the 22-digit barcode number from the Confirma-
5
tions Services label; then press Yes or select Continue.
If you have the optional hand-held scanner connected to your mailing machine, you can use it to scan
the barcode pattern instead of manually entering
the barcode numbers.
Apply Barcode Label
Apply the barcode label to your mail piece. If prompt-
6
ed, press Yes or select Continue.
Print Postage
Print postage on an envelope or tape.
7
SERVICES $3.85
SERVICES $3.85
√E-Del Con
Del Con
◄Insurance
◄Done
Enter Destination ZIP
Enter Destination ZIP
Code
od
Enter Barcode Number
from Label
More to Process?
Follow the prompts on your display to process more
8
Confirmation mail pieces.
Transfer Files
Follow prompts to upload records or wait to send
9
them when memory is full. If accounting is enabled,
system will prompt for account.

Using USPS® Confirmation Services
4. Step-By-Step Instructions
Using
Confirmation
Services –
All Models
The instructions below explain how to include confirmation
services for your mail piece.
1. Place the piece of mail or package on the scale.
2. Select the class (for ex am ple, Priority Mail) using the
corresponding selection key on the control panel.
3. At the Services screen, press down arrow key until you
see the confirmation service you want (for example,
E-Del Con). Select the service using the corresponding
selection key on the control panel.
NOTES:
• As soon as you select the service, a check mark appears in front of it. Other service options may no longer
appear.
• When using confi rmation services, you can not type
in the postage amount man u al ly. Your mailing system
au to mat i cal ly calculates the correct postage.
4. Select Done or press Enter.
5. If a destination ZIP Code has not yet been entered for
this transaction, the machine prompts you to enter it.
Use the numeric keyboard to enter the 5-dig it destination ZIP Code.
6. Select Continue or Accept.
SV61156 Rev. F
11
Digital Mailing Systems
4. Step-By-Step Instructions
Using
Confirmation
Services –
All Models (cont.)
7. If this is the first time you are entering a confirmation
service or you have just started a new package of labels, enter the 22-digit barcode number.
NOTE: If you have the optional hand-held scanner
connected to your mailing machine, you can use it to
scan the barcode pattern instead of manually entering
the barcode numbers.
Key in the
22-digits of
the barcode
number
You can peel
this portion and
apply it to your
own records.
If you’ve used the confirmation service before, the next
barcode value in the la bel series appears. At this point,
you can complete the barcode value by just entering
the last digit.
12
Key in the
last digit of
the barcode
number
8. When finished keying in the number, select Continue
or Accept.
SV61156 Rev. F

Using USPS® Confirmation Services
4. Step-By-Step Instructions
Using
Confirmation
Services –
All Models (cont.)
9. If prompted, apply the barcode label to the piece of mail
(see page 22 for information on label placement).
NOTE: Make sure to use labels in the order they come off
the roll. This ensures that the barcode label matches the
barcode in the system.
10. Select Continue. Insert the tape sheet or place the
piece of mail on the feeder to print postage. The postage is printed on the mail piece or tape sheet.
11. The display asks if you want to process another con-
firmation services item. Follow the prompts to proceed
with more confirmation services items. If you’re done,
select No.
SV61156 Rev. F
13

Digital Mailing Systems
4. Step-By-Step Instructions
Using
Confirmation
Services –
All Models (cont.)
HINT: If possible,
leave your mailing
system in a “ready to
connect” state for easy
uploads to the Data
Center.
IMPORTANT NOTE
FOR DM100i, DM200L,
DM125, DM225,
DP100i, and DP200L
Users: Your mailing
systems DO NOT support the ERR feature or
external printers.
HINT: Many fi nd it
handy to print a receipt
to record the recipient
with the tracking number. There are spaces
at the end of this guide
for you to paste the
USPS receipt for future
reference.
12. The system prompts you to upload the records. Select
Yes to upload. Make sure your mailing system is set
up to connect to the PB Data Center (the way you are
normally connected when adding postage). A “Sending
confirmation record. Please wait.” message (or
something) similar displays during the upload process.
13. If You Don’t Have the ERR Feature:
After uploading the records, the system prompts you
to print receipts. Insert envelope(s) or tape sheet(s)
to print the receipts. The system returns to the Home
screen when finished.
If You Do Have the ERR Feature:
The system asks if you want to print a postal manifest.
• If you have a printer, select Yes to print the manifest; select No if you don’t want a manifest.
• If you don’t have a printer, select No. You can print
receipts from the Reports menu. Select Confirma-
tion Records, Last Set Receipts.
14
SV61156 Rev. F

Using USPS® Confirmation Services
4. Step-By-Step Instructions
DM100i, DM125,
DM200L, DM225,
and DP100i,
DP200L Systems
Only
MANAGE RECORDS
◄View Record
◄Add Record
◄Delete Manifest
Managing Confirmation Services Records
The instructions below explain how to manage confirmation
services records on your system.
1. Press Options.
2. Press Page Down twice and select Advanced
Features.
3. Select Manage Conf Records to display the Manage
Records screen. Press Page Down for more options.
NOTE: If this is the fi rst time you’re adding records on the
system, only the Add Record option will appear. The Delete
Record option will not appear until you have uploaded
records.
MANAGE RECORDS
◄Upload Records
◄Print Report
◄Print Receipt
4. Select the desired option. (See table below for a description of options.)
5. Press Home to return to the Home screen.
MANAGE RECORDS
◄Edit Record
* Option is displayed only if
there are records waiting to
be uploaded.
SV61156 Rev. F
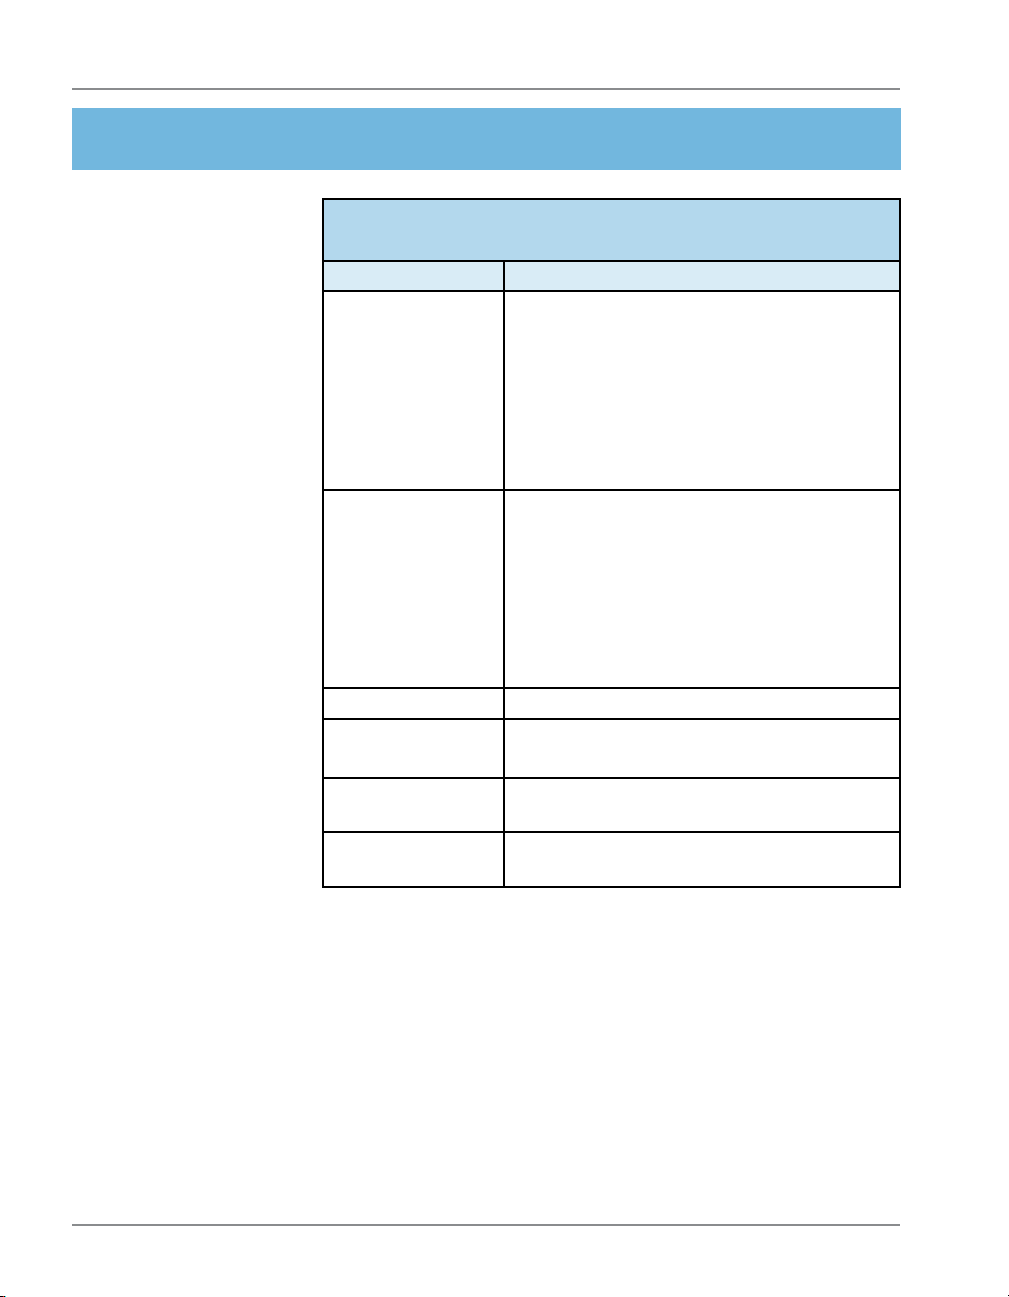
Manage Conf Records Screen
Description of Options
Option Description
View Record * Select to display a list of records by bar-
code numbers, then select the one you
want to view. The type of service (DELCON, for example) and the ZIP Code
are displayed when a record is selected.
Select Continue to return to the list of
records. Press Clear twice to return to the
Manage Conf Records menu.
15
Digital Mailing Systems
4. Step-By-Step Instructions
DM100i, DM125,
DM200L, DM225,
and DP100i,
DP200L Systems
Only (cont.)
Manage Conf Records Screen
Description of Options
Option Description
Add Record Select to add a new record (for a mail
piece that has had postage applied, but
you want to add a confirmation service to
it). The system prompts you to select a
class and fee, and enter the ZIP Code and
barcode number. It will then print postage
equal to the base class plus the confirmation service fee.
Delete Manifest Select to delete a group of uploaded re-
cords by date. A list of records by barcode
numbers display. Select the one you want
to delete. The details of the record are displayed and you are prompted to delete the
record. Press Yes to delete. Press Clear
twice to return to the Confirmation Records
menu.
Upload Records * Select to upload any pending records.
Print Report • Not manifested (records not uploaded)
• Manifested (records uploaded by date)
Print Receipt Select to print the last set of records that
were uploaded.
Edit Record * Select to edit the barcode or ZIP Code of a
records that has not been uploaded.
16
* Option is displayed only if there are records waiting to be uploaded.
SV61156 Rev. F

Using USPS® Confirmation Services
4. Step-By-Step Instructions
DM100i, DM125,
DM200L, DM225,
and DP100i,
DP200L Systems
Only (cont.)
HINT: Make sure your
mailing system is set
up to connect to the PB
Data Center, the way
you are normally connected when adding
postage.
Sending Confirmation Services Records at a Later
Time
Your system stores barcode records in memory. If your
mailing system’s connection to the PB Data Center was
not available when you created your confirmation records,
you can upload (send) them at a later time. Your sys tem
will also prompt you when you’ve pro cessed the max i mum
num ber of piec es the mem o ry can store—200.
NOTES:
• We recommend that you set up your mailing system to
connect to the PB Data Center (the way you are normally
connected when adding postage) and send (upload) your
confi rmation services records no later than the end of busi-
ness on the same day they were entered to meet USPS
requirements. Otherwise, you will not be able to view the
records on the USPS or delivery tracking system web sites
and it may cause delays in processing your mail.
• When the maximum number of records are reached (200),
the system prompts you to upload records. If you choose
not to, you can continue to run mail, but you cannot use
confi rmation services. When the system wakes up, it will
remind you to upload records.
MANAGE RECORDS
◄View Record
◄Add Record
◄Delete Manifest
SV61156 Rev. F
To send your records at a later time:
1. Press Options.
2. Press Page Down twice and select Advanced Fea-
tures.
3. Select Manage Conf Records. The Manage Records
screen is displayed.
MANAGE RECORDS
◄Upload Records
◄Print Report
◄Print Receipt
MANAGE RECORDS
◄Edit Record
17

Digital Mailing Systems
4. Step-By-Step Instructions
DM100i, DM125,
DM200L, DM225,
and DP100i,
DP200L Systems
Only (cont.)
4. Select Upload Records. The system dials into the Data
Center (this may take a few moments). Various screens
are displayed, letting you know the status of the process.
5. After uploading the records, you will be prompted to
print receipts. Insert envelope(s) or tape sheet(s) to
print the receipts. You return to the Home screen when
finished.
Special Services Report
This report provides a list of the last 200 mail pieces by
barcode number that had one of the USPS confirmation
services applied. Records that have not been uploaded
are one the Not Manifested report. Records that have been
uploaded are listed by date.
1. Press Reports.
2. Select Special Services.
3. When prompted, insert tape sheet or envelope into machine. The report is printed and you return back to the
Printable reports menu. If it is a multi-page report, you
will be prompted to insert another envelope/tape sheet.
4. Press Clear (back arrow key) to return to Report type
menu or press Home to return to the Home screen.
18
Barcode
1234567890
2345678901
Services
Printed: JAN 12 04 12 : 17P
Confirmation
Postage
001 . 480
001 . 480
ZIP
06484
06902
Uploaded
JAN 12 04
JAN 09 04
page 1 of 1
NOTE: The system holds in memory the last 200 records
processed with confi rmation services. As a result, the older re-
cords will “drop off” any list or report and be replaced by newer
records once 200 records have been reached.
SV61156 Rev. F

Using USPS® Confirmation Services
4. Step-By-Step Instructions
DM300c, DM400c,
DM450c, DM475
and DP300C,
DP400C, DP450C,
DP475 Systems
Only
Setting Up Confirmation Services
1. Press Menu.
2. Select Setup.
3. If necessary, press the green down arrow key to scroll
through the menu screens.
4. Select Confirmation Service. The screen below is dis-
played.
Display Following During
Confirmation Records
◄ Apply Labels :
◄ Upload Records :
◄ Print Receipt :
Done [Enter]
5. Select an option to toggle between "ON" and "OFF".
• Apply Labels — This option provides you with a
reminder to apply the confirmation service Label to
your package.
• Upload Records — This option prompts you to upload any records processed but not yet uploaded.
Prompts occur when completing a batch of confirmation service transactions, when waking from
sleep and at power up.
• Print Receipt — This option allows you to print receipts after uploading confirmation service records.
6. Press Enter when done.
ON
ON
ON
SV61156 Rev. F
19

Digital Mailing Systems
4. Step-By-Step Instructions
DM300c, DM400c,
DM450c, DM475
and DP300C,
DP400C, DP450C,
DP475 Systems
Only (cont.)
Managing Confirmation Records
1. Press Menu.
2. If necessary, press the green down arrow key to scroll
through the menu screens.
3. Select Advanced Features.
4. Select Confirmation Records. The Manage Confirma-
tion Records screen is displayed. You have a choice to
upload, add, view or edit records.
NOTE: If this is the fi rst time you’re adding records on the
system, only the Add Record option will appear. The Delete
Record option will not appear until you have uploaded
records.
Manage
Confirmation Records
◄ Upload Record
◄ View Record
◄ Delete Record
◄ Add Record
Manage
Confirmation Records
◄ Edit Record
20
A. If you want to upload a record, select Upload Re-
cord. Any available USPS records will be uploaded.
B. If you want to view a record that have not yet been
sent to the USPS, select View Record.
• Select the record from the list provided. The
View Details for Records screen is displayed.
• Select OK when done viewing the details.
SV61156 Rev. F

Using USPS® Confirmation Services
4. Step-By-Step Instructions
DM300c, DM400c,
DM450c, DM475
and DP300C,
DP400C, DP450C,
DP475 Systems
Only (cont.)
C. If you want to delete a record, select Delete Re-
cord. A list of records by barcode numbers is dis-
played.
• Select the record you want to delete. You are
prompted to delete the record.
• Select Yes, delete.
• If you want to delete additional records, select
Yes. If you do not want to delete additional records, select No.
D. If you want to add a record, select Add Record.
Follow the prompts to rate the mail again, i.e., select the class and fee and enter the ZIP Code and
barcode number. There is no option to print the added fee. The added record includes the base class
plus the confirmation services fee.
E. If you want to edit a record, press the green down
arrow key and select Edit Record. You can edit the
last eight digits of the barcode number and the last
two digits of the ZIP Code.
• Select the record you want to edit.
• To edit the barcode, select Barcode. Make the
necessary edits, and then select Accept.
• To edit the ZIP Code, select ZIP. Make the necessary edits, and then select Accept.
• Press Enter when done editing the record.
5. Press the Home key to return to the Home screen.
SV61156 Rev. F
21

Digital Mailing Systems
5. About Labels
Applying Labels
to Your Mail
Pieces
On Priority Mail
Front (No) Back (Yes)
On Packages
Whenever you apply a label to a package, place it on the
address side of the package. Place preprinted barcode
la bels either above the delivery address and to the right of
the return address or to the left of the de liv ery ad dress.
DO NOT cover the label with tape or plastic wrap. Barcode
scanners cannot read plastic wrap labels that are bent or
wrapped around the package. See the il lus tra tion below.
RIGHT
WRONG
Front
Certified Labels
22
SV61156 Rev. F

Using USPS® Confirmation Services
5. About Labels
Ordering
Additional
Preprinted Labels
Order your preprinted barcode labels directly from your
system supplier.
What to Order
Description Item Number
Delivery Confirmation Barcode
Labels—50 Pack
Signature Confirmation Barcode
Labels—50 Pack
E-Certified Barcode Labels—50
Pack
639-6 (No Charge)
639-9 (No Charge)
639-5 (No Charge)
DM100i, DM125, DM225, DM200L, DM300c,
DM400c, DM450c, DM475 Mailing Systems
There are several ways you can order labels for your
DM100i, DM200L, DM300c, DM400c, DM450c or DM475
mailing system.
To order labels online. Just point your browser to:
www.pb.com and click the Online Store tab.
You can also call the Pitney Bowes Supply Line at:
1.800.243.7824
Or send a fax to:
1.800.882.2499
Or an e-mail to:
supplies@pb.com
SV61156 Rev. F
DP100i, DP200L, DP300C, DP400C, DP450C,
DP475 Mailing Systems
To order labels for your DP100i, DP200L, DP300C, DP400C,
DP450C, or DP475 mailing system, contact SECAP at:
1.888.507.3569
23

Digital Mailing Systems
6. Tracking Mail on the Internet
Using the Internet
Use the Internet to make inquiries about individual ship ments. You’ll find tracking information at both the Pitney
Bowes and USPS web sites as ex plained be low. In for ma tion is post ed the evening of the date of de liv ery or at tempt ed delivery. It re mains avail able for thir teen months at
the Pitney Bowes web site, 180 days at the USPS site.
Use the Pitney Bowes web site to track your packages. You
will use your Postage by Phone® account number to display information about all the packages you send.
You may wish to provide one of your customers a tracking
number for a mail piece sent using a confirmation service.
This is an ex cel lent service you can provide your cus tom ers to as sure that an important package is re ceived.
To let a customer check the status of a package, give
them the tracking number and ask them to use the USPS
Track&Confirm site (www.usps.com). For pri va cy rea sons,
you should never give out your Postage by Phone account
number (as would be re quired to track a package on our
web site).
24
SV61156 Rev. F

Using USPS® Confirmation Services
6. Tracking Mail on the Internet
The Pitney Bowes
Web Site
1. Go to www.pb.com
2. If you a registered user, enter your user name and
password and click “login”. Otherwise, click on “My Account” to become a Pitney Bowes registered user. Create a username and password.
3. After logging on to My Account, click on “Delivery
Tracking System”.
• If the Delivery Tracking System option is not dis-
played, click on “My Account”.
• If this is the first time you accessing this feature,
you will be prompted to enter your Postage by
Phone® account number. Enter your number and
press Enter.
All recent transactions electronically uploaded by your mailing system are dis played with out having to en ter in di vid u al
tracking num bers. You can also con fig ure re ports by specifying a range of dates; or by clicking on a column heading to
sort by type of service, ship date, or delivery status.
If you need more information about a particular mail piece, or
to obtain a fax of a signature, click on the 22-digit barcode.
You’ll be linked directly to the USPS tracking site.
SV61156 Rev. F
25

Digital Mailing Systems
7. Frequently Asked Questions
About
Confirmation
Services
1. Do USPS confirmation services provide the op por tu ni ty for enroute tracking and tracing?
No. The Postal Service may perform enroute scans
but they are not a part of the Confirmation ser vice.
Track ing and tracing, which provide cus tom ers with
enroute information scanned at multiple points as well
as delivery information, is regularly provided only with
Express Mail.
2. Do First-Class Mail or Priority Mail guarantee delivery by a certain date?
No. You can use the USPS confirmation service to
confirm delivery date and time; but it doesn’t guar an tee de liv ery by a certain date and time. Express Mail
provides guaranteed delivery.
3. Can I combine confirmation services with other
spe cial services?
Yes, you can combine them with the following oth er
special services: Insured Mail, COD, Reg is tered Mail,
Return Receipt for Merchandise, Mer chan dise Re turn,
and Special Handling. Return Re ceipt and Re strict ed
Delivery Services are avail able when pur chased in
con nec tion with Insured Mail, COD (over $200), and
Reg is tered Mail.
26
You can now combine confirmation services with Cer ti-
fied Mail by using the Certified Service.
SV61156 Rev. F

Using USPS® Confirmation Services
7. Frequently Asked Questions
About
Confirmation
Services (cont.)
4. If I combine confirmation services with another
spe cial service, which article number do I use to
get information on my mailed item—the insured
mail number or the confirmation number?
Both numbers are valid for separate purposes. Use
the USPS confirmation services number to get de liv ery
status information through the USPS web page or our
web page. Use the insurance number for claims.
5. Can letter carriers accept confirmation services
pieces from customers if the label is affixed?
Yes, as long as the correct postage has been ap plied,
the confirmation services label is affixed to the mail
piece, and a return address is in clud ed on the mail ing.
6. How do I waive a signature on Signature Con fir ma tion?
Use Delivery Confirmation instead.
SV61156 Rev. F
27

Digital Mailing Systems
7. Frequently Asked Questions
Electronic Filing
of Certified Mail
1. What is the benefit of electronically filing Cer ti fied
Mail?
Similar to Delivery and Signature Confirmation, our
system transfers tracking in for ma tion about Cer ti fied
Mail to the Post Office. This information is matched
with actual delivery in for ma tion, and is sent back for
posting on our web site at:
www.pb.com
Using the Delivery Tracking System on our web site,
you have complete access to de liv ery information.
2. Can I use the information on the web site in court
as proof of mailing or delivery of a mail piece us ing Certified Mail, Delivery Con fir ma tion or Sig na ture Confirmation?
Our mailing systems provide quick and con ve nient
access to delivery information. We make no claims
regarding “legal proof” when you use our mailing prod ucts to process USPS Special Services.
3. Do I get a discount for electronically filing Cer ti fied
Mail using my mailing system?
28
No. A major benefit of using the mailing system is web
track ing of First-Class Mail. Prices for Cer ti fied Mail
are not discounted with elec tron ic filing (as is the case
with Delivery Confirmation and Sig na ture Con fir ma tion).
4. How much does a Return Receipt cost in addition
to First Class Mail and Certified Mail?
For the current prices, go to usps.com/prices/ .
SV61156 Rev. F

Using USPS® Confirmation Services
7. Frequently Asked Questions
Electronic Filing
of Certified Mail
(cont.)
5. Why would I use Return Receipt After Mailing?
After mailing, if you decide that you want a doc u ment
for proof of mailing, you can get a Return Re ceipt. The
cost for a Return Receipt after mail ing is higher than
one obtained at the time of mail ing.
6. Can I use the Certified Mail feature of the mailing
system if I need “Proof of Mailing”?
No. To gain “proof of mailing”, you must present Cer-
ti fied Mail at the Post Office. A Postal Service rep re sen ta tive will use a date stamp to cer ti fy that the mail
was accepted for delivery by the Postal Ser vice. This
can be important to mail ers who re quire legal proof of
mailing.
7. What classes of mail can I use Certified Mail with?
First-Class Mail and Priority Mail only.
8. Do I have to fill out any forms when using the elec tron ic filing feature of the mailing system?
No. However, you should maintain adequate in for ma-
tion about the mail piece for future ref er ence.
SV61156 Rev. F
29

Digital Mailing Systems
7. Frequently Asked Questions
Using the Internet
for Tracking
1. What if there is no delivery information available
when I visit the web site?
If there are no delivery or event scans in the sys tem
(attempted, forwarded, etc.), you will be told that there
is no record of that mail item. If you mailed the item
recently, it may not yet have a de liv ery scan. Try your
inquiry again later.
The absence of a delivery scan for a mail piece does
not necessarily mean the item wasn’t de liv ered. It's
pos si ble the piece was delivered but the scan wasn't
cap tured.
The Postal Service reports that its current scan rate
is approximately 95% nationally, and con tin ues to im prove.
2. What does it mean when the Internet response is:
“The system is unable to respond to that que ry.
Please try again later?”
The system is busy. As with any Internet system, per-
for mance can be affected by many outside in flu enc es.
If you receive a sim i lar mes sage, try again at a later
time.
30
3. Can I save the information to my hard drive?
Yes, you can save the Web page.
SV61156 Rev. F

1 Elmcroft Road
Stamford, Connecticut 06926-0700
www.pitneybowes.com
For Service or Supplies
SV61156 Rev. F 6/2011
*sv61156revF*
 Loading...