


Mailing Machines
Series
E589
Mailing Machine
Operating Guide
SV60975 Rev A 10/02

FCC Compliance - Mailing Machine
“Note: This equipment has been tested and found to comply with the limits for a Class
A digital device, pursuant to Part 15 of FCC Rules. These limits are designed to
provide reasonable protection against unwanted interference when the equipment is
operated in a commercial environment.
This equipment generates, uses, and can radiate radio frequency energy and, if not
installed and used in accordance with the instructions manual, may cause unwanted
interference to radio communications. Operation of this equipment in a residential area
is likely to cause unwanted interference in which case the user will be required to
correct the interference at this own expense.
“Shielded cables must be used with this unit to insure compliance with the Class A
limits."
Canadian DOC Compliance
This digital apparatus does not exceed the Class A limits for radio noise emissions
from digital apparatus set out in the Radio Interference Regulations of the Canadian
Department of Communications.
Le présent appareil numérique n’emet pas de bruits radioélectriques depassant les
limites applicables aux appareils numériques de la class A prescrites dans le
Règlement sur le brouillage radioélectrique édicté par le ministèr des Communications
du Canada.”
Due to continued product improvement, machine specifications may differ from those
in this publication.
Important Safety Information
In some countries the mailing machine is supplied with a molded mains lead (power
cord) and plug. In other countries, or if the supplied lead is not used, the following
information applies:
1. An approved mains lead for the country concerned must be used.
2. As the colors of the wires in the mains lead of this appliance may not correspond
with the colored markings identifying the terminals in your plug, proceed as
follows: The wire which is colored green and yellow must be connected to the
terminal in the plug which is marked with the letter “E” or by the earth symbol
or colored green or green and yellow. The wire which is colored blue must be
connected to the terminal which is marked with the letter “N” or colored black. The
wire which is colored brown must be connected to the terminal which is marked
with the letter “L” or colored red.
3. The wires in the supplied mains lead are colored in accordance with the following
code: green and yellow - earth, blue - neutral, brown - live.
WARNING - THIS APPLIANCE MUST BE GROUNDED.
The socket outlets should be near to the equipment and should be readily accessible.
SV60975 Rev A 10/02 ©2002 Pitney Bowes All rights reserved. Printed in U.S.A.

Contents
Contents
Safety Precautions ......................................................................... v
1 Introduction
About Your Mailing Machine ................................................ 1
Features ....................................................................................2
Control Panel ........................................................................... 4
Symbols.................................................................................... 4
2 Before you Run Envelopes or Print Tapes.................
3 To Print and Seal Envelopes
4 To Print a Tape
5 Adjustments and Supplies
Locking the Mailing Machine ................................................. 11
Locking the Meter.................................................................... 11
Removing the Postage Meter ...................................................12
Refilling the Tape Dispenser ................................................... 13
Filling the Fluid Bottle............................................................. 14
Replacing the Ink Cartridge ..................................................... 15
Adjusting the Ejector Rollers ..................................................16
............................................................. 9
...................................... 7
5
Adjusting the Feeder ................................................................ 17
Ordering Supplies .................................................................... 18
iii

Contents
6 Troubleshooting
Envelope/tape does not feed........................................................... 19
Multiple feeding ............................................................................. 19
Envelope does not seal ...................................................................20
Insufficient or partial sealing .........................................................20
Envelope does not eject ..................................................................20
Envelopes do not stay in catcher tray............................................. 20
Tape does not feed.......................................................................... 21
Postage imprint too light ................................................................ 21
Postage imprint incomplete or broken ........................................... 21
No postage imprint on envelope ....................................................22
Envelope jams in machine.............................................................. 23
Top of envelope creased................................................................. 24
7 Specifications
iv
.......................................................................25
SV60975 Rev A

Safety Precautions
Safety Precautions
When using this machine, follow the normal safety precautions for all
office equipment:
• Keep loose clothing, jewelry and long hair away from all moving
parts.
• Avoid touching moving parts or materials while the machine is in
use. When clearing a jam, be sure machine mechanisms come to a
stop before you open the front cover.
• Be certain that the area in front of the wall outlet that this machine
is plugged into is free from obstruction.
• To reduce the risk of fire and/or electrical shock, do not attempt to
disassemble this machine. If service is required, contact your
Pitney Bowes Customer Service Representative.
• The power cord wall plug is the primary means of disconnecting
the machine from the AC power. The wall outlet should be near
the machine and easily accessible.
• To protect against shock, the power cord should only be plugged
into a grounded wall outlet. The ground pin on the plug should
never be removed.
• To prevent overheating, do not cover vent openings.
• All areas of the machine requiring disassembly or removal of
covers should be accessed only by your Pitney Bowes Customer
Service Representative.
• Do not remove covers. This machine cabinet serves to enclose
hazardous parts. If the machine has been dropped or the cabinet
has been damaged in any way, notify your Pitney Bowes Customer Service Representative.
• Read all instructions before attempting to operate this equipment.
• Use this equipment only for its intended purpose.
In addition, follow any specific occupational safety and health standards
for your workplace or area.
SV60975 Rev A
v


Introduction
1 Introduction
About Your Mailing Machine
Your mailing system consists of two components that work together the Pitney Bowes mailing machine and a Pitney Bowes postage
meter. The mailing machine has a multi-thickness feeder.
Mailing Machine
• Controls the operation of the mailing system.
• Transports envelopes of various thicknesses.
• Gives you options for printing postage only, printing
postage and sealing the envelope, sealing only, or
printing a postage tape.
Postage Meter
• Installed on the mailing machine.
• Provides the postage value selection and imprinting.
Every country has its own regulations regarding the use of postage
meters. To find out about the regulations which apply to your postage
meter, check with the post office in your country.
Most countries operate the “Credit Locking” system whereby postage
credit is entered in the postage meter either at the post office or
remotely over a telephone line (Postage-by-Phone
system). These “Credit Locking” meters cease to operate when the
value in the postage unused (descending) register falls below a preset
value, depending on the meter being used.
Although this guide primarily covers the use of the mailing machine,
it also refers to the postage meter. Since several different Pitney
Bowes postage meters work with the mailing machine, the postage
meter you have may be different from the one pictured in this guide.
However, the general purpose and functionality of postage meters are
similar.
For specific information on your postage meter, see the operating
guide provided with the meter or call your local Pitney Bowes office
or dealer.
SV60975 Rev A
®
meter resetting
1
Introduction
Instruction
Cards
E589_001
Control
Panel
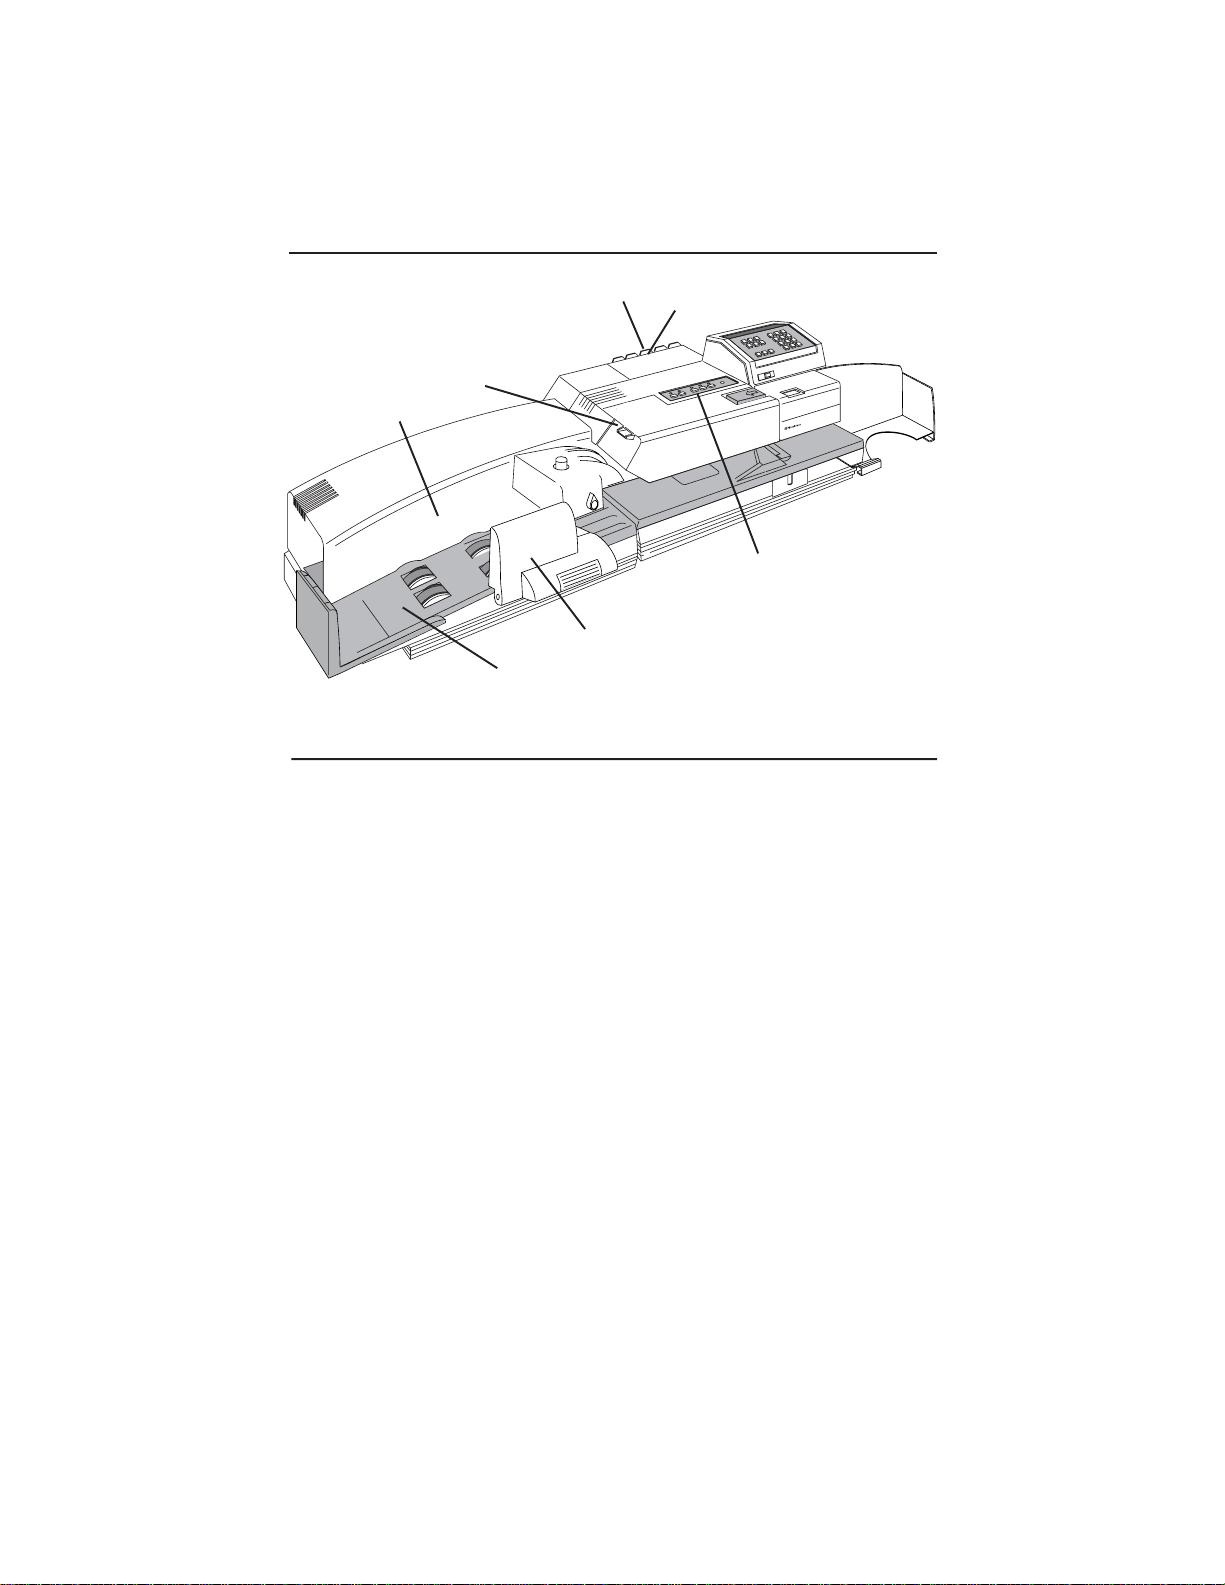
Features
Rear Wall
Strip Tape Holder
Strip Tape
Dispenser
Side Guide
Feeder
Feature Function
Feeder For feeding envelopes.
Side Guide Adjusts for envelope width to guide envelope
along feed deck. Lays flat for large envelopes or
flats. Pushes in for narrow envelopes.
Rear Wall Guides envelopes through the unit. Envelopes
must be kept flush against the wall when feeding.
Strip Tape Dispenser Automatically feeds strip tapes.
Strip Tape Holder Stores additional strip tapes.
Instruction Cards Pull up for quick reference.
Control Panel Controls operation of the mailing machine and
autofeeder. Press key for desired mode of
operation to begin processing mail.
Note: Machine remains in a sleep mode until
you press a key. The green power light will
remain on.
2
SV60975 Rev A
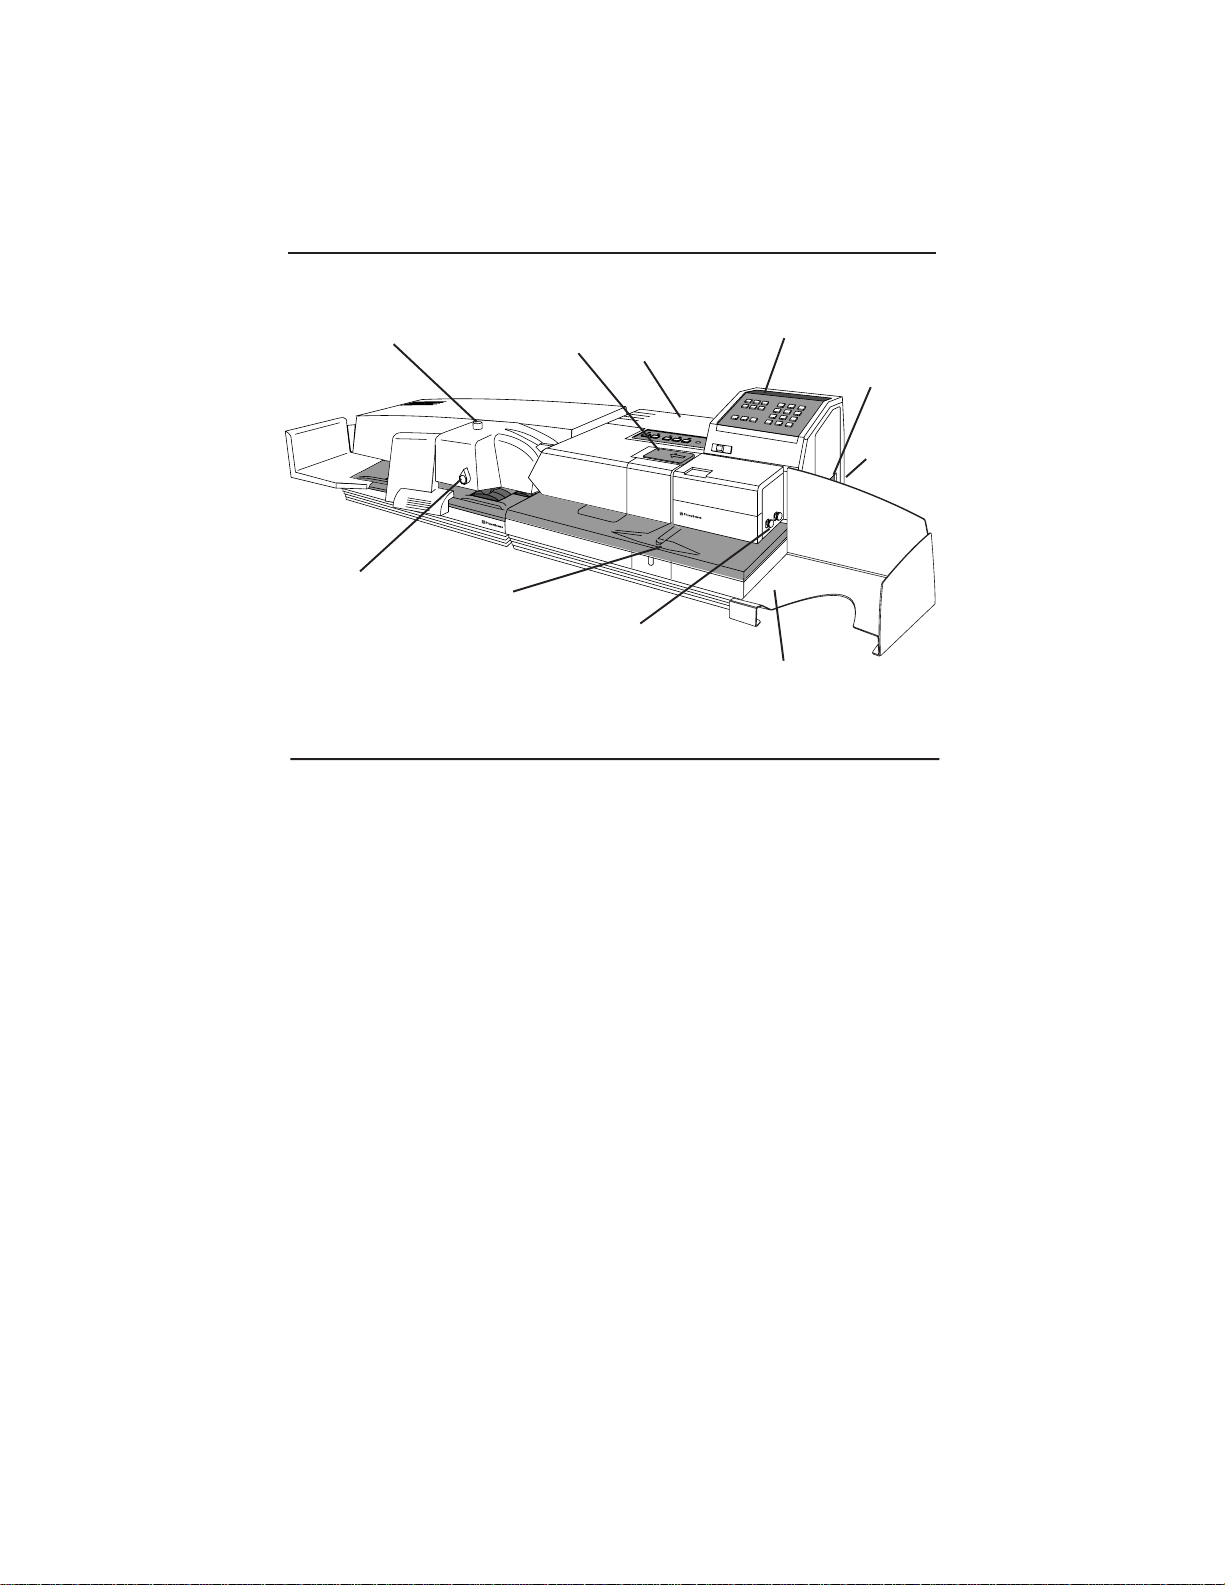
Top Tension
Knob
Ink Cartridge
Fluid Bottle
(under cover)
Postage Meter
Operate/Remove
Lever
Customer
Lock
Front Tension
Knob
Sealer
Brush
Ejector Roller
Adjustment Knobs
E589_002
Catcher Tray
Feature Function
Top Tension Knob & Allow finer adjustments to improve feeding of
Front Tension Knob
thinner or folded material.
Sealer Brush Moistens envelope flaps with E-Z Seal® solu-
tion.
Ink Cartridge Dispenses ink. Replace when postage becomes
faint.
Fluid Bottle Holds fluid for sealing envelopes. Pops up when
empty so user can refill bottle.
Postage Meter Prints and accounts for postage used.
Operate/Remove Used to install, remove, and lock the postage
meter. Lever
Customer Lock Locks and unlocks the Operate/Remove lever.
Catcher Tray Catches and stacks envelopes ejected from the
machine.
Ejector Roller Adjusts to help eject mail from the machine.
Adjustment Knobs
SV60975 Rev A
3
Introduction
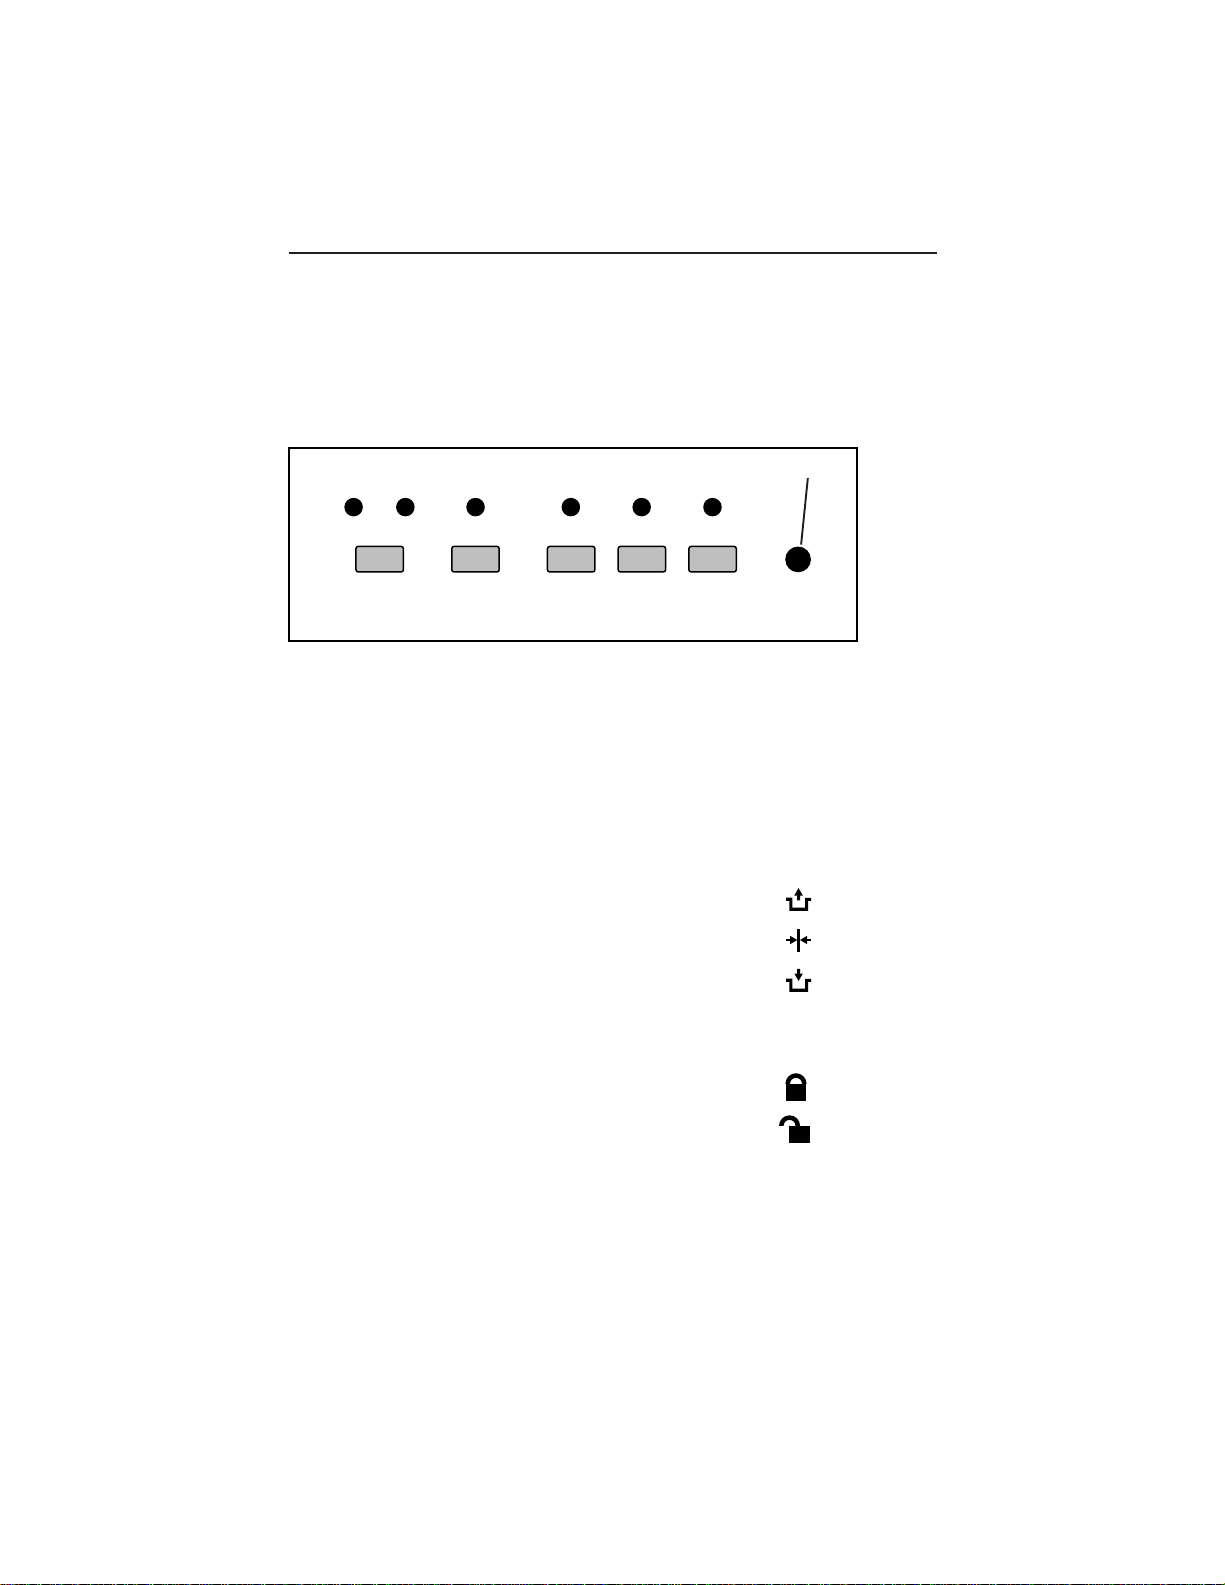
Control Panel
Your mailing machine has the control panel shown below. The Power
green light will light up when the machine is on.
Check
Check
Mailpiece
Meter
TapeClear
Print
Only
Print
+ Seal
Symbols
Operate/Remove Lever Symbols
The operate/remove lever symbols, located on
the right side of the machine, show whether
the lever for the meter is in the remove, lock,
or operate position.
(Green Light)
PowerSeal
Only
- Remove
- Lock
- Operate
Ink Cartridge Symbols
The ink cartridge lock and unlock symbols,
located on top of the machine by the ink
cartridge, guide you in removing and replacing
the cartridge.
4
- Lock
- Unlock
SV60975 Rev A

Before You Run Envelopes or Print Tapes
2 Before You Run Envelopes or Print Tapes
1. a. Connect the spider power cord as shown below.
b. Read the safety information on page v before
connecting the mailing machine. Make sure the wall outlet is near
the machine and is easily accessible. Connect the single power cord
from wall outlet to left rear of machine. The green Power light will
come on.
Female Plug:
Meter Power In
Mail Plug:
Power Out
Female Plug: Mail
Machine Power In
Viewed From Rear Of Mailing Machine
2. Install and set the date on the meter.
• Turn the key upright to the unlocked
• Move the operate/remove lever forward to
position.
the remove position
Female Plug:
Power In
.
E585_006
SV60975 Rev A
5

Before You Run Envelopes or Print Tapes
•Holding the meter by the carrying handle,
lower into place on the locating pins.
•Move the operate/remove lever back to
the operate position
• Set the date on the meter.
See pages 11-12 for information on locking
and removing the meter. For information on
using the meter, see the operating guide
provided with your meter.
.
6
SV60975 Rev A

To Print and Seal Envelopes
3 To Print and Seal Envelopes
ENVELOPES
1"– 2 "
1. Check that the fluid bottle has sufficient E-Z
®
Seal
solution.
2. Adjust the catcher tray to catch the envelopes
as they exit.
3. Select the desired postage by pressing the
key.
If the triple bars do not appear on your meter
screen, you have entered more than $1.00 or
another dollar limit set by you or your
Customer Service Representative. If you do
want to print postage above this set limit,
press the key again.
4. For 1/8" and thicker mail, tamp contents to
place material at lead edge of envelope.
k
c
t.
o
S
l R
m
k
ta
a
c
s
h
t.
o
g
ry
S
l R
C
in
m
k
5
k
ta
a
c
9
c
s
h
t.
7
o
u
k
g
6
ry
c
S
B
l R
C
in
t.
o
0
0
m
k
5
k
ta
5
T
a
c
S
9
c
s
0
l R
h
t.
7
o
u
C
m
1
k
g
6
ry
ta
n
a
c
S
B
s
l R
C
in
h
t.
o
w
0
0
m
5
k
g
ry
ta
5
T
a
S
9
c
s
0
l R
C
rto
in
h
7
u
C
m
1
5
k
g
6
ry
ta
te
n
a
9
c
B
s
C
a
in
h
7
w
u
0
0
5
k
g
6
ry
5
T
W
9
c
B
0
C
rto
in
7
u
0
0
C
1
5
k
6
5
T
te
n
9
c
B
0
a
7
w
u
0
0
C
1
6
5
T
W
n
B
0
rto
w
0
0
C
1
5
T
te
n
0
a
rto
w
C
1
W
te
n
a
rto
w
W
te
a
rto
W
te
a
W
SV60975 Rev A
5. Shingle a small handful of envelopes as
shown in the illustration to the left. Be sure
that the first envelope is positioned one to
two inches in front of the rest of the stack.
Place the envelopes face up on the feed deck
7

Check
Check
Meter
Mailpiece
Print
TapeClear
Print
Only
+ Seal
To print postage
and seal the envelope
Check
Check
Meter
Mailpiece
Print
TapeClear
Print
Only
+ Seal
To print postage only
Check
Check
Meter
Mailpiece
Print
TapeClear
Print
Only
+ Seal
To seal only
6. Adjust the side guide to fit the
envelope width. To find the
envelope width, place the
envelope on the deck and against
the rear wall. Adjust the
sideguide so that only 1/16" of
space is between the envelope
and the sideguide.
For larger mailers (9" x 12"), lay
plastic guide flat and raise
secondary metal side guide.
Adjust same way as above.
7. Select the mode by pressing one
of the keys as indicated in the
PowerSeal
Only
illustrations to the left.
Always feed already sealed
envelopes in Print Only mode.
Feeding sealed envelopes in
other modes may cause jams.
The envelope automatically feeds,
PowerSeal
Only
seals and prints.
If you selected to seal the envelope:
after the envelope ejects into the
catcher tray, apply pressure to the
envelope to finish sealing.
After the envelopes have been
processed, the mailing machine
PowerSeal
Only
automatically shuts off.
To feed more envelopes in the same
mode, press the desired mode.
If the Check Mailpiece or Check Meter lights are lit, correct the problem
and press Clear. Refeed the mailpiece. For details, see Troubleshooting,
section 6.
8
SV60975 Rev A

To Print a Tape
4 To Print a Tape
Use strip tape on envelopes thicker than 3/8 inch (9 mm) and on packages.
If your mailing machine is connected to a scale with an electronic
interface, you may be able to select the postage and print a tape directly
from the scale, depending on the model of your scale. See the scale
operating guide for more details.
To make tapes:
1. Select the desired postage. Press the key.
If the triple bars do not appear on your meter screen, you
have entered more than $1.00 or another dollar limit set by
you or your Customer Service Representative. If you do want
to print postage above this set limit, press the key again.
2. If no tapes are in the strip tape dispenser, insert a tape or
tapes (up to 50). (See page 13 for more specific instructions.)
3. Select the mode by pressing Tape.
Check
Check
Meter
Mailpiece
Print
TapeClear
Only
+ Seal
PowerSeal
Print
Only
The printed tape is ejected from the right side of the machine.
If you want to use both ends of the tape, you can run the tape
twice. First, run one end and remove the tape from the backing
and apply to an envelope. Then, reverse the tape and feed
the opposite end into the dispenser.
If you have an ad on your tape, you cannot feed the tape in twice
since the extra space is already used by the ad.
If the Check Mailpiece or Check Meter lights are lit, correct the problem
and press Clear. For details, see Troubleshooting, section 6.
SV60975 Rev A
9


Supplies and Adjustments
5 Adjustments and Supplies
Locking the Mailing Machine to Prevent Use
Locking prevents unauthorized use of the
machine. When you lock the machine to prevent
use, the meter cannot be removed and the
mailing machine does not operate. To lock the
mailing machine:
1. Turn the key upright to the unlocked position.
2. Move the operate/remove lever to the center
position
.
3. Turn the key clockwise to the horizontal
Locking the Meter
You can lock the meter so that the mailing
machine runs and the meter cannot be removed
from the machine.
1. Turn the key upright to the unlocked position.
SV60975 Rev A
locked position. Remove the key.
11

Supplies and Adjustments
2. Move the operate/remove lever to the rear
position
3. Turn the key clockwise to the horizontal
locked position. Remove the key.
.
Removing the Postage Meter
To remove the meter:
12
1. Turn the key upright to the unlocked position.
2. Move the operate/remove lever to the front
position
3. Remove the meter.
.
SV60975 Rev A

Supplies and Adjustments
Refilling the Tape Dispenser
To refill the tape dispenser:
1. Insert tapes into the slot paper side up. Do not
insert more than 50 tapes at one time.
2. Push the tapes until they cannot move farther
into the slot.
Store extra tapes in the tape holder at the rear of
the machine. See page 2 for the location of the
strip tape holder.
SV60975 Rev A
13

Supplies and Adjustments
Filling the Fluid Bottle
When the fluid bottle is empty, it will pop up from the well, displaying a
red stripe. You must refill the fluid bottle or envelopes will not seal.
To refill the fluid bottle:
1. Lift the fluid bottle up from the well.
2. Unscrew the cap.
3. Refill the fluid bottle with E-Z Seal®
solution.
E-Z Seal® solution is recommended to
minimize growth of algae and scale buildup.
14
4. Screw the cap back on.
5. Return the fluid bottle to the well.
SV60975 Rev A

Supplies and Adjustments
Replacing the Ink Cartridge
When the print becomes light, replace the ink cartridge, as follows:
1. Remove the postage meter. (See instructions
on page 12.)
2. Remove the old ink cartridge. Push to the left
until the cartridge pops up.
Use the finger grips on the sides of the
cartridge to pull the cartridge up and out.
SV60975 Rev A
3. Remove the protective cap from the new ink
cartridge. Hold the new cartridge by the
finger grips and lower it into the pocket.
Apply pressure downwards on the arrow until
the cartridge snaps into place.
15
Supplies and Adjustments
Adjusting the Ejector Rollers
If envelopes are not being ejected properly into the catcher tray, adjust
the ejector rollers.
1. Loosen the knobs on the right side of the
postage meter.
2. Adjust the knobs down until the steel rollers
under the postage meter just touch the rubber
rollers.
16
3. Tighten the knobs.
SV60975 Rev A
Supplies and Adjustments
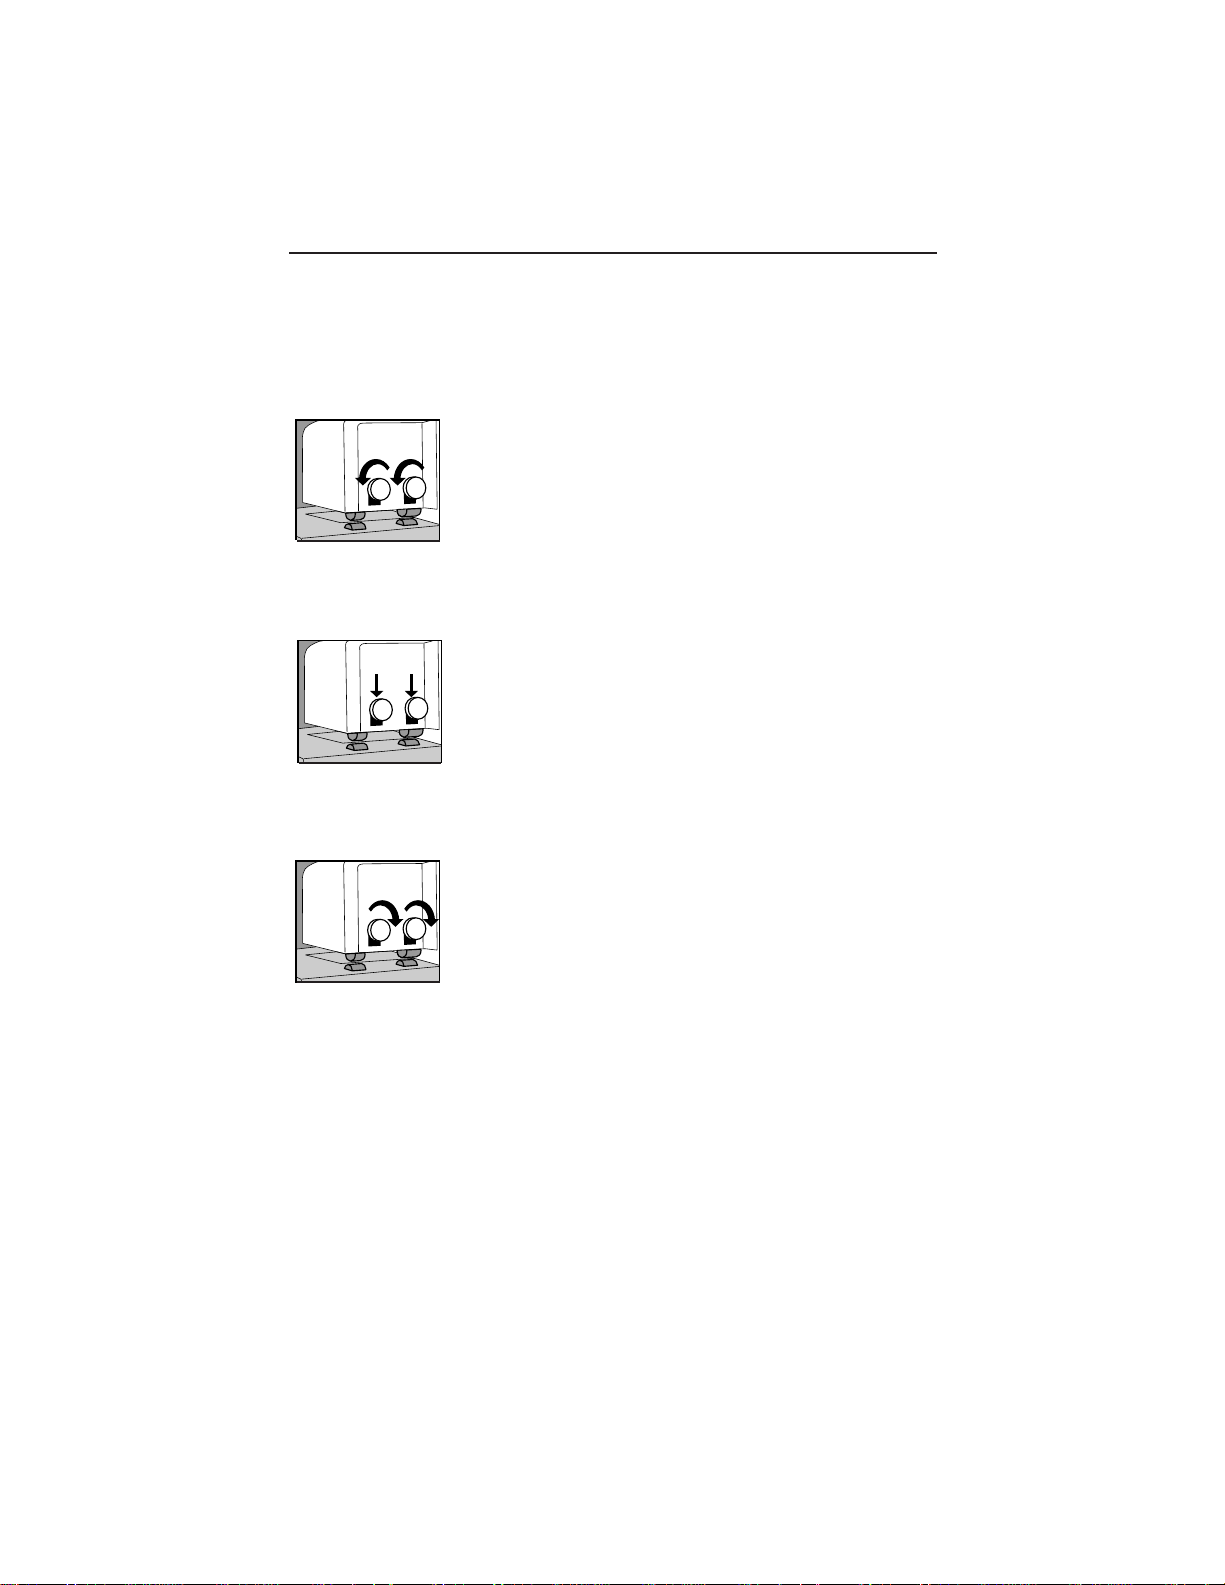
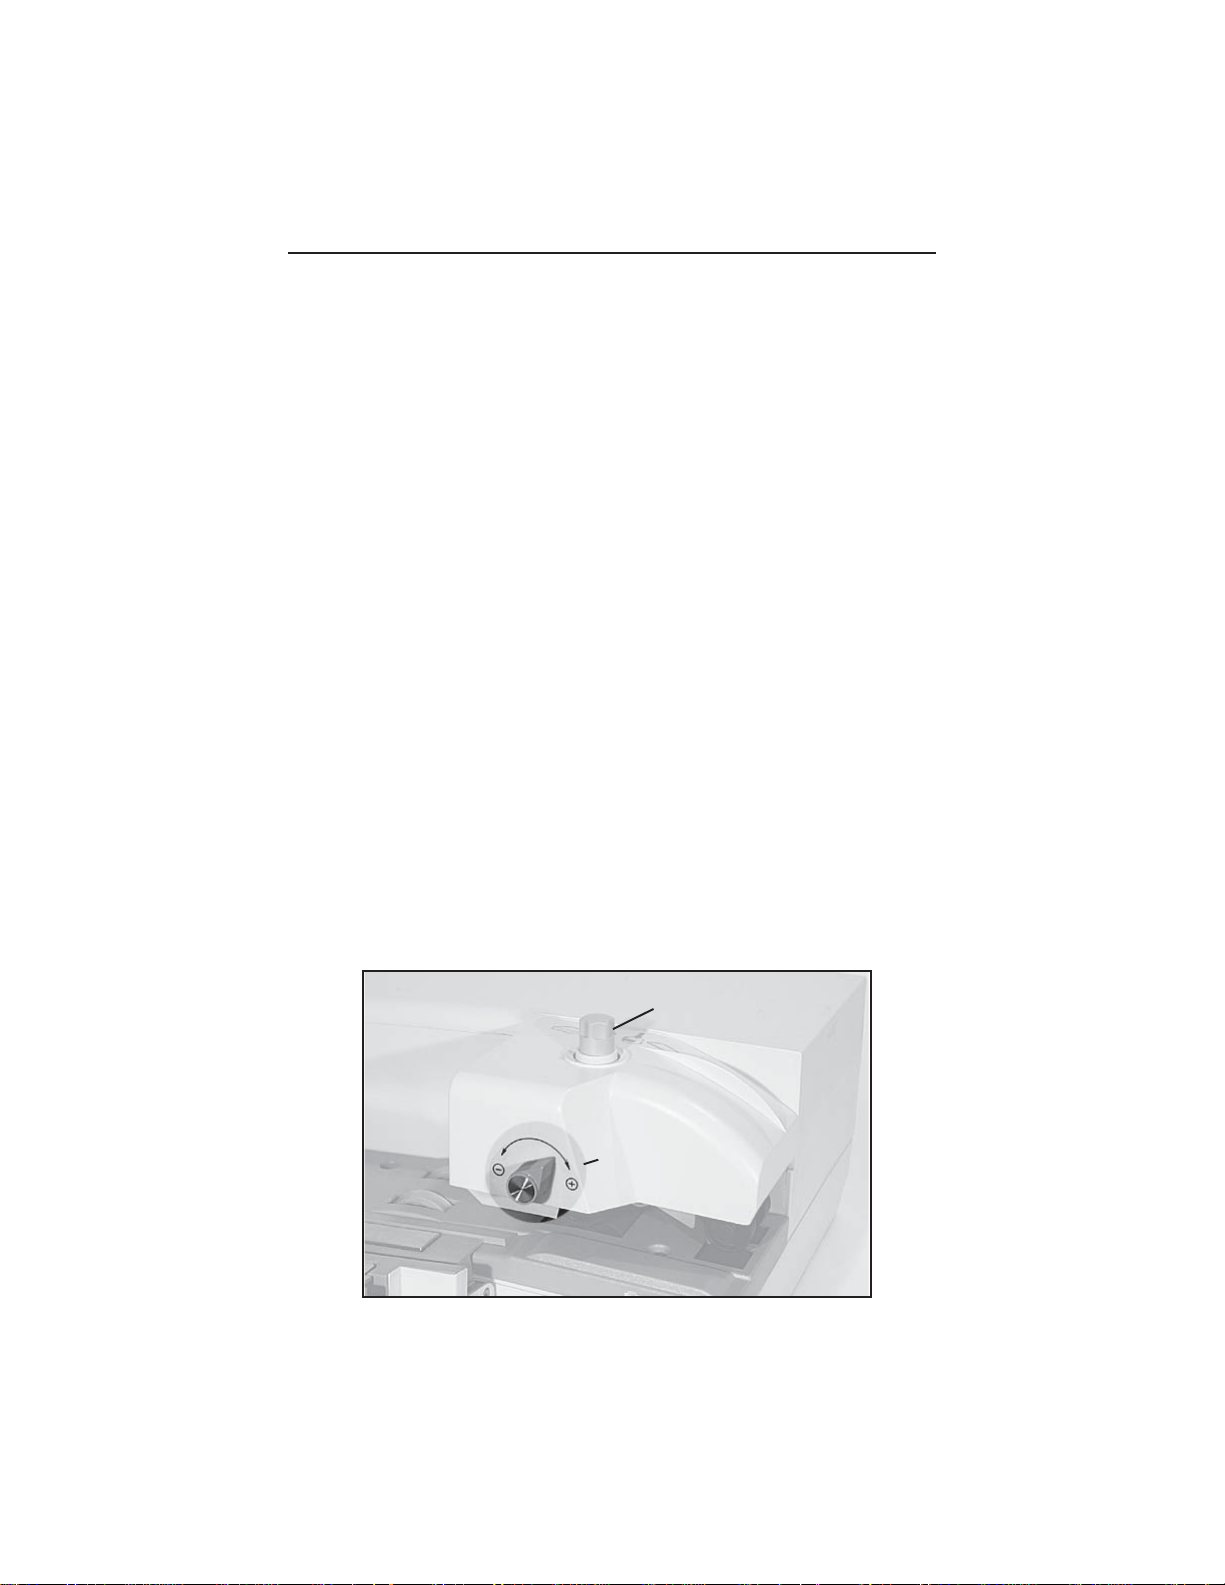
Adjusting the Feeder
For best feeding results with most media (including tri-fold material),
raise the top tension knob and turn the front tension knob to the plus (+)
sign.
For postcards, position the front adjustment knob to minus (-) and the
top tension knob down.
If envelopes are not being fed properly, you may have to adjust the
tension knobs as instructed below.
Top tension knob:
To correct double feeding, place the knob in down position. To put knob
in down position, push knob down, a little more than halfway, and rotate
counterclockwise until the knob locks in place.
For mail 1/8" to 3/8" thick: knob must be in up position. To put knob in
up position, push knob down and rotate clockwise until the knob pops
up.
Front tension knob:
For thin materials:
1. Adjust the front tension knob to the two o'clock position.
2. As the mail feeds, turn towards the plus (+) sign in small increments
until mailpieces feed properly.
When returning to regular mail thickness, reset knobs to previous
setting.
Top Tension Knob
Top Tension Knob
Front Tension
Front Tension
Knob
Knob
Feeder Adjustments
SV60975 Rev A
17

Supplies and Adjustments
Ordering Supplies
To order supplies in the United States, call the Supply Line at
1-800-243-7824. Please specify order numbers when calling.
Supply Order Number
Ink Cartridge 625-2
Strip Tape 625-0
®
E-Z Seal
(1/2 gallon)
In other countries, contact your local Pitney Bowes office or dealer.
Solution 601-0
18
SV60975 Rev A

6 Troubleshooting
Envelope/Tape Does Not Feed
Troubleshooting
Indicator Light
Power light off.
Power light flashing
with Check meter or
Check Mailpiece light
on.
Power light flashing
with no other indicator
light on.
Cause
No power to
machine.
Power cord not
connected.
A fault has
occurred.
Solution
Check that power cord is
plugged into both the
machine and the outlet.
Ensure that the power
cords are plugged in
properly. See the figure
on page 5.
Press the Clear button and
retry. If fault recurs, follow
troubleshooting for “Check
Meter” and “Check
Mailpiece”.
Disconnect power to the
mail machine and reconnect
it to the power. If the
problem persists, call
Customer Service at
1.800.522.0020
Multiple Or Double Feeding
Tension not properly
set.
SV60975 Rev A
Set the top tension knob to
its lower position. If still
not feeding properly, set
the front tension knob
between the (+) sign and
the two o'clock position as
explained on page 17.
When returning to regular
mail thickness, reset knobs
to previous setting.
19

Troubleshooting
Envelope Does Not Seal
Indicator Light
Print + Seal or Seal
Only
Indicator Light
Print Only
Cause
Fluid bottle is out of
E-Z Seal® solution.
Cause
User did not press Seal
Only or Print + Seal
before feeding envelope.
Machine reset to Print
Only after not being
used for more than 30
seconds.
Insufficient Or Partial Sealing
Indicator Light
None
Cause
Sealer brush dirty.
Envelope Does Not Eject
Solution
Add E-Z Seal® solution.
For more information see
page 14.
Solution
Press Seal Only and
refeed.
Solution
Lift tab and slide
sealer brush
toward you to
remove. Clean by
rinsing with
warm water.
Indicator Light
None
Cause
Catcher tray is full.
Ejector rollers not set
properly.
Envelopes Do Not Stay In Catcher Tray
Indicator Light
None
Cause
Catcher tray not
positioned properly.
20
Solution
Empty catcher tray.
Adjust ejector rollers.
For more information
see page 16.
Solution
Adjust catcher tray.
SV60975 Rev A

Tape Does Not Feed
Troubleshooting
Indicator Light
None
Check mailpiece
Power light blinks.
Cause
Out of tape.
Tape pack not fully
inserted.
More than 50 tapes
in slot.
Tape is jammed.
Postage Imprint Too Light
Indicator Light
None
Cause
Ink cartridge needs
replacing.
Solution
Add tape. For more
information see page l3.
Push pack in fully to solid
stop.
Remove some tapes.
Remove meter to clear
jammed tape. See page
12. Press Clear to reset.
Solution
Install new ink cartridge.
Do not reuse ink cartridge
or add ink. See page 15.
Postage Imprint Incomplete Or Broken
Indicator Light
None
SV60975 Rev A
Cause
Contents of envelope
not flush to top and
right edge of envelope
when postage printed.
Solution
Tamp contents to top and
right edge of envelope
before feeding.
21

Troubleshooting
No Postage Imprint On Envelope
Indicator Light
Check mailpiece
Check meter
Cause
Envelope was not
placed against rear
wall when fed.
Postage exceeds the
meter high value
lock level.
Not enough postage
credit left in meter.
Operate/Remove
Lever not in
Operate position.
Solution
Press Clear. Make sure
envelope is against rear
wall. Feed envelope. (If
the envelope was sealed,
press Print Only before
feeding.)
Press the green button
twice until triple Select
Postage bars appear. Press
Clear button on the
control panel.
For more information, see
your postage meter
operating guide.
Reset meter with postage.
Move lever to operate
position.
Seal Only
22
Meter dater door is
open.
Seal Only button
selected.
Close meter dater door.
Press Print Only. Refeed
envelope.
SV60975 Rev A

Envelope Jams In Machine
Troubleshooting
Indicator Light
Check Mailpiece
None
None
None
Cause
Envelope already sealed
when fed through on
Seal Only or
Print + Seal.
Envelope was thicker
than 3/8" (6mm) or fed
improperly.
Ejector rollers adjusted
too high.
Feeder sideguide
adjustment off.
The plate under the
mailing machine (shown
below) may be out of
place.
Solution
Gently pull envelope to
the left to remove. Be
sure to feed sealed
envelopes in Print Only
mode.
Press Clear and envelope will feed through
the machine.
Remove the meter and
any jammed or torn
pieces. Use tape for thick
envelopes.
Adjust ejector rollers
down. See page 16.
Check feeder sideguide
adjustment. Refeed mail.
Lift the two halves of the
mailing machine onto the
pins of the plate as
shown in the figure
below.
SV60975 Rev A
E589_003
Proper positioning of plate.
23

Troubleshooting
Top Of Envelope Creased
Indicator Light
None
Cause
Side guide not set
properly.
Solution
See step #4, 5 & 6,
page 7.
24
SV60975 Rev A

7 Specifications
Dimensions (excluding meter)
Specifications
Length: 34.5 inches (851 mm) without catcher tray
Depth: 15 inches (381 mm) (includes 4 inches for rear cable space)
Height: 7 inches (178 mm)
Weight: 38.1 pounds (17.3 kg)
45.5 inches (1156 mm) with catcher tray
Electrical
120V, 60Hz
Power Consumption
Normal: 300 watts Standby: 60 watts
2.5 amps max. processing mail no mail: .5 amps
Speed
Machine
speed: 110 cycles per minute for #10 envelopes
Normal Daily
Usage: 125 mailpieces per day
Envelopes
Size: Minimum*- 3.5 inches x 5 inches (89 mm x 127 mm)
Maximum - 10" x 13" (254 mm x 330 mm)
Thickness: Minimum - 0.007 inches (0.2 mm)
Maximum - .375 inches (9.5 mm)
Flap depth: Minimum - 1 inch (25 mm)
Maximum - 3 inches (76 mm)
* When the machine is in the seal-only mode, the minimum length must be 8 inches.
SV60975 Rev A
25

Specifications
Environmental
Operator
Idle 58 dB(A)
Metering 78 dB(A)
Seal only 76 dB(A)
Compliance
UL 1950
CSA 950
FCC Part 15 subpart B Class A
26
SV60975 Rev A
 Loading...