

Pitney Bowes dm475m series, dm400m series, dm300m series Operator's Manual
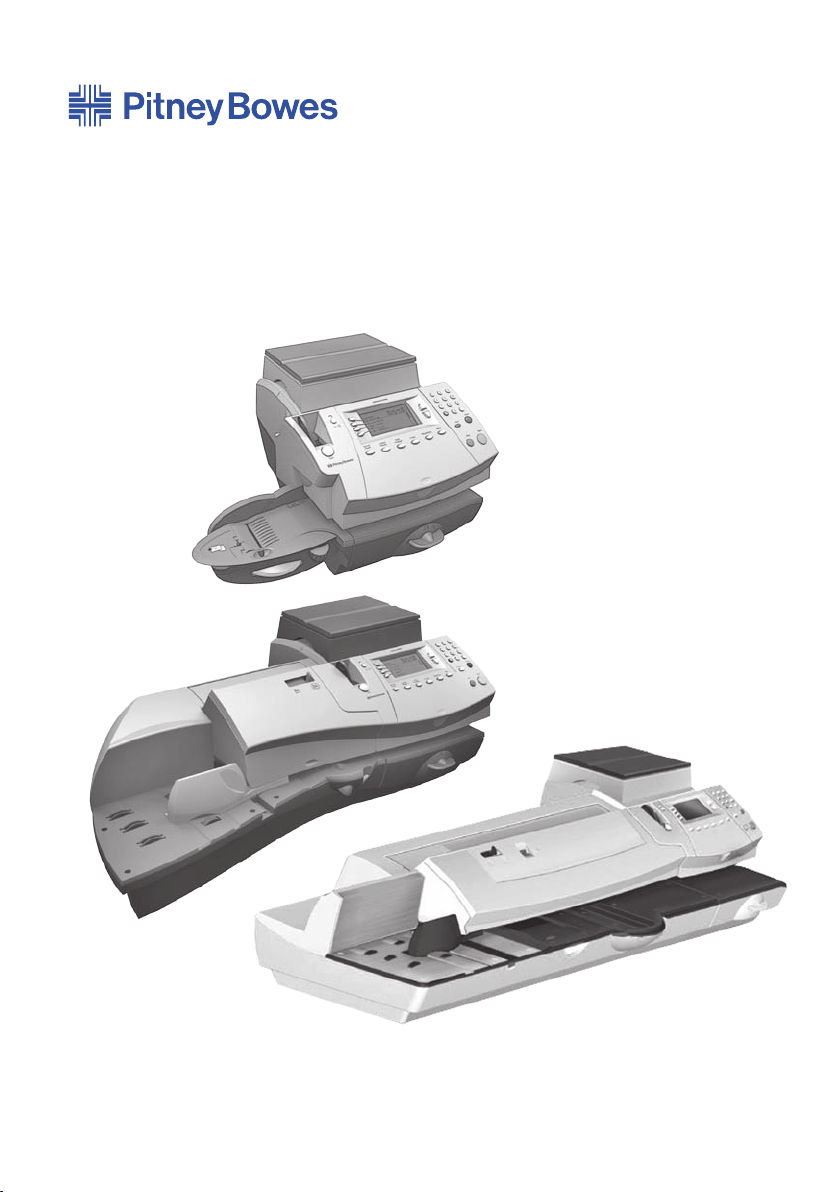
Digital Mailing System
DM300M, DM400M & DM475M series
Operator Guide
UK Version


Table of Contents
Chapter 1 Introduction
About Your Digital Mailing System .....................................1-2
About IntelliLink™ ..............................................................1-3
Postal Requirements .........................................................1-3
Safety ................................................................................1-4
Specifications ....................................................................1-6
Chapter 2 Getting to Know Your Machine
Machine Features–Front DM300M ....................................2-2
Machine Features–Front DM400M ....................................2-4
Machine Features–Front DM475M ....................................2-6
Control Panel .....................................................................2-8
Machine Features (DM300M/400c)–Rear .......................2-10
Machine Features (DM475M)–Rear ................................2-11
Moving the DM300M/400c ...............................................2-12
Warning: Do Not Move the DM475M by Yourself ............2-12
Chapter 3 Running Mail
Before You Begin ...............................................................3-3
Checklist ............................................................................3-3
Home Screen .....................................................................3-3
Selecting Postage .............................................................3-4
Using the Weighing Platform (Scale) ......................... 3-4
Standard Operation ............................................... 3-4
Differential Weighing ............................................ 3-5
Entering Weight Manually ......................................... 3-6
WOW® (Weight-on-the-way) & Pricing in
Proportion (DM475M) ................................................ 3-6
Surcharge Payments ................................................. 3-7
Parcelforce FrankPay ................................................ 3-7
Other Royal Mail Services ......................................... 3-7
Selecting an Account to Track Postage .............................3-8
Envelope Messaging .........................................................3-8
Advancing the Date on the Machine ..................................3-9
Checking and Clearing the Batch Count ........................3-10
Checking the Batch Count ....................................... 3-10
iSDC2036A

Table of Contents
Printing a Record of the Batch Count ...................... 3-10
Clearing the Batch Count ..........................................3-11
Printing Mail .....................................................................3-12
Manually Feeding Envelopes (DM300M) ................. 3-12
Automatically Feeding Envelopes
(DM400M/DM475M)................................................. 3-13
Printing Tapes .......................................................... 3-14
WOW® Mode (DM475M only) ................................. 3-15
Printing Options ...............................................................3-16
Seal the Envelope Only ........................................... 3-16
Printing Date & Time or Envelope Messaging on
Incoming Mail ........................................................... 3-17
Permit Printing ......................................................... 3-17
Text Messages .................................................................3-18
What is a Text Message? ......................................... 3-18
Selecting a Text Message ........................................ 3-18
Viewing a Text Message .......................................... 3-18
Creating a Text Message ......................................... 3-19
Delete a Text Message ............................................. 3-19
Edit a Text Message ................................................. 3-20
Edit a Text Message Name ...................................... 3-20
Chapter 4 Normal and Custom Presets
What is a Preset? ..............................................................4-2
Normal Preset ...................................................................4-2
Selecting the Normal Preset ...................................... 4-3
Viewing the Normal Preset ......................................... 4-3
Defining New Values for the Normal Preset ............... 4-3
Custom Presets ................................................................4-4
Selecting a Custom Preset ....................................... 4-4
Viewing Custom Preset .............................................. 4-4
Defining a New Custom Preset .................................. 4-5
Editing a Custom Preset Name .................................. 4-6
Overwriting a Custom Preset ..................................... 4-6
Deleting a Custom Preset .......................................... 4-7
ii SDC2036A

Table of Contents
Chapter 5 Adding Postage/Connecting to Data Centre
About the Postage by Phone System ................................5-3
How does the system operate? ................................ 5-3
Preparing to Refill with Postage ........................................5-3
LAN or PC Meter Connect™? ...........................................5-3
Connecting Your System to a LAN ....................................5-4
Connecting Your System Using PC Meter Connect™ .......5-5
Checking Funds (Postage) Available in your System ........5-5
Checking Your Postage by Phone® Account Balance ......5-5
Refill Postage ....................................................................5-6
Secure Refill .....................................................................5-6
Printing a Funds (Postage) Report ....................................5-7
Downloads from the Data Centre to Your System .............5-7
System Update ......................................................... 5-8
Envelope Messaging (Advertisements) ..................... 5-8
Software Update (mandatory) .................................... 5-8
Postal Inspection (mandatory) .................................. 5-8
Postal Rate Update (mandatory) ............................... 5-9
Connecting to the Data Centre (other than for Postage) .5-10
Check for Updates ................................................... 5-10
Chapter 6 System Options
System Options Introduction .............................................6-3
Basic Options ....................................................................6-4
Advancing the Date/Returning to Today's Date ......... 6-4
Adjusting the Contrast of the Display ......................... 6-4
Configuring the Tape Button ....................................... 6-4
Setting the Timeouts .................................................. 6-5
Setting the Normal Preset Timer ......................... 6-5
Setting Sleep Mode Activation Time .................... 6-5
Setting Wait for Envelope (DM400M/DM475M) ... 6-6
Setting the Low Funds Warning ................................. 6-6
iiiSDC2036A

Table of Contents
Changes to the Lock Code & Password .................... 6-7
Setting the Lock Code ......................................... 6-7
Disabling the Lock Code ...................................... 6-7
Changing the Lock Code ..................................... 6-8
Setting/Disabling the Supervisor Password ......... 6-8
Serial Port ..........................................................................6-8
Setting Scale Options ........................................................6-9
Zero the Scale ............................................................ 6-9
Turning Auto Scale On or Off ..................................... 6-9
Setting Weight Change Options ............................... 6-10
Current WOW Weight Limit (DM475M only) ............ 6-10
WOW Start Key Options (DM475M only) ................. 6-10
Setting the Scale Location Code .............................. 6-10
Connecting to the Data Centre ........................................ 6-11
Check for Updates ....................................................6-11
Distributor Settings ................................................... 6-12
Access the Distributor Settings .......................... 6-12
Parameter Descriptions ..................................... 6-13
Network Settings .............................................................6-14
Firewall Settings ..............................................................6-14
Connection Mode ............................................................6-14
Advanced Options ...........................................................6-14
Run Install Mode ...................................................... 6-14
Meter Withdrawal ..................................................... 6-14
Chapter 7 Maintenance
Replacing the Ink Cartridge/Printhead ...............................7-2
Filling the Moistener (DM400M/DM475M) .........................7-6
Filling the Moistener (DM300M Only) ................................7-7
Maintaining the Moistener (DM400M/DM475M) ................7-8
Maintaining the Moistener .......................................... 7-8
Cleaning the Stripper Blade &
Brush Assembly ......................................................... 7-8
Cleaning the Shield & Wick ........................................ 7-9
iv SDC2036A

Maintaining the Moistener (DM300M Only) .....................7-10
Removing the Moistener .......................................... 7-10
Removing the Moistener Brush ................................ 7-10
Removing the Shield and Wick ................................ 7-12
Running Print Tests .........................................................7-13
Test Print .................................................................. 7-13
Cleaning the Printer Nozzles (Purging) .................... 7-14
Chapter 8 Troubleshooting
Getting Help .......................................................................8-2
Power Problems (nothing displays) ...................................8-2
Error Messages .................................................................8-3
Printing Problems ..............................................................8-4
Feeding Problems .............................................................8-5
Display Problems ...............................................................8-9
Problems with Postage Refill .............................................8-9
Moistening Problems .......................................................8-10
Viewing System Configuration Levels .............................8-10
Table of Contents
Chapter 9 Supplies and Options
Options ..............................................................................9-2
Weighing Platforms .................................................... 9-2
Moistener ................................................................... 9-2
Envelope Messaging (Ads) ........................................ 9-2
Departmental Accounting ........................................... 9-2
How to Order .....................................................................9-3
Supplies .............................................................................9-3
vSDC2036A

Table of Contents
Chapter 10 Reports
Overview of Reports ........................................................10-2
Last 5 Refills Report ........................................................10-2
Funds Report ...................................................................10-2
Single Account Report .....................................................10-3
Multi-Account Summary Report .......................................10-3
Account List Report .........................................................10-4
Upload Summary Report .................................................10-4
System Setup Report ......................................................10-4
Error Report .....................................................................10-5
Configuration Report .......................................................10-5
Permit Report ..................................................................10-6
Software Version Report ..................................................10-6
Rates Summary Report ...................................................10-7
Chapter 11 Departmental (Standard) Accounting
Overview of the Accounting Feature ................................11-2
Turning On Accounting (if available) ................................ 11-2
Turning Off Accounting .................................................... 11-3
Selecting an Account ....................................................... 11-3
Creating an Account ........................................................ 11-4
Editing an Account/Setting Up Account Passwords ......... 11-5
Turning On Account Passwords ......................................11-6
Turning Off Account Passwords ......................................11-6
Viewing Account Totals .................................................... 11-7
Clearing Account Totals ................................................... 11-8
Clearing all Accounts ....................................................... 11-9
Deleting an Account .......................................................11-10
Chapter 12 INVIEW/ Budget Manager Accounting
Introduction ......................................................................12-4
Turning INVIEW/ Budget Manager On ............................12-4
Turning INVIEW/ Budget Manager Off ............................12-4
Logging On to INVIEW/ Budget Manager ........................12-5
If your system is setup for Operators ....................... 12-5
If your system is not setup for Operators ................. 12-5
If your system is Locked .......................................... 12-5
vi SDC2036A

Table of Contents
Logging Off from INVIEW/ Budget Manager ...................12-5
If your system is setup for Operators ....................... 12-5
Importing and Backing Up Data Using
PC Transfer Utility ........................................................12-6
Uploading Budget Manager/ INVIEW data to Total
Meter Reporting ...............................................................12-6
External Memory .............................................................12-7
Setting a Station ID ..........................................................12-7
Setting Up the Owner (Budget Manager Only) ................12-8
Setting Up Job IDs/ Job ID 1 and 2 .................................12-8
Configuring the Optional Barcode Scanner .....................12-9
Setting the Default Scan Type .................................. 12-9
Combining Barcodes .............................................. 12-10
Adding Barcode Prefixes ....................................... 12-12
Setting Auto-Enter .................................................. 12-13
Preparing Barcodes ............................................... 12-13
Configuring Operators ...................................................12-14
Enabling Operators ................................................ 12-14
Setup Operators ..................................................... 12-15
Important Notes Regarding Operator Functions .... 12-16
INVIEW/ Budget Manager Account Structure ................12-16
Turning Account Passwords On/Off ...............................12-18
Creating Accounts .........................................................12-18
Creating a Subaccount or Subsubaccount ....................12-20
Viewing or Editing Accounts ..........................................12-21
Deleting Accounts ..........................................................12-22
Clearing Account Data ...................................................12-23
Selecting the Accounting Period ....................................12-24
Global Surcharge ...........................................................12-26
Turning Global Surcharge On or Off ...................... 12-26
Selecting the Global Surcharge Method ................ 12-27
Selecting an Account to Print Postage ..........................12-28
Selecting an Account Manually .............................. 12-28
Selecting an Account by Name .............................. 12-28
Selecting an Account by Speed Code .................... 12-29
Entering a Surcharge .....................................................12-30
viiSDC2036A

Table of Contents
Selecting Job IDs/ Job ID 1 and 2 .................................12-31
Entering Manual Transactions .......................................12-32
Transferring Transaction Data .......................................12-33
Clearing the Transaction Log .........................................12-34
Setting the Condition for the Log Full Warning ..............12-35
Defining the Log Full Action ...........................................12-36
INVIEW/ Budget Manager Accounting Reports .............12-37
Printing Reports ..................................................... 12-37
Custom Reports ..................................................... 12-38
Creating a Custom Report ..................................... 12-39
Viewing and Editing a Custom Report ................... 12-40
Deleting a Custom Report ...................................... 12-41
Transaction Report ................................................. 12-41
Account Summary Report ...................................... 12-41
Budget Performance (Budget Manager Only) ........ 12-41
Invoice (Budget Manager Only) ............................. 12-41
Quick Profile Report ............................................... 12-41
Accounting Setup Report ....................................... 12-42
Account List Report ................................................ 12-42
Account Speed Code List Report ........................... 12-42
Operator List Report .............................................. 12-42
Weight Break Reports ........................................... 12-42
INVIEW/ Budget Manager Error/ Warning Messages
Messages ......................................................................12-43
Account Limit Reached .......................................... 12-43
Funds/Piece Count Registers Full ......................... 12-43
External Memory Not Responding ......................... 12-44
Accounting Discrepancy ........................................ 12-44
Glossary G-1
viii SDC2036A
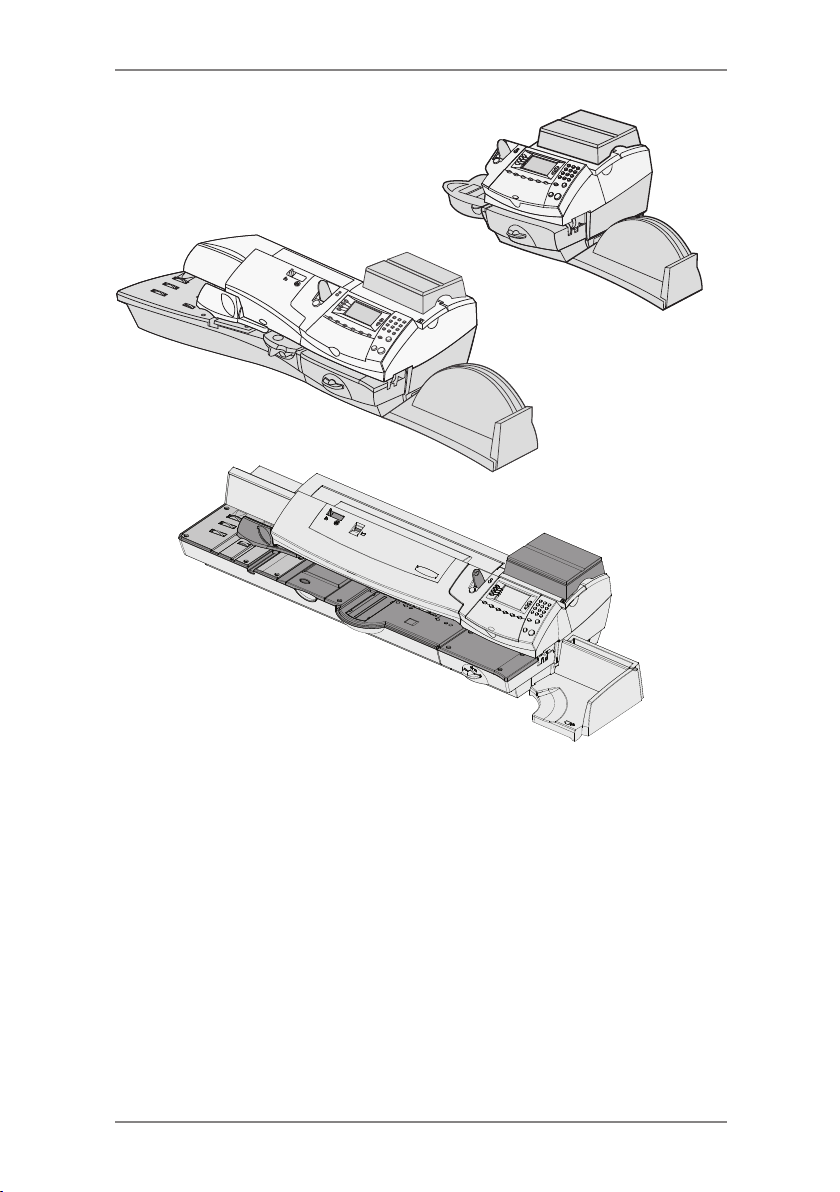
DM400M
1 • Introduction
DM300M
DM475M
This chapter lists the key features of your mailing
system, tells you what's in this book, and presents
important safety information.
About Your Digital Mailing System........................1-2
About IntelliLink™.................................................1-3
Postal Requirements ............................................1-3
Safety ...................................................................1-4
Specifications .......................................................1-6
1-1SDC2036A

1 • Introduction
About Your Digital Mailing System
Your digital mailing system's advanced features include:
• Space-saving, compact footprint.
• Large, easy-to-read display shows system status and prompts
you through setup operations.
• Semi-automatic and automatic envelope feeding, transport, and
auto-eject.
• Automatic date advance.
• Keyboard-selectable Envelope Messaging (if used).
• Convenient, one-button postage-adding via Postage by Phone
(requires a network or analogue phone line).
• Stacker neatly stacks finished envelopes.
• Ink jet printer provides clear, crisp imprints.
• Weighing platform weighs mail pieces.
• Integrated rating feature calculates correct postage.
• Optional* Date and time stamp for use on incoming mail or on
sensitive documents.
• Optional* Accounting feature tracks postage costs by department
(certain models only).
• Password protection limits access to authorised personnel.
• Report printing capability provides hard-copy records of your
postage transactions.
• In-line moistener wets and seals envelopes.
• USB communication ports for exporting report data to a PC or for
adding optional* peripherals (scanner, printer).
• LAN connection.
• Permit Prints.
• Mailmark™ compliant.
* Optional features must be purchased for use with the mailing
system.
®
NOTE: Although this guide describes all the features listed
above, your DM300M/DM400M Series is a configurable system
and availability of the features will depend on your model
and options purchased. Inclusion within this guide does not
guarantee availability of a particular feature.
Mailmark™ is a trademark of the Royal Mail
1-2 SDC2036A

1 • Introduction
About IntelliLink™
Your mailing system takes full advantage of IntelliLink™, your digital
gateway to an entire suite of services and information that can move
your mail more efficiently and enhance your business performance.
IntelliLink™ technology gives you the ability to:
Add Postage Funds conveniently
You can add funds to your machine electronically via the Postage by
®
Phone
Download Postal Rate Updates
The latest postal rates are downloaded precisely when you need
them.
Add Features On Demand
You can easily download Envelope Messaging and optional product
enhancements such as departmental accounting.
Keep Your System Current
Software download capability means you'll always have the latest
version of your machine's operating system.
Postal Requirements
The meter on your mailing system is licensed by Royal Mail and you
must follow some basic requirements.
• Mail must have the correct date and postage amount in the
• If you move to another address, you must update Royal Mail
• Your DM220i series is a Mailmark™ compliant system. At
• The tapes for putting postage on larger items must conform to
system.
meter stamp.
records. Call your local machine supplier for advice.
regular intervals defined by Royal Mail, it connects to the Pitney
Bowes Data Centre to provide usage data to Royal Mail. The
connection will normally happen in the background without you
needing to do anything. If the connection was not made for any
reason, the display will show ‘Data Upload Due’ and you should
select Connect Now. If, for any reason, a connection has not
been made within the ‘grace’ period allowed by Royal Mail, the
display will show 'Data Upload Required' and you MUST make
a connection before your franking machine will allow you to
continue processing mail.
postal specifications. For best performance, obtain tapes direct
from your machine supplier.
1-3SDC2036A

1 • Introduction
Safety
Follow the normal safety precautions for all office equipment:
• Use only Pitney Bowes approved supplies, in particular aerosol
dusters. Improper storage and use of aerosol dusters or
flammable aerosol dusters can cause an explosive-like condition
that could result in personal injury and/or property damage.
Never use aerosol dusters labeled flammable and always read
instructions and safety precautions on the duster label.
• To obtain supplies, please contact our Supply Line™ to place
orders. Material Safety Data Sheets can be obtained on the web
or from our Supply Line™. Refer to the Contact Information List
for more information.
• Use the power cord supplied with the machine and plug it into
a properly grounded wall outlet located near the machine and
easily accessible. Failure to properly ground the machine can
result in severe personal injury and/or fire.
• Avoid touching moving parts or materials while the machine is
in use. Keep hands, loose clothing, jewellery and long hair away
from all moving parts.
• Do not remove covers or defeat safety interlock switches. Covers
enclose hazardous parts that should only be accessed by
properly trained service personnel. Immediately report to service
any damaged or non-functioning components that renders the
unit unsafe.
• Place the unit in an accessible location to allow for proper
venting of the equipment and to facilitate servicing.
• The power cord wall plug is the primary means of disconnecting
the machine from the AC supply.
• Do not use an adapter plug on the line cord or wall outlet.
• Do not remove the ground pin from the line cord.
• Avoid using wall outlets that are controlled by wall switches, or
shared with other equipment.
• Do not route the power cord over sharp edges or trap between
furniture.
• Ensure there is no strain on the power cord and that it does not
become jammed between the equipment, walls or furniture.
• Be certain the area in front of the wall receptacle into which the
machine is plugged is free from obstruction.
1-4 SDC2036A

1 • Introduction
• Before clearing a stoppage, be sure machine mechanisms come
to a stop.
• When removing stalled material, avoid using too much force to
protect against minor personal injury and damaging equipment.
• To prevent overheating, do not cover any vent openings.
• Operation of this equipment without periodic maintenance will
inhibit optimum operating performance and could cause the
equipment to malfunction. Contact your machine supplier for
required service schedule.
• Read all instructions before attempting to operate the equipment.
• Use this equipment only for its intended purpose.
• Always follow the specific occupational safety and health
standards for your workplace.
• This device is not intended for use in the direct field of view at
visual display workplaces. To avoid incommodating reflections at
visual display workplaces this device must not be placed in the
direct field of view.
1-5SDC2036A

1 • Introduction
Specifications
Equipment
DM300M DM400M DM475M
Size (including
Integrated
Weight Platform)
Weight 10.4 kg approx 17.6 kg approx 30.4 kg approx
Sound Pressure
Level
Power
Requirements
Communication
Ports
Operating
Temperature
LCD Display
Size
Throughput*
*Actual Throughput
will vary, depending
on the material
used, machine
condition, use of
moistener, and the
skill of the operator.
Print Resolution 600 x 300 dpi
Print Image Area 25.4mm x 180mm
Ink Cartridge
Capacity
315mm H x
370mm W x
435mm D
Machine noise is less than 70dBA in accordance with
EN ISO 7779, and ANSI 12.10.
100-240 VAC,
50/60Hz. 1.0A
3 USB; 1 RJ-11 3 USB; 1 RJ-11 3 USB; 1 RJ-11
4°C to 43°C
88 x 44mm 88 x 44mm 95 x 44mm
65 letters per
minute
45ml
315mm H x
840mm W x
500mm D
100-240 VAC,
50/60Hz. 2.0A
95 or 120 letters
per minute
315mm H x
1296mm W x
572mm D
100-240 VAC
50/60Hz 2.0A
1 RJ-45
Colour
95 or 120 letters
per minute
Up to 90 letters
per minute WOW
Internal Envelope
Graphic Ad
Storage
Departmental
Accounting
Model Number
Series
1-6 SDC2036A
up to 20
Optional. Number of accounts available based on the
amount purchased and model.
3CXX 4CXX 6CXX
6CF1

1 • Introduction
Meter Specifications
Maximum Imprint £99.99
Maximum Credit
Setting
Setting Increment £50
Reset Type Postage by Phone
Piece Count Up to 8 digits (nonresettable)
All Pitney Bowes postage meters are manufactured in accordance
with Royal Mail's Franking Machine Standards. This includes
ascending register security, which will lock the ascending registers
when the first frank takes the most significant digit of the ascending
register to 9.
It is certified that the system complies with all applicable
Directives of the European Union.
The system has been designed to work on all Pan-European
Analogue Telecommunication Networks.
£9,950.00
1-7SDC2036A
1 • Introduction
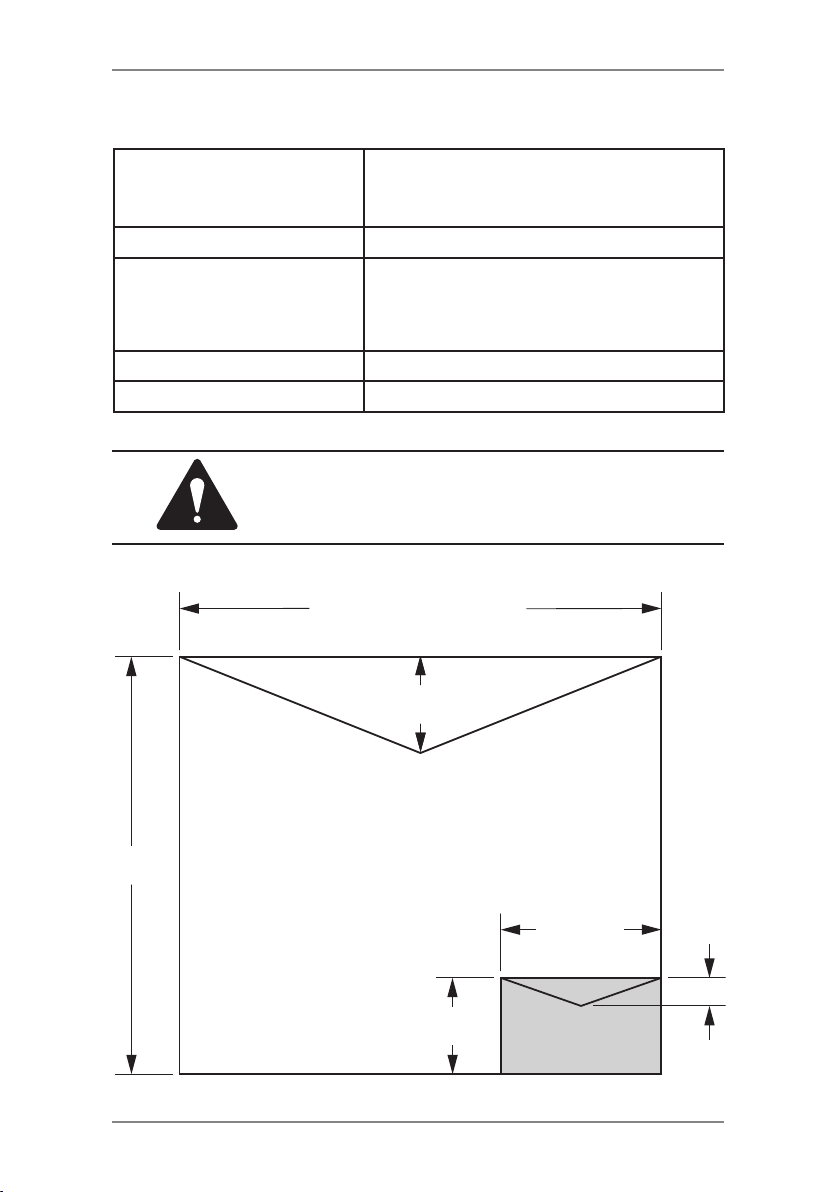
Material Specifications
Envelope Size (see Figure
Below)
Minimum 89 x 127mm
Maximum 330 x 381mm (Non WOW)
330 x 356mm (WOW Mode DM475M)
Envelope Flap Depth 22mm Min - 72mm Max
Envelope Thickness Minimum 0.20mm
Maximum (DM300M) 9.5mm
Maximum (DM400M/DM475M) 8mm
Stack Height for Mail 60mm
Envelope Weight 1g Min - 500g Max
IMPORTANT: For best results, always make
sure your material conforms to our published
specications.
381mm (Non WOW)
356mm (WOW Mode DM475M)
72mm
Maximum
330mm
127mm
22mm
89mm
1-8 SDC2036A
Minimum

2 • Getting to Know Your System
DM300M
DM400M
DM475M
In this chapter you'll find out where everything is and
what it does.
Machine Features–Front DM300M .......................2-2
Machine Features–Front DM400M .......................2-4
Machine Features–Front DM475M .......................2-6
Control Panel ........................................................2-8
Machine Features (DM300M/400c)–Rear .......... 2-10
Machine Features (DM475M)–Rear ................... 2-11
Moving the DM300M/400c..................................2-12
Warning: Do Not Move the DM475M by Yourself. 2-12
2-1SDC2036A
2 • Getting to Know Your System
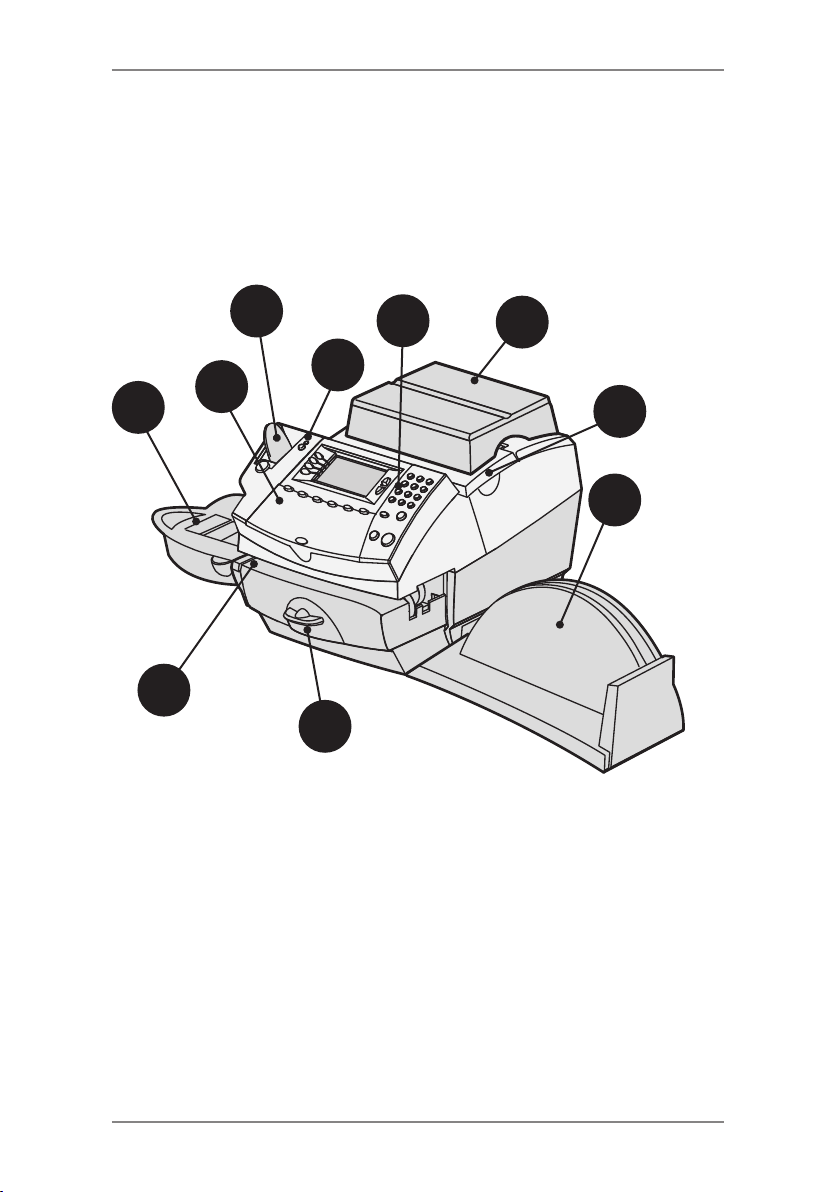
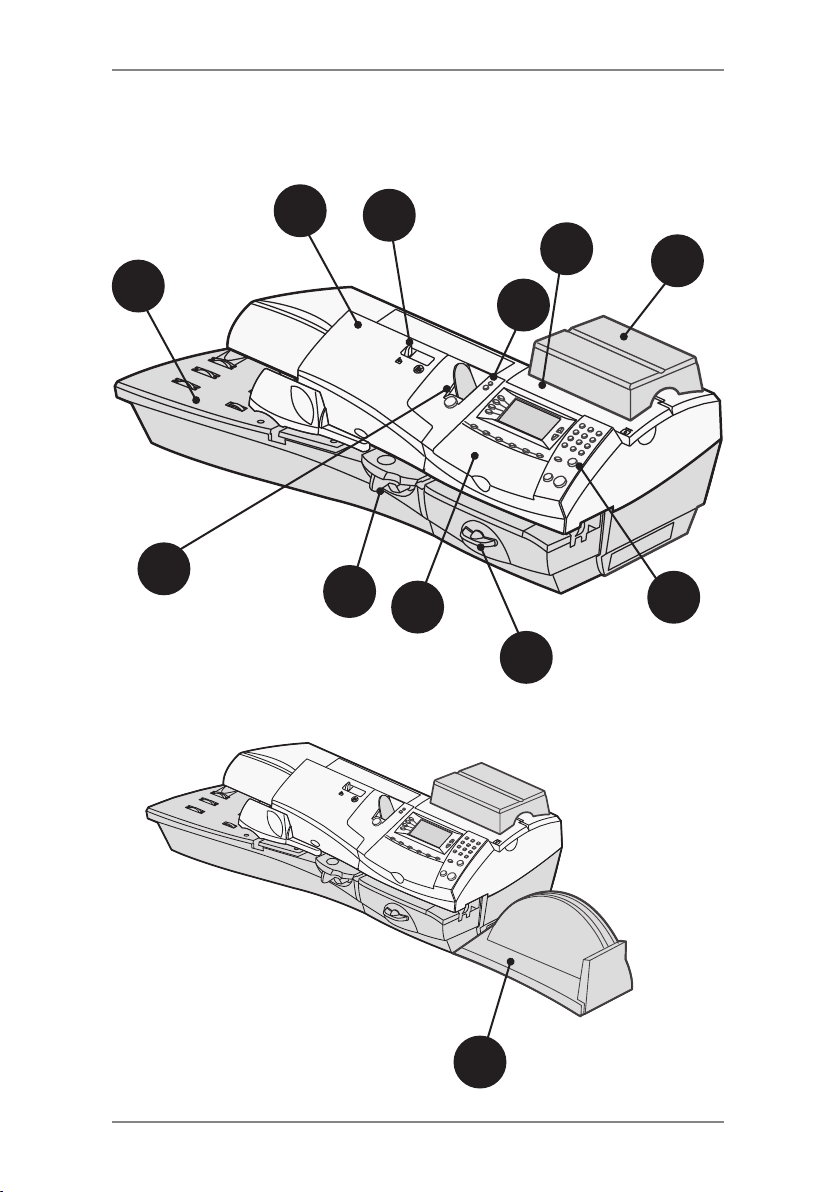
Machine Features- Front DM300M
2
1
4
3
10
9
5
6
8
7
2-2 SDC2036A

2 • Getting to Know Your System
Item Part Description
Control Panel Allows you to enter and setup information on your
1
Tape Feeder Holds and feeds tapes for printing.
2
LED Lights green when your system is on; lights
3
machine (see page 2-8 for details).
orange when your system is in "sleep" mode.
Weighing
4
Platform
Ink Access
5
Cover
Stacker Tray Allows the neat stacking of finished mail pieces.
6
Printer
7
Clearance
Lever (two
positions)
Feed Deck Supports your envelope, post card or tape sheet
8
Moistener Applies sealing fluid to the envelope flap You
9
Allows you to weigh and calculate postage of a
mail piece based on the service selected.
Opens up to allow replacement of the ink
cartridge. See Chapter 7, Maintenance for
instructions.
The slot allows convenient storage of your Quick
Reference Guide.
Home - transport rollers engaged for processing
mail (normal)
Released - transport rollers disengaged so you
can clear a stalled mail piece.
NOTE: The machine will not process mail when
left in the released position.
as it passes under the printer mechanism.
can seal envelopes or leave them unsealed,
depending on how you feed them.
10
Qwerty
Keyboard
(under cover)
For entry of information.
2-3SDC2036A
2 • Getting to Know Your System
Machine Features- Front DM400M
10
1
2
4
5
3
9
8
12
6
7
11
2-4 SDC2036A

2 • Getting to Know Your System
Item Part Description
Feeder Cover Lift to gain access to the feed and transport
1
mechanisms.
Seal/No Seal
2
Lever
LED Lights green when your system is on; lights
3
Ink Access
4
Cover
Weighing
5
Platform
Control Panel Allows you to enter and setup information on your
6
Printer
7
Clearance
Lever (two
position)
Moistener Applies sealing fluid to the envelope flap. You
8
Tape Feeder Holds and feeds tapes for printing.
9
Selects whether your envelopes are automatically
sealed or not.
orange when your system is in "sleep" mode.
Opens up to allow replacement of the ink
cartridge. See Chapter 7, Maintenance for
instructions.
Allows you to weigh and calculate postage of a
mail piece based on the service selected.
machine (see page 2-8 for details).
Home - transport rollers engaged for processing
mail (normal)
Released - transport rollers disengaged so you
can clear a stalled mail piece.
NOTE: The machine will not process mail when
left in the released position.
can seal envelopes or leave them unsealed,
depending on how you feed them.
Feed Deck Supports your envelope, post card or tape sheet
10
Stacker Tray Allows the neat stacking of finished mail pieces.
11
Qwerty
12
Keyboard
(under cover)
as it passes under the printer mechanism.
The slot allows convenient storage of your Quick
Reference Guide.
For entry of information.
2-5SDC2036A
2 • Getting to Know Your System
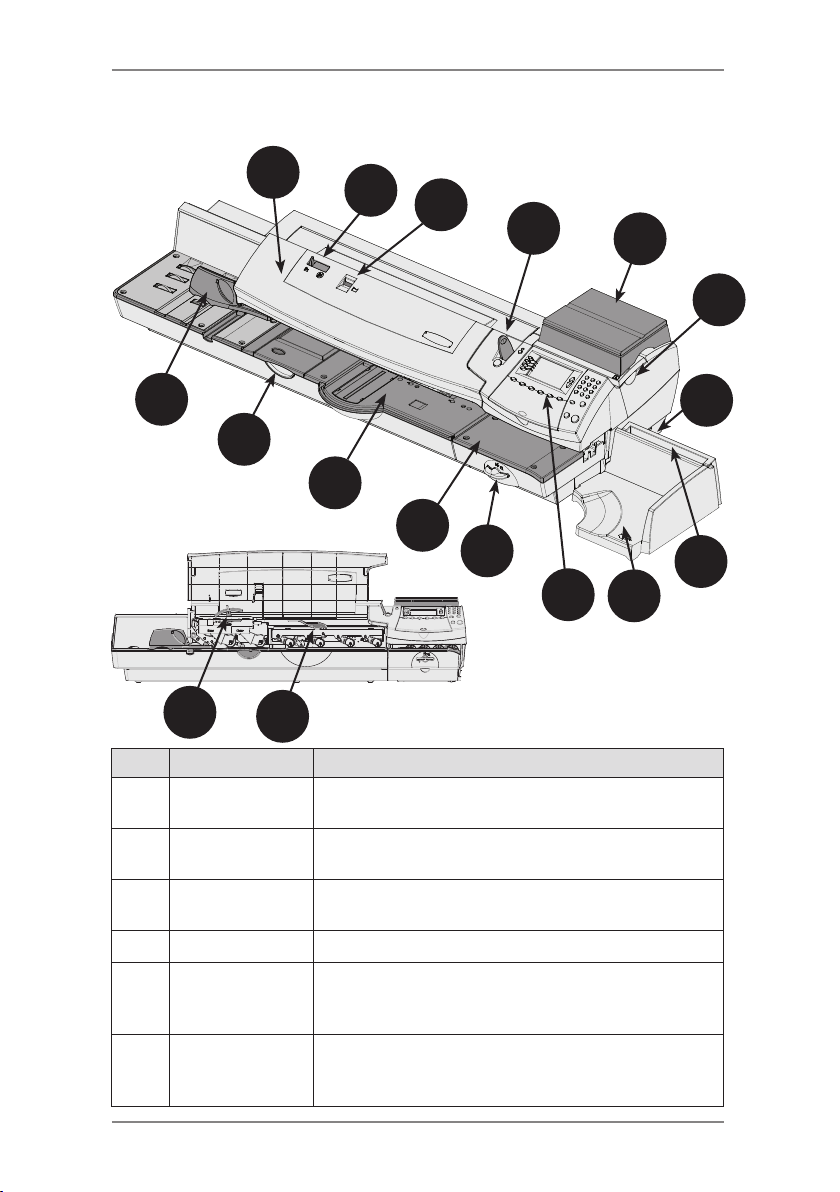
Machine Features- Front DM475M
15
16
14
1
17
2
13
(shown with
cover open)
12
3
4
5
6
7
11
10
9
8
Item Part Description
Feeder/WOW
1
Cover
Seal/No Seal
2
Lever
Sealing Fluid
3
Level Indicator
Tape Feeder Holds and feeds tape strips for printing
4
Weighing
5
Platform
(optional)
Ink Access
6
Cover (under
optional scale)
2-6 SDC2036A
Open this cover to gain access to the WOW deck
and two clearance levers (items 16 and 17).
Allows you to turn envelope sealing on and off.
Allows you to see how much sealing fluid is left in
the tank (red band indicates low level).
Allows you to weigh a mail piece so your system
can calculate postage based on the service
selected.
Opens up to allow replacement of the ink
cartridge (see Chapter 7, Maintenance).

2 • Getting to Know Your System
Parts of the Machine - DM475M (cont'd)
Ink Waste Tank
7
(in tray under
printer section)
Stacker Tray
8
Storage Slot
Stacker Tray Allows the neat stacking of finished mail pieces.
9
Control Panel Allows you to enter and set up information on
10
Printer
11
Clearance
Lever (two
position)
Printer Deck Supports your mail piece or tape strip as it
12
Feeder/WOW
13
Deck
Moistener Applies sealing fluid to the envelope flap (you
14
Side Guide Reduces the skewing of pieces of mail as you
15
Moistener
16
Clearance
Lever (two
position, under
cover)
Feeder/WOW
17
Clearance Lever
(two position,
under cover)
Collects ink waste.
Allows you store the Quick Reference Guide for
easy access.
your machine (see next page for details).
Home - printer rollers engaged for processing
mail (normal).
Released - printer rollers disengaged; lower
portion of printer deck drops down so you can
clear a stalled mail piece.
NOTE: The machine will not process mail when
left in the released position.
passes under the printer mechanism.
Supports your mail piece as it feeds through the
feeder/WOW section.
can seal envelopes or leave them unsealed,
depending on the position of Seal/No Seal lever).
feed them into the feeder.
Home - printer rollers engaged for processing
mail (normal).
Released - printer rollers disengaged; upper
rollers lifted so you can clear a stalled mail piece.
NOTE: The machine will not process mail when
left in the released position.
Home - transport rollers engaged for processing
mail (normal).
Released - transport rollers disengaged; upper
rollers lifted so you can clear a stalled mail piece.
NOTE: The machine will not process mail when
left in the released position.
2-7SDC2036A
2 • Getting to Know Your System
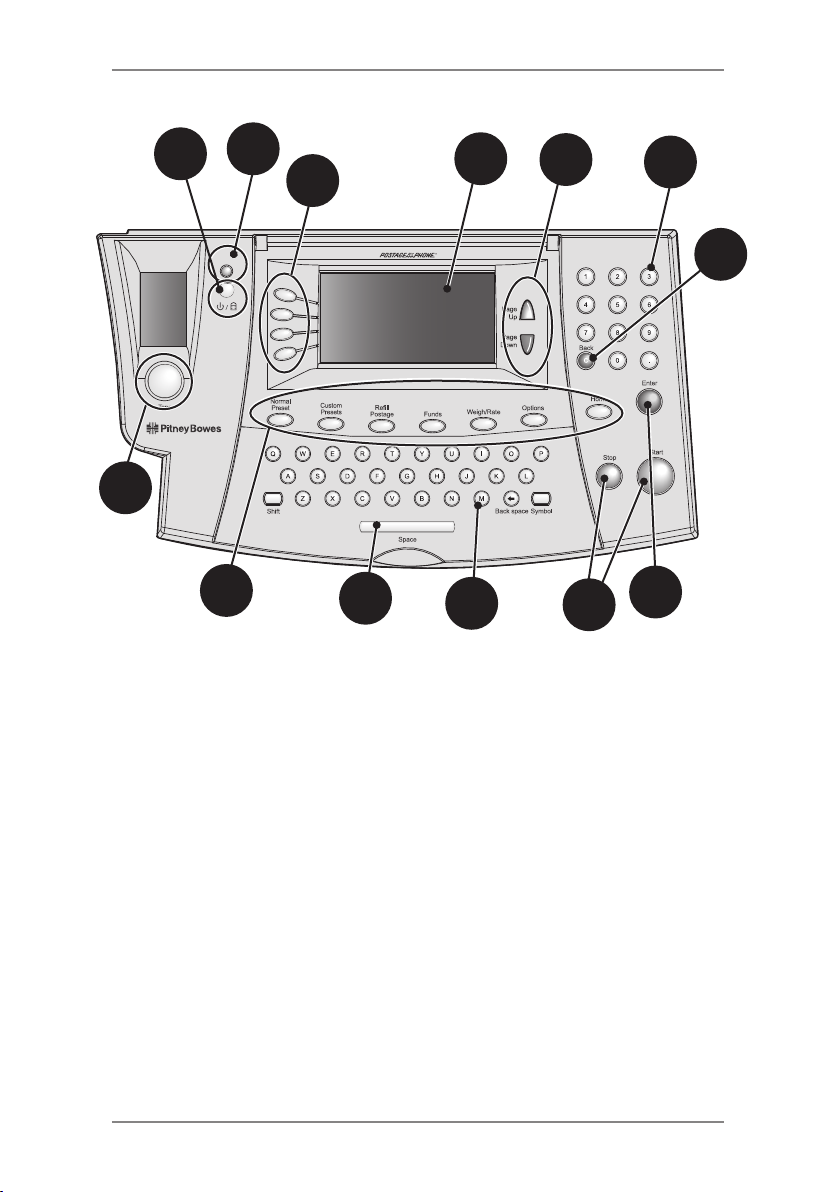
Control Panel
10
2
4
5
6
3
11
1
9
1. Tape Key—Press to print tape(s).
2. Lock/Power Key—Dual function. Prevents unauthorised use of
your system. If lock feature is setup and machine is in "sleep
mode"; entering your four-digit password unlocks (awakens) the
machine. Also allows you to power up or power down machine.
3. Screen Selection Keys—Allows you to select a line (one key
for each line) on the operator display. Whenever the left arrow
(◄) occupies the first position in one of the display lines, you may
press the corresponding Screen Selection key to select that line.
4. Operator Display—Shows the current status of your system and
prompts you through all setup operations.
5. Page Up/Page Down (Scroll Keys)—Allows you to scroll up and
down through menu choices in the operator display. If a Page/
Up/Down key is lit, it indicates additional choices are available in
a menu (up or down, depending on key) and that Page Up/Down
key can be pressed to access these further choices.
6. Alpha/Numeric Keypads—Allows you to type in numbers and
letters for account names, postage values, and other information.
7. Enter Key—Allows you to accept an entry or choice.
2-8 SDC2036A
6
12
8
7

2 • Getting to Know Your System
8. Start/Stop Keys—Allows you to start or stop feeding tape or
envelopes.
9. Feature Keys—Allows you quick access to the most common
features on the system. Pressing a Feature key takes you
immediately to the top-level screen of the feature for that key.
Home—Takes you back to the Home (date/postage) screen.
Normal Preset—Allows you access to the normal settings you
use most often. You can assign values such as postage amount,
Envelope Messaging, account number, etc. to the Normal Preset
using the Feature keys on the control panel. See Chapter 4,
Presets for details.
Custom Presets—Allows you access up to five custom settings.
You can assign values such as postage amount, Envelope
Messaging, account number, etc. to the custom presets using
the Feature keys on the control panel. See Chapter 6, System
Options for details.
Refill Postage—Allows you to add (refill) postage funds to your
machine conveniently via your LAN or an internet enabled PC.
See Chapter 5, Adding Postage for details.
Funds—Allows you to check your postage funds and number of
mail pieces processed. See Chapter 5, Adding Postage for details.
Weigh/Rate—Allows you to weigh and calculate postage based
on service selected. See Chapter 3, Running Mail for details.
Options—Allows you to access system setup information such
as date, time, postage limits, accounts setup, phone parameters,
etc. See Chapter 6, System Options for details.
10. LED—Lights green when your system is on; lights orange when
your system is in "sleep" mode.
11. Back/C Key—Allows you to move back one level in a menu, or
clear an entry.
12. QWERTY Keypad (under its own cover)—Allows you to type
in letters and special characters for account names and text
messages
IMPORTANT: When you press one of the Feature keys, any
entry in the preceding screen is lost unless you have rst
pressed the Enter key to conrm the entry. For example, if you
entered an account name on one screen and then immediately
pressed another Feature key, the account name will not be
recorded by the system.
2-9SDC2036A
2 • Getting to Know Your System
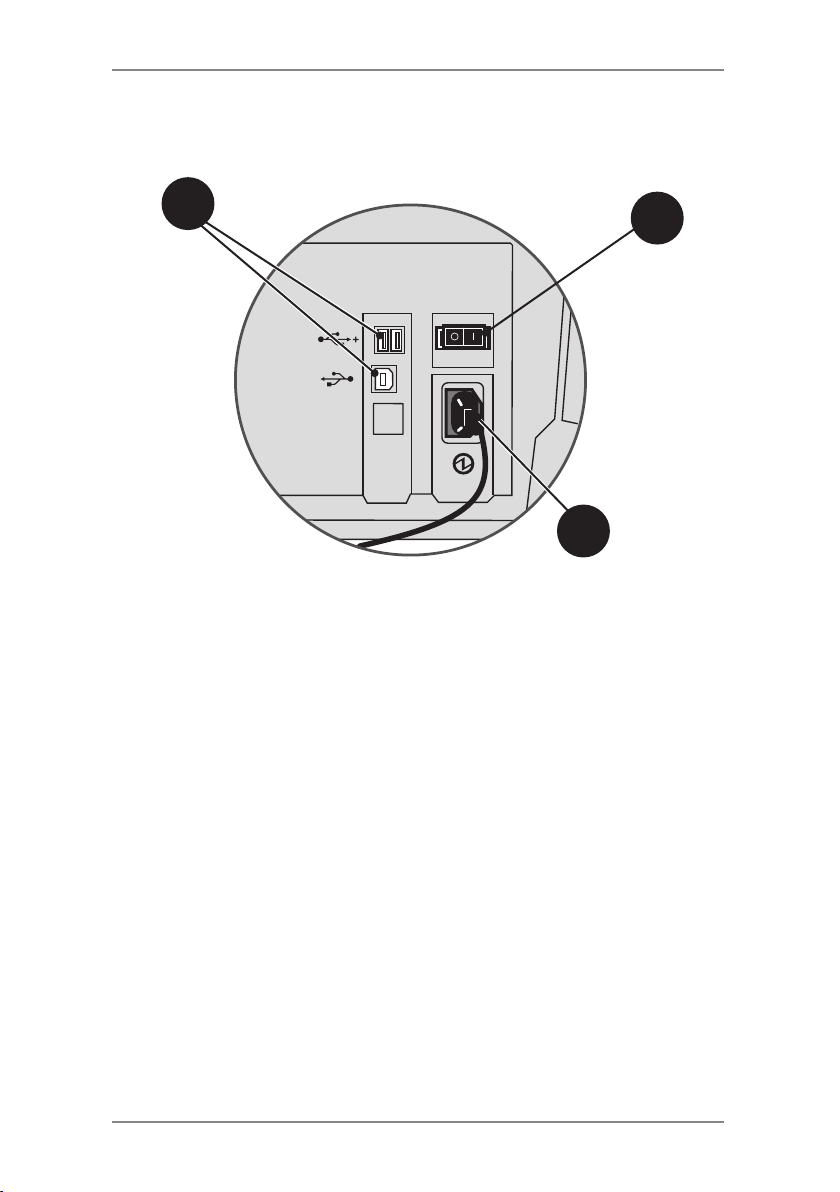
Machine Features (DM300M/D400M)- Rear
1
3
2
Machine Features—Rear
1. USB Ports—Allow you to connect a USB LAN network interface
and peripherals (scanner, external scale, INVIEW accounting).
Also allows connection to a PC for use with PC Meter Connect™
software.
2. Power Receptacle—Connects to AC power cord (supplied).
3. Power Switch—Turns power ON or OFF to machine.
2-10 SDC2036A
2 • Getting to Know Your System
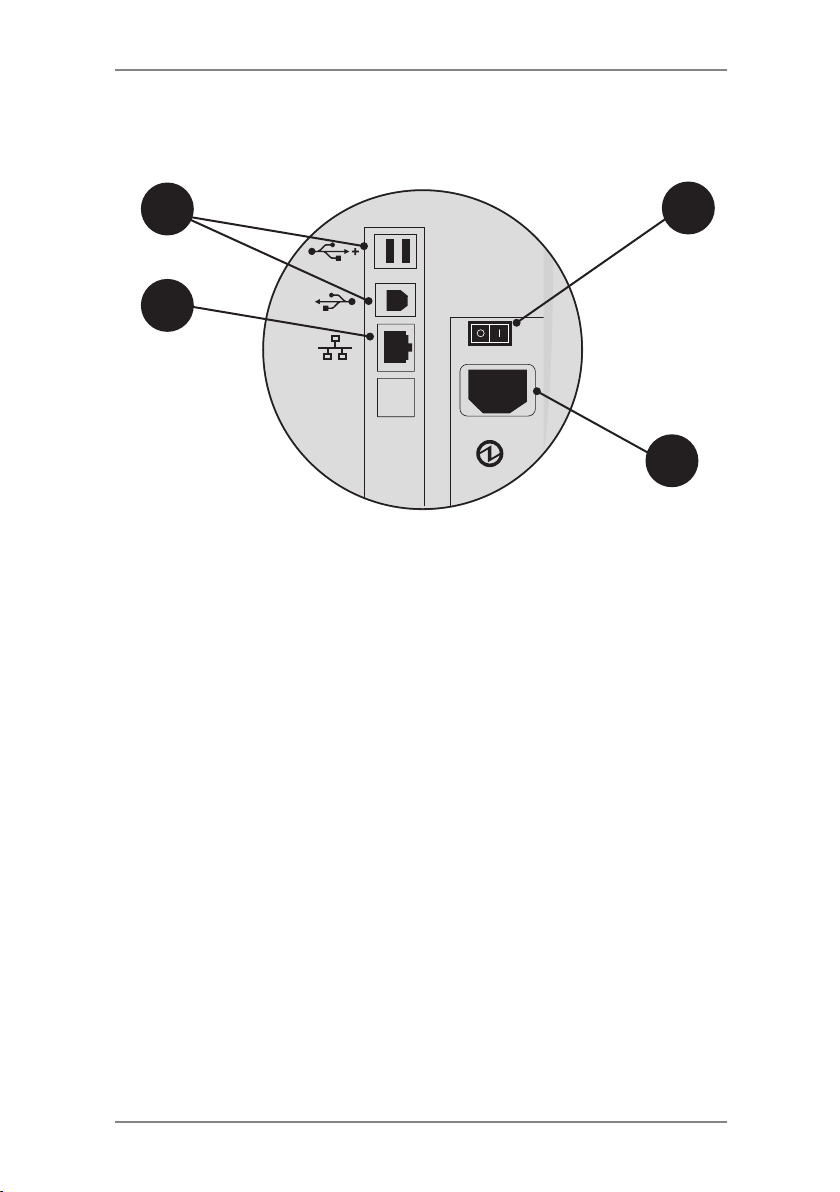
Machine Features (DM475M)- Rear
2 3
1
Machine Features—Rear
4
1. LAN Port— Allows you to connect your system to the Pitney
Bowes Data Centre via a LAN network that has internet access
(known as 'Constant Connection').
2. USB Ports—Allows you to connect a USB cable to peripherals
(scanner, external scale, INVIEW accounting). Also allows
connection to a PC for use with PC Meter Connect™ software.
3. Power Switch—Turns power ON or OFF to machine.
4. Power Receptacle—Connects to AC power cord (supplied).
NOTE:
Take care not to move your system when connecting and
disconnecting Phone/LAN, USB or Power connectors as it could
disturb existing connections. See page 2-12 for further information.
2-11SDC2036A
2 • Getting to Know Your System
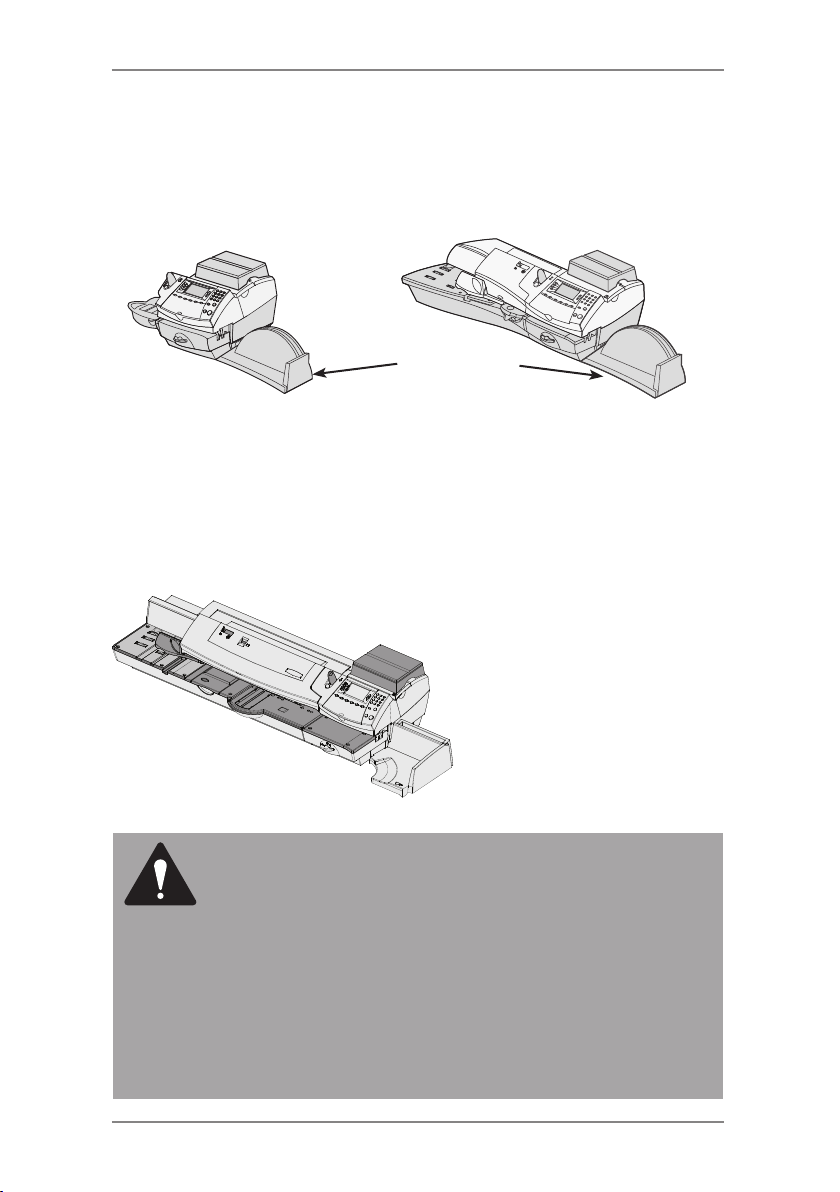
Moving the DM300M/DM400M
If you need to move your DM300M/DM400M mailing system, simply
unplug the power and any other cables attached to the back of the
machine (see figure on previous pages) and slide the stacker tray
away from the unit.
Stacker Tray
DM300M
DM400M
Warning: Do not Move the DM475M by Yourself
You should not move the DM475M machine by yourself. Call Pitney
Bowes to arrange a Service visit.
DM475M
CAUTION: Do not move the DM475M by yourself. The
machine is made to separate into two sections, and by
moving without proper disassembly, you may:
• Cause serious injury to yourself.
• Cause serious damage to the machine.
• Cause the WOW module to go out of calibration.
• Void any service warranties.
Contact Pitney Bowes to arrange a Service visit for
moving the machine (additional charges may apply).
2-12 SDC2036A
 Loading...