

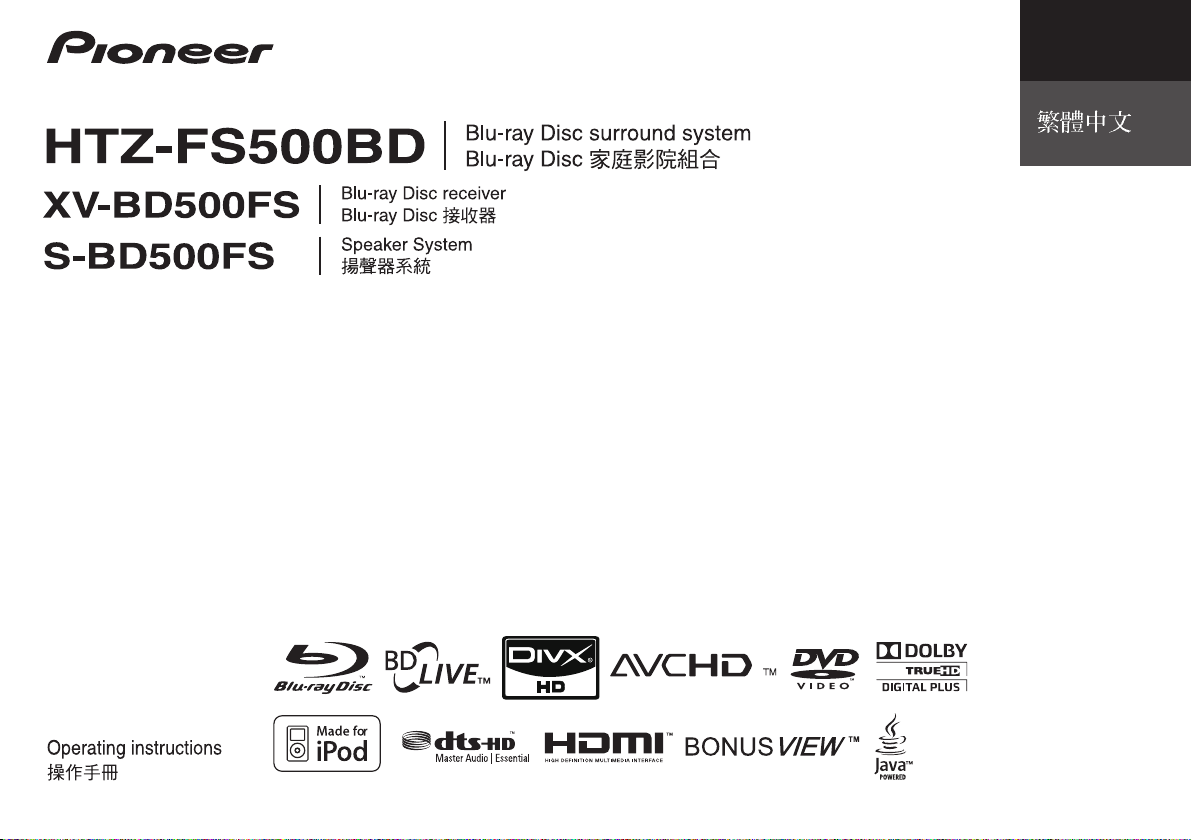
Page 1
English
Page 2
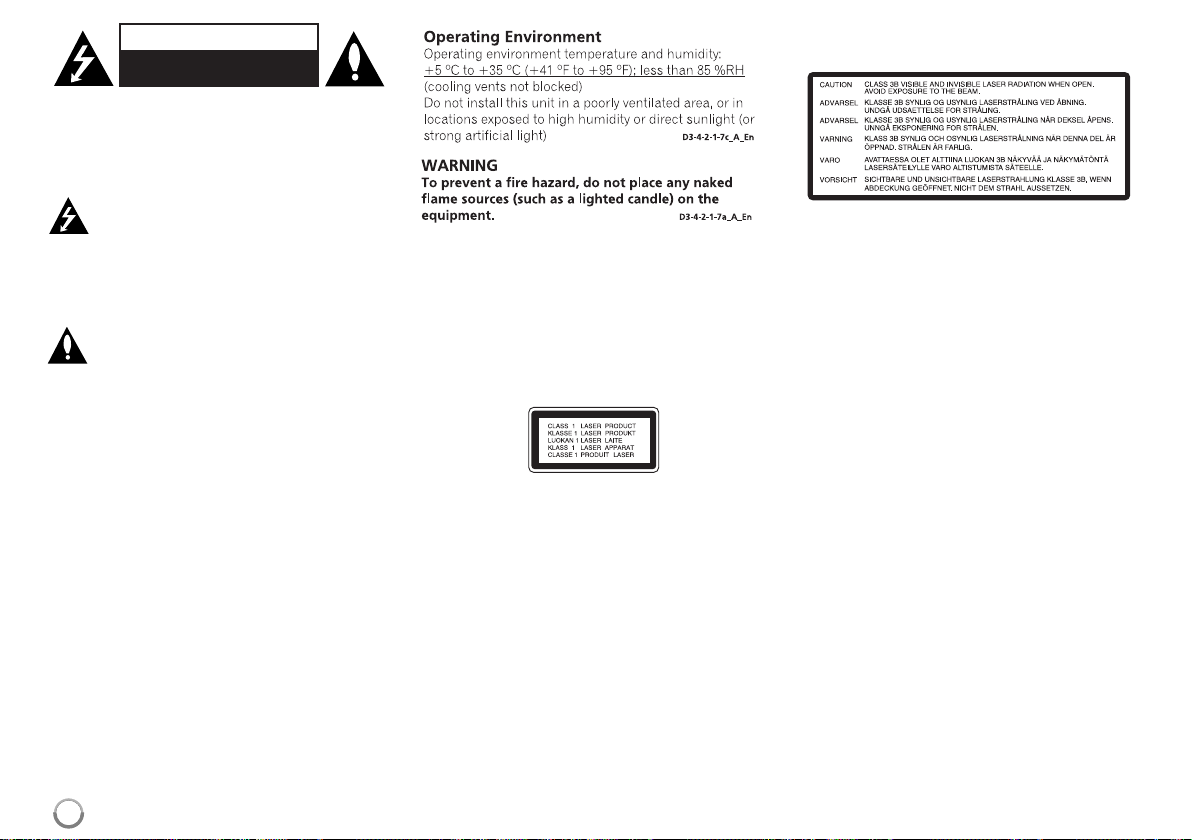
CAUTION
RISK OF ELECTRIC SHOCK
DO NOT OPEN
CAUTION: TO REDUCE THE RISK OF ELECTRIC
SHOCK DO NOT REMOVE COVER (OR BACK)
NO USER-SERVICEABLE PARTS INSIDE REFER
SERVICING TO QUALIFIED SERVICE PERSONNEL.
This lightning flash with arrowhead symbol
within an equilateral triangle is intended to
alert the user to the presence of uninsulated
dangerous voltage within the product’s
enclosure that may be of sufficient magnitude to constitute a risk of electric shock to
persons.
The exclamation point within an equilateral
triangle is intended to alert the user to the
presence of important operating and maintenance (servicing) instructions in the literature accompanying the product.
WARNING:TO PREVENT FIRE OR ELECTRIC
SHOCK HAZARD, DO NOT EXPOSE THIS PRODUCT TO RAIN OR MOISTURE.
WARNING: Do not install this equipment in a confined space such as a book case or similar unit.
CAUTION: Do not block any ventilation openings.
Install in accordance with the manufacturer's
instructions.
Slots and openings in the cabinet are provided for
ventilation and to ensure reliable operation of the
product and to protect it from over heating.The
openings shall be never be blocked by placing the
product on a bed, sofa, rug or other similar surface.
This product shall not be placed in a built-in installation such as a bookcase or rack unless
proper ventilation is provided or the manufacturer's
instruction has been adhered to.
CAUTION: When disposing of used batteries,
please comply with governmental regulations or
environmental public institution’s rules that apply in
your country/area.
WARNING: Do not use or store batteries in direct
sunlight or other excessively hot place, such as
inside a car or near a heater.This can cause
batteries to leak, overheat, explode or catch fire.It
can also reduce the life or performance of batteries.
CAUTION: This product is a class 1 laser product
classified under the Safety of laser products, IEC
60825-1:2007
To ensure proper use of this product, please read
this owner’s manual carefully and retain it for future
reference.Shall the unit require maintenance,
contact an authorized service centre.
Use of controls, adjustments or the performance of
procedures other than those specified herein may
result in hazardous radiation exposure.
To prevent direct exposure to laser beam, do not try
to open the enclosure.Visible laser radiation when
open. DO NOT STARE INTO BEAM.
The following caution label appears on your unit.
Location: top of the mechanical unit
CAUTION: The apparatus shall not be exposed to
water (dripping or splashing) and no objects filled
with liquids, such as vases, shall be placed on the
apparatus.
CAUTION concerning the Power Cord
Most appliances recommend they be placed
upon a dedicated circuit;
That is, a single outlet circuit which powers only that
appliance and has no additional outlets or branch
circuits. Check the specification page of this owner's
manual to be certain. Do not overload wall outlets.
Overloaded wall outlets, loose or damaged wall outlets, extension cords, frayed power cords, or damaged or cracked wire insulation are dangerous.Any
of these conditions could result in electric shock or
fire. Periodically examine the cord of your appliance,
and if its appearance indicates damage or deterioration, unplug it, discontinue use of the appliance,
and have the cord replaced with an exact replacement part by an authorized service centre. Protect
the power cord from physical or mechanical abuse,
such as being twisted, kinked, pinched, closed in a
door, or walked upon.Pay particular attention to
plugs, wall outlets, and the point where the cord
exits the appliance.To disconnect power from the
mains, pull out the mains cord plug.When installing
the product, ensure that the plug is easily accessible.
2
Page 3
Notes on Copyrights
Because AACS (Advanced Access Content
System) is approved as content protection
system for BD format, similar to use of CSS
(Content Scramble System) for DVD format,
certain restrictions are imposed on playback,
analog signal output, etc., of AACS protected
contents.The operation of this product and
restrictions on this product may vary depending
on your time of purchase as those restrictions
may be adopted and/or changed by AACS after
the production of this product.
Furthermore, BD-ROM Mark and BD+ are
additionally used as content protection systems
for BD format, which imposes certain restrictions
including playback restrictions for BD-ROM Mark
and/or BD+ protected contents.To obtain
additional information on AACS, BD-ROM Mark,
BD+, or this product, please contact an
authorized Customer Service Centre.
Many BD-ROM/DVD discs are encoded with copy
protection. Because of this, you should only connect your player directly to your TV, not to a VCR.
Connecting to a VCR results in a distorted picture from copy-protected discs.
This product incorporates copyright protection
technologies that are protected by certain U.S.
patents and other intellectual property rights
owned by Macrovision Corporation and other
rights owners. Use of this copyright protection
technology must be authorized by Macrovision
Corporation and is intended for home and other
limited viewing uses only, unless otherwise
authorized by Macrovision Corporation. Reverse
engineering or disassembly is prohibited.
Under the U.S. Copyright laws and Copyright
laws of other countries, unauthorized recording,
use, display, distribution, or revision of television
programs, videotapes, BD-ROM discs, DVDs,
CDs and other materials may subject you to civil
and/or criminal liability.
To use BD-Live functionality
You must attach an external USB device using the
USB port (see page 21).
Licenses
Java and all Java-based trademarks and logos are
trademarks or registered trademarks of Sun
Microsystems, Inc. in the United States and other
countries.
Manufactured under license from Dolby Laboratories.
Dolby and the double-D symbol are trademarks of
Dolby Laboratories.
Manufactured under license under U.S. Patent #’s:
5,451,942; 5,956,674; 5,974,380; 5,978,762;
6,226,616; 6,487,535; 7,392,195; 7,272,567;
7,333,929; 7,212,872 & other U.S. and worldwide
patents issued & pending. DTS is a registered
trademark and the DTS logos, Symbol, DTS-HD
and DTS-HD Master Audio l Essential are
trademarks of DTS, Inc. © 1996-2008 DTS, Inc.All
Rights Reserved.
HDMI, the HDMI logo and High-Definition
Multimedia Interface are trademarks or registered
trademarks of HDMI licensing LLC.
“BD-LIVE” logo is trademark of Blu-ray Disc
association.
is a trademark of DVD Format/Logo
Licensing Corporation.
“Blu-ray Disc” and are trademarks.
“BONUSVIEW” is trademark of Blu-ray Disc
Association.
This product is licensed under the AVC patent portfolio license and VC-1 patent portfolio license for
the personal and non-commercial use of a consumer to (i) encode video in compliance with the
AVC Standard and VC-1 Standard (“AVC/VC-1
Video”) and/or (ii) decode AVC/VC-1 Video that was
encoded by a consumer engaged in a personal and
non-commercial activity and/or was obtained from a
video provider licensed to provide AVC/VC-1 Video.
No license is granted or shall be implied for any
other use. Additional information may be obtained
from MPEG LA, LLC. See http://www.mpegla.com.
“AVCHD”and the AVCHD logo are trademarks
of Panasonic and Sony Corporation.
iPod is a trademark of Apple Inc., registered in
the U.S.and other countries.
“Made for iPod”means that an electronic
accessory has been designed to connect
specifically to iPod and has been certified by the
developer to meet Apple performance standards.
Apple is not responsible for the operation of
this device or its compliance with safety and regulatory standards.
Windows Media is either a registered trademark
or trademark of Microsoft Corporation in the
United States and/or other countries.
This product includes technology owned by
Microsoft Corporation and cannot be used or
distributed without a license from Microsoft
Licensing, Inc.
®
DivX
is a registered trademark of DivX, Inc.,
and is used under license.
(Symbol examples for batteries)
These symbols are only valid
in the European Union.
Pb
K058c_A1_En
3
Page 4

Contents
Introduction . . . . . . . . . . . . . . . . . . . . . . . . . . . . . . . . . . . . . .5-8
Remote control . . . . . . . . . . . . . . . . . . . . . . . . . . . . . . . . . . . .9
Front panel . . . . . . . . . . . . . . . . . . . . . . . . . . . . . . . . . . . . . .10
Rear panel . . . . . . . . . . . . . . . . . . . . . . . . . . . . . . . . . . . . . . .11
Speaker connection . . . . . . . . . . . . . . . . . . . . . . . . . . . . .12-14
Connections to your TV . . . . . . . . . . . . . . . . . . . . . . . . . .15-16
Resolution Setting . . . . . . . . . . . . . . . . . . . . . . . . . . . . . . .17-18
Internet connection . . . . . . . . . . . . . . . . . . . . . . . . . . . . . .19-20
Setting the sound mode . . . . . . . . . . . . . . . . . . . . . . . . . . . . .20
Adjust the speaker level settings . . . . . . . . . . . . . . . . . . . . .20
Using the late night function . . . . . . . . . . . . . . . . . . . . . . . . .20
Using the sleep timer . . . . . . . . . . . . . . . . . . . . . . . . . . . . . . .20
Using USB devices . . . . . . . . . . . . . . . . . . . . . . . . . . . . . . . . .21
Using the Home Menu . . . . . . . . . . . . . . . . . . . . . . . . . . . . . .22
Adjust the Setup settings . . . . . . . . . . . . . . . . . . . . . . . . .22-28
Play a disc . . . . . . . . . . . . . . . . . . . . . . . . . . . . . . . . . . . .29-32
Displaying disc Information . . . . . . . . . . . . . . . . . . . . . . . . . .33
Enjoying BD-LIVE™ . . . . . . . . . . . . . . . . . . . . . . . . . . . . .34-35
Playing a movie . . . . . . . . . . . . . . . . . . . . . . . . . . . . . . . .35-36
Listening to a music . . . . . . . . . . . . . . . . . . . . . . . . . . . . .37-38
Viewing a photo . . . . . . . . . . . . . . . . . . . . . . . . . . . . . . . .38-39
Listening to the radio . . . . . . . . . . . . . . . . . . . . . . . . . . . . . . .40
Playing the iPod . . . . . . . . . . . . . . . . . . . . . . . . . . . . . . . .40-41
Listening to music from your portable audio player . . . . . .42
Listening to the sound from your component . . . . . . . . . . .42
Using HDMI IN jacks . . . . . . . . . . . . . . . . . . . . . . . . . . . . . . .43
Using DIGITAL AUDIO IN jacks . . . . . . . . . . . . . . . . . . . . . . .43
Reference . . . . . . . . . . . . . . . . . . . . . . . . . . . . . . . . . . . . . . . .44
Language Codes . . . . . . . . . . . . . . . . . . . . . . . . . . . . . . . . . .45
Area Codes . . . . . . . . . . . . . . . . . . . . . . . . . . . . . . . . . . . . . .45
Troubleshooting . . . . . . . . . . . . . . . . . . . . . . . . . . . . . . . .46-47
Specifications . . . . . . . . . . . . . . . . . . . . . . . . . . . . . . . . . . . .48
Open source software notice . . . . . . . . . . . . . . . . . . . . . . . .49
Before connecting, operating or adjusting this product,
please read this instruction booklet carefully and completely.
4
4
Page 5
Introduction
To ensure proper use of this product, please read this owner’s manual
carefully and retain for future reference.
This manual provides information on the operation and maintenance of
your player.Should the unit require service, contact an authorized service
location.
About the Symbol Display
“ “ may appear on your TV display during operation and indicates that
the function explained in this owner’s manual is not available on that specific media.
Symbols Used in this Manual
Note:
Indicates special notes and operating features.
Tip:
Indicates tips and hints for making the task easier.
A section whose title has one of the following symbols are applicable only
to the disc represented by the symbol.
ALL
AVCHD
MOVIE
MUSIC
All discs listed below
BD
DVD
ACD
BD-ROM disc
DVD-Video, DVD±R/RW in Video mode or VR
mode and finalized
DVD±R/RW in AVCHD format
Movie files contained in the USB/Disc
Audio CDs
Music files contained in the USB/Disc
Handling the Unit
When shipping the unit
Please save the original shipping carton and packing materials. If you need
to ship the unit, for maximum protection, re-pack the unit as it was
originally packed at the factory.
Keeping the exterior surfaces clean
Do not use volatile liquids such as insecticide spray near the unit.
Wiping with strong pressure may damage the surface.
Do not leave rubber or plastic products in contact with the unit for a long
period of time.
Cleaning the unit
To clean the player, use a soft, dry cloth. If the surfaces are extremely dirty,
use a soft cloth lightly moistened with a mild detergent solution.
Do not use strong solvents such as alcohol, benzine, or thinner, as these
might damage the surface of the unit.
Maintaining the Unit
The unit is a high-tech, precision device.If the optical pick-up lens and disc
drive parts are dirty or wor n, the picture quality could be diminished.
For details, please contact your nearest authorized service centre.
Notes on Discs
Handling Discs
Do not touch the playback side of the disc.Hold the disc by the edges so
that fingerprints do not get on the surface. Never stick paper or tape on the
disc.
Storing Discs
After playing, store the disc in its case.Do not expose the disc to direct
sunlight or sources of heat and never leave it in a parked car exposed to
direct sunlight.
Cleaning Discs
Fingerprints and dust on the disc can cause poor picture quality and sound
distortion. Before playing, clean the disc with a clean cloth. Wipe the disc
from the centre out.
Do not use strong solvents such as alcohol, benzine, thinner, commercially
available cleaners, or anti-static spray intended for older vinyl records.
5
Page 6

Playable Discs
Blu-ray Disc
- Discs such as movies that can be purchased or rented
- BD-R/RE discs that contain audio titles, DivX, MP3, WMA, or
Photo files.
DVD-VIDEO (8 cm / 12 cm disc)
Discs such as movies that can be purchased or rented
DVD-R (8 cm / 12 cm disc)
- Video mode and finalized only
- Supports the dual layer disc also
-AVCHD format
-DVD-R discs that contain audio titles, DivX, MP3, WMA, or
Photo files.
DVD-RW (8 cm / 12 cm disc)
- VR mode, Video mode and finalized only
-AVCHD format
-DVD-RW discs that contain audio titles, DivX, MP3, WMA, or
Photo files.
DVD+R (8 cm / 12 cm disc)
- Video mode and finalized disc only
- Supports the dual layer disc also
-AVCHD format
-DVD+R discs that contain audio titles, DivX, MP3, WMA, or
Photo files.
DVD+RW (8 cm / 12 cm disc)
- Video mode and finalized only
-AVCHD format
-DVD+RW discs that contain audio titles, DivX, MP3, WMA, or
Photo files.
Audio CD (8 cm / 12 cm disc)
Audio CDs or CD-Rs/CD-RWs in audio CD format that can be
purchased
CD-R/CD-RW (8 cm / 12 cm disc)
CD-R/RW discs that contain finalized audio files, DivX, MP3, WMA,
or Photo files.
Notes:
Depending on the conditions of the recording equipment or the CD-
R/RW (or DVD±R/RW) disc itself, some CD-R/RW (or DVD±R/RW) discs
cannot be played on the unit.
Do not attach any seal or label to either side (the labeled side or the
recorded side) of a disc.
Do not use irregularly shaped CDs (e.g., heart-shaped or octagonal).
Doing so may result in malfunctions.
Depending on the recording software & the finalization, some recorded
discs (CD-R/RW or DVD±R/RW) may not be playable.
DVD±R/RW and CD-R/RW discs recorded using a personal computer or
a DVD or CD Recorder may not play if the disc is damaged or dirty, or if
there is dirt or condensation on the player’s lens.
If you record a disc using a personal computer, even if it is recorded in a
compatible format, there are cases in which it may not play because of
the settings of the application software used to create the disc. (Check
with the software publisher for more detailed information.)
This player requires discs and recordings to meet certain technical stan-
dards in order to achieve optimal playback quality.Pre-recorded DVDs
are automatically set to these standards.There are many different types
of recordable disc formats (including CD-R containing MP3 or WMA
files) and these require certain pre-existing conditions to ensure
compatible playback.
Customers should note that permission is required in order to download
MP3 / WMA files and music from the Internet. Our company has no right
to grant such permission. Permission should always be sought from the
copyright owner.
You have to set the disc format option to [Mastered] in order to make the
discs compatible with the players when for matting rewritable discs. When
setting the option to Live System, you cannot use it on player.
(Mastered/Live File System : Disc format system for windows Vista)
6
Page 7

BD-ROM Disc Features
BD-ROM Discs can store 25 GB (single layer) or 50 GB (dual layer) on a
single sided disc - about 5 to 10 times the capacity of a DVD.
BD-ROM Discs also support the highest quality HD video available in the
industry (up to 1920 x 1080) - Large capacity means no compromise on
video quality. Furthermore, a BD-ROM disc has the same familiar size and
look as DVD.
The following BD-ROM disc features are disc dependent and will vary.
Appearance and navigation of features will also vary from disc to disc.
Not all discs will have the features described below.
BD-ROM, Hybrid disc have both BD-ROM and DVD (or CD) layers on one
side. On such discs, BD-ROM layer will be only played back in this player.
Video highlights
The BD-ROM format for movie distribution supports three highly advanced
video codecs, including MPEG-2, MPEG4 AVC (H.264), and SMPTE VC1.
HD video resolutions are also available:
1920 x 1080 HD
1280 x 720 HD
Graphic planes
Two individual, full HD resolution (1920x1080) graphic planes (layers) are
available, on top of the HD video layer. One plane is assigned to videorelated, frame accurate graphics (like subtitles), and the other plane is
assigned to interactive graphic elements, such as buttons or menus.
For both planes, various wipes, fades and scroll effects may be available.
For High-Definition Playback
To view high-definition contents from BD-ROM discs, an HDTV is required.
Some discs may require HDMI OUT for viewing of high-definition contents.
Ability to view high-definition contents in BD-ROM discs may be limited
depending on the resolution of your TV.
Menu sounds
When you highlight or select a menu option, sounds can be heard such as
button clicks or a voice-over explaining the highlighted menu choice.
Multi-page/PopUp Menus
With DVD-Video, playback is interrupted each time a new menu screen is
accessed. Due to BD-ROM disc’s ability to preload data from the disc without interrupting playback, a menu can consist of several pages.
You can browse through the menu pages or select different menu paths,
while the audio and video remain playing in the background.
Interactivity
Certain BD-ROM Discs may contain animated menus and/or trivia games.
User Browsable Slideshows
With BD-ROM Discs, you can browse through var ious still pictures while
the audio remains playing.
Subtitles
Depending on what is contained on the BD-ROM disc, you may be able to
select different font styles, sizes and colours for some subtitles. Subtitles
may also be animated, scrolled or faded in and out.
BD-J Interactive Capability
The BD-ROM format supports Java for interactive functions. “BD-J” offers
content providers almost unlimited functionality when creating interactive
BD-ROM titles.
BD-ROM Disc Compatibility
This player supports BD-ROM Profile 2.
• Discs supporting BD-Live (BD-ROM version 2 Profile 2) that allows interactive functions to be used when this unit is connected to the Internet in
addition to the BONUSVIEW function.
• Discs supporting BONUSVIEW (BD-ROM version 2 Profile 1 version
1.1/Final Standard Profile) that allows Virtual packages or Picture-inPicture functions to be used.
7
Page 8
Regional Code
This unit has a regional code printed on the rear of the unit.This unit can play
only BD-ROM or DVD discs labeled same as the rear of the unit or “ALL”.
AVCHD (Advanced Video Codec High Definition)
• This player can playback AVCHD format discs.These discs are nor mally
recorded and used in camcorders.
• The AVCHD for mat is a high definition digital video camera format.
• The MPEG-4 AVC/H.264 for mat is capable of compressing images at
higher efficiency than that of the conventional image compressing
format.
• Some AVCHD discs use the “x.v.Colour” format.
• This player can playback AVCHD discs using “x.v.Colour” format.
• “x.v.Colour”is a trademark of Sony Corporation.
• Some AVCHD for mat discs may not play, depending on the recording
condition.
•AVCHD format discs need to be finalized.
• “x.v.Colour”offers a wider colour range than normal DVD camcorder
discs.
Compatibility Notes
• Because BD-ROM are a new format, certain disc, digital connection and
other compatibility issues are possible.If you experience compatibility
problems, please contact an authorized Customer Service Centre.
• Viewing high-definition content and up-converting standard DVD content may
require a HDMI-capable input or HDCP-capable DVI input on your display
device.
• Some BD-ROM and DVD discs may restrict the use of some operation
commands or features.
• Dolby Digital EX, DTS-ES and DTS 96/24 are output as Dolby Digital 5.1 or
DTS 5.1.
• You can use the USB device that is used to store some disc related
information, including downloaded on-line content.The disc you are using will
control how long this information is retained.
Certain System Requirements
For high definition video playback:
• High definition display that has COMPONENT or HDMI input jacks.
• BD-ROM disc with high definition content.
• HDMI or HDCP capable DVI input on your display device is required for some
content (as specified by disc authors).
• For up-conversion of standard definition DVD, a HDMI or HDCP capable DVI
input on your display device is required for copy protected content.
Important Notice for TV colour system
The colour system of this player differs according to currently playing discs.
For example, when the player plays back the disc recorded in the NTSC colour
system, the image is outputted as a NTSC signal.
Only the multi system colour TV can receive all signals outputted from the
player.
Notes:
•
If you have a PAL colour system TV, you will see just distorted images when
using discs recorded in NTSC.
• The multi system colour TV changes the colour system automatically
according to input signals. In case that the colour system is not changed
automatically, tur n it off and then on to see nor mal images on screen.
• Even if the disc recorded in NTSC colour system are well displayed on your
TV, these may not be recorded correctly on your recorder.
“x.v.Colour”, and are trademarks of Sony Corporation.
8
Page 9
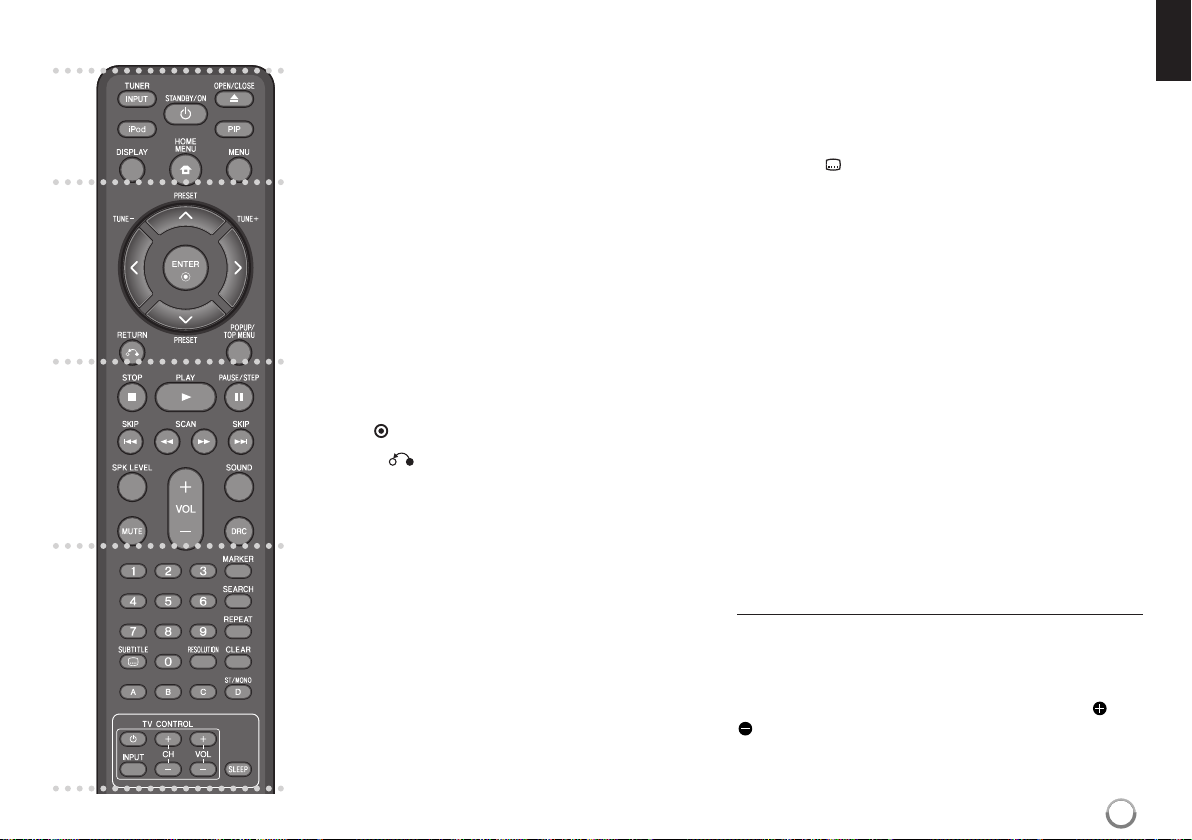
Remote control
¥
ø
π
[
¥
INPUT (TUNER): Changes the input source
(FM, AUX, PORTABLE, OPTICAL, COAXIAL,
HDMI IN 1, HDMI IN 2)
STANDBY/ON: Switches the player ON or OFF.
OPEN/CLOSE (0): Opens and closes the disc tray.
iPod: Selects REMOTE IPOD or OSD IPOD mode.
PIP*: Switches on/off Secondar y Video (Picture-in-pic-
ture) (BD-ROM only).
DISPLAY: Displays or exits On-Screen Display.
HOME MENU: Displays or exits the [Home Menu].
MENU: Accesses menu on a disc.
ø
Direction buttons: Selects an option in the menu.
PRESET (5/∞): Selects programme of Radio.
TUNE (+/-): Tunes in the desired radio station.
ENTER ( ): Acknowledges menu selection.
RETURN ( ): Exits the menu or resumes playback.
The resume play function may work depending on the
BD-ROM disc.
POPUP/TOP MENU: Displays the DVD title menu or
BD-ROM’s popup menu, if available.
π
STOP (7): Stops playback.
PLAY (£): Starts playback.
PAUSE/STEP (8): Pauses playback.
SKIP (4 / ¢): Go to next or previous chapter / track
/ file.
SCAN (1 / ¡): Searches backward or forward.
SPK LEVEL:
SOUND: Selects a sound mode.
MUTE: Press MUTE to mute your unit.You can mute
your unit in order, for example, to answer the telephone.
VOL (+/-): Adjusts speaker volume.
Sets the sound level of desired speaker.
DRC: Sets the late night function.
[
0-9 numerical buttons: Select numbered options in a
menu.
SUBTITLE ( ): Selects a subtitle language.
RESOLUTION: Sets the output resolution for HDMI and
COMPONENT VIDEO OUT jacks.
MARKER: Marks any point during playback.
SEARCH: Displays or exits the search menu.
REPEAT: Repeat a desired section.
CLEAR: Removes a mark on the search menu or a
number when setting the password.
Coloured (A, B, C, D) buttons: Use to navigate BD-
ROM menus.They are also used for [MOVIE], [PHOTO]
and [MUSIC] menu.
- D button: Selects MONO or STEREO in FM mode.
TV Control Buttons: See page 44.
SLEEP: Sets a cer tain per iod of time after which the unit
will switch to standby.
* Depending on a disc type or the pre-recorded con-
tents of the BD-ROM disc, different functions may be
executed than other media or there are no response
when pressing some buttons (depending on media
used).
Remote Control Operation
Point the Remote Control at the remote sensor and
press the buttons.
Remote Control Battery Installation
Remove the battery cover on the rear of the Remote
Control, and insert a R03 (size AAA) battery with and
matched correctly.
9
Page 10
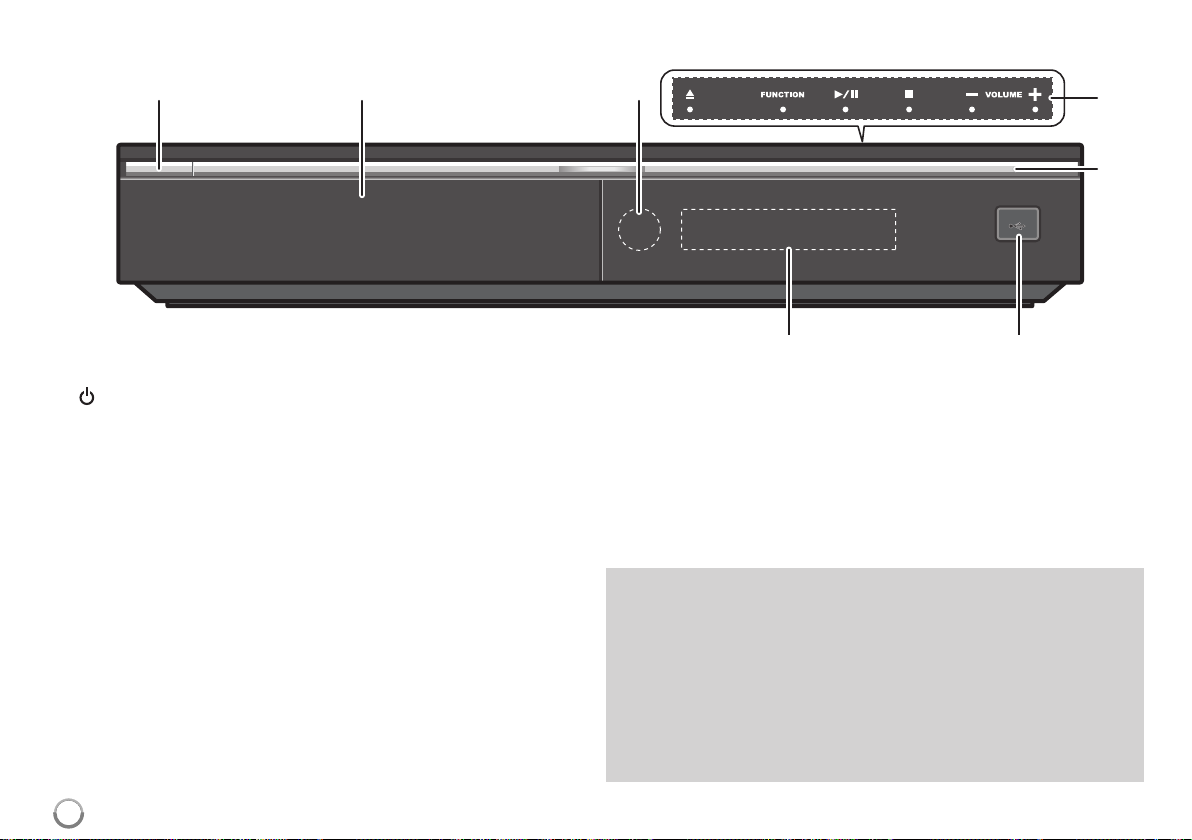
Front panel
¥ø π
¥ STANDBY/ON Button
Switches the unit ON or OFF.
ø Disc Tra y
Insert a disc here.
π Remote Sensor
Point the remote control here.
[ Touch Buttons on top panel
- 0 (OPEN/CLOSE)
Opens or closes the disc tray.
- FUNCTION
Changes the input source (FM, OSD IPOD, REMOTE IPOD, AUX,
PORTABLE, OPTICAL, COAXIAL, HDMI IN 1, HDMI IN 2) or
displays On-Screen Display.
- (£/8)PLAY / PAUSE
Starts playback.
Pause playback temporarily,
press again to exit pause mode.
- 7 (STOP)
Stops playback.
10
[
“
‘]
- VOLUME –/+
Adjusts speaker volume.
“ Action indicator
Lights when a touch sensor operation is performed.
] USB Port
Connect a USB device.
‘ Display Window
Shows the current status of the player.
Precautions in using the touch buttons
• Use the touch buttons with clean and dry hands.
- In a humid environment, wipe out any moisture on the touch buttons
before using.
• Do not press the touch buttons hard to make it work.
- If you apply too much strength, it can damage the sensor of the touch
buttons.
• Touch the button that you want to work in order to operate the function
correctly.
• Be careful not to have any conductive mater ial such as metallic object
on the touch buttons.It can cause malfunctions.
Page 11
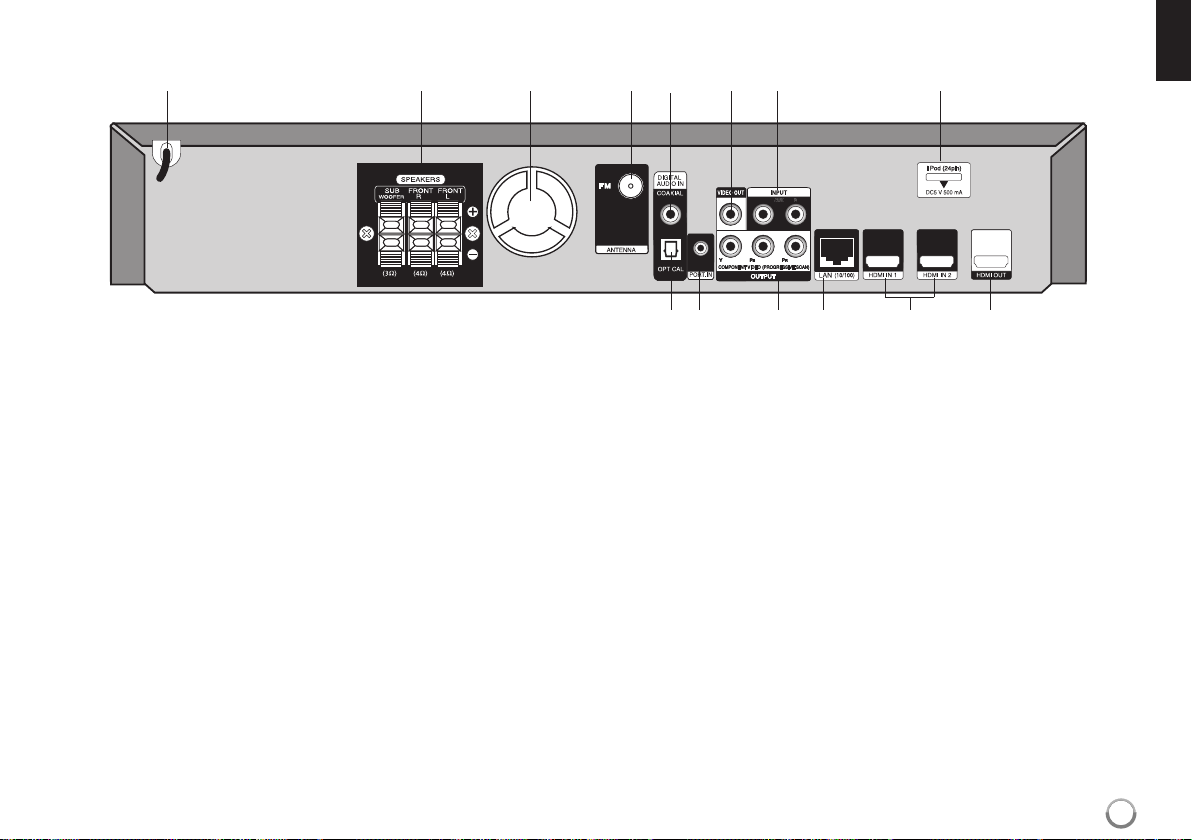
Rear panel
¥øπ[“]‘\
«Å Í Î Ï Ì
¥ AC Power Cord
Plug into the power source.
ø SPEAKER Connectors
Connect the speakers.
π Cooling Fan
[ FM ANTENNA Connector
Connect the FM antenna.
“ DIGITAL AUDIO IN (COAXIAL)
Connect to digital (coaxial) audio equipment.
] VIDEO OUT
Connect to a TV with video inputs.
‘ AUX (L/R) INPUT
Connect to an external source with 2 channel audio outputs.
\ iPod (24 pin)
Connect to the furnished iPod cradle.
« DIGITAL AUDIO IN (OPTICAL)
Connect to digital (optical) audio equipment.
Å PORT. IN
Connect to a portable player with audio outputs.
)
Í COMPONENT VIDEO (Y P
OUTPUT (PROGRESSIVE SCAN)
Connect to a TV with Y Pb Pr inputs.
Î LAN port
Connect a network with an always-on broadband connection.
Ï HDMI IN (Type A) 1/2
Connect to an external source with HDMI outputs.
Ì HDMI OUT (Type A)
Connect to TV with HDMI inputs.(Interface for digital audio and video)
B PR
11
Page 12

Speaker Connection
Attaching non-skid pads
• Attach the four large non-skid pads are for the subwoofer.
Use the supplied adhesive to attach 4 pads to the base of the subwoofer.
Assembling the speaker stands and securing
your front speakers
¥ Insert the pole from the holes behind the base and secure with the
4 screws.
ø Affix the gasket to the pole.
Affix the gasket to the surface of the pole where the speaker will be mounted.
π Insert the speaker cord from the hole behind the base through to
the pole and connect it to the speaker terminal. After connecting,
put the speaker wire in the gap on the back side of the speaker.
Match the colour tube on the wire with the colour indicator on the label, then
insert the white wire with gray line into the red (+) side and the other wire into
the black (-) side.
[ Secure the speaker and the pole with 2 screws.
Ensure that the speaker wire does not get pinched between the speaker and
the pole.
“ After connecting, put the speaker wire in the back of the base of
the stand.
12
Page 13
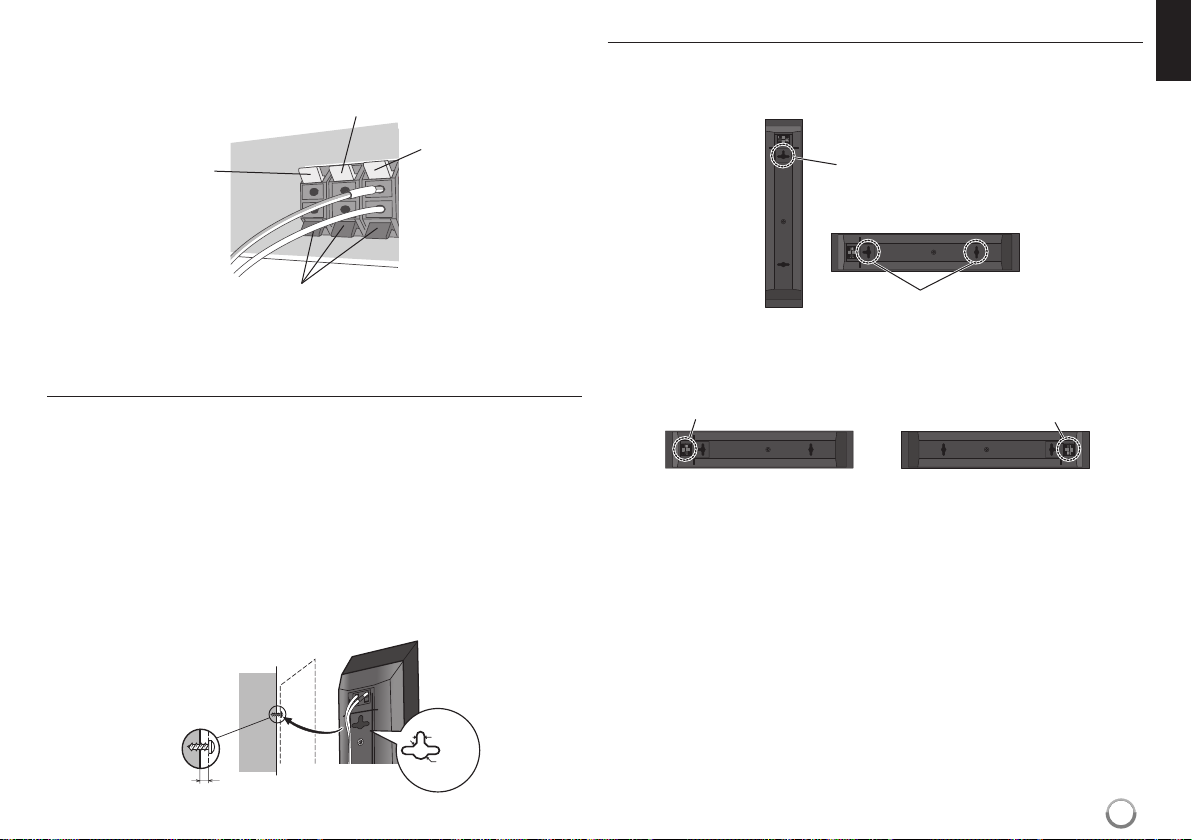
] Connect the wires to the player.
Connect the white wire with gray line into (+) side and the other wire into (–)
side.To connect the cable to the player, press each plastic finger pad to
open the connection terminal. Inser t the wire and release the finger pad.
Red (+)
White (+)
Orange (+)
Attaching the speakers
The front speaker can be hung vertically or horizontally on the wall. Use one
hole to hang it vertically and two holes to hang it horizontally. The illustration
below shows the front right speaker.
Vertical set up
Hole
Horizontal set up
Black (–)
Wall mounting the speakers
The front speaker have mounting holes.
Before mounting
• Remember that the speaker system is heavy and that its weight could cause
the screws to work loose, or the wall material to fail to support it, resulting in
the speaker falling.Make sure that the wall you intend to mount the speakers
on is strong enough to support them. Do not mount on plywood or soft surface walls.
• Mounting screws are not supplied. Use screws suitable for the wall material
and support the weight of the speaker.
Cautions:
• If you are unsure of the qualities and strength of the wall, consult a professional for advice.
• Pioneer is not responsible for any accidents or damage that result from
improper installation.
Mounting screw
(not supplied)
5
mm
10
mm
5 mm to 7 mm
Holes
When installing the speaker horizontally, set it up so that the speaker terminal
on the back side of the speaker is on the outside on the end of the surface, farthest away from the other speaker.
Speaker terminal Speaker terminal
Front right Front left
Note:
Do not connect the supplied speakers to any amplifier other than the one
supplied with this system. Connection to any other amplifier may result in
malfunction or fire.
13
Page 14

Additional notes on speaker placement
• Install the front left and right speakers at an equal distance from the TV.
Precautions:
• Make sure that all the bare speaker wire is twisted together and inserted fully
into the speaker terminal. If any of the bare speaker wire touches the back
panel it may cause the power to cut off as a safety measure.
• The front speakers supplied with this system are magnetically shielded.
However, depending on the installation location, color distor tion may occur if
the speaker is installed extremely close to the screen of a television set.If
this case happens, turn the power switch of the television set OFF, and turn it
ON after 15 min. to 30 min. If the problem persists, place the speaker system
away from the television set.
• The subwoofer is not magnetically shielded and so should not be placed near
a TV or monitor. Magnetic storage media (such as floppy discs and tape or
video cassettes) should also not be kept close to the subwoofer.
• Do not attach the subwoofer to a wall or ceiling.They may fall off and cause
injury.
FM Antenna connection
FM - Connect the FM antenna to the player.
The reception will be its best when the two loose ends of the antenna are in a
straight and horizontal line.
14
Page 15
Connections to Your TV
Be sure to turn off the power and unplug the power cord from the power
outlet whenever making or changing connections.
Make one of the following connections, depending on the capabilities of
your existing equipment.
Tips:
• Depending on your TV and other equipment you wish to connect, there
are various ways you could connect the player. Use only one of the connections described below.
• Please refer to the manuals of your TV or other devices as necessary to
make the best connections.
Cautions:
• Make sure the player is connected directly to the TV.Tune the TV to the
correct video input channel.
• Do not connect your player via your VCR. The image could be distorted
by the copy protection system.
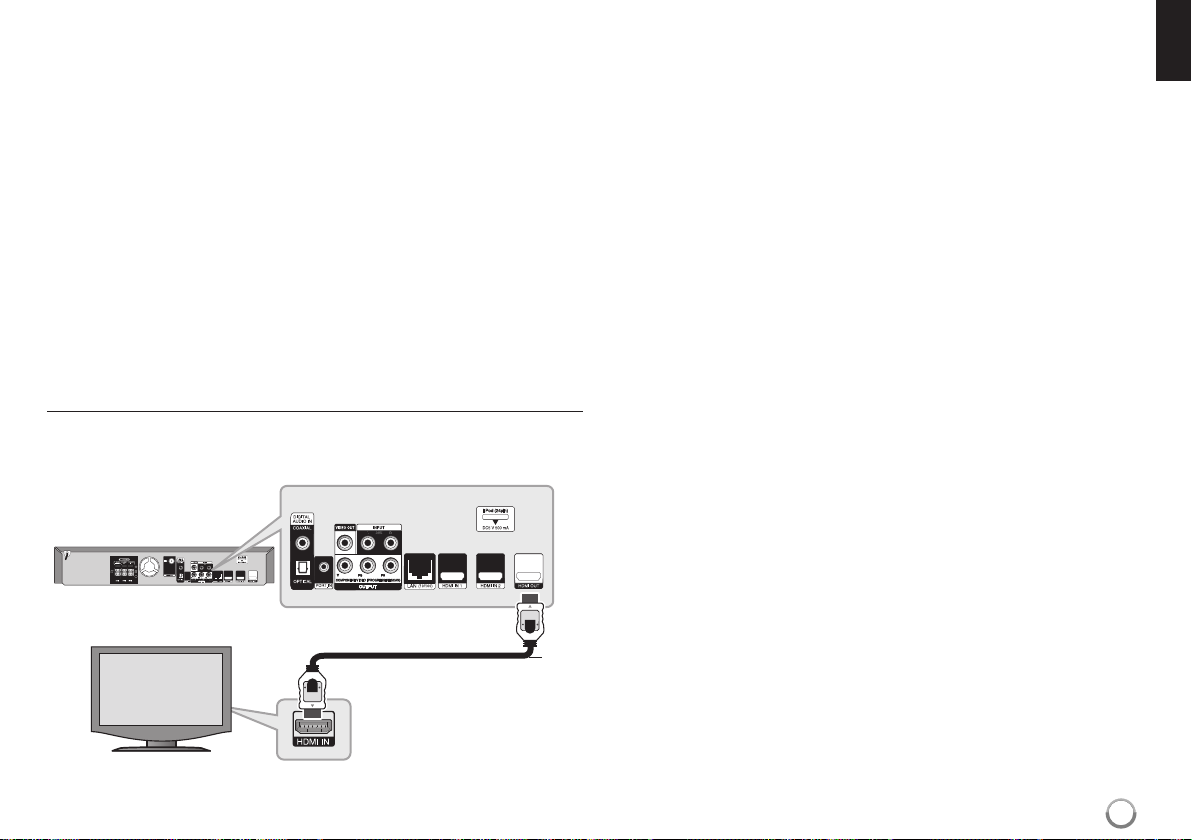
HDMI Connection
If you have a HDMI TV or monitor, you can connect it to this player using a
HDMI cable.
BD player
Connect the HDMI OUT jack on the player to the HDMI IN jack on a HDMI
compatible TV or monitor (H).
Set the TV’s source to HDMI (refer to TV’s Owner’s manual).
Notes:
•You must select a HDMI audio output that your TV accepts using
[HDMI Audio] options on the [Setup] menu (see page 25).
• If a connected HDMI device does not accept the audio output of the unit,
the HDMI device’s audio sound may be distorted or may not output.
Tips:
• You can fully enjoy digital audio and video signals together with this
HDMI connection.
• When you use HDMI connection, you can change the resolution for the
HDMI output. (Refer to “Resolution Setting” on page 17-18.)
• Select the type of video output from the HDMI OUT jack using
[HDMI Color Setting] option on the [Setup] menu (see page 23).
Cautions:
• Changing the resolution when the connection has already been
established may result in malfunctions.To solve the problem, turn
off the player and then turn it on again.
• When the HDMI connection with HDCP is not verified, TV screen is
changed to black or green screen or the snow noise may occur on the
screen. In this case, check the HDMI connection, or disconnect the
HDMI cable.
• If there is noise or lines on the screen, please check the HDMI cable
(length is generally limited to 4.5m) and use a High Speed HDMI cable
(Version 1.3).
TV
H
15
Page 16
Additional Information for HDMI
• When you connect a HDMI or DVI compatible device make sure of the
following:
-Try switching off the HDMI/DVI device and this player.Next, switch on
the HDMI/DVI device and leave it for around 30 seconds, then switch
on this player.
- The connected device’s video input is set correctly for this unit.
- The connected device is compatible with 720x576p, 1280x720p,
1920x1080i or 1920x1080p video input.
• Not all HDCP-compatible HDMI or DVI devices will work with this player.
- The picture will not be displayed properly with non-HDCP device.
- This player does not playback and TV screen is changed to black or
green screen or the snow noise may occur on the screen.
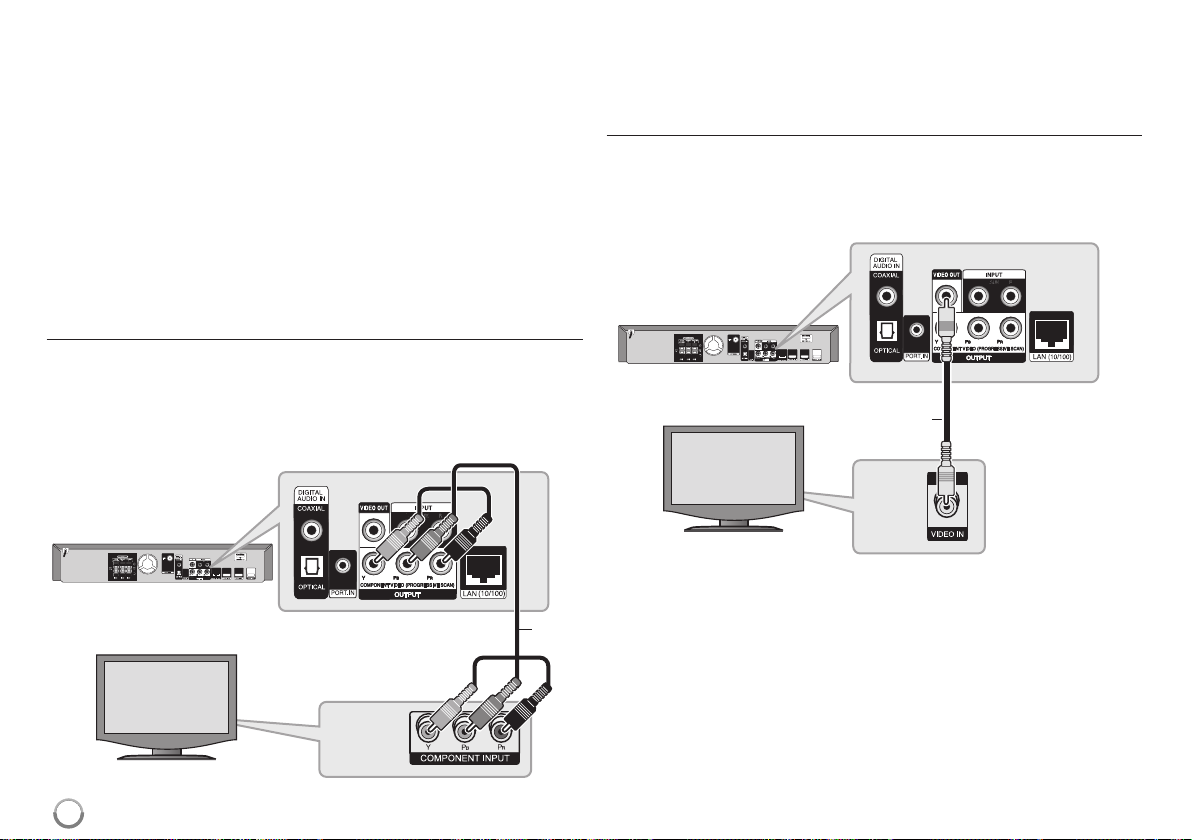
Component Video Connection
Connect the COMPONENT VIDEO OUT jacks on the player to the
corresponding input jacks on the TV using Y Pb Pr cables (C).
You can hear the sound through the system’s speakers.
BD player
Tip:
When you use COMPONENT VIDEO OUTconnection, you can change
the resolution for the output. (Refer to “Resolution setting” on page 17-18.)
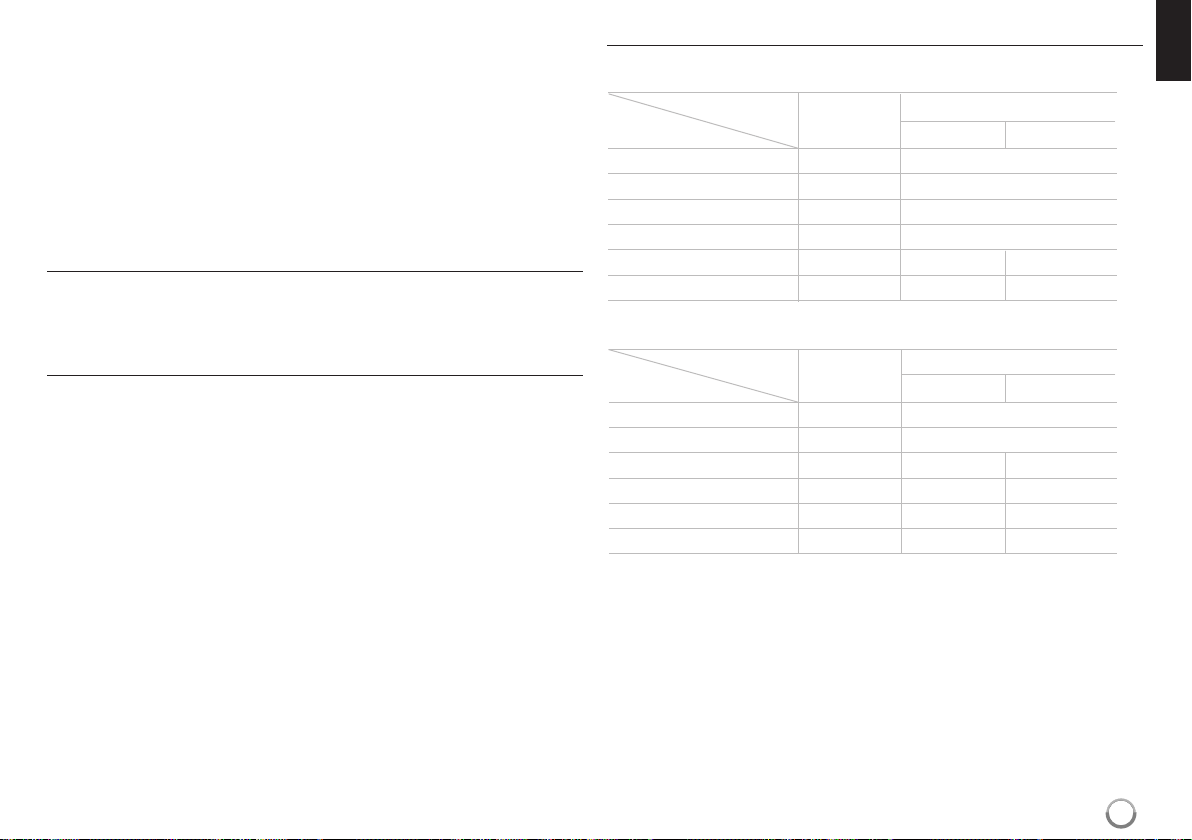
Video Connection
Connect the VIDEO OUT jack on the player to the video in jack on the TV
using a video cable (V).
You can hear the sound through the system’s speakers.
BD player
V
TV
16
C
TV
Page 17
Resolution Setting
The player provides several output resolutions for HDMI OUT and
COMPONENT VIDEO OUT jacks.
You can change the resolution using [Setup] menu or pressing the
RESOLUTION button.
Note:
Since several factors affect the resolution of video output, see “Available
resolution according to the resolution setting” to the right.
How to change the resolution using RESOLUTION
button
Press RESOLUTION repeatedly during stop mode to change the resolution.The display window will show you the current
resolution.
How to change the resolution using the [Setup] menu
1 Press HOME MENU and the [Home Menu] appears.
2 Select the [Setup] and press ENTER. The [Setup] menu appears.
3 Use 5 / ∞ to select [DISPLAY] option then press 3 to move to the
second level.
4 Use 5 / ∞ to select the [Resolution] option then press 3 to move to the
third level.
5 Use 5 / ∞ to select the desired resolution then press ENTER to confir m
your selection.
Available resolution according to the resolution setting
• When the non-copy protected media is playing back
Video Output HDMI OUT COMPONENT VIDEO OUT
Resolution Setting
576i 576p 576i
576p 576p 576p
720p 720p 720p
1080i 1080i 1080i
1080p / 24Hz* 1080p / 24Hz 576i 1080i
1080p / 50Hz* 1080p / 50Hz 576i 1080i
• When the copy protected media is playing back
Video Output HDMI OUT COMPONENT VIDEO OUT
Resolution Setting
576i 576p 576i
576p 576p 576p
720p 720p 576i 576p
1080i 1080i 576i 576p
1080p / 24Hz* 1080p / 24Hz 576i 576p
1080p / 50Hz* 1080p / 50Hz 576i 576p
* Refer to “1080p Display Mode” on page 23.
HDMI connected HDMI disconnected
HDMI connected HDMI disconnected
Note:
If the video signal from the HDMI OUT jack is not output from the TV
screen when [Resolution] is set to [Auto], change the video output
resolution by pressing RESOLUTION button.
Notes:
• Depending on your display, some of the resolution settings may result in
the picture disappearing or an abnormal picture appearing. In this case,
press HOME MENU then RESOLUTION repeatedly until the picture reappear.
• This player supports simultaneous output of all video out jacks.The
resolution of the HDMI output will not be the same as the resolution
output on the component video output.
17
Page 18

HDMI OUT connection
•For the 576i resolution setting, real output resolution of HDMI OUT will
change to 576p.
• If you select a resolution manually and then connect the HDMI jack to
TV and your TV does not accept it, the resolution setting is set to [Auto].
• If you select a resolution that your TV does not accept, the war ning
message will appear.After resolution change, if you cannot see the
screen, please wait 20 seconds and the resolution will automatically
revert back to the previous resolution.
• The 1080p video output frame rate may be automatically set to either
24Hz or 50Hz depending both on the capability and preference of the
connected TV and based on the native video frame rate of the content
on the BD-ROM disc.
COMPONENT VIDEO OUT connection
•For the 1080p resolution setting with unprotected media, real output
resolution of COMPONENT VIDEO OUT will change to 1080i.
•For the 720p, 1080i, 1080p resolution setting with protected media, real
output resolution of COMPONENT VIDEO OUT will change to 576i or
576p depending on the connectivity of HDMI cable.
• BD or DVD could prevent up-scaling on analog output.
VIDEO OUT connection
The resolution of the VIDEO OUT jack is always outputted at 576i
resolution.
18
Page 19

Internet connection
This player can be connected to a local area network (LAN) via the LAN
port on the rear panel.
After making the physical connection the player needs to be set up for
network communication.This is done from the [Setup] menu — see
“[NETWORK] Menu” on page 27 for detailed instructions.
Connect the player’s LAN por t to the corresponding port on your Modem or
Router using a LAN cable.
Use a commercially available straight LAN cable (Categor y 5/CAT5 or
better with RJ45 connector).
By connecting the unit to broadband Internet, you can use a disc that
offers BD-Live.
BD player
Broadband
Service
Router
LAN
Cautions:
• When plugging or unplugging the LAN cable, hold the plug portion of the
cable.When unplugging, do not pull on the LAN cable but unplug while
pressing down on the lock.
• Do not connect a modular phone cable to the LAN port.
• Since there are various connection configurations, please follow the
specifications of your telecommunication carrier or internet service
provider.
Notes:
• Depending on the internet service provider (ISP), the number of devices
that can receive internet service may be limited by the applicable terms
of service. For details, contact your ISP.
• Our company is not responsible for any malfunction of the player and/or
the internet connection feature due to communication errors/malfunctions associated with your broadband internet connection, or other
connected equipment.
• Our company is not responsible for any trouble in your internet
connection.
• The features of BD-ROM discs made available through the Internet
Connection feature are not created or provided by our company, and our
company is not responsible for their functionality or continued availability.
Some disc related material available by the Internet Connection may not
be compatible with this player. If you have questions about such content,
please contact the producer of the disc.
• Some internet contents may require a higher bandwidth connection.
•Even if the player is properly connected and configured, some internet
contents may not operate properly because of internet congestion, the
quality or bandwidth of your internet service, or problems at the provider
of the content.
• Some internet connection operations may not be possible due to certain
restrictions set by the Internet service provider (ISP) supplying your
broadband Internet connection.
•Any fees charged by an ISP including, without limitation, connection
charges are your responsibility.
•A 10 Base-T or 100 Base-TX LAN port is required for connection to this
player. If your internet service does not allow for such a connection, you
will not be able to connect the player.
•You must use a Router to use xDSL service.
19
Page 20

•A DSL modem is required to use DSL service and a cable modem is
required to use cable modem service. Depending on the access method
of and subscriber agreement with your ISP, you may not be able to use
the internet connection feature contained in this player or you may be
limited to the number of devices you can connect at the same time.
(If your ISP limits subscription to one device, this player may not be
allowed to connect when a PC is already connected.)
• The use of a “Router” may not be allowed or its usage may be limited
depending on the policies and restrictions of your ISP. For details,
contact your ISP directly.
•Your ISP may protect this player from being connected to network when
confirming MAC ADDRESS. In that case, contact your ISP to request to
initialize MAC ADDRESS.
Setting the sound mode
You can select a suitable sound mode. Press SOUND repeatedly until the
desired mode appears on the front panel display or the TV screen.
The setting the sound mode is not available when [HDMI Audio] is set to
[On] (see page 25).
[Bypass] mode: Software with multichannel surround audio signals
is played according to the way it was recorded.
[Bass Booster] mode: Reinforce the bass sound effect from front left
and right speaker and subwoofer.
[News] mode: This mode makes voice sound clear, improving the
quality of voice sound.
[Drama] mode: You can enjoy more dynamic sound with improved
centre channel while watching a television drama.
[Sports] mode: This mode produces dynamic sound expansion for the
sports program.
[Game] mode: You can enjoy more vir tual sound while playing video
games.
[Concert] mode: Creates the sound of concert hall.
[MP3 EXP] mode: When listening to MP3 files or other
compressed music, you can enhance the sound.
This mode is available only to 2 channel sources.
Note:
Only [BYPASS] mode is available when HDMI IN’s audio is a compressed
bitstream of Dolby Digital Plus, Dolby TrueHD and DTS-HD.
Adjust the speaker level settings
You can adjust the sound level of each speaker.
Press SPK LEVEL repeatedly to select a desired speaker to set.
Press VOL (+/-) to adjust the sound level of the selected speaker while the
level setting menu is displayed on the front panel display or the TV screen.
Repeat and adjust the sound level of the other speakers.
Using the late night function
You can compress the dynamic range of the sound track.
Press DRC repeatedly.
This may be useful when you want to watch movies at low volumes late at night.
[DRC OFF]: Late night function off.
[DRC ON]: Reduction in dynamic range.
Notes:
•
The late night function may be less effective or have no effect depending on
the source.
• During the late night mode is on, the lighting of the touch buttons and the
volume knob are turned off and the front panel display is dimmed.
Using the sleep timer
You can set the system to turn off at a preset time, so you can fall asleep
listening to music.
- Press SLEEP repeatedly to select the desired time per iod options (in minutes):
(Dimmer on
Dimmer on:
panel display is dimmed.
-To view the time countdown to the standby mode, press SLEEP again.
-To deactivate the sleep timer, press SLEEP until the previous status is displayed
or press POWER to switch the unit to standby.
==
Sleep timer value
The lighting of the blue illumination are turned off and the front
==
Dimmer off)
20
Page 21
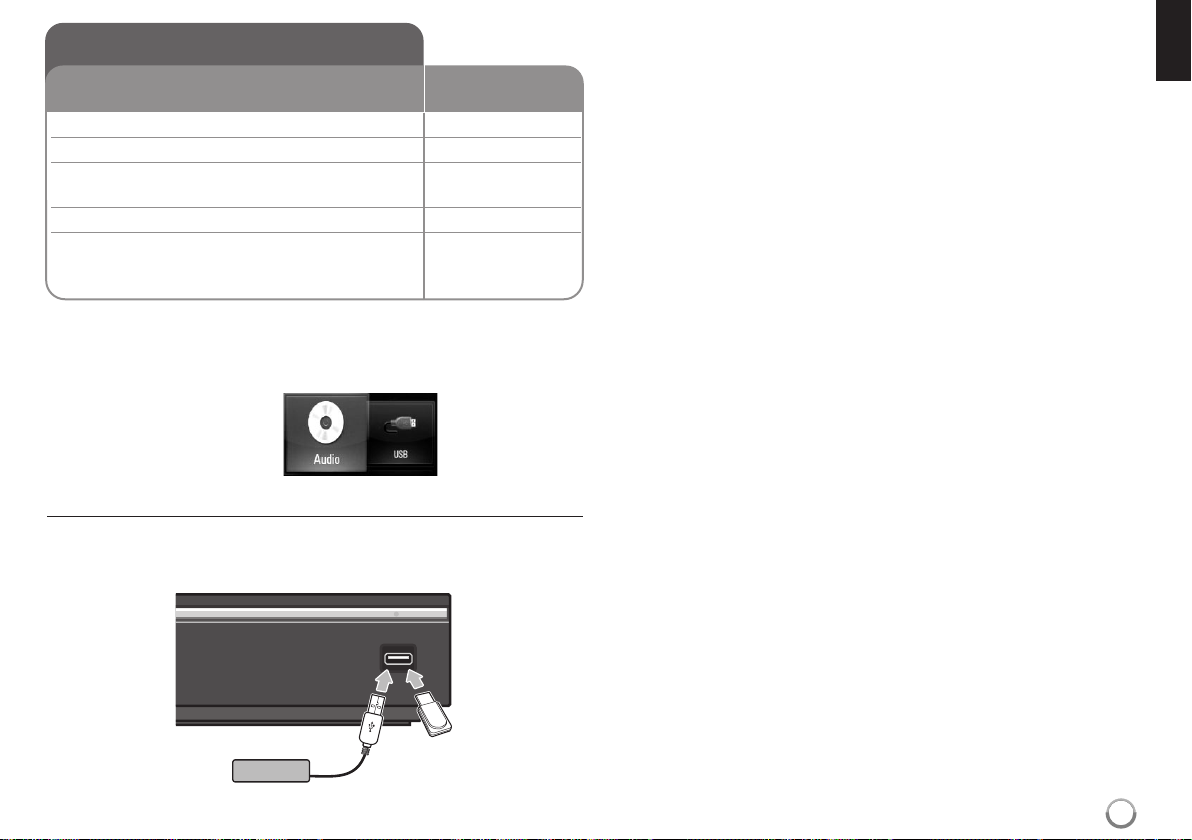
Using USB devices
This unit can play the movie, music and photo
files contained on the USB device.
1 Connect a USB device: –
2Displays the [Home Menu]: HOME MENU
3 Select a main option: 23, ENTER
[Movie], [Photo] or [Music] option
4 Select the [USB] option: 23
5Displays corresponding menu list: ENTER
[Movie], [Photo] or [Music] menu appears.
Details for the menu are on pages 35-39.
Tip:
If you select the [Movie], [Photo] or [Music] option when the USB device is
connected and a disc is inserted simultaneously, the menu for selecting a
media will appear.Select a media then press ENTER.
For example:
Inserting/Removing the USB device
Inserting the USB device – Insert straight-in until it fits into place.
Removing the USB device – Withdraw the USB device or cable
carefully.
ON REMOTE
Notes:
• This player supports USB flash memory/external HDD formatted in
FAT16, FAT32 and NTFS when accessing files (music, photo, movie).
However, for BD-Live, only FAT16 and FAT32 formats are suppor ted.
Please use the Internal Flash Memory or USB flash memor y/external
HDD formatted in either FAT16 or FAT32 when using BD-Live.
• The USB device can be used for the local storage for enjoying
BD-Live discs with Internet.
• This unit can support up to 4 partitions of the USB device.
• Do not extract the USB device during operation (play, etc.).
•A USB device which requires additional program installation when you
have connected it to a computer is not supported.
• USB device: USB device that support USB1.1 and USB2.0.
•Movie files (DivX), Music files (MP3/WMA) and photo files (JPEG/PNG)
can be played.For details of operations on each file, refer to relevant
pages.
• Regular back up is recommended to prevent data loss.
• If you use a USB extension cable or USB HUB, the USB device may not
be recognized.
• Some USB devices may not work with this unit.
• Digital camera and mobile phone are not supported.
• USB Port of the unit cannot be connected to PC.The unit cannot be
used as a storage device.
BD player
USB External HDD
USB Flash Drive
21
Page 22
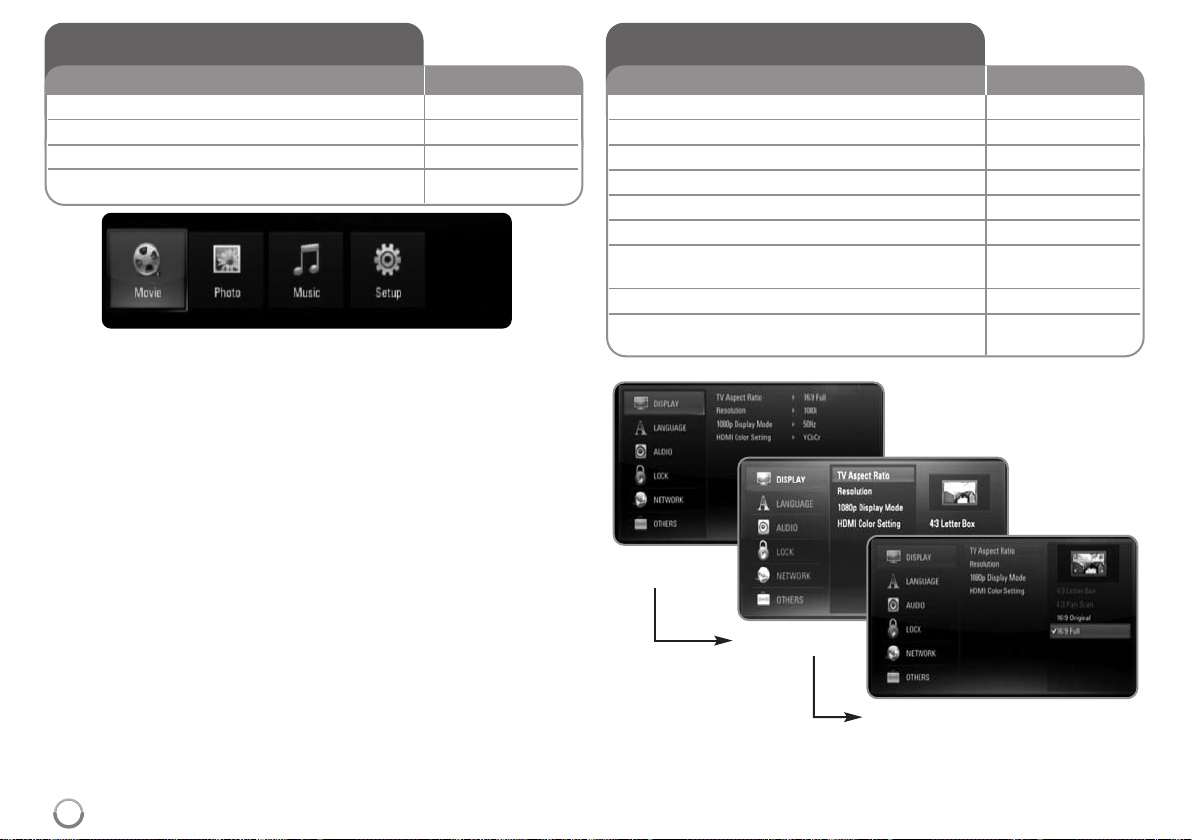
Using the Home Menu
ON REMOTE
1Displays the [Home Menu]: HOME MENU
2 Select an option: 23
3Displays the selected option menu: ENTER
4 Exit the [Home Menu]: HOME MENU
[Movie] – Start video media’s playback or displays the [MOVIE] menu.
[Photo] – Displays [PHOTO] menu. (page 38-39)
[Music] – Displays [MUSIC] menu.(page 37-38)
[Setup] – Displays the [Setup] menu.(page 22-28)
Tip:
If you select the [Movie], [Photo] or [Music] option when the USB device
is connected and a disc is inserted simultaneously, the menu for
selecting a media will appear.Select a media then press ENTER.
Notes:
• The unit will be in stop mode then the [Home Menu] will appear if you
press HOME MENU during playback.
• If you insert a DVD or an unplayable disc that is formatted as ISO9660
or UDF, the [Movie], [Photo] or [Music] option can be selected in the
[Home Menu]. But you cannot play it.
Adjust the Setup settings
ON REMOTE
1Displays the [Home Menu]: HOME MENU
2 Select the [Setup] option: 23, ENTER
3 Select a desired option on the first level: 5∞
4Move to second level: 3
5 Select a desired option on the second level: 5∞
6Move to third level: 3
7 Adjust or confirm the setting: 5∞, ENTER
Some items require additional steps. 0-9 Numeric
8 Go back to the previous level: 2
9 Exit the [Setup] menu: HOME MENU or
RETURN
First level
Second level
22
Third level
Page 23
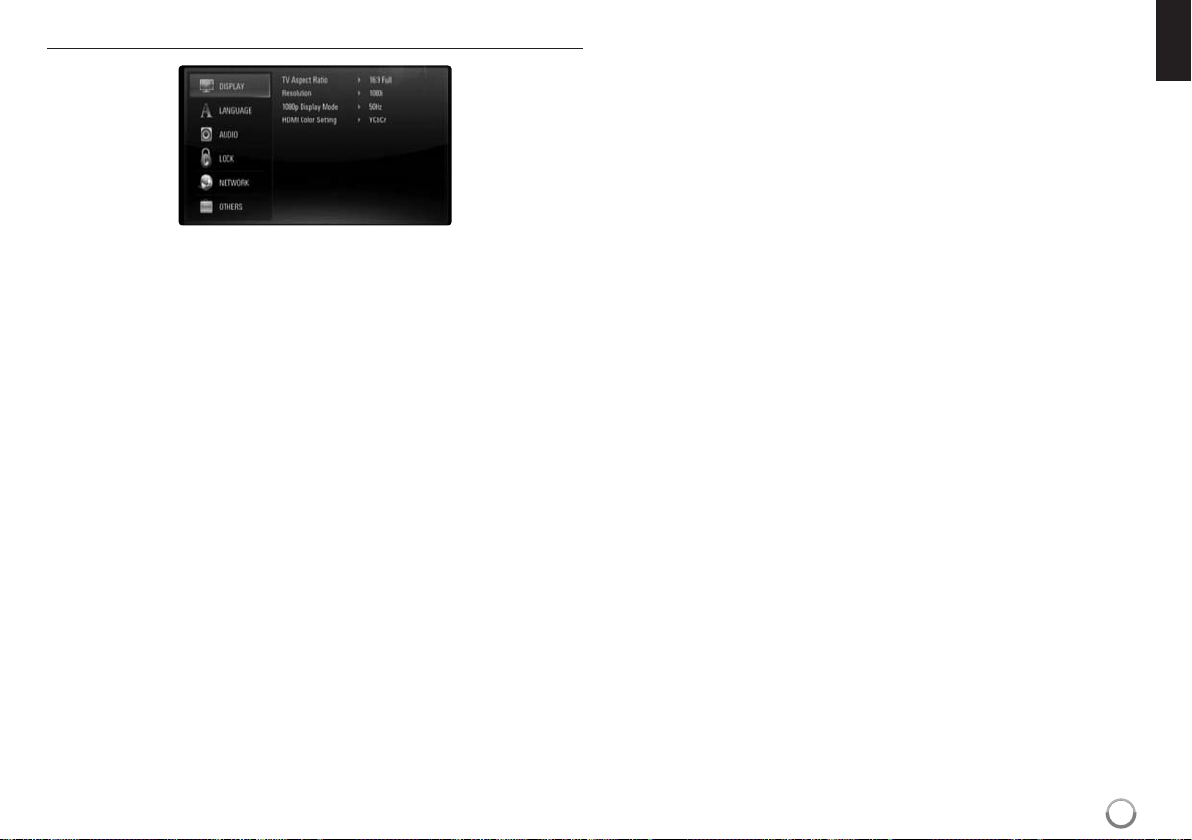
[DISPLAY] Menu
TV Aspect Ratio
[4:3 Letter Box] – Select when a standard 4:3 TV is connected.
Displays theatrical images with masking bars above and below the
picture.
[4:3 Pan Scan] – Select when a standard 4:3 TV is connected.
Displays pictures cropped to fill your TV screen. Both sides of the
picture are cut off.
[16:9 Original] – Select when a 16:9 wide TV is connected.The 4:3
picture is displayed with an original 4:3 aspect ratio, with black bars
appearing at the left and right sides.
[16:9 Full] – Select when a 16:9 wide TV is connected.The 4:3
picture is adjusted horizontally (in a linear proportion) to fill the entire
screen.
Resolution
Sets the output resolution of the Component and HDMI video signal.
Refer to “Resolution Setting”on page 17-18 for details about the
resolution.
[Auto] – If the HDMI OUT jack is connected for TVs providing display
information (EDID), automatically selects the resolution best suited to
the connected TV. If the COMPONENT VIDEO OUT is only connected,
this changes the resolution to 1080i as default resolution.
[576i] – Outputs 576 lines of interlaced video.
[576p] – Outputs 576 lines progressive video.
[720p] – Outputs 720 lines of progressive video.
[1080i] – Outputs 1080 lines of interlaced video.
[1080p] – Outputs 1080 lines of progressive video (only for HDMI
connection).
1080p Display Mode
When the resolution is set to 1080p, select [24Hz] for smooth presentation
of film material (1080/24p) with a HDMI-equipped display compatible with
1080/24p input.
Notes:
• When you select [24Hz], you may experience some picture disturbance
when the video switches video and film material. In this case, select
[50Hz].
•Even when [1080p Display Mode] is set to [24Hz], if your TV is not
compatible with 1080/24p, the actual frame frequency of the video
output will be 50Hz or 60Hz to match the video source format.
HDMI Color Setting
Select the type of output from the HDMI OUT jack. For this setting, please
refer to the manuals of your display device.
[YCbCr] – Select when connecting to a HDMI display device.
[RGB] – Select when connecting to a RGB display device.
23
Page 24
[LANGUAGE] Menu
[AUDIO] Menu
Display Menu
Select a language for the [Setup] menu and on-screen display.
Disc Menu / Disc Audio / Disc Subtitle
Select the language you prefer for the audio track (disc audio), subtitles,
and the disc menu.
[Original] – Refers to the original language in which the disc was
recorded.
[Other] – Press ENTER to select another language. Use number
buttons then ENTER to enter the corresponding 4-digit number
according to the language code list on page 45.
[Off] (for Disc Subtitle) – Turn off Subtitle.
Note:
Depending on a disc, your language setting may not work for some disc.
24
Speaker Setup
To obtain the best possible sound, use the Speaker Setup display to
specify the volume of the speakers you have connected and their distance
from your listening position. Use the Test to adjust the volume of the
speakers to the same level.
[Speaker] – Select a speaker that you want to adjust.
[Volume] – Adjust the output level of each speaker.
Be sure to set “Test” to “All” for easy adjustment.
[Distance] – Adjust the distance between each speaker and the
listening position.
[Test] –The speakers will emit a test tone.
All:The test tone is emitted from each speaker in sequence.
To save your settings, press ENTER and select [Yes] by pressing 2 / 3.
Page 25
HD AV Sync
Sometimes Digital TV encounters a delay between picture and sound. If this
happens you can compensate by setting a delay on the sound so that it
effectively ‘waits’ for the picture to arrive: this is called HD AV Sync.
Use 5∞ to scroll up and down through the delay amount, which you can set
at anything between 0 and 300m sec.
The delay will vary depending on which digital TV channel you are on. If you
change channel you may need to readjust the HD AV Sync.
HDMI Audio
You can set TV speaker output for the audio signal from the HDMI OUT jack.
[Off] – Audio signals are output to the system speakers only.
[On] – Audio signals are output from the TV’s speaker and the
system’s front left and right speakers and subwoofer.
Note:
When [HDMI Audio] is set to [On], the sound mode is switched to
[BYPASS] automatically.
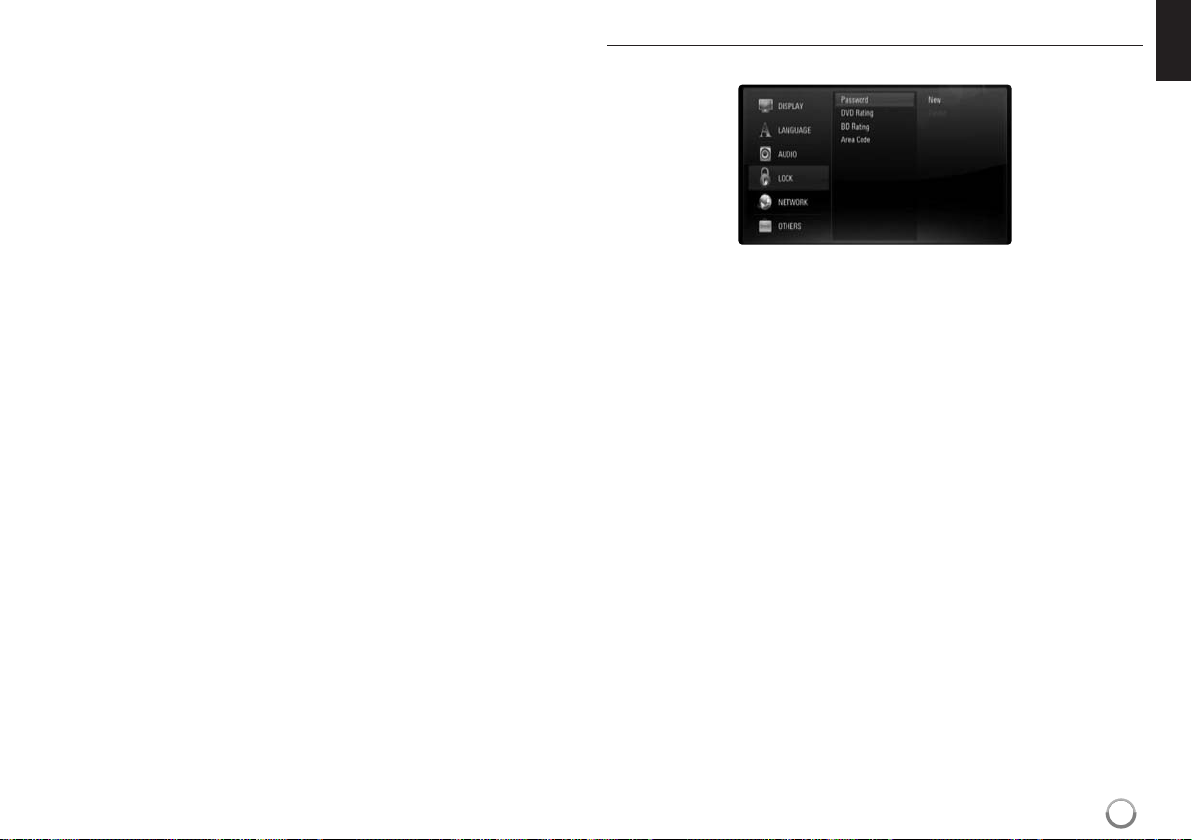
[LOCK] Menu (Parental Control)
The [LOCK] settings affect only BD and DVD playback.
To access the any features in [LOCK] settings, you must enter the 4-digit
security code you have created.
If you have not entered a password yet, you are prompted to do so. Enter a
4-digit password and press ENTER.Enter it again and press ENTER to
verify.
Password
You can create, change or delete the password.
[New] – Enter a 4-digit password and press ENTER.Enter it again and
press ENTER to create a new password.
[Change] – Enter the current password and press ENTER.
Enter a 4-digit password and press ENTER.Enter it again and press
ENTER to create a new password.
[Delete] – Enter the 4-digit password and press ENTER to delete the
password.
Tip:
If you make a mistake before pressing ENTER, press CLEAR. Then input
the correct password.
If you forget your password
If you forget your password, you can clear it using the following steps:
1 Remove any disc that might be in the player.
2 Highlight [Password] in the [LOCK] option.
3 Use Number buttons to enter “210499”.The password is cleared.
25
Page 26

DVD Rating
Blocks playback of rated disc based on their content.(Not all discs are
rated.)
[Rating 1-8] – Rating one (1) has the most restrictions and rating eight
(8) is the least restrictive.
[Unlock] – If you select unlock, parental control is not active and the
disc plays in full.
BD Rating
Set an age limit of BD-ROM play. Use number buttons to input an age limit
for BD-ROM viewing.
[255] – All BD-ROM can be played.
[0-254] – Prohibits play of BD-ROM with corresponding ratings
recorded on them.
Note:
The [BD rating] will be applied only for the BD disc that containing the
Advanced Rating Control.
Area Code
Enter the code of the area whose standards were used to rate the DVD
video disc, based on the list on page 45.
26
Page 27
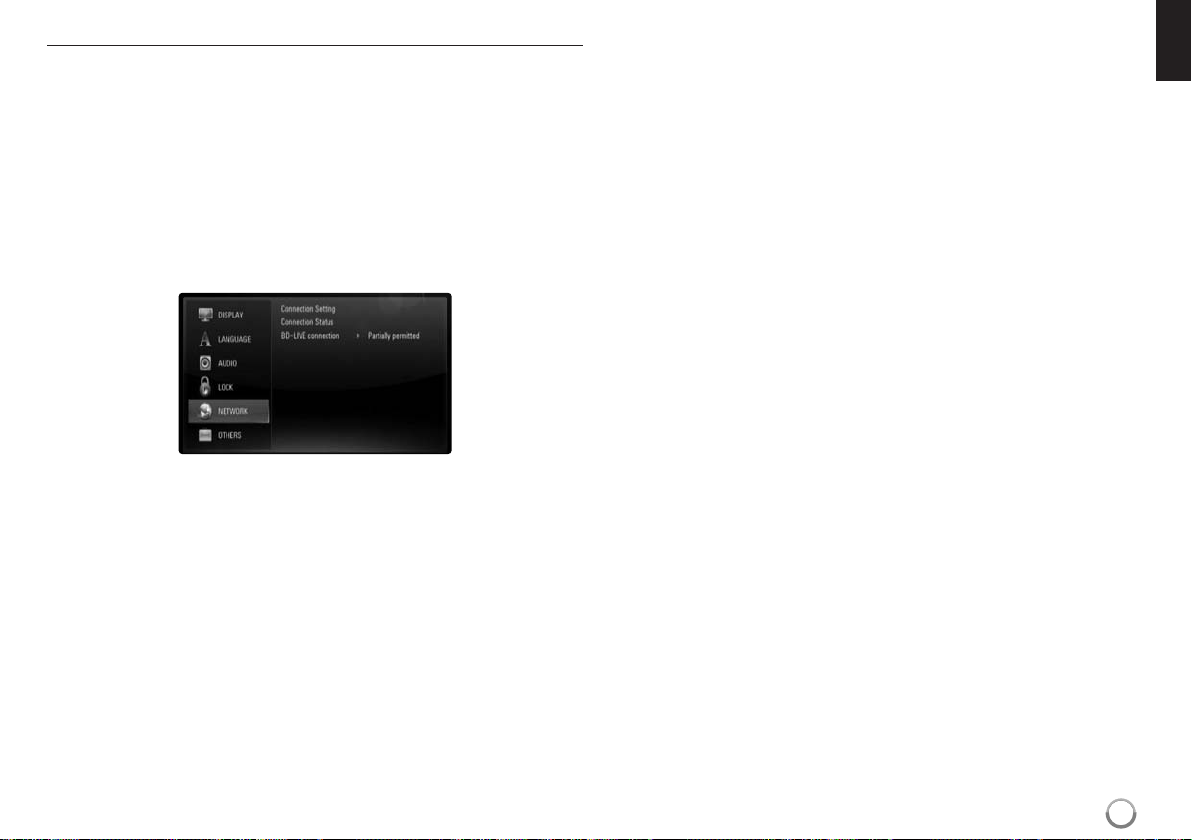
[NETWORK] Menu
The [NETWORK] settings are needed to use the BD Live features.
Some BD-ROM discs may enable you to access special BD-ROM sites, if
you connect the player to the Internet.For example, if a BD-ROM site
includes content such as links to future movie trailers, you can watch the
downloaded on-line content on the player.
You do not need to connect to a PC to use this function.
Preparations:
• This feature requires an always-on broadband internet connection.
(see page 19-20.)
•A BD-ROM disc compatible with this feature is required.Not all BDROM discs are compatible.
Connection Setting
If you have connected this player to a local area network (LAN), the player
needs to be set up for network communication.(See “Internet connection”
on pages 19-20.)
Connection Status
If you want to check the network status on this player, select the
[Connection Status] options and press 3 or ENTER to check whether a
connection to the network and the internet have been established.
BD-LIVE connection
You can restrict Internet access when BD-Live functions are used.
[Permitted] – Inter net access is per mitted for all BD-Live contents.
[Partially permitted] – Inter net access is per mitted only for BD-Live
contents which have content owner certificates.Internet access and
AACS Online functions are prohibited for all BD-Live contents without a
certificate.
[Prohibited] – Inter net access is prohibited for all BD-Live contents.
27
Page 28

[OTHERS] Menu
Skin
Changes the background of the initial screen.
Initialize
You can reset the player to its original factory settings, initialize the BD
storage or deactivate the player.
[Factory Set] – If you need to, you can reset the player to all its
factory settings. Some options cannot be reset. (Rating, Password and
Area Code, etc.)
[BD Storage Clear] – Initializes the BD contents from the connected
USB device.
DivX VOD
®
ABOUT DIVX VIDEO: DivX
is a digital video format created by DivX, Inc.
This is an official DivX Certified device that plays DivX video.
Visit www.divx.com for more information and software tools to convert your
files into DivX videos.
ABOUT DIVX VIDEO-ON-DEMAND: This DivX
®
Certified device must be
registered in order to play DivX Video-on-Demand (VOD) content.
To generate the registration code, locate the [DivX VOD] section in the
[Setup] menu. Go to vod.divx.com with this code to complete the
registration process and learn more about DivX VOD.
[DivX reg. Code] – Displays the registration code of your player.
[Deactivate] – Deactivate your player and display the deactivation
code.
Note:
All the downloaded videos from DivX
®
VOD can only be played back on
this unit.
28
Page 29
Play a disc
ON REMOTE
1 Open the disc tray: OPEN/CLOSE (0)
2 Insert a disc: -
3Close the disc tray: OPEN/CLOSE (0)
4 Adjust the disc menu settings: 5∞2 3, ENTER
A disc menu may not appear on the screen
depending on the disc.
5 Starts playback: PLAY (£)
6 Stops playback: STOP ( 7)
Notes:
• When you turn on the player or replace a disc, the player returns to the
initial default setting. Depending on a disc, a specific type of audio that
the disc has is output.
• Depending on the pre-recorded contents of the BD-ROM, some
functions may not be available or may be operated differently than
other media.
If a disc menu screen is displayed
AVCHD
DVDBD
The menu screen may be displayed first after loading a disc which contains
a menu.
Use 2 / 3 / 5 / ∞ buttons to select the title/chapter you want to view, then
press ENTER to start playback.
Skip to the next/previous chapter/track/file
During playback, press 4 or ¢ to go to the next chapter/track/file or to
return to the beginning of the current chapter/track/file.
Press 4 twice briefly to step back to the previous chapter/track/file.
ALL
Resume playback
During playback, press STOP (7) to stop playback.
The unit records the stopped point, depending on the disc. “87” appears
on the screen briefly. Press PLAY (£) to resume playback (from the
scene point). If you press STOP (7) again or unload the disc (“7” appears
on the screen.), the unit will clear the stopped point. (87 = Resume Stop,
7 = Complete Stop)
Notes:
• The resume point may be cleared when a button is pressed
(for example;STANDBY/ON, OPEN/CLOSE, etc).
• On BD-Video discs including BD-J, the resume play function does not
work.
• On BD-ROM interactive title, the unit will be in Complete Stop mode if
you press STOP once during playback.
Pause a playback
During playback, press PAUSE/STEP (8) to pause playback. Press PLAY
(£) to continue playback.
Tip: During Audio CD or MP3/WMA playback, press PAUSE/STEP (8)
once again to resume playback.
Frame-by-Frame playback
Press PAUSE/STEP (8) repeatedly to play Frame-by-Frame playback.
Slow down the playing speed
While the playback is paused, press SCAN ¡ repeatedly to play in slow
motion (4 steps, forward only).
Fast forward or fast reverse
Press SCAN (1 or ¡) to play fast forward or fast reverse during
playback.
You can change the various playback speeds by pressing SCAN (1 or
¡) repeatedly. Press PLAY (£) to continue play at normal speed.
Note:
This function may not work on some disc or titles.
ALL
ALL
ALL
AVCHD
DVDBD
DVDBD
MOVIE
AVCHD
MOVIE
29
Page 30

Playing repeatedly
During playback, press REPEAT repeatedly to select a desired repeat mode.
The current title, chapter or track will be played back repeatedly.To return to
normal playback, press REPEAT repeatedly until the icon disappears.
When you are using the repeat, A-B repeat or random functions in the
[MUSIC] menu, refer to the mode icons as shown below.
– Selected portion will be repeated continually.
Press REPEAT to select [A-] at the beginning of the portion you
wish to repeat and press ENTER at the end of the portion.
Your selected portion will be repeated continually.
You cannot select a portion less than 3 seconds. To return to
normal playback, press REPEAT repeatedly to select [OFF].
ACD
Track – The current track or file will be played back repeatedly.
All – All the tracks or files will be played back repeatedly.
All – All the tracks or files will be played back repeatedly in
random order.
– The tracks or files will be played back in random order.
To cancel the A-B repeat, repeat or Random playback, press CLEAR.
Note:
If you press ¢ once during Repeat Chapter/Track playback, the repeat
playback cancels.
DVD
BD
BD
DVD
AVCHD
MUSIC
ACD
Viewing the Title menu or Popup menu
AVCHD
DVD
BD
Press POPUP/TOP MENU to display the title menu or popup menu.
If the current DVD or BD-ROM disc has a menu, the Title menu or Popup
menu appears on the screen. Depending on the disc, the menu may not be
available.
Marker Search
To enter a Marker
You can start playback from up to nine memorized points.To enter a
marker, press MARKER at the desired point on the disc. The Marker icon
appears on the TV screen briefly. Repeat to enter up to nine mar kers.
To Recall or Clear a Marked Scene
Press SEARCH and the search menu appears on the screen.
Press a number button to select a marker number that you want to recall.
Playback starts from the marked scene.
Press ∞ to highlight a marker number. Use 2 / 3 to select a marked
scene that you want to recall or clear.
Press ENTER and playback starts from the marked scene.Press CLEAR
and the marked scene is erased from the search menu.
Notes:
• This function may not work on some disc or titles.
• All marked points are cleared if you press STOP (7) twice (complete
stop), the title is changed or if you unload the disc.
BD
DVD
AVCHD
OR
MOVIE
30
Page 31

Selecting a subtitle language
AVCHD
DVDBD
MOVIE
During playback, press SUBTITLE repeatedly to select a desired subtitle
language.
During playback, press DISPLAY to display the playback menu.
Use 5∞to select the [Subtitle] option then use 23to select desired
subtitle language.
Note:
Some discs allow you to change subtitle selections only via the disc menu.
If this is the case, press POPUP/TOP MENU or MENU button and choose
the appropriate subtitle from the selections on the disc menu.
Selecting a subtitle file
If names of the movie file and subtitle file are same, subtitle file is played
automatically when playing the movie file.If the name of the subtitle file is
different from movie file name, you need to select the subtitle file on the
[Movie] menu before playing the movie.
Use 5∞23to select the subtitle file you wish to play in the [Movie]
menu, and then press MARKER. Press MARKER again to deselect the
subtitle file. Selected subtitle file will be displayed when you play the movie
file. If you press STOP (7) while playback, the subtitle selection is
canceled.
OR
MOVIE
Using the search menu
During playback, press SEARCH to display the search menu.
Press 23to skip the playback 15 seconds forward or backward.
Tip:
You can select a point that you want to skip by pressing and holding 2 / 3
button.
Note:
This function may not work on some disc or titles.
Using coloured (A, B, C, D) Buttons
These buttons are available only dur ing BD-J contents playback. Use the
appropriate buttons as indicated by the display. Depending on the disc contents, the functions of each button may differ.
AVCHD
DVDBD
BD
MOVIE
Hearing a different audio
During playback, press DISPLAY to display the playback menu.
Use 5∞to select the [Audio] option then use 23to select desired
audio language or audio track.
Notes:
• Some discs allow you to change audio selections only via the disc
menu. If this is the case, press POPUP/TOP MENU or MENU button
and choose the appropriate audio from the selections on the disc menu.
• Immediately after you have switched sound, there may be a temporary
discrepancy between the display and actual sound.
• On BD-ROM disc, the multi audio format (5.1CH or 7.1CH) is displayed
with [MultiCH] in the on-screen display.
AVCHD
DVDBD
MOVIE
31
Page 32

Last Scene Memory
This unit memorizes last scene from the last disc that is viewed.The last
scene remains in memory even if you remove the disc from the unit or
switch off the unit. If you load a disc that has the scene memorized, the
scene is automatically recalled.
BD
DVD
Changing content list view
MOVIEMUSICACD
On the [Movie], [Music], [Photo] menu, you can change the content list
view by pressing DISPLAY repeatedly.
Notes:
• Settings are stored in memory for use any time.
• This unit does not memorize settings of a disc if you switch off the unit
before commencing to play it.
• Last Scene Memory function for a previous disc is erased once a
different disc is played.
• This function may not work depending on the disc.
Screen Saver
The screen saver appears when you leave the player in Stop mode for
about five minutes.
Note:
Depending on the unit status, the screen saver may not appear.
third push
first push
second push
Note:
The equalizer will be disappeared when you change the music contents list
view.
32
Page 33

Displaying disc information
ON REMOTE
1 Play the disc loaded on the unit: PLAY
2Displays the playback menu: DISPLAY
3Select an item: 5∞
4 Adjust the playback menu settings: 23
5Exit the disc playback menu: DISPLAY
¥
ø
π
[
“
]
¥ Title – Current title number/total number of titles.
ø Chapter – Current chapter number/total number of chapters.
π Time – Elapsed playing time.
[ Audio – Selected audio language or channel.
“ Subtitle – Selected subtitle.
] Angle – Selected angle/total number of angles.
Notes:
• If no button is pressed for a few seconds, the on-screen display
disappears.
A title number cannot be selected on some discs.
•
•An item may not be available on some discs or titles.
• If BD interactive title is playing back, some setting information is
displayed on the screen but prohibited to be changed.
Moving to another title/chapter
AVCHD
DVDBD
When a disc has more than one title/chapter, you can move to
another title/chapter/track.
Press DISPLAY during playback then use 5 / ∞ to select the
[Title/Chapter] icon.Then, press the appropriate numbered button
(0-9) or 2 / 3 to select a title/chapter number.
Playing from selected time
Press DISPLAY during playback. The time search box shows the elapsed
playing time.Select the [Time] option and then input the required start time
in hours, minutes, and seconds from left to right. For example, to find a
scene at 2 hours, 10 minutes, and 20 seconds, enter “21020” and press
ENTER. If you enter the wrong numbers, press CLEAR and enter the
correct numbers.
Note:
This function may not work on some disc or titles.
Watching from a different angle
If the disc contains scenes recorded at different camera angles, you can
change to a different camera angle during playback.
During playback, press DISPLAY to display the playback menu.Use 5∞
to select the [Angle] option, then use 23 to select desired angle.
MOVIE
AVCHD
DVDBD
MOVIE
DVDBD
33
Page 34

Enjoying BD-LIVE™
ON REMOTE
1Inserts a BD-ROM disc with BD-LIVE™ OPEN/CLOSE (0)
features:
2 Check the network connection and settings: –
BD-Live features need the internet connection.
3 Connect a USB device: –
A USB device is required to use this function.
4 Select a BD-LIVE™ features on the 5∞2 3, ENTER
disc menu:
This unit allows you to enjoy functions such as picture-in-picture,
secondary audio and Virtual packages, etc., with BD-Video supporting
BONUSVIEW (BD-ROM version 2 Profile 1 version 1.1/ Final Standard
Profile). In addition to the BONUSVIEW function, BD-Video supporting
BD-Live (BD-ROM version 2 Profile 2) that has a network extension
function allows you to enjoy more functions such as online games by
connecting this unit to the Internet.
Enjoying BD-Live discs with Internet
This unit supports BD-Live, a new BD-Video function that allows you to use
the following interactive functions when connected to the Internet.(The
usable functions and the operating method may vary with each disc. For
details, refer to the instructions for the disc.)
– Additional contents such as movie’s trailer, subtitles and BD-J, etc.can
be downloaded to USB device to play them.
– Special video data, etc. may be played back while they are being
downloaded to a USB device.
Preparations:
• The unit must be connected to the Internet and set up to use the
BD-Live functions (see page 19-20 and 27).
•A USB device is required to use this function. Connect a USB device
(see page 21).
• The free space in the USB device must be more than 1GB.
Caution:
Do not extract the connected USB device while content is being
downloaded or a Blu-ray disc is still in the disc tray. Doing so may damage
the connected USB device and BD-Live features may not operate properly
with the damaged USB device anymore.
If the connected USB device seems damaged from such an action, you
can format the connected USB device from the PC and reuse it with this
player.
Notes:
• Some BD-Live contents may be restrictively accessed in some
territories by contents provider’s own decision.
• It may take up to several minutes to load and start enjoying BD-Live
contents.
• Depending on a disc, the BD-Live function may not be operated if [BDLIVE connection] option is set to [Partially permitted]. (See page 27.)
• The connection to the Internet may take time or the Internet may not
be connected depending on the connection environment. It is required
that you use a broadband connection.
• Do not remove the USB device during operation.The USB device may
be damaged. Stop playback and turn off the menu beforehand.
Tip:
Special video data, etc. may be played back while they are being
downloaded to a USB device using one function of BD-Live. The playback
may be paused depending on the communication environment.
Some functions may be disabled to prevent skipping to sections that have
not been downloaded, etc.
AACS Online
When discs supporting BD-Live are played back, the player or disc IDs
may be sent to the content provider via the Internet.
Services and functions to be provided differ depending on the disc.
–You can be introduced to other similar movies if you record your
viewing history on the server by using these IDs.
– Game score histor ies can be saved.
34
Page 35

Playing secondary video (picture-in-picture)
Secondary video can be played from a disc compatible with the picture-inpicture function.
For the playback method, refer to the instructions for the disc.
To tur n on/off secondar y video, press PIP. Secondar y video is played.
Press the button to turn it ON or OFF.
Notes:
• Discs may not always be played back according to the settings on this
unit, as certain playback formats are prioritized on certain discs.
• Only the primary video is played during search/slow-motion or frame-byframe.
• This function may not work depending on the disc.
Playing a movie
The player can play movie files on the disc/USB
device and video contents recorded on a
DVD-RW(VR mode) discs. Before playing movie
files, read “movie file requirement”on page 36.
1Insert a disc/USB device containing –
movie contents.
2Displays the [Home Menu]
3 Select the [Movie] option: 23, ENTER
4 Selects a movie from the [MOVIE] menu: 5∞
5 Plays the selected movie: PLAY
6 Stops the playback: STOP
Notes:
• When the USB device is connected and a disc is inserted
simultaneously, the menu for selecting a media will appear.
Select a media then press ENTER.
•You can use various playback functions. Refer to pages 29-32.
• On the [MOVIE] menu, use green (B) or yellow (C) button to move to the
previous or next page and use red (A) or blue (D) button to move to the
first or last page.
• Unfinalized DVD VR format discs may not be played in this player.
• Some DVD-VR disc are made with CPRM data by DVD RECORDER.
This unit cannot support these kinds of discs.
You cannot playback DVD-VR disc playlist.
• Some DivX files may not play, depending on the DivX format or the
recording format.
• Press DISC MENU to move to the list menu.
: HOME MENU
ON REMOTE
What is CPRM?
CPRM is a copy protection system (with scramble system) only allowing
the recording of ‘copy once’ broadcast programs.CPRM stands for
Content Protection for Recordable Media.
35
Page 36

Notice for displaying the DivX subtitle
If the subtitle does not display properly, change the language code as
described below.
1 Press and hold SUBTITLE for 3 seconds during playback.
The language code will appear.
2 Press SUBTITLE repeatedly to select another language code until the
subtitle is displayed properly and then press ENTER.
Movie file requirement
Movie file compatibility with this player is limited as follows:
Available resolution size: 1920 x 1080 (W x H) pixels
File extensions: “.avi”, “.divx”, “.mpg”, “.mpeg”, “.mp4”, “.mkv”
Playable subtitle: SubRip (.sr t / .txt), SAMI (.smi),
SubStation Alpha (.ssa/.txt), MicroDVD (.sub/.txt), VobSub (.sub)
SubViewer 1.0 (.sub), SubViewer 2.0 (.sub/.txt), TMPlayer (.txt),
DVD Subtitle System (.txt)
Playable Codec format:“DIVX3.xx”, “DIVX4.xx”, “DIVX5.xx”, “XVID”,
“DIVX6.xx” (Standard playback only), H.264/MPEG-4 AVC, DIVX-HD,
MPEG1 SS, MPEG2 PS, MPEG2 TS
Playable Audio format: “Dolby Digital”, “DTS”, “MP3”, “WMA”, “AAC”,
“AC3”
Sampling frequency: within 32-48 kHz (WMA), within 16-48 kHz (MP3)
Bit rate: within 20-320 kbps (WMA), within 32-320 kbps (MP3)
CD-R/RW, DVD±R/RW, BD-R/RE Format:
ISO 9660+JOLIET, UDF and UDF Bridge format
Maximum Files/Folder: Less than 2000
• The movie file name and subtitle are limited to 180 characters.
• Not all the WMA, MP3 and AAC Audio format is compatible with this
unit.
• HD movie files contained on the CD or USB 1.0/1.1 may not played
properly. BD, DVD or USB 2.0 are recommended to play back HD
movie files.
• This player support H.264/MPEG-4 AVC profile Main, High at Level 4.1.
For a file with higher level, the player will ask whether you want to play
or not.
• This player does not support the file that are recorded with GMC*
2
.Those are video encoding techniques in MPEG4 standard, like
Qpel*
DivX or XVID have.
*1 GMC – Global Motion Compensation
*2 Qpel – Quarter pixel
1
or
36
Page 37

Listening to a music
The player can play Audio CDs and MP3/WMA
files. Before playing MP3/WMA files, read
“MP3/WMA audio file requirement” on page 38.
1Inserts an Audio CD or a disc/USB Flash –
Drive containing MP3/WMA files.
2Displays the [Home Menu]: HOME MENU
3 Select a [Music] option: 23, ENTER
4 Selects a music from the [MUSIC] menu: 5∞
5 Plays the selected music: PLAY
6 Stops the playback: STOP
Example) Audio CDs
Notes:
• When the USB device is connected and a disc is inserted
simultaneously, the menu for selecting a media will appear. Select a
media then press ENTER.
•You can use various playback functions. Refer to pages 29-32.
ON REMOTE
Tips:
•To go directly to any track or file and play, enter the track/file number
using the numbered buttons (0-9).
• The playback may start automatically if the Audio CD inserted.
• Use 5/∞/2/3 to select a folder then press ENTER and you can view
the files in the folder.If you want to move to the upper or lower directory,
use 5/∞ to move to the desired directory.
• On the [MUSIC] menu, use red or blue button to move to the first or the
last file or track and green or yellow button to move to the previous or
next page.
• The equalizer indicator is not coupled with the music in play back.
• If there is impossible code to express in the file name, it may be
displayed as illegible.
37
Page 38

MP3/WMA audio file requirement
File extensions: “.mp3”, “.wma”
Sampling frequency: within 8-48 kHz (WMA), within 11-48 kHz (MP3)
Bit rate: within 8-320 kbps (WMA, MP3)
CD-R/RW, DVD±R/RW, BD-R/RE Format:
ISO 9660+JOLIET, UDF and UDF Bridge format
Maximum Files/Folder: Less than 2000
folders)
Notes on MP3/WMA file
• Depending on the size and number of the MP3/WMA files, it may take
several minutes to read the contents of the media.
• This unit cannot support the ID3 Tag embedded in the MP3 file.
• The total playback time indicated on the screen may not correct for
VBR files.
(total number of files and
Viewing a photo
This unit can play a photo files.Before playing
photo files, read “Photo file requirement” on page
39.
1
Inserts a disc/USB device containing –
photo files.
2Displays the [Home Menu]: HOME MENU
3 Select a [Photo] option: 2/3, ENTER
4 Selects a photo from the [PHOTO] menu: 5/∞/2/3
5Displays the selected photo in full screen: ENTER
6Displays the next or previous photo: 4 / ¢
7 Return to the [PHOTO] menu screen: STOP (7)
Notes:
• When the USB device is connected and a disc is inserted
simultaneously, the menu for selecting a media will appear. Select a
media then press ENTER.
•You can star t the slide show by pressing PLAY (£) while photo file is
selected in the [PHOTO] menu.
•
On the [PHOTO] menu, use red or blue button to move to the first or the
last file and green or yellow button to move to the previous or next page.
•You can change the content list view by pressing DISPLAY repeatedly.
ON REMOTE
38
Page 39

Options during viewing a photo file in full screen
You can use various options during viewing a picture in full screen.
Use 5∞2 3 to select an option and use the options as descr ibed below.
¥
øπ [“]‘ \
¥ Use 23to advance to the previous or next file.
ø Press ENTER to start or pause the slide show.
π Press ENTER to play or pause the background music.This option
is available after the background music is selected using
[Music Select] option.
[ Selects the background music.
1) Press ENTER and the menu will appear.
2) Use 5∞23to select a media or folder that there are music
file(s).
3) Press ENTER to confirm your selection.
“ Press ENTER to rotate the picture clockwise.
This option is not available during slide show.
]
Use green or yellow buttons to zoom in or out the picture. You can
move through the zoomed picture using
RETURN to exit the [Zoom] menu and return to the normal picture size.
‘ Use 5∞to selects an option between [Effect] or [Delay].
Use 23to adjusts and press ENTER to set the selected option.
[Effects] – You can apply various effects when sliding photos.
OFF : Slide Show without any effect.
Random : Slide show effects are applied randomly.
Slide : Slides a photo from various direction.
Door : Photo will be appear like door opening.
Lattice : Photo will be appear from tiled pieces to full screen image
[Delay] – You can set the photo delaying time while Slide Show.
\ Press ENTER to exit the option menu.
To appear the menu again, press ENTER.
5∞23
buttons.Press
Photo file requirement
File extensions: “.jpg”, “.jpeg”, “.png”
Recommended size:
Less than 4,000 x 3,000 x 24 bit/pixel
Less than 3,000 x 3,000 x 32 bit/pixel
CD-R/RW, DVD±R/RW, BD-R/RE Format:
ISO 9660+JOLIET, UDF and UDF Bridge format
Maximum Files/Disc:
Less than 2000 (total number of files and folders)
Notes on Photo file
• Progressive and lossless compression photo image files are not
supported.
• Depending on the size and number of the photo files, it may take
several minutes to read the contents of the media.
39
Page 40

Listening to the radio
Be sure that FM antenna is connected.
1 Select FM: TUNER (INPUT)
2 Select a radio station: TUNE -/+
3To save a radio station: ENTER
A preset number will show on the display.
Up to 50 radio stations can be saved.
4To confirm press: ENTER
5To select a saved station PRESET 5/∞
Listening to the radio - more you can do
Look for radio stations automatically
Press and hold TUNE -/TUNE + for more than a second. The tuner will scan
automatically and stop when it finds a radio station.
Choose a preset number for a radio station
When storing a radio station, the preset number can be chosen.When this unit
automatically shows a preset number, press PRESET 5/∞ to change it. Press
ENTER to save your chosen number.
Delete all the saved stations
Press and hold ENTER for two seconds.ERASE ALL will flash up on the
display. Press ENTER to erase all saved radio stations.
Improve poor FM reception
Press ST/MONO.This will change the tuner from stereo to mono and usually
improve the reception.
ON REMOTE
Playing the iPod
For details about iPod, refer to the iPod User Guide.
Preparation
• To view iPod’s Videos and Photos on the TV screen.
- Be sure to use the video connection through the VIDEO OUT jack on
the rear panel of this unit.
Select the appropriate video input mode on the TV.
- Depending on the iPod, make sure that select Videos > Video settings,
and then set TV Out to Ask or On from your iPod.
For details about Video Settings, refer to the iPod User Guide.
- The viewing photos is available only if this unit is in REMOTE IPOD
mode and you can view photos only as a slideshow.
You have to start a slideshow on your iPod to view a photo on a TV.
For details about a slideshow, refer to the iPod User Guide.
• Before connecting the iPod, turn this unit off and reduce the volume of
this unit to its minimum.
Connect the iPod firmly.
Connect the cradle and
put your iPod on it.
• If you turn this unit on, your iPod is automatically turned on and recharging starts.
Do this on remoteTo
Select an iPod mode Press iPod.
•
REMOTE IPOD mode:You can operate your iPod through an iPod’s
display by using the supplied remote control and also control on your iPod.
• OSD IPOD mode: You can operate your iPod by controlling OSD menu
on the TV screen with the supplied remote control.The controls on your
iPod are not operational in the OSD iPod mode.
40
Page 41

Do this on remoteTo
Select a menu item Press 5∞ and 3 or ENTER.
Go back to the previous menu
Browse for a song From the main menu, select Music.
Browse for a video From the main menu, select Videos.
Play a song or video
Pause a song or video Press PAUSE/STEP (8) or PLAY (3).
Skip to the next song or video Press SKIP (¢).
Start a song or video over Press SKIP (4).
Play the previous song or video
Fast-forward or rewind a song Press and hold SCAN (1 or ¡).
or video
Repeat a song Press REPEAT repeatedly to select a
Tip:
You may use the dock adapter which should be supplied with your iPod to
the cradle for the stable use of the iPod.
If you need an adapter, consult your iPod dealer.
Press RETURN ( ) or DISC MENU or 2.
Select the song or video and press ENTER.
To continue playback, press
PAUSE/STEP (8) or PLAY (3) again.
Press SKIP (4) twice.
desired repeat mode:Track ( ), All ( ),
Off (No display).
Notes:
•
Compatibility with your iPod may vary depending on the type of your iPod.
• iPod touch has any difference in operation other than iPod.
You may need any additional control to use them with this unit.
(e.g.“slide to unlock”)
• If you use an application, make a call, or send and receive SMS text
message, etc. on your iPod touch, disconnect it from the iPod cradle
of this unit and then use it.
• Depending on your iPod’s software version, it may not be possible to control your iPod from this unit.We recommend installing the latest
software version.
• The video quality depends on the video sources on your iPod.
• If this unit displays an error message, follow the message.
An error message “CHECK IPOD” or “Please check your iPod.”
appears when:
- the communication between this unit and your iPod is failed.
==
Undock & re-dock your iPod in this unit.
- your iPod is not connected firmly.
- this unit recognizes your iPod as unknown device.
- your iPod is exceptionally low on power.
==
The battery needs to be charged.
==
If you charge the battery while iPod is extremely low in power, it may
take longer to charge.
An error message “CHECK IPOD” or “Connected iPod model is not
supported.”appears when:
- your iPod is not available for the function to be operated.
An error message
“CHECK IPOD” or
“Please update iPod’s software.”
appears when:
- your iPod has an old software version.
==
Update your iPod software to latest version.
• If you have a problem with your iPod, please visit
www.apple.com/support/ipod.
41
Page 42

Listening to music from your
portable audio player
You can enjoy the sound of your portable audio player from the speakers
of the system.
3.5 mm stereo
miniplug cable
Listening to the sound from
your component
You can enjoy the sound of your component with the analog audio
output jacks from the speakers of the system.
To the audio output jacks
of your component
(TV, VCR, etc.)
ON REMOTE
1 Connect the headphones (or line out ) jack
of the portable audio player into the PORT.
IN on the rear panel of this unit: 2Turn the power on: STANDBY/ON
3 Select the [PORTABLE] option: INPUT
4Turn down the volume of this unit: VOL (+/-)
5Turn the portable audio player on and start
it playing: 6 Adjust the volume of this unit and your VOL (+/-)
portable audio player:
42
ON REMOTE
1 Connect the analog audio output jacks of your
component into the AUX L/R (INPUT) on the rear
panel of this unit: 2Turn the power on: STANDBY/ON
3 Select the [AUX] option: INPUT
4 Turn down the volume of this unit: VOL (+/-)
5Turn your component on: 6 Adjust the volume: VOL (+/-)
Page 43

Using HDMI IN jacks
Using DIGITAL AUDIO IN jacks
You can enjoy the pictures and sound of your component with the HDMI
OUT jack.
To the HDMI OUT jack of your component
(set-top box, digital satellite receiver, video game machine, etc.)
ON REMOTE
1Connect the HDMI OUT jack of your
component into the HDMI IN 1 or 2 jack on
the rear panel of this unit. 2Turn the power on: STANDBY/ON
3
Select the [HDMI IN 1] or [HDMI IN 2] option:
4Turn down the volume of this unit: VOL (+/-)
5Turn your component on: 6 Adjust the volume of this unit: VOL (+/-)
Notes:
•You cannot change the video resolution at the HDMI IN 1/2 mode.
Change the video resolution of the connected component.
• The setting of the sound mode is not available when Dolby Digital Plus,
Dolby TrueHD and DTS-HD are played at HDMI IN 1/2 mode.
• If the video output signal is abnormal when your personal computer is
connected to HDMI IN 1/2 jack, change the resolution of your personal
computer to 576p, 720p, 1080i or 1080p.
INPUT
You can enjoy the sound of your component with the digital
optical or coaxial output jack from the speakers of the system.
or
To the digital optical output jack of your component
To the digital coaxial output jack of your component
ON REMOTE
1 Connect the optical or coaxial output jack
of your component into the OPTICAL or
COAXIAL (DIGITAL AUDIO IN) jack on the
rear panel of this unit. 2Turn the power on: STANDBY/ON
3 Select the [OPTICAL] or [COAXIAL] option: INPUT
4Turn down the volume: VOL (+/-)
5Turn your component on: 6 Adjust the volume: VOL (+/-)
43
Page 44

Reference
Controlling a TV with the Supplied Remote Control
You can control the volume, input source, and power state of your Pioneer
TV with the supplied Remote Control.
You can control your TV using the buttons below.
TV Control
Buttons
By pressing You can
Turn the TV on or off.
INPUT Switch the TV’s input source between the
CH +/– Scan up or down through memorized
VOL +/– Adjust the volume of the TV.
TV and other input sources.
channels.
44
Page 45

Language Codes
Use this list to input your desired language for Disc Audio, Disc Subtitle and Disc Menu.
Language Code
Afar 6565
Afrikaans 6570
Albanian 8381
Ameharic 6577
Arabic 6582
Armenian 7289
Assamese 6583
Aymara 6588
Azerbaijani 6590
Bashkir 6665
Basque 6985
Bengali; Bangla 6678
Bhutani 6890
Bihari 6672
Breton 6682
Bulgarian 6671
Burmese 7789
Byelorussian 6669
Chinese 9072
Language Code
Croatian 7282
Czech 6783
Danish 6865
Dutch 7876
English 6978
Esperanto 6979
Estonian 6984
Faroese 7079
Fiji 7074
Finnish 7073
French 7082
Frisian 7089
Galician 7176
Georgian 7565
German 6869
Greek 6976
Greenlandic 7576
Guarani 7178
Gujarati 7185
Language Code
Hausa 7265
Hebrew 7387
Hindi 7273
Hungarian 7285
Icelandic 7383
Indonesian 7378
Interlingua 7365
Irish 7165
Italian 7384
Japanese 7465
Kannada 7578
Kashmiri 7583
Kazakh 7575
Kirghiz 7589
Korean 7579
Kurdish 7585
Laothian 7679
Latin 7665
Latvian, Lettish 7686
Area Codes
Choose an area code from this list.
Area Code
Afghanistan AF
Argentina AR
Australia AU
Austria AT
Belgium BE
Bhutan BT
Bolivia BO
Brazil BR
Cambodia KH
Canada CA
Chile CL
China CN
Colombia CO
Congo CG
Area Code
Costa Rica CR
Croatia HR
Czech Republic CZ
Denmark DK
Ecuador EC
Egypt EG
El Salvador SV
Ethiopia ET
Fiji FJ
Finland FI
France FR
Germany DE
Great Britain GB
Greece GR
Area Code
Greenland GL
Hong Kong HK
Hungary HU
India IN
Indonesia ID
Israel IL
Italy IT
Jamaica JM
Japan JP
Kenya KE
Kuwait KW
Libya LY
Luxembourg LU
Malaysia MY
Language Code
Lingala 7678
Lithuanian 7684
Macedonian 7775
Malagasy 7771
Malay 7783
Malayalam 7776
Maori 7773
Marathi 7782
Moldavian 7779
Mongolian 7778
Nauru 7865
Nepali 7869
Norwegian 7879
Oriya 7982
Panjabi 8065
Pashto, Pushto 8083
Persian 7065
Polish 8076
Portuguese 8084
Area Code
Maldives MV
Mexico MX
Monaco MC
Mongolia MN
Morocco MA
Nepal NP
Netherlands NL
Netherlands Antilles AN
New Zealand NZ
Nigeria NG
Norway NO
Oman OM
Pakistan PK
Panama PA
Language Code
Quechua 8185
Rhaeto-Romance 8277
Rumanian 8279
Russian 8285
Samoan 8377
Sanskrit 8365
Scots Gaelic 7168
Serbian 8382
Serbo-Croatian 8372
Shona 8378
Sindhi 8368
Singhalese 8373
Slovak 8375
Slovenian 8376
Spanish 6983
Sudanese 8385
Swahili 8387
Swedish 8386
Tagalog 8476
Area Code
Paraguay PY
Philippines PH
Poland PL
Portugal PT
Romania RO
Russian Federation RU
Saudi Arabia SA
Senegal SN
Singapore SG
Slovak Republic SK
Slovenia SI
South Africa ZA
South Korea KR
Spain ES
Language Code
Tajik 8471
Tamil 8465
Telugu 8469
Thai 8472
Tonga 8479
Turkish 8482
Turkmen 8475
Twi 8487
Ukrainian 8575
Urdu 8582
Uzbek 8590
Vietnamese 8673
Volapük 8679
Welsh 6789
Wolof 8779
Xhosa 8872
Yiddish 7473
Yoruba 8979
Zulu 9085
Area Code
Sri Lanka LK
Sweden SE
Switzerland CH
Taiwan TW
Thailand TH
Turkey TR
Uganda UG
Ukraine UA
United States US
Uruguay UY
Uzbekistan UZ
Vietnam VN
Zimbabwe ZW
45
Page 46

Troubleshooting
Symptom
No power.
The power is on, but the
player does not work.
No picture.
No sound.
The player does not start
playback.
The Remote Control does
not work properly.
Possible Cause
• The power cord is disconnected.
• No disc is inserted.
• The TV is not set to receive DVD signal output.
• The video cable is not connected securely.
• The selected resolution is not capable with your TV.
• The equipment connected with the audio cable is not
set to receive disc signal output.
The power of the equipment connected with the audio
•
cable is turned off.
• The [AUDIO] options are set to the wrong position.
• The player is in reverse play, fast forward, slow motion
or pause mode.
• The disc is upside down.
• An unplayable disc is inserted.
• The rating level is set.
• The disc was recorded on another unit and was not
finalized.
• The Remote Control is not pointed at the remote
sensor on the player.
• The Remote Control is too far from the player.
Correction
• Plug the power cord into the wall outlet securely.
• Insert a disc. (Check the disc indicator in the display
window is lit.)
• Select the appropriate video input mode on the TV.
• Connect the video cable securely.
• Select another resolution using RESOLUTION button.
• Select the correct input mode of the audio receiver so you
can listen to the sound from the player.
•Tur n on the equipment connected with the audio cable.
• Set the [AUDIO] options to the correct position
(see page 24-25).
• Return to the normal playback.
• Insert the disc with the playback side down.
• Insert a playable disc. (Check the disc type and regional
code.)
• Change the rating level.
• Finalize the disc on that unit.
•Point the Remote Control at the remote sensor of the
player.
• Operate the Remote Control closer to the player.
46
Page 47

Troubleshooting
Symptom
BD-Live feature does not
work.
Radio stations cannot be
tuned in.
• External USB device is not connected.
• The connected USB device does not have enough
space.
• Internet connection is not established.
• The [BD-LIVE connection] option in the [Setup] menu
is set to [Prohibited].
• The signal strength of the stations is too weak (when
tuning in with automatic tuning).
Possible Cause
Updates
Note that information on this product is available on the Pioneer website.
Please check the website for infor mation on updating or ser vicing your Blu-ray
Disc PLAYER.
• Design and specifications are subject to change without notice.
Correction
• Connect a FAT16 or FAT32 for matted USB device to the
USB port (see page 21).
• Secure at least 1GB free space in the USB device for
using BD-Live features.
• Ensure that the unit is correctly connected to the local area
network and can access the internet (see page 19-20).
• Set the [BD-LIVE connection] option to [Permitted].
• Use direct tuning.
Resetting the unit
If you observe any of the following symptoms.
• The unit is plugged in, but the power will not turn on or off.
• The front panel display is not wor king.
• The unit is not operating normally.
You can reset the unit as follows.
• Press and hold the POWER button for at least five seconds.This will
force the player to power off. Press the POWER button again to turn
the player back on.
• Unplug the power cord, wait at least five seconds, and then plug it in
again.
47
Page 48

Specifications
General
Power requirements: AC 110 V to 240 V, 50 Hz/60 Hz
Stand by consumption: 0.33 W
Power consumption: 70 W
Dimensions (W x H x D): Approx. 430 x 76 x 372 mm without foot
Net Weight (Approx.): 4.6 kg
Operating temperature: 41 °F to 95 °F (5 °C to 35 °C)
Operating humidity: 5 % to 85 %
Inputs/Outputs
VIDEO OUT: 1.0 V (p-p), 75 Ω, sync negative,
RCA jack x 1
COMPONENT VIDEO OUT: (Y) 1.0 V (p-p), 75 Ω, sync negative,
RCA jack x 1
(Pb)/(Pr) 0.7 V (p-p), 75 Ω, RCA jack x 2
HDMI OUT (video/audio): 19 pin (HDMI standard, Type A)
HDMI IN (video/audio): 19 pin (HDMI standard, Type A)
ANALOG AUDIO IN: 2.0 Vrms (1 kHz, 0 dB), 600 Ω,
RCA jack (L, R) x 1
DIGITAL IN (COAXIAL): 0.5 V (p-p), 75 Ω, RCA jack x 1
DIGITAL IN (OPTICAL): 3 V (p-p), Optical jack x 1
PORT. IN: 0.5 Vrms (
iPod cradle (24 pin)
Tuner FM
FM T uning Range: 87.5 - 108.0 MHz
3.5 stereo jack)
Amplifier
Stereo mode: Front
PEAK Power 75 W + 75 W (4Ω 1 kHz Non CLIP)
RMS Power 60 W + 60 W (4Ω 1 kHz THD 10%)
Subwoofer
PEAK Power 150 W (3Ω 60 Hz Non CLIP)
RMS Power 120 W (3Ω 60 Hz THD 10%)
System
Laser: Semiconductor laser,
wavelength: 405nm / 650 nm
Signal system: Standard PAL/NTSC colour TV system
Frequency response: 20 Hz to 20 kHz
(48 kHz, 96 kHz, 192 kHz sampling)
LAN port: Ethernet jack x 1, 10BASE-T/100BASE-TX
Accessories
Remote control (1), Battery (1), FM antenna (1), Video cable (1),
Cradle (1)
48
Page 49

Speaker
• Front speakers
Enclosure Closed-box floorstanding type
(magnetically shielded)
System 2-way system
Speakers:
Woofer 5.2 cm cone type x2
Tweeter 2.6 cm semi-dome type
Impedance 4 Ω
Frequency range 200 Hz to 20 kHz
Maximum input power 100 W
Dimensions:
Without speaker stand 77 mm (W) x 395 mm (H) x 55 mm (D)
With speaker stand 126 mm (W) x 462 mm (H) x 126 mm (D)
Weight:
Without speaker stand 1.0 kg
With speaker stand 1.3 kg
• Subwoofer
Enclosure Bass-reflex floorstanding type
System 16 cm 1-way system
Speaker 16 cm cone type
Impedance 3 Ω
Frequency range 34 Hz to 1 kHz
Maximum Input Power 150 W
Dimensions 230 mm (W) x 380 mm (H) x 360 mm (D)
Weight 5.4 kg
Open source software notice
The licenses for the software used on this player can be found at the end of
this document.
•[Notice on GNU General Public License]
This product include the software licensed for use under the terms of a
GNU General Public License.A copy of the corresponding source code can
be obtained by being charged the fee for distribution.
To obtain a copy, contact your local Pioneer Customer Support Center.
See the GNU website (http://www.gnu.org) for details of the GNU General
Public License.
Accessories
Speaker cables (2), Speaker stand bases (2), Poles (2),
Screws (small) (8), Screws (large) (4), Non-skid pads (4), Gaskets (2)
49
Page 50

ᐈձᕘძ
ᐈձᕘძྤ࡚ᇅྡྷ࡚Ȉ
ĬĶġʨġՎġĬĴĶġʨȞĬĵIJġʩġՎġĬĺĶġʩȟȇϊܼĹĶġĦœʼn
ȞϽஈ༭տࠔЍȟ
፝ϽӶϛًȃኹܼାྡྷ࡚ܗӏޣৣȞܗ
ޠആӏྜȟޠൠܛԋ၇ҐᐡȄ
D3-4-2-1-7c*_A1_Zhtw
ឍ֚
࣐٪ЦЭدȂ፝Ͻ݃ЭྜȞԄᘉᐾޠ្ᕏȟܺဋܼҐ
ᐡαȄ
D3-4-2-1-7a_A1_Zhtw
小心
觸電風險切勿開啟
小心︰ 為減低觸電風險、切勿拆開本機前蓋
(或後蓋) 播放器內並無使用者可自行修理的部份 如需
維修,請聯絡合資格的技術人員。
等邊三角形內帶閃電箭頭的符號用以提醒使用
者︰產品內部含有未經絕緣的危險電壓,其強
度可能會使人觸電。
等邊三角形內帶感嘆號的符號用以提醒使用
者︰產品隨附的資料中包含重要的操作及維
修 (服務) 指引。
警告︰為免引起火警或觸電意外,切勿將本產品暴露於
雨水或潮濕位置。
警告︰切勿把本設備安裝在狹窄的空間,如書櫃或類
似的地方。
小心︰切勿阻塞任何通風口。 請依照生產商指示安
裝。機殼上的插槽及通風開口特別為通風而設,可確保
產品正常運作以及避免產品過熱。
切勿把產品置於睡床、沙發、地毯或其他類似的表
面上,以免堵塞通風口。 除非已有正確通風或依照生
產商指示,否則本產品不應置於如書架或機架等內建
裝置上。
小心︰本產品使用雷射系統。為確保正確使用本產品,
請仔細閱讀本說明書,並妥善保存,以備日後參考用。
若設備需要維修,請與授權的服務中心聯絡。 執行本
說明書內容以外的控制、調整或程序,可能會引致危
險輻射洩露。為免直接暴露於雷射光束下,切勿嘗試
打開產品外殼。 打開機殼時會有可見雷射輻射。 切
勿注視光束。
小心︰丟棄用過的電池時,請遵守適用您國家/地區
的政府法規或環保規定。
警告︰請勿在陽光直射或如車內或暖氣附近等其他過
熱的場所使用或存放電池,放在這些地點可能造成電
池漏液、過熱、爆炸或起火,也可能縮減電池的使用
壽命或降低效能。
小心︰切勿把本機暴露於有水(滴水或濺水) 的地方,且
不應將注滿液體的物體(如花瓶) 於置在本機上。
小心︰按雷射產品安全 IEC 60825-1:2007 分類,本產
品屬 1 級雷射產品。
為了確保正確使用本產品,請詳讀本使用手冊,並妥
善保存以便日後參閱。
若元件需維修,請聯絡授權服務中心。若使用非在此
所述的控制、調整方法或執行其他程序,將導致暴露
在危險輻射中。為了避免直接暴露在雷射光束下,請
勿開啟機殼。開啟後將可看見雷射輻射光,但請勿注
視雷射光束。
裝置上會出現下列小心標籤。
位置:機體上方
小心︰ 切勿將本機放置在有水(滴漏或潑濺)的地
方,亦不可將注滿液體的物體(如花瓶)放置在本
機上。
建議大部份裝置的電線均使用專用電路;
即只能向一個裝置供電,不能向其他裝置或分支電路
供電的單向電源插頭。請閱讀本說明書內有關此項的
說明。切勿使牆壁插頭負荷過大。 牆壁插頭負荷過
大、鬆開、受損、延長電線、電線磨損、電線受損
或破裂等均非常危險。以上任何情況均可能導致觸
電或火警。 定期檢查裝置電線,若裝置受損或退化,請
停止使用裝置並拔除電線,直至合資格服務商更換適
當電線為止。 保護電線,以免受自然或機械損傷,如扭
曲、打結、擠壓、被門夾著或被踐踏。 請特別注意
插頭、牆壁插頭及裝置接駁電線的位置。要中斷主機
電源,請拔除主機電線插頭。 安裝產品時,請確定插頭
容易插拔。
2
Page 51

版權備註
ٳಓဵ༊Ӷዊ࿘ϜԥȄ
K058c_A1_Zhtw
ȞႬԲޠጓپಓဵȟ
Pb
l 由於 AACS (先進內容接收系統) 是受 BD 格式的內
容保護系統認可, 和 DVD 格式的 CSS (內容擾亂系
統) 的用途相似, 受 AACS 保護的內容, 在錄放、模
擬訊號輸出等情況有可能受到限制。由於限制可能
會於生產產品後才通過及 / 或被 AACS 變更,本產品
的操作及限制因而視乎購買產品的時間而有別。此
外,BD-ROM Mark 及 BD+ 額外使用為 BD 格式的內
容保護系統,因此會限制部份 BD-ROM Mark 及 / 或
BD+ 的受保護內容。如需要取得更多有關 AACS,
BD-ROM Mark, BD+, 或此產品的資訊, 請聯絡授權
的客戶服務中心。
l 很多 BD-ROM/DVD 光碟受版權保護。因此,應僅直
接連接播放器至電視,並非錄影機。連接至錄影機
或會引致防複製光碟的影像失真。
l 「本產品擁有受美國著作權及其他知識產權所保護
的版權保護技術。必須得 Macrovision 授權,才可
使用本版權保護技術。除非得到 Macrovision授權,
否則只能在家庭使用或作其他有限觀看用途。嚴禁
逆向工程或分拆。」
l 在美國的版權法和其他國家的版權法下, 未經授權
的錄影,發放或修改電視節目、錄影帶、BD-ROM
光碟、DVD、CD或其他資料有可能需負民事及/或
刑事責任。
使用 BD-Live 功能
您必須使用 USB 埠連接外在的 USB 裝置 (參看第 21
頁)。
授權
Java 及其他 Java相關的註冊商標及標誌為 Sun
Microsystems, Inc. 於美國及其他國家的商標或註冊商
標。
於杜比實驗室 (Dolby Laboratories) 授權下生產。
“杜比” (Dolby) 及 double-D 標誌均為杜比實驗室的
註冊商標。
製造根據美國著作權#︰
5,451,942; 5,956,674; 5,974,380; 5,978,762;
6,226,616; 6,487,535; 7,392,195; 7,272,567; 7,333,929;
7,212,872 及其他美國以及世界各地的著作權而製
作的。DTS 是已註冊的商標,而 DTS 標誌、符
號、DTS-HD 及 DTS-HD Audio I Essential是 DTS, Inc
的商標。 © 1996-2007 DTS, Inc 版權所有。
HDMI、HDMI標記及高清多媒體介面為HDMI
licensing LLC 公司的商標或註冊商標。
“BD-LIVE”標誌是 Blu-ray Disc 協會的註冊商標。
是DVD Format/Logo Licensing Corporation 的
商標。
“Blu-ray Disc”和
均為商標。
“BONUSVIEW” 為 Blu-ray Disc 協會的註冊商標。
本產品經 AVC專利組合(AVC Patent Portfolio License)
及 VC-1 專利組合授權,授權客戶予個人及非商業
用途 (i) 把影片編碼以符合 AVC 標準 and VC-1 標準
(“AVC/VC-1 影片”) 及/或 (ii)解碼用作個人或非商
業活動時編碼之 AVC/VC-1 影片及/或獲得影片提供者
授權提供AVC/VC-1 影片。 不允許授權或授權予其他
用途。 您可從 MPEG LA, LLC 獲得更多資訊。 瀏覽
http://www.mpegla.com
“AVCHD” 及 “AVCHD” 標誌是 Panasonic
Corporation 及 Sony Corporation 的註冊商標。
iPod為Apple Inc.於美國及其他國家的註冊商標。
「Made for iPod」(專為iPod製造)的字樣代表特
別為此設計的電子配件,以便連接至 iPod搭配使
用,且開發人員符合Apple所認證的績效標準。
Apple並不對此裝置的操作或安全管理標準負起任
何責任。
Windows Media 是Microsoft Corporation 於美國及/
或其他國家的商標或註冊商標。
本產品採用Microsoft Corporation 開發之技術,未
獲Microsoft Licensing, Inc. 授權不得使用或散佈本
技術。
DivX®是DivX, Inc. 的註冊商標,並獲授權使用。
3
Page 52

目錄
引言 .....................................................5-8
遙控器 ....................................................9
前控制台 .................................................10
後控制台 .................................................11
喇叭連線 ..............................................12-14
連接電視 ..............................................15-16
解像度設定............................................. 17-18
網絡連接..................................................19
設定音效模式..............................................20
調整喇叭音量設定..........................................20
使用夜晚模式功能..........................................20
使用睡眠定時器............................................20
使用 USB 裝置 .............................................21
使用主頁功能表............................................22
調整設定 ..............................................22-28
播放光碟 ..............................................29-32
顯示光碟資訊..............................................33
享受 BD-LIVE™ ........................................ 34-35
播放電影 ..............................................35-36
聽音樂 ...................................................37
檢視照片 .................................................38
收聽收音機................................................39
播放 iPod ..............................................39-40
聆聽可攜式音訊播放器的音樂...............................41
聆聽組件的音效 ...........................................41
使用 HDMI IN 插口 ........................................42
使用 DIGITAL AUDIO IN 插口...............................42
參考資料 .................................................43
語言編碼 .................................................44
地區編碼 .................................................44
疑難排解 ..............................................45-46
規格說明 .................................................47
開放性原始碼軟體注意事項.................................48
連接、操作或調整播放器前,請先仔細閱讀本說明書。
4
Page 53

引言
為確保正確使用本產品,請仔細閱讀本說明書,並妥善保存,以備日後參考用。
本說明書提供播放器的操作及維修保養資料。
有關裝置服務,請與授權的服務中心聯絡。
關於 符號顯示
操作時電視可能會顯示“ ”符號,這即表示本說明書解釋的功能並不適用
於該特定媒介。
本說明書使用的符號
注意:
代表注意事項及操作說明。
提示︰
代表提示或使操作更容易的小秘訣。
章節標題顯示下列符號,即表示該章節的功能只適用於符號代表之光碟。
ALL
以下列出的所有光碟。
BD
BD-ROM 光碟
DVD
DVD-Video, DVD±R/RW in Video 模式或 VR 模式
及完成化
AVCHD
DVD±R/RW 在 AVCHD 的格式
MOVIE
ACD
MUSIC
USB╱磁碟裡的影片檔案
音樂 CDs
USB/磁碟裡的音樂檔案
搬動裝置
託運裝置時
請保存原有的託運紙箱及包裝物料。 若需要搬運裝置,請重新按原廠般包裝
以作最大保護。
保持外露表面清潔
l 請勿在裝置附近使用揮發性液體 (例如︰殺蟲劑)。
l 大力擦拭或會損毀表面。
l 切勿將橡膠或塑膠產品與本產品長時間接觸。
清潔裝置
使用柔軟的乾布清潔播放器。 若表面非常骯髒,請使用輕輕沾濕了溫和清潔劑
的軟布。
切勿使用強烈溶劑,如酒精、揮發油或稀釋劑,這些溶劑或會損壞裝置表面。
維修本產品
本產品是高科技、高清晰度的裝置。 如果光學讀取鏡片及光碟驅動的部件遭
損毀或弄髒,會影響畫面質素。
有關詳情,請聯絡您近的已註冊的服務中心。
光碟使用備註
觸摸光碟
請勿觸摸光碟播放一面。手持光碟邊,以免指紋印在光碟表面。 請勿於光碟
表面貼上紙張或膠紙。
存放光碟
播放後,請把光碟存於光碟中。 切勿讓光碟直接暴露於陽光下、接近熱源的
地方或在陽光下的車廂中。
清潔光碟
光碟上的指紋及塵埃可影響光碟的畫面及聲音質素。播放前,可用清潔的抹布
清潔光碟。 請從中間向外擦淨光碟。
切勿使用強烈溶劑,如酒精、揮發油、稀釋劑、通用清潔劑或適用於舊式乙烯
基抗靜電噴霧。
5
Page 54

可播放的光碟
藍光光碟
- 可購買或租看的光碟,例如電影
- 內含音訊標題 、 DivX、MP3、WMA 或 相片檔案的 BD-R/RE 光
碟。
DVD-VIDEO (8 厘米 / 12 厘米光碟)
可購買或租看的光碟,例如電影
DVD-R (8 厘米 / 12 厘米光碟)
- 僅限影像模式及完成
- 支援雙層光碟
- AVCHD 格式
- 內含音訊標題 、 DivX、MP3、WMA 或相片檔案的 DVD-R 光碟。
DVD-RW (8 厘米 / 12 厘米光碟)
- 僅限 VR 模式、影像模式及完成化
- AVCHD 格式
- 內含音訊標題 、 DivX、MP3、WMA 或相片檔案的 DVD-RW 光
碟。
DVD+R (8 厘米 / 12 厘米光碟)
- 僅限視訊模式與完成化的光碟
- 支援雙層光碟
- AVCHD 格式
- 內含音訊標題 、 DivX、MP3、WMA 或相片檔案的 DVD+R 光碟。
DVD+RW (8 厘米 / 12 厘米光碟)
- 僅限影像模式及完成
- AVCHD 格式
- 內含音訊標題 、 DivX、MP3、WMA 或相片檔案的 DVD+RW 光
碟。
Audio CD (8 厘米 / 12 厘米光碟)
可購買聲音光碟格式的聲音 CDs 或 CD-Rs / CD-RWs
附註:
l 視乎錄影裝置或 CD-R/RW (或 DVD±R/RW) 光碟的情況而定,部份 CD-R/
RW (或 DVD±R/RW) 光碟不能在裝置中播放。
l 切勿於光碟任何一面 (標誌或錄影的一面) 貼上貼紙或標貼。
l 切勿使用不規則形狀的光碟 (如:心形或八角形)。 使用這些光碟或會影響
操作。
l 視乎錄影軟件及完成過程而定,部份已錄製的光碟 (CD-R/RW 或 DVD±R/
RW) 或不能播放。
l 用個人電腦或 DVD 或 CD 錄製機錄製的 DVD±R/RW 及 CD-R/RW 光碟,
如果光盤損毀或不潔,或本產品鏡頭中有灰塵或凝結物,則可能無法播
放。
l 如果您用個人電腦錄製光碟,即使錄製為兼容格式,也有可能因為錄製
光碟軟體的設定而無法播放。 (若想獲得更詳細的資訊,請諮詢軟體發行
商。)
l 本播放器要求光碟及錄製品達到一定技術標準來保證播放質量。 事先錄製
的 DVDs 自動設定為這些標準。 可錄製光碟格式有幾個不同種類 (包括含
有 MP3 或 WMA 檔案的 CD-R),這些需要某種預設條件來保證兼容播放。
l 客戶需要注意從網絡下載 MP3 / WMA 檔案及音樂需要許可。 我們的公司
沒有權力提供此項許可。 需要向版權擁有者索取許可。
l 格式化可重複讀寫光碟片時,為了讓光碟片與播放機相容,您必須將光碟
格式選項設定為 [Mastered]。若選項設為Live File System時,您將無法在播
放機上使用。(Mastered/Live File System:適用於Windows Vista的光碟格式
系統)
CD-R/CD-RW (8 厘米 / 12 厘米光碟)
內含已完成化的音訊檔案、DivX、MP3、WMA 或相片檔案的 CD-R/
RW 光碟。
6
Page 55

BD-ROM 光碟功能
BD-ROM 光碟可於單面光碟內儲存 25 GB (單層) 或 50 GB (雙層) – 約為
DVD 容量的 5 至 10 倍。
BD-ROM 光碟亦支援業界最高質素的高清視頻 (高達 1980 x 1080) – 大容量
與視頻質素沒有直接關係。
此外,BD-ROM 光碟與 DVD 光碟的外貌及大小無異。
l 下列 BD-ROM 光碟功能視乎光碟而有所不同。
l 外表及功能導航亦視乎光碟而有所不同。
l 並非所有光碟均有下列功能。
l BD-ROM Hybrid 光碟有 BD-ROM 及 DVD (或 CD) 層在一面。 使用這種光
碟時,本播放機只會播放 BD-ROM 層。
重點視頻
電影發行所使用的 BD-ROM 格式支援三種高階視頻編碼,包括 MPEG-2
、MPEG4 AVC (H.264) 及 SMPTE VC1。
同時亦支援高清視頻解像度︰
l 1920 x 1080 HD
l 1280 x 720 HD
圖像面
高清視頻層上有兩個獨立及完整的高清解像度 (1920 x 1080) 圖像面 (層)。其
中一面指派給與視頻相關的清晰圖像 (如字幕),另一面則指派給互動圖像元素,
如按鈕或功能表。
兩面均有不同的擦除、淡出及捲動效果。
高清播放
要配備高清電視才能檢視 BD-ROM 光碟的高清內容。
部份光碟或需要 HDMI OUT 以檢視高清內容。
電視的解像度或會限制檢視 BD-ROM 光碟的高清內容的能力。
功能表聲音
反白或選取功能表選項,按鈕時會聽到「咔」的一聲或解釋於功能表上反白選
項的錄音。
多頁 / 彈出功能表
使用 DVD-Video 存取新功能表螢幕時,每次均會中斷播放。由於 BD-ROM 有
從光碟預載資料的能力,因此可以存取多至數頁的功能表而不中斷播放。
音頻及視頻在背景播放的同時,可以瀏覽功能表頁面或選取不同的功能表路
徑。
互動性
部份 BD-ROM 光碟或包含動態功能表及 / 或小遊戲。
使用者可瀏覽的幻燈片
使用 BD-ROM 光碟,可以於播放音頻的同時瀏覽不同的靜止影像。
字幕
視乎 BD-ROM 光碟內容而定,可以選取部份字幕的字形、大小及顏色。字幕
同時亦可以動態、捲動或淡入及淡出。
BD-J 互動能力
BD-ROM 格式支援 Java 的互動功能。“BD-J”為內容提供者在建立互動的
BD-ROM 標題時提供近乎無限的功能。
BD-ROM 光碟兼容性
本播放器僅支援 BD-ROM 設定檔 2 。
• 當組件連接網絡至 BONUSVIEW 功能, 可讓支援 BD-Live (BD-ROM 版本2
設定檔 2) 的光碟享有互動功能。
• 支援 BONUSVIEW (BD-ROM 版本2 設定檔1 版本1.1/ 最終標準設定檔 ) 可
使用 Virtual packages 或 Picture-in-Picture 功能。
7
Page 56

區碼
在本產品背面印有區碼。 本產品只能播放有與本產品背面的標籤相同的
BD-ROM 或 DVD 光碟或標有「全部」字樣的 BD-ROM、 HD DVD 或 DVD
光碟。
AVCHD (進階視訊轉碼器高畫質)
• 此播放器可錄放 AVCHD 格式光碟。這些光碟多數用於錄影和攝錄像機。
• AVCHD 格式是高畫質數碼影片照相機格式。
• 相比起傳統的影像壓縮格式, MPEG-4 AVC/H.264 格式可更有效地壓縮影
像。
• 有些 AVCHD 光碟使用 “x.v.Color” 格式。
• 此播放器可用 “x.v.Color” 格式錄放 AVCHD 光碟。
• “x.v.Color” 是 Sony Corporation 的商標。
• 有些 AVCHD 格式的光碟不能播放, 視乎錄影狀況而定。
• AVCHD 格式光碟需要完成化。
• “x.v.Color” 比一般的 DVD 錄像機光碟提供更多色彩度。
兼容性備註
• 由於 BD-ROM 是新的格式, 有可能產生一些光碟,數碼連接及其他相容性的
問題。如果您遇到有關相容性的問題, 請聯絡授權的客戶服務中心。
•檢視高清內容及升頻標準 DVD 內容,可能需要您的顯示裝置的 HDMI 纜線
輸入或 HDCP 纜線輸入。
• 有些 BD-ROM 及 DVD 光碟會限制一些運作指令和功能。
• Dolby Digital EX、DTS-ES 及 DTS 96/24 均能以 Dolby Digital 5.1 或 DTS 5.1 輸
出。
• 您可使用用作儲存和光碟有關資訊, 包括下載線上內容的 USB 裝置。你使用的
光碟會決定資訊的保留時間。
特定系統要求
特定系統要求
•有 COMPONENT 或 HDMI 輸入插孔的高清顯示器。
• 含高畫質內容的 BD-ROM 光碟。
• 部份內容 (光碟作者特定之內容) 需要顯示裝置具有 HDMI 或 HDCP 能力
DVI 輸出。
• 要升頻標準畫質 DVD,受複製保護的內容需要顯示裝置具有 HDMI 或 HDCP
能力 DVI 輸入。
電視色彩規格的重要注意事項
本播放器的色彩規格會隨著目前所播放的光碟而變。
舉例而言,播放器播放NTSC色彩規格的光碟時,影像會以NTSC訊號輸出。
唯有具備多重色彩規格的電視機才可接收本播放器的輸出訊號。
附註:
• 若您的電視使用PAL色彩規格,觀賞以NTSC規格所錄製的光碟時僅會看見
失真影像。
• 具有多重規格的彩色電視可依據輸入的訊號自動切換色彩規格。若未自動
切換色彩規格,請關機後重開,然後檢視畫面中的一般影像。
• 即使您的電視機可正確播放以NTSC色彩規格所錄製的光碟,錄影機也有可
能無法錄製這些光碟影像。
「x.v.Colour」、 和 是Sony Corporation 的商標。
8
Page 57

遙控器
1
2
3
4
l l l l l l l 1 l l l l l l
INPUT (TUNER): 切換輸入來源
(FM, AUX, PORTABLE, OPTICAL, COAXIAL, HDMI IN 1,
HDMI IN 2)
STANDBY/ON: 開啟或關閉播放器。
OPEN/CLOSE (h): 開啟或關閉光碟盤。
iPod: 選擇 REMOTE IPOD 或 OSD IPOD 模式。
PIP*: 開啟或關閉第二映像 (畫中畫 Picture-in-picture)
(只限於 BD-ROM )。
DISPLAY: 顯示或退出螢幕顯示。
HOME MENU: 顯示或退出[主選單]。
MENU: 進入光碟功能表。
l l l l l l l 2 l l l l l l
方向按鈕︰在功能表中選擇一個選項。
PRESET (b/a ): 可選擇收音機的頻道。
TUNE (+/-): 可調諧至想收聽的無線電台。
ENTER ( ): 確定選取之功能表。
RETURN (x): 離開功能表或恢復播放。 恢復播放功能可
否運作視乎 BD-ROM 光碟而定。
POPUP/TOP MENU: 顯示 DVD 的標題功能表或 BD-ROM
的跳出功能表 (如適用)。
l l l l l l l 3 l l l l l l
STOP (g): 停止播放。
PLAY (d): 開始播放。
PAUSE/STEP (e): 暫停播放。
SKIP (o / p): 跳到前一個或下一個章節 / 曲目 / 檔案。
SCAN (m / n): 向後或向前搜尋。
SPK LEVEL:
SOUND: 選擇音效模式。
設定喇叭音量。
MUTE: 請按下靜音(MUTE)鍵關閉裝置的聲音。 例如,
關閉裝置的聲音以接聽電話。
VOL: (+/-): 調整喇叭音量。
DRC: 設定夜晚模式功能。
l l l l l l l 4 l l l l l l
0-9 數字按鈕︰選取功能表上有編號的選項。
SUBTITLE ( ): 選取字幕語言。
RESOLUTION︰設定 HDMI 及 COMPONENT VIDEO
OUTPUT 插孔的輸出解像度。
MARKER︰播放時標記任何一點。
SEARCH: 顯示或退出 SEARCH (搜尋)功能表。
REPEAT: 重複所需區段。
CLEAR: 當設置密碼時,清除搜尋功能表中的標記或數字。
有顏色的 (A、 B、C、 D) 按鈕︰當作瀏覽 BD-ROM
menus。也適用於 [影片]、[相片] 及 [音樂] menu。
- D 按鈕: 在 FM 模式中選擇 MONO 或 STEREO。
電視控制按鈕︰詳見第 43 頁。
SLEEP: 設定未使用裝置,即會切換至待機的時間長度。
* 視乎光碟類型或 BD-ROM 光碟的內容 的預錄內容,可
操作不同的功能,或者按某些按鈕時會沒有反應。
遙控操作
請將遙控器對準遙控感應器,然後按下按鈕。
安裝遙控器電池
請取下遙控器後方的電池蓋,然後根據正確的正
及負 極,放入一顆 R03 (AAA) 電池。
9
Page 58

前控制台
1 2 3
1 u
電源按鈕 (STANDBY/ON)
開啟或關閉播放器。
2
光碟盤
在此插入光碟。
3
遙控感應器
請把遙控器對準此處。
4
上方面板的觸碰按鈕
- h (OPEN/CLOSE)
開啟或關閉光碟盤。
- FUNCTION
變更輸入來源 (FM, OSD IPOD, REMOTE IPOD, AUX, PORTABLE,
OPTICAL, COAXIAL, HDMI IN 1, HDMI IN 2) 或顯示 On-Screen Display。
- d/e (PLAY / PAUSE)
開始播放。
臨時暫停播放,再按以離開暫停模式。
- g (STOP)
停止播放。
- VOLUME -/+
調整喇叭音量。
7 6
5
動作指示燈
執行觸碰感應器操作時,此燈會亮起。
6
USB 埠
連接 USB 裝置
顯示視窗
7
顯示播放器目前狀態。
使用觸控鈕的注意事項
• 以乾淨、乾燥的手來使用觸控鈕。
- 在潮濕的環境裡,使用前請擦去觸控鈕上的濕氣。
• 勿重力按下觸控鈕。
- 太用力的話,會損壞觸控鈕的感應器。
• 觸按要使用的按鈕,就能正確執行動作。
• 小心勿讓金屬等導電物質接觸觸控鈕,可能會造成故障。
4
5
10
Page 59

後控制台
1 2 3 4 5 6 7 8
9 a b c d e
1 AC 電源線
插入電源。
喇叭接頭
2
連接喇叭。
冷卻風扇
3
FM 天線接頭
4
連接 FM 天線。
DIGITAL AUDIO IN (COAXIAL)
5
連接數位 (同軸) 音訊設備。
VIDEO OUT
6
用視頻輸入連接電視。
AUX (L/R) INPUT
7
連接有 2 聲道音訊輸出端的外接來源。
iPod (24 pin)
8
連接 iPod cradle。
9
DIGITAL AUDIO IN (OPTICAL)
連接數位 (光學) 音訊設備。
PORT. IN
a
連接有數位輸出端的可攜式播放機。
COMPONENT VIDEO (Y PB PR)
b
OUTPUT (PROGRESSIVE SCAN)
用 Y Pb Pr 輸入連接電視。
LAN 埠
c
連接時常開啟的多頻連接器至網絡。
HDMI IN (類型甲) 1/2
d
連接有 HDMI 輸出端的外接來源。
HDMI OUT (類型甲)
e
用 HDMI 輸入連接電視。(數碼音頻及視頻介面)
11
Page 60

喇叭連線
安裝防滑墊
•將四個大防滑墊安裝於重低音喇叭上。
使用隨附的膠條將 4 個墊子貼上重低音喇叭的底座。
組裝喇叭支架及固定前側喇叭
1 從底座下方的孔插入柱子,並以 4 顆螺絲固定。
3 從底座下的孔插入喇叭連接線並穿過柱子,再連接至喇叭端子。連接後,
將喇叭纜線塞入喇叭後側的溝槽中。
將彩色纜線與標籤上的色彩圖示配對,然後將帶有灰線的白色纜線插入紅色
(+) 端,而將其他纜線插入黑色 (-)端。
4 使用 2 顆螺絲固定喇叭與柱子。
確保喇叭纜線未被喇叭與柱子擠壓。
2 固定襯墊與柱子。
將襯墊固定於喇叭安裝的柱子表面上。
12
5 連接後,將喇叭纜線放入底座後側。
Page 61

6 連接纜線與播放器。
ڜᇘᝅʳ
ʻآᙟʼ
ˈʳʳ۟ʳˊʳ
ˈʳ
˄˃ʳ
ি࣋ᆜ
ֽؓ࣋ᆜ
֞
֞
ি࣋ᆜ
ֽؓ࣋ᆜ
׳ছֱ ؐছֱ
֞
֞
ໞጤ ໞጤ
將具有白色端子的灰色纜線插入正(+)極,另一條纜線則插入負(-)極。
若要連接纜線與播放器,按下塑膠指墊可開啟連線端子。將纜線插入並放開
指墊。
紅色 (+)
白色 (+)
橘色 (+)
黑色 (–)
將喇叭安裝於牆壁上
前喇叭有安裝孔。
安裝前
•請務必牢記,喇叭系統相當重且可能造成螺絲鬆動,或是牆壁材質無法支
撐,而導致喇叭掉落。 請確定安裝喇叭的牆壁強度足以支撐喇叭,請勿安
裝於夾板或不堅固的牆面。
•本產品並未隨附安裝用的螺絲,請使用適合牆壁材質並能支撐喇叭重量的
螺絲。
注意:
•若您不確定牆壁的品質及強度,請洽詢專業人士尋求建議。
•先鋒對任何不當安裝所造成之意外或損壞,概不負責。
安裝喇叭
前喇叭可垂直或水平懸掛於牆上。單孔可垂直懸掛,而雙孔則可水平懸掛。
下圖展示右前方的喇叭。
水平安裝喇叭時,讓喇叭後側的喇叭端子位於表面的外側,並盡可能遠離其
他喇叭。
附註:
請勿將隨附的揚聲器連接至不是隨本系統一起附上的擴大器。連接至其他的
擴大器上可能會導致故障或起火。
13
13
Page 62

放置喇叭的其他注意事項
•左前方與右前方喇叭和電視距離的安裝位置需相同。
小心:
•請確定所有露出的喇叭纜線已相互纏繞並完全插入喇叭端子中。若有任何
露出的喇叭纜線接觸後面板,可能造成因安全機制而切斷電源。
•本系統隨附的前喇叭具備防磁功能。
視安裝的位置而定,若安裝的喇叭太接近電視的螢幕,可能發生色彩失
真。此時請關閉電視電源,隔 15 至 30 分鐘後再開啟。若問題仍未改善,
請將喇叭系統遠離電視。
•無防磁的重低音喇叭請勿置於電視或螢幕附近,而磁性儲存媒體 (如磁碟
片與磁帶或錄影帶) 也避免靠近重低音喇叭。
•請勿將重低音喇叭安裝於牆壁或天花板上,喇叭可能會掉落並造成人員受
傷。
FM 天線連接
FM - 連接 FM 天線與播放器。
當天線的兩端延伸部分為筆直且水平時,可獲得最佳接收狀態。
14
Page 63

連接電視
H
確定在每次接線或變更接線之前,關閉電源並從電源插座上拔下電源線。
視乎現有設備的功能而使用以下連接。
提示:
•視乎電視及其他欲連接的設備,可使用多種方法連接播放器。請只使用以下
其中一種方法。
• 為獲得最佳連線狀態,請參閱您的電視或其他裝置的使用說明書。
小心:
• 請確保播放器直接連接至電視。請把電視調至正確的視頻輸入頻道。
• 切勿透過 VCR 連接播放器。複製保護系統或會令 DVD 影像失真。
連接 HDMI
可透過 HDMI 纜線連接 HDMI 電視或顯示器至播放器。
連接播放機上的 HDMI OUT 插口與 HDMI 相容電視或螢幕
插口。
設定電視來源為 HDMI (參閱電視的使用說明書)。
BD 播放器
(H) 的 HDMI IN
附註:
• 您必須使用 [設定] 功能表上的 [HDMI 音訊] 選項選擇電視可接受的 HDMI
音訊輸出 (參見第 25 頁)。
• 如果所連接的 HDMI 設備不接受播放器的音頻輸出,HDMI 裝置的音頻聲
音或被扭曲或沒有輸出。
提示:
• 您即可盡情享受 HDMI 連線位您帶來的數位音訊及視訊訊號。
• 使用 HDMI 連接時,可以變更 HDMI 輸出的解像度。(請參閱第 17-18 頁的
「解像度設定」)
• 使用在 [設定] menu (參閱第 23 頁) 的 [HDMI色彩設定] 選項以選取從
HDMI OUT 插口發出的影片輸出種類。
小心:
• 在已建立連接後變更解像度可能會引致故障。
要解決此問題,請關掉播放器然後再次開啟。
• HDMI 與 HDCP 的連線不明卻時,電視畫面會變更為黑色或綠色,或畫面
上出現雪花雜訊。 此時請檢查 HDMI 連線,或中斷連接 HDMI 纜線。
•
若畫面上有雜訊或線條,請檢查 HDMI 纜線 (長度通常限制為 4.5m) 並使
用高速 HDMI 纜線 (版本 1.3)。
TV
15
Page 64

HDMI 的額外資訊
C
V
• 連接 HDMI 或 DVI 兼容裝置時,請確保下列各項︰
- 關閉 HDMI / DVI 裝置及本播放器。然後,開啟 HDMI / DVI 裝置,等待約
30 秒,再開啟本播放器。
- 已正確地設定連接至本設備的裝置的視頻輸出。
- 所連接的裝置兼容 720x480p、1280x720p、1920x1080i 或 1920x1080p 視頻
輸出。
• 並非所有 HDCP-兼容 DVI 裝置都能和本產品一起使用。
- 影像無法在非 HDCP 裝置上正常顯示。
- 本播放機不會播放且電視畫面會變更為黑色或綠色,或畫面上出現雪花
雜訊。
連接色差視頻
用 Y Pb Pr 纜線 (C) 連接播放器的 COMPONENT VIDEO OUT 插孔至電視相應
的輸入插孔。
您會透過系統的喇叭聽見音效。
提示:
使用 COMPONENT VIDEO OUT 連接時,可以變更輸出解像度。
(請參閱第 17-18 頁的「解像度設定」)
視訊連線
透過視頻纜線 (V),連接播放器的 VIDEO OUT 插孔至電視的視頻輸入插孔。
您會透過系統的喇叭聽見音效。
BD 播放器
BD 播放器
16
TV
TV
Page 65

解像度設定
播放器為 HDMI OUT 及 COMPONENT VIDEO OUT 插口提供多個輸出解像
度。
您可使用[設定]功能表或按RESOLUTION按鈕變更解析度。
附註:
由於影響視訊輸出解析度的因素非常多,請參見 “根據解析度設定選用適合
的解析度” 了解正確資訊。
如何使用解像度按鈕更改 RESOLUTION
在停止模式下,重複按RESOLUTION按鈕即可變更解析度。
顯示視窗會顯示目前的解析度。
如何使用 [設定] menu 更改解析度
根據解析度設定選用適合的解析度
• 當不具防拷保護的媒體正在播放
視頻輸出 HDMI OUT COMPONENT VIDEO OUT
解像度設定
576i 576p 576i
576p 576p 576p
720p 720p 720p
1080i 1080i 1080i
1080p / 24Hz* 1080p / 24Hz 576i 1080i
1080p / 60Hz* 1080p / 60Hz 576i 1080i
HDMI 連接 HDMI 中斷連接
1 按 HOME MENU,然後會顯示 [主選單]。
2 選取 [設定],然後按 ENTER 鍵。 會顯示 [設定] menu。
3 使用 a / b 以選取 [顯示] 選項,然後表 d 以移至第二層。
4 使用 a / b 以選取 [解析度] 選項,然後表 d 以移至第三層。
5 使用 a / b 選取想要的解像度,然後按 ENTER 確認您的選擇。
附註:
若當 [解析度] 設為 [自動] 時,HDMI OUT 插口的視訊訊號未從電視畫面輸
出,請按 RESOLUTION 按鈕變更視訊輸出解析度。
• 當未受複製保護的媒體正在錄放
視頻輸出 HDMI OUT COMPONENT VIDEO OUT
解像度設定
576i 576p 576i
576p 576p 576p
720p 720p 576i 576p
1080i 1080i 576i 576p
1080p / 24Hz* 1080p / 24Hz 576i 576p
1080p / 60Hz* 1080p / 60Hz 576i 576p
* 請參閱第23頁的「1080p顯示模式」。
附註:
• 視乎您的顯示,一些解像度的設定可能會導致影像消失或不正常的畫
面。 遇上這種情況,按 主頁 (HOME MENU) 鍵,然後重複按解像度
(RESOLUTION) 直到畫面再現。
• 本產品支援所有 video out 插口的同步輸出。 HDMI 輸出的解像度與
component video 輸出的解像度輸出一樣。
HDMI 連接 HDMI 中斷連接
17
Page 66

HDMI OUT 連接
• 如設定為 480i 解像度, HDMI OUT 真正輸出的解像度會變為 480p。
• 如果您手動選取解6像度,並連接 HDMI 插口至電視而您的電視又不接
受,解像度會設定為 [自動]。
•如果您的電視不接受您選取的解像度,警告訊息會顯示。 解像度改變後,
如不能看到畫面, 請等待 20 秒, 然後自動返回先前的解像度。
• 1080p 影像輸出幀速會自動設定為 24Hz 或 60Hz,視乎所連接的電視的容
量及喜好,並會根據 BD-ROM 光碟的本身的影像幀速而定。
COMPONENT VIDEO OUT 連接
• 如未受複製保護的媒體設定為 1080p 解像度, COMPONENT VIDEO OUT 真
正輸出的解像度會變為 1080i。
• 如未受複製保護的媒體設定為 720p, 1080i, 1080p 解像度, COMPONENT
VIDEO OUT 真正輸出的解像度會變為 480i 或 480p, 視乎 HDMI 纜線的連接
性而定。
• BD 或 DVD 可防止類比輸出的。
VIDEO OUT 連接
VIDEO OUT 插口的解析度永遠設定為 480i。
18
Page 67

網絡連接
Broadband
Service
本播放器可透過後面板的 LAN 埠連接本區的網絡 (LAN)。
連接後,播放器需要設定網絡溝通。 可以在 [設定] 功能表中完成此項 — 有
關詳細的指引,請參閱第 27 頁的「網路」。
使用 LAN 纜線連接播放器的 LAN 埠至您的數據機或路由器相對應的埠。
使用商業供應的 LAN 直纜線 (類目 5/CAT5 或 RJ45 更佳連接器)。
將本產品連接至寬頻網路, 您可以使用軟體更新,享有 BD-Live 功能。
BD 播放器
路由器
寬帶
服務
LAN
小心:
• 插入或拔除 LAN 纜線,握緊纜線的插頭部份。
拔除纜線時,切勿拉扯 LAN 纜線;可是,卡住時,請拔除。
• 切勿連接組合式的電話纜線,至 LAN 埠。
• 因為會有不同的連接配置,請參閱您的電訊供應商或網絡服務供應商的說
明書。
附註:
•視乎不同的網絡供應商 (ISP) ,可接收網絡服務的裝置的數目可能會受可
應用之服務所限制。 有關詳情,請聯絡您的 ISP。
• 我們公司不會為播放器及/或網絡連接功能因為由您的寬帶網絡連接或其他
連接儀器的傳輸錯誤/傳輸故障而導致的故障負責。
• 我們公司不會為您的網絡連接的任何問題負責。
• 我們公司並不建立或提供透過網絡連接功能而取得的 BD-ROM 光碟的功
能,而我們公司亦不會為這些功能及其供應而負責。一些於網絡連接供應
的與光碟有關的資料可能不能與本播放器兼容。 如果您有任何相關的疑
問,請聯絡光碟製造商。
• 一些網絡內容可能需要更高帶寬連接。
• 即使播放器己正確連接及裝配,一些網絡內容可能會因為網絡擠塞、您的
網絡服務的寬帶或質量、內容供應者的問題或兼容性而不能正常操作。
• 一些網絡連接操作可能因為支援您的網絡連接的網絡服務供應商 (ISP) 所
設定的限制而不適用。
• 任何由 ISP 收取的費用,當中包括 (但不限於) 連接費用是您的責任。
• 本播放器的連接需要10 Base-T 底 100 Base-TX LAN 埠,您的網絡服務不允
許此項連接,那麼您就不能連接您的播放器。
• 您必須使用路由器以使用 xDSL 服務。
• 需要 ADSL 數據機以使用 DSL 服務,以及需要纜線數據機以使用纜線數據
機服務。 視乎您的 ISP 的存取方法以及您的 ISP 與用戶的協定,您可能不
能使用本播放器包含的網絡連接功能,,或者可能在同時連接裝置的數目上
會受到限制。 (如果您的 ISP 限制訂閱一個裝置,當連接電腦時,本播放
器可能不允許連接。)
•「路由器」的使用可能會視乎您的 ISP 的政策及限制而不被允許或受到限
制。 有關詳情,請直接聯絡您的 ISP。
• 當確認 MAC 地址時,您的 ISP 可能會保護您的播放器連接網絡。 遇上這
種情況,請聯絡您的 ISP 以要求初始 MAC 地址。
19
Page 68

設定音效模式
您可以選擇適合的音效模式。 重複按 SOUND 直到想要的模式出現在前面板
顯示幕或電視畫面上。
當 [HDMI 音響] 設為 [開] 時無法設定音效模式 (參見第 23 頁)。
[Bypass] 模式: 按照錄製方式,播放多聲道環繞音效音訊的軟體。
[Bass Booster] 模式: 增強左右前方喇叭與低音喇叭的音效效果。
[News] 模式: 此模式會讓語音聽起來格外清楚,改善語音的品質。
[Drama] 模式: 您可以在觀賞電視戲劇時享受強化中央聲道更有力的音
效。
[Sports] 模式: 此模式能在體育節目中產生延長的動態音效。
[Game] 模式: 您可以在進行電視遊戲時享受虛擬音效。
[Concert] 模式: 產生如音樂廳的音效。
[MP3 EXP] 模式: 聆聽 MP3 檔案或其他壓縮音樂時,您可以增強音效。
此模式僅適用於 2 聲道來源。
附註:
僅當HDMI IN的聲音為Dolby Digital Plus、Dolby True HD及DTS-HD的已壓縮位元
流時,才能使用[BYPASS]模式。
調整喇叭音量設定
您可以調整各喇叭的音量。
重複按 SPK LEVEL 可選擇想設定的喇叭。
按 VOL (+/-) 可調整所選喇叭的音量,而音量設定功能表會顯示在顯示幕前
面板或電視畫面上。 重覆此步驟調整其他喇叭的音量。
使用夜晚模式功能
您可以壓縮音軌的動態範圍。
重複按 DRC。
當您想要在夜晚以低音量觀看電影時,此功能相當實用。
[DRC OFF]: 關閉夜晚模式功能。
[DRC ON]: 縮小動態範圍。
附註:
• 視來源而定,夜晚模式功能的效率可能不高或無影響。
• 夜晚模式開啟時,觸碰按鈕及音量旋鈕的燈光都會熄滅,且前面板顯示幕
會變暗。
使用睡眠定時器
您可以設定系統關閉電源的時間,這樣您即可在入睡前聆聽音樂。
- 重複按 SLEEP 可選擇時間長度選項 (以分為單位): (調光器開啟 d 睡眠定
時器值 d 調光器關閉)
調光器開啟:藍光的燈光會熄滅,且前面板顯示幕會變暗。
- 如要觀看進入待機模式的倒數計時,請再按 SLEEP 一次。
- 如要停用睡眠計時器,請按 SLEEP 直到顯示之前的狀態或按 POWER 切換裝
置為待機模式 。
20
Page 69

使用 USB 裝置
本產品可以播放 USB 裝置中的音樂及影像檔案。
1. 連接 USB 裝置: –
2 顯示[主選單] : HOME MENU
3 選取主選項: c d, ENTER
[音樂]、[相片] 或 [影片] 選項
4 選取 [USB] 選項: c d
5 顯示相應menu清單: ENTER
顯示[音樂]、[相片] 或 [短片] menu 。
有關 menu 的詳情,請參閱第 35 至 38 頁。
提示:
如果您於連接 USB 裝置及插入光碟時選取 [音樂]、 [相片] 或 [音樂] 選項,
會顯示選取媒體的功能表。 選取媒體,然後按輸入。
例如:
插入/移除 USB 裝置
插入 USB 裝置 – 直線插入直到其進入正確位置。
移除 USB 裝置 – 小心移除 USB 裝置或纜線。
搖控器上
附註:
• 在存取檔案(音樂、照片、電影),本播放器支援FAT16、FAT32及NTFS
格式的USB 快閃記憶體/外接HDD,但是在存取BD-Live時,僅支援FAT16
與FAT32格式的儲存裝置,因此在存取BD-Live時,請使用FAT16或FAT32
格式的內建快閃記憶體或USB 快閃記憶體/外接HDD。
•USB 裝置可用作局部的儲存, 連接網路享受 BD-Live 光碟 。
• 本產品可支援至 USB 裝置的四個分區。
• 切勿移除正在使用中 (播放等等) 的 USB 裝置。
• 不支援當連接電腦時需要安裝額外程式的 USB 裝置。
•USB 裝置:支援 USB1.1 及 USB2.0. 的 USB 裝置。
• 可以播放音樂檔案 (MP3/WMA)和相片檔案 (JPEG/PNG)。
若要了解每個檔案的詳細操作,請參閱相關內容。
•建議定期備份以防資料損失。
•如果您使用 USB 延長纜線或 USB 接口,可能無法識別 USB 裝置。
• 本產品可能不支持某些 USB 裝置。
• 不支援數碼相機及手機。
•本產品的 USB 埠不能連接個人電腦。本產品不能用作儲存裝置。
BD 播放器
USB 外置 (HDD)
USB 閃存驅動
21
Page 70

使用主頁功能表
搖控器上
1 顯示[主選單]︰ HOME MENU
2 選取選項︰ c d
3 顯示已選取的選項menu︰ ENTER
4 退出 [主選單]︰ HOME MENU
[影片] – 開始影像媒介播放或顯示電影 [影片] menu。
[相片] – 顯示相片功能表。(第 38 頁)
[音樂] – 顯示音樂功能表。(第 37 頁)
[設定] – 顯示設定功能表。(第 22-28 頁)
提示:
如果您於連接 USB 裝置及插入光碟時選取 [音樂]、 [相片] 或 [音樂] 選項,
會顯示選取媒體的功能表。 選取媒體,然後按輸入。
附註:
• 如果您於檔案播放時按 HOME MENU,產品會處於停止模式,然後會顯示
[主選單] 。
• 如果您插入 DVD 或不能播放的 ISO9660 或 UDF 格式光碟,可於主頁功能
表中選取 [影片],[相片] 或 [音樂] 選項。 但您不能播放光碟。
調整設定
1 顯示[主選單]︰ HOME MENU
2 選取 [設定] 選項︰ c d、ENTER
3 選取想要的第一級選項︰ a b
4 進入第二級︰ d
5 選取想要的第二級選項: a b
6 進入第三級: d
7 調整或確認設定: a b、ENTER
有些項目需要額外步驟。 0-9 數字
8 回到上一級: c
9 離開 [設定] menu。 HOME MENU 或
RETURN
第一級
第二級
搖控器上
第三級
22
Page 71

[顯示] 功能表
電視畫面比例
[4:3上下黑邊] – 連接至 4:3 畫面電視時,請選此項。 顯示戲劇影像配有
遮蓋棒於畫面上下方。
[4:3平移掃描] – 連接至 4:3 畫面電視時,請選此項。 顯示削去的畫面以
填滿您的電視螢幕。 削去兩旁的畫面。
[16:9 原始模式] – 連接至 16:9 畫面電視時,請選此項。
4:3 影像會以原本的 4:3 比例顯示,黑色長條會顯示在左右兩邊。
[16:9全螢幕] – 連接至 16:9 畫面電視時,請選此項。
4:3 的影像會橫向調整 (以線性比例) 以填滿整個螢幕。
解析度
設定 Component 及 HDMI 視訊訊號的輸出解像度。
有關解像度的詳情,請參閱第 17-18 頁的「解像度設定」。
[自動] – 如果 HDMI OUT 插口連接電視以提供顯示資訊 (EDID),會自動
選取最適合所連接的電視的解像度 。 如只連接了 COMPONENT VIDEO
輸出, 這會改變至 1080i 解像度作為默認設定。
[576i] – 輸出 576 線的交錯影像。
[576p] – 輸出 576 線的逐行影像。
[720p] – 輸出 720 線的逐行影像。
[1080i] – 輸出 1080 線的交錯影像。
[1080p] – 輸出 1080 線的逐行影像。 (僅限 HDMI 連接)
1080p顯示模式
當解像律設定為 1080p 時,選擇 [24Hz] 使用安裝有 HDMI 顯示和 1080/24p 輸
入兼容的電影材料 (1080/24p) 達到流暢的觀賞效果 。
附註:
• 當您選擇 [24Hz] 時,您可能會在視訊及電影材料切換時遇到圖像失調。
如果發生以上情況,選擇 [60Hz]。
• 即使 [1080p顯示模式] 設為 [24Hz],如果您的電視和 1080/24p 不兼容,視
訊的實際幀頻將為 60 Hz 以配合視頻來源格式。
HDMI色彩設定
選擇從 HDMI OUT 插口發出的輸出類型。 請參閱您顯示裝置的使用說明書
以作設定。
[YCbCr] – 當連接到 HDMI 顯示裝置時選取。
[RGB] – 當連接到 RGBI 顯示裝置時選取。
23
Page 72

[語言] 功能表
[聲音] 功能表
顯示選單
選取 [設定] menu 及螢幕顯示的語言。
顯示選單 / 碟片音訊 / 碟片字幕
選取您想要的音訊曲目(光碟音頻)、字幕以及光碟功能表的語言。
[原始] – 指錄製光碟時的原始語言。
[其他] – 按輸入選擇其他語言。 根據第 44 頁語言編碼清單輸入相應的
4 位數字。
[關] (適用於光碟字幕) – 關閉字幕。
附註:
視乎光碟而定,您的語言設定可能不能於同一光碟運作。
24
聲道喇叭
如要聆聽最佳音效,請使用喇叭設定顯示幕來指定已連接的喇叭音量,以及
喇叭與您聆聽位置的距離。 使用測試來調整各喇叭為相同的音量。
[揚聲器] – 選擇您要調整的喇叭。
[音量] – 調整各喇叭的輸出音量。
確定設定「測試」為「全部」以利調整。
[距離] – 調整各喇叭與聆聽位置間的距離。
[測試] – 喇叭會發出測試音。
全部: 測試音會從各喇叭依序傳出。
如要儲存您的設定,請按 ENTER 並按 c / d 選擇 [是]。
Page 73

AV同步
有時數位電視會遇到圖畫與音效間的延遲。 若發生此情況,您可設定延遲音
效來補救,以便電視能有效的「等候」圖畫完成接受: 這稱為 AV同步。
使用 a b可向上和向下捲動延遲量,設定範圍為 0 至 300 毫秒。
延遲會依據您開啟的數位電視頻道而定。 若您變更頻道,可能需要重新調整
AV同步。
HDMI 音響
您可以設定電視喇叭從 HDMI OUT 插口輸出音訊訊號。
[關] – 音訊訊號僅輸出至系統喇叭。
[開] – 從電視的喇叭及系統左右前方及低音喇叭輸出音訊訊號。
附註:
[HDMI 音響] 設為 [開] 時,音效模式會自動切換為 [BYPASS]。
[上鎖] 功能表 (家長控制)
[上鎖] 設定只會影響 BD 及 DVD 播放.
要使用任何 [上鎖] 設定的功能,您必須輸入您早前建立的 4 位數安全密碼。
如果您還沒有輸入安全密碼,請儘快輸入。 輸入 4 位數安全密碼然後按
ENTER 鍵。 重新輸入安全密碼然後按 ENTER 鍵驗證。
密碼
您建立、更改或刪除密碼。
[新增] – 輸入 4 位數安全密碼然後按 ENTER 鍵。
重新輸入然後按 ENTER 鍵建立新的密碼。
[變更] – 輸入現有的密碼然後按 ENTER 鍵。
輸入 4 位數安全密碼然後按 ENTER 鍵。 重新輸入然後按 ENTER 鍵建立
新的密碼。
[刪除] – 輸入 4 位數安全密碼然後按 ENTER 鍵以刪除密碼。
提示:
輸入若出錯,請按清除 (CLEAR) 後按輸入 (ENTER) 然後輸入正確密碼。
若忘記了密碼
若您忘記了密碼,可利用下列步驟清除密碼︰
1 移除播放器中的光碟。
2 在 [上鎖] 選項中反白 [密碼]。
3 用數字按鈕輸入「210499」。 密碼已清除。
25
Page 74

DVD評分
根據 DVD 光碟內容,限制播放已分級的 DVD。(並非所有光碟已獲評級。)
[評分 1-8] – 評級一 (1) 為最高限制;評級八 (8) 則為最低限制。
[解鎖] – 若選取解鎖,家長控制將不會啟動,光碟所有內容均會播放。
BD評分
為 BD-ROM 播放設定年齡限制。 使用數字鍵為觀看 BD-ROM 設定年齡限
制。
[255] – 可以播放所有 BD-ROM。
[0-254] – 禁止播放有相應評級的 BD-ROM。
附註:
僅內建Advanced Rating Control(先進分級控制)功能的BD光碟,才能使用
[BD rating]功能。
區碼
輸入地區編碼以評定 DVD 影像光碟的等級,可參考第 44 頁的清單。
26
Page 75

[網路] 功能表
[網路] 設定用作軟體更新、執行 BD Live 功能。
如果您將播放器連接至網路,某些 BD-ROM 光碟可能使您能夠瀏覽特殊
BD-ROM 網站。 例如,如果一個 BD-ROM 網站包含未來電影的預告片連接
等內容,您可以在播放器上觀看下載的在線內容。
您不需要連接電腦便可使用此功能。
準備:
• 此功能需要長期連接的寬帶網絡連接。 (詳見第 19 頁。)
• 需要一張和此功能兼容的 BD-ROM 光碟。不是所有 BD-ROM 光碟同樣適
用。
連線設定
若您已將本播放器連接至區域網路(LAN),即需要設定播放器進行網路通
訊(請參見19頁的「網際網路連線」)內容)。
連線狀態
若您要檢視本播放器的網路狀態,選擇[連線狀態]選項,並按下 d 或
ENTER,檢查是否已建立至網路及網際網路的連線。
BD-LIVE 連接
使用 BD-Live 功能的時候,您可限制互聯網使用的情況。
[允許] – 準許所有 BD-Live 內容使用互聯網。
[部分允許] – 準許部分具備內容擁有人證明的 BD-Live 內容使用互聯
網。 如無適當證明, BD-Live 無法使用互聯網及AACS 線上功能。
[禁止] – 禁止所有 BD-Live 內容使用互聯網。
27
Page 76

[其他] 功能表
外觀
改變起始畫面的背景。
初始化
您可以重設播放器為原廠設定,並格式化 BD 儲存或 停用播放器。
[出廠設定] – 如有需要,可重設播放器至其原廠設定。 部份選項則不能
重設 (分级、密码、地区代码)
[BD 儲存清理] – 從已經連接的 USB 裝置格式化BD 內容 。
DivX VOD
關於DIVX VIDEO:DivX®為由DivX, Inc.開發出的數位影片格式。本機為獲得
DivX官方認證,可播放DivX影片的裝置。如需更多資訊及將您的檔案轉檔為
DivX影片的軟體工具,請至www.divx.com。
關於DIVX VIDEO-ON-DEMAND:您必須註冊本DivX®認證裝置,以播放
DivX Video-on-Demand(VOD)內容。請開啟[Setup]功能表裡的[DivX VOD],
以產生註冊碼。在vod.divx.com裡填入此註冊碼,以完成註冊作業,並且瞭解
更多關於DivX VOD的資訊。
[DivX reg. Code] – 顯示您的播放器的註冊碼。
[Deactivate] – 取消啟動您的播放器並顯示取消啟動碼。
附註:
從 DivX® VOD 下載的所有影視節目只能在本DVD 機上播放。
28
Page 77

播放光碟
搖控器上
1 開啟光碟托盤 : OPEN/CLOSE (h)
2 插入光碟︰ 3 關閉光碟托盤 : OPEN/CLOSE (h)
4 調整光碟 menu 設定︰ a b c d、ENTER
根據光碟的不同,
光碟功能表可能不會顯示於螢幕。
5 開始播放︰ PLAY (d)
6 停止播放: STOP (g)
附註:
• 當開啟播放器或更換光碟時,播放器還原至預設設定。 根據光碟的不
同,會輸出特殊音訊格式。
• 根據預錄的 BD-ROM 光碟的內容,某些功能可以無法使用或操作方式和
其他媒體有所不同。
若光碟功能表螢幕已顯示
功能表螢幕會於載入包含功能表的光碟後顯示。
按 c / d / a / b 按鈕選取想檢視的標題 / 章節,然後按輸入 (ENTER) 開始播
放。
BD DVD
跳到下一個 / 前一個章節 / 曲目 / 檔案
播放資料時,按下 o 或 p 鍵,即可播放下一章/音軌/檔案,或回到第一
章/音軌/檔案。
快速按下 o 兩次,即可回到前一章/音軌/檔案。
AVCHD
ALL
繼續播放
在播放期間,按 STOP (g) 停止播放。
本產品會根據光碟紀錄停止點,「eg」會短暫出現在螢幕上。
按 PLAY (d) 繼續播放 (從場景點開始)。如果您再次按下 STOP (g) 按鈕或
退出光碟 (「g」出現在螢幕上),本產品會刪除停止點。
(eg = 暫時停止,g = 完全停止)
附註:
• 當按下某個按鈕時,繼續點可能會被清除 (例如,STANDBY/ON、
• 在 BD-Video 光碟上,包括 BD-J,恢復播放功能無法使用。
• 在 BD-ROM 光碟的互動標題下,如果您在播放期間按了一次 STOP,本產
暫停播放
在播放過程中,按 PAUSE/STEP (e) 按鈕暫停播放。 按 PLAY (d) 繼續播
放。
提示:
在播放音頻 CD 或 MP3/WMA 時,再次按下 PAUSE/STEP (e) 繼續播放。
逐幀播放
重複按 PAUSE/STEP (e) 以逐幀播放。
減緩播放速度
當播放暫停時,重複按掃描 SCAN n 以慢速播放 (4 步,只能快捲)。
快捲或快速回捲
在播放時按 SCAN (m 或 n) 快捲或快速回捲。
重複按 SCAN (m 或 n) 按鈕來轉換各種播放速度。
按 PLAY (d) 繼續正常速度播放。
附註:
本功能或對某些光碟或標題無效。
ALL
OPEN/CLOSE、等等)。
品會完全停止。
ALL
BD DVD
BD DVD
ALL
AVCHD
MOVIE
AVCHD
MOVIE
29
Page 78

重覆播放
在播放時,重複按重複按鈕選擇想要的重複模式。
重覆按 REPEAT 鍵以選取需要重播的項目。 本主題、章節或曲目將會重複播
放。 回復正常播放,重複按 REPEAT 直到圖示消失。
使用[音樂] 功能表裡的重複、A-B重複或隨機功能時,請參見以下的模式圖示。
– 會連續重複播放選擇的段落。
曲目 – 重複播放目前的曲目或檔案。
按下 CLEAR即可取消A-B重複、重複或隨機播放。
附註:
播放重複章節/曲目時按一下 p 會取消重複播放。
BD DVD
在要重複播放的段落開始處按下REPEAT以選擇 [A-],並在段落
結束處按下ENTER。會連續重複播放您選擇的段落。您無法選
擇短於3秒的段落。若要回到正常播放,重複按下REPEAT功能
以選擇[OFF]。
全部 – 重複播放所有曲目或檔案。
全部 – 隨機重複所有曲目或檔案。
– 隨機播放曲目或檔案。
AVCHD
MUSIC
ACD DVD BD
ACD
標記搜尋
輸入標記
您可以使用最多九個記憶點開始播放。 要輸入MARKER, 在需要的視訊按
下標記。 標記功能表會很快於螢幕出現。 重複輸入最多九個標記。
重播或清除已標記的畫面
播放期間,按下 SEARCH。插尋目錄會於螢幕出現。
按下一個數字按鈕,選擇需要回到的標記。 從標記部分開始播放。
按下 b 選擇標記號碼。 按 c / d 選取想重播或清除的標記場景。
按下 ENTER,即可從標記場景開始播放。 按下 CLEAR,該標記場景將由搜
尋目錄中移除。
附註:
• 本功能或對某些光碟或標題無效。
• 按兩次停止 STOP (g) 退出或更換光碟 (完全停止) 會清除所有已標記點。
BD DVD
AVCHD
MOVIE
或
查看標題選單或彈出視窗選單
按 POPUP/TOP MENU 以顯示標題選單或彈出選單。
如果現有 DVD 或 BD-ROM 光碟標題有功能表,螢幕會顯示標題功能表或跳
出功能表。 根據光碟,功能表可能無法使用。
30
BD DVD
AVCHD
Page 79

選取字幕語言
在播放時,重複按字幕按鈕選擇想要的字幕語言。
播放期間,按 DISPLAY 以顯示播放選單。
使用 ab 選擇 [字幕] 選項並使用 c d 選擇想要的字幕語言。
附註:
某些光碟僅允許您通過光碟功能表更改字幕選擇。如果發生了這種情況,按
POPUP/TOP MENU 或 MENU 按鈕並從光碟能表的選項中選擇恰當的字幕。
BD DVD
AVCHD
或
MOVIE
使用搜尋功能表
播放中按下SEARCH,以顯示搜尋功能表。
按 c / d 鈕,向前或向後略過15秒的播放內容。
秘訣:按住 c / d 鈕,就能選擇要略過的點。
BD DVD
AVCHD
MOVIE
選擇字幕檔案
若影片檔案及字幕檔案的名稱相同,播放影片檔案時會自動使用該字幕檔
案。若兩者名稱相異,則需在播放影片前,透過[影片]功能表選擇字幕檔
案。
在[影片]功能表中使用 a b c d 選擇您要使用的字幕檔案,然後按
MARKER。再按一次MARKER即可取消選取字幕檔案。所選的字幕檔案會在
播放影片時使用。若您在播放中按STOP(g),將取消選取字幕。
聆聽不同的聲音
播放期間,按 DISPLAY 以顯示播放選單。
使用 a b 選擇 [聲音] 選項並使用 c d 選擇想要的聲音語言、聲音曲目或聲
音頻道。
附註:
• 某些光碟僅允許您通過光碟功能表更改音訊選擇。 如果發生了這種情
況,按 POPUP/TOP MENU 或 MENU 按鈕並從光碟功能表的選項中選擇恰
當的音訊。
• 在您切換聲音之後,畫面和聲音可能會暫時不一致。
• 在 BD-ROM 光碟上,多音訊格式 (5.1CH 或 7.1CH) 和 [MultiCH] 一起顯示
於螢幕上。
BD DVD
BD DVD
AVCHD
AVCHD
MOVIE
MOVIE
秘訣:
部分光碟或標題可能無法使用本功能。
注意:
部分光碟或標題可能無法使用本功能。
使用顏色 (A、 B、C、 D) 按鈕
此些按鈕只適用於播放 BD-J 內容。依照螢幕指示使用恰當的按鈕。 根據光
碟播放、內容的不同,每個按鈕的功能可能會有所改變。
BD
31
Page 80

最後場景記憶
本產品會記憶所播放的最後一張光碟的最後一個場景。 即使己從產品中取出
光碟或關掉產品,本產品仍會記得最後一個場景。 若載入已記憶其場景的光
碟,會自動跳至最後停止位置。
附註:
• 記憶設定可於任何時間使用。
• 若在開始播放光碟前已關掉產品,產品將不會記憶光碟設定。
• 若播放不同的光碟標題,前一光碟標題的最後鏡頭記憶將被消除。
• 根據光碟的不同,此功能可能無法使用。
BD DVD
螢幕保護
播放器處於停止模式約五分鐘,螢幕保護便會出現。
附註:
視裝置狀態而定,螢幕保護程式可能不會出現。
變更內容清單檢視畫面
DVD
MUSIC MOVIE
您可以在[電影]、[音樂]、[照片]功能表裡重複按下DISPLAY,以變更內容清
單檢視畫面。
第三推
第一推
第二推
注意:
變更音樂內容清單檢視畫面時,等化器會消失不見。
32
Page 81

顯示光碟資訊
搖控器上
1 播放載入在產品中的光碟︰ PLAY
2 顯示播放選單: DISPLAY
3 選擇一個選項︰ a b
4 調整播放選單設定︰ c d
5 退出光碟播放選單︰ DISPLAY
1
2
3
4
5
6
1 標題 – 目前標題編號 / 總標題數量。
2 章節 – 目前章節編號 / 總章節數量。
3 時間 – 已播放時間。
4 聲音 – 已選音頻語言或聲道。
5 字幕 – 已選字幕。
6 角度 – 已選角度 / 總角度數量。
附註:
• 若數秒也沒有按按鈕,螢幕顯示會消失。
有些光碟無法選取標題編號。
•
• 有些光碟或標題或不適用的項目。
• 若正在播放 BD互動標題,會顯示某些設定資訊但禁止更改。
移到其他標題/章節
當光碟內有超過一個標題/章節/曲目,您可以轉移到其他標題/章節。
在播放期間按 DISPLAY,然後以 a / b 選取 [標題/章節] 圖示 。 然後,按相
應的數字按鈕 (0-9) 或 c / d 選取標題/章節號碼。
BD DVD
會從所選的時間開始播放
播放時按 DISPLAY。 時間搜尋會顯示已播放時間。 選擇 [時間] 選項,然後
從左至右按小時、分鐘、秒的格式輸入要尋找的時間。 例如,要尋找 2 小時
10 分 20 秒的鏡頭,輸入「21020」並按 ENTER 鍵。 若輸入錯誤數字,請按
CLEAR 然後輸入正確數字。
附註:
本功能或對某些光碟或標題無效。
從不同角度觀看
若光碟包含以不同攝影角度拍攝的畫面,您可以於播放期間變更不同的攝影
角度。
播放期間,按 DISPLAY 以顯示播放選單。使用 a b 選擇 [角度] 選項並使用
c d 選擇想要的角度。
BD DVD
AVCHD
BD DVD
MOVIE
AVCHD
MOVIE
33
Page 82

享受 BD-LIVE™
搖控器上
1 插入含 BD-LIVE™內容的 BD-ROM 光碟。 OPEN/CLOSE (h)
2 檢查網絡連接及配置。 –
BD-Live 功能需有網路連接。
3 連接 USB 裝置: –
使用此功能,需要 USB 裝置。
4 在碟片選單選取 BD-LIVE™ 功能︰ abc d、ENTER
本機設有畫中畫,第二音效及 Virtual 虛擬套件等。需配合支援BONUSVIEW
的BD-Video。 (BD-ROM 第二版 設定1 版本1.1/ 最終標準設定). 除了
BONUSVIEW 功能外,BD-Video 亦支援 BD-Live (BD-ROM 版本2 設定2) 的網
絡延伸功能,讓您使用本機連接互聯網時,享受其他如網絡游戲的功能。
使用互聯網,享受 BD-Live 光碟
本機支援 BD-Live, 一項嶄新的 BD-Video 功能,連線互聯網後,讓您使用以
下互動功能。 (不同光碟的可用功能及操作方法可能相異。 詳程請參閱光碟
指示。)
– 額外資料內容如電影預告、字幕及 BD-J等,可下載至 USB 裝置,並且播
放。
– 特別視訊資料等,可於下載至 USB 裝置時,同時播放。
準備:
• 本機必須先連接互聯網,並設定使用 BD-Live 功能的參數。
(請參閱第19 頁及第 27 頁).
• 使用此功能,需要 USB 裝置。 連接 USB 裝置(請參閱第 21 頁)。
• USB 裝置的可用空間必須多於 1GB。
小心:
在下載期間或藍光光碟仍在光碟盤內時,請勿移除已連接的 USB 裝置。 這
可能會損害 USB 裝置,USB 裝置損壞會導致 BD-Live 功能不能運作正常。
如這項行為導至 USB 裝置損壞,您可把您個人電腦上連接的 USB 裝置格式
化並和本播放器 重新使用。
附註:
• BD-Live 的內容在某些地區只能限制性的獲得,這是內容提供者的意願。
• 載入 BD-Live 內容可能需要數分鐘。
• 如 [BD-LIVE 連接] 選項設定為[部分允許],某些光碟的 BD-Live 功能可
能無法使用。 (詳見第 27 頁。)
• 在不同的連線環境,互聯網連線需時不同,甚或未能成功連線。 必須使
用寬頻連線。
• 切勿移除正在使用的 USB 裝置。 USB 裝置可能受損。 在此以前,請停
止播放及關閉目錄。
提示:
特別視訊等資料,可使用 BD-Live 功能,於下載至 USB 裝置時,同時播放。
播放情況視乎聯系環境。
部分功能停用,以防止跳到還未下載的部分。
AACS Online
當使用支援 BD-Live 的光碟時,其播放器或光碟號碼可能會經過互聯網發送
到內容供應商。
不同的光碟提供不同的功能及服務。
– 如果您使用這些號碼記錄您觀看記錄,您可能受到相關電影的資料。
– 遊戲得分亦可以記錄。
34
Page 83

播放第二視訊 (畫中畫)
播放兼容畫中畫的光碟,就可播放第二視訊。
需根據光碟指示,採用該播放辦法。
如要開關第二視訊,按下 PIP。第二視訊已經播放。
按按鈕,選取開啟或關閉。
附註:
• 光碟並不一定按照本機設定播放,某些光碟上的播放格式有優先次序分
別。
• 在搜尋、慢鏡及續格搜畫時,只會播放第一視訊。
• 根據光碟的不同,此功能可能無法使用。
播放電影
播放機可在光碟/USB 裝置上播放影片檔案及於
DVD-RW (VR 模式) 光碟上錄製的視訊內容。播
放影片檔案前,請先閱讀第 36 頁的「影片檔案要
求」。
1
插入內有電影內容的光碟/USB 裝置。
2 顯示 [主選單] : HOME MENU
3 選取 [影片] 選項: c d、ENTER
4 從 [影片] 選單中選取電影檔案: a b
5 播放選取的電影︰ PLAY
6 停止播放: STOP
附註:
• 當同時連接 USB 裝置及插入光碟時,會顯示選取媒體的功能表。選取媒
體,然後按輸入。
• 您可以使用不同的播放功能。請參閱第 29 – 32 頁。
• [影片] 選單中,使用綠色(B)或黃色(C)按鈕移至上一頁或下一頁。使用紅
色(A)或藍色(D)按鈕移至最前頁或最終頁。
• 未完成化的 DVD-VR 格式光碟可能不能在此播放器播放。
• 部分 DVD 錄影機製作DVD-VR 光碟時會加入 CPRM 數據。 本機不能使用
此類光碟。您無法播放DVD-VR光碟的播放清單。
• 部分 DivX 檔案可能不會播放,視 DivX 格式或錄製格式而定。
• 按下光碟目錄,進入表列目錄。
甚麼是「CPRM」?
CPRM 是一種複製保護系統 (配合擾亂系統),只允許錄影「單次複製」
廣播節目。 CPRM 代表可錄製多媒體的著作權保護 (Content Protection for
Recordable Media)。
–
搖控器上
35
Page 84

顯示 DivX 字幕之注意事項
如果不能正常顯示字幕,按照下列方法更改語言編碼。
1 在播放期間按住 SUBTITLE 3 秒。
語言編碼會出現。
2 重複按 SUBTITLE 可選擇其他語言碼,直到字幕正確顯示後再按
ENTER。
電影檔案需求
以下為電影檔案與本播放器之間相容性的需求:
可用的解析度大小: 1920 x 1080(W x H)像素
檔案副檔名: “.avi”, “.divx”, “.mpg”, “.mpeg”, “.mp4”, “.mkv”
Playable subtitle: SubRip(.srt / .txt), SAMI(.smi), SubStation Alpha
(.ssa/.txt), MicroDVD(.sub/.txt), VobSub(.sub)SubViewer 1.0(.sub),
SubViewer 2.0(.sub/.txt), TM播放器(.txt), DVD Subtitle System(.txt)
可播放的編碼器格式: “DIVX3.xx”, “DIVX4.xx”, “DIVX5.xx”,
“XVID”, “DIVX6.xx” (僅標準播放), H.264/MPEG-4 AVC, DIVX-HD,
MPEG1 SS, MPEG2 PS, MPEG2 TS
可播放聲音格式: “Dolby Digital”, “DTS”, “MP3”, “WMA”, “AAC”,
“AC3”
採樣頻率:在32-48 kHz(WMA)內,在16-48 kHz(MP3)內
位元率:在20-320 kbps(WMA)內,在32-320 kbps(MP3)內
CD-R/RW, DVD±R/RW, BD-R/RE 格式:
ISO 9660+JOLIET, UDF及UDF Bridge 格式
最大檔案/資料夾數量:2000以下
• 電影檔名及字幕上限為180個字元。
• 非所有WMA
• 可能無法正常播放CD或USB 1.0/1.1HD裡的電影檔案。
建議使用BD、DVD或USB 2.0來播放HD電影檔案。
• 本播放器支援H.264/MPEG-4 AVC profile Main,在Level 4.1為High的設定值
本播放器會詢問您是否要播放更高設定值的檔案。
• 本播放器不支援以GMC*1或Qpel*2錄製的檔案,那些是採用像是DivX或
XVID等MPEG4標準裡的影片編碼技術。
*1 GMC – 全域動態補償Global Motion
*2 Qpel – 四分之一像素Quarter pixel
、MP3及AAC Audio格式均可在本機上播放。
36
Page 85

聽音樂
此播放器可以播放聲音光碟或MP3 / WMA 檔案。 播
放 MP3/WMA 檔案前,「MP3/WMA 檔案要求」。
1 插入Audio CD或內有MP3/WMA 檔案的光碟/
USB 快閃磁碟機 –
2 顯示[主選單] : HOME MENU
3 選取 [音樂] 選項: c d、ENTER
4 從 [音樂] 選單中選取音樂: a b
5 播放選取的音樂。 PLAY
6 停止播放: STOP (g)
例如) 音訊 CD
附註:
• 當同時連接 USB 裝置及插入光碟時,會顯示選取媒體的功能表。選取媒
體,然後按輸入。
• 您可以使用不同的播放功能。請參閱第 29 – 32 頁。
搖控器上
秘訣:
• 使用數字按鈕 (0-9),輸入音軌號碼或檔案號碼,即可直接播放。
• 當插入音訊 CD 時可能會自動開始播放。
• 使用 a/b/c/d 可選擇資料夾,再按下 ENTER 即可檢視資料夾中的檔
案。若要移至上一層或下一層目錄,請使用 a/b 移動至所需的目錄。
• 在[音樂]功能表中,使用紅色或藍色按鍵移至開頭或最後的檔案或音軌,
使用綠色或黃色按鍵移至上一頁或下一頁。
• 等化器指標未對齊播放中的音樂檔案。
• 若檔案名稱中有無法顯示的代碼,則可能會顯示為無法選取。
MP3/WMA聲音檔案需求
檔案副檔名: “.mp3”, “.wma”
採樣頻率: 在8-48 kHz(WMA)內,在11-48 kHz(MP3)內
位元率: 在8-320 kbps(WMA, MP3)內
CD-R/RW, DVD±R/RW, BD-R/RE 格式:
ISO 9660+JOLIET, UDF及UDF Bridge 格式
最大檔案/資料夾數量:2000以下(檔案及資料夾的總和)
MP3/WMA 檔案注意事項
• 視MP3/WMA檔案的大小與數量,可能要花數分鐘的時間來讀取媒體上
的內容。
• 本機不支援MP3檔案裡的ID3標籤。
•畫面上顯示的VBR 檔案總播放時間,可能是不正確的
37
Page 86

檢視照片
本產品可播放相片檔案。 播放相片檔案前,「相片
檔案要求」。
1
插入有照片檔案的光碟/USB 裝置。
2 顯示[主選單] : HOME MENU
3 選取 [相片] 選項︰ c/d、ENTER
4 從 [相片] 選單中選取相片: a/b/c/d
5 以全螢幕顯示已選取相片︰ ENTER
6 顯示下一張或上一張照片: o / p
7 回到 [相片] 選單螢幕︰ STOP (g)
附註:
• 連接USB裝置並同時插入光碟時,將出現選擇媒體的功能表。選擇要使
用的媒體,並按下ENTER。
• 在 [照片] 功能表裡選擇照片檔案時,按下PLAY (
片。
•
在[照片]功能表裡使用紅或藍色鈕來移動至第一個或最後一個檔案,或是
使用綠或黃色鈕以移動至前一或下一頁。
•
您可以重複按下DISPLAY,以變更內容清單檢視畫面。
全螢幕檢視相片檔案時的操作
在以全螢幕檢視相片時,您可以使用多種選項。
使用 abcd 選取選項並如下所示使用選項。
1
2 3 4 5 6 7 8
38
搖控器上
–
d
) 以開始播放幻燈
1 使用 c d 鈕進到前一個或下一個檔案。
2 按下ENTER以啟動或暫停幻燈片。
3 按下ENTER以播放或暫停背景音樂。
使用 [音樂選擇] 選項來選擇背景音樂後,即可使用此選項。
4 選擇背景音樂。
1) 按下ENTER,即會出現功能表。
2) 使用 a b c d 來選擇有音樂檔案的媒體或資料夾。
3) 按下 ENTER以確認選擇。
5 按下 ENTER,以順時針方向旋轉圖片。
播放幻燈片時無法使用此選項。
6 使用綠或黃色鈕以縮放圖片。
可使用 a b c d 鈕來移動縮放後的圖片。
按下RETURN以離開[Zoom]功能表,並回到正常的圖片大小。
7 使用 a b來選擇[效果]或[延遲]。
使用 c d來調整,並按下 ENTER來設定所選擇的選項。
[效果s] – 選擇在播放幻燈片時套用的效果。
OFF : 幻燈片無任何效果。
隨機 : 隨機套用幻燈片效果。
滑行 : 從不同方向播放幻燈片。
開門 : 使用開門效果來播放照片。
格子 : 從堆疊磚塊到全螢幕的方式來播放照片
[延遲] – 設定播放幻燈片時照片的延遲時間。
8 按下 ENTER以離開選項功能表。 按下ENTER即會再次顯示功能表。
。
照片檔案需求
檔案副檔名: “.jpg”, “.jpeg”, “.png”
建議尺寸:
小於4,000 x 3,000 x 24 位元/像素
小於3,000 x 3,000 x 32 位元/像素
CD-R/RW, DVD±R/RW, BD-R/RE 格式:
ISO 9660+JOLIET, UDF及UDF Bridge 格式
最大檔案/光碟數:少於2000(檔案與資料夾合計總數)
照片檔案注意事項
• 不支援循序式及無損失壓縮照片影像檔案。
• 照片檔案的大小與數量,可能要花數分鐘的時間來讀取媒體上的內容。
Page 87

收聽收音機
確定已連接FM天線。
1 選擇 FM : TUNER (INPUT)
2 選擇廣播電台: TUNE -/+
3 「儲存」廣播電台: ENTER
顯示幕會出現一個預設的編號。
最多可儲存50個廣播電台。
4 確認按下: ENTER
5 若要選擇已儲存的電台: PRESET a/b
收聽收音機 - 更多資訊
自動搜尋廣播電台
按住調諧-/調諧+(TUNE -/TUNE +)超過一秒,調諧器即會自動掃描,並在找到
廣播電台時停止。
選擇廣播電台的預設編號
在儲存廣播電台時可選擇想要的預設編號,若欲變更編號,可在播放機自動顯示
出預設編號時,按下預設a/b(PRESET a/b)進行變更,然後按下編序/ENTER
儲存所選擇的編號。
刪除所有儲存的電台
按住編序/ENTER 兩秒。畫面會顯示ERASE ALL。
按編序/ENTER 以刪除所有儲存的廣播電台。
改善不良的FM接收
按 ST/MONO。這樣會將調諧器從立體聲切換至單聲道並改善接收。
搖控器上
播放 iPod
關於 iPod 的詳細資訊,請參閱 iPod 使用指南。
準備
• 如要在電視畫面上檢視 iPod 的視訊及相片。
- 確定透過本裝置後面板的 VIDEO OUT 插口使用視訊連線。
在電視上選擇適當的視訊輸入模式。
- 視 iPod 類型而定,確定選擇 Videos (視訊) > Video settings (視訊設定),
然後設定 iPod 的 TV Out (電視輸出) 為 Ask (詢問) 或 On (開啟)。
關於視訊設定的詳細資訊,請參閱 iPod 使用指南。
- 只有在本裝置處於 REMOTE IPOD 模式時,才能觀看相片,而您只能在
此模式中以投影片的方式觀看相片。
關於投影片的詳細資訊,請參閱 iPod 使用指南。
• 連接 iPod 前,先關閉本裝置電源並降低本裝置的音量至最低。
確實連接 iPod。
連接 cradle 並放上 iPod。
• 若您開啟本裝置電源,您的 iPod 會自動開啟並開始充電。
以遙控器使用如要
選擇 iPod 模式 按下 iPod。
•
REMOTE IPOD 模式:您可以使用隨附的遙控器透過 iPod 顯示幕操作與控
制 iPod。
• OSD IPOD 模式:您可以使用隨附的遙控器控制電視畫面上的 OSD 功能
表來操作 iPod。 控制 iPod 無法套用在 OSD iPod 模式中。
39
Page 88

以遙控器使用如要
選擇功能表項目 按 a b 及 c 或 ENTER。
返回上一個功能表
瀏覽歌曲 在主功能表中選擇音樂。
瀏覽視訊 在主功能表中選擇視訊。
播放歌曲或視訊
暫停播放歌曲或視訊 按 PAUSE/STEP (e) 或 PLAY (d)。
如要繼續播放,請再按一次 PAUSE/STEP
(e) 或 PLAY (d)。
跳至下一首歌曲或視訊 按 SKIP (p)。
從頭開始播放歌曲或視訊 按 SKIP (o)。
播放上一首歌曲或視訊
快轉或倒轉歌曲或視訊 按住 SCAN (m 或 n).
重複播放歌曲 重複按 REPEAT 可選擇想要的重複模式:
曲目 (
提示:
您可能會使用 iPod 隨附的cradle轉接器,以確保iPod 的使用穩定。
若您需要轉接器,請向 iPod 經銷商洽詢。
按 RETURN (x) 或 DISC MENU 或 c。
選擇歌曲或視訊,然後按 ENTER。
按 SKIP (o) 兩次。
)、全部 ( ) 關閉 (不顯示)。
附註:
•
iPod 與本裝置的相容性需視您 iPod 的類型而定。
• iPod touch的操作方式與 iPod 相同。
您可能需要其他控制方式來以本裝置使用 iPod touch。
(例如:「移動滑稈來解鎖」)
•
若您在 iPod touch上使用應用程式、撥打電話或傳送與接收 SMS文字訊息
等,請先中斷與本裝置的 iPod cradle連接,然後再使用即可。
• 視您 iPod 軟體版本而定,可能無法從本裝置中控制 iPod。 建議您安裝最
新的軟體版本。
• 視訊品質視您 iPod 的視訊來源而定。
• 若本裝置顯示錯誤訊息,請依訊息指示操作。
以下情形會出現錯誤訊息“CHECK IPOD”(「檢查 IPOD」)或“Please
check your iPod.”(「請檢查您的 iPod。」):
- 本裝置與 iPod 間的通訊發生錯誤。
d拔下並重新插上您的 iPod 至本裝置。
- 您的 iPod 未確實連接。
- 本裝置識別您的 iPod 為未知的裝置。
- 您的 iPod 電量不足。
d電池需充電。
d若您在 iPod 電量不足時進行充電,則充電時間會更長。
以下情形會出現錯誤訊息“CHECK IPOD”(「檢查 IPOD」)或 “Connected
iPod model is not supported.” (「不支援連接的 iPod 機型。」):
- 無法操作您 iPod 的功能。
以下情形會出現錯誤訊息“CHECK IPOD” (「檢查 IPOD」)或“Please
update iPod’s software.”(「請更新 iPod 軟體。」):
- 您的 iPod 軟體版本較舊。
d將您的 iPod 軟體更新至最新版本。
• 若您的 iPod 有問題,請上
www.apple.com/support/ipod.
40
Page 89

聆聽可攜式音訊播放器的音樂
聆聽組件的音效
您可以使用系統的喇叭盡情聆聽可攜式音訊播放器中的音樂。
3.5 mm 立體聲迷
你插頭纜線
搖控器上
1 連接可攜式音訊播放器的耳機 (或線路輸出)
插口至本裝置後面板的 PORT. IN: 2 開啟電源: STANDBY/ON
3 選擇 [PORTABLE] 選項: INPUT
4 調低本裝置的音量: VOL (+/-)
5 開啟可攜式音訊播放器電源,並開始播放: 6 調整本裝置與可攜式音訊播放器的音量: VOL (+/-)
您可以利用系統喇叭的類比音訊輸出插口盡情聆聽組件的音效。
至組件的音訊輸出插口
(電視、錄放影機等)
搖控器上
1 連接組件的類比音訊輸出插口至本裝置後面板的
AUX L/R (INPUT): -
2 開啟電源: STANDBY/ON
3 選擇 [AUX] 選項: INPUT
4 調低本裝置的音量: VOL (+/-)
5 開啟組件電源: 6 調整音量: VOL (+/-)
41
Page 90

使用 HDMI IN 插口
您可以利用 HDMI OUT 插口享受圖畫及組件音效。
使用 DIGITAL AUDIO IN 插口
您可利用系統喇叭的數位光學或同軸輸出插口,盡情享受組件的音效。
或
至組件的 HDMI OUT 插口
(機上盒、數位衛星接收器、電視遊戲機等。)
搖控器上
1 連接組件的 HDMI OUT 插口至本裝置後面板的
HDMI IN 1 或 2 插口。 -
2 開啟電源: STANDBY/ON
3
選擇 [HDMI IN 1] 或 [HDMI IN 2] 選項:
4 調低本裝置音量: VOL (+/-)
5 開啟組件電源: 6 調整本裝置音量: VOL (+/-)
附註:
• 您無法在 HDMI IN 1/2 模式中變更視訊解析度。
變更已連接組件的視訊解析度。
• 在 HDMI IN 1/2 模式中播放 Dolby Digital Plus、Dolby TrueHD 及 DTS-HD
時,無法進行音效模式設定。
• 若個人電腦連接至 HDMI IN 1/2 插口後,視訊輸出訊號異常,請變更個人
電腦的解析度為 480p、720p、1080i 或 1080p。
42
INPUT
至組件的數位光學輸出插口
至組件的數位同軸輸出插口
搖控器上
1 連接組件的光學或同軸輸出插口至本裝置後
面板的 OPTICAL 或 COAXIAL (DIGITAL
AUDIO IN) 插口中。 2 開啟電源: STANDBY/ON
3 選擇 [OPTICAL] 或 [COAXIAL] 選項: INPUT
4 降低音量: VOL (+/-)
5 開啟組件電源: 6 調整音量: VOL (+/-)
Page 91

參考資料
利用備有的遙控控制電視
您可以使用隨附的遙控器控制音量、輸入來源及 Pioneer 電視的電源狀態。
您可使用下列按鈕控制電視。
電視控制
按鈕
按 可
TV POWER 開啟或關閉電視。
INPUT 切換電視輸入來源為電視或其他輸入來源。
PR/CH a/b 在已記錄的頻道之間向上或向下掃瞄。
VOL +/– 調較電視音量。
43
Page 92

語言編碼
若以下列出多過一個編碼,請嘗試逐一輸入,直至找到適用於該電視的編碼。
語言 編碼
阿法文 6565
南非荷蘭文 6570
阿爾巴尼亞文 8381
阿姆哈拉文 6577
阿拉伯文 6582
亞美尼亞文 7289
阿薩姆文 6583
亞摩拉文 6588
亞塞拜然文 6590
巴什喀爾文 6665
巴斯克文 6985
孟加拉文 6678
不丹文 6890
比哈文 6672
布裡敦文 6682
保加利亞文 6671
緬甸文 7789
白俄羅斯文 6669
中文 9072
語言 編碼
克羅埃西亞文 7282
捷克文 6783
丹麥文 6865
荷蘭文 7876
英語 6978
世界語 6979
愛沙尼亞文 6984
法羅文 7079
斐濟文 7074
芬蘭文 7073
法文 7082
夫裡斯蘭文 7089
蓋爾文 7176
喬治亞文 7565
德文 6869
希臘文 6976
格陵蘭文 7576
瓜拉尼文 7178
古吉拉特文 7185
語言 編碼
豪沙文 7265
希伯來文 7387
印度文 7273
匈牙利文 7285
冰島文 7383
印尼文 7378
國際語 7365
愛爾蘭文 7165
義大利文 7384
日語 7465
坎那達文 7578
喀什米爾文 7583
哈薩克文 7575
吉爾吉斯文 7589
韓文 7579
庫德文 7585
寮文 7679
拉丁文 7665
拉脫維亞文 7686
地區編碼
從本清單選取地區編碼。
地區 編碼
間富汗 AF
阿根廷 AR
澳洲 AU
奧地利 AT
此利時 BE
不丹 BT
波利維亞 BO
巴西 BR
柬埔塞 KH
加拿大 CA
智利 CL
中國 CN
哥倫比亞 CO
剛果 CG
地區 編碼
哥斯達黎加 CR
克羅西亞 HR
捷克 CZ
丹麥 DK
厄瓜多爾 EC
埃及 EG
薩爾瓦多 SV
埃塞俄比亞 ET
斐濟 FJ
芬蘭 FI
法國 FR
德國 DE
英國 GB
希臘 GR
地區 編碼
格陵蘭 GL
赫德及麥當勞群島 HK
匈牙利 HU
印度 IN
印尼 ID
以色列 IL
義大利 IT
牙買加 JM
日本 JP
肯亞 KE
科威特 KW
利比亞 LY
盧森堡 LU
地區 MY
語言 編碼
陵加拉文 7678
立陶宛文 7684
馬其頓文 7775
馬達加斯加文 7771
馬來文 7783
馬來亞拉姆文 7776
毛利文 7773
馬拉提文 7782
摩爾多瓦文 7779
蒙古文 7778
諾魯文 7865
尼泊爾文 7869
挪威文 7879
歐利亞文 7982
旁遮普語 8065
普什圖文 8083
波斯文 7065
波蘭文 8076
葡萄牙文 8084
地區 編碼
馬來西亞 MV
馬爾地夫 MX
墨西哥 MC
摩納哥 MN
摩洛哥 MA
尼泊爾 NP
荷蘭 NL
荷屬安地列斯 AN
紐西蘭 NZ
奈及利亞 NG
挪威 NO
阿曇 OM
巴基斯坦 PK
巴拿馬 PA
語言 編碼
蓋丘亞語 8185
裡托羅曼斯文 8277
羅馬尼亞文 8279
俄文 8285
薩摩亞語 8377
梵文 8365
蘇掐蘭蓋爾語 7168
塞爾維亞文 8382
塞爾維亞克
羅埃西亞文 8372
紹納語 8378
信德語 8368
辛哈力語 8373
斯洛伐克文 8375
斯洛維尼亞文 8376
西班牙文 6983
蘇丹文 8385
史瓦西裡文 8387
瑞典文 8386
他加祿語 8476
地區 編碼
巴拉圭 PY
菲律賓 PH
波蘭 PL
葡萄牙 PT
羅馬尼亞 RO
俄羅斯 RU
沙烏地阿拉伯 SA
編碼 SN
塞內加爾 SG
新加坡 SK
斯洛文尼亞 SI
南非 ZA
南韓 KR
西班牙 ES
語言 編碼
塔吉克文 8471
坦米爾文 8465
特拉古文 8469
國語 8472
通加語 8479
土耳其文 8482
土庫曼文 8475
特維語 8487
烏克蘭文 8575
鳥都文 8582
鳥茲別克文 8590
越南文 8673
沃拉普克語 8679
威爾斯語 6789
沃洛夫文 8779
廓薩文 8872
意第緒文 7473
優魯巴文 8979
祖魯文 9085
地區 編碼
斯里蘭卡 LK
瑞典 SE
瑞士 CH
台灣 TW
泰國 TH
土耳其 TR
烏干達 UG
烏克蘭 UA
美國 US
烏拉圭 UY
烏茲別克 UZ
越南 VN
辛巴威 ZW
44
Page 93

疑難排解
問題
沒有電源。
電源已開但播放器無法運作。
沒有畫面。
沒有聲音。
播放器沒有開始播放。
遙控器無法正常操作。
可能成因
• 未有連接電線。
•沒有插入光碟。
•尚未設定電視來接收錄影機訊號輸出。
• 未有妥善連接視頻纜線。
• 所選解像度不適用於您的電視。
• 尚未設定連接音頻纜線的設備來接收光碟訊號輸出。
播放器所連接的音響設備尚未開啟。
•
•[聲音] 操作設定位置錯誤。
•播放器正在進行反向播放、快速前進、慢速播放或暫停
播放。
• 反轉放置光碟。
• 插入了無法播放的光碟。
• 設定了評級。
• 此光碟在其他裝置上燒錄,並且未有完成化。
• 遙控器沒有對準播放器上的遙控感應器。
• 遙控器距離播放器太遠。
修正
•小心把電線插入牆壁電源插座。
•插入光碟。(檢查螢幕顯示的光碟顯示燈是否亮著。)
• 在電視選取適當的視頻輸入模式。
• 連接好視頻纜線。
•使用解像度 (RESOLUTION) 按鈕選取另一解像度。
• 在聲音接收器選取正確的輸入模式,您便可聽到播放器的聲
音。
• 開啟已連接音頻纜線的音響設備。
•將 [聲音] 操作設定於正確位置。 (詳見第 24-25 頁。)
• 返回正常播放模式。
• 放置好光碟,播放面向下。
•插入可播放的光碟。(檢查光碟類型及區碼。)
• 變更評級水平。
•在該裝置上將光碟完成化。
•請將遙控器對準播放器的遙控感應器。
• 在與播放器距離較近的地方操作遙控器。
45
Page 94

疑難排解
問題
BD-Live 功能不能使用。
無法調至收音機電台。
可能成因
• 未接上外接 USB 裝置。
• 已連接的 USB 裝置可用空間不足。
• 沒有互聯網連線。
• 在 [設定] 選單中的 [BD-LIVE 連接] 選項設定為 [禁止]。
• 電台的訊號強度太弱 (自動調頻時)。
修正
• 連接 FAT16 或 FAT32 格式的 USB 裝置至 USB 埠(請參閱第
21 頁)。
• 確定 USB 裝置中至少有 1GB 可用空間以使用 BD-Live 功
能。
• 確定本機已經連接內聯網,以及可以使用互聯網。(請參閱第
19 頁)
•設定[BD-LIVE 連接] 選項為 [允許]。
• 使用直接調諧。
客戶支援
請注意,Pioneer網站提供本產品的相關資訊。
請瀏覽網站取得有關本藍光光碟播放器的更新或維修資訊。
l 如設計及規格有任何變更,恕不另行通告。
46
重設裝置
若發現錄影機有以下問題︰
• 已插好電線,但錄影機仍無法開關。
• 前面板顯示失靈。
• 裝置無法正常操作。
可以按照以下步驟重設裝置。
• 按住 POWER 按鈕最少五秒。 這樣會強制關上播放器。再按電源
(POWER) 按鈕開啟播放器。
• 拔掉電線,等待最少五秒,再重新插入電線。
Page 95

規格說明
一般
電源要求︰ AC 110 V 至 240V、50 Hz/60 Hz
待機耗電量: 0.33 W
耗電量︰ 70 W
尺寸 (闊 x 高 x 厚): 不連底座大約 430 x 76 x 372 毫米淨重 (大約)
: 4.6 公斤
操作溫度︰ 41 °F 至 95 °F (攝氏 5 至 35 度)
操作濕度︰ 5 % 至 85 %
輸入/輸出
VIDEO OUT: 1.0 V (p-p)、75 Ω、負類比輸入訊號、
RCA 插孔 x 1
COMPONENT VIDEO OUT: (Y) 1.0 V (p-p)、75 Ω、負類比輸入訊號、
RCA 插孔 x 1
(Pb)/(Pr) 0.7 V (p-p)、75 Ω、RCA 插孔 x 2
HDMI OUT (視訊/音訊): 19 pin (標準 HDMI,類別 A)
HDMI IN (視訊/音訊): 19 pin (標準 HDMI,類別 A)
類比音訊輸入: 2.0 Vrms (1 kHz,0 dB),600 Ω,RCA 插口
(L、R) x 1
DIGITAL IN (COAXIAL): 0.5 V (p-p)、75Ω、RCA 插口 x 1
DIGITAL IN (OPTICAL): 3 V (p-p)、光纖插孔 x 1
PORT. IN: 0.5 Vrms (
iPod cradle (24 pin)
FM 調諧器
FM 調頻範圍: 87.5 - 108.0 MHz 或 87.50 - 108.00 MHz
3.5 立體聲插口)
擴大器
立體聲模式: 前
PEAK 功率 75 W + 75 W (4Ω 1 kHz 無 CLIP)
RMS 功率 60 W + 60 W (4Ω 1 kHz THD 10%)
重低音喇叭
PEAK 功率 150 W (3Ω 60 Hz 無 CLIP)
RMS 功率 120 W (3Ω 60 Hz THD 10%)
系統
雷射︰ 半導體雷射,波長︰
405 毫微米 (nm) / 650 毫微米 (nm)
訊號系統︰ 標準 NTSC 色彩電視系統
頻率反應︰ 20 Hz 至 20 kHz
(48 kHz、96 kHz、192 kHz 抽樣)
LAN 埠: 乙太網絡接口 x 1,10BASE-T/100BASE-TX
配件
遙控器 (1)、電池 (1)、FM 天線 (1)、視訊纜線 (1)、
Cradle (1)
47
Page 96

喇叭
• 前側喇叭
機箱系統 封閉箱型落地式 (防磁)
系統 雙向系統
喇叭:
低音喇叭 5.2 cm 錐形 x2
高音喇叭 2.6 cm 半圓形
阻抗 4 Ω
頻率範圍 200 Hz 至 20 kHz
最大輸入功率 100 W
主機尺寸:
不含喇叭支架 77 mm (寬) x 395 mm (高) x 55 mm (深)
含喇叭支架 126 mm (寬) x 462 mm (高) x 126 mm (深)
重量:
不含喇叭支架 1.0 kg
含喇叭支架 1.3 kg
•重低音喇叭
機箱 低音反射落地式
系統 16 cm 單向式系統
喇叭 16 cm 錐形
阻抗 3 Ω
頻率範圍 34 Hz 至 1 kHz
最大輸入功率 150 W
主機尺寸 230 mm (寬) x 380 mm (高) x 360 mm (深)
重量 5.4 kg
開放性原始碼軟體注意事項
本播放器使用之軟體授權可參見文件最末頁。
•[有關GNU 一般公共授權的注意事項]
本產品包括根據GNU 一般公共授權條款授權的軟體。支付散佈需要的費
用也可以取得相應的原始程式碼副本。若要取得副本,請洽詢先鋒客戶
支援中心。
如需有關GNU 通用公共授權的詳細資料,請瀏覽GNU網站(http://www.
gnu.org)。
配件
喇叭纜線 (2)、喇叭底座 (2)、柱子 (2)、螺絲 (小) (8)、螺絲 (大) (4)、防滑墊
(4)、襯墊 (2)
48
Page 97

49
Page 98

Open source software notice
The licenses for the software used on this player are shown below.
OpenSSL
The OpenSSL toolkit stays under a dual license, i.e.both the conditions of the OpenSSL License and the
original SSLeay license apply to the toolkit.
See below for the actual license texts.Actually both licenses are BSD-style Open Source licenses. In case of
any license issues related to OpenSSL please contact openssl-core@openssl.org.
OpenSSL License
Copyright © 1998-2007 The OpenSSL Project.All rights reserved.
Redistribution and use in source and binary forms, with or without modification, are permitted provided that
the following conditions are met:
1. Redistributions of source code must retain the above copyright notice, this list of conditions and the following disclaimer.
2. Redistributions in binary form must reproduce the above copyright notice, this list of conditions and the following disclaimer in the documentation and/or other materials provided with the distribution.
3. All advertising materials mentioning features or use of this software must display the following acknowledgment: “This product includes software developed by the OpenSSL Project for use in the OpenSSL
Toolkit.(http://www.openssl.org/)”
4. The names “OpenSSL Toolkit” and “OpenSSL Project” must not be used to endorse or promote products
derived from this software without prior written permission. For written permission, please contact opensslcore@openssl.org.
5. Products derived from this software may not be called “OpenSSL” nor may “OpenSSL” appear in their
names without prior written permission of the OpenSSL Project.
6. Redistributions of any form whatsoever must retain the following acknowledgment:“This product includes
software developed by the OpenSSL Project for use in the OpenSSL Toolkit (http://www.openssl.org/)”
THIS SOFTWARE IS PROVIDED BY THE OpenSSL PROJECT “AS IS” AND ANY EXPRESSED OR
IMPLIED WARRANTIES, INCLUDING, BUT NOT LIMITED TO, THE IMPLIED WARRANTIES OF MERCHANTABILITY AND FITNESS FOR A PARTICULAR PURPOSE ARE DISCLAIMED.IN NO EVENT SHALL
THE OpenSSL PROJECT OR ITS CONTRIBUTORS BE LIABLE FOR ANY DIRECT, INDIRECT, INCIDENTAL, SPECIAL, EXEMPLARY, OR CONSEQUENTIAL DAMAGES (INCLUDING, BUT NOT LIMITED TO,
PROCUREMENT OF SUBSTITUTE GOODS OR SERVICES;LOSS OF USE, DATA, OR PROFITS; OR
BUSINESS INTERRUPTION) HOWEVER CAUSED AND ON ANY THEORY OF LIABILITY, WHETHER IN
CONTRACT, STRICT LIABILITY, OR TORT (INCLUDING NEGLIGENCE OR OTHERWISE) ARISING IN
ANY WAY OUT OF THE USE OF THIS SOFTWARE, EVEN IF ADVISED OF THE POSSIBILITY OF SUCH
DAMAGE.
This product includes cryptographic software written by Eric Young (eay@cryptsoft.com).This product
includes software written by Tim Hudson (tjh@cryptsoft.com).
Original SSLeay License
Copyright © 1995-1998 Eric Young (eay@cryptsoft.com)
All rights reserved.
This package is an SSL implementation written by Eric Young (eay@cryptsoft.com).The implementation was
written so as to conform with Netscapes SSL.
This library is free for commercial and non-commercial use as long as the following conditions are aheared
to.The following conditions apply to all code found in this distribution, be it the RC4, RSA, lhash, DES, etc.,
code; not just the SSL code. The SSL documentation included with this distribution is covered by the same
copyright terms except that the holder is Tim Hudson (tjh@cryptsoft.com).
Copyright remains Eric Young’s, and as such any Copyright notices in the code are not to be removed. If this
package is used in a product, Eric Young should be given attribution as the author of the parts of the library
used.This can be in the form of a textual message at program startup or in documentation (online or textual)
provided with the package.
Redistribution and use in source and binary forms, with or without modification, are permitted provided that
the following conditions are met:
1. Redistributions of source code must retain the copyright notice, this list of conditions and the following disclaimer.
2. Redistributions in binary form must reproduce the above copyright notice, this list of conditions and the following disclaimer in the documentation and/or other materials provided with the distribution.
3. All advertising materials mentioning features or use of this software must display the following acknowledgement: “This product includes cryptographic software written by Eric Young (eay@cryptsoft.com)”
The word ‘cryptographic’can be left out if the rouines from the library being used are not cryptographic
related :-).
4. If you include any Windows specific code (or a derivative thereof) from the apps director y (application
code) you must include an acknowledgement:“This product includes software written by Tim Hudson
(tjh@cryptsoft.com)”
THIS SOFTWARE IS PROVIDED BY ERIC YOUNG “AS IS”AND ANY EXPRESS OR IMPLIED WARRANTIES, INCLUDING, BUT NOT LIMITED TO, THE IMPLIED WARRANTIES OF MERCHANTABILITY AND
FITNESS FOR A PARTICULAR PURPOSE ARE DISCLAIMED. IN NO EVENT SHALL THE AUTHOR OR
CONTRIBUTORS BE LIABLE FOR ANY DIRECT, INDIRECT, INCIDENTAL, SPECIAL, EXEMPLARY, OR
CONSEQUENTIAL DAMAGES (INCLUDING, BUT NOT LIMITED TO, PROCUREMENT OF SUBSTITUTE
GOODS OR SERVICES;LOSS OF USE, DATA, OR PROFITS; OR BUSINESS INTERRUPTION) HOWEVER
CAUSED AND ON ANY THEORY OF LIABILITY, WHETHER IN CONTRACT, STRICT LIABILITY, OR TORT
(INCLUDING NEGLIGENCE OR OTHERWISE) ARISING IN ANY WAY OUT OF THE USE OF THIS SOFTWARE, EVEN IF ADVISED OF THE POSSIBILITY OF SUCH DAMAGE.
The licence and distribution terms for any publically available version or der ivative of this code cannot be
changed. i.e. this code cannot simply be copied and put under another distribution licence [including the GNU
Public Licence.]
zlib
This software is based in part on zlib see http://www.zlib.net for infor mation.
FreeType
The FreeType Project is copyright © 1996-2000 by David Tur ner, Robert Wilhelm, and Werner Lemberg. All
rights reserved except as specified below.
THE FREETYPE PROJECT IS PROVIDED ‘AS IS’ WITHOUT WARRANTY OF ANY KIND, EITHER
EXPRESS OR IMPLIED, INCLUDING, BUT NOT LIMITED TO, WARRANTIES OF MERCHANTABILITY
AND FITNESS FOR A PARTICULAR PURPOSE. IN NO EVENT WILL ANY OF THE AUTHORS OR
COPYRIGHT HOLDERS BE LIABLE FOR ANY DAMAGES CAUSED BY THE USE OR THE INABILITY
TO USE, OF THE FREETYPE PROJECT.
libpng
COPYRIGHT NOTICE, DISCLAIMER, and LICENSE:
If you modify libpng you may insert additional notices immediately following this sentence.
libpng versions 1.2.6, August 15, 2004, through 1.2.26, April 2, 2008, are Copyright © 2004, 2006-2008
Glenn Randers-Pehrson, and are distributed according to the same disclaimer and license as libpng-1.2.5
with the following individual added to the list of Contributing Authors
Cosmin Truta
libpng versions 1.0.7, July 1, 2000, through 1.2.5 - October 3, 2002, are Copyright © 2000-2002 Glenn
Randers-Pehrson, and are distributed according to the same disclaimer and license as libpng-1.0.6 with the
following individuals added to the list of Contributing Authors
Simon-Pierre Cadieux
Eric S. Raymond
Gilles Vollant
and with the following additions to the disclaimer:
There is no warranty against interference with your enjoyment of the library or against infringement. There
is no warranty that our efforts or the library will fulfill any of your particular purposes or needs. This library
is provided with all faults, and the entire risk of satisfactory quality, performance, accuracy, and effort is
with the user.
libpng versions 0.97, January 1998, through 1.0.6, March 20, 2000, are Copyright © 1998, 1999 Glenn
Randers-Pehrson, and are distributed according to the same disclaimer and license as libpng-0.96, with the
following individuals added to the list of Contributing Authors:
Tom Lane
Glenn Randers-Pehrson
Willem van Schaik
libpng versions 0.89, June 1996, through 0.96, May 1997, are Copyright © 1996, 1997 Andreas Dilger
Page 99

Distributed according to the same disclaimer and license as libpng-0.88, with the following individuals added
to the list of Contributing Authors:
John Bowler
Kevin Bracey
Sam Bushell
Magnus Holmgren
Greg Roelofs
Tom Tanner
libpng versions 0.5, May 1995, through 0.88, January 1996, are Copyright © 1995, 1996 Guy Eric Schalnat,
Group 42, Inc.
For the purposes of this copyright and license, “Contributing Authors” is defined as the following set of individuals:
Andreas Dilger
Dave Martindale
Guy Eric Schalnat
Paul Schmidt
Tim Wegner
The PNG Reference Library is supplied “AS IS”.The Contributing Authors and Group 42, Inc. disclaim all warranties, expressed or implied, including, without limitation, the warranties of merchantability and of fitness for
any purpose.The Contributing Authors and Group 42, Inc. assume no liability for direct, indirect, incidental,
special, exemplary, or consequential damages, which may result from the use of the PNG Reference Library,
even if advised of the possibility of such damage.
Permission is hereby granted to use, copy, modify, and distribute this source code, or portions hereof, for any
purpose, without fee, subject to the following restrictions:
1. The origin of this source code must not be misrepresented.
2. Altered versions must be plainly marked as such and must not be misrepresented as being the original
source.
3. This Copyright notice may not be removed or altered from any source or altered source distribution.
The Contributing Authors and Group 42, Inc.specifically permit, without fee, and encourage the use of this
source code as a component to supporting the PNG file format in commercial products. If you use this source
code in a product, acknowledgment is not required but would be appreciated.
A “png_get_copyright” function is available, for convenient use in “about”boxes and the like:
printf(“%s”,png_get_copyright(NULL));Also, the PNG logo (in PNG format, of course) is supplied in the files
“pngbar.png” and “pngbar.jpg (88x31) and “pngnow.png”(98x31).
Libpng is OSI Certified Open Source Software. OSI Cer tified Open Source is a certification mark of the Open
Source Initiative.
Glenn Randers-Pehrson
glennrp at users.sourceforge.net
2-Apr-08
Expat
Copyright © 1998, 1999, 2000 Thai Open Source Software Center Ltd
Permission is hereby granted, free of charge, to any person obtaining a copy of this software and associated
documentation files (the “Software”), to deal in the Software without restriction, including without limitation the
rights to use, copy, modify, merge, publish, distribute, sublicense, and/or sell copies of the Software, and to
permit persons to whom the Software is furnished to do so, subject to the following conditions:
The above copyright notice and this permission notice shall be included in all copies or substantial portions of
the Software.
THE SOFTWARE IS PROVIDED “AS IS”, WITHOUT WARRANTY OF ANY KIND, EXPRESS OR IMPLIED,
INCLUDING BUT NOT LIMITED TO THE WARRANTIES OF MERCHANTABILITY, FITNESS FOR A PARTICULAR PURPOSE AND NONINFRINGEMENT. IN NO EVENT SHALL THE AUTHORS OR COPYRIGHT
HOLDERS BE LIABLE FOR ANY CLAIM, DAMAGES OR OTHER LIABILITY, WHETHER IN AN ACTION OF
CONTRACT, TORT OR OTHERWISE, ARISING FROM, OUT OF OR IN CONNECTION WITH THE SOFTWARE OR THE USE OR OTHER DEALINGS IN THE SOFTWARE.
GNU GENERAL PUBLIC LICENSE
Version 2, June 1991
Copyright © 1989, 1991 Free Software Foundation, Inc., 51 Franklin Street, Fifth Floor, Boston, MA 021101301 USA
Everyone is permitted to copy and distribute verbatim copies of this license document, but changing it is not
allowed.
Preamble
The licenses for most software are designed to take away your freedom to share and change it. By contrast,
the GNU General Public License is intended to guarantee your freedom to share and change free software to make sure the software is free for all its users.This General Public License applies to most of the Free
Software Foundation’s software and to any other program whose authors commit to using it. (Some other
Free Software Foundation software is covered by the GNU Lesser General Public License instead.) You can
apply it to your programs, too.
When we speak of free software, we are referring to freedom, not price.Our General Public Licenses are
designed to make sure that you have the freedom to distribute copies of free software (and charge for this
service if you wish), that you receive source code or can get it if you want it, that you can change the software or use pieces of it in new free programs;and that you know you can do these things.
To protect your rights, we need to make restrictions that forbid anyone to deny you these rights or to ask you
to surrender the rights.These restrictions translate to certain responsibilities for you if you distribute copies of
the software, or if you modify it.
For example, if you distribute copies of such a program, whether gratis or for a fee, you must give the recipients all the rights that you have.You must make sure that they, too, receive or can get the source code.And
you must show them these terms so they know their rights.
We protect your rights with two steps: (1) copyright the software, and (2) offer you this license which gives
you legal permission to copy, distr ibute and/or modify the software.
Also, for each author’s protection and ours, we want to make certain that everyone understands that there is
no warranty for this free software.If the software is modified by someone else and passed on, we want its
recipients to know that what they have is not the original, so that any problems introduced by others will not
reflect on the original authors’ reputations.
Finally, any free program is threatened constantly by software patents. We wish to avoid the danger that
redistributors of a free program will individually obtain patent licenses, in effect making the program proprietary. To prevent this, we have made it clear that any patent must be licensed for ever yone’s free use or not
licensed at all.
The precise terms and conditions for copying, distribution and modification follow.
TERMS AND CONDITIONS FOR COPYING, DISTRIBUTION AND MODIFICATION
0. This License applies to any program or other work which contains a notice placed by the copyright holder
saying it may be distributed under the terms of this General Public License.The “Program”, below, refers
to any such program or work, and a “work based on the Program”means either the Program or any derivative work under copyright law:that is to say, a work containing the Program or a portion of it, either verbatim or with modifications and/or translated into another language. (Hereinafter, translation is included
without limitation in the term “modification”.) Each licensee is addressed as “you”.
Activities other than copying, distribution and modification are not covered by this License;they are outside
its scope.The act of running the Program is not restricted, and the output from the Program is covered
only if its contents constitute a work based on the Program (independent of having been made by running
the Program).Whether that is true depends on what the Program does.
1. You may copy and distribute verbatim copies of the Program’s source code as you receive it, in any medium, provided that you conspicuously and appropriately publish on each copy an appropriate copyright
notice and disclaimer of warranty; keep intact all the notices that refer to this License and to the absence
of any warranty; and give any other recipients of the Program a copy of this License along with the
Program.
You may charge a fee for the physical act of transferring a copy, and you may at your option offer warranty
protection in exchange for a fee.
2. You may modify your copy or copies of the Program or any portion of it, thus forming a work based on the
Program, and copy and distribute such modifications or work under the terms of Section 1 above, provided
that you also meet all of these conditions:
a) You must cause the modified files to carry prominent notices stating that you changed the files and the
date of any change.
b) You must cause any work that you distribute or publish, that in whole or in part contains or is derived
from the Program or any part thereof, to be licensed as a whole at no charge to all third parties under
Page 100

the terms of this License.
c) If the modified program normally reads commands interactively when run, you must cause it, when
started running for such interactive use in the most ordinary way, to pr int or display an announcement
including an appropriate copyright notice and a notice that there is no warranty (or else, saying that you
provide a warranty) and that users may redistribute the program under these conditions, and telling the
user how to view a copy of this License.(Exception: if the Program itself is interactive but does not normally print such an announcement, your work based on the Program is not required to print an
announcement.)
These requirements apply to the modified work as a whole. If identifiable sections of that work are not
derived from the Program, and can be reasonably considered independent and separate works in themselves, then this License, and its terms, do not apply to those sections when you distribute them as separate works. But when you distribute the same sections as part of a whole which is a work based on the
Program, the distribution of the whole must be on the terms of this License, whose permissions for other
licensees extend to the entire whole, and thus to each and every part regardless of who wrote it.
Thus, it is not the intent of this section to claim rights or contest your rights to work written entirely by you;
rather, the intent is to exercise the right to control the distribution of derivative or collective works based on
the Program.
In addition, mere aggregation of another work not based on the Program with the Program (or with a work
based on the Program) on a volume of a storage or distribution medium does not bring the other work
under the scope of this License.
3. You may copy and distribute the Program (or a work based on it, under Section 2) in object code or executable form under the terms of Sections 1 and 2 above provided that you also do one of the following:
a) Accompany it with the complete corresponding machine-readable source code, which must be distrib-
uted under the terms of Sections 1 and 2 above on a medium customarily used for software interchange; or,
b) Accompany it with a written offer, valid for at least three years, to give any third party, for a charge no
more than your cost of physically performing source distribution, a complete machine-readable copy of
the corresponding source code, to be distributed under the terms of Sections 1 and 2 above on a medium customarily used for software interchange; or,
c) Accompany it with the information you received as to the offer to distribute corresponding source code.
(This alternative is allowed only for noncommercial distribution and only if you received the program in
object code or executable form with such an offer, in accord with Subsection b above.)
The source code for a work means the preferred form of the work for making modifications to it.For an
executable work, complete source code means all the source code for all modules it contains, plus any
associated interface definition files, plus the scripts used to control compilation and installation of the executable.However, as a special exception, the source code distributed need not include anything that is
normally distributed (in either source or binary form) with the major components (compiler, kernel, and so
on) of the operating system on which the executable runs, unless that component itself accompanies the
executable.
If distribution of executable or object code is made by offer ing access to copy from a designated place,
then offering equivalent access to copy the source code from the same place counts as distribution of the
source code, even though third parties are not compelled to copy the source along with the object code.
4. You may not copy, modify, sublicense, or distribute the Program except as expressly provided under this
License. Any attempt otherwise to copy, modify, sublicense or distribute the Program is void, and will automatically terminate your rights under this License. However, parties who have received copies, or rights,
from you under this License will not have their licenses terminated so long as such parties remain in full
compliance.
5. You are not required to accept this License, since you have not signed it. However, nothing else grants you
permission to modify or distribute the Program or its derivative works.These actions are prohibited by law
if you do not accept this License.Therefore, by modifying or distributing the Program (or any work based
on the Program), you indicate your acceptance of this License to do so, and all its terms and conditions for
copying, distributing or modifying the Program or works based on it.
6. Each time you redistribute the Program (or any work based on the Program), the recipient automatically
receives a license from the original licensor to copy, distribute or modify the Program subject to these
terms and conditions.You may not impose any further restrictions on the recipients’ exercise of the rights
granted herein.
You are not responsible for enforcing compliance by third parties to this License.
7. If, as a consequence of a court judgment or allegation of patent infringement or for any other reason (not
limited to patent issues), conditions are imposed on you (whether by court order, agreement or otherwise)
that contradict the conditions of this License, they do not excuse you from the conditions of this License. If
you cannot distribute so as to satisfy simultaneously your obligations under this License and any other
pertinent obligations, then as a consequence you may not distribute the Program at all.For example, if a
patent license would not permit royalty-free redistribution of the Program by all those who receive copies
directly or indirectly through you, then the only way you could satisfy both it and this License would be to
refrain entirely from distribution of the Program.
If any portion of this section is held invalid or unenforceable under any particular circumstance, the balance of the section is intended to apply and the section as a whole is intended to apply in other circumstances.
It is not the purpose of this section to induce you to infringe any patents or other property right claims or
to contest validity of any such claims; this section has the sole purpose of protecting the integrity of the
free software distribution system, which is implemented by public license practices.Many people have
made generous contributions to the wide range of software distributed through that system in reliance on
consistent application of that system; it is up to the author/donor to decide if he or she is willing to distr ibute software through any other system and a licensee cannot impose that choice.
This section is intended to make thoroughly clear what is believed to be a consequence of the rest of this
License.
8. If the distribution and/or use of the Program is restricted in certain countries either by patents or by copyrighted interfaces, the original copyright holder who places the Program under this License may add an
explicit geographical distribution limitation excluding those countries, so that distribution is permitted only
in or among countries not thus excluded. In such case, this License incorporates the limitation as if written
in the body of this License.
9. The Free Software Foundation may publish revised and/or new versions of the General Public License
from time to time. Such new versions will be similar in spirit to the present version, but may differ in detail
to address new problems or concerns.
Each version is given a distinguishing version number. If the Program specifies a version number of this
License which applies to it and “any later version”, you have the option of following the terms and conditions either of that version or of any later version published by the Free Software Foundation. If the
Program does not specify a version number of this License, you may choose any version ever published
by the Free Software Foundation.
10.
If you wish to incorporate parts of the Program into other free programs whose distribution conditions are
different, write to the author to ask for permission. For software which is copyrighted by the Free Software
Foundation, write to the Free Software Foundation;we sometimes make exceptions for this. Our decision
will be guided by the two goals of preserving the free status of all derivatives of our free software and of
promoting the sharing and reuse of software generally.
NO WARRANTY
11.
BECAUSE THE PROGRAM IS LICENSED FREE OF CHARGE, THERE IS NO WARRANTY FOR THE
PROGRAM, TO THE EXTENT PERMITTED BY APPLICABLE LAW.EXCEPT WHEN OTHERWISE STATED IN WRITING THE COPYRIGHT HOLDERS AND/OR OTHER PARTIES PROVIDE THE PROGRAM
“AS IS” WITHOUT WARRANTY OF ANY KIND, EITHER EXPRESSED OR IMPLIED, INCLUDING, BUT
NOT LIMITED TO, THE IMPLIED WARRANTIES OF MERCHANTABILITY AND FITNESS FOR A PARTICULAR PURPOSE.THE ENTIRE RISK AS TO THE QUALITY AND PERFORMANCE OF THE PROGRAM
IS WITH YOU. SHOULD THE PROGRAM PROVE DEFECTIVE, YOU ASSUME THE COST OF ALL NECESSARY SERVICING, REPAIR OR CORRECTION.
12.
IN NO EVENT UNLESS REQUIRED BY APPLICABLE LAW OR AGREED TO IN WRITING WILL ANY
COPYRIGHT HOLDER, OR ANY OTHER PARTY WHO MAY MODIFY AND/OR REDISTRIBUTE THE
PROGRAM AS PERMITTED ABOVE, BE LIABLE TO YOU FOR DAMAGES, INCLUDING ANY GENERAL, SPECIAL, INCIDENTAL OR CONSEQUENTIAL DAMAGES ARISING OUT OF THE USE OR INABILITY TO USE THE PROGRAM (INCLUDING BUT NOT LIMITED TO LOSS OF DATA OR DATA BEING
RENDERED INACCURATE OR LOSSES SUSTAINED BY YOU OR THIRD PARTIES OR A FAILURE OF
THE PROGRAM TO OPERATE WITH ANY OTHER PROGRAMS), EVEN IF SUCH HOLDER OR OTHER
PARTY HAS BEEN ADVISED OF THE POSSIBILITY OF SUCH DAMAGES.
END OF TERMS AND CONDITIONS
How to Apply These Terms to Your New Programs
If you develop a new program, and you want it to be of the greatest possible use to the public, the best way
to achieve this is to make it free software which ever yone can redistribute and change under these terms.
To do so, attach the following notices to the program. It is safest to attach them to the star t of each source file
 Loading...