

English
Español
Safety Precaution
CAUTION
RISK OF ELECTRIC SHOCK
DO NOT OPEN
CAUTION: TO REDUCE THE RISK OF ELECTRIC SHOCK DO NOT REMOVE
COVER (OR BACK) NO USER-SERVICEABLE PARTS INSIDE REFER SERVICING TO QUALIFIED SERVICE PERSONNEL.
WARNING:TO PREVENT FIRE OR ELECTRIC SHOCK HAZARD, DO NOT
EXPOSE THIS PRODUCT TO RAIN OR MOISTURE.
WARNING: Do not install this equipment in a confined space such as a book case
or similar unit.
CAUTION: Do not block any ventilation openings.Install in accordance with the
manufacturer's instructions.
Slots and openings in the cabinet are provided for ventilation and to ensure reliable
operation of the product and to protect it from over heating.The openings be never
be blocked by placing the product on a bed, sofa, rug or other similar surface.This
product not be placed in a built-in installation such as a bookcase or rack unless
proper ventilation is provided or the manufacturer's instruction has been adhered to.
Operating Environment:
Operating environment temperature and humidity:
+5 ºC to +35 ºC (+41 ºF to +95 ºF); less than 85 %RH (cooling vents not blocked)
Do not install this unit in a poorly ventilated area, or in locations exposed to high
humidity or direct sunlight (or strong artificial light)
WARNING:To prevent a fire hazard, do not place any naked flame sources (such
as a lighted candle) on the equipment.
CAUTION: When disposing of used batteries, please comply with governmental regulations or environmental public institution’s rules that apply in your country/area.
WARNING: Do not use or store batteries in direct sunlight or other excessively hot
place, such as inside a car or near a heater.This can cause batteries to leak, overheat, explode or catch fire.It can also reduce the life or performance of batteries.
This lightning flash with arrowhead symbol within an equilateral triangle is
intended to alert the user to the presence of uninsulated dangerous voltage
within the product’s enclosure that may be of sufficient magnitude to
constitute a risk of electric shock to persons.
The exclamation point within an equilateral triangle is intended to alert
the user to the presence of important operating and maintenance
(servicing) instructions in the literature accompanying the product.
CAUTION: This product is a class 1 laser product classified under the Safety of
laser products , IEC 60825-1:2007.
To ensure proper use of this product, please read this owner’s manual carefully and
retain it for future reference.the unit require maintenance, contact an
authorized service center. Use of controls, adjustments or the performance of procedures other than those specified herein may result in hazardous radiation exposure.
To prevent direct exposure to laser beam, do not try to open the enclosure.Visible
laser radiation when open. DO NOT STARE INTO BEAM.
CAUTION: The apparatus not be exposed to water (dripping or splashing) and no
objects filled with liquids, such as vases be placed on the apparatus.
CAUTION concerning the Power Cord
Most appliances recommend they be placed upon a dedicated circuit
That is, a single outlet circuit which powers only that appliance and has no
additional outlets or branch circuits. Check the specification page of this owner's
manual to be certain.
Do not overload wall outlets.Overloaded wall outlets, loose or damaged wall
outlets, extension cords, frayed power cords, or damaged or cracked wire insulation
are dangerous. Any of these conditions could result in electric shock or fire.
Periodically examine the cord of your appliance, and if its appearance indicates
damage or deterioration, unplug it, discontinue use of the appliance, and have the
cord replaced with an exact replacement part by an authorized servicer.
Protect the power cord from physical or mechanical abuse, such as being twisted,
kinked, pinched, closed in a door, or walked upon. Pay particular attention to plugs,
wall outlets, and the point where the cord exits the appliance.
To disconnect power from the mains, pull out the mains cord plug. When installing
the product, ensure that the plug is easily accessible.
Windows Media is either a registered trademark or trademark of Microsoft
Corporation in the United States and/or other countries.
This product includes technology owned by Microsoft Corporation and cannot be
used or distributed without a license from Microsoft Licensing, Inc.
2

Contents
Setting up 4
Main Unit 5
Remote control 6
Listening to CDs 7
Listening to music from your external device 7
Listening to the radio 8
Listening to cassette tapes 8
Using an USB device 9
Enjoying a pre-programmed sound field 9
Synchronized Recording from CD to Tape 10
Recording to TAPE 10
Recording to USB 11
Setting the Clock 12
Troubleshooting 13
Specifications 13
Before connecting, operating or adjusting this product, please read this instruction booklet carefully
and completely.
The making of unauthorized copies of copy-protected
material, including computer programs, files, broadcasts and
sound recordings, may be an infringement of copyrights and
constitute a criminal offense.This equipment should not be
used for such purposes.
Be responsible
Respect copyrights
3
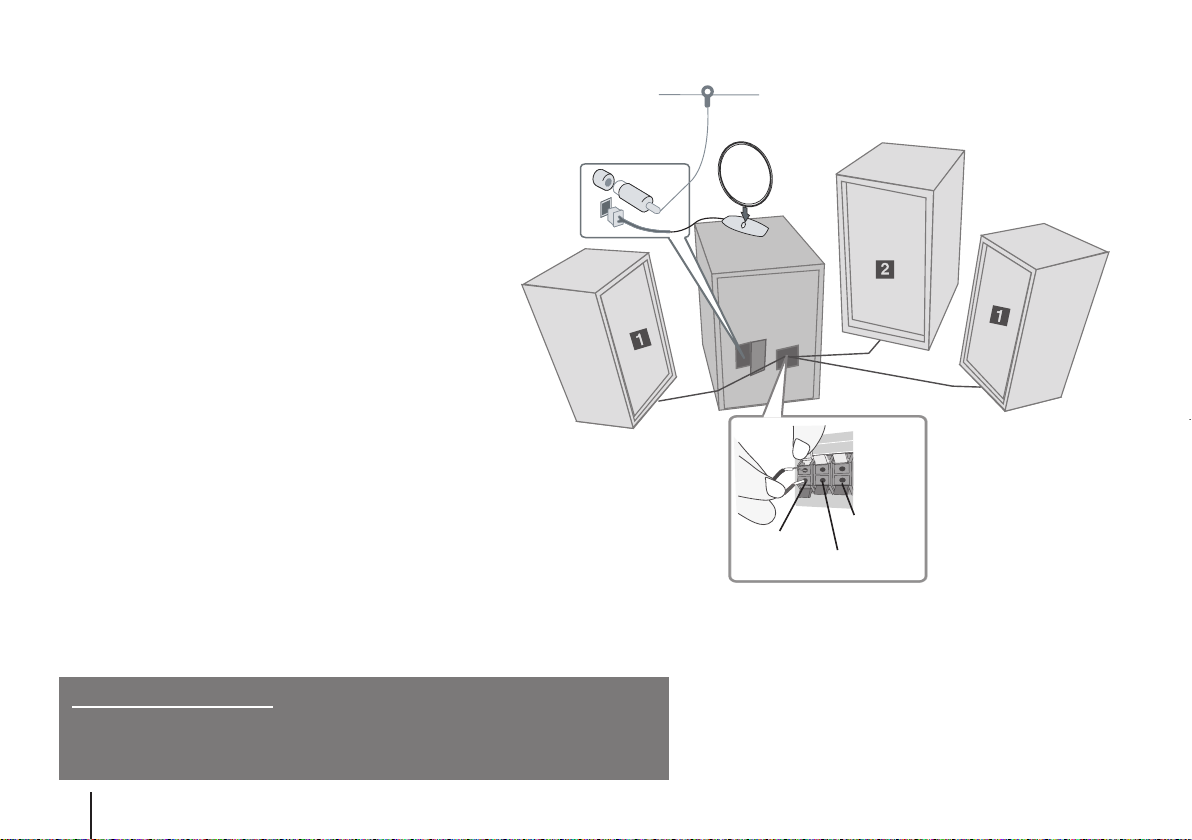
Setting up
Using the subwoofer
You can use the sound of the subwoofer to enhance the bass.
¥¥
Connection of the front speakers
Connect the speaker cables to the front speaker
terminals.
Connect the black end of each wire to the terminals
marked - (minus) and the other end to the terminals marked
+ (plus).
øø
Connection of the subwoofer
Connect the subwoofer cables to the subwoofer
terminals.
Connect the black end of each wire to the terminals
marked - (minus) and the other end to the terminals marked
+ (plus).
ππ
Fit the AM loop aerial to its stand
Connect the AM loop aerial to the unit.
[[
Connect the FM aerial
The reception will be at its best when the two loose ends
of the aerial are in a straight line and horizontal.
““
Plug the power plug into a wall socket
Be careful of the following
Be careful to make sure children not to put their hands or any objects into the
*speaker duct.
*speaker duct : A hole for plentiful bass sound on speaker cabinet(enclosure).
4
[[
(FM - aerial)
ππ
(AM - aerial- optional)
[subwoofer]
Subwoofer
Front (L)
Front (R)
NOTES :
• Do not connect the supplied speakers to any amplifier other
than the one supplied with this system. Connection to any
other amplifier may result in malfunction or fire.
• If TV screen becomes discolored do not place speakers
within 30cm from TV.
• Be sure to match the speaker cord to the appropriate
terminal on the components : + to + and – to –.If the cords
are reversed, the sound will be distorted and will lack base.
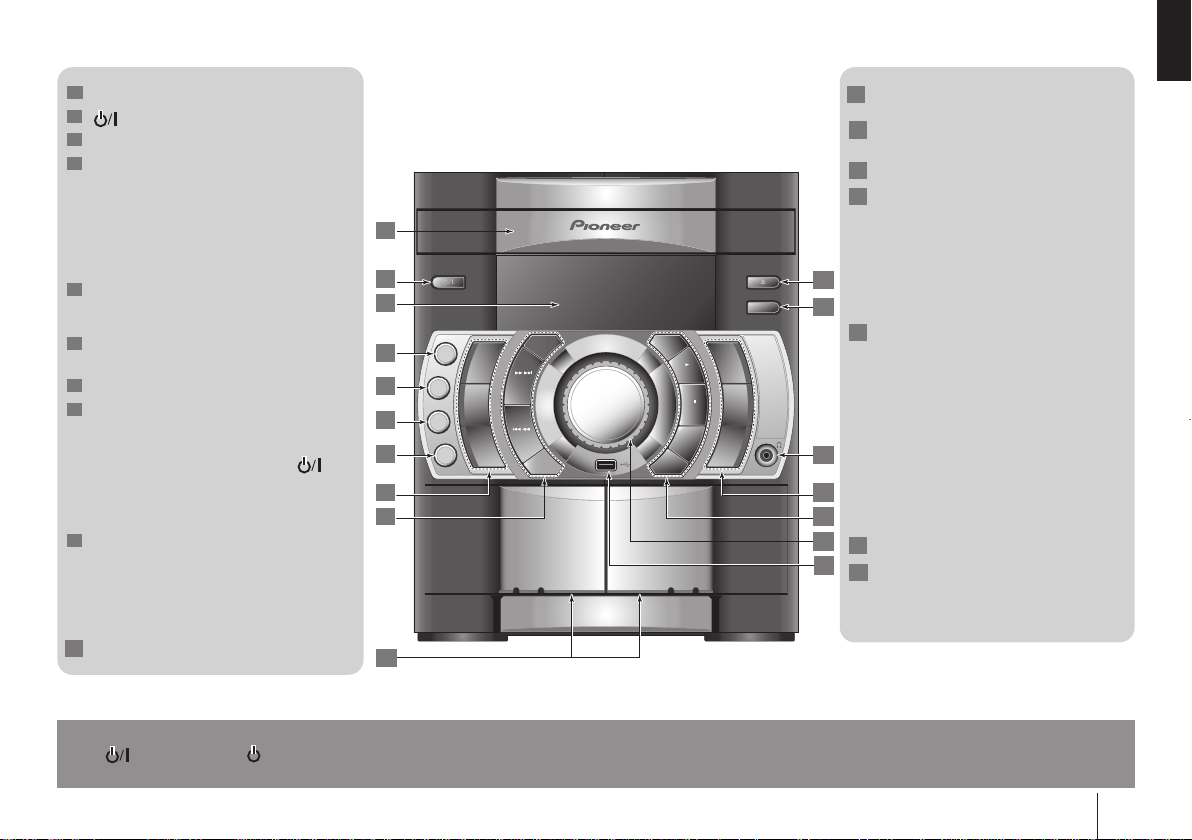
Main Unit
1
Disc tray
2
STANDBY/ON
3
Display window
4
X.BOOM
Extreme Dynamic Sound System
Reinforce the treble, bass and
surround effect.
MP3 EXP
Optimizes compressible MP3 files so
that it improves the bass sound.
5
EQ
You can choose fixed sound
impression
6
P.EQ
You can choose fixed sound impression
7
USER EQ
8
USB DEMO
- DEMO In power off state to
demonstrate the function on display
window.To cancel it, press or
this button again.
Selects TUNER function.
Selects AUX function.
9
REC/PAUSE(USB)
¡¢ TUNE +
41 TUNE -
CLOCK
For setting the clock and checking the
time.
10
Cassette Door 1, 2
10
11
0 OPEN/CLOSE
Open or close your Disc tray.
12
DISC SKIP
Choose a desired disc.
13
Headphone jack
14
Selects CD function.
1
Selects TAPE function.
SET CD PAUSE
- SET Confirms the settings.
2
3
4
5
6
7
8
9
11
12
13
14
15
16
17
(TIMER/CLOCK)
- CD PAUSE
Pauses playback.
15
CD SYNC DUBB
- CD SYNC CD to Tape
Synchronized.
- DUBB Recording from tape to tape.
3 PRESET +
7 STOP
PRESET -
TIMER
With the TIMER function you can turn
CD, TAPE, USB play and TUNER
reception on or off at a desired time.
16
Volume control
17
USB connector
Connect a USB compatible device
here.
POWER SAVE MODE
Press
Press again to cancel.
the player or on the remote control
on
for longer than 3 seconds as the device is powered on, you can move into POWER SAVE MODE.
5
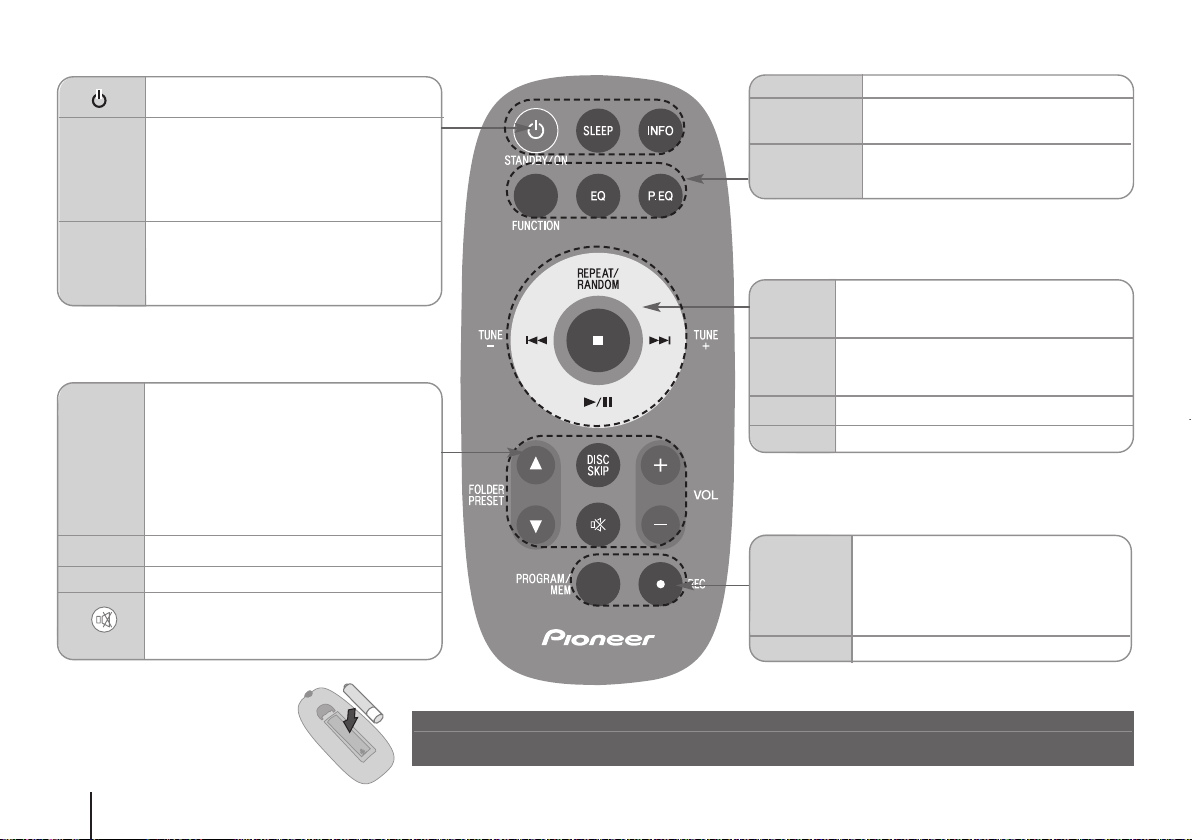
Remote control
STANDBY/ON
Power SAVE MODE
SLEEP Fall asleep while listening to your unit .
Sets the System to turn off automatically
at a specified time. (Dimmer : Dims the
LED (Light-emitting diode) of front panel by
half in power-on status.)
INFO
FOLDER
PRESET
+
VOL
-
DISC SKIP
See information about your music.
MP3/ WMA files often come with tags.The
tag gives the Title, Artist, Album or Time
information.
Searches for a folder of MP3/ WMA
files
When a CD containing MP3/ WMA files in
5
5
several folders is being played, press
FOLDER PRESET selects the folder you
want to play.
Choose a ‘preset number’for a radio
station.
Controls the volume when using any function.
Choose a desired CD
Temporarily stop the sound.
Press the button again to return to the
sound.
FUNCTION
EQ
P.EQ
REPEAT/
RANDOM
4/¢
TUNE -/+
3/8
7
PROGRAM/
MEM
÷
REC
Changes the functions.
sound quality adjustment.
You can choose sound impressions.
You can select a Natural or Local
Specialization equalizer effect by
using P.EQ.
CD: Listen to your tracks repeatedly
or randomly.
Selects the radio station.
Searches for a section within a track.
Skips Fast backward or Forward.
Starts or pauses playback
Stops playback or recording
For storing radio stations
If you have saved radio stations using
PROGRAM/MEM, you can scroll
through them and select one.
Listens to your tracks in any order
Recording button.
Put the battery into the remote control
Make sure for the + (plus) and – (minus) on the battery to be matched on the remote control.(size AAA)
6
Listening to CDs
Audio CD and MP3/ WMA CD can be played back in this unit.
ON UNIT ON REMOTE
1. Open the Disc tray
2. Select the Disc tray
3. Insert the CD: Label facing up.
4. Close the Disc tray
5. Select the CD function
The display will show the total
number of tracks (files).
6. Start the CD playing
7.To stop a CD playing
0 OPEN/ CLOSE
DISC SKIP
-
0 OPEN/ CLOSE
CD
3
7 STOP
-
DISC SKIP
-
-
FUNCTION
3/8
7
Listening to CDs - More you can do
Pausing or restarting a CD
1 Press SET/CD PAUSE
back.
2 Press this button again to resume play.
Searching for a section within a track
Hold 41 / ¡¢ on the unit or 4/¢ on the remote control
playback
and release it at the point you want to listen to.
Skipping to another track (files)
Press 41 / ¡¢ on the unit or 4/¢ on the remote control in stop
status.
Listening to your tracks (files) repeatedly or randomly
1 Press REPEAT/RANDOM repeatedly.The current (tracks) file will be played
back repeatedly or randomly.
2 To return to normal playback, press REPEAT/RANDOM repeatedly to select
[Off].
Program list
You can play up to 20 tracks on a CD in order.
1 Insert a CD and wait for it to be read.
2 Press PROGRAM/MEM
3Press 41 / ¡¢ on the unit
on the unit or 3/8 on the remote control
on the remote control
or
4/¢
in stop status.
on the remote control
during play-
during
to select a track.
4 Press PROGRAM/MEM again to save and select a next track.
5 Press
3 on the unit
music files
6 To clear your selection, press
then
.
7 STOP (or 7 ).
or
3/
on the remote control to play the programmed
8
7 STOP (or 7 ), PROGRAM/MEM and
About MP3/ WMA
MP3/WMA Disc compatibility with this unit is limited as follows:
• Sampling Frequency :32 - 48 (MP3/ WMA)
• Bit rate : 32 - 320 kbps (MP3), 40 - 320 kbps (WMA)
• CD-R physical format should be “ISO 9660/JOLIET”
• If you record MP3/WMA files using the software which cannot create a FILE
SYSTEM, for example “Direct-CD” etc., it is impossible to playback MP3 files.
We recommend that you use “Easy-CD Creator”, which creates an ISO 9660
file system.
• Do not use special letters such as “/ : * ? “ < >”etc.
•Even if the total number of files on the disc has more than 1000, it will only be
shown up to 999.
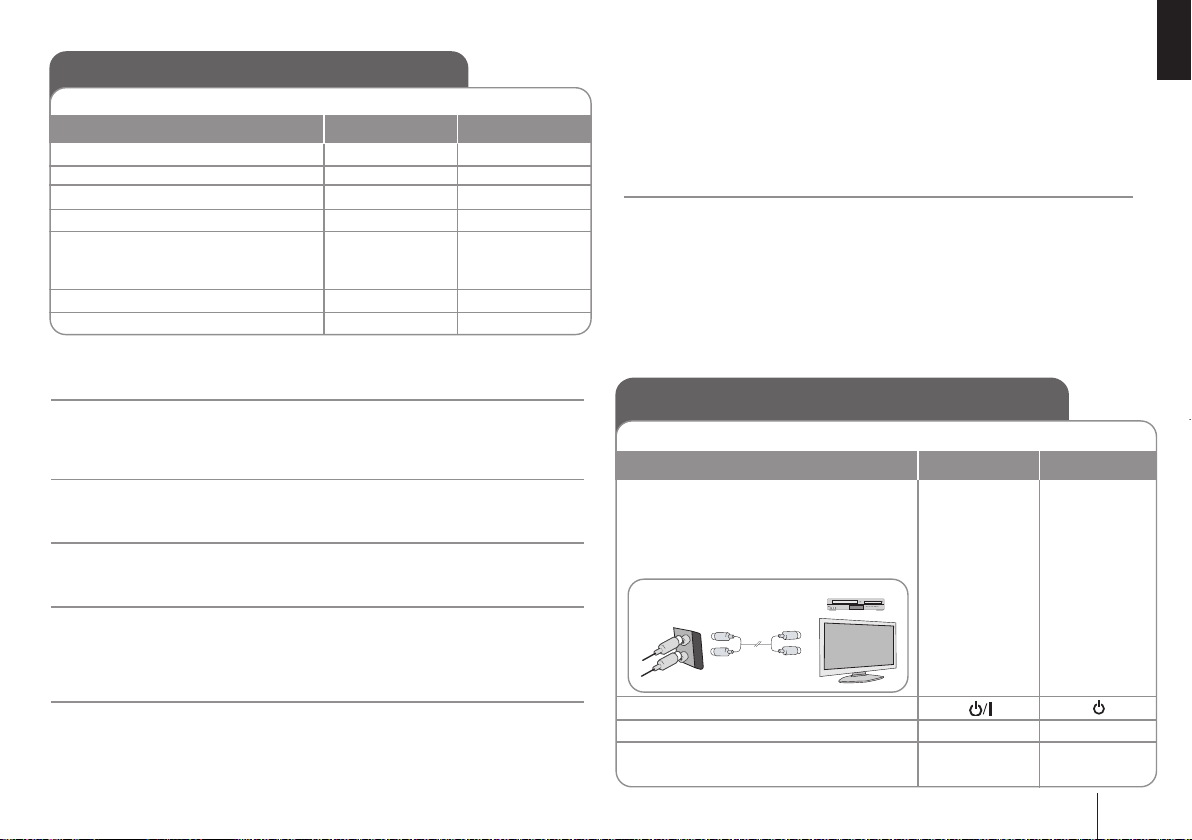
Listening to music from your external device
The unit can be used to play the music from many types of external device.
ON UNIT ON REMOTE
1.Connect the external device to the
AUX IN connector of the unit.
> If your TV has only one output for
audio(MONO). connect it to the
left(white) audio jack on the unit.
Main unit
2.Turn the power on.
3. Select the AUX function.
4.Turn on the e xternal device and start it
playing.
VCR,TV,...
--
AUX
-
FUNCTION
-
7
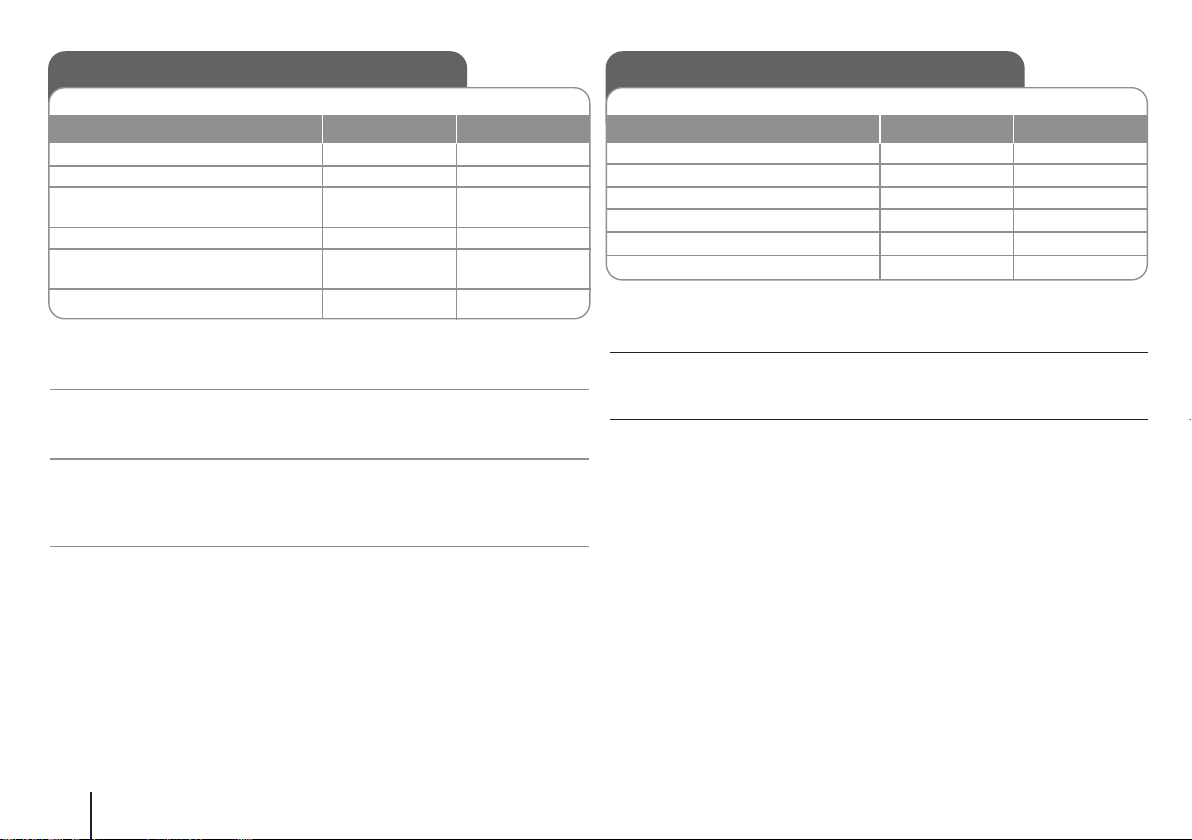
Listening to the radio
Make sure both the FM and AM aerials are connected.
1. Select either FM or AM
2. Select the radio station
3.To ‘save’ a radio station: A preset
number will show in the display.
4. Select the preset number
5.To confirm press: Up to 50 radio
stations can be saved.
6.To select a ‘saved’ station
ON UNIT
TUNER
TUNE + / TUNE -
-
PRESET - / PRESET +
-
PRESET - / PRESET +
ON REMOTE
FUNCTION
TUNE + / TUNE -
PROGRAM/MEM
FOLDER PRESET
PROGRAM/MEM
FOLDER PRESET
Listening to the radio - More you can do
Looking for radio stations automatically
1 Press and hold TUNE + / TUNE - for more than 0.5 second.
2 The tuner will scan automatically and stop when it finds a radio station.
Deleting all the saved stations
1 Press and hold PROGRAM/MEM on the
“ERASE ALL” shows.
2 Press PROGRAM/MEM on the
remote control
Improving poor FM reception
Press 3/8(MONO/ST) on the remote control.
remote control
to erase all the saved stations.
for two seconds.
Listening to cassette tapes
Cassette tapes can be played back in this unit.
1. Open the tape door
2. Insert the tape
3. Close the tape door
4. Select the TAPE function
5. Start the tape playing
6.To stop a tape playing
ON UNIT
PUSH OPEN
-
PUSH OPEN
TAPE
3
7 STOP
ON REMOTE
-
-
-
FUNCTION
3/8
7
Listening to cassette tapes - More you can do
Playing Fast backward or Forward
Press 41 / ¡¢(4 / ¢ on the
playback, or stop, press 3 at a point you want.
Dubbing
This function shows how to record from tape to tape
1 Press TAPE to select tape function.
2 Insert the tape as follows.
TAPE1 - Insert a playback tape to dub.
TAPE2 - Insert a blank tape.
3 Press DUBB “DUBBING” shows. Dubbing starts.
4 To stop dubbing, press 7 STOP.
NOTE: In case you use the tape for the first time push the PUSH OPEN to open
the tape door and then remove the cushion in it.
remote control ) on the unit during
8
 Loading...