

Page 1
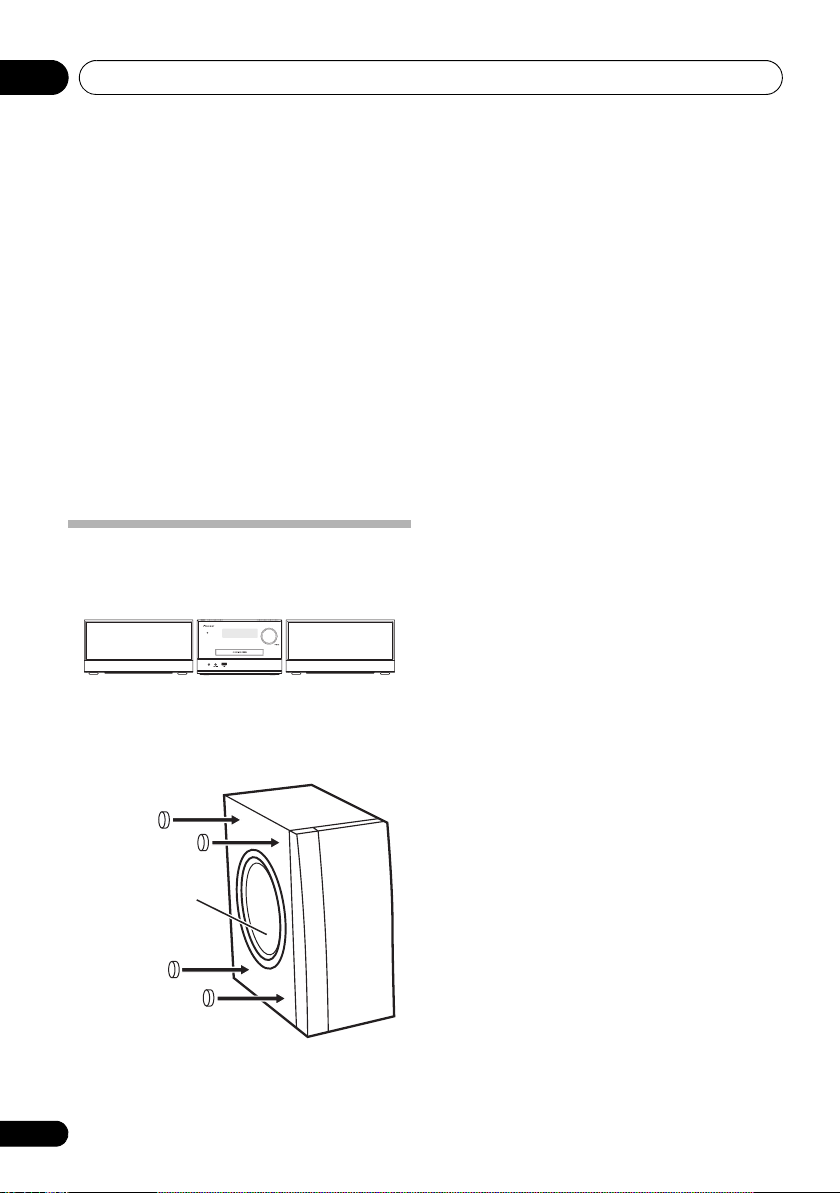
X-PM32
X-PM12
CD Receiver System
Discover the benefits of registering your product online at
http://www.pioneer.co.uk
Operating Instructions
(or
http://www.pioneer.eu
).
Page 2
WARNING
Store small parts out of the reach of children and
infants. If accidentally swallowed, contact a doctor
immediately.
WARNING
This equipment is not waterproof. To prevent a fire or
shock hazard, do not place any container filled with
liquid near this equipment (such as a vase or flower
pot) or expose it to dripping, splashing, rain or
moisture.
D3-4-2-1-3_A1_En
WARNING
To prevent a fire hazard, do not place any naked flame
sources (such as a lighted candle) on the equipment.
D3-4-2-1-7a_A1_En
Operating Environment
Operating environment temperature and humidity:
+5 °C to +35 °C (+41 °F to +95 °F); less than 85 %RH
(cooling vents not blocked)
Do not install this unit in a poorly ventilated area, or in
locations exposed to high humidity or direct sunlight (or
strong artificial light)
D3-4-2-1-7c*_A1_En
VENTILATION CAUTION
When installing this unit, make sure to leave space
around the unit for ventilation to improve heat radiation
(at least 10 cm at top, 10 cm at rear, and 10 cm at each
side).
WARNING
Slots and openings in the cabinet are provided for
ventilation to ensure reliable operation of the product,
and to protect it from overheating. To prevent fire
hazard, the openings should never be blocked or
covered with items (such as newspapers, table-cloths,
curtains) or by operating the equipment on thick carpet
or a bed.
D3-4-2-1-7b*_A1_En
This product is for general household purposes. Any
failure due to use for other than household purposes
(such as long-term use for business purposes in a
restaurant or use in a car or ship) and which requires
repair will be charged for even during the warranty
period.
K041_A1_En
CAUTION
This product is a class 1 laser product classified
under the Safety of laser products, IEC 60825-1:2007.
CLASS 1 LASER PRODUCT
D58-5-2-2a_A1_En
CAUTION
TO PREVENT THE RISK OF ELECTRIC SHOCK, DO NOT
REMOVE COVER (OR BACK). NO USER-SERVICEABLE
PARTS INSIDE. REFER SERVICING TO QUALIFIED
SERVICE PERSONNEL.
D3-4-2-1-1_B1_En
CAUTION
The
STANDBY/ON switch on this unit will not
completely shut off all power from the AC outlet.
Since the power cord serves as the main disconnect
device for the unit, you will need to unplug it from the
AC outlet to shut down all power. Therefore, make
sure the unit has been installed so that the power
cord can be easily unplugged from the AC outlet in
case of an accident. To avoid fire hazard, the power
cord should also be unplugged from the AC outlet
when left unused for a long period of time (for
example, when on vacation).
D3-4-2-2-2a*_A1_En
POWER-CORD CAUTION
Handle the power cord by the plug. Do not pull out the
plug by tugging the cord and never touch the power
cord when your hands are wet as this could cause a
short circuit or electric shock. Do not place the unit, a
piece of furniture, etc., on the power cord, or pinch the
cord. Never make a knot in the cord or tie it with other
cords. The power cords should be routed such that they
are not likely to be stepped on. A damaged power cord
can cause a fire or give you an electrical shock. Check
the power cord once in a while. When you find it
damaged, ask your nearest PIONEER authorized
service center or your dealer for a replacement.
S002*_A1_En
PHONES
Page 3
Information for users on collection and disposal of old equipment and used batteries
These symbols on the products, packaging, and/or accompanying documents mean
that used electrical and electronic products and batteries should not be mixed with
general household waste.
For proper treatment, recovery and recycling of old products and used batteries,
please take them to applicable collection points in accordance with your national
legislation.
By disposing of these products and batteries correctly, you will help to save valuable
resources and prevent any potential negative effects on human health and the
environment which could otherwise arise from inappropriate waste handling.
For more information about collection and recycling of old products and batteries,
please contact your local municipality, your waste disposal service or the point of sale
where you purchased the items.
These symbols are only valid in the European Union.
For countries outside the European Union:
If you wish to discard these items, please contact your local authorities or dealer and
ask for the correct method of disposal.
K058a_A1_En
Symbol examples
for batteries
Symbol for
equipment
Pb
Condensation
If the unit is moved suddenly from a cold place into a
warm room (in winter, for example) or if the temperature
in the room in which the player is installed rises
suddenly due to a heater, etc., water droplets
(condensation) may form inside (on operating parts and
the lens). When condensation is present, the player will
not operate properly and playback is not possible. Let
the player stand at room temperature for 1 or 2 hours
with the power turned on (the time depends on the
extent of condensation). The water droplets will
dissipate and playback will become possible.
Condensation can also occur in the summer if the
player is exposed to the direct wind from an
air-conditioner. If this happens, move the player to a
different place.
S005_A1_En
Radio wave caution
This unit uses a 2.4 GHz radio wave frequency, which is
a band used by other wireless systems (Microwave
ovens and Cordless phones, etc.). In this event noise
appears in your television image, there is the possibility
this unit (including products supported by this unit) is
causing signal interference with the antenna input
connector of your television, video, satellite tuner, etc. In
this event, increase the distance between the antenna
input connector and this unit (including products
supported by this unit).
• Pioneer is not responsible for any malfunction of the
compatible Pioneer product due to communication
error/malfunctions associated with your network
connection and/or your connected equipment.
Please contact your Internet service provider or
network device manufacturer.
• A separate contract with/payment to an Internet
service provider is required to use the Internet.
Page 4

Thank you for buying this Pioneer product.
Please read through these operating instructions so that you will know how to operate your model properly. After you
have finished reading the instructions, put them in a safe place for future reference.
Contents
01 Before you start
Introduction . . . . . . . . . . . . . . . . . . . . . . . . . . . . . . . . . . . 5
What’s in the box . . . . . . . . . . . . . . . . . . . . . . . . . . . . . . . 5
Loading the battery in the remote control . . . . . . . . . . . 5
Using speakers horizontally . . . . . . . . . . . . . . . . . . . . . . 6
02 Part names and functions
Remote control . . . . . . . . . . . . . . . . . . . . . . . . . . . . . . . . . 7
Front panel . . . . . . . . . . . . . . . . . . . . . . . . . . . . . . . . . . . . 8
Top panel. . . . . . . . . . . . . . . . . . . . . . . . . . . . . . . . . . . . . . 9
03 Connections
Speaker connection . . . . . . . . . . . . . . . . . . . . . . . . . . . . 10
Connect the subwoofer . . . . . . . . . . . . . . . . . . . . . . . . . 10
Connecting the FM antenna . . . . . . . . . . . . . . . . . . . . . 11
Using external antennas . . . . . . . . . . . . . . . . . . . . . . . . . .11
Plugging in . . . . . . . . . . . . . . . . . . . . . . . . . . . . . . . . . . . 11
04 Getting started
Turning on. . . . . . . . . . . . . . . . . . . . . . . . . . . . . . . . . . . . 12
APS mode. . . . . . . . . . . . . . . . . . . . . . . . . . . . . . . . . . . . . .12
Setting the clock. . . . . . . . . . . . . . . . . . . . . . . . . . . . . . . 12
Selecting a source . . . . . . . . . . . . . . . . . . . . . . . . . . . . . 12
Using Headphones. . . . . . . . . . . . . . . . . . . . . . . . . . . . . 13
05 Playing
Playing a disc . . . . . . . . . . . . . . . . . . . . . . . . . . . . . . . . . 14
Playing from a USB storage device . . . . . . . . . . . . . . . 14
Controlling playback . . . . . . . . . . . . . . . . . . . . . . . . . . . 14
Programming tracks . . . . . . . . . . . . . . . . . . . . . . . . . . . 15
For a CD . . . . . . . . . . . . . . . . . . . . . . . . . . . . . . . . . . . . . . .15
For WMA/MP3 files . . . . . . . . . . . . . . . . . . . . . . . . . . . . . .15
Erasing the program . . . . . . . . . . . . . . . . . . . . . . . . . . . . .15
06
Bluetooth
Music playback using Bluetooth wireless
technology. . . . . . . . . . . . . . . . . . . . . . . . . . . . . . . . . . . . 16
Remote control operation . . . . . . . . . . . . . . . . . . . . . . . 16
Pairing with the unit (Initial registration) . . . . . . . . . . . 16
Listen to music on the unit from a Bluetooth capable
device. . . . . . . . . . . . . . . . . . . . . . . . . . . . . . . . . . . . . . . . 17
Radio wave caution . . . . . . . . . . . . . . . . . . . . . . . . . . . . 17
Scope of operation. . . . . . . . . . . . . . . . . . . . . . . . . . . . . . .17
Radio wave reflections . . . . . . . . . . . . . . . . . . . . . . . . . . . 18
Precautions regarding connections to products
supported by this unit . . . . . . . . . . . . . . . . . . . . . . . . . . . .18
® Audio playback
07 Listening to the FM radio
Tuning to an FM radio station . . . . . . . . . . . . . . . . . . . . 19
Programming radio stations . . . . . . . . . . . . . . . . . . . . . 19
Tuning to a preset radio station . . . . . . . . . . . . . . . . . . 19
Display RDS information . . . . . . . . . . . . . . . . . . . . . . . . 19
08 Other features
Turn on automatically . . . . . . . . . . . . . . . . . . . . . . . . . . 20
Setting the sleep timer. . . . . . . . . . . . . . . . . . . . . . . . . . 20
Routing audio from other devices . . . . . . . . . . . . . . . . 20
Through the AUDIO IN socket . . . . . . . . . . . . . . . . . . . . . 20
USB 500 mA charge. . . . . . . . . . . . . . . . . . . . . . . . . . . . 20
Setting and deactivating the DEMO mode . . . . . . . . . 20
09 Additional information
USB playability information. . . . . . . . . . . . . . . . . . . . . . 21
Supported MP3 disc formats . . . . . . . . . . . . . . . . . . . . 21
RDS program types . . . . . . . . . . . . . . . . . . . . . . . . . . . . 21
Troubleshooting . . . . . . . . . . . . . . . . . . . . . . . . . . . . . . . 22
Cautions on use . . . . . . . . . . . . . . . . . . . . . . . . . . . . . . . 23
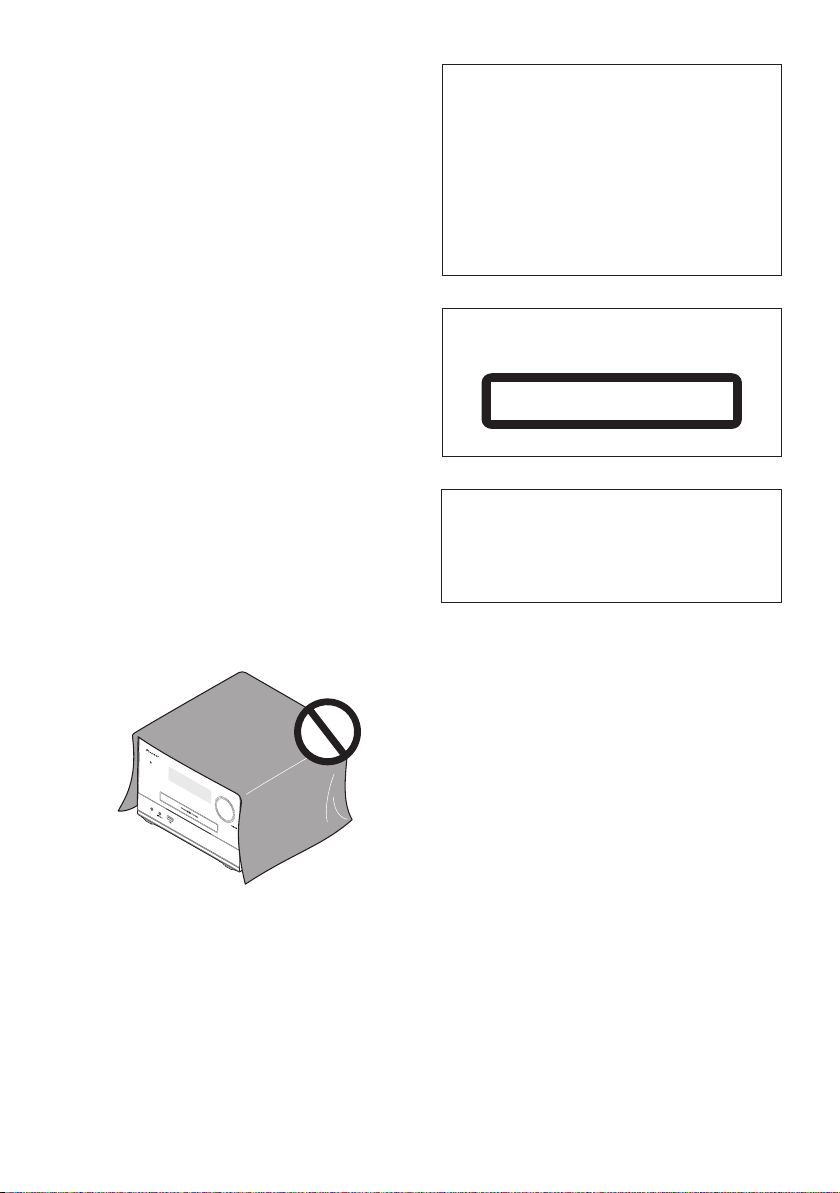
When moving this unit . . . . . . . . . . . . . . . . . . . . . . . . . . . 23
Place of installation. . . . . . . . . . . . . . . . . . . . . . . . . . . . . . 23
Do not place objects on this unit . . . . . . . . . . . . . . . . . . . 23
Cleaning the product. . . . . . . . . . . . . . . . . . . . . . . . . . . . . 24
Cleaning the lens. . . . . . . . . . . . . . . . . . . . . . . . . . . . . . . . 24
Handling discs . . . . . . . . . . . . . . . . . . . . . . . . . . . . . . . . 24
Storing . . . . . . . . . . . . . . . . . . . . . . . . . . . . . . . . . . . . . . . . 24
Cleaning discs . . . . . . . . . . . . . . . . . . . . . . . . . . . . . . . . . . 24
About specially shaped discs. . . . . . . . . . . . . . . . . . . . . .24
Specifications . . . . . . . . . . . . . . . . . . . . . . . . . . . . . . . . . 25
4
En
Page 5
Before you start 01
English
Français Español
Insert the battery by
aligning the pole
against the remote
control’s terminal
If a battery pushes and
bends the terminal out
of shape, there is
possibility of the alkaline
battery shorting out
The terminal is bent
out of shape
Chapter 1:
Before you start
Introduction
With this system, you can:
• enjoy audio from discs, USB storage devices, and other
external devices
• listen to FM radio stations
• enjoy audio from Bluetooth wireless technology enabled
device
Playable media:
• Discs: CD-DA, CD-R, CD-RW, MP3-CD, WMA-CD
• Files: .mp3, .wma
•USB storage device
– Compatibility: USB 1.1/2.0 (Full Speed)
– Class support: MSC (Mass Storage Class)
– File system: FAT12, FAT16, FAT32
– Maximum number of albums/folders: 99
– Maximum number of tracks/files: 999
– Maximum level of directory: 8
What’s in the box
Check and identify the contents of the package:
• Main unit
• Speaker unit x 2
• Speaker foot x 8
• Remote control
• AAA battery (R03)
• FM wire antenna
•Power cord
• Warranty card
• Operating Instructions (this document)
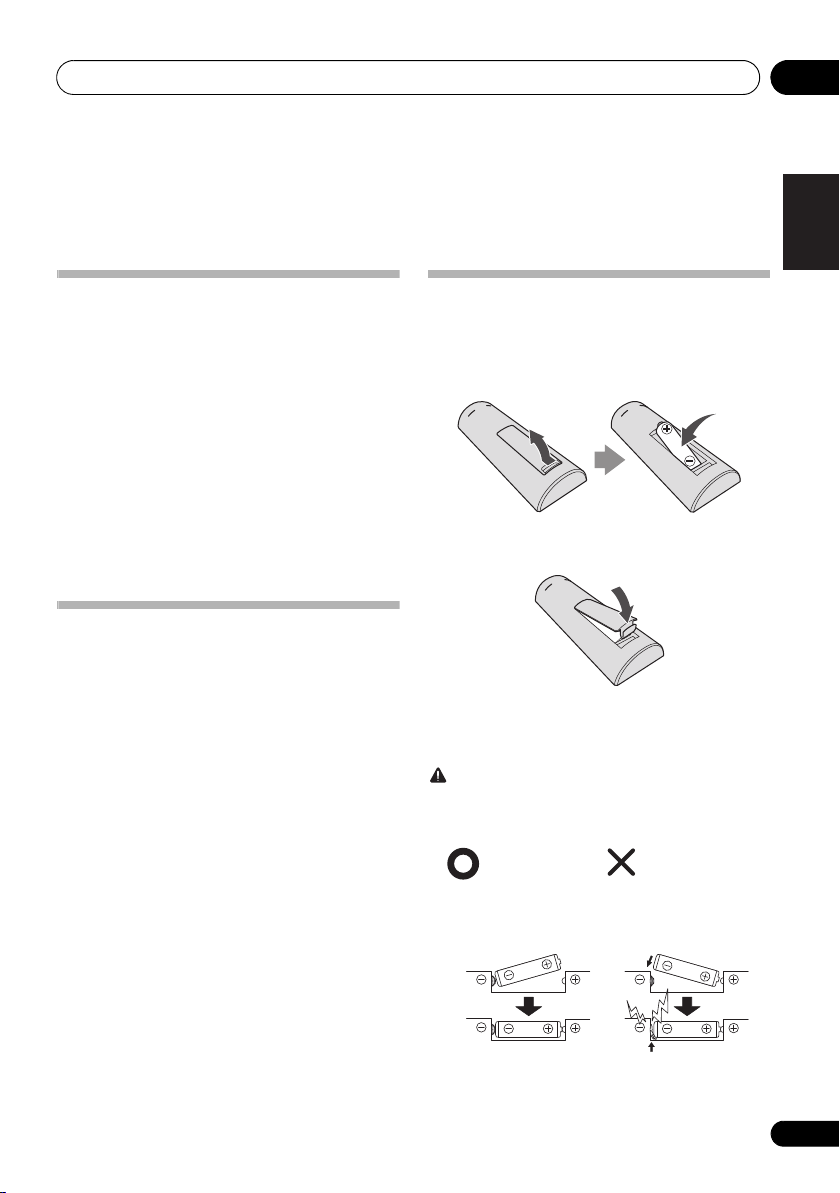
Loading the battery in the remote
control
1 Open the rear lid and load the battery as
illustrated below.
2 Close the rear lid.
The battery included with the unit has been provided to allow
you check product operation and may not last long. We
recommend using an alkaline battery that has a longer life.
CAUTION
• When inserting the battery, make sure not to damage
the spring on the battery’s terminal. This can cause
the battery to leak or overheat.
5
En
Page 6
Before you start01
Passive radiator
• Do not use any battery other than the one specified.
• When loading the battery into the remote control, set it
in the proper direction, as indicated by the polarity marks
( and ).
• Do not heat the battery, disassemble it, or throw it into
flames or water.
• To prevent leakage of battery fluid, remove the battery if
you do not plan to use the remote control for a long
period of time (1 month or more). If the fluid should leak,
wipe it carefully off the inside of the case, then insert a
new battery. If a battery should leak and the fluid should
get on your skin, flush it off with large quantities of water.
• When disposing of a used battery, please comply with
governmental regulations or environmental public
institution’s rules that apply in your country/area.
• WARNING
Do not use or store batteries in direct sunlight or other
excessively hot place, such as inside a car or near a
heater. This can cause batteries to leak, overheat,
explode or catch fire. It can also reduce the life or
performance of batteries.
Using speakers horizontally
As well as standing vertically, the speakers for this system can
be placed horizontally, as shown below.
PHONES
If you are going to use the speakers horizontally, attach the
supplied speaker foot to the speakers as shown in the
illustration below.
• Attach in 4 places to both the left and right speaker.
• Attach to the surface with the passive radiator.
6
En
Page 7
Part names and functions 02
English
Français Español
Chapter 2:
Part names and functions
4
/
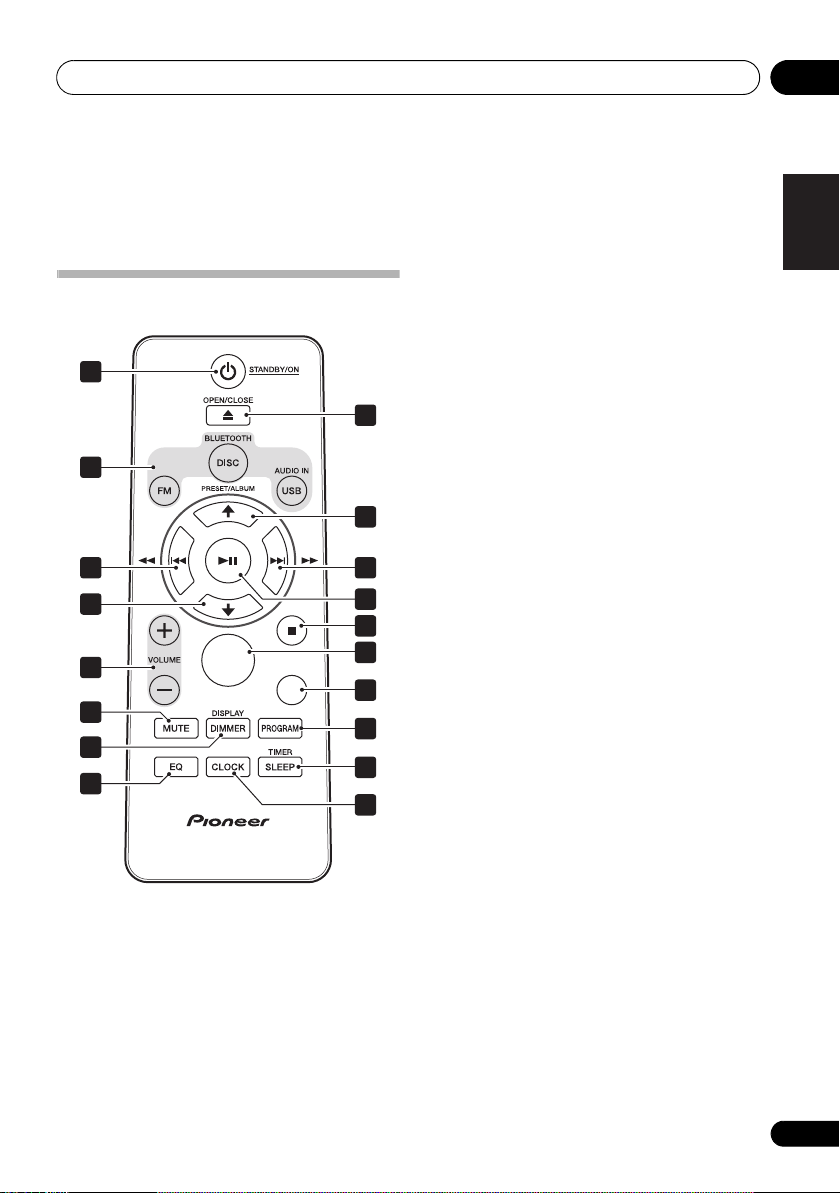
Remote control
1
2
3
4
5
P.BASS
6
7
8
1
STANDBY/ON
• Switch between standby and on.
2 Input function buttons
• Use to select the input source (DISC, BLUETOOTH, USB,
AUDIO IN, TUNER).
3
• Skip to the track.
• Press and hold to play quickly within a track.
• Tune to the station.
• Press and hold to search the radio station automatically.
REPEAT/
SHUFFLE
9
4
3
10
11
12
13
14
15
16
• Skip to the previous or next album.
• Select a preset radio station.
5
VOLUME +/–
• Use to set the listening volume.
6
MUTE
• Use to mute or restore volume.
7
DIMMER/DISPLAY
• Display the current status or media information.
• Display the available ID3 information of MP3 tracks.
• Press and hold to dim or brighten the display. The
brightness can be controlled in three steps.
• Display the available information of an RDS radio
station.
8
EQ
• Use to select EQ.
[FLAT] [ROCK] [CLASSIC] [POP] [JAZZ]
(Back to beginning)
9
OPEN/CLOSE
• Open or close the disc tray.
10
• Use to play, pause, or resume playback.
•Use to confirm actions.
11
•Use to stop playback.
12
P.BASS
• Switch the P.bass mode between on and off.
When the power is first turned on, the unit will enter the
P.bass mode which emphasises the bass frequencies.
To cancel the P.bass mode, press the P.BASS on the
main unit or remote control.
13
REPEAT/SHUFFLE
• Use to select the repeat mode or shuffle mode of each
input source (page 14).
14
PROGRAM
•Use to program audio tracks.
• Use to program radio stations.
15
SLEEP/TIMER
• Set the sleep timer in the working mode.
• Set alarm timer in the standby mode.
16
CLOCK
• In the working mode or standby mode, press to display
the clock for a while.
• In the standby mode, press and hold to set the clock.
En
7
Page 8
Part names and functions02
PHONES
1
6
8
7
3
4
5
2
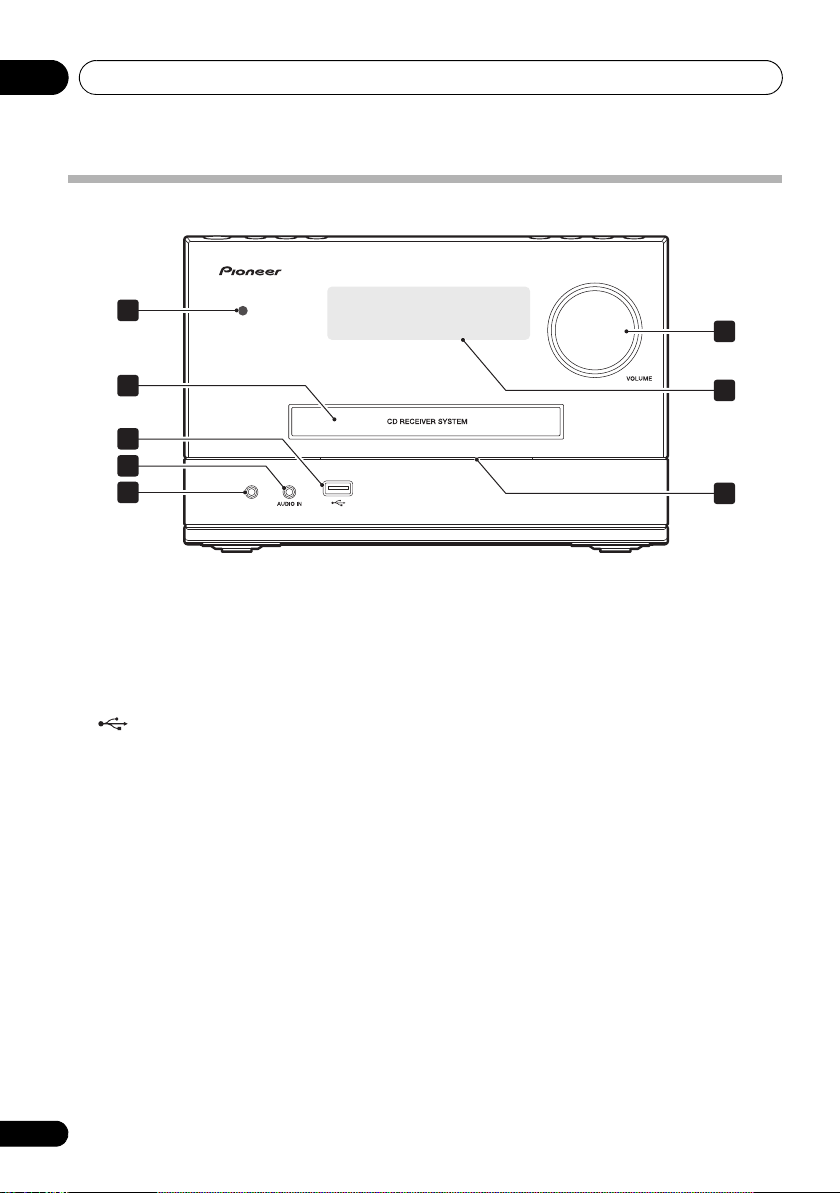
Front panel
1 Remote control sensor
• Point the remote control to this, and then operate it
within approximately 7 m. The product may have trouble
capturing remote control signals if there is a fluorescent
light nearby. If this happens, move the product away
from the fluorescent light.
2 Disc tray
• Place the disc with the label side up.
3
• Connect to a USB storage device.
4
AUDIO IN
• Connect to the audio output socket (usually the
headphones socket) of an external device.
5 Headphone socket
• Use to connect headphones. When the headphones are
connected, there is no sound output from the speakers
(page 13).
6
VOLUME
• Rotate to increase or decrease the volume level.
7 Main display
8 Indicator
• The indicator will blink blue when input is BLUETOOTH
and white for all others.
8
En
Page 9
Part names and functions 02
English
Français Español
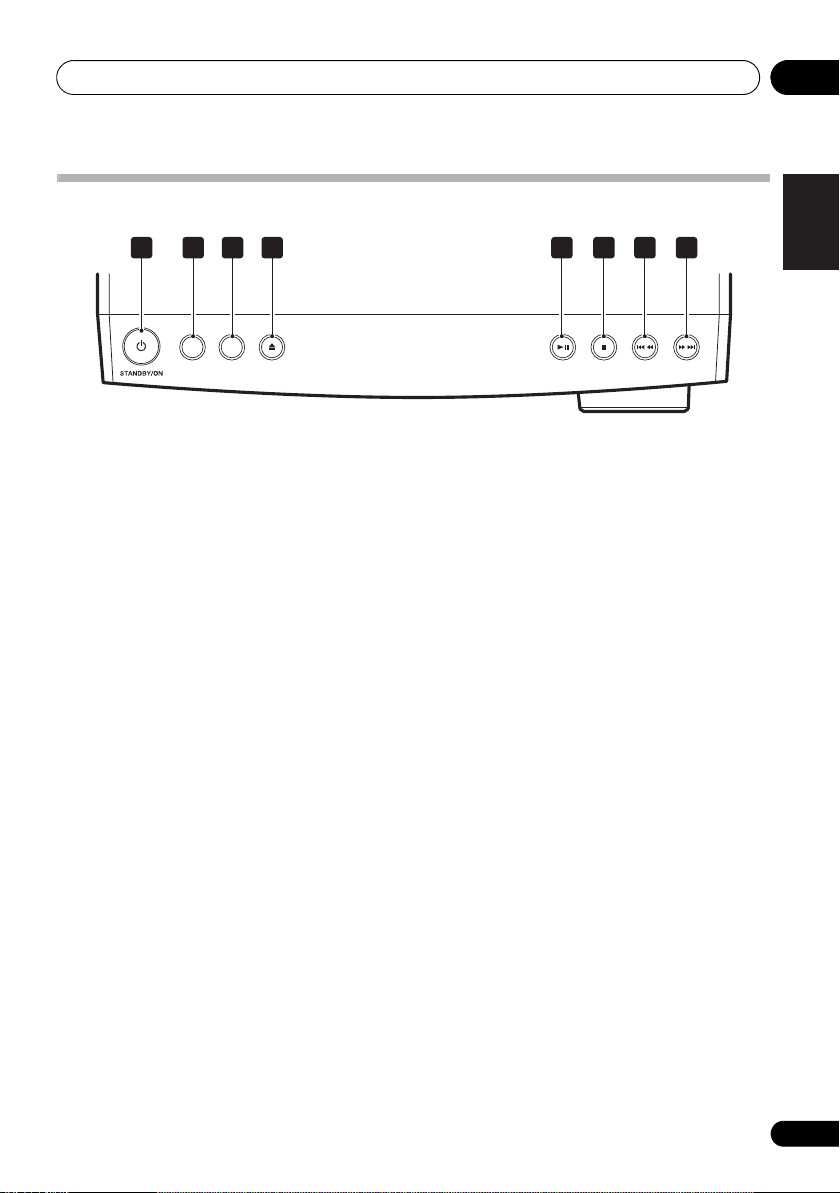
Top panel
1 2 3 4 5 6 7 8
INPUT
P.B AS S
1
STANDBY/ON
• Switch between standby and on.
2
INPUT
• Press repeatedly to select the input source.
3
P.BASS
• Switch the P.bass mode between on and off.
When the power is first turned on, the unit will enter the
P.bass mode which emphasises the bass frequencies.
To cancel the P.bass mode, press the P.BASS on the
main unit or remote control.
4
• Open or close the disc tray.
5
• Use to play, pause, or resume playback.
6
• Use to stop playback.
7
• Skip to the previous track.
• Press and hold to play reverse quickly within a track.
• Tune to the previous radio station.
• Press and hold to search the previous radio station
automatically.
8
• Skip to the next track.
• Press and hold to play forward quickly within a track.
• Tune to the next radio station.
• Press and hold to search the next radio station
automatically.
9
En
Page 10

Connections03
SPEAKERS
AC IN
FM ANTENNA PRE OUT
SUB WOOFER
(75 Ω)
SPEAKERS
1
2
Right speaker’s
rear panel
Left speaker
’s
rear panel
This unit’s rear panel
Red cord
Supplied
speaker wire
Passive radiator
Passive
radiator
LINE LEVEL
INPUT
SPEAKERS
AC IN
FM ANTENNA PRE OUT
SUB WOOFER
(75 Ω)
PRE OUT
SUB WOOFER
Subwoofer
This unit
’s rear panel
Chapter 3:
Connections
• Be sure to turn off the power and unplug the power cord
• Connect the power cord after all the connections
Speaker connection
• Push open the tabs and insert exposed wire.
• Use the provided speaker wires to connect this unit with
• These speaker terminals carry HAZARDOUS LIVE
• Do not connect any speakers other than those supplied
• Do not connect the supplied speakers to any amplifier
• Do not attach these speakers to the wall or ceiling. They
CAUTION
from the power outlet whenever making or changing
connections.
between devices have been completed.
the speakers. Connect the tip of the red wire to the (+)
terminal and the tip of the black wire to the (–) terminal.
CAUTION
voltage. To prevent the risk of electric shock when
connecting or disconnecting the speaker cables,
disconnect the power cord before touching any
uninsulated parts.
to this system.
other than the one supplied with this system.
Connection to any other amplifier may result in
malfunction or fire.
may fall off and cause injury.
• Make sure that the speaker cable cores do not become
exposed and make contact with other cable cores. This
may cause malfunction of the product.
• Do not allow the speaker cable core to come into contact
with the receiver body.
• If the speaker cable core comes into contact with any
metal portion of the receiver’s body, it may damage the
speakers and cause smoke and fire.
Insert speaker cables securely into the terminals and
check that the cable does not come out of easily.
Note
• There is no difference between L and R speakers.
• The speakers can also be placed horizontally. See Using
speakers horizontally (page 6) for details.
Connect the subwoofer
Can add and use powered subwoofer other than those for this
system. Use an RCA cable to connect the subwoofer. It is not
possible to connect using speaker cables.
Note
• The subwoofer can be placed on the floor. Putting the
speakers on the floor (except the subwoofer), or
mounting them very high on a wall is not recommended.
10
En
Page 11

Connections 03
English
Français Español
SPEAKERS
AC IN
FM ANTENNA PRE OUT
SUB WOOFER
(75 Ω)
FM ANTENNA
(75 Ω)
This unit’s rear panel
FM wire antenna
(supplied)
FM ANTENNA
(75 Ω)
One-touch
PAL connector
75 coaxial cable
To AC outlet
This unit’s rear panel
Power cord
Connecting the FM antenna
Connect the FM antenna plug onto the center pin of the FM
antenna socket.
Note
• To ensure optimum reception, make sure the FM
antenna is fully extended and not coiled or hanging at
the rear of the unit.
Using external antennas
To improve FM reception
Use a PAL connector (not supplied) to connect an external FM
antenna.
Plugging in
Before making or changing the connections, switch off the
power and disconnect the power cord from the AC outlet.
After you’ve finished making all connections, plug the unit
into an AC outlet.
(75 Ω)
SUB WOOFER
FM ANTENNA PRE OUT
CAUTION
• Do not use any power cord other than the one supplied
with this unit.
• Do not use the supplied power cord for any purpose
other than that described above.
AC IN
SPEAKERS
AC IN
11
En
Page 12

Getting started04
Chapter 4:
Getting started
CAUTION
• Use of controls or adjustments or performance of
procedures other than herein expressly specified may
result in hazardous radiation exposure or other unsafe
operation.
Always follow the instructions in this chapter in sequence.
Turning on
Press
This product switches to the last selected source.
STANDBY/ON
APS mode
• After this product is kept inactive for 15 minutes, it
automatically switches to the standby mode.
Setting the clock
Note
• During setting, if no action is made within 90 seconds, the
system exits clock setting without saving earlier
operations.
• When power supply is restored after unit is plugged in
again or after a power failure, reset the clock.
1 In the standby mode, press and hold
to activate clock setting.
[24H] blinks.
2 Press
then press
The hour digits will blink.
3 Press
press
The minute digits blink.
4 Press
press
/
/
CLOCK
/
CLOCK
to select [24H] or [12H] and
CLOCK
to confirm.
to set the hour, and then
to confirm.
to set the minute, and then
to confirm.
CLOCK
Selecting a source
Press INPUT repeatedly to select a source.
INPUT
PHONES
•[DISC]: the disc in the disc tray
•[BLUETOOTH]: Bluetooth capable device that is paired
•[USB]: .wma/.mp3 files stored on the connected USB
storage device
•[TUNER]: the FM radio
•[AUDIO IN]: the audio input through the AUDIO IN
socket
P.BASS
12
En
Page 13

Getting started 04
English
Français Español
PHONES
PHONES
Using Headphones
Connect to the jack plug of the headphones.
When the headphones are connected, there is no sound
output from the speakers.
• Do not turn the volume on to full at switch on and listen
to music at moderate levels. Excessive sound pressure
from earphones and headphones can cause hearing
loss.
• Before plugging in or unplugging the headphone,
reduce the volume.
• Be sure your headphone has a 3.5 mm diameter plug
and impedance between 16
recommended impedance is 32
and 50 . The
.
13
En
Page 14

Playing05
Chapter 5:
Playing
Playing a disc
1 Press
repeatedly on the main unit to switch the source
to [
2 Press
3 Load a disc with the printed side facing up.
4 Press
Playback starts automatically after a few seconds.
DISC
on the remote control or
DISC
].
to eject the disc tray.
again to close the disc tray.
• If playback does not start automatically, press to
start playback.
INPUT
Playing from a USB storage device
This system can play .mp3 and .wma files that are copied onto
a supported USB storage device:
• Flash drive
• Memory card reader
• HDD: hard disk drive (This product can detect only a
portable HDD with USB power peak current no more
than 500 mA.)
Note
• Pioneer does not guarantee compatibility with all USB
storage devices.
• NTFS (New Technology File System) file system is not
supported.
PHONES
1 Connect the USB storage device to the
socket.
USB
2Press
on the remote control or
repeatedly on the main unit to switch the source
USB
].
to [
Playback starts automatically.
If playback does not start automatically,
1Press
2Press
3Press
/
to select an album.
/
to select a track.
to start playback.
Controlling playback
During playback, follow the instructions below to control
playback.
Buttons Functions
Pause or resume playback.
Stop playback.
/ Skip to the previous or next track.
Press and hold to rewind a track or
search forward fast within a track.
/ Skip to the previous or next album when
REPEAT/SHUFFLE Select an available play mode.
REPEAT/SHUFFLE Select an available play mode.
no less than one album exists.
• Repeat 1 [REPEAT ONE]: repeat the
current track
• Repeat all [REPEAT ALL]: repeat all
tracks
• Repeat album [REPEAT ALB]: repeat
the current album (only USB
function)
• Shuffle [SHUFFLE]: play tracks
randomly
Shuffle [SHUFFLE] is unavailable for
programmed tracks.
USB
INPUT
14
En
Page 15

Playing 05
English
Français Español
Programming tracks
Note
• You can program up to 99 tracks.
• During programming, if no operation is made within 90
seconds, the system returns to the stop mode without
saving earlier operations.
For a CD
1 Press to stop playback.
[T0], the total number of tracks, and the duration time are
displayed.
2 Press
programming.
[01 PR01] (the sequence number) are displayed with [01]
blinking.
3 Press
4 Press
selected track.
5 Repeat steps 3 and 4 to program more
tracks.
6 Press
For WMA/MP3 files
1 Press to stop playback.
[FXX] (XX indicates the total number of albums) and [XXX]
(XXX indicates the total number of tracks) are displayed.
2 Press
programming.
[01 PR01] are displayed with [01] blinking.
3 Press
[FXX] (XX indicates the album number) are displayed.
4 Press
[XXX] (XXX indicates the track number) are displayed.
5 Press
selected track.
6 Repeat steps 3 to 5 to program more tracks.
7 Press
Erasing the program
PROGRAM
/
PROGRAM
PROGRAM
/
/
PROGRAM
to activate the
to select a track.
again to program the
to start playback.
to activate the
repeatedly to select an album.
repeatedly to select a track.
again to confirm the
to start playback.
To erase the program,
• Switch to another source.
15
En
Page 16

06
PHONES
Music data
Device not equipped with Bluetooth
wireless technology:
Digital music player
+
Bluetooth
®
audio transmitter
(commercially available)
Bluetooth wireless technology
enabled device:
Digital music player
Bluetooth wireless technology
enabled device:
Cell phone
Bluetooth
® Audio playback
Chapter 6:
Bluetooth® Audio playback
Music playback using
Bluetooth
wireless
technology
The unit is capable of playing back music stored on Bluetooth
capable devices (cell phones, digital music players etc.)
wirelessly. You can also use a Bluetooth audio transmitter
(sold separately) to enjoy music from devices that do not have
Bluetooth functionality. Please refer to the user’s manual for
your Bluetooth capable device for more details.
Note
•The Bluetooth
trademarks owned by Bluetooth SIG, Inc. and any use of
such marks by PIONEER CORPORATION is under
license. Other trademarks and trade names are those of
their respective owners.
•The Bluetooth wireless technology enabled device must
support A2DP profiles.
• Pioneer does not guarantee proper connection and
operation of this unit with all Bluetooth wireless
technology enabled devices.
®
word mark and logos are registered
Remote control operation
The remote control supplied with this unit allows you to play
and stop media, and perform other operations.
Note
•The Bluetooth wireless technology enabled device must
support AVRCP profiles.
• Remote control operations cannot be guaranteed for all
Bluetooth wireless technology enabled devices.
Pairing with the unit (Initial registration)
In order for the unit to playback music stored on a Bluetooth
capable device, pairing must first be performed. Pairing
should be performed when first using the unit with the
Bluetooth capable device, or when the pairing data on the
device has been erased for any reason.
Pairing is a step required to allow communication using
Bluetooth wireless technology to be carried out.
• Pairing is only performed the first time that you use the
unit and the Bluetooth capable device together.
• In order to allow communication using Bluetooth
wireless technology to take place, pairing must be
performed on both the unit and the Bluetooth capable
device.
1Press
INPUT
source to [
The Bluetooth indicator blinks blue.
2 Turn on the power to the Bluetooth capable
device that you wish to pair with, and perform
pairing procedure on it.
Pairing will start.
BLUETOOTH
on the remote control or
repeatedly on the main unit to switch the
BLUETOOTH
Note
• This unit will be displayed as “X-PM12” or “X-PM32” on all
Bluetooth capable devices that you have.
•Place the Bluetooth capable device close to the unit.
• Please refer to the user’s manual for your Bluetooth
capable device for details on when pairing can be
performed and the procedures required for pairing.
• When PIN code entry is requested, enter “0000.” (This
unit does not accept any PIN code setting other than
“0000.”)
].
16
En
Page 17

Bluetooth
English
Français Español
® Audio playback
3 Confirm on the Bluetooth capable device
that pairing has been completed.
• If pairing with the Bluetooth capable device has been
completed correctly, a beep will sound, and the
Bluetooth indicator will switch from blinking to staying
lit.
•If the Bluetooth indicator will not switch from blinking to
staying lit, the pairing was not completed correctly so
please try pairing with the unit again.
• If paring has been completed correctly, you need not
repeat this procedure again.
Even devices that have already been paired with this unit will
not connect during pairing mode in the following cases.
In such cases, delete pairing history from the Bluetooth
wireless technology device and perform pairing again.
In order to pair with the unit, press and hold the on the
unit for 3 seconds.
• Up to 8 pairing history can be recorded with this unit. If
connecting to a Bluetooth wireless technology device
over 8 units, the oldest pairing history will be deleted.
• If the settings are reset to the factory setting, all pairing
history will be deleted. In order to reset to factory setting,
press and hold the on the unit for more than 8
seconds.
Listen to music on the unit from a
Bluetooth
1 Press
INPUT
source to [
The unit will start using the BLUETOOTH function, and
connect with a Bluetooth capable device.
2A Bluetooth connection will be created
between the Bluetooth capable device and the
unit.
Procedures for connecting to the unit should be performed
from the Bluetooth capable device.
• Please refer to the user’s manual for your Bluetooth
3 Playback music from the Bluetooth capable
device.
Note
• When Bluetooth capable devise is not connected and no
capable device
BLUETOOTH
repeatedly on the main unit to switch the
BLUETOOTH
capable device for details of the connection procedures.
operations have been performed for more than 15
minutes, the unit will automatically power off.
on the remote control or
].
Radio wave caution
This unit uses a 2.4 GHz radio wave frequency, which is a
band used by other wireless systems (see list below). To
prevent noise or interrupted communication, do not use this
unit nearby such devices, or make sure these devices are
switched off during use.
• Cordless phones
• Cordless facsimiles
• Microwave ovens
• Wireless LAN devices (IEEE802.11b/g)
• Wireless AV equipment
• Wireless controllers for game systems
• Microwave-based health aids
•Some baby monitors
Other, less common, equipment that may operate on the
same frequency:
• Anti-theft systems
• Amateur radio stations (HAM)
• Warehouse logistic management systems
• Discrimination systems for train or emergency vehicles
Note
• In the event noise appears in your television image, there
is the possibility that a Bluetooth wireless technology
enabled device or this unit (including products
supported by this unit) are causing signal interference
with the antenna input connector of your television,
video, satellite tuner, etc. In this event, increase the
distance between the antenna input connector and the
Bluetooth wireless technology enabled device or this
unit (including products supported by this unit).
• If there is something obstructing the path between this
unit (including devices supported by this unit) and the
device equipped with Bluetooth wireless technology
(such as a metal door, concrete wall, or insulation
containing tinfoil), you may need to change the location
of your system to prevent signal noise and interruptions.
Scope of operation
Use of this unit is limited to home use. (Transmission
distances may be reduced depending on communication
environment).
In the following locations, poor condition or inability to receive
radio waves may cause the audio to be interrupted or stopped:
• In reinforced concrete buildings or steel framed or iron-
framed buildings.
• Near large metallic furniture.
• In a crowd of people or near a building or obstacle.
• In a location exposed to the magnetic field, static
electricity or radio wave interference from radio
communication equipment using the same frequency
band (2.4 GHz) as this unit, such as a 2.4 GHz wireless
LAN device (IEEE802.11b/g) or microwave oven.
06
17
En
Page 18

06
Bluetooth
• If you live in a heavily populated residential area
(apartment, townhouse, etc.) and if your neighbor’s
microwave is placed near your system, you may
experience radio wave interference. If this occurs, move
your unit to a different place. When the microwave is not
in use, there will be no radio wave interference.
® Audio playback
Radio wave reflections
The radio waves received by this unit include the radio wave
coming directly from the device equipped with Bluetooth
wireless technology (direct wave) and waves coming from
various directions due to reflections by walls, furniture and
building (reflected waves). The reflected waves (due to
obstacles and reflecting objects) further produce a variety of
reflected waves as well as variation in reception condition
depending on locations. If the audio cannot be received
properly due to this phenomenon, try moving the location of
the device equipped with Bluetooth wireless technology a
little. Also note that audio may be interrupted due to the
reflected waves when a person crosses or approaches the
space between this unit and the device equipped with
Bluetooth wireless technology.
Precautions regarding connections to
products supported by this unit
• Complete connections for all devices supported by this
unit, including all audio cords and power cables before
connecting them to this unit.
• After completing connections to this unit, check the
audio and power cables to confirm that they not twisted
together.
• When disconnecting this unit, confirm that you have
sufficient working space in the surrounding area.
• When changing connections of audio or other cables for
products supported by this unit, confirm that you have
sufficient working space in the surrounding area.
18
En
Page 19

Listening to the FM radio 07
English
Français Español
Chapter 7:
Listening to the FM radio
Tuning to an FM radio station
Note
• Make sure that you have connected and fully extended the
FM antenna.
1 Press FM on the remote control or
repeatedly on the main unit to switch the source
TUNER
to
2 Press and hold
.
/
until the frequency
starts to change.
• To tune to a station at a specific frequency, press
/ repeatedly until the desired frequency is
displayed.
Programming radio stations
Note
• You can program up to 30 preset radio stations.
• T o overwrite a programmed radio station, store another one
with its sequence number.
1 Tune to a radio station.
2 Press
[XX] (XX indicates the sequence number) blinks.
3 Press
PROGRAM
/
from 1 to 30 to this radio station, and then press
PROGRAM
The preset sequence number and the frequency of this radio
station are displayed.
4 Repeat steps 1-3 to program more stations.
• Press and holding PROGRAM will allow you to freely select
any radio station. The selected station will be saved
automatically.
to confirm.
Tip
to activate programming.
to allocate a sequence number
INPUT
Display RDS information
RDS (Radio Data System) is a service that allows FM stations
to show additional information. If you tune to an RDS radio
station, [RDS] and the station name are displayed.
1 Tune to an RDS radio station.
2 Press
the available information:
DISPLAY
• Station name
•Frequency
• Program type such as [NEWS] (news), [SPORT] (sport),
[POP M] (pop music)...
• Text messages
• CT (Clock Time)
repeatedly to scroll through
Tuning to a preset radio station
•Press / to select the sequence number of that preset
radio station.
19
En
Page 20

Other features08
PHONES
Chapter 8:
Other features
Turn on automatically
You can set a time for automatic power on.
Note
• Make sure that you have set the clock before this setup.
1 In standby mode, press the
time and then press and hold
[SOURCE] (time for auto power on) blinks.
2 Press
3 Press
The hour digits blink.
4 Press
5 Press
The minute digits blink.
6 Press
7 Press
8 Press
9 Press
The clock time and [TIMER] are displayed.
/
to select [
SLEEP/TIMER
/
to set the hour.
SLEEP/TIMER
/
to set the minute.
SLEEP/TIMER
/
to set the volume.
SLEEP/TIMER
• To deactivate the timer, display the time and then press
SLEEP/TIMER again.
• The power cannot be turned on while the timer is being
set. Finish setting the time, then turn on the power.
.
again.
again.
.
CLOCK
to display
SLEEP/TIMER
SOURCE
].
.
Setting the sleep timer
In the working mode, press SLEEP/TIMER repeatedly to select
a preset period (15, 30, 45, 60, 90 or 120 minutes).
When the sleep timer is activated, [SLEEP] is displayed on the
upper-right corner of the main display.
• To deactivate the sleep timer, press SLEEP/TIMER
repeatedly until [SLEEPOFF] is displayed.
Routing audio from other devices
Through the AUDIO IN socket
1 Connect a stereo mini-plug cable
(commercially available) to
•the AUDIO IN socket on the front panel of the main unit,
and
• the headphones socket on the external device (for
example, an MP3 player).
2Press
INPUT
source to [
3 Play the external device.
AUDIO IN
on the remote control or
repeatedly on the main unit to switch the
AUDIO IN
].
USB 500 mA charge
The USB terminal on this unit has a 500 mA output. A USB
device up to 500 mA can be connected and used/charged.
Setting and deactivating the DEMO
mode
You can set it to DEMO mode where the display scrolls the
words. When the power is off (standby mode) press and hold
. This will set the DEMO mode. To deactivate, press again.
20
En
Page 21

Additional information 09
English
Français Español
Chapter 9:
Additional information
USB playability information
Compatible USB devices:
• USB flash memory (USB1.1/2.0 (Full Speed))
• USB flash players (USB1.1/2.0 (Full Speed))
• Memory cards (an additional card reader is required)
Supported formats:
• USB or memory file format FAT12, FAT16, FAT32 (sector
size: 512 bytes)
• MP3 bitrates (data rates): 32 kbps to 320 kbps and
variable bitrates
• WMA v9 or earlier
• Directory nesting up to 8 levels
• Number of albums/folders: maximum 99
• Number of tracks/files: maximum 999 (depending on file
name length)
• ID3 tag v2.0 or later (Only English letters and numbers
are supported.)
• File name in Unicode UTF8 (maximum length: 16 bytes)
Audio files cannot be played depending on the encoding
software settings, USB device type, recording, other
conditions.
Unsupported formats:
• Empty albums: an album that does not contain MP3/
WMA files
• Unsupported file formats are skipped. For example,
Word documents (.doc) or MP3 files with extension.dlf
are ignored and not played.
• AAC, WAV, PCM audio files
• DRM protected WMA files (.wav, .m4a, .m4p, .mp4, .aac)
• WMA files in Lossless format
Supported MP3 disc formats
• ISO9660, Joliet
• Maximum track/file number: 999
(depending on file name length)
• Maximum album number: 99
• Supported sampling frequencies: 32 kHz, 44.1 kHz,
48 kHz
• Supported bitrates: 32 kbps to 320 kbps, variable bitrates
Audio files cannot be played depending on the encoding
software settings, USB device type, recording, other
conditions.
RDS program types
NO TYPE No RDS programme type
NEWS News services
AFFAIRS Politics and current affairs
INFO Special information programs
SPORT Sports
EDUCATE Education and advanced training
DRAMA Radio plays and literature
CULTURE Culture, religion and society
SCIENCE Science
VARIED Entertainment programs
POP M Pop music
ROCK M Rock music
EASY M Light music
LIGHT M Light classical music
CLASSICS Classical music
OTHER M Special music programs
WEATHER Weather
FINANCE Finance
CHILDREN Children’s programs
SOCIAL Social Affairs
RELIGION Religion
PHONE IN Phone In
TRAVEL Travel
LEISURE Leisure
JAZZ Jazz Music
COUNTRY Country Music
NATION M National Music
OLDIES Oldies Music
FOLK M Folk Music
DOCUMENT Documentary
TES Alarm Test
ALARM Alarm
21
En
Page 22

Additional information09
Troubleshooting
WARNING
• Never remove the casing of this apparatus.
Incorrect operation is often mistaken for trouble or malfunction. If you think that there is something wrong with this component,
check the points below. Sometimes the trouble may lie in another component. Inspect the other components and electrical
appliances being used. If the trouble cannot be rectified even after checking the points below, ask your nearest Pioneer
authorized service center or your dealer to carry out repair work.
• If the unit does not operate normally due to external effects such as static electricity, disconnect the power plug from the
outlet and insert it again to return to normal operating conditions.
Problem Solution
No power. Make sure that the AC power cord is connected properly.
Make sure that there is power at the AC outlet.
With a power-saving feature, the system switches off automatically 15 minutes after the
system stays inactive.
No sound or poor sound. Adjust the volume.
Make sure that the speakers are connected correctly.
No response from the system. Reconnect the AC power plug, and then turn on the system again.
With a power-saving feature, the system switches off automatically 15 minutes after the
system stays inactive.
Remote control does not work. Reduce the distance between the remote control and the main unit.
Insert battery with its polarity (+/– signs) aligned as indicated.
Replace the batteries.
Aim the remote control directly at the sensor on the front panel of the main unit.
No disc is detected. Insert a disc.
Make sure that you place the disc with its label facing upwards.
Wait until the moisture condensati on at the lens has clear ed.
Replace or clean the disc.
Make sure that the recordable disc is finalized and the format is supported.
USB storage device is not supported. Make sure that the USB storage device is compatible with the system.
Is the USB storage device connected properly? Make sure that the device is firmly inserted.
Cannot play some files on the
USB storage device.
Radio reception is poor. Increase the distance between the system and other electrical appliances.
Timer does not work. Set the clock correctly.
Clock/timer setting is erased. Power has been interrupted or the AC power cord has been disconnected.
Make sure that the file format is supported.
Make sure that the file quantity does not exceed the maximum. (page 21)
Fully extend the antenna.
Switch on the timer.
Reset the clock/timer.
22
En
Page 23

Additional information 09
English
Français Español
When the
Problem
The
cannot be connected or operated.
Sound from the
technology device is not emitted or the
sound is interrupted.
Bluetooth
Bluetooth
wireless technology device
Bluetooth
wireless technology device is connected or operated
Solution
Check that no object that emits electromagnetic waves in the 2.4 GHz band (microwave oven,
wireless
wireless LAN device or
object is near the unit, set the unit far from it. Or, stop using the object emitting the
electromagnetic waves.
Check that the
obstructions are not set between the
the
less than about 10 m* and no obstructions exist between them.
The
supporting the
technology device.
Cautions on use
When moving this unit
When moving this unit, be sure to first check that there is no
disc loaded. Then press STANDBY/ON, wait until
[GOOD BYE] disappears on main display to turn off, and then
unplug the power cord. Damage may occur if the unit is
transported or moved with a disc inserted, or when another
device is connected to the USB terminal, or AUDIO IN miniplug jack.
Place of installation
• Choose a stable place near the TV or stereo system being
used with this unit.
• Do not place this unit on top of a TV or color monitor.
Also, install it away from cassette decks and other
devices easily affected by magnetic forces.
Avoid the following locations:
• Places exposed to direct sunlight
• Humid or poorly ventilated places
•Extremely hot places
• Places exposed to vibrations
• Places in which there is much dust or cigarette smoke
• Places exposed to soot, steam, or heat (kitchens, etc.)
Bluetooth
wireless technology apparatus) is near the unit. If such an
Bluetooth
wireless technology device is not too far from the unit and that
Bluetooth
wireless technology device and the unit so that the distance between them is
* The distance given is to be used as a rough guide. The actual allowable distance between devices
may vary dependin g on conditions in the su rrounding environment.
Bluetooth
wireless technology device may not be set to the communication mode
Bluetooth
wireless technology. Check the setting of the
Bluetooth
wireless technology devi ce and the unit. Set
Bluetooth
wireless
Do not place objects on this unit
Do not place any objects on top of this unit.
Do not obstruct the ventilation holes.
Do not use this unit on shaggy rugs, beds, sofas, etc., or
wrapped in cloth, etc. Doing so will prevent the heat from
dispersing, leading to damage.
Do not expose to heat.
Do not place this unit on top of an amplifier or other
components that generate heat. When rack mounting it, to
avoid the heat given off by the amplifier or other audio
components, place it on a shelf below the amplifier.
• Turn off the power of this unit when not using it.
• Depending on signal conditions, striped patterns may
appear on a TV screen and noise may enter the sound of
radio broadcasts when the power of this unit is on. If this
happens, turn off the power of this unit.
23
En
Page 24

Additional information09
Cleaning the product
• Unplug the power cord from the power outlet when
cleaning this unit.
• Clean this unit using a soft cloth. For tough dirt, apply
some neutral detergent diluted in 5 to 6 parts water to a
soft cloth, wring out thoroughly, wipe off the dirt, and
then wipe again with a soft, dry cloth.
• Alcohol, thinner, benzene, insecticides, etc., could
cause the print or paint to peel off. Also, leaving rubber
or vinyl products in contact with this unit for long periods
of time could mar the cabinet.
• When using chemical-impregnated wipes, etc., read the
cautions included with the wipes carefully.
Cleaning the lens
• The lens of this unit should not become dirty in normal
use, but if for some reason it should malfunction due to
dust or dirt, consult your nearest Pioneer authorized
service center. Although lens cleaners for players are
commercially available, we advise against using them
since some may damage the lens.
Handling discs
Storing
• Always place discs in their cases and store them
vertically, avoiding hot, humid places, places exposed to
direct sunlight and extremely cold places.
• Be sure to read the cautions included with the disc.
Cleaning discs
• Discs may not play if there are fingerprints or dust on
them. In this case, use a cleaning cloth, etc., to gently
wipe the disc from the inside towards the outside. Do not
use dirty cleaning cloths.
• Do not attach pieces of paper or stickers to discs. Doing
so could warp discs, making it impossible to play them.
Also, note that rental discs often have labels attached to
them, and the glue of the label may have oozed out.
Check that there is no glue around the edges of such
labels before using rented discs.
About specially shaped discs
Specially shaped discs (heart-shaped, hexagonal, etc.)
cannot be played on this unit. Do not attempt to play such
discs, as they could damage this unit.
• Do not use benzene, thinner or other volatile chemicals.
Also, do not use record spray or antistatic agents.
• For tough dirt, apply some water to a soft cloth, wring o ut
thoroughly, wipe off the dirt, and then wipe off the
moisture with a dry cloth.
• Do not use damaged (cracked or warped) discs.
• Do not let the signal surface of discs get scratched or
dirty.
24
En
Page 25

Additional information 09
English
Français Español
Specifications
• Amplifier
Rated Output Power
X-PM12. . . . . . . . . . . 30 W + 30 W, RMS, 1 kHz, 6 , 10 %
X-PM32. . . . . . . . . . . 60 W + 60 W, RMS, 1 kHz, 6 , 10 %
•Disc
Disc diameter . . . . . . . . . . . . . . . . . . . . . . . . . . . . . 12 cm, 8 cm
Support discs . . . .CD-DA, CD-R, CD-RW, MP3-CD, WMA-CD
Frequency response. . . . . . . . . . . . 60 Hz to 16 kHz (44.1 kHz)
• Tuner (FM)
Tuning range. . . . . . . . . . . . . . . . . . . . . . 87.5 MHz to 108 MHz
• Bluetooth
Version . . . . . . . . . . . . . . . . . . Bluetooth Specification Ver. 4.0
Output . . . . . . . . . . . . . . . . . . . Bluetooth Specification Class 2
Estimated line-of-sight transmission distance*
. . . . . . . . . . . . . . . . . . . . . . . . . . . . . . . . . . . . . . . . . .About 10 m
Frequency range. . . . . . . . .2.401 GHz to 2.480 GHz ISM Band
Modulation
. . . . . . . . . . . . FH-SS (Frequency Hopping Spread Spectrum)
Supported Bluetooth profiles. . . . . . . . . . . . . . . A2DP, AVRCP
Supported Codec . . . . . . . . . . . . . . . . . SBC (Subband Codec)
Supported contents protection. . . . . . . . . . . . . . . . . . .SMSC-T
* The line-of-sight transmission distance is an estimate.
Actual transmission distances supported may differ
depending on surrounding conditions.
• Speakers
Enclosure . . . . . . . . . . . . . . . . . . . . . . . . . . . . Bass-Reflex Type
Configuration . . . . . . . . . . . . . . . . . . . . . . . . . . . . . . . . . . .2-way
Tweeter . . . . . . . . . . . . . . . . . . . . . . . . . . . . . . . . . . . .5 cm cone
Speakers
X-PM12
Tweeter . . . . . . . . . . . . . . . . . . . . . . . . . . . . . . . .5 cm cone
Woofer . . . . . . . . . . . . . . . . . . . . . . . . . . . . . . . .9 cm cone
Passive radiator . . . . . . . . . . . . . . . . . . . . . . . .12 cm cone
X-PM32
Tweeter . . . . . . . . . . . . . . . . . . . . . . . . . . . . . . . .5 cm cone
Woofer . . . . . . . . . . . . . . . . . . . . . . . . . . . . .9 cm cone x 2
Passive radiator . . . . . . . . . . . . . . . . . . . . . . . .12 cm cone
Impedance . . . . . . . . . . . . . . . . . . . . . . . . . . . . . . . . . . . . . . 6
Dimensions
X-PM12. . . . . . . . 140 mm (W) x 290 mm (H) x 272 mm (D)
X-PM32. . . . . . . . 140 mm (W) x 290 mm (H) x 312 mm (D)
Weight
X-PM12. . . . . . . . . . . . . . . . . . . . . . . . . . . . . . . . . . . . 2.36 kg
X-PM32. . . . . . . . . . . . . . . . . . . . . . . . . . . . . . . . . . . . 3.08 kg
38 W + 38 W (30 % THD, only AUDIO IN)
75 W + 75 W (30 % THD, only AUDIO IN)
• General information
AC power. . . . . . . . . . . . . . . . . . . . 220 V to 240 V, 50 Hz/60 Hz
Operation power consumption
X-PM12. . . . . . . . . . . . . . . . . . . . . . . . . . . . . . . . . . . . . . 30 W
X-PM32. . . . . . . . . . . . . . . . . . . . . . . . . . . . . . . . . . . . . . 40 W
Standby power consumption 0.5 W
USB Direct . . . . . . . . . . . . . . . . . . . . .USB 1.1/2.0 (Full Speed)
USB 5V Power 500 mA
Dimensions. . . . . . . 230 mm (W) x 150 mm (H) x 248 mm (D)
Weight
X-PM12. . . . . . . . . . . . . . . . . . . . . . . . . . . . . . . . . . . . 2.12 kg
X-PM32. . . . . . . . . . . . . . . . . . . . . . . . . . . . . . . . . . . . 2.22 kg
Note
• The specifications and design of this product are subject to
change without notice.
• Corporation and product names mentioned herein are
trademarks or registered trademarks of the respective
corporations.
© 2014 PIONEER HOME ELECTRONICS CORPORATION.
All rights reserved.
25
En
Page 26

PIONEER HOME ELECTRONICS
CORPORATION
Declaration of Conformity with regard to the R&TTE Directive 1999/5/EC
Manufacturer:
1-1, Shin-ogura, Saiwai-ku,
Kawasaki-shi, Kanagawa
212-0031, Japan
EU Representative’s:
Pioneer Europe NV
Haven 1087, Keetberglaan 1,
9120 Melsele, Belgium
http://www.pioneer.eu
English:
Hereby, Pioneer, declares that this [*] is
in compliance with the essential
requirements and other relevant
provisions of Directive 1999/5/EC.
Suomi:
Pioneer vakuuttaa täten että [*]
tyyppinen laite on direktiivin 1999/5/EY
oleellisten vaatimusten ja sitä
koskevien direktiivin muiden ehtojen
mukainen.
Nederlands:
Hierbij verklaart Pioneer dat het toestel
[*] in overeenstemming is met de
essentiële eisen en de andere
relevante bepalingen van richtlijn
1999/5/EG
Français:
Par la présente Pioneer déclare que
l’appareil [*] est conforme aux
exigences essentielles et aux autres
dispositions pertinentes de la directive
1999/5/CE
Svenska:
Härmed intygar Pioneer att denna [*]
står I överensstämmelse med de
väsentliga egenskapskrav och övriga
relevanta bestämmelser som framgår
av direktiv 1999/5/EG.
Dansk:
Undertegnede Pioneer erklærer
herved, at følgende udstyr [*]
overholder de væsentlige krav og
øvrige relevante krav i direktiv 1999/5/EF
Deutsch:
Hiermit erklärt Pioneer, dass sich
dieses [*] in Übereinstimmung mit den
grundlegenden Anforderungen und den
anderen relevanten Vorschriften der
Richtlinie 1999/5/EG befindet". (BMWi)
Ελληνικά:
ΜΕ ΤΗΝ ΠΑΡΟΥΣΑ Pioneer ΔΗΛΩΝΕΙ
ΟΤΙ [*] ΣΥΜΜΟΡΦΩΝΕΤΑΙ ΠΡΟΣ ΤΙΣ
ΟΥΣΙΩΔΕΙΣ ΑΠΑΙΤΗΣΕΙΣ ΚΑΙ ΤΙΣ
ΛΟΙΠΕΣ ΣΧΕΤΙΚΕΣ ΔΙΑΤΑΞΕΙΣ ΤΗΣ
ΟΔΗΓΙΑΣ 1999/5/ΕΚ
Italiano:
Con la presente Pioneer dichiara che
questo [*] è conforme ai requisiti
essenziali ed alle altre disposizioni
pertinenti stabilite dalla direttiva
1999/5/CE.
Español:
Por medio de la presente Pioneer
declara que el [*] cumple con los
requisitos esenciales y cualesquiera
otras disposiciones aplicables o
exigibles de la Directiva 1999/5/CE
[*] X-PM12, X-PM32
Page 27

Português:
Čeština:
Eesti:
Magyar:
Latviešu valoda:
Lietuvių kalba:
Malti:
Slovenčina:
Slovenščina:
Română:
български:
Polski:
Norsk:
Íslenska:
Pioneer declara que este [*] está
conforme com os requisitos essenciais
e outras disposições da Directiva
1999/5/CE.
Pioneer tímto prohlašuje, že tento [*] je
ve shodě se základními požadavky a
dalšími příslušnými ustanoveními
směrnice 1999/5/ES
Käesolevaga kinnitab Pioneer seadme
[*] vastavust direktiivi 1999/5/EÜ
põhinõuetele ja nimetatud direktiivist
tulenevatele teistele asjakohastele
sätetele.
Alulírott, Pioneer nyilatkozom, hogy a
[*] megfelel a vonatkozó alapvetõ
követelményeknek és az 1999/5/EC
irányelv egyéb elõírásainak.
Ar šo Pioneer deklarē, ka [*] atbilst
Direktīvas 1999/5/EK būtiskajām
prasībām un citiem ar to saistītajiem
noteikumiem.
Šiuo Pioneer deklaruoja, kad šis [*]
atitinka esminius
reikalavimus ir kitas 1999/5/EB
Direktyvos nuostatas.
Hawnhekk, Pioneer jiddikjara li dan [*]
jikkonforma mal-ħtiġijiet essenzjali u ma
provvedimenti oħrajn
relevanti li hemm
fid-Dirrettiva 1999/5/EC
Pioneer týmto vyhlasuje, že [*] spĺňa
základné požiadavky a všetky príslušné
ustanovenia Smernice
1999/5/ES.
Pioneer izjavlja, da je ta [*] v skladu z
bistvenimi zahtevami in ostalimi
relevantnimi določili direktive
1999/5/ES.
Prin prezenta, Pioneer declara ca acest
[*] este in conformitate cu cerintele
esentiale si alte prevederi ale Directivei
1999/5/EU.
С настоящето, Pioneer декларира, че
този [*] отговаря на основните
изисквания и други съответни
постановления на Директива
1999/5/EC.
Niniejszym Pioneer oświadcza, że
[*] jest zgodny z zasadniczymi wymogami oraz pozostałymi stosownymi
postanowieniami
Dyrektywy 1999/5/EC
Pioneer erklærer herved at utstyret [*]
er i samsvar med de grunnleggende
krav og øvrige relevante krav i direktiv
1999/5/EF.
Hér með lýsir Pioneer yfir því að
[*] er í samræmi við
grunnkröfur og aðrar kröfur, sem gerðar
eru í tilskipun 1999/5/EC
Hrvatski:
Ovime tvrtka Pioneer izjavljuje da je
ovaj [*] u skladu osnovnim zahtjevima i
ostalim odredbama Direktive
1999/5/EC.
R-TTE-24L_C1_En
Page 28

Printed in China
© 2014 PIONEER HOME ELECTRONICS CORPORATION.
All rights reserved.
<4.10.E.XPM12011RR>
PIONEER HOME ELECTRONICS CORPORATION
1-1, Shin-ogura, Saiwai-ku, Kawasaki-shi, Kanagawa 212-0031, Japan
PIONEER ELECTRONICS (USA) INC.
P.O. BOX 1540, Long Beach, California 90801-1540, U.S.A. TEL: (800) 421-1404
PIONEER ELECTRONICS OF CANADA, INC.
340 Ferrier Street, Unit 2, Markham, Ontario L3R 2Z5, Canada TEL: 1-877-283-5901, 905-479-4411
PIONEER EUROPE NV
Haven 1087, Keetberglaan 1, B-9120 Melsele, Belgium TEL: 03/570.05.11
PIONEER ELECTRONICS ASIACENTRE PTE. LTD.
253 Alexandra Road, #04-01, Singapore 159936 TEL: 65-6472-7555
PIONEER ELECTRONICS AUSTRALIA PTY. LTD.
5 Arco Lane, Heatherton, Victoria, 3202, Australia, TEL: (03) 9586-6300
PIONEER ELECTRONICS DE MEXICO S.A. DE C.V.
Blvd.Manuel Avila Camacho 138 10 piso Col.Lomas de Chapultepec, Mexico, D.F. 11000 TEL: 55-9178-4270
K002_B3_En
http://www.pioneer.co.uk
http://www.pioneer.eu
 Loading...