

Page 1
X-HM76D
XC-HM86D
X-HM76
X-HM86D
Language select / Sélection de la langue / Selección de idioma / Selezione lingua /
Sprachauswahl / Taal selecteren / Выбор языка
English
Italiano Deutsch Nederlands
Русский
Français
Español
Page 2

E
N
> Before Start > Part Names > Install > Initial Setup > Playback
Advanced Setup | Firmware Update | Others
NETWORK CD RECEIVER SYSTEM
X-HM76D
X-HM76
X-HM86D
NETWORK CD RECEIVER
XC-HM86D
Instruction
Manual
Before Start
What's in the box ..........................................................................2
Part Names
Front Panel ...................................................................................4
Rear Panel (X-HM76D, X-HM86D, XC-HM86D) .......................... 5
Rear Panel (X-HM76) ................................................................... 6
Remote Controller ......................................................................... 7
Display ..........................................................................................8
Speakers System (X-HM76D, X-HM76) .......................................9
Speakers System (X-HM86D) .................................................... 10
Install
Connect the Speakers ................................................................ 11
Connecting the antennas and power cord, etc. ..........................12
Initial Setup
Power On & Initial Setup ............................................................. 13
Time settings ..............................................................................16
Playback
Playing CDs ................................................................................17
USB Storage Device/HDD .......................................................... 19
Internet Radio ............................................................................. 21
Spotify ......................................................................................... 22
Listening to the FM Radio ...........................................................23
Listening to DAB Digital Radio (X-HM76D, X-HM86D, XC-HM86D) ...... 26
BLUETOOTH® ............................................................................ 27
®
AirPlay
Playing audio from an external device ........................................30
Music Server ............................................................................... 31
Using the alarm to start play ....................................................... 33
Entering text, adjusting sound quality, etc. .................................34
Advanced Setup
Advanced Settings....................................................................... 35
Firmware Update
Firmware Update ........................................................................ 39
Others
Troubleshooting ..........................................................................41
General Specifications ................................................................44
License and Trademark Information ........................................... 46
...................................................................................... 29
Page 3
> Before Start > Part Names > Install > Initial Setup > Playback
E
N
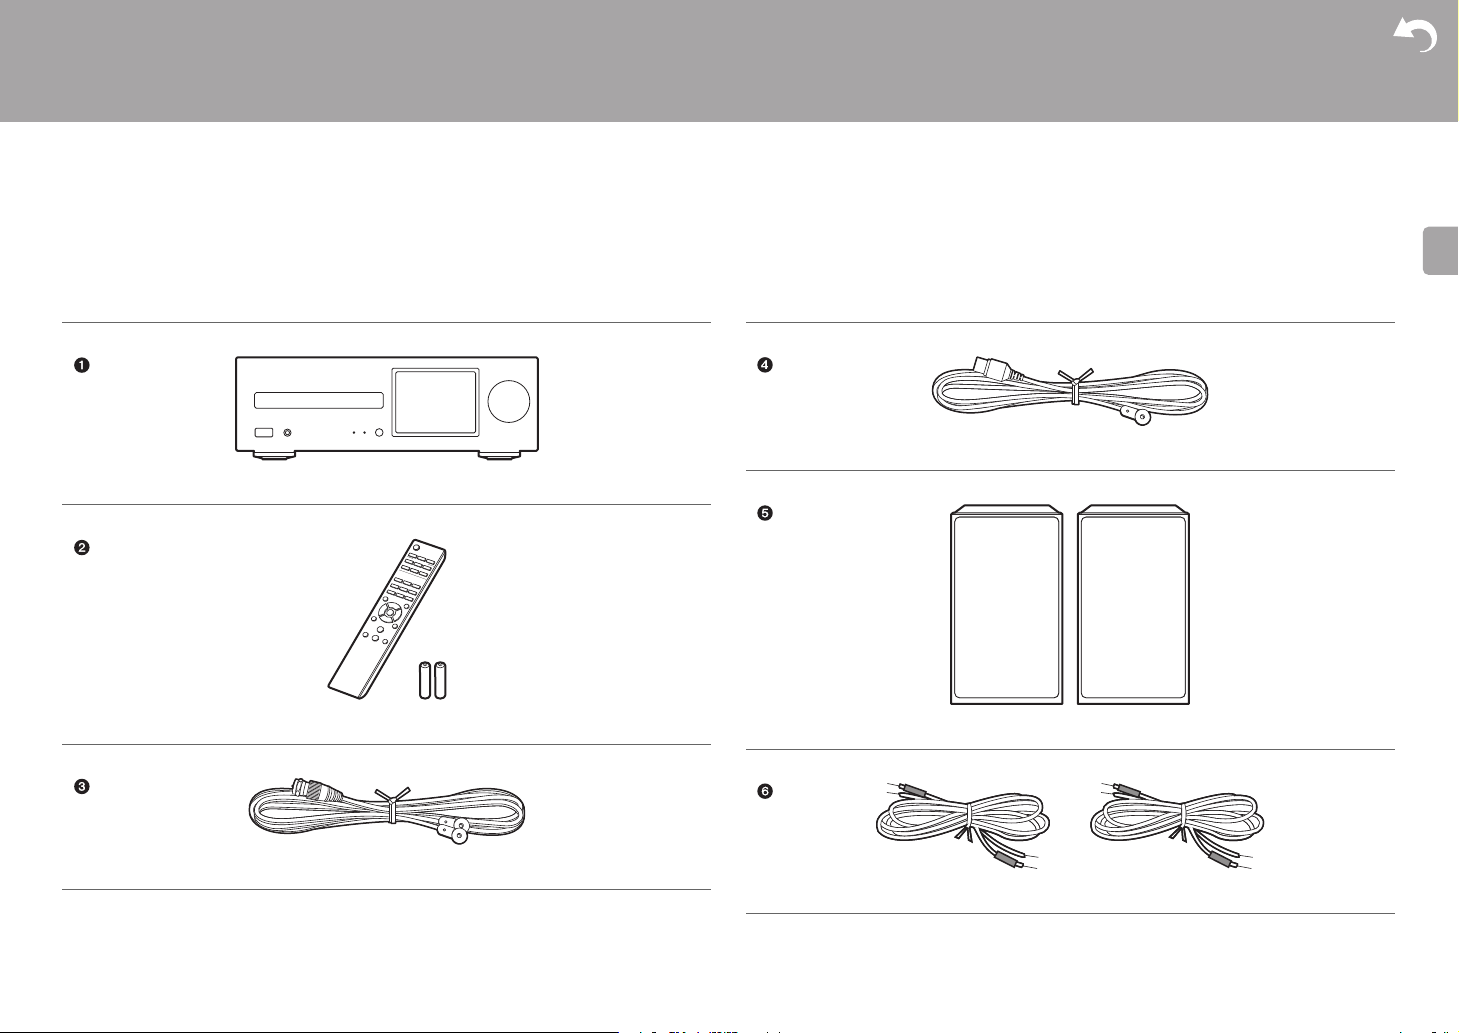
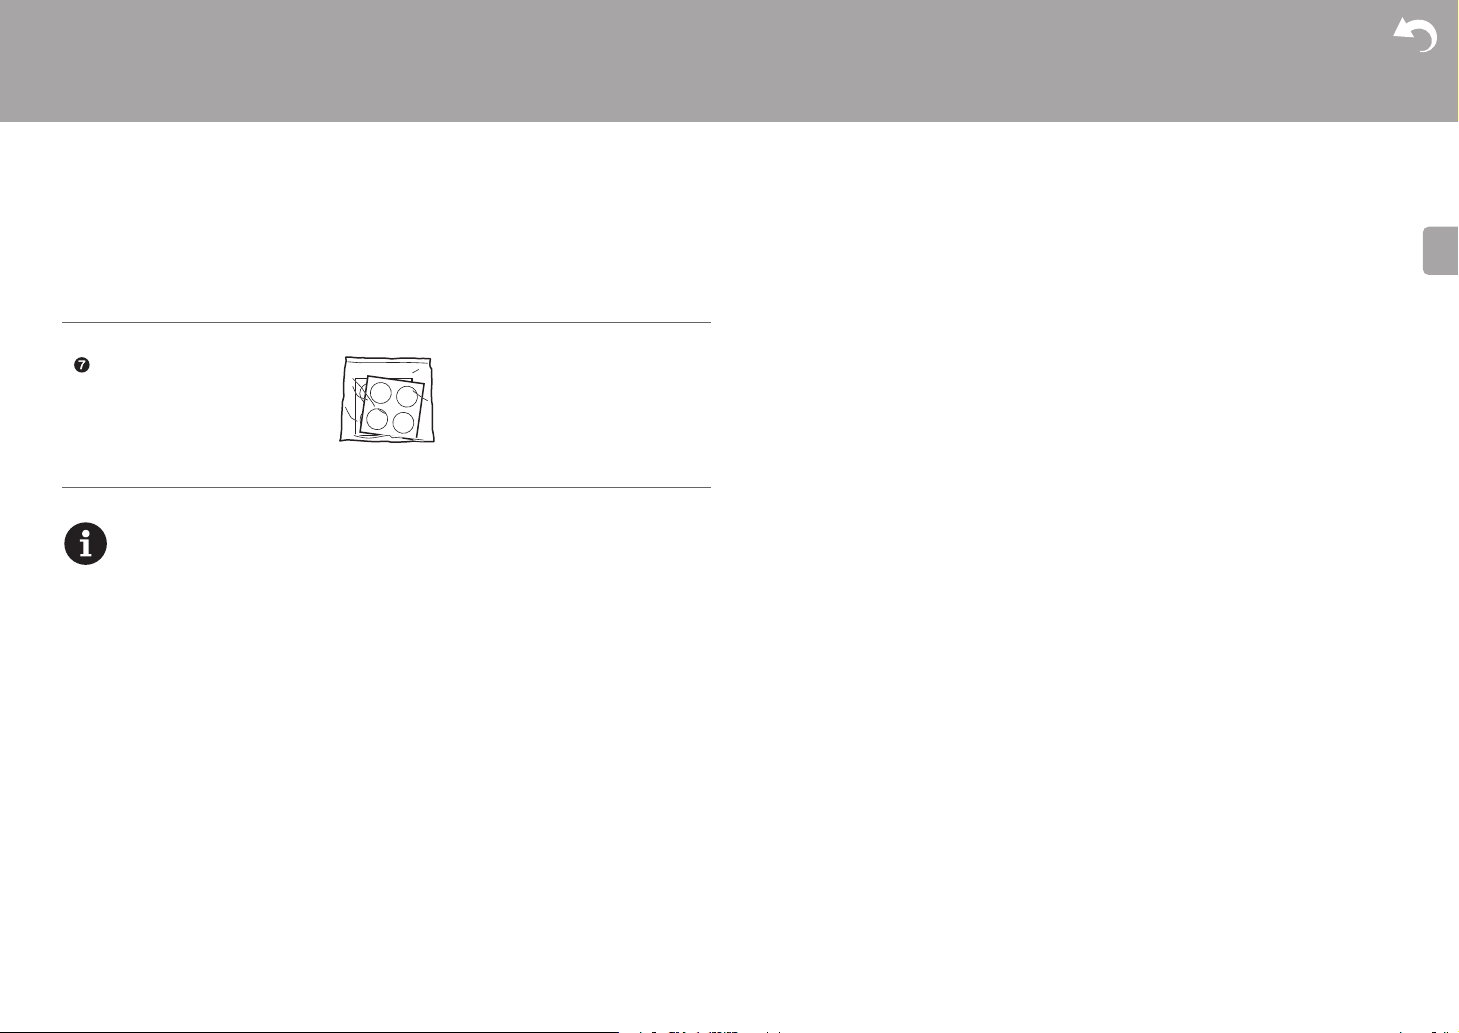
What's in the box
Before Start
X-HM76D : 12356
X-HM76 : 12456
X-HM86D : 123567
XC-HM86D : 123
Indoor FM antenna (1)
Main unit (1)
Advanced Setup | Firmware Update | Others
Remote controller (RC-945S) (1), Batteries (AAA/R03) (2)
DAB/FM wire antenna (1)
2
Speaker system (2)
Speaker cable (1.5 m) (2)
Page 4
> Before Start > Part Names > Install > Initial Setup > Playback
E
N
Non-skid pads (8)
0 The power cord must be connected only after all other cable connections are completed.
0 Connect speakers with 4 Ω to 16 Ω impedance.
0 We will not accept responsibility for damage arising from the connection of equipment
manufactured by other companies.
0 Functionality may be introduced by firmware updates and service providers may cease
services, meaning that some network services and content may become unavailable in
the future.
0 Specifications and appearance are subject to change without prior notice.
Advanced Setup | Firmware Update | Others
3
Page 5
> Before Start >Part Names > Install > Initial Setup > Playback
E
N
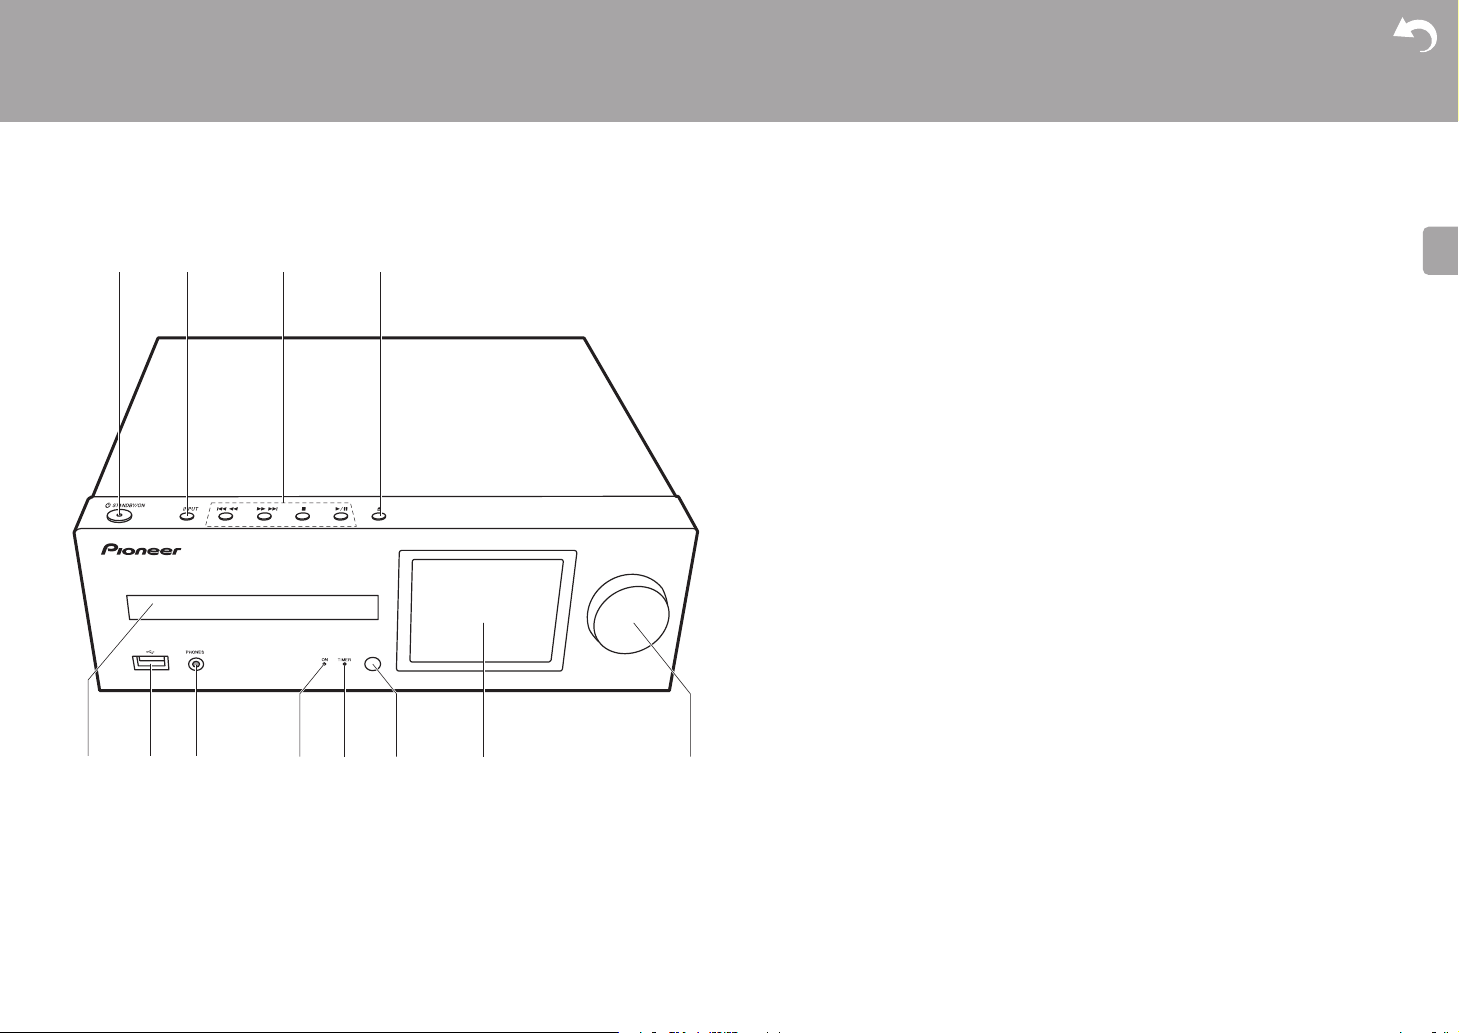
Front Panel
Part Names
1. Í STANDBY/ON button: Turns the unit on or to standby mode.
2. INPUT button: Switches the input to be played.
3. Play button:
:6
: Return to the beginning of the track being played. Press and hold to rewind the
track quickly. (CD)
59
∫
1
0 Depending on the input, the operation may not start.
4. < button: Open or close the disc tray.
5. Disc tray: Place discs here. 8-cm discs can also be used.
6. USB
also supply power (maximum 5 V/0.5 A) to USB devices with a USB cable.
0 When connecting a HDD that requires more than 5 V/0.5 A, connect to the USB port
7. PHONES jack: Connect stereo headphones with a mini plug.
8. Power indicator: This lights blue when the unit is on.
9. TIMER indicator: This lights when the alarm is set.
10.
Remote control sensor
11.
Display (ÄP8)
12.
VOLUME dial: Adjust the volume. Adjust between 0 and 50.
Move to the previous track. (USB, Music Server)
: Move to the next track. Press and hold to fast-forward through the track. (CD)
Move to the next track. (USB, Music Server)
: This button stops playback.
/; : This button pauses the playback.
port: Connect a USB storage device or HDD (hard disk drive) to play music files. You can
(maximum 5 V/1 A) on the rear of the unit.
Advanced Setup | Firmware Update | Others
4
Page 6

> Before Start >Part Names > Install > Initial Setup > Playback
E
N
180°
90°
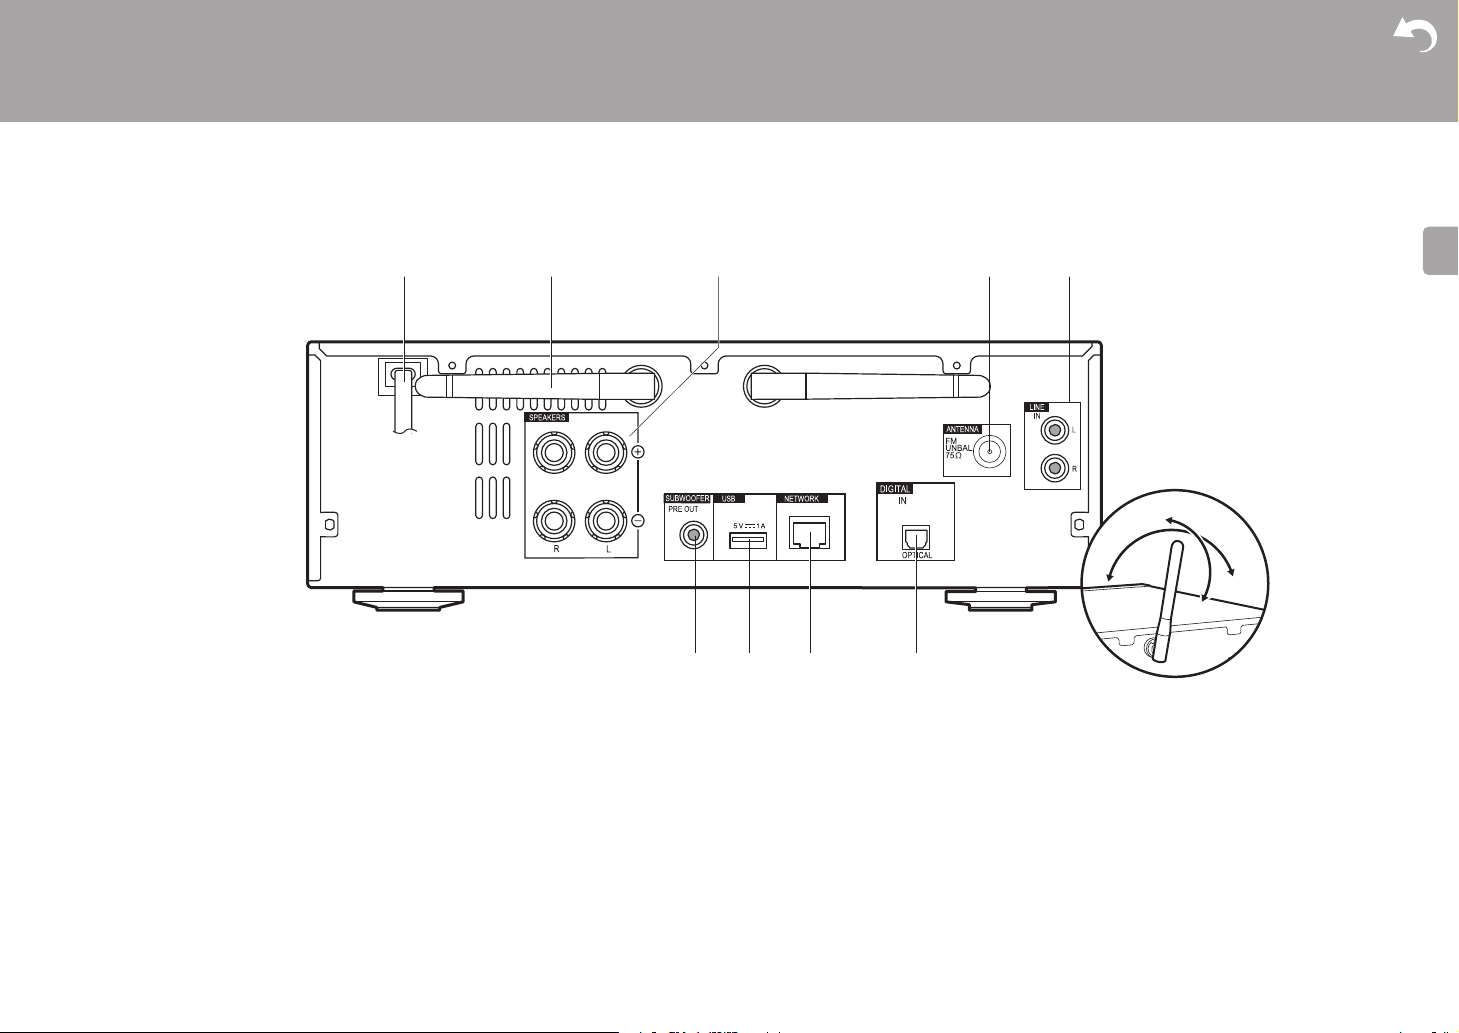
Rear Panel (X-HM76D, X-HM86D, XC-HM86D)
Advanced Setup | Firmware Update | Others
1. Power cord
2. Wireless antenna: Used for Wi-Fi connection or when using a BLUETOOTH enabled
device. Adjust their angles according to the connection status.
3. Speaker terminals: Connect speakers with speaker cables.
4. DAB/FM ANTENNA jack: Connect the supplied DAB/FM wire antenna.
5. LINE IN jack: You can play the audio from an external device such as a television
connected with an analogue audio cable.
6. SUBWOOFER PRE OUT jacks: Connect a subwoofer with built-in amplifier.
7. USB port: Connect a USB storage device or HDD (hard disk drive) to play music files. You
8. NETWORK jack: Connect to the network with an ethernet cable.
9. DIGITAL IN OPTICAL jack: You can play the digital audio from an external device such as
can also supply power (maximum 5 V/1 A) to USB devices with a USB cable.
a television connected with a digital optical cable.
5
Page 7
> Before Start >Part Names > Install > Initial Setup > Playback
E
N
180°
90°
Rear Panel (X-HM76)
Advanced Setup | Firmware Update | Others
1. Power cord
2. Wireless antenna: Used for Wi-Fi connection or when using a BLUETOOTH enabled
device. Adjust their angles according to the connection status.
3. Speaker terminals: Connect speakers with speaker cables.
4. FM ANTENNA jack: Connect the supplied indoor FM antenna.
5. LINE IN jack: You can play the audio from an external device such as a television
connected with an analogue audio cable.
6. SUBWOOFER PRE OUT jacks: Connect a subwoofer with built-in amplifier.
7. USB port: Connect a USB storage device or HDD (hard disk drive) to play music files. You
8. NETWORK jack: Connect to the network with an ethernet cable.
9. DIGITAL IN OPTICAL jack: You can play the digital audio from an external device such as
can also supply power (maximum 5 V/1 A) to USB devices with a USB cable.
6
a television connected with a digital optical cable.
Page 8
> Before Start >Part Names > Install > Initial Setup > Playback
E
N
30°
30°
Approx.7 m
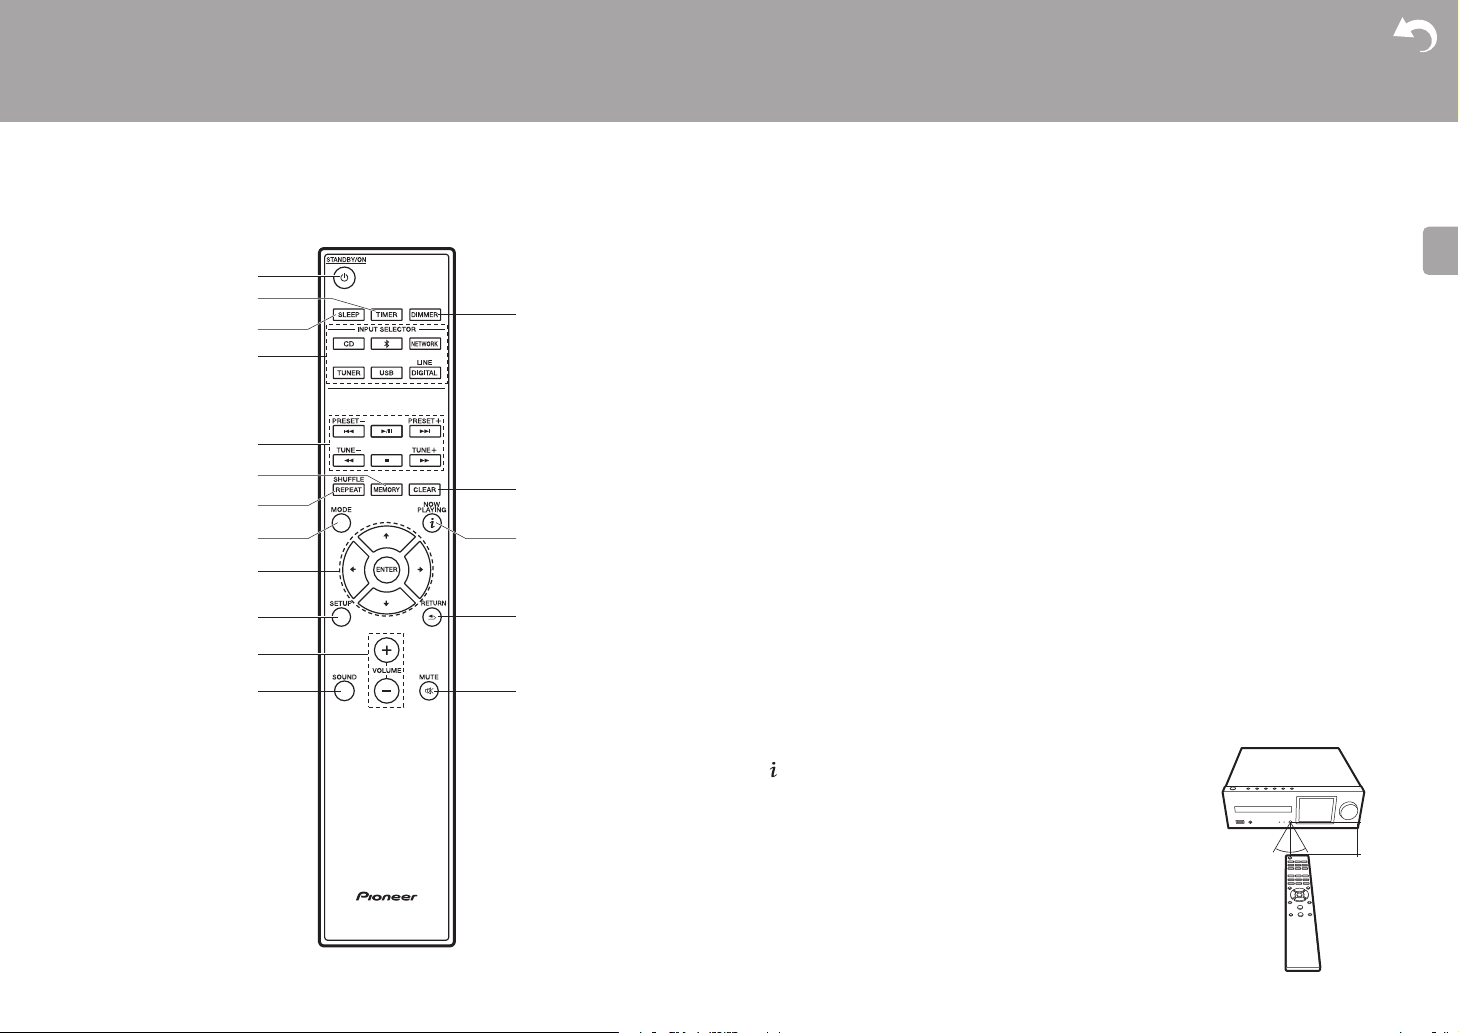
Remote Controller
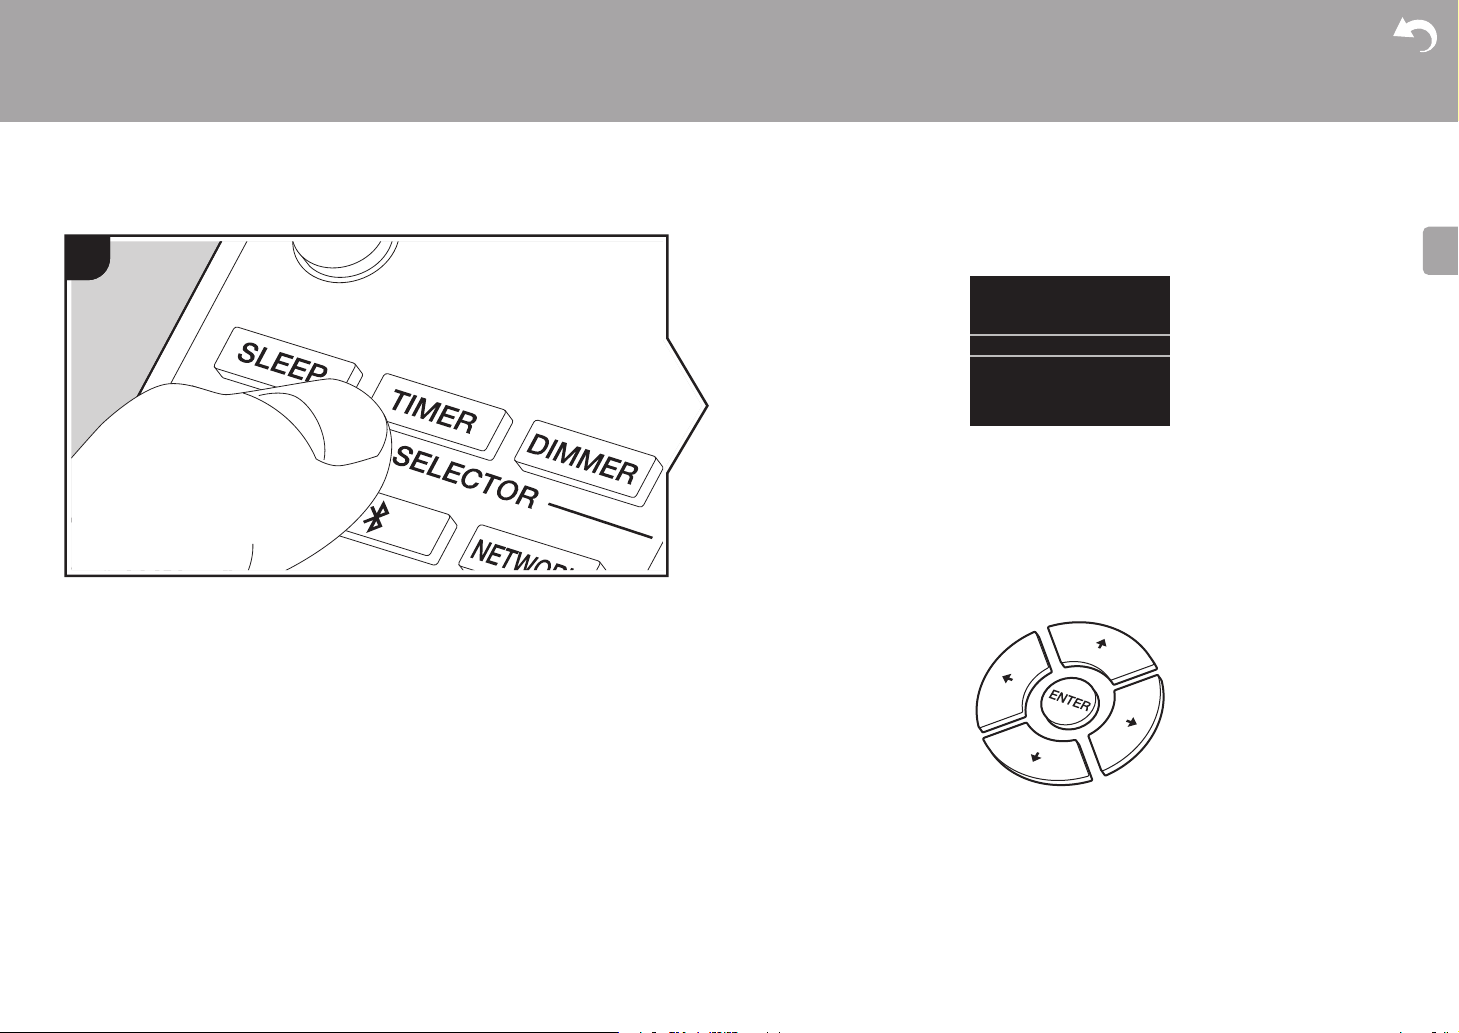
1. Í STANDBY/ON button: Turns the unit on or into standby mode.
2. TIMER button: Used to set the time and set the alarm.
3. SLEEP button: Set the sleep timer. When the time set (30, 60, or 90 minutes) has
elapsed, the unit switches to standby. If SLEEP button is pressed after setting, the time
remaining until sleep is displayed.
4. INPUT SELECTOR buttons: Switches the input to be played.
5. Play buttons:
:: Return to the beginning of the track being played. (CD)
Move to the track before the one being played. (USB, Music Server)
X/;: Play or pause play.
9: Move to the next track.
22: Rewind the track quickly. (CD only)
∫: Stop playback.
11: Fast-forward the track. (CD only)
0 Depending on the input, the operation may not start.
PRESET i/j buttons: Used to select stations that have been registered or to give names
to stations.
TUNE i/j buttons: Used to select radio stations.
6. MEMORY button: Used to register favorite radio stations.
7. SHUFFLE/REPEAT button: Set repeat play and shuffle play.
8. MODE button: Used for program play of CDs.
9. Cursors, ENTER button: Select the item with the cursors and press ENTER to confirm.
10.
SETUP button: Displays the Setup menu.
11.
VOLUME i/j buttons: Adjust the volume. Adjust between 0 and 50.
12.
SOUND button: Adjust the sound quality.
13.
DIMMER button: Switch the display off or adjust the brightness of the display in three
steps.
14.
CLEAR button: Used when entering text, etc.
15.
(NOW PLAYING) button: Switches the information on the
display.
16.
RETURN button: Returns the display to the previous state.
17.
MUTE button: Temporarily mutes audio. Press again to cancel
muting.
Advanced Setup | Firmware Update | Others
7
Page 9
> Before Start >Part Names > Install > Initial Setup > Playback
E
N
00:01:45 / 00:03:23
FLAC
44.1
kHz/24bit
USB Front
Song
Artist
Album
1
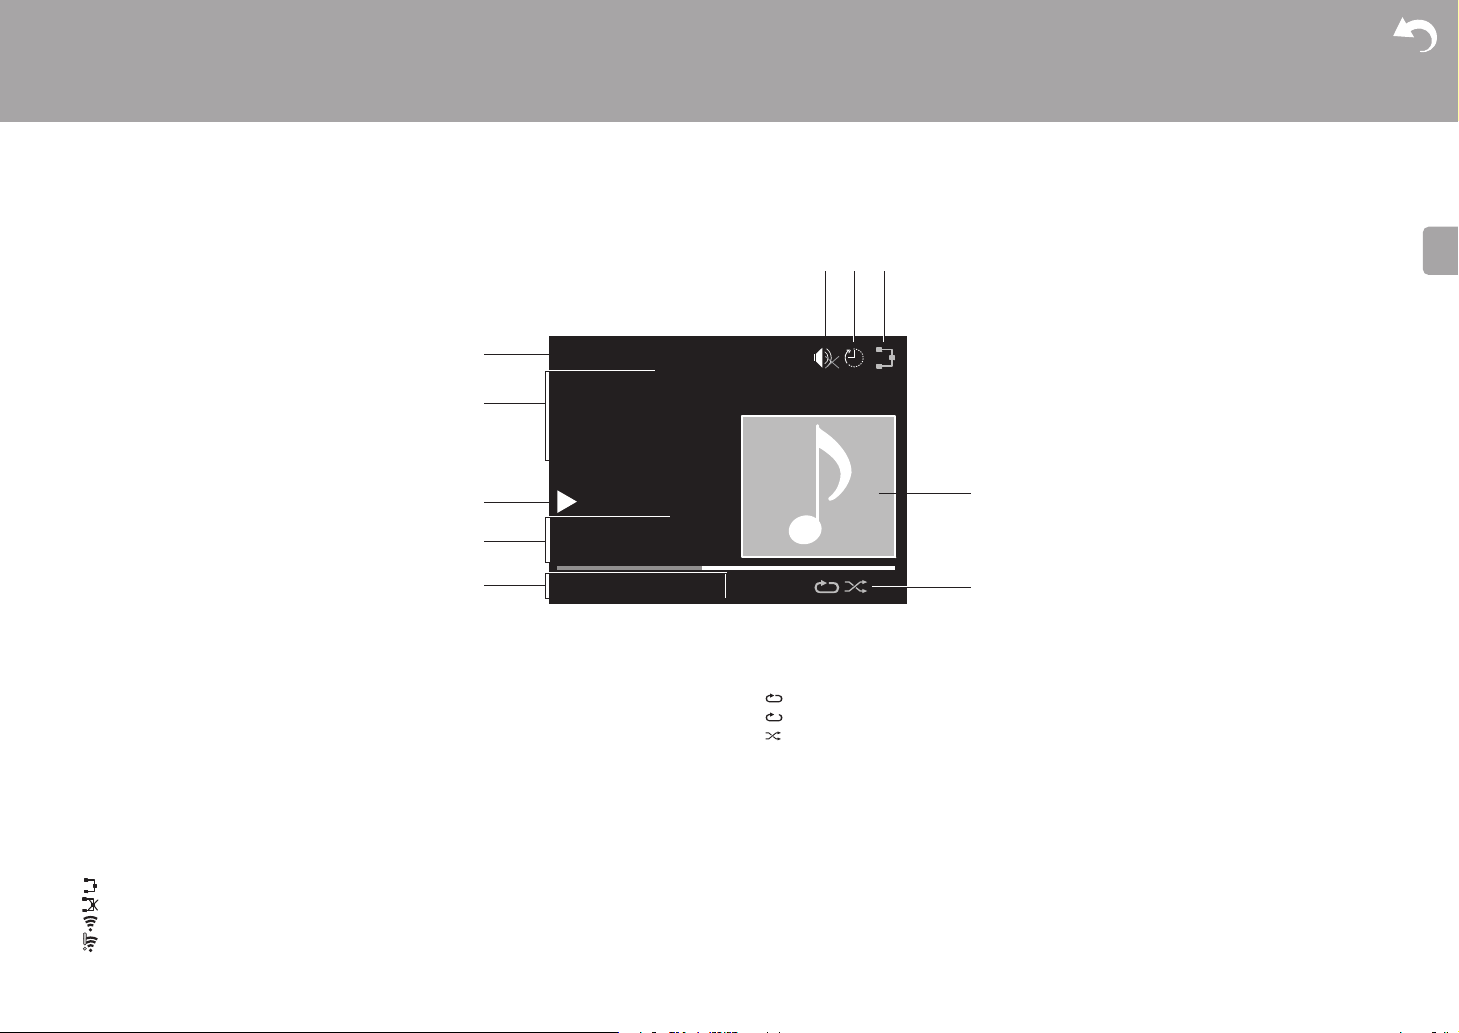
Display
Advanced Setup | Firmware Update | Others
1. The input mode is displayed.
(USB Front / USB Rear / CD / Bluetooth / Network / Digital In / Line / Tuner DAB
FM)
*X-HM76D, X-HM86D, XC-HM86D
2. The name of the file, artist, album, station, etc., is displayed.
3. Displays the play status.
4. Displays file format, sampling frequency, and quantization bit information.
5. The file play status is displayed. This may not be displayed depending on the input or file.
6. This is displayed when muting is on.
7. Displayed when the sleep timer is set.
8. Lights in the following conditions.
:
When the connection setting on the unit is "Wired" and the unit is connected to the network.
:
When the connection setting on the unit is "Wired" and the unit is not connected to the network.
:
When the connection setting on the unit is "Wi-Fi" and the unit is connected to the network.
:
When the connection setting on the unit is "Wi-Fi" and the unit is not connected to the network.
9. If an album jacket is recorded for the file being played, it is displayed here.
8
*
/ Tuner
10.
Lights in the following conditions.
: When all track repeat play is on
: When one track repeat play is on
: When shuffle play is on
0 When DIMMER is pressed to turn off the display, the unit may appear the same as if you
had unplugged the unit from the power outlet, but electricity is still being supplied to the
unit. To completely cut the unit off from the power supply, you need to unplug the power
plug (shutoff device) unit from the power outlet.
Page 10
> Before Start >Part Names > Install > Initial Setup > Playback
E
N
1
21
2
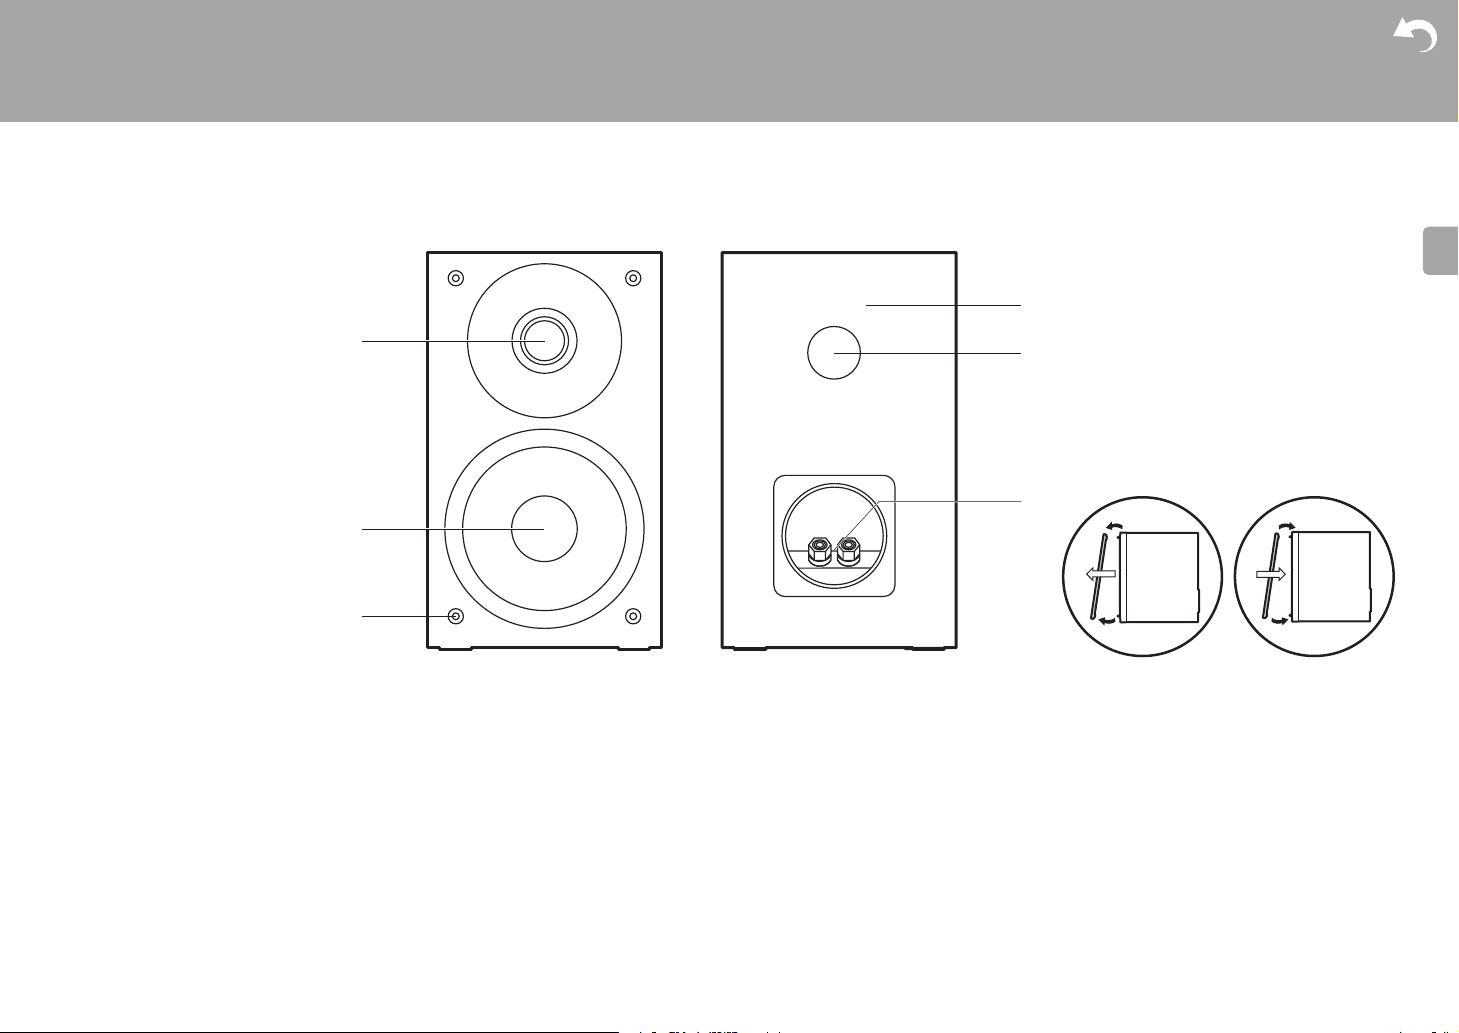
Speakers System (X-HM76D, X-HM76)
Advanced Setup | Firmware Update | Others
There is no distinction between left and right with the included speaker system. There will be
no difference in sound quality whichever side you choose to put each speaker.
1. Tweeter: Plays the mid range and treble.
2. Woofer: Plays the bass.
3. Grill net fittings: Used to attach the grill nets. When removing the grill net, hold the bottom
of the grill net with both hands and pull gently forward, then gently pull the top of the grill
out to remove. To attach again, attach the top first, then the bottom.
4. Speaker cabinet
5. Bass ref duct: This releases the reverberations that occur within the cabinet to enhance
the reproductive capabilities of the bass range. Do not block the ducts.
6. Speaker terminals: Connect speakers to the main unit with speaker cables.
9
Page 11

> Before Start >Part Names > Install > Initial Setup > Playback
E
N
1
21
2
Speakers System (X-HM86D)
Advanced Setup | Firmware Update | Others
There is no distinction between left and right with the included speaker system. There will be
no difference in sound quality whichever side you choose to put each speaker.
1. Tweeter: Plays the mid range and treble.
2. Woofer: Plays the bass.
3. Grill net fittings: Used to attach the grill nets. When removing the grill net, hold the bottom
of the grill net with both hands and pull gently forward, then gently pull the top of the grill
out to remove. To attach again, attach the top first, then the bottom.
4. Speaker cabinet
5. Bass ref duct: This releases the reverberations that occur within the cabinet to enhance
the reproductive capabilities of the bass range. Do not block the ducts.
10
6. Speaker terminals: Connect speakers to the main unit with speaker cables.
Page 12
> Before Start > Part Names >Install > Initial Setup > Playback
E
N
X-HM86D only
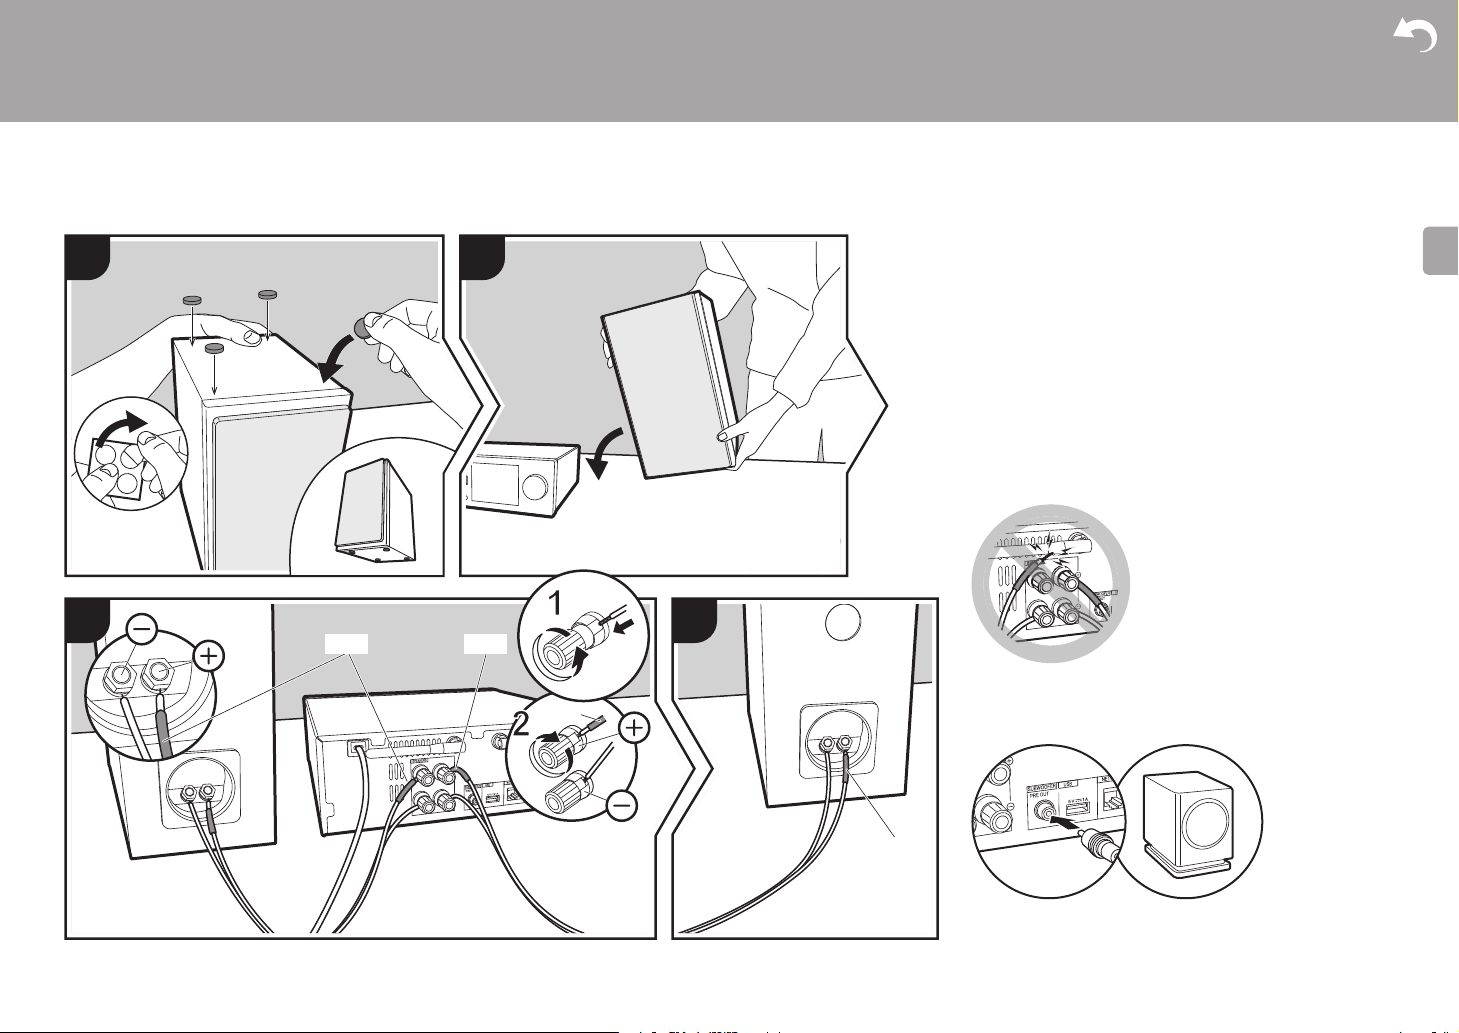
Connect the Speakers
Install
1
a
a
a
a
2
Advanced Setup | Firmware Update | Others
When connecting the speaker system for X-HM76D, XHM76 or X-HM86D, connect the included speaker cables
with ends with the red tubing attached to the i jacks on the
main unit and the speaker. If connection is wrong, the phase
reverses and this makes it harder to output bass.
For XC-HM86D, use the illustration as a reference to
connect your own speakers.
After inserting the speaker cables, tighten the terminals
firmly by turning to the right. Also make sure the exposed
wires of the speakers do not stick out of the speaker
terminals when connecting. If the exposed wires of the
speakers touch the rear panel or the i and s wires touch
each other, the protection circuit may be activated and the
power may turn off.
3
RED
b
a Non-Skid pads, b Speaker cable
RED
RED
b
4
You can also connect a subwoofer with a built-in amplifier to
boost bass playback even more. Use a subwoofer cable for
connection.
RED
11
Page 13
> Before Start > Part Names >Install > Initial Setup > Playback
E
N
c
a
b
c
1 1
2
X-HM76D, X-HM86D, XC-HM86D X-HM76
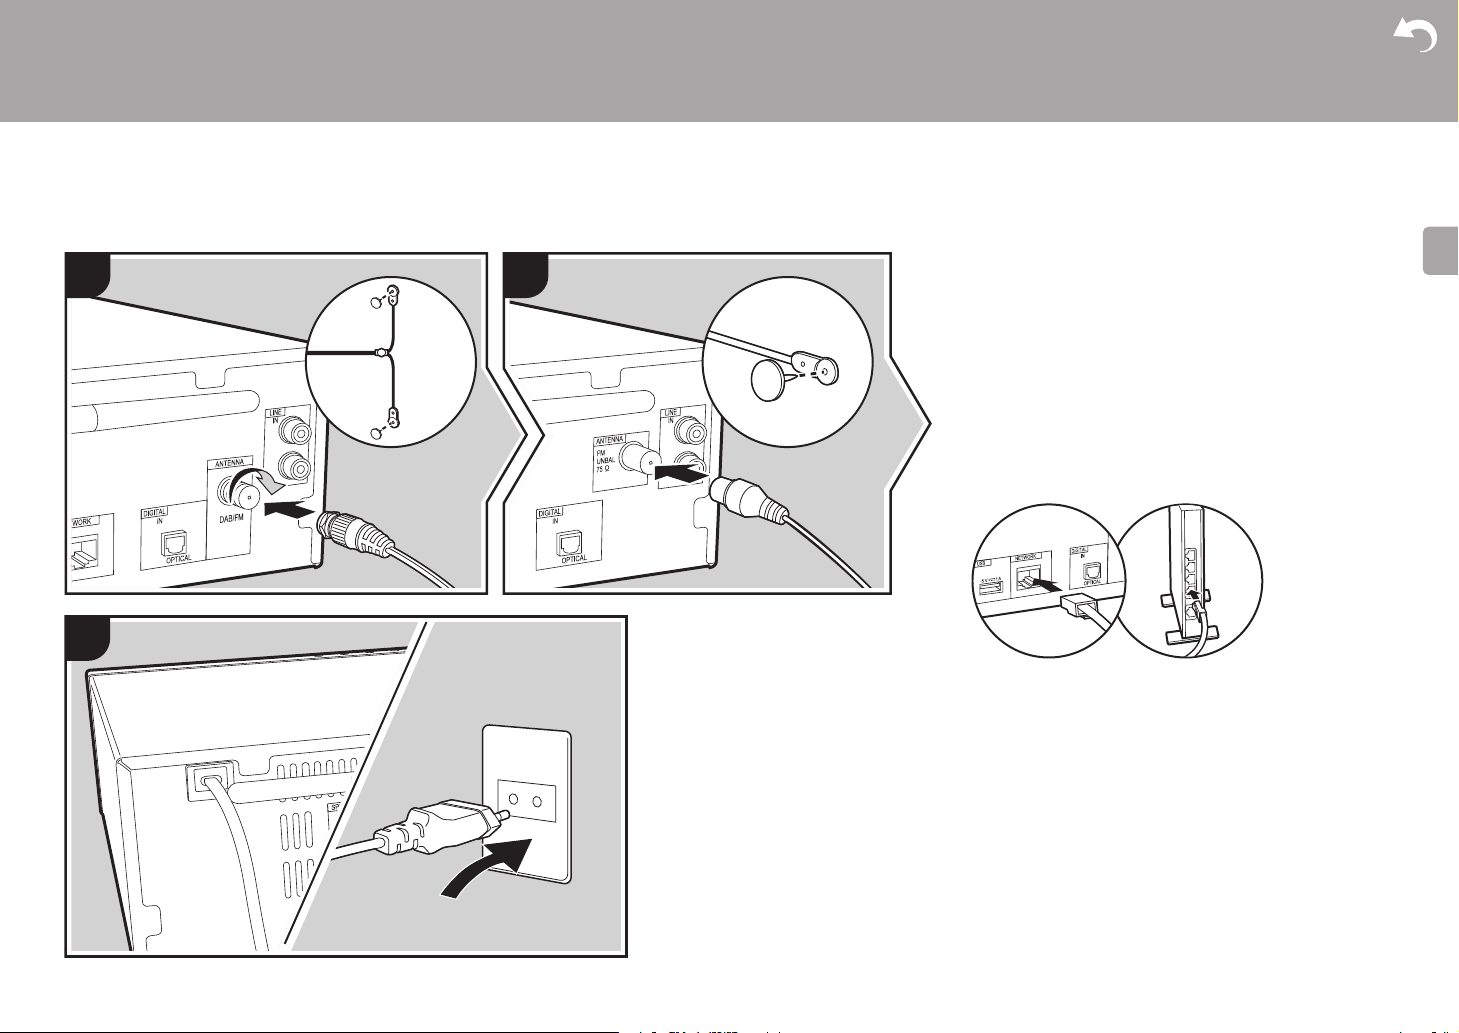
Connecting the antennas and power cord, etc.
Advanced Setup | Firmware Update | Others
Antenna Hookup
Move the antenna around while playing the radio to find the
position with the best reception.
Power Cord Hookup
Connect the power cord to the power outlet after completing
all other connections.
To connect to the network with an ethernet cable, use the
NETWORK jack. When using Wi-Fi connection, make
settings in initial settings (ÄP13). You can enjoy features
such as internet radio and AirPlay by connecting to the
network.
a DAB/FM wire antenna, b Indoor FM antenna, c Power cord
12
Page 14
> Before Start > Part Names > Install > Initial Setup >Playback
E
N
Initial Setup
Wired (Exit)
Wi-Fi
Selects the method of network
connection
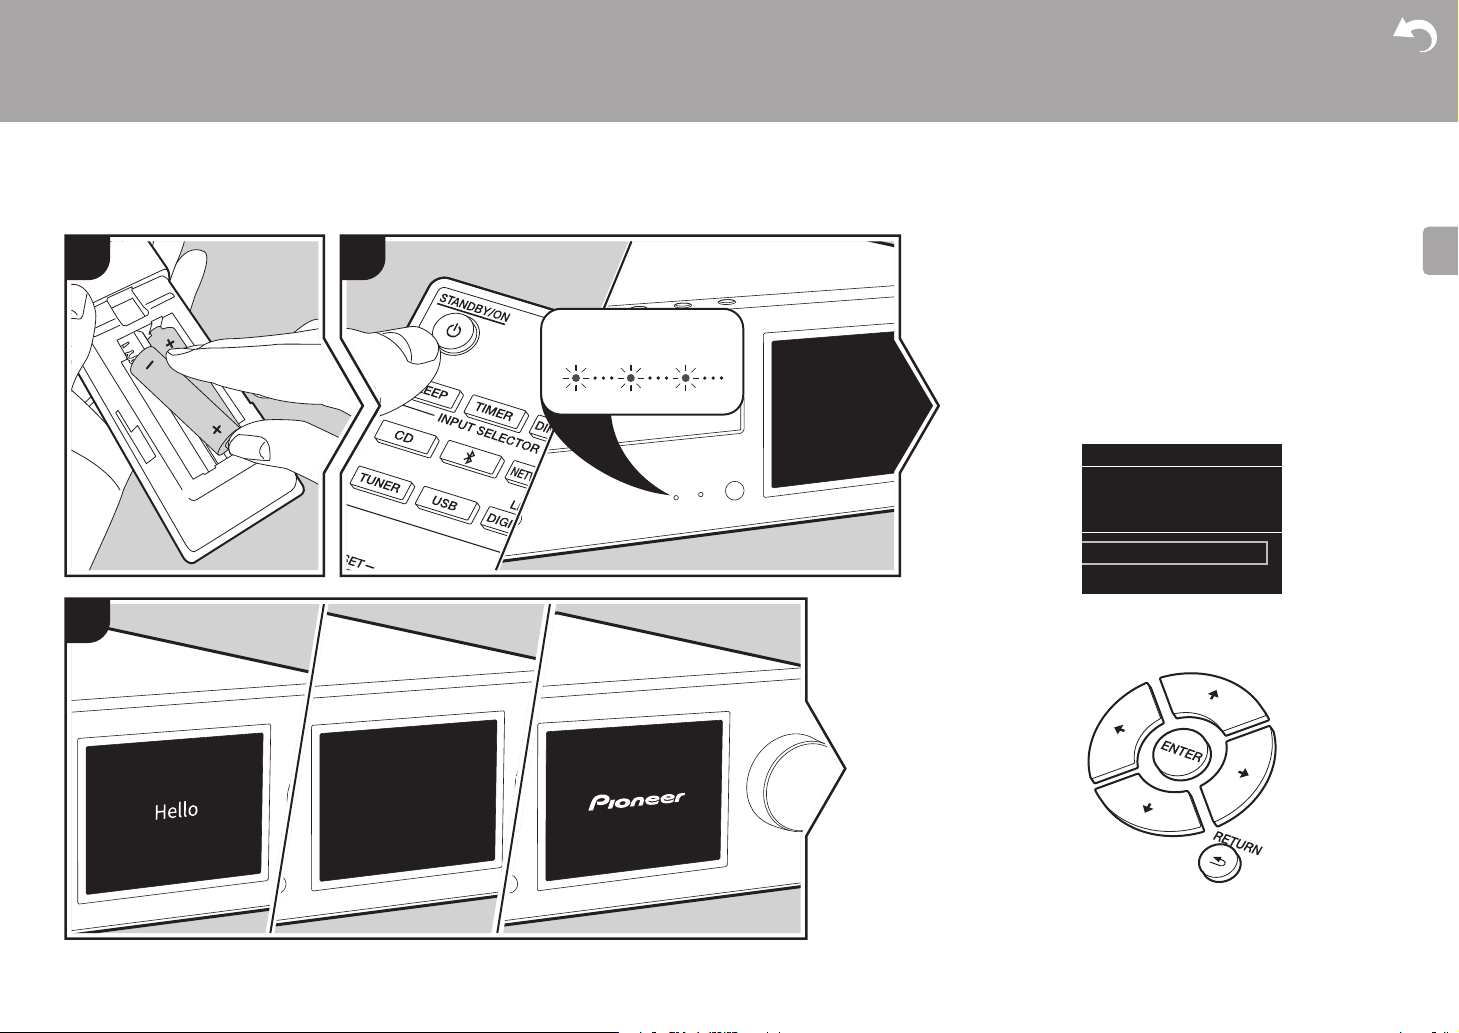
Power On & Initial Setup
Initial Setup
1
2
Advanced Setup | Firmware Update | Others
Starting up: When you press Í STANDBY/ON, the power
indicator on the main unit slowly blinks blue, then "Hello" is
displayed on the display about 20 seconds later. After this,
the display goes blank, then after the Pioneer logo is
displayed, you can start operating the unit.
3
BLUEBLINKING
Wi-Fi connection settings
When you first turn the power on, the initial setup screen is
displayed automatically, allowing you to easily make Wi-Fi
connection settings.
To set, select the item with the cursors on the remote
controller and press ENTER to confirm. To return to the
previous display, press RETURN.
13
Page 15
> Before Start > Part Names > Install > Initial Setup >Playback
E
N
Wireless
Push Button
Password
A
Delete One Character[CLEAR]
Change Text[REPEAT]
Advanced Setup | Firmware Update | Others
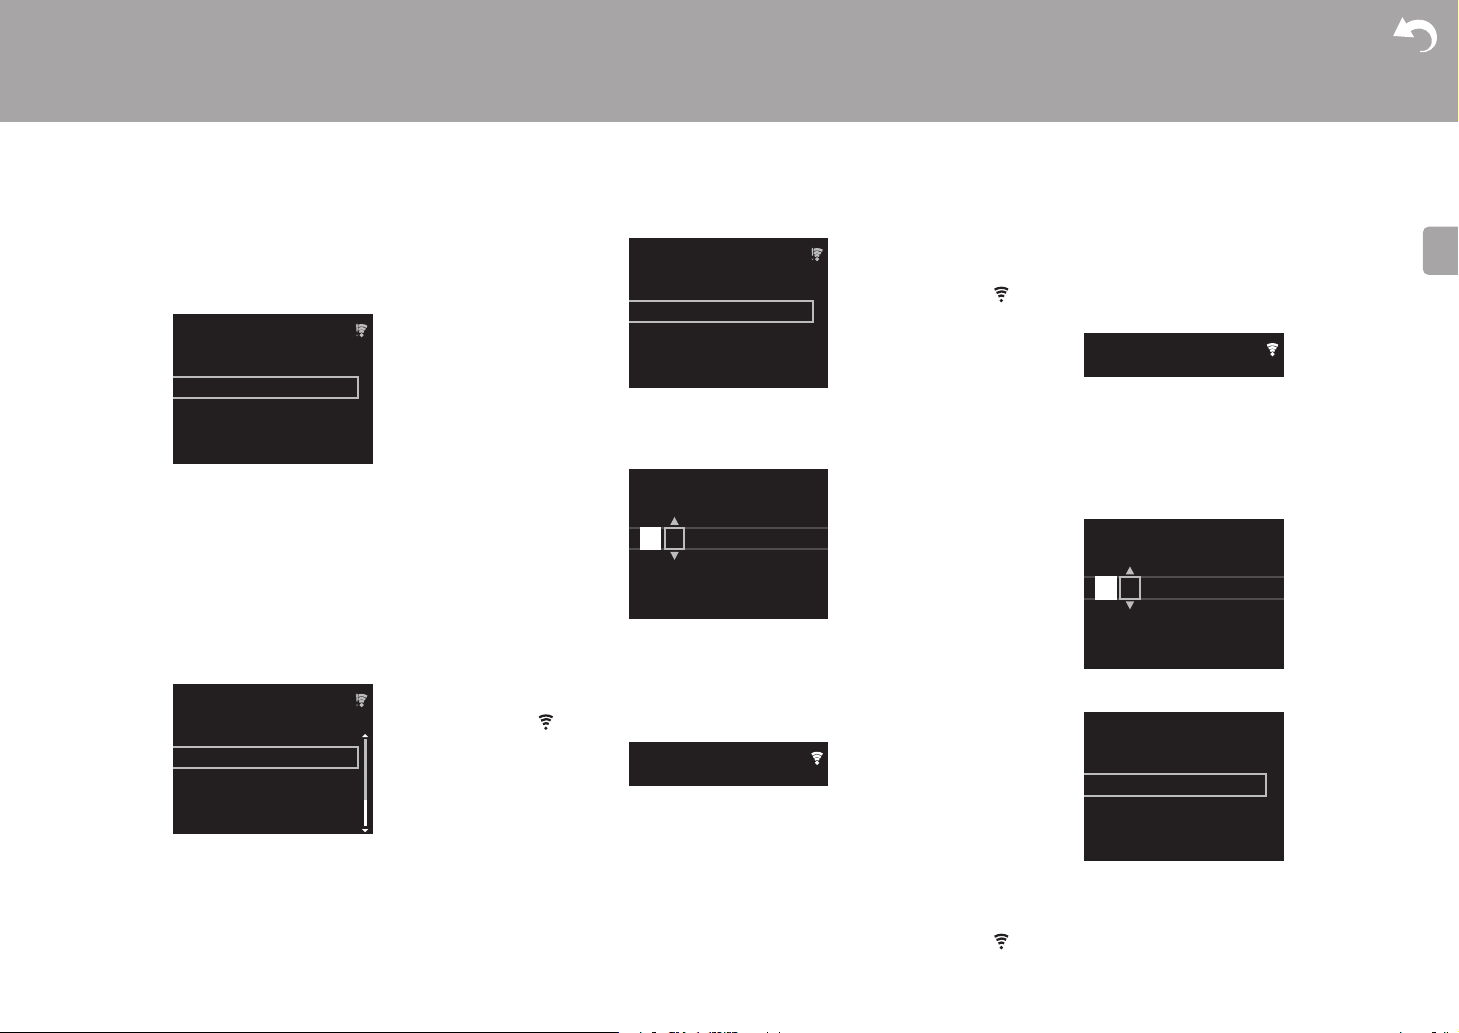
To make Wi-Fi settings, select "Wi-Fi". If you have
connected with an ethernet cable, select "Wired(Exit)" and
confirm. If you select "Wi-Fi", select the method for setting
in the next screen (for example "Scan Networks").
Wireless
Scan Networks
Use iOS Device
Input SSID
0 To redo the initial settings, press SETUP on the remote
controller, select "Wi-Fi" in "Network Setting" "Connection", then select "Wi-Fi Setup".
■ Scan Networks
From the list of SSID for access points such as wireless
LAN routers, select the required SSID and make the
settings.
1. Select the SSID of the access point you want to connect
and then confirm.
Wireless
aaaaaaaaaaaaaaaa
bbbbbbbbbbbbbbbbb
ccccccccccccccccccc
ddddddddddddddddd
2. Select either "Enter Password" or "Push Button" and
confirm. If the access point has an automatic setting
button, by selecting "Push Button" you can connect
without entering a password.
14
Enter Password
3. If you select "Enter Password", enter the password of the
access point and press ENTER. For details on how to
enter text, refer to "Entering text" (ÄP34).
If you select "Push Button", then after pressing and
holding the automatic setting button on the access point
for the required amount of time, press ENTER on the
remote controller.
4. is displayed when the settings are complete.
■ Use iOS Device
Set by sharing the iOS device's Wi-Fi settings with this unit.
1. Connect the iOS device by Wi-Fi.
2. Select this device in the "SET UP NEW AIRPLAY
SPEAKER..." item on the screen of the iOS device and
select "Next".
0 This unit is displayed as "Pioneer HM76D (76 or 86D)
XXXXXX".
3. After establishing the connection, select "Done" on the
screen of the iOS device.
4. is displayed on the display of the unit when the
settings are complete.
■ Enter SSID of the access point
Set by entering the SSID of the access point you want to
connect.
1. Enter the SSID. For details on how to enter text, refer to
"Entering text" (ÄP34).
SSID
A
Change Text[REPEAT]
Delete One Character[CLEAR]
2. Select and confirm the authentication method.
Security Method
None
WEP
WPA
WPA2
0 If you select "None", proceed to step 3. If you select
"WEP", "WPA", or "WPA2", enter the password and
confirm.
3. is displayed when the settings are complete.
Page 16

> Before Start > Part Names > Install > Initial Setup >Playback
E
N
Advanced Setup | Firmware Update | Others
15
Page 17
> Before Start > Part Names > Install > Initial Setup >Playback
E
N
CLOCK
0:00Sun
Time settings
By setting the time, you can use the alarm to start play (ÄP33).
11
1. Press TIMER.
2. Press ENTER.
3. Set the day of the week with w/x, then press ENTER.
4. In the next screen, use w/x to select either "24H" (24-hour display) or "12H" (12-hour
display) and press ENTER.
5. In the next screen, set the time with w/x, then press ENTER.
6. In the next screen, set the minutes with w/x, then press ENTER. Setting ends
automatically after a short time.
0 Once you have completed the setting, the set time can be displayed for about 10 seconds
by pressing TIMER.
Advanced Setup | Firmware Update | Others
16
Page 18
> Before Start > Part Names > Install > Initial Setup >Playback
E
N
a
1
2
b
c
Playing CDs
Playback
Advanced Setup | Firmware Update | Others
This unit can also play CD-R recorded with MP3 or WMA
format files, along with commercially available music CDs.
0 The supported sampling rates for MP3 files are 8 kHz to
48 kHz, and supported bitrates are between 64 kbps and
384 kbps.
0 The supported sampling rates for WMA files are 32 kHz,
44.1 kHz, and 48 kHz, and supported bitrates are
between 64 kbps and 320 kbps.
0 Play of CDs not conforming to the CD standards, such as
copy control CDs, is not guaranteed.
Playing music CDs
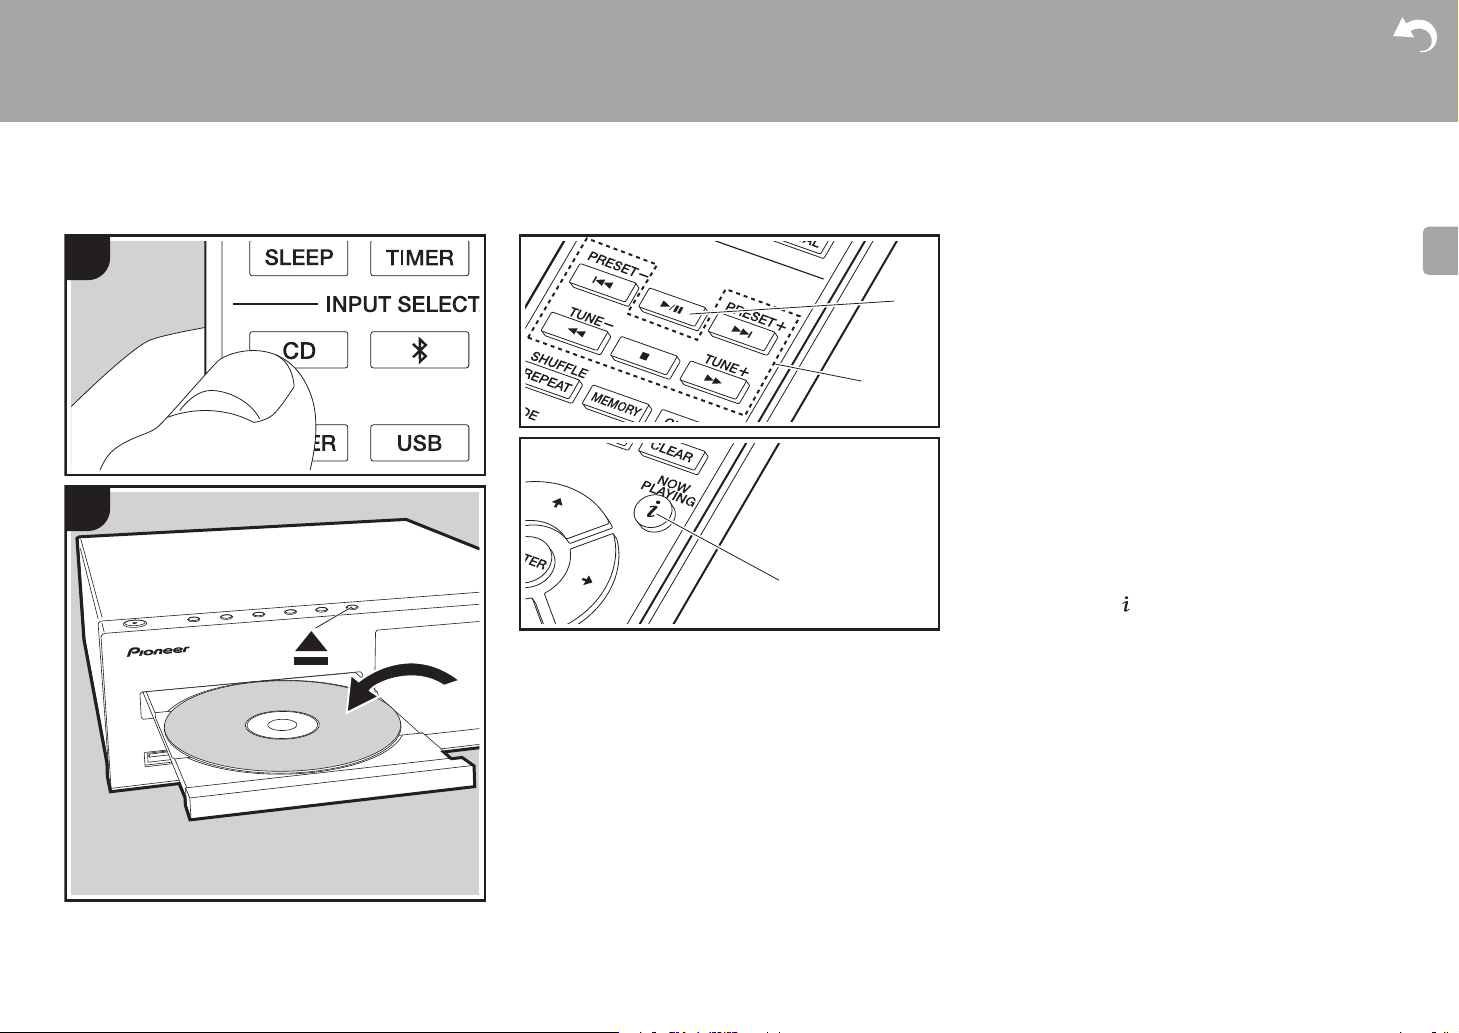
1. Turn the unit on.
2. Press CD to change input to CD.
3. Press < on the main unit to open the disc tray.
4. Put the disc on the tray, then press < to close the tray.
5. Press
X/; (a) on the remote controller to start play. Use
other play buttons (b) to stop play or choose tracks to
play. If you press (NOW PLAYING) (c), you can
switch the display to show the elapsed time or remaining
time of the track.
17
Page 19

> Before Start > Part Names > Install > Initial Setup >Playback
E
N
b
a
g
f
c
e
d
F019 T159
CD
1
1
Advanced Setup | Firmware Update | Others
Playing MP3/WMA discs
1. Turn the unit on.
2. Press CD to change input to CD.
3. Press < on the main unit to open the disc tray.
4. Put the disc on the tray, then press < to close the tray.
5. When reading of the disc is complete, the numbers of
folders containing MP3/WMA files and track numbers are
displayed.
0 If MP3/WMA files are stored in two or more folders,
each folder is automatically allocated a number.
6. To start play, press X/; (a) on the remote controller. To
select a folder to play, press w/x (f) to select the folder.
Play starts automatically when you select a folder.
0 Folders that do not contain music files this unit can
play are skipped.
0 A maximum of 255 folders can be read. This includes
folders that contain files this unit cannot play.
Program play (Music CDs)
You can program up to 32 tracks to play.
1. Press MODE (e).
2. The track number (T--) flashes on the display.
CD
PROGRAM
P-01<T--
3. Press
4. Press
:/9 (b) to select the track to register and
press ENTER (g). Repeat this step to register other
tracks. The last track in the program is deleted if you
press CLEAR (c).
X/; (a) to start play.
0 If you press MODE (e) again while play is stopped, the
entire program is cleared.
0 Shuffle play and 1 track repeat play cannot be used
while playing a program.
Repeat play/Shuffle play
1. Repeatedly press SHUFFLE/REPEAT (d) to display ,
, or on the display.
: Repeat play of all tracks.
: Repeat play of the selected individual track.
: Play tracks randomly.
To cancel repeat or shuffle play, press SHUFFLE/
REPEAT (d) several times until the icons disappear.
18
Page 20
> Before Start > Part Names > Install > Initial Setup >Playback
E
N
2
a
b
e
d
c
1
USB Storage Device/HDD
Advanced Setup | Firmware Update | Others
Basic operations
You can play music files by connecting a USB storage
device or HDD (hard disk drive) to the USB port on the front
or rear of the unit.
0 The USB port on the front supports a maximum 5 V/0.5 A
power supply. If the HDD requires more than this,
connect to the USB port (maximum 5 V/1 A) on the rear
of the unit.
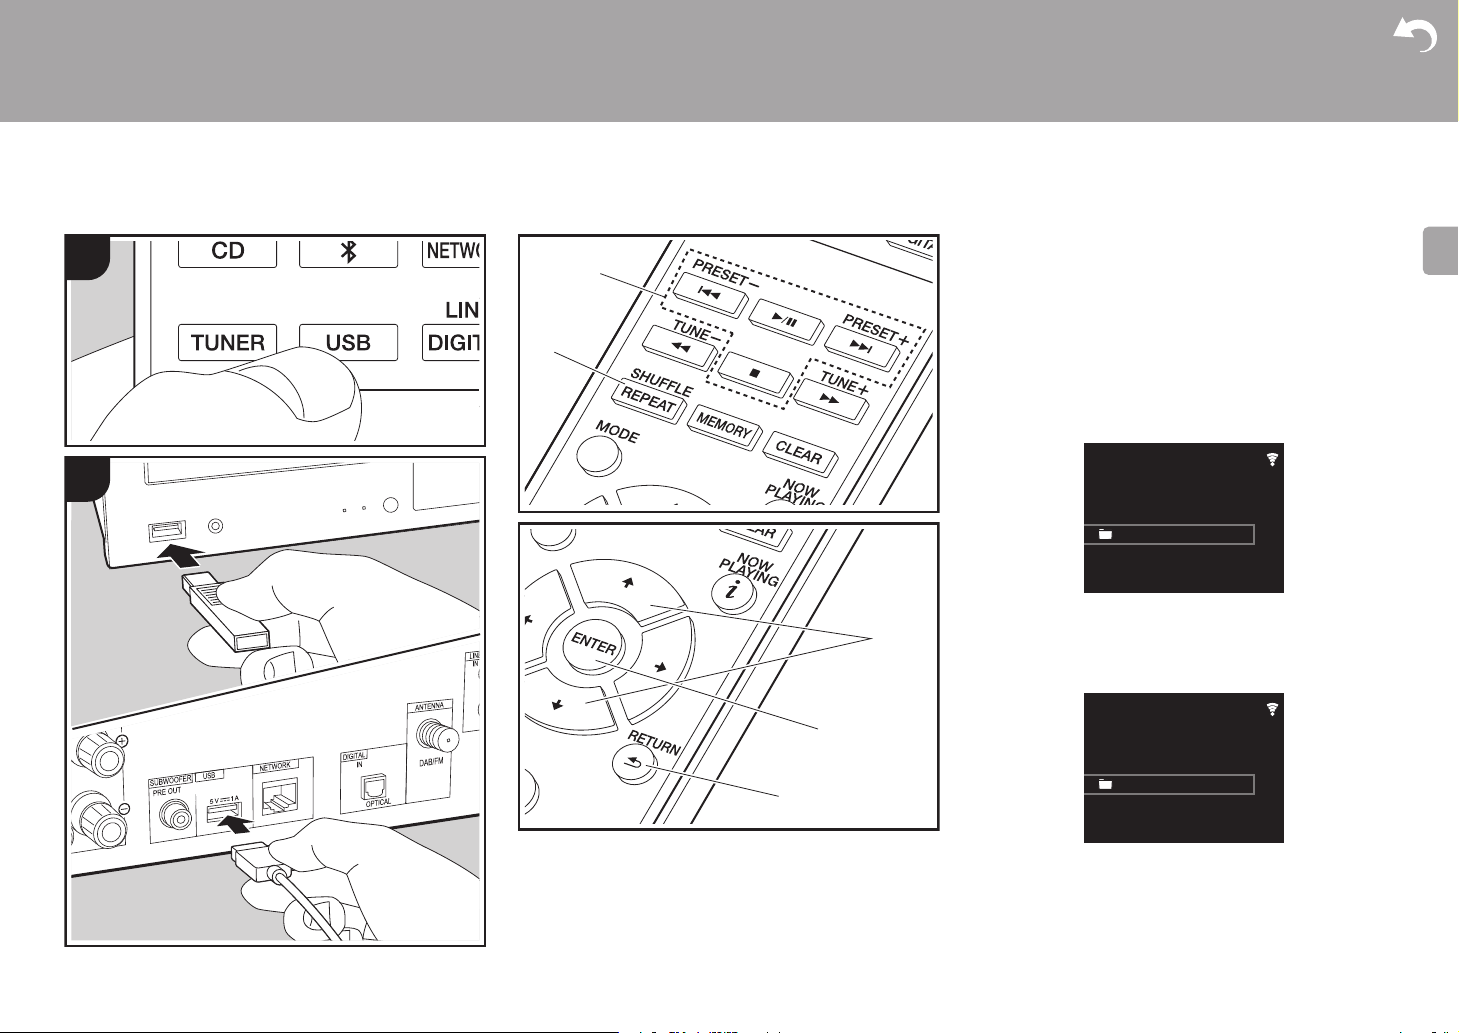
1. Turn the unit on.
2. Press USB to select either "USB Front" or "USB Rear".
USB Front
USB
No Storage
3. Plug your USB storage device or HDD into the USB port
on the front or rear.
4. Folders and music files are displayed on the display
when loading is complete.
USB Front
USB
USB Storage
5. Select the folder or music file with the cursors (c) of the
remote controller and press ENTER (d) to confirm. To
return to the previous display, press RETURN (e).
6. Use play buttons (a) to stop play or choose tracks to play.
0 The display of album name, artist name, and album art is
supported with MP3/WMA/Apple Lossless/FLAC/AAC/
19
Page 21

> Before Start > Part Names > Install > Initial Setup >Playback
E
N
1
Advanced Setup | Firmware Update | Others
DSD (DSF only) format music files. The formats for
embedded images are JPEG and PNG.
0 Characters that cannot be displayed by this unit appear
as "
¢
".
0 The USB port of this unit conforms with the USB 2.0
standard. The transfer speed may be insufficient for
some content you play, which may cause some
interruption in sound.
Repeat/Shuffle
1. Repeatedly press SHUFFLE/REPEAT (b) during play to
display , or on the display.
: Repeat play of all tracks.
1
: Repeat play of the selected individual track.
: Play tracks in a folder randomly.
To cancel repeat or shuffle play, press SHUFFLE/
REPEAT (b) several times until the icons disappear.
USB Storage / HDD Device Requirements
0 Note that operation is not guaranteed with all USB
storage devices or HDD.
0 This unit can use USB storage devices that comply with
the USB mass storage device class standard. (However,
there are still devices that cannot be played by this unit
even if they comply with the USB mass storage class
standard.)
0 The unit is also compatible with USB storage devices
using the FAT16 or FAT32 file system formats. Other
formats such as exFAT, NTFS, and HFS cannot be
played by this unit.
0 If the USB storage device has been partitioned, each
section will be treated as an independent device.
0 Up to 20,000 tracks per folder can be displayed, and
folders may be nested up to 16 levels deep.
0 USB hubs and USB storage devices with hub functions
are not supported. Do not connect these devices to the
unit.
0 USB storage devices with security function are not
supported on this unit.
0 If the USB storage device or HDD comes with an AC
adapter, we recommend that you use its AC adapter to
power it.
0 Media inserted to the USB card reader may not be
available in this function. Furthermore, depending on the
USB storage device, proper reading of the contents may
not be possible.
0 We accept no responsibility whatsoever for the loss or
damage to data stored on a USB storage device when
that device is used with this unit. We recommend that you
back up your important music files beforehand.
Supported Audio Formats
For server playback and playback from a USB storage
device, this unit supports the following music file formats.
Note that sound files that are protected by copyright cannot
be played on this unit.
MP3 (.mp3/.MP3):
0 Supported formats: MPEG-1/MPEG-2 Audio Layer 3
0 Supported sampling rates: 44.1 kHz, 48 kHz
0 Supported bitrates: Between 8 kbps and 320 kbps and
VBR.
WMA (.wma/.WMA):
0 Supported sampling rates: 44.1 kHz, 48 kHz
0 Supported bitrates: Between 5 kbps and 320 kbps and
VBR.
0 WMA Pro/Voice/WMA Lossless formats are not
supported
WAV (.wav/.WAV):
WAV files include uncompressed PCM digital audio.
0 Supported sampling rates: 44.1 kHz, 48 kHz, 88.2 kHz,
96 kHz, 176.4 kHz, 192 kHz
0 Quantization bit: 8 bit, 16 bit, 24 bit
AIFF (.aiff/.aif/.aifc/.afc/.AIFF/.AIF/.AIFC/.AFC):
AIFF files include uncompressed PCM digital audio.
0 Supported sampling rates: 44.1 kHz, 48 kHz, 88.2 kHz,
96 kHz, 176.4 kHz, 192 kHz
0 Quantization bit: 8 bit, 16 bit, 24 bit
AAC (.aac/.m4a/.mp4/.3gp/.3g2/.AAC/.M4A/.MP4/.3GP/
.3G2):
0 Supported formats: MPEG-2/MPEG-4 Audio
0 Supported sampling rates: 44.1 kHz, 48 kHz, 88.2 kHz,
96 kHz
0 Supported bitrates: Between 8 kbps and 320 kbps and
VBR.
FLAC (.flac/.FLAC):
0 Supported sampling rates: 44.1 kHz, 48 kHz, 88.2 kHz,
96 kHz, 176.4 kHz, 192 kHz
0 Quantization bit: 8 bit, 16 bit, 24 bit
Apple Lossless (.m4a/.mp4/.M4A/.MP4):
0 Supported sampling rates: 44.1 kHz, 48 kHz, 88.2 kHz,
96 kHz, 176.4 kHz, 192 kHz
0 Quantization bit: 16 bit, 24 bit
DSD (.dsf/.dff/.DSF/.DFF):
0 Supported formats: DSF/DSDIFF
0 Supported sampling rates: 2.8 MHz, 5.6 MHz, 11.2 MHz
20
Page 22
> Before Start > Part Names > Install > Initial Setup >Playback
E
N
Internet Radio
Basic operations
1
When this unit is connected to a network, you can listen to
TuneIn or other preregistered Internet radio services.
Depending on the internet radio service, the user may need
to register from their computer first.
1. Turn the unit on.
2. Press NETWORK.
Network
Advanced Setup | Firmware Update | Others
a
TuneIn Radio
Spotify
Deezer
TIDAL
b
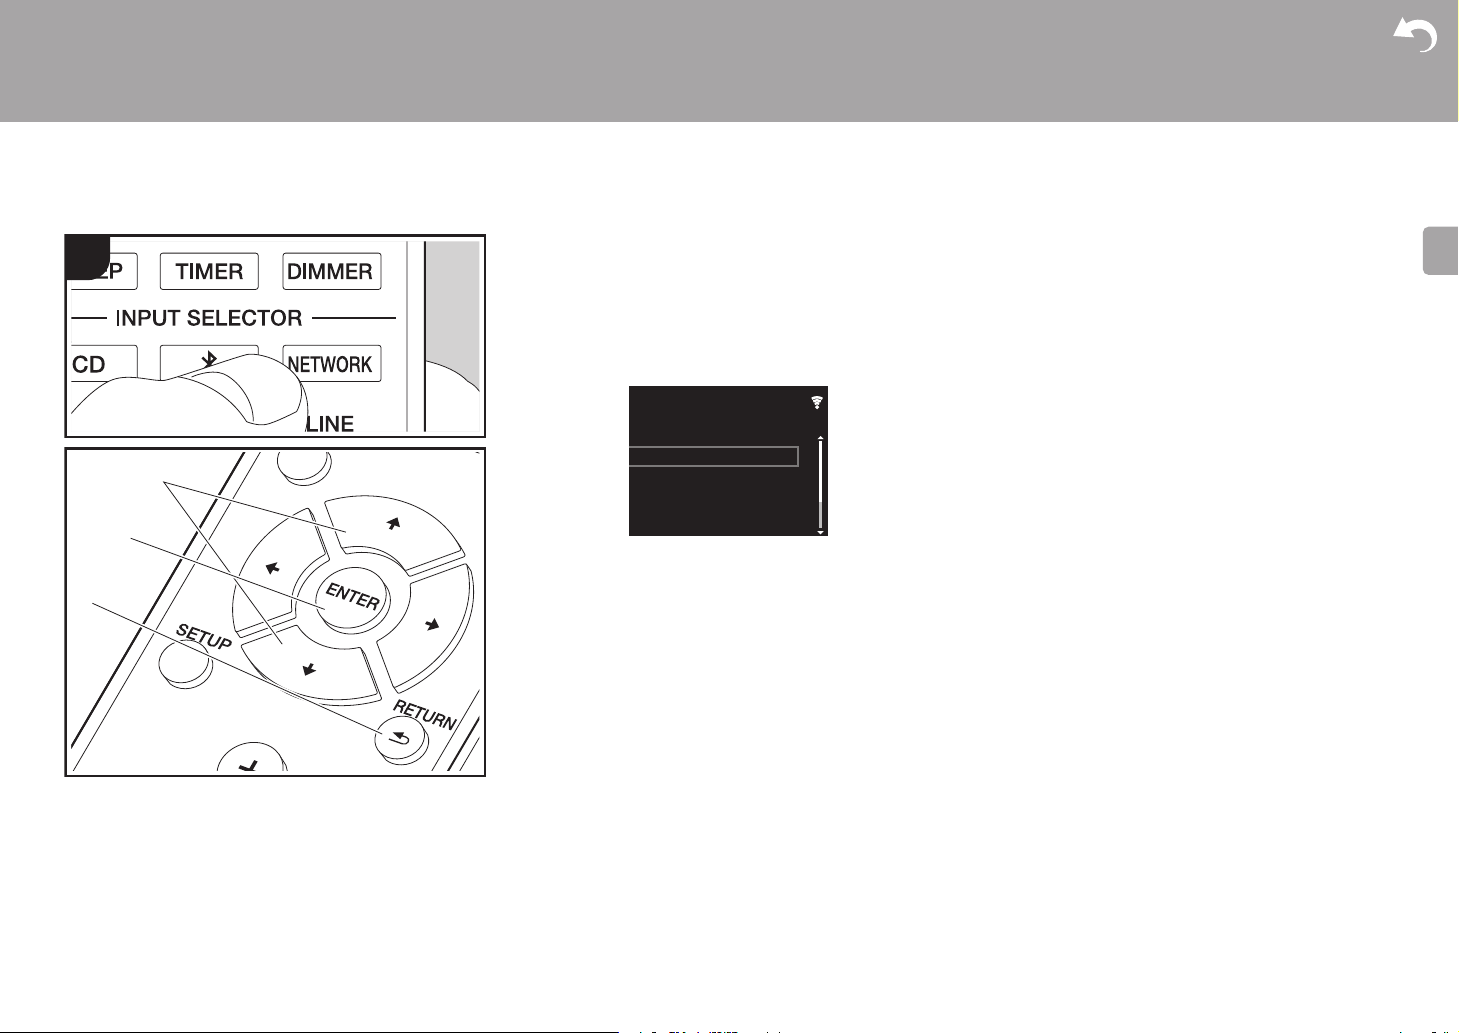
3. Select "TuneIn Radio" with the cursors (a) of the remote
controller and press ENTER (b) to confirm. After
c
switching the display to the internet radio service, you
can select stations with the cursors (a) on the remote
controller and press ENTER (b) to confirm. To return to
the previous display, press RETURN (c).
TuneIn
You can register a station you have played as a favorite.
1. Press ENTER (b) while playing TuneIn.
2. Select "Add to My Presets" on the display and confirm.
3. To play a favorite, in the top screen of TuneIn, select the
registered station in "My Presets" and confirm. To delete
favorites, press ENTER (b) during play, select "Remove
from My Presets" and confirm.
21
Page 23
> Before Start > Part Names > Install > Initial Setup >Playback
E
N
Wi-Fi
PioneerHMXXxxxxxx
b
a
c
d
1
4
3
2
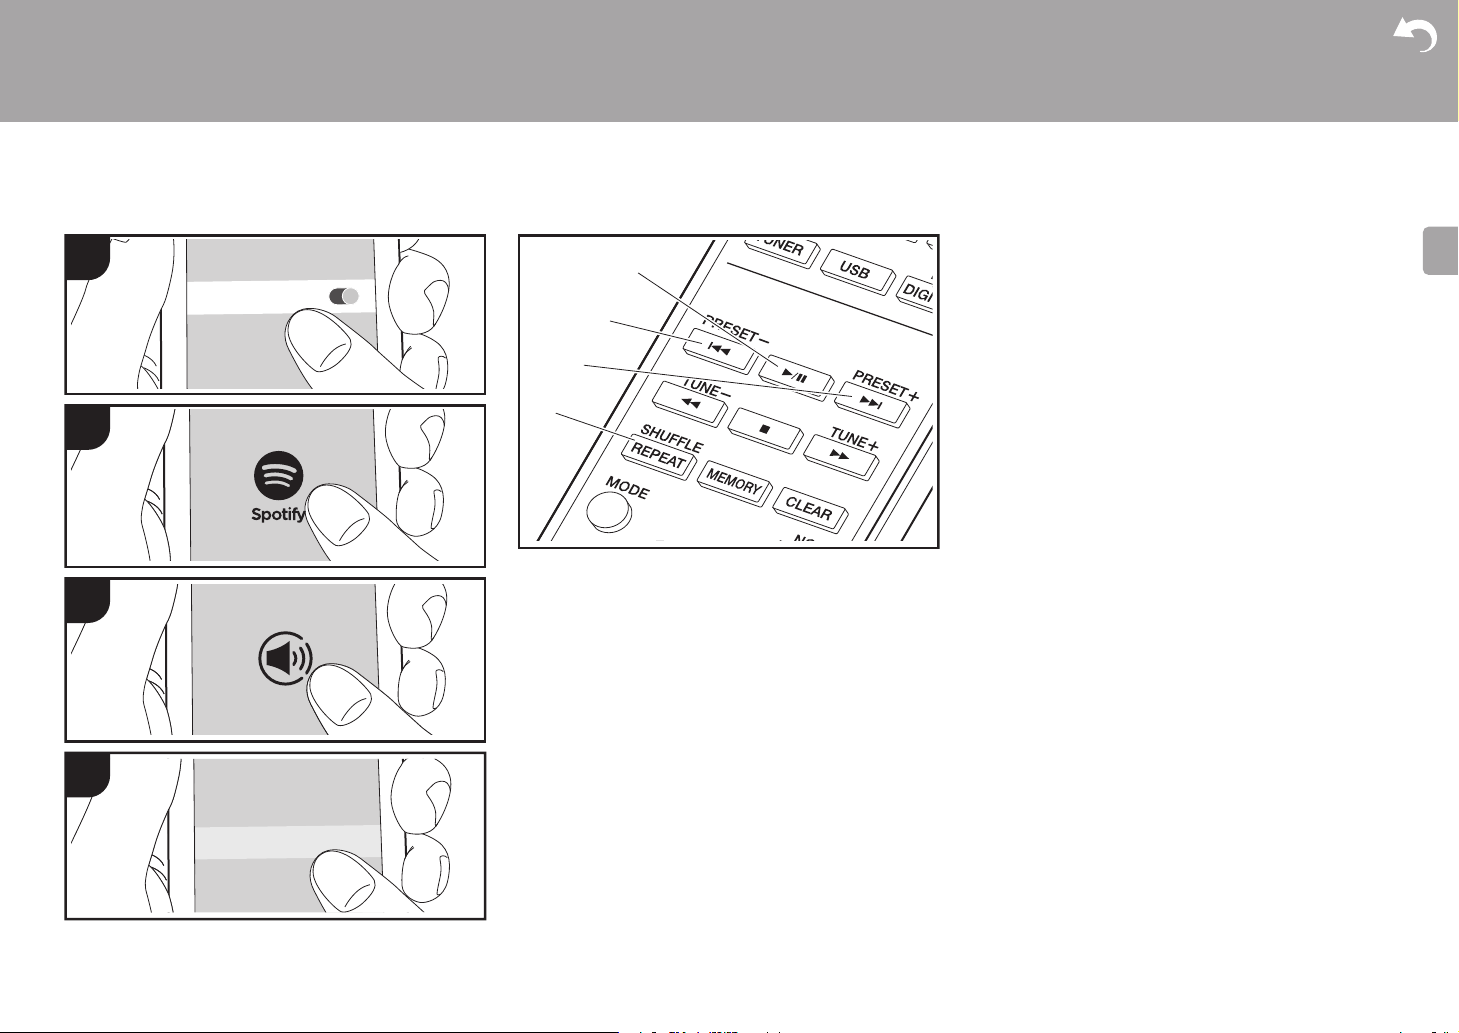
Spotify
Advanced Setup | Firmware Update | Others
Basic Operation
Spotify Connect play is possible by connecting this unit to
the same network as a smart phone or tablet. To enable
Spotify Connect, install the Spotify application on your
smartphone or tablet and create a Spotify premium
account.
1. Connect the smartphone to the network that this unit is
connected to.
2. Click the Connect icon in the track play screen of the
Spotify app.
3. Select this unit.
0 This unit is displayed as "Pioneer HM76D (76 or 86D)
XXXXXX"
4. This unit turns on automatically and the input selector
changes to NETWORK and streaming of Spotify starts.
0 If "Option Setting" - "Power Off Setting" - "Network
Standby" is set to "Off" in the Setup menu, manually
turn the unit on and then press NETWORK on the
remote controller.
0 Refer to the following for Spotify settings:
www.spotify.com/connect/
0 The Spotify software is subject to third party licenses
found here:
www.spotify.com/connect/third-party-licenses
The following remote controller operations are also
possible.
(a) Pressed during play this button pauses playback.
Pressed while paused, and it restarts play.
(b) This button plays the previous track.
(c) This button plays the next track.
(d) Start Repeat or Shuffle play. Pressing this button
repeatedly cycles through the repeat/shuffle modes.
22
Page 24
> Before Start > Part Names > Install > Initial Setup >Playback
E
N
1
d
e
f
b
e
a
c
d
h
f
g
87.50
MHz
AUTO
Tuner FM
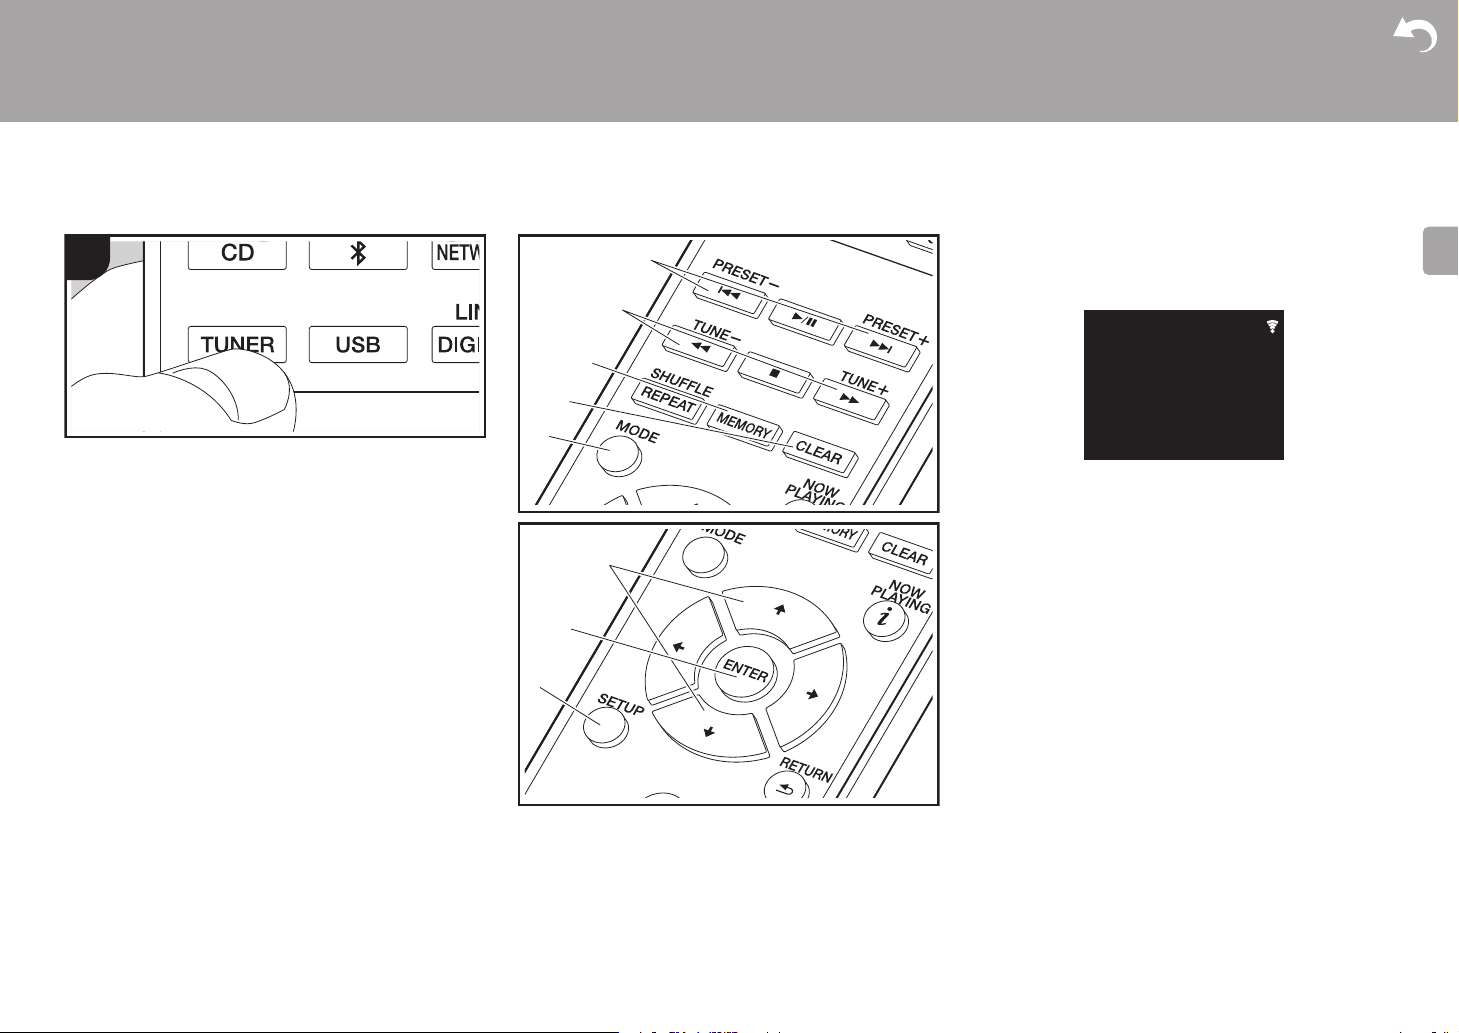
Listening to the FM Radio
Advanced Setup | Firmware Update | Others
Tuning Automatically
1. Turn the unit on.
2. Repeatedly press TUNER to switch input to Tuner FM.
3. When you press TUNE i/j (b) on the remote controller,
automatic tuning starts, and searching stops when a
station is found. "Tuned Stereo" or "Tuned Mono" is
displayed when FM stations are being received.
When FM broadcasts are difficult to receive: Perform the
procedure for "Tuning Manually". If the "Tuning Mode" is set
to "Manual", the reception for FM broadcasts will be
monaural rather than stereo, irrespective of the sensitivity of
the reception.
Tuning Manually
You will need to change the initial settings. Press SETUP
(h) on the remote controller and select "Option Setting" "Tuner Setting" - "Tuning Mode" - "Manual" on the display
and confirm. Press SETUP (h) to finish the settings.
1. Turn the unit on.
2. Repeatedly press TUNER to switch input to Tuner FM.
23
Page 25

> Before Start > Part Names > Install > Initial Setup >Playback
E
N
Tuner FM
87.50
MHz
87.50
MHz
Tuner FM
P01
Advanced Setup | Firmware Update | Others
3. Select the station you want to listen to while pressing
TUNE i/j (b) on the remote controller.
0 The frequency changes by 1 step each time you press
the button. The frequency changes continuously if the
button is held down and stops when the button is
released. Tune by looking at the display.
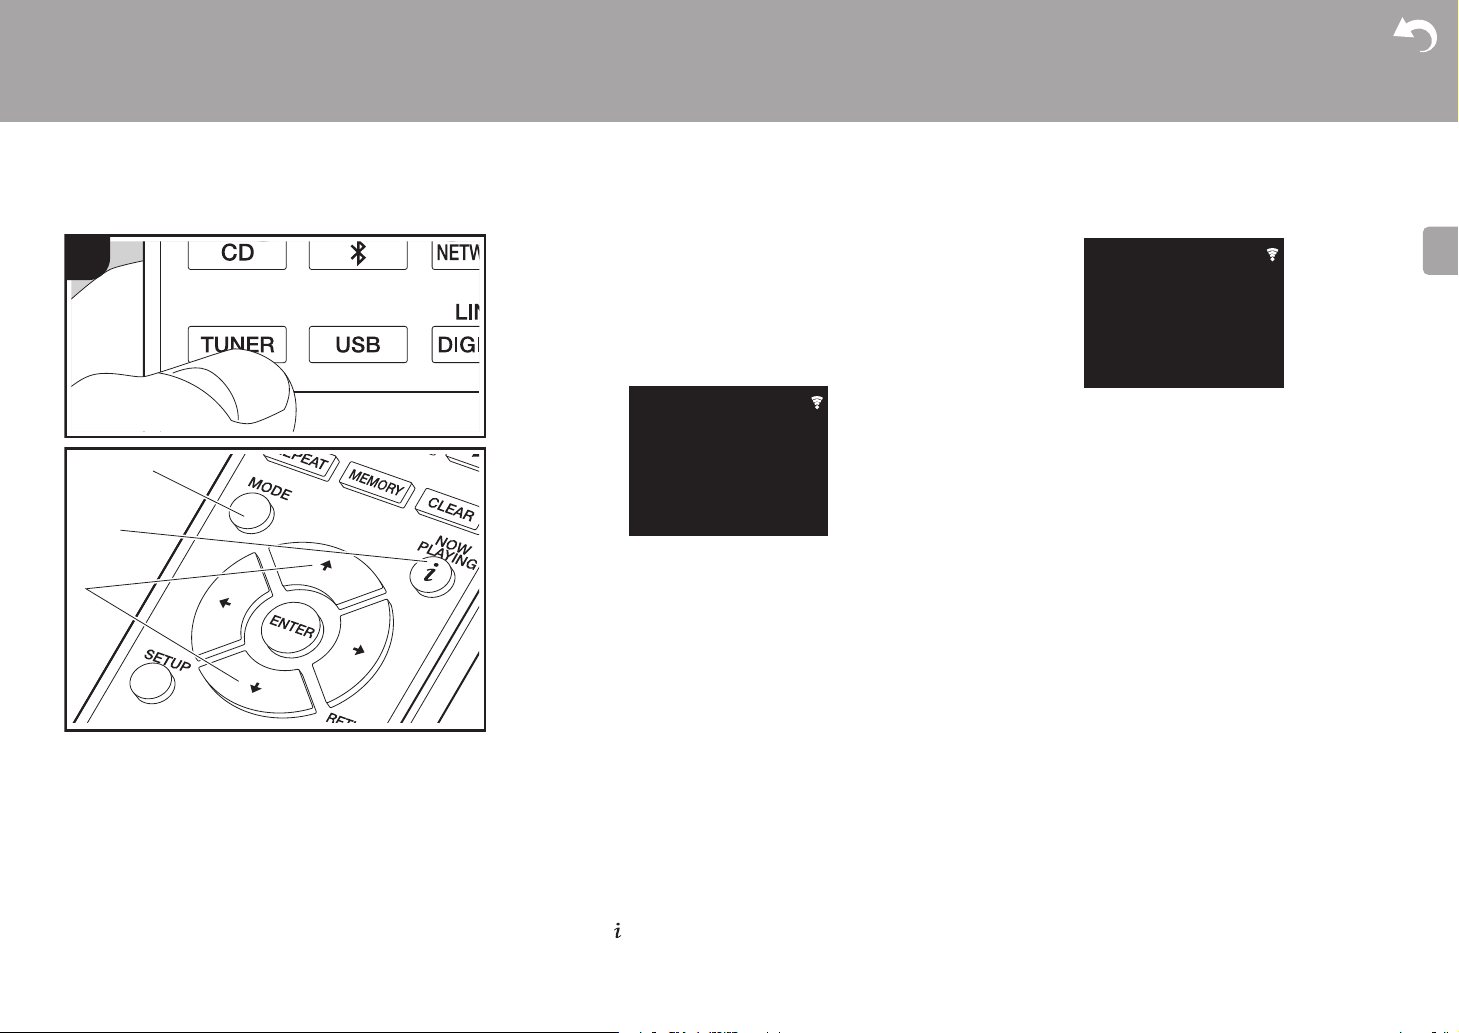
Registering a station
You can register a maximum of 40 stations.
1. Tune into the radio station you want to register.
2. Press MEMORY (c) on the remote controller so that the
preset number on the display flashes.
3. While the preset number is flashing (about 8 seconds),
repeatedly press PRESET i/j (a) on the remote
controller to select a number between 1 and 40.
4. Press MEMORY (c) on the remote controller again to
register the station. When registered, the preset number
stops flashing.
24
Selecting registered stations
1. Repeatedly press TUNER to switch input to Tuner FM.
2. Press PRESET i/j (a) on the remote controller to select
a preset number.
To delete a registered station
1. Repeatedly press TUNER to switch input to Tuner FM.
2. Press PRESET i/j (a) on the remote controller to select
the preset number you want to delete.
3. Press CLEAR (d) on the remote controller to delete the
preset number.
To give a name to a registered station
1. Repeatedly press TUNER to switch input to Tuner FM.
2. Press PRESET i/j (a) on the remote controller to select
a preset number.
3. Press SETUP (h) on the remote controller.
4. Press y/z (f) on the remote controller to select "Option
Setting" - "Tuner Setting" - "Preset Name" and press
ENTER (g).
5. Enter a name for the station. For details on how to enter
text, refer to " Entering text" (ÄP34).
Using RDS
RDS stands for Radio Data System and is a method of
transmitting data in FM radio signals. In regions using RDS,
the radio station name is displayed when you tune into a
radio station broadcasting program information. When you
press MODE (e) on the remote controller in this state, you
can use the following functions.
Displaying text information (Radio Text)
1. While the name of the station is being displayed on the
display, press MODE (e) on the remote controller once.
Radio Text (RT) broadcast by the station is displayed
scrolling across the display. "Not RDS" is displayed when
no text information is available.
0 Unusual characters may be displayed when the unit
receives unsupported characters. However, this is not a
malfunction. Also, if the signal from a station is weak,
information may not be displayed.
Search for stations by Program Type
1. While the name of the station is being displayed on the
display, press MODE (e) on the remote controller twice.
2. Press the PRESET i/j (a) on the remote controller to
select the Program Type you want to find, then press
ENTER (g) to start the search.
The Program Types displayed are as follows:
None
News (News reports)
Current affair
Information
Sport
Education
Drama
Cultures
Science (Science and technology)
Varied speech
Pop music
Rock music
Easy listening
Light classics
Serious classi (Serious classics)
Other music
Weather & metr
Finance
Children's pro (Children's programmes)
Social affairs
Religion
Phone in
Travel & touri
Leisure & hobb
Jazz music
Country music
Nation music
Oldies music
Page 26

> Before Start > Part Names > Install > Initial Setup >Playback
E
N
Folk music
Documentary
0 The information displayed may sometimes not match
the content being broadcast by the station.
3. "FINISH" is displayed when a station is found and the
frequency display flashes. Press ENTER (g) while this is
happening to start receiving that station. If you don't
press ENTER (g), the unit continues to search for
another station.
0 If no stations are found, the message "Not Found" is
displayed.
0 Unusual characters may be displayed when the unit
receives unsupported characters. However, this is not a
malfunction. Also, if the signal from a station is weak,
information may not be displayed.
Advanced Setup | Firmware Update | Others
25
Page 27
> Before Start > Part Names > Install > Initial Setup >Playback
E
N
1
b
a
c
News
ABCD-Station
Tuner DAB
Listening to DAB Digital Radio (X-HM76D, X-HM86D, XC-HM86D)
Tuning
1. Turn the unit on.
2. Repeatedly press TUNER to switch input to Tuner DAB.
0 The very first time you select Tuner DAB, the Auto
Tuning function automatically scans the DAB Band 3
for the multiplexes (i.e., stations) available in your
area.
Tuner DAB
Scan: 100%
0 Once the scanning process is complete, the first
station that was detected is selected.
0 If a new DAB station is introduced, or you move to a
new area, press SETUP on the remote controller, then
use "DAB Scan" in "Option Setting" - "Tuner Setting".
3. Select the desired radio station with the cursors (c) on
the remote controller.
Advanced Setup | Firmware Update | Others
DLS (Dynamic Label Segment) : When tuned to a
station that's broadcasting DLS text data, the text will
scroll across the display.
Program Type : Displays the type of program.
Bit Rate and Audio Mode : Displays the station's bit rate
and audio mode (Stereo, Mono).
Quality : Displays the signal quality.
0 - 59: Poor reception
60 - 79: Good reception
80 - 100: Excellent reception
Multiplex Name : Displays the name of the current
multiplex.
Multiplex Number and Frequency : Displays the
number and frequency of the current multiplex.
26
Changing the order stations are displayed
You can sort the abailable stations alphabetically or by
multiplex.
1. Press MODE (a) repeatedly to set the method for sorting
the display order from the following.
Alphabet (default setting) : Sort stations alphabetically.
Multiplex : Sort stations by multiplex.
Displaying DAB Radio Information
1. Press the (NOW PLAYING) button (b) repeatedly to
display more information about the selected DAB station.
Page 28
> Before Start > Part Names > Install > Initial Setup >Playback
E
N
PioneerHMXXxxxxxx
PioneerHMXXxxxxxx
Playing BackPairing
--:--:--/--:--:--
Now Pairing...
Bluetooth
Advanced Setup | Firmware Update | Others
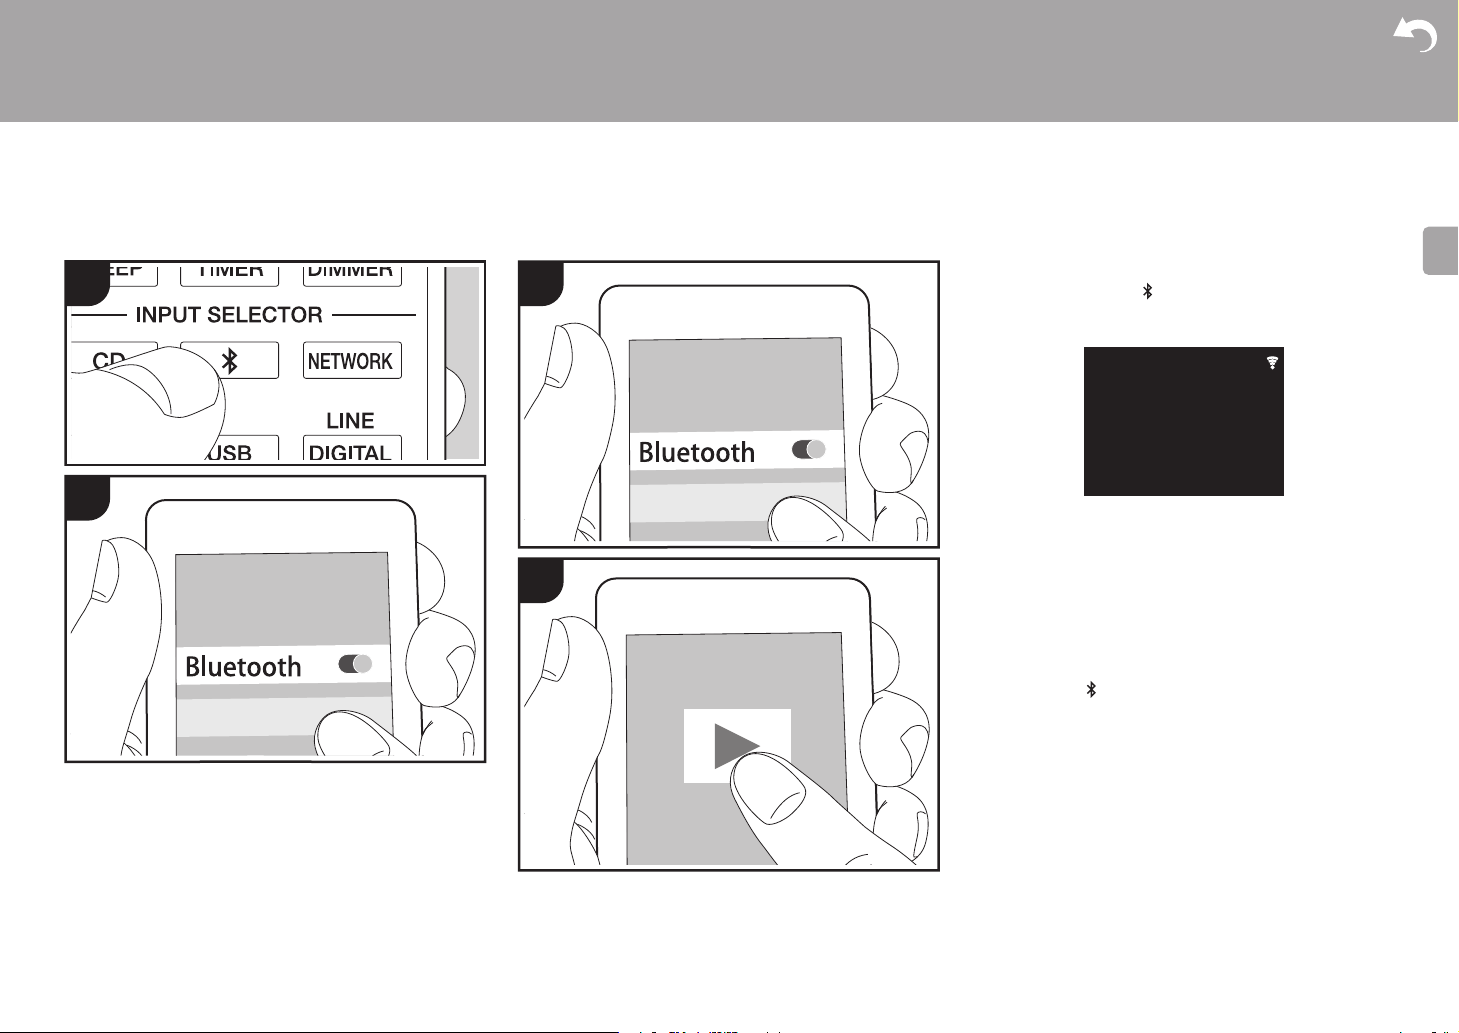
BLUETOOTH
1
2
®
Pairing
1.
1
2
Turn the unit on
2. When you press the button on the remote controller,
"Now Pairing... " is displayed on the display, and the
pairing mode is enabled.
3.
Enable (turn on) the BLUETOOTH function of the
BLUETOOTH enabled device, then select this unit from
amongst the devices displayed. If a password is
requested, enter "0000".
0 This unit is displayed as "Pioneer HM76D (76 or 86D)
XXXXXX".
4. "Now Pairing... " on the display changes to the name of
the BLUETOOTH enabled device.
0 To connect another BLUETOOTH enabled device, press
and hold the button until "Now Pairing... " is displayed,
then perform step 3 above. This unit can store the data of
up to eight paired devices.
0 The coverage area is 10 meters. Note that connection is
not always guaranteed with all BLUETOOTH enabled
devices.
.
Playing Back
1.
Turn the unit on
2. Perform the connection procedure on the BLUETOOTH
enabled device.
3. The input selector on this unit automatically switches to
"Bluetooth".
.
27
Page 29

> Before Start > Part Names > Install > Initial Setup >Playback
E
N
4. Play the music files. Increase the volume of the
BLUETOOTH enabled device to an appropriate level.
0 Due to the characteristics of BLUETOOTH wireless
technology, the sound produced on this unit may slightly
be behind the sound played on the BLUETOOTH
enabled device.
Advanced Setup | Firmware Update | Others
28
Page 30
> Before Start > Part Names > Install > Initial Setup >Playback
E
N
1
3
PioneerHMXX
iPhone
2
4
Advanced Setup | Firmware Update | Others
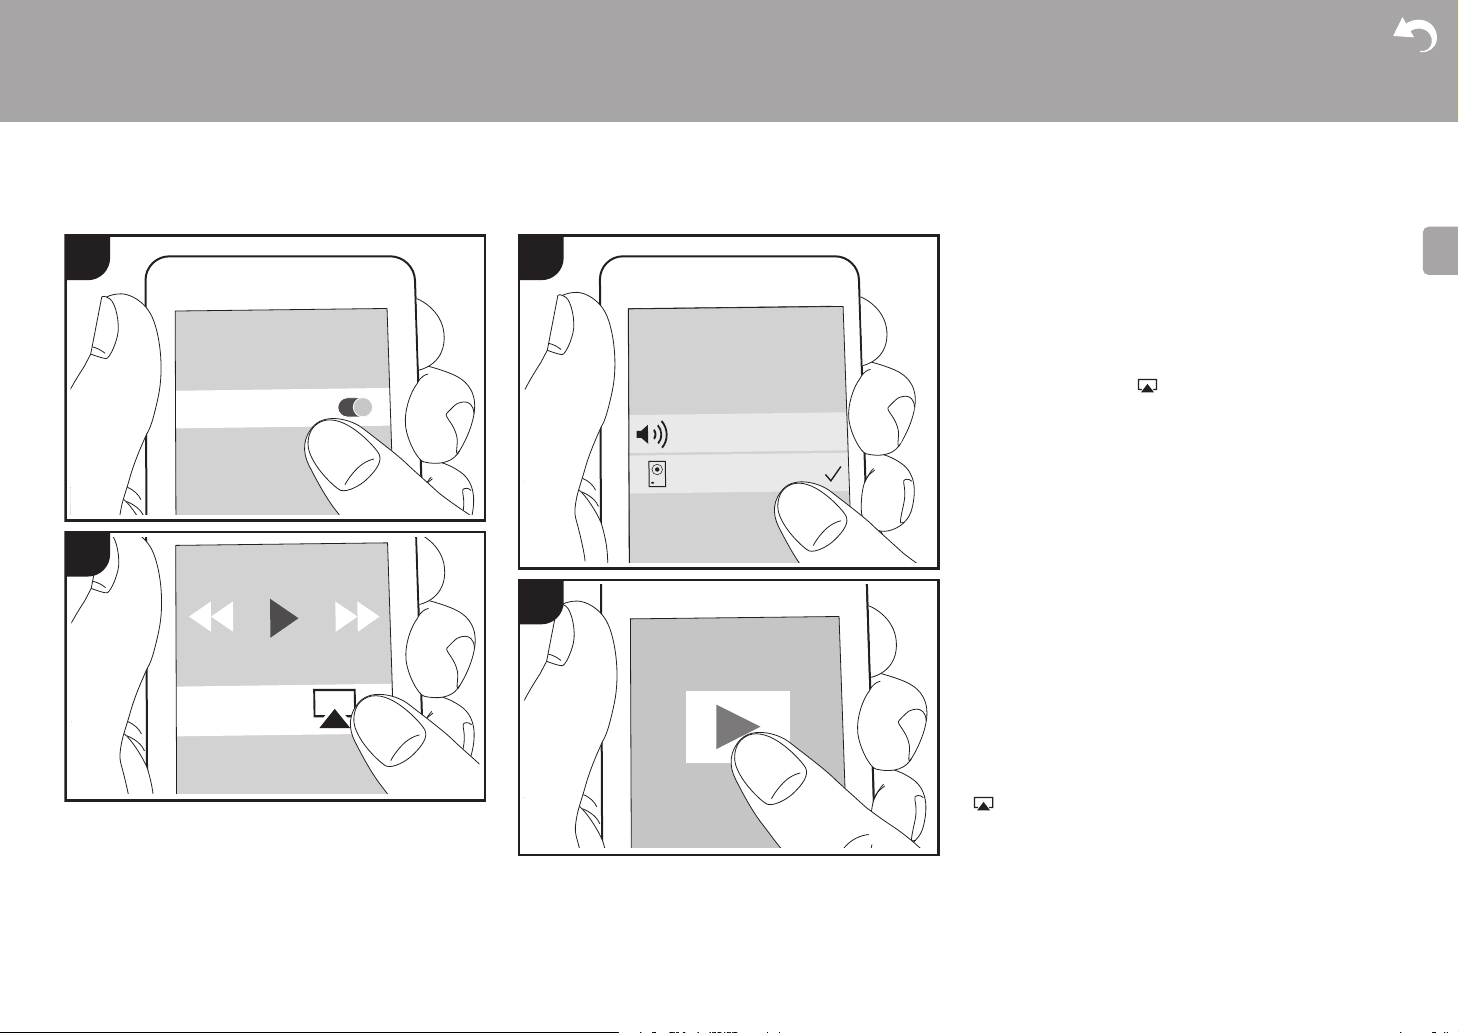
AirPlay
®
Wi-Fi
Basic Operation
You can wirelessly enjoy the music files on an iPhone®,
iPod touch
as this unit. Update the OS version on your iOS device to
the latest version.
1. Turn the unit on.
2. Connect the iOS device to the same network as this unit.
3. Tap the AirPlay icon in the control center of the iOS
4. Play the music files on the iOS device.
0 In the Setup menu displayed by pressing SETUP on the
0 Due to the characteristics of AirPlay wireless technology,
0 SHUFFLE/REPEAT on the remote controller does not
You can also play the music files on a computer with iTunes
(Ver. 10.2.2 or later). Make sure this unit and the computer
are connected to the same network, click the AirPlay icon
displayed, and start play of a music file.
®
, or iPad® connected to the same access point
device and select this unit from the list of devices
displayed, and tap "Done".
0 This unit is displayed as "Pioneer HM76D (76 or 86D)
XXXXXX".
0 If an "AirPlay Password" has been set on this unit,
enter the password you set.
remote controller, when "Option Setting"
- "Network Standby" is set to "On", when play of
Setting"
AirPlay starts, this unit turns on automatically and play
starts.
the sound produced on this unit may slightly be behind
the sound played on the AirPlay-enabled device.
work. Operate from the iOS device.
in iTunes, select this unit from the list of devices
- "Power Off
29
Page 31

> Before Start > Part Names > Install > Initial Setup >Playback
E
N
a
b
1
2
Digital In
Line
Playing audio from an external device
Connections
You can play the audio from external devices such as TVs
and game consoles through this unit. If the external device
has an optical digital output terminal, connect using a digital
optical cable to the DIGITAL IN OPTICAL terminal on this
unit. When the external device is to be connected with an
analog audio cable, connect to the LINE IN jack on this unit.
Playing Back
1. Turn the unit on.
2. When playing a device connected to the DIGITAL IN
OPTICAL terminal, press LINE/DIGITAL repeatedly to
change the input on this unit to "Digital In".
Advanced Setup | Firmware Update | Others
3. Start play on the player.
0 When connected by a digital optical cable, this unit
supports linear PCM signals of up to 192 kHz/24 bits for
input.
30
When playing a device connected to the LINE IN
terminal, press LINE/DIGITAL repeatedly to change the
input on this unit to "Line".
a Digital optical cable, b Analogue audio cable
Page 32

> Before Start > Part Names > Install > Initial Setup >Playback
E
N
Network
TIDAL
Deezer
Spotify
TuneIn Radio
Music Server
Advanced Setup | Firmware Update | Others
1
It is possible to stream music files stored on PCs or NAS
devices connected to the same network as this unit. The
network servers this unit is compatible with are those PCs
with players installed that have the server functionality of
Windows Media
compatible with home network functionality. You may need
to make some settings in advance to use Windows Media
Player 11 or 12. Note that only music files registered in the
library of Windows Media
®
Player 11 or 12, or NAS that are
®
Player can be played.
®
Configuring Windows Media® Player
a
b
c
■ Windows Media® Player 11
1. Turn on your PC and start Windows Media® Player 11.
2. In the "Library" menu, select "Media Sharing" to display a
dialog box.
3. Select the "Share my media" check box, and then click
"OK" to display the compatible devices.
4. Select this unit, click "Allow" and put a check mark next to
the icon for this unit.
5. Click "OK" to close the dialog.
0 Depending of the version of Windows Media
there may be differences in the names of items you can
select.
®
Player,
■ Windows Media® Player 12
1. Turn on your PC and start Windows Media® Player 12.
2. In the "Stream" menu, select "Turn on media streaming"
to display a dialog box.
0 If media streaming is already turned on, select "More
streaming options..." in the "Stream" menu to list players
in the network, and then go to step 4.
3. Click "Turn on media streaming" to list players in the
network.
4. Select this unit in "Media streaming options" and check
that it is set to "Allow".
5. Click "OK" to close the dialog.
0 Depending of the version of Windows Media
®
Player,
there may be differences in the names of items you can
select.
Playing
1. Turn the unit on.
2. Start the server (Windows Media
3. Make sure that the PCs and/or NASs are properly
4.
5. With y/z (a), select "Music Server", and then press
6. Select the server and music file with y/z (a) and press
®
Media
Player 12, or NAS device) containing the music
files to play.
connected to the same network as this unit.
Press NETWORK to display the network service list screen
ENTER (b).
ENTER (b) to confirm. To return to the previous display,
press RETURN (c).
0 If "No Server" is displayed, check whether the network is
properly connected.
0 Depending on the server being used and the files played,
elapsed play time and remaining play time may not be
displayed.
0 For music files on a server, there can be up to 20,000
tracks per folder, and folders may be nested up to 16
levels deep.
®
Player 11, Windows
Controlling Remote Playback from a PC
.
31
Page 33

> Before Start > Part Names > Install > Initial Setup >Playback
E
N
Advanced Setup | Firmware Update | Others
You can use this unit to play music files stored on your PC
by operating the PC inside your home network. The unit
supports remote playback with Windows Media
1. Turn on your PC and start Windows Media
®
2. Open the "Stream" menu and check that "Allow remote
control of my Player..." is checked. Click "Turn on media
streaming" to list players in the network.
3. Select and right-click the music file to play with Windows
®
Media
Player 12. To remotely play a music file on
another server, open the target server from "Other
Libraries" and select the music file to play.
4. Select this unit in "Play to" to open the "Play to" window
of Windows Media
unit. If your PC is running on Windows
to", and then select this unit. If your PC is running on
Windows
®
®
Player 12 and start playback on the
®
8.1, click "Play
10, click "Cast to Device", and select this unit.
Operations during remote playback are possible from the
"Play to" window on the PC.
5. Adjust the volume using the volume bar on the "Play to"
window.
0 Sometimes, the volume displayed on the remote
playback window may differ from that appeared on the
display of the unit. Also, when the volume is adjusted
from this unit, this is not reflected in the "Play to" window.
0 Remote playback is not possible when using a network
service or playing music files on a USB storage device.
0 Depending of the version of Windows Media
there may be differences in the names of items you can
select.
Supported Audio Formats
For server playback and playback from a USB storage
device, this unit supports the following music file formats.
0 Note that playback via wireless LAN of sampling rates of
88.2 kHz or higher, and DSD are not supported.
0 Remote play of FLAC, and DSD is also not supported.
0 Variable bit-rate (VBR) files are supported. However,
®
Player 12.
Player 12.
®
Player,
playback times may not be displayed correctly.
0 Remote playback does not support the gapless playback.
MP3 (.mp3/.MP3):
0 Supported formats: MPEG-1/MPEG-2 Audio Layer-3
0 Supported sampling rates: 44.1 kHz, 48 kHz
0 Supported bitrates: Between 8 kbps and 320 kbps and
VBR.
WMA (.wma/.WMA):
0 Supported sampling rates: 44.1 kHz, 48 kHz
0 Supported bitrates: Between 8 kbps and 320 kbps and
VBR.
0 WMA Pro/Voice/WMA Lossless formats are not
supported.
WAV (.wav/.WAV):
WAV files include uncompressed PCM digital audio.
0 Supported sampling rates: 44.1 kHz, 48 kHz, 88.2 kHz,
96 kHz, 176.4 kHz, 192 kHz
0 Quantization bit: 8 bit, 16 bit, 24 bit
AIFF (.aiff/.aif/.aifc/.afc/.AIFF/.AIF/.AIFC/.AFC):
AIFF files include uncompressed PCM digital audio.
0 Supported sampling rates: 44.1 kHz, 48 kHz, 88.2 kHz,
96 kHz, 176.4 kHz, 192 kHz
0 Quantization bit: 8 bit, 16 bit, 24 bit
AAC (.aac/.m4a/.mp4/.3gp/.3g2/.AAC/.M4A/.MP4/.3GP/
.3G2):
0 Supported formats: MPEG-2/MPEG-4 Audio
0 Supported sampling rates: 44.1 kHz, 48 kHz, 88.2 kHz,
96 kHz
0 Supported bitrates: Between 8 kbps and 320 kbps and
VBR.
FLAC (.flac/.FLAC):
0 Supported sampling rates: 44.1 kHz, 48 kHz, 88.2 kHz,
96 kHz, 176.4 kHz, 192 kHz
0 Quantization bit: 8 bit, 16 bit, 24 bit
LPCM (Linear PCM):
0 Supported sampling rates: 44.1 kHz, 48 kHz
0 Quantization bit: 16 bit
Apple Lossless (.m4a/.mp4/.M4A/.MP4):
0 Supported sampling rates: 44.1 kHz, 48 kHz, 88.2 kHz,
96 kHz, 176.4 kHz, 192 kHz
0 Quantization bit: 16 bit, 24 bit
DSD (.dsf/.dff/.DSF/.DFF):
0 Supported formats: DSF/DSDIFF
0 Supported sampling rates: 2.8 MHz, 5.6 MHz, 11.2 MHz
32
Page 34

> Before Start > Part Names > Install > Initial Setup >Playback
E
N
b
a
Using the alarm to start play
Advanced Setup | Firmware Update | Others
Settings
At the set time, the unit switches on and starts play of the
desired source. You can set two different timers, "TIMER 1"
and "TIMER 2". Make sure that the clock on this unit is set
correctly. You cannot use the timers if the clock has not
been set.
1. Press and hold TIMER for 2 seconds.
TIMER1
TimerSet
To set "TIMER 1", proceed to step 2. To set "TIMER 2",
press TIMER once more.
2. Press ENTER (b) when "Timer Set" is displayed.
3. Press w/x (a) to select the source to use for timer play,
then press ENTER (b).
0 The sources you can select are "CD", "FM" and "DAB"
(X-HM76D, X-HM86D, XC-HM86D).
When you select "FM", press w/x (a) to select a
preset station and press ENTER (b).
When you select "DAB", the service last used is
received.
4. Press w/x (a) to select "Every" or "Once" and press
ENTER (b).
If you select "Every", select days of the week from
amongst "Everyday", "Sunday", "Monday", "Tuesday",
"Wednesday", "Thursday", "Friday", "Saturday", "MonFri", "Tue-Sat", and "Sat-Sun" and confirm. If you select
"Once", select a day of the week from amongst "Sunday",
"Monday", "Tuesday", "Wednesday", "Thursday",
"Friday", or "Saturday" and confirm.
5. Press w/x (a) to set the start time for the alarm and
press ENTER (b).
6. Press w/x (a) to set the end time for the alarm and press
ENTER (b).
7. Press w/x (a) to set the volume (0 to 50) for the alarm
and press ENTER (b).
8. The TIMER indicator lights when the settings are
complete, and the content you set is displayed on the
display.
9. Press Í STANDBY/ON to switch the unit to standby.
Check whether the alarm setting is On or Off: When the
TIMER indicator is on and red, the alarm is on. The alarm is
off if the indicator is off.
Turning the alarm setting On or Off: If the alarm is
already set, you can turn the function on or off.
1. Press and hold TIMER for 2 seconds.
2. "TIMER 1" is displayed. To modify "TIMER 1", proceed to
step 3. To modify "TIMER 2", press TIMER once more.
3. To turn off, press ENTER (b) when "Timer Off" is
displayed.
0 To turn on, press ENTER (b) when "Timer On" is
displayed.
0 Press w/x (a) to select "Timer Call", then press
ENTER (b) to check the content you set.
4. Press Í STANDBY/ON to switch the unit to standby.
33
Page 35

> Before Start > Part Names > Install > Initial Setup >Playback
E
N
Password
A
Delete One Character[CLEAR]
Change Text[REPEAT]
Entering text, adjusting sound quality, etc.
Advanced Setup | Firmware Update | Others
b
Entering text
a
c
d
Text entry, for passwords, etc., uses the following remote
controller buttons.
SHUFFLE/REPEAT button (a): Each press changes text
type in the order upper case → lower case → numbers →
symbols.
y/z buttons (c): Each press changes the character.
w/x buttons (d): Move the position (cursor position) where
the character is to be entered.
CLEAR button (b): Deletes the character in the cursor
position.
ENTER button (e): Confirms the entered content.
RETURN button (f): Cancels input and returns you to the
previous display.
Emphasizing the low range (P.BASS)
1. Press SOUND button (g) three times.
2. Press w/x buttons (d) to select "On" and press ENTER
(e).
e
f
g
Adjusting the sound quality
Adjusting the bass (BASS)
1. Press SOUND button (g).
2. Press w/x buttons (d) to adjust the bass. (s5 to i5)
Adjusting the treble (TREBLE)
1. Press SOUND button (g) twice.
2. Press w/x buttons (d) to adjust the treble. (s5 to i5)
34
Page 36

> Before Start > Part Names > Install > Initial Setup > Playback
E
N
1
Setup
Factory Reset
System Info
Option Setting
Network Setting
Advanced Settings
Advanced Setup
The unit allows you to configure advanced settings to provide you with an even better
experience.
1. Press SETUP on the remote controller.
2. After the Setup screen is displayed, select the content or the setting with the cursors on
the remote controller and press ENTER to confirm your selection. To return to the
previous screen, press RETURN.
3. To exit the settings, press SETUP.
Advanced Setup | Firmware Update | Others
Network Setting
■ Connection
Select the type connection to the network.
"Wi-Fi": To connect via wireless LAN
"Wired" (Default Value): To connect via wired LAN
Perform "Wi-Fi Setup" if you select "Wi-Fi".
■ Wi-Fi Setup
35
Page 37

> Before Start > Part Names > Install > Initial Setup > Playback
E
N
Advanced Setup | Firmware Update | Others
Make Wi-Fi connection settings. (ÄP13)
This can be set only when "Wi-Fi" is selected in "Connection".
0 You can make Wi-Fi connection settings using a web browser on a computer. For details,
refer to “Web Setup” (ÄP38).
■ DHCP
"On" (Default Value): Auto configuration by DHCP
"Off": Manual configuration without DHCP
If selecting "Off", you must set "IP Address", "Subnet Mask", "Gateway", and "DNS Server"
manually.
■ IP Address
Displays/Sets the IP address.
■ Subnet Mask
Displays/Sets the subnet mask.
■ Gateway
Displays/Sets the gateway.
■ DNS Server
Displays/Sets the primary DNS server.
■ Proxy URL
Displays/Sets the proxy server URL.
■ Proxy Port
Displays/Sets the proxy server port number when you enter "Proxy URL".
■ Friendly Name
Change the device name for this unit which is shown on other devices connected to the
network to an easily recognized name. You can input up to 31 characters. For details on how
to enter text, refer to "Entering text" (ÄP34). After finishing input, press ENTER.
■ AirPlay Password
You can set a password of up to 31 characters so that only registered users can use AirPlay.
For details on how to enter text, refer to "Entering text" (ÄP34). After finishing input, press
ENTER.
■ Network Check
You can check the network connection.
Option Setting
■ Power Off Setting
Auto Standby This setting places the unit on standby automatically after 20
Network Standby
Bluetooth Wakeup This function wakes up the unit on standby by connecting a
■ Digital Filter
"Slow": Soft and fluid sound
"Sharp" (Default Value): Sound with more structure and firmness
"Short": Sound that starts quick and seems to move forward
■ Language
minutes of inactivity without any audio input.
"On" (Default Value): The unit will automatically enter standby
mode.
"Off": The unit will not automatically enter standby mode.
When this feature is turned "On", you can turn on the power of the
unit via the network using an application that can control this unit
0 Setting to "On" (Default Value) increases the power
consumption even when the unit is on standby.
0 "Network Standby", which suppresses power consumption,
may be disabled when the network connection is lost.
BLUETOOTH enabled device.
"On": Use this function
"Off" (Default Value): Do not use this function
0 Setting to "On" increases the power consumption even when
the unit is on standby.
0 This setting is fixed to "Off" if "Bluetooth Setting" - "Auto Input
Change" is set to "Off".
.
36
Page 38

> Before Start > Part Names > Install > Initial Setup > Playback
E
N
Advanced Setup | Firmware Update | Others
Select the language displayed on the display.
English (Default Value), German, French, Spanish, Italian, Dutch, Swedish, Russian,
Chinese
■ Tuner Setting
Tuning Mode Set the tuning method for the radio.
FM Search Level
DAB Scan
DAB DRC
¢
¢
Preset Name You can give names to the stations that you have registered. For
* X-HM76D, X-HM86D, XC-HM86D
"Auto" (Default Value): Radio stations that can be received are
tuned automatically.
"Manual": Tune to stations manually. If the "Tuning Mode" is set to
“Manual”, the reception for FM broadcasts will be monaural rather
than stereo, irrespective of the sensitivity of the reception.
¢
You can choose to have only those FM stations with strong
reception selected when tuning into stations automatically if
tuning regularly stops on FM stations with weak reception.
"Normal" (Default Value)
"Strong": Select only stations with strong reception.
You can run the auto scan when new DAB stations are added or
when you move house.
With the DRC (Dynamic Range Control) setting, you can reduce
the dynamic range of DAB digital radio so that you can still hear
quiet parts even when listening at low volume levels - ideal for
listening to the radio late at night when you don't want to disturb
anyone.
"0" (Default Value): DRC off
"1": Large reduction in dynamic range
"1/2": Small reduction in dynamic range
details on how to enter text, refer to " Entering text" (ÄP34). After
finishing input, press ENTER.
■ Bluetooth Setting
Bluetooth Select whether or not to use the BLUETOOTH function.
"On" (Default Value): Enables connection with a BLUETOOTH
enabled device by using the BLUETOOTH function. Select "On"
also when making various BLUETOOTH settings.
"Off": When not using the BLUETOOTH function
Auto Input Change The input of the unit will automatically be switched to
"BLUETOOTH" when connection is made from a BLUETOOTH
enabled device to the unit.
"On" (Default Value): The input will automatically become
"BLUETOOTH" when a BLUETOOTH enabled device is
connected.
"Off": The function is disabled.
0 If the input is not switched automatically, set to "Off" and
change the input manually.
Auto Reconnect This function automatically reconnects to the BLUETOOTH
enabled device connected last when you change the input to
"BLUETOOTH".
"On" (Default Value): Use this function
"Off": Do not use this function
0 This may not work with some BLUETOOTH enabled devices.
Pairing Information You can initialize the pairing information saved on this unit.
Press y/z to select "Clear", then press ENTER to initialize the
pairing information stored in this unit.
0 This function does not initialize the pairing information on the
BLUETOOTH enabled device. When pairing the unit again
with the device, be sure to clear the pairing information on the
BLUETOOTH enabled device in advance. For information on
how to clear the pairing information, refer to the BLUETOOTH
enabled device's instruction manual.
System Info
The MAC address of this unit and the current firmware version will be displayed.
37
Page 39

> Before Start > Part Names > Install > Initial Setup > Playback
E
N
Factory Reset
Reset the settings of this unit to the status at the time of shipment. We recommend that you
take a note of the settings you have changed before going ahead with a factory reset. Select
"Start" and confirm to go ahead. The unit will be placed on standby automatically when
initializing is completed.
Update
"Update" is not displayed if there are no firmware updates.
■ via Network
Press ENTER to select when you want to update the firmware via network.
■ via USB
Press ENTER to select when you want to update the firmware via USB.
Web Setup
You can make Wi-Fi connection settings using a web browser on a computer. Be sure your
computer is connected to the router wirelessly. If this unit is connected to the router using
ethernet cable, you can not do this setting.
1. Turn the unit on.
2. Press SETUP on the remote controller, select "Wi-Fi" in "Network Setting" - "Connection",
then select "Wi-Fi Setup".
3. Press y/z to select "Use iOS Device" and press ENTER.
4. In the list of wireless LAN connections on your computer, select SSID of this unit
(softap_0009B0xxxxxx).
0 "xxxxxx" in SSID is the lower three bytes of the MAC address.
5. Open the web browser on your computer and access http://192.168.200.1.
6. The "Web Setup" menu is displayed. Make network settings for this unit.
0 Depending on the equipment being used or connection environment, this function may
not work.
0 Consult the appropriate operating instructions for information regarding operation of the
computer.
0 Since this kind of connection is not encoded, a minor security risk may be involved.
Advanced Setup | Firmware Update | Others
38
Page 40

> Before Start > Part Names > Install > Initial Setup > Playback
E
N
Setup
Update
Firmware Update
Firmware Update
Advanced Setup | Firmware Update |Others
The updating function on this unit
This unit has functionality to update the firmware (the
system software) over a network or by the USB port. This
enables us to make improvements to a variety of operations
and to add features.
For details about the updated play features, see here
How to update
There are two methods for updating the firmware: via
network and via USB. The update may take about 5
minutes to complete for either method: via network or via
USB. Furthermore, existing settings are guaranteed
.
regardless of the method used for update.
0 For the latest information on updates, visit our company’s
website. There is no need to update the firmware on this
unit if there is no update available.
0 When performed over the network, it may take even
more time depending on the connection status.
0 During an update, do not
– Disconnect and reconnect any cable or USB storage
device, or perform any operation on the component
such as turn off its power
– Accessing this unit from a PC or smartphone using an
application
Disclaimer: The program and accompanying online
documentation are furnished to you for use at your own risk.
We will not be liable and you will have no remedy for
damages for any claim of any kind whatsoever concerning
your use of the program or the accompanying online
documentation, regardless of legal theory, and whether
arising in tort or contract.
In no event will we be liable to you or any third party for any
special, indirect, incidental, or consequential damages of
any kind, including, but not limited to, compensation,
reimbursement or damages on account of the loss of
present or prospective profits, loss of data, or for any other
reason whatsoever.
Updating the Firmware via Network
0 Check that the unit is turned on, and the connection to
the Internet is secured.
0 Turn off the controller component (PC etc.) connected to
the network.
0 Stop any playing Internet radio, USB storage device, or
server content.
1. The setup screen is displayed on the display when
SETUP on the remote controller is pressed.
Setup
Network Setting
Option Setting
System Info
Factory Reset
2. Press y/z and ENTER to select "Update" - "via Network"
in order.
0 "Update" is not displayed if there are no firmware
updates.
3. Press ENTER to start the firmware update.
0 "COMPLETE" is displayed when the update is
complete.
4. Press Í STANDBY/ON on the main unit to switch the
unit to standby. The process is completed and your
firmware is updated to the latest version.
If an error message is displayed: When an error occurs,
"*-** Error!" is displayed on the display of this unit. ("*"
represents an alphanumeric character.) Check the
following:
39
Page 41

> Before Start > Part Names > Install > Initial Setup > Playback
E
N
Setup
Factory Reset
System Info
Option Setting
Network Setting
Setup
Update
Advanced Setup | Firmware Update |Others
0 * -01, * -10: Ethernet cable not found. Connect the
Ethernet cable properly.
0 *-02, *-03, *-04, *-05, *-06, *-11, *-13, *-14, *-
16, *-17, * -18, * -20, *-21: Internet connection error.
Check the following:
– The router is turned on
– This unit and the router are connected via the network
Try to disconnect and then connect again the power to
the unit and router. This may solve the problem. If you
are still unable to connect to the Internet, the DNS server
or proxy server may be temporarily down. Check the
service status with your ISP provider.
0 Others: Disconnect then reconnect the AC power cord,
then repeat from the beginning.
Updating via USB
0 Prepare a 128 MB or larger USB storage device. FAT16
or FAT32 file system format.
0 Delete any data stored on the USB storage device.
0 Turn off the controller component (PC etc.) connected to
the network.
0 Stop any playing Internet radio, USB storage device, or
server content.
0 Some USB storage devices may take long to load, may
not be loaded correctly, or may not be correctly fed
depending on the device or their content.
0 We will not be liable whatsoever for any loss or damage
of data, or storage failure arising from the use of the USB
storage device with this unit. Thank you for your
understanding.
1. Connect the USB storage device to your PC.
2. Download the firmware file from our company’s website
to your PC and unzip.
Firmware files are named in the following way:
PIOHIM **** _ ************** _ *** .zip
Unzip the file on your PC. The number of unzipped files
and folders varies depending on the model.
3. Copy all unzipped files and folders to the root folder of
40
the USB storage device.
0 Make sure to copy the unzipped files.
4. Connect the USB storage device to the USB port of this
unit.
0 If you connect a USB hard disk drive to the USB port of
the unit, we recommend that you use its AC adapter to
power it.
0 If the USB storage device has been partitioned, each
section will be treated as an independent device.
5. The setup screen is displayed on the display when
SETUP button on the remote controller is pressed.
6. Press y/z and ENTER to select "Update" - "via USB" in
order.
0 "Update" is not displayed if there are no firmware
updates.
7. Press ENTER to start the firmware update.
0 "COMPLETE" is displayed when the update is
complete.
8. Press Í STANDBY/ON on the main unit to switch the
unit to standby. The process is completed and your
firmware is updated to the latest version.
9. Remove the USB storage device from this unit.
If an error message is displayed: When an error occurs,
" * - ** Error!" is displayed on the display of this unit.
Check the following:
0 * -01, * -10: USB storage device not found. Check
whether the USB storage device or USB cable is
correctly inserted to the USB port of this unit.
Connect the USB storage device to an external power
source if it has its own power supply.
0 * -05, * -13, * -20, * -21: The firmware file is not
present in the root folder of the USB storage device, or
the firmware file is for another model. Retry from the
download of the firmware file.
0 Others: Disconnect then reconnect the AC power cord,
then repeat from the beginning.
Page 42

> Before Start > Part Names > Install > Initial Setup > Playback
E
N
Troubleshooting
Others
Advanced Setup | Firmware Update | Others
Before starting the procedure
When operation is unstable, problems may be solved by
simply turning the power on or to standby or disconnecting/
connecting the power cord, rather than reviewing settings
and operations. Try the simple measures on both the unit
and the connected device. If the problem isn't fixed after
referring to "Troubleshooting", resetting the unit to the
status at the time of shipment may solve the problem. Note
that your settings will also be initialized when you reset, so
we recommend that you note down your settings before
doing the following.
Resetting the unit (this resets the unit settings to
the default)
1. Press SETUP on the remote controller, select "Factory
Reset" - "Start" in the Setup screen and press ENTER.
2. Press ENTER.
3. The unit switches to standby and the settings are reset.
Power
Cannot turn on the unit
0 Unplug the power cord from the wall outlet, wait 5
seconds or more, then plug it in again.
The unit turns off unexpectedly
0 The unit automatically switches to standby when the
"Option Setting" - "Power Off Setting" - "Auto Standby"
setting in the Setup menu functions.
0 Check if the speaker cable wires are touching the rear
panel or if the i side and s side have shorted. If there is
contact or shorting, the unit will switch to standby
automatically.
0 If the power turns off and indicators on the front panel
continually blink, there may have been a malfunction with
the amplifier or the protection circuit may have tripped.
– If the power indicator blinks at approximately 1 second
intervals: There may have been a malfunction in the
amplifier section. Unplug the power cord from the wall
outlet immediately and contact the dealer or our
company’s support.
– If the power indicator blinks at approximately 0.3
second intervals: The protection circuit may have
tripped due to playback at high volume. Reduce the
volume for playback. Alternatively, the wires in the
speaker cables may have touched the rear panel or
other wires. Connect the wires so they do not protrude
from the speaker jacks.
If the same symptoms such as being unable to turn the
unit on happen repeatedly, unplug the power cord from
the wall outlet immediately and contact the dealer or our
company’s support.
There is no audio from external devices
0 There is no sound if this unit is muted. Press MUTE on
the remote controller to cancel muting.
0 Confirm that the connection between the output jack on
the external device and the input jack on this unit is
correct.
0 Change the input selector on this unit to the position of
the terminal to which the external device is connected.
0 Check the digital audio output setting on the connected
component. On some game consoles, such as those that
support DVD, the default setting is off.
The display doesn't light
0 The display may go dim while the DIMMER is working,
and may also turn off. Press DIMMER button and change
the brightness level of the display.
Wi-Fi Connection
0 Try plugging/unplugging the power supply of wireless
LAN router and the unit, check the wireless LAN router
power-on status, and try reboot of the wireless LAN
router.
Cannot connect to the access point
0 Check that the setting of SSID and encryption (WEP,
etc.) is correct. Make sure the network settings of the unit
is properly set.
0 Connection to an SSID that includes multi-byte
characters is not supported. Name the SSID of the
wireless LAN router using single-byte alphanumeric
characters only and try again.
0 When the wireless LAN router setting is at stealth mode
(mode to hide the SSID key) or when ANY connection is
off, the SSID is not displayed. Change the setting and try
again.
Connected to an SSID different to the SSID selected
0 Some access points allow you to set multiple SSIDs for
one unit. If you use the automatic setting button on such
a router, you may end up connecting with a different
SSID from the SSID you wanted to connect to. Use the
connection method requiring you to enter a password if
this happens.
Playback is interrupted and communication does not
work
0 Shorten the distance from the access point or remove
obstacles to improve visibility, and try again. Place the
unit away from microwave ovens or other access points.
It is recommended to place the access point and the unit
in the same room.
0 If there is a metallic object near the unit, wireless LAN
connection may not be possible as the metal can effect
on the radio wave.
0 When other access point are used near the unit, several
issues such as interrupted playback and communication
may occur. You can avoid these issues by changing the
channel of the access point. For instructions on changing
channels, see the instruction manual provided with the
access point.
41
Page 43

> Before Start > Part Names > Install > Initial Setup > Playback
E
N
Advanced Setup | Firmware Update | Others
Cannot play discs
0 Place the disc in the disc tray so the label is facing up.
0 Play may not be possible if the disc is scratched or dirty.
Cannot Play USB storage device / HDD
0 Check whether the USB storage device or USB cable is
correctly inserted to the USB port of the unit.
0 Disconnect the USB storage device from the unit, and
then try reconnecting.
0 This unit may not recognize USB storage devices and
HDDs as proper devices sometimes. Try switching this
unit to standby and then turning it on again.
0 Depending on the type of format, the playback may not
be performed normally. Check the type of the file formats
that is supported. (ÄP20)
0 Cautions regarding USB and HDD devices (ÄP20)
FM reception is poor
0 Re-check the antenna connection.
0 Separate the antenna from speaker cables and the
power cord.
0 Move the unit away from your TV or PC.
0 Passing cars and airplanes can cause interference.
0 Concrete walls weaken radio signals.
0 FM reception may become clearer if you use the antenna
jack on the wall used for the TV.
0 FM reception improves if the Tuning Mode (ÄP37) is set
to Manual. However, reception will be monaural rather
than stereo.
Network function
0 If you cannot select a network service, it will become
selectable when the network function is started.
0 Try plugging/unplugging the power supply of this unit and
the router, and try rebooting the router.
Cannot access the Internet radio
0 Certain network service or contents available through the
unit may not be accessible in case the service provider
terminates its service.
0 Make sure that your modem and router are properly
connected, and make sure they are both turned on.
0 Depending on ISP, setting the proxy server is necessary.
0 Make sure that the used router and/or modem is
supported by your ISP.
Cannot access the network server
0 This unit needs to be connected to the same router as
the network server.
0 This unit is compatible with Windows Media
12 network servers or NAS that are compatible with
home network functionality. Furthermore, when using a
PC, only music files registered in the Windows Media
Player library can be played.
Playback stops while listening to music files on the
network server
0 When the PC is serving as the network server, try quitting
any application software other than the server software
(Windows Media
0 If the PC is downloading or copying large files, the
playback may be interrupted.
The album names and artist names for the Music Server
are not displayed
0 Meta data, such as album names and artist names,
needs to be recognized on the server for distribution to
this unit, so this depends on the specifications of the NAS
or server you are using.
0 The file formats supported depend on the NAS or server
software. For details, contact the manufacturer of NAS or
the server software.
Album art in Music Server is displayed sometimes but
®
Player 12, etc.).
®
Player 11 or
®
not other times
0 Music Server depends on the specifications of the server
software.
0 The formats supported depend on the server software.
0 For details, contact the manufacturer of the server
software.
BLUETOOTH function
0 Try plugging/unplugging the power of the unit and try
turning on/off the BLUETOOTH enabled device.
Restarting the BLUETOOTH enabled device may be
effective.
0 The BLUETOOTH enabled devices must support the
A2DP profile.
0 Near components such as microwave oven or cordless
phone, which use the radio wave in the 2.4 GHz range, a
radio wave interference may occur, which disables the
use of this unit.
0 If there is a metallic object near the unit, BLUETOOTH
connection may not be possible as the metal can effect
on the radio waves.
0 In order to respond to operations on the remote controller
of this unit, the BLUETOOTH enabled device must
support the AVRCP profile.
0 Note that operation with the remote controller is not
always guaranteed with all BLUETOOTH enabled
devices.
Cannot connect with this unit
0 Check that the BLUETOOTH function of the
BLUETOOTH enabled device is enabled.
0 If an already paired unit cannot be connected, delete the
pairing information on the BLUETOOTH enabled device,
then pair again.
Music playback is unavailable on the unit even after
successful BLUETOOTH connection
0 When the audio volume of your BLUETOOTH enabled
42
Page 44

> Before Start > Part Names > Install > Initial Setup > Playback
E
N
device is set low, the playback of audio may be
unavailable. Turn up the volume on the BLUETOOTH
enabled device.
0 Some BLUETOOTH enabled devices may be equipped
with a Send/Receive selector switch. Select Send mode.
Sound is interrupted
0 There may be a problem with the BLUETOOTH enabled
device. Check the information on the internet.
Advanced Setup | Firmware Update | Others
43
Page 45

> Before Start > Part Names > Install > Initial Setup > Playback
E
N
General Specifications
Advanced Setup | Firmware Update | Others
Analog Audio Output Section
RMS Output Power
0 X-HM76D, X-HM76 : 50 W + 50 W
0 X-HM86D, XC-HM86D : 65 W + 65 W
(4 ohms, 1 kHz THD 10%)
Tone Control Characteristics
0
w10 dB (100 Hz (BASS))
w10 dB (10 kHz (TREBLE))
0
Supported Speaker Impedance
0 4 ohms - 16 ohms
Tune r Section
X-HM76
Tuning Frequency Range (FM)
0 87.5 MHz - 108.0 MHz, RDS
Antenna (FM)
0 75 Ω unbalanced
Preset Channel
0 40
X-HM76D, X-HM86D, XC-HM86D
Tuning Frequency Range (FM)
0 87.5 MHz - 108.0 MHz, RDS
Tuning Frequency Range (DAB)
0 174.928 MHz - 239.200 MHz
Antenna (FM/DAB)
0 75 Ω unbalanced
Preset Channel
0 40
CD Section
Media/Format
0 CD : Standard CD
0 CD-R/RW : CD format/MP3, WMA File
Digital Audio Input
Front/Rear USB
0 Type A, USB2.0 High Speed
DC Output
0 5 V 1 A (Rear)/5 V 0.5 A (Front)
Optical Digital Input
0 Optical Jack
Network Section
Wired LAN
0 Ethernet Jack
0 10BASE-T/100BASE-TX
Wireless LAN (Wi-Fi)
0 IEEE 802.11 a/b/g/n standard
0 5 GHz/2.4 GHz band
Bluetooth Section
Communication system
0 BLUETOOTH Specification version 4.1
Frequency band
0 2.4 GHz (2.402 GHz - 2.480 GHz)
Modulation method
0 FHSS (Freq Hopping Spread Spectrum)
Compatible Bluetooth profiles
0 A2DP 1.2
0 AVR CP 1.3
0 HOGP-Host (Client)
0 HOGP-HID Device (Server)
0 HID Service (HIDS)
Supported Codecs
0 SBC
0 AAC
Transmission range (A2DP)
0 20 Hz - 20 kHz (Sampling frequency 44.1 kHz)
Maximum communication range
0 (Line of sight approx.) 10 m.
* The actual range will vary depending on factors such as
obstacles between devices, magnetic fields around a
microwave oven, static electricity, cordless phone,
reception sensitivity, antenna's performance, operating
system, software application, etc.
*
General
Power Supply
0 AC 220 - 230 V, 50/60 Hz
Power Consumption
0 X-HM76D, X-HM76 : 40 W
0 X-HM86D, XC-HM86D : 42 W
0 0.3 W (In Standby)
0 2.5 W (In Standby, Network Standby : On, Network
Setting : Wired)
0 2.8 W (In Standby, Network Standby : On, Network
Setting : Wi-Fi)
0 2.2 W (In Standby, Bluetooth Wakeup : On)
0 2.9 W (In Standby, Network Standby : On, Network
Setting : Wi-Fi, Bluetooth Wakeup : On)
Auto Standby
0 On (20 min)/Off
44
Page 46

> Before Start > Part Names > Install > Initial Setup > Playback
E
N
Advanced Setup | Firmware Update | Others
Dimensions (W t H t D)
0 290 mm t 98 mm t 333 mm
Weight
0 3.5 kg
Speaker (X-HM76D, X-HM76, X-HM86D)
Typ e
0 Bass-reflex bookshelf type
Configuration
0 2-way
0 Woofer :
X-HM76D, X-HM76 : 12 cm Cone
X-HM86D : 13 cm Glass fiber cone
0 Tweeter :
2.5 cm Soft Dome
Impedance
0 4 ohms
Maximum input power
0 X-HM76D, X-HM76 : 50 W
0 X-HM86D : 65 W
Effective Frequency Range
0 X-HM76D, X-HM76 : 70 Hz - 40 kHz
0 X-HM86D : 60 Hz - 40 kHz
Recommended Frequency Range
0 X-HM76D, X-HM76 : 50 Hz - 40 kHz
0 X-HM86D : 45 Hz - 40 kHz
Crossover Frequency
0 4 kHz
Output Sound Pressure Level
0 X-HM76D, X-HM76 : 83 dB
0 X-HM86D : 82 dB
Dimensions (W H D)
0 X-HM76D : 148 mm t 263 mm t 217 mm
0 X-HM76 : 148 mm t 263 mm t 213 mm
0 X-HM86D : 165 mm t 280 mm t 259 mm
Weight
0 X-HM76D : 3.4 kg/each
0 X-HM76 : 3.3 kg/each
0 X-HM86D : 4.4 kg/each
45
Page 47

> Before Start > Part Names > Install > Initial Setup > Playback
E
N
BLACKFIRE
License and Trademark Information
This Mark Certifies that this product is compliant with the BLACKFIRE
ALLIANCE Standard.
Please refer to WWW.BLACKFIREALLIANCE.COM for more information.
BLACKFIRETM is a Registered Trademark (No. 85,900,599) of BLACKFIRE
The Wi-Fi CERTIFIED Logo is a certification mark of Wi-Fi Alliance®.
RESEARCH CORP. All rights reserved.
Advanced Setup | Firmware Update | Others
“Все товарные знаки являются собственностью соответствующих
владельцев.”
AirPlay, iPad, iPhone, and iPod touch are trademarks of Apple Inc., registered in
the U.S. and other countries.
iPad Air and iPad mini are trademarks of Apple Inc.
“Made for iPod”, “Made for iPhone” and “Made for iPad” mean that an electronic
accessory has been designed to connect specifically to iPod, iPhone, or iPad,
respectively, and has been certified by the developer to meet Apple
performance standards. Apple is not responsible for the operation of this device
or its compliance with safety and regulatory standards.
Please note that the use of this accessory with iPod, iPhone or iPad may affect
wireless performance.
AirPlay works with iPhone, iPad, and iPod touch with iOS 4.3.3 or later, Mac
with OS X Mountain Lion or later, and PC with iTunes 10.2.2 or later.
The Bluetooth® word mark and logos are registered trademarks owned by the
Bluetooth SIG, Inc.
Google Cast and the Google Cast badge are trademarks of Google inc.
46
FireConnectTM is technology powered by BlackFire Research.
The product with this logo is conformed to Hi-Res Audio standard defined by
Japan Audio Society. This logo is used under license from Japan Audio Society.
This product is protected by certain intellectual property rights of Microsoft. Use
or distribution of such technology outside of this product is prohibited without a
license from Microsoft.
Windows and the Windows logo are trademarks of the Microsoft group of
companies.
DSD and the Direct Stream Digital logo are trademarks of Sony Corporation.
MPEG Layer-3 audio coding technology licensed from Fraunhofer IIS and
Thomson.
“All other trademarks are the property of their respective owners.”
“Toutes les autres marques commerciales sont la propriété de leurs détenteurs
respectifs.”
“El resto de marcas comerciales son propiedad de sus respectivos propietarios”.
“Tutti gli altri marchi di fabbrica sono di proprietà dei rispettivi proprietari.”
“Alle anderen Warenzeichen sind das Eigentum ihrer jeweiligen Eigentümer.”
“Alle andere handelsmerken zijn eigendom van de desbetreffende
rechthebbenden.”
Page 48

E
N
*29402674*
F1609-0
SN 29402674
Корпорация О энд Пи
2-3-12, Яэсу, Чуо-ку, г. Токио, 104-0028, ЯПОНИЯ
<Germany>
Hanns-Martin-Schleyer-Straße 35, 47877 Willich, Germany
Tel: +49(0)2154 913222
<UK>
Anteros Building, Odyssey Business Park, West End Road, South Ruislip,
Middlesex, HA4 6QQ United Kingdom
Tel: +44(0)208 836 3612
<France>
6, Avenue de Marais F - 95816 Argenteuil Cedex FRANCE
Tel: +33(0)969 368 050
2-3-12 Yaesu, Chuo-ku, Tokyo 104-0028 JAPAN
<U.S.A.>
18 PARK WAY, UPPER SADDLE RIVER, NEW JERSEY 07458, U.S.A.
Tel: 1-201-785-2600
Te l: 1-844-679-5350
Register your product on
http://www.pioneer.eu
(Europe)
© 2016 Onkyo & Pioneer Corporation. All rights reserved.
© 2016 Onkyo & Pioneer Corporation. Tous droits de reproduction et de traduction réservés.
“Pioneer” and “PBASS” are trademarks of Pioneer Corporation, and is used under license.
Printed in Malaysia / Imprimé en Malaisie / Напе
чатано в Малайзии
http://www.pioneer-audiovisual.com/privacy/
Page 49

F
R
> Avant de Démarrer > Nom des pièces > Installation > Initial Setup > Lecture
Configuration avancée | Mise à jour du micrologiciel | Autres
MICRO CHAÎNE CD ET RESEAU
X-HM76D
X-HM76
X-HM86D
MICRO CHAÎNE CD ET RESEAU
XC-HM86D
Mode d'emploi
Avant de Démarrer
Ce que contient la boîte ................................................................ 2
Nom des pièces
Panneau frontal ............................................................................ 4
Panneau arrière (X-HM76D, X-HM86D, XC-HM86D) ...................5
Panneau arrière (X-HM76) ...........................................................6
Télécommande .............................................................................7
Afficheur ........................................................................................8
Système d'enceintes (X-HM76D, X-HM76) .................................. 9
Système d'enceintes (X-HM86D) ...............................................10
Installation
Raccordez les enceintes ............................................................. 11
Raccordement des câbles d'antenne et d'alimentation, etc. ............ 12
Initial Setup
Mise sous tension & Configuration initiale .................................. 13
Réglages de l'heure .................................................................... 16
Lecture
Lecture de CD ............................................................................. 17
Périphérique de stockage USB/DD ............................................ 19
Radio Internet ............................................................................. 21
Spotify ......................................................................................... 22
Écoute de la radio FM ................................................................. 23
Écoute de la radio numérique DAB (X-HM76D, X-HM86D, XC-HM86D) ......26
BLUETOOTH® ............................................................................ 27
®
AirPlay
Lecture du son provenant d'un périphérique externe .................30
Music Server ............................................................................... 31
Utilisation de l'alarme pour démarrer la lecture .......................... 33
Saisie d'un texte, ajustement de la qualité du son, etc. .............. 34
Configuration avancée
Configuration avancée................................................................. 35
Mise à jour du micrologiciel
Mise à jour du micrologiciel ........................................................39
Autres
Dépannage .................................................................................41
Caractéristiques générales ......................................................... 44
Licence et Marque commerciale .................................................46
...................................................................................... 29
Page 50

> Avant de Démarrer > Nom des pièces > Installation > Initial Setup > Lecture
F
R
Configuration avancée | Mise à jour du micrologiciel | Autres
Ce que contient la boîte
Avant de Démarrer
X-HM76D : 12356
X-HM76 : 12456
X-HM86D : 123567
XC-HM86D : 123
Antenne FM intérieure (1)
Appareil principal (1)
Télécommande (RC-945S) (1), Piles (AAA/R03) (2)
Fil d'antenne DAB/FM (1)
2
Système d’enceinte (2)
Câbles d'enceinte (1,5 m) (2)
Page 51

> Avant de Démarrer > Nom des pièces > Installation > Initial Setup > Lecture
F
R
Configuration avancée | Mise à jour du micrologiciel | Autres
Coussinets antidérapants (8)
0 Le cordon d'alimentation devra être branché uniquement lorsque tous les autres
raccordements seront effectués.
0 Raccordez des enceintes ayant une valeur d'impédance comprise entre 4 Ω et 16 Ω.
0 Nous n’acceptons en aucun cas la responsabilité des dommages résultant d'une
connexion à des équipements fabriqués par d'autres sociétés.
0 Des fonctionnalités peuvent être mises en place par des mises à jour du micrologiciel et
des services de fournisseurs pourraient cesser, ce qui signifie que certains services
réseau ainsi que leurs contenus pourraient devenir inaccessibles dans le futur.
0 Les spécifications et l'aspect peuvent changer sans préavis.
3
Page 52

> Avant de Démarrer > Nom des pièces > Installation > Initial Setup > Lecture
F
R
Configuration avancée | Mise à jour du micrologiciel | Autres
Panneau frontal
Nom des pièces
1. Touche Í STANDBY/ON : Permet la mise en marche ou en veille de l'appareil.
2. Touche INPUT : Change l'entrée à lire.
3. Touche Lecture :
:6
: Retourner au début de la piste en cours de lecture. Appuyez longuement pour
revenir rapidement en arrière. (CD)
59
∫
1
0 Selon l’entrée, il se peut que l’opération ne démarre pas.
4. Touche < : Ouvrir ou fermer le plateau de disque.
5. Plateau du disque : Déposez les disques ici. Vous pouvez également utiliser des disques
de 8 cm.
6. Port USB : Raccorder un périphérique de stockage USB ou un DD (disque dur) pour lire
des fichiers de musique. Vous pouvez également fournir l’alimentation (maximum 5 V/
0,5 A) aux périphériques USB avec un câble USB.
0 Lorsque vous raccordez un DD qui nécessite plus de 5 V/0,5 A, branchez-le sur le port
7. Prise PHONES : Raccorder des écouteurs stéréo avec une mini fiche.
8. Témoin d'alimentation : Il est bleu lorsque l'appareil est en marche.
9. Témoin TIMER : Il est allumé lorsque l'alarme est réglée.
10.
Capteur de la télécommande
11.
Afficheur (ÄP8)
12.
Molette VOLUME : Régler le volume. Réglable entre 0 et 50.
passe à la piste précédente. (USB, Music Server)
: Passer à la piste suivante. Appuyer longuement pour avancer rapidement dans
la piste. (CD)
Passer à la piste suivante. (USB, Music Server)
: Cette touche permet d'arrêter la lecture.
/; : Cette touche permet de suspendre la lecture.
USB (maximum 5 V/1 A) à l’arrière de l’appareil.
4
Page 53

> Avant de Démarrer > Nom des pièces > Installation > Initial Setup > Lecture
F
R
180°
90°
Configuration avancée | Mise à jour du micrologiciel | Autres
Panneau arrière (X-HM76D, X-HM86D, XC-HM86D)
1. Cordon d’alimentation
2. Antenne sans fil : Utilisée pour la connexion Wi-Fi ou pour utiliser un périphérique
compatible BLUETOOTH. Réglez leurs angles en fonction de l’état de la connexion.
3. Bornes d'enceinte : Raccordez les enceintes avec les câbles d'enceinte.
4. Prise DAB/FM ANTENNA : Connectez le fil d'antenne DAB/FM fourni.
5. Prise LINE IN : Vous pouvez écouter le son provenant d'un périphérique externe tel qu'un
téléviseur connecté avec un
6. Prises SUBWOOFER PRE OUT : Connectez un caisson de basse avec amplificateur
7. Port USB : Raccorder un périphérique de stockage USB ou un DD (disque dur) pour lire
intégré.
des fichiers de musique. Vous pouvez également fournir l’alimentation (maximum 5 V/1 A)
aux périphériques USB avec un câble USB.
câble audio analogique
.
8. Prise NETWORK : Sert à se connecter au réseau à l'aide d'un câble LAN.
9. Prise DIGITAL IN OPTICAL : Vous pouvez écouter le son numérique provenant d'un
périphérique externe tel qu'un téléviseur connecté avec un câble optonumérique.
5
Page 54

> Avant de Démarrer > Nom des pièces > Installation > Initial Setup > Lecture
F
R
180°
90°
Configuration avancée | Mise à jour du micrologiciel | Autres
Panneau arrière (X-HM76)
1. Cordon d’alimentation
2. Antenne sans fil : Utilisée pour la connexion Wi-Fi ou pour utiliser un périphérique
compatible BLUETOOTH. Réglez leurs angles en fonction de l’état de la connexion.
3. Bornes d'enceinte : Raccordez les enceintes avec les câbles d'enceinte.
4. Prise FM ANTENNA : Sert à raccorder l'antenne FM intérieure fournie.
5. Prise LINE IN : Vous pouvez écouter le son provenant d'un périphérique externe tel qu'un
téléviseur connecté avec un
6. Prises SUBWOOFER PRE OUT : Connectez un caisson de basse avec amplificateur
7. Port USB : Raccorder un périphérique de stockage USB ou un DD (disque dur) pour lire
intégré.
des fichiers de musique. Vous pouvez également fournir l’alimentation (maximum 5 V/1 A)
aux périphériques USB avec un câble USB.
câble audio analogique
.
6
8. Prise NETWORK : Sert à se connecter au réseau à l'aide d'un câble LAN.
9. Prise DIGITAL IN OPTICAL : Vous pouvez écouter le son numérique provenant d'un
périphérique externe tel qu'un téléviseur connecté avec un câble optonumérique.
Page 55

> Avant de Démarrer > Nom des pièces > Installation > Initial Setup > Lecture
F
R
30°
30°
Environ
7 m
Configuration avancée | Mise à jour du micrologiciel | Autres
Télécommande
1. Touche Í STANDBY/ON : Permet la mise en marche ou en veille de l'appareil.
2. Touche TIMER : Utilisé pour régler l'heure et l'alarme.
3. Touche SLEEP : Réglez la minuterie de veille. Une fois la durée réglée écoulée (30, 60 ou
90 minutes), l'appareil se met en veille. Si vous appuyez sur SLEEP après le réglage, le
temps restant jusqu'à la mise en veille s'affiche.
4. Touches INPUT SELECTOR : Change l'entrée à lire.
5. Touches Lecture :
: : Retourner au début de la piste en cours de lecture. (CD)
Retourner à la piste précédant celle en cours de lecture. (USB, Music Server)
X/;: Lecture ou pause.
9: Passer à la piste suivante.
22 : Revenir rapidement en arrière. (CD uniquement)
∫ : Arrêter la lecture.
11 : Avancer rapidement dans la piste. (CD uniquement)
0 Selon l’entrée, il se peut que l’opération ne démarre pas.
Touches PRESET i/j : Utilisé pour sélectionner les stations enregistrées ou leur donner
un nom.
Touches TUNE i/j : Utilisé pour sélectionner les stations de radio.
6. Touche MEMORY : Utilisé pour mémoriser les stations de radio favorites.
7. Touche SHUFFLE/REPEAT : Activer la répétition et la lecture aléatoire.
8. Touche MODE : Utilisé pour la lecture programmée de CD.
9. Touches du curseur et ENTER: Sélectionner l’élément à l’aide des touches du curseur et
appuyer sur ENTER pour confirmer.
10.
Touche SETUP : Affiche le menu Setup.
11.
Touches VOLUME i/j : Régler le volume. Réglable entre 0 et 50.
12.
Touche SOUND : Réglez la qualité du son.
13.
Touche DIMMER : Désactiver l'afficheur ou régler sa luminosité sur trois niveaux.
14.
Touche CLEAR : Utilisé pour l'entrée de texte, etc.
15.
Touche (NOW PLAYING) : Modifie l'information affichée.
16.
Touche RETURN : Permet à l'affichage de retourner à son état
précédent.
17.
Touche MUTE : Mise temporaire de l'audio en sourdine.
Appuyer une nouvelle fois pour annuler la mise en sourdine.
7
Page 56

> Avant de Démarrer > Nom des pièces > Installation > Initial Setup > Lecture
F
R
00:01:45 / 00:03:23
FLAC
44.1
kHz/24bit
USB Front
Song
Artist
Album
Configuration avancée | Mise à jour du micrologiciel | Autres
Afficheur
1. Le mode d'entrée s'affiche.
(USB Front / USB Rear / CD / Bluetooth / Network / Digital In / Line / Tuner DAB
FM)
*X-HM76D, X-HM86D, XC-HM86D
2. Le nom du fichier, l'artiste, l'album, la station, etc. s'affiche.
3. Affiche l'état de la lecture.
4. Affiche le format de fichier, la fréquence d'échantillonnage, et les bits de quantification.
5. L'état de lecture du fichier s'affiche. Cet élément peut ne pas être affiché en fonction de
l'entrée ou du fichier.
6. Ce symbole s'affiche lorsque le mode sourdine est activé.
7. S'affiche lorsque la minuterie de veille est définie.
8. S'allume sous les conditions suivantes.
:
Lorsque la configuration de connexion de l'appareil est "Wired" et que l'appareil est connecté
au réseau.
:
Lorsque la configuration de connexion de l'appareil est "Wired" et que l'appareil n'est pas
connecté au réseau.
8
*
/ Tuner
:
Lorsque la configuration de connexion de l'appareil est "Wi-Fi" et que l'appareil est connecté
au réseau.
:
Lorsque la configuration de connexion de l'appareil est "Wi-Fi" et que l'appareil n'est pas
connecté au réseau.
9. Si une pochette d'album est enregistrée pour le fichier en lecture, elle s'affiche ici.
10.
S'allume sous les conditions suivantes.
: Lorsque la répétition de toutes les pistes est activée
1
: Lorsque la répétition d'une piste est activée
: Lorsque la lecture aléatoire est activée
0 Lorsque vous appuyez sur DIMMER pour désactiver l'affichage, l'appareil a le même
aspect que lorsque l'alimentation est débranchée, mais il est toujours alimenté en
électricité. Pour couper totalement l'alimentation électrique, vous devez débrancher la
fiche d'alimentation (dispositif d'arrêt) de la prise d'alimentation.
Page 57

> Avant de Démarrer > Nom des pièces > Installation > Initial Setup > Lecture
F
R
1
21
2
Configuration avancée | Mise à jour du micrologiciel | Autres
Système d'enceintes (X-HM76D, X-HM76)
Il n’y a aucune différence entre la gauche et la droite avec les enceintes fournies. La qualité
du son reste la même quel que soit le côté choisi pour chaque enceinte.
1. Haut-parleur des aigus : Diffuse les fréquences moyennes et les aigus.
2. Haut-parleur des graves : Diffuse les basses.
3. Fixations des grilles : Utilisées pour fixer les grilles. Pour retirer la grille, maintenez le bas
de cette dernière des deux mains et tirez doucement, puis tirez doucement le haut de la
grille vers l'extérieur. Pour la remettre en place, fixez d'abord le haut, puis le bas.
4. Caisson d'enceintes
5. Évent de réverbération des basses : Il permet d'évacuer les réverbérations produites à
l'intérieur du caisson afin d'améliorer les capacités de reproduction de la gamme des
basses. Ne bloquez pas les évents.
6. Bornes d'enceinte : Raccordez les enceintes à l'unité principale à l'aide des câbles
d'enceinte.
9
Page 58

> Avant de Démarrer > Nom des pièces > Installation > Initial Setup > Lecture
F
R
1
21
2
Configuration avancée | Mise à jour du micrologiciel | Autres
Système d'enceintes (X-HM86D)
Il n’y a aucune différence entre la gauche et la droite avec les enceintes fournies. La qualité
du son reste la même quel que soit le côté choisi pour chaque enceinte.
1. Haut-parleur des aigus : Diffuse les fréquences moyennes et les aigus.
2. Haut-parleur des graves : Diffuse les basses.
3. Fixations des grilles : Utilisées pour fixer les grilles. Pour retirer la grille, maintenez le bas
de cette dernière des deux mains et tirez doucement, puis tirez doucement le haut de la
grille vers l'extérieur. Pour la remettre en place, fixez d'abord le haut, puis le bas.
4. Caisson d'enceintes
5. Évent de réverbération des basses : Il permet d'évacuer les réverbérations produites à
l'intérieur du caisson afin d'améliorer les capacités de reproduction de la gamme des
basses. Ne bloquez pas les évents.
10
6. Bornes d'enceinte : Raccordez les enceintes à l'unité principale à l'aide des câbles
d'enceinte.
Page 59

> Avant de Démarrer > Nom des pièces > Installation > Initial Setup > Lecture
F
R
X-HM86D uniquement
Configuration avancée | Mise à jour du micrologiciel | Autres
Raccordez les enceintes
Installation
Pour le raccordement du système d'enceintes des appareils
1
a
a
2
a
a
X-HM76D, X-HM76 ou X-HM86D, raccordez les câbles
d'enceinte à embouts fournis aux tubes rouges fixés aux
fiches i de l'unité principale et des enceintes. Si le
raccordement est incorrect, la phase est inversée et la
diffusion des graves est plus difficile.
Raccordez les enceintes de la même façon que si vous
aviez acheté le modèle X-HM86D.
Après avoir introduit les câbles d'enceinte, resserrez
fermement les bornes en tournant vers la droite. Vérifiez
également que les fils dénudés des enceintes ne dépassent
pas des bornes d'enceinte lors du raccordement. Si les fils
dénudés des enceintes entrent en contact avec le panneau
arrière ou si les fils i et s se touchent, le circuit de
protection sera activé et l'appareil pourrait s'éteindre.
3
RED
b
a Coussinets antidérapants, b Câbles d'enceinte
RED
RED
b
4
Vous pouvez également raccorder un caisson de basse
avec amplificateur intégré pour amplifier lecture des graves.
Utilisez un câble de caisson de basse pour le raccordement.
RED
11
Page 60

> Avant de Démarrer > Nom des pièces > Installation > Initial Setup > Lecture
F
R
c
a
b
c
1 1
2
X-HM76D, X-HM86D, XC-HM86D X-HM76
Configuration avancée | Mise à jour du micrologiciel | Autres
Raccordement des câbles d'antenne et d'alimentation, etc.
Raccordement de l'antenne
Déplacez l’antenne tout en écoutant la radio pour trouver la
meilleure position de réception.
Branchement du cordon d'alimentation
Branchez le cordon d'alimentation à la prise électrique après
avoir effectué tous les autres raccordements.
Pour vous connecter au réseau à l’aide d’un câble Ethernet,
utilisez la fiche NETWORK. Si vous utilisez une connexion
Wi-Fi, indiquez les paramètres lors de la configuration
initiale (ÄP13). Vous pouvez profiter des fonctionnalités
comme la radio Internet et AirPlay en connectant au réseau.
a Fil d'antenne DAB/FM, b Antenne FM intérieure, c Cordon d'alimentation
12
Page 61

> Avant de Démarrer > Nom des pièces > Installation > Initial Setup >Lecture
F
R
Initial Setup
Wired (Exit)
Wi-Fi
Selects the method of network
connection
Configuration avancée | Mise à jour du micrologiciel | Autres
Mise sous tension & Configuration initiale
Initial Setup
Démarrage : Lorsque vous appuyez sur Í STANDBY/ON,
1
3
2
BLUEBLINKING
le témoin d'alimentation de l'unité principale clignote
lentement en bleu, puis "Hello" s'affiche à l'écran une
vingtaine de secondes plus tard. L'écran se vide ; une fois
que le logo Pioneer s'est affiché, vous pouvez commencer à
utiliser l'appareil.
Paramètres de connexion Wi-Fi
Lors de la première mise sous tension, l'écran de
configuration initiale s'affiche automatiquement, et vous
permet de définir facilement les paramètres de connexion
Wi-Fi.
Pour les définir, sélectionnez l'élément grâce aux curseurs
de la télécommande et appuyez sur ENTER pour valider.
Pour revenir sur l'affichage précédent, appuyez sur
RETURN.
13
Page 62

> Avant de Démarrer > Nom des pièces > Installation > Initial Setup >Lecture
F
R
Wireless
Input SSID
Use iOS Device
Wireless
Push Button
SSID
A
Delete One Character[CLEAR]
Change Text[REPEAT]
Configuration avancée | Mise à jour du micrologiciel | Autres
Pour définir les paramètres Wi-Fi, sélectionnez "Wi-Fi". Si
vous avez raccordé l'appareil avec un câble LAN,
sélectionnez "Wired(Exit)" et validez. Si vous sélectionnez
"Wi-Fi", sélectionnez la méthode de configuration sur
l'écran suivant (par exemple "Scan Networks").
Scan Networks
0 Pour recommencer la configuration initiale, appuyez sur
la touche SETUP de la télécommande, sélectionnez "WiFi" dans "Network Setting" - "Connection" puis
sélectionnez "Wi-Fi Setup".
■ Scan Networks
Dans la liste des SSID pour les points d'accès tels que les
routeurs LAN sans fil, sélectionnez le SSID requis et
effectuez les réglages.
1. Sélectionnez le SSID du point d'accès à connecter puis
validez.
Wireless
aaaaaaaaaaaaaaaa
bbbbbbbbbbbbbbbbb
ccccccccccccccccccc
ddddddddddddddddd
2. Sélectionnez "Enter Password" ou "Push Button" et
validez. Si le point d'accès a une touche de configuration
automatique, en sélectionnant "Push Button" vous
pouvez vous connecter sans saisir de mot de passe.
14
Enter Password
3. Si vous sélectionnez "Enter Password", saisissez le mot
de passe du point d'accès et appuyez sur ENTER. Pour
plus de détails sur la saisie de texte, voir "Saisie d'un
texte" (ÄP34).
Password
A
Change Text[REPEAT]
Delete One Character[CLEAR]
Si vous sélectionnez "Push Button", après avoir
maintenu la touche de configuration automatique du
point d'accès appuyée pendant la durée nécessaire,
appuyez sur la touche ENTER de la télécommande.
4. s'affiche lorsque les réglages sont terminés.
■ Utilisez un périphérique iOS
Effectuez le réglage en partageant les paramètres Wi-Fi du
périphérique iOS avec cet appareil.
1. Connectez le dispositif iOS par Wi-Fi.
2. Sélectionnez cet appareil dans l'élément "SET UP NEW
AIRPLAY SPEAKER..." sur l'écran du périphérique iOS
et sélectionnez "Next".
0 Cet appareil est affiché sous la forme "Pioneer HM76D
(76 ou 86D) XXXXXX".
3. Une fois la connexion établie, sélectionnez "Done" sur
l'écran du périphérique iOS.
4. s'affiche sur l'écran de l'appareil lorsque le réglage est
terminé.
■ Saisissez le SSID du point d'accès
Pour effectuer le réglage, saisissez le SSID du point
d'accès à connecter.
1. Saisissez le SSID. Pour plus de détails sur la saisie de
texte, voir "Saisie d'un texte" (ÄP34).
2. Sélectionnez et validez la méthode d'authentification.
Security Method
None
WEP
WPA
WPA2
0 Si vous sélectionnez "None", passez à l'étape 3. Si
vous sélectionnez "WEP", "WPA" ou "WPA2",
saisissez le mot de passe puis validez.
Page 63

> Avant de Démarrer > Nom des pièces > Installation > Initial Setup >Lecture
F
R
Configuration avancée | Mise à jour du micrologiciel | Autres
3. s'affiche lorsque les réglages sont terminés.
15
Page 64

> Avant de Démarrer > Nom des pièces > Installation > Initial Setup >Lecture
F
R
CLOCK
0:00Sun
Configuration avancée | Mise à jour du micrologiciel | Autres
Réglages de l'heure
En réglant l'heure, vous pouvez utiliser l'alarme pour démarrer la lecture (ÄP33).
11
1. Appuyez sur TIMER.
2. Appuyez sur ENTER.
3. Réglez le jour de la semaine avec w/x, puis appuyez sur ENTER.
4. Sur l'écran suivant, utilisez w/x pour sélectionner "24H" (affichage sur 24 heures) ou
"12H" (affichage sur 12 heures) et appuyez sur ENTER.
5. Sur l'écran suivant, réglez l'heure avec w/x, puis appuyez sur ENTER.
6. Sur l'écran suivant, réglez les minutes avec w/x, puis appuyez sur ENTER. Le réglage
prendra fin peu après.
0 Une fois le réglage terminé, l'heure réglée peut être affichée pendant une dizaine de
secondes en appuyant sur TIMER.
16
Page 65

> Avant de Démarrer > Nom des pièces > Installation > Initial Setup >Lecture
F
R
a
1
2
b
c
Configuration avancée | Mise à jour du micrologiciel | Autres
Lecture de CD
Lecture
Cet appareil peut également lire les CD-R enregistrés
contenant des fichiers au format MP3 ou WMA, outre les
CD musicaux disponibles dans le commerce.
0 Les taux d'échantillonnage pris en charge pour les
fichiers MP3 sont situés entre 8 kHz et 48 kHz, et les
débits binaires entre 64 kbps et 384 kbps.
0 Les taux d'échantillonnage pris en charge pour les
fichiers WMA sont 32 kHz, 44,1 kHz et 48 kHz, et les
débits binaires sont situés entre 64 kbps et 320 kbps.
0 La lecture de CD non conformes aux normes en la
matière, tels que les CD "Copy Control", n'est pas
garantie.
1. Mettez en marche l'appareil.
2. Appuyez sur CD pour modifier l'entrée sur CD.
3. Appuyez sur la touche < de l'appareil principal pour
ouvrir le plateau du disque.
4. Posez le disque sur le plateau, puis appuyez sur < pour
fermer le plateau.
5. Appuyez sur X/; (a) pour démarrer la lecture. Utilisez
les autres touches de lecture (b) pour arrêter la lecture
ou choisir les pistes à lire. Si vous appuyez sur (NOW
PLAYING) (c), vous pouvez changer l'affichage pour
visualiser le temps écoulé ou le temps restant de la piste.
17
Lecture de CD musicaux
Page 66

> Avant de Démarrer > Nom des pièces > Installation > Initial Setup >Lecture
F
R
b
a
g
f
c
e
d
1
PROGRAM
P-01<T--
CD
Configuration avancée | Mise à jour du micrologiciel | Autres
Lecture de disques MP3/WMA
1. Mettez en marche l'appareil.
2. Appuyez sur CD pour modifier l'entrée sur CD.
3. Appuyez sur la touche < de l'appareil principal pour
ouvrir le plateau du disque.
4. Posez le disque sur le plateau, puis appuyez sur < pour
fermer le plateau.
5. Lorsque la lecture du disque est terminée, les numéros
des dossiers contenant des fichiers MP3/WMA et les
numéros des pistes s'affichent.
CD
: Lit les pistes aléatoirement.
Pour annuler la répétition ou la lecture aléatoire, appuyez
sur SHUFFLE/REPEAT (d) plusieurs fois jusqu'à ce que
les icônes disparaissent.
Lecture programmée (CD musicaux)
Vous pouvez programmer jusqu'à 32 pistes à lire.
1. Appuyez sur MODE (e).
2. Le numéro de piste (T--) clignote sur l'écran.
F019 T159
0 Si les fichiers MP3/WMA sont enregistrés dans deux
dossiers ou plus, un numéro est automatiquement
attribué à chaque dossier.
6. Pour démarrer la lecture, appuyez sur la touche X/; (a)
de la télécommande. Pour sélectionner un dossier à lire,
appuyez sur w/x (f). La lecture démarre
automatiquement lorsque vous sélectionnez un dossier.
0 Les dossiers qui ne contiennent pas de fichiers
musicaux lisibles par cet appareil sont ignorés.
0 Il est possible de lire 255 dossiers au maximum. Ce
nombre inclut les dossiers contenant des fichiers que
cet appareil ne peut pas lire.
3. Appuyez sur
enregistrer, puis appuyez sur ENTER (g). Répétez cette
étape pour enregistrer d'autres pistes. La dernière piste
du programme est supprimée si vous appuyez sur
CLEAR (c).
4. Appuyez sur
0 Si vous appuyez une fois de plus sur MODE (e) alors
que la lecture est arrêtée, tout le programme est
supprimé.
0 La lecture aléatoire et la répétition d'une seule piste ne
peuvent pas être utilisées pendant la lecture d'un
programme.
:/9 (b) pour sélectionner la piste à
X/; (a) pour démarrer la lecture.
18
Répétition/Lecture aléatoire
1. Appuyez plusieurs fois sur la touche SHUFFLE/REPEAT
(d) pour afficher , ou sur l'écran.
: Répète la lecture de toutes les pistes.
1
: Répète la lecture de la piste sélectionnée.
Page 67

> Avant de Démarrer > Nom des pièces > Installation > Initial Setup >Lecture
F
R
2
a
b
e
d
c
1
USB Front
No Storage
USB
USB Front
USB Storage
USB
Configuration avancée | Mise à jour du micrologiciel | Autres
Périphérique de stockage USB/DD
Commandes de base
Vous pouvez lire des fichiers musicaux en connectant un
périphérique de stockage USB ou un DD (disque dur) au
port USB situé à l'avant ou à l'arrière de l'appareil.
0 Le port USB à l’avant peut supporter une charge
maximale de 5 V/0,5 A. Si le DD nécessite une
alimentation supérieure, branchez sur le port USB
(maximum 5 V/1 A) situé à l’arrière de l’appareil.
1. Mettez en marche l'appareil.
2. Appuyez sur USB pour sélectionner "USB Front" ou
"USB Rear".
3. Branchez votre périphérique de stockage USB ou votre
DD au port USB situé à l'avant ou à l'arrière de l'appareil.
4. Les dossiers et les fichiers musicaux s'affichent à l'écran
lorsque le chargement est terminé.
5. Sélectionnez le dossier ou le fichier musical grâce aux
curseurs (c) de la télécommande et appuyez sur ENTER
(d) pour valider. Pour revenir sur l'affichage précédent,
appuyez sur RETURN (e).
19
Page 68

> Avant de Démarrer > Nom des pièces > Installation > Initial Setup >Lecture
F
R
1
1
Configuration avancée | Mise à jour du micrologiciel | Autres
6. Utilisez les touches de lecture (a) pour arrêter la lecture
ou choisir les pistes à lire.
0 L'affichage du nom de l'album, du nom de l'artiste et de la
pochette de l'album est pris en charge avec les fichiers
musicaux aux formats MP3/WMA/Apple Lossless/FLAC/
AAC/DSD (DSF uniquement). Les formats des images
intégrées sont JPEG et PNG.
0 Les caractères qui ne peuvent pas être affichés par cet
appareil sont remplacés par "
0 Le port USB de cet appareil est conforme à la norme
USB 2.0. La vitesse de transfert peut être insuffisante
pour certains des contenus que vous lisez, ce qui peut
causer des coupures du son.
¢
".
Répétition/Lecture aléatoire
1. Appuyez plusieurs fois sur SHUFFLE/REPEAT (b)
pendant la lecture pour afficher , ou sur l'écran.
: Répète la lecture de toutes les pistes.
: Répète la lecture de la piste sélectionnée.
: Lit aléatoirement les pistes présentes dans un
dossier.
Pour annuler la répétition ou la lecture aléatoire, appuyez
sur SHUFFLE/REPEAT (b) plusieurs fois jusqu'à ce que
les icônes disparaissent.
Configuration requise du périphérique de
stockage USB/DD
0 Notez que cette commande n'est pas garantie avec tous
les périphériques de stockage USB ou DD.
0 Cet appareil peut utiliser les périphériques de stockage
USB conformes à la norme USB MSC. (Toutefois,
certains périphériques ne peuvent pas être lus par cet
appareil même s'ils sont conformes à la norme de
stockage de masse USB.)
0
L'appareil est également compatible avec les périphériques de
stockage USB utilisant les formats de système de fichier FAT16
ou FAT32. D'autres formats tels qu'exFAT, NTFS et HFS ne
peuvent pas être lus par cet appareil.
0 Si le périphérique de stockage USB a été partitionné,
chaque section sera considérée comme étant un
périphérique indépendant.
0
Vous pouvez afficher jusqu'à 20.000 pistes par dossier, et les
dossiers peuvent être imbriqués jusqu'à 16 niveaux de profondeur.
0 Les concentrateurs USB et les périphériques de
stockage USB avec des fonctions de concentrateur ne
sont pas pris en charge. Ne branchez pas ces
périphériques à l’appareil.
0 Les périphériques de stockage USB avec des fonctions
de sécurité ne sont pas pris en charge sur cet appareil.
0 Si le périphérique de stockage USB ou le DD est fourni
avec un adaptateur secteur, nous vous recommandons
d'utiliser son adaptateur pour l'alimenter.
0 Un média inséré dans le lecteur de carte USB peut ne
pas être disponible dans cette fonction. De plus, en
fonction du périphérique de stockage USB, une lecture
correcte du contenu peut être impossible.
0
Nous déclinons toute responsabilité pour la perte ou
l'endommagement des données sauvegardées sur un
périphérique de stockage USB lorsque ce périphérique est
utilisé avec cet appareil. Nous vous recommandons de
sauvegarder à l'avance les fichiers musicaux importants.
Formats audio pris en charge
Pour la lecture depuis un serveur et la lecture depuis un périphérique
de stockage USB, l’appareil prend en charge les formats de fichiers
musicaux suivants. Notez que les fichiers audio qui sont protégés par
droits d'auteur ne peuvent pas être lus sur cet appareil.
MP3 (.mp3/.MP3):
0 Formats pris en charge: MPEG-1/MPEG-2 Audio Layer 3
0 Taux d’échantillonnage pris en charge: 44,1 kHz, 48 kHz
0
Débits binaires pris en charge: Entre 8 kbps, 320 kbps et VBR.
WMA (.wma/.WMA):
0 Taux d’échantillonnage pris en charge: 44,1 kHz, 48 kHz
0
Débits binaires pris en charge: Entre 5 kbps, 320 kbps et VBR.
0 Les formats WMA Pro/Voice/WMA Lossless ne sont pas
pris en charge
WAV (.wav/.WAV):
Les fichiers WAV comprennent des données audio
numériques PCM non compressées.
0 Taux d’échantillonnage pris en charge : 44,1 kHz,
48 kHz, 88,2 kHz, 96 kHz, 176,4 kHz, 192 kHz
0 Bits de quantification: 8 bits, 16 bits, 24 bits
AIFF (.aiff/.aif/.aifc/.afc/.AIFF/.AIF/.AIFC/.AFC):
Les fichiers AIFF comprennent des données audio
numériques PCM non compressées.
0 Taux d’échantillonnage pris en charge : 44,1 kHz,
48 kHz, 88,2 kHz, 96 kHz, 176,4 kHz, 192 kHz
0 Bits de quantification: 8 bits, 16 bits, 24 bits
AAC (.aac/.m4a/.mp4/.3gp/.3g2/.AAC/.M4A/.MP4/.3GP/
.3G2):
0 Formats pris en charge: MPEG-2/MPEG-4 Audio
0 Taux d’échantillonnage pris en charge : 44,1 kHz,
48 kHz, 88,2 kHz, 96 kHz
0
Débits binaires pris en charge: Entre 8 kbps, 320 kbps et VBR.
FLAC (.flac/.FLAC):
0 Taux d’échantillonnage pris en charge : 44,1 kHz,
48 kHz, 88,2 kHz, 96 kHz, 176,4 kHz, 192 kHz
0 Bits de quantification: 8 bits, 16 bits, 24 bits
Apple Lossless (.m4a/.mp4/.M4A/.MP4):
0 Taux d’échantillonnage pris en charge : 44,1 kHz,
48 kHz, 88,2 kHz, 96 kHz, 176,4 kHz, 192 kHz
0 Bits de quantification: 16 bits, 24 bits
DSD (.dsf/.dff/.DSF/.DFF):
0 Formats pris en charge: DSF/DSDIFF
0 Taux d’échantillonnage pris en charge: 2,8 MHz,
5,6MHz, 11,2MHz
20
Page 69

> Avant de Démarrer > Nom des pièces > Installation > Initial Setup >Lecture
F
R
Network
TIDAL
Deezer
Spotify
TuneIn Radio
Configuration avancée | Mise à jour du micrologiciel | Autres
Radio Internet
Commandes de base
1
a
b
c
Lorsque cet appareil est connecté au réseau, vous pouvez
écouter TuneIn ou d'autres services de radio Internet
préenregistrés.
Selon le service de radio Internet, il se peut que l’utilisateur
doive s’inscrire d’abord sur l’ordinateur.
1. Mettez en marche l'appareil.
2. Appuyez sur NETWORK.
3. Sélectionnez "TuneIn Radio" à l’aide des touches du
curseur (a) de la télécommande et appuyez sur ENTER
(b) pour confirmer. Après avoir basculé l’affichage vers le
service de radio Internet, vous pouvez sélectionner des
stations avec les curseurs (a) de la télécommande et
appuyer sur ENTER (b) pour confirmer. Pour revenir sur
l’affichage précédent, appuyez sur RETURN (c).
TuneIn
Vous permet d'enregistrer une station déjà lue dans les
favoris.
1. Appuyez sur ENTER (b) pendant la lecture TuneIn.
2. Sélectionnez "Add to My Presets" sur l'écran et validez.
3. Pour lire un favori, sur l'écran du haut de TuneIn,
sélectionnez la station enregistrée dans "My Presets" et
validez. Pour supprimer des favoris, appuyez sur ENTER
(b) pendant la lecture, sélectionnez "Remove from My
Presets" et confirmez.
21
Page 70

> Avant de Démarrer > Nom des pièces > Installation > Initial Setup >Lecture
F
R
Wi-Fi
PioneerHMXXxxxxxx
b
a
c
d
1
4
3
2
Configuration avancée | Mise à jour du micrologiciel | Autres
Spotify
Commandes de base
La lecture Spotify Connect est possible en connectant cet
appareil au même réseau qu’un smartphone ou une
tablette. Pour utiliser Spotify Connect, vous devez installer
l'appli Spotify sur votre smartphone ou votre tablette et
créer un compte Spotify Premium.
1. Connectez le smartphone au réseau auquel cet appareil
est connecté.
2. Cliquez sur l'icône Connect sur l'écran de lecture de la
piste de l'appli Spotify.
3. Sélectionnez cet appareil.
0 Cet appareil est affiché sous la forme "Pioneer
HM76D (76 ou 86D) XXXXXX".
4. Cet appareil s’allume automatiquement, le sélecteur
d’entrée passe automatiquement sur NETWORK et la
diffusion en flux de Spotify démarre.
0 Si "Option Setting" - "Power Off Setting" - "Network
Standby" est réglé sur "Off" dans le menu Setup,
mettez en marche l’appareil manuellement et appuyez
sur la touche NETWORK de la télécommande.
0 Consultez ce qui suit pour configurer Spotify :
www.spotify.com/connect/
0 Le logiciel Spotify est soumis à des licences de tiers que
vous trouverez ici :
www.spotify.com/connect/third-party-licenses
Les actions suivantes sur la télécommande sont également
possibles.
(a) Pressée durant la lecture, cette touche permet de mettre
en pause la lecture. Pressée durant la pause, elle
reprend la lecture.
(b) Cette touche permet de lancer la lecture de la piste
précédente.
(c) Cette touche permet de lancer la lecture de la piste
suivante.
(d) Démarrez le mode de répétition ou aléatoire. Appuyer
sur cette touche de manière répétée permet de faire
défiler les modes de répétition / aléatoire.
22
Page 71

> Avant de Démarrer > Nom des pièces > Installation > Initial Setup >Lecture
F
R
1
d
e
f
b
e
a
c
d
h
f
g
Configuration avancée | Mise à jour du micrologiciel | Autres
Écoute de la radio FM
Syntonisation automatique
1. Mettez en marche l'appareil.
2. Appuyez plusieurs fois sur TUNER pour basculer l'entrée
sur Tuner FM.
Tuner FM
AUTO
87.50
MHz
3. Lorsque vous appuyez sur TUNE i/j (b) de la
télécommande, la syntonisation automatique démarre et
la recherche s'arrête lorsqu'une station est trouvée.
"Tuned Stereo" ou "Tuned Mono" est affiché lorsque des
stations FM sont reçues.
Lorsque les émissions FM sont difficiles à recevoir :
Effectuez la procédure de "Syntonisation manuelle". Si
"Tuning Mode" est réglé sur "Manual", la réception des
émissions FM sera monophonique plutôt que stéréo, quelle
que soit la sensibilité de la réception.
Syntonisation manuelle
Vous devrez modifier la configuration initiale. Appuyez sur
la touche SETUP (h) de la télécommande et sélectionnez
"Option Setting" - "Tuner Setting" - "Tuning Mode" "Manual" sur l'écran, puis validez. Appuyez sur SETUP (h)
pour terminer la configuration.
1. Mettez en marche l'appareil.
2. Appuyez plusieurs fois sur TUNER pour basculer l'entrée
sur Tuner FM.
23
Page 72

> Avant de Démarrer > Nom des pièces > Installation > Initial Setup >Lecture
F
R
Tuner FM
87.50
MHz
87.50
MHz
Tuner FM
P01
Configuration avancée | Mise à jour du micrologiciel | Autres
3. Sélectionnez la station à écouter en appuyant sur la
touche TUNE i/j (b) de la télécommande.
0 La fréquence change d’1 pas à chaque fois que vous
appuyez sur la touche. La fréquence change en
continu si le bouton est maintenu enfoncé, et s'arrête
lorsque le bouton est relâché. Rechercher en
regardant l'écran.
Mémorisation d'une station
Vous pouvez enregistrer jusqu'à 40 stations.
1. Syntonisez-vous sur la station de radio que vous voulez
mémoriser.
2. Appuyez sur la touche MEMORY (c) de la télécommande
pour que le numéro de préréglage clignote sur l'afficheur.
3. Pendant que le numéro de préréglage clignote (environ 8
secondes), appuyez plusieurs fois sur PRESET i/j (a)
de la télécommande pour sélectionner un numéro entre 1
et 40.
4. Appuyez de nouveau sur la touche MEMORY (c) de la
24
télécommande pour mémoriser la station. Lorsqu'il est
enregistré, le numéro de préréglage s'arrête de clignoter.
Sélection des stations mémorisées
1. Appuyez plusieurs fois sur TUNER pour basculer l'entrée
sur Tuner FM.
2. Appuyez sur PRESET i/j (a) de la télécommande pour
sélectionner un numéro prédéfini.
Pour supprimer une station mémorisée
1. Appuyez plusieurs fois sur TUNER pour basculer l'entrée
sur Tuner FM.
2. Appuyez sur PRESET i/j (a) de la télécommande pour
sélectionner un numéro prédéfini que vous désirez
supprimer.
3. Appuyez sur la touche CLEAR (d) de la télécommande
pour supprimer le numéro prédéfini.
Pour donner un nom à une station enregistrée
1. Appuyez plusieurs fois sur TUNER pour basculer l'entrée
sur Tuner FM.
2. Appuyez sur PRESET i/j (a) de la télécommande pour
sélectionner un numéro prédéfini.
3. Appuyez sur SETUP (h) de la télécommande.
4. Appuyez sur y/z (f) de la télécommande pour
sélectionner "Option Setting" - "Tuner Setting" - "Preset
Name" et appuyez sur ENTER (g).
5. Saisissez un nom pour la station. Pour plus de détails sur
la saisie de texte, voir "Saisie d'un texte" (ÄP34).
Utilisation du RDS
RDS est l’acronyme de Radio Data System, un système de
transmission de données par signaux radio FM. Dans les
régions qui utilisent le RDS, le nom de la station radio
s'affiche lorsque vous syntonisez les informations du
programme de diffusion d'une station radio. Lorsque vous
appuyez sur la touche MODE (e) de la télécommande dans
cet état, vous pouvez utiliser les fonctions suivantes.
Affichage de texte d'information (Radio Text)
1. Pendant que le nom de la station apparait sur l'afficheur,
appuyez une fois sur la touche MODE (e) de la
télécommande.
Le texte radio (RT) diffusé par la station apparait en
défilant sur l'afficheur. "Not RDS" s'affiche lorsqu'aucune
information de texte n'est disponible.
0 Des caractères inhabituels peuvent s'afficher lorsque
l’appareil reçoit des caractères non pris en charge.
Cependant, cela ne constitue pas un dysfonctionnement.
De plus, si le signal provenant d'une station est faible, les
informations peuvent ne pas s'afficher.
Recherche des stations par type de programme
1. Pendant que le nom de la station apparait sur l'afficheur,
appuyez deux fois sur la touche MODE (e) de la
télécommande.
2. Appuyez sur les touches PRESET i/j du curseur (a) de
la télécommande pour sélectionner le type de
programme que vous désirez trouver, puis appuyez sur
ENTER (g) pour lancer la recherche.
Les types de programme affichés sont les suivants :
None
News (Reportages d'actualité)
Current affair (Questions d’actualité)
Information (Informations)
Sport
Education (Enseignement)
Drama
Cultures
Science (Sciences et Technologie)
Varied speech
Pop music (musique Pop)
Rock music (musique Rock)
Easy listening (Station de musique grand public)
Light classics (Classique pour amateur)
Serious classi (Classique pour connaisseur)
Other music (Autre musique)
Weather & metr
Finance
Children's pro (Programmes pour enfants)
Social affairs (Affaires sociales)
Page 73

> Avant de Démarrer > Nom des pièces > Installation > Initial Setup >Lecture
F
R
Configuration avancée | Mise à jour du micrologiciel | Autres
Religion
Phone in
Travel & touri
Leisure & hobb
Jazz music (Musique jazz)
Country music (Musique country)
Nation music (Variétés nationales)
Oldies music (Anciens tubes)
Folk music (Musique folk)
Documentary (Documentaire)
0 Les informations affichées peuvent parfois ne pas
correspondre au contenu diffusé par la station.
3. "FINISH" s’affiche lorsqu’une station est trouvée et la
fréquence clignote sur l’afficheur. Appuyez sur ENTER
(g) pendant le clignotement pour lancer la réception de la
station. Si vous n’appuyez pas sur ENTER (g), l’appareil
cherchera une autre station.
0 Si aucune station n’est trouvée, le message "Not Found"
s’affiche.
0 Des caractères inhabituels peuvent s'afficher lorsque
l’appareil reçoit des caractères non pris en charge.
Cependant, cela ne constitue pas un dysfonctionnement.
De plus, si le signal provenant d'une station est faible, les
informations peuvent ne pas s'afficher.
25
Page 74

> Avant de Démarrer > Nom des pièces > Installation > Initial Setup >Lecture
F
R
1
b
a
c
Scan: 100%
Tuner DAB
Configuration avancée | Mise à jour du micrologiciel | Autres
Écoute de la radio numérique DAB (X-HM76D, X-HM86D, XC-HM86D)
Tuner
1. Mettez en marche l'appareil.
2. Appuyez plusieurs fois sur TUNER pour basculer l'entrée
sur Tuner DAB.
0 La toute première fois que vous sélectionnez Tuner
DAB, la fonction Syntonisation Auto balaie
automatiquement la bande 3 du DAB pour trouver les
bouquets (c.à.d. stations) disponibles dans la zone où
vous êtes.
0 Une fois le balayage effectué, la première station
trouvée est sélectionnée.
0 Si une nouvelle station DAB est trouvée ou que vous
vous déplacez, appuyez sur SETUP sur la
télécommande, puis utilisez "DAB Scan" dans "Option
Setting" - "Tuner Setting".
3. Sélectionnez la station de radio de votre choix à l’aide
des touches du curseur (c) de la télécommande.
Le changement d’ordre des stations s’affiche
Vous pouvez trier les stations disponibles par ordre
alphabétique ou par bouquet.
1. Appuyez plusieurs fois sur la touche MODE (a) pour
définir l’ordre de tri de l’affichage parmi les suivants.
Alphabet (réglage par défaut) : Tri des stations par
ordre alphabétique.
Multiplex : Tri des stations par bouquet.
Affichage des informations de la radio DAB
1. Appuyez plusieurs fois sur la touche (NOW PLAYING)
(b) pour afficher plus d'informations sur la station DAB
sélectionnée.
Tuner DAB
ABCD-Station
News
DLS (Dynamic Label Segment) : Lorsqu'il est syntonisé
sur une station qui émet des données texte DLS, le texte
défile à travers l'afficheur.
Program Type : Affiche le type de programme.
Bit Rate and Audio Mode : Affiche le débit de la radio et
le mode audio (Stereo, Mono).
Quality : Affiche la qualité du signal.
0 - 59 : Faible réception
60 - 79 : Bonne réception
80 - 100 : Excellente réception
Multiplex Name : Affiche le nom du bouquet actuel.
Multiplex Number and Frequency : Affiche le numéro
et la fréquence du bouquet actuel.
26
Page 75

> Avant de Démarrer > Nom des pièces > Installation > Initial Setup >Lecture
F
R
1
2
PioneerHMXXxxxxxx
1
2
PioneerHMXXxxxxxx
ÉcouterJumelage
--:--:--/--:--:--
Now Pairing...
Bluetooth
Configuration avancée | Mise à jour du micrologiciel | Autres
BLUETOOTH
®
Jumelage
1. Mettez en marche l'appareil.
2. Lorsque vous appuyez sur la touche de la
télécommande, "Now Pairing... " apparait sur l'afficheur
et le mode appairage s'active.
3. Activez (mettez en marche) la fonction BLUETOOTH du
dispositif compatible BLUETOOTH, puis sélectionnez cet
appareil parmi les dispositifs affichés. Si un mot de passe
est requis, saisissez "0000".
0 Cet appareil est affiché sous la forme "Pioneer HM76D
(76 ou 86D) XXXXXX".
4. "Now Pairing... " sur l'écran change et affiche le nom du
périphérique compatible BLUETOOTH.
0 Pour connecter un autre périphérique compatible
BLUETOOTH, appuyez sur la touche jusqu'à ce que
"Now Pairing... " s'affiche, puis effectuez l'étape 3 cidessus. Cet appareil peut mémoriser les données de huit
périphériques appairés.
0 La zone de couverture est d'environ 10 mètres. Notez
que la connexion n'est pas toujours garantie avec tous
les périphériques compatibles BLUETOOTH.
Écouter
1. Mettez en marche l'appareil.
Effectuez la procédure de connexion sur le périphérique
2.
compatible BLUETOOTH
3. Le sélecteur d'entrée sur cet appareil passe
automatiquement sur "Bluetooth".
.
27
Page 76

> Avant de Démarrer > Nom des pièces > Installation > Initial Setup >Lecture
F
R
Configuration avancée | Mise à jour du micrologiciel | Autres
4. Lisez les fichiers musicaux. Augmentez le volume du
dispositif compatible BLUETOOTH jusqu'à un niveau
correct.
0 À cause des caractéristiques de la technologie sans fil
BLUETOOTH, le son produit par cet appareil peut être
légèrement en retard par rapport au son lu par le
périphérique compatible BLUETOOTH.
28
Page 77

> Avant de Démarrer > Nom des pièces > Installation > Initial Setup >Lecture
F
R
1
3
PioneerHMXX
iPhone
2
4
Configuration avancée | Mise à jour du micrologiciel | Autres
AirPlay
®
Wi-Fi
Fonctionnement de base
Vous pouvez profiter à distance des fichiers musicaux
présents sur un iPhone
connecté au même point d'accès que cet appareil. Mettez à
jour la version OS de votre périphérique iOS.
1. Mettez en marche l'appareil.
2. Connectez le périphérique iOS au même réseau que
celui de cet appareil.
3. Touchez l'icône AirPlay présente dans le centre de
contrôle du dispositif iOS et sélectionnez cet appareil
dans la liste des dispositifs affichée, puis touchez "Done".
0 Cet appareil est affiché sous la forme "Pioneer HM76D
(76 ou 86D) XXXXXX".
0 Si un "AirPlay Password" a été défini sur cet appareil,
saisissez le mot de passe défini.
4. Lisez les fichiers musicaux sur le dispositif iOS.
0 Dans le menu Configuration affiché en appuyant sur la
touche SETUP de la télécommande, lorsque "Option
Setting"
- "Power Off Setting" - "Network Standby" est
défini sur "On", lorsque la lecture d’AirPlay démarre, cet
appareil se met automatiquement sous tension et la
lecture démarre.
0 À cause des caractéristiques de la technologie sans fil
AirPlay, le son produit par cet appareil peut être
légèrement en retard par rapport au son lu par le
périphérique compatible AirPlay.
0 La touche SHUFFLE/REPEAT de la télécommande ne
fonctionne pas. Utilisez le périphérique iOS.
Vous pouvez également lire les fichiers musicaux sur
l’ordinateur avec iTunes. (Ver. 10.2.2 ou ultérieure). Vérifiez
que cet appareil et l’ordinateur sont connectés au même
réseau, cliquez sur l’icône AirPlay dans iTunes,
sélectionnez cet appareil dans la liste des dispositifs
affichée et démarrez la lecture d’un fichier musical.
®
, iPod touch®, ou un iPad®
29
Page 78

> Avant de Démarrer > Nom des pièces > Installation > Initial Setup >Lecture
F
R
a
b
1
2
Digital In
Line
Configuration avancée | Mise à jour du micrologiciel | Autres
Lecture du son provenant d'un périphérique externe
Connexions
Vous pouvez écouter le son provenant de périphériques
externes tels que des téléviseurs et des consoles de jeux
sur cet appareil. Si le périphérique externe est équipé d’une
borne de sortie optonumérique, connectez-le à la borne
DIGITAL IN OPTICAL de cet appareil à l’aide du câble
optonumérique. Lorsque le périphérique externe doit être
raccordé à l’aide d’un câble audio analogique, branchez sur
la prise LINE IN de cet appareil.
3. Démarrez la lecture sur le lecteur.
0 Lorsqu'il est connecté à un câble optonumérique, cet
appareil prend en charge les signaux PCM linéaires
jusqu'à 192 kHz/24 bits en entrée.
30
a Câble optonumérique, b Câble audio analogique
Lecture
1. Mettez en marche l'appareil.
2. Lors de la lecture d'un périphérique connecté à la borne
DIGITAL IN OPTICAL, appuyez plusieurs fois sur LINE/
DIGITAL pour basculer l'entrée de cet appareil vers
"Digital In".
Lors de la lecture d'un périphérique connecté à la borne
LINE IN, appuyez plusieurs fois sur LINE/DIGITAL pour
basculer l'entrée de cet appareil vers "Line".
Page 79

> Avant de Démarrer > Nom des pièces > Installation > Initial Setup >Lecture
F
R
Configuration avancée | Mise à jour du micrologiciel | Autres
Music Server
Il est possible de diffuser en flux des fichiers de musique
1
présents sur les ordinateurs ou dispositifs NAS connectés
au même réseau que cet appareil. Le serveur réseau de cet
appareil est compatible avec les ordinateurs ayant la
fonctionnalité serveur de Windows Media
installée, ou les NAS compatibles avec la fonctionnalité
réseau domestique. Vous devez effectuer certains réglages
au préalable pour utiliser Windows Media
Notez que seuls les fichiers de musique enregistrés dans la
bibliothèque de Windows Media
®
®
Player 11 ou 12
®
Player 11 ou 12.
Player peuvent être lus.
Configuration de Windows Media® Player
a
b
c
■ Windows Media® Player 11
1. Mettez en marche votre PC et lancez Windows Media®
Player 11.
2. Dans le menu "Library", sélectionnez "Media Sharing"
pour afficher une boîte de dialogue.
3. Sélectionnez la case à cocher "Share my media", puis
cliquez sur "OK" pour afficher les périphériques
compatibles.
4. Sélectionnez cet appareil, cliquez sur "Allow" et cochez
la case près de l’icône de cet appareil.
5. Cliquez sur "OK" pour fermer la boîte de dialogue.
0 En fonction de la version de Windows Media
peut y avoir des différences de nom avec les éléments
que vous sélectionnez.
®
Player, il
■ Windows Media® Player 12
1. Mettez en marche votre PC et lancez Windows Media®
Player 12.
2. Dans le menu "Stream", sélectionnez "Turn on media
streaming" pour afficher une boîte de dialogue.
0 Si la diffusion multimédia en continu est déjà activée,
sélectionnez "More streaming options..." dans le menu
"Stream" pour afficher la liste de lecteurs réseau, puis
passez à l’étape 4.
3. Cliquez sur " Turn on media streaming " pour afficher une
liste de lecteurs dans le réseau.
4. Sélectionnez cet appareil dans "Media streaming
options" et vérifiez qu’il est réglé sur "Allow".
5. Cliquez sur "OK" pour fermer la boîte de dialogue.
0 En fonction de la version de Windows Media
peut y avoir des différences de nom avec les éléments
que vous sélectionnez.
®
Player, il
Lire
1. Mettez en marche l'appareil.
2. Démarrez le serveur (Windows Media
Windows Media
contenant les fichiers musicaux à lire.
3. Assurez-vous que les ordinateurs et/ou les NAS sont
correctement connectés au même réseau que cet
appareil.
4.
Appuyez sur NETWORK pour afficher l'écran de la liste des
services réseau.
5. Avec y/z (a), sélectionnez "Music Server", puis appuyez
sur ENTER (b).
6. Sélectionnez le serveur et le fichier musical à l’aide de y/
z (a) et appuyez sur ENTER (b) pour confirmer. Pour
revenir sur l’affichage précédent, appuyez sur RETURN
(c).
0 Si "No Server" s’affiche, vérifiez si le réseau est connecté
correctement.
®
Player 12, ou le périphérique NAS)
Network
TuneIn Radio
Spotify
Deezer
TIDAL
®
Player 11,
31
Page 80

> Avant de Démarrer > Nom des pièces > Installation > Initial Setup >Lecture
F
R
Configuration avancée | Mise à jour du micrologiciel | Autres
0 En fonction du serveur utilisé et des fichiers lus, le temps
de lecture écoulé et le temps restant peuvent ne pas
s'afficher.
0 Pour les fichiers de musique sur un serveur, il peut y
avoir jusqu'à 20.000 pistes par dossier, et les dossiers
peuvent être imbriqués jusqu'à 16 niveaux de
profondeur.
Contrôler la lecture distance à partir d'un PC
Vous pouvez utiliser cet appareil pour lire des fichiers
musicaux stockés sur votre ordinateur en utilisant
l’ordinateur à l’intérieur de votre réseau domestique. Cet
appareil prend en charge la lecture à distance avec
Windows Media
1. Mettez en marche votre PC et lancez Windows Media
Player 12.
2. Ouvrez le menu "Stream" et vérifiez que "Allow remote
control of my Player..." est coché. Cliquez sur "Turn on
media streaming" pour afficher une liste de lecteurs dans
le réseau.
3. Sélectionnez avec un clic droit le fichier de musique à lire
avec Windows Media
musique à distance sur un autre serveur, ouvrez le
serveur cible à partir de "Other Libraries" et sélectionnez
le fichier de musique à lire.
4. Sélectionnez cet appareil dans "Play to" pour ouvrir la
fenêtre "Play to" de Windows Media
démarrez la lecture sur l’appareil. Si votre PC fonctionne
sous Windows
sélectionnez cet appareil. Si votre PC fonctionne sous
Windows
sélectionnez cet appareil. Des actions sont possibles
pendant la lecture à distance à partir de la fenêtre "Play
to" du PC.
5. Réglez le volume à l’aide de la barre de volume dans la
fenêtre "Play to".
0 Quelquefois, le volume affiché dans la fenêtre de lecture
®
Player 12.
®
Player 12. Pour lire un fichier de
®
Player 12 et
®
8.1, cliquez sur "Play to", puis
®
10, cliquez sur "Cast to Device" et
à distance peut être différent de celui affiché sur l'écran
de l’appareil. De plus, lorsque le volume est réglé depuis
cet appareil, la valeur n’est pas répercutée dans la
fenêtre "Play to".
0 La lecture à distance n’est pas possible en utilisant un
service réseau ou pour lire des fichiers de musique
présents sur un périphérique de stockage USB.
0 En fonction de la version de Windows Media
peut y avoir des différences de nom avec les éléments
que vous sélectionnez.
Formats audio pris en charge
Pour la lecture depuis un serveur et la lecture depuis un
périphérique de stockage USB, l’appareil prend en charge
®
les formats de fichiers musicaux suivants.
0 Notez que la lecture via une connexion LAN sans fil des
taux d'échantillonnage de 88,2 kHz ou plus, et DSD ne
sont pas pris en charge.
0 La lecture à distance des formats FLAC, et DSD n'est
pas prise en charge non plus.
0 Les fichiers à débit binaire variable (VBR) sont pris en
charge. Cependant, les temps de lecture peuvent ne pas
s'afficher correctement.
0 La lecture à distance ne prend pas en charge la lecture
sans intervalle.
MP3 (.mp3/.MP3) :
0 Formats pris en charge: MPEG-1/MPEG-2 Audio Layer-3
0 Taux d’échantillonnage pris en charge: 44,1 kHz, 48 kHz
0 Débits binaires pris en charge: Entre 8 kbps, 320 kbps et
VBR.
WMA (.wma/.WMA) :
0 Taux d’échantillonnage pris en charge: 44,1 kHz, 48 kHz
0 Débits binaires pris en charge: Entre 8 kbps, 320 kbps et
VBR.
0 Les formats WMA Pro/Voice/WMA Lossless ne sont pas
pris en charge.
®
Player, il
WAV (.wav/.WAV) :
Les fichiers WAV comprennent des données audio
numériques PCM non compressées.
0 Taux d’échantillonnage pris en charge : 44,1 kHz,
48 kHz, 88,2 kHz, 96 kHz, 176,4 kHz, 192 kHz
0 Bits de quantification: 8 bits, 16 bits, 24 bits
AIFF (.aiff/.aif/.aifc/.afc/.AIFF/.AIF/.AIFC/.AFC) :
Les fichiers AIFF comprennent des données audio
numériques PCM non compressées.
0 Taux d’échantillonnage pris en charge : 44,1 kHz,
48 kHz, 88,2 kHz, 96 kHz, 176,4 kHz, 192 kHz
0 Bits de quantification: 8 bits, 16 bits, 24 bits
AAC (.aac/.m4a/.mp4/.3gp/.3g2/.AAC/.M4A/.MP4/.3GP/
.3G2) :
0 Formats pris en charge: MPEG-2/MPEG-4 Audio
0 Taux d’échantillonnage pris en charge : 44,1 kHz,
48 kHz, 88,2 kHz, 96 kHz
0 Débits binaires pris en charge: Entre 8 kbps, 320 kbps et
VBR.
FLAC (.flac/.FLAC) :
0 Taux d’échantillonnage pris en charge : 44,1 kHz,
48 kHz, 88,2 kHz, 96 kHz, 176,4 kHz, 192 kHz
0 Bits de quantification: 8 bits, 16 bits, 24 bits
LPCM (PCM linéaire) :
0 Taux d’échantillonnage pris en charge: 44,1 kHz, 48 kHz
0 Bits de quantification: 16 bits
Apple Lossless (.m4a/.mp4/.M4A/.MP4) :
0 Taux d’échantillonnage pris en charge : 44,1 kHz,
48 kHz, 88,2 kHz, 96 kHz, 176,4 kHz, 192 kHz
0 Bits de quantification: 16 bits, 24 bits
DSD (.dsf/.dff/.DSF/.DFF) :
0 Formats pris en charge: DSF/DSDIFF
0 Taux d’échantillonnage pris en charge: 2,8 MHz,
5,6MHz, 11,2MHz
32
Page 81

> Avant de Démarrer > Nom des pièces > Installation > Initial Setup >Lecture
F
R
b
a
TIMER1
TimerSet
Configuration avancée | Mise à jour du micrologiciel | Autres
Utilisation de l'alarme pour démarrer la lecture
À l'heure réglée, l'appareil se met sous tension et démarre
la lecture de la source souhaitée. Vous pouvez régler deux
minuteries différentes, "TIMER 1" et "TIMER 2". Assurezvous que l'horloge de cet appareil est correctement réglée.
Vous ne pouvez pas utiliser les minuteries si l'horloge n'a
pas été réglée.
1. Maintenez la touche TIMER appuyée pendant 2
secondes.
Pour régler "TIMER 1", passez à l'étape 2. Pour régler
"TIMER 2", appuyez encore une fois sur TIMER.
2. Appuyez sur ENTER (b) lorsque "Timer Set" s'affiche.
3. Appuyez sur w/x (a) pour sélectionner la source à
utiliser pour la lecture en mode minuterie, puis appuyez
sur ENTER (b).
0 Les sources que vous pouvez sélectionner sont "CD",
"FM" et "DAB"
Lorsque vous sélectionnez "FM", appuyez sur w/x (a)
pour sélectionner une station préréglée et appuyez sur
ENTER (b).
Lorsque vous sélectionnez "DAB", le dernier service
utilisé est reçu.
4. Appuyez sur w/x (a) pour sélectionner "Every" ou
"Once", puis appuyez sur ENTER (b).
Si vous sélectionnez "Every", sélectionnez les jours de la
semaine parmi "Everyday", "Sunday", "Monday",
"Tuesday", "Wednesday", "Thursday", "Friday",
"Saturday", "Mon-Fri", "Tue-Sat", et "Sat-Sun" puis
validez. Si vous sélectionnez "Once", sélectionnez un
jour de la semaine parmi "Sunday", "Monday",
"Tuesday", "Wednesday", "Thursday", "Friday", et
(X-HM76D, X-HM86D, XC-HM86D).
"Saturday", puis validez.
5. Appuyez sur w/x (a) pour sélectionner l'heure de début
de l'alarme et appuyez sur ENTER (b).
6. Appuyez sur w/x (a) pour sélectionner l'heure de fin de
l'alarme et appuyez sur ENTER (b).
7. Appuyez sur w/x (a) pour sélectionner le volume (de 0 à
50) de l'alarme et appuyez sur ENTER (b).
8. L'indicateur TIMER s'allume lorsque le réglage est
terminé, et le contenu réglé est affiché à l'écran.
9. Appuyez sur la touche Í STANDBY/ON pour mettre
l'appareil en veille.
Vérifiez si l'alarme est réglée sur On ou Off : lorsque
l'indicateur TIMER est allumé et rouge, l'alarme est activée.
L'alarme est désactivée si l'indicateur est éteint.
Régler l'alarme sur On ou Off : Si l'alarme est déjà réglée,
vous pouvez activer ou désactiver la fonction.
1. Maintenez la touche TIMER appuyée pendant 2
secondes.
2. "TIMER 1" s'affiche. Pour modifier "TIMER 1", passez à
l'étape 3. Pour modifier "TIMER 2", appuyez encore une
fois sur TIMER.
3. Pour désactiver, appuyez sur ENTER (b) lorsque "Timer
Off" s'affiche.
0 Pour activer, appuyez sur ENTER (b) lorsque "Timer
On" s'affiche.
0 Appuyez sur w/x (a) pour sélectionner "Timer Call",
puis sur ENTER (b) pour vérifier le contenu réglé.
4. Appuyez sur la touche Í STANDBY/ON pour mettre
l'appareil en veille.
33
Page 82

> Avant de Démarrer > Nom des pièces > Installation > Initial Setup >Lecture
F
R
Configuration avancée | Mise à jour du micrologiciel | Autres
Saisie d'un texte, ajustement de la qualité du son, etc.
Saisie d'un texte
a
b
c
d
e
f
La saisie de texte, pour les mots de passe, etc. nécessite
l'utilisation des touches suivantes de la télécommande.
Touche SHUFFLE/REPEAT (a) : chaque pression permet
de modifier le type de texte, dans l'ordre majuscules →
minuscules → chiffres → symboles.
Tou ches y/z (c) : chaque pression permet de modifier le
caractère.
Tou ches w/x (d) : permet de déplacer la position du
curseur à l'endroit ou l'on souhaite placer le caractère.
Tou che CLEAR (b) : permet de supprimer le caractère
situé sur la position du curseur.
Touche ENTER (e) : permet de confirmer le contenu saisi.
Tou che RETURN (f) : permet d'annuler la saisie et de
revenir à l’affichage précédent.
Password
A
Change Text[REPEAT]
Delete One Character[CLEAR]
1. Appuyez deux fois sur la touche SOUND (g).
2. Appuyez sur les touches w/x (d) pour régler les aigus.
(s5 à i5)
Accentuation de la gamme des graves (P.BASS)
1. Appuyez trois fois sur la touche SOUND (g).
2. Appuyez sur les touches w/x (d) pour sélectionner "On",
puis appuyez sur ENTER (e).
g
34
Ajustement de la qualité du son
Ajustement des graves (BASS)
1. Appuyez sur la touche SOUND (g).
2. Appuyez sur les touches w/x (d) pour régler les graves.
(s5 à i5)
Réglage des aigus (TREBLE)
Page 83

> Avant de Démarrer > Nom des pièces > Installation > Initial Setup > Lecture
F
R
1
Setup
Factory Reset
System Info
Option Setting
Network Setting
Configuration avancée | Mise à jour du micrologiciel | Autres
Configuration avancée
Configuration avancée
L'appareil vous permet de configurer les paramètres avancés pour qu'ils vous fournissent
une expérience encore meilleure.
1. Appuyez sur SETUP de la télécommande.
2. Une fois l’écran Setup affiché, sélectionnez le contenu ou le réglage avec les curseurs de
la télécommande et appuyez sur ENTER pour valider votre sélection. Pour revenir sur
l'écran précédent, appuyez sur RETURN.
3. Pour quitter les réglages, appuyez sur SETUP.
Network Setting
■ Connection
Sélectionnez le type de connexion au réseau.
"Wi-Fi" : Pour une connexion LAN sans fil
"Wired" (Valeur par défaut) : Pour une connexion LAN filaire
Effectuez "Wi-Fi Setup" si vous sélectionnez "Wi-Fi".
35
Page 84

> Avant de Démarrer > Nom des pièces > Installation > Initial Setup > Lecture
F
R
Configuration avancée | Mise à jour du micrologiciel | Autres
■ Wi-Fi Setup
Effectuez les réglages de la connexion Wi-Fi. (ÄP13)
Ce réglage peut être effectué uniquement lorsque "Wi-Fi" est sélectionné dans
"Connection".
0 Vous pouvez effectuer le réglage des paramètres de connexion Wi-Fi à l’aide d’un
navigateur web sur ordinateur. Pour plus de détails, voir "Web Setup" (ÄP38).
■ DHCP
"On" (Valeur par défaut) : Configuration automatique via le protocole DHCP
"Off": Configuration manuelle sans protocole DHCP
En sélectionnant "Off", vous devez régler manuellement "IP Address", "Subnet Mask",
"Gateway", et "DNS Server".
■ IP Address
Affiche/Définit l'adresse IP.
■ Subnet Mask
Affiche/Définit le masque de sous-réseau.
■ Gateway
Affiche/Définit la passerelle.
■ DNS Server
Affiche/Définit le serveur DNS primaire.
■ Proxy URL
Affiche/Définit l'URL du serveur proxy.
■ Proxy Port
Affiche/Définit le numéro de port du serveur proxy quand vous saisissez "Proxy URL".
■ Friendly Name
Changez le nom de périphérique de cet appareil qui apparait sur les autres périphériques
connectés au réseau pour un nom facilement reconnaissable. Vous pouvez saisir jusqu'à 31
caractères. Pour plus de détails sur la saisie de texte, voir "Saisie d'un texte" (ÄP34). Une
fois la saisie terminée, appuyez sur ENTER.
■ AirPlay Password
Vous pouvez saisir un mot de passe pouvant avoir jusqu'à 31 caractères pour que seuls les
utilisateurs mémorisés puissent utiliser AirPlay. Pour plus de détails sur la saisie de texte,
voir "Saisie d'un texte" (ÄP34). Une fois la saisie terminée, appuyez sur ENTER.
■ Network Check
Vous pouvez vérifier la connexion réseau.
Option Setting
■ Power Off Setting
Auto Standby Ce réglage met automatiquement l’appareil en veille après 20
minutes d’inactivité sans aucune entrée audio.
"On" (Valeur par défaut) : L’appareil passera automatiquement
en mode veille.
"Off" : L’appareil ne passe pas automatiquement en mode veille.
Network Standby Lorsque cette fonctionnalité est mise sur "On", vous pouvez
mettre sous tension l'appareil via le réseau en utilisant une
application qui peut commander cet appareil.
0 Le réglage sur "On" (Valeur par défaut) augmente la
consommation d'énergie même lorsque l'appareil est en mode
veille.
0 "Network Standby", qui réprime la consommation d’énergie,
peut se désactiver lorsque la connexion réseau est perdue.
Bluetooth Wakeup Cette fonction sort l'appareil du mode veille en connectant un
périphérique compatible BLUETOOTH.
"On" : Pour utiliser cette fonction
"Off" (Valeur par défaut) : N'utilisez pas cette fonction
0 Le réglage sur “On” augmente la consommation d'énergie
même lorsque l'appareil est en mode veille.
0 Ce paramètre se fixe sur "Off" si "Bluetooth Setting" - "Auto
Input Change" est réglé sur "Off".
36
Page 85

> Avant de Démarrer > Nom des pièces > Installation > Initial Setup > Lecture
F
R
Configuration avancée | Mise à jour du micrologiciel | Autres
■ Digital Filter
"Slow" : son doux et fluide
"Sharp" (Valeur par défaut) : son ayant davantage de structure et de fermeté
"Short" : son qui démarre rapidement et donne l'impression d'un déplacement vers l'avant
■ Language
Choisissez la langue d'affichage.
English (Valeur par défaut), German, French, Spanish, Italian, Dutch, Swedish, Russian,
Chinese
■ Tuner Setting
Tuning Mode Réglez la méthode de réglage de la radio.
FM Search Level
DAB Scan
DAB DRC
¢
¢
"Auto" (Valeur par défaut) : Les stations de radio qui peuvent être
reçues sont réglées automatiquement.
"Manual" : régler les stations manuellement. Si "Tuning Mode" est
réglé sur "Manual", la réception des émissions FM sera
monophonique plutôt que stéréo, quelle que soit la sensibilité de
la réception.
¢
Vous pouvez choisir d’avoir uniquement les stations FM ayant
une forte réception sélectionnées en syntonisant les stations
automatiquement si la syntonisation normale s’arrête sur les
stations FM ayant une faible réception.
"Normal" (Valeur par défaut)
"Strong": Sélectionne uniquement les stations ayant une forte
réception.
Vous pouvez lancer la recherche automatique lorsque de
nouvelles stations DAB sont ajoutées ou lorsque vous
déménagez.
Avec le paramètre DRC (Dynamic Range Control), vous pouvez
réduire la plage dynamique de la radio numérique DAB de sorte
que vous puissiez encore entendre les parties chuchotées même
lorsque le volume est bas - idéal pour écouter la radio tard la nuit
sans déranger personne.
"0" (Valeur par défaut) : DRC off
"1": Réduction élevée de la plage dynamique
"1/2": Faible réduction de la plage dynamique
Preset Name Vous pouvez donner des noms aux stations que vous avez
enregistrées. Pour plus de détails sur la saisie de texte, voir
"Saisie d'un texte" (ÄP34). Une fois la saisie terminée, appuyez
sur ENTER.
* X-HM76D, X-HM86D, XC-HM86D
■ Bluetooth Setting
Bluetooth Choisissez si vous voulez ou non utiliser la fonction
BLUETOOTH.
"On" (Valeur par défaut) : Permet d’effectuer une connexion
avec un périphérique compatible BLUETOOTH à l'aide de la
fonction BLUETOOTH. Sélectionnez également "On" lorsque
vous effectuez différents réglages BLUETOOTH.
"Off": Pour ne pas utiliser la fonction BLUETOOTH
Auto Input Change L’entrée de l’appareil passe automatiquement sur
"BLUETOOTH" lorsque la connexion est effectuée depuis un
périphérique compatible BLUETOOTH vers l’appareil.
"On" (Valeur par défaut) : L'entrée devient automatiquement
"BLUETOOTH" lorsqu’un périphérique compatible BLUETOOTH
est connecté.
"Off": La fonction est désactivée.
0 Si l’entrée ne bascule pas automatiquement, réglez sur "Off"
et modifiez manuellement l'entrée.
Auto Reconnect Cette fonction se reconnecte automatiquement au dernier
périphérique compatible BLUETOOTH connecté lorsque vous
commutez l'entrée sur "BLUETOOTH".
"On" (Valeur par défaut) : Utilisez cette fonction
"Off": Pour ne pas utiliser cette fonction
0 Ceci pourrait ne pas marcher avec certains périphériques
compatibles BLUETOOTH.
37
Page 86

> Avant de Démarrer > Nom des pièces > Installation > Initial Setup > Lecture
F
R
Configuration avancée | Mise à jour du micrologiciel | Autres
Pairing Information Vous pouvez réinitialiser les informations d'appairage
sauvegardées sur cet appareil.
Appuyez sur y/z pour sélectionner "Clear", puis appuyez sur
ENTER pour initialiser les informations d'appairage enregistrées
dans cet appareil.
0 Cette fonction ne réinitialise pas les informations d'appairage
sur le périphérique compatible BLUETOOTH. En effectuant
de nouveau l'appairage de l'appareil avec le périphérique,
assurez-vous d'effacer au préalable les informations
d'appairage présentes sur le périphérique compatible
BLUETOOTH. Pour plus d'informations sur la manière
d'effacer les informations d'appairage, reportez-vous au mode
d'emploi du périphérique compatible BLUETOOTH.
System Info
L'adresse MAC de cet appareil et la version actuelle du micrologiciel s'affichent.
Factory Reset
Réinitialisez les réglages de cet appareil pour le remettre dans l'état où il était au moment de
son achat. Nous vous recommandons de prendre note des réglages modifiés avant de
procéder à la réinitialisation aux réglages d'usine. Sélectionnez "Start" et validez pour
continuer. L'appareil se met automatiquement en veille une fois l'initialisation terminée.
Update
"Update" ne s'affiche pas si aucune mise à jour du micrologiciel n'est disponible.
Web Setup
Vous pouvez effectuer le réglage des paramètres de connexion Wi-Fi à l’aide d’un
navigateur web sur ordinateur. Veillez à ce que votre ordinateur soit connecté au routeur en
sans-fil. Si cet appareil est connecté au routeur à l’aide d’un câble Ethernet, vous ne pouvez
pas effectuer ce réglage.
1. Mettez en marche l’appareil.
2. Appuyez sur la touche SETUP de la télécommande, sélectionnez "Wi-Fi" dans "Network
Setting" - "Connection", puis sélectionnez "Wi-Fi Setup".
3. Appuyez sur y/z pour sélectionner "Use iOS Device" et appuyez sur ENTER.
4. Dans la liste des connexions LAN sans fil figurant sur votre ordinateur, sélectionnez le
SSID de cet appareil (softap_0009B0xxxxxx).
0 "xxxxxx" dans le SSID correspond aux trois bits inférieurs de l’adresse MAC.
5. Ouvrez le navigateur web sur votre ordinateur et accédez à l’adresse http://
192.168.200.1.
6. Le menu "Web Setup" s’affiche. Effectuez les nombreux réglages de cet appareil.
0 En fonction de l’équipement utilisé ou de l’environnement de connexion, cette fonction
peut ne pas fonctionner.
0 Consultez les bonnes instructions d’exploitation pour obtenir des informations sur
l’utilisation de l’ordinateur.
0 Étant donné que ce type de connexion n’est pas encodé, un risque de sécurité mineur
peut exister.
■ via Network
Appuyez sur ENTER pour sélectionner lorsque vous désirez mettre à jour le micrologiciel via
le réseau.
■ via USB
Appuyez sur ENTER pour sélectionner lorsque vous désirez mettre à jour le micrologiciel via
USB.
38
Page 87

> Avant de Démarrer > Nom des pièces > Installation > Initial Setup > Lecture
F
R
Configuration avancée | Mise à jour du micrologiciel |Autres
Mise à jour du micrologiciel
Mise à jour du micrologiciel
La fonction de mise à jour de cet appareil
Cet appareil possède une fonctionnalité qui permet la mise
à jour du micrologiciel (logiciel du système) via le réseau ou
le port USB. Ceci nous permet de pouvoir effectuer des
améliorations d’une variété de commandes et d’ajouter des
fonctionnalités.
Pour avoir plus de détails sur les fonctionnalités de lecture
mises à jour, voir ici
.
Comment mettre à jour
Il y a deux méthodes de mise à jour du micrologiciel : via
réseau et via USB. La mise à jour peut prendre environ 5
minutes pour s'effectuer avec l'une ou l'autre des
méthodes : Via réseau ou via USB. De plus, les paramètres
actuels sont garantis, quelle que soit la méthode utilisée
pour la mise à jour.
0 Pour connaître les dernières informations sur les mises à
jour, visitez le site internet de notre société. Il n'est pas
nécessaire de mettre à jour le micrologiciel de cet
appareil s'il n'y a aucune mise à jour disponible.
0 Si la mise à jour est effectuée en ligne, elle peut
nécessiter plus de temps en fonction de l'état de la
connexion.
0 Lors d'une mise à jour, ne pas
– Débranchez et rebranchez un câble ou un
périphérique de stockage USB ou bien effectuez
n'importe quelle action sur le composant comme par
exemple l'éteindre.
– Accès à cet appareil à partir d'un ordinateur ou d'un
smartphone à l'aide d'une application
Avertissement : Le programme et la documentation en
ligne qui l'accompagne vous sont fournis pour une
utilisation à vos propres risques.
Nous ne serons pas tenu responsable et vous n'aurez
aucun recours en dommages et intérêts pour toute
réclamation de quelque nature que ce soit concernant votre
utilisation du programme ou la documentation en ligne qui
l'accompagne, quelle que soit la théorie juridique et si
délictuelle ou contractuelle.
En aucun cas, Nous ne sommes responsables envers vous
ou un tiers pour tous dommages spéciaux, indirects,
accessoires ou consécutifs de toute nature, y compris, mais
sans s'y limiter, à la compensation, le remboursement ou
des dommages et intérêts en raison de la perte de profits,
présents ou futurs, perte de données, ou pour toute autre
raison que ce soit.
Mise à jour du micrologiciel via le réseau
0 Vérifiez que l'appareil est en marche et que la connexion
à Internet fonctionne.
0 Éteignez le composant du contrôleur (PC, etc.) connecté
au réseau.
0 Arrêtez la lecture de la webradio, un périphérique de
stockage USB, ou le contenu d'un serveur.
1. L'écran de configuration s'affiche lorsque vous appuyez
sur la touche SETUP de la télécommande.
Setup
Network Setting
Option Setting
System Info
Factory Reset
2. Appuyez sur y/z et ENTER pour sélectionner "Update" "via Network" dans l'ordre indiqué.
Setup
Update
0 "Update" ne s'affiche pas si aucune mise à jour du
micrologiciel n'est disponible.
3. Appuyez sur ENTER pour démarrer la mise à jour du
micrologiciel.
0
"COMPLETE" s'affiche lorsque la mise à jour est terminée.
4. Appuyez sur la touche Í STANDBY/ON de l'appareil
principal pour passer l'appareil en mode veille. Le
processus est terminé et votre micrologiciel est mis à jour
à la dernière version.
39
Page 88

> Avant de Démarrer > Nom des pièces > Installation > Initial Setup > Lecture
F
R
Setup
Update
Configuration avancée | Mise à jour du micrologiciel |Autres
Si un message d'erreur s'affiche : Lorsqu'une erreur se
produit, " * - ** Error!" apparait sur l'afficheur de cet
appareil. (" * " représente un caractère alphanumérique.)
Vérifiez les points suivants :
0 * -01, * -10 : Câble Ethernet introuvable. Raccordez le
câble Ethernet correctement.
0 *-02, *-03, *-04, *-05, *-06, *-11, *-13, *-14, *-
16, * -17, * -18, * -20, * -21 : Erreur de connexion
Internet. Vérifiez les points suivants :
– Le routeur est activé
– Cet appareil et le routeur sont connectés via le réseau
Essayez de débrancher puis connectez de nouveau
l'alimentation de l’appareil et du routeur. Ceci permet de
résoudre le problème. Si vous ne parvenez toujours pas
à vous connecter à Internet, le serveur DNS ou le
serveur proxy peuvent être temporairement
indisponibles. Vérifiez l'état du service avec votre
fournisseur d'accès à internet.
0 Autres : Débranchez puis rebranchez le cordon
d'alimentation secteur, puis répétez depuis le début.
Mise à jour via USB
0 Préparez un périphérique de stockage USB de 128 Mo
ou plus. Format de système de fichiers FAT16 ou FAT32.
0 Supprimez toutes les données enregistrées sur le
périphérique de stockage USB.
0 Éteignez le composant du contrôleur (PC, etc.) connecté
au réseau.
0 Arrêtez la lecture de la webradio, un périphérique de
stockage USB, ou le contenu d'un serveur.
0 Certains périphériques de stockage USB peuvent
prendre du temps à charger, risquent de ne pas être
chargés correctement, ou peuvent ne pas être
correctement alimentés en fonction du périphérique ou
de son contenu.
0 Nous ne pourrons être tenus responsables des pertes ou
de l’endommagement des données, ou des défaillances
de stockage causées par l'utilisation d'un périphérique de
stockage USB avec cet appareil. Nous vous remercions
de votre compréhension.
1. Connectez le périphérique de stockage USB à votre PC.
2. Téléchargez le fichier du micrologiciel sur votre
ordinateur depuis le site Web de notre société et
décompressez-le.
Les fichiers du micrologiciel sont nommés de la manière
suivante :
PIOHIM **** _ ************** _ *** .zip
Décompressez le fichier sur votre PC. Le nombre de
fichiers et de dossiers décompressés varie en fonction
du modèle.
3. Copiez tous les fichiers et dossiers décompressés dans
le dossier racine du périphérique de stockage USB.
0 Assurez-vous de copier les fichiers décompressés.
4. Branchez le périphérique de stockage USB au port USB
de cet appareil.
0 Si vous connectez un disque dur USB au port USB de
l'appareil, nous vous recommandons d'utiliser son
adaptateur secteur pour l'alimenter.
0 Si le périphérique de stockage USB a été partitionné,
chaque section sera considérée comme étant un
périphérique indépendant.
5. L'écran de configuration s'affiche lorsque vous appuyez
sur la touche SETUP de la télécommande.
Setup
Network Setting
Option Setting
System Info
Factory Reset
6. Appuyez sur y/z et ENTER pour sélectionner "Update" "via USB" dans l'ordre indiqué.
0 "Update" ne s'affiche pas si aucune mise à jour du
micrologiciel n'est disponible.
7. Appuyez sur ENTER pour démarrer la mise à jour du
micrologiciel.
0 "COMPLETE" s'affiche lorsque la mise à jour est
terminée.
8. Appuyez sur la touche Í STANDBY/ON de l'appareil
principal pour passer l'appareil en mode veille. Le
processus est terminé et votre micrologiciel est mis à jour
à la dernière version.
9. Retirez le périphérique de stockage USB de cet appareil.
Si un message d'erreur s'affiche : Lorsqu'une erreur se
produit, " * - ** Error!" apparait sur l'afficheur de cet
appareil. Vérifiez les points suivants :
0 *-01, *-10 : Périphérique de stockage USB introuvable.
Vérifiez si le périphérique de stockage USB ou si le câble
USB est correctement inséré dans le port USB de cet
appareil.
Branchez le périphérique de stockage USB à une source
d'alimentation externe s'il dispose de sa propre
alimentation.
0 * -05, * -13, * -20, * -21 : Le fichier du micrologiciel
n'est pas présent dans le dossier racine du périphérique
de stockage USB, ou le fichier du micrologiciel est
destiné à un autre modèle. Essayez à nouveau à partir
du téléchargement du fichier du micrologiciel.
0 Autres : Débranchez puis rebranchez le cordon
d'alimentation secteur, puis répétez depuis le début.
40
Page 89

> Avant de Démarrer > Nom des pièces > Installation > Initial Setup > Lecture
F
R
Configuration avancée | Mise à jour du micrologiciel | Autres
Dépannage
Autres
Avant de démarrer la procédure
Lorsque le fonctionnement est instable, les problèmes
peuvent être résolus simplement en mettant l'appareil sous
tension ou en veille, ou en débranchant/rebranchant le
cordon d'alimentation, plutôt qu'en passant en revue les
réglages et les opérations. Essayez d'effectuer les mesures
les plus simples à la fois sur l'appareil et sur le périphérique
connecté. Si la consultation de "Dépannage" ne résout pas
le problème, réinitialiser l'appareil dans l'état dans lequel il
était au moment de l'achat peut le résoudre. Veuillez noter
que vos réglages seront également initialisés lorsque vous
réinitialiserez l'appareil ; nous vous recommandons par
conséquent de noter vos réglages avant de commencer la
procédure suivante.
Réinitialisation de l'appareil (ceci réinitialise les
paramètres de cet appareil sur leur valeur par
défaut)
1. Appuyez sur la touche SETUP de la télécommande,
sélectionnez "Factory Reset" - "Start" sur l'écran Setup et
appuyez sur ENTER.
2. Appuyez sur ENTER.
3. L'appareil se met en veille et les réglages sont
réinitialisés.
Alimentation
Impossible d'allumer cet appareil
0 Débranchez le cordon d'alimentation de la prise murale,
attendez 5 secondes ou plus, puis rebranchez-le une
nouvelle fois.
L'appareil s'éteint de manière inattendue
0 L'appareil passe automatiquement en mode veille
lorsque le paramètre "Option Setting" - "Power Off
Setting" - "Auto Standby" dans les fonctions du menu
Setup est actif.
0 Vérifiez si les fils des câbles d'enceinte sont en contact
avec le panneau arrière, ou si les pôles i et s se sont
court-circuités. En cas de contact ou de court-circuit,
l'appareil est automatiquement mis en veille.
0 Si l'alimentation se coupe et si les témoins du panneau
frontal continuent de clignoter, l'amplificateur pourrait
avoir un dysfonctionnement ou le circuit de protection
peut s'être déclenché.
– Si le témoin d'alimentation clignote environ toutes les
secondes : il y a peut-être un dysfonctionnement dans
la partie de l'amplificateur. Débranchez
immédiatement le cordon d'alimentation de la prise
murale et contactez le revendeur ou l'assistance de
notre société.
– Si le témoin d'alimentation clignote environ toutes les
0,3 secondes : Le circuit de protection s'est peut-être
déclenché en raison d'une lecture à volume élevé.
Réduisez le volume de lecture. Alternativement, les fils
des câbles d'enceinte peuvent être entrés en contact
avec le panneau arrière ou d'autres fils. Connectez les
fils de manière à ce qu'ils ne ressortent pas des prises
d'enceinte.
Si des symptômes comme l'impossibilité de remettre
l'appareil en marche se reproduisent, débranchez
immédiatement le cordon d'alimentation de la prise
murale et contactez le revendeur ou l'assistance de notre
société.
Aucun son n'est restitué à partir des
périphériques externes
0 Il n’y a aucun son lorsque cet appareil est en sourdine.
Appuyez sur MUTE sur la télécommande pour annuler la
mise en sourdine.
0 Vérifiez que le raccordement entre la sortie du
périphérique externe et l'entrée sur cet appareil est bon.
0 Passez le sélecteur d'entrée de cet appareil sur la
position de la prise à laquelle le périphérique externe est
raccordé.
0 Vérifiez le réglage de la sortie audio numérique sur le
périphérique connecté. Sur certaines consoles de jeux,
telles que celles qui prennent en charge le DVD, le
réglage par défaut est sur off.
L'afficheur ne s'allume pas
0 L'afficheur peut s'assombrir pendant que le DIMMER
fonctionne, et il peut également s'éteindre. Appuyez sur
la touche DIMMER et modifiez le niveau de luminosité de
l'afficheur.
Connexion Wi-Fi
0 Essayez de brancher/débrancher l'alimentation du
routeur LAN sans fil et de l’appareil, vérifiez l'état de mise
sous tension du routeur LAN sans fil et essayez de
redémarrer le routeur LAN sans fil.
Impossible de se connecter au point d'accès.
0 Vérifiez si le réglage du SSID et le cryptage (WEP, etc.)
sont corrects. Assurez-vous que les paramètres réseau
de l’appareil soient correctement configurés.
0 La connexion à un SSID qui comprend des caractères
multi-bytes n’est pas pris en charge. Nommez le SSID du
routeur LAN sans fil à l'aide de caractères
alphanumériques à un octet uniquement et essayez à
nouveau.
0 Lorsque le routeur LAN sans fil est réglé en mode furtif
(mode pour masquer la clé SSID) ou lorsque
N'IMPORTE QUELLE connexion est désactivée, le SSID
ne s'affiche pas. Changez les paramètres et réessayez.
Connecté à un SSID différent du SSID sélectionné
0
Certains point d'accès vous permettent de définir plusieurs
SSID pour un seul appareil. Si vous utilisez la touche de
réglage automatique sur ce genre de routeur, vous pouvez
finir par vous connecter à un SSID différent du SSID que
vous désiriez. Si cela arrive, utilisez la méthode de
connexion nécessitant la saisie d'un mot de passe.
41
Page 90

> Avant de Démarrer > Nom des pièces > Installation > Initial Setup > Lecture
F
R
Configuration avancée | Mise à jour du micrologiciel | Autres
La lecture est interrompue et la communication ne
fonctionne pas
0 Réduisez la distance avec le point d'accès ou retirez tout
obstacle pour améliorer la visibilité, et essayez de
nouveau. Placez l’appareil à l’écart des fours à microondes ou d’autres points d’accès.
Il est recommandé de placer le point d’accès et l’appareil
dans la même pièce.
0 S’il y a un objet métallique à proximité de l’appareil, la
connexion LAN sans fil peut ne pas être possible du fait
que le métal peut avoir des effets sur les ondes radio.
0 Lorsque d’autres point d'accès sont utilisés à proximité
de l’appareil, plusieurs problèmes tels que l’interruption
de la lecture et de la communication peuvent se produire.
Vous pouvez éviter ces problèmes en modifiant le canal
de votre point d'accès. Pour plus d’informations sur la
modification de canaux, reportez-vous au manuel
d’instructions fourni avec le point s'accès.
Impossible de lire des disques
0 Placez le disque sur le plateau en mettant l'étiquette vers
le haut.
0 La lecture peut ne pas être possible si le disque est rayé
ou sale.
Impossible de lire un périphérique de
stockage USB/DD
0 Vérifiez si le périphérique de stockage USB ou si le câble
USB est correctement inséré dans le port USB de
l'appareil.
0 Débranchez le périphérique de stockage USB de
l’appareil, puis essayez de le rebrancher.
0 Il peut arriver que cet appareil ne reconnaisse pas les
périphériques de stockage USB et les DD comme
dispositifs adaptés. Essayer de mettre en veille cet
appareil, puis de le remettre en marche.
0 Selon le type de format, la lecture peut ne pas s’effectuer
normalement. Vérifiez les formats de fichiers pris en
charge. (ÄP20)
0 Précautions concernant les périphériques USB et DD
(ÄP20)
La réception FM est de faible qualité
0 Vérifiez à nouveau la connexion de l'antenne.
0 Éloignez l’antenne des câbles d’enceinte et du cordon
d’alimentation.
0 Déplacez l’appareil à l'écart de votre téléviseur ou votre
PC.
0 Le passage de véhicules et d'avions peut provoquer des
interférences.
0 Les murs en béton affaiblissent les signaux radio.
0 La réception FM peut devenir plus claire si vous vous
servez de la prise de l'antenne murale utilisée pour le
téléviseur.
0 La réception FM s'améliore si le Tuning Mode (ÄP37)
est réglé sur Manual. Cependant, la réception sera
monophonique plutôt que stéréo.
Fonction réseau
0 Si vous ne pouvez pas sélectionner de service réseau, il
deviendra sélectionnable lorsque la fonction réseau sera
lancée.
0 Essayez de brancher/débrancher la prise électrique de
cet appareil et du routeur, et essayez de redémarrer le
routeur.
Impossible d'accéder à la webradio
0 Certains services de réseau ou de contenus accessibles
à partir de l’appareil risquent de ne pas être accessibles
au cas où le fournisseur de services interrompt son
service.
0 Assurez-vous que votre modem et routeur soient
correctement connectés, et assurez-vous qu’ils soient
tous les deux allumés.
0 En fonction du FAI, le réglage du serveur proxy est
nécessaire.
0 Assurez-vous que le routeur utilisé et/ou le modem est
bien pris en charge par votre FAI.
Impossible d'accéder au serveur de réseau
0 Cet appareil doit être connecté au même routeur que le
serveur réseau.
0 Cet appareil est compatible avec Windows Media
Player 11 ou 12, les serveurs réseau ou les NAS
compatibles avec la fonctionnalité réseau domestique.
De plus, en utilisant un ordinateur, seuls les fichiers de
musique mémorisés dans la bibliothèque de Windows
®
Media
Player peuvent être lus.
La lecture s'arrête pendant que vous écoutez des
fichiers de musique sur le réseau du serveur
0 Lorsque l'ordinateur est utilisé comme serveur réseau,
essayez de quitter tout programme autre que le logiciel
du serveur (Windows Media
0 Si le PC télécharge ou copie des fichiers volumineux, il
se peut que la lecture soit interrompue.
Les noms des albums et des artistes de Music Server
ne sont pas affichés
0 Les métadonnées, telles que les noms des albums et des
artistes, doivent être reconnues sur le serveur pour
pouvoir être distribuées vers cet appareil ; cela dépend
des spécifications du périphérique NAS ou du serveur
que vous utilisez.
0 Les formats de fichiers pris en charge dépendent du
logiciel du serveur ou du NAS. Pour plus de détails,
contactez le fabricant du logiciel du serveur ou du NAS.
La pochette de l'album dans Music Server s'affiche
parfois, mais pas à chaque fois
0 Music Server dépend des spécifications du logiciel du
serveur.
®
Player 12, etc.).
®
42
Page 91

> Avant de Démarrer > Nom des pièces > Installation > Initial Setup > Lecture
F
R
Configuration avancée | Mise à jour du micrologiciel | Autres
0 Les formats pris en charge dépendent du logiciel du
serveur.
0 Pour plus de détails, contactez le fabricant du logiciel du
serveur.
Fonction BLUETOOTH
0 Essayez de brancher/débrancher la prise électrique de
l’appareil et essayez de mettre sous/hors tension le
périphérique compatible BLUETOOTH. Le redémarrage
du périphérique compatible BLUETOOTH peut être
efficace.
0 Les dispositifs compatibles BLUETOOTH doivent
prendre en charge le profil A2DP.
0 À proximité d'appareils comme un four à micro-onde ou
un téléphone sans fil, qui utilisent des ondes radio dans
la plage de fréquence de 2,4 GHz, une interférence
radioélectrique peut se produire, ce qui désactive
l’utilisation de cet appareil.
0 S’il y a un objet métallique à proximité de l’appareil, la
connexion BLUETOOTH peut être impossible car le
métal peut avoir des effets sur les ondes radio.
0 Pour répondre aux commandes de la télécommande de
cet appareil, le périphérique compatible BLUETOOTH
doit prendre en charge le profil AVRCP.
0 Notez que l'utilisation avec la télécommande n'est pas
toujours garantie avec tous les périphériques
compatibles BLUETOOTH.
Impossible de se connecter à cet appareil
0 Vérifiez que la fonction BLUETOOTH du périphérique
compatible BLUETOOTH est activée.
0 Si un appareil déjà appairé ne peut pas être connecté,
supprimez les informations d'appairage sur le
périphérique compatible BLUETOOTH, puis procédez à
nouveau à l'appairage.
La lecture de la musique n’est pas disponible sur
l’appareil, même après une connexion BLUETOOTH
réussie
0 Lorsque le volume du son de votre périphérique
compatible BLUETOOTH est positionné sur faible, la
lecture de fichiers audio peut ne pas être disponible.
Montez le volume du périphérique compatible
BLUETOOTH.
0 Certains périphériques compatibles BLUETOOTH
peuvent être équipés d'un sélecteur Envoi/Réception.
Sélectionnez le mode d’Envoi.
Le son est interrompu
0 Il pourrait y avoir un problème avec le périphérique
compatible BLUETOOTH. Vérifiez les informations sur
Internet.
43
Page 92

> Avant de Démarrer > Nom des pièces > Installation > Initial Setup > Lecture
F
R
Configuration avancée | Mise à jour du micrologiciel | Autres
Caractéristiques générales
Section sortie audio analogique
Puissance de sortie RMS
0 X-HM76D, X-HM76 : 50 W + 50 W
0 X-HM86D, XC-HM86D : 65 W + 65 W
(4 ohms, 1 kHz DHT 10%)
Spécificités de la commande de tonalité
0
w10 dB (100 Hz (BASS))
0
w10 dB (10 kHz (TREBLE))
Impédance d'enceinte prise en charge
0 4 ohms - 16 ohms
Partie du tuner
X-HM76
Plage de fréquence de syntonisation (FM)
0 87,5 MHz - 108,0 MHz, RDS
Antenne (FM)
0 75 Ω asymétrique
Chaîne préréglée
0 40
X-HM76D, X-HM86D, XC-HM86D
Plage de fréquence de syntonisation (FM)
0 87,5 MHz - 108,0 MHz, RDS
Plage de fréquence de syntonisation (DAB)
0 174,928 MHz - 239,200 MHz
Antenne (FM/DAB)
0 75 Ω asymétrique
Chaîne préréglée
0 40
Section CD
Support/Format
0 CD : CD standard
0 CD-R/RW : format CD/fichier MP3, WMA
Entrée audio numérique
USB avant/arrière
0 Type A, USB 2.0 haute vitesse
Sortie CC
0 5 V 1 A (arrière)/5 V 0.5 A (avant)
Entrée optonumérique
0 Prise optique
Partie réseau
Réseau local (LAN) filaire
0 Prise Ethernet
0 10BASE-T/100BASE-TX
LAN sans fil (Wi-Fi)
0 Norme IEEE 802.11 a/b/g/n
0 Bande 5 GHz/2,4 GHz
Section Bluetooth
Système de communication
0 Caractéristique BLUETOOTH version 4.1
Bande de fréquence
0 2,4 GHz (2,402 GHz - 2,480 GHz)
Méthode de modulation
0 FHSS (Freq Hopping Spread Spectrum)
Profils Bluetooth compatibles
0 A2DP 1.2
0 AVRCP 1.3
0 HOGP-Host (client)
0 Périphérique HOGP-HID (serveur)
0 Service HID (HIDS)
Codecs pris en charge
0 SBC
0 AAC
Portée de transmission (A2DP)
0 20 Hz - 20 kHz (Fréquence d'échantillonnage 44,1 kHz)
Portée de communication maximale
0 (Ligne de mire d’environ) 10 m
* La portée effective peut varier selon les facteurs comme:
les obstacles entre les appareils, les champs
magnétiques autour d'un four micro-ondes, l'électricité
statique, les téléphones sans fil, la sensibilité de
réception, la performance de l'antenne, le système
d'exploitation, le logiciel etc.
*
Général
Alimentation
0 AC 220 - 230 V, 50/60 Hz
Consommation d'énergie
0 X-HM76D, X-HM76 : 40 W
0 X-HM86D, XC-HM86D : 42 W
0 0,3 W (en mode veille)
0 2,5 W (en mode veille, Network Standby : On, Network
Setting : Wired)
0 2,8 W (en mode veille, Network Standby : On, Network
Setting : Wi-Fi)
0 2,2 W (en mode veille, Bluetooth Wakeup : On)
0 2,9 W (en mode veille, Network Standby : On, Network
Setting : Wi-Fi, Bluetooth Wakeup : On)
Mise en veille automatique
0 On (20 min)/Off
Dimensions (L × H × P)
44
Page 93

> Avant de Démarrer > Nom des pièces > Installation > Initial Setup > Lecture
F
R
Configuration avancée | Mise à jour du micrologiciel | Autres
0 290 mm 98 mm 333 mm
Poids
0 3,5 kg
Enceinte (X-HM76D, X-HM76, X-HM86D)
Typ e
0 Bass-reflex, type bibliothèque
Configuration
0 2 voies
0 Haut-parleur des graves :
X-HM76D, X-HM76 : 12 cm à cône
X-HM86D : cône en fibre de verre 13 cm
0 Haut-parleur des aigus :
dôme souple 2,5 cm
Impédance
0 4 ohms
Puissance d’entrée maximale
0 X-HM76D, X-HM76 : 50 W
0 X-HM86D : 65 W
Plage de fréquence efficace
0 X-HM76D, X-HM76 : 70 Hz - 40 kHz
0 X-HM86D : 60 Hz - 40 kHz
Plage de fréquence recommandée
0 X-HM76D, X-HM76 : 50 Hz - 40 kHz
0 X-HM86D : 45 Hz - 40 kHz
Fréquence de transition
0 4 kHz
Niveau de pression de la sortie du son
0 X-HM76D, X-HM76 : 83 dB
0 X-HM86D : 82 dB
Dimensions (L × H × P)
0 X-HM76D : 148 mm 263 mm 217 mm
0 X-HM76 : 148 mm 263 mm 213 mm
0 X-HM86D : 165 mm 280 mm 259 mm
Poids
0 X-HM76D : 3,4 kg chacun
0 X-HM76 : 3,3 kg chacun
0 X-HM86D : 4,4 kg chacun
45
Page 94

> Avant de Démarrer > Nom des pièces > Installation > Initial Setup > Lecture
F
R
BLACKFIRE
Configuration avancée | Mise à jour du micrologiciel | Autres
Licence et Marque commerciale
“Все товарные знаки являются собственностью соответствующих
владельцев.”
This Mark Certifies that this product is compliant with the BLACKFIRE
ALLIANCE Standard.
Please refer to WWW.BLACKFIREALLIANCE.COM for more information.
BLACKFIRETM is a Registered Trademark (No. 85,900,599) of BLACKFIRE
The Wi-Fi CERTIFIED Logo is a certification mark of Wi-Fi Alliance®.
RESEARCH CORP. All rights reserved.
AirPlay, iPad, iPhone, and iPod touch are trademarks of Apple Inc., registered in
the U.S. and other countries.
iPad Air and iPad mini are trademarks of Apple Inc.
“Made for iPod”, “Made for iPhone” and “Made for iPad” mean that an electronic
accessory has been designed to connect specifically to iPod, iPhone, or iPad,
respectively, and has been certified by the developer to meet Apple
performance standards. Apple is not responsible for the operation of this device
or its compliance with safety and regulatory standards.
Please note that the use of this accessory with iPod, iPhone or iPad may affect
wireless performance.
AirPlay works with iPhone, iPad, and iPod touch with iOS 4.3.3 or later, Mac
with OS X Mountain Lion or later, and PC with iTunes 10.2.2 or later.
The Bluetooth® word mark and logos are registered trademarks owned by the
Bluetooth SIG, Inc.
Google Cast and the Google Cast badge are trademarks of Google inc.
46
FireConnectTM is technology powered by BlackFire Research.
The product with this logo is conformed to Hi-Res Audio standard defined by
Japan Audio Society. This logo is used under license from Japan Audio Society.
This product is protected by certain intellectual property rights of Microsoft. Use
or distribution of such technology outside of this product is prohibited without a
license from Microsoft.
Windows and the Windows logo are trademarks of the Microsoft group of
companies.
DSD and the Direct Stream Digital logo are trademarks of Sony Corporation.
MPEG Layer-3 audio coding technology licensed from Fraunhofer IIS and
Thomson.
“All other trademarks are the property of their respective owners.”
“Toutes les autres marques commerciales sont la propriété de leurs détenteurs
respectifs.”
“El resto de marcas comerciales son propiedad de sus respectivos propietarios”.
“Tutti gli altri marchi di fabbrica sono di proprietà dei rispettivi proprietari.”
“Alle anderen Warenzeichen sind das Eigentum ihrer jeweiligen Eigentümer.”
“Alle andere handelsmerken zijn eigendom van de desbetreffende
rechthebbenden.”
Page 95

F
R
*29402674*
F1609-0
SN 29402674
Корпорация О энд Пи
2-3-12, Яэсу, Чуо-ку, г. Токио, 104-0028, ЯПОНИЯ
<Germany>
Hanns-Martin-Schleyer-Straße 35, 47877 Willich, Germany
Tel: +49(0)2154 913222
<UK>
Anteros Building, Odyssey Business Park, West End Road, South Ruislip,
Middlesex, HA4 6QQ United Kingdom
Tel: +44(0)208 836 3612
<France>
6, Avenue de Marais F - 95816 Argenteuil Cedex FRANCE
Tel: +33(0)969 368 050
2-3-12 Yaesu, Chuo-ku, Tokyo 104-0028 JAPAN
<U.S.A.>
18 PARK WAY, UPPER SADDLE RIVER, NEW JERSEY 07458, U.S.A.
Tel: 1-201-785-2600
Te l: 1-844-679-5350
Enregistrez votre produit sur
http://www.pioneer.eu
(Europe)
© 2016 Onkyo & Pioneer Corporation. All rights reserved.
© 2016 Onkyo & Pioneer Corporation. Tous droits de reproduction et de traduction réservés.
“Pioneer” and “PBASS” are trademarks of Pioneer Corporation, and is used under license.
Printed in Malaysia / Imprimé en Malaisie / Напе
чатано в Малайзии
http://www.pioneer-audiovisual.com/privacy/
Page 96

E
S
> Antes de empezar > Nombres de las piezas > Instalación > Initial Setup > Reproducción
Configuración avanzada | Actualización de Firmware | Otros
NETWORK CD RECEIVER SYSTEM
X-HM76D
X-HM76
X-HM86D
NETWORK CD RECEIVER
XC-HM86D
Manual de instrucciones
Antes de empezar
Qué se encuentra en la caja ......................................................... 2
Nombres de las piezas
Panel frontal ..................................................................................4
Panel trasero (X-HM76D, X-HM86D, XC-HM86D) .......................5
Panel trasero (X-HM76) ................................................................ 6
Mando a distancia ......................................................................... 7
Pantalla ......................................................................................... 8
Sistema de altavoces (X-HM76D, X-HM76) ................................. 9
Sistema de altavoces (X-HM86D) .............................................. 10
Instalación
Conexión de los altavoces .......................................................... 11
Conexión de las antenas, el cable de alimentación, etc. ............12
Initial Setup
Encendido y configuración inicial ................................................ 13
Ajustes de hora ........................................................................... 16
Reproducción
Reproducción de CDs ................................................................. 17
Dispositivo de almacenamiento USB/HDD .................................19
Radio por Internet .......................................................................21
Spotify ......................................................................................... 22
Escuchar la radio FM ..................................................................23
Escuchar la radio digital DAB (X-HM76D, X-HM86D, XC-HM86D) ........26
BLUETOOTH® ............................................................................ 27
®
AirPlay
Reproducir audio desde un dispositivo externo ..........................30
Music Server ............................................................................... 31
Usar la alarma para iniciar la reproducción ................................33
Introducción de texto, ajuste de la calidad del sonido, etc. .............. 34
Configuración avanzada
Configuración avanzada .............................................................. 35
Actualización de Firmware
Actualización de Firmware .......................................................... 39
Otros
Resolución de problemas ...........................................................41
Especificaciones generales ........................................................44
Información sobre licencias y marcas comerciales ....................46
...................................................................................... 29
Page 97

> Antes de empezar > Nombres de las piezas > Instalación > Initial Setup > Reproducción
E
S
Configuración avanzada | Actualización de Firmware | Otros
Qué se encuentra en la caja
Antes de empezar
X-HM76D : 12356
X-HM76 : 12456
X-HM86D : 123567
XC-HM86D : 123
Antena de FM para interiores (1)
Unidad principal (1)
Mando a distancia (RC-945S) (1), Pilas (AAA/R03) (2)
Cable de antena DAB/FM (1)
2
Sistema de altavoces (2)
Cables de los altavoces (1,5 m) (2)
Page 98

> Antes de empezar > Nombres de las piezas > Instalación > Initial Setup > Reproducción
E
S
Configuración avanzada | Actualización de Firmware | Otros
Almohadillas antideslizantes (8)
0 El cable de alimentación no debe conectarse hasta que no se hayan completado todas
las otras conexiones.
0 Conecte los altavoces con una impedancia de entre 4 Ω y 16 Ω.
0 No aceptamos ninguna responsabilidad por daño causado debido a la conexión de
equipos fabricados por otras compañías.
0 Puede que se amplíen las funcionalidades mediante actualizaciones de firmware y que
los proveedores de servicios cesen su actividad, lo que significa que algunos servicios de
red y contenidos puede que no estén disponibles en el futuro.
0 Las especificaciones y las características están sujetas a cambios sin previo aviso.
3
Page 99

> Antes de empezar > Nombres de las piezas > Instalación > Initial Setup > Reproducción
E
S
Configuración avanzada | Actualización de Firmware | Otros
Panel frontal
Nombres de las piezas
1. Botón Í STANDBY/ON: Enciende la unidad o la pone en modo de espera.
2. Botón INPUT: Cambia la entrada a reproducir.
3. Botón de reproducción:
:6
: Volver al inicio de la pista que se está reproduciendo. Manténgalo pulsado para
rebobinar la pista rápidamente. (CD)
59
∫
1
0 Dependiendo de la entrada, puede que la operación no se inicie.
4. Botón <: Abrir o cerrar la bandeja de discos.
5. Bandeja del disco: Colocar aquí los discos. También pueden utilizarse discos de 8 cm.
6. Puerto USB: Conectar un dispositivo de almacenamiento USB o un HDD (disco duro)
para reproducir archivos de música. También puede suministrar alimentación (máximo
5 V/0,5 A) a dispositivos USB con un cable USB.
0 Cuando conecte un HDD que requiera más de 5 V/0,5 A, conéctelo al puerto USB
7. Conector PHONES: Conectar auriculares estéreo con un mini plug.
8. Indicador de encendido: Se ilumina en azul cuando la unidad está encendida.
9. Indicador TIMER: Se ilumina cuando la alarma está activada.
10.
Sensor del mando a distancia
11.
Pantalla (ÄP8)
12.
Mando VOLUME: Ajuste el volumen. Ajuste entre 0 y 50.
Pasar a la pista anterior. (USB, Music Server)
: Pasar a la siguiente pista. Manténgalo pulsado para avanzar rápido a través de
la pista. (CD)
Pasar a la siguiente pista. (USB, Music Server)
: Este botón detiene la reproducción.
/; : Este botón pausa la reproducción.
(máximo 5 V/1 A) de la parte trasera de la unidad.
4
Page 100

> Antes de empezar > Nombres de las piezas > Instalación > Initial Setup > Reproducción
E
S
180°
90°
Configuración avanzada | Actualización de Firmware | Otros
Panel trasero (X-HM76D, X-HM86D, XC-HM86D)
1. Cable de alimentación
2. Antena inalámbrica: Se usa para la conexión Wi-Fi o al utilizar un dispositivo habilitado
con BLUETOOTH. Ajuste los ángulos de acuerdo con el estado de la conexión.
3. Terminales de los altavoces: Conecte los altavoces con cables de altavoz.
4. Conector DAB/FM ANTENNA: Conecte el cable de antena DAB/FM suministrado.
5. Conector LINE IN: Puede reproducir el audio desde un dispositivo externo como un
televisor conectado con un cable RCA.
6. Conectores SUBWOOFER PRE OUT: Conecte un subwoofer con un amplificador
7. Puerto USB: Conectar un dispositivo de almacenamiento USB o un HDD (disco duro)
integrado.
para reproducir archivos de música. También puede suministrar alimentación (máximo 5
V/1 A) a dispositivos USB con un cable USB.
8. Conector NETWORK: Conecte con la red a través de un cable LAN.
9. Conector DIGITAL IN OPTICAL: Puede reproducir el audio digital desde un dispositivo
externo como un televisor conectado con un cable óptico digital.
5
 Loading...