

Page 1

AUDIO/VIDEO
MULTI-CHANNEL RECEIVER
RECEPTOR MULTICANAL
DE AUDIO/VÍDEO
VSX-D71 OS
VSX-D71OS-G
VSX-D81 OS
VSX-D81 OS-G
Operating Instructions
Manual de instrucciones
Page 2

WARNING: THE APPARATUS IS NOT WATERPROOFS, TO
PREVENT FIRE OR SHOCK HAZARD, DO NOT EXPOSE THIS
APPLIANCE TO RAIN OR MOISTURE AND DO NOT PUT ANY
WATER SOURCE NEAR THIS APPARATUS, SUCH AS VASE,
FLOWER POT,COSMETICSCONTAINERAND MEDICINE BOTTLE
ETC. HOOIAEn
ADVERTENCIA: EL APARATO NO ES IMPERMEABLE.
NO PONER ALGUNA FUENTE DE AGUA CERCA DEL APARATO,
COMO VASO DE FLORES, RECIPIENTES COSMÉTICOS Y
MEDICINALES, ETC.
hooiasp
IMPORTANT
CAUTION
RISK OF ELECTRIC SHOCK
A
The lightning flash with arrowhead symbol, within an
equilateral triangle, is intended to alert the user to the
presence of uninsulated "dangerous voltage" within the
product's enclosure that may be of sufficient magnitude
to constitute a risk of electric shock to persons.
CAUTION:
TO PREVENT THE RISK OF ELECTRIC SHOCK, DO NOT
REMOVE COVER (OR BACK). NO USER-SERVICEABLE
PARTS INSIDE. REFER SERVICING TO QUALIFIED
SERVICE PERSONNEL.
DO NOT OPEN
IMPORTANTE
CAUTION
RISK OF ELECTRIC SHOCK
A
La luz intermitente com el símbolo de punta de flecha
dentro un triángulo equilátero. Está convenido para avisar
el usuario de la presencia de "voltaje peligrosa" no
aislada dentro el producto que podría constituir un peligro
de choque eléctrico para las personas.
ATENCIÓN:
PARA PREVENIR EL PELIGRO DE CHOQUE ELÉCTRICO
NO REMOVER LA TAPA NI LAS PARTES DENTRO NO
UTILIZADAS, LLAMAR UNA PERSONA CUALIFICADA
DO NOT OPEN
Ши : • пшшш
шйЯФаслшйшш - штпшш ' т ' ш&
CAUTION:
This product satisfies FCC regulations when shielded
cables and connectors are used to connect the unit to
other equipment. To prevent electromagnetic
interference with electricappliancessuch as radiosand
televisions, use shielded cables and connectors for
connections. Hoi2En
° HOOIAChH
A
The exclamation point within an equilateral triangle is
intended to alert the user to the presence of important
operating and maintenance (servicing) instructions in the
literature accompanying the appliance.
H002_En
A
El punto exclamativo dentro un triángulo equilátero
convenido para avisar el usuàrio de la presencia de
importantes instruciones sobre el funcionamento y la
H002BSp
CAUTION
RISK OF ELECTRIC SHOCK
A
ШШШШ ’ mmmimmm (^ш)
Ш "пшшш'
NOTE: This equipment has been tested and found to comply with the limits for a Class B digital device, pursuant to Part 15 of
the FCC Rules. These limits are designed to provide reasonable protection against harmful interference in a residential
installation. This equipment generates, uses, and can radiate radio frequency energy and, if not installed and used in
accordance with the instructions, may cause harmful interference to radio communications. However, there is no guarantee that
interference will not occur in a particular installation. If this equipment does cause harmful interference to radio or television
reception, which can be determined by turning the equipment off and on, the user is encouraged to try to correct the interference
by one or more of the following measures:
-Reorient or relocate the receiving antenna.
-Increase the separation between the equipment and receiver.
-Connect the equipment into an outlet on a circuit different from that to which the receiver is connected.
-Consult the dealer or an experienced radio/TV technician for help. hoioeo
Information to User
Alteration or modifications carried out without appropriate authorization may invalidate the user's right to operate the equipment.
En/Sp/ChH
DO NOT OPEN
■
шш mm штшт ° ноо2аснн
A
Page 3

CAUTION:
THE
1
OFF/-ON BUTTON IS SECONDARY CONNECTED
AND THEREFORE DOES NOT SEPARATE THE UNIT FROM
MAINS POWER IN STANDBYPOSITION.THEREFORE INSTALL
THE UNIT SUITABLE PLACES EASY TO DISCONNECT THE
MAINS PLUG IN CASE OF THE ACCIDENT. THE MAINS PLUG
OFUNITSHOULDBEUNPLUGGEDFROMTHEWALLSOCKET
WHEN LEFT UNUSED FOR A LONG PERIOD OF TIME.
ATENCIÓN:
EL INTERRUPTOR DE M OFF/-ON
ESPERA ESTÁ CONECTADO EN SECUNDARIO Y POR LO
TANTO NO DESCONECTA AL APARATO DE LA RED CUANDO
ESTE EN LA POSICION DE ESPERA (STANDBY). POR ESO
INSTALE EL APARATO EN LUGARES APROPIADOS FÁCIL DE
DESCONECTAR EL ENCHUFE DE RED EN CASO DE
ACCIDENTE. EL ENCHUFE DE RED DEL APARATO DEBERIA
SER DESCONECTADO DE LA TOMA CUANDO NON VEN
USADO POR UN LARGO PERÍODO DE TIEMPO. hoi7bsp
sitbi
H017BChH
"DTS", "ES" and "DTS Digital Surround" are trademarks of
Digital Theater Systems, Inc. Manufactured under license from
Digital Theater Systems, Inc.
Manufactured under license from Dolby Laboratories. ’Dolby", "Pro
Logic" and the double-D symbol are trademarks of Dolby Labora
tories. Confidential Unpublished Works. © 1992-1997 Dolby Labo
ratories, Inc. All rights reserved.
"DTS", "ES" y "DTS Digital Surround" son marcas
comerciales de Digital Theater Systems Inc. Fabricado
bajo licencia de Digital Theater Systems Inc.
Fabricado bajo licencia de Dolby Laboratories. "Dolby", "Pro
Logic" y el símbolo con una doble D son marcas comerciales
de Dolby Laboratories. Trabajos confidenciales no publicados.
© 1992 - 1997 Dolby Laboratories. Todos los derechos quedan
reservados.
“DTS” W‘ES”^f]“DTS Digital Surround ” (DTS
MW) ^Digital Theater System Inc
’ T^fMMDigital Theater System
“Dolby” ^ “Pro Logic”
mmmmmmmmm ^ ° ©mtw
,1m1992-1997^ o IfMmjfW ’ °
TWO VOLTAGE SELECTOR
SWITCHES (multi
voltage model only)
Only multi-voltage model is
provided with these switches.
Mains voltages in Saudi Arabia are
127 V and 220 V only. Never use
this model with the 110 V setting
in Saudi Arabia.
The line voltage selector switches are
on the rear panel. Check that they are
set properly before plugging the
power cord into the household wall
socket. If the voltage is not properly
set or if you move to an area where
the voltage requirements differ, adjust
the selector switches as follows.
1. Use a medium-size screwdriver.
2. First, insert the screwdriver in the
groove of the voltage selector at the
right, and adjust so that the tip of the
groove points to the voltage value of
your area.
3. Next, insert the screwdriver in the
groove of the voltage selector at the
left and adjust until the voltage is the
same as at the right.
DOS CONMUTADORES
SELECTORES DE TENSIÓN
(sólo el modelo
multivoltaje)
La tensión de la red en Arabia
Saudita es de 127 V y 220 V. Nunca
utilice este modelo en Arabia
Saudita con el ajuste para 110 V.
Los conmutadores selectores de la
tensión de línea se encuentran en el
panel trasero. Compruebe que éstos
se encuentren en las posiciones
correctas antes de conectar el cable de
alimentación a una toma de corriente.
Si la tensión está mal ajustada o usted
se desplaza a un área donde los
requerimientos de tensión son
diferentes, ajuste los conmutadores
selectores como se indica a
continuación.
1. Utilice un destornillador de
tamaño medio.
2. Inserte primero el destornillador
en la ranura del selector de tensión de
la derecha y ajústelo de forma que la
punta de la ranura indique hacia el
valor de la tensión utilizada en su
área.
3. A continuación, inserte el
destornillador en la ranura del
selector de tensión de la izquierda y
ajústelo hasta que la tensión sea la
misma que la del selector de tensión
de la derecha.
” att -
ikmmmi: »
ffi “ tmnimmmmxmimim
TiEm ’
1. íífflfrSlffiÉB “
2. nx’
3. > mmmmMmmxi£iim
’ mnmmtsxmm
Medium-size screwdriver
Destornillador de tamaño medio
TWO VOLTAGE SELECTORS
En/Sp/ChH
3
Page 4

Contents
Congratulations on buying this fine Pioneer product.
Please read through these operating instructions so you will know how to operate your model properly After
you have finished reading the instructions, put them away in a safe place for future reference.
01 Contents 4
02 Introductory Information 7
Checking the Supplied Accessories 7
Using this Manual 7
Installing the Receiver 7
Loading the Batteries 8
Operating Range of Remote Control Unit 8
When Making Cable Connections 8
03 Connecting Your Equipment 9
AudioWideo Cords 9
Digital audio Cords/Optical Cables 9
Connecting Digital Components 10-11
Example Connection
for a DVD/LD or LD Player 11
Connecting Audio Components 12-13
Connecting DVD 7.1 Channel (5.1ch for VSX-
D710S/D710S-G) Components 14-15
Connecting Video Components 15-17
Connecting Antennas 18-19
Connecting Speakers
(VSX-D 71OS/D 71OS-G) 20-21
Connecting Speakers
(VSX-D810S/D81 OS-G) 22-24
Hints on Speaker Placement 24-26
Connecting Additional Amplifiers
(VSX-D810S/D810S-G only) 27
Operating other Pioneer Components 28
04 Preparations 29
Setting Up for Surround Sound 29-42
Setting the Volume Level of Each Channel 43
05 Displays & Controls 44
Remote Control 44-47
Eront Panel 48-50
Display 51-53
06 Sound Modes 54
Learning about the Sound Modes 54-56
Switching ANALOG/DIGITAL Signal Input 56-57
Playing Sources with Dolby Digital or
DTS Sound 58
Selecting a Sound Mode 59
ADVANCED THEATER mode
( DD/DTS mode) 59
Surround operation 60
DVD 5.1 ch/7.1ch (5.1 ch for VSX-D710S/
D710S-G) input playback 61
MIDNIGHT Listening Mode 62
Playing other Sources 62
07 Using the Tuner 63
Einding a Station 63-64
Channel Step Setting
(multi-voltage model only) 64
Tuning Directly to a Station 65
Memorizing Stations 66
Recalling Memorized Stations 67
08 Making a Recording 68
Making an Audio or a Video Recording 68
• Record MONITOR 69
Making a Digital Recording 69
09 Controlling the Rest of Your System 70
Recalling Preset Codes 70-72
Setting Up Using Preset Code Search 73-74
Learning Mode: Programming Signals from other
Remote Controls 75-77
Checking Preset Code 77
Erasing One of the Learning Remote Control
Button Settings 78
Clearing All the Remote Control Settings 78
Direct Eunction 79
CD/MD/CD-RWCR/DVD/LD/DVR Player/
Cassette Deck Controls 80
Cable TV/Satellite TV/TV/DTV Controls 81
Preset Code List 86-92
10 Additional Information
Troubleshooting 93-95
Specifications 96
93
4
En
Page 5

índice G]
Le felicitamos por la adquisición de este producto Pioneer.
Le rogamos que lea estas instrucciones de operación para aprender cómo usar su modelo debidamente. Después de
haber leído las instrucciones, guárdelas en un sitio seguro para poderlas consultar en el futuro
01 índice 5
02 Introducción 7
Comprobación de los
accesorios suministrados 7
Uso de este manual 7
Instalación del receptor 7
Cómo cargar las pilas 8
Alcance del mando a distancia 8
Al realizar conexiones con el cable
03 Conexión de su equipo 9
Cables de audio/vídeo 9
Cables coaxiales de audio digital/cables
ópticos 9
Conexiones digitales 10-11
Ejemplo de conexión de un reproductor de DVD/
LD o reproductor LD 11
Componentes de audio 12-13
Conexión de componentes DVD 7.1 canales (5.1
canales para el VSX-D710S/D710S-G)
Conexión de componentes de vídeo
Conexión de antenas 18-19
Conexión de los altavoces
(VSX-D710S/D710S-G) 20-21
Conexión de los altavoces
(VSX-D810S/D810S-G) 22-24
Consejos para situar debidamente los
altavoces 24-26
Conexión de amplificadores
adicionales (sólo VSX-D810S/D81OS-G) 27
Cómo operar otros componentes Pioneer 28
04 Preparaciones 29
Preparación para el sonido surround 29-42
Configuración del nivel de volumen de cada
canal 43
05 Pantallas y controles 44
Mando a distancia 44-47
Panel frontal 48-50
Pantalla 51-53
06 Modos de sonido 54
Aprendiendo sobre los modos de sonido 54-56
Cambio de la señal de entrada ANALÓGICA/
DIGITAL 56-57
Reproducción de fuentes con sonido Dolby Digital
o DTS 58
Selección de un modo de sonido 59
Modo ADVANCED THEATER
(modo nn/DIS) 59
Funcionamiento del surround 60
Reproducción de entrada
DVD 5.1 canales./7.1 canales (5.1 canales para
VSX-D710S/D710S-G) 61
Modo de audición MIDNIGHT 62
Reproducción de otras fuentes 62
Utilización del sintonizador 63
8
07
Cómo encontrar una emisora 63-64
Ajuste de intervalo entre canales (sólo el modelo
multivoltaje) 64
Sintonización directa de una emisora 65
Cómo memorizar emisoras 66
Cómo sintonizar emisoras memorizadas 67
08 Grabaciones 68
Cómo realizar una grabación de audio o
de vídeo 68
14- 15
15- 17
Supervisión de la grabación 69
Cómo realizar una grabación digital 69
Control del resto de su sistema 70
09
Rellamada de códigos predefinidos 70-72
Configuración utilizando la búsqueda de códigos
predefinidos 73-74
Modo de aprendizaje (Leaming);
Programación de señales desde otros
mandos a distancia 75-77
Comprobación de códigos predefinidos 77
Cómo borrar uno de los ajustes de
botón del mando a distancia 78
Borrado de todos los ajustes del
mando a distancia 78
Función directa 79
Controles de la platina de casetes/CDs/MDs/CD-
R/VCR/DVDs/LDs/DVR 82
Controles de la TV por cable/TV por antena
parabólica/TV/DTV 83
Lista de códigos predefinidos 86-92
Información adicional 93
10
Guía de resolución de problemas 93-95
Especificaciones 97
5
Sp
Page 6

iiiWBMiMMS^PioneerjSSj “
> mm °
01 6
02 iiliiig 7
mmmmim 7
7
SASite 8
*eS№fi№IEil 8
8
03 mm$m 9
mMmmmm 9
ilSitfiAft 10-11
DVD/LD^LDifS^tSe^®ifflJi^ 11
12-13
iliiDVD?. iSjI (VSX-D710S/D710S-GS5.1^
M) Aft 14-15
iifiiSilAft 15-17
SSAI?! 18-19
(VSX-D710S/D710S-G) 20-21
(VSX-D810S/D81OS-G) 22-24
24-26
(iiffli^VSX-D810S/D810S-G) 27
Sft^'ftilPioneerAft 28
04 mmxi'^ 29
mmmmm 29-42
bSaeS 43
05 ii^x|S|}^®J 44
44-47
lEH® 48-50
51-53
06 54
54-56
tHi^ANALOG/DIGITAL (Ilft/Kii)
ffllflA 56-57
fSffit±ft®[iu^DTSS*ii 58
59
ADVANCED THEATER ()
IIA (□□/DTSflA) 59
iS^Slift 60
DVD5.1 #iI/7 • 1 Sil (VSX-D710S/D71 OS-Gg
5.1SM) mxwwL 61
MIDNIGHT (ij4i5;il) tIA 62
mmmmm 62
07
CHANNEL STEP SETTING (flilSEIIl3A)
nStiSn
63
63-64
65
66
67
08 68
68
ISSmonitor
StfiSS 69
09
iiffiflfSSft«
75-77
SffflfSAftSi 77
79
CD/MD/CD-R/VCR/DVD/LD/DVR^Ail^A
mmm 84
85
flfSAf-tSiS 86-92
Ig
70-72
rais
...... 73-74
10 PlitflOSiPJ 93
SfePffiiic 93-95
98
64
69
70
78
78
6
Ch
Page 7

Introductory
Introducción
Information
Checking the Supplied Accessories
Please check that you've received the
following supplied accessories:
• AM loop antenna
• FM wire antenna
• Dry cell batteries
(AA Size / lEC R6P) x2
• Remote control unit
• Operating instructions
Using this Manual
This manual is for the VSX-D710S/
D810S/D710S-G/D810S-G audio/
video multi-channel receivers.
It is divided into two main sections;
Set up
This section covers installing your
receiver and connecting up all the
other components in your home
theater system to it. It also describes
how to set up a multi-channel speaker
system to take full advantage of the
great surround sound features of your
receiver.
Operation
This section shows you how to use
every feature of the receiver and its
remote control unit. It also covers
using the supplied remote control to
operate your other home theater
components. To find out more about
a specific button, control or indicator,
see "Displays & Controls" starting on
page 44. This will point you to the
relevant chapter in the manual.
In the "Additional Information" section
(p.93-95,96 you'll find a troubleshoot
ing section and specifications.
Installing the Receiver
Ventilation:
• When installing this unit, make
sure to leave space around the unit
for ventilation to improve heat
radiation (at least 60 cm at the top,
10 cm at the rear, and 30 cm at
each side). If not enough space is
provided between the unit and
walls or other equipment, heat will
build up inside, interfering with
performance or causing
malfunctions.
• Do not place on a thick carpet, bed,
sofa or fabric having a thick pile. Do
not cover with fabric or other
covering.Anything that blocks
ventilation will cause the internal
temperature to rise, which may lead
to breakdown or fire hazard.
Comprobación de los accesorios suministrados
Le rogamos que compmebe que ha
recibido los siguientes accesorios que
suministramos:
• Antena de cuadro AM
• Antena de cable FM
• Baterías de célula seca x 2
(tipo AA/ lEC R6P)
• Mando a distancia
• Manual de instmcciones
Uso de este manual
Este manual describe a los receptores
multicanal de audio/vídeo VSX-D710S/
D810S/D710S-G/D810S-G y está dividido
en dos secciones principales:
Configuración
Esta sección trata de la instalación de su
receptor y de la conexión de cualquier
otro componente a su sistema de cine en
casa. Describe asimismo cómo configurar
un sistema de altavoces multicanal para
aprovechar las grandes características de
sonido surround que le ofrece su receptor.
Operación
Esta sección le indicará cómo usar cada
una de las características del receptor y de
su mando a distancia. Abarca también las
posibilidades de usar el mando a distancia
para controlar los otros componentes de
su sistema de cine en casa. Para una
mayor descripción de las funciones de
cada botón, control o indicador, consulte
"Pantallas y controles", sección que
comienza a partir de la página 44. Esa
sección le dirigirá al capítulo
correspondiente de este manual.
En la sección "Información adicional" de
las páginas 93-95, 97, encontrará una
sección para la resolución de pequeños
problemas y la hoja de especificaciones
(ficha técnica).
Instalación del receptor
Circulación de aire:
• Cuando instale este aparato, asegúrese
de dejar suficiente espacio alrededor
del aparato como para que circule el
aire y se disperse el calor (por lo
menos 60 cm arriba, 10 cm atrás, 30
cm en cada lado). Si no hay suficiente
espacio entre el aparato y las paredes u
otros equipos, el calor se acumulará en
el interior, interfiriendo con el
funcionamiento y provocando averías.
• No coloque sobre una alfombra
mullida, cama, sofá o tela de hebras
largas. No cubra con tela u otra
cubierta. Si se tapan las salidas de aire,
aumentará la temperatura en el
interior y puede romperse o provocar
un incendio.
:
• (AAM/IEC R6P) X2
• imimm
Sí;fi№vsx-D710S/D81 OS/
D710S-G/D810S-G
mmum»
iSH
«mmm >
RfiPíf -
(S93-95 . 98
M) ’ “
SS :
> 'ikm
lOcm ’ FÍfIIJ#30cm) °
i±»mmmmmíimshmm
7
En/Sp/ChH
Page 8

Loading the Batteries Cómo cargar las pilas
CAUTION:
Incorrect use of batteries may result in
such hazards as leakage and bursting.
Observe the following precautions:
• Never use new and old batteries
together.
• Insert the plus and minus sides of
the batteries properly according to
the marks in the battery case.
• Batteries of the same shape may
have different voltages. Do not use
different batteries together.
• When disposing of used batteries,
please comply with governmental
regulations or environmental
public institution’s rules that apply
in your country or area.
PRECAUCIÓN:
El uso incorrecto de las pilas puede
provocar situaciones peligrosas tales
como fugas y explosión. Tenga en
cuenta las siguientes precauciones.
• No mezcle pilas nuevas y viejas.
• Coloque correctamente los lados
positivo y negativo de las pilas de
acuerdo con las marcas de la caja
de las pilas.
• Hay pilas con la misma forma que
pueden tener distintos voltajes. No
utilice pilas diferentes
conjuntamente.
• Cuando se deshaga de las pilas
viejas, respete la legislación oficial
o las regulaciones públicas
medioambientales que rigen su
país o región.
’ lEmmx
ffl »
T^iiMSífríiT ’
Operating Range of the Remote Control Unit
The remote control may not work
properly if;
• There are obstacles between the
remote control and the receiver's
remote sensor.
• Direct sunlight or fluorescent light
is shining onto the remote sensor.
• The receiver is located near a
device that is emitting infrared
rays.
• The receiver is operated simulta
neously with another infrared
remote control unit.
When Making Cable Connections
Be careful not to arrange cables in a
manner that bends the cables over the
top of this unit. If the cables are laid
on top of the unit, the magnetic field
produced by the transformers in this
unit may cause a humming noise to
come from the speakers.
8
En/Sp/ChH
Alcance del mando a distancia
El mando a distancia puede no
funcionar correctamente si:
• Hay obstáculos entre el mando a
distancia y el sensor del mando a
distancia.
• Los rayos del sol o luces
fluorescentes se reflejan en el
sensor del mando.
• El receptor está instalado cerca de
un aparato que emita rayos
infrarrojos.
• Se intenta hacer funcionar
simultáneamente con otro mando
a distancia que utilice rayos
infrarrojos.
Al realizar conexiones con el cable
Tenga cuidado con los cables para
que no queden doblados por encima
del aparato. Si deja cables encima de
él, el campo magnético producido por
los transformadores puede provocar
que los altavoces recojan una
interferencia a modo de ruido de
fondo.
mmmmm > >
Page 9
Connecting Your
Conexión de su
Equipment
Before making or changing the
connections, switch off the power and
disconnect the power cord from the
AC wall outlet.
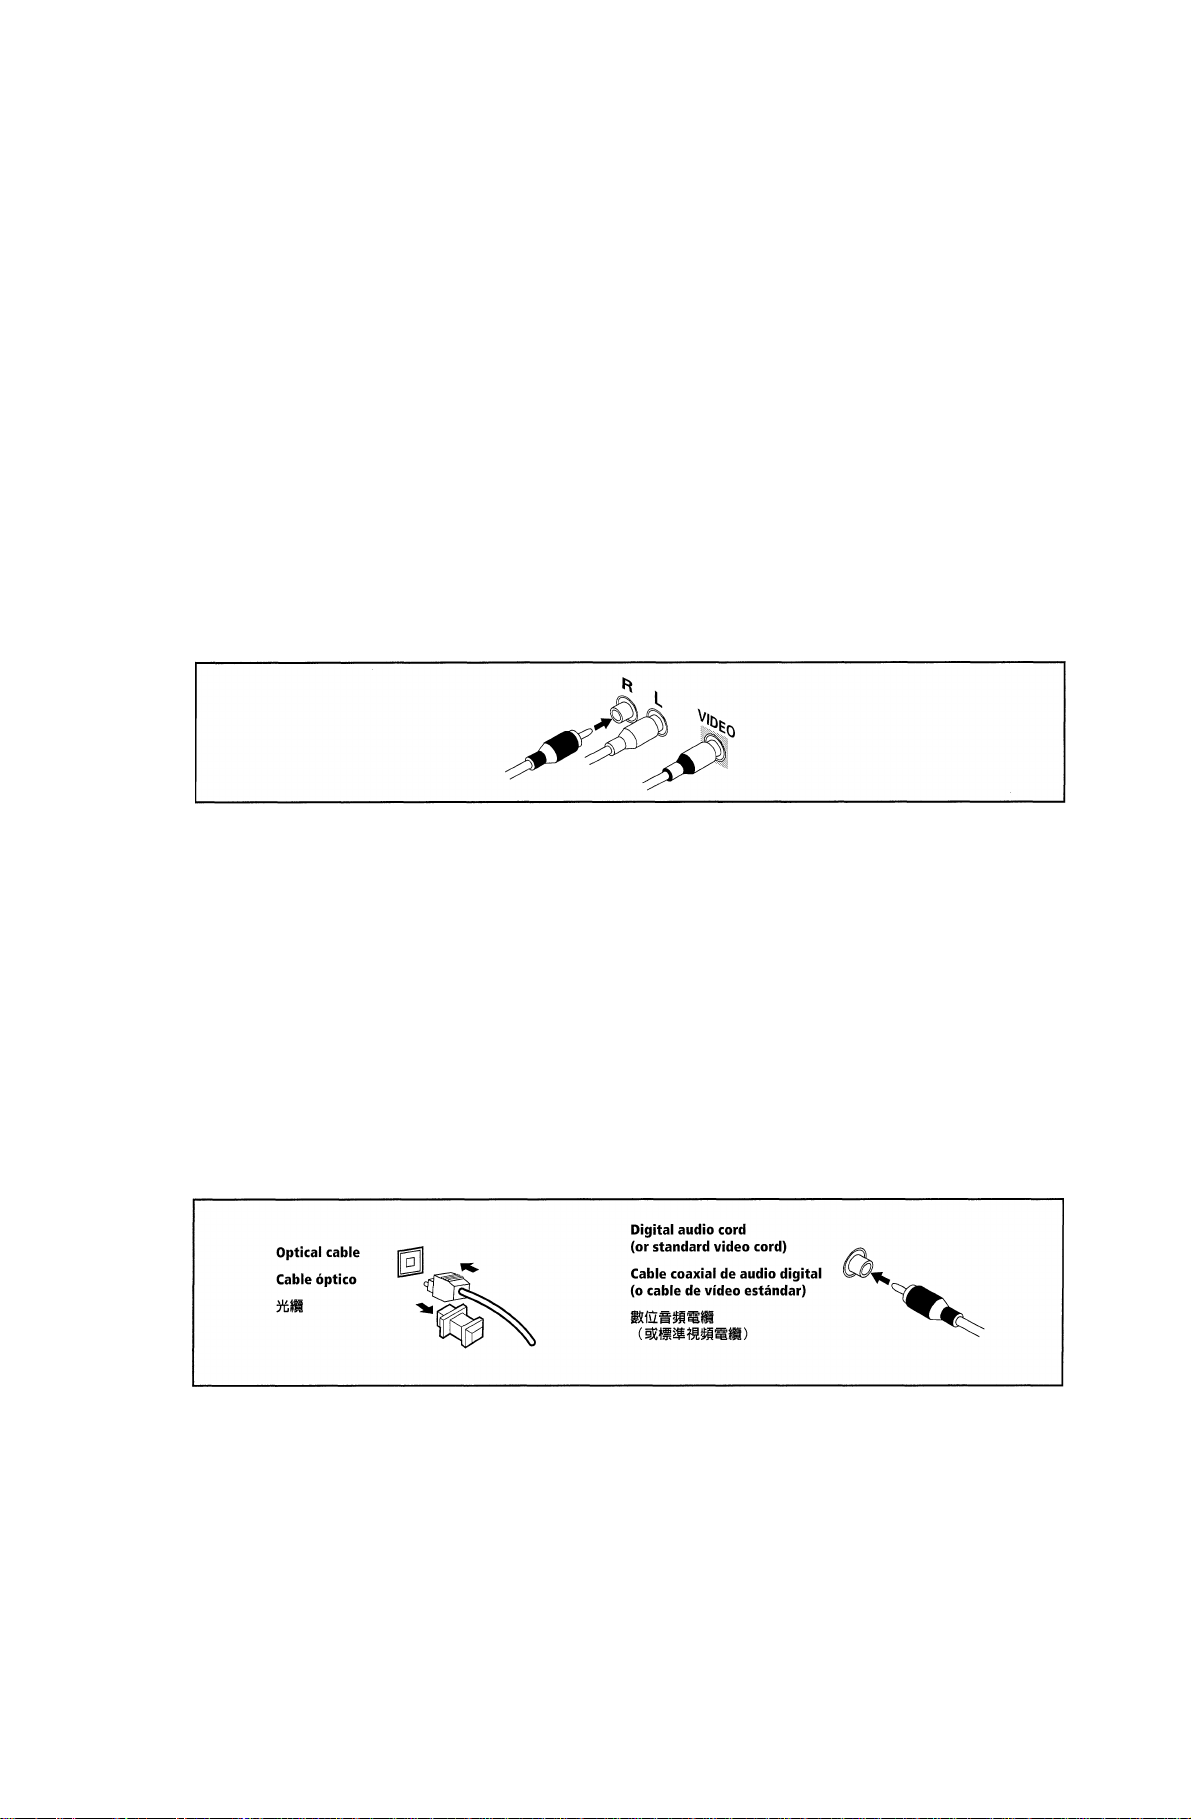
AudioA^ideo Cords
Use audio/video cords (not supplied)
to make analog audio and video
connections.
Connect red plugs to R (right), white
plugs to L (left), and the yellow plugs
to VIDEO.
Be sure to insert completely.
equipo
Antes de realizar o cambiar las
conexiones, apague el aparato y
desconecte el cable de alimentación
de la toma de CA de la pared.
Cables de audio/vídeo
Use cables de audio/vídeo (no
suministrados) para hacer conexiones
de audio y vídeo analógico.
Conecte los enchufes rojos a la toma
R (derecha), los enchufes blancos a al
toma L (izquierda) y los enchufes
rojos a al toma VIDEO.
Asegúrese de insertarlos hasta el
fondo.
±ACfÍPÍgtÍ4 “
m) ^
Wimmmmm (íí) ± > efe
mmmw. (ä) ; u&^feM
íiPjviDEo (mm) ±°
—°
Digital Audio Cords/Optical
Cabies
Commercially available digital audio
coaxial cords (standard video cords
can also be used) or optical cables
(not supplied) are used to connect
digital components to this receiver.
When you use optical digital input or
output terminals, pull off the caps
and insert the plugs. Be sure to insert
completely.
Cables coaxiales de audio
digitaj/cables ópticos
Los cables coaxiales de audio digital
de venta en el comercio (pueden
utilizarse también cables de vídeo
normales) o cables ópticos (no
suministrados) se usan para conectar
los componentes digitales en este
receptor.
Cuando utilice los terminales de
entrada o salida digital ópticos,
desmonte las tapas e inserte los
enchufes. Asegúrese de insertarlos
hasta el fondo.
II myt
11 ’ ÍEStfiTcjf il
B# ’ ñmííLT ’ if gil® A»-
En/Sp/ChH
9
Page 10

Connecting Digital
Components
In order to use PCM/DD Digital/
DTS soundtracks, you need to
make digital audio connections.
You can do this by either coaxial or
optical connections (you do not need
to do both). The quality of these two
types of connections is the same but
since some digital components only
have one type of digital terminal, it is
a matter of matching like with like
(for example, the coaxial out from the
component to coaxial in on the
receiver). The VSX-D710S/D710S-G
has a coaxial input and two optical
inputs for a total of three digital
inputs. The VSX-D810S/D810S-G has
a coaxial input and three optical
inputs for a total of four digital
inputs. Connect your digital
components as shown below. There is
one digital out jack which is marked
DIGITAL OUT. If you connect this to
the optical input on a digital recorder
(currently these include MD, DAT
and CD-R) you can make direct
digital recordings with this unit.
When connecting your equipment,
always make sure the power is turned
off and the power cord is
disconnected from the wall outlet.
Conexiones digitales
Para utilizar las pistas de sonido
PCM/DG/DTS, deberá hacer
conexiones de audio digital.
Puede hacerlo con una conexión
coaxial o una conexión óptica (no es
necesario hacer ambas). La calidad de
estos dos tipos de conexiones es la
misma, pero como algunos
componentes digitales sólo tienen un
tipo de terminal digital, es necesario
hacerlos corresponder (por ejemplo,
la salida coaxial del componente a la
entrada coaxial del receptor). El VSXD710S/D710S-G tiene una entrada
coaxial y dos ópticas para un total de
tres entradas digitales. El VSX-
D810S/D810S-G tiene una entrada
coaxial y tres ópticas para un total de
cuatro entradas digitales. Se
recomienda conectar sus
componentes como puede apreciar en
la ilustración de abajo. Hay una toma
de salida digital marcada con las
palabras DIGITAL OUT. Si la conecta
a la entrada óptica de una grabadora
digital (actualmente pueden ser MDs,
DAT y CD-R) podrá hacer
grabaciones digitales directas con esta
unidad.
Antes de conectar su equipo,
asegúrese de que el sistema está
apagado y el cable de alimentación
desconectado del enchufe de la pared.
;Í7®fflPCM/Gnlí1uSff/DTSí
i;i ’ jiííuTcfti
fñ] f¡til
íiTtftRW-aSííáíSí ’ HftR
WRIMESB ° {\mw ’ ÍAÉTtfttüíR
±) ° VSX-D710S/D710S-GM^—
ÍSRIÉliAfnffiíiTfcíiflA ’ liÄ
o vsx-
D810S/D810S-GÍIjmW-ffl|S]fÉfÍ
AfDAÍSAfifiA ’ llÄRfÄHii
»föflAffiffl “
№ ° ÍWiWDIGITAL
OUT (SífilitB) lin ’ StIfÄif
P (Sflia®BSii^ßMD'DATS
CD-R) - AtiUBigüiTitföÄ
ftilgtsíifíf ’
MM ’ MMiatilJÍÍgííÉÍIͱACÍf p
The arrows indicate the direction of the
audio signal.
VSX-D710S/D710S-G
10
En/Sp/ChH
Las flechas indican el sentido de la señal
de audio.
lSi^/T^raíi§^K)7□íq] °
CD recorder, MD
or DAT
Page 11

TV tuner
(or Satellite tuner)
Sintonizador de TV
(o sintonizador para la
Example Connection for a DVD/LD or LD Player
Since some LDs have soundtracks
recorded on the special □□ RF format
you need to make special hook ups to
ensure you can play all LDs on your
system. If you don't have an LD (or
an LD player with your DVD player)
you don't need to worry about this.
For the VSX-D710S/D710S-G/D810S/
D810S-G hook up your DVD/LD or
LD player directly and make sure you
make both a □□ RF output and either
a coaxial or optical digital connection.
Of course you must hook up your
DVD/LD or LD player with standard
(coaxial or optical) digital
connections but if you are able to
hook up your player with a □□ RF
output (if your player has one) this
will ensure you can use all LDs
available. We also recommend
hooking up your digital components
to analog audio jacks as well.
Before making or changing the
connections, switch off the power and
disconnect the power cord from the
AC wall outlet.
Ejemplo de conexión de
un reproductor de DVDs/
LDs o reproductor de LDs
Dado que algunos LDs tienen pistas
de sonido grabadas en un formato RF
□□ especial, necesitará realizar
conexiones especiales para asegurarse
de que puede reproducir todo tipo de
LDs en su sistema. Si no dispone de
un LD (o un reproductor de LDs con
su reproductor de DVDs), esta
información no le es relevante. En los
modelos VSX-D710S/D710S-G/
D810S/D810S-G, conecte su
reproductor de DVDs/LDs o de LDs
directamente y asegúrese de hacer
una salida RF □□ y una conexión
coaxial u óptica digital. Deberá
conectar su reproductor de DVDs/LDs
o de LDs con conexiones digitales
estándar (coaxiales u ópticas), pero si
puede conectar su reproductor con
una salida RF □□ (si su reproductor
tiene una), esto asegurará que puede
usar todo tipo de LDs. También
recomendamos también conectar sus
componentes digitales a tomas de
audio analógicas.
Antes de realizar o cambiar
conexiones, apague el sistema y
desconecte el cable de alimentación
de la toma CA de la pared.
íi) ’ -tíi^ííí'íia»HSvsxD710S/D710S-G/D810S/D81 OS-GE
ígEfÍDVD/LDg(LDfiíStÍ ’
IslWWiiS^liainnRFfitüö^Sfö
mm “
gtíÉílíiDVD/LD^LDffJÍ
íi >
LD o mmmmmmíL7t\mm3\
3f±ACÍÍPÍfitti
11
En/Sp/ChH
Page 12

Connecting Audio
Components
To begin set up, connect your audio
components to the jacks as shown
below. These are all analog
connections and your analog audio
components (like a cassette deck) use
these jacks. Remember that for
components you want to record with
you need to hook up four plugs (a set
of stereo ins and a set of stereo outs),
but for components that only play
you only need to hook up one set of
stereo plugs (two plugs). To use
digital source features you must hook
up your digital components to the
digital inputs (see the previous page
for more on digital connections) but
it is also a good idea to hook up your
digital components to these analog
audio jacks. If you want to record to/
from digital components (like an MD)
to/from analog components, you must
hook up your digital equipment with
these analog connections.
When connecting your equipment,
always make sure the power is turned
off and the power cord is
disconnected from the wall outlet.
Componentes de audio
Para empezar, conecte sus
componentes de audio en las tomas
como se indica a continuación. Todas
son conexiones analógicas y sus
componentes de audio analógico
(como una platina de cintas) utilizan
estas tomas. Recuerde que para los
componentes con los que desea
grabar, es necesario conectar cuatro
enchufes (un juego de entradas
estéreo y un juego de salidas estéreo),
pero para los componentes que son
sólo para reproducción sólo necesita
conectar un juego de enchufes estéreo
(dos enchufes).
Para utilizar las funciones de sonido
digital, deberá conectar sus
componentes digitales a las entradas
digitales página anterior,
donde se ofrecen más datos sobre las
conexiones digitales), aunque
también recomendamos la conexión
de sus componentes digitales a estas
tomas de audio analógicas. Si desea
grabar a/de las conexiones de
componentes digitales (como un MD)
a/de componentes analógicos, deberá
conectar su equipo digital con estas
conexiones analógicas.
Antes de conectar su equipo,
asegúrese de que el sistema está
apagado y el cable de alimentación
está desconectado del enchufe de la
pared.
’ ílf-hIItt:
»mi ’
«’ i-miimmmxmfmR
mmmm i2imm)
’ mmmiíLTiim
ífS№íifiA± ; (WliKííilíf
tm’mmrnM) »íafEWiTt
Tcft (®MD)
m (MD) -
ffidíSISÍiM > -^1
iW.
vm ’ «?ií.s-tii)iKíiÉ«f±Acap
12
En/Sp/ChH
Page 13

The arrows indicate the direction of the
audio signal.
Las flechas indican el sentido de la señal
de audio.
Ì5HM/TnM'^ÌÌ5ÌK)7dI^ <
CD player
Reproductor de CDs
cmmm
CD recorder
or Cassette deck
Grabadora de CDs
o platina de cintas
CD player
Reproductor de CDs
CD recorder
or Cassette deck
Grabadora de CDs
o platina de cintas
=fc:Wt»*t№
VSX-D710S/D710S-G
VSX-D810S/D810S-G
/- DIGITAL IN
pcM/oa/OTS
#|IH
COAX I OPT®
m
(CD-R)@
m
Cassette deck placement
Depending on where the cassette
deck is placed, noise may occur
during playback of your cassette deck
which is caused by leakage flux from
the transformer in the receiver. If you
experience noise, move the cassette
deck farther away from the receiver.
Colocación de la platina de cintas
De acuerdo con el lugar donde haya
instalado la platina de cintas, puede
haber ruido durante la reproducción,
provocado por un flujo de fugas del
transformador en el receptor. Si se
escuchan ruidos, aleje la platina de
cintas del receptor.
13
En/Sp/ChH
Page 14

Connecting DVD 7.1
Channel (5.1 chforVSXD710S/D710S-G)
Components
DVD and LD discs are compatible
with both 2 channel and 7.1 channel
(5.1 channel for VSX-D710S/D710S-
G) audio output formats. Connections
can be made from a DVD player/
multi-channel decoder equipped with
7.1 analog outputs to the 6.1 analog
inputs on this unit (the surround
back channel is mono on the VSXD810S/D810S-G models so we refer
to it as 6.1 ch). You need to connect
both the left and right surround back
channels for the VSX-D810S/D810SG models but the sound from this
channel will only be mono. Always
make sure that the receiver is
switched off and unplugged from the
wall outlet before making or changing
any connections.
Conexión de
componentes DVD 7.1
canales (5.1 canales para
elVSX-D710S/D710S-G)
Los discos de DVD y LD son
compatibles con los formatos de
salida de audio de 2 canales y de 7.1
canales (5.1 canales para el VSXD710S/D710S-G). Las conexiones
pueden efectuarse desde un
decodificador reproductor/multicanal
de DVD equipado con salidas 7.1
análogas a las entradas análogas de
6.1 de este aparato (el canal surround
posterior es monoaural en los
modelos VSX-D810S/D810S-G, por
lo que le llamamos 6.1 ch). Deberá
conectar tanto los canales surround
posteriores izquierdo como el derecho
para los modelos VSX-D810S/D810SG, pero el sonido de este canal sólo se
escuchará en mono. Antes de realizar
o cambiar conexiones, asegúrese de
que el sistema está apagado y
desconectado de la toma de la pared.
mmdw i.imm (vsx-
D710S/D710S-G^5.1«M
) Ttff
DVDfDLD)t5f ISjI
( VSX-D710S/D71 OS-GMS . 1 Sil )
’H'iBîiitÜMîÇ—^10^ °
. m
J:tfÍA± ’ (VSX-D810S/D810S-G
ovsx-
D810S/D810S-Gi!J®iiÈ'^aîlg:è
ts=.iWñímmmm -
’ mummmm > mmmú
±snfrktü °
The arrows indícate the direction of the
audio signal.
Las flechas indican el sentido de la señal
de audio.
mmmrnmmmwÆTjm ^
DVD/muIti channel
decoder with 5.1 channel
analog output jacks
Decodificador de DVDs/
multicanal con tomas de
salida analógicas de
14
En/Sp/ChH
Page 15

VSX-D810S/D810S-G
Decodificador de DVDs/multicanal con tomas de
salida analógicas de canales 7.1
DVD/^^7.
MEMO:
• The 7.1 channel (5.1 channel for
VSX-D710S/D710S-G) input can
only be used when DVD 7.1 ch
(5.1 channel for VSX-D710S/
D710S-G) input is selected.
• For 6.1 channel output select the
Surround Back Ich setting (see p.
40). In this case you can connect
the single surround back speaker
to either the left or right surround
back terminals.
Connecting Video Components
Connect your video components to
the jacks as shown below. Regarding
digital video components (like a DVD
player), you must use the analog
video connections pictured on this
page for the video signal but in order
to use a digital source (like a DVD)
you must hook up their audio to a
digital audio input (see p. 10-11). It is
also a good idea to hook up your
digital components with analog audio
connections as well (see p. 12-13).
When connecting your equipment
always make sure the power is turned
off and the power cord is
disconnected from the wall outlet.
MEMO:
• La entrada de 7.1 canales (5.1
canales para el VSX-D710S/D710SG) sólo puede ser utilizada cuando
se selecciona la entrada DVD 7.1
canales (5.1 canales para el VSXD710S/D710S-G).
• Para las salidas de 6.1 canales,
seleccione el valor posterior con
surround Ich (consulte la pg. 40).
En estos casos podrá conectar el
único altavoz surround posterior a
los terminales surround izquierdo o
derecho posteriores.
Conexión de componentes de vídeo
Conecte sus componentes de vídeo a
las tomas indicadas a continuación.
Con respecto a los componentes de
vídeo digital (un reproductor de
DVDs, por ejemplo) deberá utilizar
las conexiones analógicas de vídeo
que puede apreciar en esta página
para la señal de vídeo, pero para
poder usar una fuente digital (como
un DVD) deberá conectar su audio a
una entrada de audio digital (véanse
las pg. 10-11). Es recomendable
asimismo conectar su componentes
digitales con conexiones de audio
analógico (consulte la pg. 12-13).
mvi ■■
• HWtS5EDVD7.lSiI (VSX-
D710S/D710S-G;g5.1
ttííffl7.1»ÍISA (VSXD710S/D710S-G;^5.iSÍÍ) ”
mmn± ’
DVDfSSiíti) =
rÉ ’ mmamimmmmmn
± ; ($p
DVD) >
’ til
(M®12-13M) “S
)iígiaíi^sjí»iiígfíí > m>mm
’ l|}illtil)«í;íss±
15
En/Sp/ChH
Page 16

The arrows indicate the direction of the
audio signal.
Las flechas indican el sentido de la señal
de audio.
TV tuner
(or Satellite tuner)
TV tuner
(or Satellite tuner)
VCR
VCR
16
En/Sp/ChH
de LDs)
P)
Page 17

Front
Front video connections are accessed
via the front panel input selector as
"VIDEO".
Parte frontal
A las conexiones de vídeo delanteras
se accede mediante el selector de
entrada del panel frontal como
"VIDEO".
mmmm
«¡AS
“VIDEO” mm.)
Video camera (etc.)
Cámara de vídeo, etc
mmm m)
MEMO:
This receiver also has S-Video and
component video inputs and outputs.
These can give you a better picture
than the standard composite video
connections. For S-Video connections
use an S-Video cord (not supplied);
for component video connections use
a three-way RCA cord (not supplied).
Note that a signal fed into a video
input on this receiver is only sent to
your TV from the corresponding
video output. In other words, if you
connect your VCR to this receiver
using a standard video cord, you need
to connect the receiver to your TV
using a standard video cord. If your
DVD player is connected using an S-
Video cord, make sure that you also
connect the receiver to your TV with
an S-Video cord.
MEMO:
El receptor dispone también de
entradas y salidas de componente de
vídeo. Éstas pueden darle una mejor
imagen que la que obtendrá con las
conexiones compuestas de vídeo
estándar. Para las conexiones S-Vídeo,
utilice un cable de S-Vídeo (no
suministrado) y para las conexiones
compuestas de vídeo use un cable
RCA de tres vías (no suministrado).
Recuerde que una señal que entra por
una entrada de vídeo en este receptor
sólo se envía a su televisor desde la
salida de vídeo correspondiente. Es
decir, si conecta su reproductor de
vídeo a este receptor utilizando un
cable de vídeo estándar, necesitará
conectar el receptor a su televisor
mediante un cable de vídeo estándar.
Si conecta su reproductor de DVD
con un cable S-Vídeo, asegúrese
también de conectar el receptor a su
televisor con un cable S-Vídeo.
PiíE :
iiiiAfflfMíü « mmmmmm
Mí«) ; TtíWIÍI®JÍf|gfflA.l>
RCA«|i (A^tiMÍ«) »
im : llig?№íg^íítilIHIIAíííi
mm¡\m » nmmm > * mmmmmmmnmMimmm.
DVDifffiti ’ sxmM№s-w%ñM
mmmmmm
17
En/Sp/ChH
Page 18

Connecting Antennas Conexión de antenas
Connect the AM loop antenna and
the FM wire antenna as shown below.
To improve reception and sound
quality, connect external antennas
(see Using External Antennas,
below). Always make sure that the
receiver is switched off and un
plugged from the wall outlet before
making or changing any connections.
VSX-D710S/D710S-G
Conecte la antena de cuadro AM y la
antena de cable FM como se indica en
la siguiente ilustración. Para mejorar
la recepción y la calidad del sonido,
conecte antenas externas (consulte la
sección "Uso de antenas externas"
más abajo). Asegúrese siempre de que
el receptor esté apagado y
desconectado de la toma de la pared
antes de realizar o cambiar las
conexiones.
mm^m
MTffiíSii)
mm ’ immmmm >
íiPTOiÜ“
FM wire antenna
Connect the FM wire antenna and
fully extend vertically along a
window frame or other suitable area,
etc.
AM loop antenna
Assemble the antenna and connect to
the receiver. Attach to a wall, etc. (if
desired) and face in the direction that
gives the best reception.
18
En/Sp/ChH
Antena de cable de FM
Conecte la antena de cable de FM y
extiéndala toda ella en dirección
vertical a lo largo del marco de una
ventana u otra área adecuada, etc.
Antena de cable AM
Monte la antena y conéctela al
receptor. Acóplela a una pared, etc, si
(lo cree conveniente) y diríjala hacia
la dirección en la que obtenga una
mejor recepción.
Page 19

Antenna snap connectors
Twist the exposed wire strands
together and insert into the hole, then
snap the connector shut.
Conectores de encaje de las
antenas
Doble los filos expuestos del cable e
insértelos por el orificio. A
continuación, encaje a presión el
conector para cerrarlo.
Using External Antennas Uso de antenas externas
ífiíL ’ mkmmm »
To improve FM reception
Connect an external FM antenna.
To improve AM reception
Connect a 5-6 m length of vinylcoated wire to the AM antenna
terminal without disconnecting the
supplied AM loop antenna.
For the best possible reception,
suspend horizontally outdoors.
Cómo mejorar la recepción
en FM
Conecte una antena externa de FM
Cómo mejorar la recepción
en AM
Conecte un cable de 5-6 m. con
revestimiento de vinilo al terminal de
la antena AM sin desconectar la
antena de cable AM.
Para la mejor recepción posible,
suspéndala horizontalmente en el
exterior.
Outdoor antenna
Antena exterior
19
En/Sp/ChH
Page 20

Connecting Speakers (VSX-D710S/D710S-G)
A full complement of six speakers is
shown here but, naturally, everyone’s
home setup will vary. Simply connect
the speakers you have in the manner
described right. The receiver will
work with just two stereo speakers
(called "Front" speakers in the
diagram) but we recommend you use
at least three speakers and five is best.
The B speaker system is only for a
pair of stereo speakers.
Make sure you connect the speaker
on the right to the right terminal and
the speaker on the left to the left
terminal. Also make sure the positive
and negative (+/-) terminals on the
receiver match those on the speakers.
MEMO:
• The receiver has two speaker
systems, A & B. A is the main
system supporting the full
complement of surround sound
speakers. If you switch on both A
& B speaker systems, only front
speakers and the subwoofer will
be audible. No sound will come
from the center or surround
speakers but multi channel
sources will be down-mixed to the
active speakers so no sound will
be lost. Similarly, if you choose
just the B system you‘11 only hear
the front speakers connected to
the B system and multi channel
sources will be down-mixed to
these two speakers.
• Use speakers with a nominal
impedance of 8 Q to 16 ii.
Conexión de los
altavoces (VSX-D710S/
D710S-G)
En la siguiente ilustración se muestra
un juego total de seis altavoces pero
por supuesto la instalación de cada
hogar es diferente. El receptor puede
funcionar con sólo dos altavoces
estéreo (llamados "Altavoces
frontales" en la ilustración) pero se
recomienda utilizar como mínimo tres
altavoces, aunque cinco es siempre
mejor.
El sistema de altavoces B es sólo para
un par de altavoces estéreo.
Asegúrese de conectar el altavoz de la
derecha en el terminal de la derecha y
el altavoz de la izquierda en el
terminal izquierdo. Asimismo,
asegúrese de que los terminales
positivo y negativo (+/-) del receptor
coincidan con los de los altavoces.
MEMO:
• El receptor tiene dos sistemas de
altavoces, A y B. A es el sistema
principal que soporta un juego
completo de altavoces de sonido
surround.
sistemas de altavoces A y B, sólo
podrán escucharse los altavoces
frontales y el altavoz realzador
de graves. No saldrá ningún
sonido por los altavoces central
y surround pero las fuentes
multicanal se mezclarán en los
altavoces activos para que no
pierda ningún sonido. De la
misma forma, si elige sólo el
sistema B, sólo podrán escucharse
los altavoces frontales conectados
al sistema B y las fuentes
multicanal se mezclarán en estos
dos altavoces.
• Utilice altavoces con una
impedancia nominal de 8 O -
16a
Si activa ambos
(VSX-D710S/
D710S-G)
. iññ ’
mm’
» immR
“M” usa
o
± “ (V
-) (V-) ti
tSEie »
Plise ^
mmimm »
» mmhm
- Rmm
> mmmmmMT.
M ’ mRmmmmmí'mmm
Wlí PIÎaêsDïiJ 1
20
En/Sp/ChH
Page 21

Front Speakers (A)
Altavoces frontales (A)
(a)
VSX-D710S/D710S-G
Center Speaker
Altavoz central
c
Surround Speakers
Altavoces SURROUND
Powered subwoofer
Realzador de graves
con alimentación
When using the speaker on your TV as the center
speaker, connect the CENTER PREOUT jack on this unit to
the audio input jack on your TV. In this case, the center
speaker shown is unnecessary.
Cuando utilice el altavoz de su televisor como altavoz
central, conecte la toma CENTER PREOUT a la toma de
entrada de este aparato a la toma de entrada de audio
de su televisor. En estos casos, el altavoz central que
aparece en la ilustración no es necesario.
, íl§:$:^J:B!)CENTER
pREouT}iPi5|^íi^±0gM^iüA}iP4iiug ° mmmu
Be sure to complete all
other connections
before connecting this
unit to the AC power
source.
Asegúrese de
completar todas las
conexiones antes de
conectar este aparato a
una fuente de
alimentación de CA.
21
En/Sp/ChH
Page 22

Connecting Speakers (VSX-D810S/D810S-G)
A full complement of seven speakers
is shown here but, naturally,
everyone’s home setup will vary.
Simply connect the speakers you have
in the manner described right. The
receiver will work with just two stereo
speakers (called front speakers in the
diagram) but we recommend you use
at least three speakers. To get the
most out of the VSX-D810S/D810S-G
models hook up all seven speakers,
including a surround back speaker,
the latest advancement in home
theater. You can only hook up one
speaker here as the surround back
channel is mono on the VSX-D810S/
D810S-G models. This is actually 6.1
ch sound but we usually refer to it by
its regular name, 7.1 ch sound. The
two are essentially the same thing
both offering surround back sound. If
you don’t hook up a surround back
speaker you can use that speaker
terminal to hook up your subwoofer.
The B speaker system is only for a
pair of stereo speakers.
Make sure you connect the speaker
on the right to the right terminal and
the speaker on the left to the left
terminal. Also make sure the positive
and negative (+/-) terminals on the
receiver match those on the speakers.
MEMO:
• The receiver has two speaker
systems, A & B. A is the main
system supporting the full
complement of surround sound
speakers.
& B speaker systems, only front
speakers and the subwoofer will
be audible. No sound will come
from the center or surround
speakers but multi channel sources
will be down-mixed to the active
speakers so no sound will be lost.
Similarly, if you choose just the B
system youll only hear the front
speakers connected to the B system
and multi channel sources will be
down-mixed to these two speakers.
• Use speakers with a nominal
impedance of 8 Q to 16 Q.
• If you select subwoofer (SB
SUBWF) in the “surround back
speakers setting mode” (see p.34)
you can hook a subwoofer up to the
surround back speaker terminals. In
this case the terminals will be used
for this “passive subwoofer” and no
surround back sound will come
22
from these terminals.
En/Sp/ChH
If you switch on both A
Conexión de los altavoces (VSX-D810S/D810S-G)
En la siguiente ilustración se muestra un
juego total de siete altavoces pero por
supuesto la instalación de cada hogar es
diferente. El receptor puede funcionar con
sólo dos altavoces estéreo (llamados
altavoces "Altavoces frontales" en la
ilustración) pero se recomienda utilizar
como mínimo tres altavoces. Para
aprovechar mejor todas las prestaciones de
los modelos VSX-D810S/D810S-G, es
siempre mejor utilizar siete altavoces,
incluyendo un altavoz posterior surround,
lo último para los aficionados al cine en
casa. Aquí sólo puede conectar un altavoz,
puesto que el canal posterior surround es
monoaural en los modelos VSX-D810S/
D810S-G. Esto es sonido de 6.1 canales,
pero en general se le conoce como sonido
de 7.1 canales. Ambos son la misma cosa y
ofrecen sonido posterior surround. Si no
conecta un altavoz posterior surround
puede usar ese terminal de altavoz para
conectar un realzador de graves.
El sistema de altavoces B es sólo para un
par de altavoces estéreo.
Asegúrese de conectar el altavoz de la
derecha en el terminal de la derecha y el
altavoz de la izquierda en el terminal
izquierdo. Asimismo, asegúrese de que los
terminales positivo y negativo (+/-)':del
receptor coincidan con los de los altavoces.
MEMO:
• El receptor tiene dos sistemas de
altavoces, A y B. A es el sistema
principal que soporta un juego
completo de altavoces de sonido
surround. Si activa ambos sistemas
de altavoces A y B, sólo podrán
escucharse los altavoces frontales y
el altavoz realzador de graves. No
saldrá ningún sonido por los
altavoces central y surround pero las
fuentes multicanal se mezclarán en los
altavoces activos para que no pierda
ningún sonido. De la misma forma, si
elige sólo el sistema B, sólo podrán
escucharse los altavoces frontales
conectados al sistema B y las fuentes
multicanal se mezclarán en estos dos
altavoces.
• Utilice altavoces con una impedancia
nominal de 8 -16
• Si selecciona como opción al realzador
de graves (SB SUBWE) en el "Modo de
configuración de los altavoces
posteriores con surround" (consulte la
pg. 34), podrá conectar un realzador de
graves a los terminales de altavoz
trasero surround. En estos casos, los
terminales serán utilizados para este
"realzador de graves pasivo" y no se
oirá ningún sonido posterior surround
de estos terminales.
(VSX-D810S/D810S-G)
’ iñM. ’
» g®í#vsx-
D810S/D810S-GSyfÉ®á^ft;'cfÍ
íiSH » ÉSÍ;VSX-D810S/D810S-G
mñmpmmmmmmvíLmm
±it^6.ichws “
mmmm ^
’ mmmmmmpm
± ° (V
-) (V-) ti
fflESB »
Piiíie ^
• ’ WA
- Rigii
mmmm > mmwmwÆm
if Eí/lM8dSiJ
(SB SUBWF) » MTilüf
Page 23

Front Speakers (A)
Altavoces frontales(A)
(a)
Center Speaker
Altavoz centrai
Surround Speakers
Altavoces surround
Surround Back Speaker
Altavoz posterior con surround
[0 e '
v'“ 1 jj—
Powered subwoofer
Realzador de graves con
alimentación
/
'0 e '
" 0 0 '
/ V
■ e © '
' © © '
y y y..y
When using the speaker on your TV as the
center speaker, connect the CENTER
PREOUT jack on this unit to the audio
input jack on your TV. In this case, the
center speaker shown is unnecessary.
' e © i
y ...yi.
/ V
Be sure to complete
all other connections
before connecting
this unit to the AC
power source.
Asegúrese de
completar todas las
conexiones antes de
conectar este
aparato a una fuente
de alimentación de
CA.
lu ’
Cuando utilice el altavoz de su televisor
como altavoz central, conecte la toma
CENTER PREOUT a la toma de entrada de
este aparato a la toma de entrada de
audio de su televisor. En estos casos, el
altavoz central que aparece en la
ilustración no es necesario.
«ilB^CENTER PRE0UT}ÍPi5|®íi^J:B!]g
° ’ xmpm
23
En/Sp/ChH
Page 24
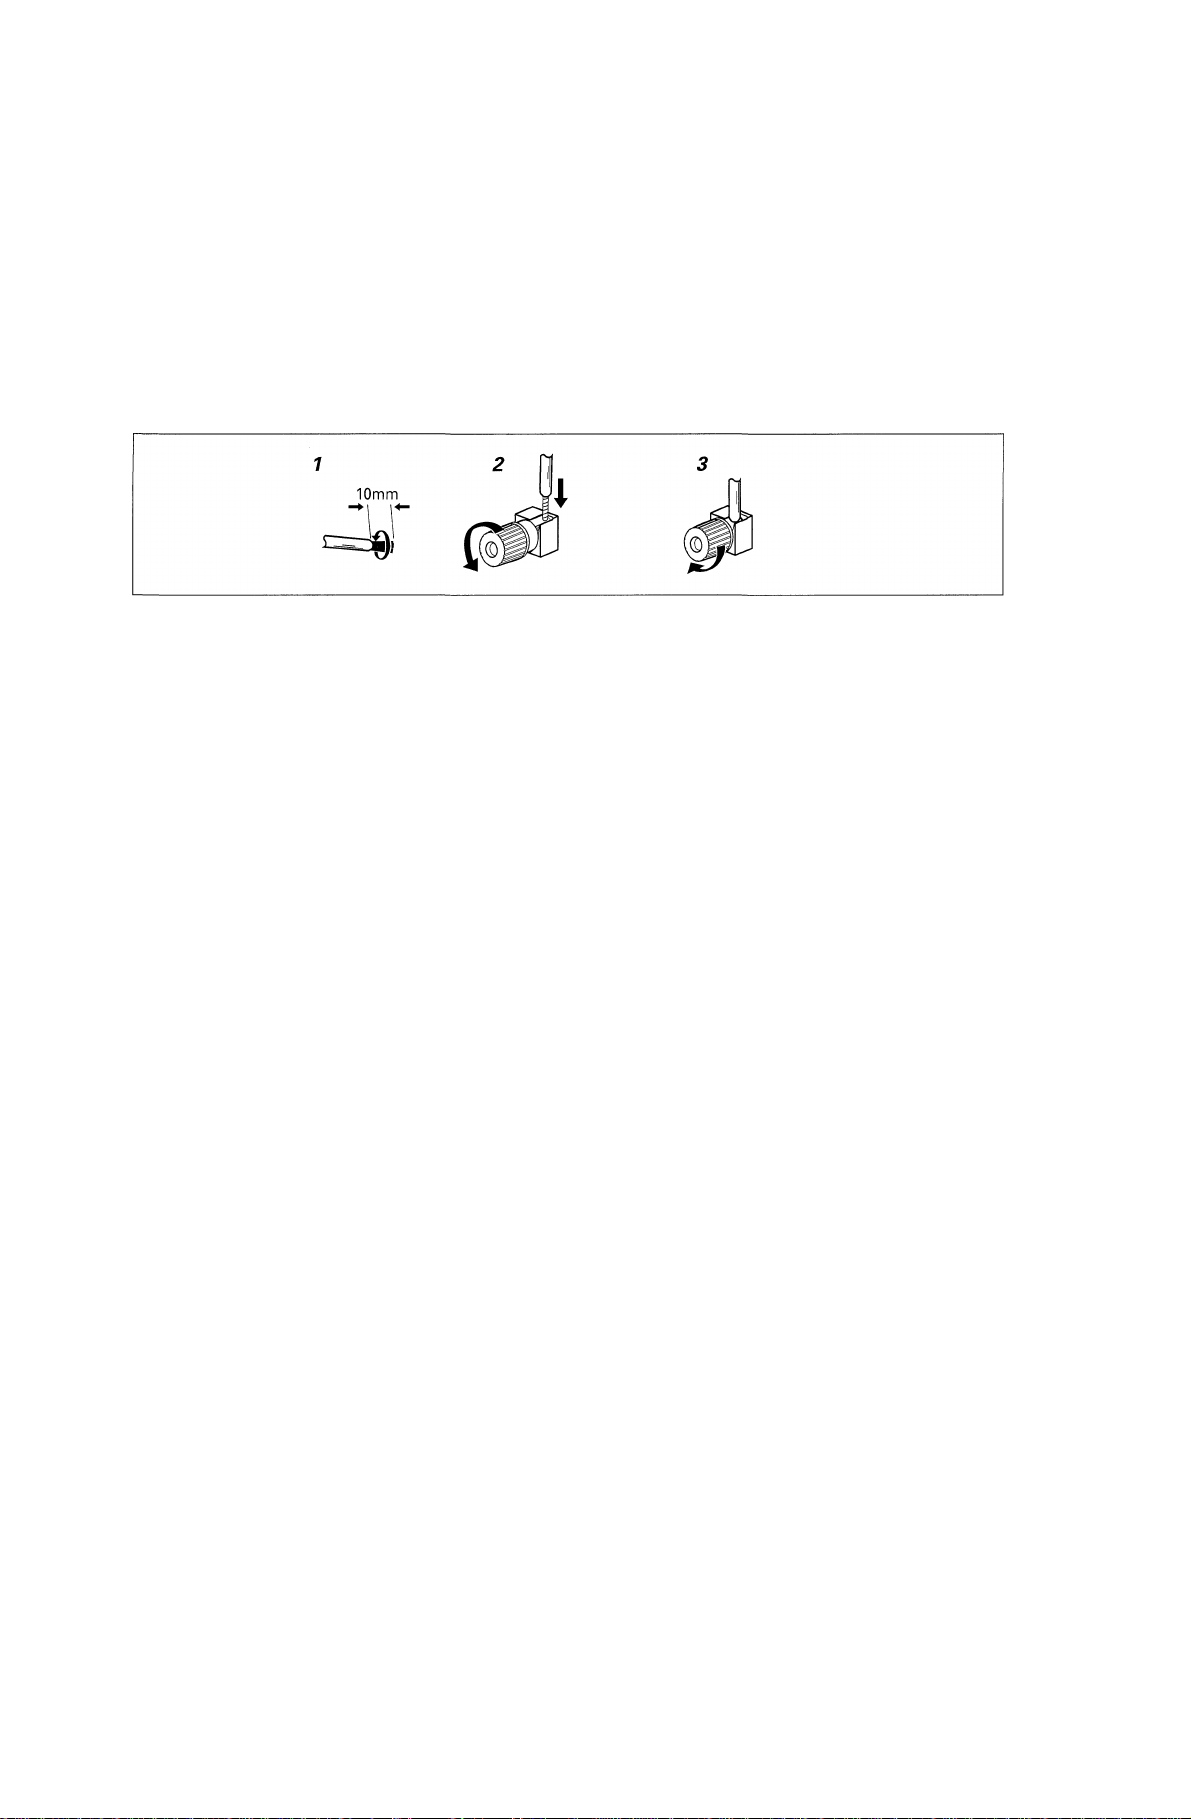
Speaker terminals
1 Twist exposed wire strands 1 Trence los filos del cable para
together. unirlos.
2 Loosen speaker terminal and insert ^ Afloje el terminal del altavoz e
exposed wire inserte el cable que queda
3 Tighten terminal. expuesto
Terminales de los altavoces
3 Apriete el terminal.
1
3
Caution:
Make sure that all the bare speaker
wire is twisted together and inserted
fully into the speaker terminal. If any
of the bare speaker wire touches the
back panel it may cause the power to
cut off as a safety measure.
Hints on Speaker Placement
Speakers are usually designed with a
particular placement in mind. Some
are designed to be floor standing,
while others should be placed on
stands to sound their best. Some
should be placed near a wall; others
should be placed away from walls.
Follow the guidelines on placement
that the speaker manufacturer
provided with your particular
speakers to get the most out of them.
• Place the front left and right
speakers at equal distances from
the TV.
• When placing speakers near the
TV, we recommend using
magnetically shielded speakers to
prevent possible interference, such
as discoloration of the picture
when the TV is switched on. If you
do not have magnetically shielded
speakers and notice discoloration
of the TV picture, move the
speakers farther away from the TV.
• Install the center speaker above or
below the TV so that the sound of
the center channel is localized at
the TV screen.
Precaución:
Asegúrese de trenzar todo el cable
que queda al descubierto y de que se
inserta totalmente al terminal del
altavoz. Si una porción del cable
desnudo del altavoz toca el panel
posterior, puede provocar un corte en
el suministro como medida de
seguridad.
Consejos para situar
debidamente los altavoces
El diseño de los altavoces siempre
tiene en cuenta la que será su mejor
emplazamiento en una sala. Algunos
altavoces están diseñados para estar
de pie en el suelo, mientras que otros
deberían colocarse en estanterías para
poder obtener su mejor rendimiento
acústico. Algunos deberían colocarse
cerca de una pared, mientras que
otros deben alejarse de ellos. Consulte
las instrucciones que vienen con sus
altavoces y que su fabricante le habrá
entregado para aprovechar al máximo
sus ventajas acústicas.
• Coloque los altavoces derecho e
izquierdo a la distancia del
televisor.
• Cuando coloque los altavoces
cerca del televisor, recomendamos
usar altavoces con resistencia
magnética para evitar posibles
interferencias, como la pérdida de
color en la imagen del televisor al
encenderlo. Si no tiene altavoces
con resistencia magnética y aprecia
una pérdida de color en la imagen
de su televisor, aleje los altavoces
del televisor.
• Instale el altavoz central sobre o
por debajo del televisor para que
el sonido del canal central quede
localizado como la pantalla del
televisor.
/Í/^\
Mimmmmmmmu ’ im-
m »
\mm\mwmmmm > mn±
mèmm
±77gcTT7 ’
24
En/Sp/ChH
Page 25

CAUTION!
If you choose to install the
center speaker on top of the TV,
be sure to secure it with putty,
or by other suitable means, to
reduce the risk of damage or
injury resulting from the
speaker falling from the TV in
the event of external shocks
such as earthquakes.
• If possible, install the surround
speakers slightly above ear level.
• Try not to install the surround
speakers farther away from the
listening position than the front
and center
speakers. Doing so can weaken the
surround sound effect.
To achieve the best possible surround
sound, install your speakers as shown
on the right. Be sure all speakers are
installed securely to prevent accidents
and improve sound quality.
¡PRECAUCIÓN!
Cuando instale el altavoz
central encima del televisor,
asegúrelo con plastelina
adeherente u otro medio
apropiado ya que el altavoz
puede caerse del televisor
debido a causas externas, por
ejemplo golpes o un terremoto,
lo cual puede poner en peligro
a las personas cercanas o dañar
el altavoz.
• En lo posible, instale los altavoces
surround ligeramente encima del
nivel de los oídos.
• Trate de no instalar los altavoces
surround más alejados de la
posición de audición que los
altavoces frontal y central. De
hacerlo, puede debilitar el efecto
del sonido surround.
Para lograr el mejor efecto surround
posible, instale sus altavoces según se
muestra en la ilustración de la
derecha. Cerciórese de que los
altavoces están instalados de forma
segura para evitar accidentes y
mejorar la calidad del sonido.
/í/€\ !
m-mmmmmmmm
mmnimm ’ mmm ’
^ mji±
25
En/Sp/ChH
Page 26

Overhead view of speaker set up ~VSX-D710S/D710S-G~
Plano superior de la instalación de altavoces ~VSX-D710S/D710S-G~
-VSX-D710S/D710S-G-
Front Right
Frontal derecho
Front Left
Frontal
izquierdo
Surround Left
Surround izquierdo
ÍÜÍHS
Center
Central
Listening Position
Posición de audición
imm^m
Siu
Subwoofer
Realzador
de graves
-^ñrnmm
Surround Right
Surround derecho
Overhead view mof speaker set up ~VSX-D810S/D810S-G~
Plano superior de la instalación de altavoces ~VSX-D810S/D810S-G-
'-VSX-D810S/D810S-G-
Front Right
Frontal derecho
Front Left
Frontal
izquierdo
íiu
Center
Central
aiu
Subwoofer
Realzador
de graves
3-D view of speaker set up
Plano tridimensional de los altavoces
3-D view of speaker set up
Plano tridimensional de los altavoces
Surround Left
Surround izquierdo Listening Position
26
En/Sp/ChH
Listening Position
Surround Back
Posterior con surround
Surround Right
Surround
derecho
^mmm
Page 27

Connecting Additional
Amplifiers (VSX-D810S/
D810S-G oniy)
This receiver has more than
sufficient power for any home use,
however it is possible to add
additional amplifiers to every
channel. Make the connections
shown below to add amplifiers to
power your speakers. Always make
sure that the receiver is switched off
and unplugged from the wall outlet
before making or changing any
connections.
The arrows indicate the direction of the
audio signal.
VSX-D810S/D810S-G
Conexión de
amplificadores
adicionales (sólo VSXD810S/D810S-G)
Este receptor tiene la suficiente
potencia para cualquier uso en el
hogar. Ahora bien, es posible agregar
amplificadores adicionales a cada
canal. Si desea utilizar amplificadores
para activar sus altavoces, haga las
conexiones que indica la ilustración.
Antes de realizar o cambiar las
conexiones, apague el sistema y
desconecte el cable de alimentación
de la toma de la pared.
Las flechas indican el sentido de la señal
de audio.
VSX-D810S/D810S-G)
“ xmmm
Front channel
amplifier
Amplificador del _
canal frontal
Surround channel
amplifier
Amplificador del
canal surround
MEMO:
To hear sound only from the pre-outs,
disconnect any speakers that are
connected directly to the receiver.
(Using the SPEAKERS button to
switch off the speakers also mutes the
pre-outs; you must set it to either A,
B, or A+B.)
MEMO:
Para oír sonido solamente de las salidas
de preamplificación, desconecte todos
los altavoces que estén conectados
directamente al receptor. (Use el botón
SPEAKERS para apagar los altavoces y
enmudecer así a las salidas de
preamplificación. Deberá configurarlo
como A, B o A+B)
Surround Back
channel amplifier
Amplificador del canal
posterior surround
Center channel
amplifier
Amplificador del
canal central
PÍSS5 ^
©iïffifi-îimiiiij»# ’ E
SPEAKERS (ÜSgS) jgffi
lim-tiinlfXM-iîESW ’ ÍIíI-
Powered
Subwoofer
Realzador
de graves
con
alimentación
En/Sp/ChH
27
Page 28

Operating other Pioneer Components
By connecting a control cord
(optional), you can control other
Pioneer equipment using the remote
control for this unit. Point the
remote control unit towards the
remote sensor of this unit, even
when operating other equipment.
The remote control signals are
received by the remote sensor of this
unit, and sent to the other devices via
the CONTROL OUT terminal.
MEMO:
• You can also control Pioneer
components by pointing the
receiver's remote control directly
at the component. This type of
operation does not require control
cords.
• Whenever making the control jack
connections, be sure to also connect
the analog input and output jacks.
System control does not function
correctly when only the digital
input and output connections are
made.
Cómo operar otros componentes Pioneer
Conectando un cable de control
(opcional) puede controlar otros
equipos Pioneer con esta unidad de
mando a distancia. Apunte el mando
a distancia hacia el sensor a distancia
de esta unidad, incluso si está
operando otro equipo.
Las señales del mando a distancia las
recibe el sensor del mando a distancia
de esta unidad y se envían a los otros
dispositivos a través del terminal
CONTROL OUT
MEMO:
• También puede controlar
componentes Pioneer apuntando
el mando a distancia del receptor
directamente al componente. Este
tipo de operación no requiere
cables de control.
• Al realizar las conexiones de la
toma de control, asegúrese de
conectar también las tomas de
entrada y salida analógicas. El
control del sistema no funciona
correctamente cuando sólo se
realizan las conexiones digitales de
entrada y de salida.
^1T^ítj3P1oneer7EÍT
(ÍÍS) ’
Pioneerg^fji °
iiCONTROLOUT (eSlJfittì)
Sí ’ »
PIÍÍ5 ^
ÌiPioneerTti^SSlJiljcft °
28
En/Sp/ChH
Connect to CONTROL
IN terminai of other
Pioneer products with
■ mark.
Conecte a la terminal
CONTROL IN de otros
productos Pioneer con
la marca Q.
Pioneer^ppÉCONTROL
IN (}^®jiiyA) °
Page 29

Preparations
Preparaciones
mmxv^
Setting Up for Surround Sound
Be sure to switch the power of this
unit on (The STANDBY indicator goes
out).
To ensure the best possible surround
sound, be sure to complete the
following set up operations. This is
particularly important when using the
□□ (Dolby)/DTS surround mode. You
only need to make these settings once
(unless you change the placement of
your current speaker system or add
new speakers, etc.). Refer to the
following pages for detailed
descriptions of the settings available
for each mode.
1 Press RECEIVER to turn the
power on.
The STANDBY indicator goes out.
2 Press RCV.
This button switches the remote to
the receiver’s mode.
3 Press < or > to select the
mode you want to set.
For best results, start with
“SPEAKERS setting mode” and
make your initial adjustments in
the order described below.
The current settings are displayed
automatically.
• DTS-ES ON/OFF setting mode
(page 32) (VSX-D810S/D810S-G
only)
Use to turn the DTS-ES (surround
back) channels ON or OFF (for
DTS discs only).
• SPEAKERS (Front, Center,
Surround) setting mode (page
33)
Use to specify the size and type of
speakers you have connected.
• SPEAKERS (Surround Back)
setting mode (page 34) (VSXD810S/D810S-G only)
Use to specify the size and type of
surround back speaker you have
connected or if you have con
nected a subwoofer here.
• SUBWOOFER ON/PLS/OFF
setting mode (page 35)
Use to specify if the subwoofer is set
Preparación para el sonido
surround
Recuerde que el aparato ha de estar
encendido (el indicador STANDBY
desaparece).
Para asegurarse de que el sonido
surround es el óptimo, lleve a cabo las
siguientes operaciones. Esto es
particularmente importante si va a hacer
uso del modo surround □□ (Dolby)/
DTS. Sólo necesita configurar estos
valores una vez (a menos que planee
cambiar la ubicación de su sistema o
añadir nuevos altavoces, etc). Consulte
la información de estas páginas para
obtener una descripción detallada de los
valores de los que dispone en cada
modo.
1 Pulse RECEIVER para encender
el aparato.
Verá desaparecer el indicador
STANDBY.
2 Pulse RCV.
Este botón pone al mando a distancia
en el modo receptor.
3 Pulse < o > para seleccionar el
modo que desee configurar.
Para obtener los mejores resultados,
comience por "Modo de
configuración de los altavoces" y
realice sus ajustes iniciales en el
orden que describimos a
continuación.
Los valores actuales aparecen
automáticamente en pantalla.
• Modo de configuración DTS-ES
ON/OFF (pg. 32) (sólo VSXD810S/D810S-G)
Use para activar (ON) o desactivar
(OFF) los canales DTS-ES
(posteriores con surround). Sólo para
discos DTS.
• Modo de configuración de los
altavoces (frontal, central,
surround) (pg. 33)
Use para especificar el tamaño y el
tipo de altavoces que tiene
conectados.
• Modo de configuración de los
altavoces posteriores con surround
(pg. 34) (sólo VSX-D810S/D810SG)
Use para especificar el tamaño y el
tipo de altavoces posteriores con
surround que tiene conectados o si
tiene conectado aquí un realzador de
graves.
• ON/PLS/OFF del realzador de
graves (pg. 35)
Use para especificar si el realzador de
graves está activado, en valor plus o
desactivado.
J<Kil9cBPXlS
» (STANDBY
(íiffl) immm) »
iiSiSTatsxSifF ° (f±
it) /DTSÍilitiítB# ’
ímmmmmmtmimimm
mmmm) » swiícsmíib
1 ÍSTRECEIVER (íiOT)
STANDBYÍi^H-® o
2 Í^TRCVÍSia»
mmmwmm&mmmití
°
“SPEAKERS (^*§1)
sí” mtá ’ w(!éi)iií5gTaíii
Sfilili °
. DTS-ES ON/OFF (ll/IS)
(S32M) immmm-
D810S/D810S-G)
ffls^üi!ciiDTs-Es mmm)
Sil (ílfflS^DTS^Sf)
. SPEAKERS (it) ' ' ii,Ü
») (^33M)
. SPEAKERS SSS«
^ (^34H) immmm-
D810S/D810S-G)
SUBWOOFER ON/PLS/OFF
mmim)
29
En/Sp/ChH
Page 30

to on, plus or off.
• Crossover frequency setting
mode (page 35)
Use to determine which
frequencies will be sent to the
subwoofer (or “Large” speakers if
you don’t have a subwoofer).
• LFE attenuator setting mode
(page 36)
Use to specify the peak level for
the LFE channel and the crossover
network for rerouted bass
frequencies.
• Low cut filter ON/OFF setting
mode (page 36)
Use to cut the distorted sound
from the subwoofer.
• FRONT speakers distance
setting mode (page 37)
Use to specify the distance from
your listening position to your
front speaker.
• CENTER speakers distance
setting mode (page 37)
Use to specify the distance from
your listening position to your
center speaker.
• SURROUND speakers distance
setting mode (page 37)
Use to specify the distance from
your listening position to your
surround speakers.
• SURROUND BACK speakers
distance setting mode (VSXD810S/D810S-G only) (page 38)
Use to specify the distance from
your listening position to your
surround back speaker.
• Dynamic range control setting
mode (page 38)
Use to compress the dynamic range
of the sound track.
• Dual mono setting (page 39)
Use with Dolby Digital software
that has dual mono encoding if
you want to isolate one channel or
listen in this specialized mono
mode.
• Component input 1 setting
(page 40)
Use to specify the video
component connected to this
input.
• Component input 2 setting
(page 40)
Use to specify the video
component connected to this
input.
30
En/Sp/ChH
• Modo de configuración de la frecuencia de cruce (pg. 35)
Use para determinar qué
frecuencias serán enviadas al
realzador de graves (o altavoces
"Large" si no tiene un realzador de
graves).
• Modo de configuración del
atenuador LFE (pg. 36)
Use para especificar el nivel
máximo del canal LFE y la red de
cruce de las frecuencias graves
reencaminadas.
• ON/OFF del filtro de corte bajo
(pg- 36)
Use para cortar el sonido
distorsionado del realzador de
graves.
• Modo de configuración de la
distancia de los altavoces
frontales (pg. 37)
Use para especificar la distancia
existente desde su posición de
audición a la de su altavoz frontal.
• Modo de configuración de la
distancia de los altavoces
centrales (pg. 37)
Use para especificar la distancia
existente desde su posición de
audición a la de su altavoz central.
• Modo de configuración de la
distancia de los altavoces
surround (pg. 37)
Use para especificar la distancia
existente desde su posición de
audición a las de sus altavoces
surround.
• Modo de configuración de la
distancia de los altavoces
posteriores con surround (sólo
VSX-D810S/D810S-G) (pg. 38)
Use para especificar la distancia
existente desde su posición de
audición a las de sus
Altavoces surround.
• Modo de configuración del
control de la gama dinámica (pg.
38)
Use para comprimir la gama
dinámica de la pista de sonido.
• Configuración del sonido
monoaural dual (pg. 39)
Use junto con el software Dolby
Digital que tiene codificación
monoaural dual si desea aislar un
canal o escuchar música en este
modo monoaural especializado.
• Valor del componente de la
entrada 1 (pg. 40)
Use para especificar el
componente de vídeo conectado a
esta entrada.
• Valor del componente de la
entrada 2 (pg. 40)
Use para especificar el
componente de vídeo conectado a
esta entrada.
> nm
LFE^ag§|g^1Íj)C (^36M)
iiiff)i®ggoN/oFFia®Sít im
36M)
s
(^37
M)
mmmmnmimmmmm
(^37
H)
37M)
mtmmmnmimmmmm
(iifflB$VSX-D810S/D810S-G)
(m38M)
• uüiEHS^jiaiiiisc (^38
«)
mnmimmmmmm»
• (^39H)
mBmmmwmmmmtím
íiKfi ’
• TíftiiAisa:^ (^40M)
• 7L№liA2ia^ (^40H)
Page 31

• Multi Channel External Decoder
Surround Back chl/ch2 setting
(VSX-D810S/D810S-G only)
(page 40)
Use to specify whether you
hooked up your External Multi
Channel Decoder surround back
speaker connection with one or
two cords. If you’re not using a
External Multi Channel Decoder
ignore this setting.
• Coaxial digital input setting
(page 41)
Use to specify the input to be
assigned to the coaxial digital
input.
• Optical digital input 1 setting
(page 41)
Use to specify the input assigned
to this optical digital input.
• Optical digital input 2 setting
(page 42)
Use to specify the input assigned
to this optical digital input.
• Optical digital input 3 setting
(VSX-D810S/D810S-G only)
(page 42)
Use to specify the input assigned
to this optical digital input.
4 Press A or V to select the
setting you want.
The setting is entered automati
cally.
5 Repeat steps 3 and 4 to set
other surround modes.
MEMO:
Press ENTER to exit the setting mode.
The setting mode is automatically
exited if no operation is performed
within 20 seconds.
• Valor de chl/ch2 del sonido
surround del decodificador
externo multicanal (sólo VSXD810S/D810S-G) (pg. 40)
Use para especificar si ha realizado
su conexión del altavoz posterior
con surround del decodificador
externo multicanal con uno o dos
cables. Si no utiliza un
decodificador externo multicanal,
este valor no aplica a su sistema.
• Valor de la entrada digital
coaxial (pg. 41)
Use para especificar la entrada a la
que se ha de asignar la entrada
digital coaxial.
• Valor de la entrada digital óptica
1 (pg. 41)
Use para especificar la entrada
asignada a la entrada digital.
• Valor de la entrada digital óptica
2 (pg. 42)
Use para especificar la entrada
asignada a la entrada digital.
• Valor de la entrada digital óptica
3 (sólo VSX-D810S/D810S-G)
(pg- 42)
Use para especificar la entrada
asignada a la entrada digital.
4 Pulse A o V para seleccionar
el valor que desee.
El valor de la configuración se
introduce automáticamente.
5 Repita los pasos 3 y 4 para
seleccionar otros modos
surround.
MEMO:
Pulse ENTER para salir del modo de
configuración.
Saldrá del modo de configuración
automáticamente si no se realiza
ninguna operación transcurridos 20
segundos.
ch2ia$ aiffi)5$VSX-D810S/
D810S-G) (H40M)
>
mmmm
ñmm ’ °
A»
A»
• )tlÍÜ<ulÍA2ÍS^ (^42M)
• 3tlÍl!!iiIIÍA3IS^
VSX-D810S/D810S-G) (Ü42 I
M)
A°
4 mAmvmm >
»A“ '
STENTER (fiA) Sffi ’
(
Q]
m
(0_
31
En/Sp/ChH
Page 32

DTS-ES ON/OFF setting mode
(VSX-D810S/D810S-G only)
This setting allows you to hear
surround back channels on DTS discs
regardless of whether the disc itself is a
5.1 Ch disc or a 6.1 Ch disc. Naturally
you need to hook up SURROUND
BACK speakers (see p. 22-25) and set
them properly (see below on this
page) in order to hear surround back
channels. If you choose ON you will
hear surround back channels with DTS
discs. If you choose OFF you will not.
Choose DTS-ES ON or OFF
by using the A or V buttons.
Modo de configuración DTSES ON/OFF (sólo VSX-D810S/
D810S-G)
Este valor le permite escuchar los
canales posteriores surround de un
disco DTS sin que importe si el disco
en sí es un disco de 5.1 canales o de
6.1 canales. Obviamente, deberá
conectar sus altavoces posteriores con
surround (véase la pg. 22-25) y
ajústelos de la manera adecuada
(consulte la sección correspondiente
de esta misma página) para poder
escuchar los canales posteriores
surround. Si elige ON, oirá los
canales posteriores surround con los
discos DTS. Ahora bien, si elige OFF,
no los oirá.
Elija DTS-ES ON u OFF
Utilizando los cursores A o V.
DTS-ES ON/OFF (Ifl/ll) ISÆ
(«fflB$VSX-D810S/
D810S-G)
mmmmm ’
SURROUND BACK (ítíiÜ®) US
fS (M22-25H) ÎÉfSÆlESS (M
im) ’ïïMmmsMm'ûm
fêssît’WioFF di)
®fflAmvígÍ55ÍíiDTS-ES
0NÜÎ0FF °
MEMO:
• If you choose none for the surround
back speakers setting later on this
page you won’t be able to select ON
here.
• You’ll only get surround back
channel sound when the receiver
is in STANDARD mode (see p. 54,
59), DTS-ES is set to ON and the
disc is a 5.1 channel disc.
11 r
JJ 1
n l\ 1
C C C
.J L .J , LJ 1 \l
MEMO:
• Si no elige ninguno de los
altavoces posteriores con sur
round en la opción que luego se le
ofrecerá en esta página, no podrá
seleccionar ON aquí.
• Sólo obtendrá sonido surround de
los canales posteriores cuando el
receptor esté en modo
STANDARD (consulte las pg. 54,
59), DTS-ES está en ON y el disco
es un disco de 5.1 canales.
—►
TI T c
JJ 1 -J
c r n c c:
L- J .U 1 1
WítE ^
• mmMWimmimmmm
ffON <=
• nWSlIÎîfilÉfôSTANDARD (ff
¥) tií'í (MM54' SQM) ’
DTs-EsSÆgiJoNUR/âii;^
32
En/Sp/ChH
Page 33

SPEAKERS (Front, Center,
Surround) setting mode
This setting establishes the size and
configuration of the speaker system
you have connected. So, for example,
here you set whether you have
connected surround speakers or not,
and how big they are. Selecting
“Large” or “Small” will determine how
much bass is sent by the receiver to
the speakers being set.
In the display, “F”, “C”, and “S” refer
to front, center, and surround
speakers respectively. Speaker size is
denoted as “L” for large speakers, “S”
for small speakers, and “*” (asterisk)
if no speaker is connected.
Choose a speaker setting
mode according to the
speakers you hooked up. Use
the A or V buttons.
The configurations shown below
will appear in the display on the
front of the receiver. One of them
should match your speaker set up.
Cycle through the different
possibilities until you find the one
that matches your set up.
Press > to advance to the next
receiver setting, and press < to
return to a previous receiver
setting.
Modo de configuración de los
altavoces (frontal, central,
surround)
Este valor establece el tamaño y
configuración del sistema de altavoces
que tenga conectado. Por ejemplo,
aquí configura si ha conectado
altavoces surround o no y su tamaño.
Seleccionar "Large" (grande) o "Small"
(pequeño) decidirá la cantidad de
graves que el receptor envía a los
altavoces que esté configurando.
En la pantalla, “F”, “C”, y “S” quieren
decir altavoces frontal, centro y
surround respectivamente. El tamaño
del altavoz puede ser “L” para los
altavoces grandes, “S” para los
altavoces pequeños y “ * ” (asterisco)
si no hay ningún altavoz conectado.
Elija el modo de
configuración del altavoz
pertinente según los
altavoces que tenga
conectados. Utilice los
cursores A o V.
Las configuraciones que se
muestran a continuación
aparecerán en la pantalla que hay
situada en la parte frontal del
receptor. Una de ellas debería ser
la misma que la de su sistema de
altavoces. Pase por las diferentes
posibilidades hasta que encuentre
la que más se parezca a la suya.
> mm
“T” ffi “'J'” á'lJSífüf
B/KS-t ’ “F” > “C” ’
“S”
u “L”
ÍC °
tfiâ^ii7SS±Mïi ’
Û ’ M-íiíISÍf '
If the cone size (diameter) of the
speaker is larger than 12-13 cm,
please set to "Large".
Pulse > para avanzar al siguiente
valor del receptor y < para
regresar al valor anterior.
Si el tamaño del cono (diámetro) del
altavoz es superior a 12-13 cm, elija
"Large".
ígíi»»jDAR^ (fill) ±3
12-13cm . iffSÆS'J “±” °
33
En/Sp/ChH
Page 34

SPEAKERS (Surround Back)
setting mode (VSX-D810S/
D810S-G only)
This setting establishes the size of the
speaker connected to the surround
back terminal (VSX-D810S/D810S-G
only). You can choose a surround back
speaker and its size or you can chose to
hook a subwoofer to this terminal.
Switch the surround back
speaker setting mode
according to the size of the
speaker you hooked up. Use
the A or V buttons.
The configurations shown below
will appear in the display on the
front of the receiver. Choose one.
Cycle through the different
possibilities until you find the one
that matches your set up.
If you select SB SUBWF here you
can hook a subwoofer up to the
surround back speaker terminals
(see p.23). In this case the
terminals will be used for this
“passive subwoofer” and no
surround back sound will come
from these terminals.
Press > to advance to the next
receiver setting, and press < to
return to a previous receiver
setting.
Modo de configuración de los
altavoces posteriores con
surround (sólo VSX-D810S/
D810S-G)
Este valor establece el tamaño del
altavoz que tenga conectado al
terminal posterior surround (sólo
VSX-D810S/D810S-C). Puede elegir
un altavoz posterior con surround y
su tamaño o puede optar por conectar
un realzador de graves a este
terminal.
Escoja el modo de
configuración del altavoz
posterior surround según el
tamaño del altavoz que tenga
conectado. Utilice los
cursores A o V.
Las configuraciones que se
muestran a continuación aparecerán
en la pantalla que hay situada en la
parte frontal del receptor. Elija una.
Pase por las diferentes posibilidades
hasta que encuentre la que más se
parezca a la suya.
Si selecciona SB SUBWF aquí.
podrá conectar un realzador de
graves a los terminales de altavoz
posterior con surround (véase la
pg. 23). En este caso, los termi
nales serán utilizados para este
"realzador de graves pasivo" y no
obtendrá ningún sonido posterior
surround de estos terminales.
Pulse > para avanzar al siguiente
valor del receptor y < para
regresar al valor anterior.
(Mfflí§VSX-D810S/D810S-G)
({Ifflft$;vsx-D8ios/
D810S-G)
»
fËfflA^vîgia -
IEffltiK№liAix¥± “ ’
SUBWF >
(M®23M) “ ittH# ’ ggííSíffl
nmm ‘mpkimmmw’ -
m O
wmm'iàm
> iiiËSB
MEMO:
• You can only set the surround
back speaker to “large” if the
surround speakers are set to
“small”.
• If you choose none for surround
speakers (see previous setup) you
won’t be able to select any
surround back speakers either.
• If you choose both A & B speaker
systems no sound is heard from
the “passive subwoofer”.
34
En/Sp/ChH
MEMO:
• Sólo puede configurar el altavoz
posterior con surround a "Large" si
los altavoces surround están
configurados a "Small".
• Si no escoge ningún el valor para
los altavoces surround (véase la
configuración anterior), no podrá
seleccionar tampoco ningún
altavoz posterior con surround.
• Si utiliza tanto los sistemas A
como el B, no se oirá ningún
sonido de este "realzador de graves
pasivo".
Pfifgfi ^
“/Jn” ’ mmmmmí
(MuijHbS
Page 35

SUBWOOFER ON/PLS/OFF
setting mode
Sets whether the SUBWOOFER is used
or not. Also, when used you have the
option to use the
“PLS” setting.
Press A or V to select
subwoofer ON, PLS or OFF.
MEMO:
• The initial setting is “ON”.
• Setting the front speaker size to
“Small” in the SPEAKERS setting
mode automatically locks the
subwoofer in the
• Use the PLS for extra bass. When
you use PLS you will get the bass
sounds from the subwoofer even if
the front speakers are set to
“Large”.
• If you select “OFF” in this setting
you won’t be able to select
subwoofer in the surround back
speaker setting on previous page.
“ON” position.
Crossover frequency setting
mode
Crossover frequency is the point
where the receiver divides the high
and low sounds (the frequencies)
between the speakers. Since most
smaller speakers can’t handle deep
bass tones, this setting allows you to
send those sounds to the subwoofer
(or speakers set to “Large” if you don’t
have a subwoofer) instead of the
speakers set to “Small” in your
system. Choose the point at which
you want the frequency routed to the
subwoofer (or “Large” speakers).
We recommend setting this to 200 Hz
if smaller bookshelf-type speakers are
used for your “Small” speakers.
Press A or V to specify the
crossover frequency for your
small speakers (100 Hz, 150
Hz or 200 Hz).
100Hz^—►150Hz-
----
► 200Hz-^
--------------
ON/PLS/OFF del realzador de
graves
Establece si se utiliza un realzador de
graves o no. Además, cuando se
utilice, dispone de la opción de
utilizar el valor “PLS”.
Pulse A o V para seleccionar
los valores del realzador de
graves: activado (ON), PLS o
desactivado (OFF).
MEMO:
• El valor inicial es de “ON”.
• Si se selecciona el valor "Small"
para el tamaño del altavoz frontal
en el modo de configuración de
los altavoces, el realzador de
graves quedará bloqueado
automáticamente en la posición
“ON”.
• Utilice el valor PLS si desea realzar
más los graves. Cuando utilice
PLUS, obtendrá sonidos graves del
realzador incluso si los altavoces
frontales están configurados como
"Large".
• Si selecciona “OFF”, no podrá
seleccionar al realzador de graves
en la configuración del altavoz
posterior con surround que hemos
mencionado anteriormente.
Modo de configuración de la
frecuencia de cruce
La frecuencia de cruce es el punto en
el cual el receptor divide los sonidos
altos y bajos (las frecuencias) entre los
distintos altavoces. Dado que los
altavoces más pequeños no pueden
manejar los tonos graves más bajos,
este valor permitirá enviar esos
sonidos al realzador de graves (o
altavoces configurados como "Large"
si no tiene realzador de graves) en
lugar de hacerlo a los altavoces
seleccionados como "Small" en su
sistema. Elija el punto en el que desea
que la frecuencia sea enviada al
realzador de graves (o altavoces
"Large"). Recomendamos ajustar este
valor a 200 Hz si se utilizan pequeños
altavoces tipo estantería con la opción
"Small" seleccionada.
Pulse A o V para especificar
la frecuencia de cruce de sus
altavoces pequeños (100 Hz,
150 Hz o 200 Hz).
nñrnmmm “mimim”
SUBWOOFER
“PLS”
(lE)
ÍSa^vÍSíB - íMÜON
(H) ’ PLS (lE) UÍOFF
(ü) °
PIÜK ^
• “ON” »
. ^SPEAKERS lastly^
“/Jn”
“ON” ÍÍB o
• ° MfflPLS ’ w
’ Sí?
“OFF” > MiJi£iijM)5/fSIS'^íáíS
mm 'A
mmmmimnñ ’
“/J^” «mw
“/Jn”
®g200Hz °
íSTADívígia >
(ioohz -
150HZÜÍ200HZ) »
lOOHz^—►150Hz-
----
►200Hz ◄
----
> iijñi
lOOHz^—►IBOHz-
----
►200Hz-^
----
35
En/Sp/ChH
Page 36

100 Hz
Sends bass frequencies below 100 Hz
to the subwoofer (or “Large” speakers).
150 Hz
Sends bass frequencies below 150 Hz
to the subwoofer (or “Large” speakers).
200 Hz
Sends bass frequencies below 200 Hz
to the subwoofer (or “Large” speakers).
MEMO:
• The initial setting is “100 Hz”.
• If all speakers (front, center, and
surround) are set to “Large” in
SPEAKERS setting mode,
crossover frequency cannot be set
because there are no “Small”
speakers (* * * appears in the
display).
LFE attenuator setting mode
Dolby Digital and DTS surround
sources include ultra-low bass tones.
Set the LEE attenuator as needed to
prevent the ultra-low bass tones from
distorting the sound from the
speakers.
Press A or V to set the
attenuation level (0 dB, 10
dB or ** dB(oo)).
OdB ◄—►lOdB
<■ (display "**")
i:.
MEMO:
• The initial setting is “0 dB”.
• When oo is selected (* * appears
in the display), LEE is not
available.
Low cut filter ON/OFF setting
mode
Turn the low cut filter ON when
distorted sound is output through the
subwoofer.
Press A or V to select low cut filter ON or OFF.
MEMO:
• The initial setting is “OFF”.
• If the subwoofer is set to “OFF” in
the SUBWOOFER ON/PLS/OFF
setting mode, the low cut filter
cannot be set.
36
En/Sp/ChH
100 Hz
Envía las frecuencias graves por
debajo de 100 Hz al realzador de
graves (o altavoces "Large").
150 Hz
Envía las frecuencias graves por
debajo de 150 Hz al realzador de
graves (o altavoces "Large").
200 Hz
Envía las frecuencias graves por
debajo de 200 Hz al realzador de
graves (o altavoces "Large").
MEMO:
• El valor inicial es “100 Hz”.
• Si todos los altavoces (frontales,
centrales y surround) se
configuran como "Large" en el
modo de configuración de los
altavoces, la frecuencia de cruce no
podrá establecerse debido a que
no existirá ningún altavoz "Small".
(Verá aparecer * * * en la
pantalla).
Modo de configuración del
atenuador LFE
Las fuentes de sonido Dolby Digital y
DTS incluyen tonos graves ultrabajos.
Configure el atenuador LEE según
prefiera para evitar que los tonos
graves ultrabajos distorsionen el
sonido de los altavoces.
Pulse A o V para establecer
el nivel de atenuación (0 dB,
10 dB o dB(oo)).
o dB ◄—► 10 dB ◄-i
oo (pantalla "**") ◄—'
cr.
MEMO:
• El valor inicial es “0 dB”.
• Cuando se selecciona °o (verá
aparecer * * en la pantalla), no
dispondrá de LFE.
ON/OFF del filtro de corte
bajo
Active (ponga en ON) del filtro de
corte bajo cuando el sonido
producido por el altavoz esté
distorsionado.
Pulse A o V para activar
(ON) o desactivar (OFF) el
filtro de corte bajo.
MEMO:
• El valor inicial es “OFF”.
• Si el realzador de graves se
desactiva “OFF” en el modo de
ON/PLS/OFF del realzador de
graves, el filtro de corte bajo no
podrá configurarse.
lOOHz
mmooEzmmmmmnpm
m mm^) »
150Hz
MJ''15 OH 2fK 01] fS
m mmm °
200Hz
(isc ]isss) “
mm--
• “100 Hz” «
• (M '
Bm ‘v]^” ’ Wimm
*** ) »
ígTAiXvígíH >
> (OdB > 10dBlS6**dB
(oo) ) o
OdB -4—►lOdB
.o (display "**")
IH3E
• (ü/kP±!Üí1
**) ’ lljLFEPfSÉEf^/fj o
íSÜÜieSON/OFFiS^^íC
P(ilSB =
• mthw&ñ “OFF” »
• (¡DUfiSUBWOOFER ON/PLS/OFF
^SPEAKERS (jiSfl)
“±” ’ È
'a
“OdB”
“ON” »
mTAmvtm ’ ^íiígifi)«
Ki§0N (H) ^OFF (II) °
yOFF” > il]ffiÌfìl®ll«ÌÌg5
Page 37

FRONT speakers distance
setting mode
Sets the distance from the FRONT
speakers to the listening position.
Press A or V to set the
distance of the FRONT
speakers from the main
listening position (within a
9.0 m range).
MEMO:
• The initial setting is 3.0 m.
• One step equals about 0.3 m.
CENTER speaker distance
setting mode
Sets the distance from the CENTER
speakers to the listening position.
Press A or V to set the
distance of the CENTER
speaker from the main
listening position (within a
9.0 m range).
MEMO:
• The initial setting is 3.0 m.
• When “C * ” is selected in
SPEAKERS setting mode, the
Center distance cannot be set.
• One step equals about 0.3 m.
SURROUND speakers distance
setting mode
Use to set the SURROUND speakers
distance. Like the CENTER speaker
position, the SURROUND speakers
may be set in a location closer or
farther to your main listening position
than the FRONT speakers. Set the
distance of the SURROUND speakers
accurately to hear sounds coming
from both FRONT and SURROUND
speakers at the same time.
Press A or V to set the
distance of the SURROUND
speakers from the main
listening position (within a
9.0 m range).
MEMO:
• The initial setting is 3.0 m.
• When “S * ” is selected in
SPEAKERS setting mode, the
SURROUND distance cannot be
set.
• One step equals about 0.3 m.
Modo de configuración de la
distancia de los altavoces
frontales
Configura la distancia desde los
altavoces frontales a la posición de
audición.
Pulse A o V para establecer la
distancia que hay entre los
altavoces frontales desde la
posición de audición principal
(hasta una distancia de 9,0
metros).
MEMO:
• El valor inicial es 3,0 metros.
• Un paso equivale a 0,3 metros.
Modo de configuración de la
distancia de los altavoces
centrales
Configura la distancia desde los
altavoces centrales a la posición de
audición.
Pulse A o V para establecer la
distancia que hay desde la
posición de audición principal
hasta el altavoz central (no
más de 9,0 m).
MEMO:
• El valor inicial es 3,0 metros.
• Cuando se selecciona “C * ” en el
modo de configuración de los
altavoces, no se podrá configurar la
distancia del altavoz central.
• Un paso equivale a 0,3 metros.
Modo de configuración de la
distancia de los altavoces
surround
Utilice este modo para establecer la
distancia de los altavoces surround. Al
igual que sucede con la posición del
altavoz central, los altavoces pueden
acercarse o alejarse más de su posición
de audición principal que los altavoces
frontales. Configure la distancia de los
altavoces surround con precisión para
poder escuchar sonido tanto de los
altavoces frontales como de los
surround simultáneamente.
Pulse A o V para establecer la
distancia que hay desde la
posición de audición principal
hasta los altavoces surround
(no más de 9,0 m).
MEMO:
• El valor inicial es 3,0 metros.
• Cuando se selecciona “S * ” en el
modo de configuración de los
altavoces, no se podrá configurar la
distancia del surround.
• Un paso equivale a 0,3 metros.
FRONT m
íK
issííÉfíí^sgifijii#síuBe^®
íSTA^vísia • HS^íiíÉii#
(ÍBllií9.0m;2F*g) »
PliílB : ^
. ■ 3ra °
CENTER (Ф/1!,\)
ÍSTA^víglB >
ü (lEBlií9.0iíi;2F*g) °
PltlB ^
• ®$pÍS®:^3.0ra o
. ^SPEAKERS {Wi9^)
“c*” if ’
. . 3m °
SURROUND
g lüjf»
штштшштшт^ »
ÍSTAÜÍvígiB - K^ííEÉIll
№11 (1виг9.0т;гга) »
ЙЗЕ:
• ■ От »
“S*” if. тшт^штш
• #Л|Ш0.3га»
37
En/Sp/ChH
Page 38

SURROUND BACK speaker
distance setting mode (VSXD810S/D810S-G only)
Use to set the SURROUND BACK
speaker distance. Like the
SURROUND speakers, the
SURROUND BACK speakers may be
set in a location closer or farther to
your main listening position than the
FRONT speakers. Set the distance of
the SURROUND BACK speakers
accurately to hear sounds coming
from both FRONT and SURROUND
speakers at the same time.
Press A or V to set the
distance of the SURROUND
BACK speakers from the
main listening position
(within a 9.0 m range).
MEMO:
• The initial setting is 3.0 m.
• When “SB*” is selected in
SPEAKERS setting mode, the
SURROUND BACK distance
cannot be set.
• One step equals about 0.3 m.
Modo de configuración de la
distancia de los altavoces
surround (sólo VSX-D810S/
D810S-G)
Utilice este modo para establecer la
distancia de los altavoces posteriores
con surround. Al igual que sucede
con la posición de los altavoces
surround, los altavoces posteriores
con surround pueden acercarse o
alejarse más de su posición de
audición principal que los altavoces
frontales. Configure la distancia de los
altavoces surround con precisión para
poder escuchar sonido tanto de los
altavoces frontales como de los
surround simultáneamente.
Pulse A o V para establecer
la distancia que hay desde la
posición de audición princi
pal hasta los altavoces
surround (no más de 9,0m).
MEMO:
• El valor inicial es 3,0 metros.
• Cuando se selecciona “SB * ” en el
modo de configuración de los
altavoces, no se podrá configurar
la distancia del surround posterior.
• Un paso equivale a 0,3 metros.
SURROUND BACK M
(mm
VSX-D810S/D810S-G)
mTAmvím - isiíííeéiií
№11 (l0lli£9.Otii;Z
F*9) °
Rüse:
• WtlaaS^MS.Om o
“SB*” B# ’ llJiErÉlfi/gíáíI
• #íÍI^M0.3m »
mmmmmmmifmsfí
Dynamic range control
setting mode
Dynamic range is the difference
between the loudest and softest
sounds in any given signal. The
dynamic range control helps you play
back sounds so the quieter sounds are
audible yet the louder sounds don’t
get distorted. It does this by
compressing the dynamic range.
When watching a movie at low
volume, setting this function enables
low level sounds to be heard more
easily but you won’t be jolted by
louder sounds.
Press A or V to set the
dynamic range control (OFF,
MAX, or MID).
MEMO:
• The initial setting is “OFF”.
• When the volume level is
increased, set to “OFF”.
• For listening enjoyment at low
volumes, set to “MAX” for
maximum dynamic range
compression.
• Dynamic range control is effective
only when a Dolby Digital signal is
38 being played back.
En/Sp/ChH
Modo de configuración del
control de la gama dinámica
La gama dinámica es la diferencia
existente entre los sonidos más altos y
los más bajos en una señal. El control
de la gama dinámica le ayuda a
reproducir sonidos de modo tal que
los sonidos más bajos sean audibles
sin distorsionar a los más altos. Esta
función se lleva a cabo comprimiendo
la gama dinámica. Cuando esté
viendo una película a un volumen
muy bajo, activar esta función le
permitirá escuchar sonidos de nivel
bajo con mayor facilidad, pero sin
que le sobresalten los sonidos altos.
Pulse A o V para configurar
el control de la gama
dinámica (OFF, MAX o MID).
MEMO:
• El valor inicial es “OFF”
(desactivado).
• Al incrementar el nivel de
volumen, póngalo en “OFF”.
• Para poder gozar de una buena
audición a unos bajos volúmenes,
configure esta función en “MAX”
para obtener la máxima
compresión de la gama dinámica.
• El control de la gama dinámica
sólo es efectivo cuando se
reproduce una señal Dolby Digital.
mm ’
mTAmvmm > mmmmm
(OFF (II) 'MAX
(«;*^) ' ^MID
m) ) “
PlitSB
Sg “OFF”
Wiiasx
“OFF” »
KmEilKliW “MAX” -
Rmmmmmmmm > mm
Page 39

Dual mono setting
The dual mono setting can only be
used when listening to Dolby Digital
discs that have dual mono software
encoded in them. As of now these are
not that widely used. With this setting
you can choose which channel in the
dual mono setting you want to listen
to. Thus, it is useful for soundtracks
that have one language on one
channel and a different language on
the other. Remember you can only
use this setting if you have Dolby
Digital software with this feature and
want to isolate one of the channels
therein.
There are two different ways to route
the sound in the dual mono setting,
one is with Dolby Digital mode on,
the other with Dolby Digital mode
off. If Dolby Digital mode is switched
on, the ch1 setting will play channel
1 through your center speaker. The
ch2 setting will play channel 2
through your center speaker. With
Dolby Digital mode off, the dual
mono sound routing is as follows: In
the ch1 setting your will hear channel
1 out of both front speakers. In the
ch2 setting you will hear channel 2
out of both speakers. In the L. c1 R.
c2 setting the speakers will play the
soundtrack independently of each
other. The left front speaker will play
channel 1 and the right front speaker
will play channel 2.
Press A or V to cycle
through the possible DUAL
MONO settings.
—► L c 1 R. c 2 M
---
Configuración del sonido
monoaural dual
La configuración del sonido
monoaural dual sólo puede utilizarse
cuando se escuchen discos Dolby
Digital que tengan incorporada la
codificación de software monoaural
dual. En la actualidad, estos discos
todavía no se han popularizado
demasiado. Con este valor puede
elegir qué canal de los monoaurales
duales desea escuchar. Por ello resulta
útil para bandas sonoras que tienen
un idioma en un canal y otro idioma
en el otro canal. Recuerde que sólo
puede utilizar este modo si tiene el
software Dolby Digital con esta
característica y quiere aislar uno de
los canales.
Hay dos modos de enrutar el sonido
en la configuración de sonido
monoaural dual: uno es con el modo
Dolby Digital activado y el otro con el
modo Dolby Digital desactivado. Si el
modo Dolby Digital está activado,
elegir ch1 reproducirá por el altavoz
central el canal 1. Elegir ch2
reproducirá por el altavoz central el
canal 2. Con el modo Dolby Digital
desactivado el sonido monoaural dual
se enruta de la manera siguiente:
eligiendo
ambos altavoces frontales. Elegir ch2
hará que se oiga el canal 2 por ambos
altavoces. En los valores L. c1 R. c2,
los altavoces reproducirán las bandas
sonoras independientemente los unos
de los otros. El altavoz frontal
izquierdo reproducirá el canal 1 y el
altavoz frontal derecho reproducirá el
canal 2.
el'chl se oirá el canal 1 por
’ ch2fsÆas
mMwm ’ mmmmmur •
L.ci R. ^
MMi ’ aMíiSglíf °
mTAmvmm ’
mm\iM MONO immmm)
5/Tjtíz» -
55ZÆ °
-► Leí R.c2-
-► ch2 chi
JE :
JH—üjlSfSÆSchl
-► ch2
MEMO:
• The default setting of this feature
is ch1.
ch1
Pulse A o V para pasar por
todos los posibles valores del
modo de configuración del
sonido monoaural dual.
—► Leí R. c 2 M
-► ch2
MEMO:
• El valor por defecto de esta
característica es ch1.
-----
chi ◄-
39
En/Sp/ChH
Page 40

Component input 1 setting
Tells the receiver which device (DVD
player, etc.) is connected to this
input.
Press A or V to select the
component setting (DVD, TV,
VCR or OFF).
MEMO:
• The initial setting is “DVD”.
Component input 2 setting
Tells the receiver which device (TV,
etc.) is connected to this input.
Press A or V to select the
component setting (TV,
VCR, OFF or DVD).
MEMO:
• The initial setting is “TV”.
Multi Channel External
Decoder Surround Back ch1/
ch2 setting (VSX-D810S/
D810S-G only)
You only need to make this setting if
you are using a multi channel
external decoder with your DVD
player. If you aren’t just ignore this
setting.
Press A or V to select the
channel setting. Select chi if
your DVD is outputting 6.1
sound (the surround back
channel is mono) or select
ch2 if your DVD is
outputting 7.1 sound (the
surround back channel is
stereo).
MEMO:
• The initial setting is “ch1”.
Valor del componente de la
entrada 1
Le dice al receptor que aparato
(reproductor de DVDs, etc.) hay
conectado a esta entrada.
Pulse A o V para seleccionar
el aparato correspondiente
(DVD, TV, VCR u OFF).
MEMO:
* El valor inicial es “DVD”.
Valor del componente de la
entrada 2
Le dice al receptor que aparato
(televisor, etc.) hay conectado a esta
entrada.
Pulse A o V para seleccionar
el aparato correspondiente
(TV, VCR, OFF o DVD).
MEMO:
• El valor inicial es “TV”.
Valor de ch1/ch2 del sonido
surround del decodificador
externo multicanal (sólo VSXD810S/D810S-G)
Sólo necesitará realizar este
configuración si está utilizando un
decodificador externo multicanal con
su reproductor de DVDs. Si no lo
tiene, ignore esta configuración.
Pulse A o V para seleccionar
el valor del canal. Seleccione
chi si su DVD está
reproduciendo sonidos de
6.1 (el canal posterior
surround es mono) o
seleccione ch2 si su DVD
reproduce sonido de 7.1 (el
canal posterior surround es
estéreo).
ttSII (DVDfSiKti#) o
mTAmvmm -
m (DVD ' TV ' VCR^OFF) »
mm--
7tffií!¡A2gg^
ÍWI (Tv^) “
’ 5ÍÍÍ7t#HS
m (TV ' VCR ' 0FFÜ6DVD) »
PlitiB =
• “TV” »
chl/ch2iS!S (fflfflB$VSX-
D810S/D810S-G)
mTAmvim -
^ ° ëDVDŒSIitUe.lSffi
siJiMíichl : ^DVDIESIittì
i.imm
liS) ’ÍJíiíich2°
nm ■ ■
• “ch1” <■
40
En/Sp/ChH
MEMO:
• El valor inicial es “ch1
Page 41

Coaxial digital input setting
Here you tell the receiver what
component you have hooked up to
the coaxial digital input jack.
Press A or V to select the
coaxial digital input (DVD,
TV, CD, CD-R, VCR, or
OFF).
After you assign the component to
this digital jack whenever you
select that component, for
example a CD player, the receiver
will automatically change to the
digital input setting. You can see
this in the D1G1TA17ANALOG
indicator on the front of the
receiver.
MEMO:
• The initial setting is “DVD”.
Optical digital input 1 setting
Here you tell the receiver what
component you have hooked up to
the optical input jack 1.
Press A or V to select the
optical digital input 1 (DVD,
TV, CD, CD-R, VCR, or
OFF).
After you assign a component to
this digital jack whenever you
select that component, for
example a CD player, the receiver
will automatically change to the
digital input setting. You can see
this in the DIGITAIYANALOG
indicator on the front of the
MEMO:
• The initial setting is “CD”
Valor de la entrada digital
coaxial
Aquí puede decirle al receptor qué
aparato tiene conectado a la toma de
entrada digital coaxial.
Pulse A o V para seleccionar
la entrada digital coaxial
(DVD, TV, CD, CD-R, VCR u
OFF).
Después de que haya asignado el
aparato a esta toma digital,
siempre que seleccione ese aparato
(por ejemplo un reproductor de
CDs), el receptor cambiará
automáticamente al valor de la
entrada digital. Puede cerciorarse
de esto en el indicador DIGITAIV
ANALOG situado en la parte
frontal del receptor.
MEMO:
• El valor inicial es “DVD”.
Valor de la entrada digital
óptica 1
Aquí puede decirle al receptor qué
aparato tiene conectado a la toma de
la entrada digital óptica 1.
Pulse A o V para seleccionar
la entrada digital óptica 1
(DVD, TV, CD, CD-R, VCR u
OFF).
Después de que haya asignado el
aparato a esta toma digital,
siempre que seleccione ese aparato
(por ejemplo un reproductor de
CDs), el receptor cambiará
automáticamente al valor de la
entrada digital. Puede cerciorarse
de esto en el indicador DIGITAL/
ANALOG situado en la parte
frontal del receptor.
mnmimAmm
¡ím ’ mmum -
ÍSTa^vÍS^ . 5ÍíillÍlSi(
íuliA (DVD ' TV ' CD ' CDR'VCR^OFF) “
(ijajfSíiJKíí®°
tilEfflfiWDIGITAL/ANALOG (K
\mm)
íf ° '
Pliíafi ^ I
• “DVD” “
ítm ’ mm¡\m -
f4fÍA»ni№7tí«M« I
Í^Ta^vÍSÍH >
íiTliAl (DVD ' TV ' CD ' CDR'VCRiíOFF) »
'ñ ’ ’
í?ij®-éfCDíiSíti ’ mmmñ
li)Bj(»íiJ»í4liA!SS»
ÍÍIEMISWdigital/analog (Wí
íf »
№15 =
• “CD” «
MEMO:
• El valor inicial es “CD”.
41
En/Sp/ChH
Page 42

Optical digital input 2 setting
Here you tell the receiver what
component you have hooked up to
the optical input jack 2.
Press A or V to select the
optical digital input 2 (DVD,
TV, CD, CD-R, VCR, or
OFF).
After you assign a component to
this digital jack whenever you
select that component, for
example a CD player, the receiver
will automatically change to the
digital input setting. You can see
this in the DIG1TA17ANALOG
indicator on the front of the
MEMO:
• The initial setting is “CD-R”.
Optical digital input 3 setting
(VSX-D810S/D810S-G only)
Here you tell the receiver what
component you have hooked up to
the optical input jack 3.
Press A or V to select the
optical digital input 3 (DVD,
TV, CD, CD-R, VCR, or
OFF).
After you assign a component to
this digital jack, whenever you
select that component, for
example a CD player, the receiver
will automatically change to the
digital input setting. You can see
this in the DIG1TAI7ANALOG
indicator on the front of the
MEMO:
• The initial setting is “TV”.
Valor de la entrada digital
óptica 2
Aquí puede decirle al receptor qué
aparato tiene conectado a la toma de
la entrada digital óptica 2.
Pulse A o V para seleccionar
la entrada digital óptica 2
(DVD, TV, CD, CD-R, VCR u
OFF).
Después de que haya asignado el
aparato a esta toma digital,
siempre que seleccione ese aparato
(por ejemplo un reproductor de
discos compactos), el receptor
cambiará automáticamente al valor
de la entrada digital. Puede
cercionarse de esto en el indicador
D1G1TAI7ANALOG situado en la
parte frontal del receptor.
MEMO:
• El valor inicial es “CD-R”.
Valor de la entrada digital
ópticas (sóloVSX-D810S/
D810S-G)
Aquí puede decirle al receptor qüé
aparato tiene conectado a la toma de
la entrada digital óptica 3.
Pulse A o V para seleccionar
la entrada digital óptica 3
(DVD, TV, CD, CD-R, VCR u
OFF).
Después de que haya asignado el
aparato a esta toma digital,
siempre que seleccione ese aparato
(por ejemplo un reproductor de
CDs), el receptor cambiará
automáticamente al valor de la
entrada digital. Puede cerciorarse
de esto en el indicador DIGITAL/
ANALOG situado en la parte
frontal del receptor.
MEMO:
• El valor inicial es “TV”.
fiHA«P2№7cftllSy “
ÍSTa^víSIH -
ÜiliiA2 (DVD ' TV ' CD ' CDR'VCR^OFF) »
ffiíiSÍSPJAISiíiiíS P
'ñ ’ ’
mm—éícmmñ ’
ÜjBjiSSiJMíífiAfSS » ÍEÍgft
íilEffltfié^DIGITAL/ANALOG (St
'lfr£ °
№85 ^
• “CD-R” o
VSX-D810S/D810S-G)
íim ’ ^mmm -
fSfÍA«P3é<]7U«M “
©TA^VÍglS .
mmA3 (DVD ' TV ' CD ' CD-
R'VCR^OFF) »
TEfiíl»S№itf4«P№7cff
IÍIEHtfífi^DWITAL/ANAL0G|Í7K
’ ñJ»SlJa—íf?R “
№85 :
• “TV” °
42
En/Sp/ChH
Page 43

Setting the Volume Level of
each Channel (adjusting the
speaker volume balance)
Use to set the relative volume of each
channel.
1 Press RCV.
2 Press □□/DTS.
3 Press MASTER VOLUME + or
- to adjust the volume to an
appropriate level.
4 Press TEST TONE to output
the test tone.
The test tone is output in the
following order.
Configuración del nivel de
volumen de cada canal (ajuste
del balance de volumen en los
altavoces)
Use para establecer el volumen relativo de
cada canal.
1 Pulse RCV
2 Pulse Dn/DTS.
3 Pulse MASTER VOLUME + o-
para ajustar el volumen a un
nivel adecuado.
4 Pulse TEST TONE para oír el
tono de prueba.
Se escuchará el tono de prueba en el
orden siguiente.
1 íSTRCVÍgÍH»
2 íSTan/DISÍglB »
3 Í^TMASTER VOLUME
(ígM) +m-mm > íeí
-gqZ o
4 ATTEST TONE (iSEg
il) mm ’ îituisawii »
VSX-D710S/D710S-G
FL —► CT —
U
SW SL SR ◄-
• Test tone is only output in DD/DTS
modes. The test tone sequence
corresponds to the speaker setting
mode.
5 Adjust speaker levels so that
you hear the test tone at the
same volume from each
speaker when seated in the
main listening position.
• If a speaker is deselected in the
speaker setting mode (see p. 33)
then no test tone will be output for
that speaker.
• The channel level range is ± 10 dB.
• Levels can be set for each
surround mode.
6 Press TEST TONE to turn off
the test tone.
MEMO:
• Initial setting is 0 dB.
• Since the SUBWOOFER transmits
an ultra-low frequency its sound
may seem quieter than it actually is.
• The speaker volume can be
adjusted without outputting the
test tone by pressing
CH SELECT button.
• You can set each sound mode
individually and these settings are
completely independent of each
other. The sound modes you can
set include DSP, stereo, DVD 7.1
Ch and nn/DTS, as explained in
steps above. However, you can
only use the test tone feature when
setting DD/DTS.
CH LEVEL or
VSX-D810S/D810S-G
FR
• E1 tono de prueba sólo se reproduce en
los modos DO/UTS. La secuencia de
tonos de prueba corresponde al modo de
configuración de los altavoces.
5 Ajuste los niveles de los
altavoces de modo que oiga el
tono de prueba al mismo
volumen de cada altavoz cuando
esté sentado en la posición de
audición principal.
• Si se selecciona un altavoz en el modo de
configuración de los altavoces (véase la
pg. 33), no se reproducirá ningún tono
de prueba en ese altavoz.
• La gama de nivel del canal es ± 10 dB.
• Pueden establecerse niveles en cada
modo surround.
6 Pulse TEST TONE para
desactivar el tono de prueba.
MEMO:
• El valor inicial es 0 dB.
• Dado que el realzador de graves
transmite una frecuencia ultrabaja, su
sonido puede parecer más bajo de lo que
realmente es.
• El volumen del altavoz puede ajustarse
sin necesidad de tener que oír el tono de
prueba pulsando el botón
FL —► CT —► FR
U
SW
CH LEVEL o
CH SELECT.
• Puede configurar cada modo de sonido
individualmente y estos valores son
completamente independientes el uno
del otro. Los modos de sonido que
puede configurar incluyen el DSP,
estéreo, DVD 7.1 ch y DO/DTS, como se
ha explicado en los pasos anteriores. No
obstante, sólo puede utilizar el tono de
prueba cuando está configurando el □□/
DTS.
-> SR
SL
flttl «
SB
• Íít.l#P{lSttJ:tnn/DTS|l5^
5 ügíííieggasp, íiíi - éiá
- nmm
Mi
• ^IMS¥l5ll±iodB »
6 ATTEST TONEfêffl - il
mm--
• SSi^i^SUBWOOFER s
• fêTCH LEVEL (IMSzp) ^
CH SELECT (flîtîiif) S
• WSfSSS-Wlït > iis
: DSP ’ VUS ’ DVD7.1
SilfPDD/DTS ° ’ rrWIS
ÆDG/DTS0# > VVTÎIJfflMMW
En/Sp/ChH
IIJ
43
Page 44

1^ Displays & Controls Pantallas y controles
Remote Control Mando a distancia
T
d>(D
d)—111 © © © J
^ CD CD CD
ñ
----------
]—[([0 0 © 0^11
f CD CD CD ]
I I MIDNIGHT 5.1/7.1 ATT
<D CD ^
CD CD/(g^
^ DTVINFO MPXmETURN DACCESS GUIDE
<D CD CD CD'
[(§) (S) <s> @>J
^ UU/DTS ~B5P~ TEST TONE SIGNAL SELECT;
OOP о
o)
© SOURCE (!) button
Use to turn on/off other components
connected to the receiver.
@ MULTI CONTROL buttons
Use to put the receiver/remote control
in the stated mode.
For other equipment controls, see
“Controlling the Rest of Your System”
on pages 69-85.
© RCV button
Use this button when setting up the
surround sound for the receiver. Also
press it if you want to use special
features attached to some of the
number buttons, for example
MIDNIGHT, 5.1/7.1, EFFECT +/- or
ATT.
© NUMBER/MODE buttons
Use the number buttons to select the
radio frequency in tuner DIRECT
ACCESS (see page 64) mode or the
tracks in CD, DVD mode etc.
Also, buttons marked with the
following names have special
functions. If you try to use one of
44
En/Sp/ChH
f^tO/ÌGGr
© Botón SOURCE (1)
Utilícelo para encender/apagar otros
componentes conectados al receptor.
@ Botones MULTI CONTROL
Utilícelos para poner el receptor/mando
a distancia en el modo indicado.
Para los controles de otros equipos,
consulte "Control del resto de su
sistema" en las pg. 69-85.
@ Botón RCV
Utilice este botón al configurar el
sonido surround para el receptor.
Asimismo púlselo si desea utilizar las
características especiales incluidas en
algunos de los botones numerados, por
ejemplo, MIDNIGHT, 5.1/7.1, EFFECT
+/- o ATT.
® Botones NUMERADOS/MODE
Utilice los botones numerados para
seleccionar la frecuencia de radio en
modo de sintonizador DIRECT ACCESS
(consulte la pg. 64) o las pistas en
modo de CD, DVD, etc.
Además, los botones marcados con los
siguientes nombres tienen funciones
especiales. Si intenta utilizar una de
estas funciones pero la pantalla
parpadea significa que esa función no
puede utilizarse en el modo en que se
©SOURCE (5
(wmm) mm
mnm/mmmmmmmmm
(D
MULTI CONTROL
’ #r^^69-85
@ RCViSIB
H# > tiiusTittffi«:
MIDNIGHT ' 5.1/7.1 ' EFFECT +/-
^ATT o
©NUMBER/MODE SIS
ACCESS (SSm) Hit (M^64
H) » DVD
: ts.ich (vsx-
D710S/D710S-G) /7,lCh (VSXD810S/D810S-G) M
Page 45

these functions but the display flashes
it means that function cannot be used
in the current mode (for example DSP
modes cannot be used when 5.1 Ch
(VSX-D710S/D710S-G)/ 7.1 Ch (VSX-
D810S/D810S-G) setting is on).
MIDNIGHT button (see page 62)
Use to put receiver in MIDNIGHT
mode. To use first press the RCV
button then operate this button.
5.1/7.1 button (see page 61)
(VSX-D710S/D710S-G is 5.1 Ch/VSXD810S/D810S-Gis 7.1 Ch).
When the DVD/LD or DVD 5.1/7.1
Ch function is selected each press
switches the DVD/LD input between
DVD/LD and DVD 5.1/7.1 Ch. To use
first press the RCV button then
operate this button.
ATT button
When the overload indicator lights
use this button to attenuate (lower)
the level of an analog input signal and
prevent distortion. To use first press
the RCV button then operate this
button.
EFFECT +/- buttons (see page 59,
60)
Use to add or subtract the amount of
effect in different DSP sound modes
(except 6 Ch Stereo for VSX-D810S/
D810S-G only) or advanced listening
modes.
To use first press the RCV button then
operate these buttons.
d) THE FOLLOWING BUTTONS
ARE BOTH CONTROLS FOR
OTHER COMPONENTS (LIKE A
DVD PLAYER) AND DEDICATED
TUNER CONTROLS. THE TUNER
CONTROLS ARE EXPLAINED
HERE. YOU CAN USE THEM
AFTER YOU HAVE PUSHED THE
TUNER MULTI CONTROL
BUTTON.
BAND button (see pages 63-65)
Use to switch between the AM and
FM band when in TUNER mode.
CLASS button (see page 66-67)
Use to switch between the three
banks (classes) of station memories.
MPX/RETURN button (see page 64)
Use to switch between auto stereo
and mono reception of FM
broadcasts. If the signal is weak then
switching to MONO will improve the
sound quality.
encuentra (por ejemplo los modos DSP
no pueden utilizarse cuando la
configuración 5.1 Ch (VSX-D710S/
D710S-G)/ 7.1 Ch (VSX-D810S/D810SG) está activada).
Botón MIDNIGHT (consulte la pg.
62)
Utilícelo para poner el receptor en
modo MIDNIGHT. Para utilizarlo pulse
primero el botón RCV y a continuación
este botón.
Botón 5.1/7.1 (consulte la pg. 61)
(Para el VSX-D710S/D710S-G es 5.1
Ch/para el VSX-D810S/D810S-G es 7.1
Ch).
Cuando está seleccionada la función
DVD/LD o DVD 5.1/7.1 Ch cada
pulsación cambia la entrada DVD/LD
entre DVD/LD y DVD 5.1/7.1 Ch. Para
utilizarlo pulse primero el botón RCV y
a continuación opere este botón.
Botón ATT
Cuando el indicador de sobrecarga se
ilumine utilice este botón para atenuar
(reducir) el nivel de una señal de
entrada analógica y evitar la distorsión.
Para utilizarlo pulse primero el botón
RCV y a continuación opere este botón.
Botones EFFECT+/- (consulte la pg.
59, 60)
Utilícelos para añadir o restar la
cantidad de efecto en diferentes modos
de sonido DSP (excepto 6 Ch estéreo,
sólo para el VSX-D810S/D810S-G) o
modos de audición avanzada.
Para utilizarlo pulse primero el botón
RCV y a continuación opere estos
botones.
(D LOS SIGUIENTES BOTONES
SON TANTO CONTROLES PARA
OTROS COMPONENTES (UN
REPRODUCTOR DVD, POR
EJEMPLO) COMO CONTROLES
DEL SINTONIZADOR DEDICADOS.
A CONTINUACIÓN SE EXPLICAN
LOS CONTROLES DEL
SINTONIZADOR. PUEDE
UTILIZARLOS DESPUÉS DE HABER
PULSADO EL BOTÓN MULTI
CONTROL DEL SINTONIZADOR.
Botón BAND (consulte las pg. 63-65)
Utilícelo para cambiar entre la banda de
FM y la de AM cuando esté en modo
TUNER.
Botón CLASS (consulte la pg. 66-67)
Utilícelo para cambiar entre las tres
categorías (clases) de memorias de emisora.
Botón MPX/RETURN (consulte la pg.
64)
Utilícelo para cambiar entre recepción
auto estéreo y monoaural de
transmisiones de FM. Si la señal es débil
el cambio a MONO mejorará la calidad
del sonido.
MIDNIGHT
mm
(MH62
H)
ffl ígl|í(tÍBSÍ;MIDNIGHHTtl îÇ “ ’ ÆSTRCVgffi ’ ñ
5.i/7.ichfêifl
(VSX-D710S/D710S-G:^5.1CH >
VSX-D810S/D810S-Gg7. ICH )
#SÆDVD/LDâS(DVD5.1/7. le
H# ’ ’ fiDVD/LDflAi
DVD/LD#íDVD5.1/7. lch;¿rBlt7I^ »
mmeiM)
’ ÆSTRcvfêffi ’ mmm
ATTísia
m ’ iumm mm m«AiSM
TRCVÍSffl ’ “
EFFECT+/- (5KS)
mm mmeo
M)
^ |S] WdSP#®tlí'í ( VSX-D81 OS/
D810S-GK6chV^S ’
mmnmm'mMM » iíjib# >
/feSTRcvgffi ’
$ñ o
(D (5DDVDS
mm)
ñ’ :^miÉ№Mmmm
BAND
om) mm
M) ÎÏTUNER .
fflS$®}ÍAMíDFM»g °
CLASS (SS) fôia
mtmmmmñú im)
^ o
M^PX/RETURNfôia (^IS64H)
SífBiî ° ’ LU^jiJmono
°
(Mnea-es
(^m66-67M)
En/Sp/ChH
45
Page 46

D. ACCESS button (see page 65)
Use to directly access a radio station
by pressing the number of the station
you want.
DTV INFO button
Use to bring up information screens
on a digital TV.
DTV MENU button
Use to bring up menus on a digital TV.
DTV ON/OFF button
Use to turn a digital TV on/off.
GUIDE button
Use to bring up the guides on a digital
TV.
(6) □□ /DTS button (see pages 54-
55, 58-59)
Use to put the receiver in DOLBY
DIGITAL, DOLBY SURROUND and
DTS modes. To use first press the
RCV button then operate this button.
DSP button (see pages 55, 56, 60)
Use to put receiver in one of the DSP
modes. To use first press the
button then operate this button.
TEST TONE button (see page 43)
Use to sound the TEST TONE when
setting up the surround sound of the
receiver (the DD/DTS mode must be
on). To use first press the RCV button
then operate this button.
SIGNAL SELECT (see page 56-58)
Use to select the proper signal (analog,
digital) for the source your are
inputting. On the VSX-D810S/D810SG receivers there is an AUTO setting.
In this setting the receiver will
automatically switch between the
analog and digital signals according to
what is being input. If both signals are
input the AUTO setting will choose the
digital one. This setting is convenient
as the receiver will always choose the
best or appropriate signal. To use first
press the
button.
(Z) CH SELECT button (see page
43)
Use to select a speaker when setting
up the surround sound of the
receiver.
CH LEVEL +/- (see page 43)
Use to set up the levels of the
surround sound of the receiver.
FUNCTION button
Use to select the playback or record
ing source. This button lets you cycle
through the different functions of the
receiver in the following order: CD,
TUNER, AUX, CDR/TAPE, VCR/DVR,
DVD/LD, DVD 7.1 ch, VIDEO, and
TV/SAT (VSX-D810S/D810S-G).
CD, TUNER, AUX, CDR/TAPE, VCR/
DVR, DVD/LD, VIDEO, and TV/SAT
40 (VSX-D710S/D710S-G).
En/Sp/ChH
RCV button then operate this
RCV
Botón D. ACCESS (consulte la pg. 65)
Utilícelo para acceder directamente a
una emisora de radio pulsando el
nùmero de la emisora que desea.
Botón DTV INFO
Utilícelo para consultar las pantallas
de información en un televisor digital.
Botón DTV MENU
Utilícelo para consultar menús en un
televisor digital.
Botón DTV ON/OFF
Utilícelo para encender/apagar un
televisor digital.
Botón GUIDE
Utilícelo para consultar las guías de
un televisor digital.
(6) Botón DG/DTS (consulte las pg.
54-55, 58-59)
Utilícelo para poner el receptor en modos
DOLBY DIGITAL, DOLBY SURROUND y
DTS. Para utilizarlo, pulse el botón RCV en
primer lugar y a continuación opere este
botón.
Botón DSP (consulte las pg. 55, 56, 60)
Utilícelo para poner el receptor en uno de
los modos DSP Para utilizarlo, pulse el
botón RCV en primer lugar y a
continuación opere este botón.
Botón TEST TONE (consulte la pg. 43)
Utilícelo para hacer sonar el tono de
pmeba al configurar el sonido surround
del receptor (el modo DD/DTS debe estar
activado). Para utilizarlo, pulse el botón
RCV en primer lugar y a continuación
opere este botón.
SIGNAE SELECT (consulte la pg. 56-58)
Utilícelo para seleccionar la señal adecuada
(analógica, digital) para la fuente que está
introduciendo. En los receptores VSXD810S/D810S-G existe una característica
AUTO. En esta posición el receptor
cambiará automáticamente entre las señales
analógicas y digitales de acuerdo con la
entrada existente. Si se introducen ambas
señales la característica AUTO elegirá la
entrada digital. Esta característica es
conveniente ya que el receptor elegirá
siempre la señal más apropiada o mejor.
Para utilizarlo, pulse el botón RCV en
primer lugar y a continuación opere este
botón.
© Botón CH SELECT (consulte la
pg- 43)
Utikcelo para seleccionar un altavoz al
configurar el sonido surround del receptor.
CH LEVEL +/- (consulte la pg. 43)
Utilícelo para configurar los niveles del
sonido surround del receptor.
Botón FUNCTION
Utilícelo para seleccionar la fuente de
reproducción o grabación. Este botón le
permite pasar a través de las distintas
funciones del receptor en el siguiente
orden: CD, TUNER, AUX, CDR/TAPE,
VCR/DVR, DVD/LD, DVD 7.1 ch, VIDEO
y TV/SAT (VSX-D810S/D810S-C).
CD, TUNER, AUX, CDR/TAPE, VCR/DVR,
DVD/LD, VIDEO y TV/SAT (VSX-D710S/
D710S-G).
D.ACCESS (B}gjMi5) mm mm
65M)
DTV INFO igffl
DTV MENU {wmmwmmm isia
DTV ON/OFF
mm
GUIDE (mm) mm
® DD/DTS }gia (E^54-55M -
^58-59H)
DIGITAL
() ’ DOLBY SURROUND
H# ’ ^jSTRcvgffl ’ B'iknmw
DSPiSia (^^55,56,60H)
’ ifeSTRcvg» ’ m'm
TEST TONE (KISgll) }gia (M
^43«)
TONE mn » ’
^iSTRcvgffl ’
ffi °
SIGNAL SELECT (iSsH^MS) (M IB56-58H)
(Hit ' Stii) »VSX-D810S/
D810S-Gig№^WAUT0 (gij)
» S^Mflfaf^lPfiASijAUTO >
(nn/DTs
»mmum
TRCVSffi ’ «
® CH SELECT (Siiii»)
(^^43«)
o
CH LEVEL (»5i«q2) +/43«)
FUNCTION (lOlg) sia
mimmmmmmmmm» as®
: CD > TUNER ’ AUX >
CDRAAPE ’ VCR/DVR ’ DVD/LD >
DVDT.lch ’ VIDEOfPTV/SAT (VSXD810S/D810S-G) »
CD > TUNER > AUX > CDR/TAPE » VCR/
DVR > DVD/LD > VIDEOffiTV/SAT
(VSX-D710S/D710S-G) »
mm
’ mmwm
(mm
Page 47

® LOUDNESS button
Use to switch on the loudness. This
feature is useful for getting good bass
and treble sounds listening at low
volumes.
FL DIMMER button
Use this button to make the fluores
cent display (FL) dimmer or brighter.
There are three brightness settings as
well as an off setting.
SETUP button (see page 70-79)
Use this button when setting up the
remote control to control other
components.
MUTING button
Use to mute the sound or restore the
sound if it has been muted.
® THE FOLLOWING BUTTONS
ARE DEDICATED TV CONTROL
BUTTONS. THEY ARE ONLY USED
FOR CONTROLLING YOUR TV.
TV FUNC button
Use to select the TV function.
TV (1) button
Use to turn on/off the power of the TV
TV VOLUME +/- buttons
Use to adjust the volume on your TV.
® MENU button
Use to access different menus
associated with your DVD player. To
use first press the DVD button then
operate this button.
O MASTER VOLUME +/- buttons
Use to set the overall listening volume.
® CHANNEL +/- buttons
Use to skip tracks backward or
forward on CDs, DVDs, etc and
change channels on the VCR, DVR, etc.
® <> A V ( TUNE/ST +/-) &
ENTER buttons (see pages 29-42)
Use these arrow buttons when setting
up your surround sound system (see
pages 29-43). These buttons are also
used to control DVD menus/options
and for deck 1 of a double cassette
deck player (see pages 80-81). The
TUNE/ST +/- buttons can be used to
find radio frequencies and preset
stations, respectively (see pages 63-67).
® DISC button
Use to select a disc and a multi-CD
player. To use first press the CD
button then operate this button.
® RECEIVER (1) (POWER) button
This switches between STANDBY
mode and power ON for this receiver.
® LED DISPLAY (see pages 70-79)
This display flashes when a command
is sent from the remote control to the
receiver. It also flashes at other times,
for example when teaching the receiver
preset codes, with specific meanings.
® Botón LOUDNESS
Utilícelo para activar el realzador. Esta
característica es útil para obtener buenos
sonidos graves y agudos a bajos
volúmenes.
Botón FL DIMMER
Utilice este botón para que la pantalla
fluorescente (FL) se haga más tenue o más
brillante. Hay tres posiciones de brillo
además de una posición de apagado.
Botón SETUP (consulte las pg. 70-79)
Utilice este botón al configurar el mando a
distancia para controlar otros
componentes.
Botón MUTING
Utilícelo para silenciar el sonido o restaurar
el sonido si ha sido silenciado.
® LOS SIGUIENTES BOTONES ESTÁN
DEDICADOS AL CONTROL DEL
TELEVISOR. SÓLO SE UTILIZAN
PARA CONTROLAR SU TELEVISOR.
Botón TV FUNC
Utilícelo para seleccionar la función de TV.
Botón TV O
Utilícelo para encender/apagar la
alimentación del TV.
Botones TV VOLUME +/-
Utilícelos para ajustar el volumen de su
TV.
® Botón MENU
Utilícelo para acceder a diferentes menús
asociados con su reproductor de DVDs.
Para utilizarlo, pulse primero el botón
DVD y a continuación, opere este botón.
(Q) Botones MASTER VOLUME +/-
Utilícelos para ajustar el volumen de
audición general.
® Botones CHANNEL +/-
Utilícelos para saltar por las pistas
sucesivas o anteriores en CDs y DVDs, etc.
y para cambiar canales en el vídeo, DVR,
etc.
® Botones O A V (TUNE/ST +/-) y
ENTER (consulte las pg. 29-42)
Utilice estos botones de flechas al
configurar su sistema de sonido surround
(consulte las pg, 29-43). Estos botones
también se usan para controlar los mentis/
opciones de DVD y para la unidad 1 de
una platina de doble casete (consulte las
pg. 82-83). Los botones TUNE/ST +/pueden utilizarse para encontrar
frecuencias de radio y presintonías
respectivamente (consulte las pg. 63-67).
® Botón DISC
Utilícelo para seleccionar un disco en un
reproductor de CDs múltiples. Para
utilizarlo pulse primero el botón CD y a
continuación opere este botón.
© Botón RECEIVER CD (POWER)
Éste cambia entre el modo de espera
(STANDBY) y ENCENDIDO para este
receptor.
® Pantalla del LED (consulte las pg. 70-
79)
Esta pantalla parpadea cuando se envía un
comando desde el mando a distancia hasta
el receptor. También parpadea en otras
ocasiones, por ejemplo, al memorizar en el
receptor códigos predefinidos con
significados específicos.
d) LOUDNESS (i^Jg)
mm
mmrm&mm«
'a'fPiRj'a' ’ °
FL DIMMER
(fl) m
SETUP (iSB) mm (m^7o-/9 i
M)
MUTING (ifg)
mm
(D
TV FUNC
TV o (wsn)
mm
TV VOLUME +/- (BTiiiwM)
©MENU
amm) mm
MS ° ’
mm
mm
O MASTER VOLUME +/- (iM)
SiB«
® CHANNEL +/- (^ii) mm«
' DVD±e^
tIjI ’ aiMkMVCR ' DVR#±fl^S
© <> AV
flisffi« (m^29-43M)
tS (M®84-85i;) ° TUNE/ST ■ +/-
(TUNE/ST+/-) (il
«ENTER (iiA)
(M^29-42M)
mm
mmmimmimimmmmi
(MS63-671:) “
® DISC (^1«) iSiS
mmmmmammcDmm
® RECEIVER (1) (POWER) (SM 0 (WJ^) ) Jgifl »
IIS;«*?® jg
a»
® LED DISPLAY (LED 115^) (M
mio-im)
B# ’ IgUTurAlil» SfiffiBgrEH ’ ^
; \mw:
47
En/Sp/ChH
Page 48

ES
Front Panel
Panel frontal
(VSX-D710S/D710S-G DVD5.1CH button)
(Botón DVD 5.1 canales del VSX-D710S/D710S-G)
© STANDBY indicator
Lights when the receiver is in standby
mode (note that the receiver
consumes a small amount of power
(IW) in standby mode).
@ A OFF/ * ON (Main power)
button
If the button is OFF (A), the power
of the receiver is shut off and the
STANDBY/ON button on the receiver
or the RECEIVER (I) button on the
remote control do not function.
Pressing the button again will turn
the receiver ON (.») and the receiver
enters the standby mode. In the
standby mode, you can turn on the
receiver using (J) STANDBY/ON
button on the receiver or the
RECEIVER O button on the remote
control.
C!) STANDBY/ON button
Switches the receiver between on and
standby (note that the receiver
consumes a small amount of power
(IW) in standby mode).
@ STATION (+/-) buttons (see
pages 66-67)
Selects station memories when using
the tuner.
© TUNING (+/-) buttons (see
pages 63)
Selects the frequency when using the
tuner.
® DIRECT button
Use to switch DIRECT playback on or
off. This mode bypasses the tone
controls, channel levels, DD/DTS and
DSP modes for the most accurate
reproduction of a program source.
48
En/Sp/ChH
© Indicador STANDBY
Se enciende cuando el receptor está en
modo de espera (standby). Recuerde
que el receptor sigue consumiendo
una pequeña cantidad de electricidad
(1 W) cuando está en modo de espera.
@ Botón A OFF/ * ON
(desactivación/activación)
Si el botón está en OFF (A), la
alimentación del receptor está
desconectada y el botón (J)
STANDBY/ON del receptor o el
RECEIVER (I) del mando a distancia
no funcionan. Cuando vuelva a pulsar
el botón, se encenderá el receptor (*)
y éste entrará en el modo de espera.
En el modo de espera puede encender
el receptor utilizando el botón
O STANDBY/ON del receptor o
RECEIVER (!) del mando a distancia.
Botón (O STANDBY/ON)
Hace que el receptor cambie entre el
modo de espera y el encendido.
Recuerde que el receptor sigue
consumiendo una pequeña cantidad
de electricidad (1 W) cuando está en
modo de espera.
© Botones STATION (+/-)
(consulte las pg. 66-67)
Selecciona las memorias de estación al
utilizar el sintonizador.
© Botones TUNING (+/-) (consulte
la pg. 63)
Selecciona la frecuencia cuando se
utiliza el sintonizador.
© Botón DIRECT
Utilícelo para activar o desactivar la
reproducción directa. Este modo
ignora los controles del tono, los
niveles de canal así como los modos
□□/DTS y DSP para ofrecerle la
reproducción más precisa de una
fuente de programa.
©STANDBY («ffl)
(iftt* ’ íEíiffliistT ’
dw) ) «
©MOFF (H) /-ON (H) (í«
s)
mm
msoFF (M)
ISIfl ’ STANDBY/
ON (íiffl/fTSi)
^RECEIVER O (íi№ O) S
&pm\m » niKìicrrnm >
tͱS^CD STANDBY/ONlgffigSc^
eH±0^RECEIVER Ogffl ’ fT
O STANDBY/ONJgíH
(IW) ) O
©STATION (+/-) («S) ÍSÍB
(M^66-67H)
’ as«iÉíKtt
© TUNING (+/-) (lili)
©DIRECT (¡Kg) mm
ít:i5i^a^i3gíi5ij ' «ii«© '
□□/dtsRdspIIíí >
mmmm °
mm
■> ftfl
Page 49

® MONITOR button
Press to switch tape monitoring on/
off.
® DIGITAL NR button (VSXD810S/D810S-G)
Switches the DIGITAL NR on or off.
To reduce extraneous noise switch on
DIGITAL NR.
DVD5.1CH button (VSX-D710S/
D710S-G) (see page 61)
On the VSX-D710S this button
switche between DVD5.1Ch input
and regular DVD input.
® DSP button (see page 56, 60)
Use to switch between the various DSP
modes available (HALL1, HALL 2,
JAZZ, DANCE, THEATER1,
THEATER 2, 5/6CH STEREO [VSX-
D810S/D810S-G only]) and DSP off.
Use this button to create different
surround sound effects from any stereo
source.
@ Remote sensor
Receives the signals from the remote
control.
® SIGNAL SELECT button (see
page 56-58)
Use to select an analog or digital or
AUTO (VSX-D810S/D810S-G only)
signal.
© DD/DTS button (see pages 5455, 58-59)
Use to switch between the various
□□/DTS surround modes.
® TONE button
This button allows you to activate the
BASS & TREBLE controls. To adjust
the BASS and/or TREBLE use the
MULTI JOG dial. Tone can only be
used in 2 channel stereo sound mode.
The tone controls have no effect on
the B speaker system.
® MULTI JOG dial
You can use this dial for two pur
poses. Firstly, in normal mode turn it
to select a source component.
Secondly, use it to adjust the BASS
and/or TREBLE levels when the
TONE button has been activated (as
explained above).
@ MASTER VOLUME
Use to set the overall listening
volume.
©VIDEO INPUT jacks
Connect a video camera, video game
system, etc. to the VIDEO INPUT
jacks (refer to page 17).
® Botón MONITOR
Pulse para activar/desactivar la
monitorización de la cinta.
® Botón DIGITAL NR (VSXD810S/D810S-G)
Activa y desactiva el DIGITAL NR.
Para reducir ruidos extraños, active el
DIGITAL NR.
Botón DVD5.1 CH (VSX-D710S/
D710S-G) (consulte la pg. 61)
En el VSX-D710S, este botón cambia
entre la entrada DVD5.Ich y la
entrada normal del DVD.
® Botón DSP (consulte las pg. 56,
60)
Utilícelo para cambiar entre los
modos de sonido DSP disponibles
(HALLI, HALL 2, JAZZ, DANCE,
THEATER1 o THEATER 2, 5/6CH
STEREO [sólo VSX-D810S/D810SG] y DSP off). Utilice este botón para
crear diferentes efectos de sonido
surround desde cualquier fuente
estéreo.
® Sensor remoto
Recibe las señales del mando a
distancia.
® Botón SIGNAL SELECT
(consulte la pg. 56-58)
Utilícelo para seleccionar una señal
analógica o digital o AUTO (sólo
VSX-D810S/D810S-G).
O Botón DD/DTS (consulte las pg.
54-55, 58-59)
Utilícelo para cambiar entre los
diferentes modos surround DD/DTS.
® Botón TONE
Este botón le permite activar los
controles BASS (graves) y TREBLE
(agudos). Para ajustar los graves y/o
los agudos, utilice el dial MULTI JOG.
El tono sólo puede utilizarse en el
modo de sonido estéreo de 2 canales.
Los controles de los tornos no afectan
al sistema de altavoces B.
® Dial MULTI JOG
Puede utilizar este selector (dial) para
dos fines: en modo normal puede
hacerlo girar para seleccionar un
componente fuente y, cuando el
botón TONE ha sido activado
también puede utilizarlo para ajustar
los niveles de BASS (graves) y/o
TREBLE (agudos) como se ha
explicado anteriormente.
® MASTER VOLUME
Utilícelo para establecer el volumen
general de audición.
© Tomas VIDEO INPUT
Conecte una cámara de vídeo,
videojuego, etc a las tomas VIDEO
INPUT (consulte la pg. 17).
® MONITOR (Kii)
©DIGITAL NR
mm
imiumm) mm
(VSX-D810S/D810S-G)
fTHflsSclifflDIGITAL NR » UWi.'P^
^fltin.ì^ÌTIlDIGITAL NR (gtfi
°
um.icmm
(vsx-d7ios/d7ios-
G) (^S61M)
VSX-D710S jitfèfflffiDVDS.lchflA
® DSPJgffl (Mlg55 . 56BSH60
(HALL 1
(Am 1) 'HALL 2
(xm
2) '
JAZZ (ll±) ' DANCE (^SS) '
THEATER 1
{mm
1) 'THEATER2
(RPf 2) ' 5/6CH STEREO (5/
eCHiZilB) niffll5$VSX-810S/
D810S-G] ) ftHRSDSP »
ffi ’
® SINGAL SELECT (Silici») ®
ifl (MH56-58M)
mrMimmimmmmmm
AUTO (gfil) (iifflii^VSXD810S/D810S-G) »
O nn/DTSigia (Mlg54-55M > M
58-59M)
©TONE (esi) im
T^SiinlitigBASS&TREBLE (Mn
iHissw) mil - siilffBAssfp / m
TREBLE ’ nJj^^MULTI JOG (#T/j
mwM) mm » nmimmmm
©MULTI JOG
mm
tmm-imm ■■
> tTONE (#il)
là ’ fflS^iigiSBASSTPMTREBLEfl:
iuwnmm)
® MASTER VOLUME (±S«)
® VIDEO INPUT (iliiilA)
VIDEO INPUTffin (#1^17
mu
49
En/Sp/ChH
Page 50

ED
® MIDNIGHT button (see page
62)
Use when listening to movie
soundtracks at low volume. This feature
will enable you to hear quiet sounds
and not get jolted by loud or sudden
sound effects.
© SPEAKERS button
Use to switch the speaker system A
B -► A+B -► off. In B and A+B
speaker modes you hear only 2 channel
stereo sound.
® MPX button (see page 64)
If there is interference or noise during
a FM radio broadcast, or the radio
reception is weak, press the MPX
button to switch the receiver into
mono reception mode. This should
improve the sound quality and allow
you to enjoy the broadcast.
® BAND button (see page 63-67)
Press to select the AM or FM band.
@ MEMORY button (see page 66)
Press to memorize a station for recall
using the STATION (+/-) buttons.
@ CLASS button (see pages 66)
Switches between the three banks
(classes) of station memories.
©PHONES jack
Use to connect headphones but this
does not switch the speakers off.
® Botón MIDNIGHT (consulte la
Pg- 62)
Utilícelo al escuchar bandas sonoras
de películas a bajo volumen. Esta
característica le permitirá oír sonidos
de manera más tranquila y que
efectos de sonido repentinos o de alto
volumen no le sobresalten.
© Botón SPEAKERS
Utilícelo para hacer cambiar al
sistema de altavoces A —► B -► A+B
-► apagado. En los modos de altavoz
B y A+B escuchará sólo sonidos
estéreo de dos canales.
® Botón MPX (consulte la pg. 64)
Si hay interferencias o ruidos durante
una emisión de radio FM, o si la
recepción de la radio es débil, pulse el
botón MPX para hacer cambiar el
receptor al modo de recepción
monoaural. Esto debería mejorar la
calidad de sonido y permitirle
disfrutar más de la emisión.
® Botón BAND (consulte las pg.
63-67)
Pulse para seleccionar la banda AM o
EM.
@ Botón MEMORY (consulte la pg.
66)
Pulse para memorizar una emisora y
poderla llamar de nuevo utilizando
los botones
® Botón CLASS (consulte la pg.
66)
Cambia entre los tres bancos (clases)
de memorias de emisoras.
@ Toma PHONES
Utilícela para conectar auriculares,
aunque esta toma no apaga los
altavoces.
STATION {+/-).
©MIDNIGHT (¥Mi) íSiB mm
62
M)
mmmmm »
® SPEAKERS Jgffl
^off ° >
©Mpxísifl
iñmem)
’ íiigTwipxsa ;
« ’ mitMmmmwmm °
® BAND (»©) ígffi (M^63-67 M)
STííPam^fmS® »
@ MEMORY (I5ti) mm (MH66
W)
(«é) mm ’ »
©CLASS
: ffifflSTATlON (+/-)
(«)
mm (^m66M)
im) WMÉíisti»
@ PHONES JiP
mmimm ’ m-mwmm
50
En/Sp/ChH
Page 51

Display
Pantalla
I/TnS
0)
SIGNAL SELECT -i
□□ DIGITAL DTS
ANALOG DIGITAL-I
© SIGNAL SELECT indicators
Light to indicate the type of input
signal assigned for the current
component (see “Front Panel“, ®
SIGNAL SELECT). When the AUTO
setting is being used on the VSXD810S/D810S-G receiver a set of
brackets will appear around the
SIGNAL SELECT indicators.
□□DIGITAL : Lights when a Dolby
Digital signal is played.
DTS: Lights when a source with DTS
audio signals is played.
ANALOG : Lights when an analog
signal is selected.
DIGITAL ; Lights when a digital audio
signal is selected.
[ ]: Lights when the AUTO setting is
selected. (VSX-D810S/D810S-G only)
@ DTS indicator
Lights when DTS mode is being used.
@ □□ DIGITAL indicator
When the DG/DTS mode of the
receiver is on, this lights to indicate
playback of a Dolby Digital signal.
However, □□ PRO LOGIC lights
during two channel playback of
Dolby Digital.
® Surround Back indicator (VSX-
D810S/D810S-G only)
Lights when most Surround Back
channel flag encoded (6.1 channel)
software is playing. (With some
Surround Back channel software the
surround back indicator won’t light
because there is no flag encoded in the
software.) If you play DTS 5.1/6.1
channel software surround sound will
be heard whether it is encoded with a
surround back channel flag or not.
cH«
(6) 0
□□DIGITAL SB • ATT DIRECT MONITOR
□□PRO LOGIC DSP*—s ^MIDNIGHT^SP ► A TUNED
© Indicadores SIGNAL SELECT
Se encienden para indicar el tipo de
señal de entrada asignado al aparato
actual (consulte "Panel frontal", ®
SIGNAL SELECT). Cuando se esté
utilizando el valor AUTO en el
receptor VSX-D810S/D810S-G, verá
aparecer una serie de escuadras
alrededor de los indicadores SIGNAL
SELECT.
□□DIGITAL : Se enciende al
reproducirse una señal en Dolby
Digital.
DTS; Se enciende al reproducirse
señales audio DTS.
ANALOG ; Se enciende cuando hay
una señal analógica seleccionada.
DIGITAL : Se enciende cuando hay
una señal digital seleccionada.
[ ]: Se enciende cuando está
seleccionada la señal AUTO (sólo
VSX-D810S/D810S-G)
@ Indicador DTS
Se enciende mientras se esté
utilizando el modo DTS.
© Indicador □□ DIGITAL
Cuando esté activado el modo □□/
DTS del receptor, este indicador se
enciende para indicar la reproducción
de una señal Dolby Digital. Sin
embargo, □□
encenderá durante la reproducción en
dos canales del Dolby Digital.
® Indicador de surround posterior
(sólo VSX-D810S/D810S-G)
Se enciende por lo general cuando se
está reproduciendo software
codificado (6.1 canales) marcado para
surround posterior. (El indicador de
surround posterior no se encenderá
con algún software para canales
surround posteriores si no hay una
marca codificada en el software). Si
está reproduciendo software para DTS
5.1/6.1 canales, el sonido surround se
oirá esté o no codificado con una
• DNR
PRO LOGIC se
LOUDNESS |MONO STEREO
© SIGNAL SELECT (fisiìiii)
fWM®» (M “lEffifi” ©LISI
ìli?) o tAUTO (Èlù)
VSX-D81OS/D81OS-GgJjfttl0# > ft
□□DIGITAL : 'tÌSSSittLt
DTS :
o
ANALOG mil) :
DIGITAL (»li) :
[ ] • °
( iiffl Si: VSX-D810S/D81OS-G ) »
@ DTSfi^x^
@ dddigital mm mmm
#®4i(ÌÌ2/DTS|IAIir0t ’
PRO LOGICffi^ °
D810S/D810S-G)
(6.1»ÌI) (fi
mmkmmmmmtm - mm
©ÌS “ $nSifSSiDTS5.i/6.i#ìii:
fi ’
MSSìitii
dB
ÌM
’ ft
Pi □□
51
En/Sp/ChH
Page 52

(D OVERLOAD indicator
This lights when an analog signal is
too high (the SIGNAL SELECT would
have to be on ANALOG). It indicates
the sound is distorting and the input
signal should be reduced.
® ATT indicator
Lights when ATT is used to attenuate
(reduce) the level of the input signal
(can only be used in ANALOG
mode).
® DIRECT indicator
Lights when source DIRECT is in use.
This function bypasses all tone,
balance, DSP and Dolby Surround
effects.
® SPEAKER indicator
Shows if the speaker system is on or
not. SP ► A means that speakers are
switched on. SP ► means that
speakers are switched off.
® MONITOR indicator
Lights when MONITOR is selected.
Used to hear a recording as it's being
made (see page 68).
® CHARACTER display
Shows the radio frequency or
function (DVD/LD, CD, etc.) receiver
is using .
O □□ PRO LOGIC indicator
When the Dn/DTS mode of the
receiver is on, this lights to indicate
playback of a two channel source.
® DNR indicator (VSX-D810S/
D810S-G only)
Lights when the digital noise
reduction is on. Use to reduce
extraneous noise. It can be used with
any sound mode.
marca para canal posterior surround.
® Indicador OVERLOAD
Este indicador se enciende cuando
una señal analógica es demasiado alta
(el SIGNAL SELECT debería estar en
ANALOG). Indica que el sonido está
distorsionado y que debería reducirse
la señal de entrada.
® Indicador ATT
Se enciende cuando se utilice el ATT
para atenuar (reducir) el nivel de
señal de entrada (sólo puede utilizarse
en el modo ANALOG).
® Indicador DIRECT
Se enciende cuando se está utilizando
la fuente DIRECT. Esta función es
más poderosa que y sobrepasa todos
los efectos de tono, balance, DSP y
Dolby Surround.
® Indicador SPEAKER
Indicada si el sistema de altavoces
está encendido o no. SP ► A significa
que los altavoces están encendidos.
SP ► significa que están apagados.
@ Indicador MONITOR
Se enciende al seleccionar MONITOR.
Se utiliza para oír la grabación según
se está realizando (consulte la pg. 68).
® Pantalla de caracteres
Muestra la frecuencia de radio o
función (DVD/LD, CD, etc.) que el
receptor está utilizando.
O Indicador □□ PRO LOGIC
Cuando el modo DD/DTS del receptor
está activado, se ilumina para indicar
la reproducción de una fuente de dos
canales.
® Indicador DNR (sólo VSXD810S/D810S-G)
Se ilumina cuando está activada la
reducción de ruido digital. Utilícelo
para reducir ruidos externos. Puede
utilizarse con cualquier modo de
sonido.
(D
OVERLOAD (5®Ü)
“
(SIGNAL
SELECT (ÍI§!g^ff) ANALOG
(Sj:t) ) sm “ >
® ATTÍÍ5^§§
ATTfflSíraS (icíL') iiÁdSÍS
©DIRECT (Üg)
’ zpiíDspfpttLtíi
® SPEAKER íi^§§
» sp »-a
- sp ►
©MONITOR mmm
aífMONITOR (STM)
(M^68l[)
® CHARACTER (m) 115^^
(DVD/LD > CD ’ #) o
© mPRO LOGICÍi^x^
#ffilíítiS^nn/DTStIj^íTra0# ’ IÈ
® DNRÍiS^^ (ffiffl)5$VSX-D810S/
D810S-G)
#i!íspf0#tTra0#K^ ’ mm'h
52
En/Sp/ChH
Page 53

® DSP indicator
Lights when any “Advanced Theater”
or “DSP” mode is selected.
® MIDNIGHT indicator
Lights when MIDNIGHT listening
mode is in use.
® LOUDNESS indicator
Lights when the LOUDNESS is on.
Use to boost the bass and treble at
low volume.
® TUNER indicators
MONO.
Lights when the mono mode is set
using the MPX button.
TUNED:
Lights when a broadcast is being
received.
STEREO:
Lights when a stereo EM broadcast is
being received in auto stereo mode.
® MASTER VOLUME LEVEL
Shows the overall volume level.
Volume level is maintained even
when the power is off. —dB
indicates the minimum level, and
OdB indicates the maximum level.
$
® Indicador DSP
Se ilumina cuando se selecciona
cualquier modo 'Advanced Theater" o
"DSP".
® Indicador MIDNIGHT
Se ilumina cuando está en uso el
modo de audición MIDNIGHT.
© Indicador LOUDNESS
Se ilumina cuando LOUDNESS está
activado. Utilícelo para realzar los
graves y agudos a bajo volumen.
® Indicadores TUNER
MONO:
Se ilumina cuando se activa el modo
monoaural empleando el botón MPX.
TUNED:
Se ilumina cuando se está recibiendo
una transmisión.
STEREO:
Se ilumina cuando se está recibiendo
una transmisión de FM en modo auto
estéreo.
® Indicador MASTER VOLUME
LEVEL
Muestra el nivel de volumen general.
El nivel de volumen se mantiene
incluso cuando se apaga la
alimentación. —dB indica el nivel
mínimo y OdB indica el nivel
máximo.
“DSP” »
® MIDNIGHT (¥MI)
® LOUDNESS (gjg)
t LOUDNESSfTlB^K^ ’
® TUNER (liig^)
MONO (5*) :
TUNED (Bilif) :
STEREO (Vii*) : |
FM^ff ° I
© MASTER VOLUME LEVEL (iM
i/KlIWi
0# ’ °
|zp > “
mmwmm
53
En/Sp/ChH
Page 54

Sound Modes Modos de sonido
Learning about the Sound Modes
The sound modes are explained here.
There are two cinema modes: □□
STANDARD, and ADVANCED
THEATER. These are designed to be
used with multi channel surround
sound audio/visual sources (like
DVDs and LDs). Intrinsic to home
theater, these modes can deliver
realistic and powerful surround
sound that recreates the movie theater
experience. You may need to
experiment with them to see which
settings suit your home system and
personal tastes.
The DSP and STEREO modes are
designed to be used with music
sources but some DSP modes are also
suited for film soundtracks. Again, try
different settings with various
soundtracks to see which you like.
□□ (STANDARD) mode
This mode is for pure decoding of
Dolby Digital, DTS and Dolby
Surround sources. No special effects
are added. It is good for enjoying
movies that have been recorded in
Dolby Digital, DTS or Dolby
Surround.
You can identify Dolby Digital
software by the or
marks. Most Dolby Surround software
is marked surround] ^ but unmarked
software may also incorporate Dolby
Surround.
ADVANCED THEATER modes
MUSICAL
Simulates the acoustic environment of
a large concert hall and is suitable for
music or musical sources marked
(SELTrrTrJ) or
DRAMA
Simulates the relaxed environment of
a classic medium size movie theater,
and is suitable for watching dramas
on sources marked
nn I DOLBY SURROUND^
AC-3D I Q f T i
54
En/Sp/ChH
^)orPfm'.
Aprendiendo sobre los modos de sonido
A continuación se explican los modos
de sonido.
Existen dos modos de cine: □□
STANDARD y ADVANCED
THEATER. Éstos están diseñados para
utilizarse con fuentes audio/visuales
de sonido surround y multicanal
(como DVDs y LDs). Intrínsecos al
cine en casa, estos modos pueden
proporcionar un sonido surround
realista y potente que recree la
experiencia de una sala de cine. Es
posible que necesite experimentar
con ellos para ver qué configuración
se adecúa mejor a su sistema
doméstico y gustos personales.
Los modos DSP y STEREO están
diseñados para emplearse con fuentes
musicales, pero algunos modos DSP
también son adecuados para bandas
sonoras de películas. Nuevamente,
pruebe con diferentes configuraciones
de distintas bandas sonoras para ver
cuál le gusta más.
Modo □□ (STANDARD)
Este modo es para decodificación
pura de fuentes Dolby Digital, DTS y
Dolby Surround. No se añaden
efectos especiales. Está bien para
disfrutar de películas que han sido
grabadas en Dolby Digital, DTS o
Dolby Surround.
Puede identificar el software Dolby
Digital por las marcas PPo^t^ o
□□i^oLBvs—I sayona del software
Dolby Surround lleva la marca
□□[mlEysür^ ^ pero un software sin
marcas puede también incorporar
Dolby Surround.
Modos ADVANCED THEATER
MUSICAL
Simula el entorno acústico de una
sala de conciertos grande y es
adecuado para música o fuentes
musicales marcadas con
DOLBY SURROUND |
DRAMA
Simula el entorno relajado de una sala
de cine clásica de tamaño medio y es
adecuado para ver películas
dramáticas en fuentes marcadas con
nniooLBYl ^ nn I DOLBY SURROUMP'
?)o cg’.
?)o Eia'
W—: DDSTANDARD (tf
fp) fPADVANCED THEATER
mvsM/WM9M (®DVDft
LD) ^ ’
'ùì
DPSffiSTEREO (irli*)
íiWSDPSlIi^-tll
’ mtm
□□(STANDARD) liSC
mmmmnmmmm » xmm
íttaJSíll »
° fiÜtgHBW
mmmmÈèmmmmmm °
ADVANCED THEATER
1^)
MllSTPAI
( nnij^OLBY SUHROUNdI ^ ^
DRAMA (®ÍIJ)
DOLBY SURROUND
?)
WESi
Page 55

ACTION
Simulates the acoustic environment of
a large modern movie theater. You
can enjoy the power and dynamics of
motion picture audio which is best
used with action movies on sources
marked or
EXPANDED (VSX-D710S)
This mode is especially designed to
give sound depth to stereo sources.
The overall effect builds a dynamic
and broad sound space, allowing twochannel (stereo) signals to faithfully
imitate a five speaker sound. Use with
Dolby Pro Logic for a stereo surround
effect. You can also use with Dolby
Digital sources for a wider stereo field
than STANDARD mode.
5/6-D THEATER (VSX-D810S)
This mode is especially designed to
give sound depth to stereo sources.
The overall effect builds a dynamic
and broad sound space, allowing twochannel (stereo) signals to faithfully
imitate a six speaker sound. The
mode should be used in conjunction
with Dolby Pro Logic for sources
bearing the nniPOLBYsuR^miw^ mark.
DSP modes
The DSP (Digital Signal Processing)
modes allow you to transform your
living room into a variety of different
sonic environments when playing
standard (two-channel) stereo
sources, Dolby Pro Logic sources, and
Dolby Digital sources. DSP modes do
not work when the speakers are off.
HALL 1
Simulates the acoustic environment of
a large, wooden concert hall.
Complex delay of reflected sounds
coupled with reverberation effects
create the dynamic and beautiful
sound characteristics of an orchestra
performing in a concert hall, making
it suitable for classical music
HALL 2
Simulates the acoustic environment of
a concert hall with stone walls. The
rich reverberations and natural
fullness of the sound create the
auditory impression of being in a
concert hall, also making it suitable
for classical music.
ACTION
Simula el entorno acústico de una
sala de cine grande y moderna. Puede
disfrutar del poderío y dinamismo del
audio de bandas sonoras que
proporciona los mejores resultados
con películas en fuentes marcadas con
□□fSSTiTI nni DOLBY SURROUND I IÍ7V’
DIGITAL , Ac-3 D I G I T A L U •
EXPANDED (VSX-D710S)
Este modo está especialmente
diseñado para proporcionar calado de
sonido a fuentes estéreo. El efecto
general crea un espacio acústico
dinámico y amplio, permitiendo que
las señales de dos canales (estéreo)
imiten fielmente el sonido de cinco
altavoces. Utilícelo con Dolby Pro
Logic para un efecto surround
estéreo. También puede utilizarlo con
fuentes Dolby Digital para un campo
estéreo más amplio que el modo
STANDARD.
5/6-D THEATER (VSX-D810S)
Este modo está especialmente
diseñado para proporcionar calado de
sonido a fuentes estéreo. El efecto
general crea un espacio acústico
dinámico y amplio, permitiendo que
las señales de dos canales (estéreo)
imiten fielmente el sonido de seis
altavoces. El modo debe utilizarse en
conjunción con Dolby Pro Logic para
fuentes que lleven la marca
nn Ipolby surroumd] .
Modos DSP
Los modos DSP (Digital Signal
Processing) le permiten transformar
su sala de estar en una variedad de
diferentes entornos acústicos cuando
reproduce fuentes estándar estéreo
(de dos canales), fuentes Dolby Pro
Logic y fuentes Dolby Digital. Los
modos DSP no funcionan cuando los
altavoces están apagados.
HALL 1
Simula el entorno acústico de una
sala de conciertos grande de madera.
Un complejo retardo de sonidos
reñejados junto con unos efectos
reverberantes crean las bellas y
dinámicas características sonoras de
una orquesta tocando en una sala de
conciertos, haciendo que sea
adecuado para música clásica.
HALL 2
Simula el entorno acústico de una
sala de conciertos con paredes de
piedra. Las ricas reverberaciones y la
plenitud natural del sonido crean la
impresión de estar en una sala de
conciertos, haciendo que también sea
adecuado para música clásica.
ACTION
ñmmmmímmmmm
»
EXPANDED (fgJliy)
(VSX-
D710S)
’ IIM:
mtmMmmmm
II (Vfi») immmmmits
»mtttPro Logic
(*№)
STANDARD (filp)
5/6
-D THEATER
(5/6-Dmm)
(VSX-D810S)
(vus) mmmmwmem
mmmn ° mmmnm
DSP
DSP
VfiK»« ’ Dolby Pro Logic®
- mmnm (»sii)
HALL 1
m ’ ’ i2û±m
(xm
1)
HALL 2 (Xœ 2)
> iijiaaiiifâw
mm
ii/S-
° aw
55
En/Sp/ChH
Page 56

JAZZ
Simulates the acoustic environment of
a jazz club. Less delay on the reflected
sounds emphasizes the sensation of
hearing a live band.
DANCE
Simulates the acoustic environment
and strong bass sound of a dance
club. A short delay on the reflected
sounds emulates the raw power of the
dance music.
THEATER 1
Adjusts the delay of the reflected
sound to simulate the acoustic
environment of a medium sized
movie theater.
THEATER 2
Simulates the acoustic environment of
a theater while maintaining proper
localization of each channel.
5/6Ch STEREO (VSX-D810S/
D810S-G)
This mode reproduces stereo sound
but uses all the speakers in the system
to induce a rich, all-around sound.
MEMO:
• When using 96 kHz PCM
playback, STANDARD,
ADVANCED THEATER, and DSP
sound modes are not available.
JAZZ
Simula el entorno acústico de un club
de jazz. Un menor retardo de los
sonidos reflejados refuerza la
sensación de estar audiciónndo una
banda en directo.
DANCE
Simula el entorno acústico y el fuerte
sonido de graves de un club de dance.
Un breve retardo de los sonidos
reflejados simula la potencia pura de
la música dance.
THEATER 1
Ajusta el retardo del sonido reflejado
para simular el entorno acústico de
una sala de cine de medio tamaño.
THEATER 2
Simula el entorno acústico de una
sala de cine al tiempo que mantiene
una adecuada localización de cada
canal.
5/6 Ch STEREO (VSX-D810S/
D810S-G)
Este modo reproduce el sonido
estéreo pero utiliza todos los altavoces
del sistema para inducir un sonido
rico y envolvente.
MEMO:
• Al utilizar reproducción de 96 kHz
PCM, los modos de sonido
STANDARD, ADVANCED
THEATER y DSP no están
disponibles.
JAZZ
Wit®) “
DANCE (^SSS^)
THEATER 1
THEATER 2
{mu
(mu
1)
2)
5/6Ch STEREO (5111») (VSXD810S/D810S-G)
PlitlB:
• 96kHz ?cmwM >
STANDARD (Hip) » ADVANCED
THEATER fDDPSi^S
Switching ANALOG/ DIGITAL Signal Input
When you select a function (for
example CD) that is only hooked up
by a digital connection, then the
ANALOG/DIGITAL signal input
switch will automatically choose
digital (VSX-D810S/D810S-G only). If
you have that function hooked up by
both digital and analog connections
this switch lets you choose which to
listen to.
56
En/Sp/ChH
Cambio de la señal de entrada ANALÓGICA/ DIGITAL
Cuando selecciona una función (por
ejemplo CD) que está conectada
solamente a una conexión digital, el
conmutador de entrada de señal
ANALÓGICA/DIGITAL elegirá
automáticamente digital (sólo VSXD810S/D810S-G). Si tiene esa
función conectada tanto a una
conexión digital como a una analógica
este conmutador le permite elegir cuál
audiciónr.
tm
ANALOG/DIGITAL (ü
m/mm) mmmA
tнiнf-SнiJSЬннЙнlSfбSaiS
WÄtbB# (Í?IJ® : CD) > ANALOG/
DIGITALilÄ At/JÄ# g ®))iÆ
Stfâ (fiffifôVSX-D810S/D810S-
G)
w—aiiA °
Page 57

1 Press RCV.
1 Pulse RCV.
1 í$TRCVÍgiB°
2 Press SIGNAL SELECT to
select the input signal
corresponding to the source
component.
Each press switches between
ANALOG and DIGITAL signal
selection (VSX-D710S/D710S-G).
On the VSX-D810S/D810S-G
receiver there is an AUTO setting
(see page 51 ®). In this setting the
receiver will automatically switch
between the analog and digital
signals according to what is being
input. If both signals are input the
AUTO setting will choose the
digital one. This setting is
convenient as the receiver will
always choose the best or
appropriate signal.
3 While SIGNAL SELECT is set
to DIGITAL, □□ DIGITAL
lights when a Dolby Digital
signal is input, DTS lights
when a DTS signal is input.
MEMO:
• SIGNAL SELECT is fixed in the
“ANALOG” position for
components not assigned to one of
the digital input jacks.
• This receiver can only play back
Dolby Digital, PCM (32kHz,
44kHz, and 48kHz [VSX-D810S/
D810S-G can play 96kHz]), and
DTS, digital signal formats. With
digital signal formats other than
these, set SIGNAL SELECT to
ANALOG.
• When an LD or CD player
compatible with DTS is played back
with SIGNAL SELECT set in
“ANALOG”, digital noise is output
caused by playing back the DTS
directly (no decoding). To prevent
noise, you need to make digital
connections (Refer to page 10-11)
and set SIGNAL SELECT to
“DIGITAL”.
• Some DVD players don’t output
DTS signals. For more details,
refer to the instruction manual
supplied with your DVD player.
2 Pulse SIGNAL SELECT para
seleccionar la señal de
entrada correspondiente al
componente fuente.
Cada pulsación cambia entre
selección de señal ANALÓGICA y
DIGITAL (VSX-D710S/D710S-G).
En el receptor VSX-D810S/D810S-
G hay una característica AUTO
(consulte la pagina 51 ®). En esta
característica el receptor cambiará
automáticamente entre las señales
analógicas y digitales de acuerdo a
la entrada recibida. Si se reciben
ambas señales la característica
AUTO elegirá la digital. Esta
característica es conveniente ya
que el receptor elegirá siempre la
señal más apropiada o mejor.
3 Mientras SIGNAL SELECT
esté ajustado a DIGITAL, □□
DIGITAL se iluminará
cuando se reciba una señal
Dolby Digital, y DTS se
iluminará cuando se reciba
una señal DTS.
MEMO:
• SIGNAL SELECT está fija en la
posición "ANALOG" para
componentes que no estén
asignados a una de las tomas de
entrada digital.
• Este receptor sólo puede
reproducir formatos de señal
digital Dolby Digital, PGM (32
kHz, 44 kHz y 48 kHz [el VSXD810S/D810S-G puede reproducir
96 kHz] y DTS. Con formatos de
señal digital distintos a estos ajuste
SIGNAL SELECT a "ANALOG".
• Cuando se reproduce desde un LD
o un CD compatible con DTS con
SIGNAL SELECT en el valor
"ANALOG", se producirá ruido
digital como consecuencia de la
reproducción del DTS directamente
(sin decodificación). Para evitar
ruidos, necesitará realizar
conexiones digitales (consulte la
página 10-11) y seleccionar
"DIGITAL" en SIGNAL SELECT.
• Algunos reproductores de DVDs
no dan salida a señales DTS. Para
más información, consulte el
manual de instrucciones
suministrado con su reproductor
de DVDs.
2 ÍSTSIGNAL SELECT (fl
mm -
AffiANALOG mtl) fn
DIGITAL
tZlft (VSX-D710S/D710S-G) »
VSX-D810S/D810S-Ggl|fttÍW
AUTO (g®j)
©) ° íiSsSSH# ’
íiiEiíflAWÍaSf ’
SílPfiAB# ’ AUT0fS^#SÍ?ft
fí®A»
’ ÍÜOttISSíi
3 ^SIGNAL SELECTHS:^^
DIIGITALBt ’ glÜAttttiJ
> iÜnnDIGITififfi :
gliADTSiiÜ - iJDTSifi
Plstie:
TCff ’ SIGNAL SELECTEI®:(£
“analog” iig»
PCM (32kHz » 44kHz > 1048kHz
[ VSX-D810S/D810S-G|g®
96kHz] ) USDTsKfiffMSiJ
^ ’ ^ilfSIGNAL SELECTggglJ
analog ■ >
SIGNAL SELECTfS^g
“analog”
5i)ffffiDTS >
■ b ° ’ WMMiWl
SIGNAL SELECTfS^g
“digital” ) »
. W*DVDaffifi©tgfitiiDTSjf
^»mmm > rnm'rnmm
I
I
57
En/Sp/ChH
Page 58

Playing Sources with
Dolby Digital or DTS
Sound
1 Turn on the power of the
playback component.
2 Turn on the power of the
receiver.
Be sure that the STANDBY
indicator turns off on the front
panel.
3 Press MULTI CONTROL
buttons or the FUNCTION
button to select the source
you want to playback.
If the DIRECT FUNCTION is off
you have to use the FUNCTION
button to select the source (see p.
79).
4 Press RCV.
5 Press SIGNAL SELECT to
select DIGITAL.
(Refer to “Switching ANALOG/
DIGITAL signal input” on page 56-
57)
6 Press DD/DTS to switch the
□□/DTS mode on.
7 Start playback of the
component you selected in
step 1.
8 Press MASTER VOLUME (+/-)
to adjust the volume level.
MEMO:
• You can only hear the sound on
DTS encoded discs if the CD or
LD player with DTS is digitally
connected to this receiver. If you
play a DTS encoded disc through
analog connections you will only
hear digital noise, not the
soundtrack. To prevent noise, you
need to make digital connections
(Refer to page 10-11) and set
SIGNAL SELECT to DIGITAL.
Reproducción de fuentes
con sonido Dolby Digital
oDTS
1 Encienda el componente
reproductor.
2 Encienda el receptor.
Compruebe que el indicador de
espera se apaga en el panel frontal.
3 Pulse los botones MULTI
CONTROL o el botón
FUNCTION para seleccionar
la fuente que desea
reproducir.
Si la función directa está
desactivado tendrá que utilizar el
botón FUNCTION para seleccionar
la fuente (consulte la página 79).
4 Pulse RCV.
5 Pulse SIGNAL SELECT para
seleccionar DIGITAL.
(Consulte "Cambio de la señal.de
entrada ANALÓGICA/DIGITAL" la
página 56-57).
6 Pulse DG/DTS para activar el
modo DD/DTS.
7 Comience la reproducción
del componente que
seleccionó en el paso 1.
8 Pulse MASTER VOLUME (+/-)
para ajustar el nivel de
volumen.
MEMO:
• Sólo podrá audiciónr el sonido de
discos codificados con DTS si el
reproductor de CDs o LDs con
DTS está conectado digitalmente a
este receptor. Si reproduce un
disco codificado con DTS a través
de conexiones analógicas sólo
audiciónrá interferencias digitales,
no la pista de sonido. Para evitar
los ruidos, necesitará efectuar
conexiones digitales (consulte las
páginas 10-11) y ajustar SIGNAL
SELECT a "DIGITAL".
jm
1 }ННННН¡K7t№0!l®J?. °
2 »
®fiIE®tß±0^STANDBY (íi
3 ÍSTMULTI CONTROL (3
immM) mmm
FUNCTION mm) ím -
^DIRECT FUNCTION (¡S&Pj
tg) mWi ’ FUNCTION
ígffiSífSi® (M^79K) »
4 ÍSTRCVÍglH»
5 ÍSTSIGNAL SELECTÍg
la ’ ^íiDIGITAL »
( 1.56-57i;±0^ “t;U^ANAL0G/
DIGITALjg«[A” )
6 ígTDQ/DTSígia > wm\
□□/dts^í: »
8 ÍSTMASTER VOLUME(+/-)
(^Sm) Í^íS ’ ilUiinBM
míe ^
mm » - mwMmíL
ilíg (MHio-iiH) >USÍG
SIGNAL SELECTfSggl]
“DIGITAL” o
58
En/Sp/ChH
Page 59

Selecting a Sound Mode
To ensure the best possible surround
sound, be sure to complete the set up
procedures described in “Setting Up
for Surround Sound” (starting on
page 29) before using the sound
modes. This is particularly important
when using the □□ (Dolby) surround
mode,
ADVANCED THEATER mode
(□□/DTS mode)
Switch on the Dn/DTS mode by
pressing the DD/DTS button. When
□□/DTS mode is on, Dolby Pro Logic,
Dolby Digital and DTS, and signal
processing is performed automatically
corresponding to the input signal.
Use this button to cycle through the
various modes.
When the STANDARD mode is
selected, DSP modes are off.
1 Press RCV. 2 Switch the DD/DTS mode on
and off by pressing Dn/DTS
on the remote control or □□/
DTS on the front panel.
Each press changes the display as
follows.
Selección de un modo de sonido
Para garantizar el mejor sonido
surround posible, asegúrese de que
lleva a cabo todos los procedimientos
de configuración descritos en
"Preparación para el sonido surround"
(comenzando en la página 29) antes
de utilizar los modos de sonido. Esto
es particularmente importante cuando
se utiliza el modo surround □□
(Dolby).
Modo ADVANCED THEATER
(modo Dn/DTS)
Active el modo DG/DTS pulsando el
botón DG/DTS. Cuando el modo □□/
DTS esté activo, Dolby Pro Logic,
Dolby Digital y DTS y la procesación
de señales se realiza automáticamente
según corresponda con la señal de
entrada. Utilice este botón para
recorrer los distintos modos.
Cuando se selecciona el modo
STANDARD los modos DSP se
desactivan.
1 Pulse RCV.
2 Active y desactive el modo
□□/DTS pulsando DD/DTS en
el mando a distancia o □□/
DTS en el panel frontal.
Cada pulsación cambia la pantalla
como sigue.
ADVANCED THEATER
1^) miz (dd/dts^s:)
(9cmm
ígTm/DTSgffl > ñTíTUflan/DTs
» tDD/DTStlj^íTMBt ’ S0S
Pro Logic - |±Íb|í(íiíTPDTS > UR
immm ° mmmm >
iisíf ”
tS^STANDBY (íiffl) ’
1 íSTRcvísia»
2 }gT5Í^^Jz05DD/DTS}gia
^IE®tSJi65nn/DTSÍgiB >
^ÍJümHFJDD/DTS^j)S O
’ «ASUTIilllíají
(VSX-D710S/D710S-G)
I—► STANDARD —► MUSICAL —► DRAMA —i !-►* STANDARD —► MUSICAL -------------------► DRAMA
1
------
OFF ◄------------ EXPANDED ◄
When using DTS 5.1/6.1 ch discs
in STANDARD mode the display
will change to DTS-ES. Naturally
the playback will still be 6.1
output. (VSX-D810S/D81OS-G)
Refer to page 54-56 for more details
about each surround effect.
--------------
ACTION ◄—* '
Al utilizar discos DTS 5.1/6.1 ch
en modo STANDARD la pantalla
cambiará a DTS-ES. Como es
natural, la reproducción seguirá
siendo de salida 6.1 (VSX-D810S/
D810S-G).
Consulte las páginas 54-56 para
más información sobre cada efecto
surround.
(VSX-D810S/D810S-G)
-----
OFF ◄
----------
5/6-D THEATER ◄
-------------
STANDARD (IS^Í)
fi^DTSS. 1/6. iSilASf ’ Btjt
llfaj(»SDTs-Es > mWiññinñ
6.1IIÍÜ “ (VSX-D810S/D81OS-
G)
mnm-mm
M^54-56H
ACTION
---------
1
59
En/Sp/ChH
Page 60

MEMO:
• The effects of Dn/DTS mode can
be adjusted in the range of 10 to
90 by pressing EFFECT +/- (the
default setting is 70). Also, the
effect level can be set in each
ADVANCED THEATER mode by
pressing the EFFECT +/- button.
The STANDARD mode cannot be
changed.
• Eorthe VSX-D810S/D810S-G,
when the surround back channel
is set to off in the speakers
settings, 6-D Theater becomes 5-D
Theater.
MEMO:
• Los efectos del modo DD/DTS
pueden ajustarse en el rango de 10
a 90 pulsando EFFECT +/- (el
valor de ajuste por defecto es 70).
Además, el nivel de efecto puede
ajustarse en cada modo
ADVANCED THEATER pulsando
el botón EFFECT +I-. El modo
STANDARD no puede cambiarse.
• Para el VSX-D810S/D810S-G,
cuando el canal posterior surround
está desactivado, en los ajustes de
los altavoces 6-D Theater se
convierte en 5-D Theater.
PfSE ^
• ÍSEFFECT+/- (aS) Sffl’
^iigpm/DTSíííS. íIIíJIeH
ÍÍÉ10?IJ90 »
flADVANCED THEATER
> fgEFFECT+/-gffl ’
STANDARD (tip) °
. VSX-D810S/D810S-Gffi^^f|fS
’ mmmmmmmmm
Surround operation
1 Press RCV.
This sets the remote to select the
sound mode.
(You can skip this step when
using the controls on the
receiver.)
2 Press DSP to select the sound
mode.
Each press changes the DSP mode
as follows:
MEMO:
• The amount of effect of each DSP
mode can be adjusted in the range
of 10 to 90 (the default setting
value is 70) by pressing EFFECT
+/-.
• The DSP effects can’t be heard in
5/6 CH STEREO (VSX-D810S/
D810S-G only).
• Eor VSX-D810S/D81 OS-G receiver,
when the surround back channel
is set to off or SW, 6 channel stereo
becomes 5 channel stereo.
60
En/Sp/ChH
Funcionamiento dei surround
Pulse RCV.
Esto ajusta el mando a distancia
para seleccionar el modo de
sonido.
(Puede saltarse este paso cuando
utilice los controles del
receptor).
Pulse DSP para seleccionar el modo de sonido.
Cada pulsación cambia el modo
DSP como sigue:
HALL 1
E
5/6CH STEREO ◄-THEATER 2 ◄- THEATER
(VSX-D810S/D810S-Gonly)
(sólo VSX-D810S/D810S-G)
(iiffl VSX-D810S/D81OS-G)
MEMO:
• La cantidad de efecto de cada
• Los efectos DSP no pueden oírse
• Para el receptor VSX-D81 OS/
HALL 2
modo DSP puede ajustarse en el
rango de 10 a 90 (el valor de
aiuste por defecto es 70) pulsando
EFFECT+/-.
en 5/6 CH STEREO (sólo VSXD810S/D810S-G).
D810S-G, cuando el canal
posterior con surround está
configurado en el valor de
apagado, el estéreo de 6 canales se
convierte en estéreo de 5 canales.
JAZZ ■
1 íSTRcvígía
ilWtéSflRSS
»
2 mTDSPim ’
ají» :
DANCE
№83 =
• gEFFECT+/-gffi ’ ñJfilííS
gDSP|Íít№5^:S:m ’ ÍIIPIeBI
í(ÉioPj90o
70) °
. BÌ5/6 CH STEREO (Siiirli
( fIfl!;55:VSX-D810S/D810S-
G) »
. VSX-D810S/D810S-Ggi|)ífÍfÍít
Page 61

DVD 5.1 ch./7.1 ch (5.1 ch for
VSX-D710S/D710S-G) input
playback
If you want you can connect a
component with 7.1 channel (5.1
channel for VSX-D710S/D710S-G)
analog output to enjoy surround
sound playback. In this case the
surround sound will be externally
decoded and then fed into the
receiver.
To switch on DVD 7.1 ch
(5.1 chfor VSX-D710S/
D710S-G) mode press the
DVD/LD MULTI CONTROL
button on the remote, then
RCV, then 5.1/7.1 button.
VSX-D710S/D710S-G only:
On the main unit press the
DVD 5.1 CH button to switch
on 5.1 ch mode.
Press the 5.1/7.1 button on
the remote to go back to the
DVD/LD mode. If you’re
using the main unit, choose
any other function with the
MULTI JOG.
MEMO:
• When 5.1 ch/7.1 ch input is
selected, Dn/DTS mode, DSP
mode, SIGNAL SELECT, ATT,
DIRECT, TONE, MIDNIGHT
mode, LOUDNESS, DIGITAL NR
(VSX-D810S/D810S-G only), and
speakers B cannot be operated.
• When 5.1 ch/7.1 ch input is
selected, only the volume level and
channel levels can be set.
Reproducción de entrada
DVD 5.1 canales/7.1 canales
(5.1 canales para VSX-D710S/
D710S-G)
Si lo desea puede conectar un
componente con salida analògica de
canales 7.1 (canales 5.1 paraVSXD710S/D710S-G) para disfrutar de
una reproducción de sonido
surround. En este caso el sonido
surround se decodificará
externamente у а continuación pasará
al receptor.
Para activar el modo DVD
7.1 canales (5.1 canales para
el VSX-D710S/D710S-G)
pulse el botón DVD/LD MULTI
CONTROL en el mando a
distancia, a continuación
RCV y finalmente el botón
5.1/7.1.
Sólo VSX-D710S/D710S-G:
En la unidad principal pulse
el botón DVD 5.1 CH para
activar el modo de 5.1
canales.
Pulse el botón 5.1/7.1 en el
mando a distancia para
volver al modo DVD/LD. Si
está utilizando la unidad
principal, elija cualquier otra
función con el MULTI JOG.
MEMO:
• Cuando se selecciona la entrada
5.1 ch/7.1 ch, no pueden operarse
el modo DD/DTS, el modo DSP,
SIGNAL SELECT, ATT, DIRECT,
TONE, el modo MIDNIGHT,
LOUDNESS, DIGITAL NR (sólo
VSX-D810S/D810S-G) ni altavoces
В.
• Cuando se selecciona la entrada
5.1 ch/7.1 ch, sólo puede ajustarse
el nivel de volumen у los niveles
de canal.
DVD5.1M11/7.1MM (vsxD710S/D710S-G^5.1SM) lü
( VSX-D710S/D710S-Gg5.)
ШШШ » ittB# > шшшштш
íi ’ шшштттш °
7.1ШШ
(VSX-
О71О$/О71О$-0^5.ШШ)
DVD/LD MULTI CONTROL
ШШ
’
ЩШ
TRcvísia >
7.1ШШ
“
iiffll5$VSX-D710S/D710S-G =
iíílii; ’ ®TDVD5.1CH
Ш ’ ™iÍÜ5.1ch1iSC »
шттш§§±й^5.1/7.1ш
m ’ ÜfíiPiiJDVD/LDIiíS =
№82 ^
. SS5.1 ch/7.IchfiAit ’
fifpnn/DTSfli^ .
SIGNAL SELECT (jlillSif) ’
ATT ’ DIRECT (¡lig) ’ TONE
(Wii) . MIDNIGHT (ifiiili)
list ’ LOUDNESS iWS.) ’
DIGITAL NR (irfiiia#) (flffl
Si;VSX-D8I0S/D810S-G)
• S/ty lch/7. IchfiAi^ ’ Atb
IS/e’M';
ШШШТ5.М
I > fflMULTI JOG
61
En/Sp/ChH
Page 62

MIDNIGHT Listening Mode
When listening at low volume,
surround effects tend to become less
than satisfactory. Turn the
MIDNIGHT listening mode on to
enjoy the effects of quality surround
sound even at low volumes. This
mode allows you to hear effective
surround sound of movies at low
volume levels.
1 Press RCV.
This sets the remote to select the
sound mode.
(You can skip this step when
using the controls on the
receiver.)
2 Press MIDNIGHT.
Each press switches MIDNIGHT
listening mode on or off.
MEMO:
• The effect automatically adjusts
according to the volume level.
Modo de audición MIDNIGHT
Cuando se audición a bajo volumen,
los efectos surround tienden a oírse
de forma no del todo satisfactoria.
Active el modo de audición
MIDNIGHT para disfrutar los efectos
de un sonido surround de calidad
incluso a bajo volumen. Este modo le
permite audiciónr un auténtico
sonido surround de películas a bajo
volumen.
1 Pulse RCV.
Esto ajusta el mando a distancia
para seleccionar el modo de
sonido.
(Puede saltarse este paso cuando
utilice los controles del
receptor).
2 Pulse MIDNIGHT.
Cada pulsación activa o desactiva
el modo de audición MIDNIGHT
MEMO:
• El efecto se ajusta
automáticamente de acuerdo al
nivel de volumen.
MIDNIGHT
ÍÍmidnightIIjI^ »
1 Í$TRCVÍ$ÍH°
Jl$ ^ S iS nS S PJ iS I?’b" S te
jSjH—^ ° )
2 ÍSTMIDNIGHTÍSia “
’ mmmmm
MIDNIGHTfl5>í °
PlitlB =
(mmm)
üsc
- -è
Playing other Sources
1 Turn on the power of the
playback component.
2 Turn on the power of the
receiver.
Be sure that the standby indicator
turns off on the front panel.
3 Press MULTI CONTROL
buttons or the FUNCTION
button to select the source
you want to playback.
If the Direct Function is off you
have to use the FUNCTION button
to select the source (see p.79).
4 Press RCV.
5 If necessary, press SIGNAL
SELECT to select the input
signal corresponding to the
source component (see p.56-
57).
6 Start playback of the
component you selected in
step 1.
62
En/Sp/ChH
Reproducción de otras
fuentes
1 Encienda el componente
reproductor.
2 Encienda el receptor.
Compruebe que el indicador de
espera se apaga en el panel frontal.
3 Pulse los botones MULTI
CONTROL o el botón
FUNCTION para seleccionar
la fuente que desea
reproducir.
Si la función directa está
desactivada tendrá que utilizar el
botón FUNCTION para seleccionar
la fuente (consulte la página 79).
4 Pulse RCV. 5 Si es necesario, pulse
SIGNAL SELECT para
seleccionar la señal de
entrada que corresponda con
el componente fuente
(consulte las páginas 56-57).
6 Comience la reproducción
del componente que
seleccionó en el paso 1.
1 »
3 ígTMUTLI COUTROL (3
imm\) íSiB^
FUNCTION nm) mm -
mmmmmñmmím
FUNCTIONS® ’ SPSÍg
(Mlg79K) °
4 ÍSTRCVÍgiH «
5 ’ ÍSTSIGNAL
SELECT m
|AÍÍ5Í° (^^56-57
6 »
Page 63

Using the Tuner
Utilización del
Finding a Station
The following steps show you how to
tune in to FM and AM radio
broadcasts using the automatic
(search) and manual (step) tuning
functions. If you already know the
exact frequency of the station you
want to listen to, see “Tuning Directly
to a Station” on page 65. Once you
are tuned to a station you can
memorize the frequency for recall
later—see “Memorizing Stations” on
page 66 for more on how to do this.
1 Press the MULTI CONTROL
TUN button on the remote
control.
On the receiver, use the MULTI
JOG to select the tuner mode.
2 Use the BAND button to
change the band (FM or AM),
if necessary.
Each press switches the band
between FM and AM On the
receiver, pressing the BAND
button switches between bands.
3 Tune to a station.
Automatic tuning
To search for stations in the
currently selected band, press and
hold either the TUNE + or TUNE -
button for about a second. The
receiver will start searching for the
next station, stopping when it has
found one. Repeat this step to
search for other stations.
Manual tuning
To change the frequency one step
at a time, press the TUNE + or
TUNE- (AV) buttons.
High speed tuning
Press and hold the TUNE + or
TUNE - button for high speed
tuning, releasing the button once
the desired frequency is reached.
sintonizador
Cómo encontrar una emisora
Los pasos siguientes le muestran
cómo sintonizar transmisiones
radiofónicas de FM y AM empleando
las funciones de sintonización
automática (búsqueda) y manual
(intervalos). Si ya conoce la frecuencia
exacta de la emisora que quiere
escuchar, consulte "Sintonización
directa de una emisora" en la página
siguiente. Una vez que haya
sintonizado una emisora puede
memorizar la frecuencia para
rellamarla más tarde. Consulte "Cómo
memorizar emisoras" en la página 66
para más información sobre cómo
hacer esto.
1 Pulse el botón MULTI
CONTROL TUN en el mando
a distancia.
En el receptor, utilice el MULTI
JOG para seleccionar el modo de
sintonizador.
2 Utilice el botón BAND para
cambiar la banda (FM o AM
si es necesario).
Cada pulsación cambia la banda
entre FM y AM. En el receptor,
pulsando el botón BAND se
cambia entre bandas.
3 Sintonice una emisora.
Sintonización automática
Para buscar emisoras en la banda
seleccionada actualmente pulse y
mantenga pulsado el botón
+ o TUNE - durante un segundo
aproximadamente. El receptor
comenzará a buscar la próxima
emisora, deteniéndose cuando
encuentre una. Repita este paso
para buscar otras emisoras.
Sintonización manual
Para cambiar la frecuencia un
intervalo cada vez, pulse los
botones TUNE + o TUNE - (AV).
Sintonización a alta velocidad
Pulse y mantenga pulsado el botón
TUNE + o TUNE - para una
sintonización a alta velocidad,
soltando el botón una vez que se
alcance la frecuencia deseada.
TUNE
m
m) mmmmfí
65k±Ó^
“lESm
a
mm °
1 íg™S^±0DMULTI
CONROLTUN
fijimii)
mm
»
’ íífflMULTI JOG
(mtmm) síinit^ts
°
2 gitili > ^fflBAND ()JS?
m) mm
-
(FMm
AM) »
IS « ’ STBANDf^
m ’ »
3 °
TMSíítune +^tune -S
3B# ’ ÉÍTfr
TUNE+^TUNE- (av) fg
ffi»
ST'Rjliirá’ STMSffi
TUNE+^TUNE-Sia > BS
’ iiJM®
> íst
63
En/Sp/ChH
Page 64

MPX mode
If there is interference or noise during
a FM radio broadcast, or the radio
reception is weak, press the MPX
button to switch the receiver into
mono reception mode. This should
improve the sound quality and allow
you to enjoy the broadcast.
Modo MPX
Si hay interferencias o ruidos durante
una emisión de radio FM, o si la
recepción de la radio es débil, pulse el
botón MPX para hacer cambiar el
receptor al modo de recepción
monoaural. Esto debería mejorar la
calidad de sonido y permitirle
disfrutar más de la emisión.
m
I ’ uiSTMPxisii ; mm’i
Channel Step Setting
(multi-voltage model
only)
The unit has been factory preset to
the channel allocation value for the
area in which it is to be sold. If this
value is set incorrectly, the tunes in
frequency may be wrong, or sound
may be distorted, resulting in an
inability to reproduce reception
signals at their proper sound quality.
For this reason, be sure to confirm
that the values are set correctly before
first using the unit.
FM 100 kHz, AM 10 kHz:
Set to this position for areas with an
FM reception step of 100 kHz and
AM 10 kHz.
FM 50 kHz, AM 9 kHz:
Set to this position, for areas with an
FM reception step of 50 kHz and AM
9 kHz.
NOTE:
When unsure about the channel
allocation for your area, consult your
dealer for correct information.
To Change Channel Steps
With the power turned OFF, hold the
STANDBY/ON button depressed
while pressing the BAND button on
front panel to turn the power ON.
• Each time the above operation is
performed, the channel tuning
step will alternate between FM 100
kHz/AM 10 kHz, and FM 50 kHz/
AM 9 kHz.
Ajuste de intervalo
entre canales (sólo el
modelo multivoltaje)
El aparato fue preparado en fábrica
para un valor de distribución de
canales correspondiente a la región en
la que será vendido. Si este valor está
mal ajustado, las sintonías de las
frecuencias pueden estar equivocadas,
el sonido puede escucharse
distorsionado, no pudiendo
reproducirse las señales recibidas en
su calidad de sonido correcta. Por
esta razón, confirme que los valores
se han ajustado correctamente antes
de utilizar el aparato por primera vez.
FM 100 kHz, AM 10 kHz:
Ajuste en esta posición para regiones
que tengan intervalos de recepción de
FM de 100 kHz y AM de 10 kHz.
FM 50 kHz, AM 9 kHz:
Ajuste en esta posición, para regiones
que tengan intervalos de recepción de
FM de 50 kHz y AM de 9 kHz.
NOTA:
Cuando no esté seguro de la
distribución de canales de su región,
consulte con su concesionario para
obtener la información correcta.
Para cambiar los intervalos
entre canales
Con el aparato desconectado en OFF,
mantenga presionado el botón
STANDBY/ON mientras presiona el
botón BAND en el panel delantero
para conectarlo a ON.
• Cada vez que se realiza el
procedimiento anterior, el
intervalo de sintonización de
canales cambiará entre FM 100
kHz/AM 10 kHz y FM 50 kHz/AM
9 kHz.
CHA NNE L ST EP SE TT IN G ( I
(í
Sis
m)
iiaSápííltt
m ’ mmmmMtmmmm - mm
nKmñmmmn » mtt >
ía.¿ií ’
FM 100 kHz, AM 10 kHz:
fíS^FMfgí|ÍCSgSf:^FM 100 kHzfOAM 10
kHzS^Eji > ISBfJil—UH °
FM 50 kHz, AM 9 kHz:
fíft?:FMÍgilí[SgÍ|@FM 50 kHziDAM 9
kHzÉíjsa. isBíijii-ua »
ìtW. :
iì«ÌÌÌTlfÈ^'ifaT ’ iìÌStìSTAND-
BY/ONÍ^fflS<]|5jB$ . eTiEfflS±№
H|#SFI\/I 100 kHz/AM 10 kHzíPFM 50 kHz/AM 9 kHzUH^í#»^ “
64
En/Sp/ChH
Page 65

Tuning Directly to a
Station
Sometimes, you'll already know the
frequency of the station you want to
listen to. In this case, you can simply
enter the frequency directly using the
number buttons on the remote
control (this function is not available
using the front panel controls of the
receiver).
1 Press the MULTI CONTROL
TUN button on the remote
control.
On the receiver, use the MULTI
JOG to select the tuner mode.
2 Press the BAND button to
select either FM or AM.
Each press switches the band
between FM and AM.
On the receiver, pressing the
BAND button switches between
bands.
3 Press D.ACCESS (DIRECT
ACCESS).
4 Use the number buttons to
enter the frequency of the
radio station.
Example: To tune to 106.00 (FM),
press 1 - 0- 6- 0- 0
SP^A STEREO
c: n/i
I 11
MEMO:
• If you make a mistake while
inputting the frequency, press the
1 n c n n
1 LJ U . LJ U
D.ACCESS button twice to cancel
the frequency and start again.
Sintonización directa de una emisora
A veces ya conocerá la frecuencia de
la emisora que desea escuchar. En
este caso, puede sencillamente
introducir la frecuencia directamente
empleando los botones numerados
del mando a distancia (esta función
no está disponible utilizando los
controles del panel frontal del
receptor).
1 Pulse el botón MULTI
CONTROL TUN en el mando
a distancia.
En el receptor, utilice el MULTI
JOG para seleccionar el modo de
sintonizador.
2 Pulse el botón BAND para
seleccionar FM o AM.
Cada pulsación cambia la banda
entre FM y AM. En el receptor,
pulsando el botón
cambia entre bandas.
BAND se
3 Pulse D.ACCESS (DIRECT
ACCESS).
4 Utilice los botones
numerados para introducir la
frecuencia de la emisora de
radio.
Ejemplo; Para sintonizar a 106.00
(FM) pulse 1-0-6-0-0
TUIMED
SP^A STEREO
O n//
1 1 1
MEMO:
• Si comete un error al introducir la
frecuencia pulse el botón
1 n c n n
1 LJ LJ. L J L J
D.ACCESS dos veces para
cancelar la frecuencia y comience
de nuevo.
mmuñmm
m ° íítm ’
mi ^ °
MI) °
1 ÍSTSÍS^Jia^MULTI
CONTROL TUN (3 WM B
íüüig) im °
’ ffifflMULTI JOG
mjjÉmm)
2 ÍSTBAND (;SS) m m ’
Ix °
’ fITBANDgffl ’
3 ígTD.ACCESS (ÜgÍM
SS)
mm
°
í?ij$n : giiifPJioe.oo (FM) >
ST1 - 0- 6- 0- 0
C M
1 1 1
D.AccEssíSias;^ ’
mM ’ ^
1 n c n n
1 LJ L J. LJ L J
ssiiifgiii
TUNED
SP^A STEREO
(№
65
En/Sp/ChH
Page 66

Memorizing Stations
If you often listen to a particular radio
station, it's convenient to have the
receiver store the frequency for easy
recall whenever you want to listen to
that station. This saves the effort of
manually tuning in each time. The
VSX-D710S/D710S-G/D810S/D810SG can memorize up to 30 stations,
stored in three banks, or classes, (A,B
and C) of 10 stations each. When
memorizing FM frequencies, the
receiver also stores the MPX setting
(auto stereo or mono, see p.64). The
process for memorizing stations is
only possible from the controls on the
front panel of the receiver.
1 Tune to a station you want to
memorize.
See “Finding a Station” on page 63
and “Tuning Directly to a Station”
on this page for more detail on
how to do this.
2 Press the MEMORY.
The display shows a blinking
memory class.
G o c: n
j .j. j u
3 Press CLASS to select one of
the three classes.
Repeatedly pressing this button
cycles through the three available
classes. A, B and C.
4 Press the STATION+/-
buttons to select the desired
station memory number.
Pressing these buttons repeatedly
cycles through the 10 available
station memories in each class.
After choosing the location you
want, the preset class and number
blink for about 5 seconds and the
receiver stores the station.
Repeat steps 1 to 4 to memorize
up to 30 stations.
66
En/Sp/ChH
Cómo memorizar emisoras
Si escucha frecuentemente una
emisora de radio concreta es
conveniente hacer que el receptor
memorice la frecuencia para
sintonizarla rápidamente siempre que
desee escuchar esa emisora. Esto le
ahorrará el trabajo de sintonizarla
manualmente cada vez. El VSXD710S/D710S-G/D810S/D810S-G
puede memorizar hasta 30 emisoras,
que se guardan en tres bancos, o
clases, (A, B y C) de 10 emisoras cada
una. Al memorizar frecuencias de FM,
el receptor también almacena el valor
del MPX (autoestéreo o mono,
consulte la página 64). El proceso de
memorización de emisoras es sólo
posible desde los controles del panel
frontal del receptor.
1 Sintonice una emisora que
desea memorizar.
Consulte Cómo encontrar una
emisora y Sintonización directa de
una emisora en la página 63 y en
esta página para averiguar más
sobre cómo hacer esto.
2 Pulse MEMORY.
La pantalla mostrará una clase de
memoria parpadeando.
O O c n
-J U. J u
3 Pulse CLASS para
seleccionar una de las tres
clases.
Pulsando este botón repetidamente
se recorren las tres clases
disponibles. A, B y C.
4 Pulse STATION +/- para
seleccionar el número de
memoria de la emisora
deseada.
Pulsando estos botones
repetidamente se recorren las 10
memorias de emisora disponibles
en cada clase. Después de elegir la
ubicación que desee, la clase y
número predefinidos parpadearán
durante unos 5 segundos y el
receptor memorizará la emisora.
Repita los pasos 1 a 4 para
memorizar hasta 30 emisoras.
senffiö
■ ä ’ “ M
BffsT » VSX-D710S/D710S-G/D810S/
D810S-GHEti#^30fflÄföM€
è' ’ ’ Sio
íiSéf-» (A ' Bfnc)
’ UÍI#7MPXfg
0^ “mm fn2|s;i:±ö^ “¡I
2 ÍSTMEMORY (HBti) ÍS
15“
o o c n
-J -j. J u
3 ígTCLASS (|g) Ígi5 ’ Íi
íiEflÍlS@Üct305-ii “
^ijA ' “
4 ígTSTATION+/- («Ö)
mm
- ii}i^aisöö5H5ii
iííiZ“
mmmmis'ik » ìiisswirbij
» imm
Page 67

Recalling Memorized
Stations
Cómo sintonizar emisoras memorizadas
Having memorized up to 30 stations
(see the previous explanation for how
to do this), preset stations can be
easily recalled.
1 Press the MULTI CONTROL
TUN button on the remote
control.
On the receiver, use the MULTI
JOG to select the tuner mode.
2 Press CLASS to select the
class in which the station is
stored.
Repeatedly pressing this button
cycles through the three available
classes. A, B and C.
3 Use the STATION +/- buttons
to select the station memory
in which the station is
stored.
Alternatively, recall the station
memory using the number buttons
on the remote control.
MEMO:
• If the receiver is left disconnected
from the AC power outlet for a
lengthy period, the station
memories will be lost and will
have to be reprogramd.
Tras haber memorizado hasta 30
emisoras (consulte la explicación
previa sobre cómo hacerlo) las
presintonías pueden sintonizarse
fácilmente.
1 Pulse el botón MULTI
CONTROL TUN en el mando
a distancia.
En el receptor utilice el MULTI
JOG para seleccionar el modo de
sintonizador.
2 Pulse CLASS para
seleccionar la clase en la que
está memorizada la emisora.
Pulsando este botón repetidamente
se recorren las tres clases
disponibles. A, B y C.
3 Utilice los botones STATION
+/- para seleccionar la
memoria en la que está
guardada la emisora.
Alternativamente, sintonice la
memoria de la emisora empleando
los botones numerados del mando
a distancia.
MEMO:
• Si el receptor se deja desconectado
de la toma de CA durante un
periodo prolongado, se perderán
las estaciones memorizadas y
tendrán que volver a programarse.
1 ÍST^S^JieUMULTI
CONTROL TUN
íüiiig) mm »
MULTI JOG
2 ÍSTCLASS (fS) ígE - Íi
Km&ntmñ ’
gijA ^ »
3 ®fflSTATION+/- (tttì)
PIÜ K ^
i® ’ ’ smí
67
En/Sp/ChH
Page 68

Making a
Grabaciones
Recording
Making an Audio or a Video Recording
The following steps show you how to
make an audio or a video recording
from the built in tuner, or from an
audio or video source connected to
the receiver (such as a CD player or
TV). Recordings can be made to a
CD-R, TAPE, MD, VCR, or DVR
connected to the CD-R/TAPE/MD,
VCR or DVR in/out connectors.
1 Turn the MULTI JOG dial to
select a source to record (you
can also use the MULTI
CONTROL buttons if the
DIRECT FUNCTION is on).
All functions except MONITOR
are accessible from the remote
control.
2 Prepare the program source.
Tune to the radio station, load the
CD, etc. Eor a video recording
load the video, DVD etc.
3 Insert a blank tape, MD,
video etc. into the recording
device connected to either
CD-R/MD/TAPE or VCR/DVR
and set the recording levels.
Refer to the instructions that came
with the recorder if you are unsure
how to do this. Most video
recorders set the audio recording
level automatically—check your
video's instruction manual if you
are unsure whether yours has
manual controls.
4 Start recording, then start
playback of the source
component.
MEMO:
The receiver's volume, TONE control
(bass & treble) LOUDNESS,
MIDNIGHT, DIGITAL NR (VSXD810S/D810S-G only) and surround
effects have no effect on the recorded
signal.
68
En/Sp/ChH
Cómo realizar una grabación de audio o de vídeo
Los pasos siguientes le muestran
cómo realizar una grabación de audio
o de vídeo desde el sintonizador
incorporado o desde una fuente de
audio o vídeo conectada al receptor
(tal como un reproductor de CDs o
un TV). Se puede grabar a una
grabadora de CDs, una platina de
casetes, una unidad de MDs, VCR, o
DVR conectada a los conectores de
entrada/salida CD-R/TAPE/MD, VCR
0 DVR.
1 Gire el dial MULTI JOG para
seleccionar una fuente a
grabar (también puede
utilizar los botones MULTI
CONTROL si está activada la
función directa).
Todas las funciones excepto
MONITOR pueden accederse
desde el mando a distancia.
2 Prepare la fuente de
programa.
Sintonice la emisora de radio,
cargue el CD, etc. Para una
grabación de vídeo cargue el
vídeo, DVD, etc.
3 Introduzca una cinta, MD,
vídeo etc. virgen en el
dispositivo de grabación
conectado a CD-R/MD/TAPE
o bien a VCR/DVR y ajuste
los niveles de grabación.
Consulte las instrucciones que
acompañaban a la grabadora si no
está seguro de cómo hacerlo. La
mayoría de grabadoras de vídeo
ajustan el nivel de grabación de
audio automáticamente. Compruebe
el manual de instrucciones de su
vídeo si no está seguro de si el suyo
tiene controles manuales.
4 Comience la grabación y a
continuación comience la
reproducción del
componente fuente.
MEMO:
El volumen del receptor, el control de
TONE (graves y agudos), LOUDNESS,
MIDNIGHT, DIGITAL NR (sólo VSXD810S/D810S-G) y los efectos
surround no influyen en la señal
grabada.
(acDíssíti^sMi) 'MheM
TAPE/MD . VCRl!(DVRfÍA/IÍtÜSS
írStijl№CD-R ’ TAPE ’ MD > VCR^
DVR o
1 isiiMULTi joG
Ü) SI® ’ ’
(5DDIRECT FUNCTION (Bíi
m^) íinBf -
MULTI CONTROL
m\) mm) »
P^Tmonitor
2 2
’ SAcd
# “
nmmmm
DVD^ °
’
mxmm
3 )lf
IÍ^ÍÜCD-R/MD/TAPES!6VCR/ DVR > °
^WM\m g
’ immmmmmmm
mm--
' TONE (Wfl) S|IJ
LOUDNESS (#
g) ' MIDNIGHT '
DIGITAL NR (gtíuNR)
VSX-D810S/D810S-G)
’ tmm
Page 69

Record MONITOR
You can listen to (monitor) the
recording as it's being made using the
MONITOR button on the front panel
(a cassette deck would have to have a
record monitor function).
Press the MONITOR button to switch
between the recorded signal and the
original source signal.
Making a Digital Recording
The VSX-D710S/D710S-G/D810S/
D810S-G has one optical digital
output jack. If you want to make a
digital recording from this receiver
hook up the optical output on this
receiver to the optical input on the
digital component you want to record
into. The source component (like
MD, CD, DVD, etc.) must be digital
also, of course, and hooked up to this
receiver in a digital manner. Make
sure the analog/digital switch is set to
digital (see p. 56-57) The recording
procedure is the same as described
above.
Refer to the table below for the type of
digital connections available in each
receiver model.
Supervisión de la grabación
Puede escuchar (supervisar) la
grabación según se va haciendo
empleando el botón MONITOR del
panel frontal (una platina de casetes
debería contar con una función de
supervisión de grabación).
Pulse el botón MONITOR para
cambiar entre la señal grabada y la
señal de la fuente original.
Cómo realizar una grabación digital
El VSX-D710S/D710S-G/D810S/
D810S-G tiene una toma de salida
digital óptica. Si desea realizar una
grabación digital desde este receptor
conecte la salida óptica de este
receptor con la entrada óptica del
componente digital en el que quiere
grabar. El componente fuente (como
un MD, CD, DVD, etc.) debe también
ser digital, por supuesto, y debe
conectarse a este receptor de forma
digital. Compruebe que el selector
analógico/digital está ajustado a
digital (consulte la página 56-57). El
proceso de grabación es el mismo que
se describe anteriormente.
Consulte la tabla siguiente para ver el
tipo de conexión digital disponible en
cada modelo de receptor.
Mi^ MON IT OR
ÍÜffl^®^±№MONITORÍgffi ’
»m
mmmmpim) »
jSTMONITORgia ’
VSX-D710S/D710S-G/D810S/D81OS-
Gíiw-TtMifiüifín»um
:$:ÍS±e^7tllfiaiÍlfgPJ#MÍS«
W.7t\^ ( $0MD > CD > DVD# )
(MS56-57M) »
MODEL
VSX-D710S/D710S-G
VSX-D810S/D810S-G
VSX-D710S/D710S-G
VSX-D810S/D810S-G
COAX IN
1
1 3 I
OPT IN OPT OUT
2
UMliiA
1
1
2 1
3
I
1
69
En/Sp/ChH
Page 70

Controlling the
Control del resto
Rest of Your
System
Recalling Preset Codes
The following steps show you how to
recall preset codes for each MULTI
CONTROL button. Once the preset
code is assigned, pressing the button
will automatically set the remote to
operate the respective component.
MEMO:
• Refer to “Preset Code List” on
pages 86 to 92 for the components
and manufacturers available.
• Refer to “Controlling the Rest of
Your System” on pages 70 to 92
for detailed explanations on how
to operate your other components.
de su sistema
Rellamada de códigos
predefinidos
Los pasos siguientes le muestran cómo
hacer rellamadas de códigos
predefinidos para cada botón MULTI
CONTROL Una vez que esté asignado
el código predefinido, pulsando el
botón se activará automáticamente el
mando a distancia para que opere el
componente respectivo.
MEMO:
• Consulte la "Lista de códigos
predefinidos" en las páginas 86 a
92 para ver los componentes y
fabricantes disponibles.
• Consulte "Control del resto de su
sistema" en las páginas 70 a 92
para obtener explicaciones
detalladas sobre cómo operar sus
demás componentes.
"h
fe © e e
1^© e 0
® ® cp
CD CD Cp
LED
2
3
’MULTI
CONTROL ÍSñ№]
fiissmi “ - uíisfiissít
5,1 ’
PIÜHB:
#lfé*86HSl]M92K±0^ “fl
iäSLSIS” °
m ’ ñi#MííÉig7oMpjs92i:±
‘‘mnmmmmm’’ »
1 Press SETUP and hold for
three seconds to select the
Preset mode.
The LED lights steadily for two
seconds.
To cancel the preset mode at any
time
Press SETUP.
The remote control will also return
to the previous mode after thirty
seconds of inactivity.
70
En/Sp/ChH
CD CD CD ¿)
o cdJoö^
O O
Pulse SETUP y manténgalo
pulsado durante tres
segundos para seleccionar el
modo de preselección.
El LED se ilumina continuamente
durante dos segundos.
Para cancelar el modo
predefinido en cualquier
momento
Pulse SETUP.
El mando a distancia también
volverá al modo anterior después
de treinta segundos de inactividad.
1
ígTMíSffisETUP
ígíB3^J>S -
LEDÍt||i¿^2&'|Í °
mm)
STSETUPÍgffi “
Page 71

2 Press the MULTI CONTROL
button for the component
you want to control.
Each button can be set to control
one of the following components
DVD DVD/LD player or DVR
TV TV, Satellite tuner or
Cable TV tuner
VCR VCR or Digital Video
Recorder
CD CD player
CD-R CD Recorder, Tape
deck or MD
TVC TV or Cable TV tuner
TUN FM/AM tuner
3 Use the number buttons to
enter the 4 digit setup code,
(see pages 87-93 for “Preset
Code List”)
The LED will blink for half a
second after each digit is input and
will show a long, two second blink
to confirm a valid code has been
input.
If the LED blinks three times it
means an invalid code has been
input or an error has occurred.
Check the preset code list and try
again. If you are not able to input
a preset code you can refer to page
75-77 to teach the remote control
individual commands.
The remote control returns to the
previous operation mode. It will
also return to the previous mode
after thirty seconds of inactivity.
4 Repeat steps 1 through 3 to
assign preset codes for as
many components as
necessary.
2 Pulse el botón MULTI
CONTROL para el
componente que desee
controlar.
Cada botón puede ajustarse para
que controle uno de los siguientes
componentes
DVD
TV
VCR
CD
CD-R
TVC
TUN
Reproductor de DVDs/LDs o
DVR
TV, sintonizador para
antena parabólica o
sintonizador para TV por
cable
VCR o grabadora de
vídeo digital
Reproductor de CDs
Grabadora de CDs,
platina de cintas o
MD
TV o sintonizador para
TV por cable
Sintonizador FM/AM
3 Utilice los botones
numerados para introducir el
código de configuración de 4
dígitos. (Consulte las páginas
87-93 para ver la Lista de
códigos predefinidos).
El LED parpadeará durante medio
segundo después de introducir
cada dígito y confirmará con un
parpadeo largo de dos segundos
que se ha introducido un código
válido.
Si el LED parpadea tres veces
significa que se ha introducido un
código no válido o que ha
ocurrido un error. Compruebe la
lista de códigos predefinidos y
vuelva a intentarlo. Si no puede
introducir un código predefinido
puede consultar la página 75-77
para enseñar al mando a distancia
comandos individuales.
El mando a distancia volverá al
modo de operación anterior.
También volverá al modo anterior
después de treinta segundos de
inactividad.
4 Repita los pasos 1 a 3 para
asignar códigos predefinidos
a tantos componentes como
fuera necesario.
2
MULTI CONTROL
Siü) M »
Ttff
DVD/LDÍSSÍtÍ:^DVR
DVD
TV
VCR
CD
CD-R
TVC SÍItlSfeWISSÍlliittl
TUN FM/AM
3 iiffliííuígía -
4
Silfi ' 'ñMmmmwM
mmmmsm
VCRMñíiMÍMW:
CDff Sfeti
cDís^ti '
MD
mim (M^87-93MJ:K)
flAS—fáltíá ’ LEDPATilifi#
ü ’ ffiSEIIAmiWííí “
> «BüfiAítiS
tasítüi ’ #h^75-77h ’ m
71
En/Sp/ChH
Page 72

MEMO:
• You can only input a code for the
component type written on each
MULTI CONTROL button.
• If you recall a preset code for the
tuner (TUN MULTI CONTROL),
you will not be able to control the
built-in tuner of this receiver using
the remote. To reset the remote to
the built-in tuner, input the preset
code 7008.
• To erase the preset code for the
current MULTI CONTROL button,
enter 0000 as the code in step 3.
MEMO:
• Sólo puede introducir un código
para el tipo de componente escrito
en cada botón
• Si rellama a un código predefinido
para el sintonizador (TUN MULTI
CONTROL) no podrá controlar el
sintonizador incorporado de este
receptor utilizando el mando a
distancia. Para volver a ajustar el
mando a distancia para el
sintonizador incorporado,
introduzca el código predefinido
7008.
• Para borrar el código predefinido
para el botón MULTI CONTROL
actual, introduzca 0000 como
código en el paso 3.
MULTI CONTROL.
Plf lB :
• KttIiAfíÉPffiS-MULTI
CONTROL
(TUN MULTI CONTROL)
iSíf^ ’ fiAiBfS£f't5i7008 «
• MtPtSfllMULTI CONTROL
cfj. fiAooooft:SA5Í °
72
En/Sp/ChH
Page 73

Setting Up Using Preset Code Search
An alternative method of setting up
the remote with preset codes is to use
the search feature. The remote
transmits batches of 10 codes; when
you see the component responding
you just scan through those last 10
codes until you find the correct one.
Configuración utilizando la búsqueda de códigos predefinidos
Un método alternativo de configurar
el mando a distancia con códigos
predefinidos es utilizar la
característica de búsqueda. El mando
transmite lotes de 10 códigos; cuando
vea que el componente responde
usted sólo tendrá que examinar esos
últimos 10 códigos hasta que
encuentre el correcto.
í© ©_© ©
l©]@°@ ©
CD CD Cp
® (D CD
CD CÌf^CÈ)
® ® ® ®
o oJd o"
2A
cs-
Wí±i-fflioí@«5i ’
mmmmixm °
LED
3
Switch on the component
you want to control.
If the component is some kind of
player (CD player, VCR, etc.), then
start it playing.
Press and hold SETUP for
three seconds.
The LED lights steadily for two
seconds.
The remote control will also return
to the previous mode after thirty
seconds of inactivity.
Press the MULTI CONTROL
button for the component
you want to control.
Each button can be set to control
one of the following components
DVD DVD/LD player or DVR
TV TV, Satellite tuner or
Cable TV tuner
1 Encienda el aparato que
desea controlar.
Si el componente es algún tipo de
reproductor (reproductor de CDs,
VCR, etc.) haga que comience a
reproducir.
2 Pulse y mantenga pulsado
SETUP durante tres
segundos.
El LED se ilumina continuamente
durante dos segundos. El mando a
distancia también volverá al modo
anterior después de treinta
segundos de inactividad.
3 Pulse el botón MULTI
CONTROL para el
componente que desee
controlar.
Cada botón puede ajustarse para
que controle uno de los siguientes
componentes
DVD
TV
Reproductor de DVDs/
LDs o DVR
TV, sintonizador para
antena parabólica o
sintonizador para TV por
cable
1 »
(CDffffiti'VCR#)
üéíf » «
2 ©TÍÉÍgiíSETUP (ISB)
LEDÍ#«iÍ^2r>ll »
’ SIJÌI0
MULTI CONTROL (^ W Èè
mi) mm °
> ueíüijTii-fi
Ttff
DVD DVD/LDÍiKti^DVR
TV «liti '
73
En/Sp/ChH
Page 74

VCR VCR or Digital Video
Recorder
CD CD player
CD-R CD Recorder, Tape
deck or MD
TVC TV or Cable TV tuner
TUN FM/AM tuner
4 Press and hold SETUP for
two seconds.
A batch of 10 codes is transmitted
and the LED blinks during
transmission. If you see the
component respond, by stopping
(for playback components only) or
switching off, go on to the step 5,
otherwise repeat this step.
If you want to cancel the search
mode, press and hold MUTING for
three seconds (During LED blinks,
it cann’t be cancelled).
5 Switch the component back
on or restart playback.
6 Use the A V buttons to scan
through the last 10 codes
transmitted to identify the
correct code.
The LED will blink during
transmission of the code. Stop
when you see the component stop
or switch off.
You can also verify you have the
correct code by pressing PLAY,
STOP, VOL +/-, etc.
7 Press and hold ENTER for
three seconds to save the
preset code.
The remote control automatically
returns to normal usuage.
MEMO:
• After the remote control has
transmitted all the codes it will go
back to the first code and start
transmitting them again
automatically.
VCR VCR o grabadora de
vídeo digital
CD Reproductor de CDs
CD-R Grabadora de CDs,
platina de cintas o MD
TVC TV o sintonizador para
TV por cable
TUN Sintonizador FM/AM
4 Pulse y mantenga pulsado
SETUP durante dos
segundos.
Se transmitirá un lote de 10
códigos y el LED parpadeará
durante la transmisión. Si ve que
el componente responde
deteniéndose (sólo para
componentes reproductores) o
apagándose, vaya al paso 5. De lo
contrario repita este paso.
Si desea cancelar el modo de
búsqueda, pulse y mantenga
pulsado MUTING durante dos
segundos. 3 segundos (durante los
parpadeos del LED no se puede
seleccionar el modo de búsqueda).
5 Vuelva a encender el
componente o reanude la
reproducción.
6 Utilice los botones A V para
examinar los últimos 10
códigos transmitidos para
identificar el código correcto.
El LED parpadeará durante la
transmisión del código. Deténgase
cuando vea detenerse o apagarse al
componente. También puede
verificar que ha encontrado el
código correcto pulsando PLAY,
STOP, VOL+/-, etc.
7 Pulse y mantenga pulsado
ENTER durante tres
segundos para guardar el
código predefinido.
El mando a distancia retorna
automáticamente a su uso normal.
MEMO:
• Después de haber transmitido
todos los códigos ,el mando a
distancia regresará al primer
código y comenzará a transmitirlos
de nuevo automáticamente.
VCR VCRgclííiÍSÍtti
CD cmM§,
CD-R cmm^ -
MD
TVC
TUN FM/AM filfH
4 íSTiIÉíSiíSETUPÍ$®2?j>
Ü o
ajSHi-ffliofflmi ’
ft. ledPai^ -
m ’ íf± mmmìTim m
liK > mm^ms >
SíiMUTING (ifW) 3&'S
(LEDfATji0#,fiÍ?ÉM) °
ínl °
’ LEDfATii o m\
ir °
ÜlPlgTPLAY (fi®) ’STOP
’ V0L+/“ ( h'm)
m ’ mmm\mxmw^AEm °
7 ©TMÍSiÍENTER (lüA)
mmmm -
51 °
Pli lÍ B =
74
En/Sp/ChH
Page 75

Learning Mode:
Programming Signals
from other Remote
Controls
If preset codes are not available for
your component(s), or the available
preset codes do not operate correctly,
you can use this function to program
in signals from the remote control(s)
of your other component(s). This
operation can also be used after
recalling a preset code to program
additional operations not covered in
the preset codes.
Modo de aprendizaje
(Learning):
Programación de
señaies desde otros
mandos a distancia
Si no dispone de códigos predefinidos
para su(s) componente(s), o si los
códigos predefinidos disponibles no
funcionan correctamente, puede
utilizar esta función para programar
señales del/de los mando(s) a
distancia de su(s) otro(s)
componente(s). Esta operación
también puede utilizarse después de
rellamar un código predefinido para
programar operaciones adicionales
que no están cubiertas por los códigos
predefinidos.
lift ’
3
2
1 Press SETUP and hold for
three seconds.
The LED on the remote control
will light for two seconds.
To cancel the SETUP mode at
any time
Press SETUP.
The remote control will also return
to the previous mode after thirty
seconds of inactivity.
2 Press the MULTI CONTROL
button for the component you want to control.
Pulse SETUP у manténgalo pulsado durante tres segundos.
El LED del mando a distancia se
iluminará durante dos segundos.
Para cancelar el modo SETUP en
cualquier momento
Pulse SETUP.
El mando a distancia también
volverá al modo anterior después
de treinta segundos de inactividad.
Pulse el botón MULTI
CONTROL para el
componente que desee
controlar.
Ь6
1 ígT3É©iíSETUP (HSM)
ÍÍeS±e^LEDÍfi^2ftÍI »
STSETUP °
MULTI CONTROL (^ÍÜ|g
ШШ) mm
»
75
En/Sp/ChH
Page 76

3 Press and hold the RE
CEIVER (1) button for two
seconds to start the LEARN
ING mode.
The LED lights steadily.
To cancel LEARNING setup
mode
Press SETUP for one second.
If no commands are entered
within thirty seconds the remote
will revert to its previous mode.
4 Point the two remote con
trols towards each other.
Press the button to be
learned on this receiver’s
remote control (for example
the ► [play] button).
3 Pulse y mantenga pulsado el
botón RECEIVER O durante
dos segundos para comenzar
el modo de aprendizaje.
El LED se ilumina continuamente.
Para cancelar el modo
configuración de aprendizaje.
Pulse SETUP durante un segundo.
Si no se introduce ningún
comando en treinta segundos el
mando a distancia volverá a su
modo anterior.
4 Apunte los dos mandos a
distancia entre sí. Pulse el
botón que hay que aprender
en el mando a distancia de
este receptor (por ejemplo, el
botón ► [reproducción]).
3 íSTÍtÉíSiíRECEIVER o
(íiM)
mmzmm
-
LEARNING imW) “
^I5)^LEARNING8M^K
gttSETUP (fSfi) Sili#
Ém °
la - (Í5!i5n - ► [«]
m
Point the remote controls directly
at each other, about 2-5 cm apart,
and press the button on the
remote control for the operation
you want to program. The LED
flashes rapidly.
5 Press the corresponding
button on the other remote
control to be taught to this
receiver’s remote control (in
the above example the ►
[play] button).
Point the remote controls toward
each other.
Press the button on the other
remote control corresponding to
the operation you wish to
program. The LED on this
receiver’s remote will go out and
then resume a steady light if the
operation is learned. If the
operation hasn’t been learned for
some reason the LED will blink for
three seconds and then light
steadily. If this happens press the
teaching key repeatedly, varying
the distances between the remotes,
until you see the LED on this unit’s
remote light steadily, without
blinking first.
76
En/Sp/ChH
oopoopQOT
0 odododUoI
Apunte los mandos a distancia
directamente entre sí, a unos 2-5
cm de distancia y pulse el botón
del mando a distancia para la
operación que desea programar. El
LED parpadeará rápidamente.
2 — 5 cm
5 Pulse el botón
correspondiente del otro
mando a distancia que hay
que enseñar al mando a
distancia de este receptor (en
el ejemplo anterior, el botón
► [reproducción]).
Apunte los mandos a distancia
entre sí. Pulse el botón del mando
a distancia correspondiente a la
operación que desea programar. El
LED del mando de este receptor se
apagará y posteriormente volverá a
iluminarse con una luz continua si
se ha aprendido la operación. Si la
operación no se ha aprendido por
alguna razón el LED parpadeará
durante tres segundos y a
continuación se iluminará
continuamente. Si sucede esto
pulse el botón de aprendizaje
repetidamente, variando las
distancias entre los mandos hasta
que vea el LED del mando de esta
unidad iluminarse continuamente
sin parpadear al principio.
©0i00®0^!oi¿jo'^MDi(a[D '
mmmmmmmm ^ ra®2-
5cm ; mrwÉummmn
mmi ° LEmmmm °
mm
m] mm)
ÓBLEOS o ’ BPE'lt
'mimm ° >
Rmmmmmi > ajíSiiefi
g|±É^LED^$feFAl«MI^«lí
“ [íi
»
’ LEDfAi'^3#ii > m
Page 77

To program additional opera
tions for the current component
Repeat steps 4 and 5.
To program operations for
another component
Repeat steps 2 through 5.
6 Press and hold SETUP for
one second to exit the
LEARNING setup mode.
After thirty seconds of inactivity
the remote control will
automatically leave the LEARN
ING mode and revert to its
previous mode.
MEMO:
• Some commands from other
remote controls cannot be learned,
but in most cases the remotes just
need to be moved closer together
or farther apart.
• Certain buttons represent modes
that cannot be learned from other
remote controls. These include;
RCV, CH SELECT, CH LEVEL,
EUNCTION LOUDNESS, EL
DIMMER, MASTER VOLUME and
MUTING .
• TV CONTROL buttons (TV CD,
VOL+/-, and TV FUNC ) can only
be learned in TV & TVC mode.
Para programar operaciones
adicionales para el componente
que esté manejando en esos
momentos
Repita los pasos 4 y 5.
Para programar operaciones
para otro componente
Repita los pasos 2 a 5.
6 Pulse y mantenga pulsado
SETUP durante un segundo
para salir del modo de
configuración de aprendizaje
(LEARNING).
Después de treinta segundos de
inactividad el mando a distancia
abandonará automáticamente el
modo de aprendizaje y volverá a
su modo anterior.
MEMO:
• Algunos comandos de otros
mandos a distancia no pueden
aprenderse, pero en la mayoría de
los casos los mandos sólo
necesitan acercarse o alejarse un
poco.
• Ciertos botones representan
modos que no pueden aprenderse
desde otros mandos a distancia.
Éstos incluyen: RCV, CH SELECT,
CH LEVEL, EUNCTION LOUD
NESS, EL DIMMER, MASTER
VOLUME y MUTING.
• Los botones TV CONTROL (TV CD,
VOL+/- y TV FUNC) sólo pueden
aprenderse en modo TV y TVC.
mm
mm
Siigli2ílj5 o
6 ígT3Éíg1íSETUP it m )
mmmm > míulearning ,
’ iiensiíi
Ür?flLEARNING|l5tíMÍI0ÍIJí®7fe
№86 = I
’ fifefiRcv ^ CH
SELECT ' CH LEVEL
(ISxiS^) 'FUNCTION I
LOUDNESS () ' FL
DIMMER 'MASTER
VOLUME UWm) fflMUTING (ff
■ s') °
• TV CONTROL (Siltifify)
iSffi (TVC!) > VOL+/- (#
m) ’ fflTVFUNC
It) ) flMffiTV&TVClIxtTP
Checking Preset Codes
To check which preset code is
associated with a MULTI CONTROL
button:
1 Press SETUP and hold for
three seconds.
The LED on the remote control
lights for two seconds.
2 Press the MULTI CONTROL
button you want to check the
preset code for.
3 Press and hold ENTER for
two seconds.
Each preset code consists of four
digits, for example 1329. Each
digit will be represented by a series
of blinks on the remote’s LED—3
blinks to represent the digit “3”,
etc. (“0” is represented by 10
blinks.)
Comprobación de códigos predefinidos
Para comprobar qué código
predefinido está asociado con un
botón MULTI CONTROL:
1 Pulse SETUP y manténgalo
pulsado durante tres
segundos.
El LED del mando a distancia se
iluminará durante dos segundos.
2 Pulse el botón MULTI
CONTROL al que desea
comprobar el código
predefinido.
3 Pulse ENTER y manténgalo
pulsado durante dos
segundos.
Cada código predefinido consiste
en cuatro dígitos, por ejemplo,
1329. Cada dígito estará
representado por una serie de
parpadeos en el LED del mando a
distancia. 3 parpadeos representan
al dígito "3", etc. (El "0" está
representado por 10 parpadeos).
MSWIULTI CONTROL
SJ) :
1 ÌSTSÉÌSiÌSETUPÌglHS#
Ü °
MULTI CONTROLiSM =
3 ígT3ÉígffiENTER (liA)
fija > 1329 >
3fc ’ “3” # »
( “0” » )
77
En/Sp/ChH
Page 78

Erasing One of the
Learning Remote Controi
Button Settings
This erases one of the buttons you
have programmed and restores the
factory installed preset to that button.
1 Press SETUP and hold for
three seconds.
The LED on the remote control
will light for two seconds.
2 Press the MULTI CONTROL
button relating to the
function of the button to be
cleared.
The remote control will return to
the previous mode after thirty
seconds of inactivity.
3 Press the RECEIVER CD
button twice within three
seconds to start erase mode.
The LED blinks.
4 Press the button to be
cleared for three seconds.
The LED lights steadily for three
seconds and then goes off.
5 Repeat step 4 to erase other
codes.
6 Press and hold the SETUP
button for one second to exit
the erase mode.
Cómo borrar uno de los
ajustes de botón del
mando a distancia
Esta acción borra uno de los botones que
ha programado y restaura la
configuración instalada en fábrica a ese
botón.
1 Pulse SETUP y manténgalo
pulsado durante tres segundos.
El LED del mando a distancia se
iluminará durante dos segundos.
2 Pulse el botón MULTI
CONTROL relacionado con la
función del botón a borrar.
El mando a distancia volverá al modo
anterior después de treinta segundos
de inactividad.
3 Pulse el botón RECEIVER (D
dos veces antes de que
transcurran tres segundos para
iniciar el modo de borrado.
El LED parpadeará.
4 Pulse el botón a borrar durante
tres segundos.
El LED se iluminará continuamente
durante tres segundos y a
continuación se apagará.
5 Repita el paso 4 para borrar
otros códigos.
6 Pulse y mantenga pulsado el
botón SETUP durante un
segundo para salir del modo de
borrado.
1 ígTaÉíSffisETUP (laa)
65MULTI CONTROL (^10
mmi) mm
»
3 ÍÍ3ÍÜ>ÜF*3 > ígRECEIVER
O (ígM) ’ mm
LEOrAW °
ü °
LEDf#|lií^3#iÍ - m'iMÈÌìi “
6 ÍSTaÉÍSÍÍSETUPÍgíBl#
li ’ °
Clearing All the Remote
Control Settings
Clears all presets, all learned func
tions and restores the factory presets.
1 Press SETUP and hold for
three seconds.
The LED on the remote control
lights for two seconds.
If you want to cancel the
CLEARING mode, press SETUP.
The remote control will also return
to the previous mode after thirty
seconds of inactivity.
2 Use the number buttons to
enter 0123.
The LED lights for half a second
for each digit input. The LED
lights for two seconds to indicate
that the setings have been restored
to the factory presets. (If the LED
blinks three times, then you made
a mistake with the code—try re
78
En/Sp/ChH
entering it.)
Borrado de todos los
ajustes del mando a
distancia
Borra todos los códigos predefinidos y
todas las funciones aprendidas y restaura
los códigos predefinidos de fábrica.
1 Pulse SETUP y manténgalo
pulsado durante tres segundos.
El LED del mando a distancia se
iluminará durante dos segundos.
Si desea cancelar el modo de borrado,
pulse SETUP.
El mando a distancia también volverá
al modo anterior después de treinta
segundos de inactividad.
2 Utilice los botones numerados
para introducir 0123.
El LED se iluminará durante medio
segundo por cada dígito introducido.
El LED se iluminará durante dos
segundos para indicar que se han
restaurado los valores predefinidos de
fábrica. (Si el LED parpadea tres
veces, significa que cometió un error
con el código. Pmebe a introducirlo
de nuevo).
tg ’ áÉitíisijí±iKB#e^íitss °
1 ©TMÍgffiSETUP (iSH)
^SMCLEARNING
5*: ’ lITSETUPlSffi °
2 íiffliíiiZígíH ’ IÍA0123 °
LEDÍ¿^2f#Ü*0;^fS®E'RÍISlJ
($n*LEorAl
Page 79

Direct Function
The direct function is a useful feature
which allows you keep the receiver in
one function (for example, CD) while
putting the remote control in a
different function. This could let you,
for example, use the remote control to
set up and listen to a CD on the
receiver and then use the remote
control to rewind a tape in your VCR
while you continue to listen to your
CD player.
When the direct function is on any
MULTI CONTROL button you press
will change the function of both the
receiver and the remote control. When
you turn the direct function off, you
can operate the remote control without
affecting the receiver. Thus you could
switch the remote control the VCR and
operate that component while the
receiver plays a different component.
To set a MULTI CONTROL button to
direct on or direct off:
1 Press SETUP and hold for
three seconds.
The LED on the remote control
will light for two seconds.
The remote control will also return
to the previous mode after thirty
seconds of inactivity.
2 Press the MULTI CONTROL
button that you want to set
up.
3 Use the number buttons to
enter 9990 (direct on) or
9995 (direct off).
The LED will light for half a
second on each digit input. Then,
the LED will light for two seconds
to indicate that it’s been correctly
set. (If the LED blinks three times,
then you made a mistake with the
code—try re-entering it.)
MEMO:
• TVC doesn’t have this feature and
thus can’t use the direct function.
Función directa
La función directa es una útil
característica que le permite mantener
el receptor en una función (por
ejemplo, CD) mientras pone el
mando a distancia en una función
distinta. Esto le podría permitir, por
ejemplo, utilizar el mando a distancia
para preparar y escuchar un CD en el
receptor y a continuación utilizar el
mando a distancia para rebobinar una
cinta de su VCR mientras continúa
oyendo su reproductor de CDs.
Cuando la función directa esté
activada cualquier botón MULTI
CONTROL que pulse cambiará la
función tanto del receptor como del
mando a distancia. Cuando desactive
la función directa, podrá operar el
mando a distancia sin afectar al
receptor. De esta forma podría activar
el mando a distancia del VCR y
operar ese componente mientras el
receptor reproduce un componente
diferente.
Para ajustar un botón MULTI
CONTROL a función directa activada
0 desactivada (DIRECT ON o
DIRECT OFF).
1 Pulse SETUP y manténgalo
pulsado durante tres
segundos.
El LED del mando a distancia se
iluminará durante dos segundos.
El mando a distancia también
volverá al modo anterior después
de treinta segundos de inactividad.
2 Pulse el botón MULTI
CONTROL que desea
configurar.
3 Utilice los botones
numerados para introducir
9990 (activación de la
función directa) o 9995
(desactivación de la función
directa).
El LED se iluminará durante
medio segundo al introducir cada
dígito. A continuación, el LED se
iluminará durante dos segundos
para indicar que se ha configurado
correctamente. (Si el LED
parpadea tres veces, significa que
cometió un error con el código.
Pruebe a introducirlo de nuevo).
mmv^m
> im
ÍD’CD) >
CONTROL B# > g
’
nmmmmmm
tn»iiegiefiijvcR ’ sfiín^Tt I
m
> íiíí
ft ’ °
fS^MULTI CONTROLgffle^ilS
1 ÍSTMÍSIÍSETUP (ISB)
2 íír”Fíi33ÍBSBfl5MULTI
CONTROL©® »
3 mmrnmmmA9m m
íiílll) ^9995 (H©||
m) °
üÍͱlͧ-HIIA-3^IEfiSft
5i) »
mtñ--
. TVC (siMtiefj) «ittffíi’
MEMO:
• TVC no cuenta con esta
característica y por tanto no puede
utilizar la función directa.
79
En/Sp/ChH
Page 80

CD/MD/CD-R/VCR/DVD/LD/DVR/Cassette Deck Controls
This remote control can control these components after entering the proper codes or teaching the receiver the
commands (see p.70-77).
Use MULTI CONTROL buttons to put the remote control in the stated mode.
Button(s)
SOURCE CD Press to switch the components between STANDBY and ON.
Press to return to the start of the current track. Repeated presses skips to the
start of previous tracks.
Go back channels (channel -).
Play the reverse side of the tape on a reversible deck.
Press to advance to the start of the next track. Repeated presses skips to the
start of following tracks.
► ► 1 Go forward channels (channel +).
Play the forward side of the tape on a reversible deck.
II
► ► Hold down for fast forward playback.
◄ ◄
► Start playback.
■
Number
Buttons
+ 10 Button
DISC Button
• RECORD
Button
MENU
CHANNEL
+/A
V
ENTER Start playback.
< Past rewind the tape.
> Past forward the tape
OAV &
ENTER
Pause playback or recording.
Hold down for fast reverse playback.
Stop playback (on some models, pressing this when the disc is already
stopped will cause the disc tray to open).
Directly access tracks on a program source.
Use the number buttons to navigate the on-screen display.
Select tracks higher than 10. Press this button and the remaining number to
get the track (+10 Button + 3= track 13).
Choose the disc.
Ejects thte disc
Press to switches between the VCR tuner and the TV tuner.
Changes sides of the ED.
Start recording. To prevent accidental recording, this button must be pressed
twice to take effect (the second press must be within 10 seconds of the first).
Displays menus concerning the current DVD or DVR you are using.
Select channels.
Pause the tape.
Stop the tape.
Navigate DVD menus/options.
Function
Components
CD/MD/CD-IWCR/DVD/LD/
DVR/Cassette deck
CDAID/CD-R/DVD/LD
VCR/DVR
Cassette deck
cd/md/cd-r/dVd/ld
VCR/DVR
Cassette deck
CD/MD/CD-R/VCR/DVD/LD/
DVR/Cassette deck
CD/MD/CD-R/VCR/DVD/LD/
DVR/Cassette deck
CD/MD/CD-R/VCR/DVD/LD/
DVR/Cassette deck
CD/MD/CD-R/VCR/DVD/LD/
DVR/Cassette deck
CD/MD/CD-R/VCR/DVD/LD/
DVR/Cassette deck
CD/MD/CD-R/VCR/LD
DVD/DVR
CD/MD/CD-R/VCR/LD
Multiple CD player
MD
VCR/DVR
LD
VCR/DVR
DVD/DVR
VCR/DVR
Cassette deck
Cassette deck
Cassette deck
Cassette deck
Cassette deck
DVD/DVR
80
En
Page 81

Cable TV/Satellite TV/TV/DTV Controls
This remote control can control these components after entering the proper codes or teaching the receiver the
commands (see p.70-77).
Use MULTI CONTROL buttons to put the remote control in the stated mode.
Button(s)
TV (D
TV FUNC.
CHANNEL
+/-
TV VOL +/- Adjust the TV volume. Cable TV/Satellite TV/TV/DTV
SOURCE 0
►►I
II
► ►
◄ ◄
►
■ Use to switch DTV audio tracks
Number
Buttons
+ 10 Button Use to add a decimal point when selecting a specific TV channel. DTV
DISC Button
MENU Select different menus from the DTV functions.
< > AV &
ENTER
EFFECT +/-
Press to switch the DTV on or off
Press to switch the TV or CATV between STANDBY and ON.
Press to switch the TV input. (Not possible with all models. If it doesn't work
with the preset code, use the learning feature.)
Select channels.
Press to switch the DTV on or off
Move to lower numbered channels Cable TV/Satellite TV/TV
Choose the RED commands on a DTV menu. DTV
Use to move to higher numbered channels Cable TV/Satellite TV/TV
Use to choose the YELLOW commands on a DTV menu.
Use as the GUIDE button for navigating DTV
Use to choose the GREEN commands on a DTV menu.
Use to choose the BLUE commands on a DTV menu. DTV
Use to get INFO on the DTV program.
Use to select a specific TV channel.
Use to enter a channel. DTV
Select the menu screen. Cable TV/Satellite TV/TV
Select or adjust and navigate items on the menu screen,
ENTER : Use to bring up the DTV menus.
Press to select or adjust and navigate items on the menu screen.
For TV and cable TV use this button to immediately enter a new channel
(CHANNEL ENTER function). Eor satellite TV use this button to exit the
menu screen.
Function Components
DTV
Cable TV/Satellite TV/TV
TV
Cable TV/Satellite TV/TV/DTV
DTV
DTV
DTV
DTV
DTV
Cable TV/Satellite TV/TV/DTV
DTV
DTV
Cable TV/Satellite TV/TV/DTV
Cable TV/Satellite TV/TV/DTV
MEMO:
• The first four buttons for the VSX-D710S/D810S are dedicated to control the TV assigned to the TVC button. Thus
if you only have one TV to hook up to this system assign it to the TVC MULTI CONTROL button. If you have two
TVs, assign the main TV to the TVC button. If you hook up your system this way, the first four TV controls will
always be accessible.
81
En
Page 82

Controles de la platina de casetes/CDs/MDs/CD-R/VCR/DVDs/LDs/DVR
Este mando a distancia puede controlar estos componentes después de introducir los códigos correctos o de enseñar
los comandos al receptor (consulte las páginas 70-77).
Utilice los botones MULTI CONTROL para poner al mando a distancia en el modo indicado.
82
Sp
Botón(es)
SOURCE CD
► ► 1
II
► ►
►
■
Botones
numerados
Botón +10
CHANNEL
+/-
Botón DISC
Botón •
RECORD
Menu
A
V
ENTER
<1
>
o AV &
ENTER
Función Componentes
Pulse para cambiar los componentes entre estado de espera y
encendido.
Pulse para volver al comienzo de la pista actual. Pulsaciones repetidas
saltan al comienzo de pistas anteriores.
Retrocede canales (canal -).
Reproduce la cara inversa de la cinta en una platina reversible.
Pulse para avanzar hasta el comienzo de la próxima pista. Pulsaciones
repetidas saltan al comienzo de pistas siguientes.
Avanza canales (canal +).
Reproduce la cara delantera de la cinta en una platina reversible.
Hace una pausa en la reproducción o grabación.
Mantenga pulsado para avanzar rápidamente.
Mantenga pulsado para retroceder rápidamente.
Comienza la reproducción.
Detiene la reproducción (en algunos modelos si se pulsa cuando el
disco ya se ha detenido hará que la bandeja de discos se abra).
Acceso directo a pistas en una fuente programada.
Utilice los botones numerados para navegar la pantalla.
Selecciona pistas más altas que 10. Pulse este botón y el número
restante para obtener la pista (botón +10 +3 = Pista 13).
Seleccionar canales VCR/DVR
Elige el disco.
Expulsa el disco.
Pulse para cambiar entre el sintonizador de VCR y el sintonizador de
TV
Cambia las caras del LD.
Comienza la grabación. Para evitar la grabación accidental, debe
pulsarse el botón dos veces para que tenga efecto (la segunda pulsación
debe ser a menos de 10 segundos de la primera).
Muestra menús relativos al DVD o DVR que está utilizando en esos
momentos.
Hace una pausa en la cinta.
Detiene la cinta.
Comienza la reproducción.
Rebobina la cinta.
Avanza la cinta rápidamente.
Navega los menús/opciones de DVD.
Platina de casetes/CDs/
MDs/CD-RA/CR/DVDsA-Ds/
DVR
CDs/MDs/CD-R/DVDs/LDs
VCR/DVR
Platina de casetes
CDs/MDs/CD-R/DVR/LDs
VCR/DVR
Platina de casetes
Platina de casetes/CDs/
MDs/CD-R/VCR/DVDs/LDs/
DVR
Platina de casetes/CDs/
MDs/CD-R/VCR/DVDs/LDs/
DVR
Platina de casetes/CDs/
MDs/CD-R/VCR/DVDs/LDs/
DVR
Platina de casetes/CDs/
MDs/CD-R/VCR/DVDs/LDs/
DVR
Platina de casetes/CDs/
MDs/CD-R/VCR/VCR/LDs/
DVR
CDs/MDs/CD-R/DVDs/LDs
DVDs/DVR
CDs/MDs/CD-RA?CR/LDs
Reproductor de CDs
múltiples
MDs
VCR/DVR
LDs
DVR/VCR
DVD/DVR
Platina de casetes
Platina de casetes
Platina de casetes
Platina de casetes
Platina de casetes
DVD/DVR
Page 83

Controles de la TV por cable/TV por antena parabólica/TV/DTV
Este mando a distancia puede controlar estos componentes después de introducir los códigos correctos o de enseñar
los comandos al receptor (consulte las páginas 70-77).
Utilice los botones MULTI CONTROL para poner al mando a distancia en el modo indicado.
C]
Botón(es)
TV 0
TV FUNC
CHANNEL
+/-
TVVOL+/-
SOURCE Cl)
► ► 1
II
► ►
◄ ◄
►
■
Botones
numerados
Botón +10
Botón DISC
MENU
o AV 6a:
ENTER
EFFECT +/-
Función
Púlselo para encender/apagar un DTV (televisor digital).
Pulse para cambiar la TV o CATV entre el modo de espera y
encendido.
Pulse para cambiar la entrada de TV. (No es posible con todos los
modelos. Si no funciona con el código predefinido, utilice la
característica de aprendizaje).
Selecciona canales.
Ajusta el volumen del TV.
Púlselo para encender/apagar la DTV.
Pasa a canales con menor numeración.
Escoja los comandos RED (rojo) en el menú de un DTV
Pasa a canales con mayor numeración.
Utilícelo para escoger los comandos YELLOW (amarillos) en el menú
de un DTV.
Utilícelo como botón GUIDE para navegar.
Utilícelo para escoger los comandos GREEN (verdes) en el menú de
un DTV.
Utilícelo para escoger los comandos BLUE (azules) en el menú de un DTV.
Utilícelo para obtener INFO sobre el programa DTV
Utilícelo para cambiar entre pistas de audio en un DTV
Utilice para seleccionar un canal de TV específico.
Utilícelo para añadir un punto decimal al seleccionar un canal de TV
específico.
Utilícelo para introducir un canal.
Para seleccionar diferentes menús de las funciones del DTV
Selecciona la pantalla de menús.
Para seleccionar o ajustar y navegar por opciones de la pantalla del menú.
ENTER: Utilícelo para consultar los menús del DTV.
Pulse para seleccionar o ajustar y navegar en la pantalla de menús.
Para TV y TV por cable utilice este botón para introducir inmediatamente un
nuevo canal (Función CHANNEL ENTER). Para TV por antena parabólica
utilice este botón para salir de la pantalla de menús.
Componentes
DTV
TV por cable/TV por antena
parabólica /TV
TV
TV por cable/TV por antena
parabólica /TV/DTV
TV por cable/TV por antena
parabólica /TV/DTV
DTV
TV por cable/TV por antena
parabólica /TV
DTV
TV por cable/TV por antena
parabólica /TV
DTV
DTV
DTV
DTV
DTV
DTV
TV por cable/TV por antena
parabólica /TV/DTV
DTV
DTV
DTV
TV por cable/TV por antena
parabólica /TV
DTV
TV por cable/TV por antena
parabólica /TV/DTV
TV por cable/TV por antena
parabólica /TV/DTV
MEMO:
• Los primeros cuatro botones del VSX-D710S/D810S están dedicados a controlar el TV asignado al botón TVC. Por
tanto, si sólo tiene un TV para conectar a este sistema asígnele el botón TVC MULTI CONTROL. Si tiene dos TV
asigne el TV principal al botón TVC. Si conecta su sistema de este modo, los primeros cuatro controles de TV
estarán siempre accesibles.
83
Sp
Page 84

CD/MD/CD-R/VCR/DVD/LD/DVR/aS:i®^^M}5iy
(ms7o-77M)
SfflMULTI CONTROL
iSM
- )IS5i}SfS«)S$№5iK)MSC»
mB 7U№
SOURCE 0 STnIt7]jijc#S^STANDBY (iiffl) fPON (gS) » CD/MD/CD-R/VCR/DVD/LD/
DVR/^5^il^*^ti
CD/MD/CD-R/DVD/LD
■ RfilMdlM-) »
► ► 1
t»M (®m+) »
II
► ►
◄ ◄
►
■
wm^rnmn “
ST ’ ttii»
ST ’ 'RfiJ»
mmm °
w±mm ’ ffi7t5i¥iiif±i#ST№Sffi >
mill B®sixii5@®±waM»
ism
+ioi$®
DlSCgffi
•RECORD
\mmimm > »aiPTUT»
mmxmo^mm - STittsaffl^Titfi > j^ufsijaii
(+iosffl+3=aai3)
aiTt®»
STWiivcRflif ISinSTItifiitSI “
Bj^SLDiSffijg o
im
MENU HTWlSffiriEffiiifflS^DVDlScDVRfi'^fttg^ »
CHANNEL+/-
A
V
ENTER
<
>
< > AV
fPENTER
mwmm
mmm °
mmm °
VCR/DVR
CD/MD/CD-R/DVD/LD
VCR/DVR
CD/MD/CD-R/VCR/DVD/LD/
DVR/
CD/MD/CD-R/VCR/DVD/LD/
CD/MD/CD-R/VCR/DVD/LD/
DVR/^5iii||^^^ti
CD/MD/CD-R/VCR/DVD/LD/
DVR/^5^i!^^^ti
CD/MD/CD-R/VCR/DVD/LD/
DVR/^S^il^^ifii
CD/MD/CD-R/VCR/LD
DVD/DVR
CD/MD/CD-R/VCR/LD
mmmmm
MD
VCR/DVR
LD
VCR/DVR
DVD/DVR
VCR/DVR
DVD/DVR
84
ChH
Page 85

C!
®fflMULTI CONTROL
TV 0
TV FUNC
{3imm\) iSm
mrim ’ rmmoTv (wimiiti) »
STliLtn^sTANDBY (liffl) ffloN (fga) ¿PbIS^TV (^TI
ti) sSccATv mmm »
STJiLLziSiTvfiA
xi'P’mmmmmi) °
CHANNEL+/-
TV VOL +/-
SOURCE (!)
► ► I
II
► ►
◄ ◄
►
■
Sif «M»
pMISpSiMtS's'M °
mrms ’ ifl§S(ii!!5i«Titi»
WiSTM*M^±Si?RED (life) il^o
ffi®[5iS:iIfi*tg^±)ii?YELL0W (Mf e)
#fiGuiDE (fgjf) ■ >
Ti!Si^ffii[5i€iiii*#b^±Si?BLUE (Mf e)
ffls^ftipiiSiiti®i@±»ixiNFo (*m) »
m.mm
> »
im
green (life) il^o
7C№
mu/mum
«Tlti
wmwmi
mwmmw
m%wm
w^Mwm
mwmmm/
wmmm
S!5i«TIIi
mn/mum.
m'imwmmmwnmm
iiffiSTIti
i!5i«TIIi
»5i«TIS
WMWfW.
mm/mim/
Discaii
MENU
mmsMmmm»
< > AV
fPENTER
ENTER : <=
STLIilif l!cilgi5Ji(S»!±i*t^|IPS±№aiI»
mm’mm
EFFECT +/-
(«MiiAT/)M) »WitmmnM > immmmmHisM^
’ \mimmmLWi&x-mmmm
mmmnm
mm^
Pli iE =
ffii5:^VSX-D71OS/D81OSe^fJffi4f®igffl:i;S5t5Si|5lJiH^illTVCiS$S0^fl;ilti » mu ’
’ ffl«TIfiig®SljTVC MULTI CONTROL (TVC#*tie|IJ) Sffi °
ii ’ iE±«TItiig^SljTVCgffi ’
mM/mmm
imwmmm/
imm/mnm/
[TS
85
ChH
Page 86

Iip
Preset Code List
You can only set these codes for the
buttons that are assigned to the
respective components. So, for
example, the TV codes can only be set
to the TV or TVC button.
TV
TV
ШШШ
Manufacturer
Fabricante
ШШШ
PHILIPS
SONY
PANASONIC
TOSHIBA
TELEFUNKEN
SHARP
SAMSUNG
FERGUSON
MITSUBISHI
GOLDSTAR
BLAUPUNKT
RADIOLA
JVC
DAEWOO
ORION
Code
Código
Ш
1008,1017,1020
1025.1104.1115
1001,1007,1016
1023,1054,1055
1075.1076.1082
1087.1121.1124
1015,1016,1027
1031,1050,1051
1085
1005,1026,1034
1038,1042,1046
1075,1097
1016.1019.1041
1056.1124
1006.1011.1013
1039.1062.1079
1089,1092,1102
1005,1017,1033
1046,1065,1084
1091
1011.1016.1041
1045,1049,1062
1114
1002.1011.1013
1017,1019,1026
1046.1062.1079
1092
1066,1068,1071
1075.1115
1008.1017
1016,1024,1030
1053,1065,1067
1103,1122
1006.1011.1017
1019,1028,1040
1050,1104,1110
1118,1119
1017.1063.1083
1095,1098,1099
1112
SIEMENS
ADMIRAL
1017,1052,1066
1068.1071.1075
1115
1041.1055.1075
1112
ADYSON
AIKO
AKAI
AKURA
ACURA
ALARON
ALBA
ALLORGAN
86
En/Sp/ChH
1014.1079
1040
1013,1074
1080,1089
1006
1063,1078
1006.1016.1017
1080,1103
1095
0 0
Lista de códigos predefinidos
Sólo podrá ajustar estos códigos para
los botones asignados a los
componentes respectivos. Así, por
ejemplo, los códigos de TV sólo
pueden ajustarse al botón TV o TVC.
ANAM
ANAM NATIONAL
AMBASSADOR
AMERICA ACTION
AMPLIVISION
AMPRO
AMSTRAD
ANITECH
AOC
ARCAM
ASBERG
ASUKA
ATLANTIC
AUDIOSONIC
AUDIOVOX
AUTOVOX
BANG&OLUFSEN
BASIC UNE
BAYSONIC
BAUR
ВЕКО
BELCOR
BELL & HOWELL
BEON
BINATONE
BLUESKY
BLUE STAR
BONDSTEC
BOOTS
BPL
BSR
BRADFORD
BRANDT
BRITANNIA
BROCKWOOD
BROKSONIC
BTC
BUSH
CANDLE
CARNIVALE
CARREFOUR
CARVER
CASCADE
CATHAY
CENTURY
CENTURION
CELEBRITY
CCE
CGE
CIMLINE
CINERAL
CITIZEN
1004,1006,1029
1054,1064,1087
1108
1054,1087,1108
1061
1064
1079
1126
1006,1017,1103
1105
1006,1029,1036
1011,1013
1078,1079
1036
1080
1073
1017,1046
1040,1064,1110
1118
1036,1073
1116
1006,1080
1064
1007,1017,1114
1115
1102
1011
1009,1050
1017
1079
1080
1090
1086
1079
1090
1095
1064
1046,1069,1070
1072
1078
1011
1083,1112
1080
1006,1016,1017
1080,1090,1095
1103,1104
1013,1026
1013
1016
1025,1058
1006
1017
1075
1017
1001
1017
1034,1036,1038
1086,1097
1006
1040,1110
1013,1019,1026
1027,1040
шьйтътшш °
S; CLARIVOX
CLATRONIC
i! CME
ÍI CONCERTO
S CONDOR
r CONTEC
1
' CONTINENTAL EDISON 1069,1070
F CRAIG
CROSLEY
F CROWN
1
I
F CRYSTAL
5 CS ELECTRONICS
1 CTC
CURTIS MATHES
1
CYBERTRON
^ CXC
DAINICHI
F DANSAI
! DAYTRON
DECCA
F DEGRAAF
:: DENON
DIXI
F DUAL TEC
1 DUMONT
F DWIN
;! ECE
F ELBE
i ELECTROBAND 1001
ELIN
: ELITE
F ELTA
, EMERSON
I
1
ENVISION
' ERRES
ETRON
EXPERT
i FIDELITY
( FINLANDIA
FIN LUX
1
FISHER
i
F FLINT
^ FORMENTI
- FORTRESS
i: FRONTECH
1017
1036,1086,1102
1007,1015,1114
1026
1098,1102
1006,1016,1064
1078
1072
1054
1025,1034,1036
1038,1075
1006,1017,1019
1036,1064,1102
1106
1109
1078
1086
1009,1013,1019
1022,1023,1025
1026,1027,1041
1047,1050,1057
1110,1113,1129
1131
1080
1064 1077,1080
1017
1006,1011
1017,1032
1074
1047
1006,1017
1079
1010,1011,1031
1125,1127
1017
1088
1017
1080,1098
1006
1011,1018,1019
1050,1061,1062
1063,1064,1075
1083,1090,1112
1118,1119
1013
1008,1017
1006,1120
1073
1078
1074
1017,1031,1032
1044
1050,1074,1079
1096,1102
1111
1017,1075,1098
1041
1055,1086,1089
1109
Page 87

FUJITSU
FUNAI
FUTURETECH
GE
GEC
GELOSO
GENEXXA
GIBRALTER
GOODMANS
GORENJE
GPM
GRAETZ
GRANADA
GRADIENTE
GRANDIN
GRUNDIG
GRUNPY
HALLMARK
HANSEATIC
HARLEY DAVIDSON 1063
HARVARD
HARMAN/KARDON
HCM
HINARI
HISAWA
HITACHI
HUANYU
HYPSON
ICE
ICES
IMPERIAL
INDIANA
INFINITY
INGELEN
INNO HIT
INNOVA
INTEQ
INTERBUY
INTERFUNK
INTERVISION
ISUKAI
ITS
ITT
JBL
JCB
KAISUI
KAMP
KAPSCH
KAWASHO
KEC
KENDO
KNEISSEL
KENWOOD
KINGSLEY
KÖNIG
KORPEL
KOYODA
1032,1063,1073
1059,1063,1064
1089,1095,1096
1064
1012,1022,1023
1041,1062,1090
1110,1129,1131
1017,1020,1032
1072,1079
1006,1075
1055,1080
1010,1011,1013
1016,1017,1032
1079,1103,1104
1102
1080
1055
1017,1032,1048
1074,1079,1100
1024,1026,1058
1090
1031,1066,1068
1072,1115
1063,1064
1062
1017,1098
1029,1064
1025
1006,1090,1105
1006,1016,1017
1080
1090,1111
1014,1016,1018
1020,1021,1026
1044,1046,1047
1055,1069,1070
1079,1081,1097
1078,1104
1017,1089,1090
1079,1089,1103
1080
1034,1036,1038
1086,1102,1106
1017
1025
1055
1032
1017
1010
1029
1017,1055,1086
1114
1017,1029,1043
1079,1089
1080
1103
1055
1025
1001
1006,1078,1079
1080,1090,
1078
1055,1073
1078
1064
1017
1088
1011,1013
1078
1114
1017
1006
KTV
LEYCO
LG
LIESENK&TTER
LLOYTRON
LOEWE
LOGIK
LUMA
LUXMAN
LXI
M ELECTRONIC
MAGNAVOX
MAGNADYNE
MAGNAFON
MAJESTIC
MANESTH
MARANTZ
MARK
MATS Ul
MATSUSHITA
MCMICHAEL
MEDIATOR
MEGATRON
MEMOREX
METZ
MGA
MIDLAND
MINERVA
MINOKA
MINUTZ
MIVAR
MOTION
MOTOROLA
MTC
MULTITECH
NAD
NEC
NECKERMANN
NEI
NETSAT
NICAMAGIC
NIKKAI
NIKKO
NOBLIKO
NORDMENDE
NTC
OCEANIC
ONWA
OPTIMOS
OPTONICA
OSAKI
OSO
1013,1019,1064
1017,1032,1089
1095
1026
1017
1014
1035.1114
1009
1073
1026
1022,1025,1050
1051.1062
1006,1017,1029
1044,1046,1055
1079.1091.1104
1013.1016.1025
1063
1043,1086
1036.1043.1075
1009
1079,1089,1098
1013.1017.1025
1017
1006.1015.1016
1017,1032,1074,
1079,1095,1103
1087
1020
1008,1017
1047.1062
1006.1009.1026
1049.1050.1062
1087,1112
1075
1011,1013,1049
1062
1010,1019,1022
1023
1031.1115
1105
1012
1078,1092,1093
1094
1036
1041
1011.1013.1026
1027,1078,1114
1006.1036.1043
1064,1078
1051.1057.1062
1011.1013.1016
1026,1058
1017.1066.1075
1115
1017,1109
1017
1078
1014.1015.1017
1032,1078,1080
1089
1013.1040.1062
1036.1043
1046,1069,1070
1075,1091
1040
1055,1077
1064
1050,1057,1087
1041,1056
1014,1032,1079
1080.1089.1105
1080
OSUME
OTTO
OTTO VERSAND
PALLADIUM
PANAMA
PATHE MARCONI
PATHE CINEMA
PAUSA
PENNEY
PERDIO
RHAPSODY
PHASE
PHILCO
PHONOLA
PILOT
PORTLAND
PRISM
PROFEX
PROLINE
PROSOCAN
PROTECH
PROTON
PULSAR
PYE
QUASAR
QUELLE
QUESTA
R-LINE
RANK ARENA
RBM
RCA
REALISTIC
REX
REVOX
ROADSTAR
RUNCO
SABA
SACCS
SAISHO
SALDRA
SAMBERS
SAMPO
SAMSUX
SANDRA
SANSEI
SANSUI
SANYO
SBR
1014,1032,1052
1007.1114
1007.1016.1017
1066,1075,1079
1098.1115
1102,1106
1079.1089
1069,1070,1072
1075,1078,1084
1098
1006
1003,1011,1012
1013.1019.1022
1023,1026,1027
1051,1062,1131
1098
1078
1014
1011,1013,1025
1034,1036,1038
1047.1075.1086
1112
1008.1017
1011.1013.1019
1011.1019.1040
1023
1006,1037
1099
1022
1006,1017,1043
1079.1086.1089
1106.1109
1062,1113
1010,1011
1008
1023.1056.1087
1007,1017,1031
1034.1038.1071
1075,1097,1114
1115
1016
1017
1016
1031
1011.1018.1022
1023.1039.1041
1128,1129,1130
1131,1132
1011.1013.1019
1026,1050,1056
1062,1064
1055.1073.1088
1089
1017
1006.1080.1089
1106
1010,1013,1117
1035,1046,1055
1069.1070.1072
1075,1091
1084
1006.1089.1109
1055
1036,1043,1075
1013.1019
1019
1078
1110
1112
1016,1032,1048
1050,1052,1074
1075,1100
1008,1017,1020
87
En/Sp/ChH
Page 88

SCHNEIDER
SCIMITSU
SCOTCH 1062
SCOTT
SEARS
SEG 1016,1036,1079
SEI 1043,1075,1095
SEI-SINUDYNE
SELECO
SEMIVOX
SEMP 1051 i
SENTRA
SHOGUN 1011 1 1 WARDS
SHORAI
SSS
SIAREM
SINDYNE
SIGNATURE 1009
SILVER
SKY
SKY-WORTH 1017
SOLAVOX
SONITRON 1074 ZANUSSI
SONOKO
SONOLOR
SONTEC
SOUNDESIGN 1062,1063,1064 1
SOUNDWAVE 1017,1106 1
SQUAREVIEW 1059 1
STANDARD
STARLITE 1064 i 1 REPRODUCTOR IMDs ^ ^
STERN 1055,1073,1088 1
SUNKAI
SUPERTECH
SUPREME
SUSUMU 1080 1
SYLVAN 1A 1013,1025 Í
SYMPHONIC
SYSLINE
TANDY 1032,1041,1055 I ONKYO
TASHIKO 1016,1020,1079
TEC 1079,1086
TECHNEMA
TECHNICS
TECHNOLACE 1063
TECHWOOD
TEKNIKA
TELEAVIA
TELEMEISTER 1098
TELETECH
TELETON
TENSAI 1080,1095,1098 |
TEXET 1078,1080 1
THOMSON
THORN
TMK
TOMASHI 1090 1
TOTEVISION 1019 1
TRIUMPH
TUTUNG 1017,1032,1079 1
UHER 1073,1096,1098 ^
88
1017,1080,1086
1096,1103
1011
1011,1062,1063
1064,1083
1022,1025,1026
1050,1051,1059
1062,1063
1089
1007
1055,1073,1088
1064 1 1 WALTHAM 1079
1015 1
1095
1011,1064
1043,1075
1043,1075,1095
1016
1017 YAMAHA 1011,1013
1014,1055
1006,1017
1055,1074,1077
1017 1 PIONEER 1018,1046,1055
1006,1079,1080 1
1095,1099 1
1078 1
1001 1
1059 1
1017 Ì 1 SHARP 5403
1079,1080 1
1098
1023,1087,1121
1023,1026
1009,1011,1019
1025,1026,1027
1040,1049,1063
1064
1072 AKAI
1006 i
1016,1073,1079 !
1046,1069,1070 1
1072,1091 1
1015,1017,1032 1
1034,1038,1065 1
1067,1114 1
1026,1061,1062 i
1085 1
ULTRA
ULTRAVOX 1043
UNIVERSUM 1017,1044,1089
VECTOR RESEARCH 1013
VESTEL
VICTOR 1016,1024,1053
VIDEOSAT 1086
VIDEOTECHNIC 1079
VIDIKRON 1025
VIDTECH 1011,1016,1062
VISION
1 VOXSON 1055
1 WATSON
1 WATT RADIO
WEGA
WHITE WESTINGHOUSE 1017,1078
YOKO 1017,1079,1101
ZENITH 1009,1010,1040
¡
1 MD PLAYER
1 аджш
1 Manufacturer Code
1 Fabricante Código
1 ШШШ
1 SONY
1 KENWOOD
1 ORION 5406
DENON 5405
PIONEER 5408
1 LD PLAYER
REPRODUCTOR
Ldmmm
Manufacturer
Fabricante
mmm
BBK 5224
1 CYRUS ЪЖ1
1 DENON
1 DISCO VISION 5201
1 FUNAI 5217
i HITACHI 5201
1 HONG DENG
1 IDALL 5219
1 KEBAO
1 MARANTZ
I MITSUBISHI
i NAD
i PANASONIC
1 PHILIPS 5203, 5207, 5209
1 RADIOLA
^ ROWA
En/Sp/ChH
1067
1102
1017
1087
1098
1017,1098
1043
1009,1011,1012
1013,1025,1026
1056,1062,1063
1016
1098,1112,1118
1119
1109
1073
1112
1057,1060,1091
1107,1123,1124
(nn.m ( nn 1
Ш
5401
5402,5407
5404
Code
Código
im
5222
5202
5213
5215
5203, 5205
5202
5202
5210
5207
5212
SEGA
SHARP
SHINCO
SMC
SONY
SUPER
TELEFUNKEN
TOSHIBA
PIONEER
5201
5221
5211
5220
5204, 5206, 5216
5218
5215
5202
5223
5201,5202, 5208
5214
CD PlAYEB
REPRODUCTOR CDs ^
СдШШШ
Manufacturer
Fabricante
mmm
AIWA
AKAI
ANAM
ARCAM
AUDIOLAB
AUDIOMECA
AUDIO TON
BESTAR
BURMESTER
CALIFORNIA AUDIO
CARVER
CONDOR
CURTIS MATHES
CYRUS
DENON
DKK
DUAL
DYNAMIC BASS
EMERSON
EROICA
FANTASIA
FISHER
GARRARD
GENEXXA
GOLDSTAR
GRUNDIG
HARMAN/KARDON
HITACHI
INKEL
JVC
KENWOOD
KRELL
LINN
LUXMAN
LXI
MAGNAVOX
MARANTZ
MATSU I
MCS
MEMOREX
MERIDIAN
MICROMEGA
MISSION
MITSUBISHI
MTC
NAD
NAIM
NIKKO
NSM
ONKYO
Code
Código
im
5016, 5021
5014, 5020, 5032
5041
5021
5021
5021
5021
5022
5045
LABS 5004
5021,5025, 5046
5018, 5022
5004
5021
5002, 5006, 5040
5060
5001
5031
5025
5038
5053,5054
5051
5024, 5025
5044, 5045
5005, 5038
5043, 5051
5021
5021,5023
5005
5015, 5026, 5046
5011
5003, 5008, 5029
5056, 5057, 5062
5021
5021
5036
5038
5021,5038
5004, 5009, 5017
5021,5026
5021
5004
5022
5021
5021
5021
5014, 5020
5045
5001
5021
5024, 5041,5051
5021
5012, 5013, 5042
5059
Page 89

OPTIMUS
ORION
PANASONIC
PARASOUND 5045
PHILIPS
PMG
POPPY
PROTON
QED
QUAD
QUASAR
RCA
PARASOUND 5045
PHILIPS
PMG
POPPY
PROTON
QED
QUAD
QUASAR
RCA
REALISTIC
REVOX
ROTEL
SAE
SANSUI
SANYO
SCHNEIDER 5018
SCOTT
SEARS
SHARP
SHERWOOD
SONY
SOUDESIGN 5019
TASCAM 5045
TEAC
TECHNICS
THORENS
TOSHIBA
UNIVERSUM
YAMAHA
YORX
VICTOR 5011
WARDS
PIONEER
5001,5005, 5008
5019, 5025, 5038
5045, 5046, 5048
5061
5004,5037
5021,5055
5022
5022
5021
5021
5021
5004,
5010, 5025, 5038
5021,5055
5022
5022
5021
5021
5021
5004,
5010, 5025, 5038
5025, 5026, 5045
5021
5021,5045
5021
5021,5033,5038
5025, 5039
5038
5038
5008, 5026, 5058
5015, 5026, 5031
5001,5027, 5050
5024, 5026, 5044
5045
5004, 5034, 5037
5021
5049
5021
5007, 5028
5047
5010, 5021
5005, 5030, 5035
5038, 5048, 5052
5063
TAPE DECK
PLATINA CASETES ^ ^
mmmmm
Manufacturer Code
Fabricante
mmm
ADC
AIWA
AKAI
ANAM
ARCAM 6005
CARVER
DENON
DUAL
DYNAMIC BASS
EROICA
FISHER
GARRARD 6036
GOLDSTAR 6036
GRUNDIG
HARMON/KARDON 6002,6014
Código
тш
6013
6002, 6022, 6017
6018
6015, 6016
6035
6002,6028
6005, 6039
6037
6028 AMPLIFICADOR
6041
6028
6002
(CD-R) ICD )
1 INKEL
1 JVC
1 KENWOOD
1
1 KYOCERA 6013
1 LOTTE
1 LUXMAN 6029
I MAGNAVOX
I MARANTZ
i
1 MEMOREX
1 MITSUBISHI
NAKAMICHI 6020
1
NIKKO 6035
OLYMPUS
ONKYO
OPTIMUS
PANASONIC
PHILIPS
RCA
RENAISSANCE 6040
REVOX
SAMSUNG
SANSUI
SANYO
SHARP 6019
SONIC
SONY
TEAC
TECHNICS
THORENS
VICTOR
WARDS
YAMAHA
PIONEER
1
1 DVD PLAYER
6003
6027, 6030, 6031
6003, 6004, 6019
6024, 6025
6034
6002
6002
6008, 6009
6016
6029
6010, 6011,6032
6001,6021
6023
6002
6028
6002
6038
6002
6028
6036
6012, 6026, 6033
6038
6023
6002
6027,6030
6001
6006, 6007,6019
6001,6008, 6009
6021,
REPRODUCTOR DVDs W
Manufacturer
Fabricante
mmm
TOSHIBA
SONY
PANASONIC
KENWOOD 5307
JVC
SAMSUNG
AKAI
HARMAN/KARDON
MAGNAVOX 5302
MITSUBISHI 5303
ONKYO
PROSCAN
RCA
SHARP
THETA DIGITAL
TECHNICS 5301
THOMSON
YAMAHA
PHILIPS
ZENITH 5302, 5315
PIONEER
Code
Código
тш
5302
5306
5301,5322
5311,5318
5313
5316
5314
5302, 5317, 5319
5304
5304
5320
5312
5310
5301,5309
5302, 5308
5305, 5312, 5321
5322
AMPLIFIER (tun)
i mxm
Manufacturer
Code
Fabricante Código
l^üiS
ш
1 n\/n 1
AUDIOLAB 8005
DENON 8002
GRUNDIG
MARANTZ 8005
MICROMEGA
PHILIPS 8005
PIONEER
REVOX 8005
TANDBERG
THORENS
YAMAHA
8005
8005
8004
8003
8005
8001,8006
MISC AUDIO
MISCELÁIMEOS AUDIO
MISCSS
Manufacturer Code
Fabricante Código
mmm
JERROLD
STARCOM
SCIENTIFIC ATLANTA 8202
RECEIVERS
RECEPTORES
Manufacturer
Fabricante
mmm
ADC
AIWA
AKAI
ANAM
ARCAM
AUDIOLAB
CAPETRONIC
CARVER
CURTIS
DAEWOO
DENON
DUAL
EROICA
FANTASIA
FERGUSON
FINE ARTS
FISHER
GARRARD
GOLDSTAR
GOODMANS
GP AUDIO
GRUNDIG
HARMAN/KARDON
INKEL
JBL
JVC
KENWOOD
LOTTE
LUXMAN
MAGNAVOX
MARANTZ
MCINTOSH
MCS
MCSILVER
MICROMEGE
NIKKO
OPTIMOS
ONKYO
PALLADIUM
PANASONIC
PHILIPS
тш
8201,8203
8201
Code
Código
im
7042
7012, 7023,7031
7055, 7064
7011,7027
7010, 7046
7018,7048
7059
7042
7055, 7059
7008
7032
7001,7056, 7058
7040
7005
7037
7042
7059
7028
7032,7034,7035
7010
7027
7033
7018,7059
7009, 7051
7038,7040
7009
7007,7036,7042
7003, 7017, 7025
7026,7044,7053
7063, 7066
7037,7039
7021
7030.7042.7055
7059
7004.7018.7055
7059
7020
7004
7037
7018, 7059
7032, 7037,7046
7017, 7034, 7042
7049, 7052
7013, 7029
7050
7004, 7024, 7041
7018, 7030, 7045
7048, 7051,7055
7059 En/Sp/ChH
(tun)
<o
89
m
S'
m
CO
Q)
31
о
Page 90

ГР
90
En/Sp/ChH
PHONOTREND
QUASAR
RCA
RENAISSANCE
REVOX
ROADSTAR
SABA
SAISHO
SAMSUNG
SANSUI
SANYO
SCHNEIDER
SHARP
SHERWOOD
SOUNDESIGN
SONY
TAE KWANG
TEAC
TECHNICS
TELEFUNKEN
THORENS
UHER
VICTOR
WARDS
YAMAHA
PIONEER
VCR
VCR
Manufacturer
Fabricante
PHILIPS
PANASONIC
THOMSON
SONY
JVC
GRUNDIG
AKAI
HITACHI
TOSHIBA
MITSUBISHI
SHARP
ORION
SANYO
FERGUSON
BLAUPUNKT
7038
7004
7006,7042
7043
7018
7027
7042
7027
7010
7027, 7055
7028
7042
7017
7038
7049
7015, 7054, 7057
7060
7034
7010, 7035
7004, 7062, 7065
7019,7024, 7041
7061,7062, 7065
7018, 7059
7027,7042, 7050
7007
7002,7006, 7008
7016,7017
7002, 7008, 7014
7022, 7042, 7047
7050, 7052
(v^
Code
Código
Ш
2015, 2035, 2074
2075
2015, 2042, 2053
2054, 2055, 2087
2021,2064, 2074
2001,2009, 2012
2013, 2014, 2015
2008, 2021,2033
2049, 2050, 2074
2080
2003, 2005, 2007
2010, 2034, 2035
2048, 2050, 2054
2069, 2071,2075
2021,2029, 2038
2060,2063
2001,2004, 2021
2022, 2043, 2056
2057
2021,2023, 2024
2035, 2074
2023, 2027, 2033
2035, 2045
2027, 2073
2002, 2004, 2016
2036, 2046, 2052
2070, 2072, 2078
2025, 2026, 2037
2057
2021,2039, 2064
2065
2003, 2005, 2010
2014, 2041,2042
2048, 2054, 2055
2075
NOKIA
ADMIRAL
ADVENTURA
AIKO
AIWA
AKIBA
ALBA
AMBASSADOR
AMERICAACTION
AMERICAN HIGH
AMSTRAD
ANAM
ANAM NATIONAL
ANITECH
ASA
ASHA
ASUKA
AUDIOVOX
BAIRD
BASIC LINE
BEAUMARK
BELL & HOWELL
BRANDT
BRANDT ELECTRONIC 2021
BROKSONIC
BUSH
CALIX
CANON
CAPEHART
CARVER
CATRON
CCE
CGE
CIMLINE
CINERAL
CITIZEN
CLATRONIC
COLT
COMBITECH
CONDOR
CRAIG
CROWN
CURTIS MATHES
CYBERNEX
CYRUS
DAEWOO
DANSAI
DAYTRON
DECCA
DE GRAAF
DENON
DUAL
DUMONT
DYNATECH
ELBE
ELCATECH
ELECTROHOME
ELECTROPHONIC
EMEREX
2025, 2037, 2038
2057
2027,2052
2001
2059
2001,2017, 2062
2070, 2072
2034
201 i, 2034, 2052
2059, 2063, 2072
2011
2059
2015
2001,2059, 2067
2068
2017, 2042, 2054
2057,2059,2082
2084
2042, 2054, 2087
2034
2017,2035
2057
2017
2017
2001,2021,2037
2039
2011,2034, 2059
2057
2037
2047, 2064, 2065
2002, 2040, 2046
2052, 2078
2034, 2052, 2059
2072
2017
2015
2011
2035
2011
2034, 2059
2001
2034
2059
2017,2059
2011
2034
2072
2011
2017, 2026, 2034
2057,2058
2011.2034, 2059
2015, 2021,2032
2042
2057
2035
2011,2024, 2025
2059, 2083
2034
2011
2001,2035
2022, 2043
2022
2021
2001.2035, 2037
2001
2018
2034
2017
2017
2012
EMERSON
ESC
FIDELITY
FINLANDIA
FINLUX
FIRSTLINE
FISHER
FRONTECH
FUJI
FUNAI
GARRARD
GE
GEC
GENERAL
GOLDHAND
GOLDSTAR
GOODMANS
GO VIDEO
GRAETZ
GRANADA
GRADIENTE
GRANDIN
HANSEATIC
HARMAN/KARDON
HARLEY DAVIDSON
HARWOOD
HCM
HEADQUARTER
HINARI
Hl-Q
HUGHES NETWORK
HYPSON
IMPERIAL
INGERSOL
INTERFUNK
ITT
ITV
JENSEN
KAISUI
KEC
KENDO
KENWOOD
KLH
KODAK
KORPEL
LAYCO
LENCO
LG
LLOYD'S
LOGIK
LOEWE
LUXOR
LXI
M ELECTRONIC
MAGNASONIC
MAGNAVOX
MAGNIN
MANESTH
2001,2002, 2017
2023, 2040, 2046
2051,2052, 2059
2078, 2083
2057, 2059
2001
2035, 2037
2001,2022, 2035
2037
2017, 2023, 2024
2034, 2052
2025, 2026, 2030
2037
2011
2015
2001
2001
2015, 2027, 2032
2057
2035
2011,2028
2034
2017, 2018, 2053
2079
2001.2017, 2034
2059, 2075
2077,2081
2005, 2021,2037
2057
2025, 2035, 2037
2001,2008
2001.2017, 2034
2017
2018, 2035
2001
2034
2034
2025
2004, 2034, 2057
2072
2026
SYSTEMS 2022
2034
2001
2004
2035
2005, 2021,2025
2037, 2038, 2057
2074
2017, 2059
2021
2034
2017, 2059
2038, 2052
2018, 2021,2033
2034
2015, 2017
2034
2034
2059
2079
2001,2051
2004, 2034, 2057
2004, 2005, 2017
2035
2023, 2025, 2027
2037, 2038
2017
2001
2059
2001,2015, 2019
2035
2057
2024, 2034
Page 91

MARANTZ 2003,
MARTA 2017
MATSU I 2004,
MATSUSHITA 2015,
MEI 2015
MELECTRONIC 2018
MEMOREX 2001,
MEMPHIS 2034
METZ 2003,
M6A 2023,
MGN TECHNOLOGY 2057
MINCRVA 2048
MINERVA 2005,
MINOLTA 2022
MOTOROLA 2015,
MTC 2001,
MULTITECH 2001,
MURPHY 2001
NAD 2031
NATIONAL 2054
NEC 2018,
NECKERMANN 2035
NESCO 2034
NIKKO 2017
NIKON 2014
NOBLEX 2057
NOKIA 2021,
NORDMENDE 2021,
OCEANIC 2001,
OKANO 2063,
OLYMPUS 2015,
OPTIMUS 2017,
OSAKI 2001,
OTTO VERSANO 2035
PALLADIUM 2005,
PATHE MARCONI 2021
PATHE CINEMA 2016
PENTAX 2022
PENNY 2015,
2035
2052,
2019,
2027,
2057,
2087,
2042,
2069
2033,
2038,
2065,
2037,
2086,
2034
2020
PERDIO 2001
PHILCO 2015,
PHONOLA 2035
PILOT 2017
PORTLAND 2011
PROFEX 2066
PROFITRONIC 2057
PROLINE 2001
PROSCAN 2032
PROTEC 2034
PULSAR 2019
PYE 2035
QUARTER
QUARTZ
QUASAR
QUELLE
RADIO SHACK
2078
2025
2025
2015, 2042, 2087
2035
2001,2085
2005, 2015
2016, 2036
2070, 2072
2042, 2055
2015, 2017
2025, 2026
2037, 2052
2062, 2085
2088
2005, 2017
2048, 2055
2057
2010, 2048
2027
2057
2034
2020,2021
2037
2025, 2037
2057
2061,2064
2074
2021
2070
2054
2027, 2031
2042, 2077
2087,2088
2017,2034
2017, 2021
2017, 2018
2022, 2057
,
2018, 2052
RADIOLA
RADIX
RANDEX
RCA
REALISTIC
REX
RFT
RICOH
ROADSTAR
RUNCO
SABA
SAISHO
SALORA
SANKY
SANSUI
SAMSUNG
SAVILLE
SBR
SCHAUB LORENZ
SCHNEIDER
SCOTT
SEARS
SEG
SEI
SELECO
SEMP
SENTRA
SHINTOM
SHOGUN
SHORAI
SIEMENS
SILVA
SINGER
SINUDYNE
SOLAVOX
SONOLOR
SONTEC
MKAI
SUNSTAR
SUNTRONIC
SYLVAN IA
SYMHONIC
TASHIKO
TATUNG
TEAC
TEC
TECHNICS
TEKNIKA
TELEAVIA
TELEFUNKEN
TENOSAL
TENSAI
THOMAS
2035
2017
2017
2015, 2022, 2027
2032, 2038, 2057
2001.2015, 2017,
2025, 2026, 2027,
2037
2021,2074
2075
2014
2017, 2034, 2057
2059
2019
2021,2049, 2050
2061,2064, 2065
2074
2004.2016, 2036
2052
2023, 2025, 2038
2019, 2027
2001,2021,2033
2052, 2058, 2078
2024, 2057, 2076
2077
2072
2035
2001,2005, 2021
2037
2001,2034, 2035
2023,2024, 2040
2046
2001.2015, 2017
2022, 2025, 2026
2037
2057.2066
2004, 2035
2021
2024
2011
2034, 2037
2057
2004
2003, 2005, 2010
2017, 2030, 2035
2037, 2048
2017
2024, 2034
2004, 2035
2011
2025
2017
2022
2070
2001
2001
2001.2015, 2023
2035
2001
2001
2001,2021,2035
2001,2021
2011
2015, 2042, 2054
2001.2015, 2007
2017, 2028
2021
2021,2047, 2058
2064, 2074
2034
2001.2066
2001
THORN
TMK
TOTEVISION
TOWADA
UHER
UNITECH
UNIVERSUM
VECTOR
VECTOR RESEARCH 2018,2020
VICTOR 2008,2021, 2033
VIDEO CONCEPTS 2020,2024
VIDEOSONIC 2057
WARDS 2001,2015,2022
WHITE WESTINGHOUSE 2052,2059
XR-1000
XR-1001
XR-1002
YAMAHA
YAMISHI
YOKAN
YOKO
ZENITH
PIONEER
2016, 2021,2037
2051.2057
2017.2057
2066
2057
2057
2001,2006,2010
2017, 2035, 2038
2048, 2057,2067
2024
2026, 2027, 2032
2034, 2035, 2057
2001
2015
2034
2018
2034
2034
2011.2057
2001,2014, 2019
2052,2078
2031,2033, 2035
2044, 2056
, SATEIUTETUNER
i SifSIt: AMT. i>ARAB. ^ ^
Manufacturer
Fabricante
тшт
ABSAT
AST
ALBA
ALDES
AMSTRAD
ANKARO
ANTTRON
ARMSTRONG
ASTRA
ASTRO
AVALON
AXIS
ВТ
ВЕКО
BEST
BLAUPUNKT
BOCA
BRAINWAVE
BRITISH SKY BROADCASTING
BUSH 4002
CNT 4045
CAMBRIDGE 4024
CANAL SATELLITE 4059
CANAL+ 4059
CHANNEL MASTER 4029
COMLINK
CONNEXIONS
CROWN
CYRUS
D-BOX
DDC
DNT
ECHOSTAR
Code
Código
тш
4006
4027
4029,4034,4037
4052
4019
4003,4016, 4025
4038,4039,4042
4013,4019,4030
4044
4009,4034
4015
4005
4008,4039,4045
4031
4030, 4046
4053
4010.
4030
4008
4015,4043
4022
4019
4031
4015
4011
4054
4029
4011,4031
4031,4036,4061
4058
91
En/Sp/ChH
Page 92

EMANON 4034
FTE HUMAX 4060
FERGUSON 4002,
FIDELITY 4016
FINLUX 4005,
FRACARRO 4061
FREECOM 4034
FUBE 4030,
G-SAT 4009
GALAXIS 4019,
GENERAL INSTRUMENT
GOLD BOX 4059
GOODING 4048
GOODMANS 4010
GRUNDIG 4008,
HINARI 4009
HIRSCHMANN 4008,
HITACHI 4037
HOUSTON 4053
HUTH 4013,
ITT 4005
INVIDEO 4061
INTERVISION 4050
JVC 4048
JOHANSSON 4022
KATHREIN 4004,
KREISELMEYER 4008
KYOSTAR 4034
LA SAT 4043,
LENCO 4034
LENNOX 4050
LUPUS 4030
LUXOR 4005,
MANHATTAN 4037,
MARANTZ 4011
MASPRO 4004,
MATSUI 4024,
MEDIASAT 4059
MEDIAMARKT 4015
MINERVA 4048
MORGAN'S 4015,
NAVEX 4022
NEUHAUS 4039
NEUSAT 4057
NEWHAUS 4013
NIKKO 4028
NOKIA 4005,
NORDMENDE 4029
ORBITECH 4039
OXFORD 4024
PACE 4002,
PALLADIUM 4048
PALSAT 4039
PANDA 4037
PHILIPS 4007,
PHONOTREND 4019,
PIONEER 4021,
PLANET 4061
PROMAX 4037
PROSAT 4019
QUADRAL 4029,
RADIOLA 4011
RADIX 4031,
92
RFT 4011,
En/Sp/ChH
4023
4037
4040,
4026
4011,
4049,
4023,
4058
4037,
4009,4010
4024,4032
4031,4034
4057, 4060
4012
4010,4048
4032,4039
4049
4015,4019
4006,4008
4035,4041
4045
4049
4045, 4050
4023
4048
4043
4032,4037
4054,4063
4009,4014
4037,4055
4011,4020
4048,4059
4050
4059
4044
4064
4013,4019
SAT
SABA
SABRE
SAGEM
SALORA
SATCOM
SATEC
SATMASTER
SATPARTNER
SCHWAIGER
SEEMANN
SEG
SIEMENS
SKYMASTER
SONY
STRONG
SUNSTAR
TPS
TANTEC
TECHNISAT
TECHNILAND
TELEFUNKEN
TELEKA
TELESAT
THOMSON
TONNA
TRIAD
TRIASAT
UNITOR
UNIVERSUM
VENTANA
VORTEC
VTECH
WINERSAT
WISI
XSAT
XCOM MULTIMEDIA 4065
ZEHNDER
4027,4038
4023,4045
4037
4056
4005
4026,4051
4009
4026
4022, 4034,4040
4045
4009, 4041
4031,4046
4030,4034
4008
4019,4044,4051
4017, 4018
4062
4043
4056
4023,4037
4001,4039
4026
4034
4015,4052
4051
4037,4059
4026,4053
4027
4040
4022
4008,4049
4011
4034
4027
4022
4008,4027, 4031
4037
4006,4065
4033,4045, 4047
CABLE TV
TV POR CABLE
mumm
Manufacturer
Fabricante
mmm
ABC
ANDOVER
BELL & HOWELL
BIRGMINGHAM CABLE ^
COMMUNICATION 3020 ;
BRITISH TELECOM
CABLETIME
CONTEC
CLYDE
CRYPTOVISION
DAEHAN
DAERYUNG
DECSAT
EVERQUESST
FILMNET
FRANCE TELECOM
GEC
GEMINI
GENERAL INSTRUMENT 3004,3020
GOLDSTAR 3014,3047
GRUNDIG 3035
Code
Código
\m
3002,3003,3004
3006,3008
3037
3006 i
3002,3012
3016,3019,3025
3029
3009
3011
3038
3043
3003
3027
3007
3028
3030
3011
3007
3031,3046
HITACHI
JASCO
JERROLD
LG ALPS
MEMOREX
MNET
NOW
OAK
PACIFIC
PANASONIC
PARAGON 3001
PULSAR
PVP STEREO VISUAL
MATRIX
PIONEER
QUASAR
RADIO SHACK
REMBRANDT
RUNCO
SAMSUNG
SATBOX
SIGNAL
SIGNATURE
STS
SALORA
SCIENTIFIC
SCIENTIFIC ATLANTA 3003, 3008
SEAWOO
STARCOM
STARGATE
STARQUEST
TAIHAN
TELESERVICE
TELE+1
TUDI
TUSA
TOCOM
TONGKOOK
0 0
TOSHIBA 3001
UNITED CABLE
VIDEOWAY
VISICABLE+ 3033
WESTMINSTER
WOLSEYGENE 3037
i ZENITH
1 DVR
DVR
; DVR
Manufacturer
Fabricante
mmm
PIONEER
3004
3007
3002, 3004,3005
3006, 3007,3020
3031,3046
3044
3001
3009,3028
3041
3009
3039
3001,3013
3001
3002
3010,3014,3018
3036
3001
3007
3004
3001
3014,3040
3024
3007
3004
3015
3026
3003, 3032, 3049
3021
3045
3002,3007
3007
3007
3043
3022
3028
3023
3007
3005
3042,3048
3002
3017
3012
3001,3034
(d^ (v^
Code
Código
im
5321
Page 93

Additional
Información
Information
Troubleshooting
Incorrect operations are often
mistaken for trouble and
malfunctions. If you think that there
is something wrong with this
component, check the points below
Sometimes the trouble may lie in
another component. Investigate the
other components and electrical
appliances being used. If the trouble
cannot be rectified even after
exercising the checks listed below, ask
your nearest PIONEER authorized
service center or your dealer to carry
out repair work.
The power does not turn on.
• Connect the power plug to the
wall outlet.
• Disconnect the power plug from
the outlet, and insert again.
• Make sure there are no loose
strands of speaker wire touching
the rear panel. This could cause
the receiver to shut off
automatically.
The unit does not respond when
the buttons are pressed.
No sound is output when a
function is selected.
• Make sure the component is
connected correctly (refer to pages
9 to 28).
• Press MUTING on the remote
control.
• Adjust MASTER VOLUME.
• Press the MONITOR button.
• Press SPEAKERS to select the
speakers you connected.
No image is output when a function
is selected.
• Make sure the component is
connected correctly (refer to pages
9 to 28).
• Press the correct function button.
Considerable noise in radio
broadcasts.
• Tune in the correct frequency.
• Connect the antenna (refer to page
18-19).
• Route □□ RE and digital cables
away from the antenna terminals
and wires.
adicional
Guía de resolución de problemas
Un manejo incorrecto a menudo se
confunde con problemas o
funcionamientos defectuosos. Si cree
que algo va mal con este componente,
compruebe los puntos siguientes. A
veces el problema puede estar en otro
componente. Investigue los demás
componentes y aparatos eléctricos
que se están utilizando. Si no puede
rectificarse el problema incluso
después de llevar a cabo las
comprobaciones listadas a
continuación, consulte con su centro
de servicio o con su distribuidor
autorizado PIONEER más cercano
para que lleve a cabo los trabajos de
reparación.
El aparato no se enciende.
• Conecte el enchufe de
alimentación a la toma.
• Desconecte el enchufe de
alimentación de la toma y vuelva a
enchufarlo.
• Compruebe que no hay hilos
sueltos del cable de altavoces
tocando el panel posterior. Esto
podría hacer que el receptor se
desconectara automáticamente.
La unidad no responde cuando se
pulsan los botones.
Cuando se selecciona una función
no se emite sonido.
• Compruebe que el componente
está conectado correctamente
(consulte las páginas 9 a 28).
• Pulse MUTINO en el mando a
distancia.
• Ajuste el MASTER VOLUME.
• Pulse el botón MONITOR.
• Pulse SPEAKERS para seleccionar
los altavoces que conectó.
Cuando se selecciona una función
no se emite imagen.
• Compruebe que el componente
está conectado correctamente
(consulte las páginas 9 a 28).
• Pulse el botón de función correcto.
Ruido considerable en
transmisiones radiofónicas.
• Sintonice la frecuencia correcta.
• Conecte la antena (consulte la
página 18-19).
• Encamine los cables digitales y □□
RE alejados de los terminales y
cables de la antena.
dsimmix
ttí±#ítíE^IÍifó^íi№t№teP¥
mwi ’ °
PI0NEERfiW]jfHâ^|gKc|i,5^|f
ÄPiiffittiSMiisi ’ affli
o I
mmmmm
«gTIgíBBf »
l3MÍS7íÜflÍ0f»»g|lütli “
«fgÆMSIIÎg (#^^9-28'
kT^fô§§±È'llMUTING (®
»
• PIPMASTER VOLUME (±#
m) °
• STMONITOR (iëlM) g
ffi»
• STSPEAKERS S
ffi’ »
• —ÆSlE®llÎS7i:tt (MS9-28
• ÍIÍiAlI (M®18-19H) »
• mon RFffisfímíiffiSí#®«
93
En/Sp/ChH
Page 94

Fully extend the FM wire antenna,
position for best reception, and
secure to a wall.
Connect an outdoor FM antenna
(refer to page 18-19).
Adjust the direction and position
for best reception.
Connect an additional internal or
external AM antenna (refer to page
19).
Turn off the equipment causing
the noise or move it away from the
receiver.
Place the antenna farther away
from the equipment causing the
Broadcast stations cannot be
selected automatically.
• Connect an outdoor antenna (refer
to page 19).
No sound from surround or center
speakers.
• Refer to “SPEAKERS setting mode”
on page 33 to check the speaker
settings.
• Refer to “Setting the volume level
of each channel” on page 43 to
check the speaker levels.
• Connect the speakers (refer to
page 20-23).
• Make sure that both A and B sets
of speakers are not switched on at
the same time (A+B setting).
Sound is produced from other
components, but not from LD or
DVD player.
• Set SIGNAL SELECT to “DIGITAL”
or “ANALOG” according to the
type of connections made (refer to
page 56-57).
• Set the digital input settings
correctly (refer to pages 41-42).
• Make digital connections (refer to
page 10-11) and set SIGNAL
SELECT to “DIGITAL” (refer to
page 56-57).
• Refer to the instruction manual
supplied with the DVD player.
No audio is output when software
with DTS is played back.
• Make sure your DVD is digitally
connected to this receiver (refer to
page 10-11) and set the SIGNAL
SELECT to “DIGITAL”.
94
En/Sp/ChH
• Extienda totalmente la antena de
cable de FM, posiciónela para
obtener una recepción óptima y
sujétela a la pared.
• Conecte una antena de FM externa
(consulte la página 18-19).
• Ajuste la dirección y posiciónela
para obtener una recepción
óptima.
• Conecte una antena de AM interna
o externa adicional (consulte la
página 19).
• Apague el equipo que está
causando el ruido o aléjelo del
receptor.
• Aleje la antena del equipo que está
causando el ruido.
Las emisoras no pueden
seleccionarse automáticamente
• Conecte una antena externa
(consulte la página 19).
No se emite sonido por los
altavoces surround o central
• Consulte "Modo de configuración
de los altavoces" en la página 33
para comprobar el ajuste de los
altavoces.
• Consulte "Configuración del nivel
de volumen de cada canal" en la
página 43 para comprobar los
niveles de los altavoces.
• Conecte los altavoces (consulte las
páginas 20-23).
• Compruebe que ambos conjuntos
de altavoces A y B no se encienden
al mismo tiempo (configuración
A+B).
Se emite sonido de otros
componentes pero no del
reproductor de LDs o DVDs.
• Ajuste SIGNAL SELECT a
"DIGITAL" o "ANALOG" de
acuerdo con el tipo de conexión
realizada (consulte la página 56-
57).
• Ajuste los valores de entrada
digital correctamente (consulte las
páginas 41-42).
• Realice las conexiones digitales
(consulte las páginas 10-11) y
ajuste SIGNAL SELECT a
"DIGITAL" (consulte la página 56-
57).
• Consulte el manual de
instrucciones suministrado con el
reproductor de DVDs.
No se emite audio cuando se
reproduce software con DTS
• Compruebe que su DVD está
conectado digitalmente a este
receptor (consulte las páginas 10-
11) y ajuste el SIGNAL SELECT a
"DIGITAL".
19K) «
ídíS °
II (M®19M) °
mmmtmTé »
(Mmi9
K) °
• M®33M±É^
• ilSíiSfl (Mm20-23K) »
• (A+Biss) tm
»WfflKffiTtftSÍ - ÍÍd^*í!ÉLD
• ’ dfSIGNAL
SELECT (fails}?) fSSPJ
“DIGITAL” (gffu) M
“ANALOG” (M^56-
) »
• lEíiSBSBftfiifÉAnSlíS 41-42M)
• itÍTÜifiil» (MSio-iiH)
àÈIESIGNAL SELECTfSgflJ
“DIGITAL” »
littí “
(M^lO-lli;) ’ MüfSIGNAL
SEIEECTfS^SlJ “DIGITAL” <■
Page 95

when a search is performed by a
DTS compatible CD player during
playback, noise is output.
• This is not a malfunction, but be
sure to turn the volume down to
prevent the output of loud noise
from your speakers.
Cannot be remote controlled.
• Replace the batteries (refer to page
8).
• Operate within 7 m, 30° of the
remote sensor on the front panel
(refer to page 8).
• Remove the obstacle or operate
from another position.
• Avoid exposing the remote sensor
on the front panel to direct light.
The display is dark or off.
• Press FL DIMMER on the remote
control repeatedly to return to the
default.
If the unit does not operate normally
due to external effects such as static
electricity.
Disconnect the power plug from the
outlet and insert again to return to
normal operating conditions.
Cuando se lleva a cabo una
búsqueda con un reproductor de
CDs compatible con DTS se emiten
ruidos.
• Esto no es un funcionamiento
defectuoso, pero reduzca el
volumen para evitar la salida de
ruido a alto volumen de sus
altavoces.
No se puede controlar con el mando a distancia
• Cambie las pilas (consulte la
página 8).
• Opere a 7 metros y 30° del sensor
a distancia del panel frontal
(consulte la página 8).
• Elimine el obstáculo u opere desde
otra posición.
• No exponga el sensor a distancia
del panel frontal a la luz directa.
La pantalla está oscura o apagada.
• Pulse FL DIMMER en el mando a
distancia repetidamente para
volver a la posición por defecto.
Si la unidad no funciona
normalmente debido a efectos
externos tales como electricidad
estática.
Desconecte el enchufe de la toma y
vuelva a enchufarlo para que vuelva a
las condiciones operativas normales.
’ ^BShIIíÜj °
iifi ’ o
30° (MS8
Wñ ’ ft—ÍIIÍiififi№ °
DIMMER ’iIlUSlJ I
i'jíAÉft p±ífiTaiiifsi ’
Maintenance of External
Surfaces
• Use a polishing cloth or dry cloth
to wipe off dust and dirt.
• When the surfaces are dirty, wipe
with a soft cloth dipped in some
neutral cleanser diluted five or six
times with water, and wrung out
well, and then wipe again with a
dry cloth. Do not use furniture
wax or cleansers.
• Never use thinners, benzine,
insecticide sprays or other
chemicals on or near this unit,
since these will corrode the
surfaces.
Mantenimiento de las
superficies externas
• Utilice un paño de pulir o paño
seco para limpiar el polvo y la
suciedad.
• Cuando las superficies están
sucias, frote con un paño suave
empapado en un limpiador neutro
diluido en cinco porciones de
agua, enjugue el paño para secarlo
y limpie nuevamente con un paño
seco. No utilice limpiadores o cera
para muebles.
• No utilice diluyentes de pintura,
bencina, rociadores de insecticida
u otros productos químicos en o
cerca del aparato porque pueden
corroer las superficies.
—ÉfccfittÍTfcídflJ »
^ - as
' íf ^PfiJ ' Sá
itmmi »
95
En/Sp/ChH
Page 96

Specifications
Amplifier Section
Continuous Power Output (STEREO MODE)
FRONT
.......
100 W + 100 W (DIN 1 kHz, THD 1 %, 8 Q)
Continuous Power Output (SURROUND MODE)
FRONT............................100 W/ch (1 kHz, THD 1 %, 8 Q)
CENTER
SURROUND
SURROUND BACK*
Input (Sensitivity/Impedance)
Frequency Response
Output (Level/Impedance)
Tone Control
..............................
..................
...................................
CD, AUX, VCR/DVR, CD-R/TAPE/MD, DVD/LD,
TV/SAT, VIDEO
.......................................................................
CD, AUX, VCR/DVR, CD-R/TAPE/MD, DVD/LD,
TV/SAT, VIDEO
.....................................................5 Hz to 100,000 Hz -SMB
VCR/DVR OUT, CD-R/TAPE/MD REC
...................................................................... 200 mV/2.2 kQ
BASS...............................................................±6dB(100 Hz)
TREBLE
.........................................................
LOUDNESS
................................
100 W (1 kHz, THD 1 %, 8 Q)
100 W/ch (1 kHz, THD 1 %, 8 Q)
100 W/ch (1 kHz, THD 1 %, 8 Q)
200 mV/47 kQ
± 6 dB (10 kHz)
+9dB (100 Hz/10 kHz)
EM Tuner Section
Frequency Range
Usable Sensitivity
...............................
50 dB Quieting Sensitivity
Signal-to-Noise Ratio
Signal-to-Noise Ratio (DIN)
Distortion
Alternate Channel Selectivity
Stereo Separation
Frequency Response .......................30 Hz to 15 kHz (±ldB)
Antenna Input (DIN).....................................75 Ì2 unbalanced
...............................
Mono: 13.2 dBf, IHF (1.3 pV/ 75 Q)
...............................
.....................
................................
...............................................
.......................
.................................................
87.5 MHz to 108 MHz
Mono: 20.2 dB
Stereo: 38.6 dBf
Mono: 73 dB (at 85 dBf)
Stereo: 70 dB (at 85 dBO
Mono: 62 dB
Stereo: 58 dB
Stereo: 0.5 % (1 kHz)
60 dB (400 kHz)
40 dB (1 kHz)
AM Tuner Section
Frequency Range
Multi voltage model
................................. 531 kHz to 1,602 kHz(9 kHz step)
..............................
Singapore model
Sensitivity (IHF, Loop antenna) ............................... 350 pV/m
Selectivity ..........................................................................30 dB
Signal-to-Noise Ratio
Antenna
................................................................. Loop antenna
530 kHz to 1,700 kHz(10 kHz step)
.............................
.........................................................
531 kHz to 1,602 kHz
50 dB
Signal-to-Noise Ratio
[DIN (Continuous rated power output/50 mW)]
CD, AUX, VCR/DVR, CD-R/TAPE/MD, DVD/LD,
TV/SAT, VIDEO
............................................................................
VIDEO Section
Input (Sensitivity/Impedance)
VCR/DVR, DVD/LD, TV/SAT
..............................................................................1 Vp-p/75 Q
Output (Level/Impedance)
VCR/DVR, TO MONITOR TV OUT
Frequency Response
VCR/DVR, DVD/LD, TV/SAT -> MONITOR
.............................................................
Signal-to-Noise Ratio
.........................................................
...............
5 Hz to 7 MHz V dB
COMPONENT VIDEO Section
Input (Sensitivity/Impedance)
DVD/LD, TV/SAT
Output (Level/Impedance)
TO MONITOR TV OUT............................................1 Vp-p/75 Q
......................................................
96
En
88 dB/64 dB
1 Vp-p/75 Q
55 dB
1 Vp-p/75 Q
Miscellaneous
Power Requirements
Multi voltage model
... AC 110/120-127/220/240 V (Switchable), 50/60 Hz
Singapore model
Power Consumption
VSX-D710S/D710S-G
Multi voltage model ................................................ 660 W
Singapore model
VSX-D810S/D810S-G
Multi voltage model ................................................ 660 W
Singapore model
In Standby
Dimensions
Weight (without package)
VSX-D710S/D710S-G.........................................................9.5 kg
VSX-D810S/D810S-G.......................................................10.5 kg
..............
..........
AC 220-230 V, 50/60 Hz
.......................................................
.......................................................
..................................................................................
....................
420 (W) x 158 (H) x 401 (D) mm
Furnished Parts
AM loop antenna
EM wire antenna........................................
Dry cell batteries (AA size lEC R6P).
Remote control
Operating instructions
NOTE:
• Specifications and the design are subject to possible
modifications without notice, due to improvements.
* VSX-D810S only.
.......................................
..........................................
..............................
Published by Pioneer Corporation.
Copyright © 2001 Pioneer Corporation.
All rights reserved.
250 W
280 W
1 W
Page 97

Especificaciones
Sección del amplificador
Potencia continua (modo estéreo)
Frontales .... 100 W + 100 W (DIN 1 kHz, DAT 1 %, 8 Q)
Potencia continua (modo surround)
Frontales
Centrales............................... 100 W (1 kHz, DAT 1 %, 8 Q)
Surround
Posteriores con surround*
Entrada (Sensitividad/Impedancia)
Frecuencia de respuesta
Salida (Nivel/Impedancia)
Control del tono
....................
...................
..............................
CD, AUX, VCR/DVR, CD-R/TAPE/MD, DVD/LD,
TV/SAT, VIDEO
.......................................................................
CD, AUX, VCR/DVR, CD-R/TAPE/MD, DVD/LD,
TV/SAT, VIDEO
......................................................5 Hz a 100.000 Hz -IdB
VCR/DVR OUT, CD-R/TAPE/MD REC
......................................................................
BASS..............................................................±6dB(100 Hz)
TREBLE.........................................................±6dB(10kHz)
LOUDNESS
100 W/canal (1 kHz, DAT 1 %, 8 Q)
100 W/canal (1 kHz, DAT 1 %, 8 JQ)
100 W/canal (1 kHz, DAT 1 %, 8 Q)
200 mV/2.2 kQ
................................
+9dB (100 Hz/10 kHz)
200 mV/47 kD
Sección del sintonizador de FM
Gama de frecuencias
Sensitividad utilizable
...............................
50 dB Sensitividad de silencio
Relación señal/ruido
Relación señal/ruido (DIN)
Distorsión
Selectividad de canal de substitución ... 60 dB (400 kHz)
Separación estéreo
Frecuencia de respuestas
Entrada de antena (DIN)
............................................
............................
Mono: 13,2 dBf, IHF (1.3 pV/ 75 Q)
.........................
................................
..............................................
.................
................................
87,5 MHz a 108 MHz
........................
Mono: 73 dB (a 85 dBf)
30Hzal5 kHz (±ldB)
Mono: 20.2 dB
Estéreo: 38.6 dBf
Stereo: 70 dB (a 85 dBO
Mono: 62 dB
Estéreo: 0,5 % (1 kHz)
40 dB (1 kHz)
75 asimétrica
Estéreo: 58 dB
Sección del sintonizador de AM
Gama de frecuencias
Modelo multivoltaje
...........
531 kHz a 1.602 kHz (incrementos de 9 kHz)
.........
530 kHz a 1.700 kHz (incrementos de 10 kHz)
Modelo para Singapur
Sensitividad (IHF, Antena de bucle)........................ 350 pV/m
Selectividad...........................................................................30 dB
Relación señaLruido
Antena............................................................Antena de cuadro
....................
............................................................
531 kHz a 1.602 kHz
50 dB
Relación señaVruido
[DIN (Potencia nominal continua/50 mW)]
CD, AUX, VCR/DVR, CD-R/TAPE/MD, DVD/LD,
TV/SAT, VIDEO
............................................................................
88 dB/64 dB
Sección video
Entrada (Sensitividad/Impedancia)
VCR/DVR, DVD/LD, TV/SAT
..............................................................................1 Vp-p/75 Q
Salida (Nivel/Impedancia)
VCR/DVR, TO MONITOR TV OUT
Frecuencia de respuesta
VCR/DVR, DVD/LD, TV/SAT ^ MONITOR
...............................................................5 Hz a 7 MHz dB
Relación señal/ruido............................................................55 dB
...............
1 Vp-p/75 Q
Sección de los componentes de vídeo
Entrada (Sensitivity/lmpedancia)
DVD/LD, TV/SAT
Salida (Nivel/Impedancia)
TO MONITOR TV OUT.....................................1 Vp-p/75 Q
...............................................
1 Vp-p/75 Q
Misceláneos
Alimentación
Modelo multivoltaje
.....
CA 110/120-127/220/240 V (conmutable), 50/60 Hz
Modelo para Singapur
Consumo
VSX-D710S/D710S-G
Modelo multivoltaje....................................................... 660 W
Modelo para Singapur................................................... 250 W
VSX-D810S/D810S-G
Modelo multivoltaje
Modelo para Singapur
En modo de espera.........................................................................1 W
Dimensiones
Peso (sin embalaje)
VSX-D710S/D710S-G..............................................................9,5 kg
VSX-D810S/D810S-G
..............
..............
CA 220-230 V, 50/60 Hz
.....................................................
.................................................
420 (An) x 158 (Al) x 401 (Lg) mm
...................................................
10,5 kg
660 W
280 W
Accesorios suministrados
Antena de cuadro AM
Antena de cable FM
Pilas de célula seca (tipo AA/IEC R6P)
Mando a distancia
Manual de instrucciones
NOTA:
• Las especificaciones y el diseño están sujetas a
posibles modificaciones sin previo aviso debido a la
política de mejoras continuas de la empresa.
* Sólo VSX-D810S.
..................................
......................................
.........................................
..............................
Publicado por Pioneer Corporation.
Copyright © 2001 Pioneer Corporation.
Todos los derechos reservados.
97
Sp
Page 98

]®XpPí0'
lu
............
100 W+100 W (DIN IkHz ’ THD 1Ж > 8 D)
lU
......................
Ф
............................
ЩШШ
(ÍIM»IÍ5Í)
100 W/ch (1 kHz ’ THD 1% ’ 8 D )
100 W ( 1 kHz ’ THD 1% > 8 Q )
............
100 W/ch (1 kHz > THD IX > 8 Q )
100 W/ch (1 kHz > THD 1% > 8 Q.)
«л (МШЙ/Шя)
CD ’ AUX > VCR/DVR > CD-R/TAPE/MD > DVD/LD ’
TV/SAT »VIDEO
............................................................... 200 mV/47 кП
FMÜig^gßi^
ШЩШШ
50 dBffiteSM ...............................................Mono : 20.2 dB
..............
.........
Mono : 13.2 dBf > IHF (1.3 //V/ 75 П)
................................73 dB (at 85 dBf)
87.5 MHz to 108 MHz
Stereo : 38.6 dBf
ïlfi®: 70 dB (at 85 dBf)
ШШй: (DIN) .................................................ЩЩ: 62 dB
irfg*: 58 dB
..................................ÜÜS : 0.5 X (1 kHz)
ÍíSSjÍjIÍ?®
ïlfiSPi*
ЛИИЛ (DIN)
...............................................
.........................................................
...........................
..................................................
30 Hz to 15 kHz (±ldB)
60 dB (400 kHz)
40 dB (1 kHz)
75
CD > AUX » VCR/DVR » CD-R/TAPE/MD » DVD/LD >
TV/SAT » VIDEO
...........................................5 Hz to 100,000 Hz :?dB
»(il (М¥/РДШ
VCR/DVR OUT » CD-R/TAPE/MD REC
............................................................. 200 raV/2.2 kD
...............................................
ÜW
...................................................
Pg
......................................
[DIN (ÎiaSÆÂ^fii±l/50mW) ]
CD » AUX » VCR/DVR » CD-R/TAPE/MD » DVD/LD >
TV/SAT » VIDEO
...................................................................
+9 dB (100 Hz/10 kHz)
±6 dB (100 Hz)
±6 dB (10 kHz)
88 dB/64 dB
ил (ШШЙ/Шл)
VCR/DVR » DVD/LD » TV/SAT
................................................................. 1 Vp-p/75 Q
«tÜ (Ш¥/Шя)
VCR/DVR » ТО MONITOR TV OUT
VCR/DVR » DVD/LD » TV/SAT^MONITOR
......................................................5 Hz to 7 MHz dB
_
1 Vp-p/75 Çi
ШШй: .........................................................................55 dB
штш
^штт§й
................
.........
ШМШ ( IHF » ттш )
ШШШ.
ЛШ ..................................................................................ЩМЛШ
ШШ
531 kHz to 1,602 kHz (9 kHz ßM)
..530 kHz to 1,700 kHz (lO kHz ¿РШ)
.........................
.
........................................................................
..........................................................................50 dB
531 kHz to 1,602 kHz
...........................
350 ^ V/m
30 dB
ШШШ
АС 110/120-127/220/240 V (nJt/)Ä) ’ 50/60 Hz
ЖШШШЗЙ
VSX-D710S/D710S-G
ШМШШЖ
VSX-D810S/D810S-G
.............. АС 220-230 V » 50/60 Hz
.......................................................
........................................................
..................................................... 660 W
..................................................... 280 W
......................................................
...420 (Ш) X 158 (|gj) X 401 (Ш) mm
660 W
250 W
1 w
шл
VSX-D710S/D71OS-G
VSX-D810S/D810S-G
.........................................
..........................................
9.5 kg
10.5 kg
ИЛ (в#М/Шя)
DVD/LD » TV/SAT
ИЖ (М¥/Шя)
ТО MONITOR TV OUT
98
ChH
.................................
.........................
1 Vp-p/75 Q.
1 Vp-p/75 Q
Îl«05g|3№
........................................................................1
щшмм
ШШШ (AAäyiEC R6P)
шшвд»...................................................................................1
lÊBJ =
• > щцшчш ’ »
* fÍfflSÍ^VSX-D810S «
................................................................................
....................................................
.................................................................................1
Mi©2ooi0$5tflÄW]
шштм
1
2
Page 99

99
Page 100

Published by Pioneer Corporation.
Copyright © 2001 Pioneer Corporation.
All rights reserved.
PIONEER CORPORATION 4 i , Meguro 1-Chôme, Meguro-ku, Tokyo 153-8654, Japan
PIONEER ELECTRONICS [USA] INC. P.O. BOX 1540, Long Beach, California 90801-1540, U.S.A.
PIONEER ELECTRONICS OF CANADA, INC. 300 Allstate Parkway, Markham, Ontario L3R OP2, Canada
PIONEER EUROPE NV Haven 1087, Keetberglaan 1, B-9120 Melsele, Belgium TEL: 03/570.05.11
PIONEER ELECTRONICS AUSTRALIA PTY. LTD. 178-184 Boundary Road, Braeside, Victoria 3195, Australia, TEL: [03] 9586-6300
PIONEER ELECTRONICS DE MEXICO S.A. DE C.V. San Lorenzo 1009 3er Piso Desp. 302 Col. Del Valle Mexico D.F. C.P. 03100
TEL: 5-688-52-90
<TNGEW/01B00001>
Printed in Belgium <XRE3038-A>
 Loading...