

Page 1
Operating
Instructions
AUDIO/VIDEO STEREO RECEIVER
N∫m¿Û≤∫
SR
POWER
STANDBY/ON
DOLBY SURROUND
AC-3 PRO • LOGIC
PHONES
Intelligent System Control
AUDIO/VIDEO STEREO RECEIVER
STANDBY
RETURN
RESET
SPEAKERS
A
VIDEO
B
SLEEP
AUDIOL
DIRECT
N∫m¿Û≤∫
VIDEO
VCR 2
VCR 1
R
TV/SAT
LD CD
VIDEO
INPUT
Thank you for buying this Pioneer product.
Please read through these operating instructions so you will
know how to operate your model properly. After you have
finished reading the instructions, put them away in a safe place
for future reference.
In some countries or regions, the shape of the power plug and
power outlet may sometimes differ from that shown in the
explanatory drawings. However, the method of connecting and
operating the unit is the same.
IMPORTANT NOTICE
[For U.S. and Canadian models]
The serial number for this equipment is located on the rear
panel. Please write this serial number on your enclosed warranty
card and keep it in a secure area. This is for your security.
[For Canadian model]
CAUTION: TO PREVENT ELECTRIC SHOCK DO NOT USE
THIS (POLARIZED) PLUG WITH AN EXTENSION CORD,
RECEPTACLE OR OTHER OUTLET UNLESS THE BLADES CAN BE
FULLY INSERTED TO PREVENT BLADE EXPOSURE.
ATTENTION: POUR PREVENIR LES CHOCS ELECTRIQUES
NE PAS UTILISER CETTE FICHE POLARISEE AVEC UN
PROLONGATEUR, UNE PRISE DE COURANT OU UNE AUTRE
SORTIE DE COURANT, SAUF SI LES LAMES PEUVENT ETRE
INSEREES A FOND SANS EN LAISSER AUCUNE PARTIE A
DECOUVERT.
MULTI-JOG
AC-3
PHONO
TAPE 2
TAPE 1
MONITOR
TUNER
TUNING MODE
MPX MODE
FM/AM
DSP OFF
PRO-LOGIC
MEMORY
DOLBY
SELECT
SURROUND MODE
DSP MODE
SUPER
BASS
MASTER VOLUME
INPUT
ATT
GUI
MODE
GUI
ENTER
MIN
TREBLEBASS
+–+–
SUPER BASS
FLAT
MAX
MAX
DEMO MODE
¶The demonstration mode is activated by turning on the
power switch while holding down the RETURN button
(from power standby condition). The demonstration will
appear on the display.
¶Press any button to cancel the demonstration. Activating
the demonstration mode causes memory contents to return
to their original default condition, except the tuner.
U.S. and Canadian models NTSC
Multi-voltage model NTSC/PAL
WARNING: TO PREVENT FIRE OR SHOCK HAZARD, DO
NOT EXPOSE THIS APPLIANCE TO RAIN OR MOISTURE.
RETURN function
This function returns the unit to its initial settings with the
tuner ready to receive a broadcast. This is helpful during
troubleshooting or when no sound is output. For details,
refer to page 13.
RESET function
Set the MASTER VOLUME to minimum before pressing the
RESET button.
Use this function when normal operation is not possible due
to external influences such as static electricity or lightning, or
when operations are not functioning even when the operation
switches are pressed. Press the RESET button to return to
normal operating conditions.
Page 2
IMPORTANT
The lightning flash with arrowhead, within an
equilateral triangle, is intended to alert the user to the
presence of uninsulated "dangerous voltage" within the
product's enclosure that may be of sufficient magnitude
to constitute a risk of electric shock to persons.
SAFETY INSTRUCTIONS
CAUTION
RISK OF ELECTRIC SHOCK
DO NOT OPEN
CAUTION:
TO PREVENT THE RISK OF ELECTRIC SHOCK, DO
NOT REMOVE COVER (OR BACK). NO USERSERVICEABLE PARTS INSIDE. REFER SERVICING
TO QUALIFIED SERVICE PERSONNEL.
The exclamation point within an equilateral triangle is
intended to alert the user to the presence of important
operating and maintenance (servicing) instructions in
the literature accompanying the appliance.
READ INSTRUCTIONS — All the safety and operating
instructions should be read before the appliance is
operated.
RETAIN INSTRUCTIONS
instructions should be retained for future reference.
HEED WARNING
in the operating instructions should be adhered to.
FOLLOW INSTRUCTIONS
instructions should be followed.
WATER AND MOISTURE
be used near water – for example, near a bathtub,
washbowl, kitchen sink, laundry tub, in a wet
basement, or near a swimming pool, etc.
LOCATION
WALL OR CEILING MOUNTING — The appliance
VENTILATION
HEAT
POWER SOURCES
POWER-CORD PROTECTION
POLARIZATION
CLEANING
—
stable location.
should not be mounted to a wall or ceiling.
that its location or position does not interfere with its
proper ventilation. For example, the appliance should
not be situated on a bed, sofa, rug, or similar surface
that may block the ventilation openings; or, placed in
a built-in installation, such as a bookcase or cabinet
that may impede the flow of air through the
ventilation openings.
—
The appliance should be situated away from
heat sources such as radiators, heat registers, stoves,
or other appliances (including amplifiers) that produce
heat.
connected to a power supply only of the type
described in the operating instructions or as marked
on the appliance.
should be routed so that they are not likely to be
walked on or pinched by items placed upon or
against them. Pay particular attention to cords at
plugs, convenience receptacles, and the point where
they exit from the appliance.
provided with a polarized power plug, please read the
following instructions. This product is equipped with
a polarized alternating current line plug (a plug having
one blade wider than the other). This plug will fit into
the power outlet only one way. This is a safety
feature. If you are unable to insert the plug fully into
the outlet, try reversing the plug. If the plug should
still fail to fit, contact your electrician to replace your
obsolete outlet. Do not defeat the safety purpose of
the polarized plug.
—
with a polishing cloth or a soft dry cloth. Never clean
with furniture wax, benzine, insecticides or other
volatile liquids since they may corrode the cabinet.
—
The safety and operating
—
All warnings on the appliance and
—
All operating and use
—
The appliance should not
The appliance should be installed in a
—
The appliance should be situated so
—
The appliance should be
—
Power-supply cords
—
If your purchased product is
The appliance should be cleaned only
—
POWER LINES
located away from power lines.
NONUSE PERIODS
should be unplugged from the outlet when left
unused for a long period of time.
OBJECT AND LIQUID ENTRY
so that objects do not fall and liquids are not spilled
into the enclosure through openings.
DAMAGE REQUIRING SERVICE
should be serviced by a Pioneer authorized service
center or qualified service personnel when:
The power–supply cord or the plug has been
•
damaged.
•
Objects have fallen, or liquid has been spilled into the
appliance.
•
The appliance has been exposed to rain.
•
The appliance does not appear to operate normally or
exhibits a marked change in performance.
•
The appliance has been dropped or the enclosure
damaged.
SERVICING
the appliance beyond that described in the operating
instructions. All other servicing should be referred to
qualified service personnel.
ELECTRIC
SERVICE
EQUIPMENT
FIG. A
An outdoor antenna should be
—
The power cord of the appliance
—
Care should be taken
—
The appliance
—
The user should not attempt to service
GROUND
GROUND
GROUND
GROUND
GROUND
GROUND
GROUND
GROUND
GROUND
GROUND
GROUND
CLAMP
CLAMP
CLAMP
CLAMP
CLAMP
CLAMP
CLAMP
CLAMP
CLAMP
CLAMP
CLAMP
GROUND CLAMPS
POWER SERVICE GROUNDING
ELECTRODE SYSTEM
(NEC ART 250, PART H)
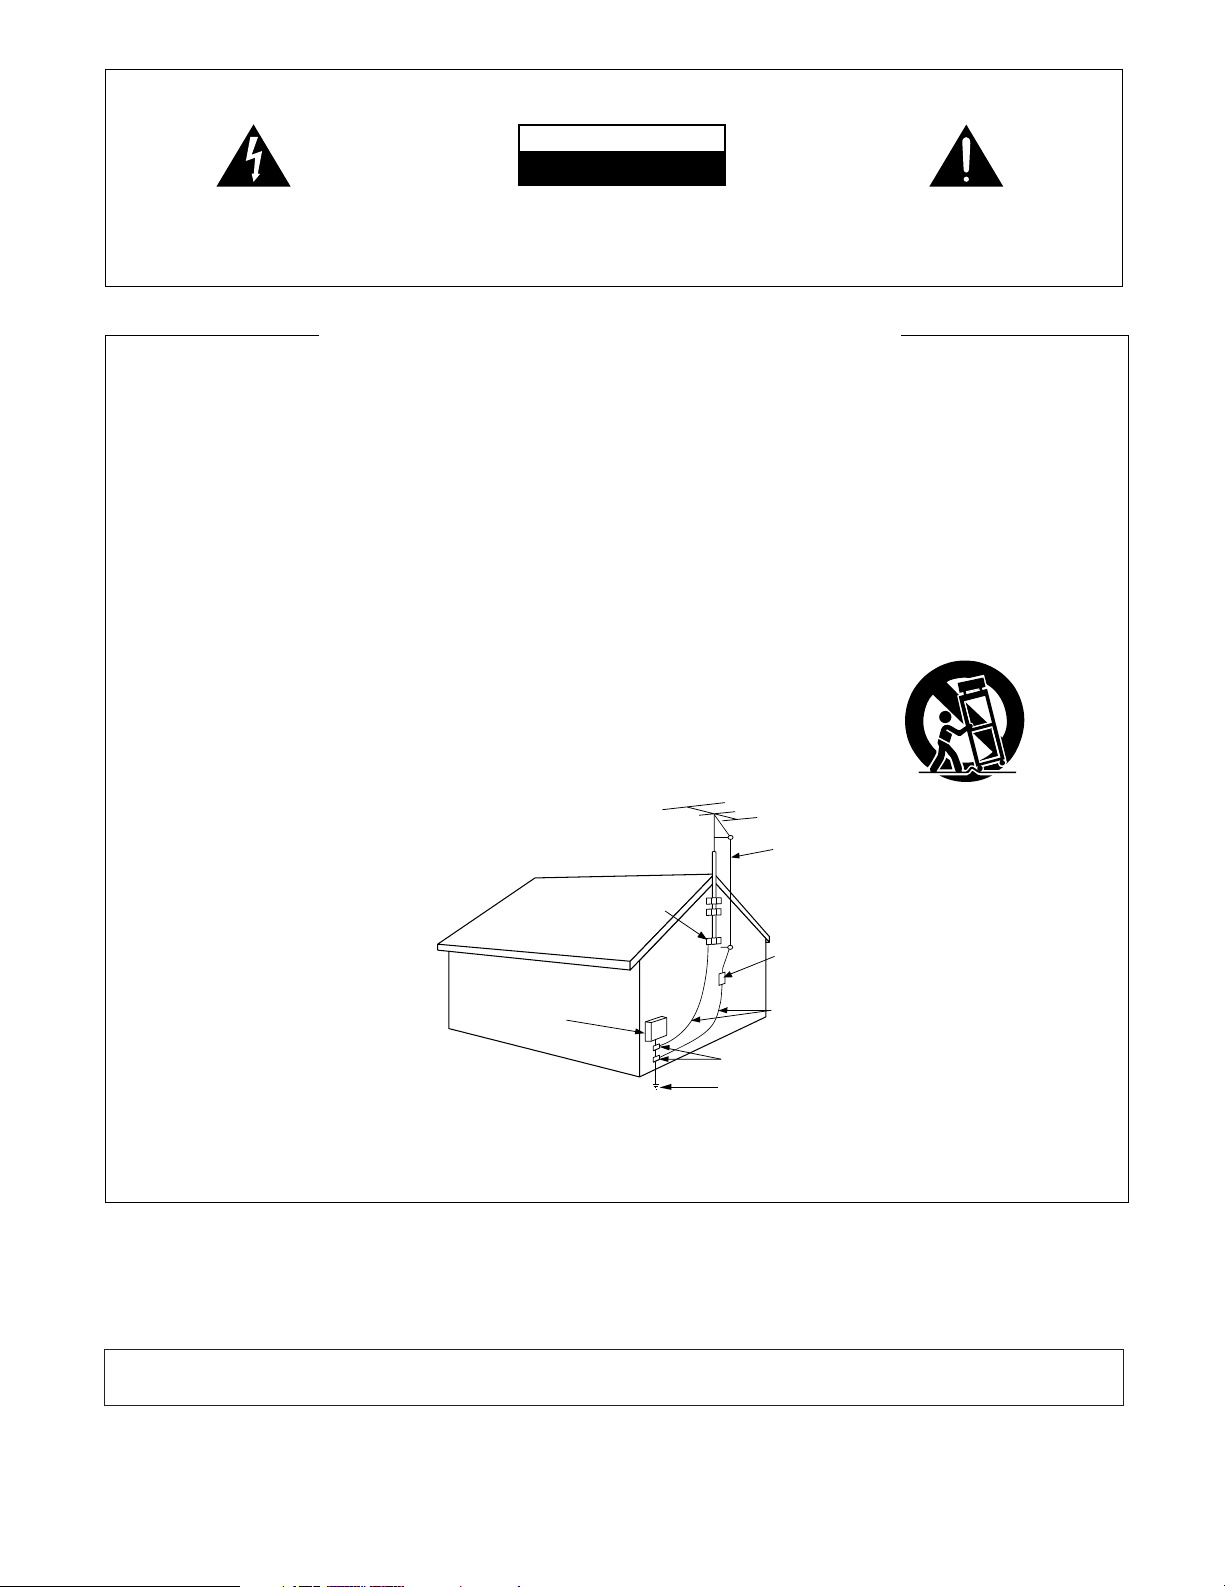
OUTDOOR ANTENNA GROUNDING
antenna is connected to the antenna terminal, be
sure the antenna system is grounded so as to
provide some protection against voltage surges and
built-up static charges.
In the U.S.A. section 810 of the National Electrical
Code, ANSI/NFPA 70, provides information with
respect to proper grounding of the mast and
supporting structure, grounding of the lead-in wire to
an antenna discharge unit, size of grounding
conductors, location of antenna discharge unit,
connection to grounding electrodes, and
requirements for the grounding electrode. See Fig. A.
CART
—
An appliance and cart combination should be
moved with care. Quick stops, excessive force, and
uneven surfaces may cause the appliance and cart
combination to overturn.
NEC — NATIONAL ELECTRIC CODE
ANTENNA
LEAD-IN
WIRE
ANTENNA
DISCHARGE UNIT
(NEC SECTION 810
GROUNDING CONDUCTORS
(NEC SECTION 810
–
20)
–
21)
—
If an outside
Note to CATV system installer
This reminder is provided to call the CATV system installer’s attention to Article 820-40 of the NEC that provides guidelines for proper
grounding and, in particular, specifies that the cable ground shall be connected to the grounding system of the building, as close to the
point of cable entry as practical.
Information to User
Alteration or modifications carried out without appropriate authorization may invalidate the user’s right to operate the equipment.
2
<ARB7050>
Page 3
INSPECTION CHECKLIST
CONTENTS
The Pioneer Receiver is packaged with the following
items:
FM T-type antenna
AM Loop Antenna
Main-Repeater
Mini-Repeater
BEFORE OPERATING
INSPECTION CHECKLIST ............................................................ 3
INSTALLATION ............................................................................ 4
SETTING THE SWITCHES
FOR THE MULTI-VOLTAGE MODEL ONLY ...................... 4
INSTALLATION PRECAUTIONS ............................................. 5
CONNECTIONS
ANTENNA CONNECTIONS .................................................... 6
AUDIO SYSTEM CONNECTIONS .......................................... 7
VIDEO SYSTEM CONNECTIONS ........................................... 8
SPEAKER SYSTEM CONNECTIONS ...................................... 9
IR REPEATER CONNECTION ................................................ 10
PANEL FACILITIES
REAR PANEL FACILITES............................................................ 11
FRONT PANEL FACILITIES ........................................................ 13
DISPLAY SECTION ............................................................... 15
OPERATIONS
OPERATING THE TUNER .......................................................... 16
TUNING INTO STATIONS .................................................... 16
FREQUENCY PRESETTING .................................................. 16
LISTENING TO BROADCASTS USING PRESET TUNING ... 16
RECEIVING FM SIMULCAST TV PROGRAMS ..................... 17
OPERATING THE AUDIO/VIDEO COMPONENTS..................... 17
PLAYBACK ............................................................................ 17
RECORDING WITH A CASSETTE DECK.................................... 18
RECORDING WITH TAPE 1 ................................................... 18
RECORDING WITH TAPE 2 ................................................... 18
USING VCR 1, VCR 2 FOR AUDIO RECORDING .................. 18
COPYING TAPES .................................................................. 18
VIDEO RECORDING ................................................................... 19
SURROUND EFFECT.................................................................. 19
Remote control unit
Dry cell batteries
(size “AA” IEC R6P) x 2
Warranty Card
(Not supplied in multi-voltage model.)
Operating Instructions
If any of these items were not included in the package, contact
the dealer where you purchased the product from to obtain the
missing items or a complete replacement.
REMOTE CONTROL OPERATION
PUTTING BATTERIES INTO THE REMOTE CONTROL UNIT
REMOTE CONTROL RANGE ................................................ 20
RECEIVER CONTROL BUTTONS .......................................... 21
OPERATING OTHER COMPONENTS ................................... 21
OPERATING USING GUI
RECEIVER CONTROL BUTTONS .......................................... 24
OPERATING THE TUNER .......................................................... 25
MANUAL/AUTO TUNING ..................................................... 25
PRESET TUNING .................................................................. 25
OPERATING OTHER COMPONENTS ........................................ 26
COPY OPERATION ..................................................................... 28
USING THE VIDEO SIGNAL SELECTOR ................................... 28
SOUND EDIT OPERATION ........................................................ 29
SETTING THE SPEAKER MODE ........................................... 29
LEVEL AND BALANCE ADJUSTMENT ................................ 30
REMOTE SET UP........................................................................ 31
ONE TOUCH OPERATION SET UP............................................ 33
TROUBLESHOOTING ................................................................ 34
APPENDICES
APPENDIX A: SPECIFICATIONS ................................................ 36
APPENDIX B: SURROUND EFFECT .......................................... 37
APPENDIX C: DOLBY AC-3 SURROUND .................................. 38
... 20
<ARB7050>
3
Page 4

INSTALLATION
FM 50kHz
/50μS
AM 9kHz
CHANNEL
/FM DE-
100kHz
/75μS
10kHz
STEP
EMPHASIS
SETTING THE SWITCHES FOR THE MULTI-VOLTAGE MODEL ONLY
TWO VOLTAGE SELECTOR SWITCHES
(Not available on U.S. and Canadian models)
Only multi-voltage models are provided with these
switches. U.S. and Canadian models are not provided
with these switches. Mains voltages in Saudi Arabia are
127 V and 220 V only. Never use this model with the 110
V setting in Saudi Arabia.
The line voltage selector switches are on the rear panel. Before
your model is shipped from the factory, these switches are set
to the power requirements of the destination. Check that they
are set properly before plugging the power cord into the
household wall socket. If the voltage is not properly set or if you
move to an area where the voltage requirements differ, adjust
the selector switches as follows.
1. Use a medium-size screwdriver.
2. First, insert the screwdriver in the groove of the voltage
selector at the right, and adjust so that the tip of the groove
points to the voltage value of your area.
3. Next, insert the screwdriver in the groove of the voltage
selector at the left and adjust until the voltage is the same as
at the right.
TWO VOLTAGE SELECTORS
110V
120〜127V
CHANNEL STEP/FM DE-EMPHASIS SWITCH
(Not available on U.S. and Canadian models)
The unit has been factory preset to the channel allocation and
de-emphasis value for the area in which it is to be sold. If these
values are set incorrectly, the tuned in frequency may be wrong,
or sound may be distorted, resulting in an inability to reproduce
reception signals at their proper sound quality. For this reason,
be sure to confirm that the values are set correctly before first
using the unit.
(FM 100 kHz/75 µs, AM 10 kHz) position:
Set to this position for areas with an FM reception step of 100
kHz, de-emphasis 75 µs and AM 10 kHz.
(FM 50 kHz/50 µs, AM 9 kHz) position:
Set to this position, for areas with an FM reception step of 50
kHz, de-emphasis 50 µs and AM 9 kHz.
NOTE:
When unsure about the channel allocation and de-emphasis
values for your area, consult your dealer for correct information.
220V
240V
220V
110V
240V
120-127V
Medium-size screwdriver
PAL/NTSC SWITCH
(Not available on U.S. and Canadian models)
This unit uses the TV screen to operate the system. Set the rear
panel PAL/NTSC switch to match your TV’s color system. The
screen will be unclear if the color system does not match.
PAL NTSC
4
<ARB7050>
Page 5
INSTALLATION
INSTALLATION PRECAUTIONS
INSTALLING THE RECEIVER
÷Place the unit on a stable platform next to the television and
stereo system to be used with the unit.
÷When using the unit with a stereo system, your speakers
should be placed away from your television (or TV monitor).
÷Do not place heavy objects such as a television or TV monitor
on top of the unit.
÷Do not place the unit on top of your TV set or TV monitor. Also,
keep the unit away from devices such as cassette decks which
are sensitive to magnetic fields.
If the cassette deck is installed in the A positions as shown in
the drawing below, it may be adversely affected during
playback. If possible, it is better to install it in the B position.
A
A B
INSTALL THE RECEIVER IN A WELL-VENTILATED
PLACE AWAY FROM HEAT AND HUMIDITY
Do not install the unit in a location subject to direct sunlight, or
near a stove or radiator, etc. This could adversely affect the
cabinet and internal components. Also, avoid installing the unit
in a humid or dusty location. This could result in a malfunction
or accident. Do not install near a cooking stove where the unit
could be affected by smoke, steam, or heat. Avoid placing the
unit on surfaces such as shaggy carpets, beds and sofas which
may block ventilation under the unit and may cause damage.
÷The rear panel vents are designed to disperse heat from the
unit. Be careful that curtains or other items do not block the
vents.
÷ To improve heat dispersion, set the unit so that it is at least
20 cm (8 inches) away from the wall.
At least 20 cm (8 inches)
Receiver
A
POWER-CORD CAUTION
Handle the power cord by the plug. Do not pull out the plug by
tugging the cord and never touch the power cord when your
hands are wet as this could cause a short circuit or electric
shock. Do not place the unit, a piece of furniture, etc., on the
power cord, or pinch the cord. Never make a knot in the cord or
tie it with other cords. The power cords should be routed such
that they are not likely to be stepped on. A damaged power cord
can cause a fire or give you an electrical shock. Check the power
cord once in a while. When you find it damaged, ask your
nearest PIONEER authorized service center or your dealer for a
replacement.
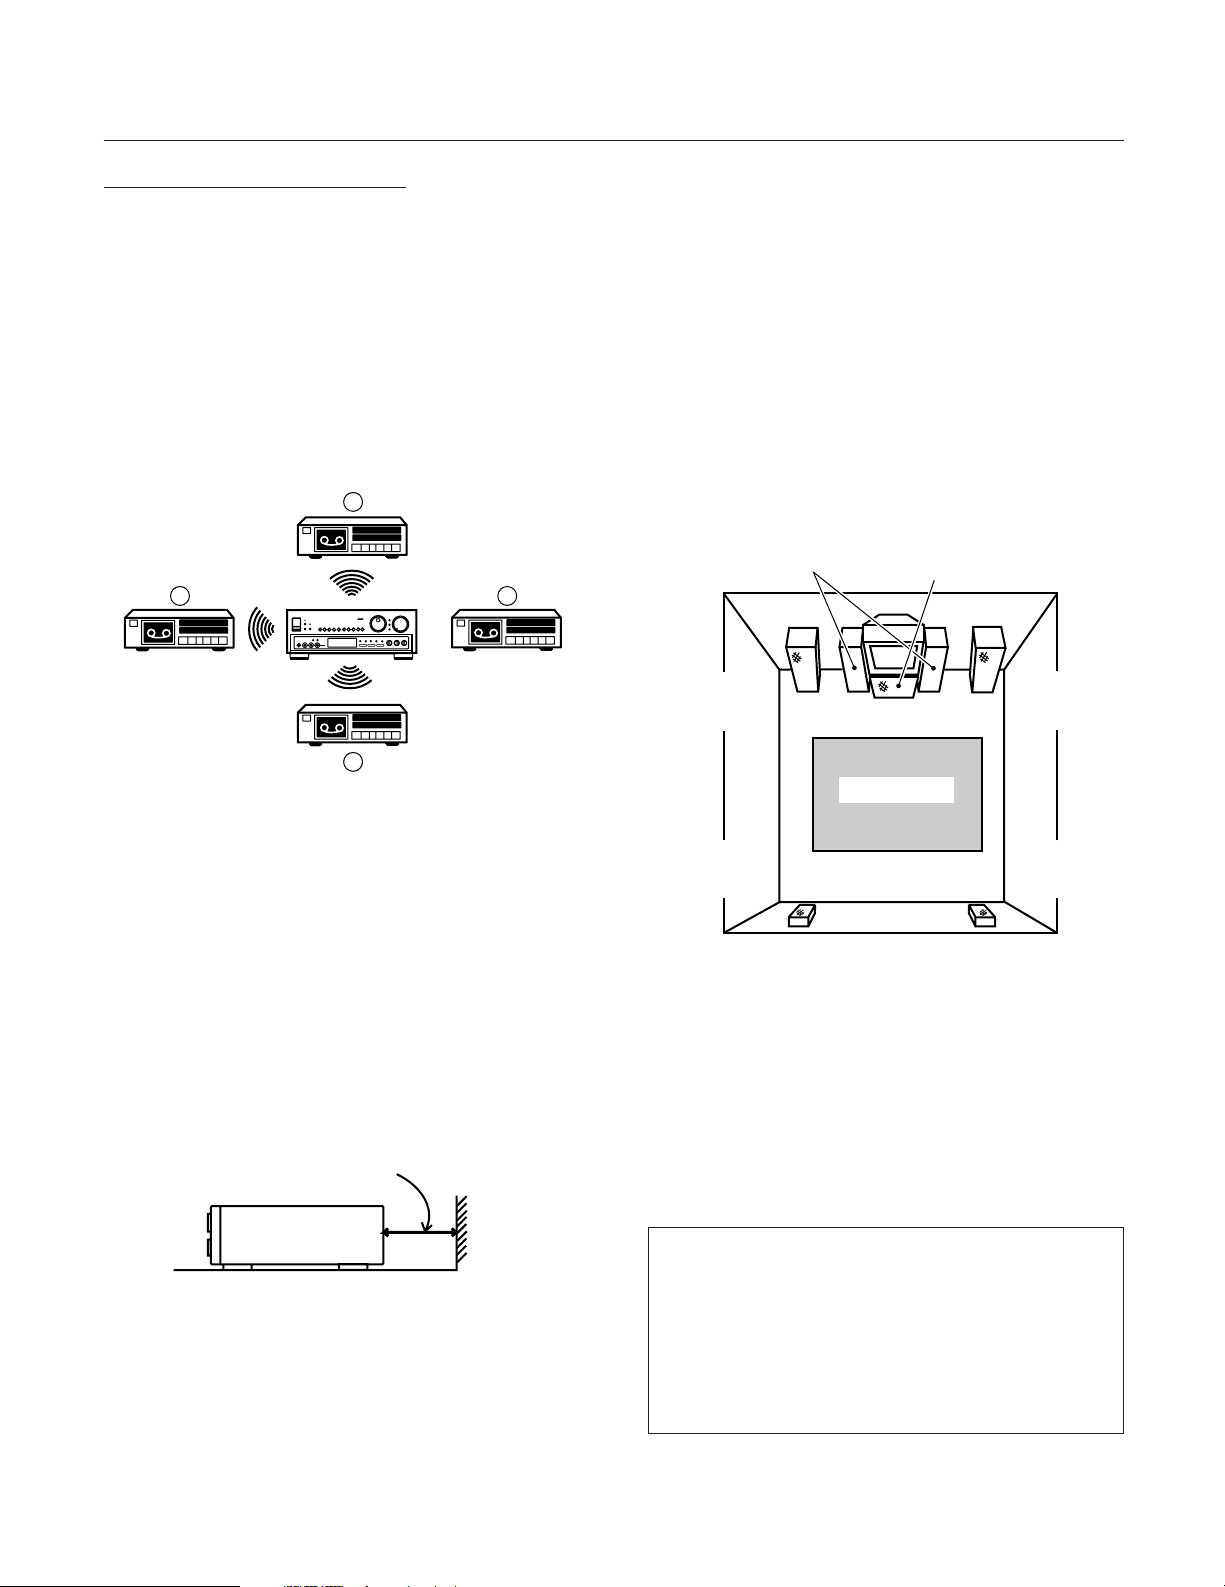
SURROUND SPEAKER INSTALLATION EXAMPLE
To get the best effect out of the surround system, place the
speakers as shown below.
An example for center speaker location
When using dual center
speakers
LEFT
FRONT
SPEAKER
LEFT
SURROUND
SPEAKER
CENTER SPEAKER
Listening Area
NOTE:
÷
To avoid interference with the picture on a nearby TV set, use
magnetically shielded speaker systems. This is particularly
important for the center speaker since it is usually located
closest to the TV.
÷
Position the left and right channel speakers at equal distances
from the TV set and approximately 1.8 m (6 feet) from each
other.
÷
Position the center speaker above, below, or behind the TV set.
Sound may not appear to coincide with the picture if you
position it next to the TV set.
÷
Rear speakers are best positioned slightly above ear level.
When using a single
center speaker
TV
FRONT
REAR
RIGHT
FRONT
SPEAKER
RIGHT
SURROUND
SPEAKER
You can set this unit to match the requirements and
specifications of your stereo system’s speakers (whether or
not center speaker(s), rear speakers or a sub-woofer are
used, speaker size, etc.) to assure optimum sound quality.
Before using, perform settings in the SPEAKER MODE (refer
to page 29).
NOTE:
This unit does not feature conventional switching between
NORMAL/ WIDE / PHANTOM center modes.
<ARB7050>
5
Page 6
CONNECTIONS
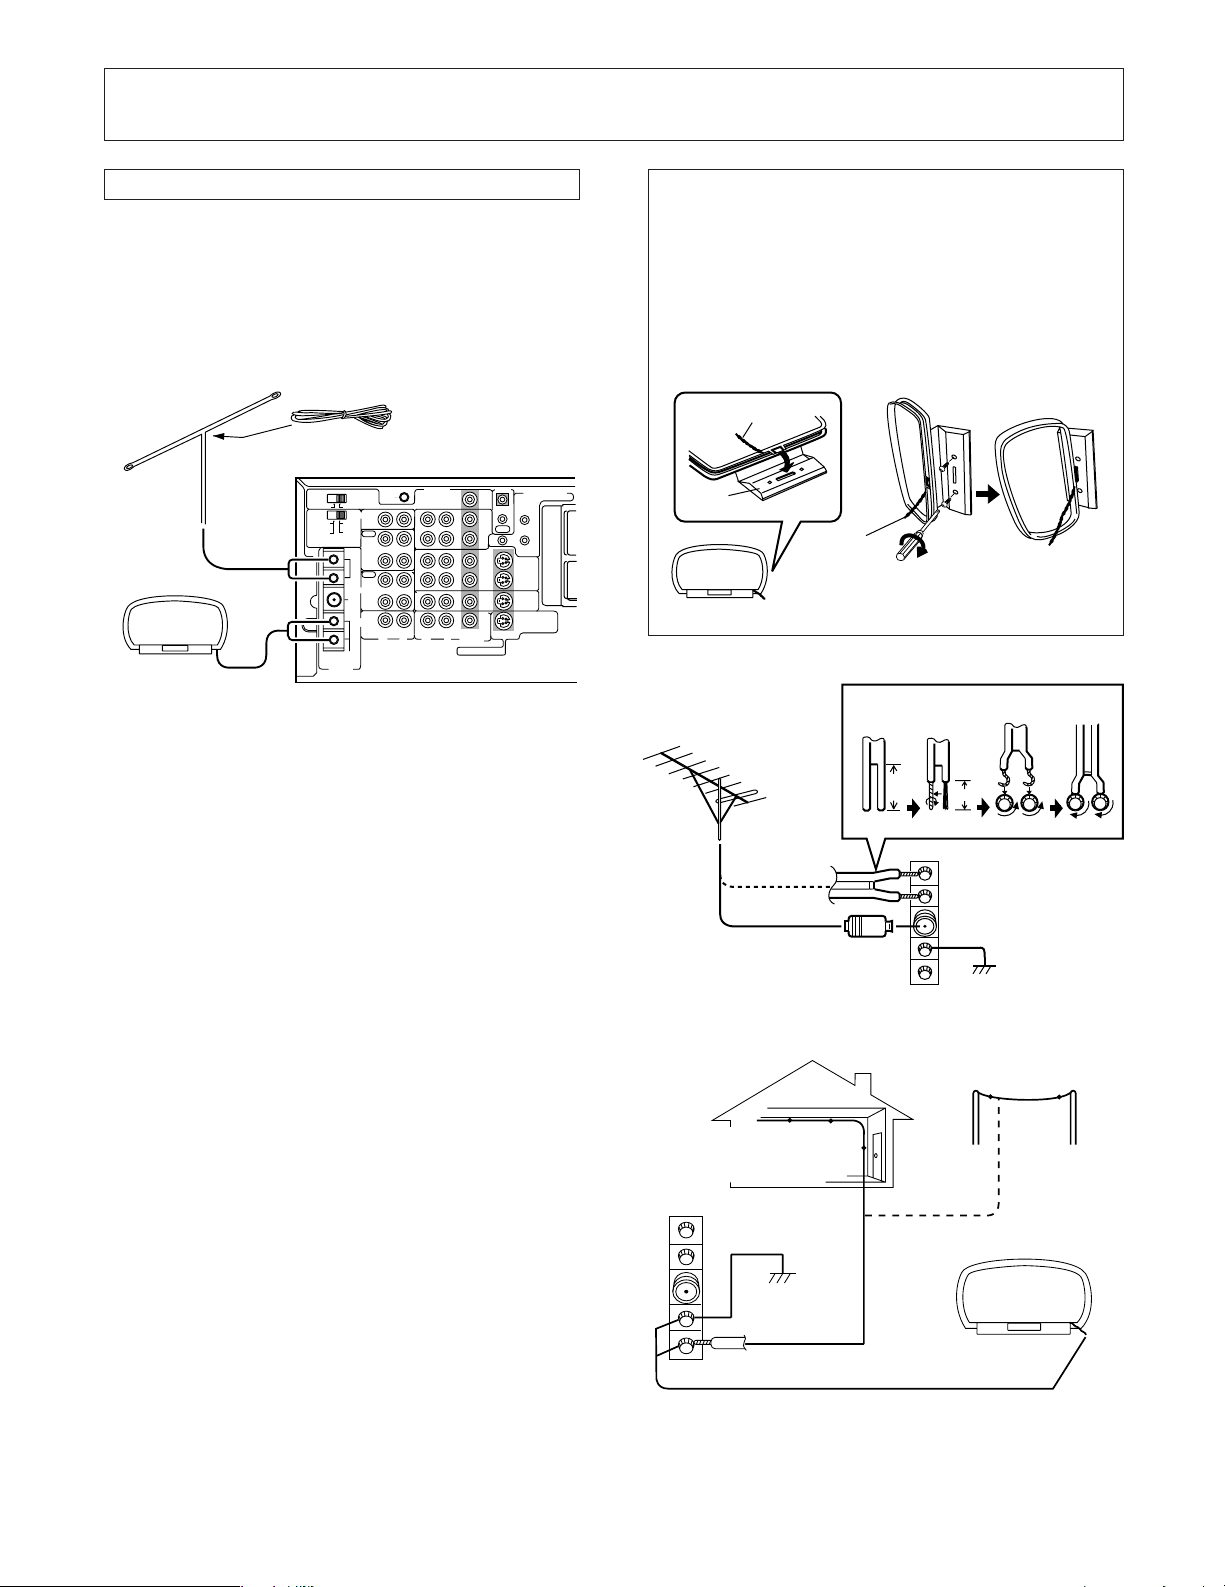
ANTENNA CONNECTIONS
NOTE FOR FM ANTENNA:
Stretch the antenna out to its full length and affix it to a wall, etc.
NOTE FOR AM LOOP ANTENNA:
The antenna should be placed at a distance from the receiver,
and should not be allowed to touch metallic objects. Avoid
placing it near CD players, personal computers, television sets
and other devices generating radio frequencies.
Accessory FM T-type antenna
Stretch the antenna out
to its full “T” shape and
affix it to a wall, etc.
VIDEO OUT
GND
TO MONITOR TV
IN
REC
TAPE2
MONITOR
PLAY
REC
TAPE1
PLAY
CD
IN
R
R
L
Accessory AM
loop antenna
PAL
NTSC
PHONO
FM 50kHz
100kHz
/50μS
/75μS
AM 9kHz
10kHz
STEP
CHANNEL
EMPHASIS
/FM DE-
FM
BAL
300Ω
FM
UNBAL
75Ω
GND
AM
LOOP
ANTENA
ANTENNA
Illustration shows Multi-voltage model.
7 OUTDOOR FM ANTENNA
The main advantage of FM over AM is the quality of the
broadcast signal. In order to benefit fully from the high signal
quality of FM broadcasts, it is recommended that a specialpurpose FM antenna be installed. In weak signal areas, a multielement (3-, 5-, or 7-element) antenna should be used.
7 GROUNDING
Grounding is recommended if reception of FM programs is
impaired by noise. To ground, connect a thick polyvinyl insulated
wire to the GND terminal and attach the other end to a metal
water pipe or grounding bar or wind it around a copper plate
and bury it.
CAUTION:
Never connect a wire to a gas pipe for grounding since sparks may
ignite the gas.
7 EXTERNAL AM ANTENNA
If it is not possible to obtain adequate AM reception even by
changing the orientation of the AM loop antenna, a separate
indoor antenna, or an outdoor antenna should be installed.
INDOOR AM ANTENNA
Use a vinyl insulated wire (5 — 6 m, 17 — 20 feet), and connect
one end to the AM antenna terminal and affix the other end to
the wall or ceiling, as high as possible.
OUTDOOR AM ANTENNA
If reception quality is not improved sufficiently even when an
indoor antenna is used, a vinyl insulated wire should be installed
outside and fixed in place.
NOTE:
Do not detach the AM loop antenna when using an indoor or an
outdoor AM antenna.
CONTROL
SYSTEM CONTROL
IR OUT
MAIN-
IN
REPEATER
OUT
OUT
VCR2
IN
2
1
MINIREPEATER
OUT
S
VCR1
OUT
S
IN
IN
LD
S
IN
IN
TV
/SAT
IN
L
VIDEO
SEE INSTRUCTION MANUAL
MANUFACTURED UNDER LICENSE FROM DOLBY LABORATORIES LICENSING CORPORATION.
"DOLBY","AC-3", "PRO LOGIC" AND THE DOUBLE-D SYMBOL ARE TRADEMARKS OF
DOLBY LABORATORIES LICENSING CORPORATION.
TO
S
MONITOR
OUT
TV
Setting Up the AM Antenna
÷Insert the claw on the bottom of the antenna into the
groove in the leg.
÷ Place the antenna on a level surface and rotate it to locate
the orientation that yields the best reception.
÷Use the attachment hole in the leg to screw to a wall or
other location, then insert the claw on the bottom of the
antenna into the groove in the leg (affixing the antenna in
the direction that gives the best reception.)
Lead wire
Leg
Lead wire
Twist the wire strands together.
FM outdoor antenna
30
300 Ω feeder
coaxial 75 Ω cable
F-type plug
Indoor AM wire antenna
(Polyvinyl insulated wire)
GROUND
(1-3/16)
Unit: mm (in)
15(9/16)
GROUND
Outdoor AM antenna
AM loop antenna
6
<ARB7050>
Page 7
AUDIO SYSTEM CONNECTIONS
NOTE:
Dolby Surround will not operate correctly if the signal passes
through a graphic equalizer.
When using Dolby Surround, turn off the TAPE 2 MONITOR
button or set the graphic equalizer for flat response or to its
through (defeat) setting.
Cassette deck 2
When using a graphic equalizer
CONNECTIONS
★ Connect when using a PIONEER projection monitor
receiver's built-in speaker as a center speaker.
Refer to the projection monitor's operating
instructions for details concerning connection and
operation.
LINE
L
R
PLAY
REC
INPUT
OUTPUT
L
R
R
Turntable
L
REC
(L, R)
IN
From L and R
REC jacks
L
R
L
R
L
R
R
PAL
NTSC
PHONO
FM 50kHz
100kHz
/50μS
/75μS
AM 9kHz
10kHz
STEP
CHANNEL
EMPHASIS
/FM DE-
FM
BAL
300Ω
TAPE1
FM
UNBAL
75Ω
GND
CD
AM
LOOP
ANTENA
ANTENNA
L
R
L
R
VIDEO OUT
GND
TO MONITOR TV
IN
REC
TAPE2
MONI-
TOR
PLAY
REC
PLAY
IN
R
R
L
Illustration shows Multi-voltage model.
L
CONTROL
SYSTEM CONTROL
IR OUT
MAIN-
IN
REPEATER
OUT
OUT
VCR2
IN
2
1
MINIREPEATER
OUT
S
VCR1
OUT
S
IN
IN
LD
S
IN
IN
TV
/SAT
IN
L
VIDEO
SEE INSTRUCTION MANUAL
MANUFACTURED UNDER LICENSE FROM DOLBY LABORATORIES LICENSING CORPORATION.
"DOLBY","AC-3", "PRO LOGIC" AND THE DOUBLE-D SYMBOL ARE TRADEMARKS OF
DOLBY LABORATORIES LICENSING CORPORATION.
TO
S
MONITOR
OUT
TV
AC-3•
DIGITAL IN
TV
/SAT
PLAY
(L, R)
Graphic equalizer
OUT
To L and R
PLAY jacks
SUB WOOFER
PRE
OUT
I
SPEAKER
IMPEDANCE
8Ω〜16Ω
AC-3•
RF IN
R
/SPEAKER
LD
L-AUDIO
(MONO)
LD
PIONEER Projection
monitor receiver
★
TWO VOLTAGE SELECTORS
SPEAKER
CENTER
SELECTOR
PRE
OUT
I+II
CENTER
SPEAKERS
ONLY
I
SEE
II
INSTRUCTION
MANUAL
R
L
REAR
SPEAKERS
R
SPEAKER
IMPEDANCE
8Ω〜16Ω
/SPEAKER
CAUTION:
THE POWER
SUPPLY CORD SHOULD
BE DISCONNECTED
BEFORE CHANGING
THE VOLTAGE
SELECTOR.
A
FRONT
SPEAKERS
B
SPEAKER IMPEDANCE
8Ω〜16Ω/SPEAKER
110V
120〜127V
220V
240V
L
SWITCHED
TOTAL 100W MAX
UNSWITCHED
100W MAX
L
CAUTION:
DO NOT CONNECT
TV SET CR MONITOR.
220V
AC OUTLETS
240V
120-127V
110V
AC wall socket
Cassette deck 2
L
R
L
R
LINE
L
R
PLAY
REC
INPUT
OUTPUT
L
R
OUTPUT
L
R
AUDIO
CD
CD playerCassette deck 1
NOTE:
Before connecting pin jacks, speaker cables and other jacks and cables, switch power to the unit
OFF, and wait for about one hour. (When power is ON, the rear panel may become very hot.)
Built-in amplifier
woofer, monaural
amplifier, etc.
To connect the Pioneer
IN
S-W1000 Powered Subwoofer, connect from the
receiver’s SUB WOOFER
PRE OUT to the subwoofer input.
7
<ARB7050>
Page 8
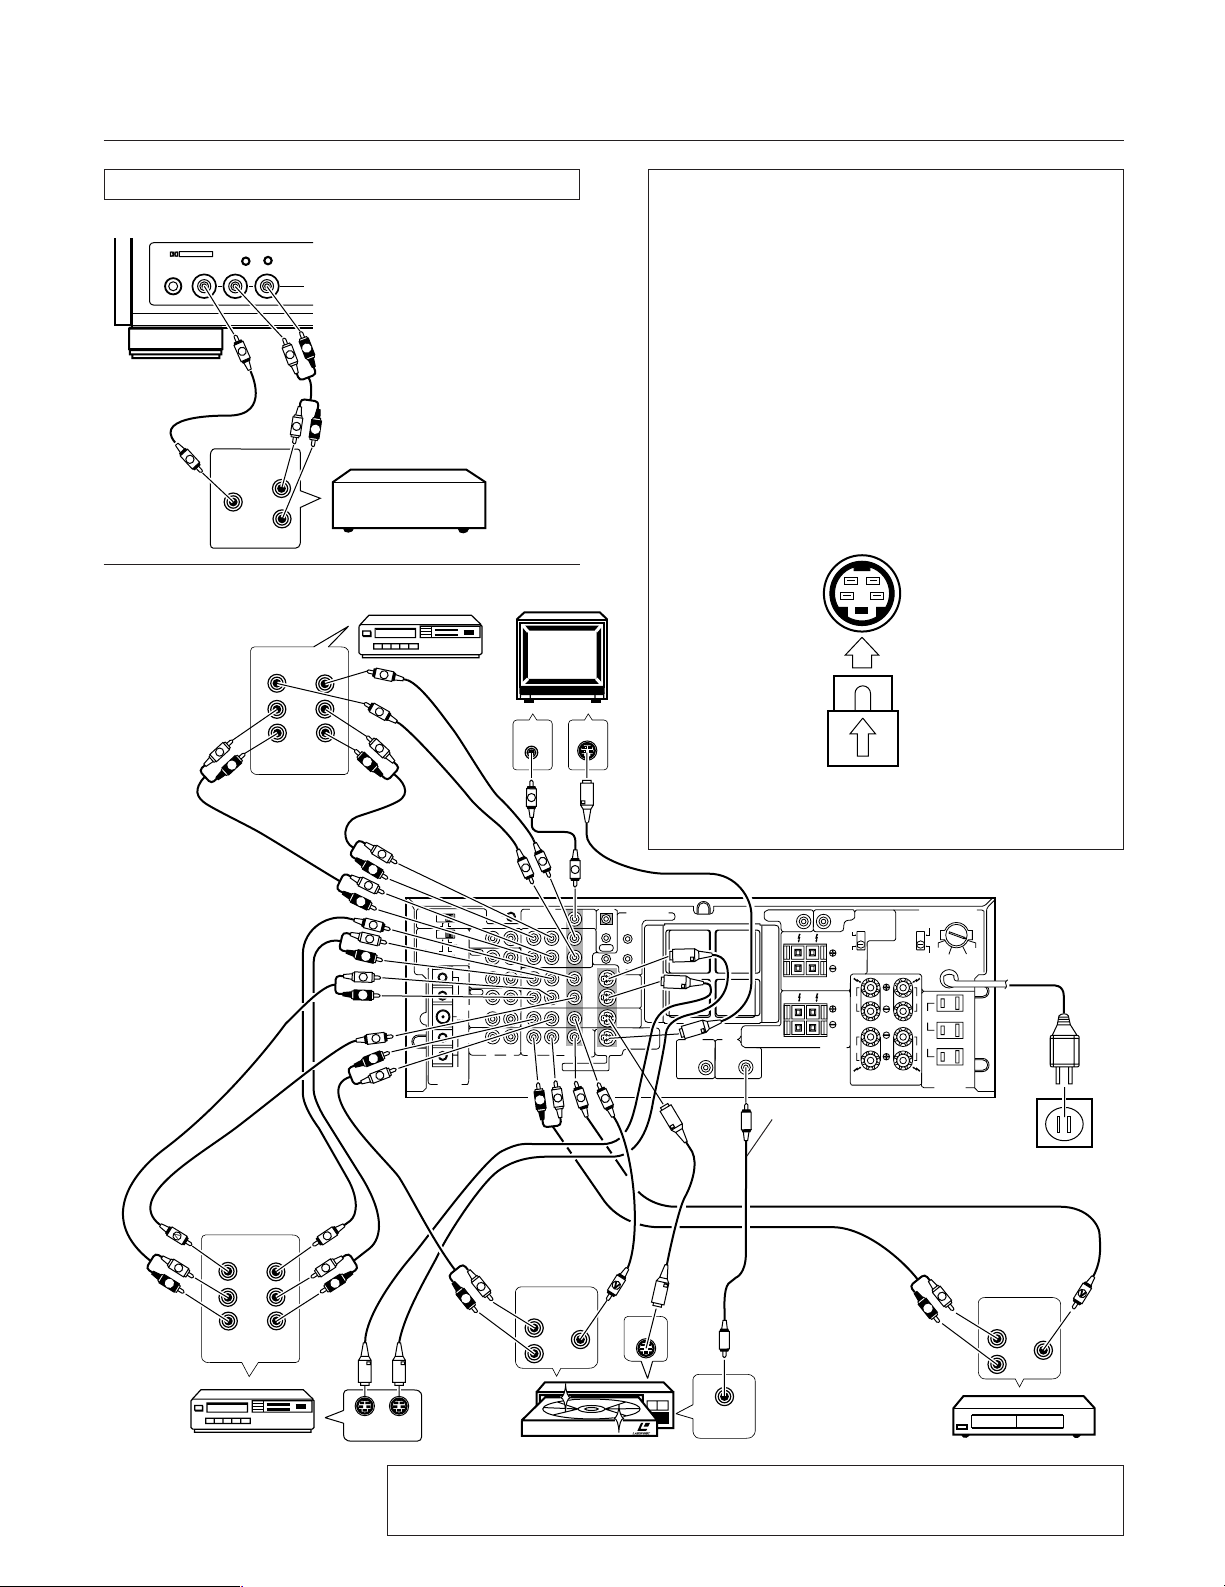
CONNECTIONS
VIDEO SYSTEM CONNECTIONS
FRONT PANEL
FRONT PANEL
DOLBY SURROUND
AC-3
PRO • LOGIC
PHONES
Intelligent System Control
SLEEP DIRECT
R
AUDIOL
VIDEO
V
VIDEO
OUT
VIDEO
INPUT
AUDIO
OUT
R
L
VCR (for playback only), or
L
R
another component such as a
TV camera.
V
L
R
VCR 2 TV Monitor
VIDEOVIDEO
AUDIO
L
(PLAY)
OUT
R
(REC)
IN
L
R
V
V
L
R
L
R
L
R
V
L
FM 50kHz
AM 9kHz
R
L
R
V
R
L
THE S-VIDEO CONNECTORS
When using the VCR 1, LD and TO MONITOR TV jacks with
components which have S-VIDEO connectors, they can be
connected to the S-VIDEO connectors.
For the operation of components connected to S-VIDEO
connectors, refer to the instruction manuals of the
corresponding components.
NOTE:
÷
In this unit, the S-VIDEO connectors (Y-C separate) and the
regular pin jacks are independent, so any signal input
through a pin jack must be output from the pin jack, and any
signal input through an S-VIDEO connector must be output
through the S-VIDEO connector.
÷
Do not connect a different component to the same function's
S-VIDEO connector and regular pin jacks.
÷
The S-VIDEO connector is for the video portion only, so be
sure to also make the audio connections.
How to use S-VIDEO connectors
S-VIDEO jack
VCR
VIDEOINVIDEO
V
GND
PAL
NTSC
PHONO
IN
100kHz
/50μS
/75μS
10kHz
REC
STEP
CHANNEL
EMPHASIS
/FM DE-
TAPE2
MONITOR
FM
PLAY
BAL
300Ω
REC
TAPE1
FM
UNBAL
75Ω
PLAY
GND
CD
IN
AM
R
L
LOOP
ANTENA
ANTENNA
V
V
VIDEO OUT
TO MONITOR TV
R
R
V
L
VIDEO
SEE INSTRUCTION MANUAL
L
IN
OUT
VCR2
IN
1
OUT
VCR1
IN
LD
IN
TV
/SAT
IN
V
Check the position of
the holes and insert.
S-VIDEO plug
For the method of switching the TV monitor S-VIDEO
connector/VIDEO jack, refer to the TV monitor’s instruction
manual.
Illustration shows Multi-voltage model.
CONTROL
OUT
SYSTEM CONTROL
IR OUT
MAIN-
IN
REPEATER
2
MINIREPEATER
S
OUT
S
IN
S
IN
TO
MONITOR
AC-3•
DIGITAL IN
TV
TV
/SAT
S
OUT
SUB WOOFER
SPEAKER
IMPEDANCE
8Ω〜16Ω
AC-3•
/SPEAKER
RF IN
LD
CENTER
PRE
PRE
OUT
OUT
I+II
CENTER
SPEAKERS
ONLY
I
SEE
I
II
INSTRUCTION
MANUAL
R
R
L
REAR
SPEAKERS
R
V
SPEAKER
SELECTOR
SPEAKER
IMPEDANCE
8Ω〜16Ω
/SPEAKER
CAUTION:
THE POWER
SUPPLY CORD SHOULD
BE DISCONNECTED
BEFORE CHANGING
THE VOLTAGE
SELECTOR.
A
FRONT
SPEAKERS
B
SPEAKER IMPEDANCE
8Ω〜16Ω/SPEAKER
TWO VOLTAGE SELECTORS
110V
120〜127V
220V
220V
110V
240V
L
SWITCHED
TOTAL 100W MAX
UNSWITCHED
100W MAX
L
CAUTION:
DO NOT CONNECT
TV SET CR MONITOR.
AC OUTLETS
120-127V
240V
Do not place the AC-3
connection cord near
the antenna wires or
antenna terminals.
AC wall socket
R
8
<ARB7050>
V
VIDEOVIDEO
L
AUDIO
L
R
(REC)
(PLAY)
OUT
VCR 1
IN
VCR
V
L
R
OUT IN
L
AUDIO
R
OUT
L
R
S
VIDEO
OUT
V
S
OUT
L
R
AUDIO
OUT
L
VIDEO
OUT
V
R
AC-3
RF OUT
LD player TV tuner
NOTE:
Before connecting pin jacks, speaker cables and other jacks and cables, switch power to the unit
OFF, and wait for about one hour. (When power is ON, the rear panel may become very hot.)
Page 9
L
R
PRE
OUT
FRONT
SPEAKERS
SUB WOOFER
AC OUTLETS
CENTER
SPEAKERS
CENTER
SWITCHED
TOTAL 100W MAX
PRE
OUT
UNSWITCHED
100W MAX
SPEAKER IMPEDANCE
8Ω〜16Ω/SPEAKER
CAUTION:
THE POWER
SUPPLY CORD SHOULD
BE DISCONNECTED
BEFORE CHANGING
THE VOLTAGE
SELECTOR.
TWO VOLTAGE SELECTORS
110V
120〜127V
220V
240V
CAUTION:
DO NOT CONNECT
TV SET CR MONITOR.
220V
110V
120-127V
240V
II
I
REAR
SPEAKERS
I+II
I
ONLY
SEE
INSTRUCTION
MANUAL
SPEAKER
SELECTOR
SPEAKER
IMPEDANCE
8Ω〜16Ω
/SPEAKER
L
A
R
R
L
B
I+II
I
ONLY
+
+
+
–
–
–
+
–
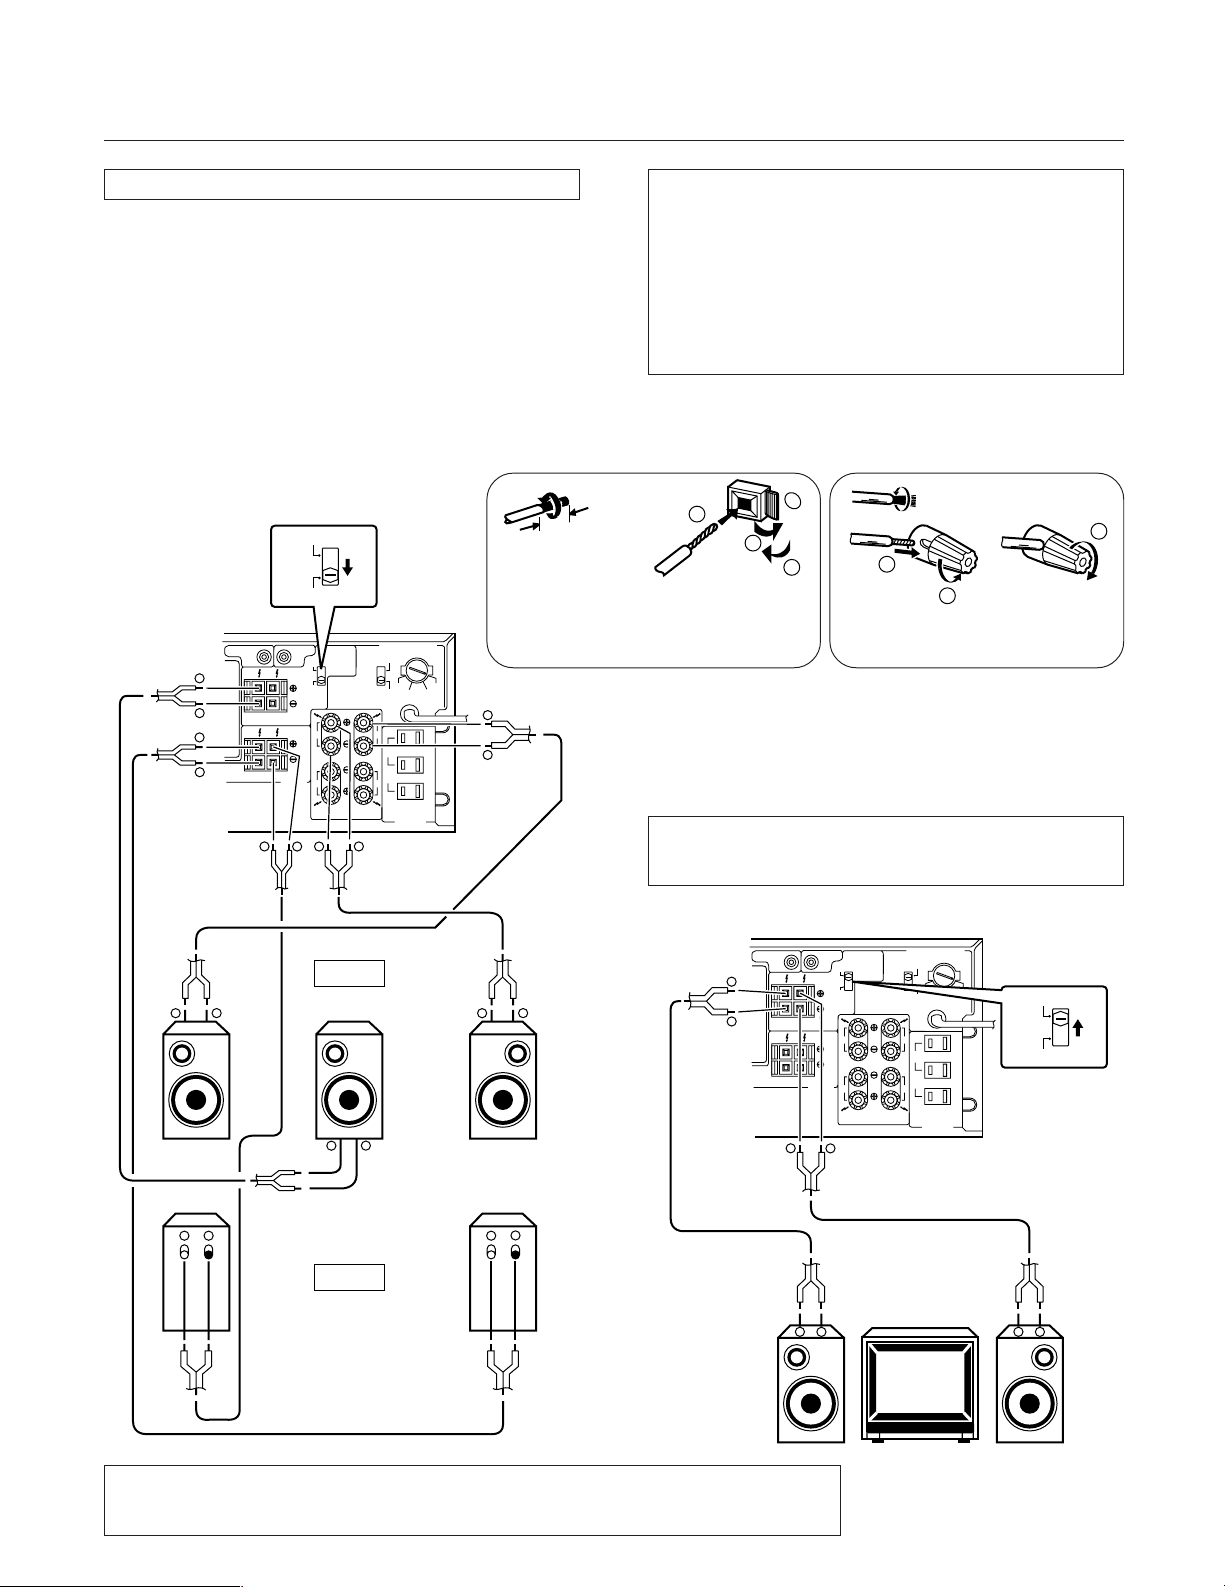
CONNECTIONS
SPEAKER SYSTEM CONNECTIONS
NOTE:
Use speakers with an impedance of 8 Ω to 16 Ω.
When connecting speakers to the FRONT SPEAKERS B terminals,
the procedure is the same as that used for connecting speakers
to the FRONT SPEAKERS A terminals.
NOTE:
÷
Do not allow any of the cord’s conductors to protrude from the
terminals or touch any other conductors. Malfunctioning or
breakdowns may occur when conductors come into contact
with each other.
÷
If you have one pair of speakers only, connect it to front
speaker terminals A or B.
÷
Be sure to connect single rear speaker to the L channel.
SPEAKER
SELECTOR
SUB WOOFER
+
–
+
–
I+II
I
ONLY
CENTER
PRE
PRE
OUT
OUT
CENTER
SPEAKERS
SEE
I
II
INSTRUCTION
MANUAL
R
L
REAR
SPEAKERS
++
–
10mm (3/8 in)
1 Push the lever forward.
TWO VOLTAGE SELECTORS
SPEAKER
SELECTOR
110V
SPEAKER
IMPEDANCE
8Ω〜16Ω
/SPEAKER
CAUTION:
THE POWER
SUPPLY CORD SHOULD
BE DISCONNECTED
BEFORE CHANGING
THE VOLTAGE
SELECTOR.
A
FRONT
SPEAKERS
B
SPEAKER IMPEDANCE
8Ω〜16Ω/SPEAKER
120〜127V
220V
220V
120-127V
110V
240V
L
SWITCHED
TOTAL 100W MAX
UNSWITCHED
100W MAX
L
CAUTION:
DO NOT CONNECT
TV SET CR MONITOR.
AC OUTLETS
Illustration
240V
I+II
ONLY
I
R
R
–
2 Insert the cord into the hole.
3 Pull the lever back.
+
–
shows Multivoltage model.
You can set this unit to match the requirements and
specifications of your stereo system’s speakers (whether or
not center speaker(s), rear speakers or a sub-woofer are
used, speaker size, etc.) to assure optimum sound quality.
Before using, perform settings in the SPEAKER MODE (refer
to page 29).
NOTE:
This unit does not feature conventional switching between
NORMAL/WIDE/PHANTOM center modes.
Speaker cord connection
2
+
1
3
2
1
1 Loosen cap.
2 Insert wire.
3 Tighten cap.
3
Connecting Two Center Speakers for Dual Center
There are two sets of terminals for center speakers on the main
unit, so you can connect two speakers. When you cannot install
a speaker under or behind your TV, installing speakers either
side of the TV as a center speaker is just as effective.
When the SPEAKER SELECTOR switch is in the “Ι + ΙΙ” position,
be sure to connect two speakers. If only one speaker is connected,
there will be no sound.
Both speaker systems should have an impedance of 4 Ω to 16 Ω.
FRONT
CENTER
+
REAR
–
+
–
+
–
+
–
SP-A(L) SP-A(R)
+
NOTE:
(L) (R)
–
Before connecting pin jacks, speaker cables and other jacks and cables, switch power to the unit
OFF, and wait for about one hour. (When power is ON, the rear panel may become very hot.)
SPEAKER
SELECTOR
Illustration shows
Multi-voltage model.
9
<ARB7050>
Page 10

CONNECTIONS
IR REPEATER CONNECTION
Connecting a supplied IR Repeater lets you also control other components with this unit’s remote control.
NOTE:
To operate components not made by Pioneer, perform REMOTE SET UP (page 31) after connecting an IR Repeater.
Remote control signals directed towards this unit or GUI operation signals are transmitted from the repeater as infrared signals, enabling
control of other components.
There are two kinds of infrared repeaters. Connect either or both to match the remote control requirements of different components.
MAIN-REPEATER
Use this to operate other components with this unit’s remote
control or to operate using GUI on-screen indications.
Install on top of this unit as shown in the figure.
MAIN-REPEATER
CD
VCR
CONTROL
VIDEO OUT
GND
PAL
FM 50kHz
/50μS
AM 9kHz
CHANNEL
/FM DE-
ANTENNA
TO MONITOR TV
NTSC
PHONO
IN
100kHz
/75μS
10kHz
REC
STEP
EMPHASIS
TAPE2
MONITOR
FM
PLAY
BAL
300Ω
REC
TAPE1
FM
UNBAL
75Ω
PLAY
GND
CD
IN
AM
R
L
R
L
LOOP
ANTENA
SYSTEM CONTROL
IR OUT
MAIN-
IN
REPEATER
OUT
OUT
VCR2
IN
2
1
MINIREPEATER
OUT
S
VCR1
OUT
S
IN
IN
LD
S
IN
IN
TV
TO
S
MONITOR
/SAT
OUT
TV
IN
VIDEO
SEE INSTRUCTION MANUAL
MANUFACTURED UNDER LICENSE FROM DOLBY LABORATORIES LICENSING CORPORATION.
"DOLBY","AC-3", "PRO LOGIC" AND THE DOUBLE-D SYMBOL ARE TRADEMARKS OF
DOLBY LABORATORIES LICENSING CORPORATION.
Illustration shows Multi-voltage model.
MINI-REPEATER
Use this when a component operates incorrectly after receiving
a signal from this unit’s remote control, or when it is difficult for
a component to receive signals from the Main-Repeater. Stick it
directly on the remote control sensor window.
There are two MINI-REPEATER terminals.
If you need another Mini-Repeater, contact you nearest Pioneer
Service Center.
VCR
1 Insert the REPEATER’s two
pegs into the holes on the top.
2
1
2 Install the REPEATER laying
on its side on the top.
The pegs are usually
inserted in the two
rear holes.
Use the two front holes when
there’s another component on
top of this preventing easy
reception of the MAIN
REPEATER’s infrared signals.
VSX-D3S
VSX-D3S
NOTE:
To prevent possible damage, be careful to avoid accidentally
connecting the MINI-REPEATER to the MAIN-REPEATER
terminals.
MINI-REPEATER
CONTROL
VIDEO OUT
GND
PAL
FM 50kHz
/50μS
AM 9kHz
CHANNEL
/FM DE-
ANTENNA
TO MONITOR TV
NTSC
PHONO
IN
100kHz
/75μS
10kHz
REC
STEP
EMPHASIS
TAPE2
MONITOR
FM
PLAY
BAL
300Ω
REC
TAPE1
FM
UNBAL
75Ω
PLAY
GND
CD
IN
AM
R
L
R
L
LOOP
ANTENA
Illustration shows Multi-voltage model.
SYSTEM CONTROL
IR OUT
MAIN-
IN
REPEATER
OUT
OUT
VCR2
IN
2
1
MINI-
REPEATER
OUT
S
VCR1
OUT
S
IN
IN
LD
S
IN
IN
TV
TO
S
MONITOR
/SAT
OUT
TV
IN
VIDEO
SEE INSTRUCTION MANUAL
MANUFACTURED UNDER LICENSE FROM DOLBY LABORATORIES LICENSING CORPORATION.
"DOLBY","AC-3", "PRO LOGIC" AND THE DOUBLE-D SYMBOL ARE TRADEMARKS OF
DOLBY LABORATORIES LICENSING CORPORATION.
1
2
1 Remove the seal.
2 Stick onto the remote control
sensor window.
NOTE:
Before connecting the MAIN-REPEATER or MINI-REPEATER, switch power to the unit OFF, and wait
for about one hour. (When power is ON, the rear panel may become very hot.)
10
<ARB7050>
VCR
Page 11
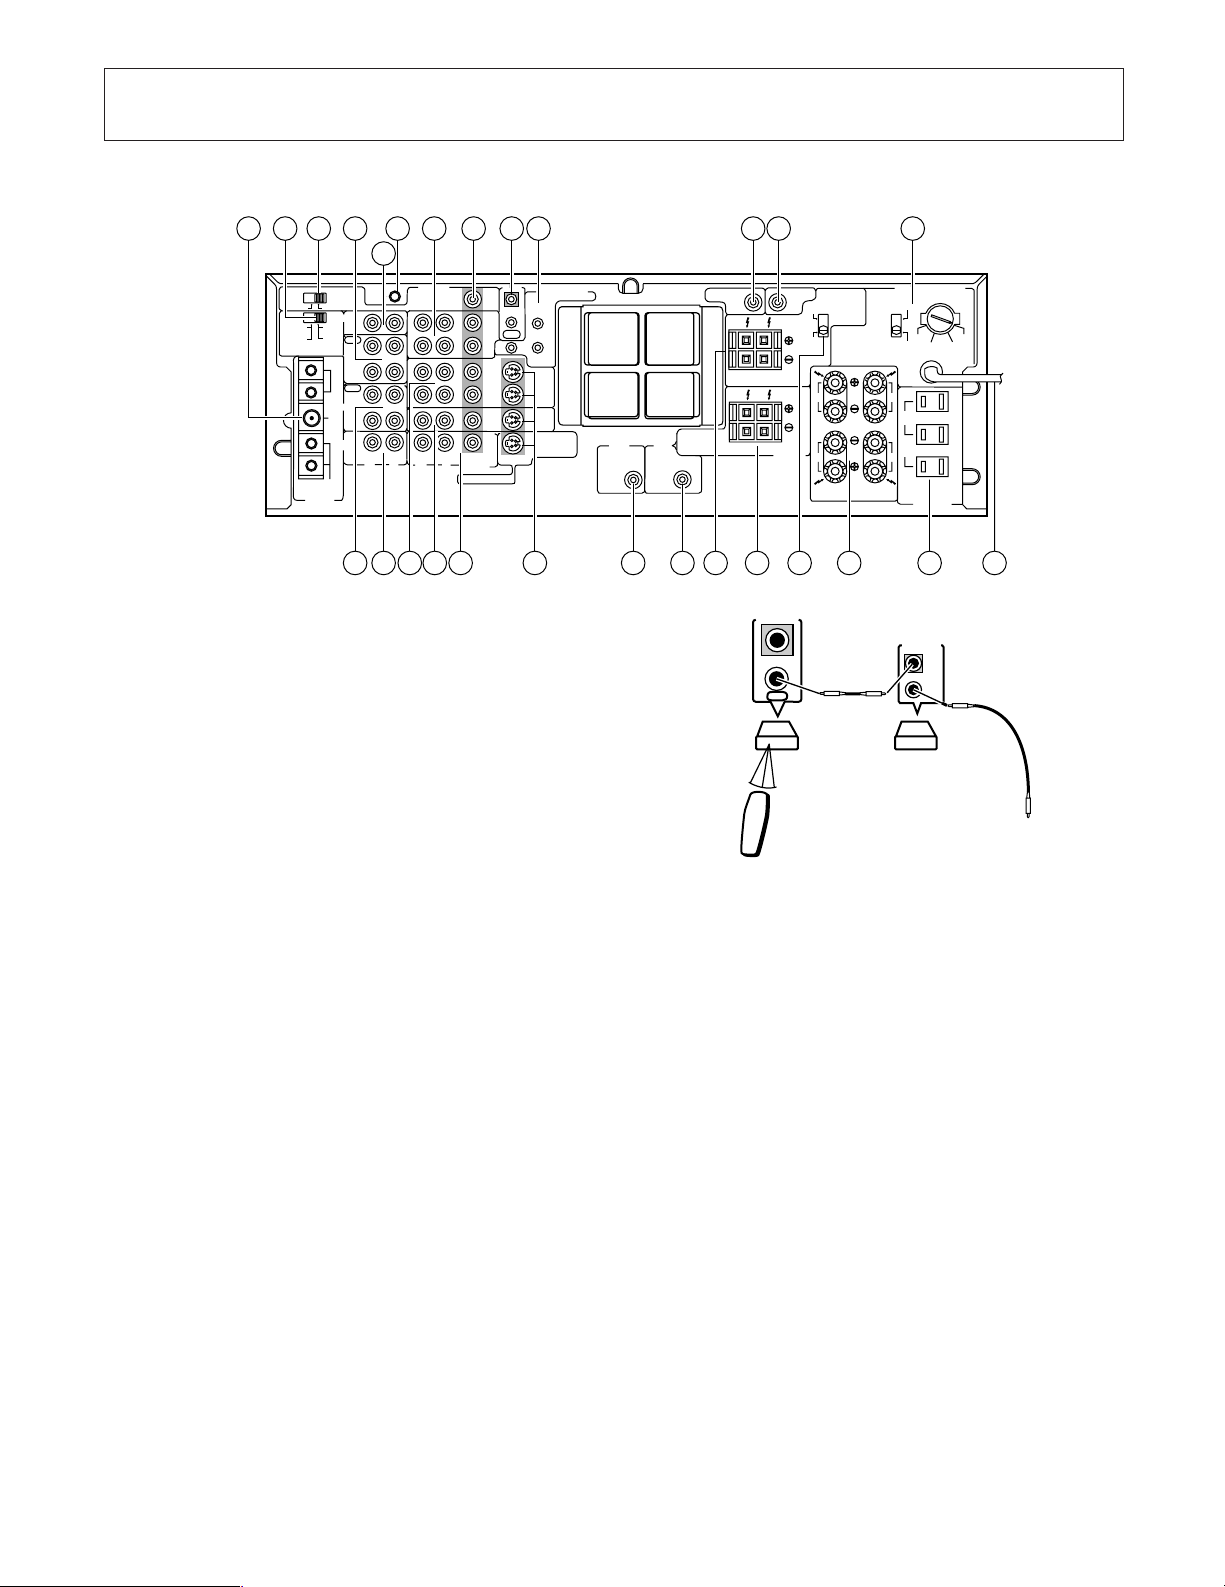
REAR PANEL FACILITIES
Illustration shows Multi-voltage model.
1 2 3 4
7 8 9
6
10 11 12 13
5
CONTROL
SYSTEM CONTROL
IR OUT
MAIN-
IN
REPEATER
OUT
OUT
VCR2
IN
OUT
VCR1
IN
LD
IN
TV
/SAT
IN
VIDEO
SEE INSTRUCTION MANUAL
MANUFACTURED UNDER LICENSE FROM DOLBY LABORATORIES LICENSING CORPORATION.
"DOLBY","AC-3", "PRO LOGIC" AND THE DOUBLE-D SYMBOL ARE TRADEMARKS OF
DOLBY LABORATORIES LICENSING CORPORATION.
2
1
MINIREPEATER
S
OUT
S
IN
S
IN
TO
S
MONITOR
OUT
TV
FM 50kHz
AM 9kHz
VIDEO OUT
GND
PAL
NTSC
PHONO
IN
100kHz
/50μS
/75μS
10kHz
REC
STEP
CHANNEL
EMPHASIS
/FM DE-
TAPE2
MONITOR
FM
PLAY
BAL
300Ω
REC
TAPE1
FM
UNBAL
75Ω
PLAY
GND
CD
IN
AM
LOOP
ANTENA
ANTENNA
TO MONITOR TV
R
R
L
L
14 16 17 18 20 21 23 24 25 26 2715 19 22
1 FM/AM ANTENNA terminals
Use these antenna terminals for reception of normal FM and AM
broadcasts.
2 CHANNEL STEP switch
(Multi-voltage model only)
See page 4.
3 PAL/NTSC switch
(Multi-voltage model only)
See page 4.
4 TAPE 2 MONITOR jacks
Connect to audio components such as a second cassette deck or
a graphic equalizer.
5 PHONO input jacks
Connect to the output cables from a turntable.
6 GND terminal
Connect the turntable ground lead to this terminal.
7 VCR 2 jacks
[VIDEO OUT]
Connect to the VCR 2 VIDEO INPUT jack.
[AUDIO OUT (L, R)]
Connect to the VCR 2 AUDIO INPUT jacks.
[VIDEO IN]
Connect to the VCR 2 VIDEO OUTPUT jack.
[AUDIO IN (L, R)]
Connect to the VCR 2 AUDIO OUTPUT jacks.
8 VIDEO OUT (TO MONITOR TV) jack
Connect to a monitor TV or to TV sets with video input terminals
to watch program materials from a VCR or LD player connected
to this unit.
9 CONTROL IN/OUT jacks
IN : Connect this jack to other Pioneer components when
using those components to control this unit.
OUT : Connect this jack to other Pioneer components when
using the remote control of this unit to control the other
components.
CAUTION:
THE POWER
SUPPLY CORD SHOULD
BE DISCONNECTED
BEFORE CHANGING
THE VOLTAGE
SELECTOR.
A
FRONT
SPEAKERS
B
SPEAKER IMPEDANCE
8Ω〜16Ω/SPEAKER
TWO VOLTAGE SELECTORS
110V
120〜127V
220V
220V
110V
240V
L
SWITCHED
TOTAL 100W MAX
UNSWITCHED
100W MAX
L
CAUTION:
DO NOT CONNECT
TV SET CR MONITOR.
AC OUTLETS
CONTROL
IN
OUT
120-127V
240V
AC-3 •
DIGITAL IN
SPEAKER
SUB WOOFER
SPEAKER
IMPEDANCE
8Ω〜16Ω
AC-3 •
/SPEAKER
RF IN
TV
/SAT
LD
CENTER
SELECTOR
PRE
PRE
OUT
OUT
SPEAKER
I+II
IMPEDANCE
SEE
INSTRUCTION
MANUAL
8Ω〜16Ω
/SPEAKER
ONLY
I
R
R
I
R
CENTER
SPEAKERS
II
L
REAR
SPEAKERS
CONTROL
IN
OUT
Receiver
PIONEER component
bearing the Î mark.
Remote
control unit
To the CONTROL IN jack of
the PIONEER component
bearing the Î mark.
NOTE:
÷
If there is a plug in this unit’s CONTROL IN jack, Intelligent
System Control and GUI operation are not possible.
÷
The receiver’s remote sensor does not function when a plug is
inserted in the IN jack. To operate, point a remote control unit
other than this unit's supplied remote control unit at the
remote sensor on the component to which the receiver’s IN
jack is connected.
÷
You cannot use the supplied remote control unit to operate this
unit via another component’s remote sensor.
0 SYSTEM CONTROL IR OUT jacks
To operate other components with this unit’s remote control or
with GUI, connect the supplied repeater. (See page 10.)
MINI-REPEATER 1, 2:
Connect the supplied Mini-Repeater.
MAIN-REPEATER:
Connect the supplied Main-Repeater.
- SUB WOOFER PRE OUT jack
When you play back the low frequencies with a sub-woofer,
connect to a powered sub-woofer.
= CENTER PRE OUT jack
Connect when using a PIONEER projection monitor receiver's
built-in speaker as a center speaker.
Refer to the projection monitor's operating instructions for details
concerning connection and operation.
11
<ARB7050>
Page 12

REAR PANEL FACILITIES
~ TWO VOLTAGE SELECTORS switches
(Multi-voltage model only)
See page 4.
! TAPE 1 jacks
Connect to the first cassette deck.
@ CD input jacks
Connect to the output jacks of a compact disc player.
# VCR 1 jacks
[VIDEO OUT]
Connect to the VCR 1 VIDEO INPUT jack.
[AUDIO OUT (L, R)]
Connect to the VCR 1 AUDIO INPUT jacks.
[VIDEO IN]
Connect to the VCR 1 VIDEO OUTPUT jack.
[AUDIO IN (L, R)]
Connect to the VCR 1 AUDIO OUTPUT jacks.
$ LD input jacks
Connect to an LD player’s output jacks (audio, video).
% TV/SAT (Satellite) jacks (input)
Use these jacks if you wish to connect a TV tuner with both video
and audio outputs.
^ S (connector) video jacks
When used in conjunction with a VCR, LD player or TV monitor
equipped with S video jacks, connect to these jacks. (Refer to
page 8.)
÷ TO MONITOR TV jack
This unit uses the TV screen to operate the system. Set the rear
panel PAL/NTSC switch (3) to match your TV's color system
(Multi-voltage model only). The screen will be unclear if the
color system does not match.
& AC-3 • DIGITAL IN (TV/SAT) jack
This jack is ready for future AC-3 system digital TV audio
broadcasts.
NOTE:
Do not connect to a CD or DAT coaxial digital audio output.
* AC-3 • RF IN (LD) jack
Connect to an LD player’s AC-3 • RF OUT jack.
( CENTER SPEAKERS terminals
Connect the center speaker(s) to these terminals.
NOTE:
Do not allow any of the cord’s conductors to protrude from the
terminals or touch any other conductors. Malfunctions or
breakdowns may occur when conductors come into contact
with each other.
Use a center speaker with an impedance of 8 Ω to 16 Ω. (If you
connect two center speakers, use speakers with an impedance
of 4 Ω to 16 Ω. Refer to _.)
) REAR SPEAKERS terminals
Connect the rear speakers to these terminals.
NOTE:
Do not allow any of the cord’s conductors to protrude from the
terminals or touch any other conductors. Malfunctions or
breakdowns may occur when conductors come into contact
with each other.
Use rear speakers with an impedance of 8 Ω to 16 Ω.
_ CENTER SPEAKER SELECTOR switch
This switch changes the speaker impedance when only one
center speaker is connected, or two speakers are connected.
When only one speaker is connected:
Be sure to set the switch to “Ι ONLY” (down side), and always
connect a speaker with an impedance of 8 Ω to 16 Ω to the Ι
terminal.
When two speakers are connected:
Be sure to set the switch to “Ι + ΙΙ” (up side), and always use
speakers with an impedance of 4 Ω to 16 Ω.
NOTE:
Switch the CENTER SPEAKER SELECTOR when the unit power
supply is at STANDBY. Do not switch the selector when the
power supply is at ON.
+ FRONT SPEAKERS terminals
A : Connect to the first set of speakers.
B : Connect to the second set of speakers.
NOTE:
Do not allow any of the cord’s conductors to protrude from the
terminals or touch any other conductors. Malfunctions or
breakdowns may occur when conductors come into contact
with each other.
Use front speakers with an impedance of 8 Ω to 16 Ω.
¡ AC OUTLETS
(U.S. and Canadian models)
[SWITCHED TOTAL 100 W (0.8 A) MAX]
Power supplied through these outlets is turned on and off by the
receiver’s POWER switch. Total electrical power consumption
of connected equipment should not exceed 100 W (0.8 A).
[UNSWITCHED 100 W (0.8 A) MAX]
Power flows continually to this outlet, regardless of whether the
receiver is switched ON or OFF. Electrical power consumption
of the connected equipment should not exceed 100 W (0.8 A).
(Multi-voltage model)
[SWITCHED TOTAL 100 W MAX]
Power supplied through these outlets is turned on and off by the
receiver’s POWER switch. Total electrical power consumption
of connected equipment should not exceed 100 W.
[UNSWITCHED 100 W MAX]
Power flows continually to this outlet, regardless of whether the
receiver is switched ON or OFF. Electrical power consumption
of the connected equipment should not exceed 100 W.
NOTE:
÷
This unit should be disconnected by removing the power plug
from the wall socket when not in regular use, e.g. when on
vacation.
÷
Do not connect appliances with high power consumption such
as heaters, irons or television sets to these AC OUTLETS in
order to avoid overheating and fire risk. This can cause the
receiver to malfunction.
CAUTION:
DO NOT CONNECT A MONITOR OR TV SET TO THIS UNIT'S AC
OUTLETS.
12
<ARB7050>
™ Power cord
Page 13

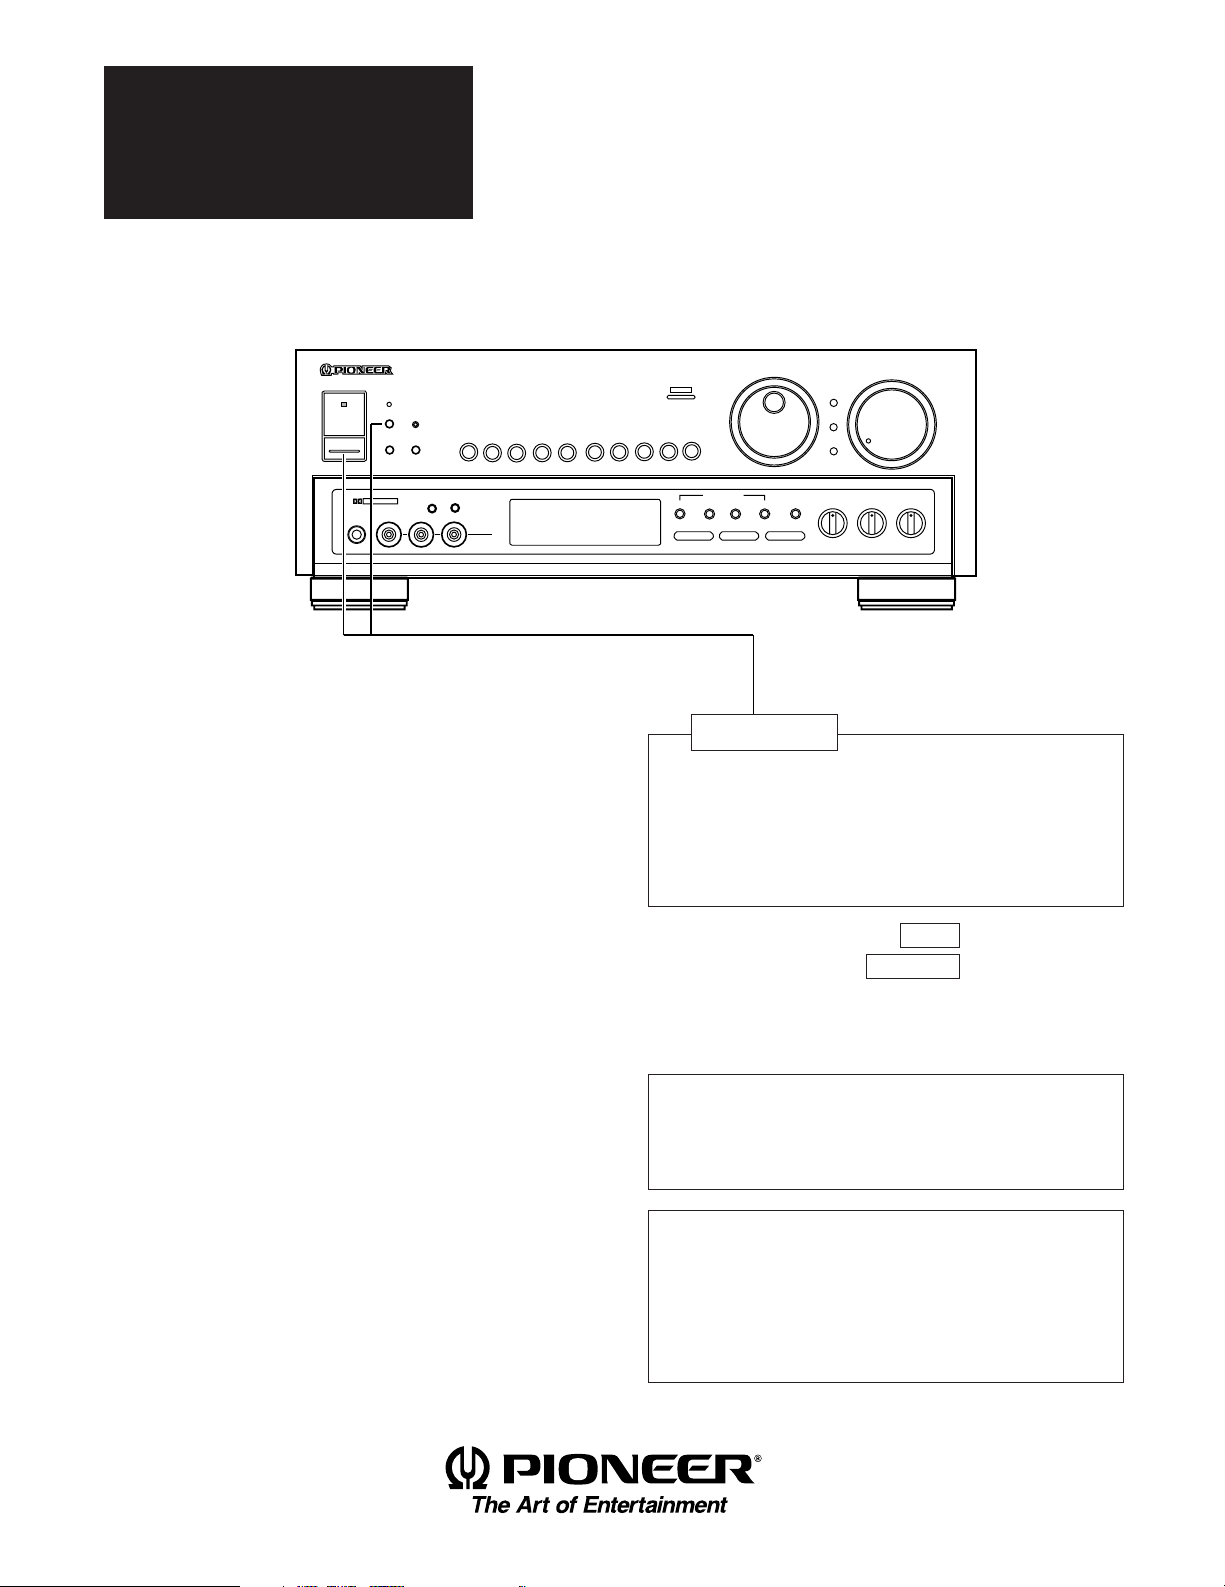
FRONT PANEL FACILITIES
3 5
1 2
SR
POWER
STANDBY/ON
DOLBY SURROUND
AC-3 PRO • LOGIC
PHONES
Intelligent System Control
4 6
AUDIO/VIDEO STEREO RECEIVER
STANDBY
RETURN
RESET
SPEAKERS
A
VIDEO
B
SLEEP DIRECT
AUDIOL
N∫m¿Û≤∫
VCR 2
VCR 1
R
VIDEO
INPUT
7 8 9
VIDEO
TV/SAT
LD CD
14 15 16 17 18 24 25 2619 20 21 22 23
1 Remote sensor
2 POWER STANDBY/ON switch
This is the switch for electric power.
ON : When set to the ON position, power is supplied and
the unit becomes operational.
STANDBY : When set to the STANDBY position, the main power
flow is cut and the unit is no longer fully operational.
A minute flow of power feeds the unit to maintain
operation readiness.
(Timer ON/OFF possible)
When the unit is switched ON, ON/OFF control can be performed
by means of the optional timer.
NOTE:
÷
When the power is initially turned ON, muting will be applied to
prevent sound from being output for about 5 seconds.
÷
If the unit is on and you switch power off and then on again, it
takes about three seconds for operation to resume. This is not
a malfunction.
3 STANDBY indicator
The STANDBY indicator lights when the power is set to STANDBY,
and goes out when set to ON.
4 RETURN button
Press this button to return the receiver to its initial state. TUNER is
selected at this initial state. Adjust the sound level by using the
MASTER VOLUME control.
TAPE 2 MONITOR ...... OFF
DSP ............................. OFF
SUPER BASS .............. OFF
And SPEAKERS buttons switch as follows.
Before pressing
the RETURN button
Both A and B are off Only A is on
Only A is on No change
Only B is on Both A and B are on
Both A and B are on No change
NOTE:
Press the RETURN button, and the frequency last selected is
received. If reception of the frequency last selected is not possible,
the mode automatically switches to AUTO TUNING.
MUTING ....................... OFF
FUNCTION ............ TUNER
After pressing
3
3
3
3
11
1310 12
MULTI-JOG
AC-3
PHONO
TAPE 2
TAPE 1
MONITOR
TUNER
TUNING MODE
MPX MODE
FM/AM
DSP OFF
MEMORY
PRO-LOGIC
DOLBY
SELECT
SURROUND MODE
DSP MODE
SUPER
BASS
MASTER VOLUME
INPUT
ATT
GUI
MODE
GUI
ENTER
MIN
+–+–
MAX
SUPER BASS
TREBLEBASS
MAX
FLAT
5 RESET button
Use this when normal operation is not possible because of
external influences such as static electricity, lightning or when
operations are not functioning even when operation buttons are
pressed. Press this button to return to normal operating
conditions.
(The input selector automatically switches to TUNER, and
SPEAKERS button A is the only one on.
Also, the tuner station memory, surround settings, and remote
control REMOTE SET UP settings are all returned to their initial
defaults.)
If you press this button when the power is ON, the unit switches
to POWER STANDBY.
6 SPEAKERS buttons (A, B)
On/off switches for the A and B speaker systems.
7 Input selector buttons
VCR 1 : Press when performing playback on a first VCR unit.
VCR 2 : Press when performing playback on a second VCR
unit.
VIDEO : Press when performing playback on a TV camera or
VCR connected to VIDEO INPUT jack on the front
panel.
TV/SAT : Press to watch TV broadcasts from the TV tuner
connected to the rear panel TV/SAT IN jacks.
LD : Press when performing playback on an LD player.
TAPE 1 : Press when performing playback on a cassette deck.
TAPE 2 MONITOR
: Press when performing playback on a second cassette
deck and when monitoring recording.
PHONO : Press when playing records on a turntable.
TUNER : Press when listening to radio broadcasts.
CD : Press when playing compact discs on a CD player.
8 AC-3 button**/indicator
Switches AC-3 (Dolby Surround AC-3) on and off. (When the
input selector is set to a source other than LD or TV/SAT, it does
not operate.)
No sound will be heard if you turn on this switch when playing
an LD that does not use the AC-3 format.
** Setting is memorized separately for each input selector
button.
13
<ARB7050>
Page 14

FRONT PANEL FACILITIES
9 MULTI-JOG
Use during tuner operation to select frequencies and station
numbers. During GUI operation, use to move the on-screen
cursor.
0 GUI ENTER button (GUI operation)
Press to execute an operation selected with the MULTI-JOG.
- INPUT ATT button
Press on, and audio input sensitivity is attenuated (–10 dB) to
prevent clipping due to excessively high input levels. Switch
this on if the overload indicator in the display section lights
during playback. When you switch it on, the ATT indicator
lights.
NOTE:
Operates only when a DSP mode other than AC-3 is on.
= GUI MODE button
Switches GUI MODE on and off.
~ MASTER VOLUME control
Use it to simultaneously adjust the sound volume from the
front, center, and rear speakers.
! SLEEP button/indicator
Activates the SLEEP timer. The length changes in the following
manner each time the button is pressed:
3
90
33
60 30
2
0 (off)
Unit: minutes
@ PHONES jack
Connect the plug on your headphones to this jack. Set SPEAKERS
A and B switches to off if you want to cut the sound from the
speakers and listen to it only through the headphones.
Auto stereo mode
Normally, leave in this mode for reception. When a stereo FM
broadcast is received, it will be automatically reproduced in
stereo.
Monaural mode
When receiving distant stations or stations with weak broadcast
signals, the input signal may be weak, thus resulting in increased
noise during FM stereo broadcasts. In this event, setting the
receiver to the monaural mode will reduce the noise. In this
case, however, FM stereo broadcasts will be reproduced in
monaural sound.
NOTE:
This button has no effect on reception of AM broadcasts.
MEMORY button:
Press this button to switch to the frequency preset mode.
SELECT button:
Press this button to switch to the station mode. Then you can
turn the multi-jog to select a station.
& DSP OFF button**
Switches DSP (( DSP MODE, * DOLBY PRO-LOGIC, 8 AC-3)
off.
* DOLBY* PRO-LOGIC button**
Switches DOLBY PRO-LOGIC SURROUND on and off.
( DSP MODE button**
Each time you press it, the mode and the display indications
change as follows:
3
JAZZ
off
2
33
DANCE HALL
THEATER
22
SIMULATED
SURROUND
) SUPER BASS button**
Press this button when you want to boost the bass.
# VIDEO INPUT jacks
VIDEO components such as a VCR or TV camera, etc. can be
connected.
$ DIRECT button**/indicator
Press this to listen to source sound without passing the audio
signal through sound quality and balance adjusting circuitry.
DSP, super bass, INPUT ATT, rear and center speakers are
automatically switched off.
% Display section
See page 15.
^ TUNING MODE buttons
FM/AM button:
Use this to switch between FM and AM frequency band reception.
MPX MODE button:
Use to select the auto stereo mode or monaural mode when
listening to FM broadcasts. The monaural mode has been
selected when the MONO indicator in the display section is lit.
_ BASS control
Use to adjust the low-frequency level. Turn clockwise to boost
bass, and counterclockwise to attenuate bass.
+ TREBLE control
Use to adjust the high-frequency level. Turn clockwise to boost
treble, and counterclockwise to attenuate treble.
¡ SUPER BASS control
Use to adjust the bass boost level when the SUPER BASS button
is set to on.
** Setting is memorized separately for each input selector
button.
*
Manufactured under license from Dolby Laboratories Licensing
Corporation. Additionally licensed under Canadian patent number
1,037,877. “Dolby”, “AC-3”, “Pro Logic” and the double-D symbol
are trademarks of Dolby Laboratories Licensing Corporation.
Fabriqué sous licence de Dolby Laboratories Licensing Corporation
et sous le brevet suivant: Canada 1,037,877. DOLBY, AC-3, PRO
LOGIC et le symbole double-D, sont des marques de Dolby
Laboratories Licensing Corporation.
14
<ARB7050>
Page 15

DISPLAY SECTION
A B C D E F G H I
FRONT PANEL FACILITIES
L
L
S
LFE
ST CALL
MONO
TUNED
STEREO
TAPE 2
C
S
R
R
S
DOLBY
SURROUND
AC-3
J K L
A LFE indicator
During Dolby AC-3 mode operation, if the LFE (Low Frequency
Effect) channel is set in the program source, “LFE” lights, and if
there is an LFE signal, a frame “
” lights.
B Dolby AC-3 channel indicator
During Dolby AC-3 mode operation, the channel set in the
program source is indicated.
C DOLBY SURROUND AC-3 indicator
D DOLBY PRO LOGIC indicator
E DSP MODE indicators
DOLBY
PRO LOGIC
DSP MODE
JAZZ DANCE HALL
SIM SURR THEATER
SP AB
SUPER BASS
ATT
AM
FM
kHz
MHz
H ATT indicator
This lights when the INPUT ATT button is on.
I SUPER BASS indicator
This lights when the SUPER BASS button is on.
J Tuning indicators
ST (STATION) CALL
MONO : Lights up when the FM MONO mode is selected
TUNED : Lights up when a station is tuned.
STEREO : Lights up when a stereo FM broadcast is being
: Press the SELECT button to switch to the station
mode and this indicator lights.
with the MPX MODE button.
received.
F SP (SPEAKERS) A, B indicators
Shows which speaker system (or systems) are switched on.
G Overload indicator
This lights when input signal level is excessive.
If it lights during playback, press the INPUT ATT button on, and
the ATT indicator lights.
Operates only when a DSP mode other than AC-3 is on.
K TAPE 2 indicator
Lights up when the input selector is set to TAPE 2 MONITOR on.
L Character display
15
<ARB7050>
Page 16

OPERATING THE TUNER
Press the POWER switch to the ON position.
Select TUNER with the input selector button.
Be sure to turn the TAPE 2 MONITOR button off when listening to
AM or FM broadcasts.
Switch on the SPEAKERS button corresponding to the speakers
you wish to use.
FM auto stereo reception and monaural reception
Each time you press the MPX MODE button, the MONO indicator
in the display section lights or goes out.
÷If an FM stereo broadcast is received when the MONO indicator
is out, the STEREO indicator lights and sound is in stereo.
÷If an FM stereo broadcast is received when the MONO indicator
is lit, the sound will be monaural. If there is interference during
stereo mode reception, switch to mono. The sound will become
monaural but interference will be reduced.
TUNING INTO STATIONS
Turn the MULTI-JOG and the tuning frequency changes.
(Switch off when the GUI MODE button is on.)
Turning in a clockwise direction raises the frequency, while
turning in a counterclockwise direction lowers the frequency.
GUI MODE
12
SELECT
3
FREQUENCY PRESETTING
2, 4
MPX MODE
Switch off when the GUI MODE button is on.
1. Tune into the desired station.
See the section “TUNING INTO STATIONS”.
In addition to station frequencies, the MPX MODE (auto
stereo mode or monaural mode) can also be preset (FM
only).
2. Press the MEMORY button.
The station (channel) number flashes in the display. (Memory
mode.)
3. Turn the MULTI-JOG to select the station (channel) you
want to memorize.
4. Press the MEMORY button.
÷The station (channel) number lights in the display, indicating
that it has been memorized.
÷If you do not press the MEMORY button within about five
seconds after selecting a station, the memory mode is
canceled.
5. Repeat steps 1 to 4 to preset additional stations.
A total of 30 AM and FM stations may be preset. When you
store a new preset, it takes the place of the previously stored
station (if any).
GUI MODE
3
1. Use the FM/AM button to select either FM or AM.
When the “ST CALL” indicator is lit in the display, press the
SELECT button to switch it off.
2. Turn the MULTI-JOG until you reach the frequency of a
desired station.
When a station is received, the TUNED indicator will light up.
NOTE:
The TUNED indicator may not light with broadcasts received
over long distances, or when the broadcast signals are extremely
weak.
3. Adjust the volume and tone as desired.
Auto tuning
Auto tuning is convenient when you do not remember the
frequency of a desired station, or when you wish to find stations
that you do not normally listen to.
Operate by remote control. (Refer to page 23.)
You can also perform Auto Tuning using GUI. (Refer to page 25.)
You can also preset using GUI. (Refer to page 25.)
LISTENING TO BROADCASTS USING
PRESET TUNING
GUI MODE
12
Switch off when the GUI MODE button is on.
1. Press the SELECT button.
The “ST CALL” indicator lights in the display and the mode
switches to station call.
2. Turn the MULTI-JOG to select a station.
3. Adjust the volume and tone as desired.
When operating by remote control, press the ST +/– buttons to
select a memorized station. (Refer to page 23.)
With GUI, you can also select preset channels. (Refer to page 25.)
3
16
<ARB7050>
Page 17

OPERATING THE TUNER
NOTE:
Even if the receiver’s power cord is unplugged, data remains in
memory for several days. If the contents of the memory are
erased, preset once more.
Last station memory
When the POWER switch is pressed to turn the power on, the
last station received before the power was previously turned off
will be tuned in again. When the power is ON, if the FM/AM
button is pressed, the last station received before the FM/AM
button was previously pressed will be tuned in again.
RECEIVING FM SIMULCAST TV PROGRAMS
By combining a TV set with this receiver, you can receive FM
simulcast TV programs (stereo TV sound transmitted from an
FM radio station) while viewing the video portion on your TV.
1. Select the desired TV program with the TV set.
2. Tune in the desired FM simulcast TV program on the receiver.
3. Adjust the volume and tone controls as desired.
OPERATING THE AUDIO/VIDEO COMPONENTS
Press the power switch to the ON position, and turn on the power
to the other components you wish to use (for example, TV, VCR,
cassette deck, etc.).
PLAYBACK
1
3
To watch a video cassette tape on
the VCR connected to VCR 1 jacks.
To watch a video cassette tape on
the VCR connected to VCR 2 jacks.
To watch a VCR connected to
VIDEO INPUT jacks on front panel.
To watch the TV picture from a TV
tuner connected to the TV/SAT
jacks.
Program Source
Input selector
VCR 1
VCR 2
VIDEO
TV/SAT
TAPE 2 MONITOR
1. Use the input selector buttons to select the desired program
source.
If you select a music source other than TAPE 2, switch off the
TAPE 2 MONITOR.
2. Operate the appropriate audio/video component to playback
the program source.
For a video source, switch the TV connected to this unit to the
video input mode.
3. Adjust the volume and tone controls as desired.
Refer to page 19 for details concerning surround operation.
(Surround operation is also possible with GUI. Refer to page
24.)
To watch a LaserDisc.
To listen to a tape on the cassette
deck connected to TAPE 1 jacks.
To listen to a tape on the cassette
deck connected to TAPE 2
MONITOR jacks.
To listen to a record.
To listen to a compact disc.
LD
TAPE 1
TAPE 2 MONITOR
PHONO
CD
17
<ARB7050>
Page 18

RECORDING WITH A CASSETTE DECK
RECORDING WITH TAPE 1
If the TAPE 2 MONITOR button is on, press to turn off.
1
TAPE 2 MONITOR
1. Select the source you want to record from with the input
selector buttons.
When recording AM or FM broadcasts, select a preset station
using the MULTI-JOG. If the desired station has not been
preset, tune in the station.
2. Start recording on TAPE 1 cassette deck.
3. Play the desired program source (record, compact disc, etc.).
The volume, balance and tone controls have no effect on the
recording.
RECORDING WITH TAPE 2
1. Select the source you want to record from with the input
selector buttons.
2. Start recording on the TAPE 2 cassette deck.
3. Play the desired program source (record, compact disc, etc.).
The volume, balance and tone controls have no effect on the
recording.
USING VCR 1, VCR 2 FOR AUDIO RECORDING
The audio signal output from the VCR 1 and VCR 2 AUDIO OUT
jacks is the same as that output from the TAPE 1 REC jacks, so
you can record using the same procedure as for recording with
TAPE 1.
COPYING TAPES
1
The following operations concern TAPE 1 to TAPE 2 copying.
1. Press the TAPE 1 input selector button.
2. Load the TAPE 1 cassette deck with a tape to playback.
3. Load the TAPE 2 cassette deck with a tape to record to.
4. Start recording on the TAPE 2 cassette deck.
5. Start playback on the TAPE 1 cassette deck.
The following operations concern TAPE 2 to TAPE 1 copying.
1. Select a source other than TAPE 1 with the input selector
buttons.
2. Press the TAPE 2 MONITOR button to turn it on.
3. Load the TAPE 2 cassette deck with a tape to playback.
4. Load the TAPE 1 cassette deck with a tape to record to.
5. Start recording on the TAPE 1 cassette deck.
6. Start playback on the TAPE 2 cassette deck.
Tape monitoring
When recording is performed on a cassette deck equipped with
a monitoring function, the recorded sound can be monitored
through the speaker system by pressing the TAPE 2 MONITOR
button to ON.
18
<ARB7050>
Page 19

VIDEO RECORDING
Refer to the connection procedures on pages 8 to 10 and refer
to the VCR’s Operating Instructions regarding proper operation
procedures. Recording can be performed on both VCR 1 and
VCR 2.
1
1. Select the source you want to record from with the input
selector buttons.
÷When recording from a LaserDisc on VCR 1 or VCR 2 = LD
÷When recording from the TV tuner on VCR 1 or VCR 2
= TV/SAT
÷When recording from VCR 1 on VCR 2 = VCR 1
÷When recording from VCR 2 on VCR 1 = VCR 2
÷When recording on VCR 1 or VCR 2 from a component
connected to the front panel VIDEO INPUT jacks = VIDEO
SURROUND EFFECT
2. Start recording on the VCR.
For VCR, select a line input (external input).
3. Start playback on the component selected with the input
selector buttons.
The volume, balance and tone controls have no effect on the
recording.
NOTE:
When recording with VCR 1, be sure the input selector is set to
a position other than VCR 1. When recording with VCR 2, be sure
the input selector is set to a position other than VCR 2.
GUI operation enables easy copying from a LaserDisc to VCR 1
(or 2), and copying between VCR 1 and VCR 2. (Refer to page 28.)
1
1. Select the desired mode with the DOLBY PRO-LOGIC button,
DSP MODE button and AC-3 button.
The DSP MODE changes in sequence each time the DSP
MODE button is pressed. (The DSP MODE indicator lights.)
3
JAZZ
2
off
÷Press the DSP OFF button to switch the DSP off.
÷If rear speakers are not selected during SPEAKER MODE
setting (page 29), pressing the DOLBY PRO-LOGIC button
selects DOLBY 3CH LOGIC.
33
DANCE HALL
THEATER
22
SIMULATED
SURROUND
2. Adjust levels to achieve a correct surround sound
reproduction.
This is done using GUI (page 24). For details concerning how
to perform level adjustment, refer to page 30.
You can set this unit to match the requirements and
specifications of your stereo system’s speakers (whether or
not center speaker(s), rear speakers or a sub-woofer are
used, speaker size, etc.) to assure optimum sound quality.
Before using, perform settings in the SPEAKER MODE (refer
to page 29).
NOTE:
This unit does not feature conventional switching between
NORMAL/WIDE / PHANTOM center modes.
19
<ARB7050>
Page 20

REMOTE CONTROL OPERATION
PUTTING BATTERIES INTO THE REMOTE
CONTROL UNIT
–
+
+
–
1. Open the battery compartment cover on the rear of the
remote control unit. The cover should open easily if you slide
it in the direction of the arrow while pressing on it with your
thumb.
2. Press the RESET button in the center hole of the battery
compartment.
3. Take out the two supplied batteries size “AA” (IEC R6P), and
insert them into the battery compartment in accordance
with the indications in the compartment.
4. Close the cover of the battery compartment.
Incorrect use of batteries may lead to leakage or
rupture. Always be sure to follow these guidelines:
A:
Always insert batteries into the battery compartment correctly
matching the positive ª and negative · polarities, as indicated
inside the compartment.
B:
Never mix new and used batteries.
C:
Batteries of the same size may have different voltages, depending
on their type. Do not mix different types of batteries.
REMOTE CONTROL RANGE
30°
30°
7m (23 feet)
When operating the remote control unit, point the front of the
unit at the front panel of the receiver. The remote control unit
may be used within a range of about 7 meters (23 feet) from the
remote sensor, within angles of up to about 30 degrees.
Performance of the remote control unit is adversely affected in
the presence of a strong fluorescent light. Keep such lights
away, especially from the sensor window.
Battery Replacement
As battery power runs down, the range over which the remote
control unit can operate decreases. Also, ONE TOUCH
OPERATION and other buttons light less brightly.
When the range becomes too short, change the batteries.
20
<ARB7050>
Page 21

REMOTE CONTROL OPERATION
RECEIVER CONTROL BUTTONS
RECEIVER
POWER
1
U
I
G
ENTER
TV CH
TV VOL.
FQ +
FQ -
+
TAPE
TUNER
MUTE
+
+
M
.
C
H
E
C
K
ST+ST–
CDVCR 1
R
E
W
O
P
2
3
4
5
6
V
O
L
U
M
E
ONE TOUCH OPERATION
VCR 2
LD
FUNC.
TV FUNC.
−
TAPE2
TV POWER
−
−
FOR AV RECEIVER
7
8
9
10
4 ONE TOUCH OPERATION buttons
VCR 1/2, CD, LD, TAPE:
Pressing these buttons automatically calls up “ONE TOUCH
OPERATION SET UP” settings, made using GUI (page 33).
TUNER:
This switches power to the TUNER ON and starts reception of the
last memorized station.
Also, if power to this unit is OFF, it is switched ON and operation
automatically switches to the selected function. When you press
any of the ONE TOUCH OPERATION buttons, the GUI MODE
switches off.
5 FUNC. (function) button
Press to select the receiver input.
VCR 13VCR 2 VIDEO TV/SAT LD
CD
333 3
2
222
TUNER PHONO TAPE 1
6 TAPE 2 (TAPE 2 MONITOR) button
Switches TAPE 2 MONITOR on and off.
7 GUI button
Switches GUI MODE on and off.
When the GUI mode is on, the 9 Select/Adjust buttons (%, #, fi,
@) light.
8 M.CHECK (Mode check) button
Indicates whether the GUI MODE is on or off.
When it is on, %, #, fi, @ light. When it is off, a 4 ONE TOUCH
OPERATION button lights to indicate the current function.
If you press the button again while it is lit, remote control
functions change. When the remote control is in the GUI mode,
the 9 Select/Adjust buttons (%, #, fi, @) light.
1 RECEIVER POWER button
Switches the receiver power between ON and STANDBY.
2 ENTER button
When GUI is on, press to execute an operation selected with the
Select/Adjust buttons.
3 VOLUME +, – buttons
Adjusts the overall volume.
OPERATING OTHER COMPONENTS
REMOTE CONTROLLING OF ANY OTHER OF YOUR
AUDIO-VISUAL COMPONENTS VIA THIS UNIT
REQUIRES:
All components must be remote controllable (have a sensor
window on the front panel) to receive a direct command from
this unit, upon successful learning of those commands by
this programmable unit.
9 Select/Adjust buttons (%, #, fi, @)
When the GUI mode is on, %, #, fi and @ light.
When using the GUI function with the on-screen display, use for
such operations as selection and adjustments (by moving the
cursor).
When the GUI mode is off, use to operate other components.
0 MUTE button
Used to temporarily mute the sound. When it’s in the on position,
the indicator on the MASTER VOLUME knob flashes. The volume
is restored when pressed again.
When operating components other than the receiver:
1. Press the ONE TOUCH OPERATION button for the component
you want to operate.
2. Press the operation button.
NOTE:
Components that could not originally be operated by remote
control cannot be controlled by this unit’s remote control.
21
<ARB7050>
Page 22

REMOTE CONTROL OPERATION
RECEIVER
POWER
U
I
G
TV CH
TV VOL.
M
FQ +
FQ -
+
CDVCR 1
TAPE
TUNER
MUTE
+
+
1
2
3
R
E
W
O
P
V
O
L
U
M
E
ONE TOUCH OPERATION
VCR 2
LD
FUNC.
TV FUNC.
ENTER
−
TAPE2
TV POWER
−
−
FOR AV RECEIVER
ONE TOUCH OPERATION buttons
switch between each of the functions.
VCR 1/VCR 2 operation
1 POWER button:
Switches VCR power ON/OFF.
.
C
H
E
C
K
ST+ST–
4
5
6
2 1 (REW) button:
Rewinds the tape and allows picture search.
3 7 (STOP) button:
Stops the tape transport.
4 8 (PAUSE/STILL) button:
Sets pause and still picture.
5 ¡ (FF) button:
Rapidly advances the tape and allows picture search.
6 3 (PLAY) button:
Selects playback.
LD player operation
1 POWER button:
Switches LD player power ON/OFF.
2 1 (SCAN/CHAPTER SEARCH) button:
Pressing quickly once takes you to the start of the chapter
7
8
9
10
currently playing. Each time you press it, you move back to
the start of the previous chapter. Continue pressing for fast
reverse.
3 7 (STOP) button:
Playback is stopped when pressed once.
With some LD players, pressing the button twice may open
the disc tray.
4 8 (PAUSE) button:
Video and audio are stopped and playback is paused.
5 ¡ (SCAN/CHAPTER SEARCH) button:
Pressing quickly once takes you to the start of the next
chapter. Each time you press it, you move ahead to the start
of the next chapter. Continue pressing for fast forward.
6 3 (PLAY) button:
Selects playback.
TV operation
7 TV POWER button:
Switches the power of the TV ON/OFF.
8 TV CH (channel) +, – button:
Switches TV channels in order.
9 TV VOL (volume) +, – button:
Raises (+) and lowers (–) the volume.
0 TV FUNC. (function) button:
Used to change the TV FUNCTION.
TV FUNC. button cannot be used with some PIONEER TVs.
CD player operation
1 POWER button:
Switches CD player power ON/OFF.
2 1 (MANUAL/TRACK SEARCH) button:
Pressing quickly once takes you to the start of the track
currently playing. Each time you press it, you move back to
the start of the previous track. Continue pressing for reverse
search.
Pressing the 1 button while pressing the 7 button takes
you to the previous disc. (With a file-type CD player.)
3 7 (STOP) button:
Stops playback.
4 8 (PAUSE) button:
Pauses playback.
5 ¡ (MANUAL/TRACK SEARCH) button:
Pressing quickly once takes you to the start of the next track.
Each time you press it, you move ahead to the start of the
next track. Continue pressing for forward search.
Pressing the ¡ button while pressing the 7 button takes
you to the next disc. (With a file-type CD player.)
6 3 (PLAY) button:
Selects playback.
22
<ARB7050>
Page 23

REMOTE CONTROL OPERATION
TAPE operation
1 POWER button:
Switches cassette deck power ON/OFF.
2 1 (FF) button:
Rapidly advances the tape in the direction of the arrow.
3 7 (STOP) button:
Stops the tape transport.
4 8 (PAUSE) button:
Temporarily stops tape transport. Press again to resume
tape transport.
5 ¡ (FF) button:
Rapidly advances the tape in the direction of the arrow.
6 3 (PLAY) button:
Selects playback.
NOTE:
On a Pioneer double deck, you can operate Deck II.
Tuner operation
2 ST – (Station Down) button:
Used for recalling memorized stations.
3 FQ – (Frequency Down) button:
Shifts the frequency down.
4 FQ + (Frequency Up) button:
Shifts the frequency up.
5 ST + (Station Up) button:
Used for recalling memorized stations.
6 Band button:
Switches the FM and AM bands in turn.
Auto tuning:
Press FQ + (up) or – (down) button until the frequency starts to
change, then release it. The tuner will automatically search for
a broadcasting station and stops when one is found, and the
TUNED indicator lights up. To search for another station, press
again.
Manual tuning:
Press FQ + (up) or – (down) button and release quickly. The
tuning frequency will change by one step each time the button
is pressed. Press as many times as necessary to tune in the
desired station. The TUNED indicator lights up when the station
is tuned in best.
÷If you keep the FQ (up/down) button depressed after the
frequency has began to change, the reception frequency
changes continuously, and stops when the button is released.
NOTE:
When AUTO TUNING is in use, reception may not be possible
over long distances or when signals are weak. At these times
MANUAL TUNING is recommended.
23
<ARB7050>
Page 24

OPERATING USING GUI
GUI
GUI (Graphic User Interface) lets you use the TV screen to
operate the system.
÷Press the GUI MODE button on this unit or the GUI button on
the remote control and operation indications for the currently
selected function are displayed on the TV screen.
÷To operate, use the %, #, fi, @ buttons on the remote control
(they light up when the GUI mode is on) or the MULTI-JOG on
this unit to move the cursor (the hand shaped mark) displayed
on the TV screen. When the cursor is on the button you want
÷When the operating instructions say “Press the button”, this
means move the cursor to the desired button and press the
GUI ENTER button.
NOTE:
÷
If you do not perform any of the operations above within 10 ~ 30
seconds, the GUI display is canceled.
÷
<Multi-voltage model only>
Set the rear panel PAL/NTSC switch to match your TV’s color
system. The screen will be unclear if the color system does not
match.
to operate, press the GUI ENTER button.
RECEIVER CONTROL BUTTONS
÷The buttons in the following explanation are the receiver operation button indications common to all function displays. (The illustration
shows LD operation indications.)
(Figure 1: Main Menu display)
LD
AC-3
DOLBY
PROLOGIC
DOLBY
PROLOGIC
THEATER
DSP
MODE
SUPER
BASS
SUPER
BASS
DIRECT
SOUND
ED I T
SET
UP
1 2 3 4 5 6 7 8 9
1 AC-3:
Switches DOLBY SURROUND AC-3 on/off.
When on, “AC-3” is displayed on the right of the function
indications. (When the input selector is set to a source other
than LD or TV/SAT, it does not operate. Also, when TAPE 2 is on,
it does not operate.)
2 DOLBY PRO-LOGIC:
Switches DOLBY PRO-LOGIC on/off.
When on, “DOLBY PRO-LOGIC” is displayed to the right of the
function indications.
3 DSP MODE:
Switches between the five DSP modes as follows:
off
3
JAZZ
2
33
DANCE HALL
THEATER
22
SIM.SURR
(SIMULATED SURROUND)
The selected mode is displayed to the right of the function
indications.
4 SUPER BASS:
Switches SUPER BASS on/off.
When on, “SUPER BASS” is displayed on the right of the
function indications.
5 DIRECT:
Press this to listen to source sound without passing the audio
signal through sound quality and balance adjusting circuitry.
The surround mode, rear and center speakers are automatically
switched off.
6 SOUND EDIT:
Press to make adjustments such as level setting for the currently
selected DSP mode, DOLBY SURROUND AC-3 or DOLBY PROLOGIC.
When you press this button, the display changes to SOUND
EDIT indications. (Refer to page 30.)
(Figure 2: Sub Menu display)
D/A/CX AUDIO
+
V.
SEL
THEATER
DSP
MODE
10
A B
VCR 1
SUPER
BASS
SUPER
BASS
DISPLAY
SLEEP
DIRECT
90
min
SOUND
ED I T
SYSTEM
OFF
SET
UP
1 2 3 4 5
6 7 8 9 0
COPY
DOLBY
LD
AC-3
PROLOGIC
DOLBY
PROLOGIC
10 11 12
7 SET UP:
Press this button and the display changes to the SET UP MENU.
(Refer to pages 31 – 33.)
8 Display change button:
Switches between Main Menu display (Figure 1) and Sub Menu
display (Figure 2).
9 COPY:
Press to copy from a LaserDisc to a VCR, or to copy between VCR
1 and VCR 2.
When you press this button, the display changes to COPY
indications. (This button is displayed only when the function is
LD, VCR 1 or VCR 2. Refer to page 28.)
0 V.SEL (VIDEO SIGNAL SELECTOR):
This switches only the video signal in sequence, leaving the
sound unchanged. (Refer to page 28.)
VCR 13VCR 2 VIDEO TV/SAT LD
333 3
2
off
- SLEEP:
This operates the sleep timer. Move the cursor to this button,
and each time you press the GUI ENTER button, timer settings
change as follows:
3
90 min
33
60 min 30 min
0 min (off)
2
= SYSTEM OFF:
Switches power to this unit, the TV and the currently selected
function off.
NOTE:
When you press the SYSTEM OFF button, power to components
not made by Pioneer switches on if power to these components
was already switched off.
24
<ARB7050>
Page 25

OPERATING THE TUNER (GUI OPERATION)
Calling up the tuner display.
1. Press the TUNER button of the input selector.
2. Press the GUI MODE button on this unit or the GUI button on
the remote control.
TUNER operation indications are displayed.
(Main Menu display) (Sub Menu display)
FM
MHz
SUPER
BASS
SUPER
BASS
+–
BAND
DIRECT
MEMORY
SOUND
ED I T
SET
UP
TUNER
ch
1
AC-3
DOLBY
PROLOGIC
87.50
DOLBY
PROLOGIC
DSP
MODE
21 43
1 Channel indication:
Indicates the current channel.
2 –, + buttons:
Use to raise or lower the frequency.
3 Frequency indication:
Indicates the current frequency.
4 BAND button:
Switches between FM/AM. The band changes each time you press
this button and is displayed next to the frequency indication.
NEXT
1
2
3
4
5
TUNER
1
ch
AC-3
5
87.50
87.50
98.00
106.70
DOLBY
PROLOGIC
FM
MHz
FM
MHz
FM
MHz
FM
MHz
AM
530
KHz
V.
SEL
VCR 1
DOLBY
PROLOGIC
87.50
DSP
MODE
FM
MHz
SUPER
BASS
6
100.00
7
89.50
8
1440
9
620
10
108.00
SLEEP
90
BAND
DIRECT
min
MEMORY
MEMORY
SOUND
ED I T
+–
SUPER
BASS
76
FM
MHz
FM
MHz
AM
KHz
AM
KHz
FM
MHz
SYSTEM
OFF
SET
UP
5 NEXT button:
Switches between channel lists. There are a total of thirty channels,
from 1 to 30, displayed 10 at a time on three lists which change each
time you press the button as follows.
3
1~10
33
11~20 21~30
6 Channel list:
Frequencies memorized in each channel are displayed. Press a
number button and that channel’s frequency is received.
7 MEMORY button:
Use to memorize stations.
You can only press this button when a channel list is displayed
(Sub Menu display).
MANUAL/AUTO TUNING
1. Move the cursor to BAND, and select FM or AM.
The band changes each time you press the GUI ENTER button.
2. Move the cursor to + or – and press the GUI ENTER button
to raise or lower the frequency as desired.
÷One Step Tuning:
Press the GUI ENTER button and release quickly. The frequency
will change by one step each time the button is pressed. Press as
many times as necessary to tune in the desired station.
÷Auto Tuning:
Press the GUI ENTER button until the frequency starts to change
(about 1 sec.), then release it. The tuner automatically searches for
a broadcasting station and stops when one is found.
NOTE:
When the signal level is too weak for reception, the unit cannot
perform Auto tuning. In this case, change to Manual tuning.
÷High Speed Manual Tuning:
Keep the GUI ENTER button pressed. The frequency changes
continuously and stops when the button is released.
PRESET TUNING
You can preset up to 30 FM/AM stations for easy recall.
FREQUENCY PRESETTING
1. Press to switch to the Sub Menu display.
(The channel list is displayed.)
2. Tune in the desired station.
Refer to “MANUAL/AUTO TUNING” procedures.
In addition to station frequencies, the MPX MODE can also be
preset (FM only).
Switch to the MPX MODE using the MPX MODE button on this
unit. (No indications are displayed.)
3. Press the MEMORY button.
Channel indications “– –” flash.
4. Select the channel you want to memorize from the channel
list and press the GUI ENTER button.
This memorizes the frequency.
To memorize other stations, repeat steps 2 through 4.
25
<ARB7050>
Page 26

OPERATING OTHER COMPONENTS (GUI OPERATION)
<VCR 1/VCR 2>
VCR1
AC-3
PROLOGIC
DOLBY
PROLOGIC
DOLBY
DSP
MODE
SUPER
BASS
SUPER
BASS
DIRECT
SOUND
ED I T
SET
UP
0 1 2 3 4
5 6 7 8 9
COPY
VCR1
AC-3
PROLOGIC
DOLBY
PROLOGIC
DOLBY
V.
SEL
DSP
MODE
CH+
CH−
VCR 1
SUPER
BASS
SUPER
BASS
FUNC
SLEEP
DIRECT
TV/
VCR
90
MTS
min
SOUND
ED I T
SYSTEM
OFF
SET
UP
7 : Stops tape transport.
8 : Sets pause and still picture.
¶ :Selects the recording mode.
3 : Starts playback.
1 : Rewinds the tape.
¡ : Rapidly advances the tape.
NOTE:
Fast-forwarding or rewinding during playback may interfere with
GUI display.
<TAPE>
DOLBY
DECK
ΙΙ
DOLBY
PROLOGIC
PROLOGIC
DSP
MODE
TAPE 1
AC-3
[DECK ΙΙ ]
7 : Stops playback.
8 : Temporarily stops tape transport.
3 : Selects playback.
1 : Rapidly advances the tape in the direction of the arrow.
¡ : Rapidly advances the tape in the direction of the arrow.
TAPE 2 : Displayed when TAPE 2 MONITOR is on.
When using a single cassette deck, select DECK ΙΙ.
SUPER
TAPE 2
BASS
SOUND
SUPER
BASS
DIRECT
ED I T
SET
UP
TAPE 2 MONITOR indicator
0 ~ 9 : Use to call up channels.
CH + : Shifts channels in ascending order.
CH – : Shifts channels in descending order.
TV/VCR : This button can be used only for VCRs with a TV/VCR
selector.
Toggles the antenna output between TV and VCR.
FUNC : Switches the input selector functions.
MTS : Selects the reception mode for multi-channel TV sound.
Ι / ΙΙ / ΙΙΙ: Using the REMOTE SET UP learning function (page 32),
use to memorize commands.
1 2 3 4 5 6
DECK
Ι
DECK
ΙΙ
DOLBY
PROLOGIC
DOLBY
PROLOGIC
TAPE 1
AC-3
V.
SEL
DSP
MODE
VCR 1
SUPER
BASS
SLEEP
SUPER
BASS
DIRECT
[DECK Ι ]
7 : Stops playback.
8 : Temporarily stops tape transport.
3 : Selects playback.
1 : Rapidly advances the tape in the direction of the arrow.
¡ : Rapidly advances the tape in the direction of the arrow.
1 ~ 6 : Selects the cassette No. (1 to 6) for multi-cassette
changer.
90
min
SOUND
ED I T
SYSTEM
OFF
SET
UP
<TV>
TV
AC-3
DOLBY
PROLOGIC
CH − CH +
DOLBY
PROLOGIC
DSP
MODE
MTS
SUPER
BASS
SUPER
BASS
ANT
DIRECT
SOUND
ED I T
SET
UP
CH – : Shifts channels in descending order.
CH + : Shifts channels in ascending order.
MTS : Selects the reception mode for multi-channel TV sound.
ANT : Press to switch between ANTENNA-A and ANTENNA-
B when you wish to watch TV.
26
<ARB7050>
12
TV
AC-3
CHANNEL 1 ~ 9, 0
: Used to call up channels.
For example, to receive channel “23”, press 2 and
then 3.
For channels 1 through 9, press the number and wait
for about 2 seconds.
1 2 3 4 5 6
Ch
CH − CH +
PROLOGIC
DOLBY
PROLOGIC
DOLBY
V.
SEL
DSP
MODE
VCR 1
MTS
SUPER
BASS
SUPER
BASS
ANT
SLEEP
DIRECT
7 8 9 0
SYSTEM
OFF
90
min
SOUND
SET
ED I T
UP
Page 27

<CD>
CD
AC-3
DOLBY
PROLOGIC
DOLBY
PROLOGIC
THEATER
DSP
MODE
OPERATING OTHER COMPONENTS (GUI OPERATION)
1 2 3 4 5
6 7 8 91010
SUPER
SUPER
BASS
BASS
DIRECT
SOUND
ED I T
SET
UP
CD
AC-3
DOLBY
PROLOGIC
DOLBY
PROLOGIC
DSP
MODE
DISC
V.
SEL
VCR 1
THEATER
TRACK DISC+
MODE
+
SUPER
BASS
SUPER
BASS
SLEEP
DIRECT
DISC−
90
min
SOUND
ED I T
SYSTEM
OFF
SET
UP
7 : Stops playback.
8 : Pauses playback.
3 : Selects playback.
1 : Selects fast backward.
¡ : Selects fast forward.
4 : Returns to the beginning of the track currently playing.
¢ : Advances to the next track.
<LD>
LD
AC-3
DOLBY
PROLOGIC
DOLBY
PROLOGIC
THEATER
DSP
MODE
SUPER
BASS
SUPER
BASS
DIRECT
SOUND
ED I T
SET
UP
1 ~ 10 : For direct selection of a track or programming of
tracks.
+10 : Use when selecting a track number higher than 10.
For example, to select 21, press the +10 button twice
and then the 1 button.
This button cannot be used with some CD players.
DISC : Before selecting a disc number button, select this
button first.
TRACK : Before selecting a track number button, select this
button first.
MODE : Use this button to switch between SINGLE and ALL
modes when using a File-type CD player.
To play only a single disc select SINGLE.
For search and continuous play of all discs select ALL.
DISC + : Use to select a disc number.
DISC – : Use to select a disc of the file-type CD player.
Ι / ΙΙ / ΙΙΙ : Using the REMOTE SET UP learning function (p. 32),
use to memorize commands.
D/A/CX AUDIO
+
V.
SEL
THEATER
DSP
MODE
10
A B
VCR 1
SUPER
BASS
SUPER
BASS
DISPLAY
SLEEP
DIRECT
90
min
SOUND
ED I T
SYSTEM
OFF
SET
UP
1 2 3 4 5
6 7 8 9 0
COPY
DOLBY
LD
AC-3
PROLOGIC
DOLBY
PROLOGIC
7 : Playback is stopped when selected once.
With some LD players, pressing the button twice may
open the disc tray.
8 : Video and audio are stopped and playback is paused.
3 : Selects playback.
1 : Selects fast backward.
¡ : Selects fast forward.
4 : Searches for the start of the chapter currently playing.
¢ : Searches for the start of the next chapter.
1 ~ 10 : For direct selection of a chapter.
+10 : Use to input such information as chapter numbers
higher than 10.
D/A/CX : Use to switch between LD digital/analog sound and
the CX system.
A:Selects playback of LD disc to side A.
B:Selects playback of LD disc to side B.
AUDIO : Switches speakers between STEREO, L and R.
DISPLAY : Switches TV screen display of chapter, frame/time
number on/off.
Ι / ΙΙ / ΙΙΙ : Using the REMOTE SET UP learning function (p. 32),
use to memorize commands.
27
<ARB7050>
Page 28

COPY OPERATION (GUI OPERATION)
÷LD = VCR 1/2 and VCR 1 Ô VCR 2 copying is possible.
÷For VCR, select a line input (external input).
LD = VCR 1 (VCR 2) Copying
1. Select LD with the FUNC. button and press to switch
to the Sub Menu display.
LD function indications are displayed.
D/A/CX AUDIO
+
V.
SEL
THEATER
DSP
MODE
10
A B
VCR 1
SUPER
BASS
SUPER
BASS
DISPLAY
SLEEP
DIRECT
90
min
SOUND
ED I T
SYSTEM
OFF
SET
UP
1 2 3 4 5
6 7 8 9 0
COPY
DOLBY
LD
AC-3
PROLOGIC
DOLBY
PROLOGIC
2. Press the COPY button.
COPY indications are displayed.
COPY
START
START
STOP
STOP
LD to VCR1
LD to VCR2
VCR 1 = VCR 2 or VCR 2 = VCR 1 Copying
(Example: VCR 1 = VCR 2)
1. Select VCR 1 with the FUNC. button and press to
switch to the Sub Menu display.
VCR 1 function indications are displayed.
TV/
0 1 2 3 4
5 6 7 8 9
COPY
VCR1
DOLBY
AC-3
PROLOGIC
V.
SEL
DOLBY
PROLOGIC
DSP
MODE
CH+
CH−
VCR 1
SUPER
BASS
SUPER
BASS
FUNC
SLEEP
DIRECT
VCR
90
MTS
min
SOUND
ED I T
SYSTEM
OFF
SET
UP
2. Press the COPY button.
COPY indications are displayed.
COPY
START
VCR1 to VCR2
STOP
EXIT
3. Select the component you are using to copy (VCR 1 or VCR 2),
and press START.
The LD player starts playing and recording begins on the
3. Press START.
VCR 1 starts playing back and recording starts on VCR 2. To
stop, press the STOP button.
VCR. To stop, press the STOP button.
USING THE VIDEO SIGNAL SELECTOR (GUI OPERATION)
This function can be used to allow you to listen to the playback
sound while changing the video image only, thus allowing you
to playback and record video images different from the playback
sound source.
1. Select the component you want to listen to with the FUNC.
button.
When listening to (or recording) AM or FM broadcasts, select a
preset station. If the desired station has not been preset, tune in
the station.
2. Press the GUI button to switch the GUI mode ON.
GUI indications for the selected function are displayed.
3. Press to switch to the Sub Menu display.
(Example: TUNER)
NEXT
1
87.50
2
87.50
3
98.00
4
106.70
5
TUNER
1
ch
DOLBY
AC-3
PROLOGIC
FM
MHz
FM
MHz
FM
MHz
FM
MHz
AM
530
KHz
V.
SEL
VCR 1
DOLBY
PROLOGIC
87.50
DSP
MODE
FM
MHz
6
100.00
7
89.50
8
1440
9
10
108.00
SLEEP
SUPER
BASS
+–
BAND
SUPER
DIRECT
BASS
FM
MHz
FM
MHz
AM
KHz
AM
620
KHz
FM
MHz
SYSTEM
OFF
90
min
MEMORY
MEMORY
SOUND
ED I T
SET
UP
4. Select the video component you want to watch with the
V.SEL (VIDEO SIGNAL SELECTOR) button.
5. Start playback of the component selected with the FUNC.
button and the component selected with the V.SEL button.
CAUTION:
If you must operate the V.SEL button during recording, do so
after setting the recording VCR to the pause mode. If the button
is operated when the tape is traveling during recording, the
recorded image and sound may be disrupted at the point at
which the button is operated.
EXIT
28
<ARB7050>
Page 29

SOUND EDIT OPERATION (GUI OPERATION)
SUB
WOOFER
÷If you press the SOUND EDIT button on a function operation
display, display switches to “SOUND EDIT” indications for the
currently selected surround mode. (Press the EXIT button to
return to the original function operation display.)
÷On the SOUND EDIT display, you can adjust levels and balances
set to the speaker mode, etc.
(When using PRO-LOGIC THEATER)
SOUND EDIT
PRO-LOGIC THEATER
SPEAKER
MASTER BALANCE
MODE
L
TEST
TONE
F - L
R
REAR BALANCE
L
CENTER LEVEL
REAR LEVEL
SUB WF LEVEL
EFFECT LEVEL
–
+10
–
–10
–
+6
–
50
R
+
dB
+
dB
+
dB
+
EXIT
SETTING THE SPEAKER MODE
You can set this unit to match the requirements and specifications
of your stereo system’s speakers (whether or not center
speaker(s), rear speakers or a sub-woofer are used, speaker
size, etc.) to assure optimum sound quality.
÷Pressing the SPEAKER MODE button on the “SOUND EDIT”
display takes you to the “SPEAKER MODE” display.
SPEAKER MODE
FRONT
SPEAKER
LARGE
REAR
SPEAKER
SMALL × 2
LFE MODE
LOW CUT FIL.
CROSS OVER
CENTER DELAY
REAR DELAY
÷Set the SPEAKER MODE using the different buttons.
FRONT
SPEAKER
CENTER
SPEAKER
Selects the size of the front L, R speakers.
LARGE Ô SMALL
Selects center speaker size, or NONE if no center
speaker is used.
3
LARGE SMALL NONE
–
S
S
33
CENTER
SPEAKER
SMALL
WOOFER
USE
dB
+10
ON
100
Hz
L
SUB
+
L
EXIT
During Pro-Logic reproduction, this unit does not let you
switch between NORMAL, WIDE, and PHANTOM center
mode settings. However, setting the SPEAKER MODE as
follows provides the same effects as these modes.
Front Center
LARGE SMALL \ NORMAL
LARGE LARGE \ WIDE
LARGE NONE \ PHANTOM
Set the rear speaker to NONE for conventional 3CH Logic
reproduction.
Selects whether there is a sub-woofer or not.
USE Ô NONE
LFE MODE
÷Attenuate LFE (Low Frequency Effect = ultra-low bass effect for
more powerful movie sound or music) level. It changes in
sequence each time the button is pressed.
3
+10 dB 0 dB OFF
NOTE:
If you set to “+10 dB”, front three channel (L + R + C) output
power is required for the sub-woofer. If this is more power than
the sub-woofer can handle, clipping may occur resulting in
distortion.
LOW CUT FIL.
÷Switch ON if the sub-woofer does not have high power handling
capabilities. (This enables bass boosting while reducing the
possibility of the sub-woofer clipping.)
CROSSOVER
÷Set sub-woofer crossover frequency (highest frequency it can
reproduce). Press – to lower the crossover frequency and
press + to raise it. (100 Hz/150 Hz/200 Hz)
CENTER DELAY
÷Sets center channel delay time. Press S for shorter delay,
press L for longer delay.
÷This is possible only when the AC-3 is selected.
REAR DELAY
÷Set rear (surround) channel delay time. Press S for shorter
delay, press L for longer delay.
÷This is possible only when the AC-3 or PRO-LOGIC is selected.
Pressing
– +
S L
S L
EXIT
33
ON Ô OFF
returns you to SOUND EDIT display.
REAR
SPEAKER
Selects the size and number (1 or 2) of rear speakers,
or NONE if no rear speakers are used.
3
LARGE x 2 SMALL x 2
NONE
33LARGE
SMALL
22
29
<ARB7050>
Page 30

SOUND EDIT OPERATION (GUI OPERATION)
LEVEL AND BALANCE ADJUSTMENT
÷First, perform settings in the “SETTING THE SPEAKER MODE”.
(Refer to page 29.)
÷If you press the SOUND EDIT button on a function operation
display, display switches to “SOUND EDIT” indications for the
currently selected surround mode.
(When using PRO-LOGIC THEATER)
SOUND EDIT
PRO-LOGIC THEATER
SPEAKER
MASTER BALANCE
MODE
L
TEST
TONE
F - L
R
REAR BALANCE
L
CENTER LEVEL
REAR LEVEL
SUB WF LEVEL
EFFECT LEVEL
÷Adjust level and balance settings with the buttons.
÷In the “SETTING THE SPEAKER MODE”, parameters for
channels set to “NONE” cannot be adjusted.
SPEAKER
MODE
Switches to the SPEAKER MODE display. (Refer
to page 29.)
–
+10
–
–10
–
+6
–
50
R
+
dB
+
dB
+
dB
+
EXIT
NOTE:
If you adjust the level to match a program source with little bass,
clipping may occur with a program source that has a lot of bass,
resulting in distortion from the sub-woofer. Pay careful attention
to sub-woofer channel output, making sure the level is not too
high.
EFFECT LEVEL
÷Adjust surround effect level. (10 – 80)
÷Press
Press
–
EXIT
– +
to reduce the surround effect, press + to increase it.
to return to the original function display.
7 Adjustment using the TEST TONE
1. Press the TEST TONE button to switch ON.
÷The test tone is output from channels set in the “SETTING
THE SPEAKER MODE”.
2. Use the L, R, +, and – buttons to adjust channel
volume level balance.
÷Adjust so that the volume level of each channel is the same.
3. Press the TEST TONE button to switch OFF.
4. Press the EXIT button.
TEST
TONE
MASTER BALANCE
÷Adjust the system’s overall left/right volume level balance.
÷Press L and the right channel’s volume level decreases.
÷Press R and the left channel’s volume level decreases.
REAR BALANCE
÷Adjust rear channel left/right volume level balance.
÷Press L and the right rear channel’s volume level decreases.
÷Press R and the left rear channel’s volume level decreases.
CENTER LEVEL
÷Adjust center channel volume level. (± 10 dB)
÷Press – to lower volume, press + to raise volume.
REAR LEVEL
÷Adjust rear channel volume level. (± 10 dB)
÷Press – to lower volume, press + to raise volume.
SUB WF LEVEL
÷Adjust sub-woofer channel volume level. (± 10 dB)
÷Press – to lower the volume, press + to raise volume.
This switches the test tone signal used for
adjustment ON/OFF. When ON, the test tone is
output through each channel in turn. The display
below the TEST TONE button indicates the
channel through which the test tone is being
output.
(Example) F-L : Front Left channel
L R
L R
– +
– +
– +
30
<ARB7050>
Page 31

REMOTE SET UP (GUI OPERATION)
Even if your audio/video components are not made by Pioneer,
performing the following procedures will enable you to operate
them with this unit’s remote control and GUI. (If you do not
perform the following procedures, you will not be able to
operate other manufacturers’ components with this unit’s remote
control.)
When operating, be sure to connect an IR repeater (page 10).
Calling up and setting up presets
This unit is already preset with the remote control signals of
other manufacturers’ components. The following procedures
show you how to call up and set up these presets.
1. Press the SET UP button that is indicated on all the function
operation displays.
Display switches to the SET UP MENU.
SET UP MENU
ONE TOUCH
OPERATION SET UP
VCR 1 VCR 2 TAPE 1
L D
C D
REMOTE SET UP
VCR 1 VCR 2 TAPE 1
L D
2. Select one of the six REMOTE SET UP functions.
The display switches to REMOTE SET UP indications. The
name of preset manufacturers are indicated in white in the
lower half of the screen.
(Example: VCR)
C D
T V
EXIT
3. Select the manufacturer of your component.
÷For VCRs, CD players and TVs, press the NEXT button and
another manufacturers’ list is displayed.
÷For TVs, there’s also a display of CATV terminal
manufacturers you can select from. (However, if you select
a CATV manufacturer, a TV cannot be operated. In this case,
learn the TV operation signals, see page 32.)
REMOTE SET UP
VCR 1
POWER
0 1 2 3 4
5 6 7 8 9
NEXT
R C A
SHARP
ZENITH
S O N Y
4. The selected manufacturers’ name and preset operation
buttons are indicated in black.
This calls up the preset.
To finish remote set up operation, press the EXIT button.
NOTE:
÷
To return preset buttons to their original settings, press the
CLEAR button. The original settings are Pioneer remote control
commands.
÷
Even if a button is preset, it may not operate. If this happens,
learn the command using the learning function (page 32).
TV/
CH+
CH−
VCR
FUNC
MTS
TOSHIBA
HITACHI
J V C
PANASONIC
CLEAR
EXIT
REMOTE SET UP
VCR 1
POWER
0 1 2 3 4
5 6 7 8 9
NEXT
R C A
SHARP
ZENITH
S O N Y
TV/
CH+
CH−
VCR
FUNC
MTS
TOSHIBA
HITACHI
J V C
PANASONIC
CLEAR
EXIT
31
<ARB7050>
Page 32

REMOTE SET UP (GUI OPERATION)
Learning
Pioneer remote control commands are in the non-preset gray
buttons, but you can use them to learn remote control signals from
your component’s remote control.
1. Perform the first three steps of “Calling up and setting up
presets”.
2. Select the gray button you want to use for learning and
press.
The “STANDBY” indication flashes. (If you remain in STANDBY
for about 1 minute, it is canceled.)
(Example: Using the 0 button for learning)
REMOTE SET UP
VCR 1
POWER
0 1 2 3 4
5 6 7 8 9
NEXT
R C A
SHARP
ZENITH
S O N Y
3. Point your component’s remote control at this unit’s remote
sensor window and press the selected button.
STANDBY
TV/
CH+
VCR
FUNC
CH−
TOSHIBA
HITACHI
J V C
PANASONIC
MTS
CLEAR
EXIT
NOTE:
÷
To return the buttons you used for learning to their original
settings, press the CLEAR button. This returns them to the
original Pioneer remote control commands.
÷
There are no signals in buttons Ι, ΙΙ, and
ΙΙΙ
, so you can use
them for learning.
÷
Even when “OK” is displayed during learning, operation may
still not be possible. If this happens, repeat the learning
procedures. With some manufacturers’ components, learning
may be difficult to perform. Learning may also not be possible
if the remote control’s batteries are run down. If this is the
case, load the remote control with new batteries and repeat
the learning procedures.
÷
Even black preset buttons can be used for learning other
commands.
÷
Learning a command may not be possible if many commands
requiring a large amount of memory have already been learned
resulting in insufficient memory remaining.
VSX-D3S
Press, holding the remote control
unit within 50 cm (20 inches) of
this unit’s sensor window.
+
−+−
+
−
÷If “OK” is displayed, learning has been completed. If you want
to use another button for learning, repeat steps 2 and 3.
REMOTE SET UP
VCR 1
POWER
0 1 2 3 4
5 6 7 8 9
NEXT
R C A
SHARP
ZENITH
S O N Y
÷If “NG” is displayed, repeat steps 2 and 3.
÷When you have completed learning, press the EXIT button.
OK
TV/
CH+
CH−
VCR
FUNC
MTS
TOSHIBA
HITACHI
J V C
PANASONIC
CLEAR
EXIT
32
<ARB7050>
Page 33

ONE TOUCH OPERATION SET UP (GUI OPERATION)
÷Sets the operation signal that is transmitted when a remote
control ONE TOUCH OPERATION button is pressed.
÷Initially, Pioneer remote control signals are transmitted.
(Figure 1)
(Figure 1: Initial settings for LD)
TV
L
The transmitted signal is .....
manufacturer ..... PIONEER
TV .................. POWER ON
TV ...................... FUNC. LD
V
C
R 1
C
D
V
C
R
2
TA
P
E
LD
T
UN
ER
LD .................. POWER ON
LD ............................. PLAY
Press the
LD button.
To operate other manufacturers’ components, first complete
REMOTE SET UP procedures (page 31).
Example : When you want to change LD ONE TOUCH
OPERATION commands.
1. Press the SET UP button for display of the operation buttons
of each function.
The SET UP MENU is displayed.
SET UP MENU
ONE TOUCH
OPERATION SET UP
VCR 1 VCR 2 TAPE 1
L D
C D
2. Select LD from the five ONE TOUCH OPERATION SET UP
function buttons.
ONE TOUCH OPERATION SET UP indications are displayed.
(Example: LD)
ONE TOUCH
OPERATION SET UP
LD
1 2 3 4
TV
POWER POWER
1 ~ 4
: You can select which operation buttons will transmit operation
signals and those which will not.
When the operation button’s character is black, a signal will be
transmitted. If it is gray, it will not be transmitted. The button’s
character color changes each time it is pressed.
÷With other manufacturers’ components, if power is on when the
POWER signal is transmitted, power is switched off.
When the TV “FUNC” signal is transmitted, the TV function may
not become the function connected to the receiver.
For this reason, when other manufacturers’ presets are called up
with REMOTE SET UP, commands are not automatically
transmitted.
5, 6
: TV and LD manufacturers settings are displayed.
÷If you use REMOTE SET UP (page 31) to call up another
manufacturers’ presets, that manufacturers’ name is displayed.
÷When you use the REMOTE SET UP learning function (page
32), the “PIONEER” indication becomes gray. Remote control
signals set with REMOTE SET UP are transmitted.
To return to the original Pioneer remote control commands,
press the ON/OFF button (on the left of “PIONEER”) to turn the
“PIONEER” indication black.
(If they are not the original Pioneer remote control commands,
even Pioneer components may switch OFF when the POWER
command is transmitted, or there may be some other incorrect
operation.)
TV
FUNC
5
6
LD
PIONEER
TV
LD
PIONEER
LD
EXIT
REMOTE SET UP
VCR 1 VCR 2 TAPE 1
L D
C D
T V
EXIT
3. After completing the settings, press the EXIT button.
NOTE:
With original Pioneer remote control commands, the TV function
always becomes “LD”, so connect the receiver’s VIDEO OUT
(TO MONITOR TV) terminal to the TV’s LD video input terminal.
33
<ARB7050>
Page 34

TROUBLESHOOTING
Incorrect operations are often mistaken for trouble and malfunctions. If you think that there is something wrong with this component,
check the points below. Sometimes the trouble may lie in another component. Investigate the other components and electrical
appliances being used.
If the trouble cannot be rectified even after exercising the checks listed below, ask your nearest PIONEER authorized service center or
your dealer to carry out repair work.
Symptom
Power does not come on even
when the POWER switch is
pressed.
Control is not possible
regardless of what operation
button is pressed.
No sound is produced, even
when the input selector button
is selected.
No picture is produced, even
when the input selector button
is selected.
Cause
÷Power cord is disconnected.
÷Instances are rare, but the problem may be
due to the operation of the protector circuit.
÷Static electricity affects the unit when the air
is dry, such as in winter.
÷Connections are incorrect.
÷The MUTE button is pressed.
÷VOLUME is turned down.
÷Speaker connecting wires are disconnected
from speaker terminals.
÷One or both of the input cords are
disconnected.
÷TAPE 2 MONITOR button is in the ON position.
÷The SPEAKERS button is OFF.
÷Connections are incorrect.
÷The selected input selector button is not
correct.
Remedy
÷Connect cord securely.
÷Unplug the power cord of the unit from the AC
wall outlet, then plug it in again.
÷Unplug the power cord of the unit from the AC
wall outlet, then plug it in again.
÷Press the RESET button.
÷If static electricity is pronounced, it is
recommended that you operate the unit using
the remote control unit.
÷Consult pages 6 — 10 and perform connections
correctly.
÷Press the MUTE button to cancel the MUTING
effect.
÷Raise volume.
÷Connect wires to terminals securely.
÷Connect input cords securely.
÷Press the button again to the OFF position.
÷Switch the SPEAKERS button ON.
÷Consult pages 6 — 10 and perform connections
correctly.
÷Press the correct button.
High noise level.
÷Station has not been tuned in to correct
frequency.
÷Antenna has not been connected or has
become disconnected.
FM reception
÷Accessory FM antenna remains bundled up
or it is not pointing in the right direction.
÷Weak broadcasting station signals.
AM reception
÷AM loop antenna is not pointing in the right
direction.
÷Weak broadcasting station signals.
÷Noise is being picked up by this unit from
other equipment (especially electrical
appliances using motors or fluorescent
lights).
÷Tune the station in correctly.
÷Connect the antenna securely.
÷Stretch both ends of antenna taut and locate
direction yielding optimum reception.
÷Replace accessory FM antenna with an outdoor
FM antenna.
÷Change the direction of the AM loop antenna and
find a position where reception is improved.
÷Erect an outdoor AM antenna or connect a ground
wire.
÷Turn off the appliances generating noise or
remove them from the vicinity of the stereo
equipment.
÷Separate the antenna from the unit by some
distance.
34
<ARB7050>
Page 35

TROUBLESHOOTING
Symptom
No auto stop.
TV source cannot be seen when
the VCR’s TV tuner is used.
No rear sound is produced.
Remote control does not work.
÷Input signals are not strong enough.
÷TV antenna is not connected to the VCR, or
connections are faulty.
÷The VCR’s input switch is set to line input.
÷The SPEAKER MODE is set incorrectly.
÷The REAR LEVEL is turned down.
÷Speaker connecting wires are disconnected
from the REAR SPEAKERS terminals.
÷Batteries are dead or missing in remote
control unit.
÷Poor angle or too great a distance from the
remote sensor window.
÷There is an obstacle between you and the
remote sensor window.
÷A fluorescent light is shining on the remote
sensor window.
÷The Main-repeater signal does not reach
other components.
Cause
Remedy
÷(FM) If the supplied simple antenna is being
used, change to an outdoor antenna.
÷Consult the VCR’s operating instructions, and
connect the antenna correctly.
÷Set the VCR’s input switch to built-in tuner.
÷Set correctly.
÷Refer to page 30 and adjust the rear level.
÷Connect wires to the terminals securely.
÷Insert new batteries.
÷Use within 7 meters and within a 30 degree angle
of the remote sensor window.
÷Change your position or move the obstacle.
÷Move the receiver so fluorescent light does not
shine directly on the receiver’s front panel remote
sensor window.
÷Try changing the position of this unit or other
units. If the signal still does not reach other
components, use a supplied Mini-repeater.
Abnormal functioning of this unit may be caused by static electricity or other external interference. To restore normal operation, turn
the power off and then on again, or unplug the AC power cord and then plug it in again.
35
<ARB7050>
Page 36

APPENDIX A: SPECIFICATIONS
Amplifier Section
<2-channel mode>
Continuous average power output of 130 watts* per
channel, min., at 8 ohms, from 20 Hz to 20,000 Hz with
no more than 0.05 %** total harmonic distortion.
<5-channel mode>
Continuous average power output of 100 watts* per
channel, min., at 8 ohms, from 20 Hz to 20,000 Hz with
no more than 0.8 %** total harmonic distortion.
* Measured pursuant to the Federal Trade Commission’s Trade
Regulation rule on Power Output Claims for Amplifiers.
** Measured by Audio Spectrum Analyzer.
Continuous Power Output
Front ...................................... 100 W + 100 W (1 kHz, 0.8 %, 8 Ω)
Center ................................................. 100 W (1 kHz, 0.8 %, 8 Ω)
Rear ....................................... 100 W + 100 W (1 kHz, 0.8 %, 8 Ω)
[Multi-voltage model]
Continuous Power Output (DIN)
Front (1 kHz, T.H.D. 1 %, 8 Ω) ............................. 150 W + 150 W
Dynamic Power (2 Ω/4 Ω) ........................................ 275 W/220 W
Input (Sensitivity/Impedance)
PHONO MM ........................................................... 2.8 mV/47 kΩ
CD, TAPE 1, TAPE 2, LD,
VCR 1, VCR 2, VIDEO, TV/SAT ............................. 200 mV/47 kΩ
Phono Overload Level (T.H.D. 0.1%, 1 kHz)
PHONO MM ...................................................................... 80 mV
Frequency Response
PHONO MM ..................................... 20 Hz to 20,000 Hz ± 0.3 dB
CD, TAPE 1, TAPE 2, LD, VCR 1,
VCR 2, VIDEO, TV/SAT ......................... 5 Hz to 100,000 Hz
Output (Level/Impedance)
TAPE 1 REC, TAPE 2 REC .................................... 200 mV/2.2 kΩ
VCR 1 OUT, VCR 2 OUT ...................................... 200 mV/2.2 kΩ
Tone Control
BASS .................................................................... ± 8 dB (150 Hz)
TREBLE ................................................................ ±8 dB (10 kHz)
SUPER BASS .................................... 0 ~ +8 dB (80 Hz, variable)
Signal-to-Noise Ratio (IHF, short circuited, A network)
PHONO MM ........................................................................ 76 dB
CD, TAPE 1, TAPE 2, LD,
VCR 1, VCR 2, VIDEO, TV/SAT ........................................... 98 dB
Signal-to-Noise Ratio [EIA, at 1 W (1 kHz)]
PHONO MM ........................................................................ 77 dB
CD, TAPE 1, TAPE 2, LD,
VCR 1, VCR 2, VIDEO, TV/SAT ........................................... 80 dB
VIDEO Section
Input (Sensitivity/Impedance)
VCR 1, VCR 2, LD, VIDEO, TV/SAT ........................... 1 Vp-p/75 Ω
Output (Level/Impedance)
VCR 1, VCR 2, MONITOR ......................................... 1 Vp-p/75 Ω
Frequency Response
VCR 1, VCR 2,
LD, VIDEO = MONITOR ............................ 5 Hz to 10 MHz
Signal-to-Noise Ratio............................................................ 55 dB
Cross Talk .............................................................................. 55 dB
+0
–3
dB
+0
–3
dB
FM Tuner Section
Frequency Range ........................................ 87.5 MHz to 108 MHz
Usable Sensitivity ................... Mono: 11.2 dBf, IHF (1.0 µV/75 Ω)
50 dB Quieting Sensitivity .................................... Mono: 16.8 dBf
Signal-to-Noise Ratio.............................. Mono: 80 dB (at 65 dBf)
Stereo: 76 dB (at 85 dBf)
Distortion ...................................................... Stereo: 0.3 % (1 kHz)
Alternate Channel Selectivity ............................... 65 dB (400 kHz)
Stereo Separation ..................................................... 45 dB (1 kHz)
Frequency Response ............................... 30 Hz to 15 kHz (
Antenna Input ...................................................... 300 Ω balanced
AM Tuner Section
Frequency Range ..................... 531 kHz to 1,602 kHz (9 kHz step)
530 kHz to 1,700 kHz (10 kHz step)
Sensitivity (IHF, Loop antenna) ..................................... 300 µV/m
Selectivity .............................................................................. 25 dB
Signal-to-Noise Ratio............................................................ 50 dB
Antenna ................................................................... Loop antenna
Miscellaneous
Power Requirements
U.S. and Canadian models ............................... AC 120 V, 60 Hz
Multi-voltage model ............... AC 110 V/120 -127 V/220 V/240 V
Power Consumption
U.S. and Canadian models ................................. 455 W, 700 VA
Multi-voltage model ........................................................ 1175 W
In Standby Condition ............................................................... 5 W
AC Outlets
U.S. and Canadian models
SWITCHED x 2 .............................. TOTAL 100 W (0.8 A) MAX
UNSWITCHED x 1 ..................................... 100 W (0.8 A) MAX
Multi-voltage model
SWITCHED x 2 .......................................... TOTAL 100 W MAX
UNSWITCHED x 1 ................................................. 100 W MAX
Dimensions ................................ 420 (W) x 162 (H) x 425 (D) mm
16-9/16 (W) x 6-3/8 (H) x 16-3/4 (D) in
Weight (without package)
U.S. and Canadian models .......................... 15.0 kg (33 lb 1 oz)
Multi-voltage model ..................................... 15.2 kg (33 lb 8 oz)
Furnished Parts
FM T-type Antenna ...................................................................... 1
AM Loop Antenna........................................................................ 1
Dry Cell Batteries (size “AA” IEC R6P) ........................................ 2
Remote Control Unit .................................................................... 1
Main-Repeater ............................................................................. 1
Mini-Repeater .............................................................................. 1
Operating Instructions ................................................................. 1
Stereo: 38.6 dBf
+0.5
) dB
–2.0
75 Ω unbalanced
(Switchable), 50/60 Hz
NOTE:
Specifications and the design are subject to possible
modifications without notice, due to improvements.
AC-3 Input Section
AC-3 • RF (LD) ................................................................................ 1
AC-3 • DIGITAL (TV/SAT) .............................................................. 1
36
<ARB7050>
Page 37

APPENDIX B: SURROUND EFFECT
This unit has a built-in surround processor for adding presence
and an expansive effect to the sound.
5 Mode Selection with DSP (Digital Signal Processor):
JAZZ:
This gives you the sound field of a jazz club.
DANCE:
A “hot” high-energy sound, with extra reverb for greater
ambience.
SIMULATED SURROUND:
The “SIMULATED SURROUND” creates the effects of
reverberated and reflected sound from the walls and ceiling
similar to a concert hall. These sound-effects added to the actual
sound from the source make you feel as if you were in a more
expanded space. The different ranges of the expanded space
can be set by the REAR DELAY TIME button.
The “SIMULATED SURROUND” also gives effects on monaural
sources by outputting the added reverberated sound from the
rear speakers while outputting the actual source sound from the
front speakers. Turn on the “SIMULATED SURROUND” for a
monaural source to gain effective surround playback.
HALL:
You can enjoy a convincing hall sound.
THEATER:
This gives you the sound field of an atmosphere of a movie
theater.
÷ You can use these five modes in combination with AC-3 and
PRO-LOGIC.
DOLBY PRO-LOGIC SURROUND:
Choose this setting for movies and music (especially Video
Discs and video tapes bearing the
playback.
DOLBY PRO-LOGIC SURROUND continuously detects the size
and direction of the dominant signal and cancels undesirable
crosstalk, thereby providing signal emphasis.
It makes you clearly perceive the directional source of the
music. Real flow of sound also can be re-created naturally using
this feature. You can feel as if being in an outstanding and
expansive sound field.
Even if the video recordings do not bear the
mark, some of them may be Dolby Surround encoded.
Choose the SIMULATED SURROUND mode if the source sound
signal is mono. Little or no sound will be heard from the
surround speakers if the DOLBY PRO-LOGIC SURROUND mode
is selected.
DOLBY SURROUND
DOLBY SURROUND
mark)
DOLBY 3CH LOGIC:
Select “NONE” with the SPEAKER MODE REAR SPEAKER button,
press the DOLBY PRO-LOGIC button ON and DOLBY 3CH LOGIC
is selected.
Combining the rear speaker signal with that of the front speakers
results in your being able to enjoy a regenerated sound field
which has comparatively more presence and a more expansive
feeling from the front 3 channels (front L, front R, and center
speakers) than that of ordinary stereo regeneration. DOLBY 3CH
LOGIC can be used with stereo sources not encoded with
DOLBY SURROUND.
DOLBY AC-3:
Choose this setting for movies and music (especially video
discs bearing the
DOLBY SURROUND
AC–3 D I G I T A L
mark) playback. The
LaserDisc player’s AC-3 RF OUT jack must be connected to
this unit’s AC-3 RF IN jack.
AC-3 is the compression format used when recording 6-channel
audio onto the digital track of film for the SR D (Surround
Digital) movie theater surround system. To enable AC-3 to
reproduce the same multi-track audio in the home on laserdisc,
the six independent audio channels compressed by the AC-3
system are recorded on the right analog stereo channel. Among
these six channels, the sub-woofer signal (SW) is exclusively for
low-range reproduction. Since this SW signal is not really
necessary as far as the total system is concerned, the number of
channels is expressed as 5.1.
37
<ARB7050>
Page 38

APPENDIX C: DOLBY AC-3 SURROUND
Dolby Laboratories spearheaded home theater with the introduction of Dolby Surround, and then defined it with the follow-up format
Dolby Pro-Logic Surround. They have continued the evolution of home theater with the introduction of Dolby AC-3 Pro-Logic, a MultiChannel Digital delivery system. Just as Dolby Surround found it’s beginnings in the cinema, so does AC-3. This advanced multi-channel
digital sound, although originally conceived for and later chosen for HDTV, made it practical to implement in the cinema because it
enabled the film to retain the analog soundtrack. With backwards compatibility a priority so the film could be played in any cinema, it
was decided to place the new digital optical track between the sprocket holes, which was a key factor in defining its maximum practical
bit rate (see illustration).
5.1 – Channel
Digital Soundtrack
3
4 – Channel Analog
Soundtrack (Matrixed)
3
AC-3
ENCODING
AC-3 IN THE CINEMA
In 1992 Dolby Surround Digital, the film sound format with AC-3 as its keystone, made its debut in the cinema. In less than three years,
more than 300 feature films had been released in this new format, and nearly 1,500 cinemas had been equipped for playback of the digital
soundtrack. Furthermore, AC-3 can now be brought to the consumer’s home today via the LaserDisc.
Traditional Pulse Code Modulation (PCM), which is utilized on compact discs and LD’s 4-channel matrixed digital audio tracks, uses a
16-bit word to “describe” the sampled point in the original analog wave. By sampling this analog wave 44,100 times per second for each
channel, the system will yield a dynamic range of 96 dB from the loudest sound to the noise floor. However, this process creates an
immense amount of data which is too large for multi-channel systems. Thus, a form of data reduction must be employed to reduce the
total amount of information without serious degradation of the sound quality — hence the introduction of AC-3.
The premise of AC-3 is simple, it reproduces the full bit resolution (16-bit) when a lower resolution will not result in the same sound
quality. However, when a lower resolution is acceptable, it will utilize this lower resolution opting instead for psychoacoustical theories
and digital noise filtering technologies to help insure acceptable sound quality.
38
<ARB7050>
Page 39

APPENDIX C: DOLBY AC-3 SURROUND
THE LASER DISC FORMAT
The one major concern when the idea of incluiding another form of audio on a laser disc was .... Backwards Compatibility. It would not
do the laser disc format any justice, especially in a time of growing acceptability, to change the audio system without considering those
consumers that had already purchased a laser disc player. Thus to maintain backward compatibility, the AC-3 encoding was deemed
to be stored in one of the existing analog tracks.
Dolby AC-3
Dolby AC-3
Analog Mono
Digital Audio
Audio
Digital (PCM)
Digital (PCM)
Audio
Audio
2 4 6 8 10 12 14 MHz
The above diagram shows the format of the AC-3 Pro-Logic laser disc. The PCM audio track, containing the 4-channel matrixed digital
soundtrack, was fully maintained for continued use in laser disc players with digital capabilities. As mentioned above, one of the analog
channels will now contain the AC-3 encoding, while the other analog channel will contain a mono analog soundtrack, which still provides
backwards compatibility with those pre-1984 laser disc players (1984 was the year we introduced an LD player with digital capabilities).
Analog Mono
Digital Audio
Audio
Analog Video
Analog Video
THE ADVANTAGES OF AC-3 OVER PRO-LOGIC
AC-3 is called a 5.1-channel system because it provides 5 independent channels (left, right, center, left surround, and right surround),
all reproducing a 20 – 20,000 Hz range. In addition, the system provides for an independent sub-woofer channel, which is called a low
frequency effects channel. Use of the low frequency effect channel is optional, since the 5 channels provide a full frequency bandwidth,
but available for those consumer wishing to include a sub-woofer for thunderous bass reproduction. Furthermore, AC-3 provides
improved channels separation, multi-directional discrete capability, and increased sound-design creative flexibility (for the movie
makers). Below highlights some of the other advantages of Dolby AC-3:
Available Channels on Disc
Playback Channels
Description of Playback Channels
Sound Processing
Surround Channel Maximum
Frequency Response
Other Information
DOLBY SURROUND DIGITAL (AC-3)
5.1 Channels
5.1 Channels
Left, Right, Center, Left Surround, Right
Surround, and Sub-woofer
Discrete Digital AC-3
Encoding & Decoding
20,000 Hz
-5 Discrete Channels
- Fully Backward Compatible with
Dolby Surround
- High Dynamic Range
- Extremely Accurate and Natural
Sound for Vocals and Effects Imaging
DOLBY SURROUND PRO-LOGIC
2 channels
4 channels
Left, Right, Center, and Surround
Analog Matrix Processing for Dolby Surround
7,000 Hz
39
<ARB7050>
Page 40

g
I
C
N
I
D
N
U
O
S
R
T
T
R
C
I
E
E
L
S
E
EIA
•
EST 1924
A
S
S
O
•
N
O
I
T
C
A
I
We
Want You
LISTENING
For A Lifetime
Selecting fine audio equipment such as the unit you’ve just
purchased is only the start of your musical enjoyment. Now it’s
time to consider how you can maximize the fun and excitement
your equipment offers. This manufacturer and the Electronic
Industries Association’s Consumer Electronics Group want you
to get the most out of your equipment by playing it at a safe
level. One that lets the sound come through loud and clear
without annoying blaring or distortion—and, most importantly,
without affecting your sensitive hearing.
Sound can be deceiving. Over time your hearing “comfort
level” adapts to higher volumes of sound. So what sounds
“normal” can actually be loud and harmful to your hearing.
Guard against this by setting your equipment at a safe level
BEFORE your hearing adapts.
To establish a safe level:
÷ Start your volume control at a low setting.
÷ Slowly increase the sound until you can hear it comfortably
and clearly, and without distortion.
Once you have established a comfortable sound level:
÷ Set the dial and leave it there.
Taking a minute to do this now will help to prevent hearing
damage or loss in the future. After all, we want you listening for
a lifetime.
We Want You Listening For A Lifetime
Used wisely, your new sound equipment will provide a
lifetime of fun and enjoyment. Since hearing damage from loud
noise is often undetectable until it is too late, this manufacturer
and the Electronic Industries Association’s Consumer Electronics
Group recommend you avoid prolonged exposure to excessive
noise. This list of sound levels is included for your protection.
Decibel
Level Example
30 Quiet library, soft whispers
40 Living room, refrigerator, bedroom away from traffic
50 Light traffic, normal conversation, quiet office
60 Air conditioner at 20 feet, sewing machine
70 Vacuum cleaner, hair dryer, noisy restaurant
80 Average city traffic, garbage disposals, alarm clock
THE FOLLOWING NOISES CAN BE DANGEROUS
UNDER CONSTANT EXPOSURE
90 Subway, motorcycle, truck traffic, lawn mower
100 Garbage truck, chain saw, pneumatic drill
120 Rock band concert in front of speakers, thunderclap
140 Gunshot blast, jet plane
180 Rocket launching pad
Information courtesy of the Deafness Research Foundation.
R
T
C
E
L
E
EIA
•
A
S
N
O
S
C
I
EST 1924
O
C
I
N
D
U
S
T
R
I
S
N
O
I
T
A
I
at two feet.
E
•
We
Want You
LISTENING
For A Lifetime
MAINTENANCE OF EXTERNAL SURFACES
÷Use a polishing cloth or dry cloth to wipe off dust and dirt.
÷When the surfaces are dirty, wipe with a soft cloth dipped
in some neutral cleanser diluted five or six times with
water, and wrung out well, and then wipe again with a dry
cloth. Do not use furniture wax or cleaners.
÷Never use thinners, benzine, insecticide sprays or other
chemicals on or near this unit, since these will corrode the
surfaces.
PIONEER ELECTRONIC CORPORATION
PIONEER ELECTRONICS [USA] INC.
PIONEER ELECTRONICS OF CANADA, INC.
PIONEER ELECTRONIC [EUROPE] N.V.
PIONEER ELECTRONICS AUSTRALIA PTY. LTD.
PIONEER ELECTRONICS DE MEXICO S.A. DE C.V.
P.O. BOX 1540, Long Beach, California 90801-1540
300 Allstate Parkway, Markham, Ontario L3R 0P2, Canada
Haven 1087 Keetberglaan 1, 9120 Melsele, Belgium, TEL: 03/570.05.11
4-1, Meguro 1-Chome, Meguro-ku, Tokyo 153, Japan
178-184 Boundary Road, Braeside, Victoria 3195, Australia, TEL: [03] 580-9911
Augusto Rodin No. 128 PB Col. San Juan Mixcoac Mexico D.F. CP.03730 TEL: 52-5-598-3950
<95E00FF0H01> Printed in Japan <ARB7050-C>
Published by Pioneer Electronic Corporation.
Copyright 1995 Pioneer Electronic Corporation.
All ri
hts reserved.
 Loading...