

Pioneer DEH-110E User Manual [en, ru, de, es, fr, it]

CD RDS RECEIVER
REPRODUCTOR DE CD CON RECEPTOR RDS
CD RDS-EMPFÄNGER
AUTORADIO CD RDS
SINTOLETTORE CD RDS
CD RDS-ONTVANGER
CD RDS ПРИЕМНИК
DEH-112E
DEH-110E
English Español Deutsch Français Italiano Nederlands
Operation Manual
Manual de instrucciones
Bedienungsanleitung
Mode d’emploi
Manuale d’istruzioni
Bedieningshandleiding
Руководство по эксплуатации
Русский

Contents
Thank you for purchasing this PIONEER product.
Please read through this manual before using the product for the first time, to ensure proper use. After reading, please keep the manual in a safe and accessible place
for future reference.
Before You Start
About this unit 3
Visit our website 3
Protecting your unit from theft 3
– Removing the front panel 4
– Attaching the front panel 4
Operating this unit
What’s what 5
– Head unit 5
– Display indication 5
Basic Operations 6
– Power ON/OFF 6
– Selecting a source 6
– Adjusting the volume 6
Tuner 6
– Listening to the radio 6
– Storing and recalling broadcast
frequencies 6
– Tuning in strong signals 6
– Storing the strongest broadcast
frequencies 7
– Switching the RDS display 7
– Receiving PTY alarm broadcasts 7
– Selecting alternative frequencies 7
– Receiving traffic announcements 8
Built-in Player 9
– Playing a disc 9
– Repeating play 9
– Playing tracks in random order 9
– Scanning tracks of a CD 9
– Pausing disc playback 9
Audio Adjustments 9
– Using balance adjustment 9
– Using the equalizer 10
– Adjusting equalizer curves 10
– Adjusting loudness 10
– Adjusting source levels 10
Other Functions 10
– Adjusting initial settings 10
– Setting the FM tuning step 10
– Switching Auto PI Seek 11
– Switching the auxiliary setting 11
– Saving the battery consumption 11
– Sound muting 11
Additional Information
Error messages 12
Handling guideline of discs and player 12
Dual Discs 12
Specifications 14
2
En

Before You Start
Section
01
If you want to dispose this product, do not mix
it with general household waste. There is a separate collection system for used electronic
products in accordance with legislation that requires proper treatment, recovery and recycling.
Private households in the member states of the
EU, in Switzerland and Norway may return their
used electronic products free of charge to designated collection facilities or to a retailer (if you
purchase a similar new one).
For countries not mentioned above, please contact your local authorities for the correct method
of disposal.
By doing so you will ensure that your disposed
product undergoes the necessary treatment, recovery and recycling and thus prevent potential
negative effects on the environment and human
health.
About this unit
The tuner frequencies on this unit are allocated for use in Western Europe, Asia, the
Middle East, Africa and Oceania. Use in other
areas may result in poor reception. The RDS
(radio data system) function operates only in
areas with FM stations broadcasting RDS signals.
CAUTION
! Do not allow this unit to come into contact
with liquids. Electrical shock could result.
Also, damage to this unit, smoke, and overheating could result from contact with liquids.
! “CLASS 1 LASER PRODUCT”
This product contains a laser diode of higher
English
class than 1. To ensure continued safety, do
not remove any covers or attempt to gain access to the inside of the product. Refer all servicing to qualified personnel.
! The Pioneer CarStereo-Pass is for use only in
Germany.
! Keep this manual handy as a reference for op-
erating procedures and precautions.
! Always keep the volume low enough so that
you can hear sounds from outside the vehicle.
! Protect this unit from moisture.
! If the battery is disconnected or discharged,
the preset memory will be erased and must be
reprogrammed.
! Should this product fail to operate properly,
contact your dealer or nearest authorized
Pioneer Service Station.
Visit our website
Visit us at the following site:
http://www.pioneer.co.uk
! Register your product. We will keep the de-
tails of your purchase on file to help you
refer to this information in the event of an
insurance claim such as loss or theft.
! We offer the latest information about
Pioneer Corporation on our website.
Protecting your unit from
theft
The front panel can be detached to deter theft.
Important
! Handle gently when removing or attaching
the front panel.
! Avoid subjecting the front panel to excessive
shock.
! Keep the front panel out of direct sunlight and
high temperatures.
En
3

Section
01
Before You Start
! Before detaching, be sure to remove the AUX
cable from the front panel. Otherwise, this
unit, connected device or vehicle interior may
be damaged.
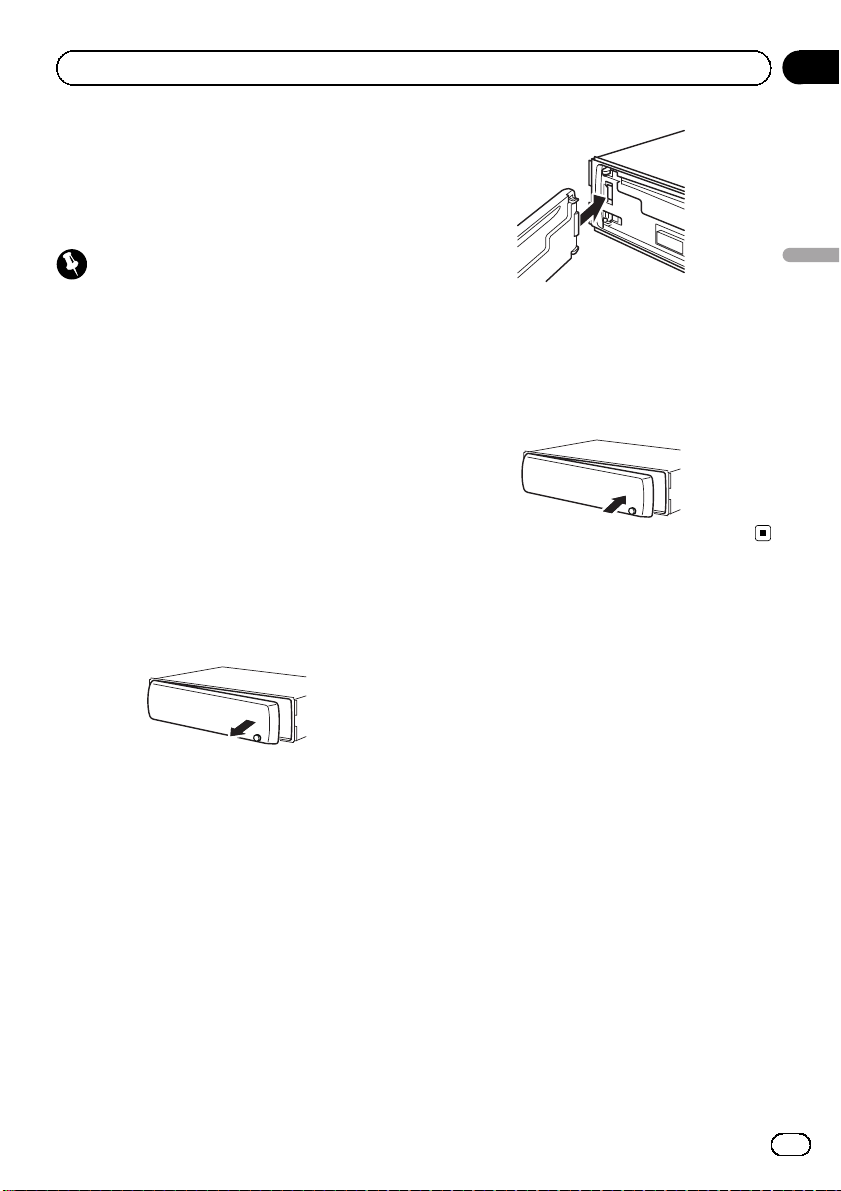
Removing the front panel
1 Press DETACH to release the front
panel.
2 Grab the front panel and remove.
3 Put the front panel into the provided
protective case for safe keeping.
Attaching the front panel
1 Slide the front panel to the left until it
clicks.
Front panel and the head unit are jointed on
the left side. Make sure that the front panel
has been jointed to the head unit.
2 Press the right side of the front panel
until it is firmly seated.
# If you can’t attach the front panel to the head
unit successfully, try again. Front panel may be
damaged if you attach the front panel forcedly.
4
En
Operating this unit
Section
02
What’s what
Head unit
12 4 5 6
3
d c a
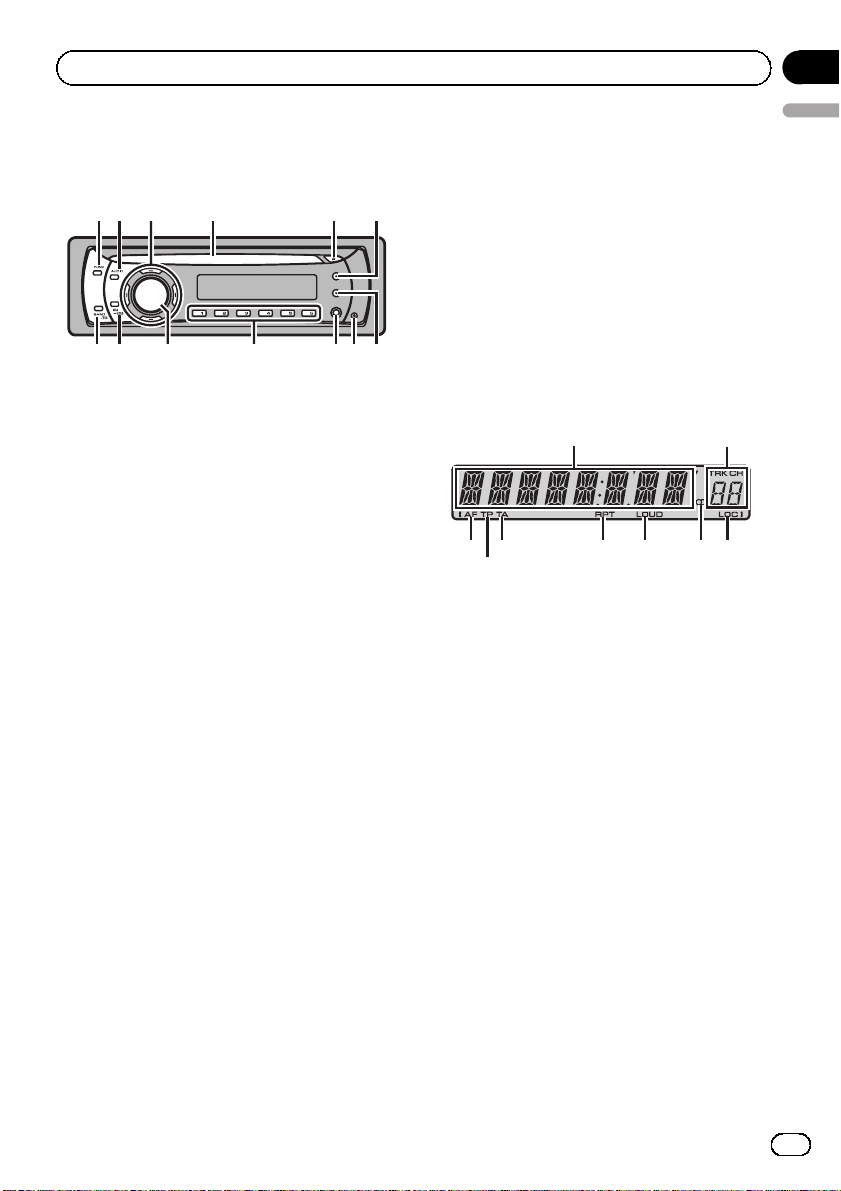
1 FUNCTION button
Press to recall the function menu when operating a source.
2 AUDIO button
Press to select various sound quality controls.
3 a/b/c/d buttons
Press to perform manual seek tuning, fast
forward, reverse and track search controls.
Also used for controlling functions.
4 CD loading slot
Insert a disc to play.
5 EJECT button
Press to eject a CD from your built-in CD
player.
6 DISPLAY button
Press to select different displays.
7 TA button
Press to turn TA function on or off. Press
and hold to turn AF function on or off.
8 DETACH button
Press to remove the front panel from the
head unit.
9 AUX input jack (3.5 mm stereo jack)
Use to connect an auxiliary device.
a 1 to 6 buttons
Press for preset tuning.
b SOURCE button, VOLUME
This unit is turned on by selecting a source.
Press to cycle through all the available
sources.
b
89 7
Press and hold to recall the initial setting
menu when the sources are off.
Rotate it to increase or decrease the volume.
c EQ button
Press to select various equalizer curves.
Press and hold to turn loudness on or off.
d BAND button
Press to select among MW/LW and two FM
bands and cancel the control mode of functions.
Display indication
3
5
1
6 7 8 9
2
4
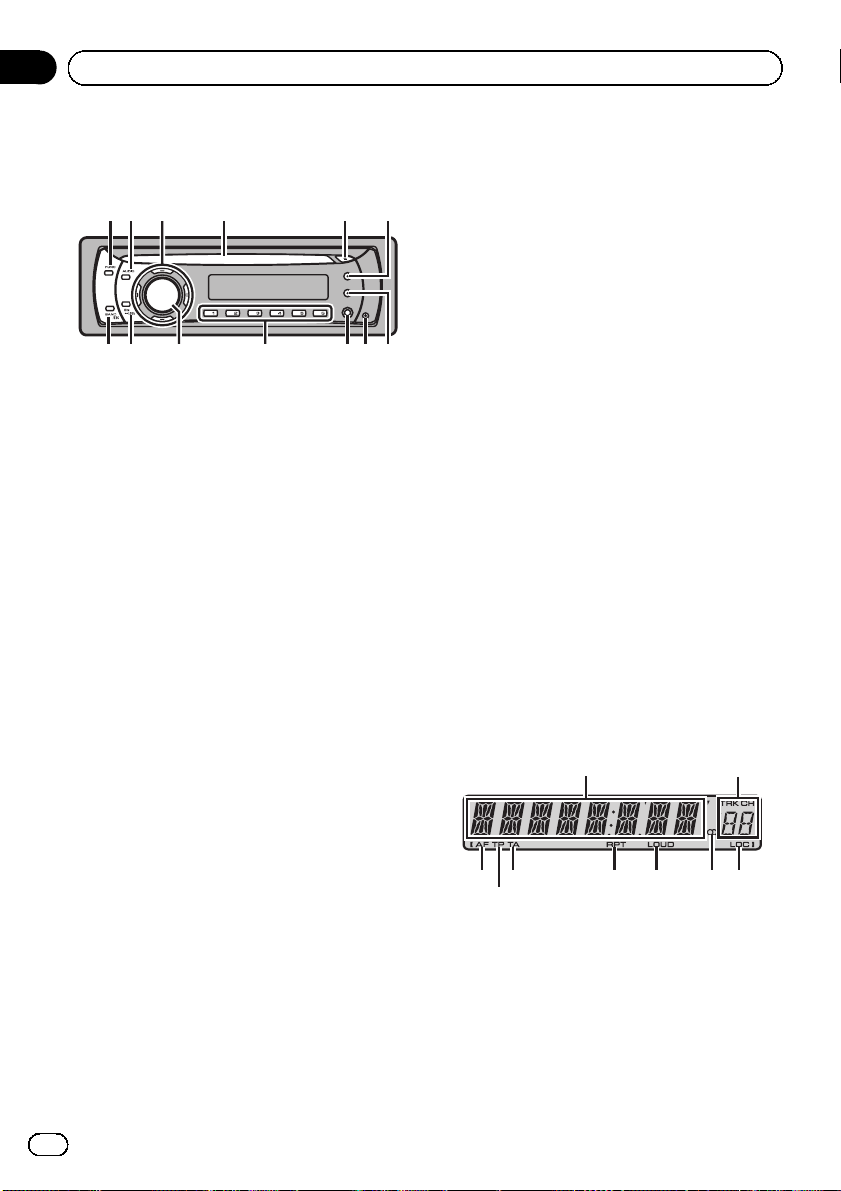
1 Main display section
Shows the various information such as
band, play time, and other setting.
! Tuner
Band and frequency are displayed.
! RDS
Program service name, PTY information
or frequency is displayed.
! Built-in CD Player
Elapsed play time is displayed.
2 Preset number/track number indicator
Shows the track number or preset number.
3 AF indicator
Appears when AF (alternative frequencies
search) function is on.
4 TP indicator
Appears when a TP station is tuned in.
5 TA indicator
Appears when TA (traffic announcement
standby) function is on.
6 RPT indicator
Shows when repeat play is turned on.
7 LOUD indicator
Appears when loudness is on.
English
En
5

Section
02
Operating this unit
8 5 (stereo) indicator
Appears when the selected frequency is
being broadcast in stereo.
9 LOC indicator
Appears when local seek tuning is on.
Basic Operations
Power ON/OFF
Turning the unit on
% Press SOURCE to turn the unit on.
Turning the unit off
% Press SOURCE and hold until the unit
turns off.
Selecting a source
You can select a source you want to listen to.
% Press SOURCE to select a source.
Press SOURCE repeatedly to switch between
the following sources.
Tuner—Built-in CD player—AUX
Notes
! In the following cases, the sound source will
not change.
— When there is no disc in the unit.
— When AUX (auxiliary input) is set to off
(refer to page 11).
! AUX is set to on by default. Turn off the AUX
when not in use (refer to Switching the auxili-
ary setting on page 11).
! When this unit’s blue/white lead is connected
to the vehicle’s auto-antenna relay control
terminal, the vehicle’s antenna extends when
this unit’s source is turned on. To retract the
antenna, turn the source off.
Adjusting the volume
% Turn VOLUME to adjust the sound level.
Tuner
Listening to the radio
1 Press SOURCE to select the tuner.
2 Press BAND to select a band.
Press BAND until the desired band (F1, F2 for
FM or MW/LW) is displayed.
3 To perform manual tuning, briefly press
c or d.
4 To perform seek tuning, press and hold
c or d for about one second and release.
The tuner will scan the frequencies until a
broadcast strong enough for good reception is
found.
# You can cancel seek tuning by briefly pressing
c or d.
# While pressing and holding c or d, you can
skip stations. Seek tuning starts as soon as you
release c or d.
Storing and recalling broadcast
frequencies
% When you find a frequency that you
want to store in memory, press one of preset tuning buttons 1 to 6 and hold until the
preset number stops flashing.
Memorized radio station frequency can be recalled by pressing the preset tuning button.
# Up to 12 FM stations, 6 for each of the two FM
bands, and 6 MW/LW stations can be stored in
memory.
# Press a or b to recall radio station frequen-
cies.
Tuning in strong signals
Local seek tuning lets you tune in only those
radio stations with sufficiently strong signals
for good reception.
1 Press FUNCTION to select LOCAL.
2 Press a or b to turn local seek tuning
on or off.
3 Press c or d to set the sensitivity.
FM: LOCAL 1—LOCAL 2—LOCAL 3—
LOCAL 4
6
En

Operating this unit
Section
02
MW/LW: LOCAL 1—LOCAL 2
The LOCAL 4 setting allows reception of only
the strongest stations, while lower settings let
you receive progressively weaker stations.
Storing the strongest broadcast
frequencies
BSM (best stations memory) lets you automatically store the six strongest broadcast frequencies under preset tuning buttons 1 to 6.
Once stored you can tune in to those frequencies with the touch of button.
! Storing broadcast frequencies with BSM
may replace broadcast frequencies you
have saved using buttons 1 to 6.
1 Press FUNCTION to select BSM.
2 Press a to turn BSM on.
The six strongest broadcast frequencies are
stored in the order of their signal strength.
# To cancel the storage process, press b.
Switching the RDS display
RDS (radio data system) contains inaudible information that helps search for the radio stations.
! RDS service may not be provided by all sta-
tions.
! RDS functions such as AF and TA are only
active when your radio is tuned to an RDS
station.
% Press DISPLAY.
Press DISPLAY repeatedly to switch between
the following settings:
Program service name—PTY information—
Frequency
# PTY information and the frequency appear on
the display for eight seconds.
PTY list
Specific Type of program
NEWS News
AFFAIRS Current affairs
INFO General information and advice
SPORT Sports
WEATHER Weather reports/meteorological infor-
mation
FINANCE Stock market reports, commerce,
English
trading, etc.
POP MUS Popular music
ROCK MUS Contemporary modern music
EASY MUS Easy listening music
OTH MUS Non-categorized music
JAZZ Jazz
COUNTRY Country music
NAT MUS National music
OLDIES Oldies, golden oldies
FOLK MUS Folk music
L.CLASS Light classical music
CLASSIC Classical music
EDUCATE Educational programs
DRAMA Radio plays and serials
CULTURE National or regional culture
SCIENCE Nature, science and technology
VARIED Light entertainment
CHILDREN Children’s
SOCIAL Social affairs
RELIGION Religious affairs or services
PHONE IN Phone in
TOURING Travel programs; not for traffic an-
nouncements
LEISURE Hobbies and recreational activities
DOCUMENT Documentaries
Receiving PTY alarm broadcasts
When the emergency PTY code broadcasts,
the unit receives it automatically (ALARM appears). When the broadcasting ends, the system returns to the previous source.
! An emergency announcement can be can-
celed by pressing TA.
You can also cancel an emergency announcement by pressing SOURCE, BAND,
a, b, c or d.
Selecting alternative frequencies
When the tuner cannot get a good reception,
the unit automatically searches for a different
station in the same network.
% Press and hold TA repeatedly to turn AF
(alternative frequency search) on or off.
# You can also turn the AF function on or off in
the menu that appears with the pressing of
FUNCTION.
En
7

Section
02
Operating this unit
Notes
! Only RDS stations are tuned in during seek
tuning or BSM when AF is on.
! When you recall a preset station, the tuner
may update the preset station with a new frequency from the station’s AF list. (This is only
available when using presets on the F1 or F2
bands.) No preset number appears on the display if the RDS data for the station received
differs from that for the originally stored station.
! Sound may be temporarily interrupted by an-
other program during an AF frequency search.
! AF can be turned on or off independently for
each FM band.
Using PI Seek
If the tuner cannot find a suitable station, or
reception status becomes bad, the unit automatically searches for a different station with
the same programming. During the search,
PI SEEK is displayed and the output is muted.
Using Auto PI Seek for preset stations
When preset stations cannot be recalled, as
when travelling long distances, the unit can
be set to perform PI Seek during preset recall.
! The default setting for Auto PI Seek is off.
See Switching Auto PI Seek on page 11.
Limiting stations to regional
programming
When AF is used, the regional function limits
the selection of stations broadcasting regional
programs.
1 Press FUNCTION to select REG.
2 Press a or b to turn the regional function on or off.
Notes
! Regional programming and regional networks
are organized differently depending on the
country (i.e., they may change according to
the hour, state or broadcast area).
! The preset number may disappear from the
display if the tuner tunes in a regional station
which differs from the originally set station.
! The regional function can be turned on or off
independently for each FM band.
Receiving traffic announcements
TA (traffic announcement standby) lets you receive traffic announcements automatically, no
matter what source you are listening to. TA
can be activated for both a TP station (a station that broadcasts traffic information) or an
enhanced other network’s TP station (a station
carrying information which cross-references
TP stations).
1 Tune in a TP or enhanced other network’s TP station.
TP indicator lights.
2 Press TA to turn traffic announcement
standby on.
# To turn traffic announcements standby off,
press TA again.
3 Use VOLUME to adjust the TA volume
when a traffic announcement begins.
The newly set volume is stored in memory and
recalled for subsequent traffic announcements.
4 Press TA while a traffic announcement
is being received to cancel the announcement.
The tuner returns to the original source but remains in the standby mode until TA is pressed
again.
# You can also turn the TA function on or off in
the menu that appears with the pressing of
FUNCTION.
Notes
! The system switches back to the original
source following traffic announcement reception.
! Only TP and enhanced other network’s TP sta-
tions are tuned in during seek tuning or BSM
when TA is on.
8
En

Operating this unit
Built-in Player
Playing a disc
1 Insert a CD into the CD loading slot.
Playback will automatically start.
# Be sure to turn up the label side of a disc.
# After a CD has been inserted, press SOURCE
to select the built-in CD player.
# You can eject a CD by pressing EJECT.
2 To perform fast forward or reverse,
press and hold c or d.
3 To skip back or forward to another
track, press c or d.
Notes
! Read the precautions for discs and player on
page 12.
! If an error message such as ERROR-11 is dis-
played, refer to Error messages on page 12.
Repeating play
Repeat play lets you hear the same track over
again.
1 Press FUNCTION to select RPT.
2 Press c or d to select the repeat range.
DSC – Repeat all tracks
TRK – Repeat the current track
# If you perform track search or fast forward/reverse, repeat play is automatically cancelled.
# To return to the normal display, press BAND.
Playing tracks in random order
Random play lets you play back tracks on the
CD in a random order.
1 Press FUNCTION to select RDM.
2 Press a or b to turn random play on or
off.
When random play is on, RDM appears in the
display.
# To return to the normal display, press BAND.
Section
02
English
Scanning tracks of a CD
Scan play lets you hear the first 10 seconds of
each track on the CD.
1 Press FUNCTION to select SCAN.
2 Press a to turn scan play on.
SCAN appears in the display. The first 10 sec-
onds of each track is played.
3 When you find the desired track press
b to turn scan play off.
# If the display has automatically returned to
the playback display, select SCAN again by pressing FUNCTION.
# After scanning of a CD is finished, normal
playback of the tracks will begin again.
Pausing disc playback
Pause lets you temporarily stop playback of
the disc.
1 Press FUNCTION to select PAUSE.
2 Press a or b to turn pause on or off.
# To return to the normal display, press
BAND.
Audio Adjustments
Using balance adjustment
Fader/balance setting creates an ideal listening environment in all occupied seats.
1 Press AUDIO to select FAD.
2 Press a or b to adjust front/rear speaker balance.
FAD F15 to FAD R15 is displayed.
# FAD 0 is the proper setting when only two
speakers are used.
3 Press c or d to adjust left/right speaker
balance.
BAL L15 to BAL R15 is displayed.
# To return to the normal display, press BAND.
En
9

Section
02
Operating this unit
Using the equalizer
There are six stored equalizer settings such as
DYNAMIC, VOCAL, NATURAL, CUSTOM,
FLAT and POWERFUL that can easily be re-
called at any time.
! CUSTOM is an adjusted equalizer curve
that you create.
! When FLAT is selected no supplement or
correction is made to the sound.
% Press EQ to select the equalizer.
Press EQ repeatedly to switch between the following equalizers:
DYNAMIC—VOCAL—NATURAL—CUSTOM
—FLAT—POWERFUL
Adjusting equalizer curves
You can adjust the currently selected equalizer
curve setting as desired. Adjusted equalizer
curve settings are memorized in CUSTOM.
Adjusting bass/mid/treble
You can adjust the bass/mid/treble level.
1 Press AUDIO to select BASS/MID/
TREBLE.
2 Press a or b to adjust the level.
+6 to –6 is displayed as the level is increased
or decreased.
# To return to the normal display, press BAND.
Adjusting loudness
Loudness compensates for deficiencies in the
low- and high-sound ranges at low volume.
1 Press AUDIO to select LOUD.
2 Press a or b to turn loudness on or off.
# You can also turn loudness on or off by pressing and holding EQ.
3 Press c or d to select a desired level.
LOW (low)—HI (high)
# To return to the normal display, press BAND.
Adjusting source levels
SLA (source level adjustment) lets you adjust
the volume level of each source to prevent ra-
dical changes in volume when switching between sources.
! Settings are based on the FM volume level,
which remains unchanged.
! The MW/LW volume level can also be ad-
justed with source level adjustments.
1 Compare the FM volume level with the
level of the source you wish to adjust.
2 Press AUDIO to select SLA.
3 Press a or b to adjust the source volume.
SLA +4 to SLA –4 is displayed as the source
volume is increased or decreased.
# To return to the normal display, press
BAND.
Other Functions
Adjusting initial settings
Using the initial settings, you can customize
various system settings to achieve optimal performance from this unit.
1 Press SOURCE and hold until the unit
turns off.
2 Press SOURCE and hold until function
name appears in the display.
3 Press FUNCTION to select one of the initial settings.
Press FUNCTION repeatedly to switch between the following settings:
FM (FM tuning step)—A-PI (auto PI Seek)—
AUX (auxiliary input)—SAVE (power save)
Use the following instructions to operate each
particular setting.
# To cancel initial settings, press BAND.
# You can also cancel initial settings by holding
down SOURCE until the unit turns off.
Setting the FM tuning step
Normally the FM tuning step employed by
seek tuning is 50 kHz. When AF or TA is on,
the tuning step automatically changes to 100
kHz. It may be preferable to set the tuning step
to 50 kHz when AF is on.
10
En

Operating this unit
Section
02
! The tuning step remains at 50 kHz during
manual tuning.
1 Press FUNCTION to select FM.
Refer to Adjusting initial settings on the previous page.
2 Press c or d to select the FM tuning
step.
Press c to select 50 (50 kHz). Press d to select 100 (100 kHz).
Switching Auto PI Seek
The unit can automatically search for a different station with the same programming, even
during preset recall.
1 Press FUNCTION to select A-PI.
Refer to Adjusting initial settings on the previous page.
2 Press a or b to turn the Auto PI seek
on or off.
Switching the auxiliary setting
It is possible to use auxiliary device with this
unit. Activate the auxiliary setting when using
auxiliary device connected to this unit.
1 Press FUNCTION to select AUX.
Refer to Adjusting initial settings on the previous page.
2 Press a or b to turn the auxiliary setting on or off.
! Operations other than turning on the
English
source are not allowed when this function
is on.
Important
If the battery in your vehicle is disconnected, the
Power Save mode is canceled. Turn on Power
Save again once the battery has been reconnected. If the ignition switch in your vehicle
doesn’t have an ACC (accessory) position, it is
possible depending on the connection method
that when Power Save is off, the unit will draw
power from the battery.
1 Press FUNCTION to select SAVE.
Refer to Adjusting initial settings on the previous page.
2 Press a or b to turn the power save on
or off.
Sound muting
Sound from this unit is muted automatically in
the following cases:
! When a call is made or received using a
cellular telephone connected to this unit.
! When the voice guidance is output from a
Pioneer navigation unit connected to this
unit.
The sound is turned off, MUTE is displayed
and no audio adjustments, except volume control, are possible. Operation returns to normal
when the phone connection or the voice guidance is ended.
Using the AUX source
% Insert the stereo mini plug into the
input jack on this unit.
Selecting AUX as the source
% Press SOURCE to select AUX as the
source.
Saving the battery consumption
Switching this function on enables you to save
the consumption of battery power.
En
11

Appendix
Additional Information
Error messages
When you contact your dealer or your nearest
Pioneer Service Center, be sure to have the
error message recorded.
Message Cause Action
ERROR-11, 12,
17, 30
ERROR-11, 12,
17, 30
ERROR-10, 11,
12, 15, 17, 30,
A0
ERROR-15 The inserted disc
ERROR-22, 23 The CD format
CD-ROM CD-ROM is in-
Dirty disc Clean disc.
Scratched disc Replace disc.
Electrical or mechanical
does not contain
any data
cannot be played
back
serted
Turn the ignition
switch OFF and
back ON, or switch
to a different
source, then back
to the CD player.
Replace disc.
Replace disc.
Replace disc.
Handling guideline of discs
and player
! Use only discs featuring following logo.
! Do not insert anything other than a CD into
the CD loading slot.
! Do not use cracked, chipped, warped, or
otherwise damaged discs as they may damage the player.
! Unfinalized CD-R/CD-RW disc playback is
not possible.
! Do not touch the recorded surface of the
discs.
! Store discs in their cases when not in use.
! Avoid leaving discs in excessively hot envir-
onments including under direct sunlight.
! Do not attach labels, write on or apply che-
micals to the surface of the discs.
! To clean a CD, wipe the disc with a soft
cloth outward from the center.
! Condensation may temporarily impair the
player’s performance. Leave it to adjust to
the warmer temperature for about one
hour. Also, wipe any dump discs with a soft
cloth.
! Playback of discs may not be possible be-
cause of disc characteristics, disc format,
recorded application, playback environment, storage conditions, and so on.
! Text information may not be correctly dis-
played depending on the recorded environment.
! Road shocks may interrupt disc playback.
! Read the precautions for discs before
using them.
! Use only conventional, fully circular discs.
Do not use shaped discs.
! Use 12-cm or 8-cm CD. Do not use an
adapter when playing 8-cm CDs.
12
En
Dual Discs
! Dual Discs are two-sided discs that have a
recordable CD for audio on one side and a
recordable DVD for video on the other.
! Since the CD side of Dual Discs is not phy-
sically compatible with the general CD
standard, it may not be possible to play the
CD side with this unit.

Additional Information
Appendix
! Frequent loading and ejecting of a Dual
Disc may result in scratches on the disc.
Serious scratches can lead to playback problems on this unit. In some cases, a Dual
Disc may become stuck in the disc loading
slot and will not eject. To prevent this, we
recommend you refrain from using Dual
Disc with this unit.
! Please refer to the information from the
disc manufacturer for more detailed information about Dual Discs.
English
En
13

Appendix
Additional Information
Specifications
General
Power source ............................. 14.4 V DC (10.8 V to 15.1 V
allowable)
Grounding system ................... Negative type
Max. current consumption
..................................................... 10.0 A
Dimensions (W × H × D):
DIN
Chassis ..................... 178 mm × 50 mm × 162
mm
Nose ........................... 188 mm × 58 mm × 15 mm
D
Chassis ..................... 178 mm × 50 mm × 162
mm
Nose ........................... 170 mm × 48 mm × 15 mm
Weight .......................................... 1.3 kg
Audio
Maximum power output .......50 W × 4
Continuous power output ...22 W × 4 (50 Hz to 15000
Hz, 5% THD, 4 W load, both
channels driven)
Load impedance ...................... 4 W (4 W to 8 W allowable)
Tone controls:
Bass
Freque ncy ................ 100 Hz
Gain ............................ ±13dB
Mid
Freque ncy ................ 1 kHz
Gain ............................ ±12 dB
Treble
Freque ncy ................ 10 kHz
Gain ............................ ±12 dB
LW tuner
Freque ncy range ...................... 153 kHz to 281 kHz
Usable sensitivity ..................... 28 µV (S/N: 20 dB)
Signal-to -noise ratio ............... 62 dB (IEC -A network)
Note
Specifications and the design are subject to modifications without notice due to improvements.
CD player
System .......................................... Compact disc audio system
Usable discs .............................. Compact disc
Signal-to-noise ratio ............... 94 dB (1 kHz) (IEC -A net-
Number of channels .............. 2 (stereo)
work)
FM tuner
Freque ncy range ...................... 87.5 MHz to 108.0 MHz
Usable sensitivity ..................... 11 dBf (0.7 µV/75 W, mono,
Signal-to-noise ratio ............... 72 dB (IEC-A network)
S/N: 30 dB)
MW tuner
Freque ncy range ...................... 531 kHz to 1 602 kHz
Usable sensitivity ..................... 25 µV (S/N: 20 dB)
Signal-to-noise ratio ............... 62 dB (IEC-A network)
14
En

Contenido
Gracias por haber comprado este producto PIONEER.
Lea con detenimiento este manual antes de utilizar el producto por primera vez,
para que pueda darle el mejor uso posible. Una vez leído, guarde este manual en un
lugar seguro y a mano para consultarlo en el futuro.
Español
Antes de comenzar
Acerca de esta unidad 16
Visite nuestro sitio Web 16
Protección del producto contra robo 17
– Extracción de la carátula 17
– Colocación de la carátula 17
Utilización de esta unidad
Qué es cada cosa 18
– Unidad principal 18
– Indicaciones de pantalla 18
Funciones básicas 19
– Encendido y apagado 19
– Selección de una fuente 19
– Ajuste del volumen 19
Sintonizador 19
– Para escuchar la radio 19
– Almacenamiento y recuperación de
frecuencias 20
– Sintonización de señales fuertes 20
– Almacenamiento de las frecuencias de
radio más fuertes 20
– Cambio de la visualización RDS 20
– Recepción de transmisiones de alarma
PTY 21
– Selección de frecuencias
alternativas 21
– Recepción de anuncios de tráfico 22
Reproductor incorporado 23
– Reproducción de un disco 23
– Repetición de reproducción 23
– Reproducción de las pistas en orden
aleatorio 23
– Exploración de las pistas de un CD 23
– Pausa de la reproducción de un
disco 23
Ajustes de audio 24
– Uso del ajuste del balance 24
– Uso del ecualizador 24
– Ajuste de las curvas de
ecualización 24
– Ajuste de la sonoridad 24
– Ajuste de los niveles de la fuente 24
Otras funciones 25
– Configuración de los ajustes
iniciales 25
– Ajuste del paso de sintonía de FM 25
– Cambio de la búsqueda PI
automática 25
– Cambio del ajuste de un equipo
auxiliar 25
– Ahorro del consumo de la batería 26
– Silenciamiento del sonido 26
Información adicional
Mensajes de error 27
Pautas para el manejo de discos y del
reproductor 27
Discos dobles 28
Especificaciones 29
15
Es
Sección
01
Antes de comenzar
Si desea deshacerse de este producto, no lo
mezcle con los residuos generales de su hogar.
De conformidad con la legislación vigente,
existe un sistema de recogida distinto para los
productos electrónicos que requieren un procedimiento adecuado de tratamiento, recuperación y reciclado.
Las viviendas privadas en los estados miembros
de la UE, en Suiza y Noruega pueden devolver
gratuitamente sus productos electrónicos usados
en los centros de recolección previstos o bien en
una tienda minorista (si adquieren un producto
similar nuevo).
En el caso de los países que no se han mencionado en el párrafo anterior, póngase en contacto
con las autoridades locales a fin de conocer el
método de eliminación correcto.
Al actuar siguiendo estas instrucciones, se asegurará de que el producto eliminado se someta a
los procesos de tratamiento, recuperación y reciclaje necesarios, evitando de este modo efectos
potencialmente negativos en el entorno y la salud
humana.
PRECAUCIÓN
! No permita que esta unidad entre en contacto
con líquidos. ya que ello puede producir una
descarga eléctrica. Además, el contacto con
líquidos puede causar daños en la unidad,
humo y recalentamiento.
! “PRODUCTO LÁSER DE CLASE 1”
Este producto contiene un diodo de láser de
clase superior a 1. Para garantizar la seguridad continua, no extraiga ninguna tapa ni intente acceder a la parte interna del producto.
Solicite a personal cualificado que realice el
servicio técnico.
! El CarStereo-Pass Pioneer es para usarse sólo
en Alemania.
! Conserve este manual a mano para que
pueda consultar los procedimientos de operación y las precauciones cuando sea necesario.
! Mantenga siempre el volumen lo suficiente-
mente bajo como para que pueda escuchar
los sonidos que provienen del exterior del vehículo.
! Proteja esta unidad de la humedad.
! Si se desconecta o se descarga la batería, la
memoria preajustada se borrará y deberá ser
reprogramada.
! En caso de que este producto no funcione co-
rrectamente, comuníquese con su concesionario o el Servicio técnico oficial Pioneer más
próximo a su domicilio.
Acerca de esta unidad
Las frecuencias del sintonizador de esta unidad están asignadas para su uso en Europa
Occidental, Asia, Medio Oriente, África y
Oceanía. El uso en otras áreas puede causar
una recepción deficiente. La función RDS (sistema de datos de radio) opera sólo en áreas
con emisoras de FM que trasmiten señales de
RDS.
16
Es
Visite nuestro sitio Web
Visítenos en el siguiente sitio:
http://www.pioneer.es
! Registre su producto. Conservaremos los
datos de su compra archivados para que
pueda consultar esta información en caso
de que deba efectuar un reclamo a la compañía de seguros por pérdida o robo.
! En nuestro sitio Web ofrecemos la informa-
ción más reciente acerca de Pioneer
Corporation.
Antes de comenzar
Protección del producto
contra robo
Se puede extraer la carátula como medida
antirrobo.
Sección
01
Importante
! Proceda con cuidado al retirar o colocar la ca-
rátula.
! Evite someter la carátula a impactos excesi-
vos.
! Mantenga la carátula fuera del alcance de la
luz solar directa y no la exponga a altas temperaturas.
! Antes de extraer la carátura, asegúrese de re-
tirar de la misma el cable AUX. De lo contrario, puede dañarse la unidad, el dispositivo
conectado o el interior del vehículo.
Extracción de la carátula
1 Presione DETACH para soltar la carátula.
2 Sujete la carátula y extráigala.
3 Coloque la carátula en la funda protectora provista para guardarla de manera segura.
Español
2 Presione el lado derecho de la carátula
hasta que asiente firmemente.
# Si no puede fijar con éxito la carátula a la unidad principal, inténtelo de nuevo. Si aplica fuerza
excesiva para fijar la carátula, ésta puede dañarse.
Colocación de la carátula
1 Deslice la carátula hacia la izquierda
hasta que oiga un chasquido.
La carátula y la unidad principal quedan unidas por el lado izquierdo. Asegúrese de que la
carátula haya quedado unida a la unidad principal.
17
Es
4
Sección
02
Utilización de esta unidad
Qué es cada cosa
Unidad principal
12 4 5 6
3
d c a
1 Botón FUNCTION
Presione este botón para acceder al menú
de funciones al utilizar una fuente.
2 Botón AUDIO
Presione este botón para seleccionar los diversos controles de calidad del sonido.
3 Botones a/b/c/d
Presione estos botones para utilizar los controles de sintonización por búsqueda manual, avance rápido, retroceso y búsqueda
de pista. También se usan para controlar las
funciones.
4 Ranura de carga de CD
Introduzca el disco para reproducirlo.
5 Botón EJECT
Presione este botón para expulsar un CD
del reproductor de CD incorporado.
b
89 7
9 Conector de entrada AUX (conector estéreo de 3,5 mm)
Utilícelo para conectar un dispositivo auxiliar.
a Botones 1 a 6
Presione para la sintonización preajustada.
b SOURCE botón, VOLUME
Esta unidad se enciende al seleccionar una
fuente. Presione este botón para visualizar
todas las fuentes disponibles.
Mantenga presionado este botón para acceder al menú de ajustes iniciales si las fuentes están desactivadas.
Gírelo para aumentar o disminuir el volumen.
c Botón EQ
Presione este botón para seleccionar las diversas curvas de ecualización.
Presione y mantenga presionado para activar o desactivar la sonoridad.
d Botón BAND
Presione para seleccionar entre la banda
MW/LW y dos bandas FM, y cancelar el
modo de control de funciones.
Indicaciones de pantalla
1
2
6 Botón DISPLAY
Presione este botón para seleccionar las diferentes visualizaciones.
7 Botón TA
Presione este botón para activar o desactivar la función TA. Manténgalo presionado
para activar o desactivar la función AF.
8 Botón DETACH
Presione este botón para extraer la carátula
de la unidad principal.
18
Es
3
5
1 Sección principal de la pantalla
Muestra información variada, como la
banda, el tiempo de reproducción y otros
ajustes.
! Sintonizador
Se muestran la banda y la frecuencia.
! RDS
6 7 8 9
Utilización de esta unidad
Sección
02
Se muestran el nombre del servicio de
programa, la información PTY o la frecuencia.
! Reproductor de CD incorporado
Se muestra el tiempo de reproducción
transcurrido.
2 Indicador del número de presintonía/
número de pista
Muestra el número de pista o el número de
presintonía.
3 Indicador AF
Aparece cuando la función AF (búsqueda
de frecuencias alternativas) está activada.
4 Indicador TP
Aparece cuando una emisora TP está sintonizada.
5 Indicador TA
Aparece cuando la función TA (espera por
anuncio de tráfico) está activada.
6 Indicador RPT
Aparece cuando la repetición de reproducción está activada.
7 Indicador LOUD
Aparece cuando la sonoridad está activada.
8 Indicador (estéreo) 5
Aparece cuando la frecuencia seleccionada
se está transmitiendo en estéreo.
9 Indicador LOC
Aparece cuando la sintonización por búsqueda local está activada.
Funciones básicas
Encendido y apagado
Encendido de la unidad
% Presione SOURCE para encender la unidad.
Apagado de la unidad
% Mantenga presionado SOURCE hasta
que se apague la unidad.
Selección de una fuente
Puede seleccionar una fuente que desee escuchar.
% Presione SOURCE para seleccionar una
fuente.
Presione SOURCE varias veces para cambiar
entre las siguientes fuentes.
Sintonizador—Reproductor de CD incorporado—AUX
Notas
! En los siguientes casos, la fuente sonora no
cambiará.
— Cuando no hay un disco cargado en la uni-
dad.
— Cuando AUX (entrada auxiliar) está apaga-
da (consulte la página 25).
! AUX está activada de forma predeterminada.
Desactive AUX cuando no la utilice (consulte
Cambio del ajuste de un equipo auxiliar en la
página 25).
! Si el cable azul/blanco de esta unidad está co-
nectado al terminal de control del relé de la
antena automática del vehículo, la antena se
extiende cuando se enciende el equipo. Para
retraer la antena, apague la fuente.
Ajuste del volumen
% Gire VOLUME para ajustar el nivel de
sonido.
Sintonizador
Para escuchar la radio
1 Presione SOURCE para seleccionar el
sintonizador.
Español
19
Es

Sección
02
Utilización de esta unidad
2 Presione BAND para seleccionar una
banda.
Presione BAND hasta que se visualice la
banda deseada (F1, F2 para FM o MW/LW).
3 Para utilizar la sintonización manual,
presione brevemente c o d.
4 Para utilizar la sintonización por búsqueda, mantenga presionado c o d durante aproximadamente un segundo, y suelte
el botón.
El sintonizador explorará las frecuencias hasta
que encuentre una emisora con señales de suficiente intensidad como para asegurar una
buena recepción.
# Se puede cancelar la sintonización por búsqueda presionando brevemente c o d.
# Al mantener presionado c o d se pueden
saltar las emisoras. La sintonización por búsqueda comienza inmediatamente después de que
suelte c o d.
Almacenamiento y
recuperación de frecuencias
% Cuando encuentre la frecuencia que
desea almacenar en la memoria, presione
uno de los botones de ajuste de presintonías 1 a 6 y manténgalo presionado hasta
que el número de presintonía deje de destellar.
Una frecuencia de emisora de radio memorizada se puede recuperar presionando el botón
de ajuste de presintonías.
# En la memoria se pueden almacenar hasta 12
emisoras FM, 6 para cada una de las dos bandas
FM, y 6 emisoras MW/LW.
# Presione a o b para recuperar las frecuen-
cias de las emisoras de radio.
1 Presione FUNCTION para seleccionar
LOCAL.
2 Presione a o b para activar o desactivar la sintonización por búsqueda local.
3 Presione c o d para ajustar la sensibilidad.
FM: LOCAL 1—LOCAL 2—LOCAL 3—
LOCAL 4
MW/LW: LOCAL 1—LOCAL 2
El ajuste LOCAL 4 sólo permite recibir las emisoras con las señales más fuertes, mientras
que los ajustes más bajos permiten recibir de
manera progresiva las emisoras con las señales más débiles.
Almacenamiento de las
frecuencias de radio más fuertes
La función BSM (memoria de las mejores emisoras) permite guardar automáticamente las
seis frecuencias de las emisoras más fuertes
en los botones de ajuste de presintonías 1 a 6.
Una vez almacenadas, podrá sintonizar esas
frecuencias pulsando un solo botón.
! Al almacenar frecuencias con la función
BSM, se pueden reemplazar las frecuencias que ha almacenado con los botones 1
a 6.
1 Presione FUNCTION para seleccionar
BSM.
2 Presione a para activar la función BSM.
Las seis frecuencias de las emisoras de mayor
intensidad se almacenarán en orden según la
intensidad de las señales.
# Para cancelar el proceso de almacenamiento,
presione b.
Sintonización de señales fuertes
La sintonización por búsqueda local le permite
sintonizar sólo las emisoras de radio con señales lo suficientemente fuertes como para asegurar una buena recepción.
20
Es
Cambio de la visualización RDS
RDS (sistema de datos de radio) contiene información inaudible que ayudan a buscar emisoras de radio.
! Es posible que no todas las emisoras sumi-
nistren el servicio RDS.

Utilización de esta unidad
Sección
02
! Las funciones RDS como AF y TA sólo se
activan cuando la radio está sintonizada en
una emisora RDS.
% Presione DISPLAY.
Presione DISPLAY repetidamente para cam-
biar entre los siguientes ajustes:
Nombre del servicio de programa—Información PTY—Frecuencia
# La información PTY y la frecuencia aparecen
en el display durante ocho segundos.
Lista PTY
Específico Tipo de programa
NEWS Noticias
AFFAIRS Temas de actualidad
INFO Información general y consejos
SPORT Programas deportivos
WEATHER Informes del tiempo/información me-
FINANCE Informes del mercado de valores, co-
POP MUS Música popular
ROCK MUS Música moderna contemporánea
EASY MUS Música ligera
OTH MUS Música alternativa
JAZZ Jazz
COUNTRY Música country
NAT MUS Música nacional
OLDIES Música antigua y de la “Edad de Oro”
FOLK MUS Música folklórica
L.CLASS Música clásica ligera
CLASSIC Música clásica
EDUCATE Programas educativos
DRAMA Comedias y series radiofónicas
CULTURE Cultura nacional o regional
SCIENCE Naturaleza, ciencia y tecnología
VARIED Entretenimiento ligero
CHILDREN Programas para niños
SOCIAL Temas sociales
RELIGION Programas o servicios de asuntos reli-
PHONE IN Entrada por teléfono
TOURING Programas de viaje; no para anuncios
LEISURE Pasatiempos favoritos y actividades
DOCUMENT Programas documentales
teorológica
mercio, transacciones, etc.
giosos
de tráfico
recreativas
Recepción de transmisiones de
alarma PTY
Cuando se emite el código PTY de emergencia, la unidad lo recibe automáticamente (aparece ALARM). Una vez finalizada la
transmisión, el sistema vuelve a la fuente anterior.
! Se puede cancelar un anuncio de emer-
gencia, pulsando TA.
También se puede cancelar un anuncio de
emergencia presionando SOURCE, BAND,
a, b, c o d.
Selección de frecuencias
alternativas
Si el sintonizador no puede obtener una
buena recepción, la unidad busca automáticamente otra emisora de la misma red.
% Presione TA repetidamente para activar
o desactivar AF (búsqueda de frecuencia alternativa).
# También se puede activar o desactivar la función AF en el menú que aparece presionando
FUNCTION.
Notas
! Sólo se sintonizan las emisoras RDS durante
la sintonización por búsqueda o BSM cuando
la función AF está activada.
! Cuando se recupera una emisora presintoni-
zada, el sintonizador puede actualizarla con
una nueva frecuencia de la lista AF de emisoras. (esta función sólo está disponible al utilizar las presintonías en las bandas F1 o F2). En
el display no aparece ningún número de presintonía si los datos RDS de la emisora recibida son distintos de los de la emisora
almacenada originalmente.
! Otro programa puede interrumpir temporal-
mente el sonido durante la búsqueda de una
frecuencia AF.
! La función AF se puede activar y desactivar in-
dependientemente para cada banda FM.
Español
21
Es

Sección
02
Utilización de esta unidad
Uso de la búsqueda PI
Si el sintonizador no puede encontrar una
emisora adecuada o el estado de la recepción
empeora, la unidad buscará automáticamente
otra emisora con la misma programación. Durante la búsqueda aparece PI SEEK y la salida
se silencia.
Uso de la búsqueda PI automática
para emisoras presintonizadas
Cuando no se pueden llamar las emisoras presintonizadas, como por ejemplo, al realizar viajes largos, se puede ajustar la unidad para
realizar la búsqueda PI durante la llamada de
las emisoras presintonizadas.
! El ajuste predefinido de la función de bús-
queda PI automática es desactivado. Consulte Cambio de la búsqueda PI automática
en la página 25.
Limitación de las emisoras para
programación regional
Cuando se usa la función AF, la función regional limita la selección de las emisoras que
transmiten programas regionales.
1 Presione FUNCTION para seleccionar
REG.
2 Presione a o b para activar o desactivar la función regional.
Notas
! La programación regional y las redes regiona-
les se organizan de distinta manera según el
país (es decir, pueden cambiar de acuerdo
con la hora, el estado o la provincia de que se
trate, o el área de transmisión).
! El número de presintonía puede desaparecer
del display si se sintoniza una emisora regional que es diferente de la emisora almacenada originalmente.
! La función regional se puede activar o desacti-
var en forma independiente por cada banda
FM.
Recepción de anuncios de tráfico
TA (espera por anuncio de tráfico) permite recibir anuncios de tráfico automáticamente, al
margen de la fuente que se escuche. La función TA se puede activar tanto para una emisora TP (una emisora que transmite
información de tráfico) como para una emisora TP de otra red realzada (una emisora que
brinda información que remite a emisoras TP).
1 Sintonice una emisora TP o la emisora
TP de otra red realzada.
El indicador TP se iluminará.
2 Presione TA para activar la espera por
anuncio de tráfico.
# Para desactivar la espera por anuncio de tráfico, vuelva a presionar TA.
3 Utilice VOLUME para ajustar el volumen de TA cuando comienza un anuncio de
tráfico.
El volumen recién ajustado se almacena en la
memoria y se recupera para los siguientes
anuncios de tráfico.
4 Presione TA mientras se está recibiendo
el anuncio de tráfico para cancelarlo.
El sintonizador vuelve a la fuente original pero
sigue en el modo de espera hasta que se vuelva a presionar TA.
# También se puede activar o desactivar la función TA en el menú que aparece presionando
FUNCTION.
Notas
! El sistema cambia de nuevo a la fuente origi-
nal después de la recepción del anuncio de
tráfico.
! Sólo se sintonizan las emisoras TP y las emi-
soras TP de otra red realzada durante la sintonización por búsqueda o BSM cuando la
función TA está activada.
22
Es

Utilización de esta unidad
Sección
02
Reproductor incorporado
Reproducción de un disco
1 Introduzca un CD por la ranura de carga
de CD.
La reproducción comenzará automáticamente.
# Asegúrese de que el lado de la etiqueta
del disco esté hacia arriba.
# Después de colocar un CD, presione SOURCE
para seleccionar el reproductor de CD incorporado.
# Se puede expulsar un CD presionando EJECT.
2 Para realizar el avance rápido o retroceso, mantenga presionado c o d.
3 Para saltar y retroceder o avanzar hasta
otra pista, presione c o d.
Notas
! Lea las precauciones sobre los discos y el re-
productor en la página 27.
! Si aparece un mensaje de error como
ERROR-11, consulte Mensajes de error en la
página 27.
Repetición de reproducción
La repetición de reproducción le permite escuchar la misma pista de nuevo.
1 Presione FUNCTION para seleccionar
RPT.
2 Presione c o d para seleccionar la
gama de repetición.
DSC – Repite todas las pistas
TRK – Repite la pista actual
# Si se realiza una búsqueda de pista o el avance rápido/retroceso, la repetición de reproducción se cancelará automáticamente.
# Para volver a la visualización normal, presione
BAND.
Reproducción de las pistas en
orden aleatorio
La reproducción aleatoria le permite reproducir las pistas del CD en un orden aleatorio.
1 Presione FUNCTION para seleccionar
RDM.
2 Presione a o b para activar o desactivar la reproducción aleatoria.
Cuando la repetición aleatoria está activada,
en el display aparece RDM.
# Para volver a la visualización normal, presione
BAND.
Exploración de las pistas de un CD
La reproducción con exploración le permite
escuchar los primeros 10 segundos de cada
pista de un CD.
1 Presione FUNCTION para seleccionar
SCAN.
2 Presione a para activar la reproducción
con exploración.
SCAN aparece en el display. Se reproducirán
los primeros 10 segundos de cada pista.
3 Cuando encuentre la pista deseada,
presione b para desactivar la reproducción
con exploración.
# Si el display vuelve automáticamente a la visualización de reproducción, seleccione SCAN
de nuevo presionando FUNCTION.
# Una vez finalizada la exploración del CD, volverá a comenzar la reproducción normal de las
pistas.
Pausa de la reproducción de un
disco
La pausa le permite detener temporalmente la
reproducción del disco.
1 Presione FUNCTION para seleccionar
PAUSE.
Español
23
Es

Sección
02
Utilización de esta unidad
2 Presione a o b para activar o desactivar la pausa.
# Para volver a la visualización normal, presione
BAND.
Ajustes de audio
Uso del ajuste del balance
El ajuste de fader/balance crea un entorno de
audio ideal en todos los asientos ocupados.
1 Presione AUDIO para seleccionar FAD.
2 Presione a o b para ajustar el balance
entre los altavoces delanteros/traseros.
Aparece FAD F15 a FAD R15.
# FAD 0 es el ajuste apropiado cuando se usan
sólo dos altavoces.
3 Presione c o d para ajustar el balance
entre los altavoces izquierdos/derechos.
Aparece BAL L15 a BAL R15.
# Para volver a la visualización normal, presione
BAND.
Uso del ecualizador
Hay seis ajustes de ecualización almacenados, a saber: DYNAMIC, VOCAL, NATURAL,
CUSTOM, FLAT y POWERFUL, que se pueden
utilizar con facilidad en cualquier momento.
! CUSTOM es una curva de ecualización
ajustada creada por el usuario.
! Cuando se selecciona FLAT no se introdu-
ce ningún suplemento ni corrección en el
sonido.
% Presione EQ para seleccionar el ecualizador.
Presione EQ repetidamente para cambiar
entre las siguientes opciones:
DYNAMIC—VOCAL—NATURAL—CUSTOM
—FLAT—POWERFUL
Ajuste de las curvas de
ecualización
Puede configurar el ajuste de la curva de
ecualización seleccionado según lo desee. Los
ajustes de la curva de ecualización configurados se memorizan en CUSTOM.
Ajuste de graves/medios/agudos
Se puede ajustar el nivel de graves/medios/
agudos.
1 Presione AUDIO para seleccionar BASS/
MID/TREBLE.
2 Presione a o b para ajustar el nivel.
Se visualiza +6 a –6 mientras se aumenta o
disminuye el nivel.
# Para volver a la visualización normal, presione
BAND.
Ajuste de la sonoridad
La sonoridad compensa las deficiencias en
las gamas de sonido bajas y altas cuando se
escucha a un volumen bajo.
1 Presione AUDIO para seleccionar LOUD.
2 Presione a o b para activar o desactivar la sonoridad.
# También se puede activar o desactivar la sonoridad presionando EQ.
3 Presione c o d para seleccionar el nivel
deseado.
LOW (bajo)—HI (alto)
# Para volver a la visualización normal, presione
BAND.
Ajuste de los niveles de la fuente
La función SLA (ajuste del nivel de fuente) le
permite ajustar el nivel de volumen de cada
fuente para evitar cambios radicales en el volumen cuando se cambia entre las fuentes.
! Los ajustes se basan en el nivel de volumen
de FM, que se mantiene inalterado.
24
Es

Utilización de esta unidad
Sección
02
! El nivel del volumen de MW/LW también se
puede ajustar con el ajuste del nivel de
fuente.
1 Compare el nivel de volumen de FM
con el de la fuente que desea ajustar.
2 Presione AUDIO para seleccionar SLA.
3 Presione a o b para ajustar el volumen
de la fuente.
Se visualiza SLA +4 a SLA –4 mientras se aumenta o disminuye el volumen de la fuente.
# Para volver a la visualización normal, presione
BAND.
Otras funciones
Configuración de los ajustes
iniciales
Utilizando los ajustes iniciales, puede personalizar varios ajustes del sistema para lograr
un funcionamiento óptimo de esta unidad.
1 Mantenga presionado SOURCE hasta
que se apague la unidad.
2 Mantenga presionado SOURCE hasta
que el nombre de la función aparezca en el
display.
3 Presione FUNCTION para seleccionar
uno de los ajustes iniciales.
Presione FUNCTION repetidamente para cambiar entre los siguientes ajustes:
FM (paso de sintonía de FM)—A-PI (búsqueda
PI automática)—AUX (entrada auxiliar)—
SAVE (ahorro de energía)
Siga las instrucciones que se indican a continuación para operar cada ajuste en particular.
# Para cancelar los ajustes iniciales, presione
BAND.
# También se pueden cancelar los ajustes iniciales presionando SOURCE hasta que se apague
la unidad.
Ajuste del paso de sintonía de FM
Normalmente, el paso de sintonía de FM empleado por la sintonización por búsqueda es
de 50 kHz. Si la función AF o TA está activada,
el paso de sintonía cambia automáticamente
a 100 kHz. Puede ser conveniente ajustar el
paso de sintonía a 50 kHz si la función AF está
activada.
! El paso de sintonía es de 50 kHz durante la
sintonización manual.
1 Presione FUNCTION para seleccionar
FM.
Consulte Configuración de los ajustes iniciales
en esta página.
2 Presione c o d para seleccionar el paso
de sintonía de FM.
Presione c para seleccionar 50 (50 kHz). Presione d para seleccionar 100 (100 kHz).
Cambio de la búsqueda PI
automática
La unidad puede buscar automáticamente
una emisora diferente con el mismo programa, aun durante la recuperación de emisoras
presintonizadas.
1 Presione FUNCTION para seleccionar
A-PI.
Consulte Configuración de los ajustes iniciales
en esta página.
2 Presione a o b para activar o desactivar la búsqueda PI automática.
Cambio del ajuste de un equipo
auxiliar
Se puede utilizar un dispositivo auxiliar con
esta unidad. Active el ajuste auxiliar si utiliza
un dispositivo auxiliar conectado a esta unidad.
Español
25
Es

Sección
02
Utilización de esta unidad
1 Presione FUNCTION para seleccionar
AUX.
Consulte Configuración de los ajustes iniciales
en la página anterior.
2 Presione a o b para activar o desactivar el ajuste auxiliar.
Uso de la fuente AUX
% Inserte el miniconector estéreo en el conector de entrada de esta unidad.
Selección de AUX como la fuente
% Presione SOURCE para seleccionar AUX
como la fuente.
Ahorro del consumo de la baterí a
La activación de esta función le permite ahorrar consumo de la batería.
! Cuando esta función está activada, no se
permiten operaciones que no sean sintonizar la fuente.
Importante
Si la batería del vehículo está desconectada, se
cancela el modo de Ahorro de Energía. Active de
nuevo el Ahorro de Energía cuando vuelva a conectar la batería. Si la llave de encendido del
automóvil no tiene una posición ACC (accesorio),
según el método de conexión es posible que,
cuando el Ahorro de Energía esté desactivado, la
unidad consuma energía de la batería.
! Cuando se realiza o recibe una llamada
con un teléfono móvil conectado a esta unidad.
! Cuando funciona el sistema de orientación
por voz de la unidad de navegación Pioneer
conectada a esta unidad.
El sonido se desactiva, se visualiza MUTE yno
se puede ajustar el audio, salvo el control del
volumen. El funcionamiento vuelve a su estado normal cuando se termina la llamada telefónica o la orientación por voz.
1 Presione FUNCTION para seleccionar
SAVE.
Consulte Configuración de los ajustes iniciales
en la página anterior.
2 Presione a o b para activar o desactivar el ahorro de energía.
Silenciamiento del sonido
El sonido de esta unidad se silencia automáticamente en los siguientes casos:
26
Es
Información adicional
Apéndice
Mensajes de error
Cuando contacte con su proveedor o con el
servicio técnico Pioneer más cercano, asegúrese de haber anotado el mensaje de error.
Mensaje Causa Acción
ERROR-11, 12,
17, 30
ERROR-11, 12,
17, 30
ERROR-10, 11,
12, 15, 17, 30,
A0
ERROR-15 El disco inser-
ERROR-22, 23 No se puede re-
CD-ROM Hay un CD-ROM
Disco sucio Limpie el disco.
Disco rayado Reemplace el
Problema eléctrico o mecánico
tado no contiene
datos
producir el formato del CD
insertado
disco.
Cambie la llave de
encendido del
automóvil a la posición de desactivación y luego pase
de nuevo a activación, o cambie a
una fuente diferente, y después vuelva a activar el
reproductor de CD.
Reemplace el
disco.
Reemplace el
disco.
Reemplace el
disco.
Pautas para el manejo de
discos y del reproductor
! Use sólo discos que tengan el siguiente
logo.
! Utilice sólo discos convencionales y com-
pletamente circulares. No use discos con
formas irregulares.
Español
! Utilice un CD de 12 cm u 8 cm. No utilice
un adaptador cuando reproduzca un CD de
8 cm.
! No coloque ningún otro elemento que no
sea un CD en la ranura de carga de CD.
! No use discos con roturas, picaduras, de-
formados o dañados de otro modo, ya que
pueden causar daños al reproductor.
! No es posible reproducir discos CD-R/CD-
RW no finalizados.
! No toque la superficie grabada de los dis-
cos.
! Almacene los discos en sus cajas cuando
no los utilice.
! Evite dejar discos en ambientes excesiva-
mente calientes o expuestos a la luz solar
directa.
! No fije etiquetas, no escriba ni aplique sus-
tancias químicas en la superficie de los
discos.
! Para limpiar un CD, pásele un paño suave
desde el centro hacia afuera.
! La condensación puede afectar temporal-
mente el rendimiento del reproductor. Deje
que se adapte a la temperatura más cálida
durante aproximadamente una hora. Además, si los discos tienen humedad, séquelos con un paño suave.
! Quizás no pueda reproducir algunos discos
debido a sus características, formato, aplicación grabada, entorno de reproducción,
condiciones de almacenamiento u otras
causas.
! Dependiendo del entorno en que se grabó
la información de texto, puede que no se visualice correctamente.
! Las vibraciones en las carreteras pueden
interrumpir la reproducción de un disco.
! Lea las advertencias de los discos antes de
utilizarlos.
27
Es

Apéndice
Información adicional
Discos dobles
! Los discos dobles son discos de dos caras
que incluyen CD grabable de audio en una
cara y DVD grabable de vídeo en la otra
cara.
! Debido a que la cara CD de los discos do-
bles no es físicamente compatible con el
estándar CD general, es posible que no se
pueda reproducir la cara CD en esta unidad.
! La carga y expulsión frecuente de un disco
doble puede producir rayaduras en el
disco. Las rayaduras graves pueden producir problemas de reproducción en esta unidad. En algunos casos, un disco doble
pueden atascarse en la ranura de carga del
disco y no se expulsará. Para evitarlo, recomendamos que no utilice un disco doble
en esta unidad.
! Consulte la información del fabricante del
disco para obtener más información sobre
los discos dobles.
28
Es

Información adicional
Apéndice
Especificaciones
Generales
Fuente de alimentación ........ 14,4 V CC (10,8 V a 15,1 V
permisible)
Sistema de conexión a tierra
..................................................... Tipo negativo
Consumo máximo de corriente
..................................................... 10,0 A
Dimensiones (An × Al × Pr):
DIN
Bastidor .................... 178 mm × 50 mm × 162
mm
Cara anterior .......... 188 mm × 58 mm × 15 mm
D
Bastidor .................... 178 mm × 50 mm × 162
mm
Cara anterior .......... 170 mm × 48 mm × 15 mm
Peso ............................................... 1,3 kg
Audio
Potencia de salida máxima
..................................................... 50 W × 4
Potencia de salida continua
..................................................... 22 W × 4 (50 a 15 000 Hz,
5% THD, 4 W de carga,
ambos canales activados)
Impedancia de carga ............. 4 W (4 W a8W permisible)
Controles de tono:
Graves
Frecuencia .............. 100 Hz
Ganancia ................. ±13 dB
Media
Frecuencia .............. 1 kHz
Ganancia ................. ±12 dB
Agudos
Frecuencia .............. 10 kHz
Ganancia ................. ±12 dB
Sensibilidad utilizable ........... 25 µV (Señal /ruido: 20 dB)
Relación de señal a ruido .... 62 dB (red IEC-A)
Sintonizador de LW
Gama de frecuencias ............ 153 kHz a 281 kHz
Sensibilidad utilizable ........... 28 µV (Señal /ruido: 20 dB)
Relación de señal a ruido .... 62 dB (red IEC-A)
Español
Nota
Las especificaciones y el diseño están sujetos a
posibles modificaciones, para incorporar mejoras, sin previo aviso.
Reproductor de CD
Sistema ........................................ Sistema de audio de discos
compactos
Discos utilizables .................... Disco compacto
Relación de señal a ruido .... 94 dB (1 kHz) (red IEC-A)
Número de canales ................ 2 (estéreo)
Sintonizador de FM
Gama de frecuencias ............ 87,5 MHz a 108,0 MHz
Sensibilidad utilizable ........... 11 dBf (0,7 µV/75 W, mono,
Señal/ruido: 30 dB)
Relación de señal a ruido .... 72 dB (red IEC-A)
Sintonizador de MW
Gama de frecuencias ............ 531 kHz a 1 602 kHz
29
Es

Inhalt
Vielen Dank, dass Sie sich für dieses PIONEER-Produkt
entschieden haben.
Bitte lesen Sie diese Bedienungsanleitung vor der erstmaligen Verwendung des
Produkts, um seinen ordnungsgemäßen Betrieb zu gewährleisten. Bewahren Sie
die Bedienungsanleitung nach dem Lesen zur zukünftigen Bezugnahme sicher auf.
Bevor Sie beginnen
Zu diesem Gerät 31
Unsere Website 32
Diebstahlschutz 32
– Abnehmen der Frontplatte 32
– Anbringen der Frontplatte 32
Bedienung des Geräts
Die einzelnen Teile 33
– Hauptgerät 33
– Display-Anzeige 33
Grundlegende Bedienvorgänge 34
– Ein-/Ausschalten 34
– Wählen einer Programmquelle 34
– Regeln der Lautstärke 34
Tuner 34
– Rundfunkempfang 34
– Speichern und Abrufen von
Senderfrequenzen 35
– Abstimmen von Stationen mit starken
Sendesignalen 35
– Speichern von Stationen mit den
stärksten Sendesignalen 35
– Umschalten der RDS-Anzeige 35
– Empfang von PTY-Alarm-
Sendungen 36
– Wählen alternativer Frequenzen 36
– Empfang von Verkehrsdurchsagen 37
Eingebauter Player 38
– Abspielen einer Disc 38
– Wiederholwiedergabe 38
– Abspielen von Titeln in zufälliger
Reihenfolge 38
– Anspielwiedergabe der Titel einer
CD 38
– Anhalten der Disc-Wiedergabe 38
Audio-Einstellungen 39
– Gebrauch der Balance-Einstellung 39
– Gebrauch des Equalizers 39
– Einstellen von Equalizer-Kurven 39
– Einstellen von Loudness 39
– Einstellen der
Programmquellenpegel 40
Andere Funktionen 40
– Anpassen der Grundeinstellungen 40
– Einstellen des UKW-Kanalrasters 40
– Umschalten des Auto-PI-
Suchlaufs 40
– Umschalten der AUX-Einstellung 41
– Einschränken der
Batteriebeanspruchung 41
– Abschalten des Tons 41
Zusätzliche Informationen
Fehlermeldungen 42
Richtlinien für die Handhabung von Discs
und Player 42
Dual-Discs 43
Technische Daten 44
30
De
 Loading...