

Philips FWM570/21T, FWM570/19 User Manual
FWM570
México
Es necesario que lea cuidadosamente su instructivo de
manejo.
PRECAUCIÓN - ADVERTENCIA
No abrir, riesgo de choque eléctrico
Verifique que el voltaje de alimentación
sea el requerido para su aparato
Para evitar el riesgo de choque eléctrico, no quite la tapa.
En caso de requerir servicio, dirijase al personal calificado.
Descripción: Microsistema de Audio
Modelo : FWM570/ 21
Alimentación: 110–127 / 220–240V; ~50–60 Hz
Consumo: 60 W
Importador: Philips Mexicana, S.A. de C.V.
Domicilio: Av. La Palma No.6
Localidad y Tel: Edo. de México C.P. 52784
Exportador: Philips Electronics HK, Ltd.
País de Origen: China
Nº de Serie: ______________________________
ATENCIÓN
Col. San Fernando La Herradura
Huixquilucan
Tel.52 69 90 00
LEA CUIDADOSAMENTE ESTE INSTRUCTIVO
ANTES DE USAR SU APARATO.
AVISO IMPORTANTE
Philips Mexicana, S.A. de C.V. no se hace
responsable por daños o desperfectos causados por:
– Maltrato, descuido o mal uso, presencia de
insectos o roedores (cucarachas, ratones etc.).
– Cuando el aparato no haya sido operarado
de acuerdo con el instructivo del uso, fuera
de los valores nominales y tolerancias de las
tensiones (voltaje), frecuencia (ciclaje) de
alimentación eléctrica y las características
que deben reunir las instalaciones auxiliares.
– Por fenómenos naturales tales como:
temblores, inundaciones, incendios, descargas
eléctricas, rayos etc
terceros (choques asaltos, riñas
2
.o delitos causados por
, etc.).
CAUTION
Use of controls or
adjustments or performance
of procedures other than
herein may result in
hazardous radiation
exposure or other unsafe
operation.
P1
P2
P3
P4
22
1
3
3

Energy Star
As an ENERGY STAR
Partner, Philips has
determined that this product
meets the ENERGY STARR guidelines for
energy efficiency.
4
R

Index
English ------------------------------------------------ 6
Français -------------------------------------------- 27
Español --------------------------------------------- 48
-------------------------------------------------------- 69
English
Français
Español
5

Contents
English
General Information
Supplied accessories ............................................ 7
Environmental information ................................ 7
Care and safety information .............................. 7
Functional Overview
Main unit and remote control ....................... 8~9
Control buttons available on the
remote control only ......................................... 9
Tuner Operations
Tuning to radio stations .................................... 19
Presetting radio stations ................................... 19
Using the plug and play .................................. 19
Automatic presetting ..................................... 19
Manual presetting ............................................ 19
Selecting a preset radio station ....................... 20
Deleting a preset radio station .................... 20
Changing tuning grid .......................................... 20
Connections
Step 1: Connecting FM/MW antennas .......... 11
Step 2: Connecting the speakers .................... 11
Step 3: Connecting to the game console ...... 11
Step 4: Connecting the AC power cord ........ 11
Step 5: Inserting batteries into the remote
control .................................................................. 12
Using the remote control to operate
the system ........................................................ 12
Gameport Operations
About Gameport ............................................... 13
Preparation before use ..................................... 13
Starting operation .............................................. 13
Basic Operations
Switching on/off ................................................. 14
Switching to active mode .............................. 14
Switching to standby mode (view clock) ... 14
Demonstration mode ........................................ 14
Setting the clock ................................................. 14
Dimming system’s display screen .................... 15
Volume control ................................................... 15
Sound control ..................................................... 15
MAX Sound ...................................................... 15
Digital sound control ..................................... 15
Virtual ambience control ............................... 15
Dynamic bass boost ....................................... 15
Ta pe Operation/Recording
Ta pe playback ...................................................... 21
General information on recording ................. 21
Preparation for recording ................................ 22
Disc synchro recording..................................... 22
Dubbing tapes ..................................................... 22
Timer Operations
Setting the timer ................................................. 23
Activating/Deactivating the timer ............... 23
Setting the sleep timer ...................................... 24
Other Connection
Listening to an external source ...................... 24
Specifications ........................................... 25
Troubleshooting .................................... 26
Disc Operations
Playable discs ....................................................... 16
Loading discs ....................................................... 16
Basic playback controls ..................................... 16
Playing an MP3 disc ............................................ 17
Repeat and shuffle .............................................. 17
Repeat play ....................................................... 17
Random play ..................................................... 17
Programming the disc tracks ........................... 18
Checking the programme ............................. 18
Clearing the programme ............................... 18
6

General Information
IMPORTANT!
PLEASE NOTE THAT THE VOLTAGE
SELECTOR LOCATED AT THE REAR OF
THIS SYSTEM IS PRESET AT 220V FROM
THE FACTORY. FOR COUNTRIES THAT
OPERATE AT 110V-127V, PLEASE ADJUST
TO 110V-127V BEFORE YOU SWITCH ON
THE SYSTEM.
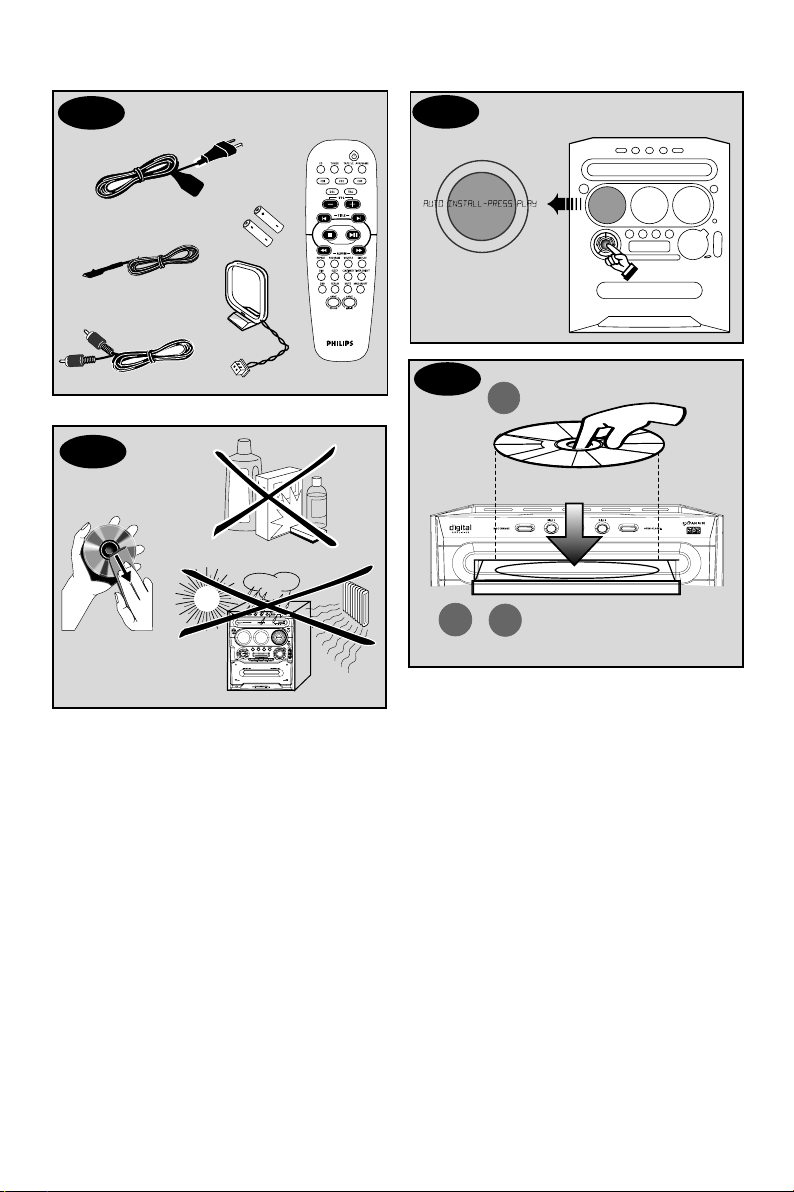
Supplied accessories (page 3 – P1)
– Remote control and two AA batteries.
– MW loop antenna
– FM wire antenna
– Video cinch cable (yellow)
–AC power cord
Environmental information
All unnecessary packaging has been omitted.
We have tried to make the packaging easy to
separate into three materials: cardboard (box),
polystyrene foam (buffer) and polyethylene
(bags, protective foam sheet).
Your system consists of materials which can be
recycled and reused if disassembled by a
specialised company. Please observe the local
regulations regarding the disposal of packaging
materials, exhausted batteries and old
equipment.
Care and safety information
(page 3 – P2)
Avoid high temperature, moisture, water
and dust
– Do not expose the system, batteries or discs
to humidity, rain, sand or excessive heat (caused
by heating equipment or direct sunlight). Always
keep the disc tray closed to avoid dust on the
lens.
– No objects filled with liquids, such as vases,
shall be placed on the apparatus.
– No naked flame sources, such as lighted
candles, should be placed on the apparatus.
Avoid condensation problem
– The lens may cloud over when the system is
suddenly moved from cold to warm
surroundings, making it impossible to play a disc.
Leave the system in the warm environment until
the moisture evaporates.
Do not block the vents
– In a cabinet, allows about 10cm (4 inches) of
free space all around the system for adequate
ventilation.
Care of discs
–To clean a CD, wipe it in a straight line from
the centre towards the edge using a soft, lint-free
cloth. A cleaning agent may damage the disc!
–Write only on the printed side of a CDR(W)
and only with a soft felt-tipped pen.
– Handle the disc by its edge, do not touch the
surface.
Care of the cabinet
– Use soft cloth slightly moistened with a mild
detergent solution. Do not use a solution
containing alcohol, spirits, ammonia or abrasives.
Finding a suitable location
– Place the system on a flat, hard, and stable
surface.
Built-in safety circuit
– Under extreme conditions, this system may
switch to the standby mode automatically. If this
happens, let the system cool down before
reusing it.
Power saving
– This system is designed to use less than 1W
of electricity when switched to the standby
mode. Disconnect the AC power cord from the
power outlet when not in use.
English
7
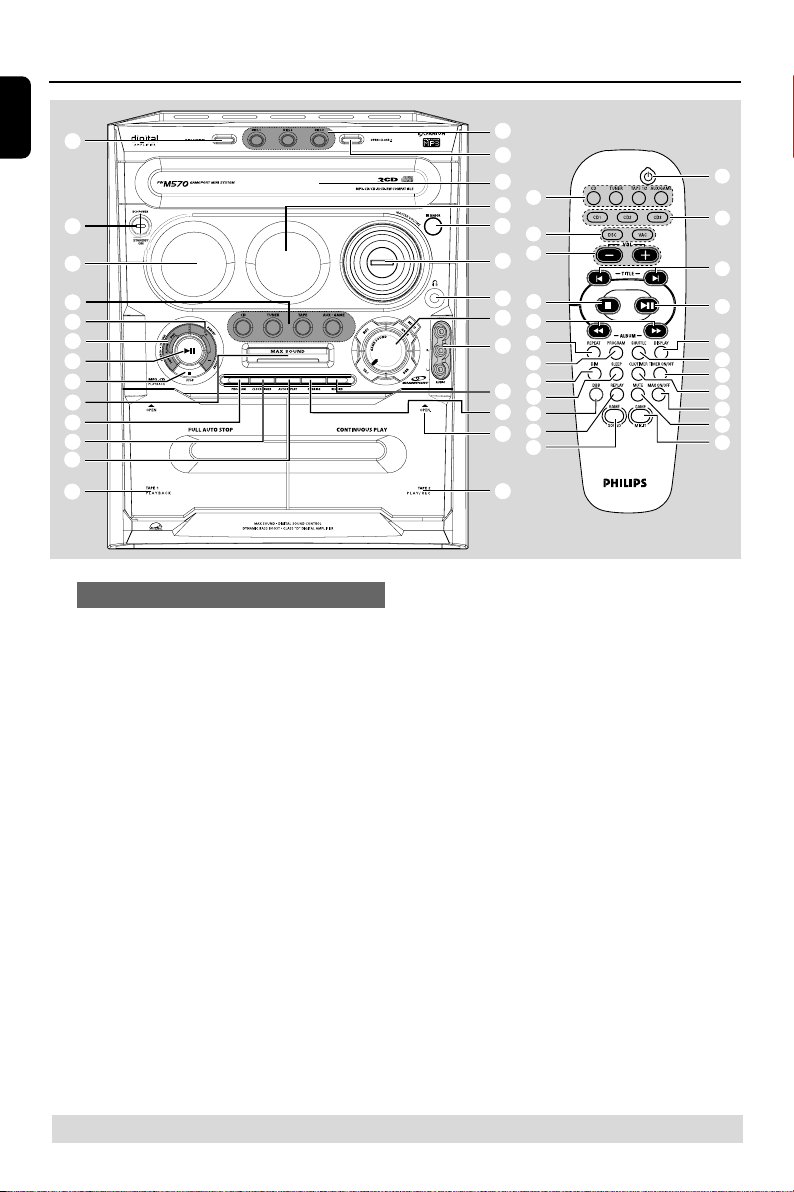
Functional Overview
English
∞
1
2
3
4
5
6
7
8
9
0
!
#
Main unit and remote control
1 STANDBY ON B / ECO POWER
– Switches to the Eco Power standby mode or
turns on the system.
– *Switches to the standby mode.
2 Display screen
3 CD / TUNER / TAPE(TAPE1/2) /
AUX•GAME
– Selects the relevant active mode.
– CD: toggles between DISC 1~3.
– TUNER: toggles between FM and MW band.
– AUX•GAME: toggles between AUX and
GAMEPORT mode.
– TAPE: toggles between Tape Deck 1 and Tape
Deck 2.
4 PRESET (–) (í)
PRESET (+) (ë)
– CD: selects a track or selects a title from MP3
disc.
– TUNER: selects a preset radio station.
– CLOCK: sets the minutes.
5 SEARCH•TUNING•ALBUM 4 / ¢
(1 / ¡)
≤
£
™
¡
)
(
*
&
^
%
$
@
3
&
(
7
5
≥
9
º
⁄
&
!
&
§
£
4
6
ª
•
¤
0
8
‹
&
#
– CD: *searches backward/forward.
– MP3-CD: select an album
– TUNER: tunes the radio frequency up/ down.
– CLOCK: sets the hour s.
– TAPE: searches backward/ forward.
6 PLAY•PAUSE ÉÅ
– CD: starts/pauses playback.
– TAPE: starts playback.
(only on the main unit)
– TUNER: *enters Plug & Play mode and/or starts
preset radio station installation.
7 STOP 9
– Exits an operation.
– CD: stops playback or clears a programme.
– TUNER: *erases a preset radio station.
(only on the main unit)
–*Tur ns on/off the demonstration mode.
8 MAX SOUND (MAX ON/OFF)
–Turns on/off the optimal mix of various sound
features.
9 PROGRAM
– CD: starts or confirms tracks programming.
– TUNER: starts *automatic/manual preset
* = Press and hold the button for more than two seconds.
8
 Loading...