

Philips FWD197-98 User Manual

Register your product and get support at
DVD Mini Hi-Fi System
FWD197/98
EN User manual
TH คู่มือผู้ใช้

Contents
1 Important 2
Safety 2
Notice 4
2 Your DVD Mini Hi-Fi System 5
Introduction 5
What’s in the box 5
Overview of the main unit 6
Overview of the remote control 7
3 Connect 9
Connect speakers 9
Connect TV (video) 9
Connect an external audio system
(optional) 10
4 Get started 12
Install remote control batteries 12
Set the clock 12
Turn on 12
Select the correct source on TV 12
Select the correct TV system 13
Change system menu language 13
7 Listen to the radio 21
Tune to a radio station 21
Program radio stations automatically 21
Program radio stations manually 21
Select a preset radio station 21
8 Play tape 22
9 Adjust sound 23
Adjust volume 23
Boost sound power 23
Mute sound 23
Select a preset sound effect 23
Enhance bass 23
10 Other features 24
Listen to an external device 24
Record from disc 24
Record from radio 24
Record from external source 24
Set the sleep timer 24
Record to a digital recorder 24
Listen through headphone 25
English
5 Play 14
Play disc 14
Play from USB 14
Play DivX video 15
Play MP3/WMA/picture fi les 15
Play control 15
Play options 16
Picture view options 17
6 Adjust settings 18
System setup 18
Language setup 19
Audio setup 20
11 Product information 26
Specifi cations 26
Supported disc formats 27
USB playability information 27
Maintenance 28
12 Troubleshooting 29
13 Glossary 31
EN
1

1 Important
l Unplug this apparatus during lightning
storms or when unused for long periods
of time.
Safety
Important Safety Instructions
a Read these instructions.
b Keep these instructions.
c Heed all warnings.
d Follow all instructions.
e Do not use this apparatus near water.
f Clean only with dry cloth.
g Do not block any ventilation openings.
Install in accordance with the
manufacturer’s instructions.
h Do not install near any heat sources
such as radiators, heat registers, stoves,
or other apparatus (including amplifi ers)
that produce heat.
i Protect the power cord from being
walked on or pinched, particularly at
plugs, convenience receptacles, and
the point where they exit from the
apparatus.
j Only use attachments/accessories
specifi ed by the manufacturer.
k Use only with the cart, stand, tripod,
bracket, or table specifi ed by the
manufacturer or sold with the apparatus.
When a cart is used, use caution when
moving the cart/apparatus combination
to avoid injury from tip-over.
m Refer all servicing to qualifi ed service
personnel. Servicing is required when
the apparatus has been damaged in any
way, such as power-supply cord or plug
is damaged, liquid has been spilled or
objects have fallen into the apparatus,
the apparatus has been exposed to rain
or moisture, does not operate normally,
or has been dropped.
n Battery usage CAUTION – To prevent
battery leakage which may result in
bodily injury, property damage, or
damage to the unit:
Install all batteries correctly, + and - •
as marked on the unit.
Do not mix batteries (old and new •
or carbon and alkaline, etc.).
Remove batteries when the unit is •
not used for a long time.
o Apparatus shall not be exposed to
dripping or splashing.
p Do not place any sources of danger on
the apparatus (e.g. liquid fi lled objects,
lighted candles).
q This product may contain lead and
mercury. Disposal of these materials
may be regulated due to environmental
considerations. For disposal or recycling
information, please contact your local
authorities or the Electronic Industries
Alliance: www.eiae.org.
Know these safety symbols
2 EN

This ‘bolt of lightning’ indicates uninsulated
material within your unit may cause an
electrical shock. For the safety of everyone
in your household, please do not remove
product covering.
The ‘exclamation point’ calls attention to
features for which you should read the
enclosed literature closely to prevent
operating and maintenance problems.
WARNING: To reduce the risk of fi re or
electric shock, this apparatus should not be
exposed to rain or moisture and objects fi lled
with liquids, such as vases, should not be
placed on this apparatus.
CAUTION: To prevent electric shock, match
wide blade of plug to wide slot, fully insert.
Where the MAINS plug or an appliance •
coupler is used as the disconnect device,
the disconnect device shall remain readily
operable.
Warning
Never remove the casing of this apparatus. •
Never lubricate any par t of this apparatus.•
Never place this apparatus on other electrical •
equipment.
Keep this apparatus away from direct sunlight, naked
•
fl ames or heat.
Never look into the laser beam inside this apparatus.
•
Ensure that you always have easy access to the power •
cord, plug or adaptor to disconnect this apparatus
from the power.
Hearing safety
Listen at a moderate volume.
Using headphones at a high volume can •
impair your hearing. This product can
produce sounds in decibel ranges that
may cause hearing loss for a normal
person, even for exposure less than a
minute. The higher decibel ranges are
offered for those that may have already
experienced some hearing loss.
Sound can be deceiving. Over time your •
hearing ‘comfor t level’ adapts to higher
volumes of sound. So after prolonged
listening, what sounds ‘normal’ can
actually be loud and harmful to your
hearing. To guard against this, set your
volume to a safe level before your hearing
adapts and leave it there.
To establish a safe volume level:
Set your volume control at a low setting. •
Slowly increase the sound until you can •
hear it comfortably and clearly, without
distortion.
Listen for reasonable periods of time:
Prolonged exposure to sound, even •
at normally ‘safe’ levels, can also cause
hearing loss.
Be sure to use your equipment •
reasonably and take appropriate breaks.
Be sure to observe the following guidelines
when using your headphones.
Listen at reasonable volumes for •
reasonable periods of time.
Be careful not to adjust the volume as •
your hearing adapts.
Do not turn up the volume so high that •
you can’t hear what’s around you.
You should use caution or temporarily •
discontinue use in potentially hazardous
situations. Do not use headphones while
operating a motorized vehicle, cycling,
skateboarding, etc.; it may create a traffi c
hazard and is illegal in many areas.
English
EN 3
Notice
Any changes or modifi cations made to this
device that are not expressly approved by
Philips Consumer Lifestyle may void the user’s
authority to operate the equipment.
The making of unauthorized copies of
copy-protected material, including computer
programs, fi les, broadcasts and sound
recordings, may be an infringement of
copyrights and constitute a criminal offence.
This equipment should not be used for such
purposes.
This product incorporates copyright
protection technology that is protected
by U.S. patents and other intellectual
proper ty rights. Use of this copyright
protection technology must be authorized
by Macrovision, and is intended for home
and other limited viewing uses only unless
otherwise authorized by Macrovision. Reserve
engineering or disassembly is prohibited.
Environmental information
All unnecessary packaging has been omitted.
We have tried to make the packaging easy to
separate into three materials: cardboard (box),
polystyrene foam (buffer) and polyethylene
(bags, protective foam sheet.)
Your system consists of materials which can
be recycled and reused if disassembled by
a specialized company. Please observe the
local regulations regarding the disposal of
packaging materials, exhausted batteries and
old equipment.
DivX, DivX Certifi ed, and associated logos are
trademarks of DivX, Inc. and are used under
license.
Windows Media and the Windows logo are
trademarks, or registered trademarks of
Microsoft Corporation in the United States
and/or other countries.
This apparatus includes this label:
Manufactured under license from Dolby
Laboratories. Dolby and the double-D symbol
are trademarks of Dolby Laboratories.
4 EN
2 Your DVD Mini
You can play DVDs with the following region
code:
Hi-Fi System
Congratulations on your purchase, and
welcome to Philips! To fully benefi t from the
support that Philips offers, register your product
at www.philips.com/welcome.
Introduction
With this unit, you can enjoy:
Video from DVDs, VCDs, and DivX fi les •
that are stored on USB devices.
Audio from audio CDs, radio, tape, •
external devices, and MP3/WMA fi les
that are stored on USB devices.
Pictures from picture discs or stored on •
USB devices.
The unit offers you multiple sound effect
settings that enrich sound with Digital Sound
Control (DSC) and Dynamic Bass Boost (DBB).
The unit supports the following media formats:
DVD region
code
Countries
Southeast Asia, South Korea,
Taiwan, Hong Kong, Macau
What’s in the box
Check and identify the contents of your
package:
Main unit•
Speaker box x 2•
Remote control•
Video cable•
MP3 link cable•
User manual•
Quick star t guide•
English
EN 5
Overview of the main unit
i
a
b
c
d
e
f
g
j
k
l
m
n
o
h
a
Turn on the unit, or switch to •
standby mode.
b Display panel
Show current status.•
c IR sensor
d
Stop play or erase a program.•
e PROGRAM
Program tracks.•
6 EN
p
q
r
Program radio stations.•
Review the program.•
f Source buttons ( DISC ,TUNER ,
USB /MP3 LINK ,TAPE )
Select a source: DISC, TUNER, USB, •
MP3 LINK or TAPE.
g
Jack for a USB mass storage device. •
h MP3 LINK
Audio input jack (3.5mm ) for an •
external audio device.
i Disc compartment
j OPEN/CLOSE
Open or close the disc •
compartment.
Overview of the remote
control
English
k
/
Skip to the previous/next track/title/•
chapter.
Search within a track/title/chapter.•
Tune to a radio station.•
l ALBUM/PRESET +/-
Select a preset radio station.•
Skip to the previous/next album.•
m
Start or pause play.•
n DBB /DSC
Turns on or off dynamic bass •
enhancement.
Select a preset sound setting.•
o Volume control
Adjust volume.•
Adjust time.•
p
Connect headphones.•
a
b
c
d
e
f
g
h
l
m
n
o
p
q
r
s
t
u
v
w
x
q OPEN
Pull to open the tape button cover.•
r Tape cont rols
•
Start to record.
•
Star t tape play.
•
/
Fast rewind/forward the tape.
•
Stop the tape play or open the tape
door.
•
Pause tape play or pause recording.
i
j
k
y
z
{
a
Turn on the unit, or switch to •
standby mode.
b Source buttons ( DISC , USB ,TUNER ,
MP3 LINK )
Select a source: DISC, USB, TUNER, •
or MP3 LINK.
EN 7

c SUBTITLE
Select a DVD subtitle language.•
d AUDIO
For DVD, select an audio language.•
For VCD, select an audio channel.•
e REPEAT A-B
Repeat a specifi c section within a •
track/title/chapter.
r
/ ( / )
s OK
t
/
Navigate through the menu.•
Fast search backward/forward.•
Tune to a radio station.•
Confi rm a selection.•
Skip to the previous/next track.•
f RETURN/TITLE
Return to the previous menu/title.•
g SETUP
Access or exit the system setup •
menu.
h VOL +/-
Adjust volume.•
Adjust time.•
i GOTO
During disc play: specify a position to •
star t play.
j MAX
Turn on/off the optimal mix of sound •
features.
k SOUND
Select a preset sound setting.•
u
Start or pause play.•
v
Stop play or erase a program.•
w OSD/DISPLAY
Display play information on a •
connected TV.
Set the clock.•
x Numeric keypad
Input a number.•
During play, select a title/chapter/•
track directly.
y PROG
Program tracks/titles/chapters/•
picture fi les.
Program radio stations.•
l ANGLE
Select a viewing angle of a DVD•
m ZOOM
Zoom into or out of an image.•
n SLEEP
Set the sleep timer.•
o MODE
Select a play mode.•
p MENU
For DVD/VCD, access or exit the •
disc menu.
For video discs with playback •
control(PBC): turn on/off PBC.
q
/
Navigate through the menu.•
z MUTE
Mute or restore volume.•
{ DBB
Turns on or off dynamic bass •
enhancement.
8 EN
3 Connect
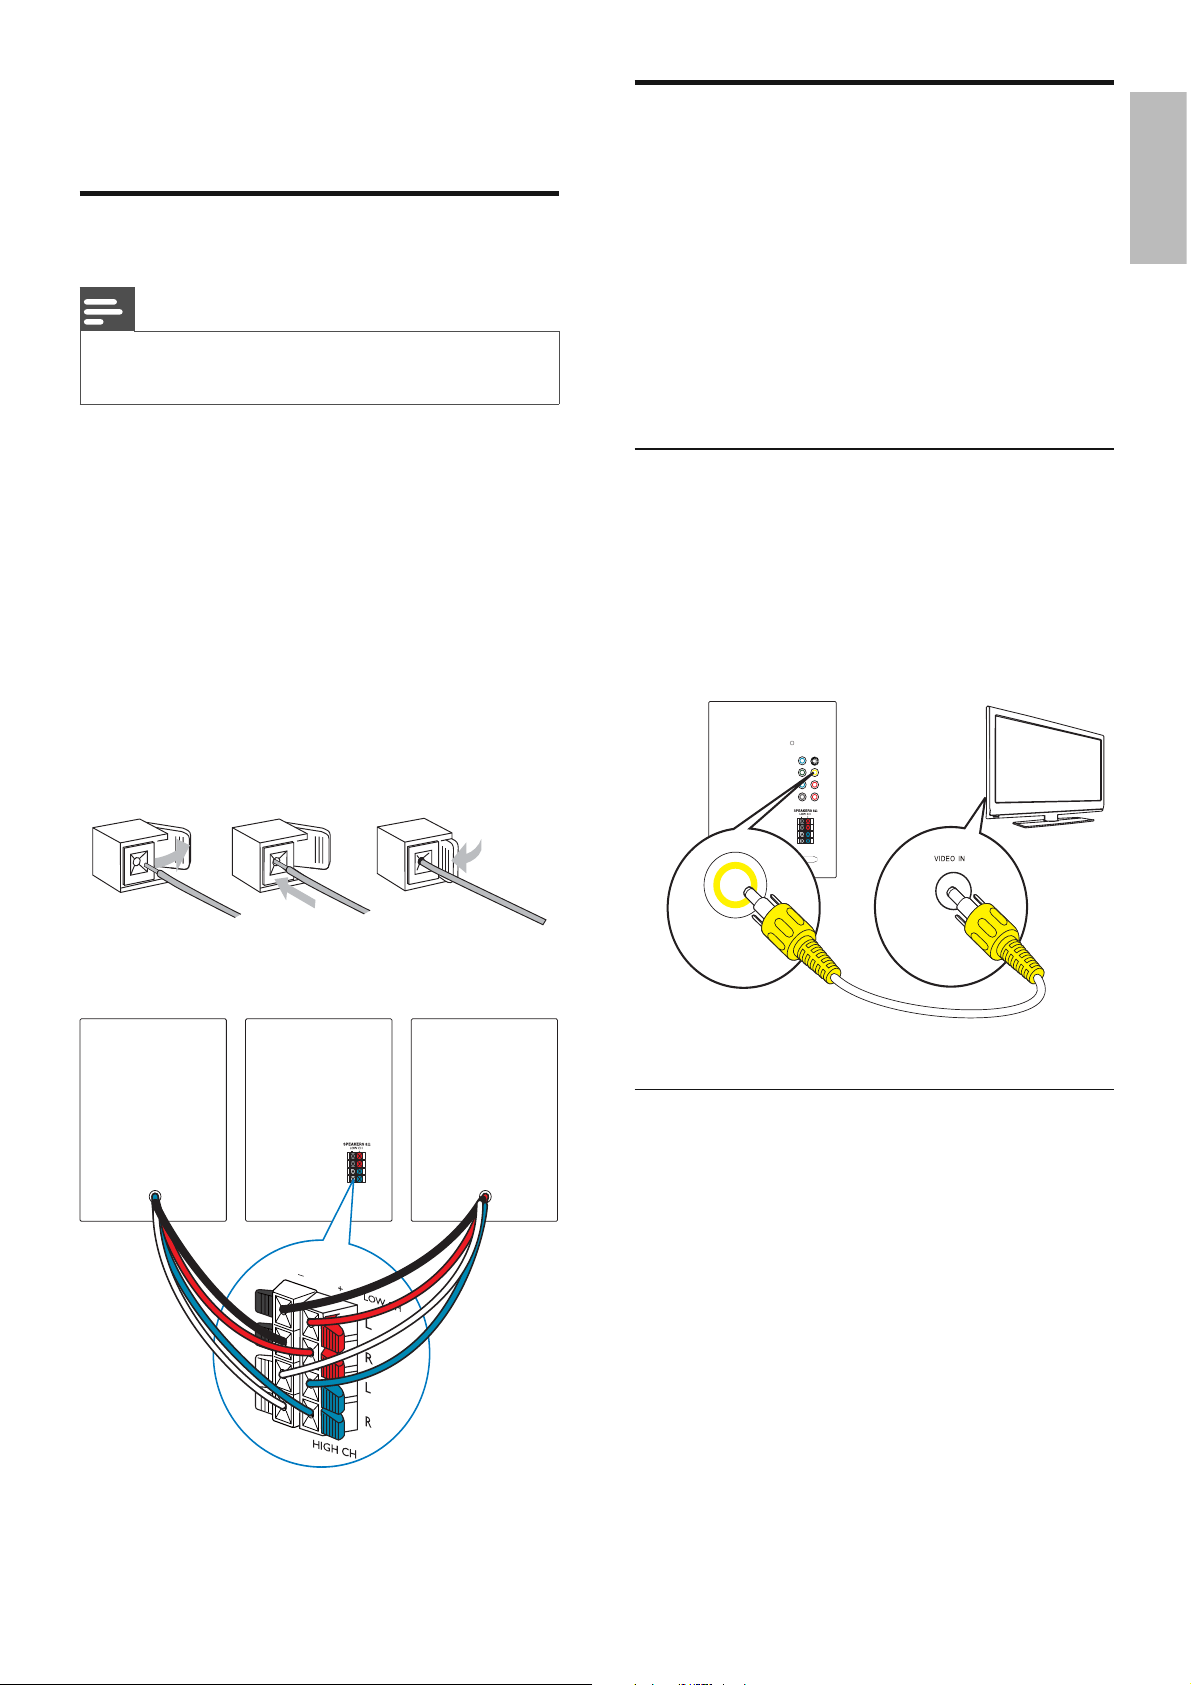
Connect speakers
Note
Ensure that the colors of the speaker wires and •
terminals are matched.
1 Hold down the socket fl ap.
2 Insert the stripped part of the wire
completely.
Insert the right speaker wires to •
“HIGH CH R/LOW CH R”, lef t
speaker wires to “ HIGH CH L/LOW
CH L”.
Insert the red/blue wires to “ • +”,
black/grey wires to “ -”.
Connect TV (video)
Option 1: Connect through composite •
video socket (for a standard TV).
Option 2: Connect through S-Video •
socket (for a standard TV).
Option 3: Connect through component •
video sockets (for a standard TV or
Progressive Scan TV).
You must connect this unit directly to a TV.
Option 1: Connect through
composite video socket
1 Connect the supplied composite video
cable to:
the • VIDEO socket on this unit.
the video input socket on the TV.•
English
3 Release the socket fl ap.
abc
Speaker
(Right)
L
R
L
R
HIGH CH
Speaker
(Left)
S-VIDEOVIDEO
Y
Pb Pr
AUDIO OUT COAXIAL
HIGH CH
VIDEO
RL
L
R
L
R
TV
Option 2: Connect through S-Video
socket
1 Connect an S-video cable (not supplied)
to:
the • S-VIDEO socket on this unit.
the S-Video socket on the TV.•
EN 9
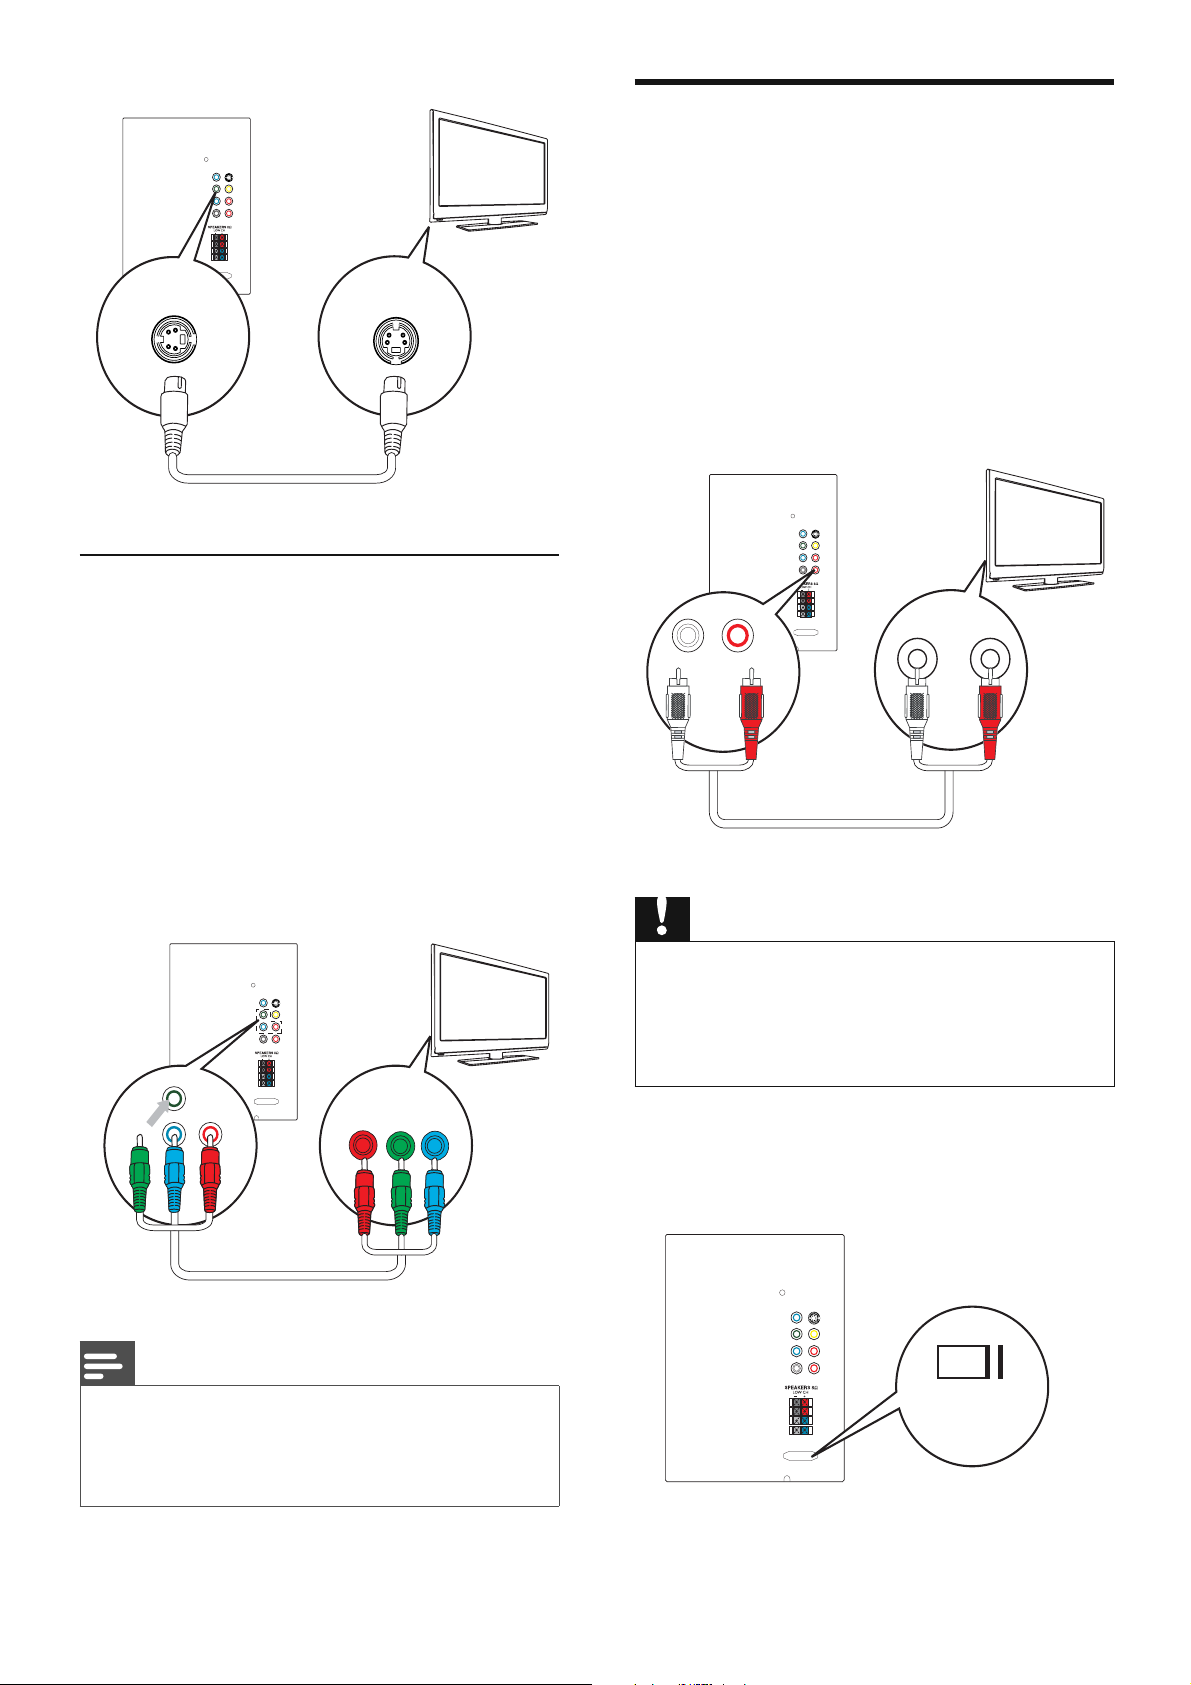
Connect an external audio
Y
Pb Pr
AUDIO OUT COAXIAL
HIGH CH
S-VIDEOVIDEO
RL
L
R
L
R
TV
S-VIDEO IN
S-VIDEO
Option 3: Connect through
component video sockets
Connect a progressive scan TV through
component video for higher quality video.
1 Connect component video cables (red/
blue/green - not supplied) to:
the • VIDEO OUT (Pr Pb Y) sockets
on this unit.
the component input sockets on the •
TV.
system (optional)
You can connect this unit to an external audio
system to listen to the sound.
1 connect audio cables (red/white) to:
the • AUDIO OUT L/R sockets on
this unit.
the audio input sockets on the •
external audio system.
Caution
S-VIDEOVIDEO
Y
Pb Pr
AUDIO OUT COAXIAL
RL
L
R
L
R
HIGH CH
RL
L LINE IN R
TV
S-VIDEOVIDEO
Y
Pb Pr
AUDIO OUT COAXIAL
RL
L
R
L
R
Y
Pb Pr
HIGH CH
Note
If your TV does not support progressive scan, you •
cannot view the picture.
For how to activate progressive scan on your TV, refer •
to the TV user manual.
Pr/Cr Pb/Cb Y
COMPONENT VIDEO IN PUT
TV
Risk of product damage! Ensure that the power supply •
voltage corresponds to the voltage printed on the back
or the underside of the unit.
Before connecting the AC power cord, ensure you
•
have completed all other connections.
1 Switch the voltage selector to the local
power line voltage.
S-VIDEOVIDEO
Y
Pb Pr
AUDIO OUT COAXIAL
RL
HIGH CH
L
R
L
R
110-
127V
220240V
10 EN
 Loading...