

Philips Expanium AZ1150, Expanium AZ1155 Manuale Utente [it]
Audio
Audio
MP3-CD Soundmachine
AZ 1150
AZ 1155

2
AZ 1150 /00 page 2
Norge
Typeskilt finnes på apparatens underside.
Observer: Nettbryteren er sekundert
innkoplet. Den innebygde netdelen er derfor
ikke frakoplet nettet så lenge apparatet er
tilsluttet nettkontakten.
For å redusere faren for brann eller elektrisk
støt, skal apparatet ikke utsettes for regn eller
fuktighet.
Important notes for users in the U.K.
Mains plug
This apparatus is fitted with an approved 13 Amp
plug.To change a fuse in this type of plug proceed
as follows:
1. Remove fuse cover and fuse.
2. Fix new fuse which should be a BS1362
5 Amp, A.S.T.A. or BSI approved type.
3. Refit the fuse cover.
If the fitted plug is not suitable for your socket
outlets, it should be cut off and an appropriate
plug fitted in its place. If the mains plug contains a
fuse, this should have a value of 5 Amp. If a plug
without a fuse is used, the fuse at the distribution
board should not be greater than 5 Amp.
Note:The severed plug must be disposed of to
avoid a possible shock hazard should it be
inserted into a 13 Amp socket elsewhere.
How to connect a plug
The wires in the mains lead are coloured with
the following code: blue = neutral (N), brown =
live (L). As these colours may not correspond
with the colour markings identifying the terminals
in your plug, proceed as follows:
• Connect the blue wire to the terminal marked
N or coloured black.
• Connect the brown wire to the terminal
marked L or coloured red.
• Do not connect either wire to the earth
terminal in the plug, marked E (or e) or
coloured green (or green and yellow).
Before replacing the plug cover, make certain that
the cord grip is clamped over the sheath of the
lead - not simply over the two wires.
Copyright in the U.K.
Recording and playback of material may require
consent. See Copyright Act 1956 and The
Performer’s Protection Acts 1958 to 1972.
Italia
DICHIARAZIONE DI CONFORMITA’
Si dichiara che l’apparecchio Lettore CD/Radioregistratore mod. AZ1150,AZ1155 Philips
risponde alle prescrizioni dell’art. 2 comma 1
del D. M. 28Agosto 1995 n. 548.
Philips Consumer Electronics
Philips, Glaslaan 2, SFF 10
5616 JB Eindhoven,The Netherlands
3
AZ 1150 /00
page 3
&*
)
(
AC MAINS
12^
3
4
5
6
#
$
%
7
90!
@
8
1
2
3
%
B
CD
V
O
L
U
M
E
S
E
A
R
C
H
P
R
E
S
E
T
T
U
N
IN
G
B
A
N
D
T
U
N
E
R
R
E
P
E
A
T
M
U
T
E
B
A
S
S
S
H
U
F
F
L
E
K
L
$
#
!
0
@
4
5
7
6
8
9

English
Français
Español
4
AZ 1150 /00 page 4
Index
Deutsch
Nederlands
Italiano
Svenska
Dansk
English 6
Français 18
Español 32
Deutsch 44
Nederlands 56
Italiano 68
Svenska 80
Dansk 92
Suomi
Portugês
E
5
AZ 1150 /00
page 5
Index
Suomi 104
Português 116
E 128
Italiano
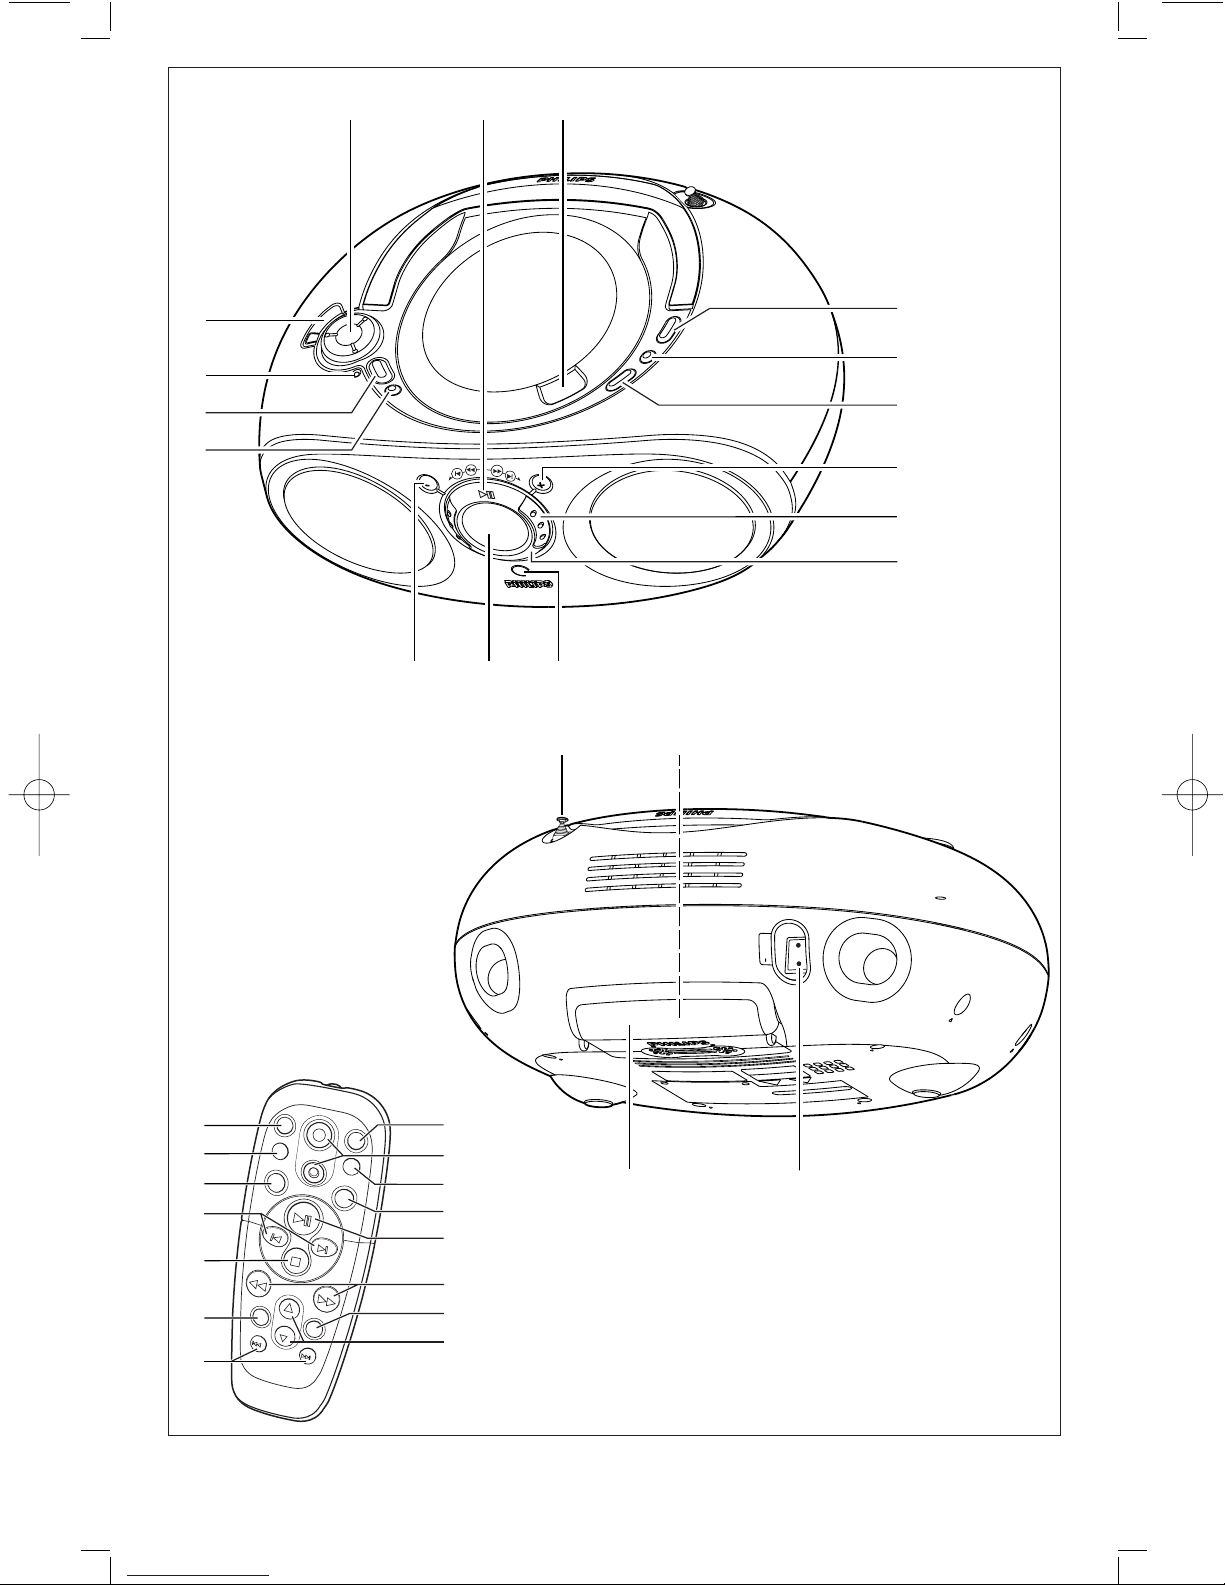
Pannello superiore e frontale
1 2; – inizia o mette in pausa la
riproduzione del CD MP3/CD
2 OPEN•CLOSE – premere per
aprire/chiudere lo sportello del CD
3 BAND – seleziona la banda radio FM/
MW (AM)/LW (solo in alcune versioni)
4 PROGRAM
– CD MP3/CD: programma/ revisiona i
brani programmati;
– TUNER: programma le stazioni del
sintonizzatore
5 CD MODE
– riproduce brani CD MP3/CD/un
programma in ordine sparso
– ripete un brano/CD/ programma
6 + ALBUM, PRESET
– solo CD MP3: seleziona l'album seguente
– TUNER: seleziona la stazione
preselezionata successiva
7 ROTARY NAVIGATION 5 , 6
– CD MP3/CD: ricerca velocemente
all'indietro, in avanti entro un brano
– TUNER: sintonizza la radio
(manualmente: in giù, in su)
¡ , ™
– CD MP3/CD: salta al brano/titolo
precedente, seguente
– TUNER: ricerca di sintonizzazione
automatica (in giù, in su)
8 STOP 9 – interrompe la riproduzione del
CD MP3; cancella un programma CD MP3
9 IR SENSOR (solo modelli AZ1155)
– infrarossi per telecomando
10 Visualizzatore – retroilluminato solo
quando alimentato da rete
– CD MP3: retroilluminazione arancio
– TUNER/CD: retroilluminazione verde
11 - ALBUM, PRESET
– solo CD MP3: seleziona l'album precedente
– TUNER: seleziona la stazione preselezionata
12 SOURCE – seleziona la fonte sonora per
CD MP3 o TUNER
13 POWER – spegne/accende l'apparecchio
14 LOW BATT – l'indicatore si illumina se la
batteria si sta scaricando
15 ULTRABASS 2 – migliora la risposta dei bassi
16 VOLUME – regola il livello del volume
Pannello posteriore
17 Antenna telescopica – per migliorare la
ricezione FM
18 Selettore di voltaggio – (dentro lo
scomparto della batteria, non in tutte le
versioni) si regola per adeguarsi al voltaggio
di zona 110/220V prima di inserire la spina
19 AC MAINS – presa per il cavo di
alimentazione
20 Sportello della batterie – aprire per
inserire 6 x R-14, UM-2 or celle C
68
Comandi
Questo prodotto è conforme ai requisiti
delle interferenze radio della Unione
Europea.
 Loading...