

Peugeot Partner Tepee 2016 Owner's Manual
Handbook
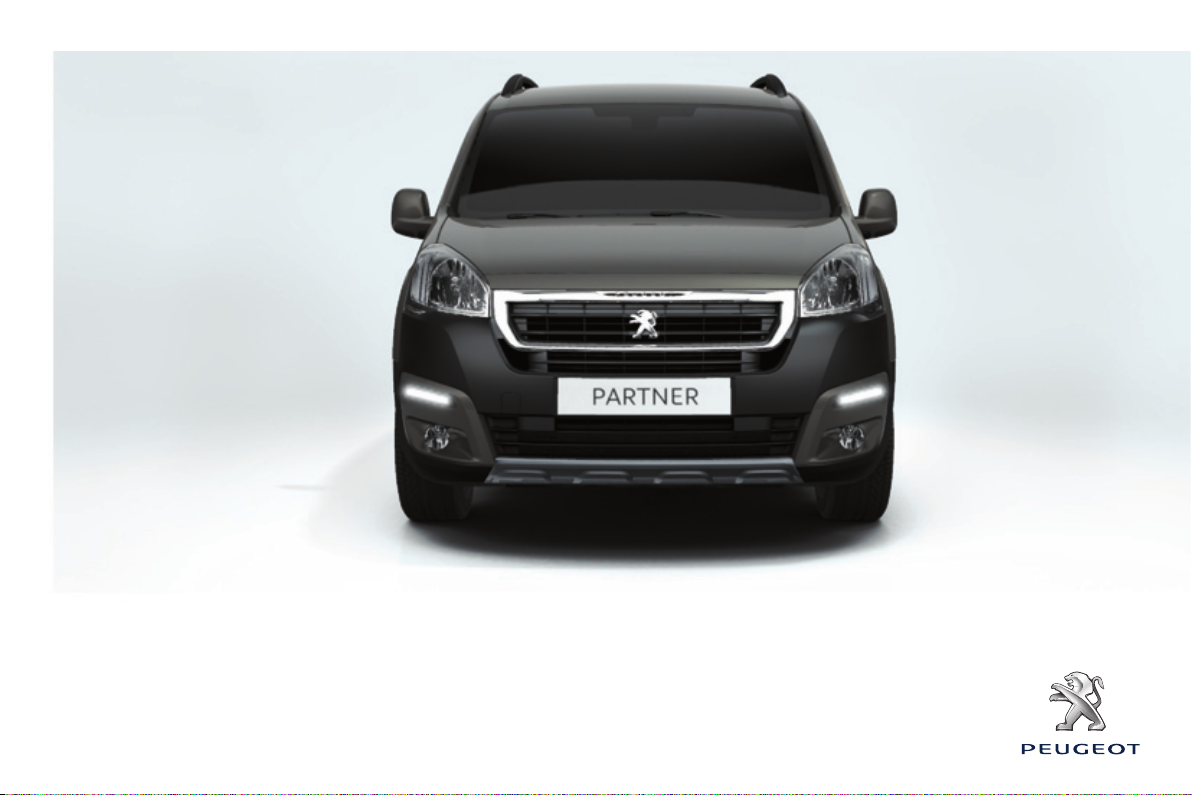
PARTNER Tepee
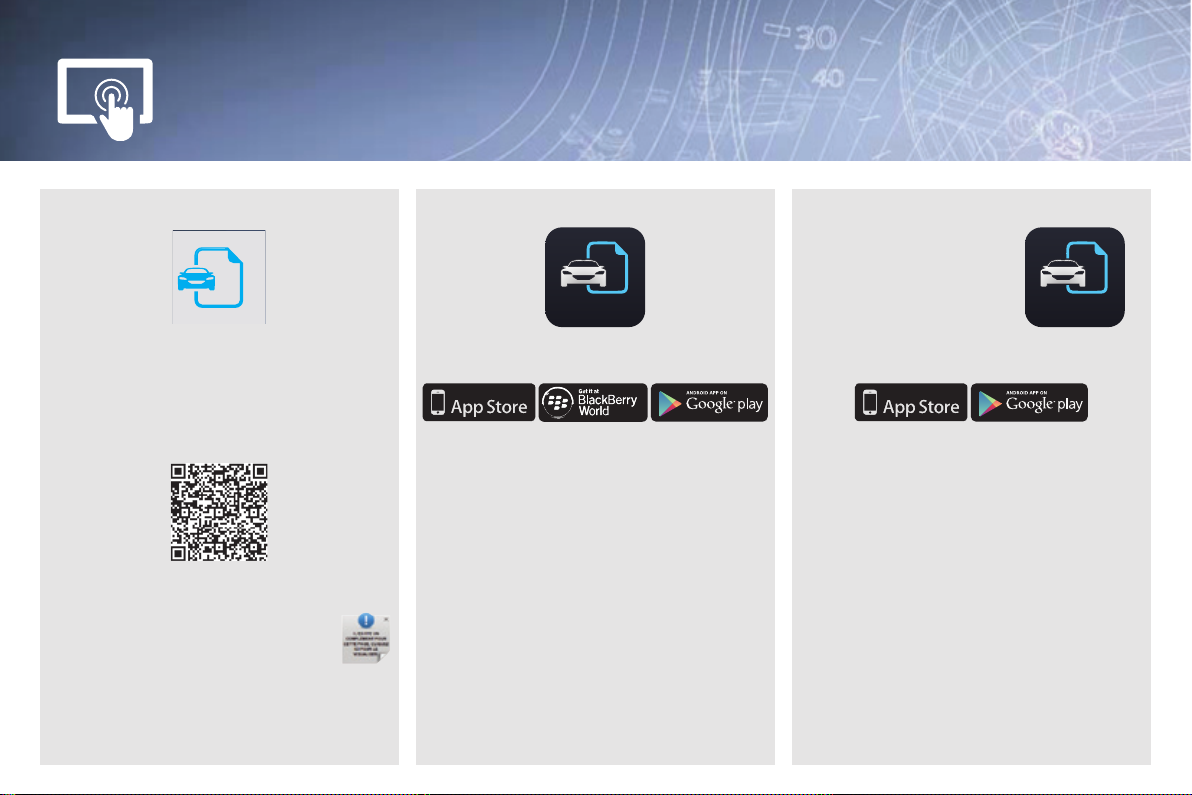
Mirror Screen
Flipbook Star t MyPeugeot Star t MyPeugeot
Start Start
The handbook. to download to your smartphone. to display in the touch screen of your vehicle.
The on-line handbook:
http://public.servicebox.peugeot.com/ddb/
Find all of the information from the handbook
for your vehicle on the internet.
The latest information included is
identified by this symbol!
From the home page presenting the range,
choose a language, click on the body style and
then the edition, by reference to the date of first
registration of the vehicle.
The Start MyPeugeoT application is available
for your vehicle and allows you to familiarise
yourself with your new PeugeoT.
Summary of the main systems and their
settings.
Access to certain driving assistance systems.
Library of warning and indicator lamps.
Focus on audio & telematic functions.
App Store for smartphones that support
®
CarPlay
that support MirrorLink
and google Play for smartphones
TM
.
The synchronisation of a personal smartphone
allows users to display applications from the
smartphone adapted for the CarPlay
MirrorLink
TM
technology.
®
and
The Start MyPeugeoT inter-activity becomes
available in landscape format in the touch
screen.
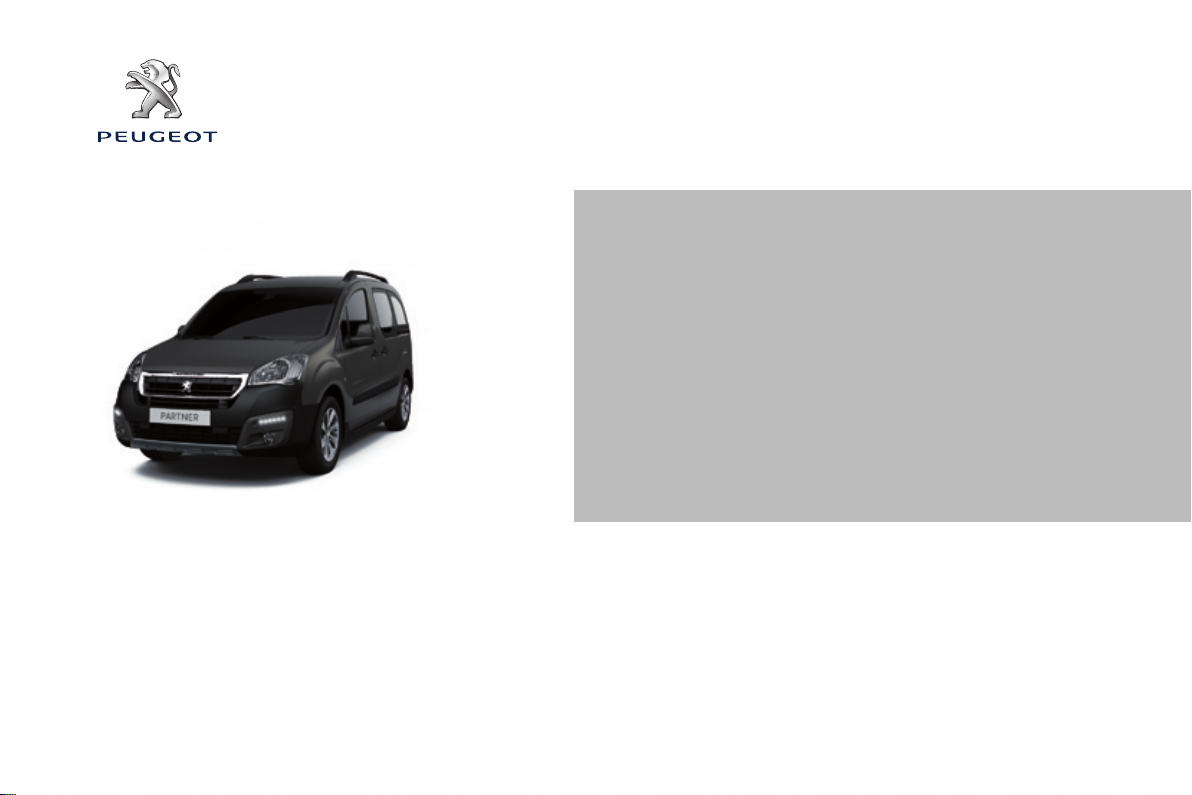
Welcome
This new vehicle has been designed to satisfy all
your requirements in terms of practicality, comfort,
safety and aesthetics. In order to get the most out of
your vehicle, we suggest that you take a tour, from
the cab to the load space, with the "Handbook" in
front of you. The handbook presents the operation of
the equipment available on board in detail.
PEUGEOT thanks you for your condence and
wishes you very happy motoring.

Contents
1.
oVeRVIeW
2
4-14
exterior 5
Interior 6
left hand drive 6
right hand drive 7
Instruments and controls 8
left hand drive 8
right hand drive 10
Technical data -
Maintenance 12
The "Visual Search" (visual
index) section assists
you in nding the controls
and functions and their
associated page numbers
on the schematic outlines of
the vehicle.
Instruments and controls
left hand drive 13
right hand drive 14
2.
eCo-DRIVINg
15-17
environment 15
Eco-driving 16
3.
ReADY to go
18-57
Key 18
Alarm 20
Doors 21
Tailgate 23
Rear roof ap 26
Central locking 27
Instrument panel 28
Date and time 29
Warning lamps 32
Fuel gauge 40
Coolant 40
Under-ination
detection 41
Under-ination detection
with reinitialisation 43
Service indicator 47
Lighting dimmer 48
Steering wheel
adjustment 49
Manual gearbox 49
gear shift indicator 50
6-speed electronic
gearbox 51
Stop & Start 53
Starting and stopping 55
Hill start assist 56
Driving
recommendations 57
4.
eASe oF uSe and
58-113
CoMFoRt
Lighting 58
Wipers 61
Trip computer 63
Cruise control 64
Speed limiter 67
Heating / Air conditioning
manual 70
digital 72
Demisting and
defrosting 75
Front seats 77
Rear bench seat 79
Rear seats
(5 seat version) 82
Rear seats
(7 seat version) 85
Modularity 92
Front ttings 94
Zenith roof 98
Roof bars 103
Courtesy lamps 104
Load space cover
(5 seat version) 105
Load space cover
(7 seat version) 109
Mirrors 111
electric windows 113
SAFetY
5.
114-147
Hazard warning lamps 114
Horn 114
Parking brake 114
Parking sensors 115
Reversing camera 117
Anti-lock braking
system (ABS) 118
eBA 118
ASR and DSC 119
grip control 120
Active City Brake 122
Seat belts 126
Airbags 129
Carrying children 133
Deactivating the
passenger's front
airbag 136
Recommended seats 139
Installation 141
ISoFIX mountings 143
Recommended ISoFIX
seat 144
ISoFIX locations 145
Child lock 147

Contents
ACCeSSoRIeS
6.
148-152
Towing a trailer 148
Towbar with detachable
swan neck towball 150
other accessories 152
CHeCKS
7.
153-168
opening the bonnet 154
Petrol engine 155
Diesel engine 156
Levels 157
Checks 159
Fuel 161
Fuel cut-off 162
Diesel priming pump 162
BlueHDi and
AdBlue
®
additive 163
QuICK HeLP
8.
169-191
Battery 169
Temporary puncture
repair kit 171
Changing a wheel 172
Removable snow
screen 178
Snow chains 179
Changing a bulb 180
a fuse 186
a wiper blade 190
Being towed 191
9.
teCHNICAL DAtA
192-200
Dimensions 192
Engines 196
Weights 196
Identication
markings 200
teCHNoLogY on
10.
BoARD
201-286
7-inch touch screen 201
PeugeoT Connect
Sound (RD5) 269
The "Technology on board"
section presents the new
audio/navigation systems.
corresponds to
a left hand drive
vehicle.
corresponds to
a right hand drive
vehicle.
3
CONTENTS
INtRoDuCtIoN
4
The equipment presented may be
standard, an option or not available,
depending on the model and can vary
from one country to another or not be
available in all countries.
We draw your attention to
the following point:
The tting of electrical equipment
or accessories which are not
recommended by PeugeoT may
result in a failure of your vehicle's
electronic system. Contact a
PeugeoT dealer to be shown
the recommended equipment and
accessories.
For any work on your vehicle, use
a qualied workshop that has the
technical information, skills and
equipment required, all of which a
PeugeoT dealer is able to provide.
Within each section, symbols draw
your attention to specic information:
directs you to the section and
part which contains detailed
information concerning a function,
indicates important information
relating to use of the equipment,
alerts you to the safety of
individuals and on-board
equipment.
Location
exteRIoR
Accessories 152
Zenith roof 98-99, 102
Roof bars 103
Rear lamps,
direction indicators 58-59
3rd brake lamp 185
Changing
rear bulbs 180-181, 184-185
Doors, tailgate 23-25
Rear roof ap 26
emergency control 23
Number plate lamps 185
Spare wheel, jack,
changing a wheel, tools 172-177
Temporary puncture repair kit 171
Ination, pressures 200
Towing, lifting 191
Towbar,
swan neck towball 148-151
Parking sesnsors 115-116
Reversing camera 117
Dimensions 192-195
Brakes, pads 114, 157, 159
emergency braking 118
ABS, eBFD 118
ASR, DSC 119
grip control 120-121
Active City Brake 122-125
Tyres, pressures 200
Snow chains 179
Tyre under-ination detection 41-42
Tyre under-ination detection
with reinitialisation 43-46
Remote control 18-19
Changing the battery,
reinitialisation 19
Key 18
Starting 55
Hill start assist 56
Central locking / unlocking 18, 27
Wiper blades 190
Door mirrors 111
Side repeaters 183
Active City Brake 122-125
Front lamps, foglamps, direction
indicators 58-60, 180-183
Headlamp beam height
adjustment 60
Changing front bulbs 180-183
Headlamp wash 62, 158
Snow cover 178
Front doors 21
Sliding side doors 22-23
Key 18
opening the bonnet 154
Child lock 147
Filler cap, fuel tank 161-162
Fuel cut-off, Diesel priming 162
®
AdBlue
additive,
topping up 38-39, 163-168
5
OVERVIEW
1
Location
INteRIoR
6
Front seats, adjustments,
head restraint 77-78
Seat belts 108, 126-128
opening the bonnet 154
Rear bench seat 79-81
Rear seats
(5-seat version) 82-84, 92
Seat conguration, benches 92-93
Rear courtesy lamp 104
Changing courtesy lamp bulbs 183
Rear ttings 97
- oor boxes,
- aircraft style table,
- side blinds,
Zenith roof 98-99
Scented air freshener 100-101
Load space cover
(5-seat version) 105
Load space cover
(7-seat version) 109-110
Rear view mirror 112
Front courtesy lamp 104
Changing courtesy
lamp bulbs 183
Front, lateral,
curtain airbags 129-132
Deactivating the passenger's
front airbag 132, 136
Battery, charging,
starting 169
Child seats 133-142, 145
ISoFIX mountings, seats 143-145
Parking brake, handbrake 114
Rear windows 112
Rear seats
(7-seat version) 85-91, 93
Fittings (7-seat version) 107-108
- cup holder,
- 12 V socket,
- stowing rings,
- storage ap.
Spare wheel, jack,
changing a wheel, tools 172-177
Towing, llifting 191
Towable loads 196-199
Accessories 152
INteRIoR
Front seats, adjustments,
head restraint 77-78
Seat belts 108, 126-128
opening the bonnet 154
Child seats 133-142, 145
ISoFIX mountings, seats 143-145
Rear bench seat 79-81
Rear seats
(5-seat version) 82-84, 92
Seat conguration, benches 92-93
Rear courtesy lamp 104
Changing courtesy lamp bulbs 183
Rear ttings 97
- oor boxes,
- aircraft style table,
- side blinds,
Zenith roof 98-99
Scented air freshener 100-101
Load space cover
(5-seat version) 105
Load space cover
(7-seat version) 109-110
Rear view mirror 112
Front courtesy lamp 104
Changing courtesy lamp
bulbs 183
Spare wheel, jack,
changing a wheel, tools 172-177
Location
Accessories 152
Front, lateral,
curtain airbags 129-132
Deactivating the passenger's
front airbag 132, 136
Battery, charging, starting 169
Parking brake, handbrake 114
Rear windows 112
Rear seats
(7-seat version) 85-91, 93
Fittings (7-seat version) 107-108
- cup holder,
- 12 V socket,
- stowing rings,
- storage ap.
Towing, llifting 191
Towable loads 196-199
7
OVERVIEW
1
Location
INStRuMeNtS AND CoNtRoLS
8
Lighting 58-60
Foglamps 59
LeD daytime running lamps 59
Automatic illumination of
headlamps 59-60
Cruise control 64-66
Speed limiter 67-69
ASR-eSC 119
Parking sensors 115-116
electric mirrors 111
Headlamp beam height adjustment
Stop & Start 53-55
Dashboard, passenger
compartment fuses 186-188
opening the bonnet 154
60
Instrument panels, screens,
dials 28-29
Setting the time in the
instrument panel 29
Warning lamps,
indicator lamps 32-39
Indicators, fuel gauge 40, 47-48
Lighting dimmer 48
gear shift indicator 50
Wipers 61-62
Automatic rain sensitive wipers 61
Screenwash /
headlamp wash 62, 158
Trip computer 63
6-speed electronic gearbox 51-52
Ignition switch 55
Steering mounted controls:
- Touch screen 204
- PeugeoT Connect
Sound (RD5) 271
Steering wheel adjustment 49
Horn 114
Parking brake 114
Rear view mirror 112
Child surveillance mirror 112
Screens, menus 28, 205, 272
Setting the time
in the screen 30-31
"grip control" 120-121
Location
Courtesy lamps 104, 183
Touch screen 201-268
PeugeoT Connect Sound
(RD5) 269-286
Reversing camera 117
Deactivating the passenger's
front airbag 132, 136
Heating, ventilation
- heating 70-71, 74
- air conditioning A/C 70-71, 74
Digital air conditioning 72-73, 74
Demisting/defrosting 75-76
9
Controls
- central locking 27
- electric child lock 147
- electric windows 113
- hazard warning lamps 114
Manual gearbox 49
Front ttings 94-96
- storage compartment.
- glove box,
- bottle holder,
- bag holder,
- centre console,
- overhead storage,
- sun visor,
- storage drawers,
OVERVIEW
1
Location
INStRuMeNtS AND CoNtRoLS
10
Rear view mirror 112
Child surveillance mirror 112
Courtesy lamps 104, 183
Screens, menus 28, 205, 272
Setting the time
in the screen 30-31
Touch screen 201-268
PeugeoT Connect
Sound (RD5) 269-286
Reversing camera 117
Front ttings 94-96
- storage compartment.
- glove box,
- bottle holder,
- bag holder,
- centre console,
- overhead storage,
- sun visor,
- storage drawers,
Dashboard, passenger
compartment fuses 186-188
opening the bonnet 154
Manual gearbox 49
"grip control" 120-121
Heating, ventilation
- heating 70-71, 74
- air conditioning A/C 70-71, 74
Digital air conditioning 72-73, 74
Demisting/defrosting 75-76
Controls:
- central locking 27
- electric child lock 147
- electric windows 113
- hazard warning lamps 114
Lighting 58-60
Foglamps 59
LeD daytime running lamps 59
Automatic illumination of
headlamps 59-60
6-speed electronic
gearbox 51-52
Instrument panels,
screens, dials 28-29
Setting the time in the
instrument panel 29
Warning lamps,
indicator lamps 32-39
Indicators, fuel gauge 40, 47-48
Lighting dimmer 48
gear shift indicator 50
Location
Wipers 61-62
Automatic rain sensitive wipers 61
Screenwash /
headlamp wash 62, 158
Trip computer 63
Deactivating the passenger's
front airbag 132, 136
Ignition switch 55
11
Cruise control 64-66
Speed limiter 67-69
Steering wheel adjustment 49
Horn 114
Parking brake 114
ASR-eSC 119
Parking sensors 115-116
electric mirrors 111
Headlamp beam height
adjustment 60
Stop & Start 53-55
Steering mounted controls:
- Touch screen 204
- PeugeoT Connect
Sound (RD5) 271
OVERVIEW
1
Location
teCHNICAL DAtA - MAINteNANCe
12
Warning lamps 32-39
Identication markings, serial
number, paint code, tyres 200
Windscreen / headlamp wash,
levels 158
Changing bulbs, lighting 180-185
opening the bonnet, stay 154
Dimensions 192-195
Petrol engines / weights 196-197
Diesel engines /
weights 196, 198-199
Levels 157-158
- engine oil dipstick,
- brake uid,
- coolant.
- power steering uid,
- Diesel additive,
Bleeding water, Diesel lter 160
Engine fuses 186, 189
Checks 159-160
- battery,
- brake pads,
- brake drums, discs.
- parking brake,
- carbon/passenger compartment
lter,
- oil lter,
- particle lter,
- gearbox,
emissions control 41
under the bonnet
- Diesel 156
- petrol 155
Fuel cut-off, Diesel priming 162
®
AdBlue
additive 163-168
Presentation
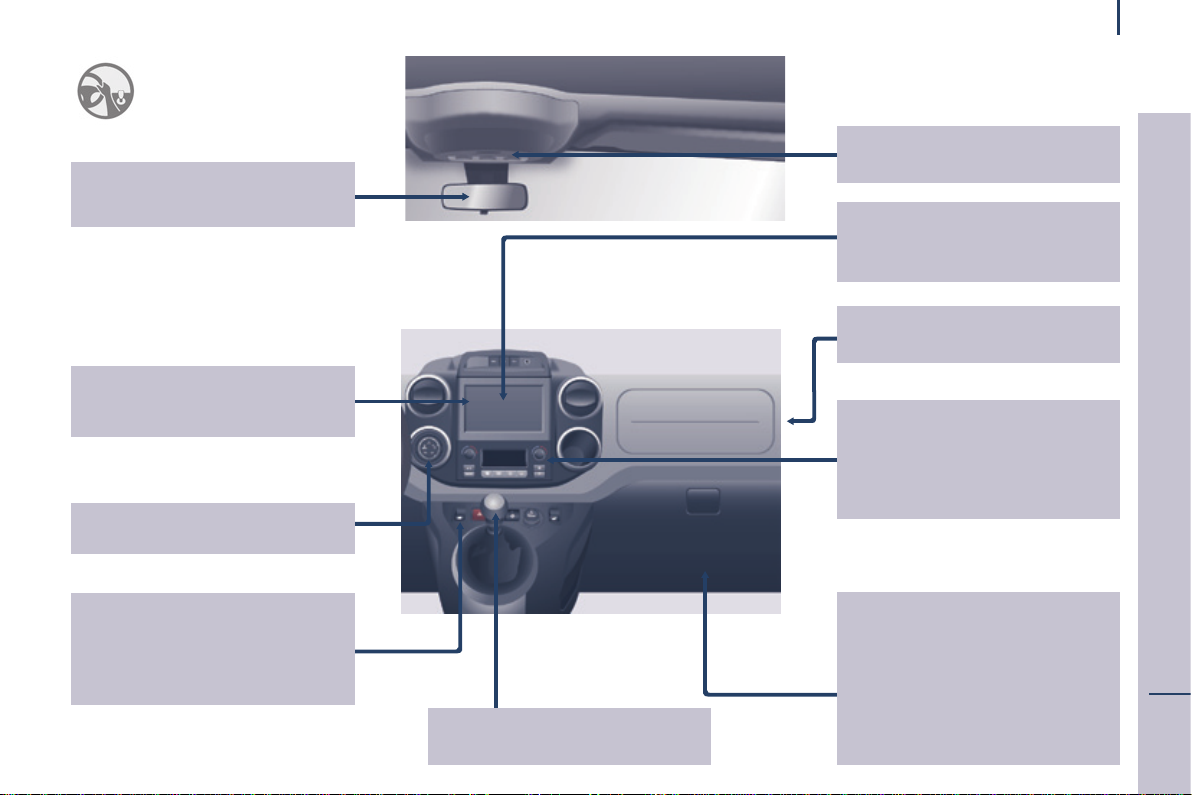
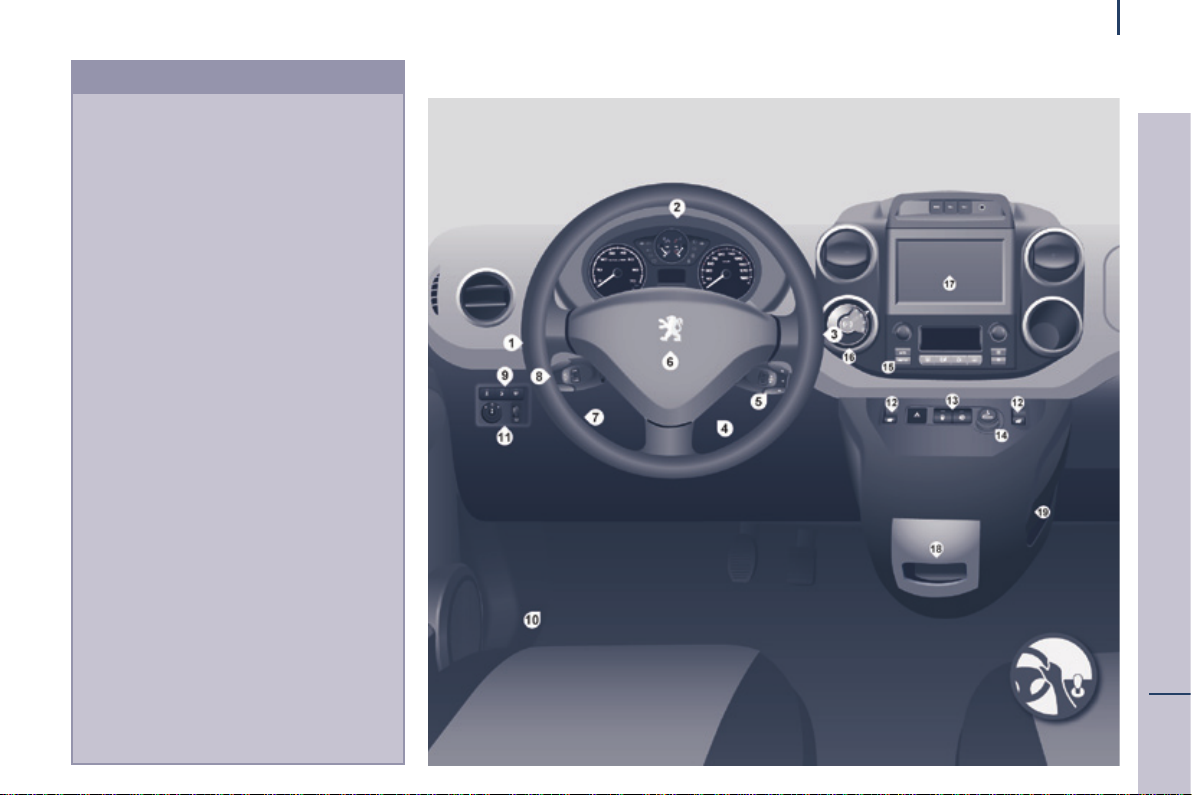
INStRuMeNtS AND CoNtRoLS
1. Lighting and direction indicator stalk.
2. Instrument panel with screen.
3. Wipers, screenwash, trip computer
control stalk.
4. Ignition.
5. Audio system controls.
6. Driver's front airbag, horn.
7. Steering wheel height and reach
adjustment.
8. Cruise control, speed limiter controls.
9. Switch panel, parking sensors,
headlamp beam adjustment, eSC,
Stop & Start.
10. Bonnet release.
11. electric door mirror adjustment.
12. electric window switches.
13. Switch panel: hazard warning lamps,
central locking, child lock.
14. Cigarette lighter.
15. Heating-ventilation controls.
16. electronic gearbox controls or grip
control button.
17. Touch screen.
18. uSB port (with electronic gearbox)
19. uSB port (with manual gearbox).
13
OVERVIEW
1
Presentation
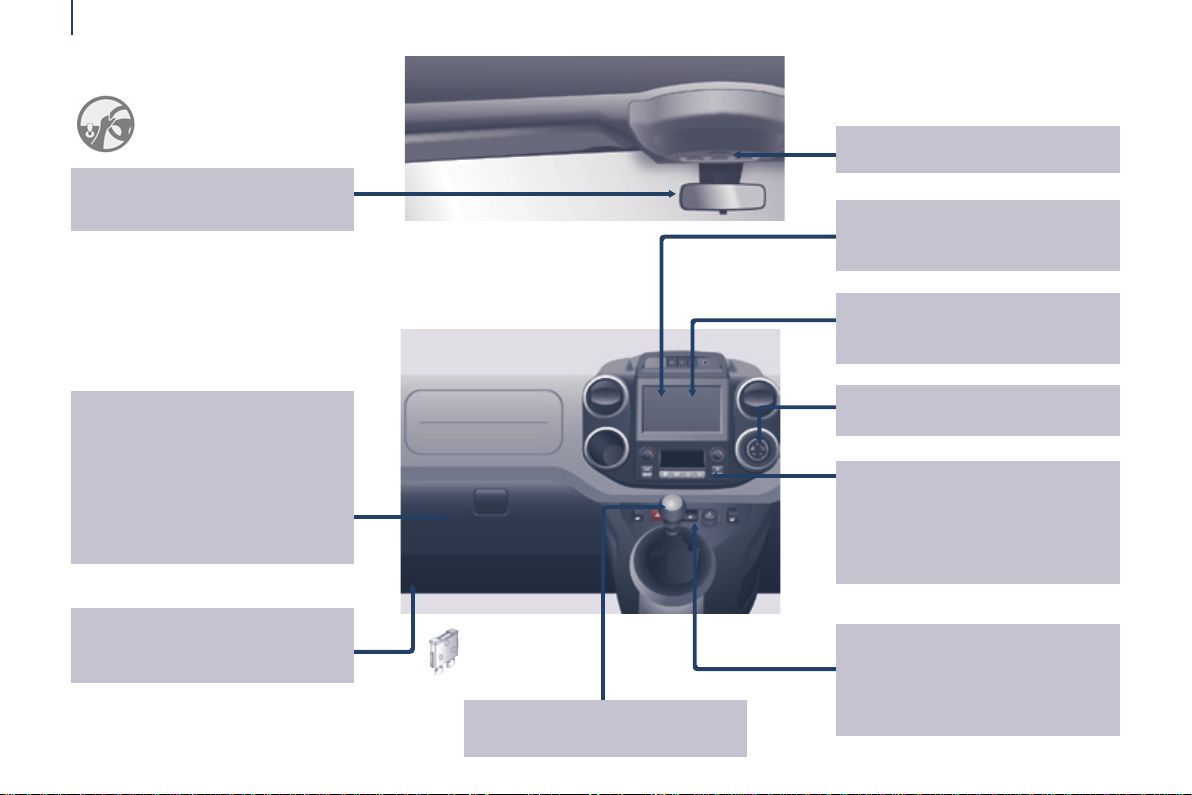
14
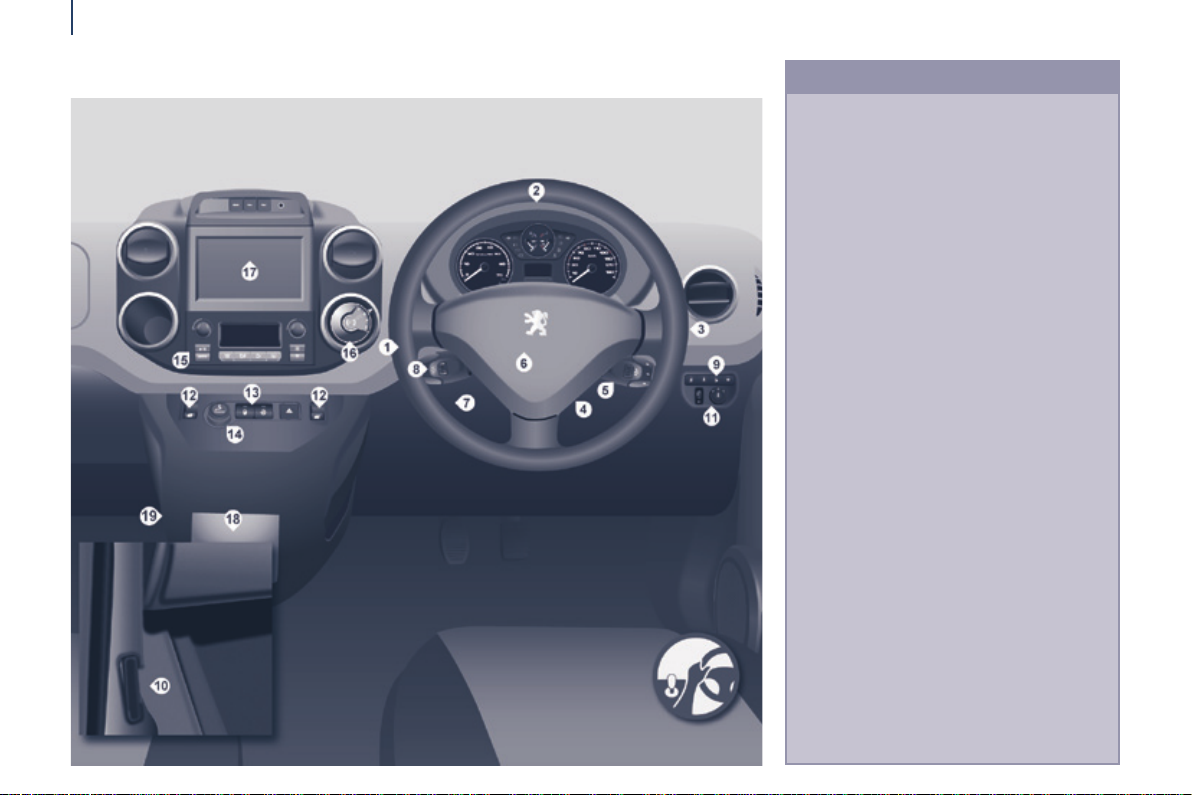
INStRuMeNtS AND CoNtRoLS
1. Lighting and direction indicator
control stalk.
2. Instrument panel with screen.
3. Wiper, screenwash, trip computer
control stalk.
4. Ignition switch.
5. Audio system controls.
6. Driver's front airbag, horn.
7. Steering wheel height and reach
adjustment.
8. Cruise control, speed limiter controls.
9. Switch panel, parking sensors,
headlamp beam adjustment, eSC,
Stop & Start, alarm.
10. Bonnet release lever.
11. electric door mirror controls.
12. electric window switches.
13. Switch panel: hazard warning, central
locking, child lock.
14. Cigarette lighter.
15. Heating-ventilation controls.
16. electronic gearbox controls or grip
control button.
17. Touch screen.
18. uSB port (with electronic gearbox).
19. uSB port (with manual gearbox).
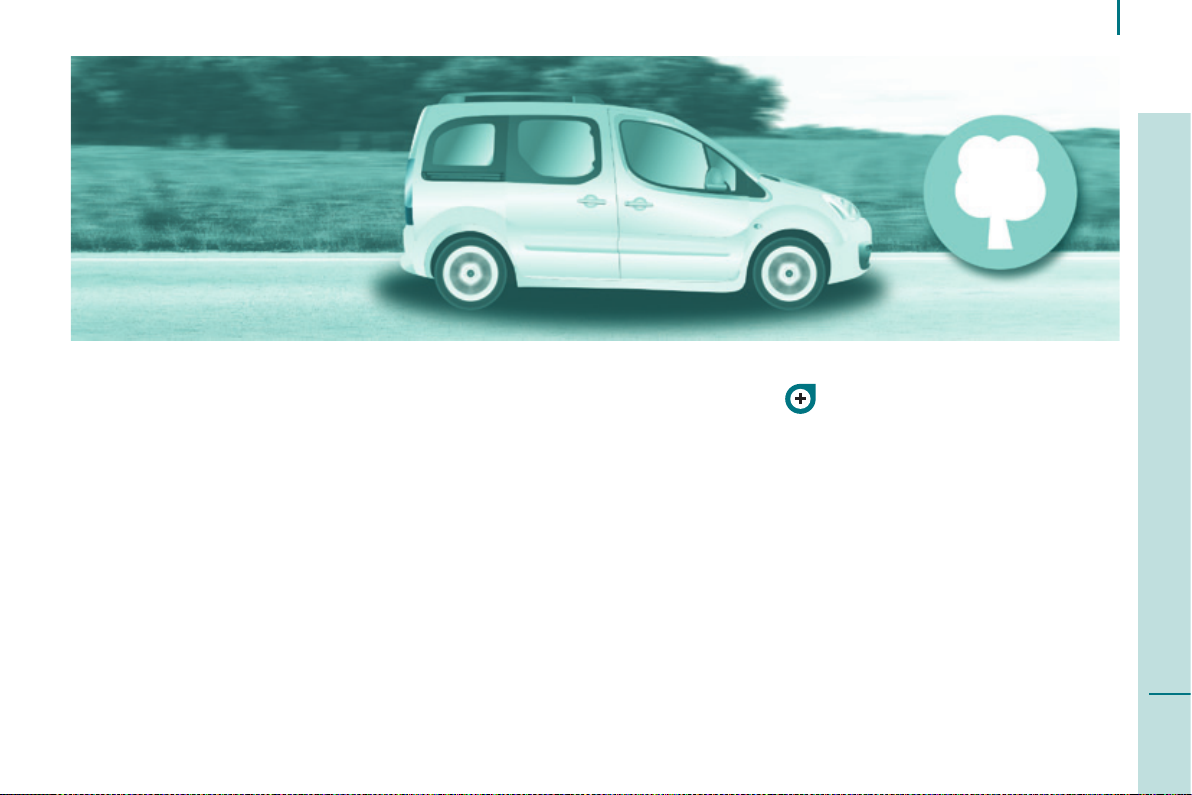
environment
With you, PeugeoT acts to protect
the environment.
We invite you to visit the
www.peugeot.co.uk website.
As the driver, you also can contribute
to protecting the environment in the
following way:
- drive smoothly, without frequent
and harsh acceleration,
- observe the service intervals;
we recommend that services are
carried out by a PeugeoT dealer,
authorised to collect used batteries
and uids,
- in order to preserve the reliability
of the engine and emission control
systems, do not use engine oil
additives.
Motoring & the environment
15
Refer to information on eco-driving
at the end of this section.
ECO-DRIVING
2

Motoring & the environment
eco-driving
16
eco-driving is a range of everyday practices that allow the motorist to optimise their fuel consumption and Co
emissions.
2
optimise the use of your gearbox
With a manual gearbox, move off gently and change up
without waiting. During acceleration change up early.
With an automatic or electronic gearbox, give preference
to automatic mode and avoid pressing the accelerator
pedal heavily or suddenly.
The gear shift indicator invites you engage the most
suitable gear: as soon as the indication is displayed in the
instrument panel, follow it straight away.
For vehicles tted with an electronic or automatic gearbox,
this indicator appears only in manual mode.
Drive smoothly
Maintain a safe distance between vehicles, use engine
braking rather than the brake pedal, and press the
accelerator progressively. These practices contribute
towards a reduction in fuel consumption and Co2
emissions and also helps reduce the background trafc
noise.
If your vehicle has cruise control, make use of the system
at speeds above 25 mph (40 km/h) when the trafc is
owing well.
Control the use of your electrical equipment
Before moving off, if the passenger compartment is too
warm, ventilate it by opening the windows and air vents
before using the air conditioning.
Above 30 mph (50 km/h), close the windows and leave the
air vents open.
Remember to make use of equipment that can help keep
the temperature in the passenger compartment down
(sunroof and window blinds...).
Switch off the air conditioning, unless it has automatic
regulation, as soon as the desired temperature is attained.
Switch off the demisting and defrosting controls, if not
automatic.
Switch off the heated seat as soon as possible.
Switch off the headlamps and front foglamps when the
level of light does not require their use.
Avoid running the engine before moving off, particularly in
winter; your vehicle will warm up much faster while driving.
As a passenger, if you avoid connecting your multimedia
devices (lm, music, video game...), you will contribute
towards limiting the consumption of electrical energy, and
so of fuel.
Disconnect your portable devices before leaving the
vehicle.

Motoring & the environment
17
Limit the causes of excess consumption
Spread loads throughout the vehicle; place the heaviest
items in the bottom of the boot, as close as possible to the
rear seats.
Limit the loads carried in the vehicle and reduce wind
resistance (roof bars, roof rack, bicycle carrier, trailer...).
use a roof box in preference.
Remove roof bars and roof racks after use.
At the end of winter, remove snow tyres and ret your
summer tyres.
observe the recommendations on maintenance
Check the tyre pressures regularly, when cold, referring to
the label in the door aperture, driver's side.
Carry out this check in particular:
- before a long journey,
- at each change of season,
- after a long period out of use.
Don't forget the spare wheel and the tyres on any trailer or
caravan.
Have your vehicle serviced regularly (engine oil, oil
lter, air lter, passenger compartment lter...) and
observe the schedule of operations recommended in the
manufacturer's service schedule.
With a BlueHDi Diesel engine, if the SCR system is
faulty your vehicle becomes polluting; go to a PeugeoT
dealer or a qualied workshop without delay to have the
emissions of nitrous oxides brought back to the legal level.
When refuelling, do not continue after the third cut-off of
the nozzle to avoid any overow.
At the wheel of your new vehicle, it is only after the rst
1 800 miles (3 000 kilometres) that you will see the fuel
consumption settle down to a consistent average.
ECO-DRIVING
2

Access
18
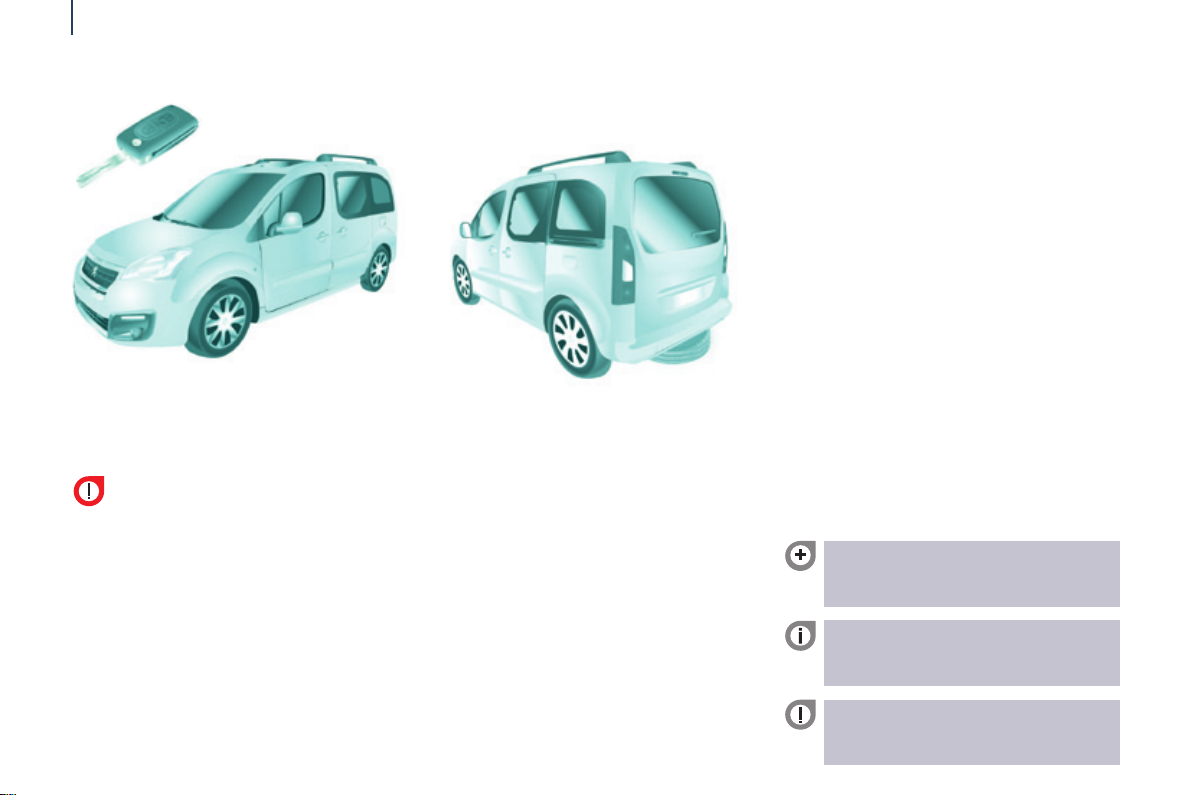
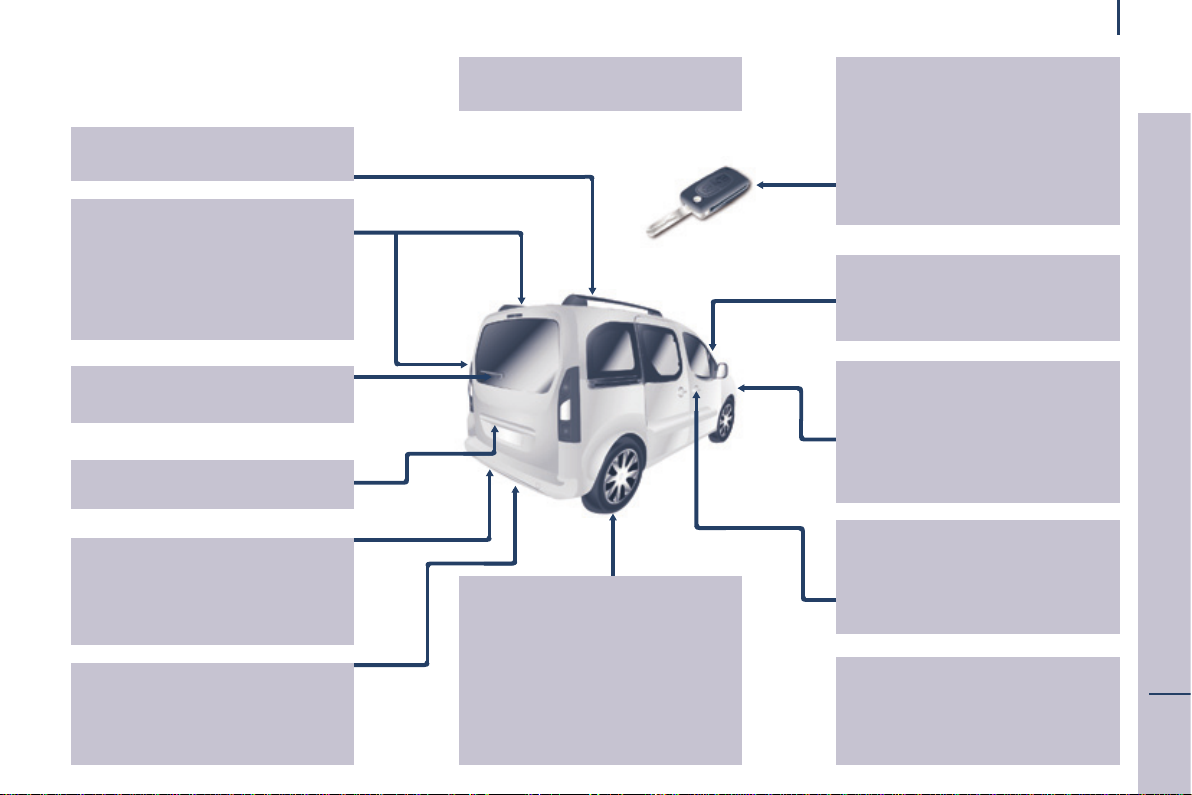
KeY ReMote CoNtRoL
This locks and unlocks the vehicle's
doors, opens and closes the fuel ller
cap, as well as starting and stopping
the engine.
unlocking
Press this button to unlock all
of your vehicle's doors.
The direction indicators ash twice.
Locking
Press this button to lock all of
your vehicle's doors.
The direction indicators ash once.
If one of the doors is open or is not
closed correctly, the central locking will
not work.
Deadlocking
A second press on the closed
padlock on the remote control within
ve seconds after locking changes the
locking to deadlocking.
This is conrmed by xed lighting
of the direction indicators for
approximately two seconds.
Deadlocking renders the exterior
and interior door opening handles
inoperative: do not leave anyone inside
the vehicle when it is deadlocked.
If deadlocking is activated from inside
the vehicle using the remote control, it
will change to normal locking when the
vehicle is started.
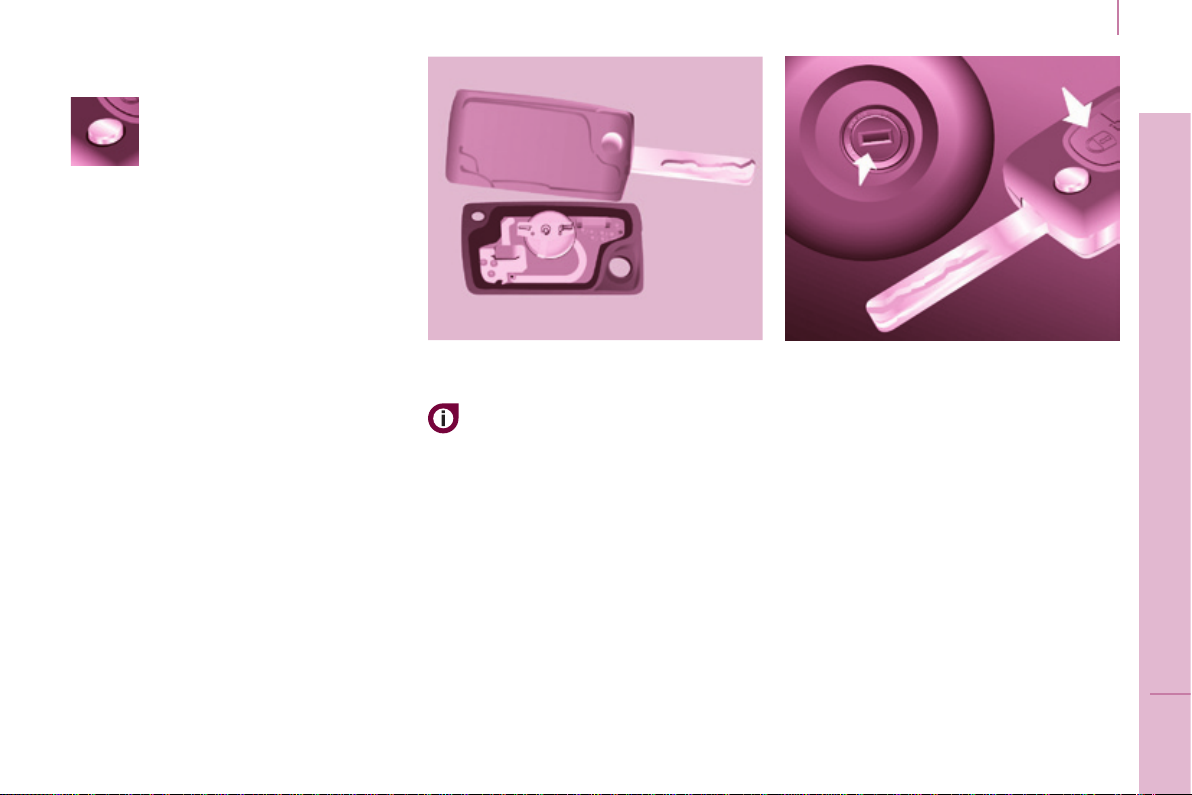
unfolding / folding
Access
If you do not press the button,
you may damage the key's
folding mechanism.
good practice
Take care not to allow the remote
control to come into contact with
grease, dust, rain or a damp
environment.
A heavy object attached to the key
(key ring, ...) weighing on the shaft
of the key in the switch, may cause a
malfunction.
ReMote CoNtRoL
Changing the battery
Battery ref.: CR1620 / 3 volts.
The "battery at" information is given
by an audible signal, accompanied by
a message in the screen.
To replace the battery, unclip the
casing using a coin at the ring.
If the remote control does not work
after the battery has been changed,
reinitialise the remote control.
There is a risk of damage if the
replacement battery is not the correct
type.
use only identical batteries
or batteries of an equivalent
type to those recommended by
PeugeoT dealers.
Do not discard the remote control
batteries, they contain metals which
are harmful to the environment.
Deposit them at a PeugeoT
dealership, or at an authorised
collection point.
Reinitialising the remote control
Following changing of the remote
control battery or disconnection of the
vehicle battery, the remote control may
have to be reinitialised.
Wait at least one minute before using
the remote control.
Insert the key in the ignition switch with
the buttons (padlocks) of the remote
control facing you.
Switch on the ignition.
Press the locking padlock for at
least ve seconds within the next
ten seconds.
Switch off the ignition.
Wait at least one minute before using
the remote control.
The remote control is now working
again.
19
READY TO GO
3
Access
eLeCtRoNIC IMMoBILISeR
20
All of the keys contain an electronic
immobiliser device.
This device locks the engine supply
system. It is activated automatically
when the key is removed from the
ignition.
After the ignition is switched on, a
dialogue is established between the key
and the electronic immobiliser system.
The metal part of the key must be
unfolded correctly for correct dialogue
to take place.
If you lose your keys
Visit a PeugeoT dealer with the
vehicle's V5 registration certicate and
your identication document.
A PeugeoT dealer will be able
to retrieve the key code and
the transponder code so that a
replacement key can be ordered.
good practice
Do not make any modications to the
electronic immobiliser system.
operating the remote control, even
when it is in your pocket, may result in
involuntary unlocking of the doors.
The simultaneous use of other
high frequency equipment (mobile
telephones, domestic alarms…), may
interfere with the operation of the
remote control temporarily.
The remote control does not operate
while the key is in the ignition, even if
the ignition is off.
When purchasing a second-hand
vehicle, have the keys memorised by
a PeugeoT dealer, so as to be sure
that the keys in your possession are
the only ones that can be used to start
the vehicle.
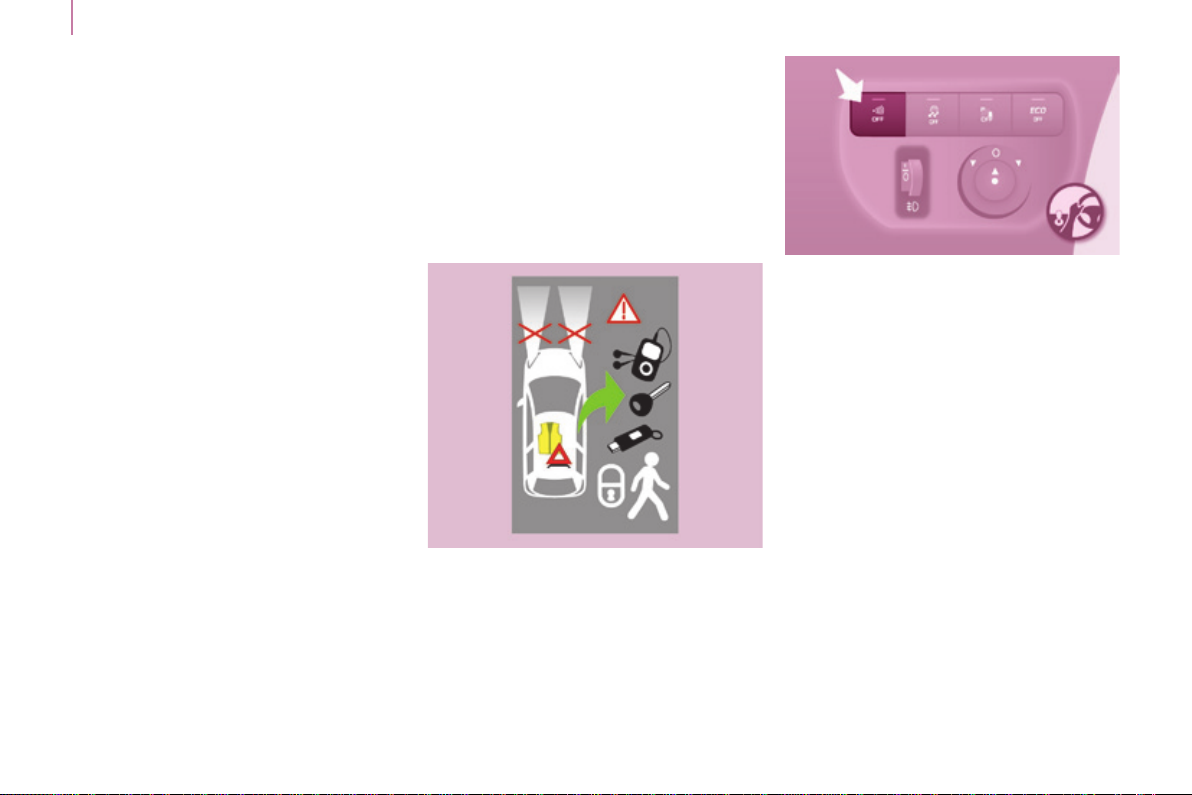
Don't forget
When leaving the vehicle, check that
the lighting is off and nothing of value
is visible.
As a safety precaution (with children
on board), remove the key from the
ignition when leaving the vehicle, even
for a short time.
ALARM
If tted on your vehicle, this provides
two types of protection:
- exterior protection: it sounds if a
front/rear door or the bonnet is
opened.
- interior protection: it sounds if
the volume inside the passenger
compartment changes (breaking of
a window or a movement inside the
vehicle).
If your vehicle is tted with a separation
partition, the interior protection is not
active in the load space.
Locking the vehicle with
complete alarm
Setting the alarm
- Switch off the ignition and get out of
the vehicle.
- Set the alarm within ve minutes of
getting out of the vehicle, by locking
or deadlocking using the remote
control. The red LeD, located in the
button, ashes once per second.
Access
Disarming
- unlock the vehicle with the remote
control or switch on the ignition, the
red LeD goes off.
Locking the vehicle with
exterior protection only
If, while you are away from the vehicle,
you wish to leave a window partially
open or a pet inside the vehicle, you
should choose exterior protection only.
- Switch off the ignition.
- In the next ten seconds,
press the button until
the red LeD is on
continuously.
- get out of the vehicle.
- Within the next ve minutes, set
the alarm by locking or deadlocking
using the remote control (the red
LED ashes once a second).
triggering
The siren sounds, the direction indicators
ash for approximately 30 seconds and
the red LED ashes rapidly.
-
T o switch it of f, insert the key and
switch on the ignition.
When the alarm has been triggered ten
times in succession (when triggered for
the eleventh time) it is deactivated. Repeat
the procedure for setting the alarm.
Locking the vehicle without
alarm
- Insert the key in the lock on the
driver's door and lock it.
Do not set the alarm when washing
your vehicle.
Failure of the remote control
When the alarm is set but the remote
control does not operate:
- unlock the doors with the key and
open the door. The alarm is triggered.
- Switch on the ignition in the next ten
seconds. The alarm is disarmed.
Incorrect operation
When the ignition is switched on, if the
red LeD remains on for ten seconds,
there is a fault in the siren connection.
Contact a PeugeoT dealer to have
the system checked.
Automatic setting of the alarm
Depending on the country in which
the vehicle is sold, the alarm is set
automatically approximately 2 minutes
after the last door is closed.
To prevent triggering of the alarm when
a door is opened, you have to press
the remote control unlocking button
again.
Do not make any modications
to the alarm system as this could
cause faults.
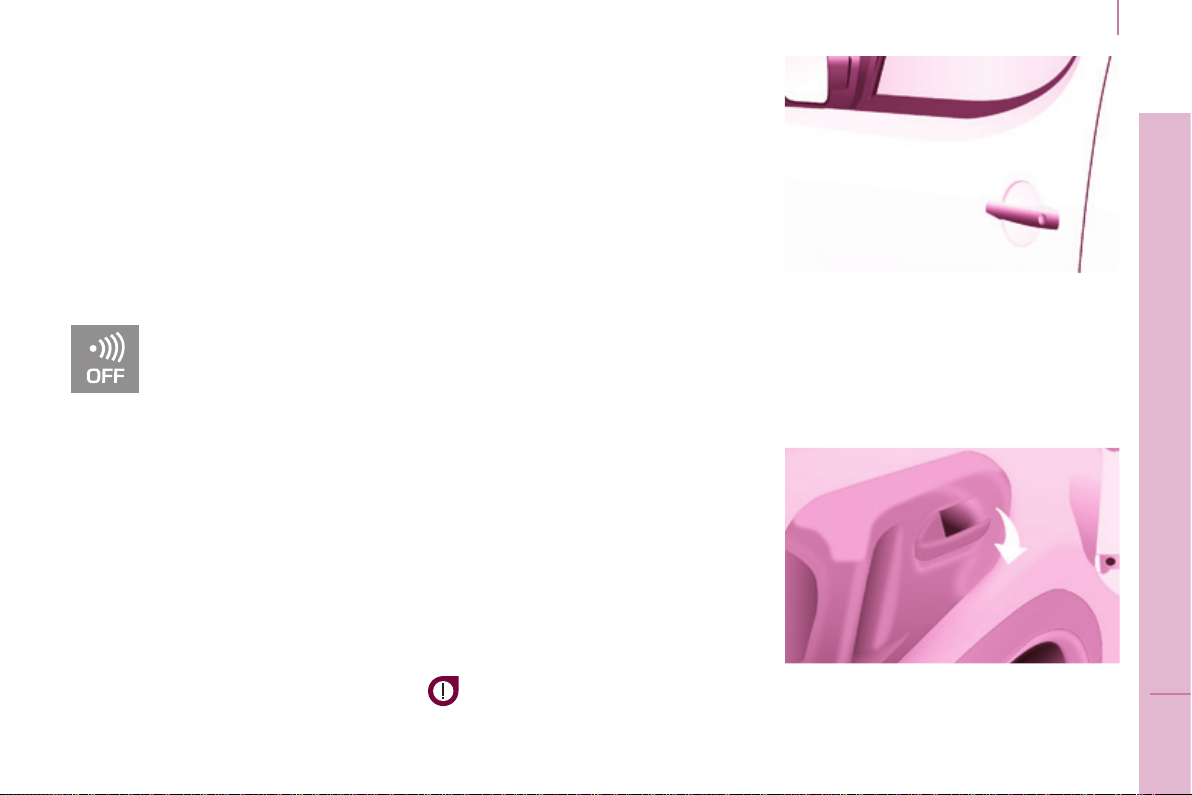
FRoNt DooRS
From the outside
use the remote control to lock/unlock
the vehicle.
Insert the metal part of the key in the
lock on the driver's side if the remote
control does not work.
From the inside
use the door opening control to unlock
and open the door concerned.
21
READY TO GO
3
Access
22
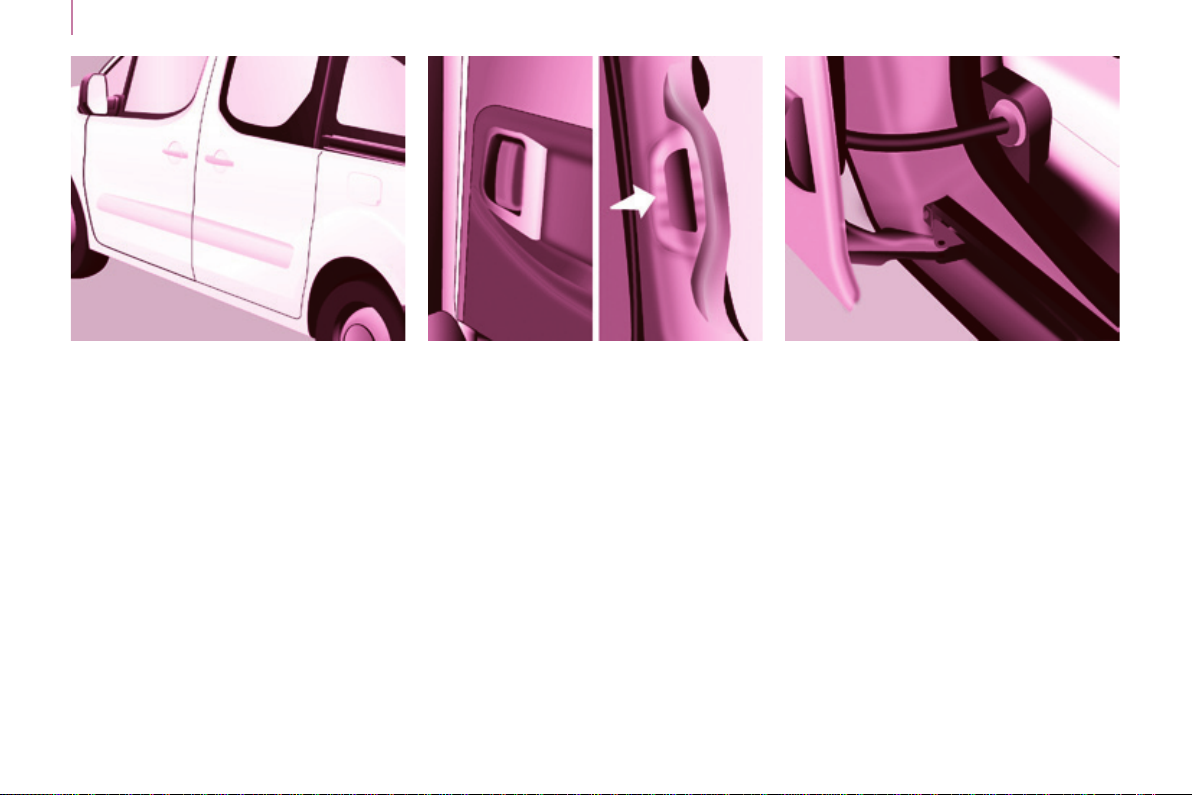
SLIDINg SIDe DooRS
From the outside
Pull the handle towards you then
towards the rear and open the side
door guiding the rearward sliding to
beyond the point of resistance to hold
it open.
A mechanical system prevents opening
of the left-hand side door when the fuel
ller ap is open.
From the inside
unlock the side door using this handle
and open it, guiding the rearward
sliding to the point of resistance. Pass
this point to hold the door open.
Close the side door using the handle
to start the sliding and pass the point
of resistance. Then, use the shaped
recess at the top of the door pillar to
guide the door until it locks.
Do not use the grab handle to slide the
door.
good practice
Take care not to block the guide space
on the oor to allow the door to slide
correctly.
If your vehicle is parked on a slope,
guide the sliding of the side door. In
fact, the door could open or close more
rapidly due to the slope of the ground
and could cause injury.
For safety and operation reasons, do
not drive with the sliding side doors
open.
Access
23
operation in the event of
a battery failure
Front and side passenger doors
In the event of a battery or of the
central locking fault, use the lock to
lock the doors mechanically.
- To open the door and get out of the
vehicle, pull the interior control.
- To lock the door, insert the key in
the lock, located on the edge of the
door, then turn it one eighth of a
turn.
Driver's door
- Insert the key in the lock, then turn
it to the right to lock or to the left to
unlock.
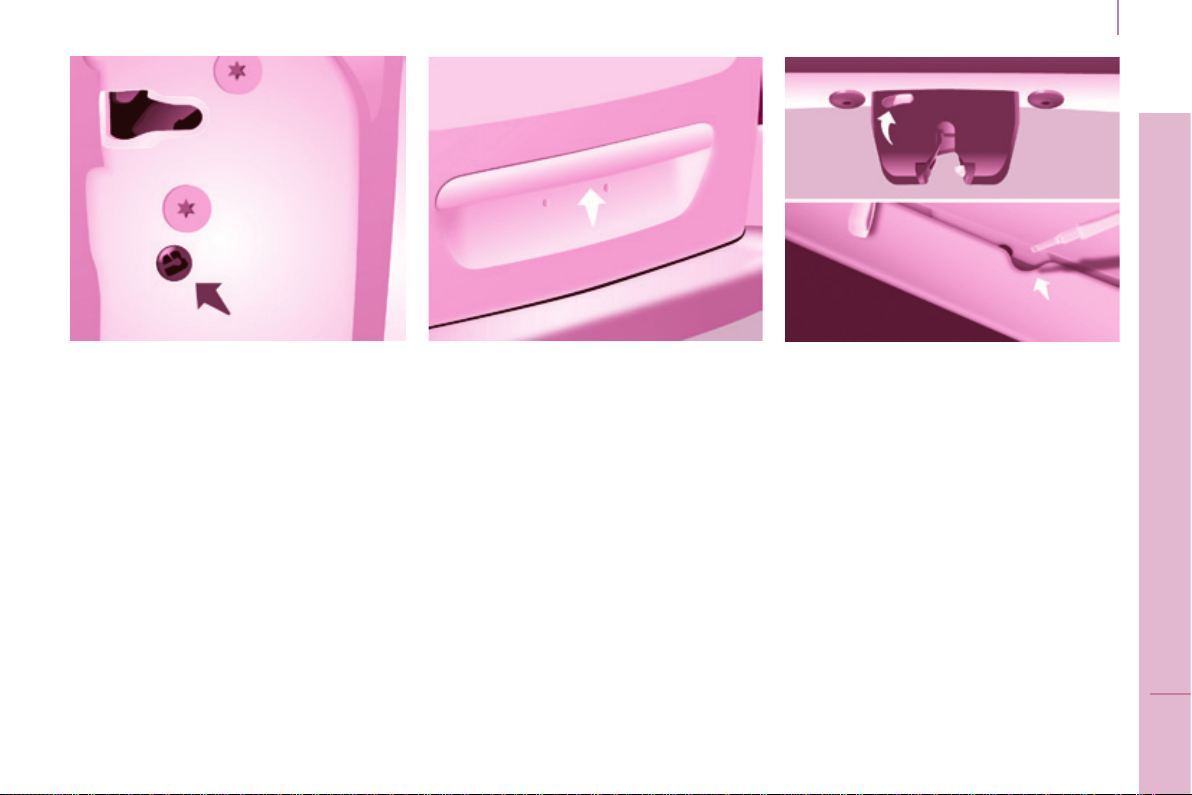
tAILgAte
opening
From outside
Locking/unlocking is by means of the
remote control.
To open, press the control below the
trim then raise the tailgate.
A pull strap is available to close the
tailgate in the high position.
guide the closing of the tailgate to the
balance point of its travel then apply
a nal press on the tailgate to close it
fully.
From inside
(emergency control)
In the event of a central unlocking
operating fault, this permits unlocking
of the tailgate from the inside.
Insert a small screwdriver in the
opening, between the tailgate and the
oor. To unlock the lock, move the
catch to the left then push the tailgate.
READY TO GO
3

24
Access
tailgate screen
The opening rear screen allows you to
access the rear of the vehicle directly,
without having to open the tailgate.
opening
After unlocking the vehicle using the
remote control or the key, press the
control and raise the rear screen to
open it.
Closing
Close the rear screen by pressing
the centre of the glass until it is fully
closed.
The tailgate and tailgate screen
cannot both be open at the
same time, to prevent damage to
the screen.
HINgeD ReAR DooRS
The hinged rear doors are
asymmetrical (2/3 - 1/3), with the
smaller door on the right.
They are tted with a central lock.
From outside
To open, pull the handle towards you.
Pull the lever to open the right-hand
door.
To close, start with the right-hand door
then close the left-hand door.
With the roof rear ap, the rear bumper
has been reinforced to serve as a
footrest when entering the vehicle.
Access
25
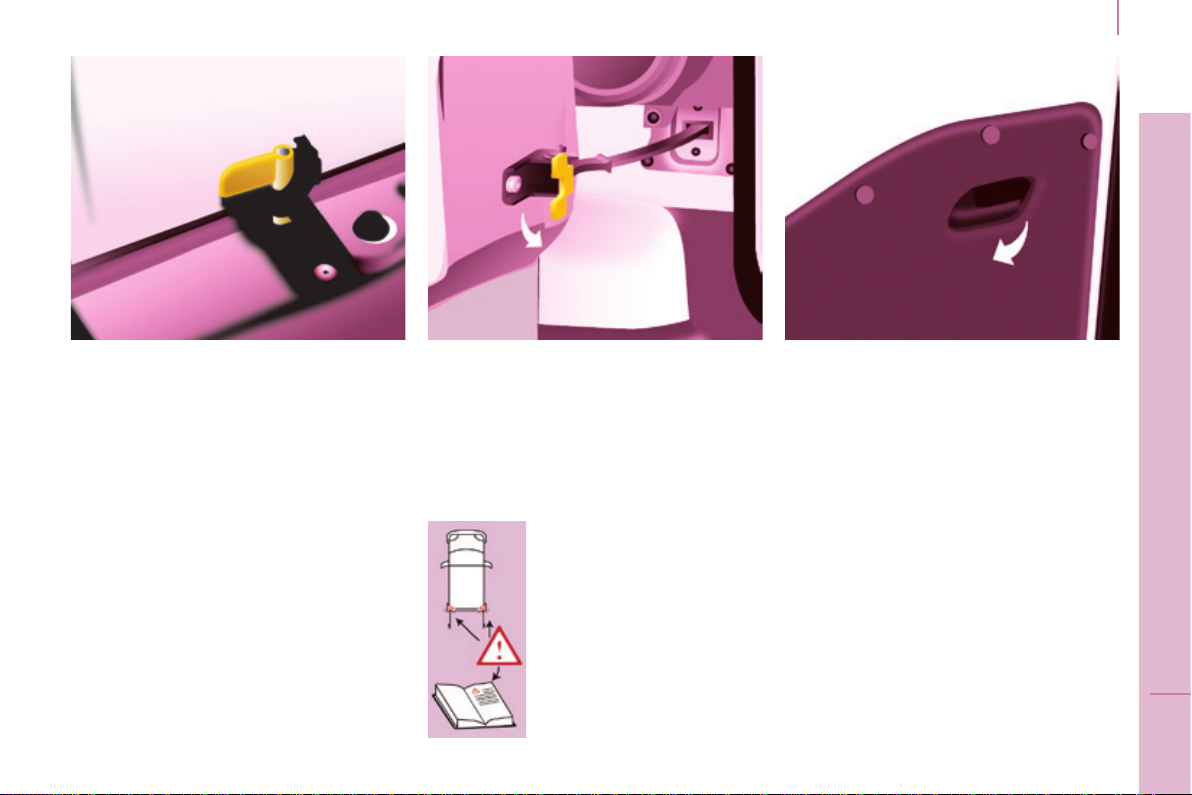
In practice
It is possible to drive with the righthand door open to make it easier to
carry long loads. The left-hand door is
kept closed by the distinctive "yellow"
lock, positioned at the base of the door.
This closed door must not be used as
a load retainer.
Driving with the right-hand door open
is a special dispensation. Comply with
the usual safety indications to warn
other drivers.
opening to approximately 180°
A check strap system permits extension
of the opening from approximately 90°
to approximately 180°.
Pull the yellow control when the door
is open.
The check strap will engage again
automatically on closing.
When parked with the
rear doors open to 90°,
the doors mask the rear
lamps. To signal your
position to other road
users driving in the same
direction who may not
have seen your vehicle,
use a warning triangle
or other device required
by the legislation in your
country.
From inside
When present on the vehicle, pulling
this handle towards you opens the lefthand door.
READY TO GO
3
Access
26
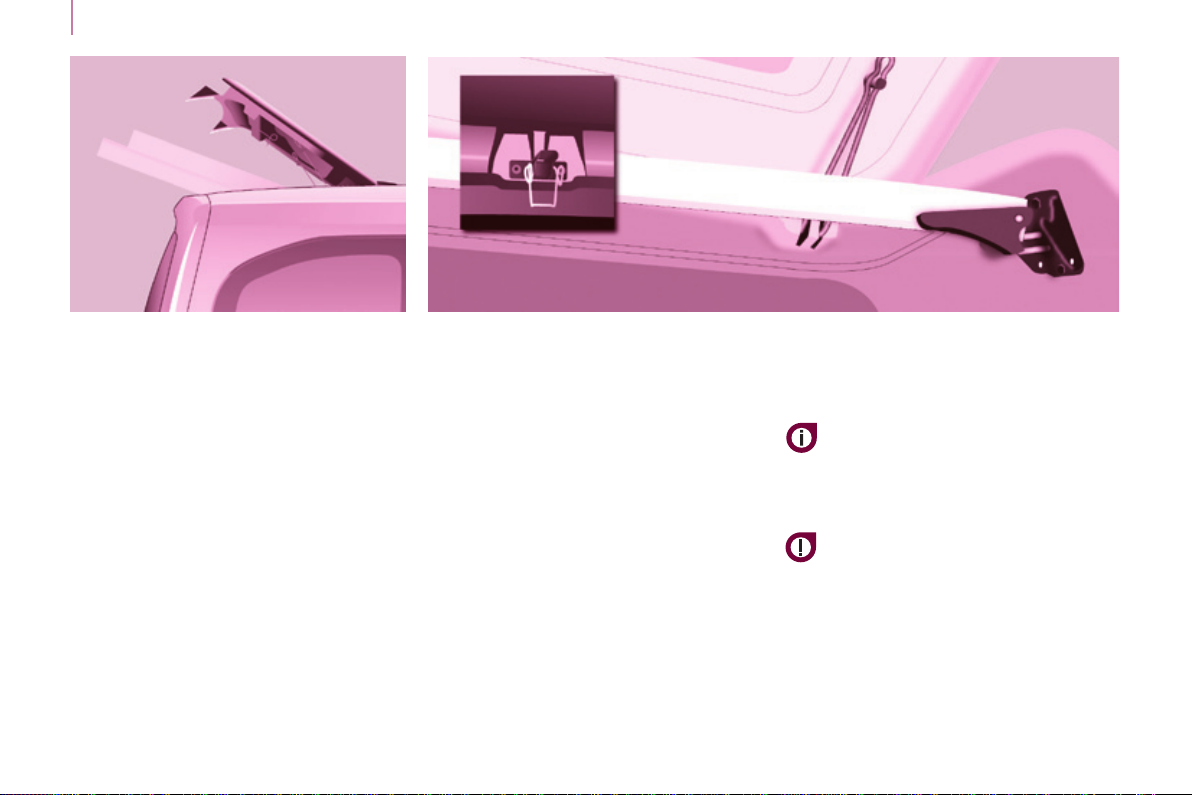
ReAR RooF FLAP
This rear roof ap is only compatible
with side-hinged rear doors.
To open the rear roof ap:
- raise the black paddle of the toggle,
- relieve the toggle by pressing the
rear roof ap (downwards) then
release the hook,
- lift the rear roof ap,
- pass the point of resistance to
secure the rear roof ap using the
support stays.
Never drive without the stays in place.
To close the rear roof ap:
- check that the support bar is
secured correctly,
- lower the rear roof ap,
- while pressing the rear roof ap
(downwards), take hold of the
two loops of the spring then place
the hook in its housing,
- lower the black paddle to secure
the rear roof ap.
Securing the rear roof ap places it on
the seal correctly and ensures sealing
without noise.
Support bar
A support bar is provided for
transporting long loads, after opening
the rear roof ap.
Fold back the support bar by lifting the
lever.
guide it to the door pillar.
Support the long loads to be
transported, lift them and reposition the
support bar with one hand.
ensure that it is secured correctly by
pressing the handle downwards past
the point of resistance and secure the
loads rmly.
The side supports can be used as
hooking points.
Never attach any load to the rear roof
ap.
The rear bumper has been
reinforced to serve as a footrest
when entering the vehicle.
Never drive without the support bar in
place.
The rear doors only lock when the
support bar is installed.
When the rear roof ap is open, take
care when driving where height is
restricted.
Never rest loads directly on the rear
doors.
Comply with the usual indications, to
warn other drivers.
Reserve the use of the rear roof ap
for short journeys.
Access
Anti-intrusion security
Locking while driving
When the vehicle moves off, as soon
as you reach approximately 6 mph
(10 km/h), the system locks the doors.
The characteristic central locking noise
is heard. The LeD in the switch on
the dashboard central switch panel
comes on.
During the journey, opening a door
results in complete unlocking of the
vehicle.
27
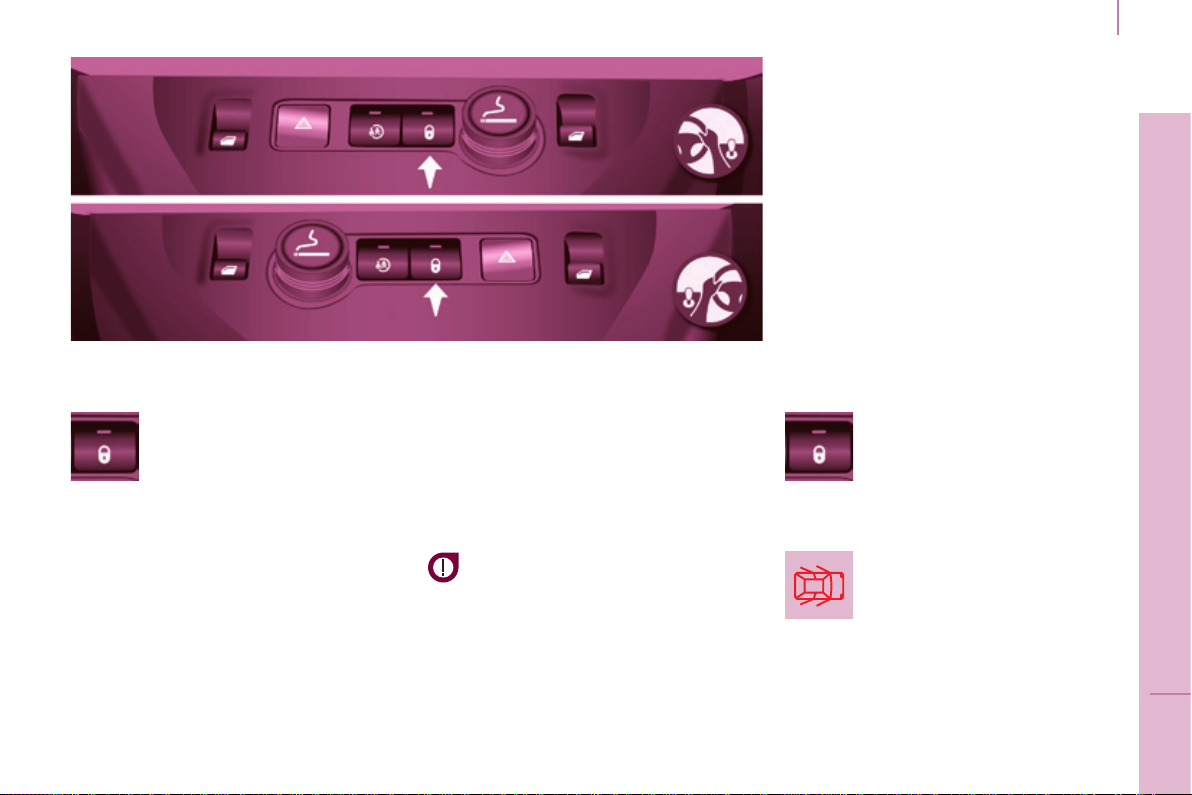
CeNtRAL LoCKINg
An initial press permits
central locking of the vehicle,
when all of the doors are
closed.
A second press permits central
unlocking of the vehicle.
The control is inactive when the vehicle
has been locked using the remote
control or the key from the outside.
The doors can still be opened from the
inside.
The control switch LeD:
-
ashes when the doors are locked with
the vehicle stationary and the engine off,
-
comes on when the doors are locked
and from the time the ignition is
switched on.
Driving with the doors locked may
make access to the interior more
difcult in an emergency.
Activating / deactivating the
function
With the ignition on, press
and hold this switch to
activate or deactivate the
function.
Door open warning lamp
If this warning lamp comes
on, check that all of your
vehicle's doors are closed
correctly.
READY TO GO
3
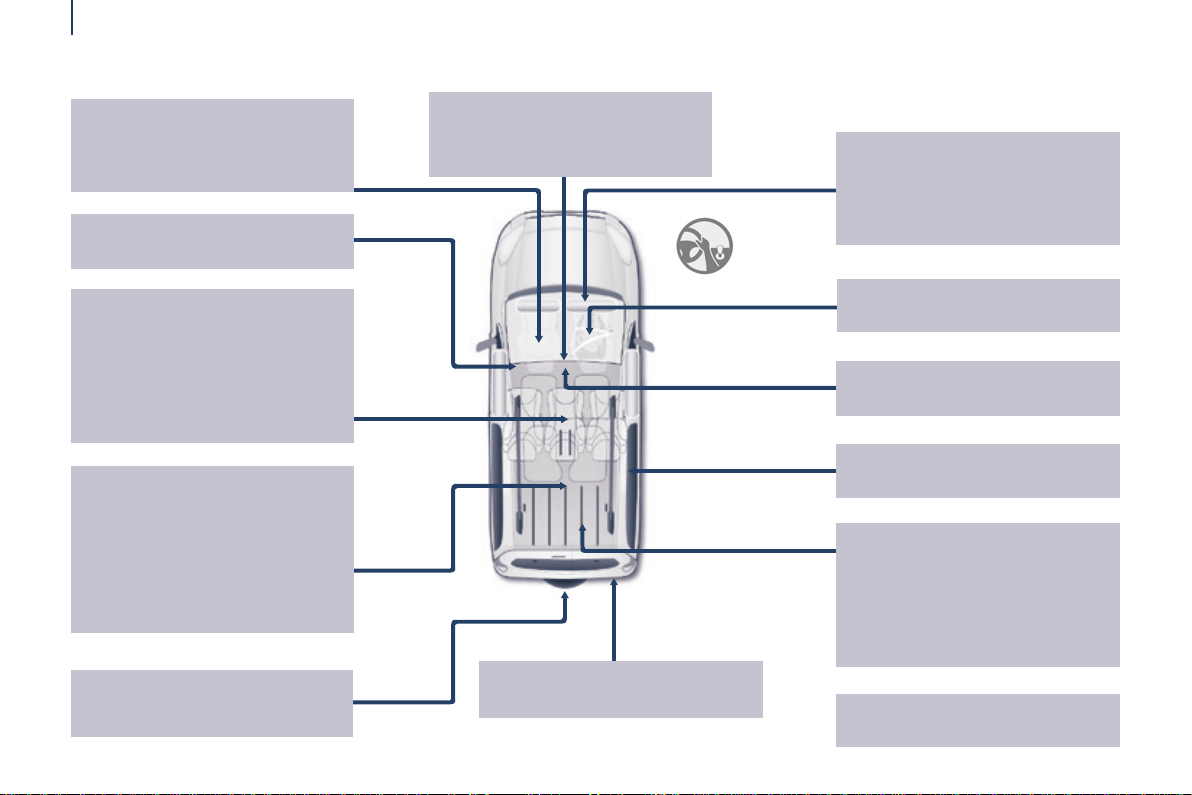
Instruments and controls
28
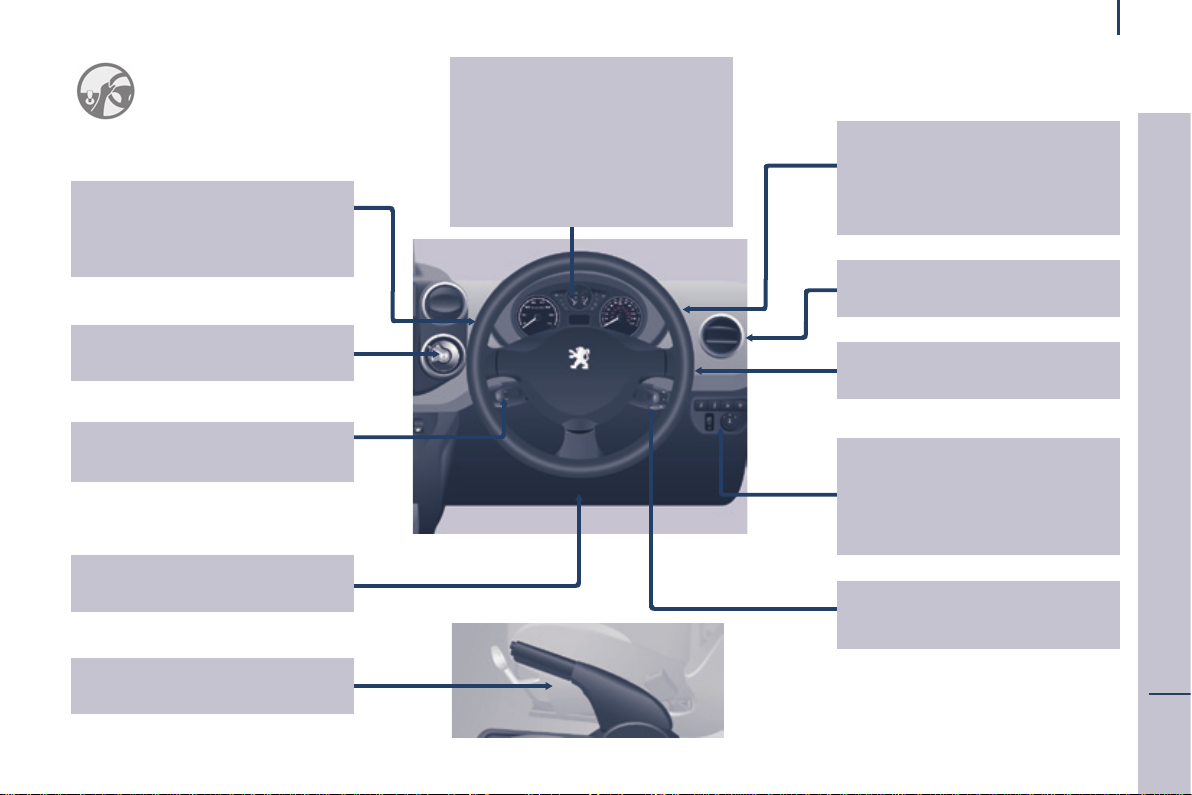
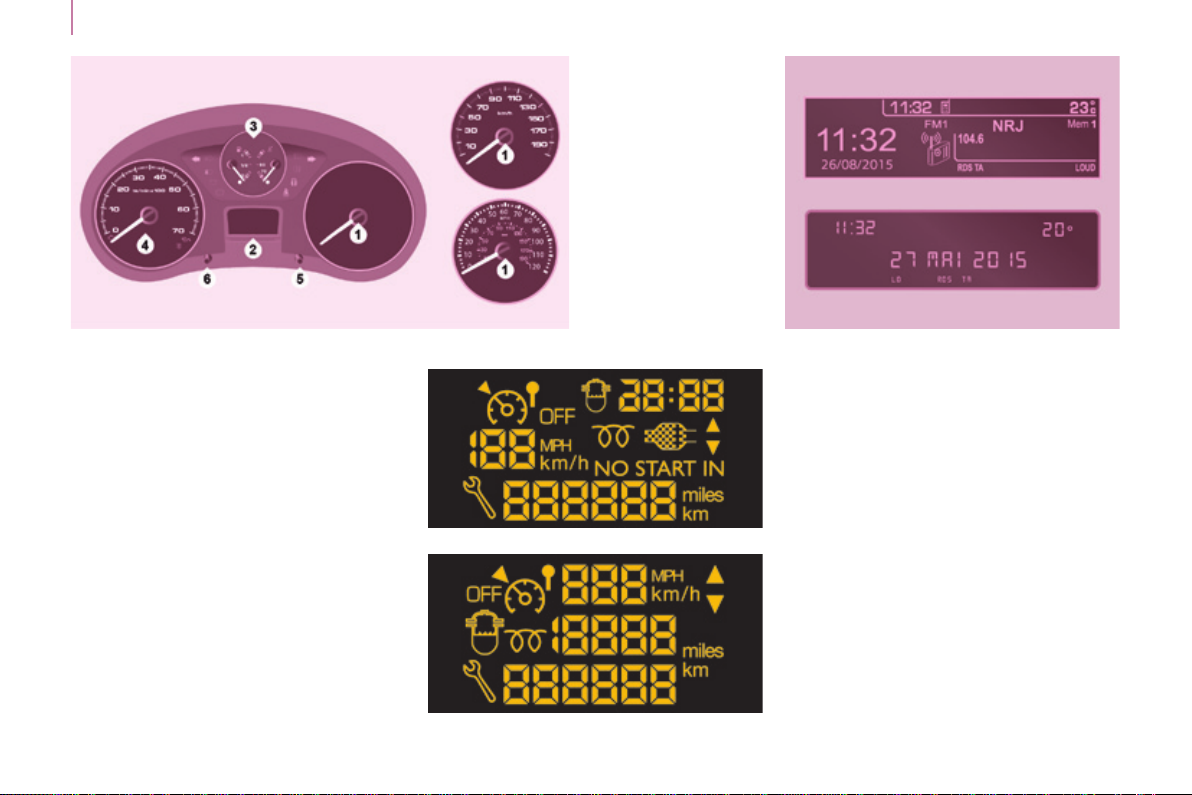
INStRuMeNt PANeL Display screens Screens Dials
1. Distance recorder in kilometres /
miles.
2. Display screen.
3. Fuel gauge, coolant temperature.
4. Rev counter.
5. Trip distance recorder / service
indicator reset.
6. Instrument panel lighting dimmer.
Level 1
The format of the information
presented in the screen depends on
the vehicle's equipment level.
Level 2
with the touch screen
 Loading...