

Peugeot Partner Tepee 2013 User Manual
HANDBOOK
PARTNER
WELCOME
Within the chapters, symbols draw your attention to
PRESENTATION
specifi c information:
directs you to the chapter and section which
contains detailed information concerning a function,
indicates important information relating to use of the
equipment,
alerts you to the safety of individuals and equipment
on board.
The fi tting of electrical equipment or accessories which
are not recommended by PEUGEOT may result in
a failure of your vehicle's electronic system. Please
note this specifi c warning and contact a PEUGEOT
dealer to be shown the recommended equipment and
accessories.
For any work on your vehicle, use a qualifi ed workshop
that has the technical information, competence and
equipment required, which a PEUGEOT dealer is able to
provide.
This new vehicle has been designed to satisfy all
your requirements in terms of practicality, comfort,
safety and aesthetics. In order to get the most out of
your vehicle, we suggest that you take a tour with the
"Handbook" in front of you. The handbook presents
the operation of the equipment available on board in
detail.
PEUGEOT thanks you for your confi dence and wishes
you very happy motoring.
4
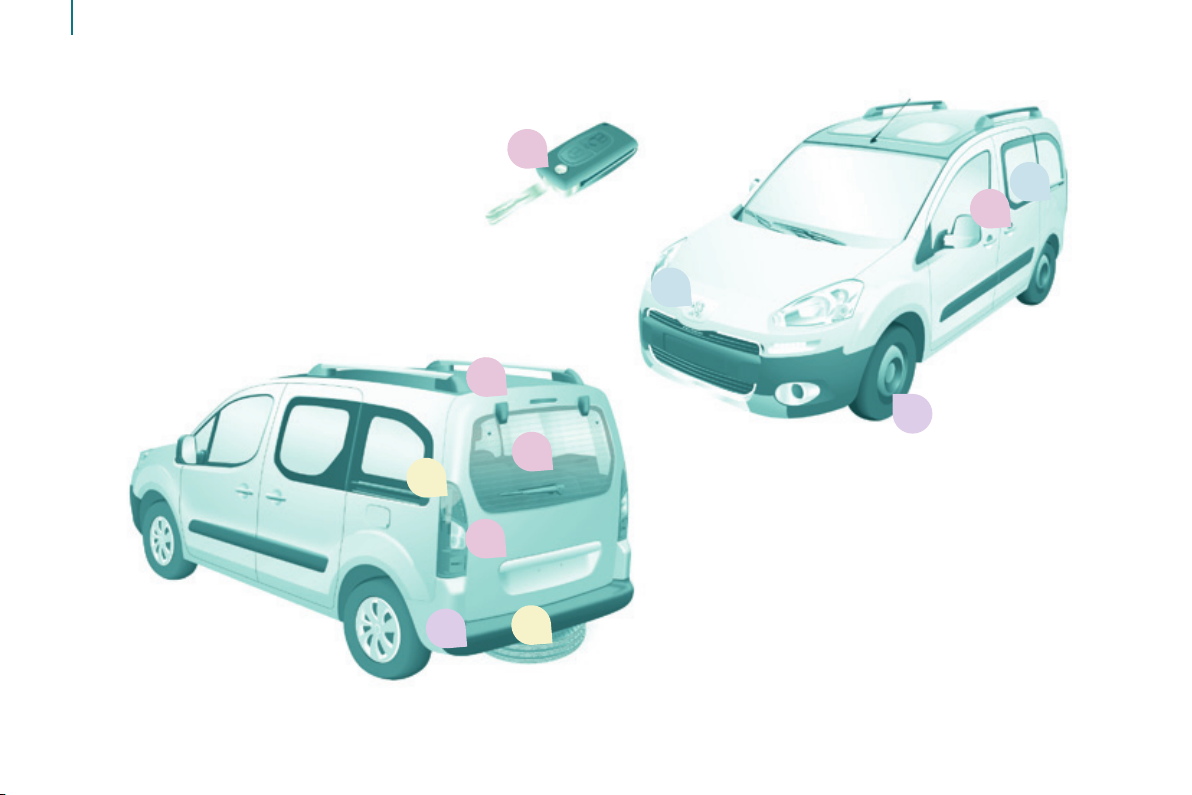
Exterior
2a
6b
2b
6a
2d
4
2e
7b
2c
4
7a
Interior
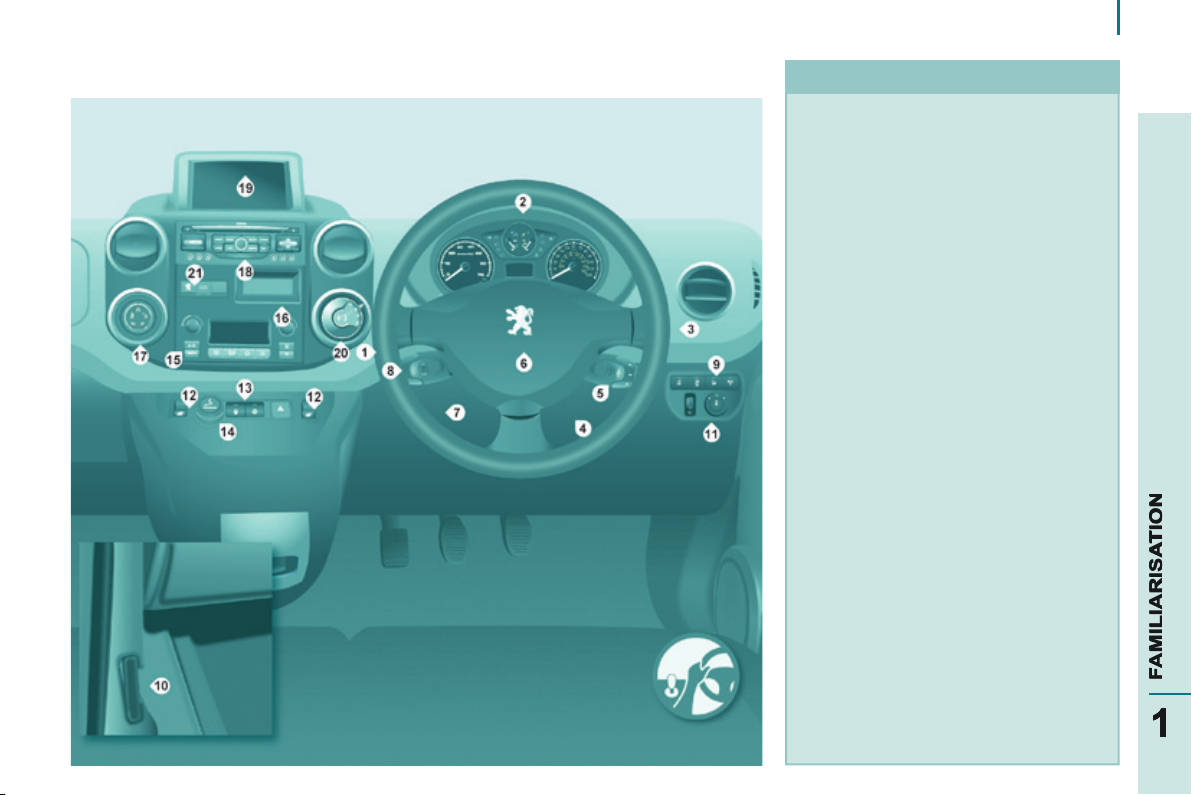
6
1. Lighting and direction indicator
stalk.
2. Instrument panel with screen.
3. Wipers, screenwash, trip
computer control stalk.
4. Ignition.
5. Audio system controls.
6. Driver's airbag, horn.
7. Steering wheel height and reach
adjustment.
8. Cruise control, speed limiter
controls.
9. Switch panel, parking sensors,
headlamp beam adjustment,
ESC, Stop & Start.
10. Bonnet release.
11. Electric door mirror adjustment.
12. Switch panel: electric windows.
13. Switch panel: hazard warning
lamps, central locking, child lock.
14. Cigarette lighter.
15. Heating-ventilation controls.
16. Storage compartment.
17. Grip Control.
18. Audio equipment.
19. Screen.
20. Electronic gearbox control.
21. Emergency or assistance call.
6
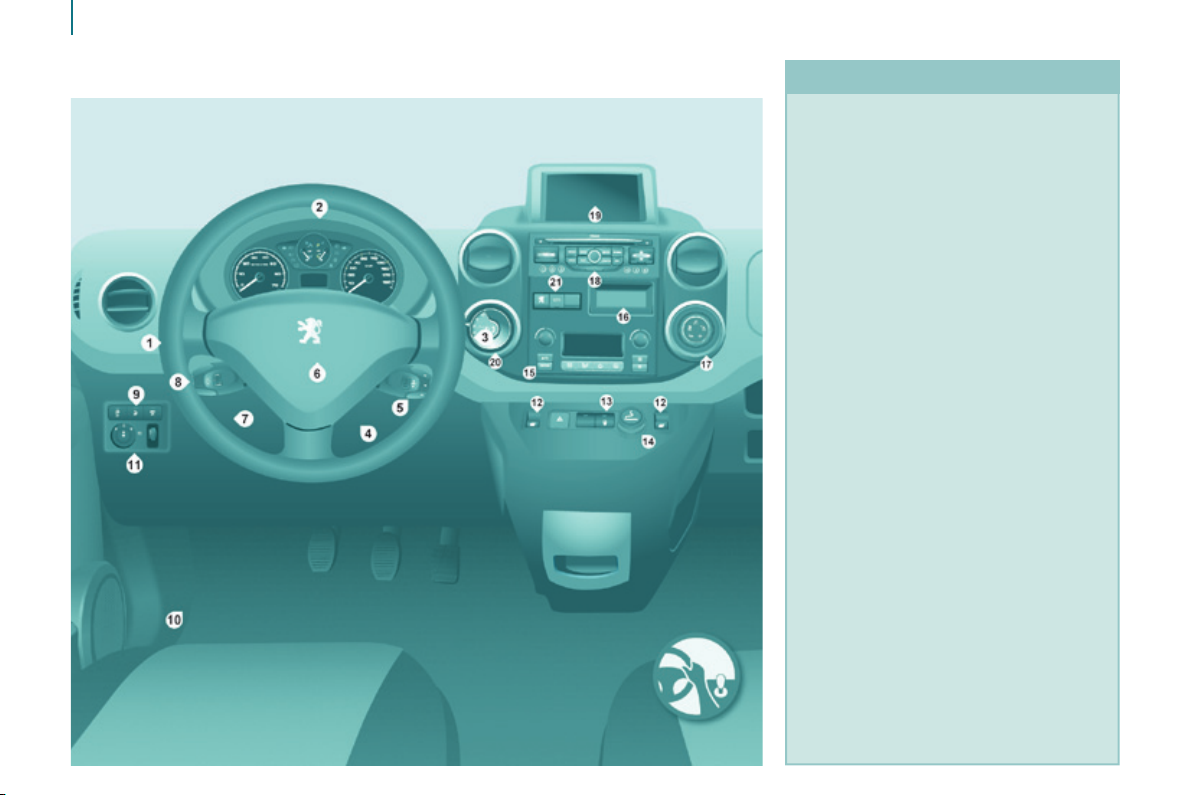
INSTRUMENTS AND CONTROLS
Interior
INSTRUMENTS AND CONTROLS
1. Lighting and direction indicator
control stalk.
2. Instrument panel with screen.
3. Wiper, screenwash, trip
computer control stalk.
4. Ignition switch.
5. Audio system controls.
6. Driver's airbag, horn.
7. Steering wheel height and reach
adjustment.
8. Cruise control, speed limiter
controls.
9. Switch panel, parking sensors,
headlamp beam adjustment,
ESC, Stop & Start.
10. Bonnet release lever.
11. Electric door mirror controls.
12. Switch panel: electric windows.
13. Switch panel: hazard warning,
central locking, child lock.
14. Cigarette lighter.
15. Heating-ventilation controls.
16. Door pockets.
17. Grip Control.
18. Audio system.
19. Screen.
20. Electronic gearbox control.
21. Emergency or assistance call.
7
7
Interior
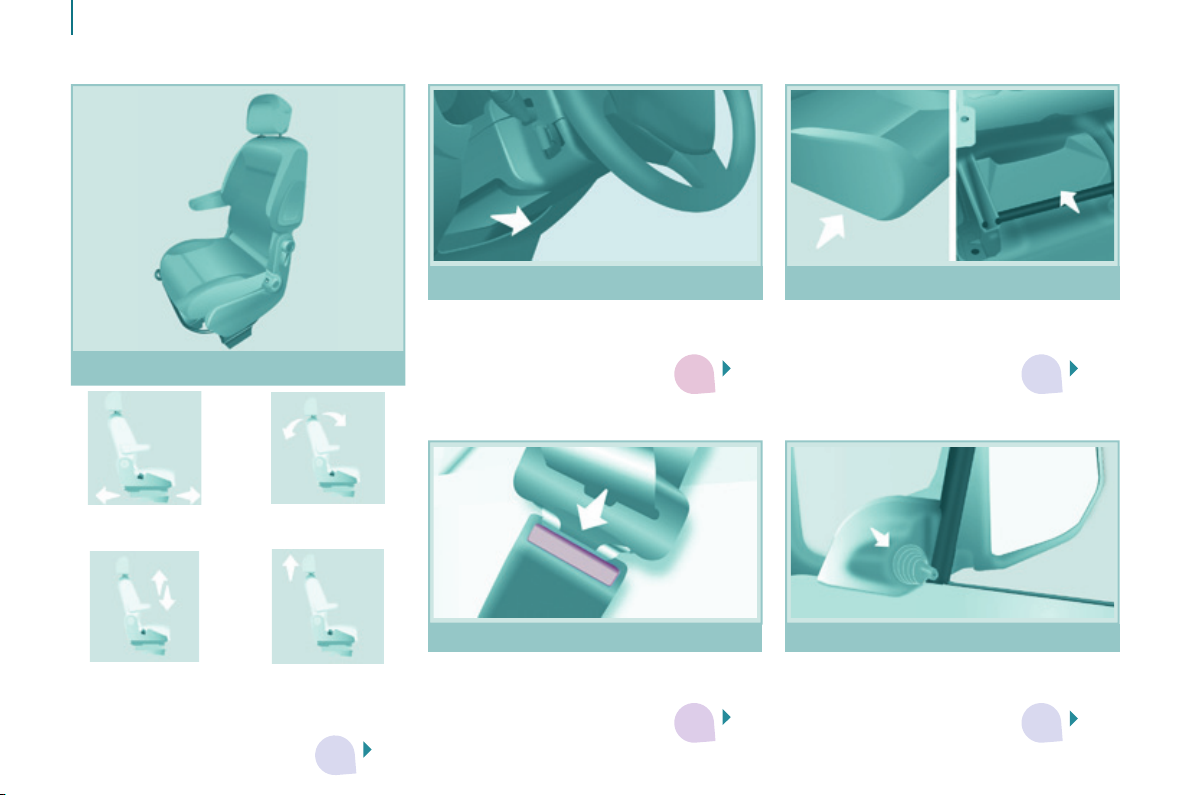
SITTING COMFORTABLY
8
8
Steering wheel Storage compartments
Adjust the steering wheel for height
and reach.
The tools are stored under the left-hand
seat.
Driver's seat
Forwards-backwards
1.
adjustment.
3. Seat cushion
height.
2. Backrest angle.
4. Head restraint
height and
angle.
3
Seat belts
Height adjustment.
Fastening.
66
43
2
Mirrors
Manual adjustments.
Electric adjustments.
110
4
85
3
100
3
VISIBILITY
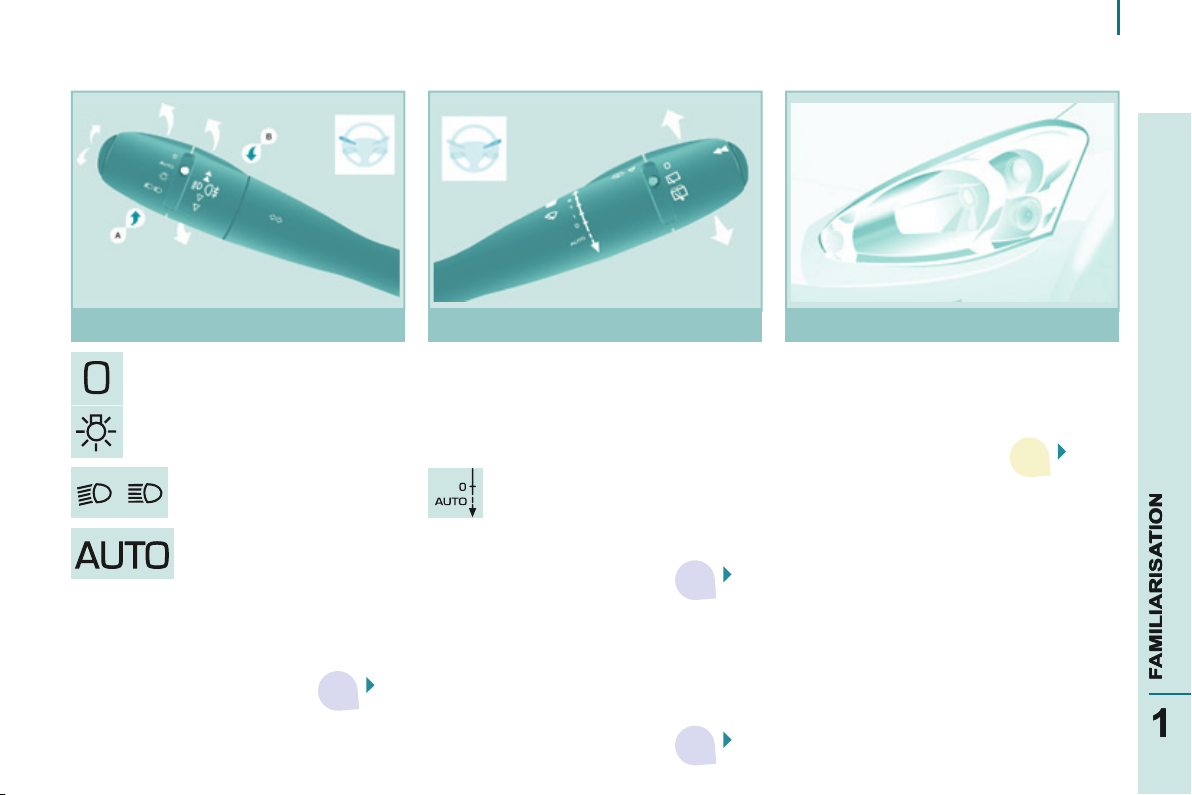
Lighting stalk Wiper stalk Changing bulbs
Lighting off.
Sidelamps.
Main beam headlamps (blue).
Dipped beam headlamps (green).
AUTO, automatic
illumination of headlamps.
Motorway function: press the stalk up
or down to fl ash the direction indicator
three times.
3
2 fast.
1 normal.
I intermittent.
0 park.
single wipe.
AUTO, press the stalk down.
Reactivate if the ignition has
been off for more than one
minute.
Special position for the front wipers
For one minute after switching off the
ignition, any action on the wiper stalk
places the wiper arms and blades
49
vertically alongside the screen pillars.
3
In bad weather or in winter, ensure that
the lamps are not covered with mud or
snow.
52
Interior
7
151
9
9
53,
3
160
Interior
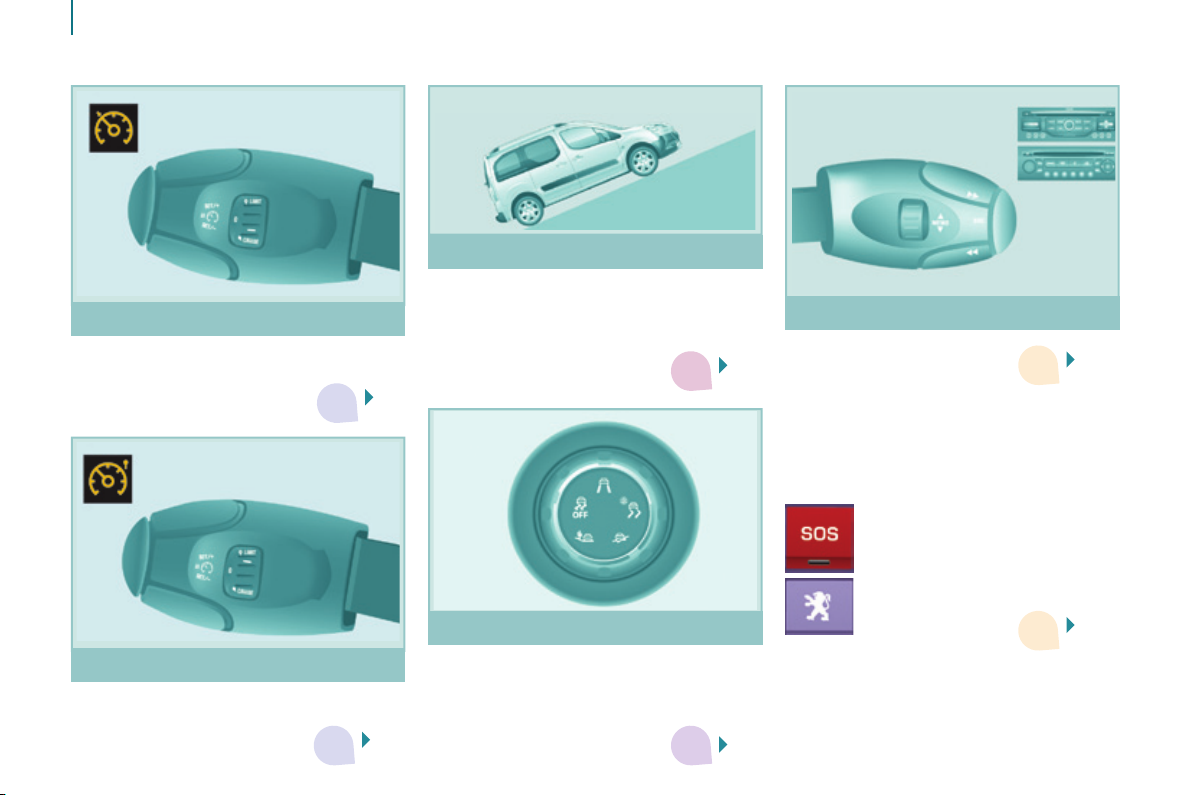
DRIVING SAFELY
10
10
Cruise control
The vehicle speed must be higher than
25 mph (40 km/h) with at least 4th gear
engaged.
Hill start assist
From the time you release the brake
pedal, the vehicle is held for approximately
2 seconds without need to use the parking
brake, to allow you to move off.
48
2
54
3
PEUGEOT Connect Sound (RD5)
9.3,
9
9.63
Emergency or roadside assistance call
This in-car system allows
you to send an emergency
or roadside assistance call
to the dedicated PEUGEOT
centres.
Speed limiter
The minimum speed which can be
programmed is 20 mph (30 km/h).
3
Grip control
ESC (normal mode).
Snow.
Mud.
Sand.
57
ESC OFF.
9.1
9
4
108
Interior
PASSENGER COMPARTMENT SPACE
11
11
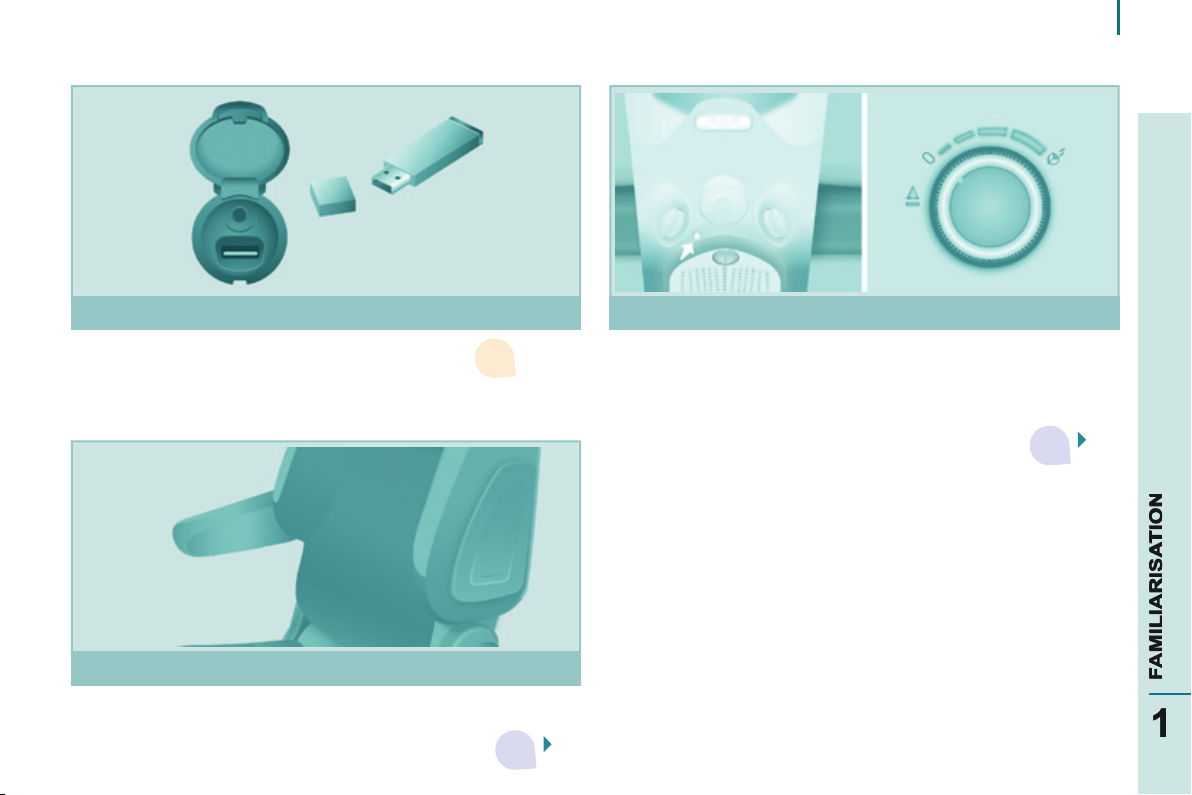
USB player
Armrest
If the vehicle is fi tted with the additional console and an
armrest, remove the console or the armrest to fold the
passenger seat to the table position.
Zenith roof, Scented air freshener
9.42,
9
9.70
3
The multifunction roof console extends the overhead
storage compartment.
The fragrance is diffused in the passenger compartment
from the vents of the roof console.
67
87,
3
89
12
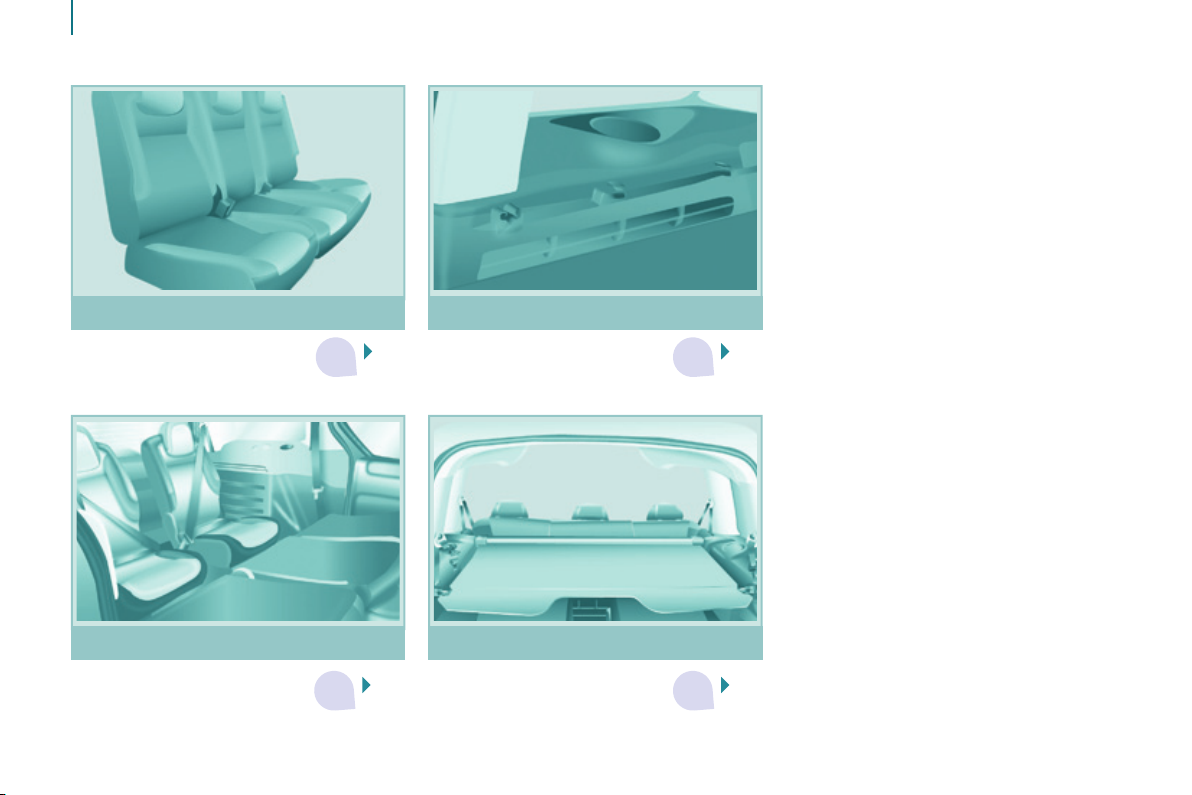
REAR FITTINGS
12
Interior
Load space cover, 5 seat version Rear seats, 5 seat version
71
3
Load space cover, 7 seat version Rear seats, 7 seat version
74
3
94
3
Maximum loads
Overhead storage compartment: 5 kg.
Zenith roof:
- central storage compartments:
6 kg,
- box: 10 kg,
- roof bars placed longitudinally or
transversely: 35 kg.
Transverse roof bars: 75 kg.
98
3
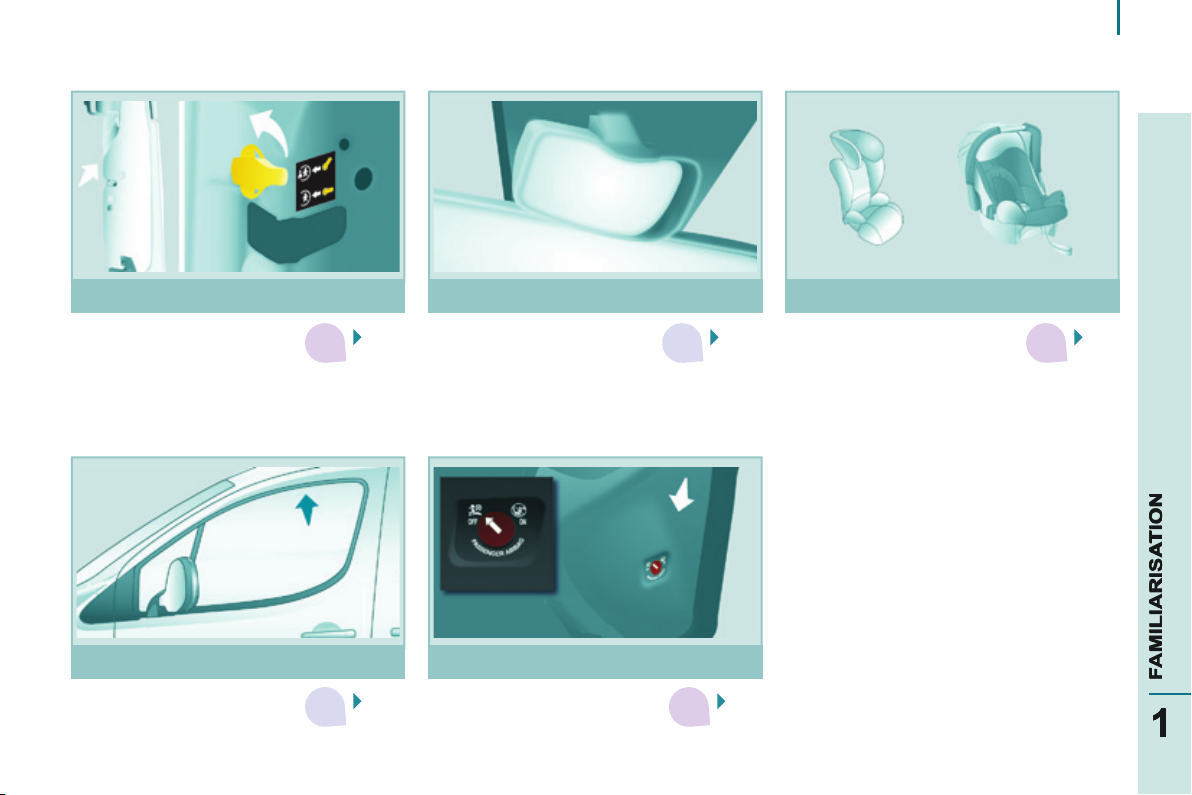
CHILD SAFETY
Interior
13
13
Child seats Side door child lock Child surveillance mirror
126
4
Safety anti-pinch Airbag deactivation
102
3
101
3
116
4
117
4
Interior
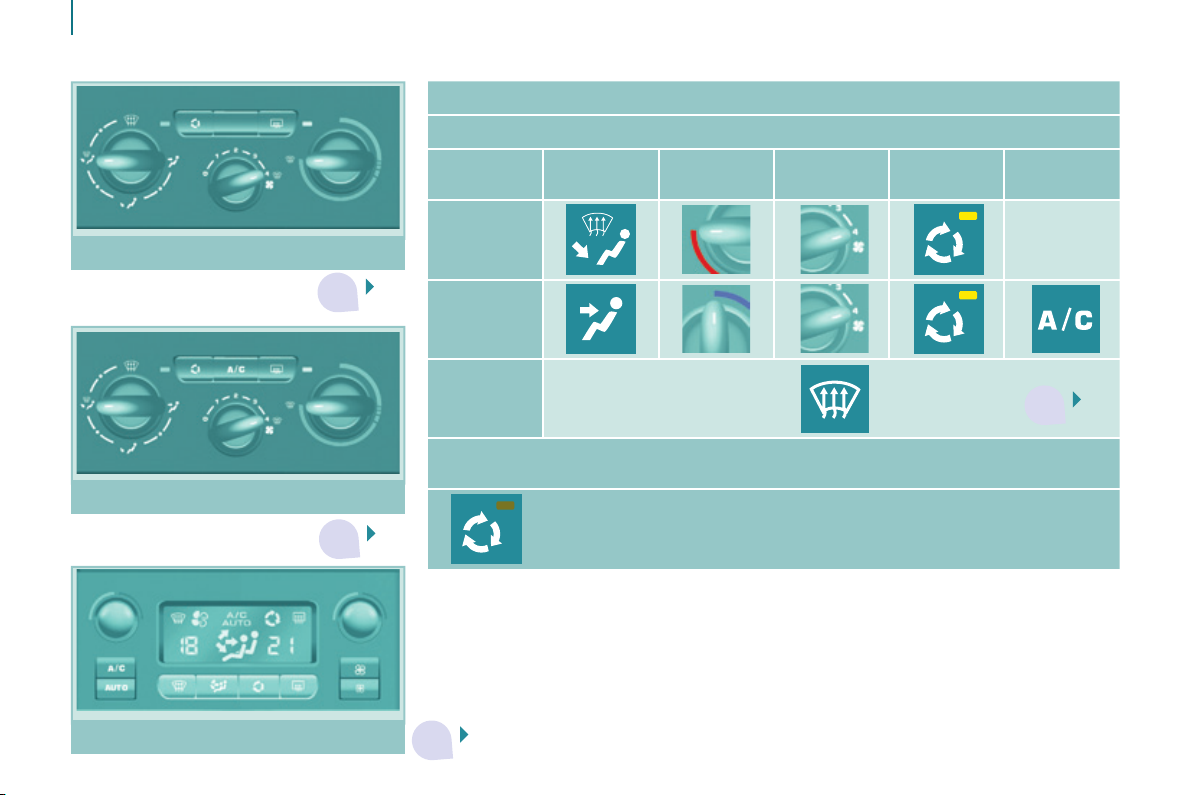
VENTILATION
14
14
Heating
Air conditioning
Recommended settings for Manual Air Conditioning
For optimum use of the system, we recommend:
If I
require...
Heating -
60
3
Cooling
Demisting
Defrosting
With Digital Air Conditioning, operation in AUTO mode is recommended at all
times.
60
3
Air
distribution
Remember to switch the system off when the ambient air suits
your requirements.
Temperature
Air fl ow
Air
recirculation
3
AC
64
Digital air conditioning
62
3

ECO-DRIVING
Eco-driving is a range of everyday practices that allow the motorist to optimise their fuel consumption and CO
emissions.
1515
2
Optimise the use of your
gearbox
With a manual gearbox, move
off gently and change up without
waiting. During acceleration change
up early.
With an automatic or electronic
gearbox, give preference to
automatic mode and avoid pressing
the accelerator pedal heavily or
suddenly.
The gear shift indicator invites you
engage the most suitable gear: as
soon as the indication is displayed in
the instrument panel, follow it straight
away.
For vehicles fi tted with an electronic
or automatic gearbox, this indicator
appears only in manual mode.
Drive smoothly
Maintain a safe distance between
vehicles, use engine braking rather
than the brake pedal, and press the
accelerator progressively. These
practices contribute towards a
reduction in fuel consumption and CO
emissions and also helps reduce the
background traffi c noise.
If your vehicle has cruise control,
make use of the system at speeds
above 25 mph (40 km/h) when the
traffi c is fl owing well.
Control the use of your
electrical equipment
Before moving off, if the passenger
compartment is too warm, ventilate it
by opening the windows and air vents
before using the air conditioning.
Above 30 mph (50 km/h), close the
windows and leave the air vents open.
Remember to make use of equipment
that can help keep the temperature
in the passenger compartment down
(sunroof and window blinds...).
Switch off the air conditioning, unless
it has automatic regulation, as
soon as the desired temperature is
attained.
Switch off the demisting and
defrosting controls, if not automatic.
2
Switch off the heated seat as soon as
possible.
Switch off the headlamps and front
foglamps when the level of light does
not require their use.
Avoid running the engine before
moving off, particularly in winter; your
vehicle will warm up much faster
while driving.
As a passenger, if you avoid
connecting your multimedia devices
(fi lm, music, video game...), you
will contribute towards limiting the
consumption of electrical energy, and
so of fuel.
Disconnect your portable devices
before leaving the vehicle.

1616
Limit the causes of excess
consumption
Spread loads throughout the
vehicle; place the heaviest items in
the bottom of the boot, as close as
possible to the rear seats.
Limit the loads carried in the
vehicle and reduce wind resistance
(roof bars, roof rack, bicycle
carrier, trailer...). Use a roof box in
preference.
Remove roof bars and roof racks
after use.
At the end of winter, remove snow
tyres and refi t your summer tyres.
Observe the recommendations
on maintenance
Check the tyre pressures regularly,
when cold, referring to the label in the
door aperture, driver's side.
Carry out this check in particular:
- before a long journey,
- at each change of season,
- after a long period out of use.
Don't forget the spare wheel and the
tyres on any trailer or caravan.
Have your vehicle serviced regularly
(engine oil, oil fi lter, air fi lter,
passenger compartment fi lter...) and
observe the schedule of operations
recommended in the warranty and
maintenance record.
When refuelling, do not continue after
the third cut-off of the nozzle to avoid
any overfl ow.
At the wheel of your new vehicle, it is
only after the fi rst 1 800 miles
(3 000 kilometres) that you will see
the fuel consumption settle down to a
consistent average.
ACCESS
REMOTE CONTROL
This locks and unlocks the doors on
the vehicle, opens and closes the
fuel fi ller cap, as well as starting and
stopping the engine.
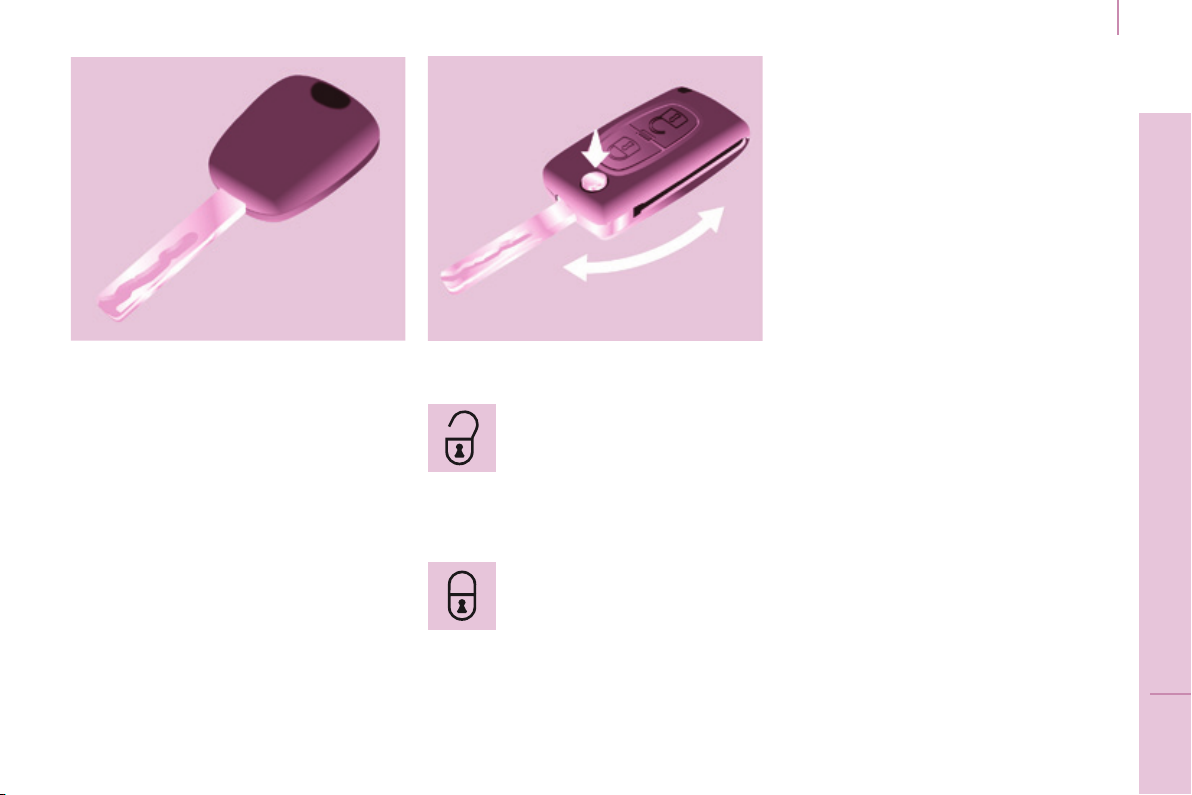
Central unlocking
Press this button to unlock all
of your vehicle's doors.
The direction indicators fl ash twice.
Central locking
Press this button to lock all of
your vehicle's doors.
The direction indicators fl ash once.
If one of the doors is open or is not
closed correctly, the central locking will
not work.
Access
Deadlocking
A second press on the closed
padlock on the remote control within
fi ve seconds after locking changes the
locking to deadlocking.
This is confi rmed by fi xed lighting
of the direction indicators for
approximately two seconds.
Deadlocking renders the exterior
and interior door opening handles
inoperative: do not leave anyone inside
the vehicle when it is deadlocked.
If deadlocking is activated from inside
the vehicle using the remote control, it
will change to normal locking when the
vehicle is started.
Access
REMOTE CONTROL
Folding / unfolding the key
Press this button to release
the key from its housing.
To fold the key, press this
chromed button then fold
the key into the housing.
If you do not press the button, the
mechanism may be damaged.
Good practice
Take care not to allow the remote
control to come into contact with
grease, dust, rain or a damp
environment.
A heavy object attached to the key
(keyring, ...) weighing on the shaft of
the key in the switch, may cause a
malfunction.
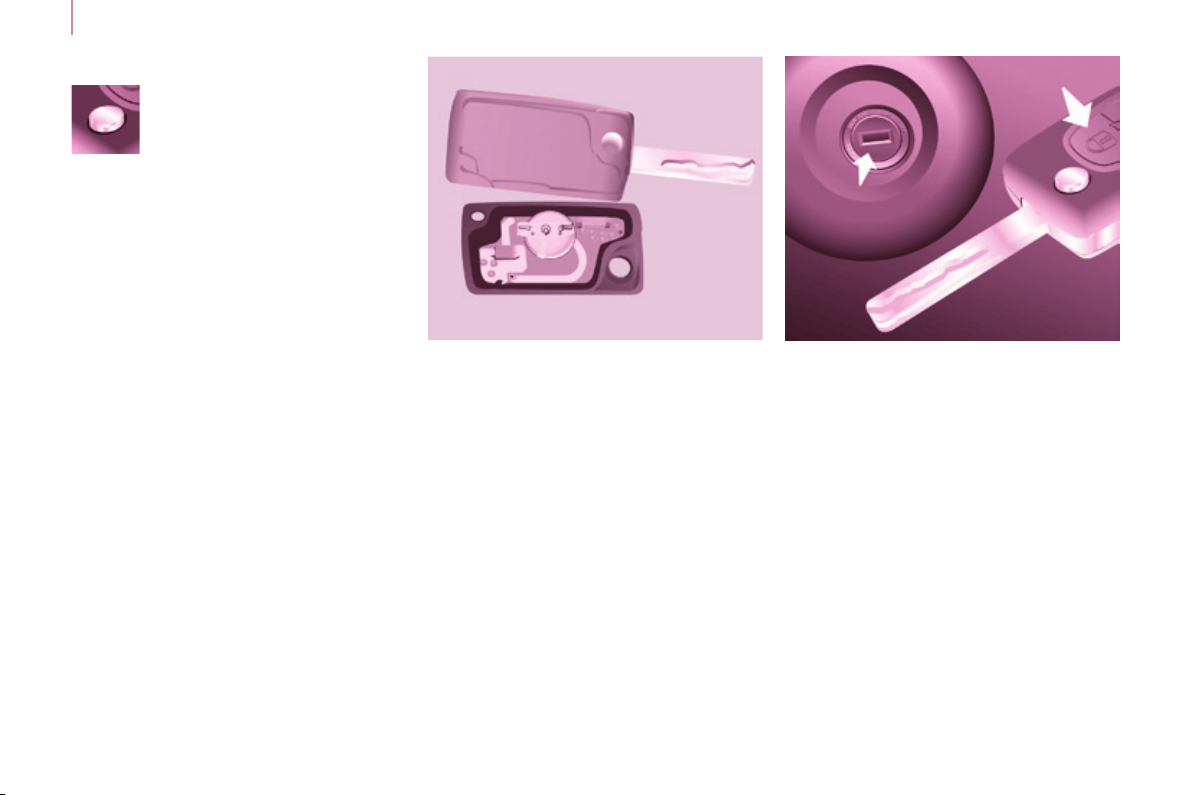
Changing the battery
Battery ref.: CR1620 / 3 volts.
The "battery fl at" information is given
by an audible signal, accompanied by
a message in the screen.
To replace the battery, unclip the
casing using a coin at the ring.
If the remote control does not work
after the battery has been changed,
reinitialise the remote control.
There is a risk of damage if the
replacement battery is not the correct
type.
Use only identical batteries or
batteries of an equivalent type to those
recommended by PEUGEOT dealers.
Do not discard the remote control
batteries, they contain metals which
are harmful to the environment.
Deposit them at a PEUGEOT
dealership, or at an authorised
collection point.
Reinitialising the remote control
Following changing of the remote
control battery or disconnection of the
vehicle battery, the remote control may
have to be reinitialised.
Wait at least one minute before using
the remote control.
Insert the key in the ignition switch with
the buttons (padlocks) of the remote
control facing you.
Switch on the ignition.
Press the locking padlock for at
least fi ve seconds within the next
ten seconds.
Switch off the ignition.
Wait at least one minute before using
the remote control.
The remote control is now working
again.
ELECTRONIC IMMOBILISER
All of the keys contain an electronic
immobiliser device.
This device locks the engine supply
system. It is activated automatically
when the key is removed from the
ignition.
After the ignition is switched on, a
dialogue is established between the
key and the electronic immobiliser
system.
The metal part of the key must be
unfolded correctly for correct dialogue
to take place.
If you lose your keys
Visit a PEUGEOT dealer with the
vehicle's V5 registration document and
your identifi cation document.
A PEUGEOT dealer will be able
to retrieve the key code and
the transponder code so that a
replacement key can be ordered.
Good practice
Do not make any modifi cations to the
electronic immobiliser system.
Operating the remote control, even
when it is in your pocket, may result in
involuntary unlocking of the doors.
The simultaneous use of other
high frequency equipment (mobile
telephones, domestic alarms…), may
interfere with the operation of the
remote control temporarily.
The remote control does not operate
while the key is in the ignition, even if
the ignition is off.
When purchasing a second-hand
vehicle:
- have the keys memorised by a
PEUGEOT dealer to ensure that
the keys in your possession are
the only ones which can start the
vehicle.
When leaving the vehicle, check that
the lamps are off and nothing of value
is visible.
As a safety precaution (with children
on board), remove the key from the
ignition when leaving the vehicle, even
for a short time.
Access
If fi tted on your vehicle, this provides
two types of protection:
- exterior protection: it sounds if a
front/rear door or the bonnet is
opened.
- interior protection: it sounds if
the volume inside the passenger
compartment changes (breaking of
a window or a movement inside the
vehicle).
If your vehicle is fi tted with a separation
partition, the interior protection is not
active in the load space.
Locking the vehicle with
complete alarm
Setting the alarm
- Switch off the ignition and get out of
the vehicle.
- Set the alarm within fi ve minutes of
getting out of the vehicle, by locking
or deadlocking using the remote
control. The red LED, located in the
button, fl ashes once per second.
Access
FRONT DOORS
Disarming
- Unlock the vehicle with the remote
control or switch on the ignition, the
red LED goes off.
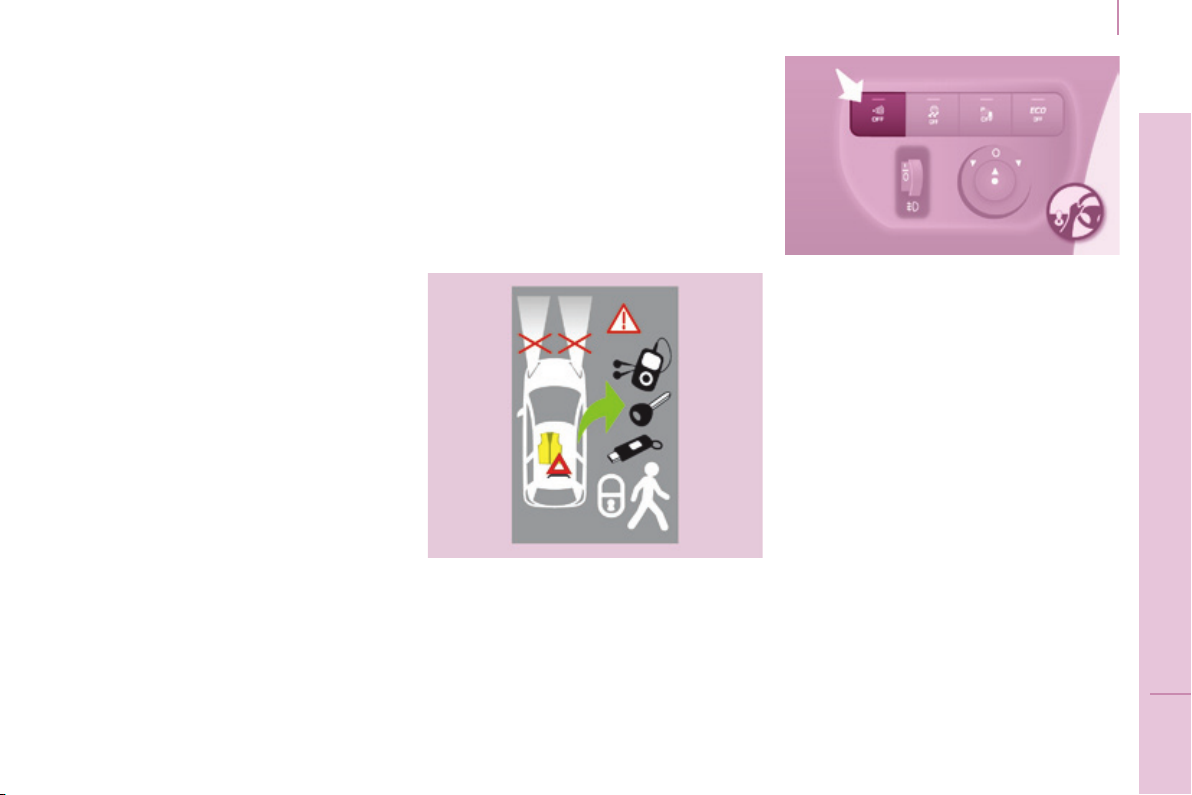
Locking the vehicle with
exterior protection only
If, while you are away from the
vehicle, you wish to leave a window
partially open or a pet inside the
vehicle, you should choose exterior
protection only.
- Switch off the ignition.
- In the next ten seconds,
press the button until
the red LED is on
continuously.
- Get out of the vehicle.
- Within the next fi ve minutes, set
the alarm by locking or deadlocking
using the remote control (the red
LED fl ashes once a second).
Triggering
The siren sounds, the direction indicators
fl ash for approximately 30 seconds and
the red LED fl ashes rapidly.
- To switch it off, insert the key and
switch on the ignition.
When the alarm has been triggered ten
times in succession (when triggered for
the eleventh time) it is deactivated. Repeat
the procedure for setting the alarm.
Locking the vehicle without
alarm
- Insert the key in the lock on the
driver's door and lock it.
Do not set the alarm when washing
your vehicle.
Failure of the remote control
When the alarm is set but the remote
control does not operate:
- Unlock the doors with the key and
open the door. The alarm is triggered.
- Switch on the ignition in the next
ten seconds. The alarm is disarmed.
Incorrect operation
When the ignition is switched on, if the
red LED remains on for ten seconds,
there is a fault in the siren connection.
Contact a PEUGEOT dealer to have
the system checked.
Automatic setting of the alarm
Depending on the country in which
the vehicle is sold, the alarm is set
automatically approximately 2 minutes
after the last door is closed.
To prevent triggering of the alarm when
a door is opened, you have to press
the remote control unlocking button
again.
Do not make any modifi cations
to the alarm system as this could
cause faults.
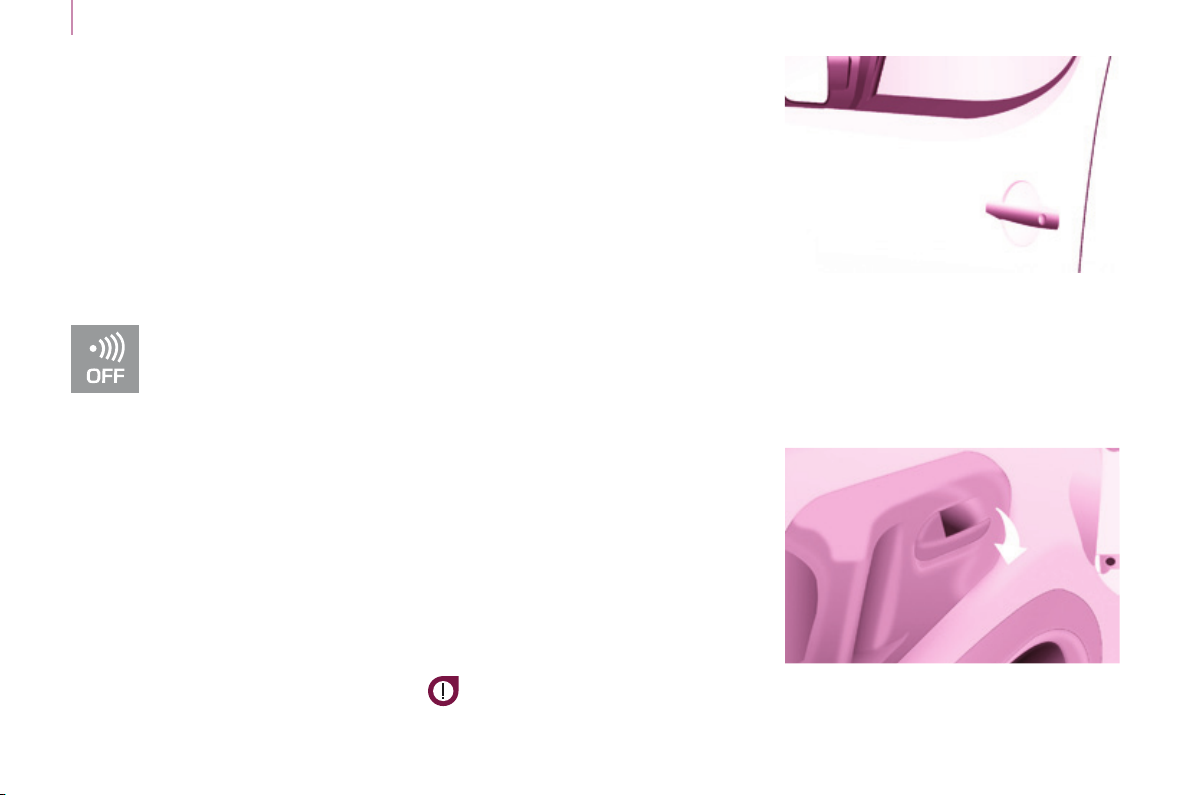
From the outside
Use the remote control to lock/unlock
the vehicle.
Insert the metal part of the key in the
lock on the driver's side if the remote
control does not work.
From the inside
Use the door opening control to unlock
and open the door concerned.
Access
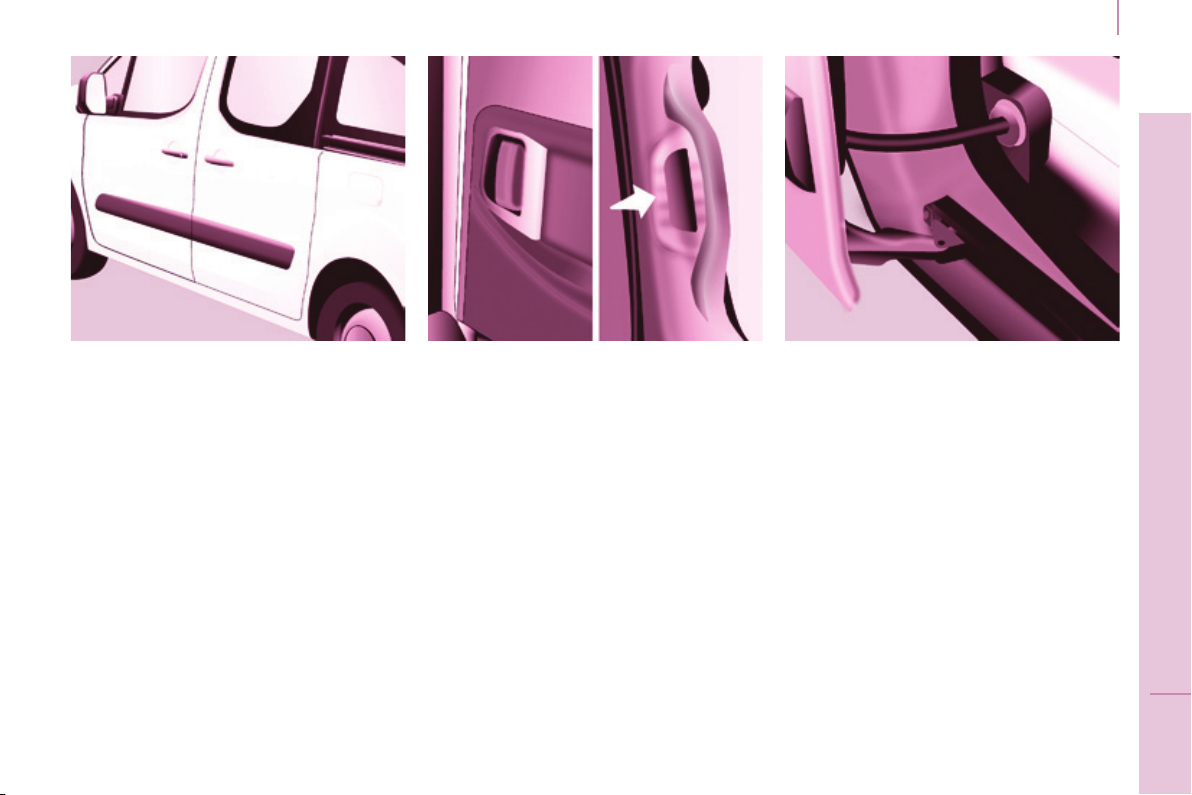
SLIDING SIDE DOORS
From the outside
Pull the handle towards you then
towards the rear and open the side
door guiding the rearward sliding to
beyond the point of resistance to hold
it open.
A mechanical system prevents opening
of the left-hand side door when the fuel
fi ller fl ap is open.
From the inside
Unlock the side door using this handle
and open it, guiding the rearward
sliding to the point of resistance. Pass
this point to hold the door open.
Close the side door using the handle
to start the sliding and pass the point
of resistance. Then, use the shaped
recess at the top of the door pillar to
guide the door until it locks.
Do not use the grab handle to slide the
door.
Good practice
Take care not to block the guide space
on the fl oor to allow the door to slide
correctly.
If your vehicle is parked on a slope,
guide the sliding of the side door. In
fact, the door could open or close more
rapidly due to the slope of the ground
and could cause injury.
For safety and operation reasons, do
not drive with the sliding side doors
open.
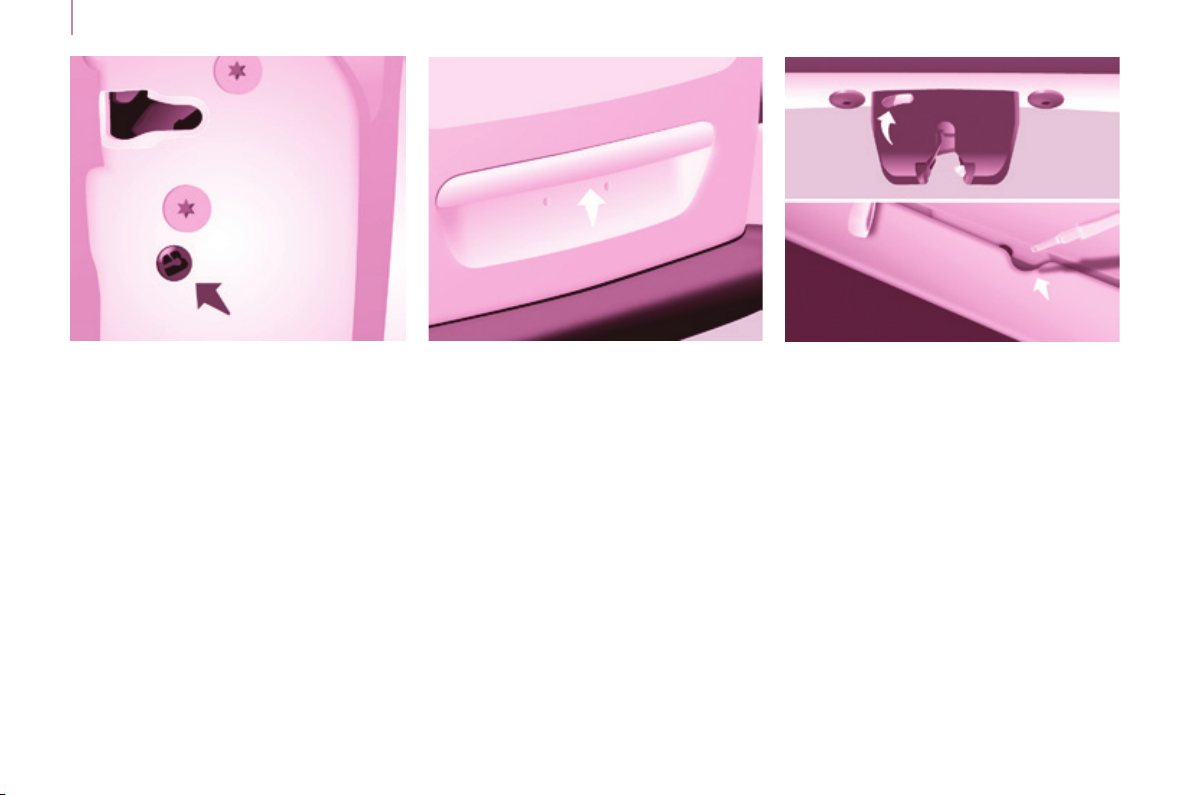
Access
TAILGATE
Operation in the event of a
battery failure
Front and side passenger doors
In the event of a battery or central
locking fault, use the lock to lock the
doors mechanically.
To open the door and get out of the
vehicle, pull the interior control.
To lock the door, insert the key in
the lock, located on the edge of the
door, then turn it one eighth of a
turn .
From outside
Locking/unlocking is by means of the
remote control.
To open, press the control below the
trim then raise the tailgate.
A pull strap is available to close the
tailgate in the high position.
Guide the closing of the tailgate to the
balance point of its travel then apply
a fi nal press on the tailgate to close it
fully.
From inside
Emergency control
In the event of a central unlocking
operating fault, this permits unlocking
of the tailgate from the inside.
Insert a small screwdriver in the
opening, between the door and the
fl oor. To unlock the lock, move the
catch to the left then push the tailgate.
Driver's door
Insert the key in the lock, then turn
it to the right to lock or to the left to
unlock.
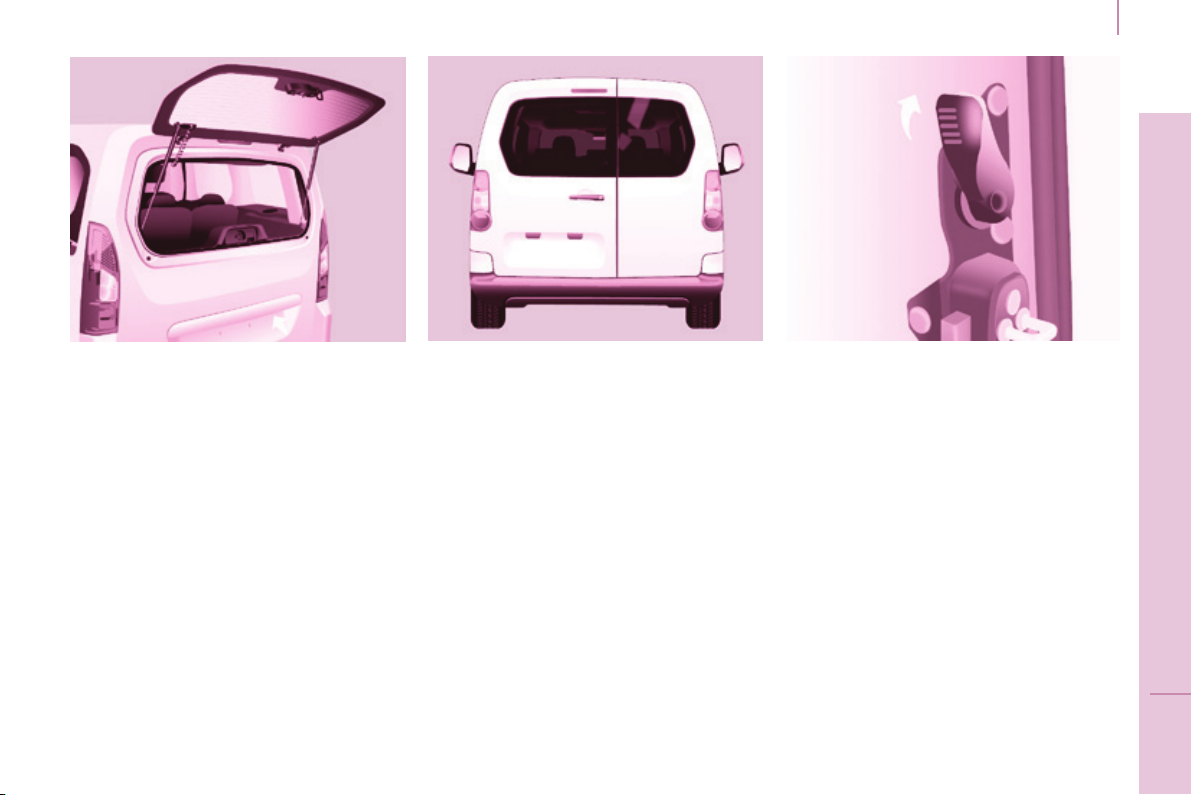
Access
HINGED REAR DOORS
Tailgate screen
The opening rear screen allows you to
access the rear of the vehicle directly,
without having to open the tailgate.
Opening
After unlocking the vehicle using the
remote control or the key, press the
control and raise the rear screen to
open it.
Closing
Close the rear screen by pressing
the centre of the glass until it is fully
closed.
The tailgate and tailgate screen cannot
both be open at the same time, to
prevent damage to the screen.
The hinged rear doors are
asymmetrical (2/3 - 1/3), with the
smaller door on the right.
They are fi tted with a central lock.
From outside
To open, pull the handle towards you.
Pull the lever to open the right-hand
door.
To close, start with the right-hand door
then close the left-hand door.
With the roof rear fl ap, the rear bumper
has been reinforced to serve as a
footrest when entering the vehicle.
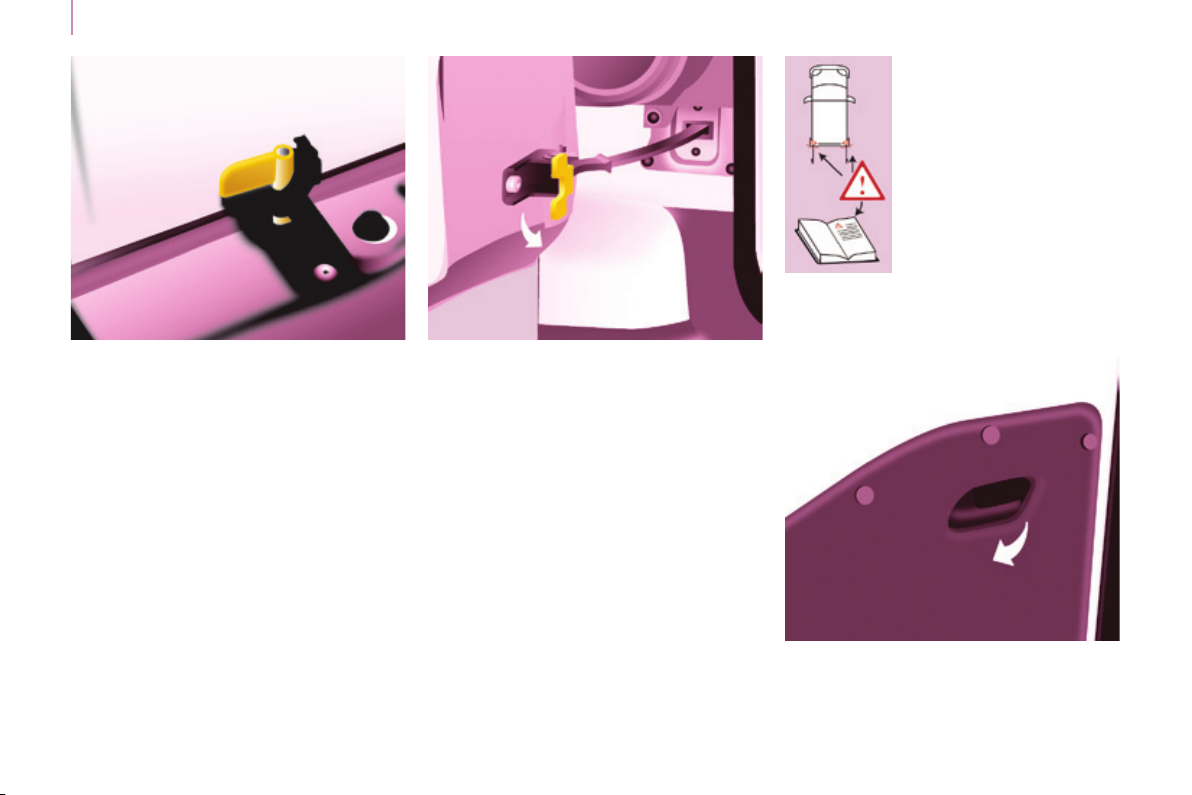
Access
In practice
It is possible to drive with the righthand door open to make it easier to
carry long loads. The left-hand door is
kept closed by the distinctive "yellow"
lock, positioned at the base of the door.
This closed door must not be used as
a load retainer.
Driving with the right-hand door open
is a special dispensation. Comply with
the usual safety indications to warn
other drivers.
Opening to approximately 180°
A check strap system permits extension
of the opening from approximately 90°
to approximately 180°.
Pull the yellow control when the door is
open.
The check strap will engage again
automatically on closing.
When parked with the
rear doors open to 90°,
the doors mask the rear
lamps. To signal your
position to other road
users driving in the same
direction who may not
have seen your vehicle,
use a warning triangle
or other device required
by the legislation in your
country.
From inside
Pull the handle towards you to open
the left-hand door.
Access
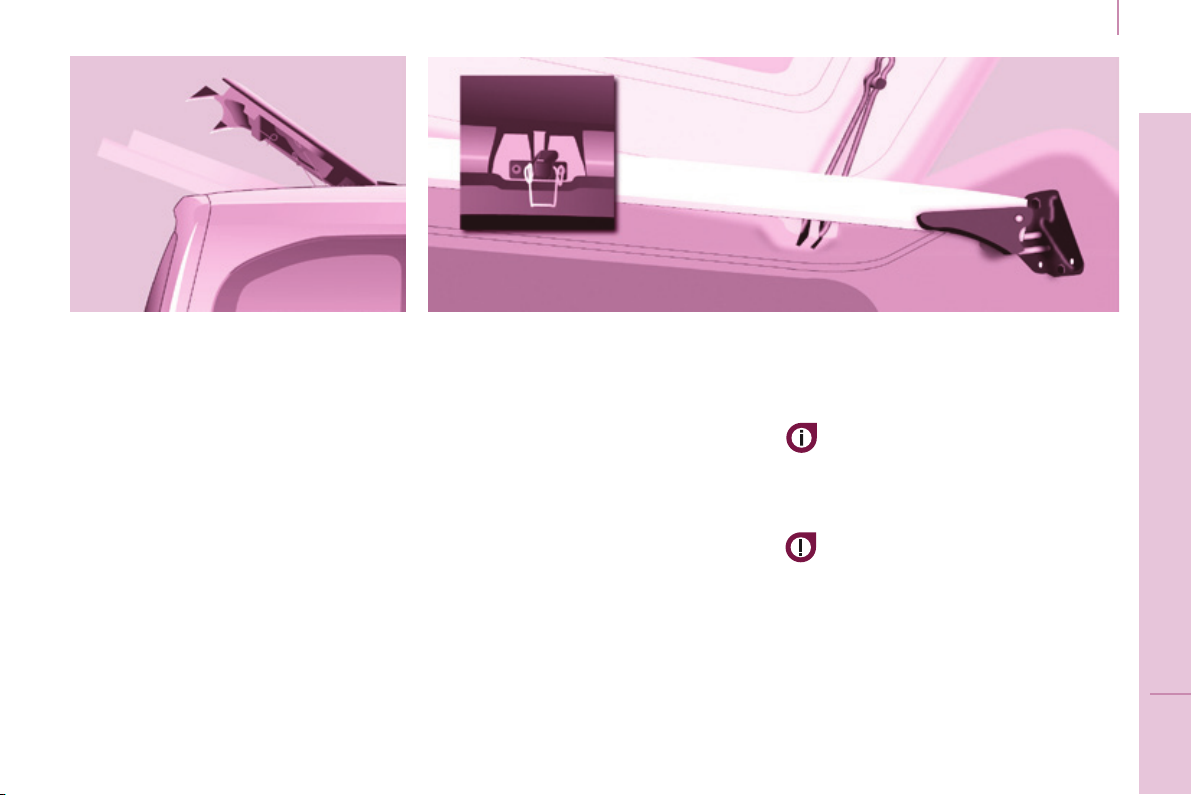
REAR ROOF FLAP
This rear roof fl ap is only compatible
with side-hinged rear doors.
To open the rear roof fl ap:
- raise the black paddle of the toggle,
- relieve the toggle by pressing the
rear roof fl ap (downwards) then
release the hook,
- lift the rear roof fl ap,
- pass the point of resistance to
secure the rear roof fl ap using the
support stays.
Never drive without the stays in place.
To close the rear roof fl ap:
- check that the support bar is
secured correctly,
- lower the rear roof fl ap,
- while pressing the rear roof fl ap
(downwards), take hold of the two
loops of the spring then place the
hook in its housing,
- lower the black paddle to secure
the rear roof fl ap.
Securing the rear roof fl ap places it on
the seal correctly and ensures sealing
without noise.
Support bar
A support bar is provided for
transporting long loads, after opening
the rear roof fl ap.
Fold back the support bar by lifting the
lever.
Guide it to the door pillar.
Support the long loads to be
transported, lift them and reposition the
support bar with one hand.
Ensure that it is secured correctly by
pressing the handle downwards past
the point of resistance and secure the
loads fi rmly.
The side supports can be used as
hooking points.
Never attach any load to the rear roof
fl ap.
The rear bumper has been
reinforced to serve as a footrest
when entering the vehicle.
Never drive without the support bar in
place.
The rear doors only lock when the
support bar is installed.
When the rear roof fl ap is open, take
care when driving where height is
restricted.
Never rest loads directly on the rear
doors.
Comply with the usual indications, to
warn other drivers.
Reserve the use of the rear roof fl ap
for short journeys.

Access
CENTRAL LOCKING
An initial press permits
central locking of the vehicle,
when all of the doors are
closed.
A second press permits
central unlocking of the vehicle.
The control is inactive when the vehicle
has been locked using the remote
control or the key from the outside.
The doors can still be opened from the
inside.
The control switch LED:
- fl ashes when the doors are locked
with the vehicle stationary and the
engine off,
- comes on when the doors are
locked and from the time the
ignition is switched on.
Driving with the doors locked may
make access to the interior more
diffi cult in an emergency.
Anti-intrusion security
Locking while driving
When the vehicle moves off, as soon
as you reach approximately 6 mph
(10 km/h), the system locks the doors.
The characteristic central locking noise
is heard. The LED in the switch on
the dashboard central switch panel
comes on.
During the journey, opening a door
results in complete unlocking of the
vehicle.
Activating / deactivating the
function
With the ignition on, press
and hold this switch to
activate or deactivate the
function.
Door open warning lamp
If this warning lamp comes
on, check that all of your
vehicle's doors are closed
correctly.
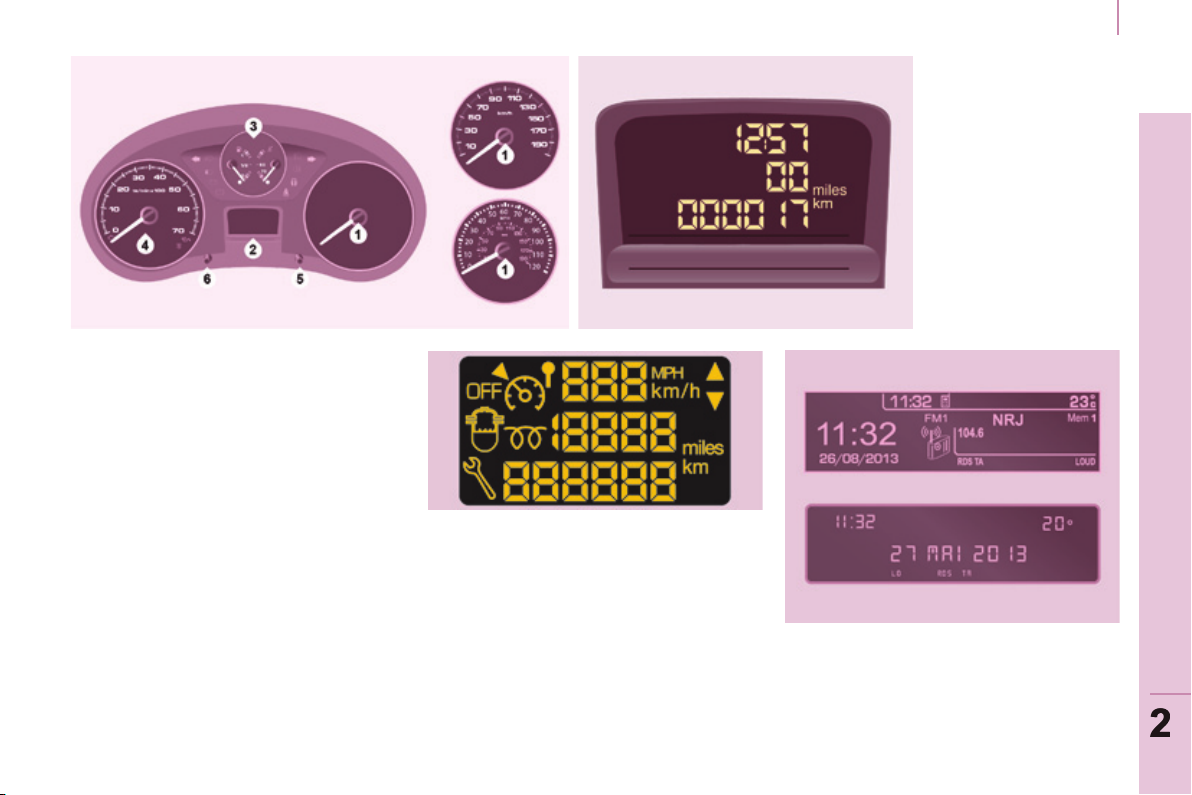
INSTRUMENT PANEL
INSTRUMENTS AND CONTROLS
Dials
1. Distance recorder in kilometres /
miles.
2. Screen.
3. Fuel level, coolant temperature.
4. Rev counter.
5. Trip distance recorder / service
indicator zero reset.
6. Instrument panel lighting dimmer.
Displays
- Speed limiter / cruise control.
- Kilometres / Miles travelled.
- Service indicator, engine oil level
indicator, total kilometres / miles.
- Presence of water in the Diesel
fi lter.
- Diesel pre-heating.
Instruments and controls
Screens
The format of the information
presented in the screen depends on
the vehicle's equipment.
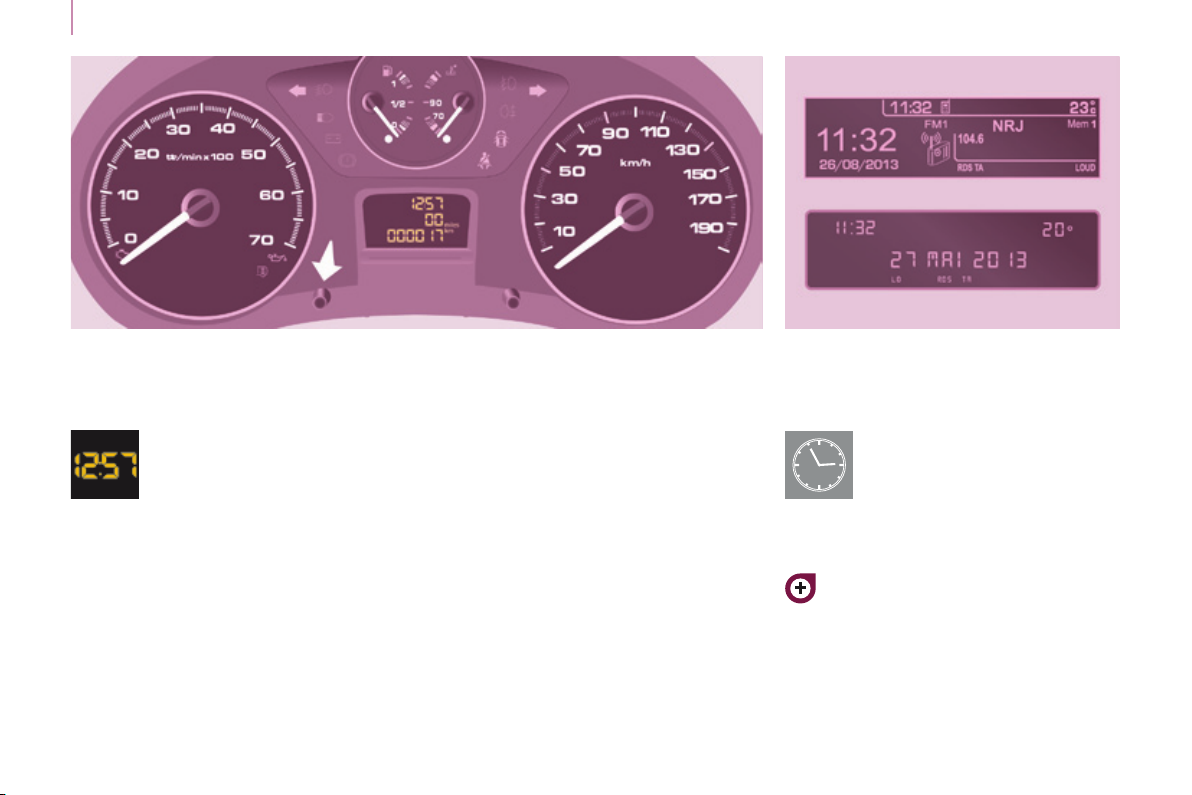
Instruments and controls
ADJUSTING THE TIME
Instrument panel without screen
Centre console without screen
To adjust the time of the clock,
use the left-hand button on
the instrument panel then
carry out the operations in the
following order:
- turn to the left: the minutes fl ash,
- turn to the right to increase the
minutes (hold the button to the right
for rapid scrolling),
- turn to the left: the hours fl ash,
- turn to the right to increase the
hours (hold the button to the right
for rapid scrolling),
- turn to the left: 24H or 12H is
displayed,
- turn to the right to select 24H or
12H,
- turn to the left to complete the time
adjustment.
After approximately 30 seconds
without any action, the screen returns
to the normal display.
Centre console with screen
The display - time sequence
is linked according to model
(version). The access to
the "Date" adjustment is
only active when the model
version offers a date in words.
To adjust the time and date
indicated in the screen, refer to
the "Adjusting the date and time"
section of chapter 9.
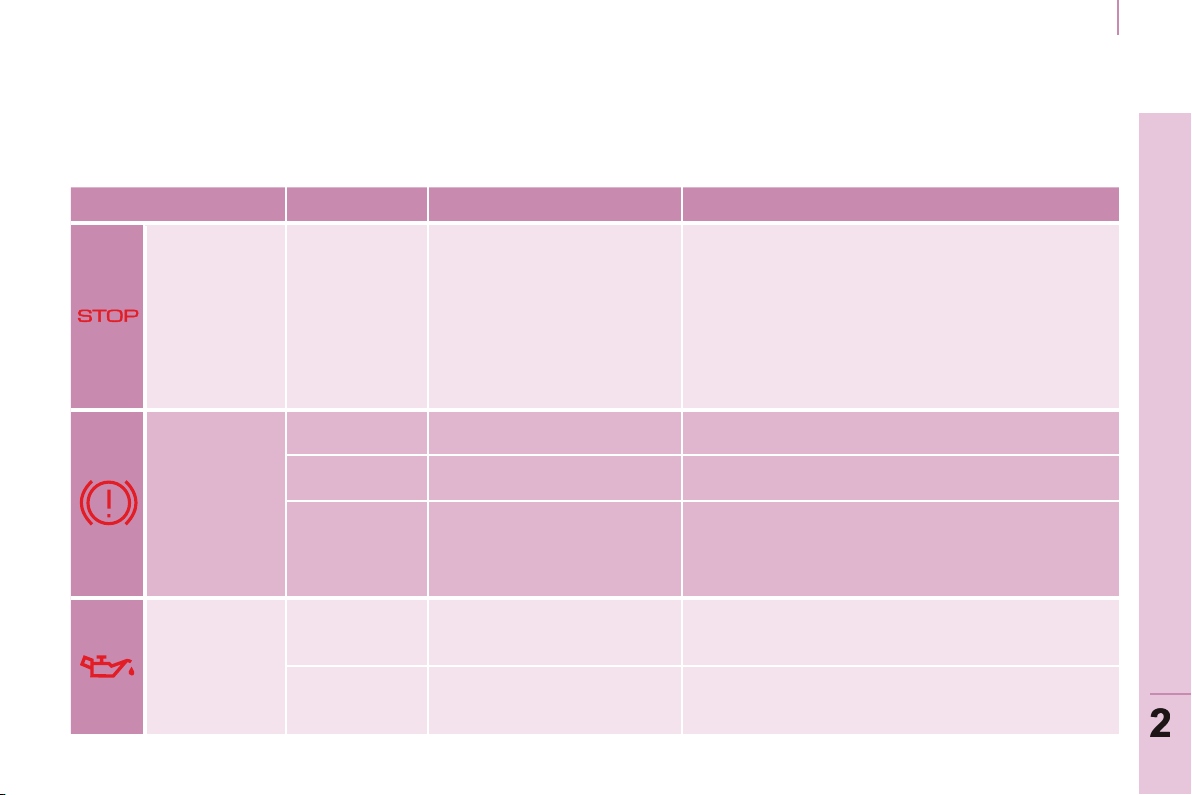
Instruments and controls
Warning lamps
Each time the vehicle is started: a series of warning lamps comes on applying a self-test check. They go off almost
immediately. When the engine is running: the warning lamp becomes a warning if it remains on continuously or fl ashes.
This initial warning may be accompanied by an audible signal and a message which appears in the screen.
Do not ignore these warnings.
Warning lamp is indicates Solution - action
STOP
Parking
brake / Brake
fl uid level /
EBFD
Engine oil
pressure and
temperature
on, associated
with another
warning
lamp and
accompanied
by a message
in the screen.
on.
on. low brake fl uid level. Top up using a fl uid recommended by PEUGEOT.
remaining on even
though the level
is correct and
associated with the
ABS warning lamp.
on while
driving.
remaining on,
even though the
level is correct.
major faults linked with
the "Brake fl uid level",
"Engine oil pressure and
temperature", "Coolant
temperature", "Electronic
brake force distribution",
"Power steering" and
"Under-infl ation detection"
warning lamps.
that the parking brake is applied
or has not been released fully.
a fault with the electronic
brake force distribution.
low pressure or a high
temperature.
a major fault.
You must stop as soon as it is safe to do
so, park and switch off the ignition. Have it
checked by a PEUGEOT dealer or a qualifi ed
workshop.
Releasing the parking brake switches off the
warning lamp.
You must stop as soon as it is safe to do
so, park and switch off the ignition. Have it
checked by a PEUGEOT dealer or a qualifi ed
workshop.
Park and switch off the ignition then allow to
cool. Visually check the level. Chapter 6, "Levels"
section.
Have it checked by a PEUGEOT dealer or a
qualifi ed workshop.

Instruments and controls
Warning lamp is indicates Solution - action
Service
ECO
Coolant
temperature
and level
Driver's
seat belt not
fastened
on with needle
in the red
zone.
fl ashing. a drop in the coolant level.
on temporarily. minor faults or warnings.
remaining on. major faults.
on then
fl ashing.
accompanied
by an audible
signal then
remains on.
on.
fl ashes for a
few seconds,
then goes off.
an abnormal increase in
temperature.
the driver has not fastened
their seat belt.
the vehicle is moving with
the driver's seat belt not
fastened.
The Stop & Start system
has put the engine in STOP
mode following a vehicle
stop (red light, traffi c jam,
etc...).
The STOP is temporarily
unavailable.
or
The START mode has been
invoked automatically.
Park and switch off the ignition then allow to cool.
Visually check the level.
Chapter 6, "Levels" section. Contact a
PEUGEOT dealer or a qualifi ed workshop.
Consult the alert log in the display or screen.
If your vehicle is equipped with a trip computer
or a screen: refer to the "Audio equipment Trip computer" section of chapter 9. Contact a
PEUGEOT dealer or a qualifi ed workshop.
Pull the strap then insert the tongue in the buckle.
Check that the seat belt is fastened by pulling the
strap. Chapter 4, "Seat belts" section.
As soon as you want to move off, the warning
lamp goes off and the engine restarts
automatically in START mode.
Section 2, under "Stop & Start".
Warning lamp is indicates Solution - action
Instruments and controls
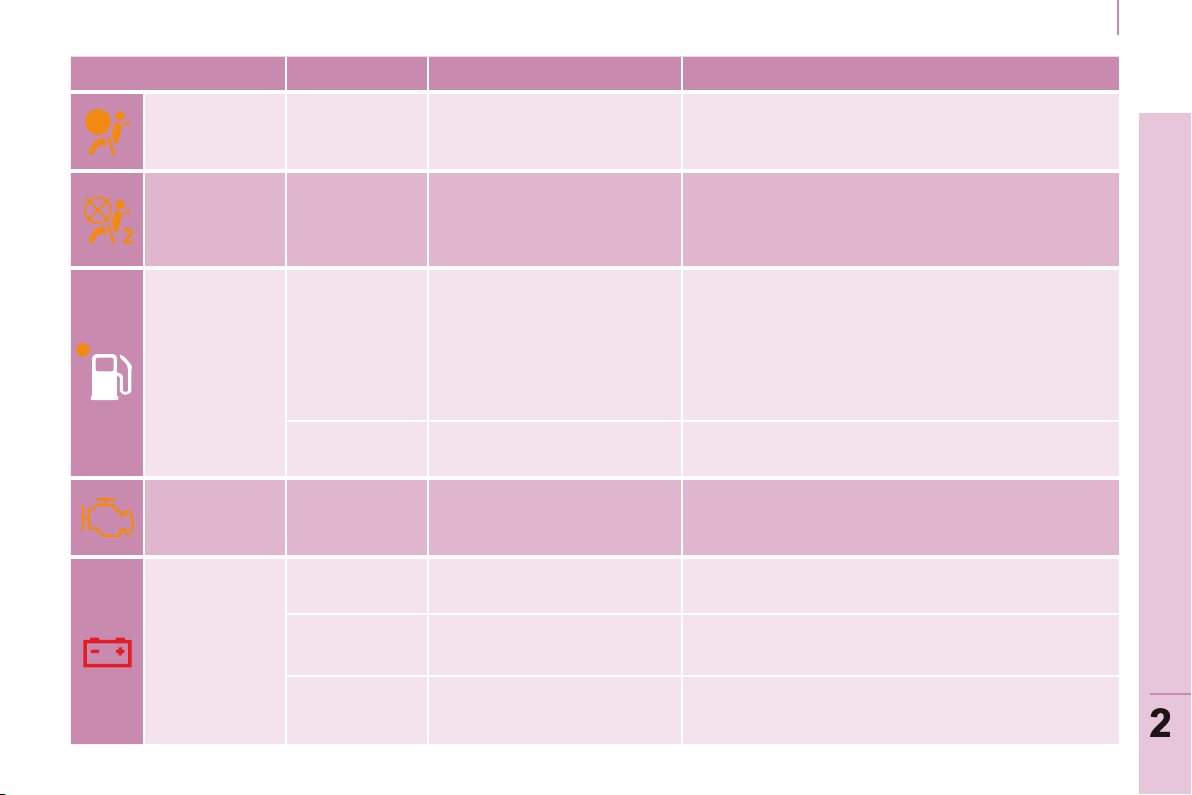
Front / lateral
airbag
Front
passenger's
airbag
deactivated
Low fuel
level
EOBD
emission
control
system
Battery
charge
fl ashing or
remaining on.
on.
on with gauge
needle in the
red zone.
fl ashing.
fl ashing or
remaining on.
on.
fl ashing.
remaining on,
in spite of the
checks.
a failure of an airbag.
the intentional deactivation
of this airbag in the
presence of a rear-facing
child seat.
When it fi rst comes on,
there remains around
8 litres of fuel in the tank.
The distance you can drive
on this fuel depends on
your style of driving and the
engine type.
cutting off of the fuel supply
following a serious impact.
a failure of the system.
a fault in the charging
circuit.
placing of the active
functions on standby
(economy mode).
a faulty circuit, an ignition or
injection malfunction.
Have the system checked by a PEUGEOT
dealer or a qualifi ed workshop without delay.
Chapter 4, "Airbags" section.
Chapter 4, "Airbags-child safety" section.
You must fi ll up with fuel to avoid running out.
This warning lamp comes on each time you
switch on the ignition until you have fi lled up.
Capacity of the tank: approximately 60 litres.
Never risk driving until the tank is empty, this
could damage the emissions and injection
systems.
Restore the supply. Chapter 6, "Fuel" section.
There is a risk of damage to the catalytic
converter. Have it checked by a PEUGEOT or a
qualifi ed workshop.
Check the battery terminals, … Chapter 7,
"Battery" section.
Chapter 7, "Battery" section.
Have it checked by a PEUGEOT dealer or a
qualifi ed workshop.

Instruments and controls
Warning lamp is indicates Solution - action
ABS
ABS remaining on.
ESC
Power
steering
Door open
detection
Under-
infl ation
on.
on and accompanied
by a message in the
screen.
fl ashing.
remaining on.
remaining on with the
LED in the button (on
the dashboard) on.
on.
fl ashing then
remaining on,
accompanied by
the Service warning
lamp, and depending
on equipment, the
display of a message.
a fault with the
system.
that a door is not
closed correctly.
a fault with the antilock braking system.
triggering of the ASR
or ESC regulation.
a fault with the
system. E.g.: under-
infl ation of the tyres.
deactivation of
the system at the
request of the driver.
The tyre pressure is
too low in or more
wheels.
The tyre pressure
monitoring system
has a fault or one of
the wheels does not
have a sensor.
The vehicle retains conventional steering without
assistance. Have it checked by a PEUGEOT
dealer or a qualifi ed workshop.
Check that all of the doors are closed.
The vehicle retains conventional braking.
Have it checked by a PEUGEOT dealer or a
qualifi ed workshop.
The system optimises traction and improves the
directional stability of the vehicle. Chapter 4,
"Driving safety" section.
E.g.: check the pressure of the tyres. (Wheel
speed sensor, hydraulic block, ...). Have it
checked by a PEUGEOT dealer or a qualifi ed
workshop.
Operation of the system is deactivated.
Reactivation is automatic above 30 mph
(50 km/h) or after pressing the button (on the
dashboard).
Check the tyre pressure as soon as possible.
This check should preferably be done with the
tyres cold.
Detection of under-infl ation is no longer assured.
Have it checked by a PEUGEOT dealer or a
qualifi ed workshop.
 Loading...