

Page 1
SLR DigitalC
amera
Quick Guide
Thank you for purchasing this PENTAX u Digital Camera.
When you use this camera for the first time, it is recommended you read
this Quick Guide first in order to gain a feel for the basic operation of the
camera. Refer to the separately supplied “Operating Manual” for further
explanation of function and advanced operations of the camera, and refer
to the separately supplied “PENTAX PHOTO Browser 3/PENTAX PHOTO
Laboratory 3 Operating Manual” and “PENTAX REMOTE Assistant 3
Operating Manual” for an explanation of how to connect the camera to
your PC.
Page 2

Page 3

Index
Check Before Starting
Checking the Contents of the Package ............................... 4
Names of Working Parts......................................................5
Getting Started
1 Charging the Battery............................................................6
2 Attaching the Strap .............................................................. 7
3 Inserting the Battery............................................................. 8
4 Inserting the SD Memory Card ............................................ 9
5 Attaching the Lens ............................................................. 11
6 Turning the Camera On ..................................................... 12
7 Initial Settings .................................................................... 13
Hints - When an Incorrect Language is Set ....................... 14
8 Formatting the SD Memory Card.......................................17
9 Adjusting the Viewfinder Diopter........................................ 19
Taking Pictures
1 Holding the Camera...........................................................20
2 Letting the Camera Choose the Optimal Settings ............. 21
Hints - Subjects that are Difficult to Focus on....................24
3 Using a Zoom Lens............................................................ 25
4 Using the Built-in Flash......................................................26
5 Taking Pictures Using the Shake Reduction Function....... 27
Playing Back Still Pictures
1 Playing Back Images ......................................................... 28
2 Deleting Images.................................................................30
3
Page 4
Check Before Starting
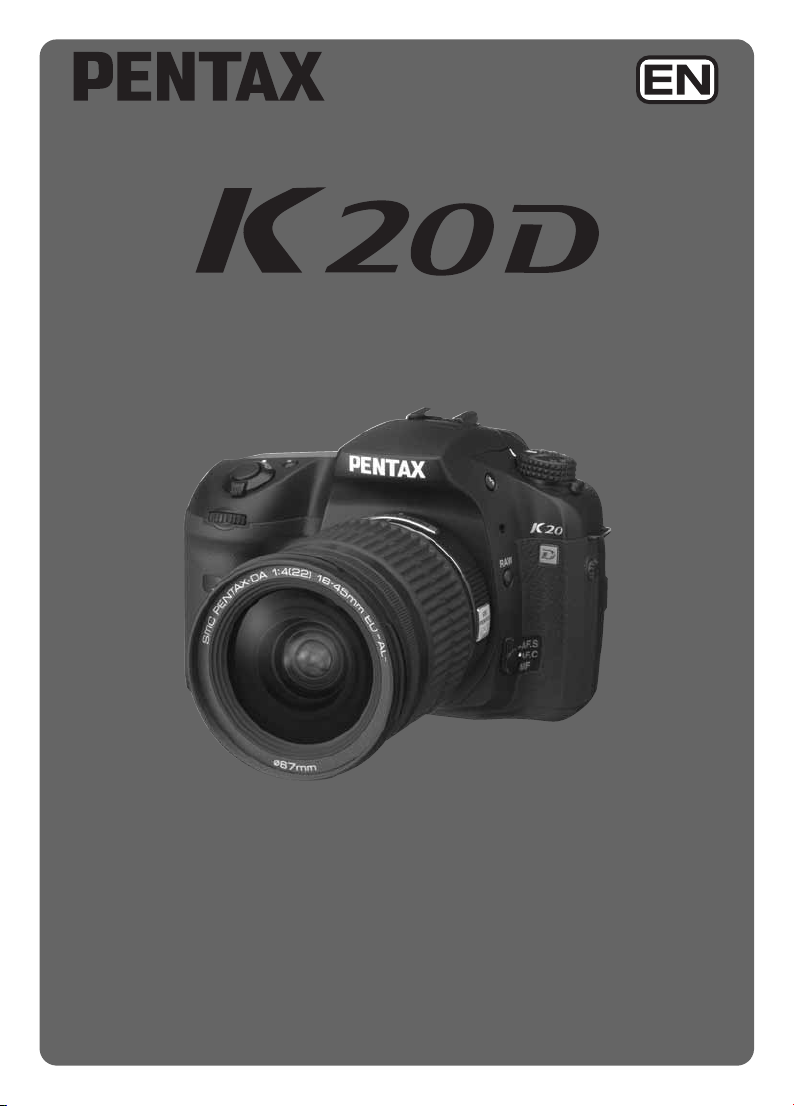
Checking the Contents of the Package
The following accessories are packaged with your camera.
Check that all accessories are included.
Hot shoe cover FK
(Installed on camera)
Sync socket 2P cap
(Installed on camera)
Video cable
I-VC28
Rechargeable lithium-ion
D-LI50 battery
Eyecup F
(Installed on camera)
Body mount cover
(Installed on camera)
Software (CD-ROM)
S-SW74, S-SW75
Battery charger
D-BC50
P
ME Viewfinder cap
USB cable
I-USB17
Strap
O-ST53
AC plug cord
Operating Manual Quick Guide
4
(this manual)
PENTAX PHOTO Browser 3/
PENTAX PHOTO Laboratory
3 Operating Manual
PENTAX REMOTE
Assistant 3
Operating Manual
Page 5
Names of Working Parts
Check the names of the working parts on the camera used for
basic recording and playing back operations.
In this page, only the names of the working parts that appear in this Quick Guide
are introduced. For further explanation about the names and functions of the
working parts, refer to the Operating Manual (p.17 - 21).
Main switch
Shutter release button
Mode dial
Front e-dial
Card cover
Lens mount index
(red dot)
Lens unlock button
Built-in Flash
3 button
i button
M button
Q button
Monitor
K button
Strap lug
Focus mode lever
Diopter adjustment
lever
LCD panel
Viewfinder
4 button
Card cover
unlock lever
Card access lamp
Shake Reduction
switch
Four-way controller
Tripod socket
Battery cover
unlock lever
Battery cover
5
Page 6
Getting Started
Before turning the camera on and starting to shoot, You need to prepare
the camera for use.
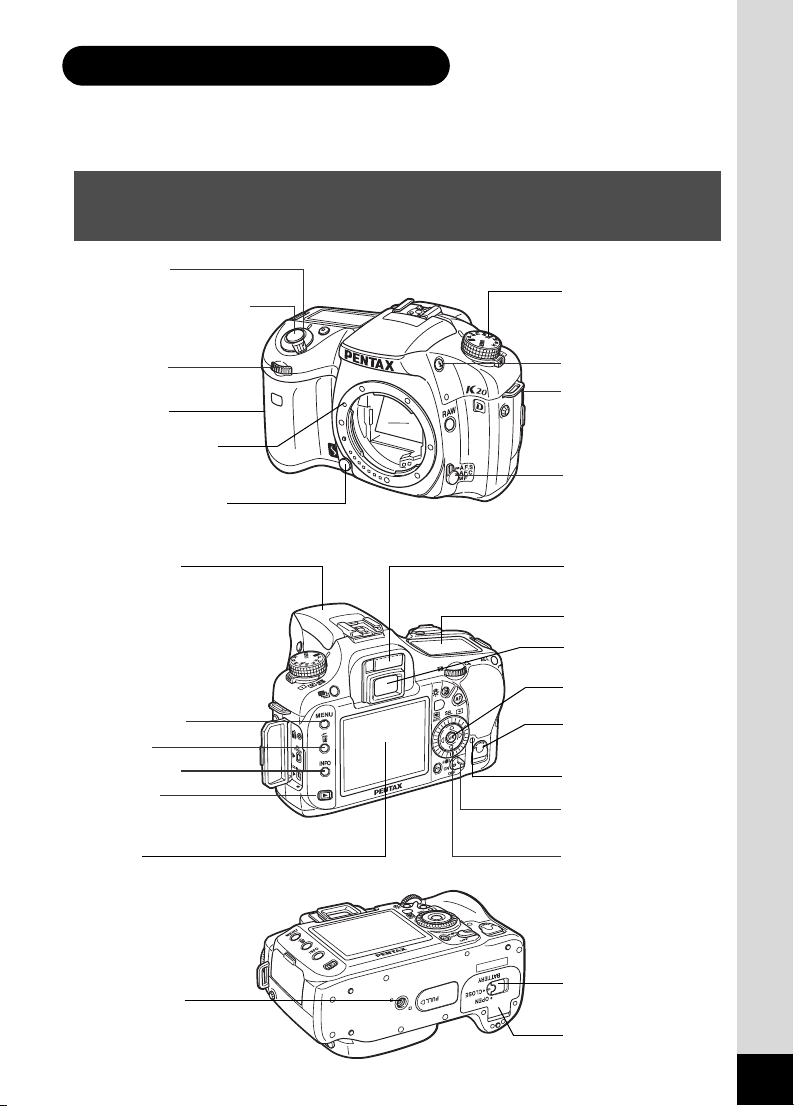
Charging the Battery
Battery charger D-BC50
Battery D-LI50
AC plug cord
Indicator lamp
1 Connect the AC plug cord to the battery charger.
2 Plug the AC plug cord into the power outlet.
3 Face the S mark on the exclusive battery up and insert it
into the battery charger.
The indicator lamp is lit red during charging.
The indicator lamp turns off when the battery is fully charged.
4 When the battery is fully charged, remove the battery from
the battery charger.
•
Do not use the provided battery charger to charge batteries other than rechargeable
lithium-ion battery D-LI50. Charging other batteries may cause damage or overheating.
•
If the battery is correctly oriented and inserted into the battery charger but the
indicator lamp is not lit, the battery is faulty. Install a new battery in the camera.
• The maximum charging time is approximately 180 minutes. Charge in a
location where the temperature is between 0°C and 40°C. (Charge time
depends on temperature and remaining battery power.)
• If usage time is reduced even when properly charged, the battery has
reached the end of its usage span. Install a new battery in the camera.
For further information and precautions for the battery, refer to the Operating
Manual (p.2 - 3 and p.35 - 39).
6
Page 7
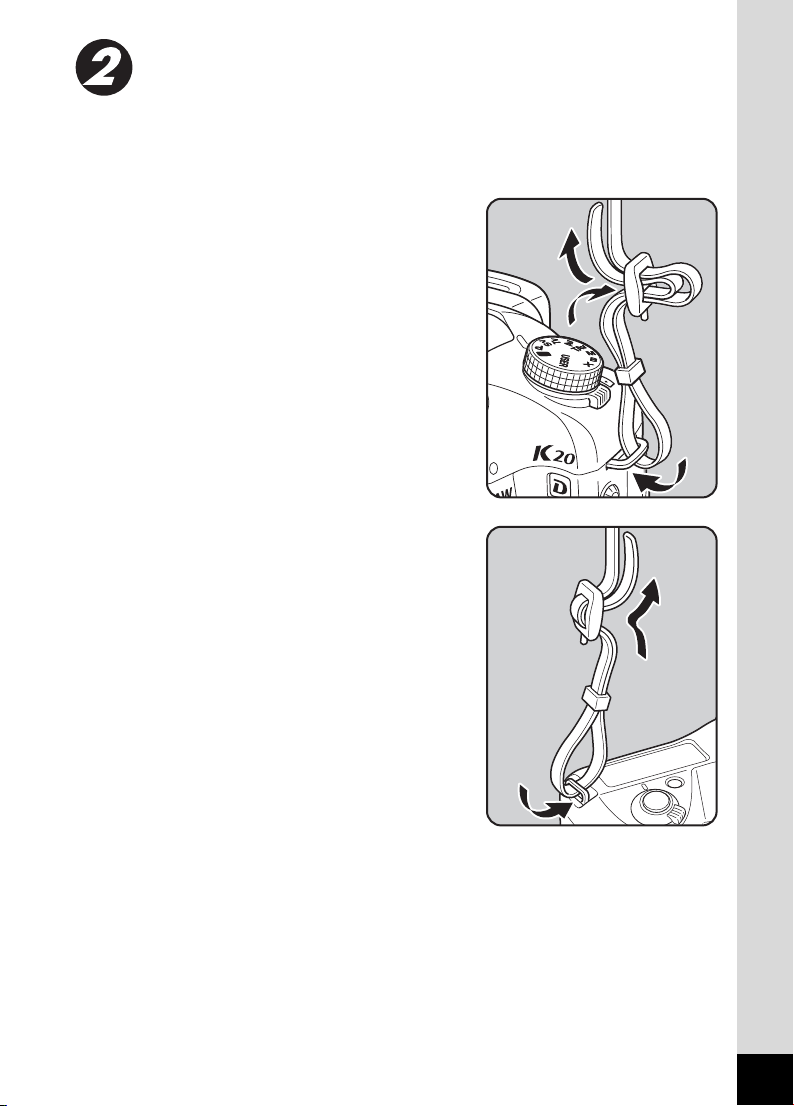
Attaching the Strap
Attach the supplied strap O-ST53 before shooting to prevent the camera
being dropped.
1 Pass the end of the strap
through the strap lug, then
secure it on the inside of the
clasp.
2 Pass the other end of the strap
through the other strap lug on
the camera, then secure it on
the inside of the clasp.
7
Page 8
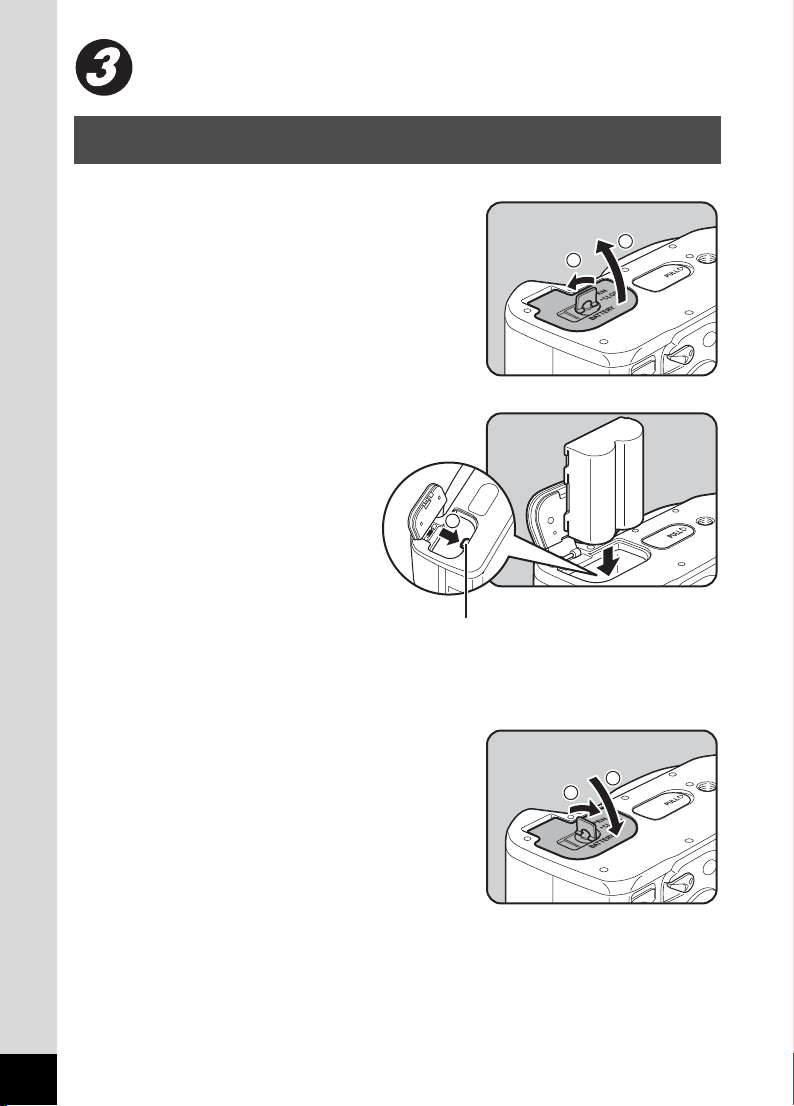
Inserting the Battery
For further information and precautions for the battery, refer to the Operating
Manual (p.2 - 3 and p.35 - 39).
1 Open the battery cover.
Lift the battery cover unlock lever, turn
towards OPEN (1) to unlock, and then
pull the cover open (2).
2 Face the S mark on the
battery towards the
monitor, push the
battery lock lever in the
direction of the arrow
(1) and insert the
battery.
1
2
1
Insert until the battery locks.
To remove the battery, push
the battery lock lever in the direction of the arrow (1) with your hand.
The battery pops out slightly. Remove it.
3 Close the battery cover (1)
and turn the battery cover
unlock lever towards CLOSE
(2) to lock.
Stow the battery cover unlock lever
when finished closing.
8
Battery lock lever
1
2
Page 9
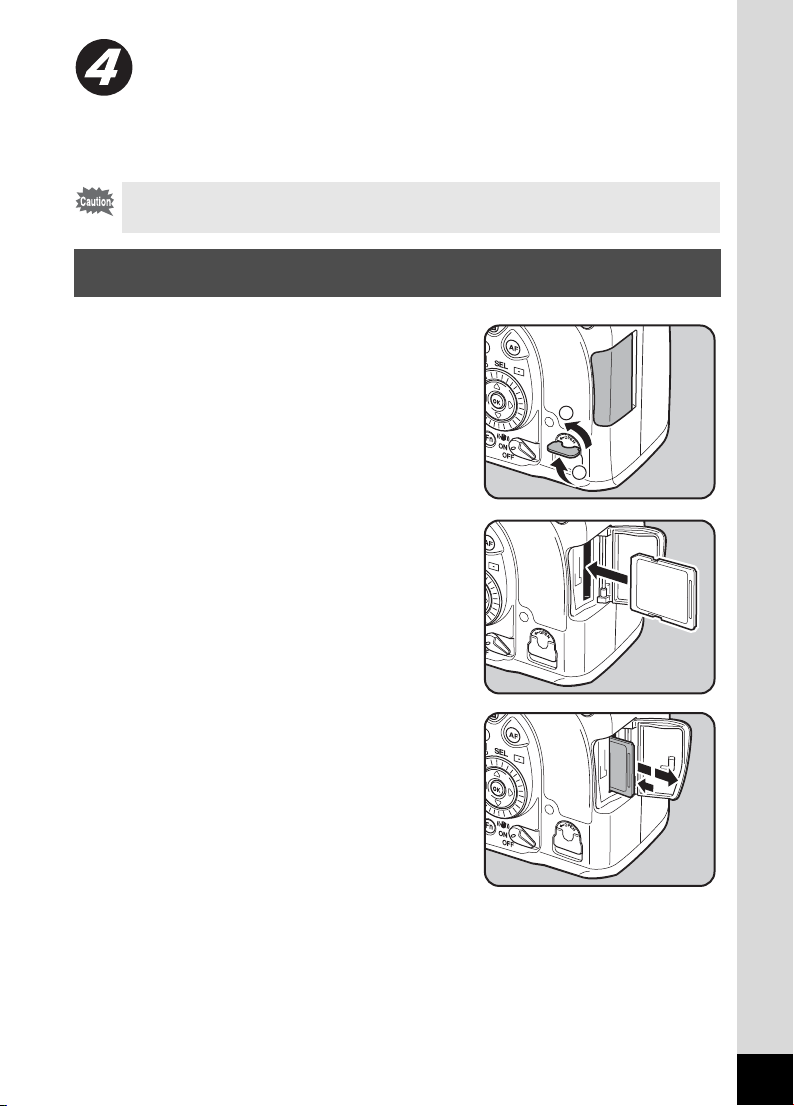
Inserting the SD Memory Card
This camera uses either an SD Memory Card or an SDHC Memory Card.
(Both cards are referred to as SD Memory Cards hereafter.)
Make sure the camera is turned off before inserting or removing the SD
Memory Card (market product).
For further information and precautions for the SD Memory Card, refer to the
Operating Manual (p.40 - 41).
1 Lift the card cover unlock lever
(1) and turn it towards OPEN
(2).
The card cover opens.
2 Insert the card all the way with
the SD Memory Card label
toward the monitor.
2
1
To remove the SD Memory Card, push
it in once.
9
Page 10

3 Close the card cover.
Be sure to fully close the card cover. The
camera will not turn on if the card cover is
open.
10
Page 11

Attaching the Lens
It is recommended to use the DA, D FA, FA J or other lenses with an
Aperture s (Auto) position.
• Turn the camera off before attaching or removing the lens to prevent
unexpected lens movement.
• We assume no responsibility nor liability for accidents, damages and
malfunctions resulting from the use of lenses made by other manufacturers.
For further information and precautions on selecting the lens or attaching or
removing the lens, refer to the Operating Manual (p.50 - 51 and 249 - 251).
1 Check that the camera is turned off.
2 Remove the body mount cover
(1) and lens mount cover (2).
Be sure to put the lens down with the
lens mount side facing upward to
protect the lens mount from damage
after removal.
3 Align the Lens mount index
(red dots) on the camera and
the lens, and secure by turning
the lens clockwise until it
clicks.
After attaching, turn the lens
counterclockwise to check that the lens
is locked in place.
11
Page 12

4 Remove the front lens cap by
pushing the indicated portions
inward.
To detach the lens, hold down the lens
unlock button (3) and turn the lens
counterclockwise.
Turning the Camera On
3
1 Move the main switch to [ON]
position.
The camera will turn on.
Move the main switch to [OFF] position
to turn off the camera.
12
Page 13

Initial Settings
Setting the Display Language
You can choose the language in which the menus, error messages, etc. are
displayed from the following: English, French, German, Spanish, Portuguese,
Italian, Dutch, Danish, Swedish, Finnish, Polish, Czech, Hungarian, Turkish,
Russian, Korean, Chinese (traditional/simplified) and Japanese.
1 Use the four-way controller
(2345) to select the desired
language.
The default setting is English.
OK
English
OK
2 Press the 4 button.
The [Initial Setting] screen for the
selected language appears.
Press the four-way controller (3) twice
and proceed to Step 9 if [Hometown]
does not have to be adjusted.
3
Press the four-way controller (3).
The cursor moves to W.
MENU
Initial Setting
Language
New York
Text Size Std.
MENU
Cancel
4 Press the four-way controller (5) and use the four-way
controller (45) to select the city.
5 Press the four-way controller (3).
The cursor moves to DST (daylight saving time).
6
Use the four-way controller (
45
) to select O (On) or P (Off).
7 Press the 4 button.
The camera returns to the [Initial Setting] screen.
8 Press the four-way controller (3).
OKCancel
OK
The cursor moves to [Text Size].
13
Page 14

9 Press the four-way controller (5)
AF.S
01
/
2008
/
00
:
00
P
P LINE
RAW+
9
and use the four-way controller
(23) to select [Std.] or [Large].
Selecting [Large] magnifies the selected
menu item.
Initial Setting
Language
New York
Text Size Large
MENU
Cancel
English
Std.
OK
OK
0 Press the 4 button twice.
The screen for setting the date and time will be displayed.
When an Incorrect Language is Set
When you mistakenly select a language in the [Language/ ] screen,
you can perform the following operations to set the correct language.
1 Press the 3 button once or twice
to display the guides on the monitor.
The screen shown on the right is an
example of the guides displayed. The
displayed screen will vary depending on
the selected language.
The guides appear on the monitor for 3
P
RAW
AF
2008
2008/
seconds. (Capture mode)
2 Press the 3 button once.
A is displayed in the upper tab. ([A Rec. Mode] menu)
3 Press the four-way controller (5) twice.
R is displayed in the upper tab. ([R Set-up] menu)
4 Use the four-way controller (3) to select [Language/ ] in the
bottom row.
5 Press the four-way controller (5).
The [Language/ ] screen appears.
6 Use the four-way controller (2345) to select the desired
language and press the 4 button.
The [R Set-up] menu for the selected language appears.
9
RAW+
RAW+
AF.S
AF.S
010101
01 01
P LINE
P LINE
00
00 00// :
00
Refer to the following pages on the Operating Manual and set the desired city
for [Hometown] and the current date and time as necessary.
• To change Hometown: “Setting the World Time” (p.221)
• To change date and time: “Changing the Date and Time and the Display Style”
(p.220)
14
Page 15

Setting the Date and Time
Set the current date and time and the display style.
1 Press the four-way controller
(5).
The frame moves to [mm/dd/yy].
Date Adjust
Date Style
Date
Time
MENU
Cancel
mm/dd/yy
2008/0101 /
00 :
00
OK
24h
OK
2 Use the four-way controller (23) to choose the date style.
3 Press the four-way controller
(5).
The frame moves to [24h].
Date Adjust
Date Style
Date
Time
MENU
Cancel
mm/dd/yy
2008/0101 /
00
00 :
OK
24h
OK
4 Use the four-way controller (23) to select 24h (24-hour
display) or 12h (12-hour display).
5 Press the four-way controller (5).
The frame returns to [Date Style].
6 Press the four-way controller (3).
The frame moves to [Date].
15
Page 16

7 Press the four-way controller
(5).
The frame moves to the month.
Date Adjust
Date Style
Date
Time
mm/dd/yy
2008/0101 /
00 :
00
24h
MENU
Cancel
OK
8 Use the four-way controller (23) to set the month.
Set the day and year in the same manner.
Next, set the time.
If you select [12h] in Step 4, the setting switches between am and pm
depending on the time.
9 Press the 4 button.
The camera is ready to take a picture. If you set the date and time with
the menu operations, the screen will return to the [R Set-up] menu.
Press the 4 button again.
When you finish the settings and press the 4 button, the camera clock is
reset to 00 seconds. To set the exact time, press the 4 button when the time
signal (on the TV, radio, etc.) reaches 00 seconds.
For further information on how to change the language and date/time, refer to
the Operating Manual (p.220, 224).
OK
16
Page 17

Formatting the SD Memory Card
Use this camera to format (initialize) an SD Memory Card that is unused
or has been used on other cameras or digital devices.
Formatting will delete all the data on the SD Memory Card.
• Do not open the card cover while formatting SD Memory Card. The card may
be damaged beyond use.
• Formatting will delete all data, either protected or unprotected. Be aware.
For further information and precautions for the SD Memory Card, refer to the
Operating Manual (p.40 - 41).
1 Press the 3 button in
Capture mode.
The [A Rec. Mode] menu appears on
the monitor.
Rec. Mode
14.6
JPEG Rec. Pixels
JPEG Quality
File Format
RAW file format
Extended Bracket
Multi-exposure
MENU
Exit
M
JPEG
PEF
Off
Off
1/2
2 Press the four-way controller
(5) twice.
The [R Set-up] menu appears.
Set-up
USER
Format
Beep
Date Adjust
World Time
MENU
Exit
EnglishLanguage
1/4
17
Page 18

3 Use the four-way controller (23) to select [Format].
Formatting
Cancel
4 Use the four-way controller (5) to display the Format
screen.
5 Use the four-way controller
(23) to select [Format].
6 Press the 4 button.
Formatting starts. When formatting is
completed, the monitor turns off and the
camera is ready to take pictures.
Format
All data deleted
Format
Cancel
Formatting
MENU
Cancel
Cancel
OK
OK
18
Page 19

Adjusting the Viewfinder Diopter
Adjust the viewfinder to suit your eyesight.
If it is difficult to see the viewfinder image clearly, slide the diopter
adjustment lever sideways.
You can adjust the diopter from approximately –2.5m
1 Look through the viewfinder
and point the camera at a white
wall or other bright and
consistent surface. Slide the
diopter adjustment lever left or
right.
Adjust the lever until the AF frame in
the viewfinder is focused.
-1
to +1.5m-1.
The FP Eyecup is attached to the viewfinder
portion when camera leaves the factory.
Diopter adjustment is available with the F
Eyecup attached. However, adjustment is
easier with the eyecup removed. To remove
the F
P Eyecup, press in one side and pull it
out in the direction of the arrow.
To attach the F
groove on the viewfinder eyepiece and push
it into position.
P Eyecup, align it with the
P
AF frame
19
Page 20

Taking Pictures
Holding the Camera
How you hold the camera is important when taking pictures.
• Hold the camera firmly with both hands.
• Press the shutter release button gently when taking a picture.
Horizontal position Vertical position
• To reduce camera shake, support your body or the camera on a solid object
such as a table, tree, or wall.
• Use a tripod or the Shake Reduction function (p.27) to prevent camera
shake. However, do not use the Shake Reduction function when using a
tripod.
20
Page 21

Letting the Camera Choose the
Optimal Settings
This section explains how to take pictures by simply pressing the shutter
release button.
The u features various Capture modes, Focus modes, and Drive modes
to let you create images that express your photographic vision. For further
information about various shooting methods of u, refer to the Operating
Manual (p.71 - 133).
1 Set the mode dial to B.
The Exposure mode changes to B
(Green) mode. In B, proper
exposure is determined by the
camera and the shutter speed and
aperture are automatically set.
For further information about B
(Green) mode, refer to the Operating
Manual (p.83).
2 Set the focus mode lever to
l.
The Focus mode changes to l
(Autofocus/Single) mode. In l, the
lens automatically focuses when the
shutter release button is pressed
halfway. When the image is focused,
the shutter can be released.
For further information about focusing
methods, refer to the Operating
Manual (p.104).
21
Page 22

3 Look through the viewfinder to
view the subject.
A zoom lens can be used to change the
size of the subject in the viewfinder.
1 Using a Zoom Lens (p.25)
4 Position the subject inside the
AF frame and press the shutter
release button halfway.
The focus indicator ] appears in the
viewfinder when the subject comes into
focus.
The flash does not pop up automatically.
If the flash is necessary, the flash status
E blinks. Press the K button (p.26) to
pop up the flash manually.
1Operating the shutter release button
(p.23)
1Subjects that are Difficult to Focus on
(p.24)
1Using the Built-in Flash (p.26)
Flash
status
Focus indicator
5 Press the shutter release
button fully.
The picture is taken.
22
Page 23

6 Review the captured image on
Delete
the monitor.
The captured image appears for 1
second on the monitor (Instant
Review).
Operating the shutter release button
The shutter release button has two working positions.
Delete
Delete
Not pressed Pressed halfway
(first position)
Pressed fully
(second position)
Pressing it down halfway (first position) turns on the viewfinder and
LCD panel indicators and the autofocus system operates. Pressing it
fully (second position) takes the picture.
• Press the shutter release button gently when taking a picture to prevent
camera shake.
• Practice pressing the shutter release button halfway to learn where the
first position is.
23
Page 24

Subjects that are Difficult to Focus on
The autofocus mechanism is not perfect. Focusing may be difficult when
taking pictures under the following conditions ((a) to (f) below).
(a) Extremely low-contrast subjects such as a white wall in the
focusing area.
(b) Subjects which do not reflect much light within the focusing area.
(c) Fast moving objects.
(d) Strongly reflected light or strong backlighting (bright background).
(e) If repeating vertical or horizontal line patterns appear within the
focusing area.
(f) Multiple subjects in the foreground and background within the
focusing area.
Your subject may not be focused even when ] (focus indicator) is displayed
when (f) above applies.
For further information on how to adjust the focus manually, refer to the
Operating Manual (p.110 - 112).
24
Page 25

Using a Zoom Lens
Enlarge the subject (telephoto) or capture a wider area (wide angle) with
a zoom lens. Adjust it to the desired size and take the picture.
1 Turn the zoom ring to the right
or left.
Turn the zoom ring clockwise for
telephoto and counterclockwise for
wide angle.
• The smaller the number of the displayed focal length, the wider the angle.
The larger the number, the more magnified the image appears.
• Power Zoom (Auto Zoom) is available if a Power Zoom compatible FA lens
is used with this camera.
Wide Angle Telephoto
25
Page 26

Using the Built-in Flash
If you wish to discharge the flash in a dark or backlit location, press the
K button to pop up the flash.
For further information on how to use the flash, refer to the Operating Manual
(p.135 - 151).
1 Press the K button.
The built-in flash pops up and begins
charging. When the flash is fully
charged, E appears in the LCD panel
and viewfinder.
2 Press the shutter release button halfway.
The focus indicator ] appears in the viewfinder when the camera is in focus.
3 Press the shutter release button fully.
The picture is taken.
• When the mode dial is at B, the flash is not discharged when the lighting
conditions do not require flash for correct exposure even if the flash is popped
up.
• The Flash On mode is used when the flash is popped up if the mode dial is
at a setting other than B.
4 Push down on the portion
indicated in the illustration to
retract the flash.
26
Page 27

Taking Pictures Using the Shake
Reduction Function
The Shake Reduction function reduces camera shake that occurs when
the shutter release button is pressed.
For further information about the Shake Reduction function, refer to the
Operating Manual (p.65 - 67).
1 Turn on the Shake Reduction
switch.
When the shutter release button is
pressed halfway, k appears in the
viewfinder and the Shake Reduction
function turns on.
Be sure to turn off the Shake Reduction switch when using the camera with a
tripod.
27
Page 28

Playing Back Still Pictures
After you enjoy shooting, you can play back the pictures taken on the
camera.
Playing Back Images
You can play back captured still pictures with the camera.
Use the included “PENTAX PHOTO Browser 3” software to play back using a
PC. Refer to the “PENTAX PHOTO Browser 3/PENTAX PHOTO Laboratory 3
Operating Manual” for details.
1 Press the Q button after
taking a picture.
The most recently captured image
(image with the largest file number) is
displayed on the monitor.
Press the M button during
playback to display information such
as the image data for the displayed
image.
Refer to the next page for display
information details.
28
Page 29

100-0001
RGB
100-0001
100-0001
1/2000
F2.8
JPEG
ISO
10000K
A1
AdobeRGB
200
AF.S
100-0001
1/2000
+1.5
F2.8
-
0.5
10
:
mm
±0
±0
±0
±0
g
/
2008
100-0001
1/2000
1/2000
F2.8
F2.8
Standard display
M
100-0001
100-0001
RGB
RGB
Histogram display
+1.5
+1.5
2008
AvAvAv
10000K
10000K
10
M
100-0001
100-0001
AF.S
AF.S
242424
g
0.5
-
0.5
G2G2A1
A1
G2
AdobeRGB
AdobeRGB
393910 : 39
AMAMAM
mm
mm
±0
±0
±0
±0
M
M
1/2000
1/2000
F2.8
F2.8
ISO
ISO
JPEG
JPEG
020202022008//02 02/
200
200
14.6
No info. Display Detailed information display
2 Press the four-way controller
(45).
4 : The previous image appears.
5 : The next image appears.
You can display the next or previous image by turning the front e-dial.
• Refer to “Playback Functions” (p.169 - 191) for playback mode details.
• You can process pictures taken with the camera. For further information, refer
to the Operating Manual (p.193 - 201).
29
Page 30

Deleting Images
100-0046
OK
Cancel
All images
You can delete one image at a time.
• Deleted images cannot be restored.
• Protected images cannot be deleted.
1 Press the Q button and use the four-way controller (45)
to select an image to delete.
2 Press the i button.
The Delete screen appears.
3 Use the four-way controller
(23) to select [Delete].
Select the file format to delete for
images saved in RAW+ format.
Delete JPEG
Delete RAW
Delete
RAW+JPEG
Deletes only the JPEG
image.
Deletes only the RAW
image.
Deletes both file formats.
4 Press the 4 button.
The image is deleted.
30
Delete
Cancel
Cancel
All images
All images
100-0046
100-0046
OK
OK
OK
Page 31

MEMO
31
Page 32

PENTAX Corporation 2-36-9, Maeno-cho, Itabashi-ku, Tokyo 174-8639, JAPAN
(http://www.pentax.co.jp/)
PENTAX Europe GmbH
(European Headquarters)
PENTAX U.K. Limited PENTAX House, Heron Drive, Langley, Slough, Berks
PENTAX France S.A.S. 112 Quai de Bezons, B.P. 204
PENTAX Italia S.r.l. Via Dione Cassio 15, 20138 Milano, ITALY
PENTAX (Schweiz) AG Widenholzstrasse 1, 8304 Wallisellen, Postfach 367,
PENTAX Scandinavia AB P.O. Box 650, 75127 Uppsala, SWEDEN
PENTAX Imaging Company
A Division of PENTAX of America, Inc.
PENTAX Canada Inc. 1770 Argentia Road Mississauga, Ontario L5N 3S7,
PENTAX Trading
(SHANGHAI) Limited
Julius-Vosseler-Strasse 104, 22527 Hamburg,
GERMANY
(HQ - http://www.pentaxeurope.com)
(Germany - http://www.pentax.de)
SL3 8PN, U.K.
(http://www.pentax.co.uk)
95106 Argenteuil Cedex, FRANCE
(http://www.pentax.fr)
(http://www.pentaxitalia.it)
8305 Dietlikon, SWITZERLAND
(http://www.pentax.ch)
(http://www.pentax.se)
(Headquarters)
600 12th Street, Suite 300 Golden, Colorado 80401, U.S.A.
(PENTAX Service Department)
12000 Zuni Street, Suite 100B Westminster, Colorado
80234, U.S.A.
(http://www.pentaximaging.com)
CANADA
(http://www.pentax.ca)
23D, Jun Yao International Plaza, 789 Zhaojiabang Road,
Xu Hui District, Shanghai, 200032 China
http://www.pentax.co.jp/english
• Specifications and external dimensions are subject to change without notice.
57998 Copyright © PENTAX Corporation 2008
00-200801 Printed in Philippines
 Loading...