

Page 1
SLR Digital Camera
Operating Manual
For optimum camera performance, please read
the Operating Manual before using the camera.
Page 2

Thank you for purchasing this PENTAX x Digital Camera. Please
read this manual before using the camera in order to get the most out of all the
features and functions. Keep this manual safe, as it can be a valuable tool in
helping you to understand all the camera capabilities.
Lenses you can use
In general, lenses that can be used with this camera are DA, D FA and FA J lenses and
lenses that have an Aperture s (Auto) position.
To use any other lens or accessory, see p.45 and p.230.
Regarding copyrights
Images taken using the x that are for anything other than personal enjoyment
cannot be used without permission according to the rights as specified in the Copyright
Act. Please take care, as there are cases where limitations are placed on taking
pictures even for personal enjoyment during demonstrations, performances or of items
on display. Images taken with the purpose of obtaining copyrights also cannot be used
outside the scope of use of the copyright as laid out in the Copyright Act, and care
should be taken here also.
Regarding trademarks
PENTAX and smc PENTAX are trademarks of PENTAX Corporation.
SD logo and SDHC logo are trademarks.
This product includes DNG technology under license by Adobe Systems Incorporated.
The DNG logo is either a registered trademark or trademark of Adobe Systems
Incorporated in the United States and/or other countries.
All other brands or product names are trademarks or registered trademarks of their
respective companies.
To users of this camera
• There is a possibility that recorded data may be erased or that the camera may not
function correctly when used in surroundings such as installations generating strong
electromagnetic radiation or magnetic fields.
• The liquid crystal panel used in the monitor is manufactured using extremely high
precision technology. Although the level of functioning pixels is 99.99% or better, you
should be aware that 0.01% or fewer of the pixels may not illuminate or may illuminate
when they should not. However, this has no effect on the recorded image.
This product supports PRINT Image Matching III. PRINT Image Matching enabled
digital still cameras, printers and software help photographers to produce images more
faithful to their intentions. Some functions are not available on printers that are not
PRINT Image Matching III compliant.
Copyright 2001 Seiko Epson Corporation. All Rights Reserved.
PRINT Image Matching is a trademark of Seiko Epson Corporation.
The PRINT Image Matching logo is a trademark of Seiko Epson Corporation.
Regarding PictBridge
PictBridge allows the user to connect the printer and digital camera directly, using the
unified standard for the direct printout of images. You can print images directly from the
camera through a few simple operations.
• There is a possibility that the illustrations and the display screen of the monitor in this
manual are different from the actual product.
Page 3

FOR USING YOUR CAMERA SAFELY
We have paid close attention to the safety of this product. When using this
product, we request your special attention regarding items marked with the
following symbols.
1
Warning
Caution
This symbol indicates that violating this item could cause
serious personal injuries.
This symbol indicates that violating this item could cause
minor or medium personal injuries, or material losses.
ABOUT THE CAMERA
Warning
• Do not disassemble or modify the camera. High voltage areas are present
inside the camera, with the risk of electric shock.
• If the camera interior is exposed due to dropping or otherwise damaging the
camera, never touch the exposed portion. There is the risk of electric shock.
• To avoid the risk of it being swallowed by mistake, keep the SD Memory
Card out of the reach of small children. Seek medical attention immediately
if a memory card is accidentally swallowed.
• Wrapping the strap around your neck is dangerous. Take care that small
children do not hang the strap over their necks.
• Do not look directly at the sun through the camera with a telephoto lens
attached, as viewing the sun may damage your eyes. Viewing the sun
directly with a telephoto lens may lead to a loss of eyesight.
• Be sure to store the batteries out of the reach of children. Placing in mouth
may cause an electrical shock.
• Always use the AC adapter exclusively developed for this product, with the
specified power and voltage. Using an AC adapter not exclusive to this
product, or using the exclusive AC adapter with an unspecified power or
voltage can cause a fire, electric shock, or camera breakdown.
• If any irregularities occur during use, such as smoke or a strange odor, stop
use immediately, remove the batteries or the AC adapter, and contact your
nearest PENTAX Service Center. Continued use could cause a fire or
electric shock.
• During thunderstorms, unplug and discontinue use of the AC adapter.
Continued use could cause equipment failure, a fire, or electric shock.
Page 4

2
Caution
• Do not short the batteries or dispose of the batteries in fire. Do not
disassemble the batteries. The batteries could explode or catch fire.
• Of the batteries that can be used in this camera (AA Ni-MH batteries, AA
lithium batteries and AA alkaline batteries), only the Ni-MH batteries can be
recharged. Recharging other batteries can cause a fire or explosion.
• Remove the batteries from the camera immediately if they become hot or
begin to smoke. Be careful not to burn yourself during removal.
• Some portions of the camera heat up during use. There is the risk of low
temperature burns when holding such portions for long periods.
• Do not place your finger over or cover the flash with clothing when
discharging the flash. Fingers or clothing may be burned.
• To reduce the risk of hazards, use only CSA/UL Certified power supply cord
set, cord is Type SPT-2 or heavier, minimum NO.18 AWG copper, one end
with a molded-on male attachment plug cap (with a specified NEMA
configuration), and the other is provided with a molded-on female connector
body (with a specified IEC nonindustrial type configuration) or the equivalent.
PRECAUTIONS FOR BATTERY USAGE
• Only use the specified batteries with this camera. Use of other batteries can
cause a fire or explosion.
• Replace all the batteries at the same time. Do not mix battery brands, type
or an old battery with a new one. It may cause explosion or a fire.
• The batteries should be inserted correctly with regard to polarity (+ and –)
marked on the batteries and the camera. Not inserting batteries correctly
may cause explosion or a fire.
• Do not disassemble the batteries. Of the batteries that can be used in this
camera, only the Ni-MH batteries can be recharged. Disassembling the
batteries or attempting to charge non-rechargeable batteries could result in
explosion or leakage.
Care to be Taken During Handling
• When traveling, take the Worldwide Service Network that is included in the
package. This will be useful if you experience problems abroad.
Page 5

• When the camera has not been used for a long time, confirm that it is still
working properly, particularly prior to taking important pictures (such as at a
wedding or during traveling). Pictures cannot be guaranteed if recording,
playback or transferring your data to a computer, etc. is not possible due to
a malfunction of your camera or recording media (SD Memory Card), etc.
• Do not clean the product with organic solvents such as thinner or alcohol
benzene.
• Do not subject the camera to high temperatures or high humidity. Do not
leave the camera in a vehicle, as the temperature can get very high.
• Do not store the camera with preservatives and chemicals. Storage in high
temperatures and high humidity can cause mold to grow on the camera.
Remove from the case and store in a dry and well-ventilated location.
• Do not subject the camera to strong vibrations, shocks, or pressure. Use a
cushion to protect the camera from vibrations of motorcycles, automobiles,
or ships.
• The temperature range for camera use is 0°C to 40°C (32°F to 104°F).
• The LCD display may appear black under high temperatures, but will return
to normal as temperatures normalize.
• The LCD display may respond more slowly at low temperatures. This is due
to liquid crystal properties, and is not a fault.
• Periodic inspections are recommended every one to two years to maintain
high performance.
• Sudden temperature changes will cause condensation on the inside and
outside of the camera. Place the camera in your bag or a plastic bag,
removing the camera after temperature of the camera and surroundings are
equalized.
• Avoid contact with garbage, mud, sand, dust, water, toxic gases, or salts.
These could cause a camera breakdown. Wipe dry any rain or water drops
on the camera.
• Refer to “Precautions When Using the SD Memory Card” (p.42) regarding
the SD Memory Card.
• Use a lens brush to remove dust accumulated on the lens or viewfinder.
Never use a spray blower for cleaning as it may damage the lens.
• Please contact PENTAX Service Center for professional cleaning of the
CCD. (This will involve a fee.)
• Please do not press forcefully on the monitor. This could cause breakage or
malfunction.
• Depending on a user's physical condition, some users may experience
itching, break out in a rash or suffer from eczema. If an abnormality occurs,
immediately discontinue using the camera and seek medical attention.
3
Page 6

4
Regarding Product Registration
In order to better serve you, we request that you complete the product registration,
which can be found on the CD-ROM supplied with the camera or on the PENTAX
website. Thank you for your cooperation.
Refer to the PENTAX PHOTO Browser 3/PENTAX PHOTO Laboratory 3 Operating
Manual (Windows users: p.9, Mac OS users: p.10) for more information.
Page 7

Contents
FOR USING YOUR CAMERA SAFELY ...............................................1
ABOUT THE CAMERA.........................................................................1
PRECAUTIONS FOR BATTERY USAGE............................................2
Care to be Taken During Handling .......................................................2
Contents ...............................................................................................5
Composition of the Operating Manual ................................................11
Before Using Your Camera 13
x Camera Characteristics ............................................. 14
Checking the Contents of the Package...................................... 16
Names and Functions of Working Parts .................................... 17
Camera...............................................................................................17
Capture Mode.....................................................................................18
Playback Mode ...................................................................................20
Display Indicators ........................................................................ 22
Monitor................................................................................................22
Viewfinder...........................................................................................27
LCD Panel ..........................................................................................29
How to Operate the Menu............................................................ 30
Using the Mode Dial..................................................................... 32
5
Getting Started 35
Attaching the Strap ...................................................................... 36
Inserting the Batteries ................................................................. 37
Battery Level Indicator........................................................................38
Approximate Image Storage Capacity and Playback Time
(new batteries)....................................................................................39
Using the AC Adapter (Optional) ........................................................40
Inserting/Removing the SD Memory Card ................................. 41
Recorded Pixels and Quality Level.....................................................43
Attaching the Lens....................................................................... 45
Adjusting the Viewfinder Diopter ............................................... 47
Turning the Camera On and Off.................................................. 48
Initial Settings .............................................................................. 49
Setting the Display Language.............................................................49
Setting the Date and Time..................................................................52
Page 8

6
Basic Operations 55
Basic Shooting Operation ........................................................... 56
Holding the Camera............................................................................56
Letting the Camera Choose the Optimal Settings ..............................57
Using a Zoom Lens...................................................................... 61
Using the Built-in Flash ............................................................... 62
Taking Pictures Using the Shake Reduction Function............. 67
Turning On the Shake Reduction Function.........................................68
Setting the Shake Reduction Function ...............................................69
Playing Back Still Pictures .......................................................... 70
Playing Back Images..........................................................................70
Deleting Images ........................................................................... 72
Deleting a Single Image......................................................................72
Shooting Functions 73
How to Operate the Shooting Menus ......................................... 74
[A Rec. Mode] Menu Setting Items...................................................74
[A Custom Setting] Menu Setting Items.............................................75
Shooting Fn Menu Setting Items ........................................................77
Selecting the Appropriate Capture Mode for Scenes ............... 78
Selecting the Shooting Scene.............................................................79
Setting the Exposure ................................................................... 81
Effect of Aperture and Shutter Speed.................................................81
Setting the Sensitivity .........................................................................83
Changing the Exposure Mode ............................................................85
Selecting the Metering Method...........................................................98
Adjusting the Exposure.....................................................................100
Focusing ..................................................................................... 102
Using the Autofocus..........................................................................102
Setting the AF Mode.........................................................................104
Selecting the Focusing Area (AF Point)............................................105
Fixing the Focus (Focus Lock)..........................................................107
Adjusting the Focus Manually (Manual Focus).................................109
Shooting in Catch-in Focus Mode.....................................................111
Page 9

Checking the Composition, Exposure and Focus Before
Shooting ..................................................................................... 112
Selecting the Preview Method ..........................................................112
Displaying the Preview .....................................................................113
Continuous Shooting................................................................. 115
Self-Timer Shooting ................................................................... 117
Remote Control Shooting (Remote Control F:
Sold Separately) ......................................................................... 120
Using Mirror Up Function to Prevent Camera Shake ............. 123
Changing the Shooting Conditions Automatically when
Shooting (Auto Bracket)............................................................ 124
Using the Flash 127
Compensating Flash Output ..................................................... 128
Allowing Shooting while Charging the Flash .......................... 129
Flash Characteristics in Each Exposure Mode ....................... 130
Distance and Aperture when Using the Built-in Flash ........... 132
DA, D FA, FA J, FA and F Lens Compatibility
with the Built-in Flash................................................................ 133
Using an External Flash (Optional) .......................................... 134
Shooting Settings 143
7
Setting the Image Processing Method in Capture Mode
(Custom Image).......................................................................... 144
Setting the File Format .............................................................. 146
Setting the JPEG Recorded Pixels...................................................146
Setting the JPEG Quality Level ........................................................147
Setting the File Format .....................................................................148
Setting the RAW Button Function.....................................................149
Setting the White Balance ................................................................150
Setting the Color Space....................................................................155
Page 10

8
Playback Functions 157
How to Operate the Menus During Playback........................... 158
[Q Playback] Menu Setting Items...................................................158
[A Custom Setting] Menu Setting Items...........................................158
Playback Fn Menu Setting Items......................................................159
Rotating Images ......................................................................... 160
Enlarging Playback Images ...................................................... 161
Displaying Multiple Images ....................................................... 163
Displaying a Folder .................................................................... 165
Comparing Images..................................................................... 166
Slideshow ................................................................................... 167
Setting the Slideshow Display Interval..............................................169
Changing Playback Display Method ........................................ 170
Deleting Multiple Images ........................................................... 173
Deleting All Images...........................................................................173
Deleting Selected Images (from Multi-image Display)......................174
Deleting a Folder ..............................................................................176
Protecting Images from Deletion (Protect) .............................. 177
Connecting the Camera to AV Equipment............................... 179
Processing Images 181
Processing Images with Digital Filters .................................... 182
Editing RAW Images .................................................................. 185
Editing a RAW Image .......................................................................185
Specifying the Parameters................................................................186
Printing from the Camera 189
Setting the Printing Service (DPOF)......................................... 190
Printing Single Images......................................................................190
Settings for All Images......................................................................191
Printing Using PictBridge.......................................................... 193
Setting Transfer Mode......................................................................194
Connecting the Camera to the Printer ..............................................195
Printing Single Images......................................................................196
Printing All Images............................................................................198
Printing Images Using the DPOF Settings........................................199
Disconnecting the USB Cable ..........................................................199
Page 11

Camera Settings 201
How to Operate the [R Set-up] Menu ...................................... 202
[R Set-up] Menu Setting Items.........................................................202
Formatting the SD Memory Card .............................................. 203
Setting the Beep Setting, Date and Time, and Display
Language .................................................................................... 204
Turning the Beep On and Off............................................................204
Changing the Date and Time and the Display Style.........................205
Setting the World Time.....................................................................206
Setting the Display Language...........................................................209
Adjusting the Monitor and the Menu Display .......................... 210
Setting the Text Size.........................................................................210
Setting the Guide Display Time ........................................................210
Adjusting the Brightness of the Monitor............................................211
Setting the Display for Instant Review and Digital Preview ..............211
Setting the Image Folder Naming Convention ........................ 213
Selecting the Folder Name ...............................................................213
Selecting the File Number Setting ....................................................213
Selecting the Video Output Format and Power Settings........ 214
Selecting the Video Output Format...................................................214
Setting Auto Power Off .....................................................................214
Selecting a Battery............................................................................215
Using Pixel Mapping .................................................................. 216
Selecting Capture Mode Settings to Save in the Camera ...... 217
9
Resetting to Default Settings 219
Resetting Rec. Mode/Playback/
Set-up Menu ............................................................................... 220
Resetting the Custom Function Menu ..................................... 221
Page 12

10
Appendix 223
Default Settings.......................................................................... 224
Functions Available with Various Lens Combinations .......... 228
Notes on [23. Using Aperture Ring] ......................................... 230
Cleaning the CCD....................................................................... 231
Removing Dust by Shaking the CCD................................................231
Detecting Dust on the CCD (Dust Alert) ...........................................231
Removing Dust with a Blower...........................................................233
Optional Accessories ................................................................ 235
Error Messages .......................................................................... 240
Troubleshooting......................................................................... 243
Main Specifications ................................................................... 246
Glossary...................................................................................... 250
Index............................................................................................ 255
WARRANTY POLICY.................................................................. 260
Page 13
Composition of the Operating Manual
This Operating Manual contains the following chapters.
11
1 Before Using Your Camera
Explains camera characteristics, accessories and the names and functions of various
parts.
2 Getting Started
Explains your first steps from purchasing the camera to taking pictures. Be sure to read
it and follow the instructions.
3 Basic Operations
Explains the procedures for taking and playing back still pictures.
4 Shooting Functions
Explains the shooting-related functions.
5 Using the Flash
Explains how to use the built-in flash and the external flash.
6 Shooting Settings
Explains the procedures for configuring image processing and setting the save format.
7 Playback Functions
Explains the procedures for playing back, deleting, and protecting still pictures.
8 Processing Images
Explains the procedures for using image filters and processing pictures taken in RAW
format.
9 Printing from the Camera
Explains the procedures for setting the print settings and printing still pictures while
directly connected to a printer.
1
2
3
4
5
6
7
8
9
10
10 Camera Settings
Explains the procedures for changing the camera settings, such as the monitor settings
and the image file naming convention.
11 Resetting to Default Settings
Explains the procedure for resetting all settings to their default settings.
12 Appendix
Explains troubleshooting, introduces optional accessories and provides various
resources.
11
12
Page 14

12
The symbols used in this Operating Manual are explained below.
1
Shows reference page number explaining a related operation.
Shows useful information.
Shows precautions to take when operating the camera.
Page 15

1 Before Using Your
Camera
Check the package contents and names and functions of
working parts before use.
x Camera Characteristics .....................14
Checking the Contents of the Package ..............16
Names and Functions of Working Parts ............17
Display Indicators ................................................22
How to Operate the Menu ....................................30
Using the Mode Dial .............................................32
When using menus and Fn menu, items which cannot be changed due
to camera settings appear gray and cannot be selected.
Page 16

14
x Camera Characteristics
• Features a 23.5×15.7 mm CCD with approximately 10.2 million effective
pixels for high precision and a wide dynamic range.
• Features Shake Reduction (SR), an image sensor shifting shake
1
reduction system. This enables you to capture sharp pictures with
Before Using Your Camera
minimal camera shake regardless of the lens type.
• Features an AF sensor with 11 focusing points. The central 9 are wide
cross area sensors.
• Features a viewfinder similar to that of a conventional 35 mm camera,
with a magnification of approximately 0.85 and field of view of
approximately 96%, for easier manual focusing. Also features a
superimpose function in which the AF points on the viewfinder illuminate
red.
• Features a large 2.7-inch monitor with approximately 230,000 dots, a
wide viewing angle and brightness adjusting function for high-precision
viewing performance.
• Uses AA lithium batteries, rechargeable AA Ni-MH batteries or AA
alkaline batteries.
• A user-friendly design has been implemented in various parts of the
camera. The large text, high-contrast monitor and easy-to-use menus
make the camera easier to operate.
• Dials, buttons, body joints, and retractable parts of the camera are
splash and dust resistant.
• The CCD features a special SP coating against dust deposit. The Dust
Removal function also shakes the CCD for removing collected dust.
• Supports the optional Battery Grip D-BG3 with the vertical shutter
release button. If batteries are inserted in both the camera and grip, the
battery set with more power is prioritized. This enables you to get the
best camera performance for an extended period. A menu item also
allows you to prioritize a battery set and use its full power before
switching to the other.
• Features Custom Image which allows you to adjust settings while
previewing the edited image, enabling a wider range of expression.
• Records in the versatile JPEG format or the high quality and fully
editable RAW format. You can also select JPEG+RAW and record in
both formats. Pictures taken in RAW format can be easily processed
internally by the camera.
• Features Hyper-program and Hyper-manual modes that let you take
pictures flexibly with the intended exposure. Also features Sensitivity
Priority mode K that automatically adjusts aperture and shutter speed
according to the set sensitivity.
Page 17

The captured area (view angle) will differ between the x and 35 mm
SLR cameras even if the same lens is used because the format size for 35 mm
film and CCD are different.
Sizes for 35 mm film and CCD
35 mm film : 36×24 mm
x CCD : 23.5×15.7 mm
Angles of view being equal,
must be approximately 1.5 times longer than that of
of view framing the same
Example) To capture the same image as a 150 mm lens attached to a 35 mm
camera
150÷1.5=100
Use a 100 mm lens with the x.
Inversely, multiply the focal length of the lens used with x by 1.5 to
determine the focal length for 35 mm cameras.
Example) If 300 mm lens is used with x
300×1.5=450
Focal length is equivalent to a 450 mm lens on a 35 mm camera.
the focal length of a lens used with a 35 mm camera
x
area, divide the focal length of the 35 mm lens by 1.5.
. To obtain an angle
Shake Reduction (SR)
Shake Reduction (SR) on the x features a PENTAX original
system which uses magnetic force to move the image sensor at high
speeds, compensating camera shake.
The camera may generate some operating noise when it is shaken, such
as when changing the composition of a picture. It is not a malfunction.
15
1
Before Using Your Camera
Page 18
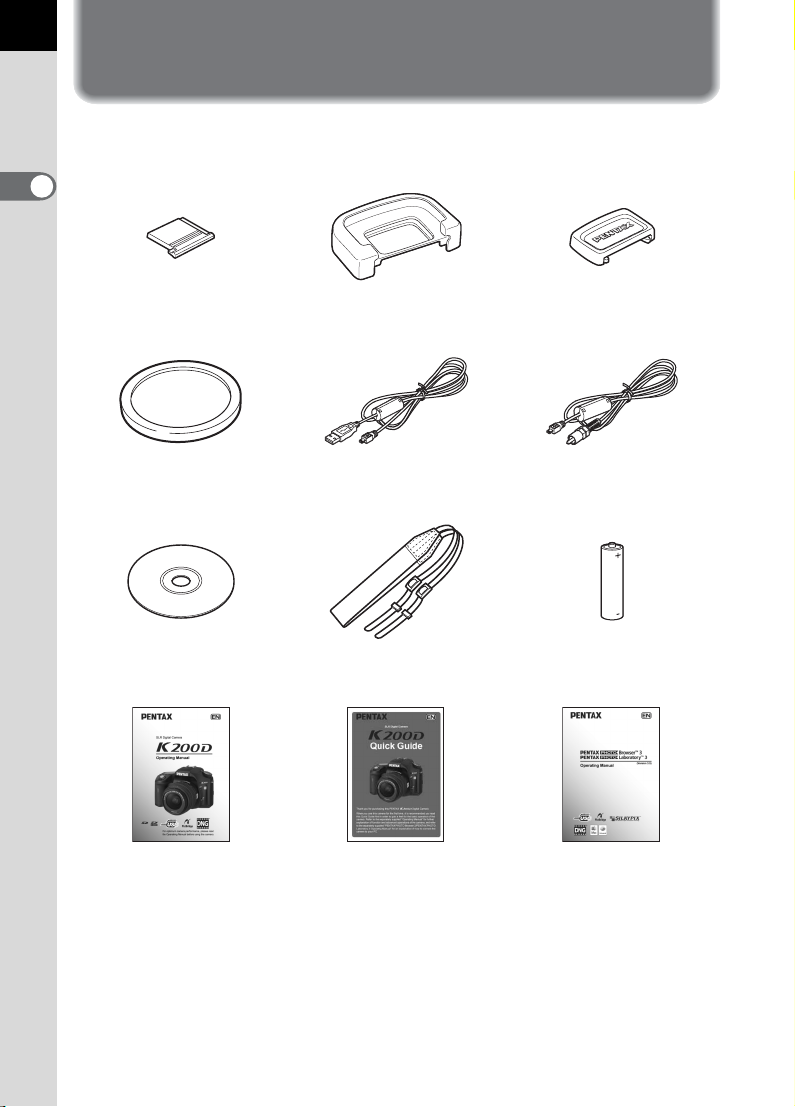
16
Checking the Contents of the Package
The following accessories are packaged with your camera.
Check that all accessories are included.
1
Before Using Your Camera
Hot shoe cover FK
(Installed on camera)
Body mount cover
(Installed on camera)
Software (CD-ROM)
S-SW74
Operating Manual
(this manual)
Eyecup FP
(Installed on camera)
USB cable
I-USB17
Strap
O-ST53
Quick Guide
ME Viewfinder cap
Video cable
I-VC28
Four AA lithium batteries
(2 packs)
PENTAX PHOTO Browser 3/
PENTAX PHOTO Laboratory 3
Operating Manual
Page 19
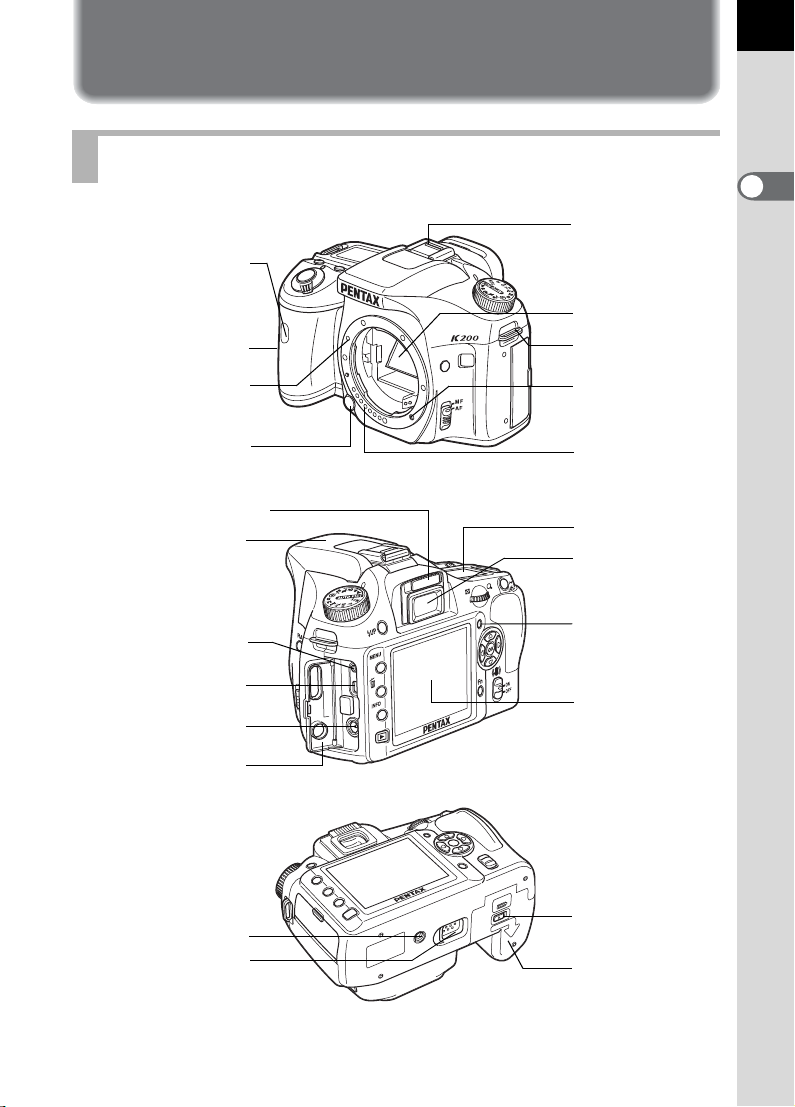
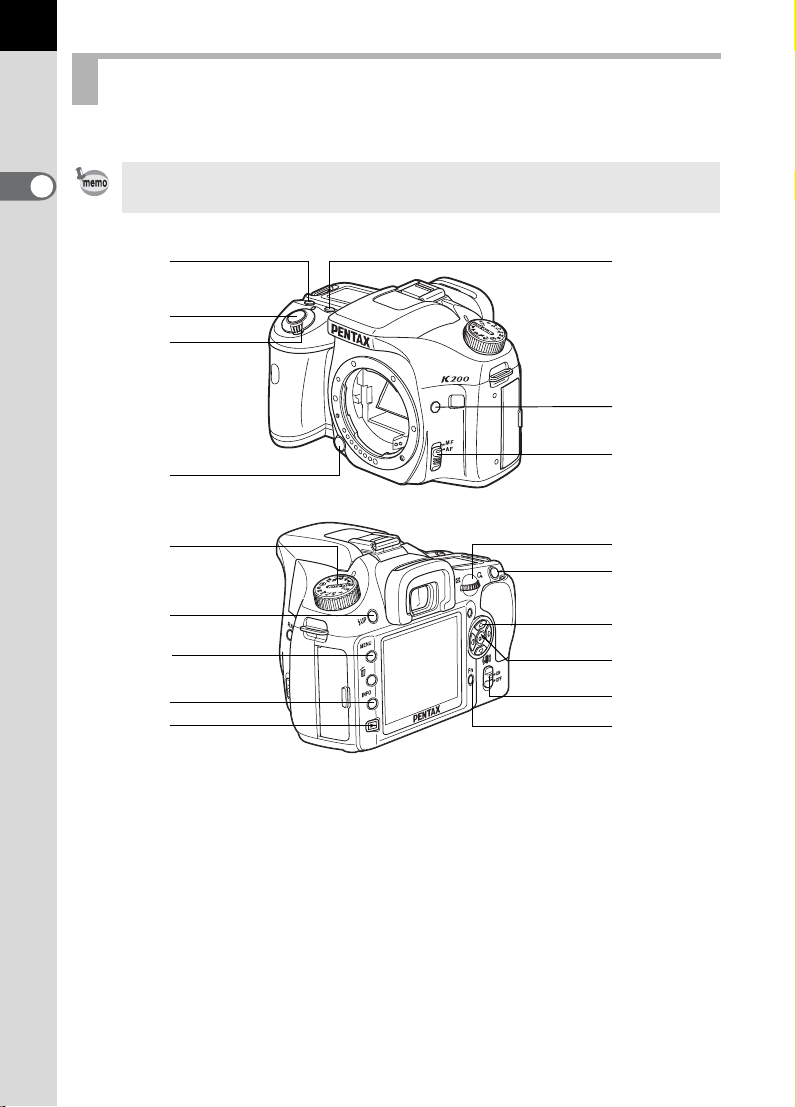
Names and Functions of Working Parts
Camera
Hot shoe
Self-Timer lamp/
Remote control receiver
Mirror
Card cover
Strap lug
17
1
Before Using Your Camera
Lens mount index
(red dot)
Lens unlock button
Diopter adjustment lever
Built-in Flash
Cable switch terminal
USB/Video terminal
DC input terminal
Terminal cover
Tripod socket
Battery grip connector
terminal
AF coupler
Lens information
contacts
LCD panel
Viewfinder
Card access
lamp
Monitor
Battery cover
unlock lever
Battery cover
* In the illustrations above, the back and bottom sides of the camera are shown
with the Eyecup F
P removed.
Page 20
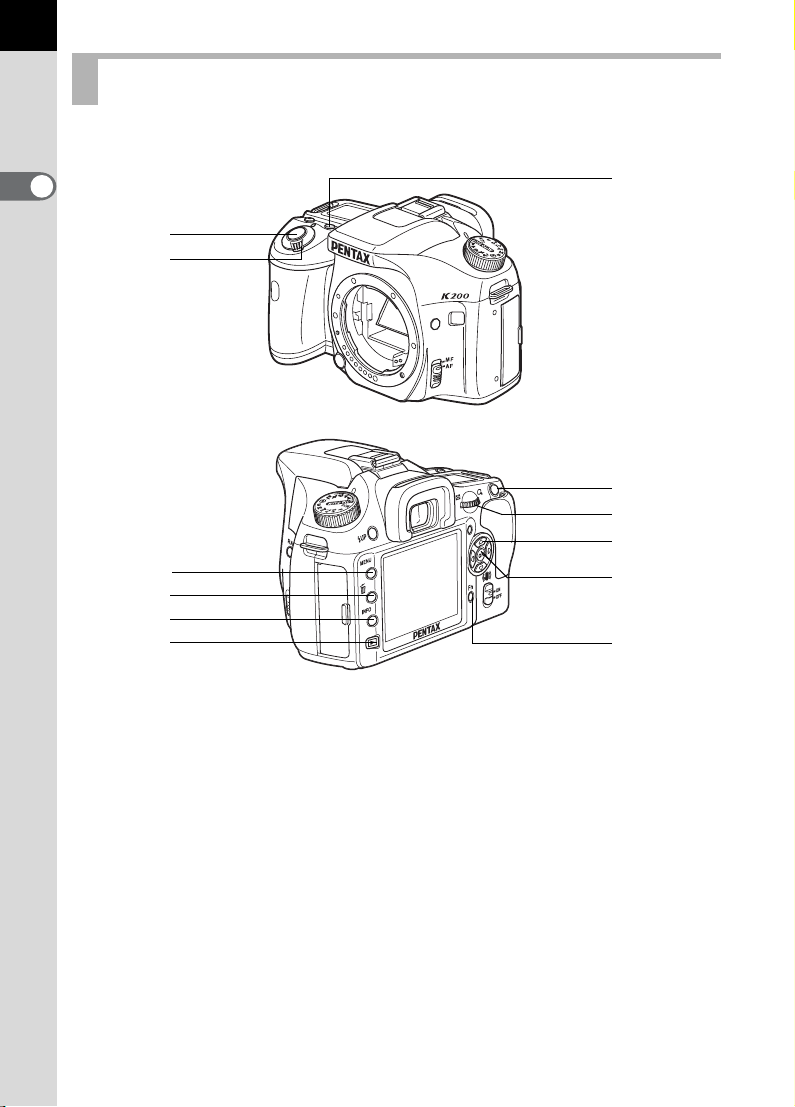
18
Capture Mode
Functions of buttons, dials and levers used during shooting are noted.
1
Before Using Your Camera
The factory default settings are explained here. Depending on the button or
dial, these settings can be changed in the [A Custom Settings] menu (p.75).
1
5
2
3
6
7
4
8
c
d
9
0
a
b
e
f
g
h
1 Green button
Sets the Exposure mode to
Automatic Exposure (p.88,
p.96) and resets the settings
(p.100, p.128, p.154).
2 Shutter release button
Press to capture images.
(p.59)
3 Main switch
Move to turn the power on/off
(p.48) or to preview (p.113).
4 Lens unlock button
Press to detach lens. (p.46)
Page 21

19
5 mc button
Sets the EV compensation and
aperture value. (p.87
p.100)
,
6 | button
Changes the file format
temporarily. Press to switch to
RAW+ (saves both JPEG and
RAW files). (p.149)
7 Focus mode lever
Switches between autofocus
mode (p.102) and manual
focus mode (p.109).
8 Mode dial
Changes the Capture mode.
(p.32, p.78)
9 K button
Press to pop up the built-in
flash. (p.62)
0 3 button
Displays the [A Rec. Mode]
menu (p.74). Next, press the
four-way controller (5) to
display [Q Playback] menu
(p.158), [R Set-up] menu
(p.202) and [A Custom
Setting] menu (p.75, p.158).
a M button
Press to show shooting
information on the monitor.
(p.23)
p.94
b Q button
Switches to the Playback
,
mode. (p.70, p.158)
c e-dial
Sets the shutter speed,
aperture, sensitivity and EV
compensation values.
1
Before Using Your Camera
d L button
Locks the exposure before
shooting. (p.96, p.101)
e Four-way controller
(2345)
Use this to move the cursor or
change items in menus and
Fn menu.
f 4 button
Saves the setting you selected
in the menu.
Press when menu is not
displayed to display the
currently selected sensitivity in
the LCD panel and viewfinder.
g Shake Reduction switch
Turns the Shake Reduction
function on or off. (p.68)
h { button
Press to display the Fn menu.
(
p.77
, p.159)
Page 22
20
Playback Mode
Functions of buttons, dials and levers used during playback are noted.
1
Before Using Your Camera
1
2
4
5
6
7
3
8
9
0
a
b
Page 23

21
1 Shutter release button
Press halfway to switch to
Capture mode.
2 Main switch
Move to turn the camera on
and off. (p.48) Set to the |
position to switch to Capture
mode and preview.
3 mc button
Press in Enlarged view to
increase the magnification.
(p.162)
4 3 button
Press to display the
[Q Playback] menu (p.158).
Next, press the four-way
controller (45) to display
[R Set-up] menu (p.202),
[A Custom Setting] menu
(p.75) and [A Rec. Mode]
menu (p.74).
5 i button
Press to delete images. (p.72)
6 M button
Press to show shooting
information on the monitor.
(p.25)
7 Q button
Press to switch to Capture
mode.
8 Z button
Press to protect images from
being accidentally erased.
(p.177)
Press in enlarged view to
decrease the magnification.
(p.162)
9 e-dial
Use it to enlarge an image
(p.162) or display multiple
images at the same time
(p.163).
0 Four-way controller
(2345)
Use it to move the cursor or
change items in menus, Fn
menu and playback screen.
a 4 button
Saves the setting you selected
in the menu or playback
screen.
b { button
Press to display the Fn menu.
(p.159)
1
Before Using Your Camera
Page 24
22
1600
AF.C
02
2008
AM
Program A utomatic
Exposure
Sh o w Se n siti v ity
P LINE
P SHIFT
RAW+
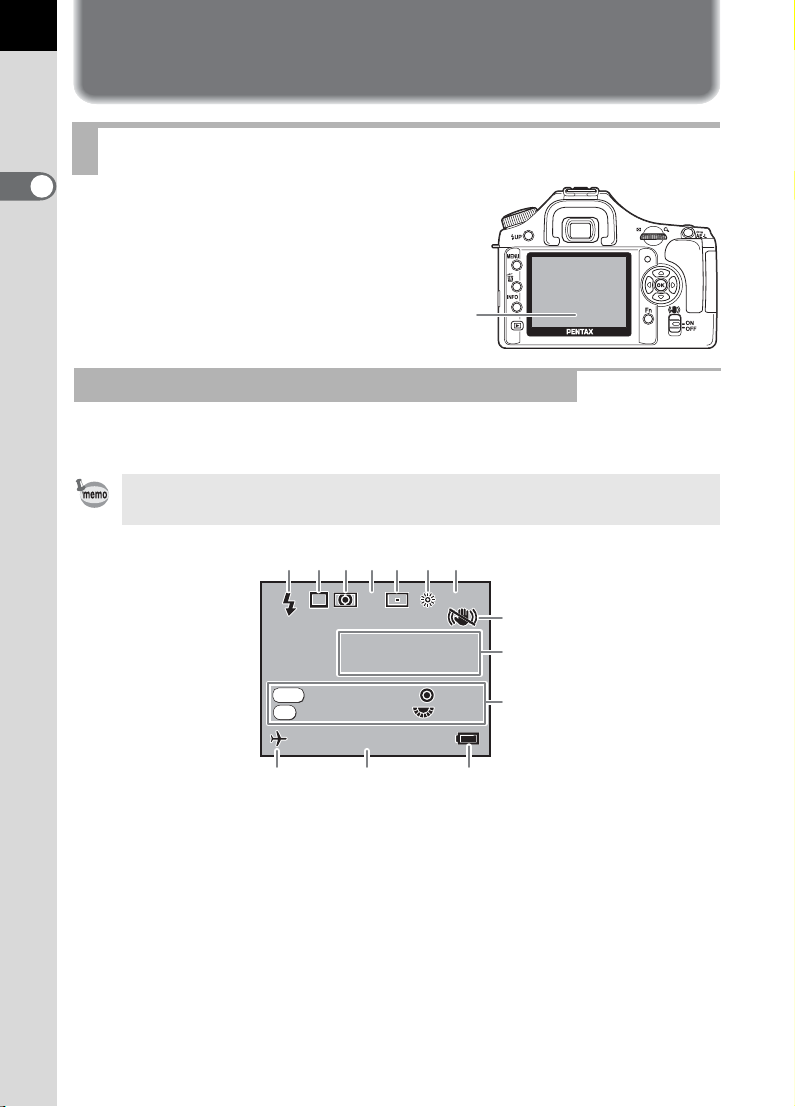
Display Indicators
Monitor
1
The following indicators
Before Using Your Camera
appear on the monitor
depending on the status of
the camera.
Monitor
At Start-up or when Operating the Mode Dial
Guides appear on the monitor for 3 seconds (default setting) when the
camera is switched on or the mode dial is turned.
Select Off for [Guide display] in [R Set-up] menu to not show indicators.
(p.202)
1234567
AF.C
AF.C
Program Automatic
Program Automatic
PP
Exposure
Exposure
RAW
RAW+
RAW+
OK
Show Sensitivity
Show Sensitivity
020202
02 02/ 2008
2008/ 1010: 3939AM
// 10:39
1600
1600
P LINE
P LINE
P SHIFT
P SHIFT
AM
8
9
10
13 12 11
1 Flash mode
(Active mode appears) (p.63)
2 Drive mode (p.77) 9
3 AE metering (p.98) 10 Button/dial guide
4 Focus mode (p.102) 11 Battery level (p.38)
5 AF point position (p.105) 12 Date and time (p.52)
6 White balance (p.150) 13 World Time (p.206)
* Indicators 3, 5, 6 and 7 only appear when a setting other than the default
setting is selected. 8 only appears when Shake Reduction is Off. 13 only
appears when World Time is On.
7 Sensitivity (p.83)
8 Shake Reduction (p.68)
Capture mode, Scene mode (p.78)
Page 25
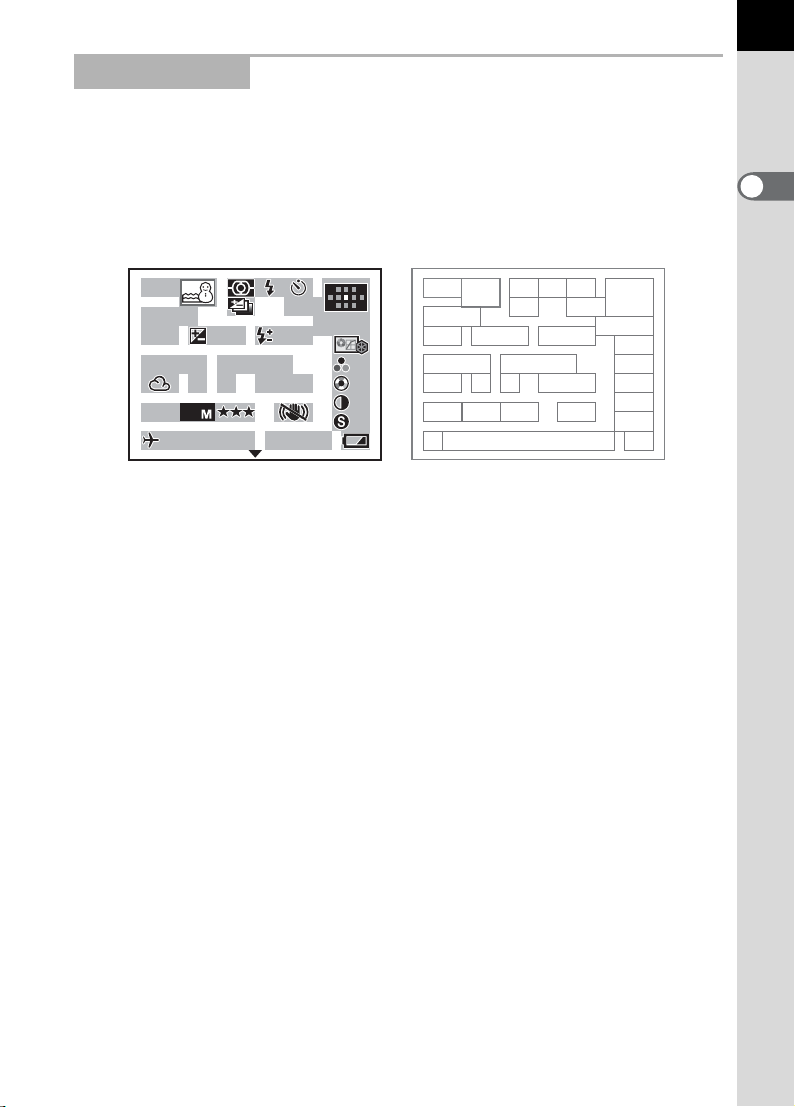
Capture Mode
RAW+
ISO
A1
AUTO
2 0 0 - 1 6 0 0
F 2 . 8
39
mm
AdobeRGB
+ 1
+ 1
SCN
1 / 2 0 0 0
+ 1 . 3
1 . 0
4 0 0
AF.C
2008
Press the M button in Capture mode to display the capture function
settings on the monitor for 30 seconds.
Press the four-way controller (23) while displayed to switch to
explanation of set Shooting mode.
Detailed information display
23
1
Before Using Your Camera
SCN
SCN
1/2000
1/2000
F2.8
F2.8
ISO
ISO
AUTO
AUTO
10
RAW+
RAW+
AF.C
AF.C
-
1.0
-
+1.3
+1.3
200-1600
200-1600 ±0±0
G2G2A1
G2 A1
// 020202020202 2008
/2008/
1.0
AdobeRGB
AdobeRGB
1010: 39
10 : 39
400
400
AMAMAM
mm
mm
± 0±0
+1
+1
+1
+1
1
10
11
14 15
16 18
20 21
29 30 31
3
5
2
17 26
4
67
12 13
19
2322
8
9
24
25
27
28
1 Capture mode (p.32) 17 GM compensation (Adjust White
2 Scene mode (p.79)
Balance) (p.154)
3 AE metering (p.98) 18 BA compensation (Adjust White
4 Flash mode (p.63)
Balance) (p.154)
5 Drive mode (p.77) 19 Color Space (p.155)
6 Exposure bracket (p.124) 20 File format (p.148)
7 Focus mode (p.102) 21 JPEG recorded pixels (p.146)
8 AF point position (p.105) 22 JPEG quality (p.147)
9 Lens focal length (p.69) 23 Shake Reduction (p.68)
10 Shutter speed (p.81) 24 Image Tone (p.144)
11 Aperture (p.82) 25 Saturation/Filter Effect (p.144)
12 EV compensation (p.100) 26 Hue/Toning (p.144)
13 Flash exposure compensation
(p.128)
14 Sensitivity (p.83)
27 Contrast (p.144)
28 Sharpness/Fine Sharpness
(p.144)
15 ISO correction in AUTO (p.83) 29 World Time (p.206)
16 White balance (p.150) 30 Date and time (p.52)
31 Battery level (p.38)
* In order to explain the detailed information display, a screenshot with all the
information displayed is shown here. Depending on the Capture mode, some
of the information may not be displayed.
Page 26

24
RAW+
SCN
--
Sh o w Se n siti v ity
P e t
F o r c a p t u r i n g m o v i n g
p e t s
Explanation of Shooting Mode
1
Before Using Your Camera
1 Capture mode (p.32)
2 Capture mode explanation
3 Button/dial guide
1
Pet
Pet
Fn
SCN
For capturing moving
For capturing moving
pets
pets
RAW
RAW+
RAW+
OK
Show Sensitivity
Show Sensitivity
SCN
------
--
--
2
3
Page 27

Playback Mode
JPEG
ISO
A1
AF.S
1 0 0 - 0 0 0 1
1 / 2 0 0 0
+ 1 . 5
F 2 . 8
0 . 5
39
2 4
200
AdobeRGB
2008
25
Every time you press the
M
button during playback, the camera switches
screen displays in the following order: Standard display, Histogram display,
Detailed information display and No information display (image only).
You can change the information initially displayed by pressing the Q button.
Detailed information display
13
2
78
11
23 24 25 26 20
27 28 29 30 21
31
4
5
617
910
Balance)
Balance)
100-0001
100-0001
PP
AF.S
AF.S
24
24
mmmmmm
1/2000
1/2000
F2.8
F2.8
ISO
200
200
ISO
JPEG
JPEG
10
+1.5
+1.5
// 020202020202 2008
/2008/
-
0.5
-
0.5
G2G2A1
A1
G2
AdobeRGB
AdobeRGB
1010: 39
10 : 39
AMAMAM
± 0±0
± 0±0
± 0±0
± 0±0
1 Rotation information 18 Image Tone
2 Captured image 19 Saturation/Filter Effect
3 Protect 20 Hue/Toning
4 Capture mode 21 Contrast
5 AE metering 22 Sharpness/Fine Sharpness
6 Flash mode 23 Sensitivity
7 Shutter speed 24 White balance
8 Shake Reduction 25 GM compensation (Adjust White
9 Drive mode
10 Exposure bracket 26 BA compensation (Adjust White
11 Aperture
12 EV compensation 27 File format
13 Flash exposure compensation 28 JPEG recorded pixels
14 Folder No./File No. 29 JPEG quality
15 Focus mode 30 Color Space
16 AF point position 31 Shooting date/time
17 Lens focal length
* Indicators 6 and 13 only appear for images in which the flash was discharged.
1
Before Using Your Camera
14
15 16
18
1912 13
22
Page 28

26
100- 0 0 0 1
RGB
100- 0 0 0 1
Histogram Display
The x features two histogram displays. The “Brightness
histogram” shows the distribution of brightness and the “RGB histogram”
shows the distribution of color intensity. Press the four-way controller
(23) to switch between “Brightness histogram” and “RGB histogram”.
1
Before Using Your Camera
12
100-0001
100-0001
23
3
4
124 3
100-0001
100-0001
7
6
RGB
RGB
6
5
Brightness histogram RGB histogram
1 File Format 6 Switch Brightness histogram/
2 Folder No./File No. (p.213)
3 Protect setting (p.177) 7 Histogram (R)
4 DPOF settings (p.190) 8 Histogram (G)
5 Histogram (Brightness) (p.170) 9 Histogram (B)
* Indicator 3 only appears for images with Protect setting and indicator 4 only
appears for images with DPOF settings.
Areas where blooming or dark portions blink if [Bright/Dark area] warning is set
to O (On) in [Playback display] in the [Q Playback] menu. (p.171)
23
5
RGB histogram
8
9
Page 29

Viewfinder
The following information appears in the viewfinder.
27
23
1
4
5 6
1
7101112
8 9
13
1 AF frame (p.47)
2 Spot metering frame (p.98)
3 AF point (p.105)
4 Flash status (p.62)
Lit: when flash is available.
Blinks: when flash is recommended but not set.
5 Focus mode (p.102)
Appears when AF Mode is set to k (Continuous mode) or \.
6 Picture/Scene mode icon (p.78)
Icon for Picture mode or Scene mode in use appears.
\ (Moving Object), q (Macro), = (Portrait), U (Normal mode in I),
. (Night Scene Portrait), s (Landscape), H (Scene)
7 Shutter speed (p.81)
Shutter speed when capturing or adjusting.
Underlined when shutter speed can be adjusted with the e-dial.
8 Aperture value (p.82)
Aperture value when capturing or adjusting.
Underlined when aperture value can be adjusted with the e-dial.
1
Before Using Your Camera
Page 30

28
9 Focus indicator (p.58)
Lit: when image is focused.
Blinks: when the subject is not in focus.
10 AE lock (p.101)
Appears during AE lock.
11 Number of recordable images/EV compensation/Sensitivity
1
Before Using Your Camera
Displays the number of recordable images with current quality and
recorded pixel setting.
The difference from the appropriate exposure value appears if exposure
mode is a. (p.95)
m: EV compensation (p.100)
Underlined when EV compensation can be adjusted with the e-dial
while the mc button is pressed.
o: Sensitivity
Underlined when sensitivity can be adjusted with the e-dial
12 Shake Reduction (p.68)
Appears when the Shake Reduction function is activated.
13 File format (p.148)
Displays the image save format in RAW/RAW+ format.
Not displayed in JPEG format.
• The AF point in use for autofocus is superimposed in red when the shutter
release button is pressed halfway. (p.105)
• When [12. OK button when shooting] in the [A Custom Setting] menu is set
to [Sensitivity/No. of Shots] and Sensitivity Priority Mode is set, the number
of recordable images is displayed in 11 while the 4 button is pressed.
When set to another mode, ISO sensitivity is displayed in 11 while the 4
button is pressed. (p.84).
• [999] is the maximum number of recordable images that can be displayed in
the viewfinder. Even if the number of recordable images is 1000 or more,
[999] is displayed.
Page 31
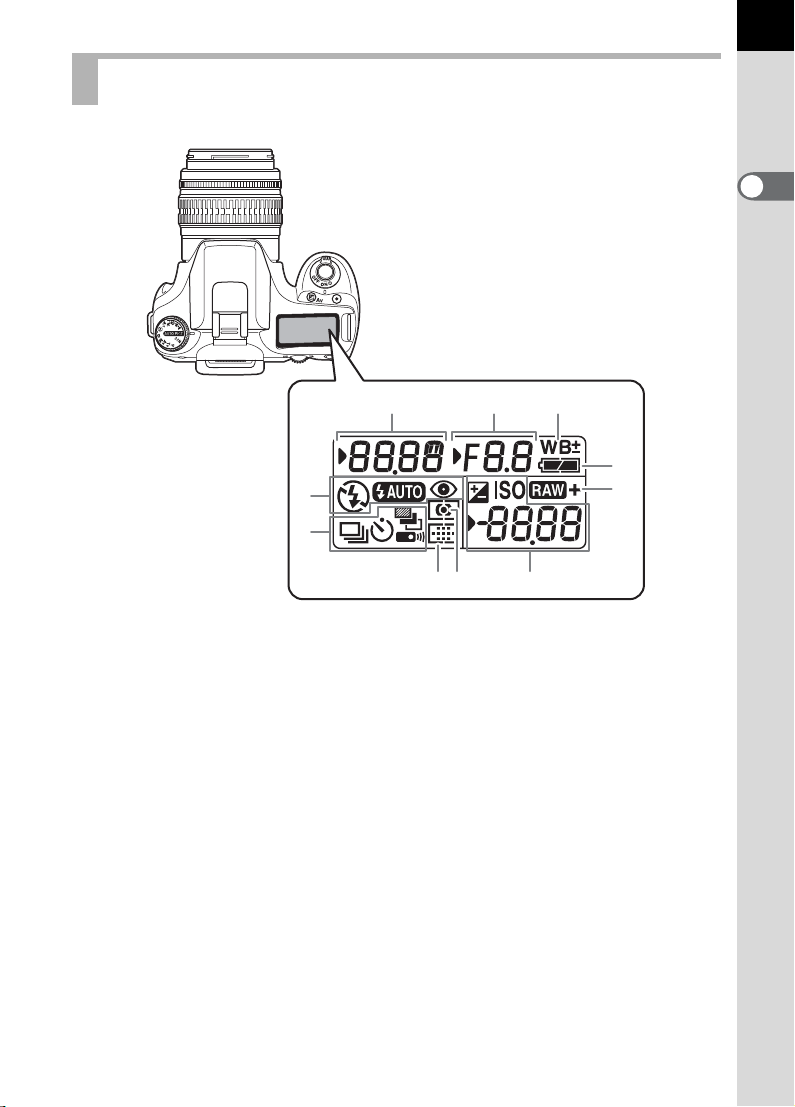
LCD Panel
The following information appears in the LCD panel on top of the camera.
1 2 3
4
5
6
987
10
29
1
Before Using Your Camera
1 Shutter speed (p.81) 7 Focusing area (p.105)
2 Aperture (p.82) No indicator: Auto
3 White balance (p.150) V : Select
(Not displayed when set to Auto) M :Center
O : White balance correction 8 AE metering (p.98)
4 Battery level No indicator: Multi-segment
5 Flash mode (p.62)
b
: Built-in flash is ready
(when blinking, flash should
be used)
a :Flash off 9 Recordable image no. (up to
E : Auto discharge
Red-eye reduction flash on
> :
6 Drive mode (p.77)
9 : Single frame shooting 10
j : Continuous shooting 1
g : Self-timer shooting 1P
V : Auto bracket shooting
W : Remote control shooting
M : Center-weighted
N : Spot metering
[999]) / EV compensation (p.100)/
Sensitivity / PC (mass storage),
Pb (PictBridge)
File Format (
No indicator : JPEG
metering
metering
p.148
)
: RAW capture
:RAW+JPEG capture
Page 32
30
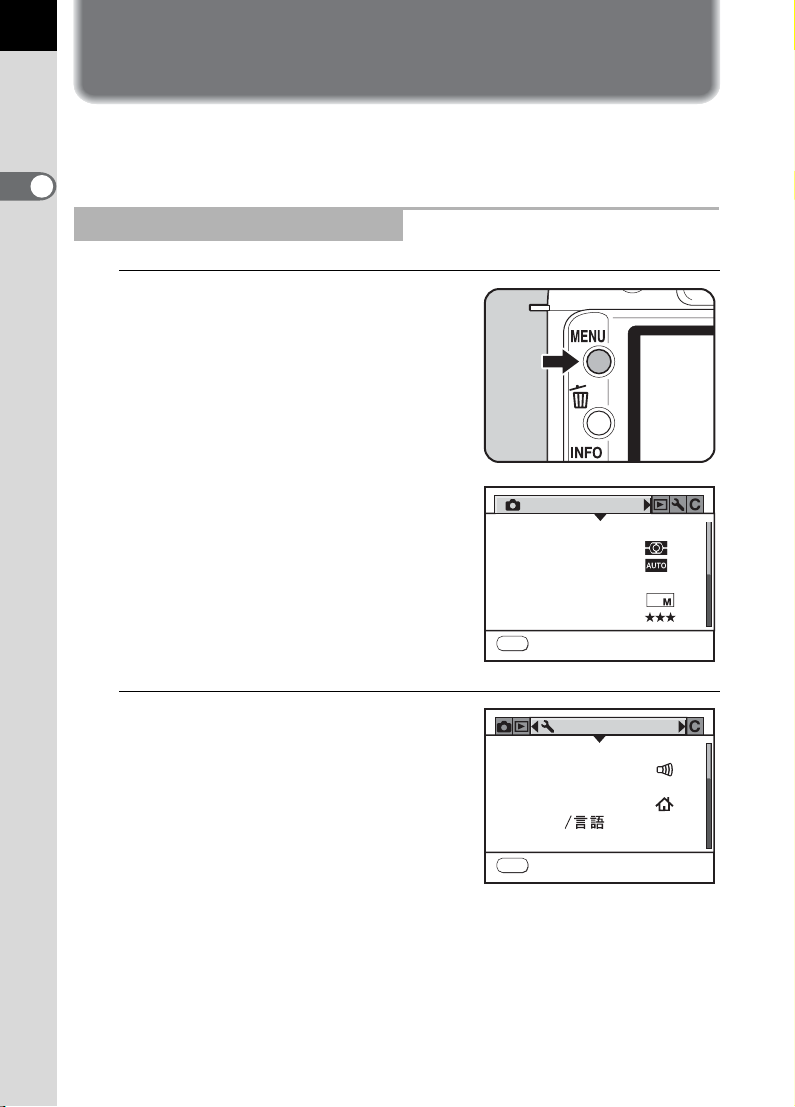
How to Operate the Menu
This section explains operation methods for [A Rec. Mode] menu,
[Q Playback] menu, [R Set-up] menu and [A Custom Setting] menu.
1
Before Using Your Camera
Displaying the Menu screen
1
Press the 3 button in
Capture mode.
The [A Rec. Mode] menu appears on
the monitor.
Rec. Mode
AF Mode
AE Metering
Select AF point
File Format
JPEG Rec. Pixels
JPEG Quality
MENU
Exit
AF.S
JPEG
10
2
Press the four-way controller
(5).
The [Q Playback] menu, [R Set-up]
menu and [A Custom Setting] menu
appear in order each time the four-way
controller is pressed. (The screen for
the [R Set-up] menu is shown on the
right.)
You can use the e-dial to switch the
menus.
Set-up
Format
Beep
Date Adjust
World Time
Language
MENU
Exit
English
Std.Text Size
Page 33

Selecting and Setting a Menu Item
Procedure to set the [JPEG Quality] on the [A Rec. Mode] menu is
explained as an example.
31
3
Use the four-way controller
(23) to choose an item.
4
Press the four-way controller (5).
Quality levels available when recording in
JPEG format are displayed.
Press the four-way controller (5) to move
to the pop-up menu if there is one.
5
Use the four-way controller (23) to select a setting.
Rec. Mode
AF Mode
AE Metering
Select AF point
File Format
JPEG Rec. Pixels
JPEG Quality
MENU
Exit
AF Mode
AE Metering
Select AF point
File Format
JPEG Rec. Pixels
JPEG Quality
MENU
Cancel
When the quality level is changed, the number of recordable images at
that quality level appears at the top right of the screen.
6
Press the 4 button.
The camera returns to the menu screen. Next, set other items.
Press the 3 button to return to Capture or Playback mode.
AF.S
JPEG
10
AF.S
OK
1
Before Using Your Camera
128
OK
Even after you press the 3 button and close the menu screen, your
settings will not be saved if the camera is turned off improperly (such as by
removing the battery while the camera is on).
If the 3 button is pressed in Capture mode, the [A Rec. Mode] menu
appears. If the 3 button is pressed in Playback mode, the [Q Playback]
menu appears.
Page 34

32
Using the Mode Dial
Dial indicator
1
Before Using Your Camera
You can switch the Capture mode by setting the icons on the mode dial to
the dial indicator.
Mode Characteristics Page
The optimal capture mode is automatically
I (Auto Picture)
(Portrait) Optimal for capturing portraits.
=
s (Landscape)
(Macro)
q
\ (Moving Object)
(Night Scene Portrait)
.
a (Flash OFF)
H (Scene)
selected from Portrait, Landscape, Macro and
Moving Object modes or standard settings
(Normal mode).
Deepens the focus range, emphasizes
contour and saturation of trees and the sky,
and produces a bright image.
Lets you take vibrant pictures of flowers or
other small subjects at short distances.
Lets you take sharp pictures of a quickly
moving subject, such as a sporting event.
Lets you capture people against a night view
or at dusk.
The built-in flash is deactivated. Other settings
are the same as the Normal mode in I.
Selects from 8 situations depending on the
shooting conditions.
p.78
p.79
For . (Night Scene Portrait), the shutter speed becomes slower in dark
places, even if the built-in flash is used. To prevent camera shake, either use
the Shake Reduction function or mount the camera on a tripod.
Page 35

Mode Characteristics
Automatically sets shutter speed and aperture
e (Program)
K (Sensitivity Priority)
b
(Shutter Priority)
c (Aperture Priority)
a (Manual)
p (Bulb)
In this manual, Capture modes are referred to as follows.
Picture mode
H (Scene) mode
Exposure mode
to the proper exposure according to Program
line when taking pictures.
Automatically sets the shutter speed and
aperture to the proper exposure according to
the set sensitivity.
Lets you set the desired shutter speed to
freeze or emphasize subject movement. Take
pictures of fast moving subjects that look still or
subjects that give a sense of movement.
Lets you set the desired aperture for controlling
the depth of field. Use it to obtain a blurred or
sharp background.
Lets you set shutter speed and aperture to
capture the picture with creative intent.
Lets you capture images that require slow
shutter speeds such as fireworks and night
scenes.
I (Auto Picture)/ = (Portrait)/ s (Landscape)/
q (Macro)/ \ (Moving Object)/ . (Night Scene
Portrait)/ a (Flash OFF)
A (Night Scene)/ i (Surf & Snow)/ K (Food)/
K (Sunset)/ C (Kids)/ E (Pet)/ D (Candlelight)/
E (Museum)
e (Program)/ K (Sensitivity Priority)/ b (Shutter
Priority)/ c (Aperture Priority)/ a (Manual)/ p
(Bulb)
33
Page
1
Before Using Your Camera
p.85
Page 36

34
Memo
Page 37

2 Getting Started
This chapter explains your first steps from purchasing the
camera to taking pictures. Be sure to read it and follow the
instructions.
Attaching the Strap ..............................................36
Inserting the Batteries .........................................37
Inserting/Removing the SD Memory Card .........41
Attaching the Lens ...............................................45
Adjusting the Viewfinder Diopter ........................47
Turning the Camera On and Off ..........................48
Initial Settings .......................................................49
Page 38

36
Attaching the Strap
1
Pass the end of the strap
through the strap lug, then
secure it on the inside of the
2
Getting Started
clasp.
2
Pass the other end of the strap
through the other strap lug on
the camera, then secure it on
the inside of the clasp.
Page 39

Inserting the Batteries
Insert batteries into the camera. Use four AA lithium batteries, AA Ni-MH
batteries, or AA alkaline batteries.
This camera is packaged with AA lithium batteries for checking the camera
functionality but some other kinds of batteries are also compatible. Use the
compatible batteries according to the intended purpose.
AA lithium batteries
AA Ni-MH
rechargeable
batteries
AA alkaline batteries
• The use of Ni-Mn batteries is not recommended as the batteries’ voltage
characteristics may cause a malfunction.
• AA lithium batteries and AA alkaline batteries that can be used in this camera
are not rechargeable.
• Do not open the battery cover or remove the batteries while the power is on.
• Remove the batteries when you will not use the camera for a long while. The
batteries may leak.
• If the date and time settings have been reset when you insert new batteries
after a long time, follow the procedure for “Setting the Date and Time” (p.52).
• Insert batteries correctly. Batteries inserted incorrectly may cause a camera
breakdown. Wipe the electrodes of the batteries before inserting.
• Replace all the batteries at the same time and do not mix battery types,
brands or old batteries with new ones. Otherwise, malfunctions, such as the
battery level not being displayed properly, may occur.
Provided with the camera. Recommended in cold climates.
These are rechargeable and are economical.
A commercially available battery charger that is
compatible with the batteries is required.
These are easily obtainable when your usual batteries run out
but they may not support all the camera functions under
certain conditions. We do not recommend their use except in
emergencies and checking the camera functionality.
37
2
Getting Started
1
Push and hold the battery
cover unlock lever as shown in
the illustration (1), and slide
the battery cover toward the
lens (2), and then flip open.
1
2
Page 40

38
2
Insert the batteries according
to the +/– indicators in the
battery chamber.
2
Getting Started
3
Press down on the batteries
with the battery cover (1) and
slide it as shown in the
1
illustration (2) to close.
2
Be sure to fully close the battery cover. The camera will not turn on if the battery
cover is open.
• Use the AC adapter D-AC76 (optional) when using the camera for a
prolonged period. (p.40)
• Check the battery orientation if the camera does not operate properly after
replacing the batteries.
Battery Level Indicator
You can confirm remaining battery level by checking the { displayed on
the LCD panel.
{ lit : Battery is full.
} lit : Battery is running low.
? lit : Battery is almost empty.
? blink : The camera turns off after displaying a message.
Page 41

• } may appear even when the battery level is sufficient if the camera is
used at low temperatures or when performing continuous shooting
consecutively. Turn the camera off and on again. If { appears, you can
use the camera.
• { does not appear on the LCD panel when using the AC adapter D-AC76
(optional).
39
Approximate Image Storage Capacity and Playback Time (new batteries)
Batteries
AA lithium
batteries
AA rechargeable
batteries
(NiMH 2500mAh)
AA Alkaline
batteries
The picture storage capacity (normal recording and flash use 50%) is based on
measuring conditions in accordance with CIPA standards and the others are based
on PENTAX measuring conditions. Some deviation from the above figures may
occur in actual use depending on shooting mode and shooting conditions.
• Battery performance temporarily decreases as the temperature decreases.
When using the camera in cold climates, have extra batteries on hand and
keep them warm in your pocket. Battery performance will return to normal
when returned to room temperature.
• Have extra batteries ready when traveling overseas, taking pictures in cold
climates, or when you will be taking a lot of pictures.
(Temperature)
(23°C) 1100 550 350 700 minutes
( 0°C) 900 440 250 600 minutes
(23°C) 700 400 240 480 minutes
( 0°C) 500 280 190 400 minutes
(23°C) 200 80 50 300 minutes
(0°C)
Normal
recording
Not
applicable
Flash photography
50% use 100% use
Not
applicable
Not
applicable
Playback
time
200 minutes
2
Getting Started
Page 42

40
Using the AC Adapter (Optional)
4
1
2
Getting Started
2
3
We recommend using the AC adapter D-AC76 (optional) when using the
monitor for a long time or when connecting to your PC.
1
Make sure the camera is turned off before opening the
terminal cover.
2
Connect the DC terminal on the AC adapter to the DC input
terminal on the camera.
3
Connect the AC plug cord to the AC adapter.
4
Plug the AC cord into the power outlet.
• Make sure the camera is turned off before connecting or disconnecting the
AC adapter.
• Make sure connections are secure between the camera, AC adapter, AC
plug cord terminal and the power outlet. SD Memory Card and data will be
corrupted if disconnected while camera is recording or reading data.
• Be sure to read the AC adapter D-AC76 Operating Manual when using the
AC adapter.
• The rechargeable batteries in your camera will not charge when connected
to the AC adapter.
Page 43

Inserting/Removing the SD Memory Card
This camera uses either an SD Memory Card or an SDHC Memory Card. (Both
cards are referred to as SD Memory Cards hereafter.) Make sure the camera is
turned off before inserting or removing the SD Memory Card (market product).
• Do not remove the SD Memory Card while the card access lamp is lit.
• Use this camera to format (initialize) an SD Memory Card that is unused or
has been used on other cameras or digital devices. Refer to “Formatting the
SD Memory Card” (p.203) for details on formatting.
1
Slide the card cover in the
direction of the arrow (1) and
then lift open (2).
2
Insert the card all the way with
the SD Memory Card label
toward the monitor.
1
2
41
2
Getting Started
Push the SD Memory Card in once to
remove.
3
Close the card cover (1) and
then slide it in the direction of
the arrow (2).
Be sure to fully close the card cover. The
camera will not turn on if the card cover is
open.
2
1
Page 44

42
Precautions When Using the SD Memory Card
• The SD Memory Card is equipped with a
write-protect switch. Setting the switch to
LOCK protects the existing data by
prohibiting recording of new data, deletion
of existing data or formatting of the card.
• Care should be taken when removing the SD Memory Card immediately after
using the camera because the card may be hot.
• Do not remove the SD Memory Card or turn the camera off while data is being
2
Getting Started
saved to the card, images are being played back, or the camera is connected
to a computer with the USB cable. This may cause the data to be lost or the
card to be damaged.
• Do not bend the SD Memory Card or subject it to violent impact. Keep it away
from water and store away from high temperatures.
Do not remove the SD Memory Card during formatting. The card may be
•
damaged beyond use.
• Data on the SD Memory Card may be deleted in the following circumstances.
PENTAX does not accept any liability for data that is deleted if
(1) the SD Memory Card is mishandled by the user.
(2) the SD Memory Card is exposed to static electricity or electrical
interference.
(3) the card has not been used for a long time.
(4) the card is ejected or the battery is removed while the data on the card is
being recorded or accessed.
• If the SD Memory Card is not used for a long time, the data on the card may
become unreadable. Be sure to regularly make a backup of important data on
a computer.
• Avoid using or storing the card where it may be exposed to static electricity or
electrical interference.
• Avoid using or storing the card in direct sunlight or where it may be exposed to
rapid changes in temperature or to condensation.
• For information on compatible SD Memory Cards, visit the PENTAX website.
• Format new SD Memory Cards. Also format SD Memory Cards used with other
cameras.
1 Formatting the SD Memory Card (p.203)
Please note that formatting the SD Memory Card will not necessarily delete the
•
data so that it cannot be recovered using off the shelf data recovery software. If you
are going to discard, give away or sell your SD Memory Card you should ensure
that the data on the card is completely deleted or the card itself is destroyed if it
contains any personal or sensitive information. There are off the shelf secure data
deletion software programs available that will completely delete the data.
In any case the data on your SD Memory Card should be managed at your own
risk.
Write-protect
switch
Page 45
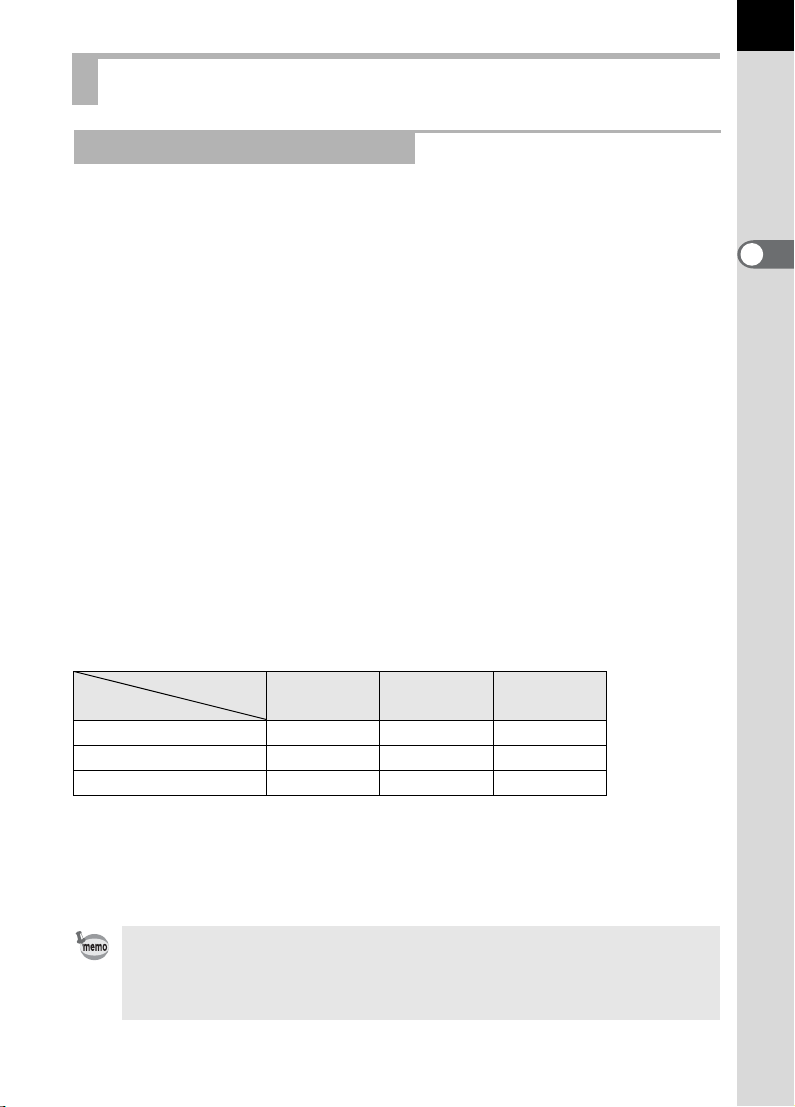
Recorded Pixels and Quality Level
When the File Format is JPEG
Choose the number of pixels (size) and quality level (JPEG data
compression rate) of pictures according to how you intend to use the
pictures you have taken.
Pictures with larger recorded pixels or more Es are clearer when printed.
The number of pictures that can be taken (the number of pictures that can
be recorded on an SD Memory Card) decreases with larger file sizes.
The quality of the captured photo or printed picture depends on the quality
level, exposure control, resolution of the printer and a variety of other
factors so you do not need to select more than the required number of
pixels. For example, to print in postcard size, i (1824×1216) is
adequate. Set the appropriate recorded size and quality level depending
on purpose.
Choose the appropriate number of recorded pixels and quality level for
JPEG images on the [A Rec. Mode] menu.
1 Setting the JPEG Recorded Pixels (p.146)
1 Setting the JPEG Quality Level (p.147)
43
2
Getting Started
JPEG Recorded Pixels, JPEG Quality and Approximate Image
Storage Capacity
JPEG Quality
JPEG Rec. Pixels
(3872×2592)
J
(3008×2000)
P
(1824×1216) 902 1549 2627
i
• The above table shows the approximate image storage capacity when using a 1
GB SD Memory Card.
• The above figures may vary depending on the subject, shooting conditions,
shooting mode and SD Memory Card, etc.
When the number of storable images exceeds 500, captured images are
divided into folders of 500 images each. However, in Auto Bracket shooting,
images will be stored in the same folder until shooting is completed, even if the
number of images exceeds 500.
C
Best
202 343 586
335 570 974
D
Better
E
Good
Page 46

44
When the File Format is RAW
With x, you can record in the versatile JPEG format or the high
quality and editable RAW format. For RAW file format, you can select the
PENTAX original PEF format or general-purpose DNG (Digital Negative)
format designed by Adobe Systems. On a 1 GB SD Memory Card, you can
record up to 58 images in PEF format or DNG format.
1Setting the File Format (p.148)
2
Getting Started
Page 47
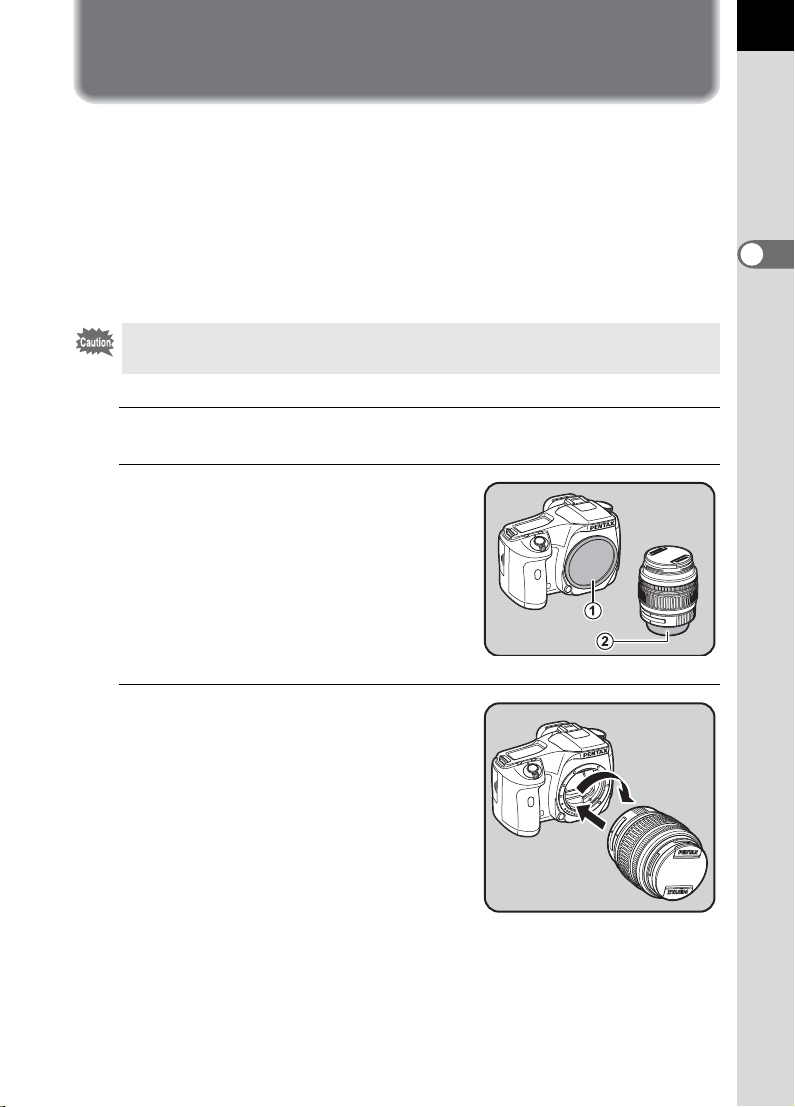
Attaching the Lens
All camera exposure modes are available when using DA, D FA, FA J or
other lenses with an Aperture s (Auto) position. Some functions are
restricted when lenses are not set to the Aperture s position. Also see
“Notes on [23. Using Aperture Ring]” (p.230). Other lenses and
accessories will not be available with factory default settings. To allow
shutter release with lenses or accessories not listed above, set [23. Using
aperture ring] in the [A Custom Settings] menu. (p.76)
Turn the camera off before attaching or removing the lens to prevent
unexpected lens movement.
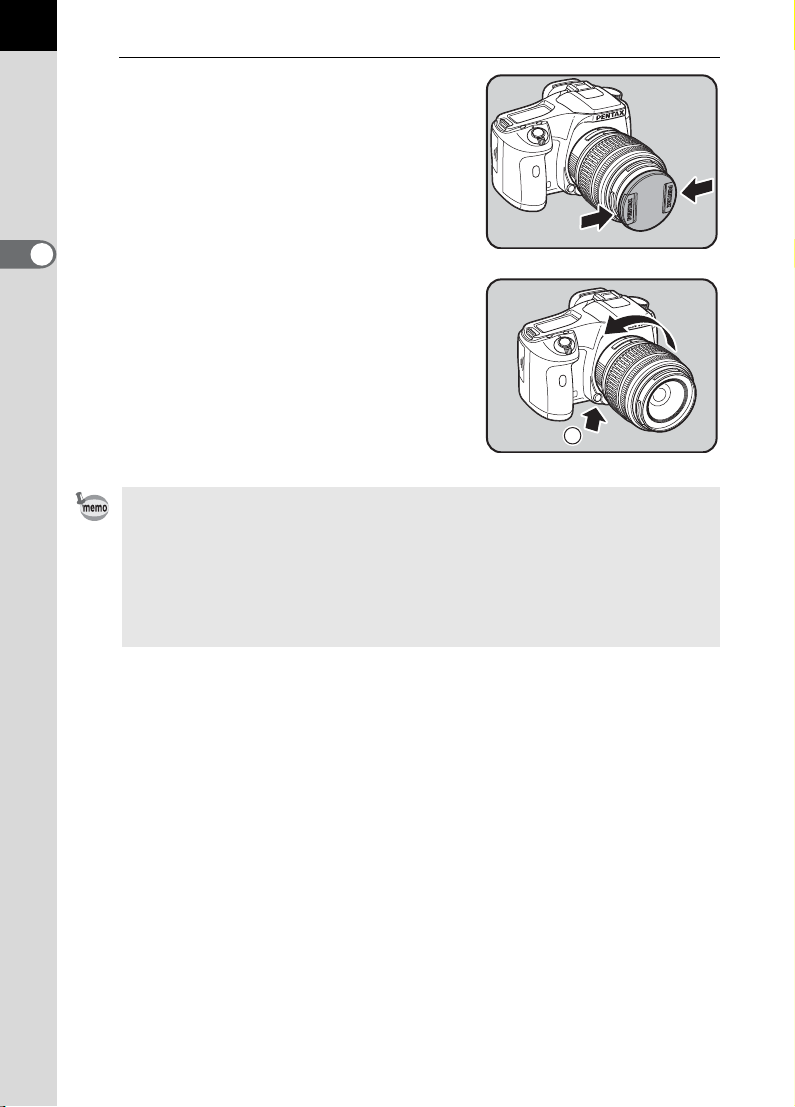
1
Check that the camera is turned off.
2
Remove the body mount cover
(1) and lens mount cover (2).
Be sure to put the lens down with the
lens mount side facing upward to
protect the lens mount from damage
after removal.
45
2
Getting Started
3
Align the Lens mount index
(red dots) on the camera and
the lens, and secure by turning
the lens clockwise until it
clicks.
After attaching, turn the lens
counterclockwise to check that the lens
is locked in place.
Page 48
46
4
Remove the front lens cap by
pushing the indicated portions
inward.
2
Getting Started
To detach the lens, hold down the lens
unlock button (3) and turn the lens
counterclockwise.
3
• The body mount cover (1) is a cover to prevent scratches and block dust
when shipped. Body Mount Cap K is sold separately and has a lock function.
• We assume no responsibility nor liability for accidents, damages and
malfunctions resulting from the use of lenses made by other manufacturers.
• The camera body and lens mount incorporate lens information contacts and
an AF coupler. Dirt, dust, or corrosion may damage the electrical system.
When necessary, clean the contacts with a soft dry cloth.
Page 49

Adjusting the Viewfinder Diopter
Adjust the viewfinder to suit your eyesight.
If it is difficult to see the viewfinder image clearly, slide the diopter
adjustment lever sideways.
You can adjust the diopter from approximately –2.5 to +1.5 m
1
Look through the viewfinder and
point the camera at a white wall
or other bright and consistent
surface. Slide the diopter
adjustment lever left or right.
Adjust the lever until the AF frame in
the viewfinder is focused.
–1
.
47
2
Getting Started
AF frame
•The FP Eyecup is attached to the viewfinder portion when the camera leaves
the factory. Diopter adjustment is available with the F
However, adjustment is easier with the eyecup removed.
• To remove the F
direction of the arrow.
To attach the FP Eyecup, align it with the
groove on the viewfinder eyepiece and
push it into position.
• If it is difficult to see the viewfinder image
clearly even if you set the diopter
adjustment lever, use the optional diopter
correction lens adapter M. However, the
Eyecup F
adapter. (p.238)
P Eyecup, pull it out in the
P must be removed to use this
P Eyecup attached.
Page 50

48
Turning the Camera On and Off
1
Move the main switch to [ON]
position.
The camera will turn on.
2
Getting Started
Move the main switch to [OFF] position
to turn off the camera.
• Always turn the camera off when not in use.
• The power will automatically turn off when you do not perform any operations
within a set period of time. To reactivate the camera after the camera turns
off automatically, turn it on again or perform any of the following.
• Press the shutter release button halfway.
• Press the Q button.
• Press the M button.
•
By default, the camera is set to power off automatically after 1 minute of
inactivity. You can change the setting with [Auto Power Off] on the [
menu. (p.214)
R
Set-up]
Page 51

Initial Settings
The first time the camera is turned on after
purchasing, the [
Language/
appears on the monitor. Follow the procedure
below to set the language displayed on the
monitor and the current date and time. Once
setting is done, these will not need to be set
again when turning your camera on.
If the Date Adjust screen appears, set the date
and time by following the procedure in “Setting
the Date and Time” (p.52).
] screen
MENU
Date Adjust
Date Style
Date
Time
OK
mm/dd/yy
2008/0101 /
00
00 :
24h
49
2
OKCancel
Getting Started
MENU
Cancel
OK
OK
Setting the Display Language
You can choose the language in which the menus, error messages, etc. are
displayed from the following: English, French, German, Spanish, Portuguese,
Italian, Dutch, Danish, Swedish, Finnish, Polish, Czech, Hungarian, Turkish,
Russian, Korean, Chinese (traditional/simplified) and Japanese.
1
Use the four-way controller
(2345) to select the desired
language.
The default setting is English.
OK
English
OK
OKCancel
OK
2
Press the 4 button.
The [Initial Setting] screen for the
selected language appears.
Press the four-way controller (3) twice
and proceed to Step 10 if [Hometown]
does not have to be adjusted.
MENU
Initial Setting
Language
New York
Text Size Std.
MENU
Cancel
Page 52

50
O K
3
Press the four-way controller (3).
The cursor moves to W.
4
Press the four-way controller (5).
The [W Hometown] screen appears.
5
2
Getting Started
Use the four-way controller
(45) to select the city.
6
Press the four-way controller (3).
The cursor moves to [DST] (daylight saving time).
7
Use the four-way controller (
8
Press the 4 button.
The camera returns to the [Initial Setting] screen.
45
) to select O (On) or P (Off).
Hometown
New York
DST
MENU
Cancel
OK
OK
OK
9
Press the four-way controller (3).
The cursor moves to [Text Size].
10
Press the four-way controller
(5) and use the four-way
controller (23) to select [Std.]
or [Large].
Selecting [Large] magnifies the
selected menu item.
11
Press the 4 button twice.
The [Date Adjust] screen appears.
In this manual, the menu screens hereafter are described with [Text Size] set
to [Std.].
Initial Setting
Language
New York
Text Size Large
MENU
Cancel
English
Std.
OK
OK
Page 53

When an Incorrect Language is Set
A F. S
2008
00
RAW+
--
When you mistakenly select a language in the [Language/ ] screen
and proceed to the [Date Adjust] screen, you can perform the following
operations to set the correct language.
If you have proceeded to switch the camera to Capture mode (and the
camera is ready to take a picture), perform the following operations from
Step 2 to set the correct language.
1
Press the 3 button once to
display the guides (p.49) on the
99
AF.S
AF.S
monitor.
The screen shown on the right is an
example of the guides displayed. The
displayed screen will vary depending on
the selected language.
The guides appear on the monitor for 3
seconds.
2
Press the 3 button once.
A is displayed in the upper tab. ([A Rec. Mode] menu)
3
Press the four-way controller (5) twice.
R is displayed in the upper tab. ([R Set-up] menu)
AUTO PICT
RAW
OK
RAW+
RAW+
010101 0101/2008
/ 01/2008/ 0000: 00
00 00:
------
--
--
51
2
Getting Started
4
Use the four-way controller (3) to select [Language/ ].
5
Press the four-way controller (5).
The [Language/ ] screen appears.
6
Use the four-way controller (2345) to select the
desired language and press the 4 button.
The [R Set-up] menu for the selected language appears.
Refer to the following pages and set the desired city for [Hometown]
and the current date and time as necessary.
• To change Hometown: “Setting the World Time” (p.206)
To change date and time: “Changing the Date and Time and the Display
•
”
(p.205)
Style
When [Hometown] and the date and time are not set, the [Initial Setting] screen
or [Date Adjust] screen will be displayed when the camera is turned on again.
If you have not proceeded to the [Date Adjust] screen, you can reselect the
language using the four-way controller (5) in the [Language/ ] screen.
Page 54

52
Setting the Date and Time
Set the current date and time and the display style.
1
Press the four-way controller
(5).
2
Getting Started
The frame moves to [mm/dd/yy].
Date Adjust
Date Style
Date
Time
mm/dd/yy
2008/0101 /
00
00 :
24h
MENU
Cancel
2
Use the four-way controller (23) to choose the date style.
3
Press the four-way controller
(5).
The frame moves to [24h].
4
Use the four-way controller (23) to select 24h (24-hour
Date Adjust
Date Style
Date
Time
MENU
Cancel
mm/dd/yy
00 :
display) or 12h (12-hour display).
5
Press the four-way controller (5).
The frame returns to [Date Style].
6
Press the four-way controller (3).
00
OK
OK
24h
2008/0101 /
OK
OK
The frame moves to [Date].
Page 55

7
Press the four-way controller
(5).
The frame moves to the month.
Date Adjust
Date Style
Date
Time
mm/dd/yy
2008/0101 /
00
00 :
53
24h
MENU
Cancel
8
Use the four-way controller (23) to set the month.
Set the day and year in the same manner.
Next, set the time.
If you select [12h] in Step 4, the setting switches between am and pm
depending on the time.
9
Press the 4 button.
The camera is ready to take a picture.
If you set the date and time with the menu operations, the screen will
return to the [R Set-up] menu. Press the 4 button again.
Pressing the 3 button while adjusting the date cancels the settings made
so far and switches the camera to Capture mode. If the power is turned on
without the date and time set, the [Date Adjust] screen is displayed if Initial
Setting has been performed. You can also set the date later by menu
operations. (p.205)
• When you finish the settings and press the 4 button, the camera clock is
reset to 00 seconds. To set the exact time, press the 4 button when the
time signal (on the TV, radio, etc.) reaches 00 seconds.
• You can change the language and date and time settings with the menu
operations. (p.205, p.209)
OK
OK
2
Getting Started
Page 56

54
Memo
Page 57

3 Basic Operations
This chapter explains basic operations for shooting by
setting mode dial to I (Auto Picture) to ensure
successful capturing.
For information about advanced functions and settings for
taking pictures, refer to chapter 4 and onward.
Basic Shooting Operation ...................................56
Using a Zoom Lens ..............................................61
Using the Built-in Flash .......................................62
Taking Pictures Using the Shake Reduction
Function ................................................................67
Playing Back Still Pictures ..................................70
Deleting Images ....................................................72
Page 58

56
Basic Shooting Operation
Holding the Camera
How you hold the camera is important when taking pictures.
• Hold the camera firmly with both hands.
• Press the shutter release button gently when taking a picture.
3
Basic Operations
Horizontal position Vertical position
• To reduce camera shake, support your body or the camera on a solid object
such as a table, tree, or wall.
• Although there are individual differences among photographers, the shutter
speed for a handheld camera is generally 1/(focal length ×1.5). For example,
it is 1/75 of a second for a focal length of 50 mm and 1/150 of a second for
100 mm. Use a tripod or the Shake Reduction function (p.67) when using a
lower shutter speed.
• When using a telephoto lens, a tripod that is heavier than the total weight of
the camera and lens is recommended to avoid camera shake.
• Do not use the Shake Reduction function when using the camera on a tripod.
Page 59

Letting the Camera Choose the Optimal Settings
The x features various Capture modes, Focus modes, and Drive
modes suited for your intentions. This section explains how to take
pictures by simply pressing the shutter release button.
1
Set the mode dial to I.
The camera will select the optimal
capture mode for the subject.
1 Selecting the Appropriate Capture
Mode for Scenes (p.78)
57
3
Basic Operations
2
Set the focus mode lever to =.
The focus mode changes to l
(Autofocus/Single) mode.
In l, the lens automatically
focuses when the shutter release
button is pressed halfway. When the
image is focused, the shutter can be
released. (p.102)
Page 60

58
3
Basic Operations
3
Look through the viewfinder to
view the subject.
A zoom lens can be used to change the
size of the subject in the viewfinder.
1Using a Zoom Lens (p.61)
4
Position the subject inside the
AF frame and press the shutter
release button halfway.
The autofocus system operates. The focus
indicator
when the subject comes into focus.
When set to I (Auto Picture) mode,
the optimal capture mode is automatically
selected from Portrait, Landscape,
Macro, and Moving Object modes or
standard settings (Normal mode).
The flash pops up automatically when
necessary. (Push the K button and
manually lift the flash when Flash mode is
not set to [Auto discharge] or [Auto
flash+Redeye reduct]).
1
(p.59)
1
(p.60)
1
1
]
appears in the viewfinder
Operating the shutter release button
Subjects that are Difficult to Focus on
Using the Built-in Flash (p.62)
Selecting the Focusing Area (AF Point) (p.105)
Flash
status
Focus indicator
You can preview the image in the monitor and check the composition,
exposure, and focus before taking the picture. (p.112)
5
Press the shutter release
button fully.
The picture is taken.
Page 61

6
D e l e te
Review the captured image on
the monitor.
Image appears for 1 second on the
monitor after capturing (Instant
Review).
1 Setting the Instant Review (p.211)
1 Histogram Display (p.211)
1 Bright/Dark Area Display (p.211)
You can magnify the image during
Instant Review with the e-dial. (p.162)
You can delete the image during
Instant Review by pressing the i
button.
1 Deleting Images (p.72)
Operating the shutter release button
The shutter release button has two working positions.
Delete
Delete
59
3
Basic Operations
Not pressed Pressed halfway
(first position)
Pressed fully
(second position)
Pressing it down halfway (first position) turns on the viewfinder and
LCD panel indicators and the autofocus system operates. Pressing it
fully (second position) takes the picture.
• Press the shutter release button gently when taking a picture to prevent
camera shake.
• Practice pressing the shutter release button halfway to learn where the
first position is.
• The viewfinder indicators stay on while shutter release button is
pressed halfway. The indications stay on for about 10 seconds (default
setting) while the exposure metering timer is on after the button is
released. (p.27, p.99)
Page 62

60
Subjects that are Difficult to Focus on
The autofocus mechanism is not perfect. Focusing may be difficult when
taking pictures under the following conditions ((a) to (f) below). These also
apply to manual focusing using the focus indicator ] in the viewfinder.
If the subject cannot be focused automatically, set the focus mode lever to
\ and use the manual focus mode to focus on the subject with the aid
of the matte field in the viewfinder. (p.110)
(a) Extremely low-contrast subjects such as a white wall in the
3
Basic Operations
focusing area.
(b) Subjects which do not reflect much light within the focusing area.
(c) Fast moving objects.
(d) Strongly reflected light or strong backlighting (bright background).
(e) If repeating vertical or horizontal line patterns appear within the
focusing area.
(f) Multiple subjects in the foreground and background within the
focusing area.
Subject may not be focused even when ] (focus indicator) is displayed when
(e) and (f) above apply.
Page 63
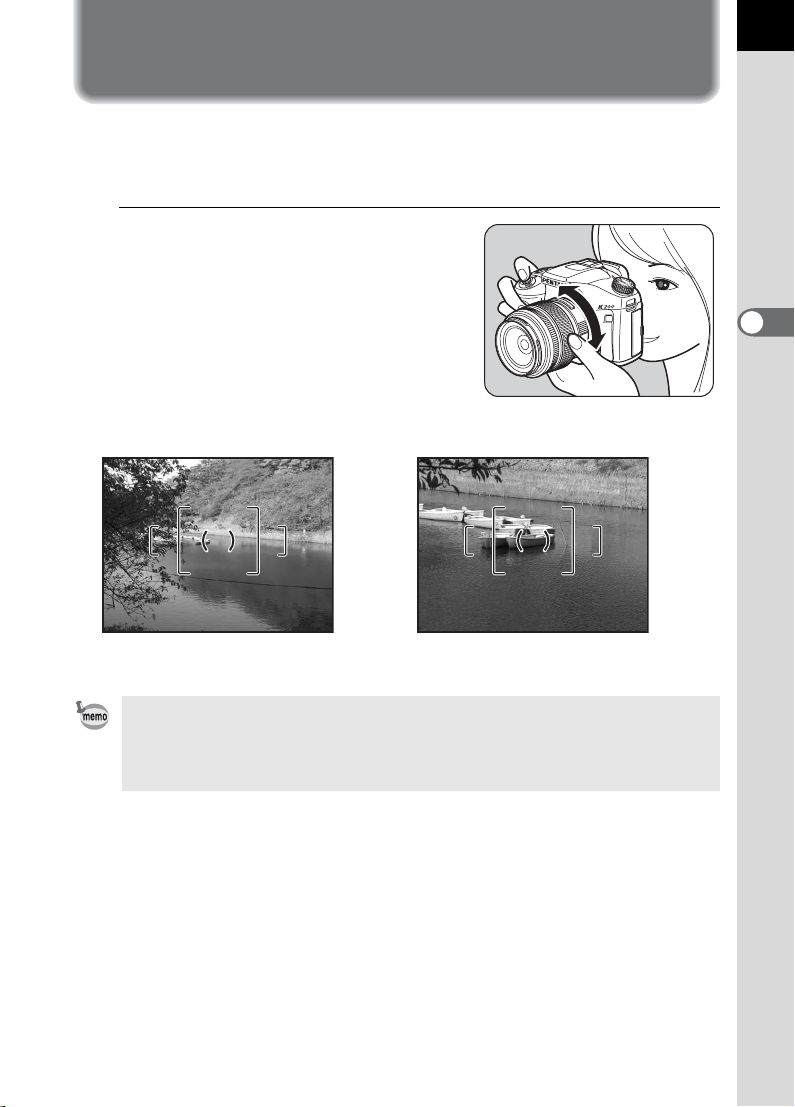
Using a Zoom Lens
Enlarge the subject (telephoto) or capture a wider area (wide angle) with
a zoom lens. Adjust the subject to the desired size and take the picture.
1
Turn the zoom ring to the right
or left.
Turn the zoom ring clockwise for
telephoto and counterclockwise for
wide angle.
61
3
Basic Operations
Wide Angle Telephoto
• The smaller the number of the displayed focal length, the wider the angle.
The larger the number, the more magnified the image appears.
• Power Zoom functions (Image Size Tracking, Zoom Clip, and Auto Zoom
Effect) are not compatible with this camera.
Page 64

62
Using the Built-in Flash
Use the following procedures to take a picture in low light or backlit
conditions or when you want to manually use the built-in flash.
The built-in flash is optimum at about 0.7 m to 5 m from the subject.
Exposure will not be properly controlled and vignetting may occur when
used at a distance closer than 0.7 m (this distance varies slightly
depending on the lens being used and set sensitivity (p.132)).
Compatibility of built-in flash and lens
3
Basic Operations
Vignetting (darkening of the corners of the image due to a lack of
light) may occur depending on the lens being used and the capture
conditions. We recommend taking a test shot to confirm this.
1DA, D FA, FA J, FA and F Lens Compatibility with the Built-in Flash
(p.133)
• When using the built-in flash, remove the lens hood before shooting.
• The built-in flash fully discharges for lenses without a function to set
aperture lens ring to s (Auto).
Flash Mode Function
Camera automatically determines ambient light and
built-in flash pops up. The flash pops up and
discharges automatically when necessary, such as
Auto discharge
g
Flash On
b
Auto flash+Redeye
i
reduct
Flash On+Red-eye
D
Wireless Mode
r
when using a shutter speed likely to cause camera
shake or in backlit conditions. The flash may pop up
but may not discharge if the camera determines that
the flash is not necessary.
Discharges flash manually. Discharges when the
flash is popped up, does not discharge when
retracted.
Lights a red-eye reduction light before automatic
flash.
Discharges flash manually. Lights a red-eye reduction
light before discharging the flash.
You can synchronize a dedicated external flash
(AF540FGZ or AF360FGZ) without using a sync cord.
Page 65

Selecting Flash Mode
AUTO
E x i t
0 . 0
Flash Mo de
Auto dis ch ar ge
O K
1
Press the { button.
63
3
Basic Operations
The Fn menu appears.
2
Press the four-way controller (3).
The [Flash Mode] screen appears.
Fn
Auto discharge
Auto discharge
0.0
0.0
OK
Flash Mode
Flash Mode
Fn
OK
AUTO
AUTO
Exit
Exit
OK
OK
Page 66

64
3
Use the four-way controller (45) to choose a flash mode.
Turn the e-dial to perform Flash exposure compensation. (p.128)
When the mode dial is set to e, K, b, c, a or p, g and i appear gray
and cannot be selected.
4
Press the 4 button.
The camera is ready to take a picture.
3
Basic Operations
Using Auto Discharge g, i (Automatic Flash Popup)
1
Set the mode dial to H, I, =, q, \ or ..
The flash is deactivated when A (Night Scene), K (Sunset),
D (Candlelight) or E (Museum) is selected in H (Scene) mode.
2
Press the shutter release
button halfway.
The built-in flash pops up if necessary
and begins charging. When the flash is
fully charged, b appears in the LCD
panel and viewfinder. (p.27, p.29)
Switch between Auto discharge mode
and Flash On mode by pressing the K
button while the built-in flash is popped
up. If Auto discharge is set, E appears
on the LCD panel.
Page 67

3
Press the shutter release button fully.
The picture is taken.
4
Push down on the portion
indicated in the illustration to
retract the flash.
65
3
Basic Operations
Using Flash On Mode b,
1
Press the K button.
The built-in flash pops up and begins
charging. Flash On mode is used
regardless of the flash mode settings.
When the flash is fully charged, b
appears in the LCD panel and
viewfinder. (p.27, p.29)
When Flash mode is set to g or i and
you pop up the built-in flash, you can
switch between Auto discharge mode
and Flash On mode by pressing the K
button under the following conditions.
• Shooting mode is set to I, =, s,
q, \, or ..
• H mode is set to i, K, C, or E.
2
Press the shutter release button fully.
The flash discharges and the picture is taken.
D
3
Push the flash down to retract.
Page 68

66
Using Red-eye Reduction Flash
“Red-eye” is the phenomenon where eyes look reddish in photographs
taken in dark environments with a flash. This is caused by the reflection of
the electronic flash in the retina of the eye. Red-eye occurs because pupils
are dilated in dark environments.
This phenomenon cannot be averted but the following measures can be
used to combat it.
• Brighten the surroundings when shooting.
• Set to wide angle and move closer to the subject if a zoom lens is in use.
• Use a flash that supports red-eye reduction.
• Position the flash as far away from the camera as possible when using
3
an external flash.
Basic Operations
The red-eye reduction function on this camera reduces red-eye by discharging
the flash twice. With the red-eye reduction function, the pre-flash is discharged
just before the shutter is released. This reduces pupil dilation. The main flash
is then discharged while the pupils are smaller, reducing the red-eye effect.
To use the red-eye reduction function in Picture mode or
(Auto flash+Redeye reduct) or
F
(Flash On+Red-eye). Set to F (Flash
On+Red-eye) in other modes.
Daylight-Sync Shooting
In daylight conditions, the flash will eliminate shadows when a portrait
picture is taken with a person’s face cast in shadow. Use of the flash in this
way is called Daylight-Sync Shooting. Flash On is used when shooting
with Daylight-Sync Shooting.
H
mode, select D
Taking pictures (Auto Picture mode)
1 Pop up the flash manually and confirm that the flash mode is set to E
(Flash On). (p.65)
2 Confirm that the flash is fully charged.
3 Take the picture.
The picture may be overexposed if the background is too bright.
Without Daylight-Sync With Daylight-Sync
Page 69

Taking Pictures Using the Shake
Reduction Function
You can easily take sharp pictures using the Shake Reduction function by
simply turning on the Shake Reduction switch.
Shake Reduction
The Shake Reduction function reduces camera shake that occurs
when the shutter release button is pressed. This is useful for taking
pictures in situations where camera shake is likely to occur. The Shake
Reduction function allows you to take pictures at approximately 4 steps
slower shutter speed without the risk of camera shake.
The Shake Reduction function is ideal when taking pictures in the
following situations.
• When taking pictures in dimly lit locations, such as indoors, at night,
on cloudy days and in the shade
• When taking telephoto pictures
Blurred picture
Picture taken with
the Shake Reduction function
67
3
Basic Operations
•
The Shake Reduction function does not compensate for blurring caused by subject
movement. To take pictures of a moving subject, increase the shutter speed.
•
The Shake Reduction function may not fully reduce camera shake when
taking close-up shots. In this case, it is recommended that the Shake
Reduction function be turned off and the camera be used with a tripod.
• The Shake Reduction function will not fully work when shooting with a
slower shutter speed, for example when shooting a moving subject or
night scenes. In this case, it is recommended that the Shake Reduction
function be turned off and the camera be used with a tripod.
Shake Reduction Function and Lens Focal Length
The Shake Reduction function operates by acquiring the lens information
such as focal length.
If the camera uses a DA, D FA, FA J, FA or F lens, the lens information is
automatically acquired when the Shake Reduction function is activated.
[Focal Length] cannot be set on the [Input Focal Length] menu in the [
Rec. Mode] (The menu items cannot be selected).
If another type of lens is used, the lens information cannot be automatically
acquired even when the Shake Reduction function is activated.
In this case, the [Input Focal Length] setting menu appears. Set [Focal
Length] manually on the [Input Focal Length] setting menu.
1
Setting the Shake Reduction Function (p.69)
A
Page 70

68
3
Basic Operations
Turning On the Shake Reduction Function
1
Turn on the Shake Reduction
switch.
When the shutter release button is
pressed halfway, k appears in the
viewfinder and the Shake Reduction
function turns on.
• Be sure to turn off the Shake Reduction switch when using the camera with
a tripod.
• The Shake Reduction function automatically turns off in the following
situations.
When using self-timer, 2 sec. self-timer, remote control shooting, remote
control (3 sec. delay) shooting, bulb shooting, or wireless mode with an
external flash
• If a type of lens that does not support automatic acquisition of lens
information such as focal length is used (p.67), the [Input Focal Length] menu
appears. Set [Focal Length] manually on the [Input Focal Length] setting
menu. 1 Setting the Shake Reduction Function (p.69)
• Turn the Shake Reduction switch off if you will not use the Shake Reduction
function.
• The Shake Reduction function will not fully work (for about 2 seconds) right
after turning on the camera or restoring from Auto Power Off. Wait for the
Shake Reduction function to become stable before gently pressing the
shutter release button to take a picture. Press the shutter release button
halfway. The camera is ready to take pictures when k appears in the
viewfinder.
• Shake Reduction is available with any x compatible PENTAX lens.
However, when the aperture ring is set at other than the s (Auto) position or
a lens without an s position is used, the camera does not operate unless [23.
Using aperture ring] (see p.76; see p.30 - p.31 for operation method) is set to
[Permitted] in the [A Custom Setting] menu. Set this beforehand. Note that
some functions are restricted when [23. Using aperture ring] is set to
[Permitted] in the [A Custom Setting] menu. Refer to “Notes on [23. Using
Aperture Ring]” (p.230) for details.
Page 71

Setting the Shake Reduction Function
The [Input Focal Length] setting menu appears when the camera is turned
on with the Shake Reduction switch on and a type of lens that does not
support automatic acquisition of lens information such as focal length
(p.67) is mounted.
Set [Focal Length] manually on the [Input Focal Length] setting menu.
• The [Input Focal Length] setting menu does not appear when using a lens
that supports automatic acquisition of lens information such as focal length
because [Focal Length] is set automatically.
• When using a lens without the s position on the aperture or with the aperture
set to a position other than the s position, set [23. Using aperture ring] on
the [A Custom Setting] (p.76) menu to [Permitted].
1
Use the four-way controller
(45) or the e-dial to set [Focal
Length].
Select from the following 34 focal length
values. (The default setting is 35.)
8 101215182024283035
40 45 50 55 65 70 75 85 100 120
135 150 180 200 250 300 350 400 450 500
550 600 700 800
Input Focal Length
Focal Length
100
120
MENU
Cancel
135
OK
OK
69
3
Basic Operations
• If the focal length for your lens is not listed above, select the value closest to
the actual focal length (example: [18] for 17 mm and [100] for 105 mm).
• When using a zoom lens, select the actual focal length at the zoom setting in
the same manner.
• Effect of Shake Reduction is influenced by the shooting distance as well as
focal length information. The Shake Reduction function may not perform as
expected when shooting at close ranges.
2
Press the 4 button.
The camera is ready to take a picture.
To change the Focal Length setting, use [Input Focal Length] on the [A Rec.
Mode] menu (p.74).
Page 72

70
10 0-0 00 1
RGB
JPEG
ISO
A1
AF.S
10 0- 00 01
1/ 20 00
+1 .5
F2 .8
0. 5
200
AdobeRGB
10 0-0 00 1
1/ 20 00
F2 .8
200 8
Playing Back Still Pictures
Playing Back Images
You can play back captured still pictures with the camera.
Use the included “PENTAX PHOTO Browser 3” software to play back using a
PC. Refer to the “PENTAX PHOTO Browser 3/PENTAX PHOTO Laboratory 3
Operating Manual” for details.
3
Basic Operations
1
Press the Q button after
taking a picture.
The most recently captured image
(image with the largest file number) is
displayed on the monitor.
Press the
to switch the information display such
as the image data for the displayed
image.
Refer to p.25 - p.26 for display
information details.
M
button during playback
100-0001
100-0001
100-0001
100-0001
M
M
RGB
RGB
Histogram displayHistogram display
M
100-0001
100-0001
PP
AF.S
AF.S
1/2000
1/2000
F2.8
F2.8
ISO
ISO
JPEG
JPEG
200
200
10
+1.5
+1.5
//020202020202 / 2008
2008/
-
0.5
-
0.5
G2G2A1
G2
AdobeRGB
AdobeRGB
1010: 393910 : 39
A1
AMAMAM
mmmmmm
1/2000
1/2000
F2.8
F2.8
Standard
M
No info. display Detailed information display
±0±0
±0±0
±0±0
±0±0
Page 73

2
Press the four-way controller
(45).
4 : The previous image appears.
5 : The next image appears.
Refer to “Playback Functions” (p.157) for playback mode details.
71
3
Basic Operations
Page 74

72
100- 0 0 4 6
O K
C a n c el
A l l im a g e s
Deleting Images
Deleting a Single Image
You can delete one image at a time.
• Deleted images cannot be restored.
• Protected images cannot be deleted.
3
Basic Operations
1
Press the Q button and use the four-way controller (
to select an image to delete.
2
Press the i button.
The Delete screen appears.
45
)
3
4
Use the four-way controller
(23) to select [Delete].
Select the file format to delete for
images saved in RAW+ format.
Delete JPEG
Delete RAW
Delete
RAW+JPEG
Deletes only the JPEG image.
Deletes only the RAW image.
Deletes both file formats.
All images
All images
Delete
Cancel
Cancel
100-0046
100-0046
Press the 4 button.
The image is deleted.
When deleting multiple images, refer to “Deleting Multiple Images” (p.173).
OK
OK
OK
Page 75

4 Shooting Functions
This chapter describes the various basic and advanced
shooting functions available with the x.
How to Operate the Shooting Menus .................74
Selecting the Appropriate Capture Mode for
Scenes ...................................................................78
Setting the Exposure ...........................................81
Focusing .............................................................102
Checking the Composition, Exposure and Focus
Before Shooting .................................................112
Continuous Shooting .........................................115
Self-Timer Shooting ...........................................117
Remote Control Shooting (Remote Control F: Sold
Separately) ..........................................................120
Using Mirror Up Function to Prevent Camera
Shake ...................................................................123
Changing the Shooting Conditions Automatically
when Shooting (Auto Bracket) ..........................124
Page 76
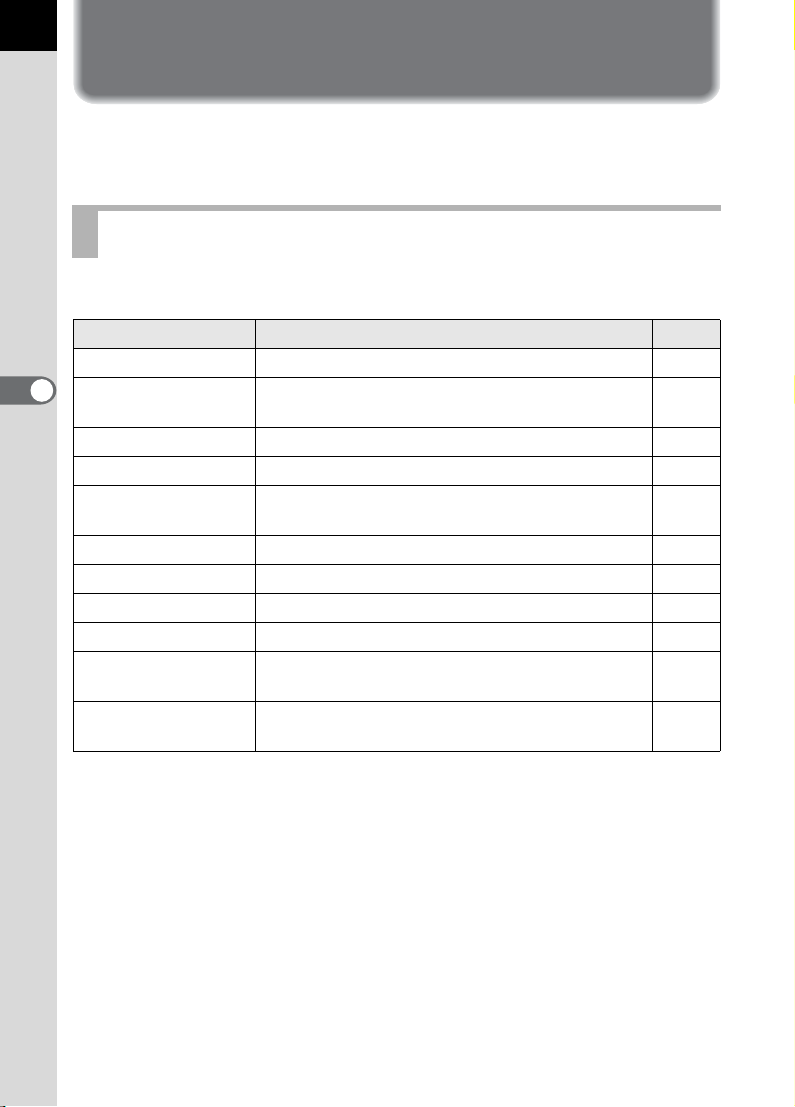
74
How to Operate the Shooting Menus
Press the 3 button in Capture mode. The [A Rec. Mode] menu
appears.
[A Rec. Mode] Menu Setting Items
Perform settings related to capturing in the [A Rec. Mode] menu.
Item Function Page
AF Mode Selects the autofocus mode. p.104
4
AE Metering
Shooting Functions
Select AF point Selects the part of the screen to focus on. p.105
File Format Sets the file format. p.148
JPEG Recorded
Pixels
JPEG Quality Sets the image quality for JPEG shooting. p.147
RAW file format Sets the file format for RAW shooting. p.148
Color Space Sets the color space to use. p.155
| button Sets the | button function. p.149
Memory
Input Focal Length
Selects the part of the screen to use for
measuring brightness and determining exposure.
Sets the recording size of images for JPEG
shooting.
Sets the settings to save when the power is
turned off.
Sets the focal length when using a lens for which
focal length information cannot be acquired.
p.98
p.146
p.217
p.69
Page 77

[A Custom Setting] Menu Setting Items
Set custom functions to fully use the functions of a SLR camera with the
Custom Setting Menu. The default setting does not change custom
function.
The [A Custom Setting] menu settings are activated when [Setting], the
first item, is O (On).
Item Function Page
Setting Sets to change custom function. -
1. EV Steps Sets the adjustment steps for exposure. p.101
2. Sensitivity Steps Sets the adjustment steps for ISO sensitivity. p.83
3. Meter Operating
Time
4. L with AF
locked
5. Link AF Point and AESets whether to link the exposure and AF point in
6. Auto Bracketing
order
7. Adjust White
Balance
8. Superimpose AF
Area
9. AF in remote
control
10. Slow Shutter
Speed NR
11. High-ISO Noise
Reduction
12. 4 button when
shooting
13. e-dial in Program Sets the e-dial in e (Program) mode. p.88
Sets the exposure metering time. p.99
Sets whether to lock the exposure value when
the focus is locked.
the focusing area during multi-segment metering.
Sets the order for Auto bracket shooting. p.124
Enables fine tuning the white balance. p.154
Sets whether to display the selected AF point
(focus position) in the viewfinder.
Sets whether to use Autofocus when shooting
with remote control.
Shutter releases after AF activates if shutter is
released from remote control when set to [On].
Shutter cannot be released until in focus.
AF does not activate at shutter release from
remote control when set to [Off].
Sets whether to use Noise Reduction in slow
speed shooting.
Sets whether to use Noise Reduction when
shooting with a high ISO. Select from three
levels.
Sets the action for the 4 button when pressed
during shooting.
p.108
p.99
p.105
p.121
p.85
p.85
p.103
75
4
Shooting Functions
Page 78

76
14. Green button in
Manual
15. Release when
Charging
16. Flash in Wireless
Mode
17. WB when using
flash
18. Preview Method
19. Display
Sensitivity
4
Shooting Functions
20. Saving rotation
info
21. Auto Image
Rotation
22. Catch-in focus
23. Using aperture
ring
Reset Custom
Function
Item Function Page
Selects the exposure adjustment method when
the Green button is pressed in a (Manual) mode.
Sets to release shutter while the built-in flash is
charging.
Sets the built-in flash discharge method in
wireless mode.
Sets whether to change the White Balance
setting when using flash to [Flash].
Sets Preview Method when the main switch is
turned to the preview position (|).
Sets whether to switch the number of recordable
images in the LCD panel and viewfinder to the
sensitivity display.
Sets whether to save rotation information when
shooting.
Sets to automatically rotate images when playing
back.
When set to [On], if the focus mode is set to l
and a manual focus lens is attached, catch-in
focus shooting is possible and the shutter is
released automatically when the subject comes
into focus.
Sets to enable shutter release when lens
aperture ring is set at other than the s position.
Resets all the settings in the [A Custom Setting]
menu to the defaults.
p.96
p.129
p.138
p.151
p.112
-
–
–
p.111
p.230
p.221
Page 79

Shooting Fn Menu Setting Items
AUTO
E x i t
77
Press the { button in Capture mode. The
Fn menu appears.
Fn
CUSTOM IMAGE
OK
Fn
Press the four-way controller (2345) or the 4 button to set the
operation.
Key or
Button
2
3
4
5
4
Item Function Page
Selects Continuous shooting, Self-
Drive Mode
Flash Mode Adjusts the method of flash discharge. p.63
White Balance
Sensitivity Sets the sensitivity. p.83
Custom Image Sets image processing. p.144
timer, Remote control or Auto Bracket
shooting.
Adjusts the color balance to match the
type of the light source illuminating the
subject.
p.115
p.117
p.120
p.124
p.150
AUTO
AUTO
Exit
Exit
4
Shooting Functions
Page 80

78
Selecting the Appropriate Capture Mode for Scenes
Select = (Portrait), s (Landscape), q (Macro), \ (Moving Object),
. (Night Scene Portrait), a (Flash OFF), H (Scene) with the mode dial
if desired image is not captured in I (Auto Picture) mode.
The characteristics of the modes are as follows.
4
Shooting Functions
Dial indicator
Mode Characteristics
The optimal capture mode is automatically selected
I (Auto Picture)
(Portrait) Optimal for capturing portraits.
=
(Landscape)
s
(Macro)
q
(Moving Object)
\
(Night Scene Portrait)
.
(Flash OFF)
a
H (Scene)
from Portrait, Landscape, Macro and Moving Object
modes or standard settings (Normal mode).
Deepens the focus range, emphasizes contour and
saturation of trees and the sky, and produces a bright
image.
Lets you take vibrant pictures of flowers and other
small subjects at short distances.
Lets you take sharp pictures of a quickly moving
subject, such as at a sporting event.
Lets you capture people against a night view or at dusk.
The flash is deactivated. Other settings are the same
as the Normal mode in I.
Lets you select from 8 shooting scenes depending on
the shooting conditions.
For . (Night Scene Portrait), the shutter speed becomes slower in dark
places, even if the built-in flash is used. To prevent camera shake, either use
the Shake Reduction function or mount the camera on a tripod.
Page 81

Selecting the Shooting Scene
AUTO
SCN
E x i t
By setting the mode dial to H (Scene), you can choose from the
following 8 shooting scenes.
Mode Characteristics
A (Night Scene)
i (Surf & Snow)
K (Food)
K (Sunset) For capturing the sunrise or sunset in beautiful colors.
C (Kids)
E (Pet) For capturing moving pets.
D (Candlelight) For capturing scenes in candlelight.
E (Museum)
The flash is deactivated in A (Night Scene), K (Sunset), D (Candlelight)
and E (Museum) modes. To prevent camera shake, either use the Shake
Reduction function or mount the camera on a tripod.
Used for night scenes. Use a tripod, etc. to prevent
shaking.
For capturing images of dazzling backgrounds, such as
snowy mountains.
For capturing images of food. Saturation will be rather
high to make it look appetizing.
For capturing moving kids. Reproduces healthy and
bright skin tone.
For capturing images in places where a flash is
prohibited.
79
4
Shooting Functions
How to Select a Shooting Scene
1
Set the mode dial to H (Scene).
2
Press the { button.
The Fn menu appears. The icon for the
currently selected shooting scene
appears in the Fn menu screen in
H (Scene) mode.
Fn
OK
SCN
SCN
Fn
AUTO
AUTO
Exit
Exit
Page 82

80
U s e d f o r n i gh t s c e ne s .
U s e a t ri p o d, et c . t o
p r e v en t s h a ki n g
O K
F o r ca p t u r i ng mo v i ng
p e t s
O K
O K
C h e c k
F o o d
3
Press the 4 button.
SCN
Night Scene
The mode palette appears.
Used for night scenes.
Used for night scenes.
Use a tripod, etc. to
Use a tripod, etc. to
prevent shaking
4
Use the four-way controller
(2345) to choose a Scene
prevent shaking
INFO
SCN
Pet
OK
OK
OK
mode.
For capturing moving
4
Shooting Functions
For capturing moving
pets
pets
INFO
OK
OK
OK
Press the M button to display the
custom image and use the four-way
controller (45) to change the scene.
Settings, such as those for Image Tone,
cannot be changed.
5
Press the 4 button.
The camera is ready to take a picture.
Set [Scene Display] in [Memory] to O (On) to display the picture in Step 3 in
the format last used (mode palette or custom image). Refer to “Selecting
Capture Mode Settings to Save in the Camera” (p.217) for details.
INFO
M
M
B
B
Food
Food
R
R
C
C
Check
Check
OK
OK
OK
Y
Y
G
G
Page 83

Setting the Exposure
Effect of Aperture and Shutter Speed
Correct exposure of the subject is determined by the combination of
shutter speed and aperture setting. There are many correct combinations
of shutter speed and aperture for a particular subject. Different
combinations produce different effects.
Effect of Shutter Speed
81
The shutter speed determines the length of time that light is allowed to
strike the CCD.
Using slower shutter speed
If the subject is moving, the image will be
blurred because the shutter is open
longer.
It is possible to enhance the effect of
motion (rivers, waterfalls, waves, etc.) by
intentionally using a slower shutter speed.
Using faster shutter speed
Choosing a faster shutter speed will allow
freezing the action of a moving subject.
A faster shutter speed also helps
preventing camera shake.
4
Shooting Functions
Page 84

82
Effect of Aperture
Adjust the amount of light hitting the CCD by changing the aperture.
Opening the aperture (reduce the aperture value)
Objects closer and farther than the focused
subject will be more out of focus. For
instance, if you take a picture of a flower
against a landscape with the aperture open,
the landscape in front and behind the flower
will be blurred, emphasizing only the flower.
Closing the aperture (increase the aperture value)
The range in focus expands forward and
4
backward. For instance, if you take a picture
Shooting Functions
of a flower against a landscape with the
aperture narrowed, the landscape in front
and behind the flower will be in focus.
Depth of Field
When you focus on a portion of the subject, there is a range in which
both objects closer and farther will also be in focus. This focused
range is called the depth of field.
• The depth of field for the x differs depending on the lens
but compared to a 35 mm camera, the value is roughly one aperture
setting lower (the focused range becomes narrower).
• The wider the wide-angle lens, and the farther away the subject, the
deeper the depth of field is (some zoom lenses do not have a scale
for depth of field because of their designs).
Depth of field Shallow Deep
Area of focus Narrow Wide
Aperture
Lens focal length
Distance to the subject Near Far
Open Close
(Smaller value) (Larger value)
Longer Shorter
(Telephoto) (Wide-angle)
Page 85

Setting the Sensitivity
800
1600
400
200
100
AUTO
S e n s it i v i t y
AUTO
1 0 0 - 40 0
D-Range
O K
You can set the sensitivity to suit the brightness of the surroundings.
The sensitivity can be set to [AUTO] or within a sensitivity range equivalent
to ISO 100 to 1600. The default setting is [AUTO].
Set [Sensitivity] in the Fn menu. (p.77)
AUTO
Sensitivity
Sensitivity
AUTO
100-400
100-400
AUTO
Fn
D-Range
D-Range
• [Sensitivity] in the Fn menu cannot be used to set the sensitivity when the
exposure mode is set to K (Sensitivity Priority). Turn the e-dial in Capture
mode to make the setting. (p.88)
• Captured images can show more noise if a higher sensitivity is set. You can
reduce image noise by setting [11. High-ISO Noise Reduction] in the [A
Custom Setting] menu. (p.85)
• You can set whether to lock the ISO sensitivity adjustment to increments of
1 EV or to coordinate it with the EV Steps (p.101) in [2. Sensitivity Steps] in
the [A Custom Setting] menu (p.75).
AUTO
100
100
200
200
400
400
800
800
1600
1600
OK
OK
OK
83
4
Shooting Functions
Setting the Range of Automatic Correction in AUTO
Set range to automatically correct sensitivity when Sensitivity is set to
[AUTO]. The sensitivity is automatically corrected in the range of [ISO 100400] by default.
Turn the e-dial to set the upper sensitivity limit in [Sensitivity] in the Fn
menu.
When the exposure mode is set to a (Manual) or p (Bulb), the sensitivity
cannot be set to [AUTO].
Page 86

84
8 0 0
1 6 0 0
4 0 0
2 0 0
AUTO
2 0 0 - 40 0
S e n s it i v i t y
AUTO
D-Range
2 0 0 %
D-Range
O K
Checking the Sensitivity in Capture Mode
Press the 4 button in Capture mode. The set sensitivity is displayed on
the LCD panel and in the viewfinder.
You can display the number of recordable images by pressing the 4 button
when the exposure mode is set to K (Sensitivity Priority).
Expanding the Dynamic Range
Dynamic range is the ratio that indicates the light level expressed by the
CCD pixels from bright areas to dark areas.
By using the Expand Dynamic Range function, you can expand the light
4
level expressed by the CCD pixels, making it more difficult for bright areas
Shooting Functions
to occur in the image.
Press the { button for the [Sensitivity] setting in the Fn menu to turn this
function on or off.
AUTO
Sensitivity
Sensitivity
200-400
200-400
AUTO
AUTO
D-Range
D-Range
200%
200%
AUTO
200
200
400
400
800
800
1600
1600
Fn
D-Range
D-Range
OK
OK
OK
When the dynamic range is expanded, the sensitivity range is reduced to ISO
200 to 1600.
Page 87

Noise Reduction
When you use a digital camera to shoot with a long exposure or high
sensitivity setting, image noise (image roughness or unevenness)
becomes noticeable.
You can reduce image noise by using Noise Reduction. Images shot
with Noise Reduction take longer to save.
Slow Shutter Speed NR
Reduces noise during long exposures.
Select from [On] or [Off] for [10. Slow Shutter Speed NR] in the
[A Custom Setting] menu (p.75).
High-ISO Noise Reduction
Reduces noise at high sensitivity (ISO) settings.
Select from [Off], [Weakest], [Weak], or [Strong] for [11. High-ISO
Noise Reduction] in the [A Custom Setting] menu (p.75).
Changing the Exposure Mode
This camera features the following six exposure modes.
Use the mode dial (p.32) to change the exposure mode. The settings
available for each exposure mode are as follows.
85
4
Shooting Functions
Exposure
Mode
e
(Program)
K
(Sensitivity
Priority)
b
(Shutter
Priority)
Description
Automatically sets
shutter speed and
aperture to the proper
exposure according to
Program line when
taking pictures.
Automatically sets the
shutter speed and
aperture to the proper
exposure according to
the set sensitivity.
Lets you set the
desired shutter speed
for expressing moving
subjects.
EV Com-
pensation
Yes #* #* Yes p.86
Yes No No
Yes Yes No Yes p.90
Change
Shutter
Speed
Change
Aperture
Change
Sensi-
tivity
Other
than
Auto
Page
p.88
Page 88

86
Exposure
Mode
c
(Aperture
Priority)
a
(Manual)
p (Bulb)
4
Shooting Functions
* In [13. e-dial in Program] in the [A Custom Setting] menu, you can set to change either the
shutter speed or aperture when the e-dial is turned.
Description
Lets you set aperture
for controlling the
depth of field.
Lets you set shutter
speed and aperture to
capture the picture
with creative intent.
Lets you capture
images that require
slow shutter speeds
such as fireworks and
night scenes.
EV Com-
pensation
Yes No Yes Yes p.92
No Yes Yes
No
Using the e (Program) Mode
Automatically sets shutter speed and aperture to the proper exposure
according to Program line when taking pictures.
Use the e-dial to change the shutter speed or aperture while maintaining
the proper exposure (Hyper-program) (p.88).
Change
Shutter
Speed
By
user’s
action
Change
Aperture
Yes
Change
Sensi-
tivity
Other
than
Auto
Other
than
Auto
Page
p.94
p.97
1
Set the mode dial to e.
Page 89

2
Turn the e-dial while pressing
the mc button and adjust the
exposure.
The EV Compensation is displayed in
the viewfinder and on the LCD panel.
The shutter speed and aperture value
are also displayed while adjusting the
exposure.
• Set EV Compensation in increments of 1/2 EV or 1/3 EV. Set in [
in the [A Custom Setting] menu. (p.101)
• You can automatically correct the sensitivity if appropriate exposure cannot
be set with the set criteria. Set [Sensitivity] to [AUTO] in the Fn menu. (p.83)
• When using a lens with an aperture ring,
set the aperture to the s position while
holding down the auto-lock button on the
lens.
EV Compensation
1. EV Steps
87
4
Shooting Functions
]
Page 90

88
e (Program) mode and e-dial
You can set the action for the e-dial when turned in e (Program)
mode. Set in [13. e-dial in Program] in the [A Custom Setting] menu.
Automatically adjusts the aperture value and shutter
Program shift
1
4
Shooting Functions
2
3
4
b
c
Off
speed in order to obtain the appropriate exposure.
• Press the Green button to return to Program
Automatic Exposure.
Switches to Shutter Priority Automatic Exposure
when the e-dial is turned.
• You can set a shutter speed to a value that will give
a correct exposure with the aperture range of the
lens being used.
• If the brightness changes and the aperture value is
outside the relative range, the aperture value will
blink in the viewfinder and on the LCD panel.
• When a picture is taken with b shift, b is
displayed for the exposure mode in the image
information.
• Press the Green button to return to Program
Automatic Exposure.
Switches to Aperture Priority Automatic Exposure
when the e-dial is turned.
• You can set the aperture to a value that will give a
correct exposure within the range of available
shutter speeds.
• If the brightness changes and the shutter speed is
outside the relative range, the shutter speed will
blink in the viewfinder and on the LCD panel.
• When a picture is taken with c shift, c is
displayed for the exposure mode in the image
information.
• Press the Green button to return to Program
Automatic Exposure.
Disables e-dial operation while Program Automatic
Exposure is set.
Using the K (Sensitivity Priority) Mode
You can set the sensitivity to suit the brightness of the subject.
The shutter speed and aperture are automatically set according to the
selected sensitivity to obtain the appropriate exposure.
Page 91

1
Set the mode dial to K.
2
Turn the e-dial and adjust the
sensitivity.
The shutter speed, aperture value and
sensitivity are displayed in the
viewfinder and on the LCD panel.
• You can set the sensitivity to values equivalent to ISO 100 to 1600. [AUTO]
is not available.
• Turn the e-dial while pressing the mc button to change the EV
compensation value. (p.100)
•
Set the sensitivity in increments of 1/2 EV or 1/3 EV. Set in [1. EV Steps] in the
[
A
Custom Setting] menu. (p.101)
•
You cannot set the sensitivity in [Sensitivity] in the Fn menu.
•
When using a lens with an aperture ring,
set the aperture to the
holding down the auto-lock button on the
lens.
s
position while
89
4
Shooting Functions
Page 92

90
Using the b (Shutter Priority) Mode
Lets you set the desired shutter speed for expressing moving subjects.
When taking pictures of a fast moving subject, you can increase the
shutter speed to make the subject look still or decrease the shutter speed
to have the subject show movement.
Aperture value is automatically set to give the appropriate exposure
depending on the shutter speed.
1Effect of Aperture and Shutter Speed (p.81)
1
Set the mode dial to b.
4
Shooting Functions
2
Turn the e-dial and adjust the
shutter speed.
The shutter speed can be set within the
range of 1/4000 to 30 seconds.
The shutter speed and aperture value
are displayed in the viewfinder and on the
LCD panel.
Page 93

• Turn the e-dial while pressing the mc button to change the EV
compensation value. (p.100)
• Set the shutter speed in increments of 1/2 EV or 1/3 EV. Set in [1. EV Steps]
in the [A Custom Setting] menu. (p.101)
• You can automatically correct the sensitivity if appropriate exposure cannot
be set with the set criteria.
• When using a lens with an aperture ring,
set the aperture to the s position while
holding down the auto-lock button on the
lens.
Set [Sensitivity] to [AUTO] in the Fn menu. (p.83)
Exposure Warning
If the subject is too bright or too dark,
the aperture value will blink in the
viewfinder and on the LCD panel. If the
subject is too bright, choose a faster
shutter speed. If it is too dark, choose a slower shutter speed. When
the aperture value indication stops blinking, you can take the picture
with proper exposure.
Use an ND (Neutral Density) filter if the subject is too bright. Use a
flash if it is too dark.
91
4
Shooting Functions
Page 94

92
Using the c (Aperture Priority) Mode
Set aperture for controlling the depth of field. The depth of field is deeper
and the front and back of the focused object is clear when aperture is set
to a large value. The depth of field is shallower and the front and back of
the focused object is blurred when aperture is set to a small value.
Shutter speed is automatically set to appropriate exposure depending on
the aperture value.
1Effect of Aperture and Shutter Speed (p.81)
1
Set the mode dial to c.
4
Shooting Functions
2
Turn the e-dial and adjust the
aperture value.
The shutter speed and aperture value
are displayed in the viewfinder and on
the LCD panel.
Page 95

• Turn the e-dial while pressing the mc button to change the EV
compensation value. (p.100)
• Set the aperture value in increments of 1/2 EV or 1/3 EV. Set in [1. EV Steps]
in the [A Custom Setting] menu. (p.101)
• You can automatically correct the sensitivity if appropriate exposure cannot
be set with the set criteria.
• When using a lens with an aperture ring,
set the aperture to the s position while
holding down the auto-lock button on the
lens.
Set [Sensitivity] to [AUTO] in the Fn menu. (p.83)
Exposure Warning
If the subject is too bright or too dark,
the shutter speed will blink in the
viewfinder and on the LCD panel. If the
subject is too bright, set the aperture smaller (larger number), and
when too dark, open the aperture further (smaller number). Once
blinking stops, you can take the picture with the proper exposure.
Use an ND (Neutral Density) filter if the subject is too bright. Use a
flash if it is too dark.
93
4
Shooting Functions
Page 96

94
Using a (Manual) Mode
You can set the shutter speed and aperture value. This mode is suitable
to take pictures of your choice by combining them. This mode is
convenient for taking pictures using the same combination of the shutter
speed and aperture settings or taking intentionally underexposed (darker)
or over-exposed (brighter) photographs.
1 Effect of Aperture and Shutter Speed (p.81)
1
Set the mode dial to a.
4
Shooting Functions
2
Turn the e-dial and adjust the
shutter speed.
3
Turn the e-dial while pressing
the mc button and adjust the
aperture.
Page 97

The shutter speed and aperture
value are displayed in the viewfinder
and on the LCD panel. Of the
shutter speed and aperture value,
the value being adjusted is
underlined in the viewfinder. While
adjusting the shutter speed or
aperture value, the difference from
the appropriate exposure (EV value)
appears in the viewfinder. The
appropriate exposure is set when
[0.0] is displayed.
95
Difference from the
appropriate exposure
• When the sensitivity is set to [AUTO] and exposure mode is set to a
(Manual) mode, the sensitivity is set to a value equivalent to ISO 100 if the
Dynamic Range is set to [Off] and ISO 200 if set to [On].
• Set the shutter speed and aperture values in increments of 1/2 EV or 1/3 EV.
Set in [1. EV Steps] in the [A Custom Setting] menu. (p.101)
• When using a lens with an aperture ring,
set the aperture to the s position while
holding down the auto-lock button on the
lens.
Exposure Warning
While adjusting the shutter speed or
aperture value, the difference from the
appropriate exposure blinks when it
becomes larger than ±3.0.
4
Shooting Functions
Page 98

96
Combining with L
Press the L button (p.101) to record the exposure value in a
(Manual) mode. If the shutter speed or aperture is then changed, the
combination of shutter speed and aperture changes while exposure
is retained.
Example: If the shutter speed is 1/125 sec and aperture is F5.6 and
is recorded with the L button, and the shutter speed is changed
to 1/30 sec with the e-dial, the aperture automatically changes to F11.
About the Green Button
4
The aperture and shutter speed are automatically adjusted to the
Shooting Functions
appropriate exposure at that moment if the Green button is pressed
in a (Manual) mode. You can set the adjustment methods in [14.
Green button in Manual] in the [A Custom Setting] menu.
1
2
3
4
Program Line
b Shift
c Shift
Off
The aperture and shutter speed are adjusted
automatically.
The aperture is locked and the shutter speed is
adjusted automatically.
The shutter speed is locked and the aperture is
adjusted automatically.
Disables Green button operation while Manual
Exposure is set.
Shutter speed is adjusted to appropriate exposure according to lens
aperture when lens aperture is not set to s position.
1 Notes on [23. Using Aperture Ring] (p.230)
Page 99

Using the p (Bulb) Mode
This mode is useful for the long exposures required for shooting night
scenes and fireworks.
The shutter remains open as long as the shutter release button is kept
pressed.
1
Set the mode dial to p.
EV compensation, Continuous shooting and Exposure Bracket are not
available in p (Bulb) mode.
• Turn the e-dial to adjust the aperture value.
• Set the aperture value in increments of 1/2 EV or 1/3 EV. Set in [1. EV Steps]
in the [A Custom Setting] menu. (p.101)
• The Shake Reduction function is automatically turned off when exposure
mode is set to p (Bulb) mode.
• Use a sturdy tripod and the cable switch CS-205 (optional) to prevent camera
shake when using p (Bulb) mode. Connect the cable switch to the cable
switch terminal (p.17).
• Bulb shooting is available when using the remote control shooting mode
(p.120). The shutter remains open as long as the shutter release button of
the optional remote control is held down.
• Noise reduction is a process to reduce noise (image roughness or
unevenness) caused by slow shutter speed. Set in [10. Slow Shutter Speed
NR] in the [A Custom Setting] menu. (p.85)
• When the sensitivity is set to [AUTO] and exposure mode is set to p (Bulb)
mode, the sensitivity is set to a value equivalent to ISO 100 if the Dynamic
Range is set to [Off] and ISO 200 if set to [On].
97
4
Shooting Functions
Page 100

98
Selecting the Metering Method
Choose the part of the screen to use for measuring brightness and
determining exposure. L (Multi-segment metering), M (Center-weighted
metering) or N (Spot metering) mode can be selected. The default setting
is L (Multi-segment metering).
L
M
N
Multi-segment
Center-
weighted
Spot Metering
Segments the viewfinder in 16 parts, meters each
portion and determines the appropriate exposure.
Measures the entire viewfinder with an emphasis on the
center and determines the exposure.
Measures only the center of the viewfinder and
determines exposure.
4
Shooting Functions
Set in [AE Metering] in the [A Rec. Mode] menu (p.74).
Rec. Mode
AF Mode
AE Metering
Select AF point
File Format
JPEG Rec. Pixels
JPEG Quality
MENU
Cancel
AF.S
10
OK
OK
Using the Multi-Segment Metering
The scene in the viewfinder is metered in
16 different zones as shown in the
illustration when using the multi-segment
metering. Even in backlit locations, this
mode automatically determines what level
of brightness is in which portion and
automatically adjusts exposure.
Multi-segment metering mode is not available when using a lens other than a
DA, D FA, FA J, FA, F or A lens, or when lens aperture ring is set at other than
s.
 Loading...