

Page 1
SLR Digital Camera
Operating Manual
For optimum camera performance,
please read the Operating Manual
before using the camera.
Page 2

Thank you for purchasing the PENTAX r Digital Camera. Please read
this manual before using the camera in order to get the most out of all the
features and functions. Keep this manual safe, as it can be a valuable tool in
helping you to understand all the camera’s capabilities.
Lenses you can use
In general, lenses t hat can be used w ith this camera are DA, D FA and FA J lenses and
lenses that have an Aperture s (Auto) position.
To use any other lens or acce ss ory, see p.37 and p.18 4.
Regarding copyrights
Images taken using th e r that are for anyt hi ng ot h er than personal enjoym e nt
cannot be used without per mission according to the r ights as specified in the Copyr ight
Act. Please take care, as there ar e even cases where limita t io ns a re placed on taking
pictures even for perso nal enjoyment durin g demonstrations, p erformances or of item s
on display. Images taken with the purpose of obtai ning copyrights als o cannot be used
outside the scope of use of the copyright as laid out in the Cop yright Act, and care
should be taken here als o.
Regarding trademarks
• PENTAX and smc PE NTAX are trademarks of PENTAX Corpor ation.
• The SD logo is a trademark.
• All other brands or product names are trademar ks or registered trademarks of thei r
respective o wners.
To users of this camera
• There is a possibility that reco rd ed data may be erased or th at the cam e ra may not
function correctly whe n used in surroundings su ch as installations gene rating strong
electromagnetic radi at io n or ma gn etic fields.
• The liquid crystal panel used i n the LCD display is manufac tured using extreme ly high
precision technolog y. Although the lev el of functioning p ixels is 99.99% or b etter, you
should be aware that 0.01% or fewer of the pixels may not illum inate or may illuminate
when they should not. H owe ver, this has no effect on the r ec orded image.
This product supp orts PRINT Image M atching III. PRINT Image Matching enabled
digital still cameras, printers and softwar e help photographers to produce images more
faithful to their intentions . So m e func tions are not available on pr inters that are not
PRINT Image Matching III compliant.
Copyright 2001 Seiko Eps on Co rporation. All Rights Rese rv ed.
PRINT Image Matching is a trad emark of Seiko Epson Co rp or atio n.
The PRINT Image Matching logo i s a trad em a rk of Seiko Epson Corporation.
Regarding PictBridge
PictBridge allows the user to conn ect the printer and digita l cam er a directly, using the
unified standard for t he direct printout of im ages. You can print im ages directly from the
camera through a few si m pl e op erations.
• There is a possibility that the illu st ra tio ns and the display screen of the LCD monitor
in this manual are differen t fro m th e act u al product.
Page 3
FOR SAFE USE OF YOUR CAMERA
We have paid close attent ion to the safety of this produ ct. When using this
product, we request yo ur special attention rega rding items marked wi th the
following symbol s.
1
Warning
Caution
This symbol indic ates that violating this item could ca use
serious personal injury.
This symbol indic ates that violating this item could ca use
minor or medium pers onal injury, or mat erial loss.
ABOUT THE CAMERA
Warning
• Do not disassemble or modify the camera. High voltage areas are present
inside the camera, with the risk of electric shock.
• If the camera interior is exposed due to dropping or otherwise damaging the
camera, never touch the exposed portion. There is the risk of electric shock.
• To avoid the risk of it being swallowed by mistake, keep the SD Memory
Card out of the reach of small children. Seek medical attention immediately
if a memory card is accidentally swallowed.
• Wrapping the strap around your neck is dangerous. Take care that small
children do not hang the strap over their necks.
• Do not look directly at the sun through the camera with the telephoto lens
attached, as viewing the sun may damage your eyes. Viewing the sun
directly with the telephoto lens may lead to a loss of eyesight.
• Be sure to store batteries out of the reach of children. Seek medical
assistance immediately if a battery is accidentally swallowed.
• Always use the AC adapter exclusively developed for this product, with the
specified power and voltage. Using an AC adapter not exclusive to this
product, or using the exclusive AC adapter with an unspecified power or
voltage can cause a fire, electric shock, or camera breakdown.
• If any irregularities occur during use, such as smoke or a strange odor, stop
use immediately, remove the batteries or the AC adapter, and contact your
nearest PENTAX service center. Continued use could cause a fire or electric
shock.
• During thunderstorms, unplug and discontinue use of the AC adapter.
Continued use could cause equipment failure, a fire, or electric shock.
Page 4

2
Caution
• Do not short the batteries or dispose of the batteries in fire. Do not
disassemble the batteries. The batteries could explode or catch fire.
• Of the batteries that can be used in this camera (AA Ni-MH batteries, AA
lithium batteries, AA alkaline batteries and CR-V3), only the Ni -MH batteries
can be recharged. Recharging other batteries can cause a fire or explosion.
• Remove the batteries from the camera immediately if they become hot or
begin to smoke. Be careful not to burn yourself during removal.
• Some portions of the camera heat up during use. There is the risk of low
temperature burns when holding such portions for long periods.
• Do not place your finger over or cover the flash with clothing when
discharging the flash. Fingers or clothing may be burned.
PRECAUTIONS FOR BATTERY USAGE
• Only use specified batteries with this camera. Use of other batteries can
cause a fire or explosion.
• Replace all the batteries at the same time. Do not mix battery brands, type
or an old battery with a new one. It may cause explosion or a fire.
• The batteries should be inserted correctly with regard to polarity (+ and –)
marked on the batteries and the camera. Not inserting batteries correctly
may cause explosion or a fire.
• Do not disassemble the batteries. Of the batteries that can be used in this
camera, only the Ni-MH batteries can be recharged. Disassembling the
batteries or attempting to charge non-rechargeable batteries could result in
explosion or leakage.
Care to be Taken During Handling
• When traveling, take the Worldwide Service Network that is included in the
package. This will be useful if you experience problems abroad.
• When the camera has not been used for a long time, confirm that it is still
working properly, particularly prior to taking important pictures (such as at a
wedding or during traveling). Pictures cannot be guaranteed if recording,
playback or transferring your data to a computer, etc. is not possible due to
a malfunction of your camera or recording media (SD Memory Card), etc.
• Do not clean the product with organic solvents such as thinner or alcohol
benzene.
Page 5

• Do not subject the camera to high temperatures or high humidity. Do not
leave the camera in a vehicle, as the temperature can get very high.
• Do not store the camera with preservatives and chemicals. Storage in high
temperatures and high humidity can cause molding. Remove from case and
store in a dry and well-ventilated location.
• This camera is not waterproof, and should not be used in the rain or where
the camera could get wet.
• Do not subject the camera to strong vibrations, shocks, or pressure. Use a
cushion to protect the camera from vibrations of motorcycles, automobiles,
or ships.
• The temperature range for camera use is 0°C to 40°C (32°F to 104°F).
• The LCD display may appear black under high temperatures, but will return
to normal as temperatures normalize.
• The LCD display may respond more slowly at low temperatures. This is due
to liquid crystal properties, and is not a fault.
• Periodic inspections are recommended every one to two years to maintain
high performance.
• Sudden temperature changes will cause condensation on the inside and
outside of the camera. Place the camera in your bag or a plastic bag,
removing the camera after temperature of the camera and surroundings are
equalized.
• Avoid contact with garbage, mud, sand, dust, water, toxic gases, or salts.
These could cause a camera breakdown. Wipe dry any rain or water drops
on the camera.
• Refer to “Precautions When Using the SD Memory Card” (p.30) regarding
the SD Memory Card.
• Use a lens brush to remove dust accumulated on the lens or viewfinder.
Never use a spray blower for cleaning as it may damage the lens.
• Please do not press forcefully on the LCD monitor. This could cause
breakage or malfunction.
3
Regarding Product Registration
In order to better serve you, w e re qu est that you complete th e pr oduct registration,
which can be fo und on the CD-ROM supplied with the camera or on the PENTAX
website. Thank you fo r yo ur coo peration.
Refer to the PENTAX PHOTO Browser 3/PENTAX PHOTO Laboratory 3 Operating
Manual (Windows use rs: p.9, Mac OS users: p.10 ) for more information.
Page 6

4
Contents
FOR SAFE USE OF YOUR CAMERA..................................................1
ABOUT THE CAMERA.........................................................................1
PRECAUTIONS FOR BATTERY USAGE ............................................2
Care to be Taken During Handling .......................................................2
Contents ...............................................................................................4
Composition of the Operating Manual ..................................................9
Before Using Your Camera 11
r Camera Characteristics ............................................... 12
Checking the Contents of the Package...................................... 13
Names of Working Parts ............................................................. 14
Camera ...............................................................................................14
LCD Monitor Indications .....................................................................16
Viewfinder Indications.........................................................................20
LCD Panel Indications ........................................................................22
Getting Started 23
Attaching the Strap ...................................................................... 24
Inserting the Batteries ................................................................. 25
Batteries..............................................................................................26
Battery Level Indicator........................................................................27
Approximate Image Storage Capac it y and Play ba ck Time
(new batteries) ....................................................................................27
Using the AC Adapter (Optional) ........................................................28
Inserting/Removing the SD Memory Card ................................. 29
Recorded Pixels and Quality Level.....................................................31
Turning the Camera On and Off.................................................. 32
Initial Settings .............................................................................. 33
Setting the Display Language.............................................................33
Setting the Date and Time..................................................................35
Attaching the Lens....................................................................... 37
Adjusting the Viewfinder Diopter ............................................... 39
Page 7

Basic Operations 41
Basic Shooting Operation ........................................................... 42
Holding the Camera............................................................................42
Letting the Camera Choose the Optimal Settings ..............................43
Selecting the Appropriate Capturing Mode for Scenes............ 47
Selecting the Shooting Scene.............................................................48
Using a Zoom Lens...................................................................... 50
Using the Built-in Flash ............................................................... 51
Other Shooting Modes................................................................. 55
Continuous Shooting ..........................................................................55
Self-Timer Shooting ................................. ...... .................................. ...57
Remote Control Shooting (Remote Control F: Sold Separately) ........61
Using Mirror Up Function to Prevent Camera Shake .........................64
Playing Back Still Pictures .......................................................... 65
Playing Back Images ..........................................................................65
Enlarging Playback Images ................................................. ...............67
Nine-Image Display ............................................................................68
Slideshow ...........................................................................................70
Connecting the Camera to AV Equipment................................. 72
Processing Images with Filters .................................................. 73
Deleting Images ........................................................................... 76
Deleting a Single Image......................................................................76
Deleting All Images.............................................................................77
Deleting Selected Images (from Nine-Image Display) ........................78
Protecting Images from Deletion (Protect)..........................................80
Setting the Printing Service (DPOF)........................................... 82
Printing Single Images........................................................................82
Settings for All Images........................................................................83
Printing Using PictBridge............................................................ 85
Setting [Transfer Mode] ......................................................................86
Connecting the Camera to the Printer ................................................87
Printing Single Images........................................................................88
Printing All Images..............................................................................90
Printing Images Using the DPOF Settings..........................................92
Disconnecting the USB Cable ............................................................92
5
Page 8

6
Menu Reference 93
Using the Button Functions ........................................................ 94
Capture Mode ..................................... ..... ...... .................................. ...94
Playback Mode ...................................................................................96
Using the Menu ............................................................................ 98
How to Operate the Menu...................................................................98
[A Rec. Mode] Menu Setting Items.................................................100
[Q Playback] Menu Setting Items...................................................100
[H Set-up] Menu Setting Items ........................................................101
[A Custom Setting] Menu Setting Items...........................................102
Using the Fn Menu ..................................................................... 104
Capture Mode ..................................... ..... ...... .................................. .104
Playback Mode .................................................................................105
Using the Mode Dial................................................................... 106
Function Reference 109
Setting the Recorded Pixels and Quality Level....................... 110
Setting the Image Tone ....................................................................110
Setting the Recorded Pixels .............................................................111
Setting the Quality Level...................................................................112
Setting the Saturation/Sharpness/Contrast ......................................113
Setting the White Balance ................................................................114
Setting the Sensitivity .......................................................................117
Setting the Color Space....................................................................119
Focusing ..................................................................................... 120
Using the Autofocus...................... .................................. ..... ...... .......120
Setting the AF Mode.........................................................................123
Selecting the Focusing Area (AF Point)............................................124
Fixing the Focus (Focus Lock)..........................................................126
Adjusting the Focus Manually (Manual Focus).................................128
Setting the Exposure ................................................................. 130
Effect of Aperture and Shutter Speed...............................................130
Selecting the Metering Method .........................................................132
Changing the Exposure Mode ..........................................................134
Setting the Exposure ........................................................................143
Changing the Exposure and Shooting (Auto Bracket) ......................145
Page 9

Checking the Composition, Exposure and Focus Before
Shooting ..................................................................................... 148
Displaying the Preview ............................................. ...... ..... ...... .......148
Selecting the Preview Method ..........................................................149
Using the Built-in Flash ............................................................. 150
Compensating Flash Output .............................................................150
Allowing Shooting while Charging Flash...........................................151
Flash Characteristics in Each Exposure Mode.................................151
Distance and Aperture when Using the Built-in Flash ......................152
DA, D FA , FA J, FA and F Lens Compatibility
with the Built-in Flash........................................................................154
Using an External Flash (Optional)...................................................156
Settings During Playback.......................................................... 163
Changing Playback Display Method ................................................163
Setting the Slideshow Display Interval..............................................164
Camera Settings......................................................................... 165
Formatting the SD Memory Card......................................................165
Turning the Beep On and Off............................................................166
Changing the Date and Time and the Display Style .........................166
Setting the World Time .....................................................................167
Setting the Display Language...........................................................170
Turning the Guide Display On and Off..............................................170
Adjusting the Brightness of the LCD Monitor....................................171
Selecting the Video Output Format...................................................171
Setting Auto Power Off .....................................................................172
Selecting the Folder Name ...............................................................172
Resetting the File Number................................................................173
Setting the Display Instant Review and Digital Preview ...................173
Resetting to Default Settings .................................................... 175
Resetting Rec. Mode/Playback /Set -up Men u...................................175
Resetting the Custom Function Menu ..............................................176
7
Page 10

8
Appendix 177
Default Settings.......................................................................... 178
Functions Available with Various Lens Combinations .......... 182
Notes on [Using Aperture Ring] ............................................... 184
Cleaning the CCD....................................................................... 185
Optional Accessories ................................................................ 187
Error Messages .......................................................................... 190
Troubleshooting......................................................................... 192
Main Specifications ................................................................... 195
Specifications for Remote Control F (Optional) ................................197
Glossary...................................................................................... 198
Index............................................................................................ 202
WARRANTY POLICY.................................................................. 206
Page 11
Composition of the Operating Manual
This operating manual c ontains the following cha pters.
9
1 Before Using Your Camera
Explains camera characteristics, accessories and the names of various
parts.
2 Getting Started
Explains your first steps from purchasing the camera to taking pictures. Be
sure to read it and follow the instructions.
3 Basic Operations
Explains the procedures for taking, playing back, and printing still pictures.
Read it to learn all of the basic operations about capturing, playing back,
and printing.
4 Menu Reference
Explains the functions of r by buttons and menus.
5 Function Reference
Introduces functions to further enhance your r experience.
6 Appendix
Explains troubleshooting, introduces optional accessories and provides
various resources.
1
2
3
4
5
6
The symbols used in this operating ma nual are explained b elow.
1
Shows reference page number explaining a related operation.
Shows useful information.
Shows precautions to take when operating the camera.
Page 12

10
Memo
Page 13

1 Before Using Your
Camera
Check the package contents and names of working parts
before use.
r Camera Characteristics .......................12
Checking the Contents of the Package ..............13
Names of Working Parts ......................................14
Page 14

12
r Camera Characteristics
• Features a 23.5×15.7 mm CCD with 6.1 million effective pixels for high
precision and a wid e dynamic range.
• Features an AF sensor with 11 focusing poin ts. The central 9 are wide
1
Before Using Your Camera
area cross sensors.
•
Features a view finder similar to that of a con ventional 35 mm ca mera, with
a 0.85× magnificat ion and 96% field of view, for easi er manual focusing .
Also features a sup erimp os e fu nc tio n in w hic h th e AF po in ts on the
viewfinder illuminat e red.
• Uses CR-V3, AA l ithium batteries, rech argeable AA Ni-MH ba tteries or
AA alkaline batte ries.
•
Features a la rge 2.5-inc h LCD monitor wi th 210,000 pi xels and a b rightness
adjusting f unction for high-precisi on/wide-fi eld viewing performance.
• Features a Digital Preview function for che cking the image to ensure that
the desired result is achieved.
• A user-friendly design h as been implemente d in various parts of the
camera. The large , high-resolution LCD m onitor and easy-to-use menus
make the camera easier to operate.
The captured area (view an gle) will differ be tween t he r and 35 mm SLR
cameras even if the same lens is used because the format size for 35 mm film
and CCD are different.
Sizes for 35 mm film and CCD
35 mm film : 36×24 mm
r CCD : 23.5×15.7 mm
Angles of view being equal, the focal length of a lens used with a 35 mm camera
must be approximately 1.5 times longer than that of
view framing the same area, divide the focal length of the 35 mm lens by 1.5.
Example) To capture th e sa me image as a 1 50 mm lens att ached to a 35 mm
camera
150÷1.5=100
Use a 100 mm lens with the r.
Inversely, multiply the focal length of the lens used with r by 1.5 to
determine the focal length for 35 mm cameras.
Example) If 300 mm lens is used with r
300×1.5=450
Focal length is equivalent to a 450 mm lens on a 35 mm camera.
r
. To obtain an angle of
Page 15
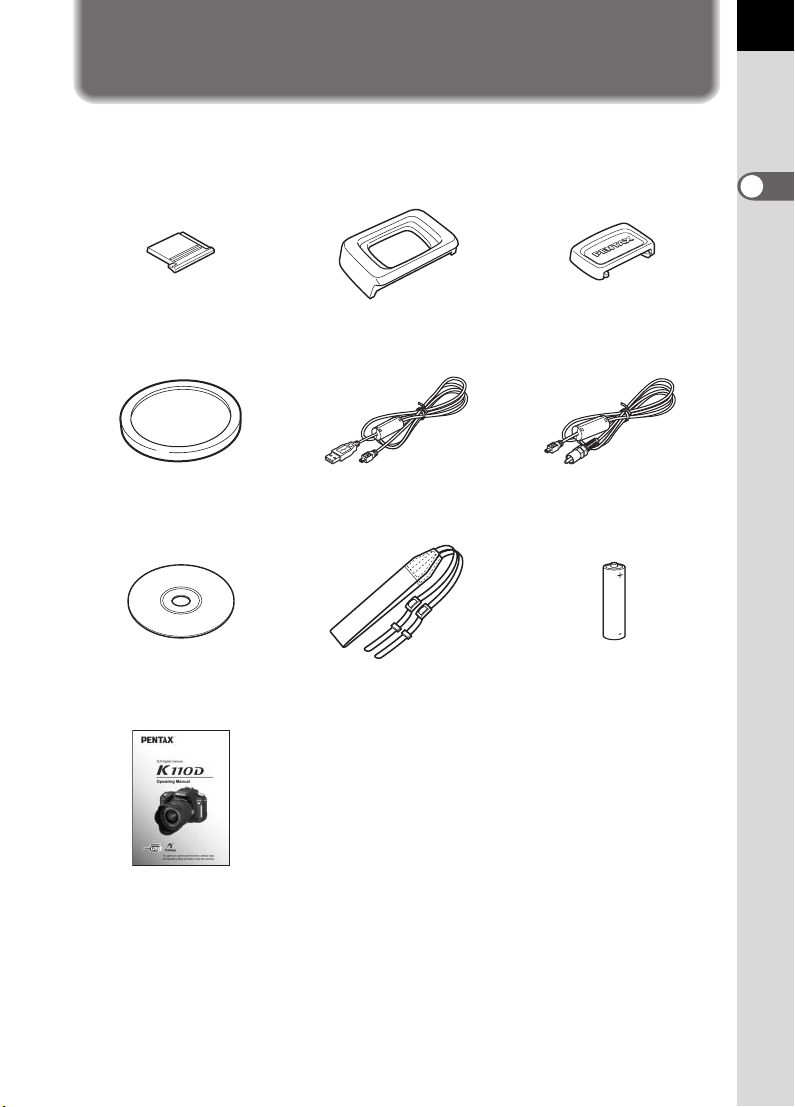
Checking the Contents of the Package
The following acce ssories are pack aged with your ca mera.
Check that all acces sories are include d.
13
1
Before Using Your Camera
Hot shoe cover FK
(Installed on camera)
Body mount co ver
(Installed on camera )
Software (CD-ROM)
S-SW53
Operating Manual
(this manual)
Eyecup F
(Installed on camera)
USB cable
I-USB17
O-ST53
O
Strap
ME Viewfinder cap
Video cable
I-VC28
AA Alkaline batteries*
(four)
* The batteries packaged with the camera are for checking the camera's
functionality.
Page 16
14
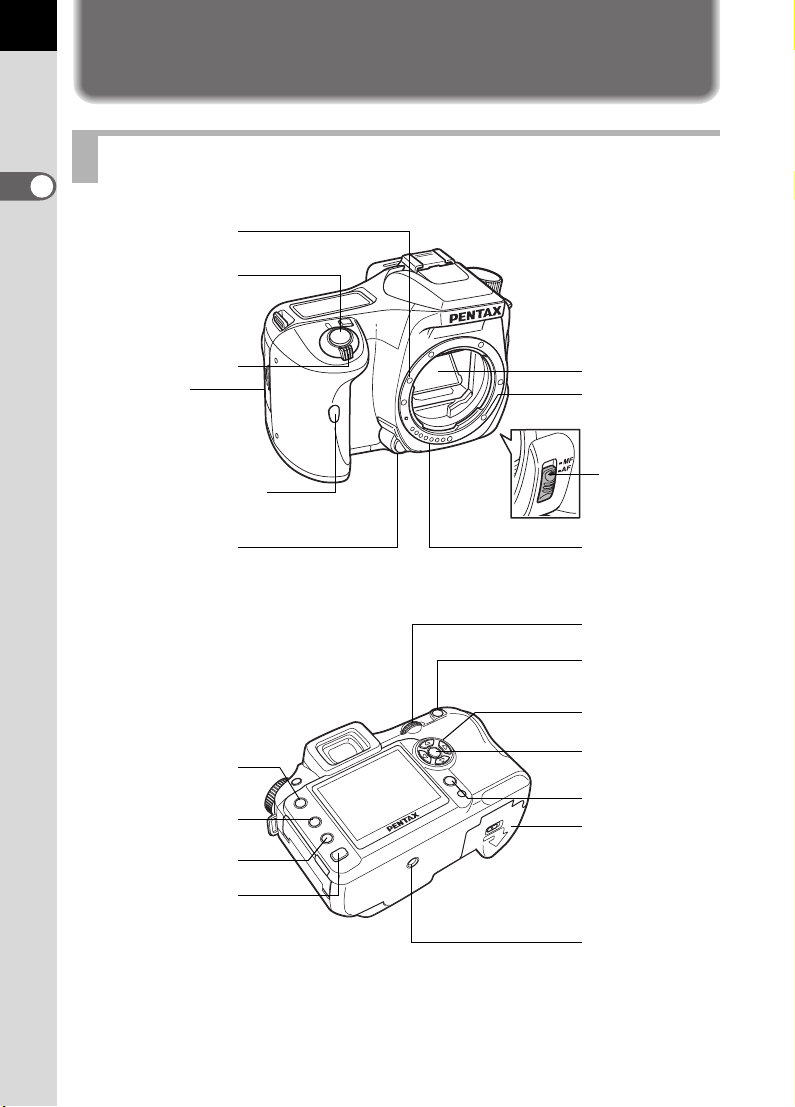
Names of Working Parts
Camera
1
Before Using Your Camera
Lens mount index
Shutter release
button
Main switch
Card cover
Self-Timer lamp/
Remote control receiver
Lens unlock button
3 button
i button
M button
Mirror
AF coupler
Focus
mode lever
Lens information
contacts
e-dial
L/Z
button
Four-way
controller
4 button
{ button
Battery cover
Q button
Tripod socket
Page 17
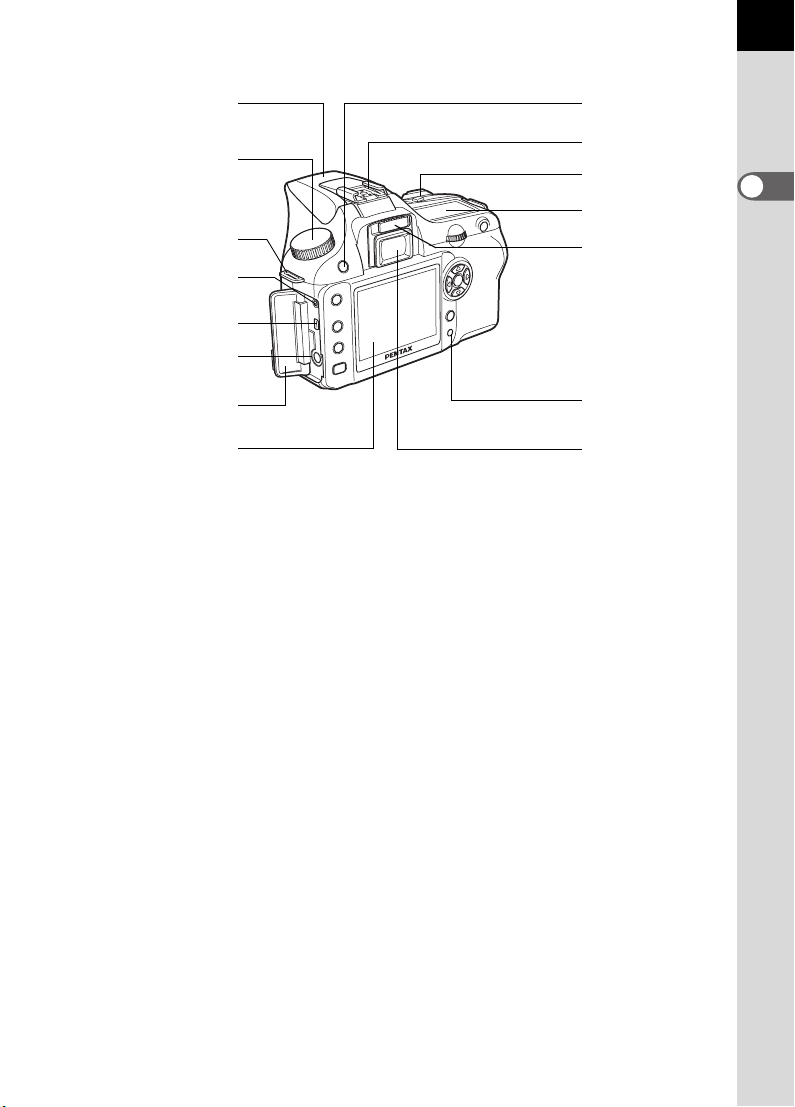
15
Built-in flash
Mode dial
Strap lug
Cable switch
terminal
USB/Video terminal
DC input terminal
Terminal cover
LCD monitor
K button
Hot shoe
mc button
LCD panel
Diopter
adjustment lever
Card access
lamp
Viewfinder
1
Before Using Your Camera
Page 18
16
1600
25
AF. S
Night Sc ene
2006
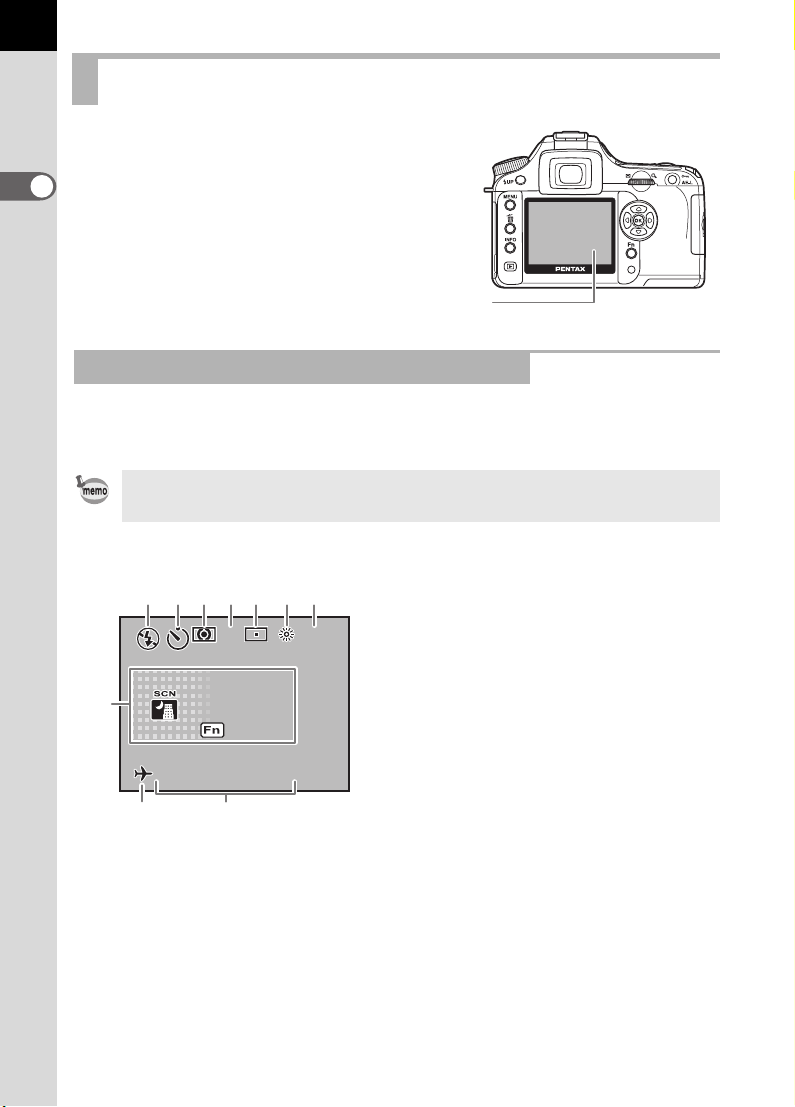
LCD Monitor Indications
The following indicato rs appear on the
LCD monitor depending on the status of
the camera.
1
Before Using Your Camera
LCD monitor
While Power is On or Operating Mode Dial
Guides appear on th e LCD monitor for 3 secon ds when the camera is
powered on or mode di al is turned.
Select Off for [Guide display] in [H Set-up] to not show indicators. (p.101)
182345 67
AF. S
AF. S
Night Scene
Night Scene
2525// 25 // 2006
060606 2006
109
1414: 25
:14 25
1600
1600
1 Flash mode
(Active mode appears) (p.51)
2 Drive mode (p.104)
3* AE metering (p.132)
4 AF mode (p.123)
5* AF point switching (p.124)
6* White bal ance (p.11 4 )
7* Sensitivity (p.117)
8 Shooting mode, Scene mode
(p.106)
9* World time warning display (p.167)
10 Date and time (p.166)
* Indicator s 3, 5, 6 and 7 only appe ar
when a setting other than the default
setting is selected. 9 only appe ars
when World T ime is On.
Page 19
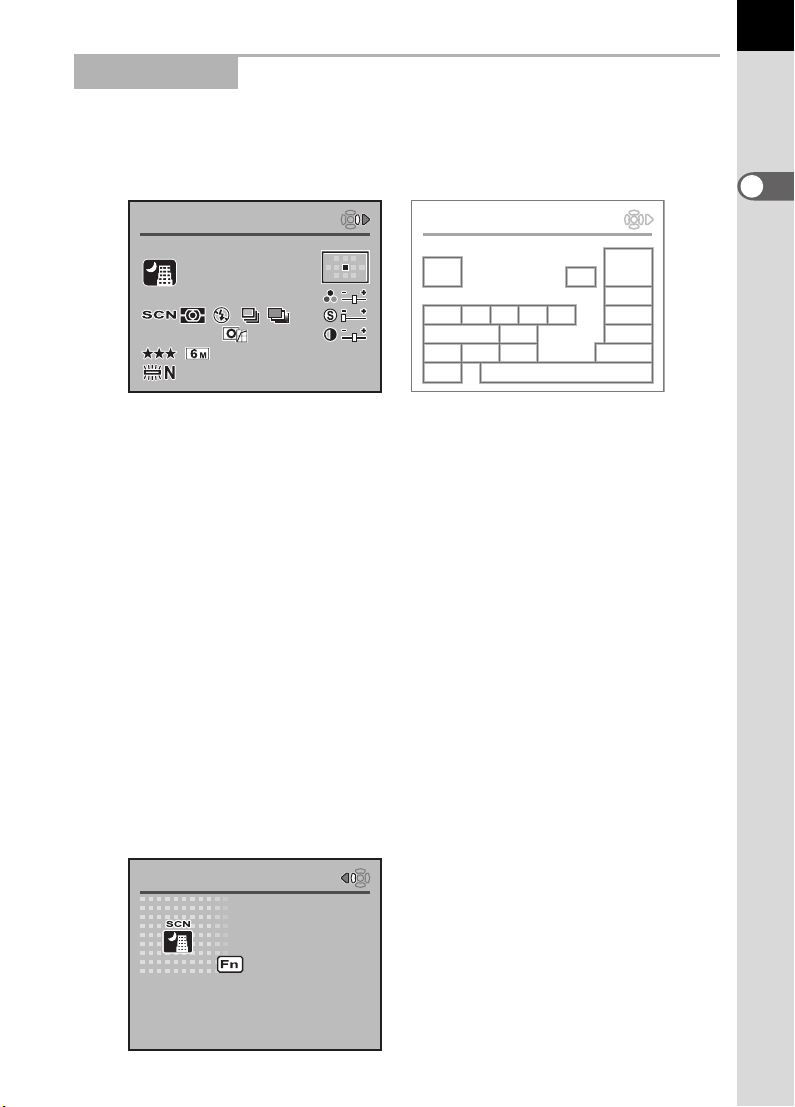
Capture Mode
25
AF. S
sRGB
mm
ISO
800
2006
Detail ed In fo
Use d f or n i g h t s c e n es.
Use a tri p o d , et c . to
pre v e n t s h a k i ng
Night Scene
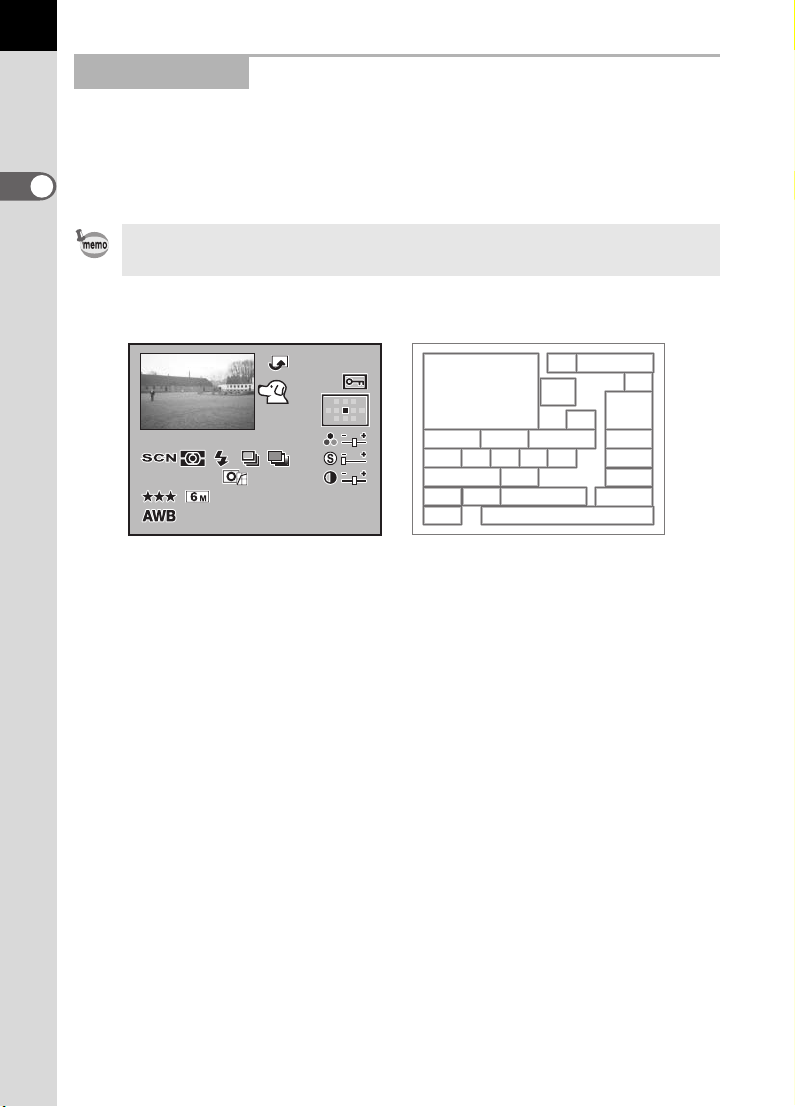
Detail ed In fo
Press the M button in Capture mode to display the capture function
settings on the LCD moni tor for 15 seconds.
17
Detailed Information
Detailed Info
Detailed Info
AF. S
AF. S
ISO
800
ISO
800
sRGB
sRGB
2006
/2525252525252006250606/ 14 : 25/06 /
4040mm
40
1414: 25
mm
1 AF mode (p.123) 11 Color space (p.119)
2 Mode dial position (p.106) 12 White balance (p.114)
3 AE metering (p.132) 13 Date and time (p.166)
4 Flash mode (p.51) 14 AF point position (p.124)
5* Drive mode (p.104) 15 Saturation (p.113)
6* Auto bracket (p.147) 16 Sharpness (p.113)
7 ISO sensitivity (p.117) 17 Contrast (p.113)
8 Image tone (p.110) 18 Lens focal length
9 Quality level (p.112) 19* Scene mode (p .47)
10 Re corded pixe l s (p.111)
* Indicators 5 and 6 do not appear at the same time. Only one appears at a
time. Indicator 19 is only displayed in Scene mode.
Detailed Info
19
109
12
13
14
1
15
1665432
1787
1811
1
Before Using Your Camera
Press the four-wa y con troller (p) to view ex planation of set Shoot ing mode.
Explanation of Set Shooting Mode
Detailed Info
Detailed Info
Used for night scenes.
Used for night scenes.
Use a tripod, etc. to
Use a tripod, etc. to
prevent shaking
prevent shaking
Night Scene
Night Scene
Page 20
18
25
sRGB
mm
ISO
800
2000
100 - 0 0 01
AF. S
2006
Playback Mode
Every time you pres s the M button during p layback, the camer a
switches screen dis plays in the following o rder: [Standard] Displ ay,
[Histogram] Display, [De tailed Information] Displ ay and [No info. Display ]
1
(image only).
Before Using Your Camera
You can change the infor m at io n ini tiall y di s pl aye d by pressing the Q button.
(p.163)
Detailed Information
2
100-0001
100-0001
26
87
18
22
2000
1 /
20001/ 228.F28.
ISO
ISO
800
800
+
+
F
sRGB
sRGB
/0606/25252006
/06 /25 2006
1 5.
15.
AF. S
AF. S
EVEVEV
4040mm
40
1414: 25
14 : 25
mm
1
11
12 13 14 15
17
20
21
24
1 Captured image 14* Drive mode (p.104)
2 Rotate icon (p.66) 15* Auto bracket (p.147)
3 Image folder number and file
number (p.172, 173)
16 Sharpness (p.113)
17 ISO sensitivity (p.117)
4 Protect icon (p.80) 18 Image tone (p.110)
5 AF mode (p.123) 19 Contrast (p.113)
6 AF point information (p.124) 20 Qual ity level (p.11 2)
7 Shutte r speed ( p.136) 21 Recorded pixels (p.111)
8 Apertu re value (p .138) 22 Color space (p.119)
9 EV compensation (p.143) 23 Lens focal length
10 Saturation (p.113) 24 White balance (p.114)
11 Mode dial position (p.106) 25 Captured date and time (p.166)
12 AE metering (p.132) 26* Scene mode (p.47)
13* Flash mode (p.51)
3
5
9
25
4
6
10
16
19
23
* Indicator 13 only appears for images in which the flash was discharged.
Indicators 14 and 15 do not appear at the sa me ti me . O nl y o ne app ears at a
time. Indicator 26 is only displayed in Scene mode.
Page 21

Histogram Display
100-0 0 4 6
12
100-0046
100-0046
3
4
1 Capture quality (Image file type)
2 Image folder number and file number (p.172, p.173)
3 Protect icon (p.80)
4 Histogram (p.163)
• Areas wh ere bloomin g overexposure occurre d bl ink if [Bri ght Portion]
warning is set to On in [Plybk dsply mt hd] in the [Q Playback] menu. (p.163)
• Press the four-way control ler (mn) in the histogram display to move the
histogram display po sition up or down.
19
1
Before Using Your Camera
Page 22
20
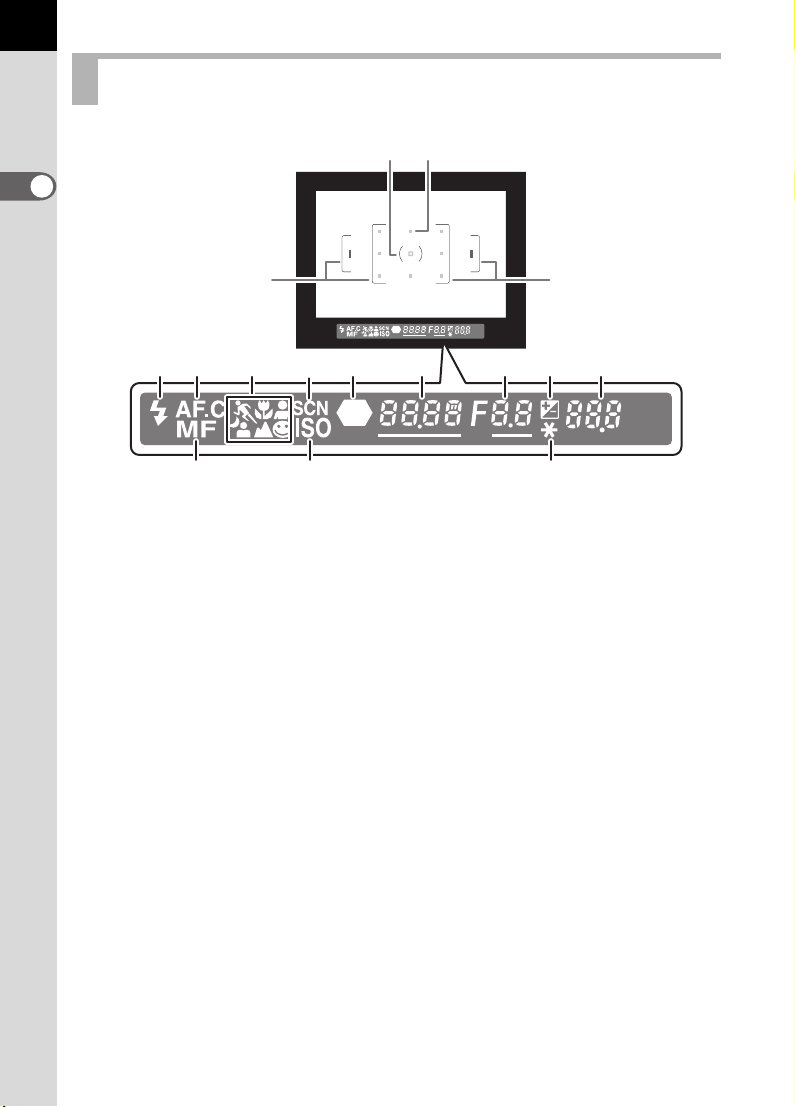
Viewfinder Indications
23
1
Before Using Your Camera
1
12
4
5 6
1
8
7
91011
1413 15
1 AF frame (p.39)
2 Spot metering frame (p.132)
3 AF point (p.124)
4 Flash s tatus (p.5 1)
Appears when flash is available and bli nks when flash i s recommended but
not set.
5 Continuous mode (p.123)
Appears when [AF Mode] in the [A Rec. Mode] is set to k (Continuous
mode).
6 Picture mode icon (p.47)
Icon for Picture mode in use appears.
\ (Moving Object), q (Macro), = (Portrait), U (Normal mode in I),
. (Night Scene Portrait), s (Landscape)
7 Scene mode icon (p.47)
Appears when taking pictures in Scen e mod e.
8 Focus i nd icator (p.4 4)
Appears when image is focused.
9 Shutter speed (p.136)/Confirm Sensitivi ty
Shutter speed when captu ring or adjusting (un derlined when shut ter speed
can be adjus ted with e- d ial).
The sensitivity is displa yed when [OK btn when s hooting] is set t o [Confi rm
Sensitivity] and the 4 button is pressed. (p.122)
Page 23

10 A p erture val ue (p.138)
Aperture value when capturi ng or adjusting (underl ined when apert ure can
be adjusted with e-dial).
11 EV compensation (p.143)
Appears when EV compensation is available or in use.
Blinks slowly when compensating flash output.
Blinks quickly when compensating exposure and flash output.
Adjusted value appears where number of recordable images is shown.
12 Number of recordable images/EV compensation
Show the number of recordable images with current quality and recorded
pixel setting.
Show the number of continuous shooting recordable images. (p.102)
EV compensat ion value appea rs when EV compe nsation is bein g adjusted.
(p.135)
The difference with the appropriate exposure value appears if exposure
mode is a. (p.140)
13 Manual focus (p.128)
Appears when focus mode is \.
14 ISO sensitivity warning (p.118)
Appears when warning value is exceeded.
15 AE lock indicator (p.144)
Appears during AE lock.
• The red indication of the AF p oint used for autofocu s lightens superimpo sed
when the shutt er release butt on is pressed h alfway. (p.124)
• When [OK btn when shooting] is se t to [Confirm Sensitivity] in the [A Cu stom
Setting] menu, press the 4 button to display the sensitivity in th e
viewfinder. (p.122)
21
1
Before Using Your Camera
Page 24
22
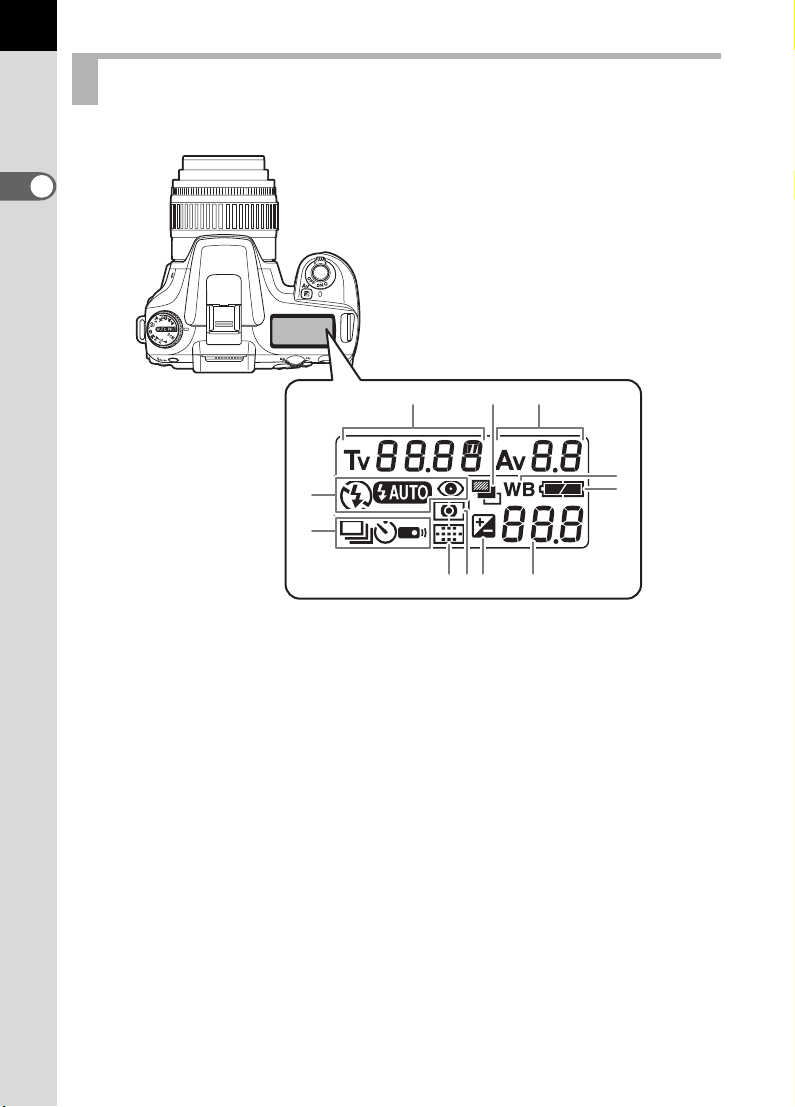
LCD Panel Indications
The following infor mation appears in t he LCD panel on top o f the camera.
1
Before Using Your Camera
1
2
7
8
3
9
4
111065
1 Shutte r speed ( p.136) 5 AF point information (p.124)
2 Aperture value (p.138) No indicator: Auto
3 Flash mode (p.51) V : Select
b : Built-in f lash is read y
(when blinking , flash should
be used or incompatible
lens is being used)
a :Flash off
E : Auto discharge M : Center-weighted
> :
Red-eye reduction flash on
4 Drive mode (p.104)
9 : Single frame shooting 8 White balance (p.114)
j : Continuous shooting
g : Self-Timer shooting 9 Battery level
h : Remote control shootin g 10 EV compensation (p.143)
M :Center
6 AE metering (p.132)
No indicator: Multi-segment
metering
metering
N : Spot metering
7 Auto bracketing (p.147)
(Not displayed when set to Auto)
11 Number of recordable images/
EV compensation value/PC (Pb)
(PC=Personal Computer (mass
storage), Pb=PictBridge)
Page 25

2 Getting Started
This chapter explains your first steps from purchas ing the
camera to taking pictures. Be sure to read it and follow the
instructions.
Attaching the Strap ..............................................24
Inserting the Batteries .........................................25
Inserting/Removing the SD Memory Card .........29
Turning the Camera On and Off ..........................32
Initial Settings .......................................................33
Attaching the Lens ...............................................37
Adjusting the Viewfinder Diopter ........................39
Page 26
24
2
Getting Started
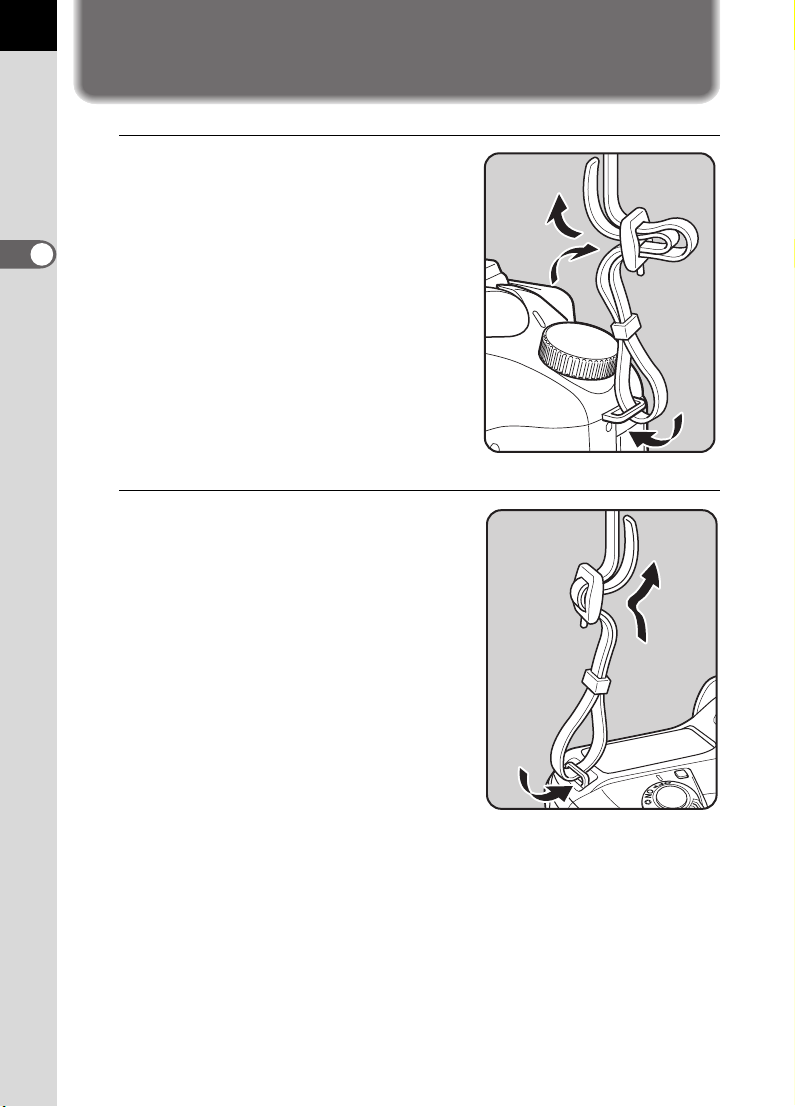
Attaching the Strap
1
Pass the end of the strap
through the strap lug, then
secure on the inside of the
clasp.
2
Pass the other end of the strap
through the other strap lug on the
camera, then secure on the inside
of the clasp.
Page 27
Inserting the Batteries
Insert batteries into the cam era. Use two CR-V3 or four AA N i-MH
batteries, AA lithium batteries, or AA al kaline batteries.
This camera is packaged with AA alkaline batteries for checking the camera’s
functionality but some other kinds of batteries are also compatible. Refer to
“Batteries” (p.26) for details on compatible batteries and when to use them.
• CR-V3, AA lithium batteries and AA alkaline batter ies that can be used in this
camera are not recharge able.
• Do not open the battery cover or remove the batteries while the p ower is on.
• Remove the batteries when you will n ot use the camera for a long whil e. The
batterie s m ay leak.
• If the date and time settings have been reset when you insert new batteries
after a long while , follow the procedu re for “Setting the D ate and Time”. (p .35)
• Insert batteries co rrectly. Batteries ins erted incorrectly may cause a c amera
breakdown. Wipe the e lectrodes of the batterie s be fore inserting.
• Replace all the batteries at the same time. Do no t mix battery type, bra nds or
an old battery with a new one.
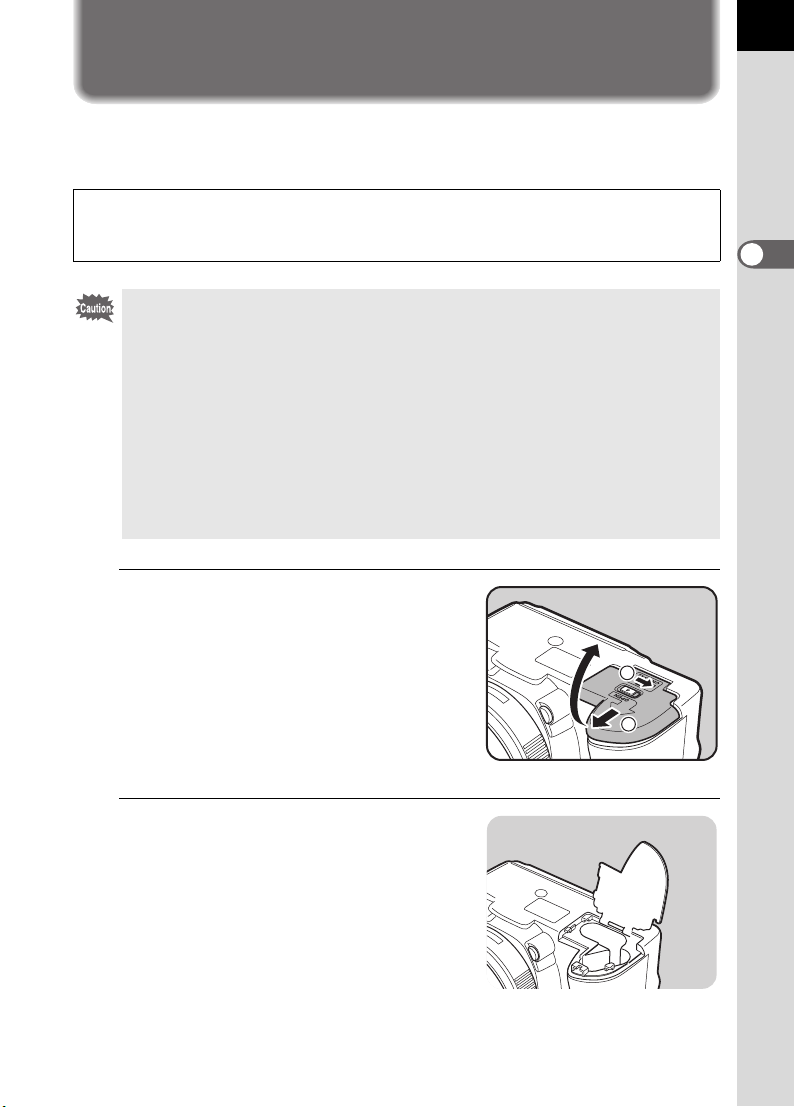
1
Push and hold the battery
cover unlock lever as shown in
the illustration (1), and slide
the battery cover toward the
lens (2), and then flip open.
1
2
25
2
Getting Started
2
Insert the batteries according
to the +/– indicators in the
battery chamber.
Page 28
26
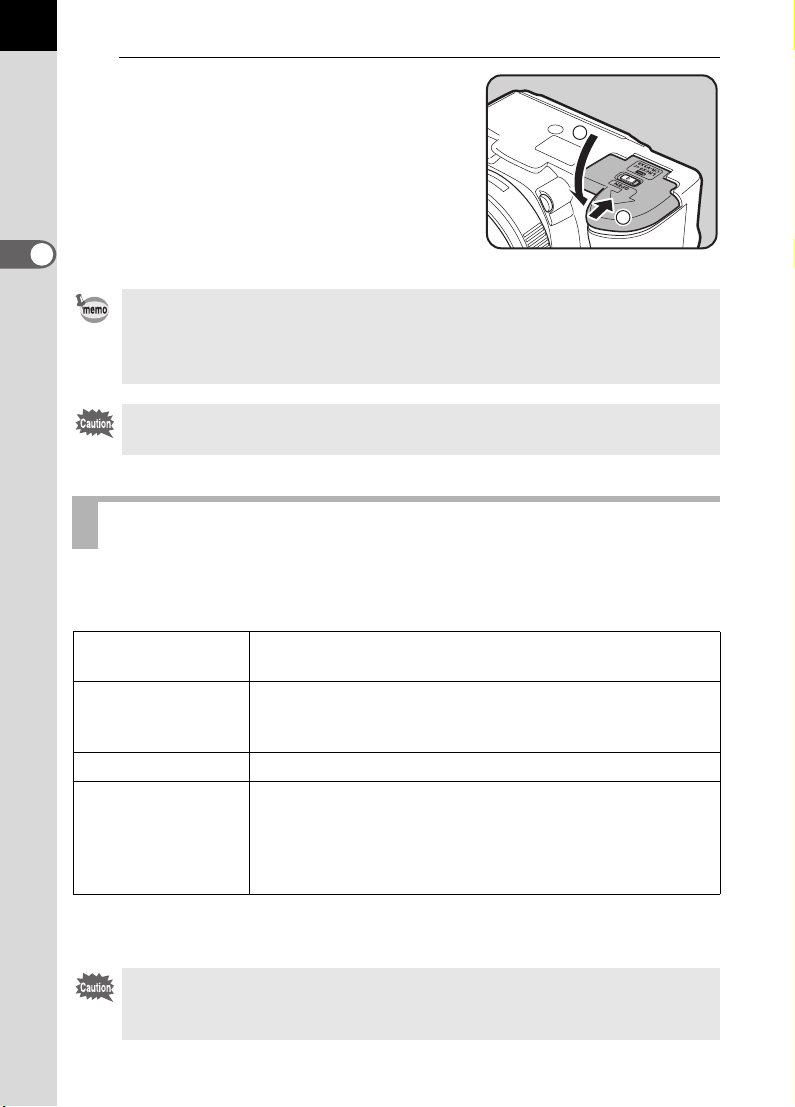
3
Press down on the batteries
with the battery cover (1) and
slide it as shown in the
1
illustration (2) to close.
2
Getting Started
• Use the AC adapter (optional) when using the camera for a prolong ed period.
(p.28)
• Check the battery orientati on if the camera does not op er at e pr ope rly after
replacing the batteries.
Be sure to fully cl ose the battery co ver. The camera wi ll not turn on if the ba ttery
cover is open.
Batteries
You can use four k inds of batteries with your camera. Battery performance
differs by type. Pleas e choose the type that best suits your purpo se.
2
CR-V3*
AA Ni-MH
rechargeable
batteries
AA lithium batteries Recommended in cold climates.
AA alkaline batteries
* CR-V3 batteries have rechargeable and non-rechargeable types. This camera
uses only non-rechargeable CR-V3 batteries.
Nickel manganese bat te rie s and rechargeable CR -V 3 bat t er i es m ay cause
malfunctions due to thei r volt age characteristics. Ther ef or e, us e is not
recommended.
The CR-V3 is a long-life battery and is convenient when
traveling.
These are rechargeable and are economical.
A commercially available battery charger that is
compatible with the batteries is required.
Provided with the camera. These are easily obtainable
when your usual batteri es run out but they may not s upport
all the camera functions under certain conditions. We do
not recommen d their use except in eme rgencies an d
checking the camera's functionality.
Page 29

Battery Level Indicator
You can confirm remai ning battery level by chec king the { displayed on
the LCD panel.
{ lit : Battery is full.
} lit : Battery is running low.
? lit : Battery is almost empty.
? blink : The camera turns off after displaying a message.
Approximate Image Storage Capacity and
Playback Time (new batteries)
27
2
Getting Started
Batteries
CR-V3
AA lithium
batteries
AA rechargeable
batteries
(NiMH 2500mAh)
AA Alkaline
Batteries
The picture storage capacity (normal recording and flash use 50%) is based on
measuring conditi ons in accordance with CIPA standards a nd the others are based
on PENTAX measuring conditions. Some deviation from the above figures may
occur in actual use depending on shooting mode and shooting conditions.
• Battery performance temporarily d ecreases as the temperature de creases.
When using the camer a i n col d c limates, have extra batt er i es on hand and
keep them warm in your pocket. Battery performance will return to normal
when returned to room temp erature.
• AA alkaline batte ries may not su pport all the camera functions. We do not
recommend thei r use except in emergencies a nd checking the camera's
functionality.
• Have extra batteries ready when traveling overseas, taking pictures in cold
climates, or when you will be taking a lot of pictures.
(Temperature)
(23°C) 730 630 480 700 minutes
( 0°C) 300 210 180 470 minutes
(23°C) 660 570 450 470 minutes
( 0°C) 520 360 310 400 minutes
(23°C) 430 300 260 350 minutes
( 0°C) 350 250 200 300 minutes
(23°C) 80 60 40 140 minutes
(0°C)
Normal
recording
Not
applicable
Flash photography
50% use 100 % use
Not
applicable
Not
applicable
Playback
time
70 minutes
Page 30
28
Using the AC Adapter (Optional)
4
1
2
Getting Started
2
3
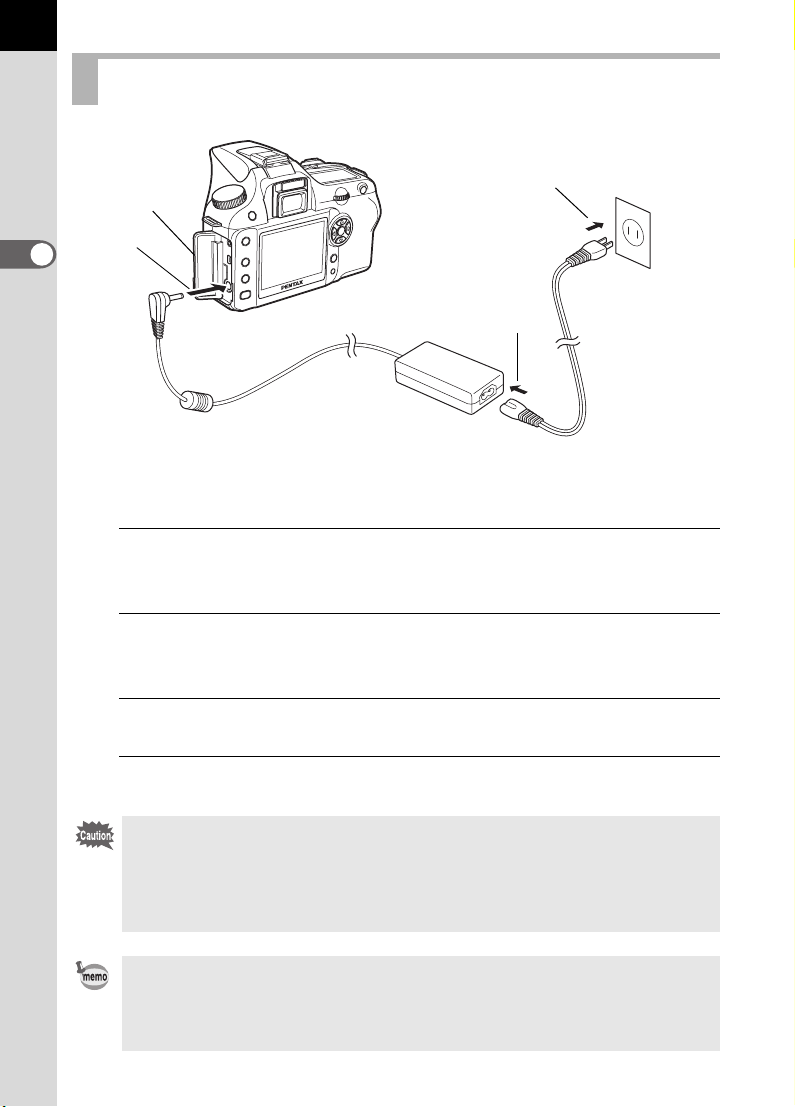
We recommend usin g the AC adapter kit K- AC10 (optional) whe n using
the LCD monitor for a long time or when conne cting to your PC.
1
Make sure the camera is turned off before opening the
terminal cover.
2
Connect the DC terminal on the AC adapter to the DC input
terminal on the camera.
3
Connect the AC plug cord to the AC adapter.
4
Plug the AC cord into the power outlet.
• Make sure the camera is turned off before connecting or disconnecting the
AC adapter.
• Make sure connections are s ecure between the cam era, AC adapter, AC
plug cord terminal and the power outlet. SD Memory Card and data will be
corrupted if disconne ct ed w h ile camera is recording or rea di ng data.
• Be sure to read the AC adapter kit K-AC10 o perating manual wh en using the
AC adapter.
• The rechargeable batteries in your camera will not charge when connected
to the AC adapter.
Page 31

Inserting/Removing the SD Memory
Card
Captured images are recorded on the SD Me mory Card. Make su re the
camera is turned off before insertin g or removing the SD Memory Card
(market product).
• Do not remove the SD Memory Card while card access lamp is lit.
• Format new SD Memory Card. Also forma t SD Memory Card used with othe r
cameras. Refer to “Formatting the SD Memory Card” (p.165) for details on
formatting.
1
Slide the card cover in the
direction of the arrow (1) and
then lift open (2).
2
Insert the card all the way with
the SD Memory Card label
toward the LCD monitor.
1
2
29
2
Getting Started
Push the SD Memory Card in once to
remove.
3
Close the card cover (1) and
then slide it in the direction of
the arrow (2).
Be sure to fully cl ose the card cover . The
camera will not turn on if the card cover
is open.
2
1
Page 32

30
Precautions When Using the SD Memory Card
• The SD Memory Card is equipped with a
write-protect switch. Settin g the switch t o
LOCK protects the existing data by
prohibiting recording of new dat a, deletion
of existing data or formatting of the card.
• Care should be taken when removin g th e SD Memory Card immedi ate ly a fter
using the camera because the card may be hot.
• Do not remove the SD Memory Card o r turn the cam era off while data is being
2
Getting Started
saved to the card, images are bei ng pl ay ed b ac k, o r the c am era is c onn ec ted
to a computer with the USB cable. This may cause the data to be lost or the
card to be damaged.
• Do not bend the SD Mem ory Card or sub ject it to vi olent impa ct. Keep it aw ay
from water and store away from high temperatures.
Do not remove the SD Memory Card during formatting. The card may be
•
damaged beyond use.
• Data on th e SD Me mory Card may be de lete d in the following circumsta nce s.
PENTAX does not accept any liability for data that is deleted if
(1) the SD Memory Card is mishandled by the user.
(2) t he SD Memory C ard is exposed to static e lectricity or e lectrical
interference.
(3) the card has not been used for a long time.
(4) the card is ejected or the battery is removed while the data on the card is
being recorded or accessed.
• The SD Memory Card h as a l imite d servic e life . If it is no t used for a long t ime,
the data on the card may become unreadable. Be sure to regularly make a
backup of important data on a computer.
• Avoid us ing or storing the ca rd w h ere it ma y be expos ed to stati c electri city or
electrical interference.
• Avoid us ing or storing the card in direct sunl ight or w here it m ay be e xposed to
rapid changes in temperature or to condensation.
• For informa tion on compa tible S D Memory Card, vi sit the PENTAX web site or
contact your nearest PENTAX customer service center.
• Format new SD M emory Ca rds. Also f ormat SD M emory Card used with other
cameras. 1Formatting the SD Memory Card (p.165)
• If you are goi ng to discard, g ive away or s ell your SD memory card y ou should
ensure that the data on the card is completely deleted or the card itself is
destroyed if it contain s any p ersona l or se nsit ive info rmat ion. Ple ase no te that
formatting the SD ca rd w i ll no t ne cessarily delete th e data s o that it cannot b e
recovered using off the shelf data recovery software. There are off the shelf
secure data deletion software programs available that will completely delete
the data. In any case the data on your SD memory card should be managed at
your own risk.
Write-protect
switch
Page 33

Recorded Pixels and Quality Level
Choose the number o f pixels (size) and quality level (da ta compression
rate) of pictures accordi ng to how you intend to use the pic tures you have
taken.
Pictures with la rger recorded pixels or more Es a re clearer when print ed.
The number of pictures tha t can be taken (the number of pictu res that can
be recorded on an SD Memory Card) becomes less with larger file siz es.
The quality of the captured ph oto or printed picture depen ds on the quality
level, exposure c ontrol, resolution of th e printer and a variet y of other
factors so you do not n eed to select more tha n the required number of
pixels. For exam ple, to print in postc ard size, R (1536×1024) is
adequate. Set the app ropriate recorded si ze and quality leve l depending
on purpose.
Choose the appropria te number of record ed pixels and qualit y level for
images on the [A Re c. Mode] menu.
1 Setting the Recorded Pixels (p.111)
1 Setting the Quali ty Level (p.112)
Recorded Pixels, Quality Level and Approximate Image Storage
Capacity
Quality Level
Recorded Pixels
(3008×2008)
P
(3008×2000)
(2400×1600)
Q
(1536×1024)
R
• The above table shows the approximate image storage capacity and recording
time when using a 128 MB SD Memory Card.
• The above figures may vary depending on the subject, shooting conditions,
shooting mode and SD Memory Card, etc.
|
11 — — —
—3470117
—5196161
— 106 173 271
C
Best
D
Better
E
Good
31
2
Getting Started
Page 34

32
2
Getting Started
Turning the Camera On and Off
1
Move the main switch to [ON]
position.
The camera will turn on.
Move the main switch to [OFF] position
to turn off the camera.
• Always turn the camera off when not in use.
• The power will automatically turn o ff when you do not perform any operations
within a set period of time. After the camera turns off aut omatically, turn it on
again or perform any of the following.
• Press the shutter release button halfway.
• Press the Q button.
• Press the M button.
• By default, the camera is set to power off automatically after 1 minute of
inactivity. You can change the setting with [Auto Power Off] on the [H Set-
up] menu. (p.1 72)
Page 35

Initial Settings
The first time the camera is turne d on after purchasing, the Init ial Settings
screen appears on the LC D monitor. Follow the pr ocedure below to set th e
language displayed on the LCD monitor and the current date and tim e.
Once setting is done, th ese will not need to be set agai n when turning your
camera on.
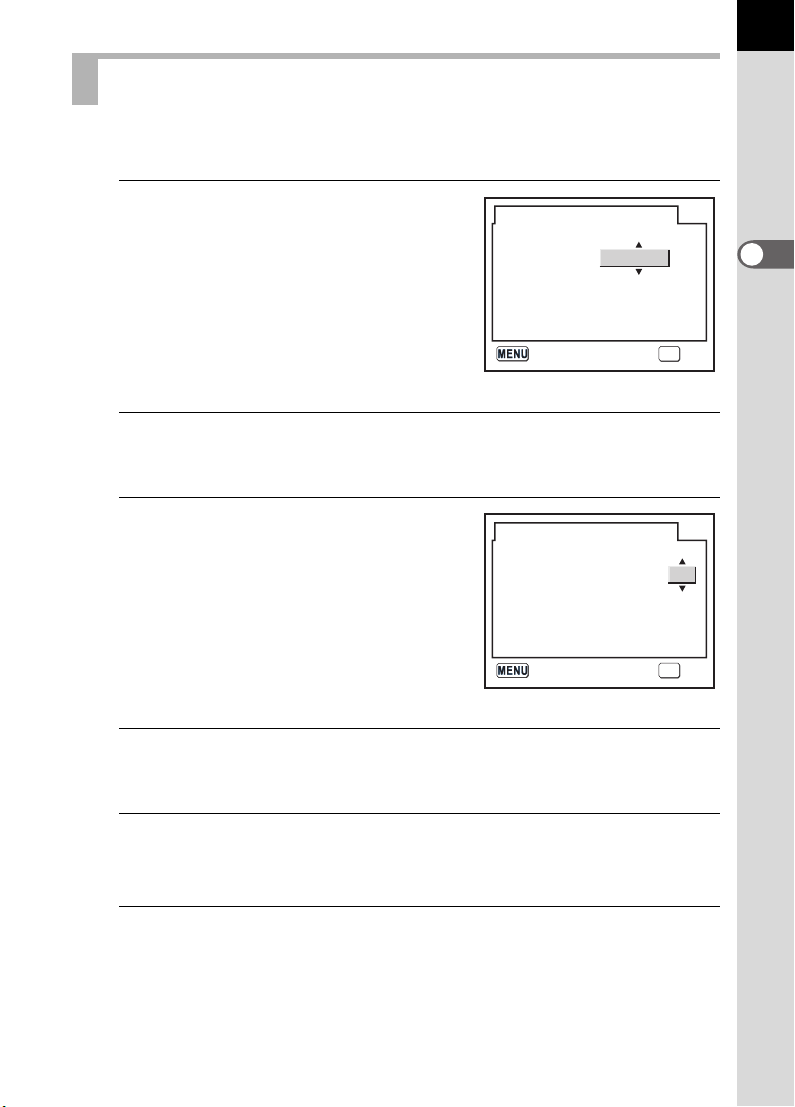
Setting the Display Language
You can choose the l anguage in which the me nus, error messages , etc.
are displayed from th e following: English, French, German, Spa nish,
Italian, Swedish, Dutch , Russian, Korean, Chi nese (traditional/sim plified)
and Japanese.
1
Press the four-way controller
(p).
Initial Settings
English
New York
DST
33
2
Getting Started
2
Use the four-way controller
(mnop) to select the
desired language.
The default setting is English.
3
Press the 4 button.
English
Français
Deutsch
Español
Italiano
Svenska
Cancel
OK
Nederlands
OK
OKCancel
OK
Page 36

34
4
Press the four-way controller (n).
The cursor moves to [W].
5
Press the four-way controller (op) to select the city.
6
Press the four-way controller (n).
2
Getting Started
The cursor moves to DST (daylight saving time).
7
Use the four-way controller (op) to select O (On) or P
(Off).
8
Press the 4 button.
The screen for setting the date and time will be displayed.
When an Incorrect Language is Set
Follow the procedure below to display the screen for setting the language, and
go to Step 2 on p.33 to set the language again.
1
Turn the camera off and turn it on again.
2
Press the 3 button.
3
Press the four-way controller (p) twice.
4
Press the four-way controller (n) five times.
5
Press the four-way controller (p) once.
The screen for setting the language will be displayed.
Page 37
Setting the Date and Time
Set the current date and time and the dis play style.
1
Press the four-way controller
(p).
The frame moves to [mm/dd/yy].
Date Adjust
Date Style
Date
mm/dd/yy
2006/0101 /
24h
35
2
Getting Started
Time
2
Use the four-way controller (mn) to choose the date
00 : 00
style.
3
Press the four-way controller
(p).
The frame moves to [24h].
4
Use the four-way controller (mn) to select 24h (24-hour
Date Adjust
Date Style
Date
Time
mm/dd/yy
00 : 00
display) or 12h (12-hour display).
5
Press the four-way controller (p).
The frame returns to [Date Style].
OK
OKCancel
24h
2006/0101 /
OK
OKCancel
6
Press the four-way controller (n).
The frame moves to [Date].
Page 38

36
7
Press the four-way controller
(p).
The frame moves to the month.
Date Adjust
Date Style
Date
mm/dd/yy
2006/0101 /
24h
2
Getting Started
8
9
Time
00 : 00
OK
OKCancel
Use the four-way controller (mn) to set the month.
Set the day and year in the same manner.
Next, set the time.
If you select [12h] in Step 4, the setting switches between am and pm
depending on the time.
Press the 4 button.
The camera is ready to take pictures. If you set the date and time with
the menu operations, the screen will return to the [H Set-up] menu.
Press the 4 button again.
You can canc el the set tin g ope rati on an d sw itch to Ca ptur e mode duri ng i nit ial
settings by pr es s ing th e 3 button. In this case, the Initia l Settings scree n
will appear again the next time you turn the camera on.
• When you finish the setting s and press the 4 button, th e ca mera clock is
reset to 00 seconds. To set the exact time, press the 4 button when t he
time signal ( on the TV, radio, etc.) rea ches 00 second s.
• You can change the languag e and date and time setti ngs w ith t he m e nu
operations. (p.166, p.170)
Page 39

Attaching the Lens
All camera expos ure modes are availab le when using DA, D FA , FA J or
other lenses with Ap erture s (Auto) posi tion. Some functions a re
restricted when le nses are not set to Ap erture s (Auto). Also see “Notes
on [Using Aperture Ring ]” (p.184). Other lenses and accessories will not
be available with fact ory default settings. To allow shutter release with
lenses or accessories not listed above, set [Using aperture ring] in custom
function settings. (p.103)
Turn the camera off before attaching or removing the lens to prevent
unexpected lens move ment.
1
Check that the camera is off.
2
Remove the body mount cover
(1) and lens mount cover (2).
Be sure to put the lens down with the
lens mount side facing upward to
protect from damage to the area
around the lens mount after removal.
37
2
Getting Started
3
Align the red dots on the
camera and the lens, and
secure by turning the lens
clockwise until it clicks.
After attaching, check that the lens is
secured. Also check that the red dots of
the lens are on top and attachment
portion does not move sideways.
Page 40

38
2
Getting Started
4
Remove the front lens cap by
pushing the indicated portions
inward.
To detach the lens, hold down the lens
unlock button (
counterclockwise.
• The body mount cover (1) is a cover to prevent scra tc hes and block dust
when shipped. Bo dy Mount Cap K i s sold separately and has a lock function.
• We assume no responsibility nor liability for accidents, damages and
malfunctions result in g from t he use of lenses made by other m anu facturers.
• The camera body and lens mount incorp orate lens informati on contacts and
an AF coupler. Dirt, dust, or co rr os io n m ay damage the electrical s yst em .
Clean the contacts w ith a s oft dry cloth.
3) and turn the lens
Page 41

Adjusting the Viewfinder Diopter
Adjust the viewfinde r to suit your eyes ight.
If it is difficult to s ee the viewfinder im age clearly, slid e the diopter
adjustment lever sideway s.
You can slide the di opter from –2.5m
1
Look through the viewfinder
and point the camera at a welllit scene. Slide the diopter
adjustment lever left or right.
Adjust the lever until the AF frame in
the viewfinder is focused.
-1
to +1.5m-1.
39
2
Getting Started
AF frame
• The Fo Eyecup is attached to the
viewfinder portion whe n camera leaves
the factor y. Diopter adjustment is
available with the Fo Eyecup attac hed.
However, adjustment is easier with the
eyecup removed. To remove the Fo
Eyecup, press in one side an d pull it out
toward you.
To attach th e Fo Eyecup, al i gn it with the
groove on the viewfind er eye piece and
push it into po sition.
• If it is difficult to see the viewfind er ima ge clearly even if you set th e di op ter
adjustment lever, use t he d iopter correction lens ada pter M. However, the
eyecup must be remov ed to use this adapter. (p.18 8)
Page 42

40
Memo
Page 43

3 Basic Operations
This chapter explains basic operations for shooting by
setting mode dial to Picture mode (Auto Picture or Portrait
mode - Flash OFF mode) and Scene mode to ensure
successful capturing.
For information about advanced functions and settings f or
taking pictures, refer to chapter 4 and onward.
Basic Shooting Operation ...................................42
Selecting the Appropriate Capturing Mode for
Scenes ...................................................................47
Using a Zoom Lens ..............................................50
Using the Built-in Flash .......................................51
Other Shooting Modes .........................................55
Playing Back Still Pictures ..................................65
Connecting the Camera to AV Equipment .........72
Processing Images with Filters ...........................73
Deleting Images ....................................................76
Setting the Printing Service (DPOF) ...................82
Printing Using PictBridge ....................................85
Page 44

42
Basic Shooting Operation
Holding the Camera
How you hold the camera is important when taki ng pict ure s.
• Hold the camera fir mly with both hands.
• Press the shutter r elease button gently wh en taking a picture.
3
Basic Operations
Horizontal position Vertical position
• To reduce camera shak e, support your body or the camera on a soli d object
such as a table, tree, or wall.
• Although there are individu al differences among ph otographers, the shut t er
speed for a handheld ca mera is generally 1/(fo cal length ×1.5). For exam ple,
it is 1/75 of a second for a foca l len gt h of 50 m m and 1/150 of a second for
100 mm. Use a tripod whe n us in g a l owe r shutter speed.
• When using a telephoto l ens, a tripod that is h eavier than the total w eight of
the camera an d lens is recomm ended to avo id camera shake.
Page 45

Letting the Camera Choose the Optimal
Settings
How to set the camera so it will choose the optimum settin gs based on the
subject lighting, distance and motion.
1
Set the mode dial to I.
The camera will select the optimal
capturing mode for the subject.
1 Selecting the Appropriate Capturing
Mode for Scenes (p.47)
43
3
Basic Operations
2
Set the focus mode lever to
=.
Autofocus mode is set. (p.120)
Page 46

44
3
Basic Operations
3
Look through the viewfinder to
view the subject.
A zoom lens can be used to change the
size of the subject in the viewfinder.
1 Using a Zoom Lens (p.50)
4
Position the subject inside the
AF frame and press the shutter
release button halfway.
The autofocus system operates. The
focus indicat or ] appears in the
viewfinder when the subject is in
focus.
The flash pops up automatically when
necessary (manually lift the flash
when Flash mode is not set to [Auto]).
1 Operating the shutter release
button (p.45)
1 Subjects that are Difficult to Focus
on (p.46)
1 Using the Built-in Flash (p.51)
1 Selecting the Focusing Area (AF
Point) (p.124)
Focus indicator
You can preview the ima ge i n t he LCD monitor and check th e co m position,
exposure, and focus bef or e t ak ing the picture. (p.148)
5
Press the shutter release
button fully.
The picture is taken.
Page 47

6
Delete
Review captured images on the
LCD monitor.
Image displays for 1 second on the
LCD monitor after capturing (Instant
Review).
You can delete the image during
Instant Review by pressing the i
button.
1 Setting the Display Time of the
Instant Review (p.173)
1 Deleting Images (p.76)
1 Displaying Bright Portion (p.174)
1 Histogram Display (p.174)
Operating the shutter release button
The shutter releas e button has two posi tions.
Delete
Delete
45
3
Basic Operations
Pressing it down halfway (first position) turns on the viewfin der and
LCD panel indicators an d the autofocus system operates. Pressing it
fully (second po sition) takes the pic ture.
• Press the shut ter r elease b utton gently w hen tak ing a pi cture t o prev ent
camera shake .
• Practice pressing the shutter release b utton halfway to le arn where the
first position is.
• The viewfinder indicators st ay on w hi l e sh ut te r r eleas e button is
pressed. The indica tions stay on for abo ut 10 seconds (def ault setting)
after the button is released. (p .2 0)
Page 48

46
Subjects that are Difficult to Focus on
The autofocus mecha nism is not perfect . Focusing may be d ifficult when
taking pictures under the foll owing conditions ((a) to (f) below). T hese also
apply to manual focus ing using the focus indicator ] in the view finder.
If the subject cannot be focused auto matically, set the focus mode lever to
\ and use the manual focus mode to focus on the subject with the aid
of the matte field in the viewfinder. (p.129)
(a) Extremely low-contras t subjects such as a white wall in the
3
Basic Operations
focusing area.
(b) Su bjects which do not reflec t much light within the focusing area.
(c) Fast moving objects.
(d) Strongly reflected ligh t or strong backlighting (bright background) .
(e) If vertical or horizont al line patterns appe ar within the focus ing
area.
(f) Multiple subjects in t he foreground and b ackground within the
focusing area.
Subject may not be focused even when ] (focus indicator) is displ ayed when
(f) above applies.
Page 49

Selecting the Appropriate Capturing
Mode for Scenes
The camera selects an d sets the optimum mode when I (Auto Picture)
on the mode dial is s et to the dial indicato r.
Select = (Portrait), s ( Landscape), q (Macro), \ (Moving Object),
. (Night Scene Portrait), a (Flash OFF), H (Scene) with the m ode dial
if desired image is not captured in Auto Picture mode.
The modes are as follows.
Selects automatically from Portrait, Landscape,
I (Auto Picture)
= (Portrait)
s (Lands cape)
q (Macro)
\ (Moving Object)
. (Night Scene Portrait)
a (Flash OFF)
H (Scene)
Macro, and Moving Objec t mod es .
Lets you take pictures with standar d settings (Normal
mode) when there is no optimal shooting mode.
Optimal for capturing portraits.
Deepens the focus range, emphasi zes contour and
saturation of trees and the sky , and produces a bright image.
Lets you take vibrant pictures of flowers and other
small subjects at short distances.
Lets you take sharp pictures of a quickly moving
subject, such as at a sport ing event.
Lets you capture p eop le aga ins t a night view or dusk.
The built-in flash is deactivated. Other s ettings are the
same as the Nor mal mode in I.
Lets you select fro m 8 shooting scen es depending on
the shooting conditions .
47
3
Basic Operations
For . (Night Scene Portrait), the shutter spee d becomes slower in da rk
places, even if the built-in f lash is used. To prevent camera sh ake, mount the
camera on a tripod.
Page 50

48
Selecting the Shooting Scene
By setting the H (Scene) icon to th e dial indicator, you can choose fr om
the following 8 shooting scenes.
A (Night Scene)
i (Surf & Snow)
B (Text)
3
K (Sunset)
Basic Operations
C (Kids)
E (Pet)
D (Candlelight)
E (Museum)
The flash is deactivated i n A (Night Scene), K (Sunset), D (Candlelight)
and E (Museum) modes. To prevent camera shake, mount the camera on a
tripod.
Used for night scenes. Use a tripod, etc. to prevent
shaking.
For capturing image s of dazzling backg rounds, such as
snowy mountains.
Lets you take clear pictu r es of text or w riting.
For capturing the sunrise or sunset in beautiful colors.
For captur in g moving kids .
Reproduces healthy and bright skin tone.
For captur ing moving pe ts.
For capturing scenes in candleli ght.
For capturing images in places where a flash is
prohibited.
How to Select a Shooting Scene
1
Set the mode dial to H (Scene).
2
Press the { button.
The Fn menu appears. The icon for the
currently selected shooting scene
appears in the Fn menu screen in
H (Scene) mode.
Page 51

3
Used f o r n i g h t s c enes.
Use a t r i p o d , e t c . to
preve n t s h a k i n g .
For captur in g mo ving
pets
Press the 4 button.
The mode palette appears.
4
Use the four-way controller
(mnop) to choose a Scene
mode.
Night Scene
Used for night scenes.
Used for night scenes.
Use a tripod, etc. to
Use a tripod, etc. to
prevent shaking.
prevent shaking.
Pet
OK
49
OKOKOK
3
Basic Operations
If Pet mode is selected, you can turn
the e-dial to choose a dog or a cat
icon.The function is the same,
regardless of which icon you choose.
5
Press the 4 button.
The screen returns to the Fn menu.
6
Press the { button.
The camera is ready to take a picture.
For capturing moving
For capturing moving
pets
pets
OK
OKOKOK
Page 52

50
Using a Zoom Lens
Enlarges the subject ( telephoto) or capture s a wider area (wide angle) wi th
a zoom lens. Adjust it to the desired si ze and take the picture.
1
Turn the zoom ring to the right
or left.
Turn the zoom ring clockwise for
3
Basic Operations
telephoto and counterclockwise for
wide angle.
• The smaller the number of the di sp layed focal length, the wide r t he angl e .
The larger the number, the mo re magnified the image ap pea rs.
• Power Zoom functions (Image Size Tracking, Zoom Clip, an d Aut o Z oom
Effect) are not compatibl e wi th th is cam e ra.
Page 53

Using the Built-in Flash
AUTO
Exit
Use the following pro cedures to take a pict ure in low light or backlit
conditions or when you want to manually us e the built-in flash .
The built-in flash is o ptimum at about 0.7 m t o 4 m from the subject .
Exposure will not be properly contro lled and vignettin g may occur when
used at a distance c loser than 0.7 m (thi s distance varies slightly
depending on the len s being used and set sensitivity (p.15 2)).
Compatibility of built-in flash and lens
Vignetting (darkening of the corners of the image due to a lack of light) may
occur depending on the lens being used and the capture conditions. We
recommend taking a test shot to confirm this.
1 DA, D FA , FA J, FA and F Lens Com patibility with t he Built-in Flash (p.154)
• When using the built-in flash, re m ov e the lens hood before shoo ting.
• The built-in flash fully dischar ge s fo r len ses without a function to s et
aperture lens ring to s ( Aut o) .
Camera automatic all y de termines surrounding ligh t and
built-in flash pops up. The f la sh pops up and discharges
Auto discha r ge
g
Manual discharge
h
Auto flash+Redeye
i
reduct
Manl flas h+Redeye
j
reduct
automatically when necessary, such as wh en using a
shutter speed likely to ca us e cam e ra shake or in backlit
conditions. (The flas h may pop up but ma y not discharge
if the camera determines that the flash is not necessary.)
Discharges flash manually. Fla sh discharges wh en
popped up, does not disc harge when retracte d.
Lights a red-eye redu ct ion l ig ht bef or e au tomatic flash.
Discharges flash ma nu ally. Lights a red-eye reduc tion
light before ma nual flash.
51
3
Basic Operations
Manual discharg e mode (Flash ON) is used reg ardless of flash mode settings
if the K button is pressed to pop up th e f la sh m an ua lly.
Selecting Flash Mode
1
Press the { button.
The Fn menu appears.
Fn
OK
Fn
AUTO
AUTO
Exit
Exit
Page 54

52
Auto disch ar ge
Flash Mode
2
Press the four-way controller
(n).
The Flash options screen appears.
When the mode dial is set to e, b, c,
a or p, g and i appear gr ay an d
cannot be se lected.
3
Use the four-way controller (op) to choose a flash mode.
3
Basic Operations
4
Press the 4 button.
The camera returns to the Fn menu screen.
5
Press the { button.
The camera is ready to take a picture.
Using Auto Discharge g, i (Automatic Flash Popup)
1
Set the mode dial to H, I, =, q, or ..
Flash Mode
Flash Mode
Auto discharge
Auto discharge
OK
OKOKOK
The flash is deactivated w he n A (Night Scene) , K (Sunset),
D (Candlelig ht ) or E (Museum) is selected in H (Scene) mode.
2
Press the shutter release
button halfway.
The built-in flash pops up if necessary
and begins charging. When the flash is
fully charged, b appears in the LCD
panel and viewfinder. (p.17, p.20, p.22)
Switch between Aut o discharge mode and M anual discharge mo de (Flash ON)
by pressing the K button while the built-in flash is popped up. If Auto
discharge is set, E appears on the LCD panel.
Page 55

3
Press the shutter release button fully.
The picture is taken.
4
Push down on the portion
indicated in the illustration to
retract the flash.
53
3
Basic Operations
Using Manual Discharge (Flash ON) h,
1
Press the K button.
The built-in flash pops up and begins
charging. Manual discharge mode
(Flash ON) is used regardless of flash
mode settings. When the flash is fully
charged, h appears in the LCD panel
and viewfinder. (p.17, p.20, p.22)
When Flash mode is set to g or i and
you pop up the built-in flas h, you can
switch between Auto dis ch ar ge m ode
and Manual discharg e m ode (Flash ON)
by pressing the K button under the
following conditions.
• Shooti ng mode is set to I, =, s,
q, \, or ..
• H mode is set to i, B, C, or E.
2
Press the shutter release button fully.
The flash discharges and the picture is taken.
j
3
Push the flash down to retract.
Page 56

54
Using Red-eye Reduction Flash
“Red-eye” is the phen omenon where eyes lo ok reddish in photogra phs
taken in dark env ironments with a fl ash. This is caus ed by the reflection of
the electronic flash in the retina of the eye. R ed-eye occurs because p upils
are dilated in dark en vironments.
This phenomenon ca nnot be averted but the f ollowing measures can be
used to combat it.
• Brighten the surround ings when shooting .
• Set to wide angle and shoot from closer if a zoom lens is in us e.
• Use a flash that su pports red-eye reducti on.
• Position the flash as fa r away from the camer a as possible when us ing
3
an external flash.
Basic Operations
The red-eye reducti on function on this c amera reduces red -eye by
discharging the fla sh twice. With the red- eye reduction functi on, the
pre-flash is disch arged just before the shutter is rele ased. This reduce s
pupil dilation. The main flash is then di scharged while the p upils are
smaller, reducin g the red-eye effect. To us e the red-eye reducti on
function, set i (Red-eye reductio n auto flash) in Picture m ode or j
(Red-eye reduction m anual flash) in other modes for Flash mode .
Daylight-Sync Shooting
In daylight conditio ns, the flash will elimi nate shadows when a portrait
picture is take n with a person’s face cast in s hadow. Use of the flash in this
way is called Dayligh t-Sync Shooting. Flash is discharged ma nually when
shooting with Da ylight-Sync Shoot ing.
Taking pictures (Auto Picture)
1 Confirm that the flash has popped up and the flas h mode is set to h
(Manual discharge) . (p.53)
2 Confirm that the flash is full y charged.
3 Take the picture.
The picture may be overex posed if the background is too bright.
Without Daylight-Sync With Daylight-Sync
Page 57

Other Shooting Modes
AUTO
Exit
Continuous Shooting
Pictures can be tak en continuously wh ile the shutter relea se button is held
down.
55
1
Press the { button.
The Fn menu appears.
3
Basic Operations
Fn
OK
Fn
AUTO
AUTO
Exit
Exit
Page 58

56
OK
Drive Mode
Single fra me s ho oting
OK
Drive Mode
Continuous s ho ot ing
3
Basic Operations
2
Press the four-way controller
(m).
The Drive Mode options screen
appears.
3
Use the four-way controller
(op) to select j.
Drive Mode
Drive Mode
Single frame shooting
Single frame shooting
OK
Drive Mode
Drive Mode
Continuous shooting
Continuous shooting
OK
OK
4
Press the 4 button.
The camera returns to the Fn menu
screen.
5
Press the { button.
The camera is ready to take pictures.
6
Press the shutter release button halfway.
The autofocus system operates. The focus indicator ] appears in the
viewfinder when the subject is in focus.
OK
OK
OK
Page 59

Set [No. cn t shtng rcd im] in [Rec ordabl e Imag e No. ] of th e [A C ustom Setting]
menu. The number of cont inuously recordable image s (buffer space) appears
when shutter is presse d hal f w ay . (p.10 2)
7
Press the shutter release button fully.
Pictures are taken continuously while the shutter release button is fully
pressed. Take your finger off the shutter release button to stop.
Continuous shooting settings are retained when the power is turned off.
Display the Fn menu again and set to 9 (Single frame shooting) to stop
Continuous shooting.
• The focu s is adju sted eac h time t he shutte r is rel eased if the [AF Mo de] in t he
[A Rec. Mode] is se t to l (Si ngle mode). (p .123)
•
Focusing is continuously active when the mode dial is set t o e, b, c or a
and [AF Mode] in the [
Picture mode is set to
E
(Pet). Note that the shutter will release even if the focusing is not complete.
• The shutter cannot be releas ed until charging is com pl et e whe n using the
built-in flash. Use a c ustom function to ena ble shutter release b efore the built-
in flash is ready. (p.151)
A
Rec. Mode] is set to
\
(Moving Object) or H mode is set to C (Kids) or
k
(Continuous mode), when
57
3
Basic Operations
Self-Timer Shooting
This camera has two types of self-tim ers: g and Z.
Shutter wi ll be released after abou t 12 seconds. Use this mode to
g
include the photographer in the picture.
A mirror pops up immediately after shutter release button is pressed.
Shutter is released after about 2 seconds. Use this mode to avoid
Z
camera shake when the shutter release button is pressed.
1
Mount the camera onto a
tripod.
Page 60

58
AUTO
Exit
OK
Drive Mode
Single fra me s ho oting
3
Basic Operations
2
Press the { button.
The Fn menu appears.
3
Press the four-way controller
(m).
The Drive Mode options screen
appears.
Fn
OK
Drive Mode
Drive Mode
Single frame shooting
Single frame shooting
Fn
OK
AUTO
AUTO
Exit
Exit
OK
OK
Page 61

4
Use the four-way controller
(op) to select g or Z.
5
Press the 4 button.
The camera returns to the Fn menu
screen.
6
Press the { button.
The camera is ready to take pictures.
59
3
Basic Operations
7
Confirm in the viewfinder that
the subject you wish to shoot is
in the display and press the
shutter release button halfway.
The focus indicator ] appears when
the subject is in focus.
Page 62

60
3
Basic Operations
8
Press the shutter release
button fully.
For g, the self-timer lamp starts
blinking slowly and blinks rapidly 2
seconds before the shutter is released.
The beep is heard and the rate
increases. The shutter will be released
about 12 seconds after the shutter
release button is pressed fully.
For Z, the shutter will be released about 2 seconds after the shutter
release button is pressed fully.
• The beep can be turned off (p. 16 6) .
• Exposure may be affected if lig ht ent er s t he vi e w find er. Attach the provided
ME viewfinder cap or us e the AE lock function (p.144). (Igno re the light
entering the view finder when the exposure mo de is set to a (Manual)
(p.140).)
• To attach accessorie s su ch as the ME Viewfinde r C ap , first remove the F
Eyecup by pressing in one si de an d t hen pulling it out toward you.
O
9
Turn the camera off after
shooting.
The next time the power is turned on,
self-timer shooting is canceled and
returns to single frame shooting.
Page 63

Remote Control Shooting
(Remote Control F: Sold Separately)
The shutter can be releas ed with the optional remote c ontrol unit. You can
select from h (rem ote control) and i ( 3 sec. delayed rel ease) for remote
control shooting.
The shutter will be rel eased immediately a fter the shutter release bu tton
h
on the remote control unit is pressed.
When the shutter release button on th e remote control unit is pressed, the
i
shutter is released after about 3 second s.
1
Mount the camera onto a
tripod.
61
3
Basic Operations
2
Press the { button.
The Fn menu appears.
Page 64

62
OK
Drive Mode
Remote Con tr ol U nit
3
Basic Operations
3
Press the four-way controller
(m).
The Drive Mode options screen
appears.
4
Use the four-way controller
(op) to select h or i.
The self-timer lamp will blink to let you
know that the camera is in remote
control wait status.
5
Press the 4 button.
The camera returns to the Fn menu screen.
Drive Mode
Drive Mode
Remote Control Unit
Remote Control Unit
OK
OK
OK
6
Press the { button.
The camera is ready to take pictures.
7
Press the shutter release button halfway.
The autofocus system operates. The focus indicator ] appears in the
viewfinder when the subject is in focus.
• You cannot focus with the re m ot e co ntrol unit in default settin gs. Foc us on
the subject first before op erating with the remote co ntrol. You can set [AF in
remote control] to [On] in the custom function. (p.103)
• When using the rem ote control uni t, flash does not p op up automatica lly even
when set to g (Auto discharge). Pop up the flas h manually befo rehand.
(p.53)
Page 65

8
Point the remote control unit
towards the front of the camera
and press the shutter release
button on the remote control.
The operating distance of the remote
control unit is about 5 m from the front
of the camera. The shutter will be
released immediately or approximately
3 seconds after the shutter release button on the remote control unit is
pressed depending on the drive mode selected.
When the picture is taken, the self-timer lamp lights for 2 seconds and
will then resume blinking.
• Exposure may be affected if lig ht ent er s t he vi e w find er. Attach the provided
ME viewfinder cap or us e the AE lock function (p.144) (ign or e t he l ight
entering the view finder when the exposure mo de is set to a (manual)
(p.140)).
• To attach accessorie s su ch as the ME Viewfinde r C ap , first remove the F
Eyecup by pressing in one si de an d t hen pulling it out toward you.
63
3
Basic Operations
O
• Turn the power off to stop the remote control operation after it has been
activated.
• The remote control may not op erate in backlit conditions .
• The remote control does n ot w or k w hi le t he f la sh is being charged.
• When using the built-in flash , raise the flas h into position first.
• The camera automatic all y re tu rn s to si ngl e frame shooting after the r em ot e
control shooting mod e is le ft unu sed for 5 minutes.
• The remote control unit bat te ry can s end a remote control sign al about
30,000 ti mes. Cont act PENTA X servi ce cent er to re place the batter y (this w ill
involve a fe e).
Page 66

64
Using Mirror Up Function to Prevent Camera
Shake
Use the Mirror Up func tion if camera shak e is evident even when c able
switch (optional ) or remote control u nit (optional) i s used.
When shooting with the 2 sec. Self-Timer , the mirror pops up a nd the
shutter is released 2 seconds after you press it, thereby avoidi ng the
vibration of the mir ror.
Follow the procedure bel ow to take a picture with t he Mirror Up function.
3
Basic Operations
1
Mount the camera onto a tripod.
2
Use the { button and the four-way controller (m) to
select Z (2 sec. Self-Timer).
1 Self-Timer Shooting (p.57)
3
Focus on the subject.
4
Press the shutter release button fully.
The mirror pops up and the picture is taken 2 seconds later. AE lock is
enabled with the exposure value set immediately before the mirror goes
up.
Page 67

Playing Back Still Pictures
100-0 0 4 6
Playing Back Images
You can play back captured still p ictures with the cam era.
Use the included “PENT AX PHOTO Browser 3” software to play back u sing a
PC. Refer to the “PENTAX PHOTO Browser 3/PENTAX PHOTO Laboratory 3
Operating Manual” for det ail s.
1
Press the Q button after
taking a picture.
The most recently captured image
(image with the largest file number) is
displayed on the LCD monitor.
65
3
Basic Operations
100-0046
100-0046
Page 68

66
10 0-0 00 1
10 0-0 00 1
10 0-0 00 1
2
Press the four-way controller
(op).
o : The previous image appears.
p : The next image appears.
Rotating Images
3
Basic Operations
You can rotate imag es 90° counterclock wise at a time. Mak e images shot
vertically easi er to view.
100-0001
100-0001100-0001
100-0001
100-0001100-0001
1
Press the Q button after
taking a picture.
The most recently captured image
(image with the largest file number) is
displayed on the LCD monitor.
2
Press the four-way controller
(n).
The image is rotated 90°
counterclockwise each time the button
is pressed.
OK
OKOKOK
OK
OKOKOK
Page 69

3
Press the 4 button.
Image rotation information is saved.
67
Enlarging Playback Images
You can magnify im ages up to 12 times wh en displaying.
1
Press the Q button and use
the four-way controller (op) to
select an image.
The most recently captured image
(image with the largest file number) is
displayed first on the LCD monitor.
3
Basic Operations
Page 70

68
3
Basic Operations
2
Turn the e-dial to the right
(toward y).
Image enlarges at each click and can
be enlarged to 12 times the original.
Turn to the left (toward f) to return.
Press the 4 button to return to the
original size.
To return the magnified view of
[Histogram] Display, [Detailed
Information] Display and [No info. Display] (image only) to its original
size, press the 4 button.
To switch to [No info. Display] in magnified view, press the M button.
To change the display area, press the four-way controller (mnop) in
magnified view.
The default settin g for the first click on the e-dial is 1.2 times. You can c hange
this in [Mag to Strt Zm Plybk] in [A Custom Setting] menu. (p.103)
Nine-Image Display
2 0.×20.×
You can display nine images on the LCD mon itor at the same time.
Page 71

1
100-0 0 4 6
100-0 0 4 6
Press the Q button.
The most recently captured image
(image with the largest file number) is
displayed on the LCD monitor.
2
Turn the e-dial to the left
(toward f).
Up to nine thumbnail images will be
displayed at once. Use the four-way
controller (mnop) to select an
image. A scroll bar appears at the right
of the screen. With an image selected
in the bottom row, pressing the four-
way controller (n) displays the next
nine images.
[?] appears for an image that cannot be
displayed.
Frame
Select&Delete
100-0046
100-0046
100-0046
Scroll bar
69
3
Basic Operations
3
Turn the e-dial to the right
(towards y) or press the 4
button.
A full screen display of the selected
image appears.
100-0046
100-0046
Page 72

70
Slideshow
You can play back all images reco rded on your SD Memo ry Card
successively. To s tart continuous play back, use the menu sc reen
displayed on the LCD monitor.
3
Basic Operations
1
Press the Q button and use
the four-way controller (op) to
select an image to be displayed
first.
The most recently captured image
(image with the largest file number) is
displayed first on the LCD monitor.
2
Press the { button.
The Fn menu appears.
Page 73

3
Start
Press the four-way controller
(p).
71
Start screen is displayed and
slideshow begins.
Press any button to end slideshow.
Press the shutter release button or the
Q button, slide the main switch to the
preview position (|) or turn the mode
dial to change to Capture mode.
Set the display time for slideshow in the [Q Playback] menu. Alternative ly,
start the slideshow from th e [ Q Playback] menu. (p.164)
Start
Start
3
Basic Operations
Page 74

72
Connecting the Camera to AV
Equipment
By using the video cable, you can play back images using a TV or other
device with a video IN j ack as your monitor. Make s ure that both the TV
and the camera are turn ed off before connecti ng the cable.
1 Selecting the Vide o Output Format (p.171)
3
Basic Operations
1
Open the terminal cover and connect the video cable to
the USB/Video terminal.
2
Connect the other end of the video cable to the video IN
jack on the AV device.
3
Turn the AV device and camera on.
• If you intend to use the camera co ntinuously for a long period, use of the AC
adapter (optional) is re co m mended. (p.28)
• For AV equipment with multiple video IN jacks (such as TVs), check the
operating manual of the AV devic e, and select the video IN jack to which the
camera is connected .
• Depending on the cou ntry or region, im ages may fail to be played back if the
video output format is set different from the one in use there. If this happens,
change the video output format setting. (p.171)
• The camera LCD monitor tu rn s of f wh ile the ca mera is connected to the AV
device.
Page 75

Processing Images with Filters
You can edit shot i mages using digi tal filters. Processed images are saved
under a different nam e.
• RAW images ca nnot be process ed using the d igital filter.
• Additionally, set digital filters from the [Q Play ba ck] menu.
73
3
Basic Operations
Digital Filter
B&W Converts to a black and white image.
Sepia
Color
Soft
Slim
Brightness
Adds a vintage touch to photos by converting them to sepia
color.
Adds a color filter to the im age. Sel ects from 18 filters (9 co lors
× 2 tones).
Creates a soft image by lightl y fadin g the enti re imag e. Selec ts
from three levels.
Changes the horizontal and vertical ratio of images. Adjusts
height or width up to two times the original size.
Changes the b rightness of images. A d justs in a ra nge of ±8
levels.
Page 76

74
Exit
B&W
OK
Color
1
Press the { button in
Playback mode.
Fn
3
Basic Operations
The Fn menu appears.
2
Press the four-way controller
(o).
The screen for selecting the filter
appears.
3
Use the four-way controller (op) to select an image.
4
Use the four-way controller (mn) to select a filter.
Select a filter and preview the effects on the image. Proceed to Step 5 if
[Color] is selected. Proceed to Step 7 if [B&W] or [Sepia] is selected.
5
If [Color] is selected, turn the
e-dial to select the filter color.
Select from 18 color filters: 9 basic
colors (red, orange, yellow, yellow-
green, green, cyan, blue, indigo and
purple) and the same 9 colors with a
darker hue.
OK
B&W
B&W
Color
Color
Fn
OK
OK
Exit
Exit
OK
OK
OKOKOK
Page 77

6
Slim
OK
Cancel
Save image a s a new file
Adjust with e-dial if slim filter,
soft filter or brightness filter is
Slim
Slim
selected.
Turn counterclockwise for wider and
clockwise for s limmer if slim filter is
selected. Turn counterclockwise to
darken and clockwise to brighten if
brightness filter is selected. Select
softness from three levels if soft filter is
selected.
Use the four-way controller (op) to select an image. The image appears
in the set slimness or softness.
7
Press the 4 button.
The save confirmation screen appears.
8
Use the four-way controller
(m) to select [Save as].
Save image as a new file
Save image as a new file
Save as
Cancel
Cancel
OK
OK
OK
OK
OKOKOK
75
3
Basic Operations
9
Press the 4 button.
The filtered image is saved under a different name.
Page 78

76
100-0 0 4 6
100-0 0 4 6
Deleting Images
Deleting a Single Image
You can delete one im age at a time.
• Deleted images canno t be re st or ed.
• Protected images cann ot be del e ted.
3
Basic Operations
1
Press the Q button and use
the four-way controller (op) to
select an image to delete.
2
Press the i button.
The Delete screen appears.
100-0046
100-0046
3
Use the four-way controller
(m) to select [Delete].
4
Press the 4 button.
The image is deleted.
Delete
100-0046
100-0046
Page 79

Deleting All Images
Delete Al l
Cancel
Delete all i ma ge s
on memory ca rd ?
You can delete all s aved images at once.
• Deleted images canno t be re st or ed.
• Protected images cann ot be del e ted.
1
Press the Q button.
2
Press the i button twice.
The Delete All screen appears.
3
Use the four-way controller
(m) to select [Delete All].
Delete all images
Delete all images
on memory card?
on memory card?
77
3
Basic Operations
4
Press the 4 button.
All images are deleted.
Delete All
Delete All
Cancel
Cancel
OK
OKOKOK
Page 80

78
100-0 0 4 6
Deleting Selected Images
(from Nine-Image Display)
You can delete multip le images fro m the nine-image dis play at once.
• Deleted images canno t be re st or ed.
• Protected images cann ot be del e ted.
• Only files in the same folder ca n be selected at once.
3
1
Basic Operations
Press the Q button.
The most recently captured image
(image with the largest file number) is
displayed first on the LCD monitor.
2
Turn the e-dial to the left
(toward f).
100-0046
100-0046
Nine thumbnail images appear.
Select&Delete
100-0046
Page 81
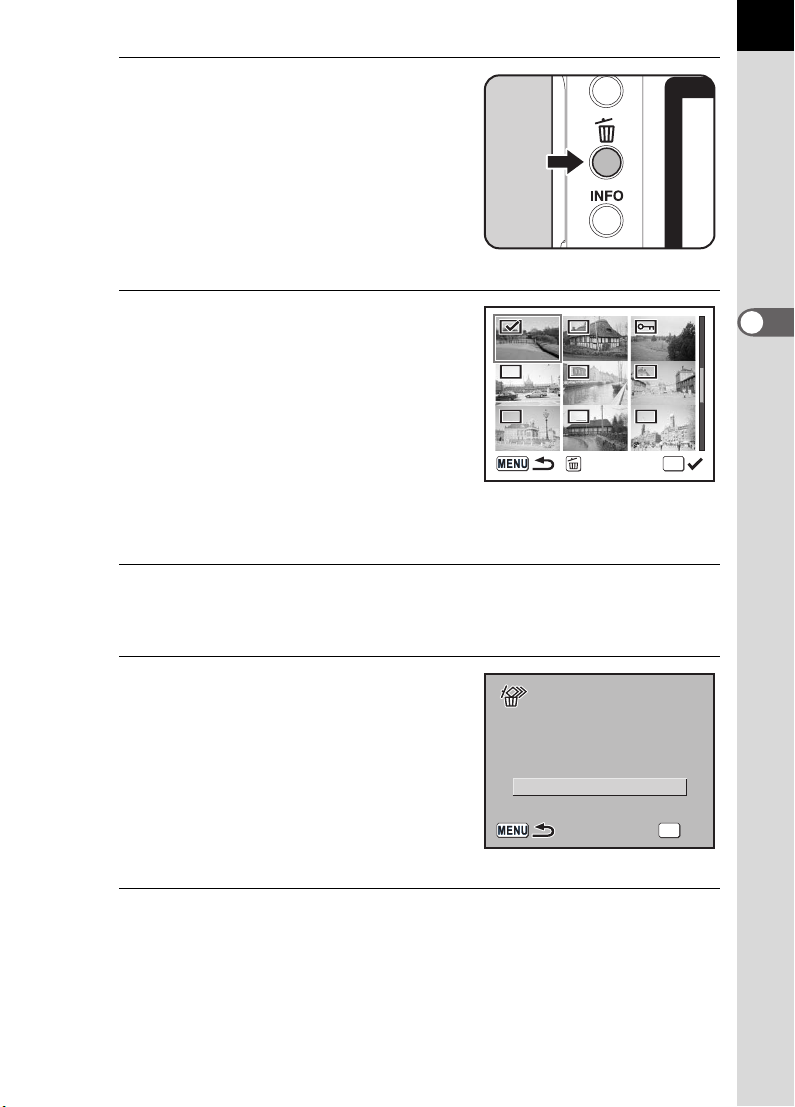
3
Cancel
All select ed
images are d el et ed
Press the i button.
9 appears on the images.
4
Use the four-way controller
(mnop) to move to the
images to delete and press the
4 button.
Image is selected and O appears.
Press { button to select all images
(the selection of images may take time
to complete depending on the number
of images).
5
Press the i button.
Delete
79
3
Basic Operations
OK
The Delete confirmation screen appears.
6
Use the four-way controller
(m) to select [Select&Delete].
7
Press the 4 button.
The selected images are deleted.
All selected
All selected
images are deleted
images are deleted
Select&Delete
Cancel
Cancel
OK
OKOKOK
Page 82

80
100-0 0 4 6
100-0 0 4 6
Unprotect
All images
Protecting Images from Deletion (Protect)
You can protect ima ges from being acciden tally deleted.
Even protected images a re deleted if the SD Memory Car d i s f or m at ted.
1
Press the Q button and use
the four-way controller (op) to
3
Basic Operations
select an image.
The most recently captured image
(image with the largest file number) is
displayed first on the LCD monitor.
2
Press the Z button.
The Protect screen appears.
100-0046
100-0046
3
4
Use the four-way controller
(m) to select [Protect].
Protect
Unprotect
Unprotect
All images
All images
Press the 4 button.
The selected image is protected.
• Select [Unprotect] in Step 3 to cancel the Protect setting.
•The Y symbol is displ ayed when play i ng back protec ted images. ( p.19)
100-0046
100-0046
OK
OKOKOK
Page 83

Protecting All Images
Unprotect
Protect al l im ag es
1
Press the Q button.
2
Press the Z button twice.
The Protect all images screen
appears.
3
Press the four-way controller
(m) to select [Protect] and
press the 4 button.
Protect all images
Protect all images
81
3
Basic Operations
All images saved in the SD Memory
Card are protected.
Select [Unprotect] in Step 3 to cancel the Protect setting on all of the images.
Protect
Unprotect
Unprotect
OK
OKOKOK
Page 84

82
Exit
100-0 0 4 6
OK
All images
Setting the Printing Service (DPOF)
You can order conven tional photograph prints by taking the SD M emory
Card with recorded images to a store for a p rinting service.
DPOF (Digital Prin t Order Format) se ttings allow you to s pecify the
number of copies or to imprint the date.
DPOF settings cann ot be ap plied to RAW images.
3
Basic Operations
Printing Single Images
Set the following it ems for each image.
Copies Selects the number of copies. You can print up to 99 copies.
Date Specifies whether you want the date inserted on the print or not.
1
Press the Q button and use the four-way controller (op)
to select an image.
2
3
Press the { button.
The Fn menu appears.
Press the four-way controller
(m).
The DPOF screen appears.
If DPOF settings have already been
made for an image, the previous
number of prints and date setting
(O (on) or P (off)) will be displayed.
Fn
Copies
Fn
All images
Date
OK
Fn
Exit
Exit
100-0046
100-0046
00
OK
OK
OKAll images
Page 85

4
All images
100-0 0 4 6
OK
Exit
Use the four-way controller (op) to choose the number of
copies and press the four-way controller (n).
The frame moves to [Date].
5
Use the four-way controller
(op) to choose whether to
insert the date (O) or not (P).
100-0046
100-0046
83
O : The date will be imprinted.
P : The date will not be imprinted.
6
Press the 4 button.
The DPOF settings are saved and the camera returns to playback status.
Depending on the pr inter or printing equipm ent at the photo proce ssing lab, the
date may not be imp rinted on the pictures ev en if the DPOF setting w as made.
To cancel DPOF s ettings, set the n umber of copies to [00] in Step 4 an d press
the 4 button.
Copies
Fn
All images
All images
Date
Settings for All Images
1
Press the { button in
Playback mode.
The Fn menu appears.
Fn
OK
01
OK
OKOK
OK
3
Basic Operations
Fn
Exit
Exit
Page 86

84
100-0 0 4 6
OK
All images
DPOF setti ng f or all
images
2
Press the four-way controller
(m).
The DPOF screen appears.
100-0046
100-0046
3
Basic Operations
Copies
Date
Fn
All images
3
Press the { button.
The screen for making DPOF settings
DPOF setting for all
for all images appears.
4
Use the four-way controller (op) to choose the number of
DPOF setting for all
images
images
Copies
Date
copies and whether to insert the date (O) or not (P).
Refer to Steps 4 and 5 of “Printing Single Images” (p.83) for details of
how to make the settings.
5
Press the 4 button.
The DPOF settings for all the images are saved and the camera returns
to playback status.
00
00
OK
OK
OK
OKAll images
OKOKOK
The number of copies sp eci f ied i n se ttings for all images applies to all the
images. Before printing, check tha t the number is correct.
Settings f or sin gle i mag es ar e ca ncel ed w hen s ett ing s ar e mad e fo r all im ages .
Page 87

Printing Using PictBridge
This function lets you p rint images directly fro m the camera without usin g
a PC (direct prin ting).
Connect the camera an d PictBridge compa tible printer wit h the included
USB cable (I-USB17) to print directly.
Select the image s you want to pr int, the number of copies and wheth er to
insert the date or no t on the camera after c onnecting to the pr inter.
Direct printing is performed in the fol lowing steps.
85
Set [Transfer Mode] on camera to [PictBridge] (p.86)
Connect the camera to the printer (p.87)
Set the printing optio ns (p.82)
Print single ima ges (p.88)
Print all images (p.90)
Print with DPOF settings (p.92)
• Use of the AC adapter is recomm e nded when connecting t he c amera to a
printer. T he prin ter may not work pr operly or the ima ge data may be lost if the
batteries run out of power while the camera is connected to the printer.
• Do not disconnect the USB cable during data transfer.
• Depending on the type of print er , not al l the s ettings made on the came ra
(such as print settings and DPOF settings) may be valid.
• A printing error may occur if th e se lected number of copi es exceeds 500.
• Printing an index of ima ges, where multiple images appear on a single sheet,
may not be possible unle ss the printer supports i nde x printing. For index
prints, you may need to us e a PC.
• RAW images cannot be pr i nted di r ec tly. Use a PC to print RAW ima ges.
• See the “PENTAX PHOTO Browser 3/PENTAX PHOTO Labora tory 3
Operating Man ual” when connec ting to a PC.
3
Basic Operations
Page 88

86
3
Basic Operations
Setting [Transfer Mode]
1
Press the 3 button.
The [A Rec. Mode] menu appears.
2
Use the four-way controller
(op) to select the [H Set-up]
menu.
Set-up
Format
Beep
Date Adjust
World Time
English
Guide display
Exit
3
Use the four-way controller (mn) to select [Transfer
Mode].
4
Press the four-way controller (p).
A pop-up menu appears.
Page 89

5
Use the four-way controller
(mn) to select [PictBridge].
6
Press the 4 button.
The setting is changed.
7
Press the 3 button.
Brightness Level
Video Out
Transfer Mode
Auto Power Off
Folder Name
File #
Connecting the Camera to the Printer
1
Turn the camera off.
Set-up
0
NTSC
PC
PictBridge
PC-F
OK
OKCancel
87
3
Basic Operations
2
Connect the camera and PictBridge compatible printer
using the USB cable supplied with the camera.
The PictBridge logo is displayed on PictBridge compatible printers.
Page 90

88
Select pri nt in g mode
Select pri nt in g mode
Date
Copies
100-0 0 4 6
Print
Date
Print this i ma ge
3
Basic Operations
3
Turn the printer on.
4
After printer start-up is
complete, turn the camera on.
Select printing mode
Select printing mode
The PictBridge menu appears.
DPOF AUTOPRINT
PictBridge menu is not displayed if [Transfer Mode] is set to [PC] or [PC-F].
Printing Single Images
1
Use the four-way controller
(mn) to select [Print One] on
the PictBridge menu.
Select printing mode
Select printing mode
Print One
Print All
OK
OKOKOK
2
Press the 4 button.
The Print One screen appears.
3
Use the four-way controller
(op) to choose an image to
print.
Print One
Print All
DPOF AUTOPRINT
Print this image
Print this image
1
Copies
Copies
1
OK
OKOKOK
100-0046
100-0046
Date
Date
Fn
Date
Date
OK
Print
Print
Page 91

4
Quality
Paper Type
Paper Size
Standard
Std.
Std.
Std.
Border Sta tu s
Print
Change Setting
Print acco rd in g
to setting s?
Use the four-way controller (mn) to choose the number
of copies.
You can print up to 99 copies.
5
Use the { button to choose whether to insert the date (O)
or not (P).
O : The date will be printed.
P : The date will not be printed.
6
Press the 4 button.
Print according
The print settings confirmation screen
appears.
Proceed to Step 12 to print the images
by default.
To change the print settings, go to Step
7.
7
Press the { button.
The screen for changing print settings
appears.
Print according
to settings?
to settings?
Paper Size
Paper Size Standard
Paper Type
Paper Type
Quality
Quality
Border Status
Border Status
Fn
Change Setting
Change Setting
PictBridge
Paper Size
Paper Type
Quality
Border Status
Standard
Std.
Std.
Std.
Std.
Std.
Std.
OK
Print
Print
Standard
Std.
Std.
Std.
89
3
Basic Operations
8
9
OK
OKCancel
Select [Paper Size] and press the four-way controller (p).
The Paper Size screen appears.
Use the four-way controller
(mnop) to choose the
paper size.
You can only choose a size that is
supported by your printer.
When the [Paper Size] is set to
[Standard], images are printed
according to the printer settings.
Paper Size
Standard
Card
L
100×150
Postcard
4”×6”
2L
8”×10”
A4
Letter
11”×17”
A3
OK
OKCancel
Page 92

90
Select pri nt in g mode
3
Basic Operations
10
Press the 4 button.
11
Repeat Steps 8 to 10 to set [Paper Type], [Quality] and
[Border Status].
The print settings change screen appears after each item has been set.
When [Std.] is selected for these print settings, images are printed
according to the printer settings.
[Paper Type] with more Es supports higher quality paper.
[Quality] with more Es indicates higher print quality.
12
Press the 4 button twice.
The image is printed according to the settings.
Press the 3 button to cancel printing.
Printing All Images
1
Use the four-way controller
(mn) to select [Print All] on
the PictBridge menu.
Select printing mode
Select printing mode
2
Press the 4 button.
The Print all images screen appears.
Print One
Print All
DPOF AUTOPRINT
OK
OKOKOK
Page 93

3
Date
28
Copies
Tota l
100-0 0 4 6
Print
Date
Print all im ag es
Choose the number of copies
and whether to imprint the date
or not.
100-0046
100-0046
Print all images
Print all images
91
The number of copies and the date
setting that you choose apply to all of
Copies
Copies
Tot a l
Tot a l
the images.
Refer to Steps 4 and 5 of “Printing
Single Images” (p.89) for details on
how to make the settings.
4
Press the 4 button.
The print settings confirmation screen appears.
Refer to Steps 7 and 11 of “Printing Single Images” (p.89 and 90) for
details on how to change the settings.
5
Press the 4 button on the print settings confirmation
screen.
All the images are printed according to the settings.
Press the 3 button to cancel printing.
28
28
1
1
Date
Date
Fn
Date
Date
OK
Print
Print
3
Basic Operations
Page 94

92
10
Date
Copies
Tota l
Print
Print w/DP OF s et tings
Printing Images Using the DPOF Settings
1
Use the four-way controller (mn) to select [DPOF
AUTOPRINT] on the PictBridge menu.
2
Press the 4 button.
3
Basic Operations
The Print w/DPOF settings screen
appears. Use the four-way controller
(op) to check the number of copies for
each image, whether the date is
imprinted or not, and total number of
copies. Print settings are set with the
Print Service. (p.82)
3
Press the 4 button.
The print settings confirmation screen appears.
Refer to Steps 7 and 11 of “Printing Single Images” (p.89 and 90) for
details on how to change the settings.
4
Press the 4 button on the print settings confirmation
Print w/DPOF settings
Print w/DPOF settings
Copies
Copies
Tot a l
Tot a l
screen.
The images are printed according to the settings.
Press the 3 button to cancel printing.
Disconnecting the USB Cable
10
10
1
1
Date
Date
OK
Print
Print
Disconnect the USB cab le from the camera an d printer when you have
finished printing.
1
Turn off the camera.
2
Disconnect the USB cable from the camera and printer.
Page 95

4 Menu Reference
Explains the functions of r by buttons and menus.
Using the Button Functions ................................94
Using the Menu .....................................................98
Using the Fn Menu .............................................104
Using the Mode Dial ...........................................106
When using menu s and Fn men u, item s whic h ca nno t be ch anged due
to camera settings appear gray and cannot be selected.
Page 96

94
Using the Button Functions
Capture Mode
Functions of buttons us ed during shooting are noted.
4
Menu Reference
1 Shutter release button
Press to capture images. (p.45)
2 Main switch
Move to turn the power on/off (p.32) or to preview (p.148).
3 Lens unlock button
Press to detach lens. (p.38)
Page 97

4 Focus mode lever
Switches between autofocus mode (p.120) and manual focus mode
(p.128).
5 Mode dial
Changes the Shooting mode. (p.106)
6 K button
Press to pop up the built-in flash. (p.51)
7 3 button
Displays the [A Rec. Mode] menu (p.100). Next, press the four-way
controller (p) to display [Q Playback] menu (p.100), [H Set-up] menu
(p.101) and [A Custom Setting] menu. (p.102)
95
8 M button
Press to show shooting information on the LCD monitor. (p.17)
9 Q button
Switches to the Playback mode. (p.65)
0 mc button
Press to set aperture and EV compensation values. (p.138, p.143)
a L button
Locks the exposure before shooting. (p.144)
Automatically adjusts the appropriate exposure in a (Manual) mode.
(p.142)
b e-dial
Sets shutter speed, aperture, and EV compensation values.
(p.136, p.138, p.143)
c 4 button
Saves the setting you selected in the menu.
d Four-way controller (mnop)
Use this to move cursor or change items in menus and Fn menu.
e { button
Press to display the Fn menu. Press the four-way controller (mnop)
to determine the following operation. (p.104)
4
Menu Reference
Page 98

96
Playback Mode
Functions of buttons us ed during playback a re noted.
4
Menu Reference
1 Shutter release button
Press to switch to Capture mode.
2 Main switch
Move to turn the camera on and off. (p.32)
3 3 button
Press to display the [Q Playback] menu (p.100). Next, press the fourway controller (op) to display [H Set-up] menu (p.101), [A Custom
Setting] menu (p.102) and [A Rec. Mode] menu (p.100).
4 i button
Press to delete images. (p.76)
Page 99

5 M button
Press to show shooting information on the LCD monitor. (p.18)
6 Q button
Press to switch to Capture mode.
7 Z button
Press to protect images from being accidentally erased. (p.80)
8 e-dial
Use this to enlarge an image (p.67) or display nine images at the same
time (p.68).
9 4 button
Saves the setting you selected in the menu or playback screen.
0 Four-way controller (mnop)
Use this to move cursor or change items in menus, Fn menu and
playback screen.
a { button
Press to display the Fn menu. Press the four-way controller (mop) to
determine the following operation. (p.105)
97
4
Menu Reference
Page 100

98
Using the Menu
How to Operate the Menu
This section explains op eration methods for [ A Rec. Mode] menu,
[Q Pl ayback] menu, [H Set-up] menu an d [A Cu stom Setting] menu.
Displaying the Menu screen
1
Press the 3 button in
4
Menu Reference
Capture mode.
The [A Rec. Mode] menu appears on
the LCD monitor.
Rec. Mode
Image Tone
Recorded Pixels
Quality Level
Saturation
Sharpness
Contrast
Exit
2
Press the four-way controller
(p).
[Q Playback] menu, [H Set-up]
menu and [A Custom Setting] menu
appear in order each time the four-way
controller is pressed.
Set-up
Format
Beep
Date Adjust
World Time
English
Guide display
Exit
 Loading...