

MOD-FCS2KIT300
MOD-FCS2KIT300-B
46" - 90"
(117 - 229 cm)
MAX
211 lb
(96 kg)
ENG
ESP
FRN
DEU
NEL
ITL
ČEŠ
SLK
POR
TÜR
1
2014-01-31 #:203-9370-1
WARNING
ENG - Before installing make sure the supporting surface will support the combined load of the equipment and
hardware. Screws must be tightly secured. Do not overtighten screws or damage can occur and product may fail.
Never exceed the Maximum Load Capacity. Always use an assistant or mechanical lifting equipment to safely lift
and position equipment. This product is intended for indoor use only. Use of this product outdoors could lead to
product failure or personal injury. For support please call customer care at 1-800-865-2112.
ADVERTENCIA
SPN - Antes de instalarlo, asegúrese de que la superfi cie de apoyo sostendrá la carga combinada del equipo y
los fi jadores. Los tornillos se tienen que fi jar fi rmemente. No apriete los tornillos en exceso o se pueden dañar y
el producto podría fallar. Nunca exceda la Capacidad Máxima de Carga de. Este producto está diseñado para
uso en interiores solamente. Utilizar este producto en exteriores podría causar fallas del producto o lesiones a
individuos. Si necesita ayuda, por favor, llame a Servicio al Cliente de Peerless al 1-800-865-2112.
ADVERTISSEMENT
FRN - Avant de procéder à l'installation, assurez-vous que la surface de support peut soutenir sans danger la
charge totale de l’équipement ainsi que des pièces de fi xation. Les vis doivent être serrées au maximum. Ne
serrez pas trop les vis pour éviter tout risque d'endommager le produit ou de causer sa défaillance. Ne dépassez
jamais la capacité de charge maximale préconisée par. Ce produit est conçu uniquement pour un usage intérieur.
L’utilisation de ce produit à l’extérieur peut causer une défaillance du produit ou des blessures corporelles. Pour
toute assistance, veuillez contacter le service à la clientèle au 1-800-865-2112.
ACHTUNG
DEU - Vergewissern Sie sich vor der Anbringung, dass die tragende Fläche das Gesamtgewicht der Geräte und
der Befestigungsteile tragen kann. Ziehen Sie die Schrauben fest genug an, dass die Wandplatte sicher befestigt
ist, doch ohne sie zu überdrehen. Durch Überdrehen können die Schrauben beschädigt werden, wodurch ihr
Haltevermögen stark reduziert wird. Die maximale Tragfähigkeit darf niemals überschritten werden. Dieses
Produkt ist nur für den Gebrauch innerhalb von Gebäuden bestimmt. Eine Verwendung dieses Produkts im
Freien kann zu Produktausfall oder Personenschaden führen. Falls Sie Unterstützung benötigen, wenden Sie
sich bitte an den Kundendienst unter der Telefonnummer +1-800-865-2112 (innerhalb der USA).
WAARSCHUWING
NEL - Vóór de installatie dient u zich ervan te overtuigen dat het ondersteunende oppervlak het totaalgewicht van
de apparatuur en de hardware kan dragen. Alle schroeven moeten stevig vastzitten. Draai de schroeven niet te
strak aan, want dit zou kunnen resulteren in schade of falen van het product. Het maximale draagvermogen mag
nooit worden overschreden. Dit product is uitsluitend bedoeld voor gebruik binnenshuis. Als dit product buitenshuis wordt gebruikt, zijn falen van het product en letsel bij personen mogelijk. Voor ondersteuning kunt u terecht
bij de afdeling Klantenzorg op 1-800-865-2112 (in de VS).
AVVERTENZA
ITL - Prima di iniziare l’installazione, accertarsi che la superfi cie di sostegno sia capace di sostenere il carico
combinato dell’unità e dei dispositivi di fi ssaggio. Le viti devono essere serrate in maniera salda. Non stringere
eccessivamente, poiché potrebbe verifi carsi un danno o il prodotto non svolgerà la sua funzione. Non superare
mai la capacità di carico massima. Questo prodotto deve essere usato solo in ambienti interni. L’uso di questo
prodotto in ambienti esterni potrebbe causare l’errato funzionamento del prodotto o infortunio alla persona. Per
assistenza, rivolgersi al servizio clienti telefonando al numero verde USA 1-800-865-2112.
VÝSTRAHA
ČEŠ - Před montáží ověřte, zda nosný povrch unese kombinované zatížení zařízení a vybavení. Šrouby je
třeba pevně utáhnout. Šrouby nedotahujte příliš silně, jinak může dojít k poškození nebo poruše zařízení.
Nikdy nepřekračujte maximální nosnost podle. Tento produkt je určen pouze pro použití v interiéru. Při použití
tohoto produktu v exteriéru by mohlo dojít k jeho poruše nebo poranení osob. Podporu získáte v centru podpory
zákazníků na čísle 1-800-865-2112.
VÝSTRAHA
SLK - Pred montážou overte, či nosný povrch unesie kombinované zaťaženie zariadenia a vybavenia. Skrutky
je potrebné pevne utiahnuť. Skrutky nedoťahuje príliš silno, inak môže dôjsť k poškodeniu alebo poruche zariadenia. Nikdy neprekračujte maximálnu nosnosť podľa. Tento produkt je určený len na použitie v interiéri. Pri použití
tohto produktu v exteriéri by mohlo dôjsť k jeho poruche alebo osobnému poraneniu. Podporu získate v centre na
podporu zákazníkov na čísle 1-800-865-2112.
2
2014-01-31 #:203-9370-1

AVISO
POR - Antes da instalação, certifi que-se de que a superfície de suporte suporta a carga combinada do equipa-
mento e das ferragens. Os parafusos têm de ser bem apertados. Não aperte em demasia, pois podem ocorrer
danos ou falha do equipamento. Nunca exceda a capacidade de carga máxima. Este produto destina-se a utilização apenas em ambientes interiores. A utilização deste produto ao ar livre pode conduzir a falha do produto
ou ferimentos pessoais. Para obter assistência, contacte o apoio ao cliente através do número 1-800-865-2112.
UYARI
TÜR - Monte etmeden önce, destekleyen yüzeyin cihaz ve donanımın yükünü taşıyıp taşımayacağını kontrol
edin. Vidalar iyice sıkılmalıdır. Vidaları aşırı sıkmayın aksi takdirde hasar olabilir veya ürün bozulabilir. Asla
Maksimum Yük Kapasitesini aşmayın. Ürün sadece kapalı alanlarda kullanım içindir. Bu ürünün açık havada
kullanılması üründe hasara veya yaralanmaya neden olabilir. Destek için lütfen 1-800-865-2112 numaralı telefondan müşteri hizmetlerini arayın.
ENG
Symbols
ESP
Símbolos
FRN
Symboles
DEU
Symbole
NEL
Symbolen
Simboli
ITL
Symboly
ČEŠ
Symboly
SLK
Símbolos
POR
Semboller
TÜR
ENG
Do not overtighten screws.
ESP
No apriete de más los tornillos.
FRN
Ne pas trop serrer les vis.
DEU
Ziehen Sie die Schrauben nicht zu
fest an.
NEL
Draai de schroeven niet te strak aan.
ITL
Non stringere troppo le viti.
ČEŠ
Šrouby neutahujte příliš silně.
Skrutky neuťahujte príliš silno.
SLK
Não apertar demasiado os parafusos.
POR
Vidaları gereğinden fazla sıkmayın.
TÜR
ENG
WARNING
ESP
ADVERTENCIA
FRN
ADVERTISSEMENT
DEU
ACHTUNG
NEL
WAARSCHUWING
AVVERTENZA
ITL
VÝSTRAHA
ČEŠ
VÝSTRAHA
SLK
AVISO
POR
UYARI
TÜR
ENG
ESP
FRN
DEU
NEL
ITL
ČEŠ
SLK
POR
TÜR
#
Skip to step.
Continúe con el
paso.
Passez à l’étape.
Weiter mit Schritt.
Ga door naar stap.
Vai al passo.
Přeskočte na krok.
Preskočte na krok.
Saltar para o
passo.
Su adıma geç.
x3
Screws must get at least three
ENG
full turns and fi t snug.
ESP
Los tornillos tienen que dar,
por lo menos, tres vueltas
completas y quedar ajustados.
Il faut effectuer au moins trois
FRN
tours de vis complets et bien
serrer les vis.
Schrauben sind mindestens drei
DEU
volle Umdrehungen einzudrehen
und müssen fest anliegen.
NEL
De schroeven moeten ten
minste drie hele slagen worden
aangedraaid en stevig vastzitten.
ITL
Girare tre volte le viti che
devono risultare aderenti.
ČEŠ
Šrouby se musí otočit minimálně
tři plné otáčky a plně dosednout.
SLK
Skrutky sa musia otočiť aspoň
tri celé otáčky a tesne dosadnúť.
POR
Os parafusos devem completar,
no mínimo, três voltas
completas e ajustar-se no local.
Vidalar en az üç tam dönüş
TÜR
yapmalı ve sıkı oturmalıdır.
3
2014-01-31 #:203-9370-1
ENG
Parts (Before beginning, make sure you have all parts shown below).
ESP
Piezas (antes de iniciar, asegúrese de tener todas las piezas siguientes).
FRN
Pièces (avant de commencer, assurez-vous d’avoir toutes les pièces illustrées ci-dessous).
DEU
Teile (Achten Sie vor Beginn der Arbeiten darauf, dass alle unten abgebildeten Teile vorhanden sind).
NEL
Onderdelen (hoort u zich ervan te overtuigen dat u alle onderdelen hebt, die hieronder te zien zijn).
Parti (prima di iniziare, accertarsi di disporre tutte le parti sotto indicate).
ITL
Díly (předtím, než začnete, připravte si všechny díly zobrazené níže).
ČEŠ
Diely (predtým, ako začnete, pripravte si všetky diely zobrazené nižšie).
SLK
Peças (antes de iniciar, certifi que-se de que tem todas as peças apresentadas em baixo).
POR
Parçalar (Başlamadan önce, aşağıda gösterilen bütün parçaların elinizde olduğundan emin olun).
TÜR
Parts List
A ceiling plate 2 100-1082 100-1082
B pole 2 100-5078 100-1078
C support clamp 2 100-1088 100-1088
D concrete anchor 8 590-0321 590-0321
E wood screw 8 520-1243 520-1243
F tilt box 1 100-1112 100-1112
G tilt plate 1 100-1091 100-1091
H horizontal rail 2 100-1085 100-1085
I vertical rail 2 100-1087 100-1087
J M5 x 10mm socket pin screw 8 520-1164 520-1164
K M8 x 15mm screw bolt 8 520-1068 520-1068
L M8 x 55mm screw bolt 4 520-1748 520-1748
M set screw 4 520-0850 520-0850
N 4mm allen wrench 2 560-9646 560-9646
O 5mm allen wrench 2 560-9640 560-9640
P M6 x 80mm screw bolt 2 520-1851 520-1851
Q M5 x 16mm self tapping screw 2 520-9515 520-9515
R M6 hex nut 2 530-1048 530-1048
S support collar 2 not used not used
AA M6 x 12mm screw 4 520-1050 520-1050
BB M6 x 25mm screw 4 520-1211 520-1211
CC M8 x 12mm screw 4 520-1724 520-1724
DD M8 x 25mm screw 4 520-1101 520-1101
EE spacer 8 600-1215 600-1215
FF M6/M8 washer 8 540-9406 540-9406
(2)
A
ceiling plate
MOD-FCS2KIT300
Part #
B (2)
pole
MOD-FCS2KIT300-B
Part #Description Qty
(8)
D
10mm concrete anchor
(2)
C
support clamp
(8)
E
3" wood screw
4
2014-01-31 #:203-9370-1
F
tilt box
(1)
G
tilt plate
(1)
(2)
H
horizontal rail
(2)
I
vertical rail
(2)
N
4mm allen wrench
(4)
AA
M6 x 12mm
(8)
J
M5 x 10mm
(4)
M
set screw
K
M8 x 15mm
O (2)
5mm allen wrench
(4)
BB
M6 x 25mm
(8)
P
M6 x 80mm
Q
M5 x 16mm
(4)
CC
M8 x 12mm
(2)
(2)
(4)
L
M8 x 55mm
(2)
S
support collar
(2)
R
M6 nut
(4)
DD
M8 x 25mm
EE
spacer
(8)
(8)
FF
M6/M8 washer
5
2014-01-31 #:203-9370-1

ENG
Tools Needed for Assembly.
ESP
Herramientas necesarias para el ensamblaje.
FRN
Outils nécessaires au montage.
Für den Zusammenbau erforderliche Werkzeuge.
DEU
Voor montage benodigd gereedschap.
NEL
Attrezzi necessari per l’assemblaggio.
ITL
Nástroje potřebné k montáži.
ČEŠ
Nástroje potrebné na montáž.
SLK
Ferramentas necessárias para a montagem.
POR
Montaj İçin Gerekli Aletler.
TÜR
7/32"
(5.5mm)
3/8"
(10mm)
11/64"
(4.5mm)
To properly tighten screws: Tighten until screw
ENG
head makes contact, then tighten another 1/2
turn. Do not overtighten screws.
ESP
Apriete adecuado de los tornillos: Apriete hasta
que la cabeza del tornillo haga contacto y luego
apriete otra 1/2 vuelta. No apriete de más los
tornillos.
Pour bien serrer les vis : Serrez jusqu’à ce que
FRN
la tête de la vis entre en contact, puis serrez
encore d’un 1/2 tour. Ne serrez pas trop les vis.
Korrektes Festziehen der Schrauben: Ziehen
DEU
Sie die Schrauben fest, bis der Schraubenkopf
Kontakt hat, und dann um eine weitere 1/2
Umdrehung. Ziehen Sie die Schrauben nicht
zu fest an.
Ga als volgt te werk om de schroeven naar
NEL
behoren aan te draaien: Draai de schroef aan
totdat de kop het oppervlak raakt; maak daarna
nog een halve slag. Draai de schroeven niet te
strak aan.
ITL
Per stringere correttamente le viti: stringere fi no
a quando la testa della vite fa contatto, quindi
stringere di un altro 1/2 giro. Non stringere
eccessivamente.
Správné utažení šroubů: Utahujte, dokud se
ČEŠ
šroub nedostane do kontaktu, poté utáhněte
ještě půl otočky. Šrouby neutahujte příliš silně.
Správne utiahnutie skrutiek: Uťahujte, kým sa
SLK
skrutka nedostane do kontaktu, potom utiahnite
ešte pol otočky. Skrutky neuťahujte príliš silno.
POR
Para apertar correctamente os parafusos:
aperte até que a cabeça do parafuso
estabeleça contacto e, em seguida, aperte mais
1/2 volta. Não aperte demasiado os parafusos.
TÜR
Vidaları doğru bir şekilde sıkılamak için: Vida
başı temas edene kadar döndürün, sonra yarım
tur daha döndürün. Vidaları gereğinden fazla
sıkılamayın.
1
(10mm)
7/16"
(11mm)
2
3
+1/2
4
6
2014-01-31 #:203-9370-1
1-1
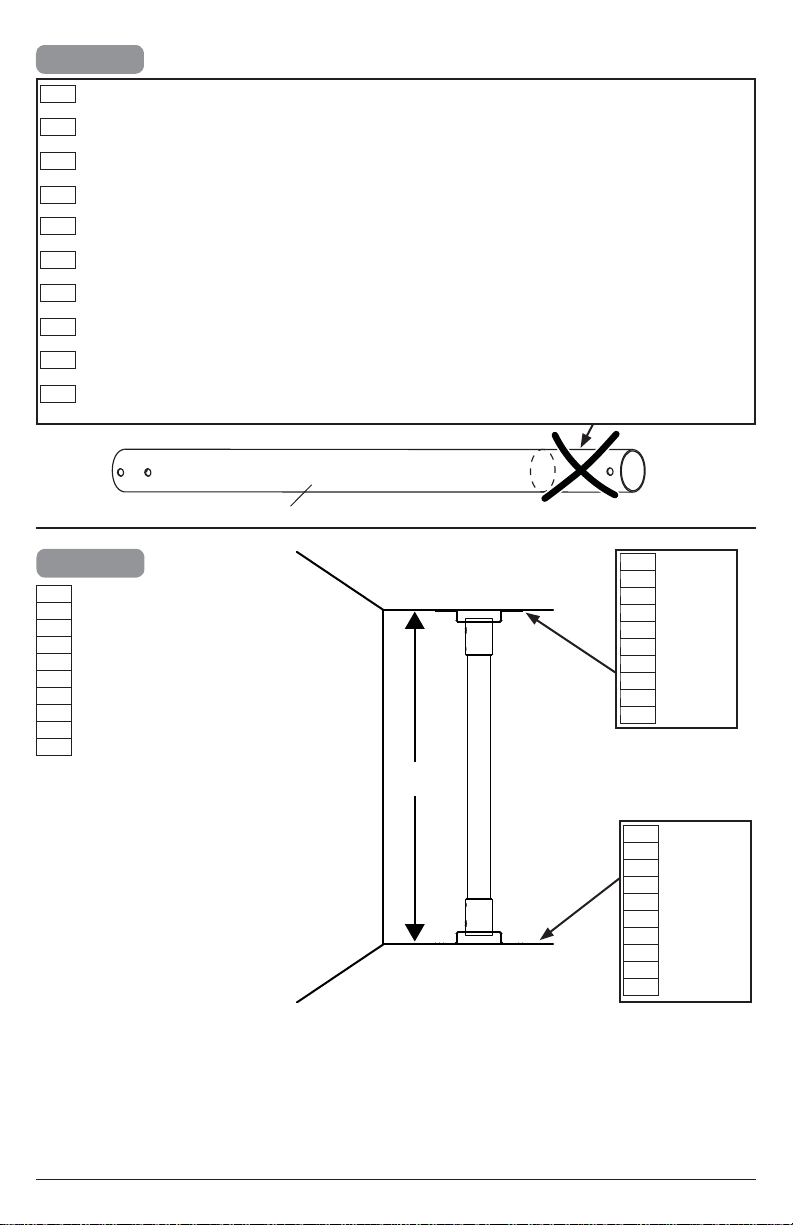
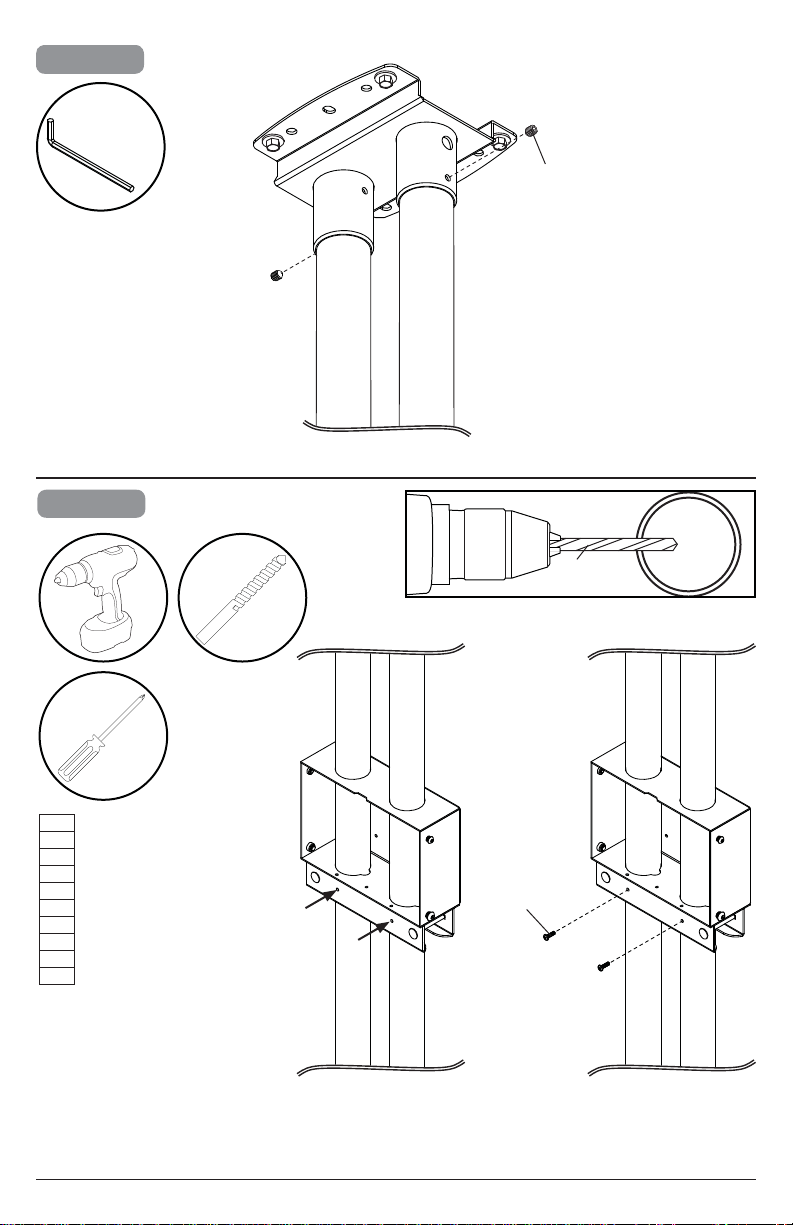
OPTIONAL: Cut pole to desired length. Cut end must be perpendicular to pole within 1/16" (1.5mm). Must
ENG
use drill template MOD-ADF (sold separately) to drill new holes in pole. Refer to accompanying instructions.
OPTIONAL: Cut pole to desired length. Cut end must be perpendicular to pole within 1/16" (1.5mm). Must
ESP
use drill template MOD-ADF (sold separately) to drill new holes in pole. Refer to accompanying instructions.
OPTIONAL: Cut pole to desired length. Cut end must be perpendicular to pole within 1/16" (1.5mm). Must
FRN
use drill template MOD-ADF (sold separately) to drill new holes in pole. Refer to accompanying instructions.
OPTIONAL: Cut pole to desired length. Cut end must be perpendicular to pole within 1/16" (1.5mm). Must
DEU
use drill template MOD-ADF (sold separately) to drill new holes in pole. Refer to accompanying instructions.
OPTIONAL: Cut pole to desired length. Cut end must be perpendicular to pole within 1/16" (1.5mm). Must
NEL
use drill template MOD-ADF (sold separately) to drill new holes in pole. Refer to accompanying instructions.
OPTIONAL: Cut pole to desired length. Cut end must be perpendicular to pole within 1/16" (1.5mm). Must
ITL
use drill template MOD-ADF (sold separately) to drill new holes in pole. Refer to accompanying instructions.
OPTIONAL: Cut pole to desired length. Cut end must be perpendicular to pole within 1/16" (1.5mm). Must
ČEŠ
use drill template MOD-ADF (sold separately) to drill new holes in pole. Refer to accompanying instructions.
OPTIONAL: Cut pole to desired length. Cut end must be perpendicular to pole within 1/16" (1.5mm). Must
SLK
use drill template MOD-ADF (sold separately) to drill new holes in pole. Refer to accompanying instructions.
OPTIONAL: Cut pole to desired length. Cut end must be perpendicular to pole within 1/16" (1.5mm). Must
POR
use drill template MOD-ADF (sold separately) to drill new holes in pole. Refer to accompanying instructions.
OPTIONAL: Cut pole to desired length. Cut end must be perpendicular to pole within 1/16" (1.5mm). Must
TÜR
use drill template MOD-ADF (sold separately) to drill new holes in pole. Refer to accompanying instructions.
B
1-2
ENG
X = Distance from fl oor to ceiling.
ESP
X = Distancia desde el suelo hasta el techo.
FRN
X = Distance entre le plancher et le plafond.
DEU
X = Abstand vom Boden zur Decke.
NEL
X = Afstand van vloer tot plafond.
X = Distanza dal pavimento al soffi tto.
ITL
X = Vzdálenost od podlahy po strop.
ČEŠ
X = Vzdialenosť od podlahy po strop.
SLK
X = Distância do chão ao teto.
POR
X = Yerden tavana kadar mesafe.
TÜR
ENG
ESP
FRN
DEU
NEL
ITL
ČEŠ
SLK
POR
TÜR
CEILING
TECHO
PLAFOND
DECKE
PLAFOND
SOFFITTO
STROP
STROP
TETO
TAVAN
X
ENG
FLOOR
ESP
SUELO
FRN
PLANCHER
BODEN
DEU
VLOER
NEL
PAVIMENTO
ITL
PODLAHA
ČEŠ
PODLAHA
SLK
CHÃO
POR
ZEMİN
TÜR
7
2014-01-31 #:203-9370-1
1-3
ENG
Measure distance from fl oor to ceiling (X), subtract 4-1/8" (105mm) then mark pole and cut away excess
material.
Mida la distancia desde el suelo hasta el techo (X), reste 4-1/8" (105mm), marque el poste y corte el exceso.
ESP
Mesurez la distance entre le plancher et le plafond (X), soustrayez 4-1/8 po (105 mm), puis marquez le
FRN
montant et coupez l’excédent de longueur.
Messen Sie den Abstand vom Boden zur Decke (X), ziehen Sie 105 mm (4-1/8 Zoll) ab, markieren Sie dann
DEU
die Stange und schneiden Sie überschüssiges Material ab.
Meet de afstand van vloer tot plafond (X), trek hiervan 105 mm af, markeer de paal en verwijder het
NEL
overtollige materiaal.
Misurare la distanza dal pavimento al soffi tto (X), sottrarre 105 mm, quindi contrassegnare il paletto e tagliare
ITL
il materiale in eccesso.
Odměřte vzdálenost od podlahy po strop (X), odpočítejte 4-1/8" (105 mm), potom poznačte tyč a odřežte
ČEŠ
nadbytečný materiál.
SLK
Odmerajte vzdialenosť od podlahy po strop (X), odpočítajte 4-1/8" (105 mm), potom poznačte tyč a odrežte
nadbytočný materiál.
POR
Meça a distância do chão ao teto (X), subtraia 105 mm e, em seguida, marquee o poste e corte o excesso.
TÜR
Yerden tavana kadar mesafeyi (X) ölçün, 4-1/8 inç (105mm) çıkarın, sonra direği işaretlemek ve fazla
malzemeyi kesin.
X - 4⅛" (105mm)
B
8
2014-01-31 #:203-9370-1
2
ENG
Wood joist/beam
ESP
Vigueta de madera
FRN
Solive de bois
Holzbalken
DEU
Houten dwarsbalk
NEL
Travetto di legno
ITL
Dřevěný nosník
ČEŠ
Drevený nosník
SLK
Trave de madeira
POR
Ahşap kiriş
TÜR
ENG
Concrete Ceiling
ESP
Techo de concreto
FRN
Plafond en béton
Betondecke
DEU
Plafond van beton
NEL
Soffi tto in calcestruzzo
ITL
Betonový strop
ČEŠ
Betónový strop
SLK
Teto em betão
POR
Beton tavan
TÜR
2a-1
2a-2
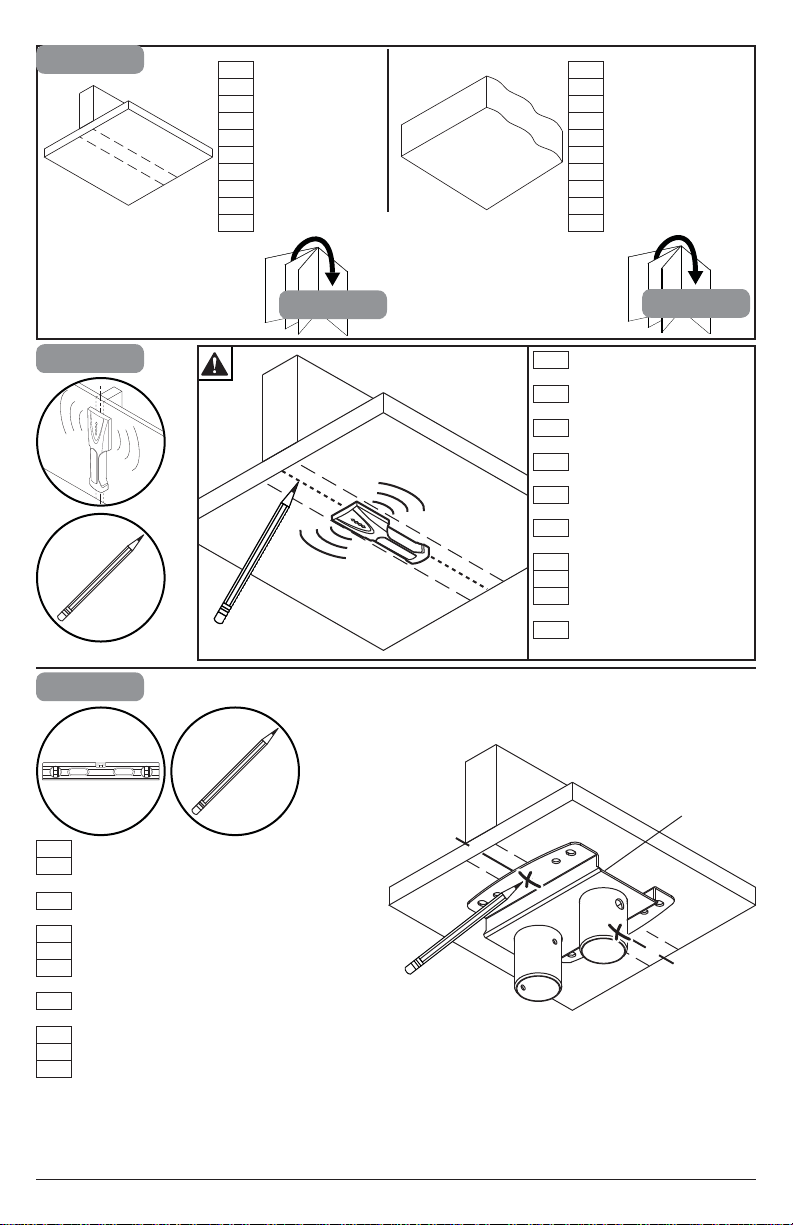
ENG
Mark mounting holes on stud center lines.
ESP
Marque los orifi cios de montaje en las líneas
centrales del montante.
Marquez les trous de fi xation le long de la ligne
FRN
médiane du montant.
Markieren Sie die Montagelöcher auf den
DEU
Ständer-Mittellinien.
NEL
Markeer montagegaten op het midden van de
ITL
balken.
ČEŠ
Contrassegna i fori di montaggio sulle linee
centrali dei montanti.
Na střední linii stěny vyznačte montážní otvory.
SLK
Na stredné čiary steny vyznačte montážne otvory.
POR
Marque os furos de montagem nas linhas
TÜR
centrais da escora.
Direk merkez hatları üzerinde montaj deliklerini
işaretleyin.
2a-1
ENG
Use stud fi nder to locate and
mark stud center lines.
Marque las líneas centrales
ESP
del montante.
Marquez la ligne médiane du
FRN
montant.
Markieren Sie die
DEU
Ständer-Mittellinien.
Markeer het midden van de
NEL
balken.
ITL
Contrassegna le linee
centrali dei montanti.
ČEŠ
Vyznačte střední linii stěny.
Vyznačte stredné čiary steny.
SLK
Marque as linhas centrais da
POR
escora.
Direk merkez hatlarını
TÜR
işaretleyin.
2b
A
9
2014-01-31 #:203-9370-1

2a-3
7/32"
(5.5mm)
ENG
Drill mounting holes into supporting surface
(3" (76mm) minimum depth required).
ESP
Taladre los agujeros de montaje en la superfi cie
de apoyo; se requiere una profundidad mínima de
3" (76mm).
FRN
Percez les trous de fi xation dans la surface
de support, une profondeur minimale de
3 po (76mm) est requise.
Bohren Sie Montagelöcher in die Montagefl äche;
DEU
Mindesttiefe von 76mm (3 Zoll) erforderlich.
NEL
Boor montagegaten in het ondersteunende
oppervlak met een diepte van ten minste 76mm.
ITL
Trapanare I fori di sostegno nella superfi cie di sup-
porto; profondità minima richiesta 76mm (3").
ČEŠ
Vyvrtejte montážní otvory do nosné plochy,
minimální požadovaná hloubka je 76mm (3").
SLK
Navŕtajte montážne otvory do nosnej plochy,
minimálna vyžadovaná hĺbka je 76mm (3").
Perfure os furos de montagem na superfície de
POR
apoio, 76mm de profundidade mínima necessária.
TÜR
Montaj deliklerini destekleyici yüzeye delin,
76mm (3 inç) minimum derinlik gereklidir.
2a-4
3"
(76mm)
7/32"
(5.5mm)
Mounting hole must center
ENG
on stud.
El orifi cio debe quedar
ESP
centrado en el montante.
Le trou doit être centré sur le
FRN
montant.
Das Loch muss am Ständer
DEU
zentriert sein.
NEL
Boorgat moet midden op de
balk liggen.
ITL
Il foro trapanato deve
centrarsi sul montante.
ČEŠ
Vyvrtaný otvor musí být v
středě stěny.
SLK
Vyvŕtaný otvor musí byť v
strede steny.
POR
O furo tem de ser perfurado
no centro da escora.
TÜR
Açılan delik direğin tam
merkezinde olmalıdır.
ENG
Install using wood screws provided.
ESP
Nivele e instale.
FRN
Mettez à niveau et procédez au montage.
Waagerecht ausrichten und anbringen.
DEU
Installeer de schroeven waterpas.
NEL
Livella e installa.
ITL
Vyrovnejte a namontujte.
ČEŠ
Vyrovnajte a namontujte.
SLK
Nivelar e instalar.
POR
Dengeleyin ve takın.
TÜR
ENG
Maximum 80 in-lb (9 Nm).
ESP
Máxima 80 in-lb (9 Nm).
FRN
Maximum 80 in-lb (9 Nm).
DEU
Maximale 80 in-lb (9 Nm).
NEL
Maximale 80 in-lb (9 Nm).
Massima 80 in-lb (9 Nm).
ITL
Maximální 80 in-lb (9 Nm).
ČEŠ
Maximálnu 80 in-lb (9 Nm).
SLK
Máxima 80 in-lb (9 Nm).
POR
Maksimum 80 in-lb (9 Nm).
TÜR
7/16"
(11mm)
10
A
E (2)
3-1
2014-01-31 #:203-9370-1

2b
WARNING
ENG • Never attach concrete expansion anchors to concrete covered with plaster, drywall, or other fi nishing
material.
ADVERTENCIA
SPN • Nunca fi je los anclajes de expansión para concreto a una pared de concreto recubierta con yeso, yeso-
cartón u otro material de acabado.
ADVERTISSEMENT
FRN • Ne fi xez jamais des chevilles à expansion pour béton à du béton recouvert d’une couche de plâtre, d’une
cloison sèche ou de tout autre matériau de fi nition.
ACHTUNG
DEU • Betonspreizdübel dürfen auf keinen Fall an Beton befestigt werden, der mit Verputz, Trockenwandmaterial
oder anderem Deckschichtmaterial bedeckt ist.
WAARSCHUWING
NEL • Gebruik nooit expansie-ankers voor beton bij montage op een betonnen muur bedekt met gips, gipsplaat
of ander afwerkingsmateriaal.
AVVERTENZA
ITL • Non fi ssare mai ancoraggi ad espansione per calcestruzzo su calcestruzzo coperto con intonaco, carton-
gesso o altro materiale di fi nitura.
VÝSTRAHA
ČEŠ • Nikdy nenasazujte betonové rozšiřující konzoly na beton pokrytý sádrokartonem, suchou stěnou nebo
jiným povrchovým materiálem.
VÝSTRAHA
SLK • Nikdy nenasadzujte betónové rozširujúce konzoly na betón pokrytý sadrokartónom, suchou stenou či iným
povrchovým materiálom.
AVISO
POR • Nunca afi xe âncoras de expansão para betão a betão coberto com estuque ou outros materiais de aca-
bamento.
UYARI
TÜR • Asla beton genişletme demirlerini alçı, alçıpan ya da diğer kaplama malzemesi ile kaplı duvarlara
takmayın.
11
2014-01-31 #:203-9370-1

2b-1
ENG
Mark mounting holes.
ESP
Marque los orifi cios de montaje.
FRN
Marquez les trous de fi xation.
Markieren Sie die Montagelöcher.
DEU
Markeer montagegaten.
NEL
Contrassegna I fori di montaggio.
ITL
Vyznačte montážní otvory.
ČEŠ
Vyznačte montážne otvory.
SLK
Marque os furos de montagem.
POR
Montaj deliklerini işaretleyin.
TÜR
A
2b-2
3/8"
(10mm)
ENG
Drill mounting holes into supporting surface (3" (76mm)
minimum depth required).
ESP
Taladre los agujeros de montaje en la superfi cie de apoyo; se
requiere una profundidad mínima de 3" (76mm).
Percez les trous de fi xation dans la surface de support, une
FRN
profondeur minimale de 3 po (76mm) est requise.
Bohren Sie Montagelöcher in die Montagefl äche; Mindesttiefe
DEU
von 76mm (3 Zoll) erforderlich.
Boor montagegaten in het ondersteunende oppervlak met een
NEL
diepte van ten minste 76mm.
ITL
Trapanare I fori di sostegno nella superfi cie di supporto;
profondità minima richiesta 76mm (3").
Vyvrtejte montážní otvory do nosné plochy, minimální
ČEŠ
požadovaná hloubka je 76mm (3").
SLK
Navŕtajte montážne otvory do nosnej plochy, minimálna
vyžadovaná hĺbka je 76mm (3").
Perfure os furos de montagem na superfície de apoio, 76mm
POR
de profundidade mínima necessária.
Montaj deliklerini destekleyici yüzeye delin, 76mm (3 inç)
TÜR
minimum derinlik gereklidir.
3"
(76mm)
3/8"
(10mm)
12
2014-01-31 #:203-9370-1

2b-3
D (4)
2b-42b-4
ENG
Install using concrete anchors and wood screws provided.
ESP
Nivele e instale.
FRN
Mettez à niveau et procédez au montage.
Waagerecht ausrichten und anbringen.
DEU
Installeer de schroeven waterpas.
NEL
Livella e installa.
ITL
Vyrovnejte a namontujte.
ČEŠ
Vyrovnajte a namontujte.
SLK
Nivelar e instalar.
POR
Dengeleyin ve takın.
TÜR
D
ENG
Insert anchor fl ush to concrete.
ESP
Inserte el anclaje a ras con el
concreto.
Insérez la cheville d’ancrage au
FRN
ras du béton.
DEU
Setzen Sie den Dübel bündig mit
dem Beton abschließend ein.
NEL
Breng anker aan gelijk met
beton.
ITL
Inserire il fermo a paro col
calcestruzzo.
ČEŠ
Přestrčte ukotvenia priamo do
betónu.
Prestrčte ukotvenia priamo do
SLK
betónu.
Introduza a bucha encastrada
POR
no betão.
Tespit demirini betona takın.
TÜR
(11mm)
7/16"
ENG
Maximum 80 in-lb (9 Nm).
ESP
Máxima 80 in-lb (9 Nm).
FRN
Maximum 80 in-lb (9 Nm).
DEU
Maximale 80 in-lb (9 Nm).
NEL
Maximale 80 in-lb (9 Nm).
Massima 80 in-lb (9 Nm).
ITL
Maximální 80 in-lb (9 Nm).
ČEŠ
Maximálnu 80 in-lb (9 Nm).
SLK
Máxima 80 in-lb (9 Nm).
POR
Maksimum 80 in-lb (9 Nm).
TÜR
E (4)
13
A
2014-01-31 #:203-9370-1
3-1
3-3
N
4mm wrench
3-2
F
(10mm)
R (2)
J
C
F
C
P (2)
B (2)
4-1
A
14
A
2014-01-31 #:203-9370-1

4-2
O
5mm wrench
4-3
M (2)
L (2)
ENG
Level, mark mounting holes then refer to step 2a or 2b to
secure mounting plate to fl oor.
ESP
Nivele, marque los agujeros de montaje y consulte el paso
2a o 2b para fi jar la placa de montaje en el suelo.
Mettez-la à niveau, marquez les trous de fi xation, puis
FRN
reportez-vous aux étapes 2a ou 2b pour fi xer la plaque de
montage au plancher.
DEU
Richten Sie die Montageplatte waagerecht aus, markieren
Sie die Montagelöcher und fahren Sie dann mit Schritt
2a oder 2b fort, um die Montageplatte am Boden zu
befestigen.
Zorg ervoor dat het geheel waterpas staat, markeer de
NEL
montagegaten en zie dan stap 2a of 2b voor de montage
van de bevestigingsplaat op de vloer.
Livellare, contrassegnare i fori di montaggio, quindi vedere
ITL
il passo 2a oppure 2b per fi ssare la piastra di montaggio al
pavimento.
Vyrovnejte, vyznačte montážní otvory a potom podle kroku
ČEŠ
2a anebo 2b zajistěte montážní desku k podlaze.
Vyrovnajte, vyznačte montážne otvory a potom podľa kroku
SLK
2a alebo 2b zaistite montážnu dosku k podlahe.
Nivele, marque o furos de montagem e, em seguida,
POR
consulte o passo 2a ou 2b para obter a montagem segura
da chapa ao chão.
Düzeltin, montaj deliklerini işaretleyin,
TÜR
sonra montaj plakasını yere
sabitlemek için 2a veya 2b. adıma
başvurun.
2a/2b
15
2014-01-31 #:203-9370-1
4-4
O
5mm wrench
5
M (2)
ENG
Drill hole
ESP
Perforar hoyos
FRN
Percez un trou
DEU
Bohrloch
Boren gat
NEL
Perforare il pozzo
ITL
Vyvrtaný otvo
ČEŠ
Vyvŕtaný otvo
SLK
Perfurar buraco
POR
Matkap delik
TÜR
11/64"
(4.5mm)
11/64"
(4.5mm)
Q (2)
16
2014-01-31 #:203-9370-1
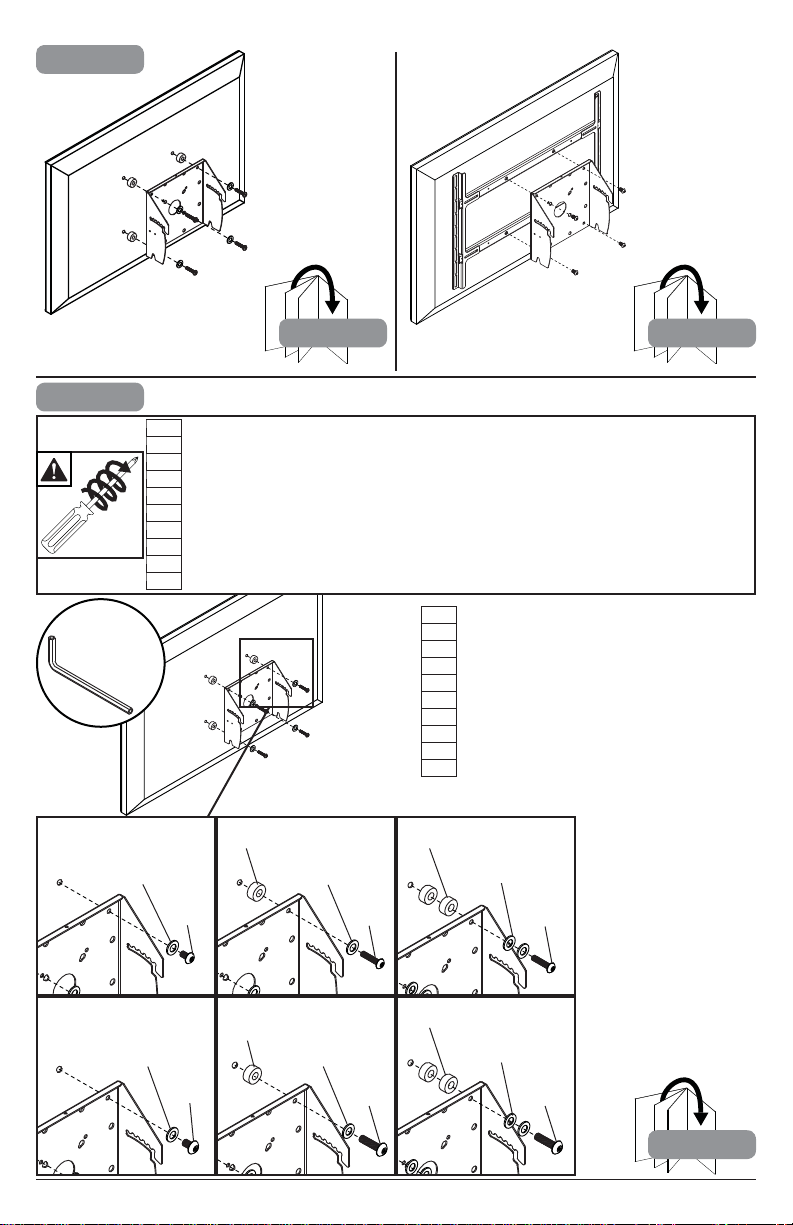
6
6a
x3
N
4mm wrench
6a 6b-1
ENG
Screws must get at least three full turns and fi t snug.
ESP
Los tornillos tienen que dar, por lo menos, tres vueltas completas y quedar ajustados.
FRN
Il faut effectuer au moins trois tours de vis complets et bien serrer les vis.
DEU
Schrauben sind mindestens drei volle Umdrehungen einzudrehen und müssen fest anliegen.
NEL
De schroeven moeten ten minste drie hele slagen worden aangedraaid en stevig vastzitten.
Girare tre volte le viti che devono risultare aderenti.
ITL
Šrouby se musí otočit minimálně tři plné otáčky a plně dosednout.
ČEŠ
Skrutky sa musia otočiť aspoň tri celé otáčky a tesne dosadnúť.
SLK
Os parafusos devem completar, no mínimo, três voltas completas e ajustar-se no local.
POR
Vidalar en az üç tam dönüş yapmalı ve sıkı oturmalıdır.
TÜR
ENG
Use of spacers is OPTIONAL.
ESP
Uso de espaciadores OPCIONAL.
FRN
FACULTATIF utilisation d’entretoises.
OPTIONAL Verwendung von Abstandhaltern.
DEU
FACULTATIEF gebruik van tussenringen.
NEL
Uso OPZIONALE di distanziatori.
ITL
VOLITELNÉ použití rozpěr.
ČEŠ
VOLITEĽNÉ použitie rozpierok.
SLK
OPCIONAL utilize espaçadores.
POR
Ayırıcıların İSTEĞE BAĞLI kullanımı.
TÜR
FF
FF
EE EE (2)
FF
AA
EE
FF
CC
BB
DD
EE (2)
17
FF (2)
BB
FF (2)
DD
7
2014-01-31 #:203-9370-1

6b-1
ENG
Center adapter brackets vertically on back of screen.
ESP
Centre verticalmente los soportes en la pantalla.
FRN
Centrez les supports à la verticale de l’écran.
Richten Sie die Halterungen senkrecht mittig an der
DEU
Bildschirm.
Centreer de beugels verticaal op de van het scherm.
NEL
centra le staffe verticalmente sul dello schermo.
ITL
vycentrujte konzoly svisle na zadní obrazovky.
ČEŠ
vycentrujte konzoly zvisle na obrazovky.
SLK
centre os suportes verticalmente no do ecrã.
POR
dirsekleri ekranın arkasına dikey olarak ortalayın.
TÜR
VESA 300 X 200,
300 X 300, 300 X 400:
I
6b-2
N
4mm wrench
I
VESA 400 X 200,
400 X 400, 600 X 400:
XX
I
XX
ENG
Use of spacers is OPTIONAL.
ESP
Uso de espaciadores OPCIONAL.
FRN
FACULTATIF utilisation d’entretoises.
OPTIONAL Verwendung von
DEU
Abstandhaltern.
FACULTATIEF gebruik van
NEL
tussenringen.
Uso OPZIONALE di distanziatori.
ITL
VOLITELNÉ použití rozpěr.
ČEŠ
VOLITEĽNÉ použitie rozpierok.
SLK
OPCIONAL utilize espaçadores.
POR
Ayırıcıların İSTEĞE BAĞLI kullanımı.
TÜR
I
FF
AA
FF
CC
EE
FF
BB
FF
EE (2)EE
EE (2)
18
FF (2)
BB
FF (2)
DDDD
2014-01-31 #:203-9370-1

6b-3
6b-4
N
4mm wrench
H (2)
K (4)
6b-5
4mm wrench
N
J (4)
19
K (4)
2014-01-31 #:203-9370-1
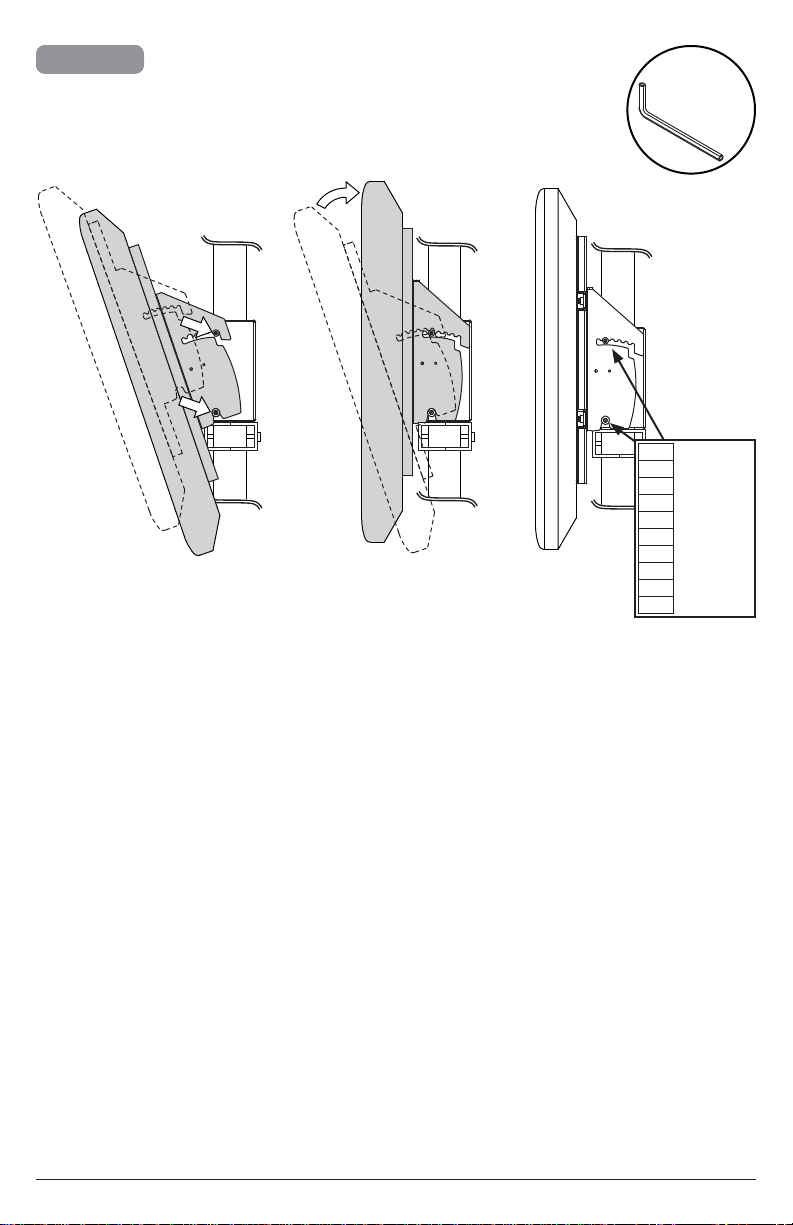
7
+20°/-5°
4mm wrench
ENG
Tighten.
ESP
Apretar.
FRN
Serrer.
Anziehen.
DEU
Aandraaien.
NEL
Stringere.
ITL
Utáhněte.
ČEŠ
Utiahnite.
SLK
Apertar.
POR
Sıkmak.
TÜR
N
20
2014-01-31 #:203-9370-1

Peerless Industries, Inc. (“Peerless”) warrants to original end-users of Peerless® products will be free from defects in material and
LIMITED FIVE-YEAR WARRANTY
workmanship, under normal use, for a period of fi ve years from the date of purchase by the original end-user (but in no case longer than
six years after the date of the product's manufacture). At its option, Peerless will repair or replace, or refund the purchase price of, any
product which fails to conform with this warranty.
In no event shall the duration of any implied warranty of merchantability or fi tness for a particular purpose be longer than the
period of the applicable express warranty set forth above. Some states do not allow limitations on how long a implied warranty lasts,
so the above limitation may not apply to you.
This warranty does not cover damage caused by (a) service or repairs by the customer or a person who is not authorized for such service
or repairs by Peerless, (b) the failure to utilize proper packing when returning the product, (c) incorrect installation or the failure to follow
Peerless' instructions or warnings when installing, using or storing the product, or (d) misuse or accident, in transit or otherwise, including
in cases of third party actions and force majeure.
In no event shall Peerless be liable for incidental or consequential damages or damages arising from the theft of any product,
whether or not secured by a security device which may be included with the Peerless
exclusion or limitation of incidental or consequential damages, so the above limitation or exclusion may not apply to you.
This warranty is in lieu of all other warranties, expressed or implied, and is the sole remedy with respect to product defects. No dealer,
distributor, installer or other person is authorized to modify or extend this Limited Warranty or impose any obligation on Peerless in
connection with the sale of any Peerless
This warranty gives specifi c legal rights, and you may also have other rights which vary from state to state.
®
product.
®
product. Some states do not allow the
Peerless Industries, Inc. (Peerless) les garantiza a los usuarios fi nales originales de los productos Peerless® que los productos Peerless®
estarán libres de defectos de materiales o de manufactura, en condiciones de uso normal, durante un periodo de cinco (5) años a partir de
la fecha en la que el usuario fi nal original compre cualquier producto (pero, en ningún caso, durante un periodo mayor de 6 años después
de la fecha de manufactura del producto). Queda a la discreción de Peerless, reparar, reemplazar o rembolsar el precio de compra de
cualquier producto que no cumpla esta garantía.
La duración de toda garantía implícita de comerciabilidad o de idoneidad para un propósito en particular no sobrepasará en caso
alguno el periodo de vigencia de la garantía explícita correspondiente indica en lo anterior. Algunos Estados no permiten que
se establezcan limitaciones en relación con el periodo de duración de una garantía implícita, de manera que es posible que la
limitación expuesta en lo anterior no sea pertinente a usted.
Esta garantía no cubre daños causados por (a) trabajos de mantenimiento o de reparación hechos por el cliente o alguna persona que
no esté autorizada por Peerless para realizar dichos trabajos de mantenimiento o de reparación, (b) no empacar el producto como es
debido si lo devuelve, (c) hacer una instalación incorrecta o no seguir las instrucciones o las advertencias de Peerless al instalar, utilizar
o guardar el producto o (d) el mal uso o los accidentes, en tránsito o en otras circunstancias, incluidos los casos relacionados con las
acciones de terceros o una fuerza mayor.
Peerless no tendrá responsabilidad en ningún caso de daños y perjuicios incidentales o indirectos o de daños y perjuicios que
surjan por el robo de cualquier producto, ya sea que el mismo esté o no esté asegurado con un dispositivo de seguridad que
se haya incluido con el producto de Peerless®. Algunos Estados no permiten que se excluyan o se establezcan limitaciones en
relación con los daños y perjuicios incidentales o indirectos, de manera que es posible que la limitación o la exclusión expuesta
en lo anterior no sea pertinente a usted.
Esta garantía remplaza toda otra garantía, expresa o implícita, y es el único recurso en lo que respecta a los defectos del producto.
Ningún concesionario, distribuidor, instalador ni ninguna otra persona está autorizada a modifi car o extender esta Garantía Limitada ni a
imponer obligación alguna a Peerless en relación con la venta de cualquier producto de Peerless®.
Esta garantía concede derechos específi cos creados por ley y es posible que usted, además, tenga otros derechos que varían de acuerdo
con el Estado donde se encuentre.
GARANTIE LIMITÉE DE CINQ ANS
Peerless Industries, Inc. (« Peerless ») garantit aux utilisateurs fi naux d’origine des produits PeerlessMD que lesdits produits ne
présenteront aucun défaut de matériau ou de main-d’œuvre, dans la mesure où ils sont utilisés normalement, pendant une période de
cinq ans à compter de la date d’achat par l’utilisateur fi nal d’origine (mais en aucun cas plus de six ans après la date de fabrication du
produit). Peerless, à sa discrétion, réparera ou remplacera tout produit non conforme aux termes de cette garantie, ou en remboursera
le prix d’achat.
La durée de toute garantie implicite de qualité commerciale ou d'application à un usage particulier n'excédera en aucun cas la
durée de la garantie applicable expressément stipulée plus haut. Certains états ou provinces n’autorisent pas la limitation de la
durée d’une garantie implicite, et la limitation ci-dessus peut donc ne pas vous être applicable.
Cette garantie ne couvre pas les dommages causés par (a) un entretien ou des réparations effectués par l'acheteur ou une personne non
autorisée par Peerless à effectuer un tel entretien ou de telles réparations, (b) un emballage inadéquat lors de l’expédition d’un produit
retourné, (c) une installation incorrecte ou le non-respect des instructions ou mises en garde de Peerless lors de l'installation, l'utilisation ou
le rangement du produit, ou (d) une mauvaise utilisation ou un accident survenu lors d’un transport ou autrement, y compris l'intervention
de tiers et les cas de force majeure.
Peerless ne peut en aucun cas être tenu responsable de quelque dommage accessoire ou indirect que ce soit ni de dommages
résultant du vol d’un quelconque produit, que celui-ci ait été ou non protégé par un dispositif de sécurité intégré à un produit
PeerlessMD. Certains états ou provinces n’autorisent pas l'exclusion ou la restriction des dommages accessoires ou indirects,
et il est possible que les restrictions ou exclusions ci-dessus ne s'appliquent pas à votre cas.
Les dispositions de cette garantie remplacent toute autre garantie expresse ou implicite et constituent le seul recours possible en cas de
défectuosité d’un produit. Aucun marchand, distributeur, installateur ou autre personne n’est autorisé à modifi er ou étendre la portée de
cette garantie limitée, ni à imposer quelque obligation ce que soit à Peerless en ce qui concerne la vente de tout produit PeerlessMD.
Cette garantie offre des droits juridiques particuliers auxquels peuvent s’ajouter d’autres droits, susceptibles de varier d’une province ou
d’un état à l’autre.
GARANTÍA LIMITADA DE CINCO AÑOS
21
2014-01-31 #:203-9370-1

Peerless Industries, Inc. („Peerless”) übernimmt gegenüber den ursprünglichen Endnutzern von Peerless®-Produkten die Gewährleistung,
BESCHRÄNKTEN FÜNFJÄHRIGEN GARANTIE
dass diese unter normalen Einsatzbedingungen für fünf Jahre ab Datum des Kaufs durch den ursprünglichen Endnutzer (aber in keinem
Fall länger als sechs Jahre nach Herstellungsdatum des Produkts) frei von Material- und Verarbeitungsfehlern sind. Peerless repariert
oder ersetzt nach eigenem Ermessen ein Produkt, das dieser Garantie nicht entspricht, oder erstattet den Kaufpreis dafür.
In keinem Fall überschreitet die Dauer einer stillschweigenden Garantie der handelsüblichen Qualität oder Eignung für einen
bestimmten Zweck den Zeitraum der zutreffenden oben angegebenen ausdrücklichen Garantie. Manche Staaten lassen
Begrenzungen der Dauer für stillschweigende Garantien nicht zu; die obige Begrenzung trifft also eventuell nicht auf Sie zu.
Diese Garantie gilt nicht bei Schäden, die aufgrund folgender Ursachen entstanden: (a) Wartung oder Reparatur durch den Kunden
oder einer Person, die nicht von Peerless für die Durchführung solcher Wartungs- oder Reparaturarbeiten autorisiert wurde, (b)
Nichtverwendung von geeigneter Verpackung bei der Rücksendung des Produkts, (c) falsche Installation oder Nichtbefolgung bzw.
Nichtbeachtung von Peerless-Anweisungen oder -Warnhinweisen bei der Installation, Verwendung oder Lagerung des Produkts oder (d)
Missbrauch oder Unfall, während des Transports oder anderweitig, einschließlich Handlungen Dritter und höherer Gewalt.
Auf keinen Fall haftet Peerless für Neben- oder Folgeschäden oder für Schäden, die aus dem Diebstahl eines Produkts entstehen,
unabhängig davon, ob das Peerless®-Produkt durch eine mitgelieferte Sicherheitsvorrichtung gesichert war oder nicht. Manche
Staaten lassen den Ausschluss oder die Beschränkung von Neben- oder Folgeschäden nicht zu; die obige Begrenzung trifft also
eventuell nicht auf Sie zu.
Diese Garantie gilt anstelle von allen anderen ausdrücklichen oder stillschweigenden Garantien und ist das alleinige Rechtsmittel bei
Produktdefekten. Kein Vertriebs- oder sonstiger Händler und keine mit der Installation beauftragte oder sonstige Person ist befugt, diese
beschränkte Garantie zu ändern oder zu verlängern oder Peerless irgendwelche Verpfl ichtungen in Zusammenhang mit dem Verkauf
eines Peerless®-Produkts aufzuerlegen.
Diese Garantie verleiht Ihnen bestimmte gesetzliche Rechte, und Sie verfügen u. U. über weitere Rechte, die sich von Staat zu Staat
unterscheiden können.
Peerless Industries, Inc. ('Peerless') biedt de oorspronkelijke eindgebruiker van Peerless®-producten de garantie dat deze producten
bij normaal gebruik vrij zijn van defecten in materiaal en fabricage gedurende een periode van vijf jaar vanaf de aankoopdatum door de
oorspronkelijke eindgebruiker (maar in geen enkel geval langer dan zes jaar na de fabricagedatum). Peerless zal, naar eigen goeddunken,
alle producten die niet aan deze garantie voldoen repareren of vervangen, dan wel de aankoopprijs ervan terugbetalen.
Onder geen enkele omstandigheid is de duur van enigerlei impliciete garantie van verkoopbaarheid of geschiktheid voor een
bepaald doel langer dan de duur van de hierboven uiteengezette expliciete garantie. In sommige rechtsgebieden zijn beperkingen
op de duur van een impliciete garantie niet toegestaan; de bovengenoemde beperking is dus mogelijk niet op u van toepassing.
Deze garantie is niet van toepassing op schade die wordt veroorzaakt door (a) service of reparaties die zijn verricht door de klant of
door een andere persoon die niet door Peerless gemachtigd is om dergelijke service of reparaties te verrichten, (b) het onjuist en/of
onvoldoende verpakken van het product wanneer het wordt geretourneerd, (c) de onjuiste installatie of het niet navolgen van de door
Peerless verschafte aanwijzingen of waarschuwingen tijdens de installatie, het gebruik of de opslag van het product of (d) verkeerd gebruik
of ongelukken, tijdens het transport of anderszins, met inbegrip van handelingen door derden en gevallen van force majeure.
Onder geen enkel beding kan Peerless aansprakelijk worden gesteld voor incidentele schade of gevolgschade of schade ten
gevolge van de diefstal van enigerlei product, ongeacht of dit uitgerust is met een beveiligingsvoorziening, die mogelijk bij
het Peerless®-product wordt geleverd. In sommige rechtsgebieden is de uitsluiting of beperking van incidentele schade of
gevolgschade niet toegestaan; de bovengenoemde beperking of uitsluiting is mogelijk dus niet op u van toepassing.
Deze garantie vervangt alle andere garanties, expliciet of impliciet, en is het enige verhaal in geval van defecten aan het product. Geen
enkele dealer, distributeur, installateur of andere persoon is gemachtigd om deze beperkte garantie aan te passen of te verlengen of om
aan Peerless enigerlei verplichting op te leggen in verband met de verkoop van enigerlei Peerless®-product.
Deze garantie geeft u specifi eke wettelijke rechten en u kunt mogelijk ook andere rechten hebben, die van land tot land en van staat tot
staat kunnen verschillen.
GARANZIA QUINQUENNALE LIMITATA
Peerless Industries, Inc. (“Peerless”) garantisce agli utenti fi nali originali di prodotti Peerless® che detti prodotti saranno privi di difetti nei
materiali e nella lavorazione, in condizioni d'uso normali, per un periodo di cinque anni dalla data d'acquisto da parte dell'utente fi nale
originale (in ogni caso, non oltre sei anni dalla data di produzione del prodotto). A sua discrezione, Peerless sostituirà o riparerà, o
restituirà il prezzo pagato, il prodotto non conforme a questa garanzia.
In nessun caso la durata di garanzie implicite di commerciabilità o idoneità ad uno scopo particolare non sarà più lunga del
periodo dell’applicabile garanzia espresso, come sopra indicato. Alcuni stati non consentono limitazioni alla durata delle
garanzie implicite; pertanto, la suddetta limitazione potrebbe non riguardare tutti gli utenti.
Questa garanzia non copre danni causati da (a) manutenzione o riparazione eseguita dal cliente o da persona non autorizzata dalla
Peerless ad eseguire interventi di manutenzione o riparazione, (b) non utilizzo dell‘imballaggio corretto in occasione di restituzione del
prodotto, (c) installazione scorretta o inosservanza delle istruzioni o delle avvertenze fornite dalla Peerless in sede di installazione, uso o
conservazione del prodotto, oppure (d) uso improprio o incidente, in transito o in altra circostanza, compresi i casi di azioni compiute da
terzi e causa di forza maggiore.
In nessun caso Peerless sarà responsabile di danni incidentali o consequenziali, o danni derivanti dal furto di un prodotto, anche
se il prodotto sia o no protetto da un dispositivo di sicurezza eventualmente fornito con il prodotto Peerless®. Alcuni stati non
consentono l’esclusione o la limitazione di danni incidentali o consequenziali; pertanto, la suddetta limitazione o esclusione
potrebbe non riguardare tutti gli utenti.
Questa garanzia sostituisce ogni altra garanzia, espresso o implicita, ed è l’unico rimedio per i difetti di un prodotto. Nessun rivenditore,
distributore, installatore o altra persona è autorizzata a modifi care o estendere questa Garanzia Limitata, o imporre altre responsabilità alla
Peerless in relazione alla vendita di un prodotto Peerless®.
Questa garanzia conferisce diritti di legge specifi ci; l’utente può avere altri diritti diversi da stato a stato.
BEPERKTE GARANTIE VAN 5 JAAR
22
2014-01-31 #:203-9370-1

Peerless Industries, Inc. (“Peerless”) zaručuje původním koncovým uživatelům výrobků Peerless®, že budou bez vad na materiálu a
OMEZENÁ PĚTILETÁ ZÁRUKA
provedení, za podmínky běžného používání, po dobu pěti let od data nákupu původním koncovým uživatelem (ale v žádném případě ne
déle než šest let po datu výroby výrobku). Společnost Peerless dle své volby opraví nebo vymění, anebo proplatí cenu nákupu jakéhokoliv
výrobku, který nebude v pořádku ve stavu, který tato záruka pokrývá.
V žádném případě nebude trvání jakékoliv implicitní záruky prodejnosti nebo vhodnosti pro určitý účel delší než doba použitelné
explicitní záruky, která je uvedena výše. Některé státy neumožňují omezení toho, jak dlouho může implicitní záruka trvat, takže
výše uvedené omezení se na vás nemusí vztahovat.
Tato záruka nepokrývá škody způsobené (a) servisem nebo opravami provedeným/i zákazníkem nebo osobou, která nemá autorizaci pro
takovýto servis nebo opravy ze strany společnosti Peerless, (b) opomenutím využití správného obalu při vracení výrobku, (c) nesprávnou
instalací nebo nepostupováním dle pokynů nebo varování společnosti Peerless při instalaci, používání či skladování výrobku, nebo (d)
zneužitím nebo nehodou, v přepravě nebo jinak, včetně případů zaviněných třetí stranou a vyšší mocí.
V žádném případě nebude společnost Peerless zodpovědná za náhodné nebo následné škody nebo škody vznikající z krádeže
jakéhokoliv výrobku, ať už je zabezpečen bezpečnostním zařízením nebo ne, které může být dodáváno s výrobkem společnosti
Peerless®. Některé státy neumožňují vyloučení nebo omezení náhodných nebo následných škod, takže výše uvedené omezení
nebo vyloučení se na vás nemusí vztahovat.
Tato záruka se poskytuje místo jiných záruk, explicitních či implicitních, a je jediným prostředkem nápravy s ohledem na vady výrobku.
Žádný obchodník, distributor, instalující osoba, nebo jakákoliv jiná osoba nemá autorizaci měnit nebo rozšiřovat tuto Omezenou záruku
nebo ukládat jakoukoliv povinnost na společnost Peerless v souvislosti s prodejem jakéhokoliv produktu společnosti Peerless®.
Tato záruka poskytuje specifi cká zákonná práva, a můžete mít také jiná práva, která se liší stát od státu.
Spoločnosť Peerless Industries, Inc. („Peerless“) zaručuje pôvodným koncovým užívateľom produktov Peerless®, že tieto produkty budú
bez závad na materiáli a vypracovaní za podmienok bežného užívania po dobu päť rokov od odo dňa zakúpenia pôvodným koncovým
užívateľom (ale v žiadnom prípade nie dlhšie ako šesť rokov odo dňa výroby produktu). Spoločnosť Peerless podľa vlastného uváženia
produkt opraví alebo vymení, prípadne preplatí hodnotu akéhokoľvek zakúpeného produktu, ktorý nebude v súlade s touto zárukou.
V žiadnom prípade nebude trvanie akejkoľvek implicitnej záruky predajnosti alebo vhodnosti pre určitý účel dlhšie ako doba
platnej explicitnej záruky, ktorá je uvedená vyššie. Niektoré štáty neumožňujú obmedzenie trvania implicitnej záruky, takže
vyššie uvedené obmedzenie sa na vás nemusí vzťahovať.
Tato záruka nepokrýva škody spôsobené (a) následkom servisu alebo opráv vykonanými zákazníkom alebo osobou, ktorá nemá
oprávnenie na takýto servis nebo opravy od spoločnosti Peerless, (b) nepoužitím správneho obalu pri vracaní produktu, (c) nesprávnou
inštaláciou alebo nepostupovaním podľa pokynov alebo varovaní spoločnosti Peerless pri inštalácii, používaní či skladovaní produktu,
alebo (d) zneužitím alebo nehodou, pri preprave alebo inak, vrátane prípadov zavinených treťou stranou a vyššou mocou.
Spoločnosť Peerless v žiadnom prípade nebude zodpovedná za náhodné nebo následné škody alebo škody vzniknuté z krádeže
akéhokoľvek produktu, či už zabezpečeného alebo nezabezpečeného pomocou bezpečnostného zariadenia, ktoré môže byť
súčasťou dodávky s produktom spoločnosti Peerless®. Niektoré štáty neumožňujú vylúčenie alebo obmedzenie náhodných
alebo následných škôd, takže vyššie uvedené obmedzenie alebo vylúčenie sa na vás nemusí vzťahovať.
Tato záruka sa poskytuje namiesto iných záruk, explicitných či implicitných, a je jediným prostriedkom nápravy vo veci závady produktu.
Žiadny predajca, distribútor, osoba vykonávajúca inštaláciu alebo akákoľvek iná osoba, nemajú oprávnenie meni
Obmedzenú záruku alebo ukladať akúkoľvek povinnosť na spoločnosť Peerless v súvislosti s predajom akéhokoľvek produktu spoločnosti
Peerless®.
Tato záruka poskytuje špecifi cké zákonné práva a vy môžete mať tiež iné práva, ktoré sa líšia v závislosti od štátu.
ť alebo rozširovať túto
GARANTIA LIMITADA DE CINCO ANOS
A Peerless Industries, Inc. (“Peerless”) garante aos utilizadores fi nais de produtos Peerless® que estarão isentos de defeitos de material
e mão-de-obra, em condições de utilização normais, por um período de cinco anos a partir da data de compra pelo utilizador fi nal original
(mas em caso algum para além dos seis anos a partir da data de fabrico do produto). Ao seu critério, a Peerless irá reparar ou substituir
ou reembolsar o preço de compra de qualquer produto que falhe a sua conformidade face a esta garantia.
Em nenhum circunstância, deverá a duração de qualquer garantia inplícita de comerciabilidade ou adequação a um determinado
fi m ser superior ao período aplicável da garantia expressa defi nida acima. Alguns estados não permitem limitações à duração
das garantias implícitas, pelo que a limitação acima pode não aplicar-se a si.
Esta garantia não cobre danos provocados por (a) serviços ou reparações realizados pelo cliente ou por uma pessoa não autorizada pela
Peerless para a realização de tais serviços e reparações, (b) não utilização da embalagem adequada para a devolução do produto, (c)
instalação incorrecta ou não observação das instruções ou avisos da Peerless ao instalar, utilizar ou guardar o produto ou (d) utilização
indevida ou acidente em trânsito ou outras situações, incluindo casos de acções de terceiros e força maior.
Em nenhuma circunstância será a Peerless responsável por quaisquer danos acidentais ou consequentes resultantes do roubo
de qualquer produto, assegurado ou não por um dispositivo de segurança, que poderá ser incluído com o produto Peerless®.
Alguns estados não permitem a exclusão ou limitação de danos acidentais ou consequentes, pelo que a limitação acima poderá
não aplicar-se a si.
Esta garantia encontra-se em ligação com todas as demais garantias, expressas ou implícitas e constitui a única solução relativamente a
defeitos de produto. Nenhum representante, distribuidor, agente ou qualquer outra pessoa está autorizado a modifi car ou prolongar esta
Garantia Limitada ou impor qualquer obrigação à Peerless em ligação com a venda de qualquer produto Peerless®.
Esta garantia confere-lhe direitos legais específi cos e também poderá ter outros direitos que variam de estado para estado.
OBMEDZENÁ PÄŤROČNÁ ZÁRUKA
23
2014-01-31 #:203-9370-1

Peerless Industries, Inc. (bundan sonra “Peerless” olarak anılacaktır) Peerless® ürünlerinde normal kullanım koşulları altında orijinal son
BEŞ YILLIK SINIRLI GARANTİ
kullanıcının satın alma tarihinden itibaren beş yıl süreyle (ama her halükarda ürünün üretim tarihinden itibaren en fazla altı yıl süreyle)
malzeme ve işçilik arızaları olmayacağını orijinal son kullanıcılara garanti eder. Bu garantiye uymayan bir ürün olduğunda Peerless takdir
yetkisi kendisinde olmak üzere böyle ürünleri tamir edecek, yenisini verecek veya alım fi yatını geri ödeyecektir.
Hiçbir durumda kastedilen satılabilirlik veya belli bir amaca uygunluk garantisinin süresi yukarıda açıkça belirtilen garanti
süresini aşmayacaktır. Bazı ülkelerde verilen garantilerin süresi ile ilgili kısıtlama getirmeye izin verilmemektedir, böyle bir
durumda bu kısıtlama sizin için geçerli olmayabilir.
Söz konusu arıza aşağıda belirtilen durumlar sonucu ortaya çıkmışsa garanti kapsamı dışındadır: (a) mü
yetki vermediği kişiler tarafından tamir veya bakım yapılması, (b) ürünü geri gönderirken düzgün paketleme yapılmaması, (c) yanlış
kurulum yapılması veya ürünü kurarken, kullanırken veya depo ederken Peerless’in talimatlarına veya uyarılarına uygun davranılmaması,
(d) üçüncü tarafl ardan veya zorlayıcı sebeplerden bile kaynaklansa taşıma esnasında veya başka bir durumda başka amaçlarla
kullanılması veya kaza olması.
Peerless, arızi veya dolaylı zararlardan, veya Peerless® ürünüyle birlikte verilmiş olabilecek bir güvenlik cihazıyla koruma altına
alınmış olsun veya olmasın herhangi bir ürünün çalınmasından kaynaklanan zararlardan hiçbir şekilde sorumlu olmayacaktır.
Bazı ülkelerde arızi veya dolaylı zararlarla ilgili sorumlulukların kaldı
durumda bu kısıtlama veya kaldırma sizin için geçerli olmayabilir
Bu garanti açıktan veya ima yoluyla belirtilen diğer bütün garantilerin yerine geçer ve ürünle ilgili arızalarda tek geçerli garantidir. Hiçbir
satıcı, dağıtıcı, kurucu veya başka bir kişi işbu Sınırlı Garantiyi değiştirme veya uzatma yetkisine veya herhangi bir Peerless® ürününün
satışıyla ilgili olarak Peerless’e herhangi bir yükümlülük yükleme yetkisine sahip değildir.
Bu garanti size bazı özel yasal haklar vermektedir, ülkeden ülkeye değişen başka yasal haklarınız da olabilir
rılmasına veya kısıtlanmasına izin verilmemektedir, böyle bir
şteri tarafından veya Peerless’in
Peerless-AV
2300 White Oak Circle
Aurora, IL 60502
Email: tech@peerlessmounts.com
Ph: (800) 865-2112
Fax: (800) 359-6500
www.peerless-av.com
© 2014, Peerless Industries, Inc.
Peerless-AV Europe
Unit 3 Watford Interchange,
Colonial Way, Watford, Herts,
WD24 4WP, United Kingdom
Customer Care
44 (0) 1923 200 100
www.peerless-av.com
© 2014, Peerless Industries, Inc.
Peerless-AV de Mexico
Ave de las Industrias 413
Parque Industrial Escobedo
Escobedo N.L Mexico 66050
Servicio al Cliente
01-800-849-65-77
www.peerless-av.com
© 2014, Peerless Industries, Inc.
 Loading...