

Page 1
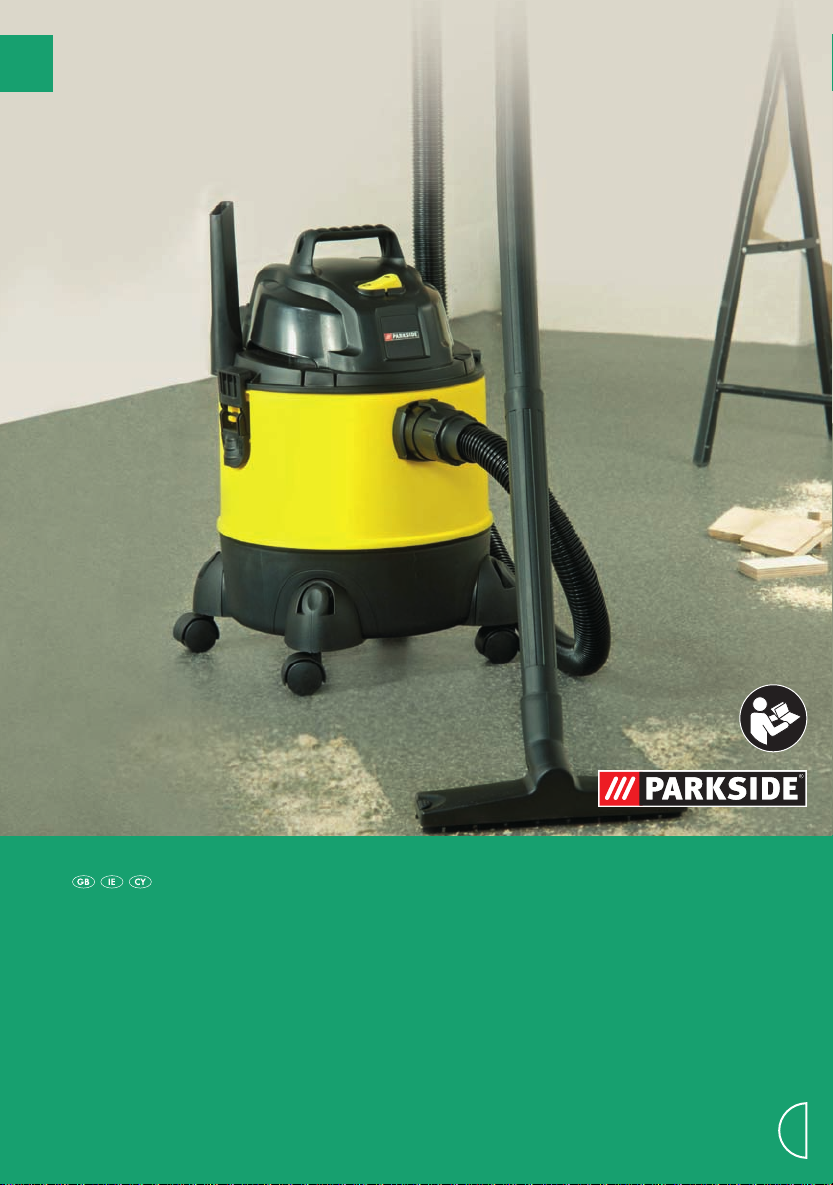
WET & DRY
CLEANER
PNTS 1300
WET & DRY CLEANER
Operation and Safety Notes
6
Page 2

Before reading, unfold the page containing the illustrations and familiarise yourself with all functions of the
device.
GB / IE / CY Operation and Safety Notes Page 5
Page 3
A
11
10
2
1
9
8
3
15
4
16
5
6
17
7
12
18
19
13
20
14
Page 4

B
C
13
2
1
10
6
15
7
D
22
23
17
15
16
21
E
F
11
13
12
8
7
Page 5

CYIEGB
Contents
Application ..................................................5
Symbols used in the instructions .............5
Safety information ......................................5
Description of operation ............................6
Overview...................................................... 6
Contents ......................................................7
Assembly..................................................... 7
Switching on/off .......................................... 7
Wet vacuuming ...........................................7
Dry vacuuming............................................ 7
Blowing ........................................................ 8
Cleaning/Maintenance/Storage ................. 8
Warranty ......................................................8
Disposal/Environmental protection ..........9
Replacement parts .....................................9
Technical data ............................................. 9
EU declaration of conformity ....................9
Grizzly Service-Center ...............................9
Application
The appliance is intended for domestic wet
and dry vacuuming in, for example, the house,
work room, car or garage.
Vacuuming of ammable or explosive materials
or those which endanger health is prohibited.
The manufacturer will not be held responsible
for injuries resulting from use which does not
comply with the directions, or from incorrect use.
Symbols used in the
instructions
Hazard symbols with information on
prevention of personal injury and
property damage.
Safety information
Before initial start-up, please read
through these operating instructions
carefully prior to using the machine.
Keep the instructions safe and pass
them on to any subsequent user so that
the information is always available.
Please read the following safety guidelines
in order to avoid risk of re, electric shock,
personal injury and damage to objects:
To avoid accidents and injuries:
• Keep the equipment away from children
and pets. Children must be supervised in
order to ensure that they do not play with
the equipment.
• Children should only be allowed to use
the appliance under supervision.
• Never leave a machine which is ready for
operation unattended at the workplace.
• The device must not be used by people
(including children) with limited physical,
sensory or mental faculties or who lack the
necessary experience and/or knowledge
- other than they are supervised by a person
responsible for safety or are being instructed
to operate the appliance by such a person.
• People and animals must not be vacu-
umed using the machine.
• Do not vacuum any hot, incandescent,
ammable, explosive materials, or those
which endanger health. This includes hot
ashes, petrol, solvents, acids or caustic
solutions. Personal injury could occur.
• Nozzles and suction tubes must not reach
head level whilst in use. Personal injury
could occur.
Precaution symbol (explanation of precau-
tion instead of exclamation mark) with information on prevention of harm / damage.
Notice symbol with information on how
to handle the device properly.
To avoid accidents and injuries from electric shocks:
• Ensure that the mains cable is not dam-
aged by being pulled over sharp edges,
by jamming, or by pulling on the cable.
• Before each use, check the power supply
5
Page 6

GB IE CY
A
lead and the extension cable for damage
and ageing. Do not use the equipment if
the cable is damaged or worn.Danger of
electric shock hazard.
• If the power cable of the appliance is dam-
aged it must be replaced with a spezial
connecting cable by the manufacturer, the
after-sales service or a qualied person.
• Switch the machine off and disconnect the
mains plug:
- when the machine is not in use,
- before the machine is opened up,
- for all maintenance and cleaning work,
- if the connecting cable is damaged or tangled up.
• Only use replacement parts and acces-
sories delivered and recommended by our
Service Centre (see addresses page 9).
The use of parts by other manufacturers
immediately renders the guarantee void.
• Do not use the cable to pull the plug out
of the socket. Protect the cable from heat,
oil, and sharp edges.
• Make sure that the mains voltage corresponds with the information on the rating
plate.
• Only plug the appliance into a socket
which is safeguarded by at least 16A.
• The device must only be connected to a
mains socket via a residual-current circuit
breaker (RCD) with a rated leakage cur-
rent of not more than 30 mA.
CAUTION! The following states how damage to the appliance and possible injury to
people can be avoided:
• Ensure that the machine is correctly assem-
bled and the lters are in the correct position.
• Do not use without the lter. This could
damage the machine.
• Only have repairs carried out at our authorised customer service points.
• Observe the instructions for cleaning and
maintenance of the machine.
• Store the appliance in a dry place and out
of reach of children.
Description of operation
The wet and dry vacuum cleaner is equipped
with a robust plastic container for waste col-
lection. The castors make the appliance
very easy to manoeuvre. The suction ow is
switched off by a oat during wet vacuuming
once the waste tank is full. The appliance is
also equipped with a blower function.
The following describes the function of the
operating parts.
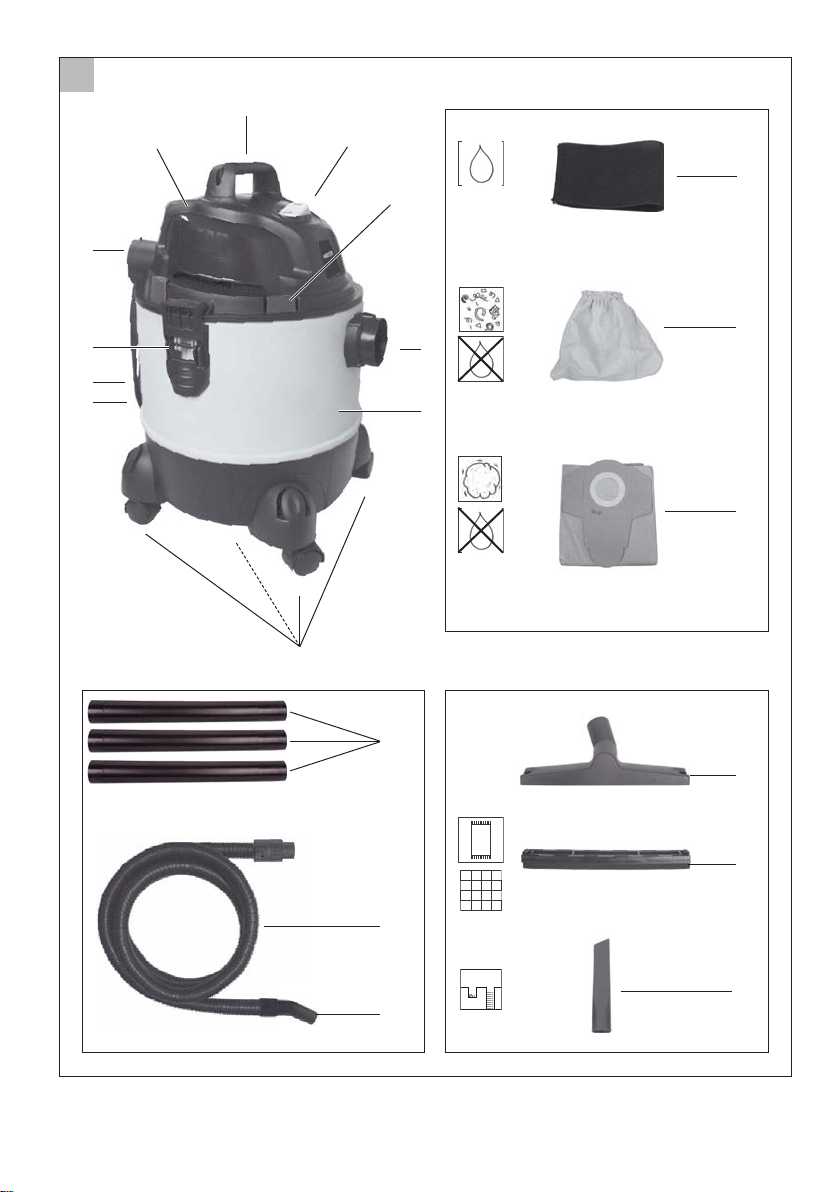
You will nd illustrations for the machine on the fold-out pages.
Overview
Housing
1 Motor housing
2 Carrying handle
3 On / off switch
4 4 attachment ports for accessories
5 Suction connection
6 Waste container
7 4 feet with castors and accessory
ttings
8 Cable holder
9 Mains cable
10 Locking clips
11 Blower connection
Accessories
12 3-part vacuum tube
13 Vacuum hose with
14 Handle component
Filter
15 Foam lter for wet vacuuming
16 Material lter for dry vacuuming
17 Paper lter bag for vacuuming ne dust
Nozzles
18 Floor nozzle with
19 Turnable insert attachment
with brush and rubber lip, for vacu-
uming carpets and smooth surfaces
20 Crevice nozzle
PNTS1300-061009op
6
Page 7

CYIEGB
A
A
A
B
C
D
A
A
C
D
Contents
Unpack the appliance and check that it is
complete:
The appliance is supplied with the motor head
tted (see
head, open the securing clips (see
1 Motor housing
2 Carrying handle
6 Schmutzbehälter
7 4 feet with castors and accessory
12 3-part vacuum tube
13 Vacuum hose with
15 Foam lter for wet vacuuming
16 Material lter for dry vacuuming
17 Paper lter bag for vacuuming ne dust
18 Floor nozzle with
20 Crevice nozzle
6 cross-head screws
Dispose of the packaging material properly.
No. 1). To remove the motor
No. 10).
ttings
Assembly
Pull out the mains plug.
This will prevent danger of injury from
electric shock.
1. Attach the carrying handle (2) rmly
using the cross-head screws supplied.
2. Attach the feet (7) and secure the feet
with the Philips head screws supplied.
3. Insert the lter:
- Foam lter for wet vacuuming (see
No. 15).
- Foam lter plus material lter (see
No. 16) for dry vacuuming
- Paper lter bag for ne dust
(see
D
No. 17)
Never vacuum without a lter!
4. Place the motor housing (1) on top
of the dirt collector (6) and close it
with the clip (10).
5. Connect the vacuum hose (13) (Bayo-
net closure) and the accessories.
Switching on/off
Connect the mains plug.
Switching on the vacuum:
On / off switch (see
in position “I”
Switching off the vacuum:
On / off switch (see
in position “O”
No. 3)
No. 3)
Wet vacuuming
In order to wet vacuum, attach the foam lter
(15) onto the lter tray. Only use a dry lter.
If the waste tank is full, a oat closes
the suction opening, and the vacuum
operation is interrupted. Switch off the
machine and empty the waste tank.
If foam or liquid exits, switch off the
machine immediately.
Dry vacuuming
In order to dry vacuum, put the material lter (16)
over the lter tray with the attached foam lter (17).
Fine dust vacuuming:
When vacuuming very ne dust, you
may nd dirt accumulating more quickly
than usual. We therefore recommend ad-
ditional use of the paper lter bag.
Insert the fabric lter
1. Fit the fabric lter (16) over the lter bas-
ket with attached foam lter (15).
Insert the paper lter bag
7
Page 8

GB IE CY
E
F
A
2. Fold down the side aps on the paper l-
ter bag (21) at the perforation.
3. Fit the paper lter bag (17) with the short ap
upwards over the internal suction pipe (22)
(see arrow
the lter bag opening must completely sur-
round the lip (24) on the suction pipe.
). The sealing ring (23) at
Blowing
To use the blower function, screw the suction
hose (13) (bayonet closure) to the connection
on the motor head (1).
Cleaning/Maintenance/
Storage
Pull out the mains plug.
This will prevent danger of injury from
electric shock.
Cleaning the appliance
Never hose the appliance down with
water. Never use aggressive cleaning agents or solvents. This could
damage the appliance.
• After use, empty the waste tank.
• Clean the waste tank with a damp cloth.
• Wash the foam lter with lukewarm water
and soap, and allow to dry.
• Beat out the material lter. If necessary,
wash with lukewarm water and soap and
allow to dry.
• Replace the paper lter bag when full (see
“replacement parts” for reordering)
Storage:
- For storage, wind the cable around
the cable holder (7) at the back of
the appliance.
- Insert the separated vacuum tubes
into the accessory holder on the ap-
pliance feet (11).
- The attachment ports (6) on the
motor part serve as nozzle storage
(see
• Store the appliance in a dry place and out
of reach of children.
• Always check the appliance before use for
any obvious faults such as a defective mains
cable, and have these repaired or replaced.
No. 4) or on the feets.
Warranty
This unit has a guarantee period of 36
months, or 12 months for units used on a
commercial basis or for replacement units ac-
cording to the statutory regulations. Damage
resulting from normal wear and tear, overloading or improper use is excluded from the
warranty. Certain parts such as the lters and
attachments are subject to normal wear and
tear and are excluded from the warranty.
Warranty claims can only be recognised if the di-
rections in the Operating Instructions on cleaning
and maintenance have been followed. Damage
resulting from material defects or manufactur-
ing errors will be rectied at no extra charge by
replacement or repair, on condition that the ap-
pliance has not been dismantled and is returned
to our Service Centre with proof of purchase and
guarantee (see addresses page 9).
You can have repairs which are not covered by
the warranty carried out by our Service Center
which will charge you for this. They will be
happy to draw up a cost estimate for you.
We can only carry out work on machines which
have adequate packaging and postage.
Warning: In the case of a warranty claim or
a service, please deliver your machine to our
service address in a clean condition accom-
panied by a description of the problem.
Machines sent without prepaid postage
– as bulky goods, express, or by special
freight – will not be accepted.
If you have a justied guarantee claim, please
contact our service centre by telephone,
which will then advise you on how the claim
PNTS1300-061009op
8
Page 9

CYIEGB
will be processed.
We will dispose of your machines free of
charge.
Disposal/Environmental
protection
Be environmentally friendly. Return the tool,
accessories and packaging to a recycling cen-
tre when you have nished with them.
Machines must not be disposed of with
household refuse.
Take the machine to a recycling point. The waste
plastic and metal parts can be separated, accurately graded and passed on for recycling. Contact our Service Centre for more details.
Replacement parts
Y ou can order replacement parts directly via our
Service Centre. Please state the appliance type
when placing an order.
Wet lter (foam lter), pack of 3 ...... 30250130
Paper lter bags, pack of 5 ............. 30250132
Material lter for dry vacuuming .....30250131
Crevice nozzle ................................72800039
Vacuum hose ................................. 72800218
Floor nozzle ....................................72800217
prior notice. All dimensions, information and
statements provided in these Operating Instruc-
tions are therefore subject to amendment. Legal
claims which are based on the Operating In-
structions can therefore not be recognised.
EU declaration of
conformity
We hereby declare that the
wet and dry vacuum cleaner
model series PNTS 1300
conforms with the following applicable rel-
evant version of the EU guidelines as of
model year 2009:
2004/108/EC • 2006/95/EC
In order to guarantee consistency, the following harmonised standards as well as
national standards and stipulations have
been applied:
EN 60335-1/A13:2008 • EN 603352-2/A1:2004+A2:2006 • EN 50366/
A1:2006 EN 55014-1:2006 • EN 55014-2/
A1:2001+A2:2008 • EN 61000-3-2:2006
EN 61000-3-3/A2:2008 • EN 62233:2008
Labelled with CE identication mark in 2010
Grizzly Gartengeräte GmbH & Co. KG
Am Gewerbepark 2
D-64823 Groß-Umstadt, 03.11.2009
Technical data
Power consumption of motor .............1300 W
Mains voltage ...........................230V~, 50 Hz
Safety class ...............................................
Protection category..................................IP24
Suction force........................................15 kPA
Cable length .............................................4 m
Waste tank capacity (brutto) ......................20 l
Usable container volume ...........................15 l
Weight (incl. all accessories) .................5,3 kg
Technical and visual modications may be car-
ried out due to further development without
2009-11-04-rev02-op
i.A.
(Andreas Gröschl, Technical Manager)
Grizzly Service-Center
II
DES UK Ltd.
Unit B7
Oxford Street Industrial Park
Vulcan Road
Bilston, West Midlands WV14 7LF
Tel: 0870 7876177
Tel from Ireland: 0044 870 787 6177
Fax: 0870 7876168
Fax from Ireland: 0044 870 787 6168
Email: grizzly@deslimited.com
9
Page 10

IAN 38026
Grizzly Gartengeräte GmbH & Co. KG
Am Gewerbepark 2
D - 64823 Groß-Umstadt
Last Information Update: 09 / 2009 · Ident.-No.: 72080317 092009 - 6
6
 Loading...